cpoe physician training guide - cabell huntington...
TRANSCRIPT

CPOE Physician Training Guide

Owner: Cerner Learning Services Cerner Millennium CPOE Participant Guide Effective date: April 19, 2011 Version 1 Tracking Number: 25TRGEXT019862 Cerner Corporation. All rights reserved. This document contains confidential information which may not be reproduced or transmitted without the express written consent of Cerner. Page 2 of 239
NNNooottteeesss
Owner: Cerner Learning Services CPOE Physician Training Guide Effective date: April 18, 2011 Version 1 Tracking Number: 25TRGEXT019862 Cerner Corporation. All rights reserved. This document contains confidential information which may not be reproduced or transmitted without the express written consent of Cerner.
NNNooottteeesss
Page 3 of 239
Table of Contents
1. Introduction ........................................................................................................... 11
Information Security Confidentiality ......................................................................................... 11
Help Desk ...................................................................................................................................... 12
Review of Windows Terminology ................................................................................................ 12
Terms to Know ............................................................................................................................ 12
2. Getting Started ...................................................................................................... 14
Logging On to Cerner Millennium ................................................................................................. 14
Logging Out of Cerner Millennium ............................................................................................... 14
3. PowerChart/FirstNet/SurgiNet Basics ............................................................... 16
Learning Objectives ..................................................................................................................... 16
Advantages of Using PowerChart ................................................................................................. 17
4. Organizer Overview .............................................................................................. 18
Menu Bar ....................................................................................................................................... 18
Organizer Toolbar ........................................................................................................................ 18
Action Toolbar.............................................................................................................................. 19
Patient Toolbar ............................................................................................................................. 19
Patient Defining Area .............................................................................................................. 20
Refresh Button ......................................................................................................................... 23
5. Message Center..................................................................................................... 24
Message Center Basics ................................................................................................................. 24
Inbox ......................................................................................................................................... 25
Proxy Capabilities ..................................................................................................................... 26
Pools .......................................................................................................................................... 27
Open a Message Center Item ................................................................................................. 27
Close a Message Center Item ................................................................................................. 29
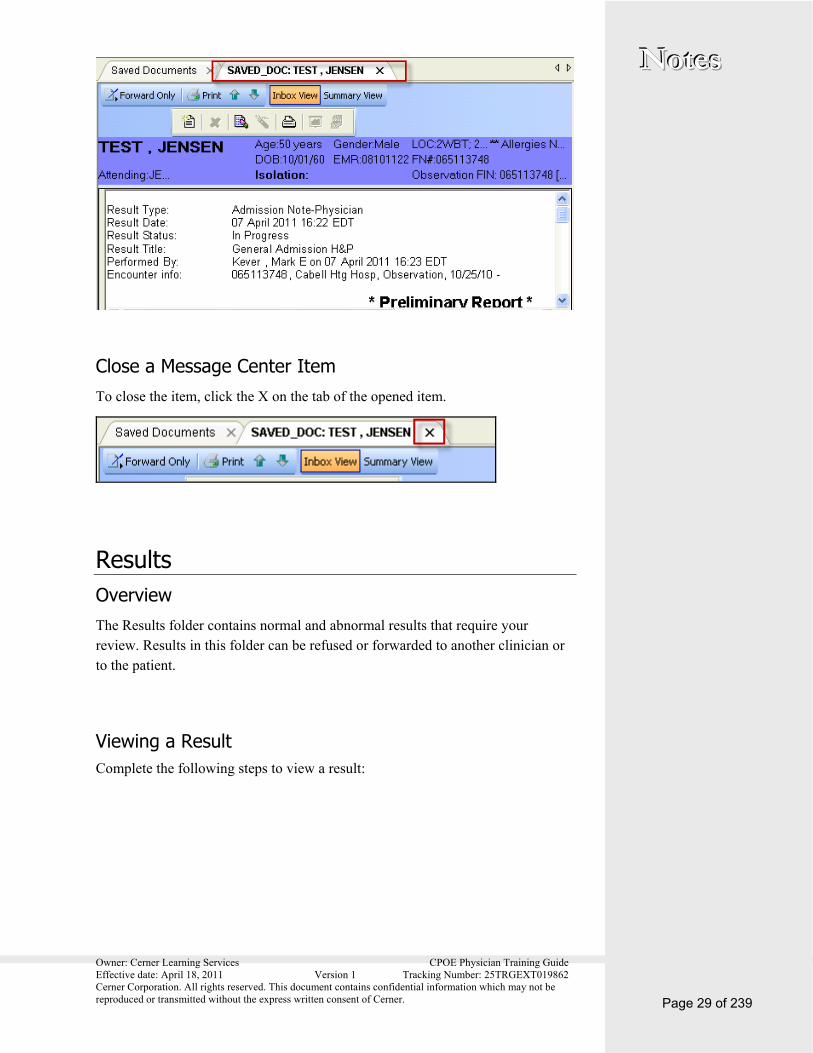
Results ............................................................................................................................................ 29
Overview ................................................................................................................................... 29
Viewing a Result ....................................................................................................................... 29
Sign a Result .............................................................................................................................. 30
Working With Orders .................................................................................................................. 33
Overview ................................................................................................................................... 33
Approving Orders .................................................................................................................... 33
Proposed Orders ...................................................................................................................... 34
Refusing Orders ....................................................................................................................... 35

Owner: Cerner Learning Services CPOE Physician Training Guide Effective date: April 18, 2011 Version 1 Tracking Number: 25TRGEXT019862 Cerner Corporation. All rights reserved. This document contains confidential information which may not be reproduced or transmitted without the express written consent of Cerner. Page 4 of 239
NNNooottteeesss Messages ........................................................................................................................................ 35
Messages Toolbar .................................................................................................................... 36
Communicate a New Message ............................................................................................... 36
Replying to a Message ............................................................................................................. 39
Forwarding a Message ............................................................................................................ 40
Deleting a Message .................................................................................................................. 40
Results FYI ................................................................................................................................... 41
Use Auto Text .............................................................................................................................. 41
Creating an Auto Text Entry ................................................................................................. 41
Out of Office Assistant ............................................................................................................... 44
Out of Office Appearance ..................................................................................................... 46
Working with Documents .......................................................................................................... 46
Signing Documents ................................................................................................................. 46
Refusing Documents .............................................................................................................. 47
Signing and Forwarding a Document ................................................................................... 48
Modifying a Document .......................................................................................................... 49
Reminders ..................................................................................................................................... 50
Create a Reminder ................................................................................................................... 50
Working with Reminders ....................................................................................................... 52
Query Future Reminders ........................................................................................................ 53
Pools .............................................................................................................................................. 54
Working with Messages as a Member of a Pool ................................................................. 54
Proxy Authorization .................................................................................................................... 55
Granting Proxy Authorization ............................................................................................... 55
Viewing Messages as a Proxy ................................................................................................. 61
Viewing Proxy Authorizations Granted to You ................................................................. 61
Viewing Proxy Authorizations That You Have Granted................................................... 62
Modifying Proxy Authorization ............................................................................................ 63
6. Rounds List ........................................................................................................... 64
Rounds List Basics ....................................................................................................................... 64
Building a Patient List ................................................................................................................. 66
Rounds List Selection and Columns ......................................................................................... 68
Review New Results................................................................................................................ 71
Opening a Patients Chart from the Rounds List ..................................................................... 73
7. Patient List ............................................................................................................ 74
Viewing Active Patient Lists ....................................................................................................... 74
Modify Your Patient List Organizer.......................................................................................... 75
Adding a Patient List to your Available Lists ........................................................................... 76
Create a Custom Patient List ...................................................................................................... 80
Owner: Cerner Learning Services CPOE Physician Training Guide Effective date: April 18, 2011 Version 1 Tracking Number: 25TRGEXT019862 Cerner Corporation. All rights reserved. This document contains confidential information which may not be reproduced or transmitted without the express written consent of Cerner.
NNNooottteeesss
Page 5 of 239
Add Patients to a Custom Patient List ...................................................................................... 82
Add a Patient from an Existing Patient List ......................................................................... 83
Add a Patient using Patient Search ........................................................................................ 84
Remove a Patient from a Custom List .................................................................................. 84
Delete a Patient List ..................................................................................................................... 85
Organizing Columns in a Patient List ........................................................................................ 86
Proxy Patient List ......................................................................................................................... 88
8. Open a Patient Chart ............................................................................................ 91
Select Locations ........................................................................................................................ 91
Select a Patient by Surgery Date ............................................................................................ 92
Select a Person .......................................................................................................................... 92
Select a Patient by Case Number ........................................................................................... 94
Select a Case by Provider ........................................................................................................ 94
Select a Case by MRN ............................................................................................................. 95
Open a Chart from the Tracking List ........................................................................................ 95
Provider Check-In ................................................................................................................... 95
Provider Check-Out ................................................................................................................ 97
Open the Patient Chart ........................................................................................................... 99
Open a Chart from the Rounds List .......................................................................................... 99
Locate and Open a Chart by Searching for a Patient ............................................................ 100
Search using the Patient Defining Area .............................................................................. 100
Search using the Patient Search Window ............................................................................ 102
Open a Recently-Opened Chart ............................................................................................... 103
Open Previous or Next Chart on Patient List ........................................................................ 104
9. Navigating the Patient Chart .............................................................................. 105
Patient Chart Overview ............................................................................................................. 105
Menu ............................................................................................................................................ 105
Pin and Unpin the Menu....................................................................................................... 106
Toolbars ....................................................................................................................................... 107
Demographics Bar ...................................................................................................................... 107
Patient Name Hyperlink ....................................................................................................... 108
Location Hyperlink ................................................................................................................ 109
Allergy Hyperlink ................................................................................................................... 109
Chart Documentation Workspace ........................................................................................... 111
Search Criteria Bar ...................................................................................................................... 111
Refresh Button ............................................................................................................................ 112
Clinical Calculator ....................................................................................................................... 112
10. Chart Components ........................................................................................... 114
Inpatient Summary MPages ........................................................................................................ 114

Owner: Cerner Learning Services CPOE Physician Training Guide Effective date: April 18, 2011 Version 1 Tracking Number: 25TRGEXT019862 Cerner Corporation. All rights reserved. This document contains confidential information which may not be reproduced or transmitted without the express written consent of Cerner. Page 6 of 239
NNNooottteeesss Tips for Using the MPages .................................................................................................... 116
Overview ..................................................................................................................................... 116
Results Review............................................................................................................................ 117
Navigate the Results Review ................................................................................................ 117
Navigate a Flowsheet ............................................................................................................ 118
Changing Search Criteria and Time Frame ........................................................................ 119
Change Time Frame Bar ...................................................................................................... 120
Result Legend ........................................................................................................................ 120
Iview/I&O .................................................................................................................................. 120
The Navigator ........................................................................................................................ 121
IView Window ........................................................................................................................ 121
Filter Window ........................................................................................................................ 122
Clinical Notes ............................................................................................................................. 123
Navigating Clinical Notes ..................................................................................................... 124
Form Browser ............................................................................................................................ 125
Open a Form ......................................................................................................................... 126
Form Options ........................................................................................................................ 127
Documents ................................................................................................................................. 128
Medication Administration Record Summary ....................................................................... 131
Time Interval Settings ........................................................................................................... 131
Change Properties in MAR Summary ................................................................................ 132
Change Defaults in the MAR Summary ............................................................................. 133
Medication Administration Record (MAR) ............................................................................ 134
MAR Screen Layout .............................................................................................................. 134
Allergies ....................................................................................................................................... 134
Adding an Allergy .................................................................................................................. 135
Indicating No Known Allergies (NKA) ............................................................................. 138
Cancel an Allergy ................................................................................................................... 139
Modify an Allergy .................................................................................................................. 140
View Allergy History ............................................................................................................. 141
Mark All as Reviewed ........................................................................................................... 142
Perform Reverse Allergy Check .......................................................................................... 142
Medication List ........................................................................................................................... 143
Immunization Schedule ............................................................................................................ 144
Chart Historical Immunizations .......................................................................................... 144
Modify Impatient Immunization ......................................................................................... 146
Unchart an Immunization .................................................................................................... 147
History ......................................................................................................................................... 148
Family ...................................................................................................................................... 148

Owner: Cerner Learning Services CPOE Physician Training Guide Effective date: April 18, 2011 Version 1 Tracking Number: 25TRGEXT019862 Cerner Corporation. All rights reserved. This document contains confidential information which may not be reproduced or transmitted without the express written consent of Cerner.
NNNooottteeesss
Page 7 of 239
Marking Negative or Unknown for all Conditions ........................................................... 148
Documenting a Negative Condition ................................................................................... 149
Documenting a Positive Condition ..................................................................................... 150
Social History .......................................................................................................................... 150
Procedure History .................................................................................................................. 151
Modifying Procedure History ............................................................................................... 153
Patient Information .................................................................................................................... 153
Patient Demographics ........................................................................................................... 154
Visit List .................................................................................................................................. 154
Patient Provider Relationship Summary ............................................................................. 155
Growth Chart ......................................................................................................................... 155
Patient Care Summary ............................................................................................................... 156
Problems and Diagnoses ........................................................................................................... 156
Add a Problem ....................................................................................................................... 157
Add a Problem to Diagnosis ................................................................................................ 158
Add a Diagnosis ..................................................................................................................... 158
Rounds Reports .......................................................................................................................... 159
Reference Text Browser ............................................................................................................ 160
Drug Reference ...................................................................................................................... 160
Education Leaflet ................................................................................................................... 160
Reference ................................................................................................................................. 161
11. Medication Reconciliation .............................................................................. 163
Document Medications by History .......................................................................................... 163
Patient with Historical Medications ..................................................................................... 163
Patient without Historical Medications ............................................................................... 164
Admission Reconciliation .......................................................................................................... 165
Medication Compliance ............................................................................................................. 168
Transfer Reconciliation .............................................................................................................. 169
View Reconciliation History from Navigator ......................................................................... 170
Review Orders for Transfer ...................................................................................................... 171
12. Orders Basics ................................................................................................... 172
Orders Overview ........................................................................................................................ 172
Orders Organization .............................................................................................................. 172
Orders Navigator ................................................................................................................... 173
Orders Documentation Area ................................................................................................ 174
Orders Toolbar Area ............................................................................................................. 174
Applying Filters ........................................................................................................................... 174
Use an Existing Filter ............................................................................................................ 174
Multum and Discern Alerts ........................................................................................................ 175

Owner: Cerner Learning Services CPOE Physician Training Guide Effective date: April 18, 2011 Version 1 Tracking Number: 25TRGEXT019862 Cerner Corporation. All rights reserved. This document contains confidential information which may not be reproduced or transmitted without the express written consent of Cerner. Page 8 of 239
NNNooottteeesss Alert Types ............................................................................................................................. 175
Alert Severity Levels ............................................................................................................. 175
Tool Tips ..................................................................................................................................... 176
Order Status Definitions ........................................................................................................... 177
13. Use Orders ...................................................................................................... 179
Place a New Order ..................................................................................................................... 179
Select the Physician (if applicable) ........................................................................................... 181
Selecting a Different Ordering Physician (For Providers) ................................................... 181
Entering or Modify Order Details ........................................................................................... 183
Sign the Order ............................................................................................................................ 184
Refresh the Screen ..................................................................................................................... 184
Entering an IV Medication .................................................................................................. 184
Modify the Order ....................................................................................................................... 185
Cancel Orders ............................................................................................................................. 185
Cancel/Reorder .......................................................................................................................... 186
Duplicate Order ......................................................................................................................... 186
Display Order Information ...................................................................................................... 187
Add Order Favorites ................................................................................................................. 188
Adding Orders to Favorites from Add Order Window ................................................... 188
Organize Favorites ..................................................................................................................... 189
Delete Order from Favorites .................................................................................................... 191
Continue Orders ........................................................................................................................ 191
Points to Remember .................................................................................................................. 192
Changing the Ordering Physician, Order Date, or Order Communication Type (If Applicable) .................................................................................................................................. 192
14. Order Sets ........................................................................................................ 193
CareSets ....................................................................................................................................... 193
PowerPlan ...................................................................................................................................... 194
PowerPlan Icons ........................................................................................................................... 194
Ordering a PowerPlan .................................................................................................................. 195
Add an Additional Order to a Phase ....................................................................................... 197
Signing the PowerPlan ................................................................................................................. 197
Refreshing the Screen ........................................................................................................... 198
Initiating the Plan ....................................................................................................................... 198
Modify a Planned Order ........................................................................................................... 199
Working with PowerPlan Sub-Phases ........................................................................................ 200
Discontinue a Phase .................................................................................................................. 201
Discontinue an Initiated PowerPlan .......................................................................................... 202
Viewing and Selecting Excluded Components ...................................................................... 203

Owner: Cerner Learning Services CPOE Physician Training Guide Effective date: April 18, 2011 Version 1 Tracking Number: 25TRGEXT019862 Cerner Corporation. All rights reserved. This document contains confidential information which may not be reproduced or transmitted without the express written consent of Cerner.
NNNooottteeesss
Page 9 of 239
15. Clinical Notes (PowerNote) Basics................................................................ 204
PowerNote Overview .................................................................................................................... 204
PowerNote Organization ......................................................................................................... 204
Navigating PowerNote ............................................................................................................. 205
Select a PowerNote ........................................................................................................................ 206
Select by Encounter Pathway ............................................................................................... 206
Select by Existing PowerNote ................................................................................................. 207
Select by Precompleted PowerNote........................................................................................ 207
Select by PowerNote Catalog................................................................................................... 207
Select by Recent PowerNote .................................................................................................... 207
Select by Favorite PowerNote ................................................................................................. 207
Auto Populate a PowerNote ........................................................................................................ 208
View Sentences In PowerNote ................................................................................................ 209
Use Mouse for Data Entry in PowerNote ............................................................................. 209
Add Comments to Terms in PowerNote ................................................................................... 209
View Paragraphs in PowerNote .............................................................................................. 210
Free Text in PowerNote ............................................................................................................... 210
Insert Sentences in PowerNote .................................................................................................... 210
PowerNote Symbols Indicate Special Action ............................................................................. 211
Triple Bar Symbol (===) ..................................................................................................... 211
Plus Symbol (+) ...................................................................................................................... 211
Asterisk Symbol (*) ................................................................................................................ 211
Ellipsis Symbol (…) ............................................................................................................... 212
16. Use PowerNote ................................................................................................ 213
Start a PowerNote .......................................................................................................................... 213
Use Precompleted Notes ........................................................................................................... 216
Create a Precompleted Note ................................................................................................ 217
Use Auto Text ............................................................................................................................. 218
Creating an Auto Text Entry ................................................................................................ 218
Use Macros .................................................................................................................................. 220
Create a Macro ....................................................................................................................... 221
Run a Macro ........................................................................................................................... 222
Update a Macro ...................................................................................................................... 223
Deleting a Macro .................................................................................................................... 224
17. Depart Process ................................................................................................ 226
Open Depart Process ................................................................................................................. 226
Discharge Orders ........................................................................................................................ 227
Discharge Diagnosis ................................................................................................................... 227
Medication Reconciliation ......................................................................................................... 229

Owner: Cerner Learning Services CPOE Physician Training Guide Effective date: April 18, 2011 Version 1 Tracking Number: 25TRGEXT019862 Cerner Corporation. All rights reserved. This document contains confidential information which may not be reproduced or transmitted without the express written consent of Cerner. Page 10 of 239
NNNooottteeesss Prescriptions ............................................................................................................................... 230
Discharge Summary ................................................................................................................... 231
Patient Education....................................................................................................................... 232
Add Patient Education Materials ........................................................................................ 233
Remove Patient Education Materials ................................................................................. 234
Follow-Up ................................................................................................................................... 234
Save Depart Process .................................................................................................................. 236
18. Appendix A – Order Naming Convention ..................................................... 237
19. Appendix B – Frequency Meanings and Times ............................................ 238

Owner: Cerner Learning Services CPOE Physician Training Guide Effective date: April 18, 2011 Version 1 Tracking Number: 25TRGEXT019862 Cerner Corporation. All rights reserved. This document contains confidential information which may not be reproduced or transmitted without the express written consent of Cerner.
NNNooottteeesss
Page 11 of 239
1. Introduction Welcome to the CPOE Provider Training Course.
The purpose of this course is to teach you to use the Cerner Millennium solutions in your department. During this course, you will view several demonstrations and practice different activities that simulate your day-to-day tasks.
This guide was designed to help you learn the process of using Message Center, navigating the patient chart, viewing patient information, viewing results, placing orders, taking notes, and the depart process. Most, but not all, of the information in this guide is covered during your training course. Some sections have been added for reference purposes and additional information.
This guide includes pictures of various windows to familiarize you with use. As you move through the guide, you can see repetitive information. This is intended to assist you in selecting the proper solution for the task you are performing.
Information Security Confidentiality When dealing with computerized healthcare records, specific confidentiality and security issues must be followed to protect the patient. There are also increasing HIPAA and JCAHO regulations that dictate how these records are handled.
Cabell Huntington Hospital has a specific confidentiality and information security policy.
When selecting a password, do not choose anything obvious, such as your birth date, or spouse and children’s names.
Create a password that consists of small or capital letters mixed with numbers (Alpha Numeric) as these are the stronger password.
Password must have a minimum of 6 characters.
Use a password that is easy for you to remember but difficult for others to figure out.
Do not tell anyone your password. Do not let anyone use your password.
The system requires you to change your password every 90 days.
The system keeps an audit trail, or record, of who enters each chart and when. It records who read the chart and who recorded each piece of information in the chart.

Owner: Cerner Learning Services CPOE Physician Training Guide Effective date: April 18, 2011 Version 1 Tracking Number: 25TRGEXT019862 Cerner Corporation. All rights reserved. This document contains confidential information which may not be reproduced or transmitted without the express written consent of Cerner. Page 12 of 239
NNNooottteeesss Not every employee is allowed to see or perform every activity on the computer. For example, a lab technician can see and do more in the lab application than a nurse can.
Do not leave the computer while still signed on.
Do not access any charts that do not apply to your current job and caseload.
Help Desk For help call 2626. Use option 1 for PowerChart/FirsNet help, option 2 for SurgiNet help, and option 3 for techincal support.
Review of Windows Terminology Cerner Millennium solutions are based on the Microsoft Windows style. See the diagram below to review some basic terminology.
Terms to Know The following terms are used in this guide and in the class sessions.
Active window – The window selected for current work. You can identify the window as active by looking at the top bar – it should be dark blue.
Refresh button – Click to refresh the screen.
Click – To tap on a mouse button, pressing it down and then immediately releasing it. This is the click a right-handed person does with their index finger.

Owner: Cerner Learning Services CPOE Physician Training Guide Effective date: April 18, 2011 Version 1 Tracking Number: 25TRGEXT019862 Cerner Corporation. All rights reserved. This document contains confidential information which may not be reproduced or transmitted without the express written consent of Cerner.
NNNooottteeesss
Page 13 of 239
Note that clicking a mouse button is different from pressing (or dragging) a mouse button, which implies that you hold the button down without releasing it.
Context menu – Available when you right-click text, objects, or other items.
Cursor – The flashing marker that tells you where you are on the screen.
Default – Preset information in the system that automatically displays when you sign on to the system or when you access certain cells that must be completed.
Demographics – Patient information.
Double-click – Tapping a mouse button twice in rapid succession. Note that the second click must immediately follow the first; otherwise the program interprets them as two separate clicks rather than one double-click.
Maximize – Located on the menu bar or title bar of the active window, it is used to maximize the window to a button on the Windows taskbar.
Minimize – Located on the menu bar or title bar of the active window, it is used to minimize the window to a button on the Windows taskbar.
Patient demographics – Information defined for the person or encounter. Demographic information includes the current location (for example, nursing station, room, and bed), age, birth date, gender, and maiden name.
Right-click – Click the right mouse button. A right-click opens the Context menu with a list of options.
Scroll bar – Located on the right and bottom of some screens and is used to adjust the view on screen.
Shortcut menu – Available when you right-click text, objects, or other items.
Title bar – Located at the top of each window and is used to identify in which window you are currently working.
Toolbar – A toolbar can contain buttons with images (the same images you see next to corresponding menu commands), menus, or a combination of both.

Owner: Cerner Learning Services CPOE Physician Training Guide Effective date: April 18, 2011 Version 1 Tracking Number: 25TRGEXT019862 Cerner Corporation. All rights reserved. This document contains confidential information which may not be reproduced or transmitted without the express written consent of Cerner. Page 14 of 239
NNNooottteeesss 2. Getting Started
Logging On to Cerner Millennium Complete the following steps to log onto the system,:
1. From your desktop, double-click the appropriate role specific icon. This would be FirstNet for ED Physicians and Residents with ED encounters, SurgiNet for CRNAs and Anesthesiologists, and PowerChart for all remaining roles.
2. The Cerner Millennium log-on screen opens.
3. Enter your user name and password.
4. Click OK.
Logging Out of Cerner Millennium When you have completed your activities, remember to exit out of the application for security purposes.
1. From the Toolbar, click Exit .
Owner: Cerner Learning Services CPOE Physician Training Guide Effective date: April 18, 2011 Version 1 Tracking Number: 25TRGEXT019862 Cerner Corporation. All rights reserved. This document contains confidential information which may not be reproduced or transmitted without the express written consent of Cerner.
NNNooottteeesss
Page 15 of 239
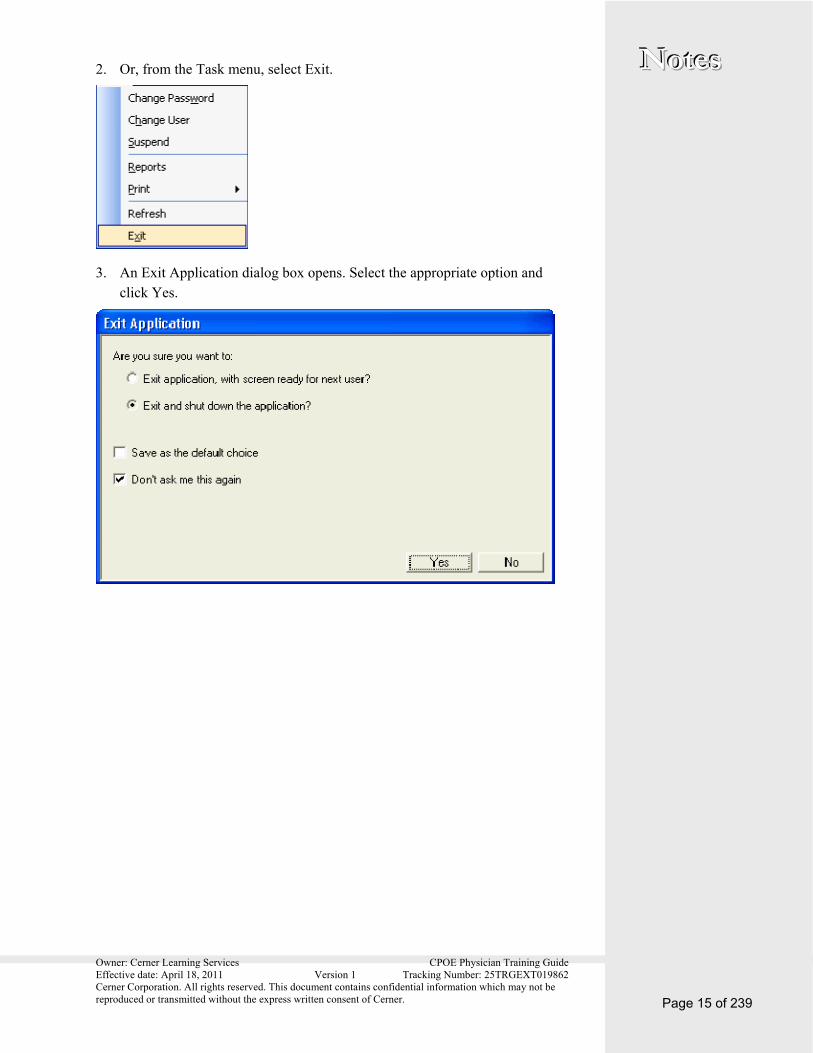
2. Or, from the Task menu, select Exit.
3. An Exit Application dialog box opens. Select the appropriate option and click Yes.

Owner: Cerner Learning Services CPOE Physician Training Guide Effective date: April 18, 2011 Version 1 Tracking Number: 25TRGEXT019862 Cerner Corporation. All rights reserved. This document contains confidential information which may not be reproduced or transmitted without the express written consent of Cerner. Page 16 of 239
NNNooottteeesss 3. PowerChart/FirstNet/SurgiNet
Basics PowerChart FirstNet, and SurgiNet are the automated solutions to meet the needs of healthcare providers by facilitating the accurate and timely charting of patient data. As part of Cerner Millennium, each patient's medical record is instantly available online, and various displays regarding the patient's status are placed at your fingertips.
PowerChart, FirstNet, and SurgiNet enable you to record the completion of tasks and enter patient results stored as part of the patient's electronic medical record. At the same time, the confidentiality of the patient is protected by security safeguards. For example, the data display is governed by your privileges and relationship with the selected patient. If you do not have the access to view a patient's data, it is not displayed for your security position.
PowerChart, FirstNet, and SurgiNet are highly interactive and designed to address the needs of care providers and medical staff. They streamline the workflow process into one desktop application, which provides access to the functions that support the electronic medical record. Use PowerChart, FirstNet, or SurgiNet as a tool to access patient lists, view pertinent patient information such as demographics and results, and perform functions that support clinical practice such as entering clinical documents. In addition, PowerChart, FirstNet, and SurgiNet provide access to other Cerner applications such as Order Management, where functions such as order entry, review, validation, and inquiry are available.
PowerChart, FirstNet, and SurgiNet are the applications used to access the electronic medical record. Each person’s access depends on the professional role of the user. Since PowerChart, FirstNet, and SurgiNet are the basis of the patient’s electronic medical record, you use it to enter orders, to document on computerized forms, and to perform other tasks.
Learning Objectives At the end of this course, you are able to perform the following tasks.
Log on to the appropriate application.
Create, navigate, customize, and proxy a patient list.
Locate and use the Rounds List
Owner: Cerner Learning Services CPOE Physician Training Guide Effective date: April 18, 2011 Version 1 Tracking Number: 25TRGEXT019862 Cerner Corporation. All rights reserved. This document contains confidential information which may not be reproduced or transmitted without the express written consent of Cerner.
NNNooottteeesss
Page 17 of 239
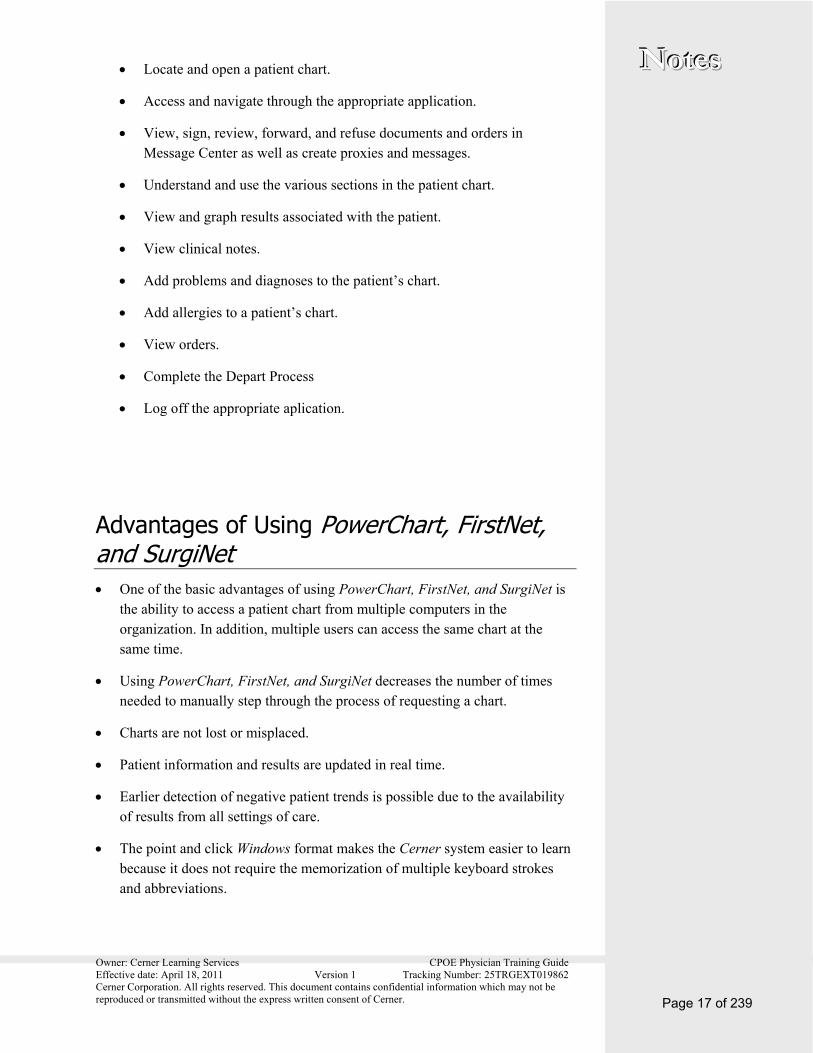
Locate and open a patient chart.
Access and navigate through the appropriate application.
View, sign, review, forward, and refuse documents and orders in Message Center as well as create proxies and messages.
Understand and use the various sections in the patient chart.
View and graph results associated with the patient.
View clinical notes.
Add problems and diagnoses to the patient’s chart.
Add allergies to a patient’s chart.
View orders.
Complete the Depart Process
Log off the appropriate aplication.
Advantages of Using PowerChart, FirstNet, and SurgiNet One of the basic advantages of using PowerChart, FirstNet, and SurgiNet is
the ability to access a patient chart from multiple computers in the organization. In addition, multiple users can access the same chart at the same time.
Using PowerChart, FirstNet, and SurgiNet decreases the number of times needed to manually step through the process of requesting a chart.
Charts are not lost or misplaced.
Patient information and results are updated in real time.
Earlier detection of negative patient trends is possible due to the availability of results from all settings of care.
The point and click Windows format makes the Cerner system easier to learn because it does not require the memorization of multiple keyboard strokes and abbreviations.
Owner: Cerner Learning Services CPOE Physician Training Guide Effective date: April 18, 2011 Version 1 Tracking Number: 25TRGEXT019862 Cerner Corporation. All rights reserved. This document contains confidential information which may not be reproduced or transmitted without the express written consent of Cerner. Page 18 of 239
NNNooottteeesss 4. Organizer Overview
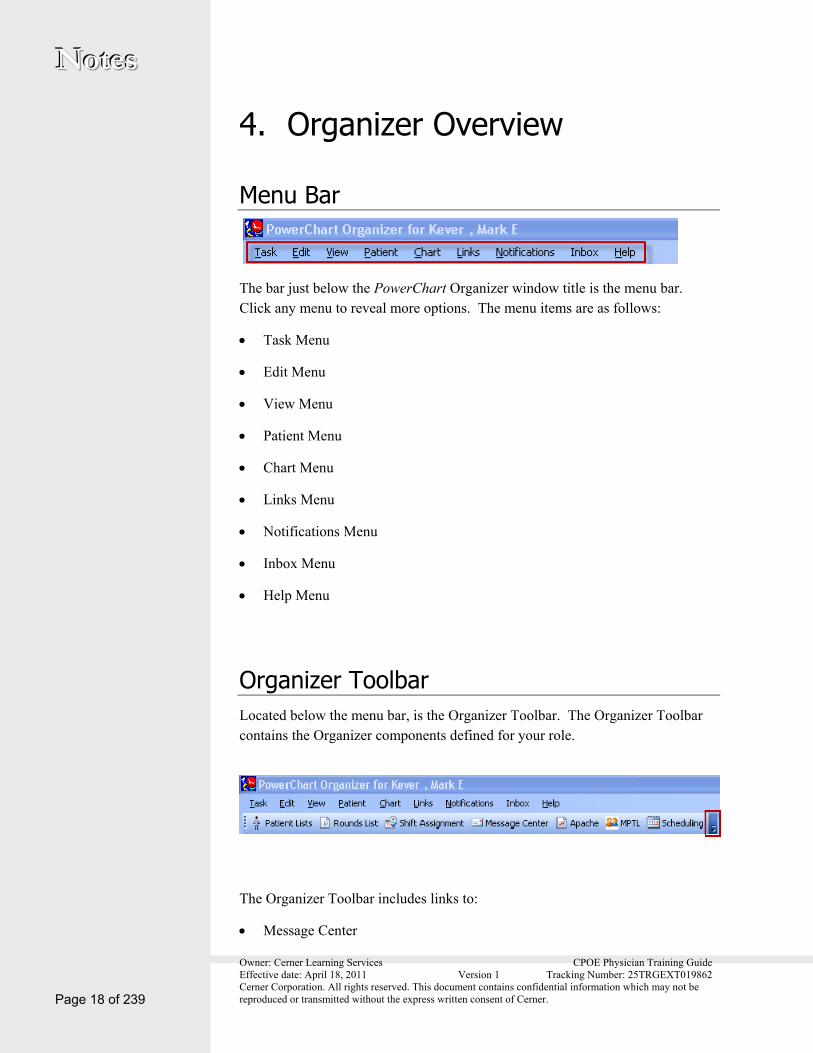
Menu Bar
The bar just below the PowerChart Organizer window title is the menu bar. Click any menu to reveal more options. The menu items are as follows:
Task Menu
Edit Menu
View Menu
Patient Menu
Chart Menu
Links Menu
Notifications Menu
Inbox Menu
Help Menu
Organizer Toolbar Located below the menu bar, is the Organizer Toolbar. The Organizer Toolbar contains the Organizer components defined for your role.
The Organizer Toolbar includes links to:
Message Center

Owner: Cerner Learning Services CPOE Physician Training Guide Effective date: April 18, 2011 Version 1 Tracking Number: 25TRGEXT019862 Cerner Corporation. All rights reserved. This document contains confidential information which may not be reproduced or transmitted without the express written consent of Cerner.
NNNooottteeesss
Page 19 of 239
Patient List
Rounds List
Apache
Note: The downward arrow at the right end of the toolbar allows you to customize the toolbar by clicking Add or Remove.
Action Toolbar Below the Organizer Toolbar, PowerChart displays an Action Toolbar.
The Action toolbar consists of the buttons that enable you to perform actions or use other Cerner Millennium components such as performing AdHoc Charting, entering Charges, using the Clinical Calculator, Depart process, Exiting the application, and more. If the button you need is not visible, or if you want to remove a button, click the downward arrow on the right end of the toolbar to customize the toolbar by clicking Add or Remove.
Patient Toolbar Below the Organizer and Action toolbars, PowerChart displays the Patient Toolbar. The Patient Toolbar consists of two areas: the list of patient charts that are currently open and a Patient Defining Area.
The following are features and limitations of the Patient Toolbar:
Owner: Cerner Learning Services CPOE Physician Training Guide Effective date: April 18, 2011 Version 1 Tracking Number: 25TRGEXT019862 Cerner Corporation. All rights reserved. This document contains confidential information which may not be reproduced or transmitted without the express written consent of Cerner. Page 20 of 239
NNNooottteeesss You can have up to 2 charts open at one time.
To make a patient chart active, click the patient identifier in the Patient Toolbar.
You can close the chart by clicking the X located next to the patient’s name in the Patient Chart area of the Toolbar. Or, when a chart is active, you can close the patient chart by clicking the X in the upper-right corner of the window containing the patient chart.
If multiple patient charts exceed the horizontal space available in the Patient Toolbar, the charts are truncated and display as an ellipsis (…). The complete patient chart is displayed by positioning the pointer over the patient identifier to activate a tooltip.
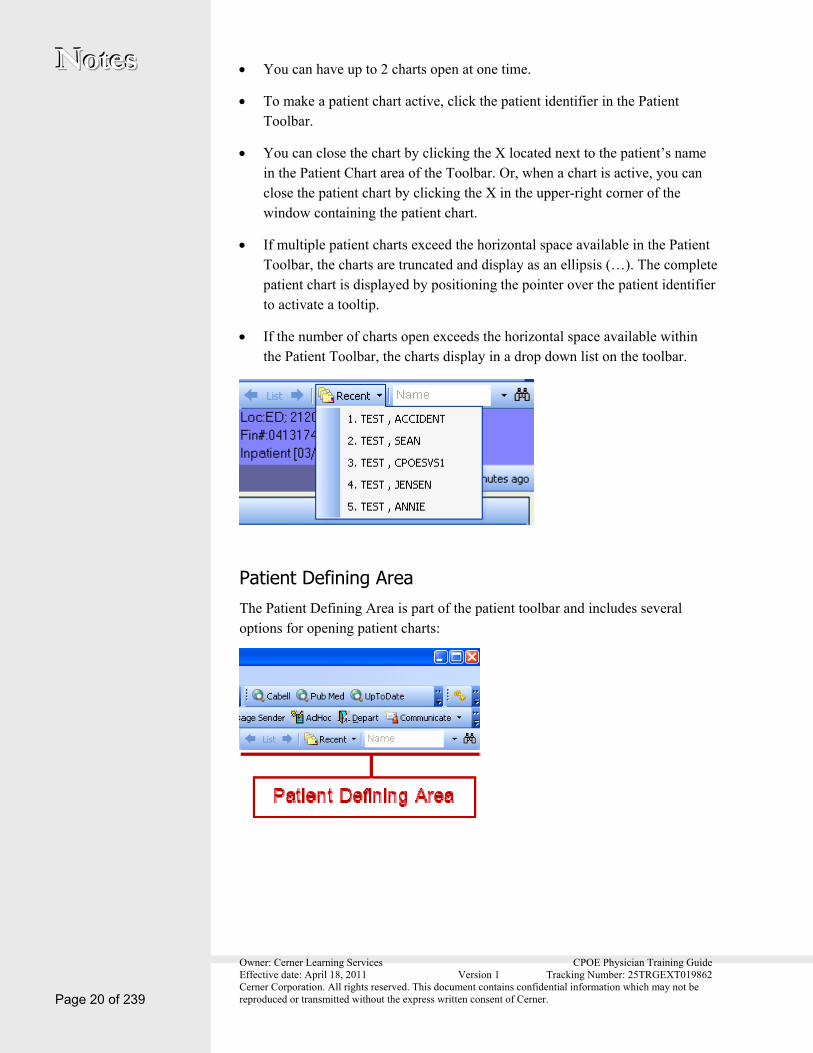
If the number of charts open exceeds the horizontal space available within the Patient Toolbar, the charts display in a drop down list on the toolbar.
Patient Defining Area The Patient Defining Area is part of the patient toolbar and includes several options for opening patient charts:

Owner: Cerner Learning Services CPOE Physician Training Guide Effective date: April 18, 2011 Version 1 Tracking Number: 25TRGEXT019862 Cerner Corporation. All rights reserved. This document contains confidential information which may not be reproduced or transmitted without the express written consent of Cerner.
NNNooottteeesss
Page 21 of 239
Recent
The downward arrow on the Recent button in the Patient Defining Area opens a list of recently opened patient charts. Selecting a chart from the Recent list launches the selected patient’s chart.
Patient Search Box
The Patient Search box allows you to search for a patient’s chart either by MRN or Patient Name criteria. To select the search criteria between Patient Name and MRN, click the downward arrow to the right of the search field, and select your wanted search method.
The default search criterion is listed in gray in the search box. In this case, the default criterion is Patient Name. To find a patient by Patient Name, input all or part of the patient’s last name and press ENTER on your keyboard.
If you want to perform a detailed search, click the Binoculars to launch the Patient Search window.
Owner: Cerner Learning Services CPOE Physician Training Guide Effective date: April 18, 2011 Version 1 Tracking Number: 25TRGEXT019862 Cerner Corporation. All rights reserved. This document contains confidential information which may not be reproduced or transmitted without the express written consent of Cerner. Page 22 of 239
NNNooottteeesss
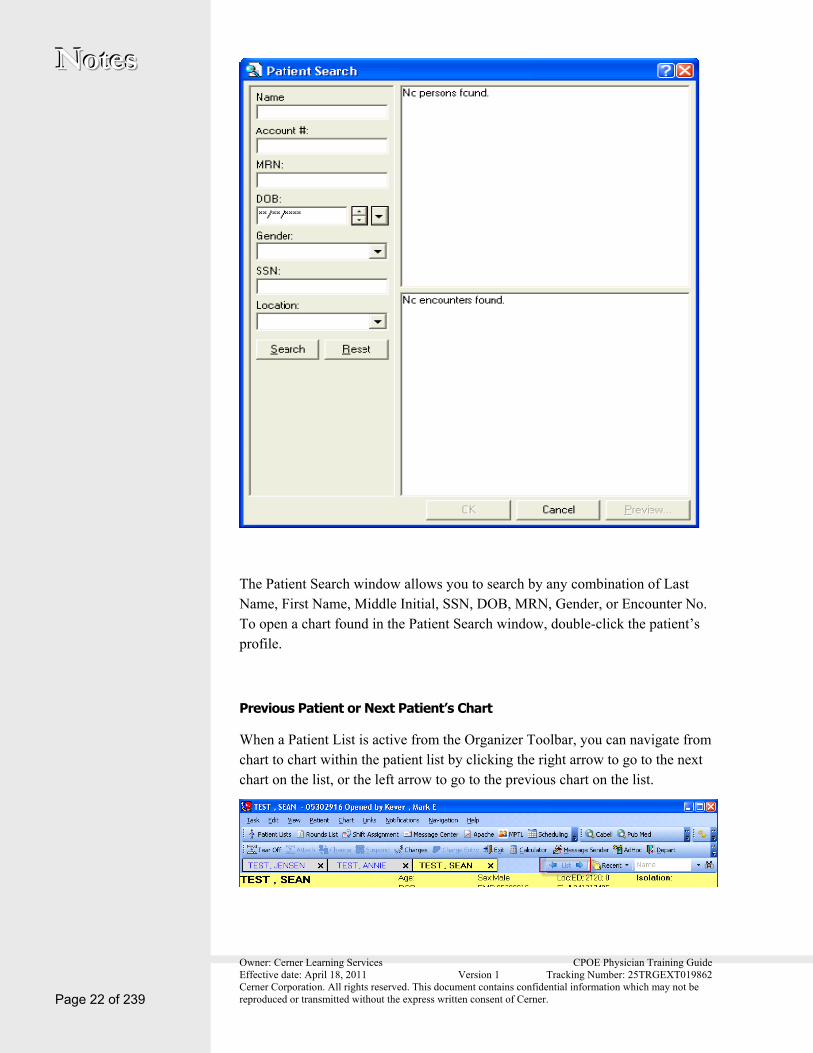
The Patient Search window allows you to search by any combination of Last Name, First Name, Middle Initial, SSN, DOB, MRN, Gender, or Encounter No. To open a chart found in the Patient Search window, double-click the patient’s profile.
Previous Patient or Next Patient’s Chart
When a Patient List is active from the Organizer Toolbar, you can navigate from chart to chart within the patient list by clicking the right arrow to go to the next chart on the list, or the left arrow to go to the previous chart on the list.
Owner: Cerner Learning Services CPOE Physician Training Guide Effective date: April 18, 2011 Version 1 Tracking Number: 25TRGEXT019862 Cerner Corporation. All rights reserved. This document contains confidential information which may not be reproduced or transmitted without the express written consent of Cerner.
NNNooottteeesss
Page 23 of 239
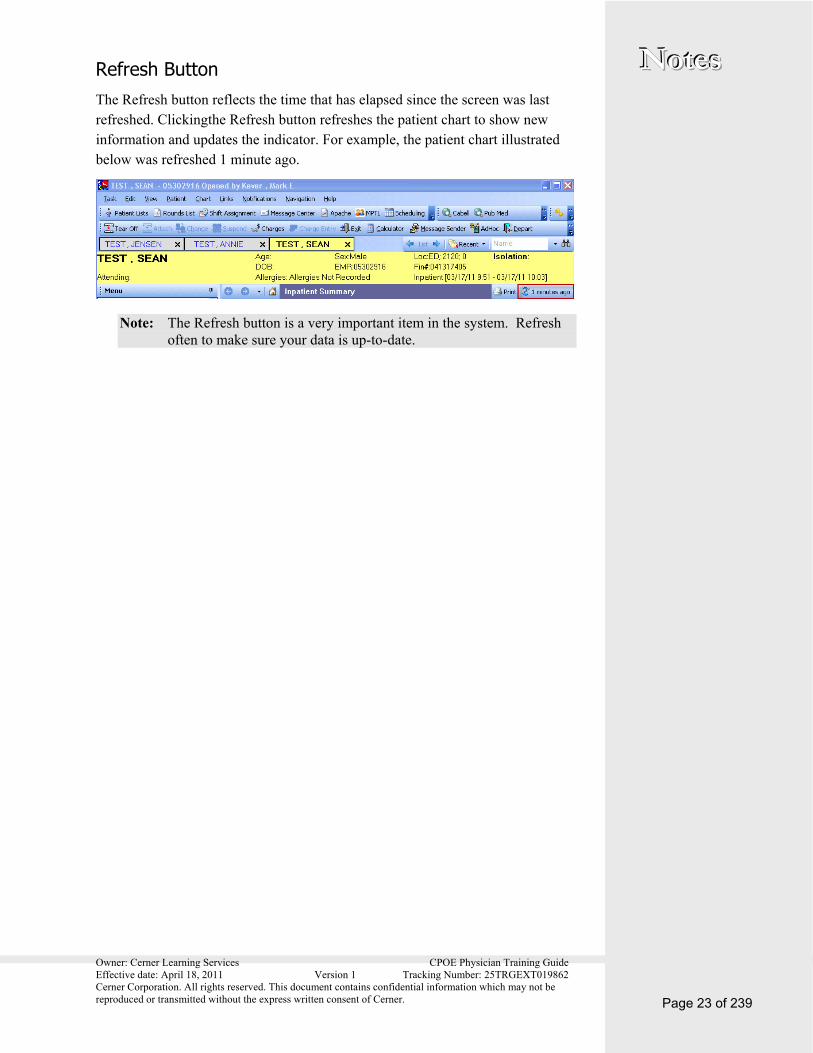
Refresh Button The Refresh button reflects the time that has elapsed since the screen was last refreshed. Clickingthe Refresh button refreshes the patient chart to show new information and updates the indicator. For example, the patient chart illustrated below was refreshed 1 minute ago.
Note: The Refresh button is a very important item in the system. Refresh often to make sure your data is up-to-date.

Owner: Cerner Learning Services CPOE Physician Training Guide Effective date: April 18, 2011 Version 1 Tracking Number: 25TRGEXT019862 Cerner Corporation. All rights reserved. This document contains confidential information which may not be reproduced or transmitted without the express written consent of Cerner. Page 24 of 239
NNNooottteeesss 5. Message Center The Message Center is Cerner Millennium's solution for managing inpatient and outpatient workflows. The Inbox allows you to route information electronically, rather than having an unwieldy flow of hard-copy documentation . It enables you to review or sign results, documents, and prescription requests, as well as work with other messages. The Inbox offers the following benefits:
All messages and notifications that require your attention, review, or signature are routed to your Inbox and are organized in folders.
The operation of taking and distributing phone messages and saving that information to the patient's chart is completed electronically.
Results can be reviewed, signed, or forwarded to other healthcare providers electronically.
Your Inbox can be accessed from any computer on your network that has Cerner Millennium installed on it.
You can customize the items you want displayed in the Inbox by filtering by dates, types of results, and so on.
Message Center Basics The Message Center is organized into two areas: the Inbox Summary, and the Inbox Summary workspace. Folders selected from the Inbox Summaryare displayed in the Inbox Summary workspace.

Owner: Cerner Learning Services CPOE Physician Training Guide Effective date: April 18, 2011 Version 1 Tracking Number: 25TRGEXT019862 Cerner Corporation. All rights reserved. This document contains confidential information which may not be reproduced or transmitted without the express written consent of Cerner.
NNNooottteeesss
Page 25 of 239
The Inbox Summary allows you to manage your Message Center workflow using tabs designated for Inbox, Proxies, and Pools.
Inbox The Inbox is where the bulk of your Message Center workflow is organized. Message Center notifications in your Inbox are divided into folders such as Priority Items, Inbox Items, Work Items, and Notifications. The Inbox sorts your various tasks such as Documents, Orders, Messages, Reminders, Documents to Dictate, and Saved Documents.
Note: Saved Documents consists of documents that you have created and saved without signing.

Owner: Cerner Learning Services CPOE Physician Training Guide Effective date: April 18, 2011 Version 1 Tracking Number: 25TRGEXT019862 Cerner Corporation. All rights reserved. This document contains confidential information which may not be reproduced or transmitted without the express written consent of Cerner. Page 26 of 239
NNNooottteeesss
Double-clicking a folder in the Inbox opens the items into the workspace located to the right of the Inbox Summary to display the contents. Users have the ability rearrange the items in the workspace by clicking the column headers to sort the items in the workspace.
Proxy Capabilities The Message Center allows you to enable other providers to access your Inbox items by granting proxy authorization. Additionally, other providers can grant you proxy to their Inbox when needed.

Owner: Cerner Learning Services CPOE Physician Training Guide Effective date: April 18, 2011 Version 1 Tracking Number: 25TRGEXT019862 Cerner Corporation. All rights reserved. This document contains confidential information which may not be reproduced or transmitted without the express written consent of Cerner.
NNNooottteeesss
Page 27 of 239
Your proxy can perform any activities for which you have granted authorization. When granting proxy authorization, you specify the provider, the specific Message Center folders to which you want to give proxy, and the effective dates for the proxy.
As a proxy to another user’s Message Center, you have access to the folders and functions that have been granted to you. The proxy Message Center has the same look and feel as your Message Center, except that all actions that you perform are on behalf of the individual for which you are proxy.
Any activities that you perform as a proxy are logged within the system.
Note: The tasks that you can perform can be limited by the user’s Message Center you are proxying.
Pools A pool is a shared mailbox that can be accessed by any user that is a member of the pool. While the contents of the Inbox are visible to all members of the pool, only one individual must act on an item in order for that item to be considered complete. Pool functionality allows providers that work in a care team setting to share responsibility for managing results, documents, and messages for a shared group of patients.
Items that will show in pools include:
Orders for Signature
Results to endorse
Messages sent to the pool
Documents sent to the pool
An example of this would be a document forwarded to the MU Internal Medicine General (MU IM Gen) pool.
Open a Message Center Item Items in the Message Center can be opened to view more details. Complete the following steps to open a Message Center item:
1. From the Message Center in the Inbox Summary, select an Inbox item. Saved Documents is illustrated below.

Owner: Cerner Learning Services CPOE Physician Training Guide Effective date: April 18, 2011 Version 1 Tracking Number: 25TRGEXT019862 Cerner Corporation. All rights reserved. This document contains confidential information which may not be reproduced or transmitted without the express written consent of Cerner. Page 28 of 239
NNNooottteeesss
2. The contents of the selected section are displayed in the Inbox Summary workspace. New items are displayed in bold while older items that have been viewed are not bold.
3. Double-click an item in the Inbox Summary workspace to open it. Notice that the item opens in a new tab. This allows you to navigate between your list and your item without closing or reopening either one.
Owner: Cerner Learning Services CPOE Physician Training Guide Effective date: April 18, 2011 Version 1 Tracking Number: 25TRGEXT019862 Cerner Corporation. All rights reserved. This document contains confidential information which may not be reproduced or transmitted without the express written consent of Cerner.
NNNooottteeesss
Page 29 of 239
Close a Message Center Item To close the item, click the X on the tab of the opened item.
Results Overview The Results folder contains normal and abnormal results that require your review. Results in this folder can be refused or forwarded to another clinician or to the patient.
Viewing a Result Complete the following steps to view a result:

Owner: Cerner Learning Services CPOE Physician Training Guide Effective date: April 18, 2011 Version 1 Tracking Number: 25TRGEXT019862 Cerner Corporation. All rights reserved. This document contains confidential information which may not be reproduced or transmitted without the express written consent of Cerner. Page 30 of 239
NNNooottteeesss 1. Select Results in the Inbox Summary.
2. From the Results list, select and double-click a result to open.
3. View the result.
4. Sign, refuse, forward, or forward the result without signing it.
Sign a Result Complete the following tasks to sign individual results,:
1. From the Inbox Summary, select Results.
2. From the Results list, select and double-click a result to open.
3. Review the result.
4. Select Sign.
5. If you have any comments you want to include, enter them in the Comments box.
6. Click OK to sign and forward the document. Click OK & Next to sign and forward the document and open the next item.
Owner: Cerner Learning Services CPOE Physician Training Guide Effective date: April 18, 2011 Version 1 Tracking Number: 25TRGEXT019862 Cerner Corporation. All rights reserved. This document contains confidential information which may not be reproduced or transmitted without the express written consent of Cerner.
NNNooottteeesss
Page 31 of 239
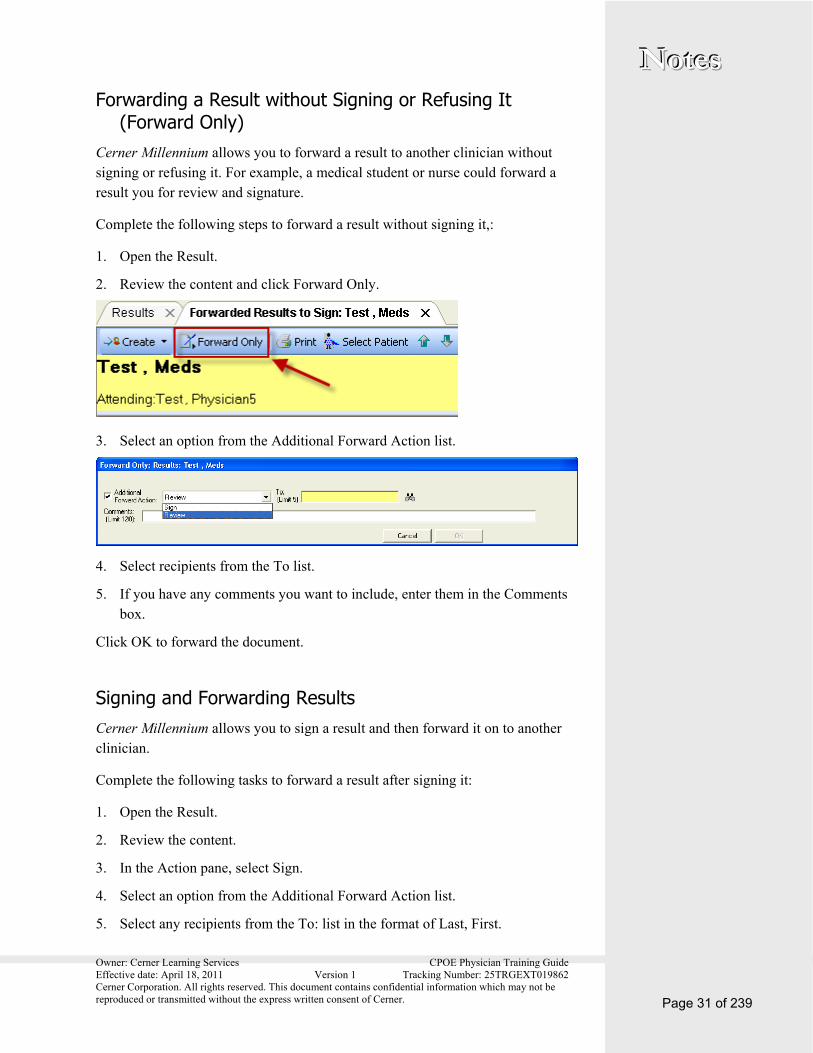
Forwarding a Result without Signing or Refusing It (Forward Only)
Cerner Millennium allows you to forward a result to another clinician without signing or refusing it. For example, a medical student or nurse could forward a result you for review and signature.
Complete the following steps to forward a result without signing it,:
1. Open the Result.
2. Review the content and click Forward Only.
3. Select an option from the Additional Forward Action list.
4. Select recipients from the To list.
5. If you have any comments you want to include, enter them in the Comments box.
Click OK to forward the document.
Signing and Forwarding Results Cerner Millennium allows you to sign a result and then forward it on to another clinician.
Complete the following tasks to forward a result after signing it:
1. Open the Result.
2. Review the content.
3. In the Action pane, select Sign.
4. Select an option from the Additional Forward Action list.
5. Select any recipients from the To: list in the format of Last, First.
Owner: Cerner Learning Services CPOE Physician Training Guide Effective date: April 18, 2011 Version 1 Tracking Number: 25TRGEXT019862 Cerner Corporation. All rights reserved. This document contains confidential information which may not be reproduced or transmitted without the express written consent of Cerner. Page 32 of 239
NNNooottteeesss
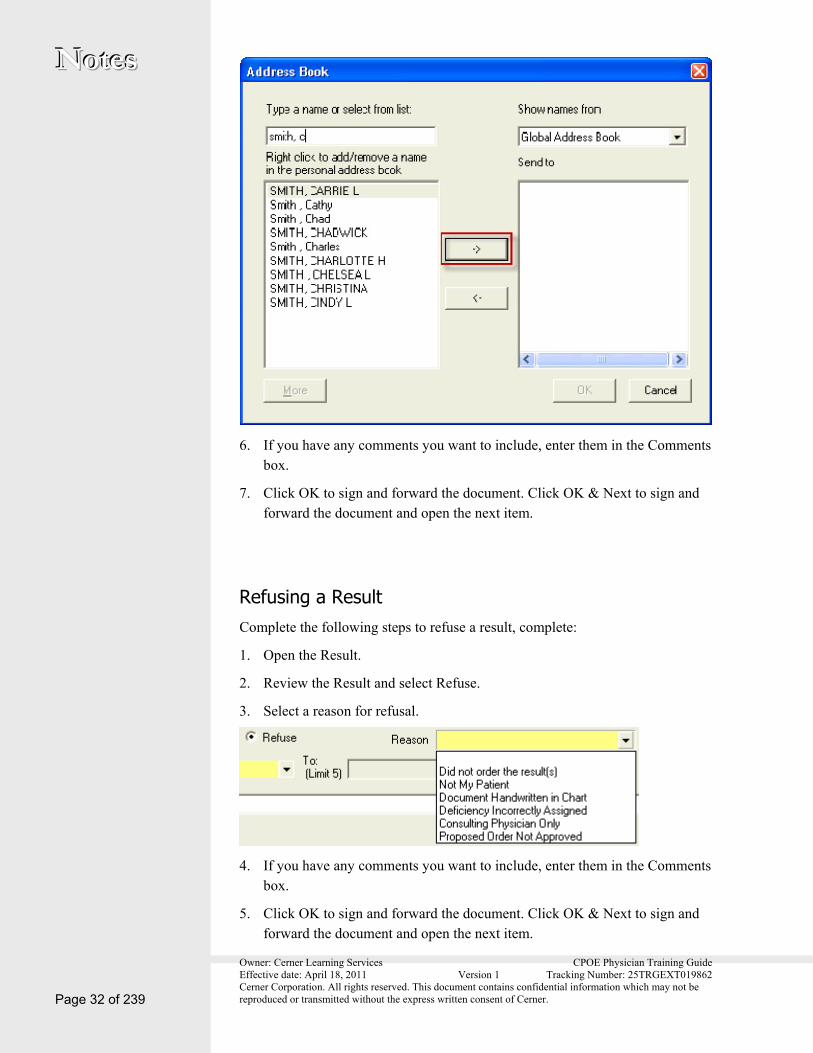
6. If you have any comments you want to include, enter them in the Comments box.
7. Click OK to sign and forward the document. Click OK & Next to sign and forward the document and open the next item.
Refusing a Result Complete the following steps to refuse a result, complete:
1. Open the Result.
2. Review the Result and select Refuse.
3. Select a reason for refusal.
4. If you have any comments you want to include, enter them in the Comments box.
5. Click OK to sign and forward the document. Click OK & Next to sign and forward the document and open the next item.

Owner: Cerner Learning Services CPOE Physician Training Guide Effective date: April 18, 2011 Version 1 Tracking Number: 25TRGEXT019862 Cerner Corporation. All rights reserved. This document contains confidential information which may not be reproduced or transmitted without the express written consent of Cerner.
NNNooottteeesss
Page 33 of 239
Note: Anything refused should be forwarded to the HIM, inbox
Working With Orders Overview The Orders folder contains orders placed by non-physicians, such as a nurse or other professional/licensed staff that require a physician approval.
Approving Orders Complete the following steps to approve an order:
1. Navigate to the Orders section in the Inbox Summary.
2. From the Orders list, select and double-click an order needing approval to open.
3. Review the order.
4. Select Approve.
5. Click OK to sign and forward the document. Click OK & Next to sign and forward the document and open the next item.
Complete the following steps to approve multiple orders:
1. Navigate to the Orders section in the Inbox Summary.
2. Select multiple orders by either holding the CTRL key and clicking the desired orders or selecting one order and holding the SHIFT key and clicking another order to select all in between.

Owner: Cerner Learning Services CPOE Physician Training Guide Effective date: April 18, 2011 Version 1 Tracking Number: 25TRGEXT019862 Cerner Corporation. All rights reserved. This document contains confidential information which may not be reproduced or transmitted without the express written consent of Cerner. Page 34 of 239
NNNooottteeesss
3. Right-Click and select Approve (no dose range checking).
Note: Approving orders in batch results in not Multum drug checking. Do this with caution.
Proposed Orders Complete the following steps to take action on a proposed order:
Note: A proposed order is any order proposed by a Med Student. They will have the ability to place an order in a proposed status until it is accepted by the Physician, Hospitalist, NP/PA, or Resident.
1. Open the proposed order or the Message containing the proposed order.
2. Review each order individually and click (Accept), (Reject), or
(Accept with Modify).
3. If you clicked Accept with modify, make the necessary changes to the order and click Sign.
4. Click Reject All and Next or Accept All and Next to take action on multiple orders.

Owner: Cerner Learning Services CPOE Physician Training Guide Effective date: April 18, 2011 Version 1 Tracking Number: 25TRGEXT019862 Cerner Corporation. All rights reserved. This document contains confidential information which may not be reproduced or transmitted without the express written consent of Cerner.
NNNooottteeesss
Page 35 of 239
If you click Reject All and Next, you are prompted to enter a Reject reason or Free-text reason. All remaining proposal orders are rejected.
If you click Accept All and Next, this signs all proposed orders and moves to the Next item. In the context of a message, this option also generates a reply or forwarded message to the designee, deletes the message, and moves to the next message.
Refusing Orders Refuse an order if you did not request the order, or if the details are incorrect.
Note: Refusing a cosign order does not stop or cancel it. This must be done from the Orders section.
1. Navigate to the Orders section in the Inbox Summary.
2. From the Orders list, select and double-click a co-sign order to open.
3. Review the order.
4. Select Refuse, and select a reason for refusal.
5. Click OK to sign and forward the document. Click OK & Next to sign and forward the document and open the next item.
Note: If an order is refused for any reason, the floor needs to be called immediately to be notified and a comment left stating who you told.
Messages Messaging can be used to send or receive general messages in Message Center. Messages can be saved to a patient’s chart as well.
Note: Messages should NOT contain time sensitive data.
Staff members will have the ability to send messages, but not the ability to receive as they cannot actively monitor an inbox.

Owner: Cerner Learning Services CPOE Physician Training Guide Effective date: April 18, 2011 Version 1 Tracking Number: 25TRGEXT019862 Cerner Corporation. All rights reserved. This document contains confidential information which may not be reproduced or transmitted without the express written consent of Cerner. Page 36 of 239
NNNooottteeesss
Messages Toolbar
The Message toolbar is only active when a message is selected.
Communicate: Clicking the menu displays options to communicate a message or reminder or to consult with another provider.
Open: Opens the message.
Reply: Replies to a message selected.
Reply All: Replies to all.
Forward: Forwards the message.
Delete: Deletes the selected message.
Message Journal: Allows you to review all Inbox messages for a selected patient.
Select Patient: Allows you to view all messages involving the selected patient.
Select All: Selects all messages in view.
Communicate a New Message Note: This is legal documentation that could be viewable in a patient chart. Use proper email etiquette when communicating through Message Center.
Owner: Cerner Learning Services CPOE Physician Training Guide Effective date: April 18, 2011 Version 1 Tracking Number: 25TRGEXT019862 Cerner Corporation. All rights reserved. This document contains confidential information which may not be reproduced or transmitted without the express written consent of Cerner.
NNNooottteeesss
Page 37 of 239
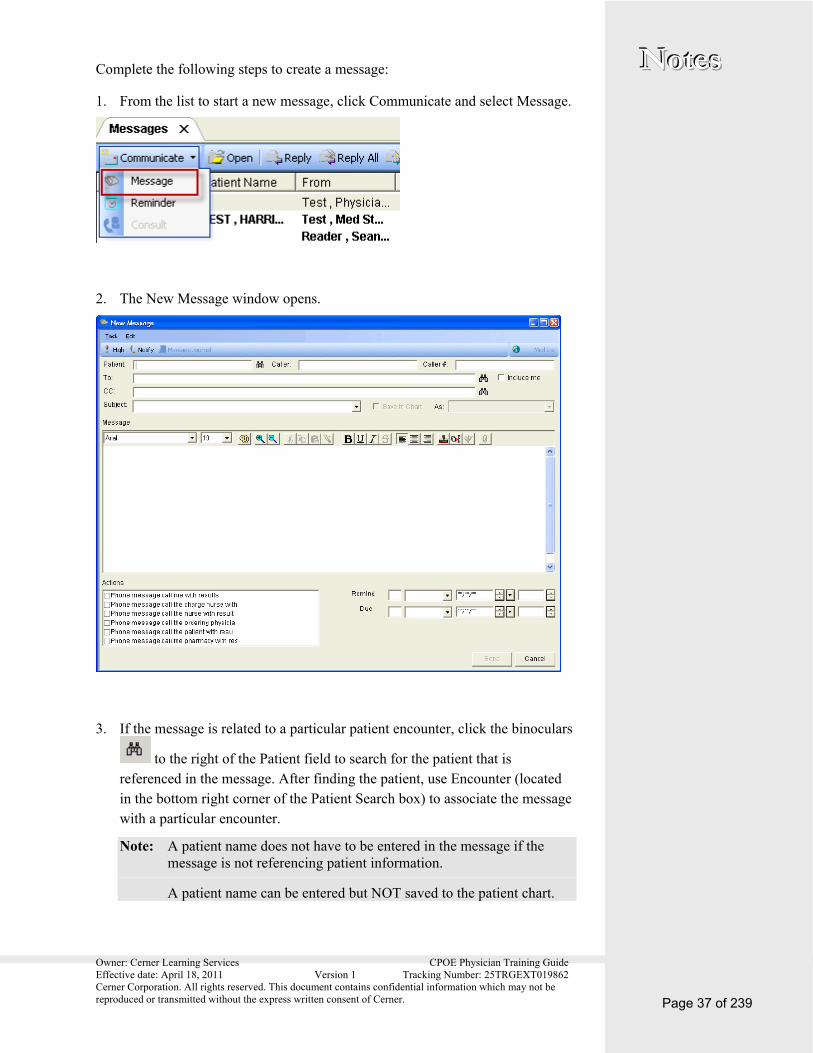
Complete the following steps to create a message:
1. From the list to start a new message, click Communicate and select Message.
2. The New Message window opens.
3. If the message is related to a particular patient encounter, click the binoculars
to the right of the Patient field to search for the patient that is referenced in the message. After finding the patient, use Encounter (located in the bottom right corner of the Patient Search box) to associate the message with a particular encounter.
Note: A patient name does not have to be entered in the message if the message is not referencing patient information.
A patient name can be entered but NOT saved to the patient chart.

Owner: Cerner Learning Services CPOE Physician Training Guide Effective date: April 18, 2011 Version 1 Tracking Number: 25TRGEXT019862 Cerner Corporation. All rights reserved. This document contains confidential information which may not be reproduced or transmitted without the express written consent of Cerner. Page 38 of 239
NNNooottteeesss 4. Enter the appropriate recipients in the To box by clicking the binoculars
. The Address Book window opens.
5. In the Type a name or select from the list box, search for the recipient by last name. Matching results display.
6. Select the correct recipient from the list then click the right arrow
to move the recipient to the Send To box. Add as many recipients as necessary.
Note: To remove a recipient from the Send To list, use the left arrow
.
Owner: Cerner Learning Services CPOE Physician Training Guide Effective date: April 18, 2011 Version 1 Tracking Number: 25TRGEXT019862 Cerner Corporation. All rights reserved. This document contains confidential information which may not be reproduced or transmitted without the express written consent of Cerner.
NNNooottteeesss
Page 39 of 239
7. When all intended recipients are added to the Send To box, click OK in the bottom right corner of the Address Book.
8. In the New Message, type a subject into the Subject box.
9. Add a CC if necessary by clicking the binoculars to launch the Address Book.
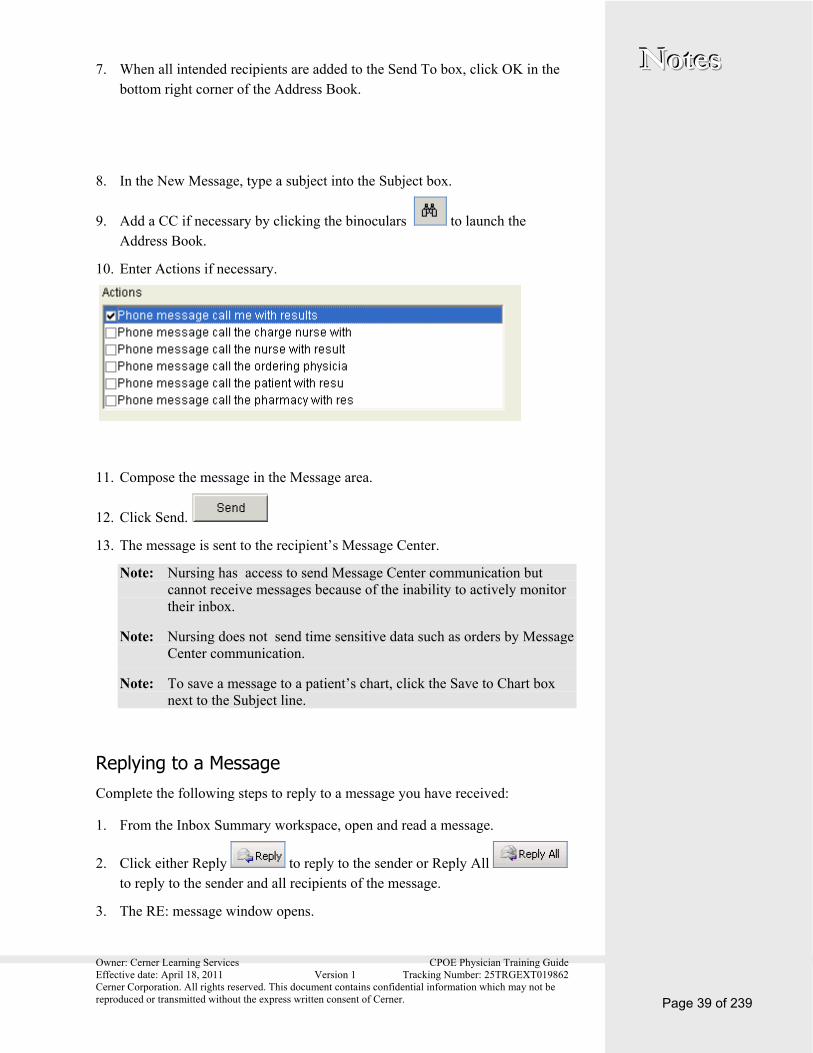
10. Enter Actions if necessary.
11. Compose the message in the Message area.
12. Click Send.
13. The message is sent to the recipient’s Message Center.
Note: Nursing has access to send Message Center communication but cannot receive messages because of the inability to actively monitor their inbox.
Note: Nursing does not send time sensitive data such as orders by Message Center communication.
Note: To save a message to a patient’s chart, click the Save to Chart box next to the Subject line.
Replying to a Message Complete the following steps to reply to a message you have received:
1. From the Inbox Summary workspace, open and read a message.
2. Click either Reply to reply to the sender or Reply All to reply to the sender and all recipients of the message.
3. The RE: message window opens.

Owner: Cerner Learning Services CPOE Physician Training Guide Effective date: April 18, 2011 Version 1 Tracking Number: 25TRGEXT019862 Cerner Corporation. All rights reserved. This document contains confidential information which may not be reproduced or transmitted without the express written consent of Cerner. Page 40 of 239
NNNooottteeesss 4. Compose the message and select Actions as needed.
5. Click Send.
Forwarding a Message Complete the following steps to forward a message you have received:
1. From the Inbox Summary workspace ,open and read the message.
2. With the message selected, click Forward . The FW: window opens.
3. Enter the recipients in the To box by clicking the binoculars to open the Address Book. Add recipients to the Send To box, and click OK.
4. If you would like to save the message to the patient’s chart, click the Save to Chart box.
5. Edit the message as necessary.
6. Click Send.
Deleting a Message Complete the following steps to delete a message:
1. From the Inbox Summary workspace, select or open the message in your.
2. With the message selected, click Delete .
3. The deleted message moves to the Trash section located in your Inbox Notifications folder.
Note: Once the Trash is emptied, deleted messages cannot be retrieved. Items stay in the trash for 30 days before being permanently deleted.

Owner: Cerner Learning Services CPOE Physician Training Guide Effective date: April 18, 2011 Version 1 Tracking Number: 25TRGEXT019862 Cerner Corporation. All rights reserved. This document contains confidential information which may not be reproduced or transmitted without the express written consent of Cerner.
NNNooottteeesss
Page 41 of 239
Results FYI The Results FYI folder contains the same critical, normal, abnormal, and other subfolders as the Results folder. Items are populated in this folder based on subscriptions that are created within PowerChart. These subscriptions are determined by teams as well as by the Attending Physician.
1. Open the result.
2. To review each order individually, click Review or Refuse.
3. Select any additional forward actions. Results can be forwarded for sign and review or a quick reminder can be generated.
4. Enter any comments in the Comments box.
5. Click OK or OK & Next to move to the next result.
Use Auto Text Auto Text entries allow for free text to be saved and automatically inserted into a message or note. This saves time when entering repetitive text again and again, or entering large amounts of the same text repetitively.
Auto text automatically pops into your message as you’re typing by using a key sequence, or abbreviation, that you designate to trigger the auto text. Be careful what abbreviation you use – every time you key stroke the abbreviation, the automatic text pops up.
Creating an Auto Text Entry 1. Click in the Message area. This activates the text editor toolbar at the top of
documentation area, including the Manage Auto Text button.

Owner: Cerner Learning Services CPOE Physician Training Guide Effective date: April 18, 2011 Version 1 Tracking Number: 25TRGEXT019862 Cerner Corporation. All rights reserved. This document contains confidential information which may not be reproduced or transmitted without the express written consent of Cerner. Page 42 of 239
NNNooottteeesss
2. Click Manage Auto Text .
3. The Manage Auto Text dialog box opens. Select New Phrase .

Owner: Cerner Learning Services CPOE Physician Training Guide Effective date: April 18, 2011 Version 1 Tracking Number: 25TRGEXT019862 Cerner Corporation. All rights reserved. This document contains confidential information which may not be reproduced or transmitted without the express written consent of Cerner.
NNNooottteeesss
Page 43 of 239
4. In the Abbreviation box, add your free-text abbreviation. This is the method to use when you add your auto-text to the note.
Note: Carefully select your auto text abbreviation. Use an uncommon letter combination that is unlikely to be replicated at the start of ordinary words, such as zz. This helps eliminate your auto text popping up continuously as you type more common letters or letter combinations.
5. Add a description for the abbreviation so that you can easily identify the auto text.
6. Select Add Text to type the text you want displayed when you type the abbreviation.
7. A Formatted Text Entry dialog box is displayed. Type the wanted text you want to save as auto text, and format the text using the options on the toolbar. Click OK when finished.

Owner: Cerner Learning Services CPOE Physician Training Guide Effective date: April 18, 2011 Version 1 Tracking Number: 25TRGEXT019862 Cerner Corporation. All rights reserved. This document contains confidential information which may not be reproduced or transmitted without the express written consent of Cerner. Page 44 of 239
NNNooottteeesss
8. The formatted text displays in the Manage Auto Text box.
9. Click Save to save the automatic text settings, or click Discard to cancel without saving.
Out of Office Assistant Out of office is available to notify other clinicians or staff when sending a message, document or result that you are not actively managing your inbox (similar to email out of office). Out of Office functionality provides the ability to set an Out of Office status on an individual or pool inbox.
The Out of Office status is set under the Inbox menu for an individual or pool inbox. An optional until date can be entered.
When sending to users or pools with the status set, the sender receives an Out of Office notification with the date displayed (if entered). The sender has the option to send anyway or discontinue the send.
Complete the following steps to use Out of Office:
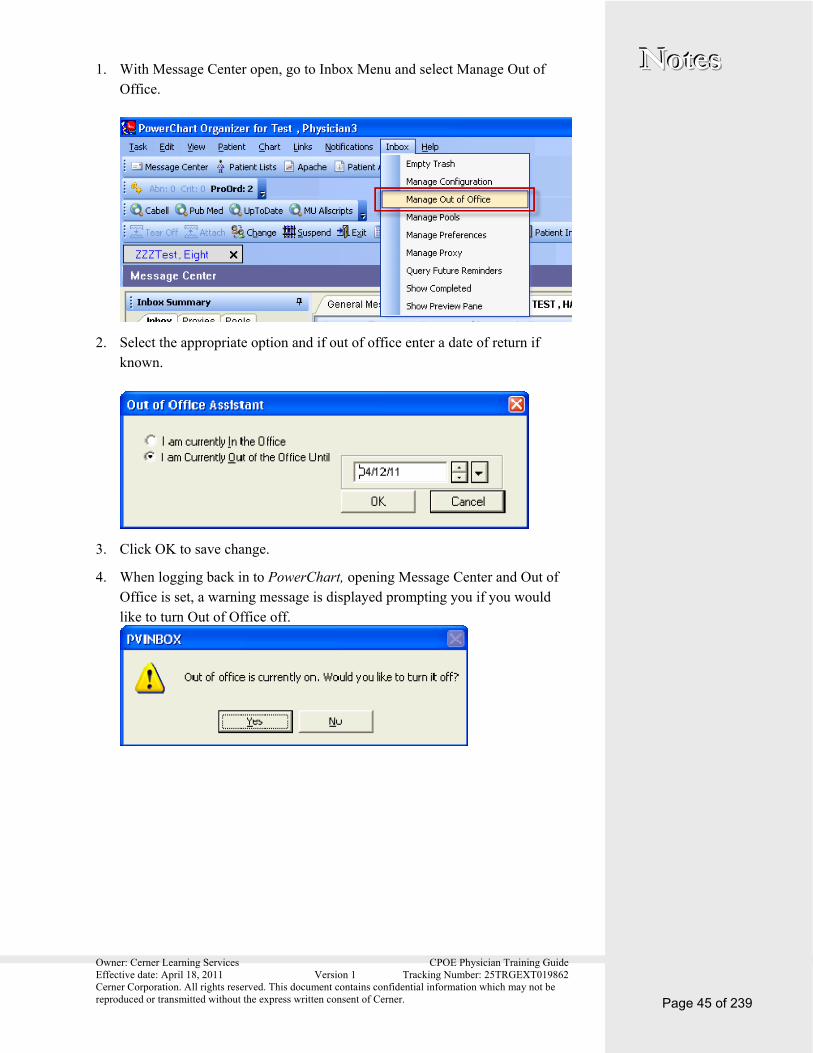
Owner: Cerner Learning Services CPOE Physician Training Guide Effective date: April 18, 2011 Version 1 Tracking Number: 25TRGEXT019862 Cerner Corporation. All rights reserved. This document contains confidential information which may not be reproduced or transmitted without the express written consent of Cerner.
NNNooottteeesss
Page 45 of 239
1. With Message Center open, go to Inbox Menu and select Manage Out of Office.
2. Select the appropriate option and if out of office enter a date of return if known.
3. Click OK to save change.
4. When logging back in to PowerChart, opening Message Center and Out of Office is set, a warning message is displayed prompting you if you would like to turn Out of Office off.
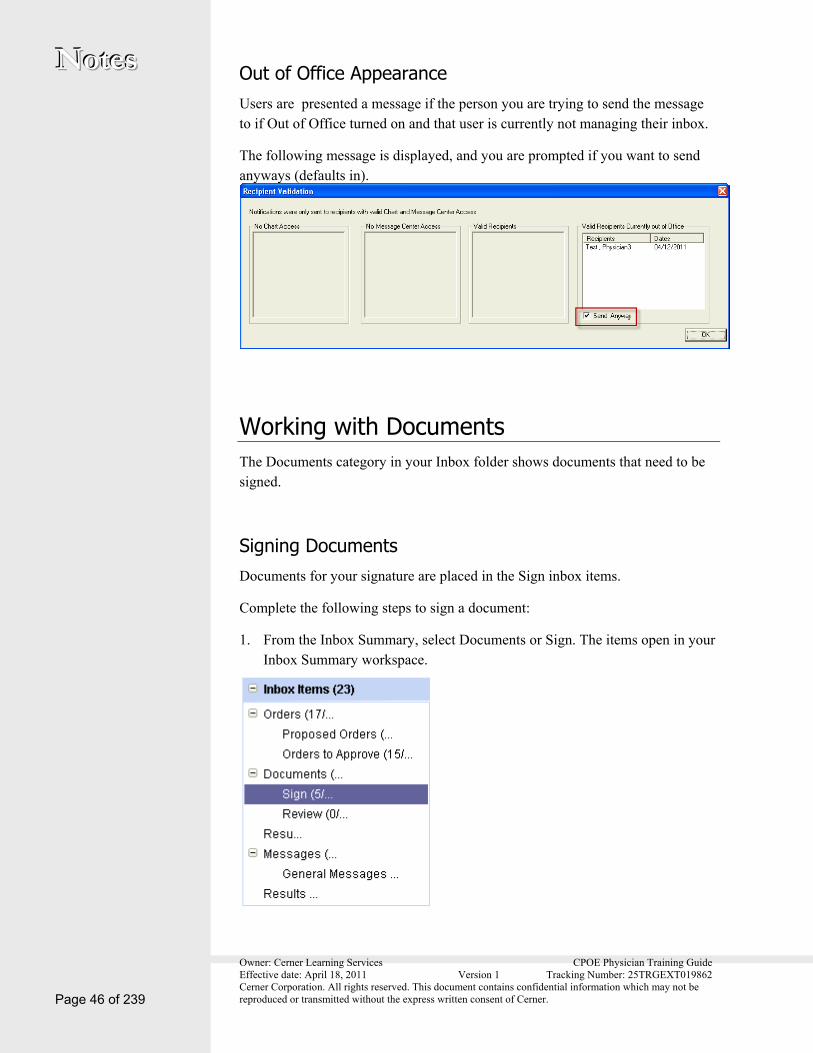
Owner: Cerner Learning Services CPOE Physician Training Guide Effective date: April 18, 2011 Version 1 Tracking Number: 25TRGEXT019862 Cerner Corporation. All rights reserved. This document contains confidential information which may not be reproduced or transmitted without the express written consent of Cerner. Page 46 of 239
NNNooottteeesss Out of Office Appearance Users are presented a message if the person you are trying to send the message to if Out of Office turned on and that user is currently not managing their inbox.
The following message is displayed, and you are prompted if you want to send anyways (defaults in).
Working with Documents The Documents category in your Inbox folder shows documents that need to be signed.
Signing Documents Documents for your signature are placed in the Sign inbox items.
Complete the following steps to sign a document:
1. From the Inbox Summary, select Documents or Sign. The items open in your Inbox Summary workspace.
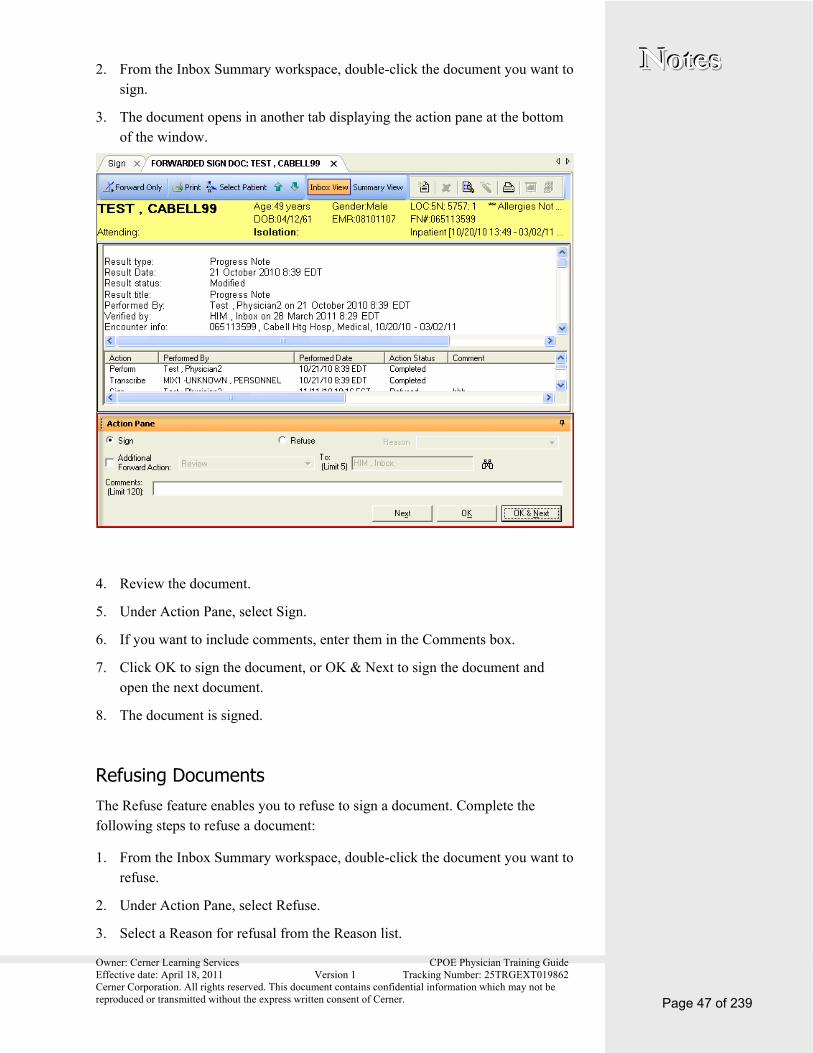
Owner: Cerner Learning Services CPOE Physician Training Guide Effective date: April 18, 2011 Version 1 Tracking Number: 25TRGEXT019862 Cerner Corporation. All rights reserved. This document contains confidential information which may not be reproduced or transmitted without the express written consent of Cerner.
NNNooottteeesss
Page 47 of 239
2. From the Inbox Summary workspace, double-click the document you want to sign.
3. The document opens in another tab displaying the action pane at the bottom of the window.
4. Review the document.
5. Under Action Pane, select Sign.
6. If you want to include comments, enter them in the Comments box.
7. Click OK to sign the document, or OK & Next to sign the document and open the next document.
8. The document is signed.
Refusing Documents The Refuse feature enables you to refuse to sign a document. Complete the following steps to refuse a document:
1. From the Inbox Summary workspace, double-click the document you want to refuse.
2. Under Action Pane, select Refuse.
3. Select a Reason for refusal from the Reason list.

Owner: Cerner Learning Services CPOE Physician Training Guide Effective date: April 18, 2011 Version 1 Tracking Number: 25TRGEXT019862 Cerner Corporation. All rights reserved. This document contains confidential information which may not be reproduced or transmitted without the express written consent of Cerner. Page 48 of 239
NNNooottteeesss
4. Search and select recipient from the To box.
Note: Documents should be refused to HIM, inbox unless the reason is Not My Patient and you know the correct physician.
5. If you have any comments you want to include, enter them in the Comments box.
6. Click OK to refuse to sign the document, or Click OK & Next to refuse to sign the document and open the next document.
Signing and Forwarding a Document The Message Center allows you to sign a document and then forward it to another clinician for review. Complete the following steps to forward a document after signing it:
1. From the Inbox Summary workspace, double-click the document to open it.
2. Under Action Pane, select Sign (if not already selected).
3. Select the option for Additional Forward Action.
4. From the Additional Forward Action list, select Review.
Note: Never select Sign as the Additional Forward Action because the Additional Forward Action is for the recipient to review the order.
5. Select the recipient to send the document for review from the To list. You can select up to 5 clinicians.

Owner: Cerner Learning Services CPOE Physician Training Guide Effective date: April 18, 2011 Version 1 Tracking Number: 25TRGEXT019862 Cerner Corporation. All rights reserved. This document contains confidential information which may not be reproduced or transmitted without the express written consent of Cerner.
NNNooottteeesss
Page 49 of 239
6. If you have any comments you want to include, enter them in the Comments box.
7. Click OK to sign and forward the document, or OK & Next to sign and forward the document and open the next item.
Modifying a Document At times when reviewing a document, updates need to be made. Updates can be made in Message Center to prevent the need to repeat dictation.
Complete the following steps to make updates to a document by modifying:
1. From the Inbox Summary workspace, double-click the document to open it.
2. Right-click anywhere in the document, and select Modify from the context menu.
3. The Modify Document window opens.

Owner: Cerner Learning Services CPOE Physician Training Guide Effective date: April 18, 2011 Version 1 Tracking Number: 25TRGEXT019862 Cerner Corporation. All rights reserved. This document contains confidential information which may not be reproduced or transmitted without the express written consent of Cerner. Page 50 of 239
NNNooottteeesss
4. Add addedum information as needed. Sign document when finished.
5. After signing the document, the item drops out of your Message Center Inbox.
Note: If the Message Center Inbox doesn’t automatically update after
signing the document, click Refresh .
Reminders Reminders allow you to compose messages or designate results or documents for follow-up at a later time. They are intended as notifications to ensure that patient care activities for the specified patient are carried out at a later time. Reminders can be sent to your own Inbox.
Reminders that are sent to another user’s Inbox are similar to messages except they are saved to the recipient’s Reminders folder and do not activate until the designated date.
Create a Reminder Create a reminder to ensure that patient care activities for a specified patient are carried out at a later time. Complete the following steps to create a reminder:

Owner: Cerner Learning Services CPOE Physician Training Guide Effective date: April 18, 2011 Version 1 Tracking Number: 25TRGEXT019862 Cerner Corporation. All rights reserved. This document contains confidential information which may not be reproduced or transmitted without the express written consent of Cerner.
NNNooottteeesss
Page 51 of 239
1. From the Inbox Summary, select the Reminders folder. The Reminders folder opens in the Inbox Summary workspace.
2. Select the form of communication by clicking the downward arrow on Communicate, and select Reminder. The New Reminder/Task window opens.
3. Click the binoculars next to the Patient field to search for the patient using the Patient Search dialog box.
4. Select the patient and click OK.
5. Select the location where the reminder should show up using the Show In list.
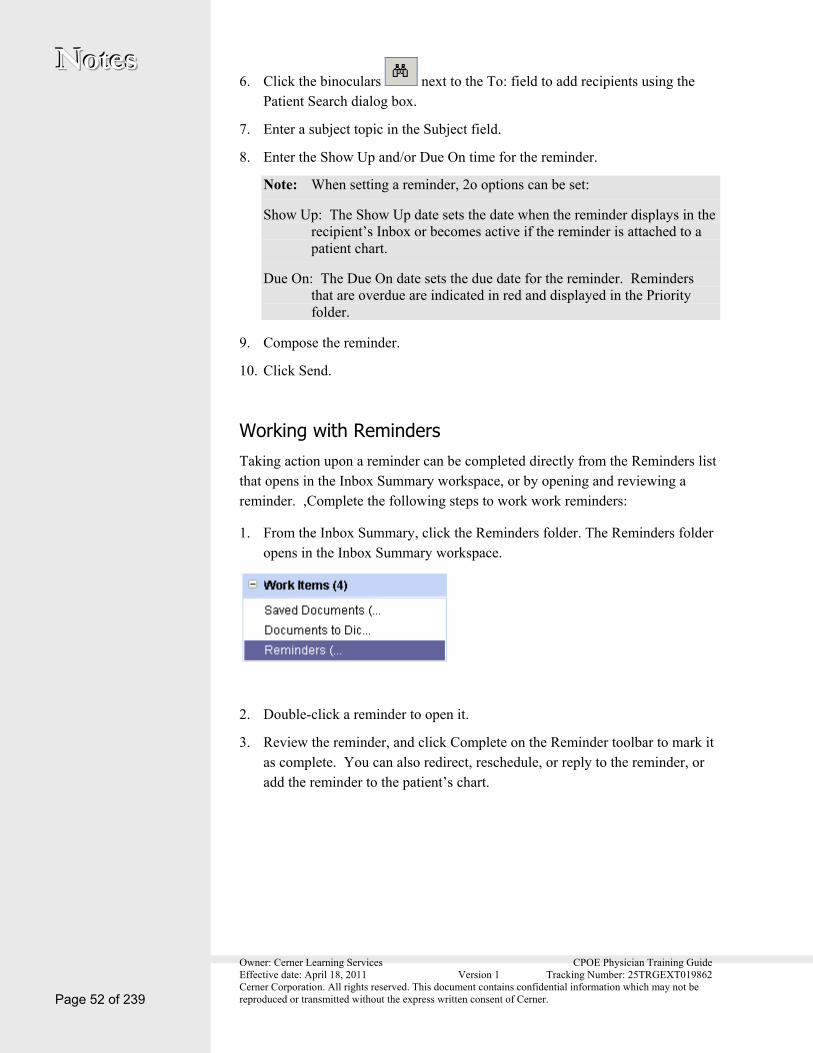
Owner: Cerner Learning Services CPOE Physician Training Guide Effective date: April 18, 2011 Version 1 Tracking Number: 25TRGEXT019862 Cerner Corporation. All rights reserved. This document contains confidential information which may not be reproduced or transmitted without the express written consent of Cerner. Page 52 of 239
NNNooottteeesss 6. Click the binoculars next to the To: field to add recipients using the
Patient Search dialog box.
7. Enter a subject topic in the Subject field.
8. Enter the Show Up and/or Due On time for the reminder.
Note: When setting a reminder, 2o options can be set:
Show Up: The Show Up date sets the date when the reminder displays in the recipient’s Inbox or becomes active if the reminder is attached to a patient chart.
Due On: The Due On date sets the due date for the reminder. Reminders that are overdue are indicated in red and displayed in the Priority folder.
9. Compose the reminder.
10. Click Send.
Working with Reminders Taking action upon a reminder can be completed directly from the Reminders list that opens in the Inbox Summary workspace, or by opening and reviewing a reminder. ,Complete the following steps to work work reminders:
1. From the Inbox Summary, click the Reminders folder. The Reminders folder opens in the Inbox Summary workspace.
2. Double-click a reminder to open it.
3. Review the reminder, and click Complete on the Reminder toolbar to mark it as complete. You can also redirect, reschedule, or reply to the reminder, or add the reminder to the patient’s chart.

Owner: Cerner Learning Services CPOE Physician Training Guide Effective date: April 18, 2011 Version 1 Tracking Number: 25TRGEXT019862 Cerner Corporation. All rights reserved. This document contains confidential information which may not be reproduced or transmitted without the express written consent of Cerner.
NNNooottteeesss
Page 53 of 239
Query Future Reminders There may be times when would be useful to look at all future reminders that you have.Complete the following steps to look up future reminders:
1. From Inbox menu, select Query Future Reminders.
2. Click All Future Items box to see all future reminders or select From and To: dates/time to see reminders in a specific timeframe and click Search.

Owner: Cerner Learning Services CPOE Physician Training Guide Effective date: April 18, 2011 Version 1 Tracking Number: 25TRGEXT019862 Cerner Corporation. All rights reserved. This document contains confidential information which may not be reproduced or transmitted without the express written consent of Cerner. Page 54 of 239
NNNooottteeesss Pools A pool is a shared mailbox that can be accessed by any user that is a member of the pool. While the contents of the Inbox are visible to all members of the pool, only one individual must act on an item in order for that item to be considered complete. Pool functionality allows providers that work in a care team setting to share responsibility for managing results, documents, and messages for a shared group of patients.
From within each pool Messages, Reminders, Refills, Results, and Documents can be acted upon just as your inbox items are today. Pool items can be assigned per user, based on who opened the item for viewing.
Working with Messages as a Member of a Pool Complete the following tasks to access a pool Inbox:
1. From the Inbox Summary, click the Pools tab.
2. Select the pool that you would like to access from the Pool list.
3. Select a specific date range.
4. If necessary, narrow the number of messages displayed by selecting an option from the Filter list.
5. Click the plus (+) sign next to the category to expand it; Click the minus (-) sign next to the category to collapse it. Click a folder to display the items in that category.
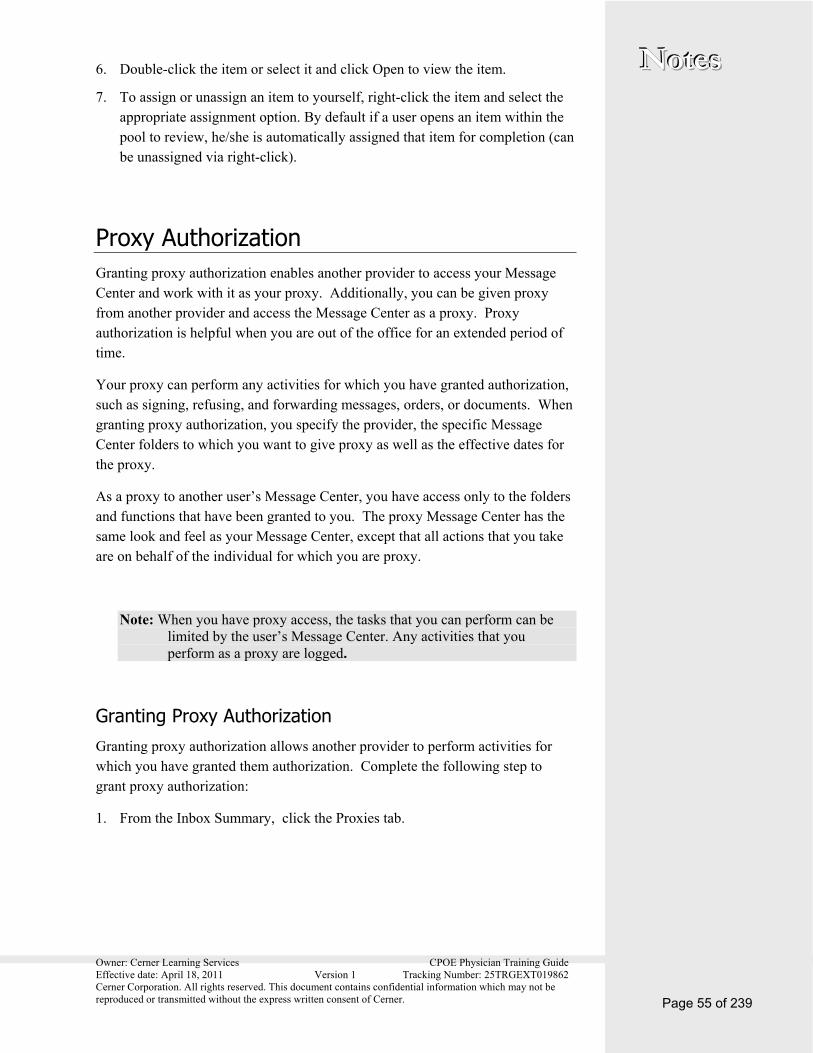
Owner: Cerner Learning Services CPOE Physician Training Guide Effective date: April 18, 2011 Version 1 Tracking Number: 25TRGEXT019862 Cerner Corporation. All rights reserved. This document contains confidential information which may not be reproduced or transmitted without the express written consent of Cerner.
NNNooottteeesss
Page 55 of 239
6. Double-click the item or select it and click Open to view the item.
7. To assign or unassign an item to yourself, right-click the item and select the appropriate assignment option. By default if a user opens an item within the pool to review, he/she is automatically assigned that item for completion (can be unassigned via right-click).
Proxy Authorization Granting proxy authorization enables another provider to access your Message Center and work with it as your proxy. Additionally, you can be given proxy from another provider and access the Message Center as a proxy. Proxy authorization is helpful when you are out of the office for an extended period of time.
Your proxy can perform any activities for which you have granted authorization, such as signing, refusing, and forwarding messages, orders, or documents. When granting proxy authorization, you specify the provider, the specific Message Center folders to which you want to give proxy as well as the effective dates for the proxy.
As a proxy to another user’s Message Center, you have access only to the folders and functions that have been granted to you. The proxy Message Center has the same look and feel as your Message Center, except that all actions that you take are on behalf of the individual for which you are proxy.
Note: When you have proxy access, the tasks that you can perform can be limited by the user’s Message Center. Any activities that you perform as a proxy are logged.
Granting Proxy Authorization Granting proxy authorization allows another provider to perform activities for which you have granted them authorization. Complete the following step to grant proxy authorization:
1. From the Inbox Summary, click the Proxies tab.
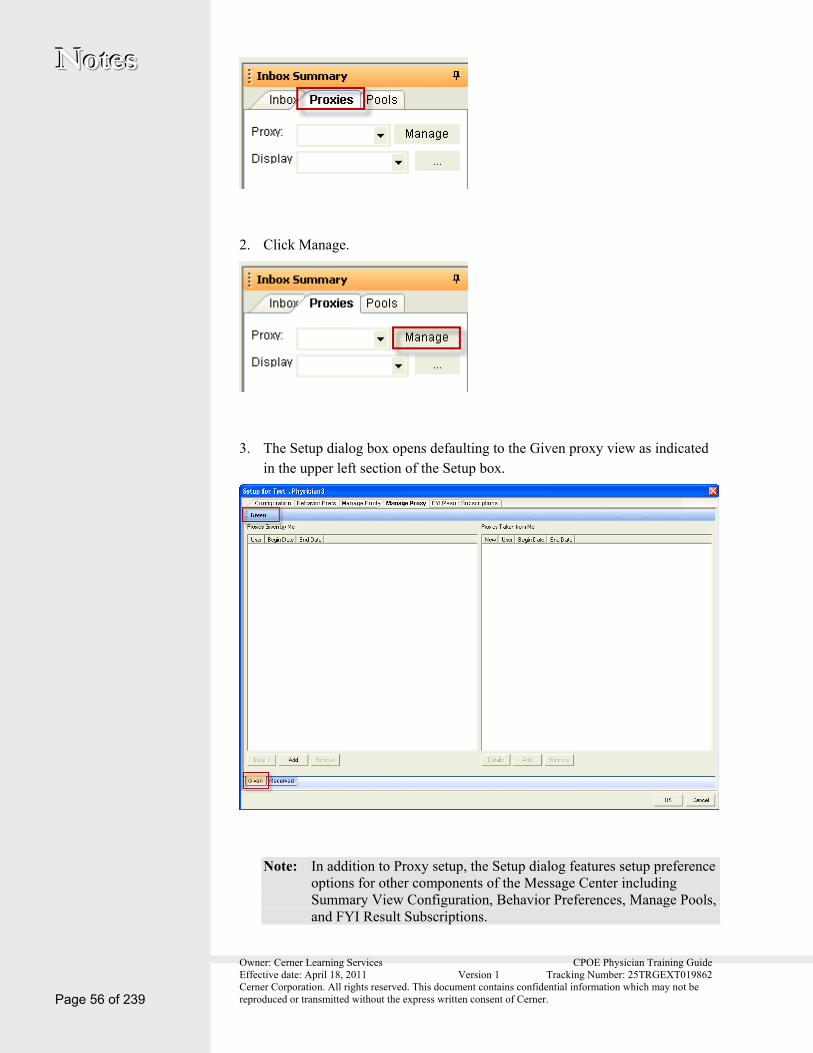
Owner: Cerner Learning Services CPOE Physician Training Guide Effective date: April 18, 2011 Version 1 Tracking Number: 25TRGEXT019862 Cerner Corporation. All rights reserved. This document contains confidential information which may not be reproduced or transmitted without the express written consent of Cerner. Page 56 of 239
NNNooottteeesss
2. Click Manage.
3. The Setup dialog box opens defaulting to the Given proxy view as indicated in the upper left section of the Setup box.
Note: In addition to Proxy setup, the Setup dialog features setup preference options for other components of the Message Center including Summary View Configuration, Behavior Preferences, Manage Pools, and FYI Result Subscriptions.
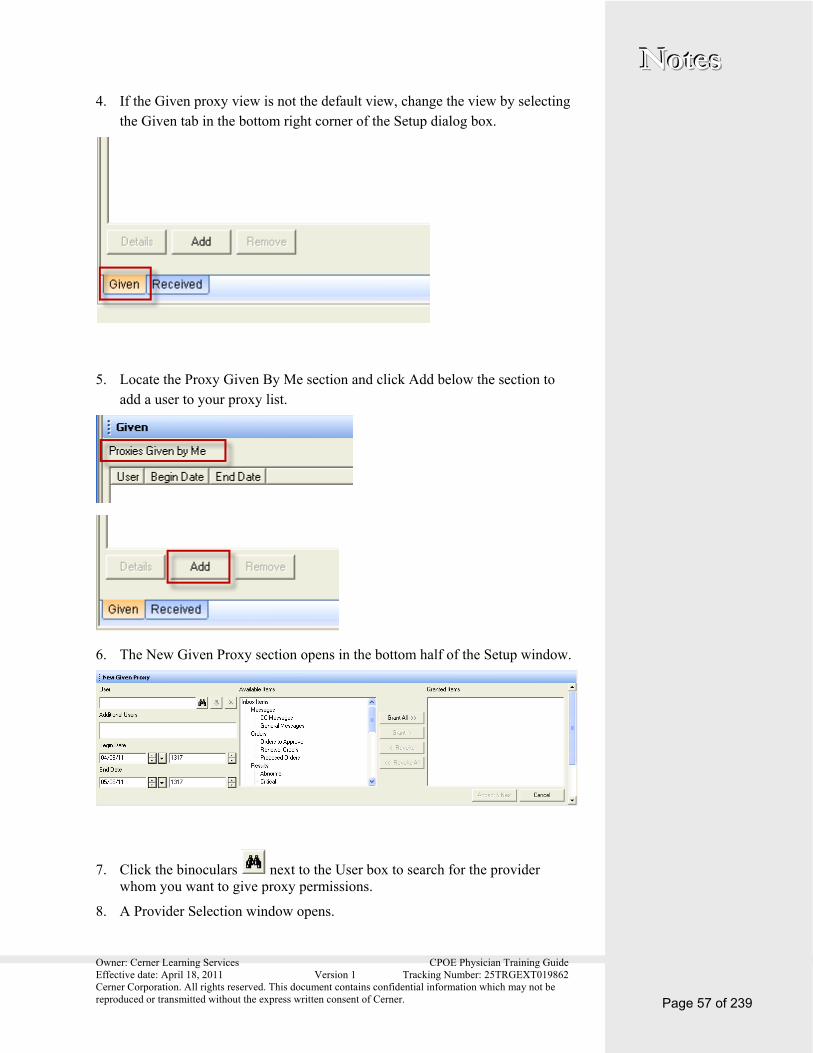
Owner: Cerner Learning Services CPOE Physician Training Guide Effective date: April 18, 2011 Version 1 Tracking Number: 25TRGEXT019862 Cerner Corporation. All rights reserved. This document contains confidential information which may not be reproduced or transmitted without the express written consent of Cerner.
NNNooottteeesss
Page 57 of 239
4. If the Given proxy view is not the default view, change the view by selecting the Given tab in the bottom right corner of the Setup dialog box.
5. Locate the Proxy Given By Me section and click Add below the section to add a user to your proxy list.
6. The New Given Proxy section opens in the bottom half of the Setup window.
7. Click the binoculars next to the User box to search for the provider whom you want to give proxy permissions.
8. A Provider Selection window opens.
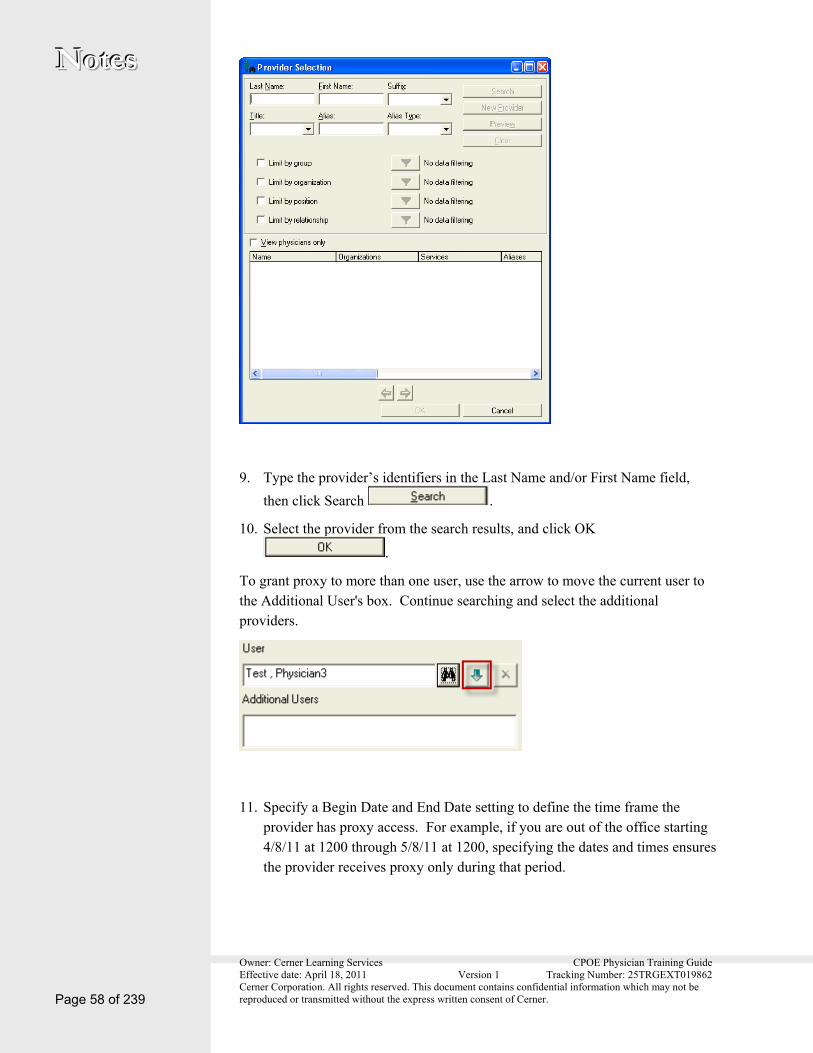
Owner: Cerner Learning Services CPOE Physician Training Guide Effective date: April 18, 2011 Version 1 Tracking Number: 25TRGEXT019862 Cerner Corporation. All rights reserved. This document contains confidential information which may not be reproduced or transmitted without the express written consent of Cerner. Page 58 of 239
NNNooottteeesss
9. Type the provider’s identifiers in the Last Name and/or First Name field,
then click Search .
10. Select the provider from the search results, and click OK
.
To grant proxy to more than one user, use the arrow to move the current user to the Additional User's box. Continue searching and select the additional providers.
11. Specify a Begin Date and End Date setting to define the time frame the provider has proxy access. For example, if you are out of the office starting 4/8/11 at 1200 through 5/8/11 at 1200, specifying the dates and times ensures the provider receives proxy only during that period.
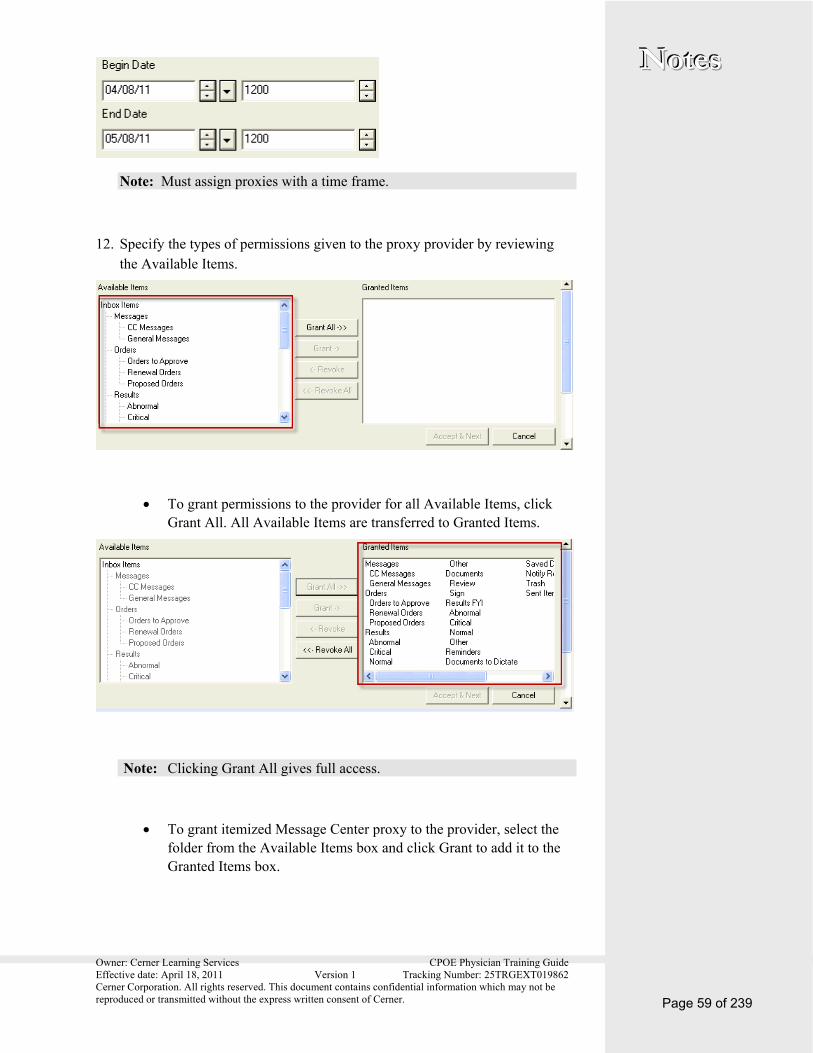
Owner: Cerner Learning Services CPOE Physician Training Guide Effective date: April 18, 2011 Version 1 Tracking Number: 25TRGEXT019862 Cerner Corporation. All rights reserved. This document contains confidential information which may not be reproduced or transmitted without the express written consent of Cerner.
NNNooottteeesss
Page 59 of 239
Note: Must assign proxies with a time frame.
12. Specify the types of permissions given to the proxy provider by reviewing the Available Items.
To grant permissions to the provider for all Available Items, click Grant All. All Available Items are transferred to Granted Items.
Note: Clicking Grant All gives full access.
To grant itemized Message Center proxy to the provider, select the folder from the Available Items box and click Grant to add it to the Granted Items box.

Owner: Cerner Learning Services CPOE Physician Training Guide Effective date: April 18, 2011 Version 1 Tracking Number: 25TRGEXT019862 Cerner Corporation. All rights reserved. This document contains confidential information which may not be reproduced or transmitted without the express written consent of Cerner. Page 60 of 239
NNNooottteeesss
13. Grant as many folders as necessary. The selected folders are moved to the Granted Items box.
14. Click Accept & Next.
15. In the Setup window, review the proxy just granted.
16. Click OK.

Owner: Cerner Learning Services CPOE Physician Training Guide Effective date: April 18, 2011 Version 1 Tracking Number: 25TRGEXT019862 Cerner Corporation. All rights reserved. This document contains confidential information which may not be reproduced or transmitted without the express written consent of Cerner.
NNNooottteeesss
Page 61 of 239
Viewing Messages as a Proxy You can access another provider’s Message Center if you have proxy. Complete the following steps to access a Message Center in which you have proxy,:
1. From the Inbox Summary, click the Proxies tab.
2. From the Proxy list, select the name of the provider’s Message Center you want to view.
3. The provider delegated a set a folders to which you are given proxy. The folders display in the Proxy Inbox Summary.
4. Complete any tasks for which you have proxy rights.
Note: The tasks you are allowed to proxy are limited by how the user set the proxy for their Message Center.
5. When finished working in the Proxies tab, navigate to your Inbox tab to view your Message Center. Your Inbox Summary folders are displayed.
Note: If you sign an Inbox item as a proxy, the signature states you have signed on behalf of the individual’s Inbox. If you review an item and you also want to leave it for the original provider to review, close the notification or move to the next Message Center item. Do not sign, refuse, or forward the notification.
Viewing Proxy Authorizations Granted to You You can view a list of all the providers that have given you proxy access to their Message Center. Complete the following steps to view proxy authorizations:
1. From the Inbox Summary, click the Proxies tab.
2. Click Manage. The Setup box opens defaulting to the Given proxy view as indicated in the upper left region of the Setup box.
3. Click the Received tab located in the bottom left corner of the Setup window.
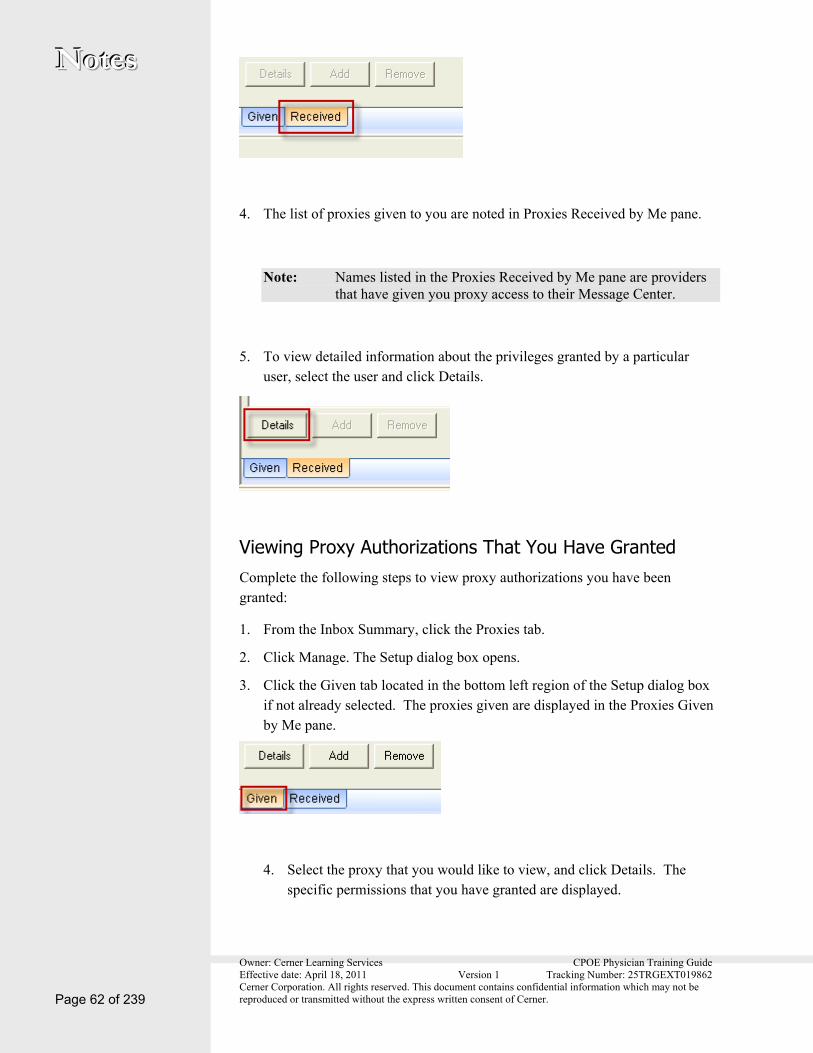
Owner: Cerner Learning Services CPOE Physician Training Guide Effective date: April 18, 2011 Version 1 Tracking Number: 25TRGEXT019862 Cerner Corporation. All rights reserved. This document contains confidential information which may not be reproduced or transmitted without the express written consent of Cerner. Page 62 of 239
NNNooottteeesss
4. The list of proxies given to you are noted in Proxies Received by Me pane.
Note: Names listed in the Proxies Received by Me pane are providers that have given you proxy access to their Message Center.
5. To view detailed information about the privileges granted by a particular user, select the user and click Details.
Viewing Proxy Authorizations That You Have Granted Complete the following steps to view proxy authorizations you have been granted:
1. From the Inbox Summary, click the Proxies tab.
2. Click Manage. The Setup dialog box opens.
3. Click the Given tab located in the bottom left region of the Setup dialog box if not already selected. The proxies given are displayed in the Proxies Given by Me pane.
4. Select the proxy that you would like to view, and click Details. The specific permissions that you have granted are displayed.

Owner: Cerner Learning Services CPOE Physician Training Guide Effective date: April 18, 2011 Version 1 Tracking Number: 25TRGEXT019862 Cerner Corporation. All rights reserved. This document contains confidential information which may not be reproduced or transmitted without the express written consent of Cerner.
NNNooottteeesss
Page 63 of 239
Modifying Proxy Authorization Once you have granted proxy authorization, you can modify the proxy as necessary. Complete the following steps to update proxies:
1. From the Inbox Summary, click the Proxies tab.
2. Click Manage.
3. From the Proxies Given by Me pane, select the proxy you want to modify.
4. Click Details.
5. Modify the proxy as needed.
6. Click Accept & Next to save changes and close the Details pane.
7. Click OK to close the Setup dialog box.
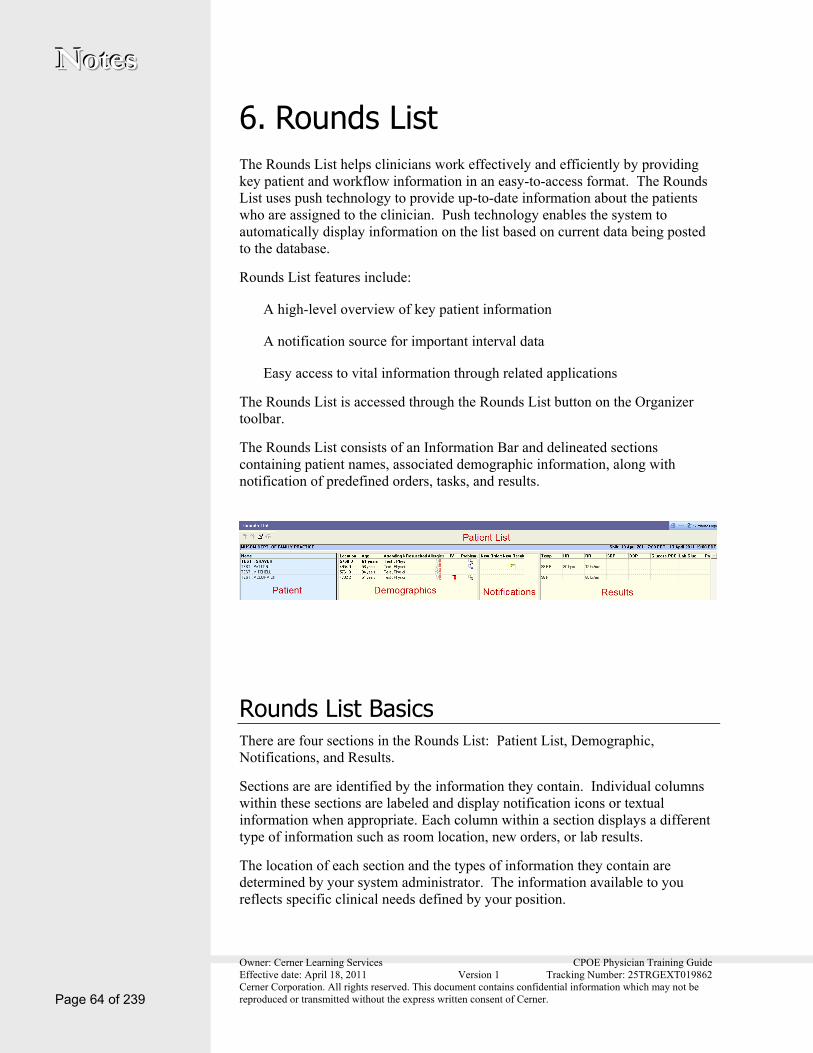
Owner: Cerner Learning Services CPOE Physician Training Guide Effective date: April 18, 2011 Version 1 Tracking Number: 25TRGEXT019862 Cerner Corporation. All rights reserved. This document contains confidential information which may not be reproduced or transmitted without the express written consent of Cerner. Page 64 of 239
NNNooottteeesss
6. Rounds List The Rounds List helps clinicians work effectively and efficiently by providing key patient and workflow information in an easy-to-access format. The Rounds List uses push technology to provide up-to-date information about the patients who are assigned to the clinician. Push technology enables the system to automatically display information on the list based on current data being posted to the database.
Rounds List features include:
A high-level overview of key patient information
A notification source for important interval data
Easy access to vital information through related applications
The Rounds List is accessed through the Rounds List button on the Organizer toolbar.
The Rounds List consists of an Information Bar and delineated sections containing patient names, associated demographic information, along with notification of predefined orders, tasks, and results.
Rounds List Basics There are four sections in the Rounds List: Patient List, Demographic, Notifications, and Results.
Sections are are identified by the information they contain. Individual columns within these sections are labeled and display notification icons or textual information when appropriate. Each column within a section displays a different type of information such as room location, new orders, or lab results.
The location of each section and the types of information they contain are determined by your system administrator. The information available to you reflects specific clinical needs defined by your position.
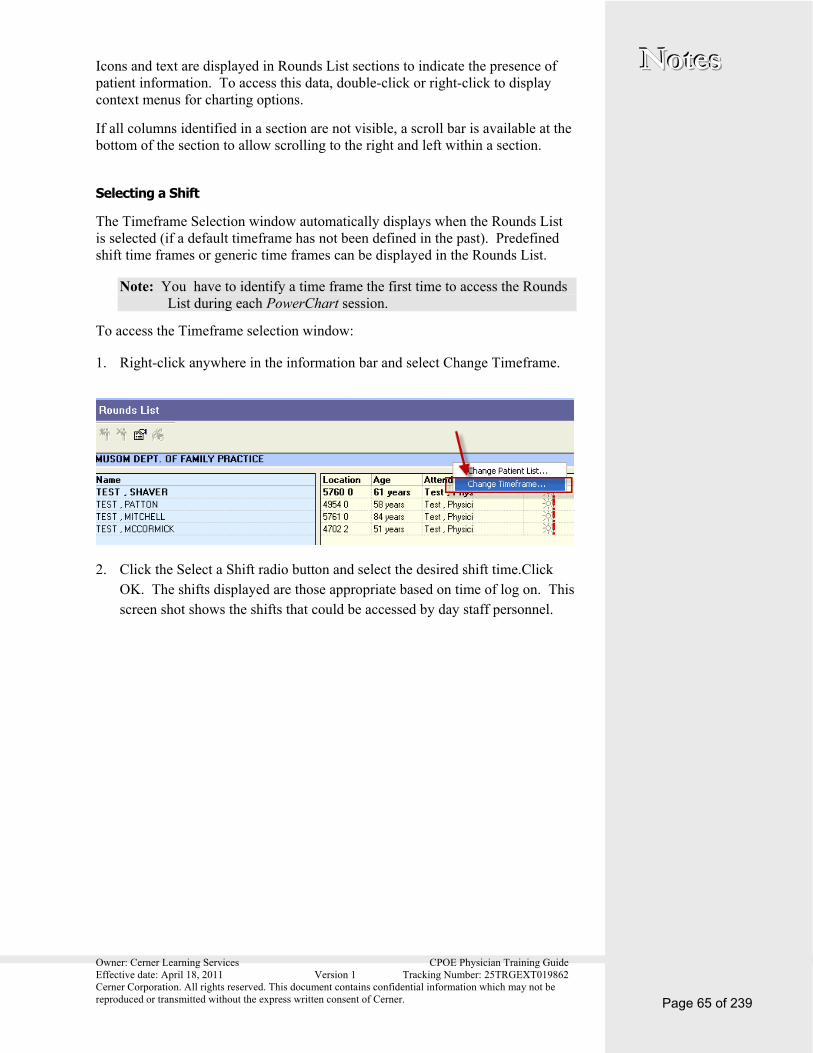
Owner: Cerner Learning Services CPOE Physician Training Guide Effective date: April 18, 2011 Version 1 Tracking Number: 25TRGEXT019862 Cerner Corporation. All rights reserved. This document contains confidential information which may not be reproduced or transmitted without the express written consent of Cerner.
NNNooottteeesss
Page 65 of 239
Icons and text are displayed in Rounds List sections to indicate the presence of patient information. To access this data, double-click or right-click to display context menus for charting options.
If all columns identified in a section are not visible, a scroll bar is available at the bottom of the section to allow scrolling to the right and left within a section.
Selecting a Shift
The Timeframe Selection window automatically displays when the Rounds List is selected (if a default timeframe has not been defined in the past). Predefined shift time frames or generic time frames can be displayed in the Rounds List.
Note: You have to identify a time frame the first time to access the Rounds List during each PowerChart session.
To access the Timeframe selection window:
1. Right-click anywhere in the information bar and select Change Timeframe.
2. Click the Select a Shift radio button and select the desired shift time.Click OK. The shifts displayed are those appropriate based on time of log on. This screen shot shows the shifts that could be accessed by day staff personnel.
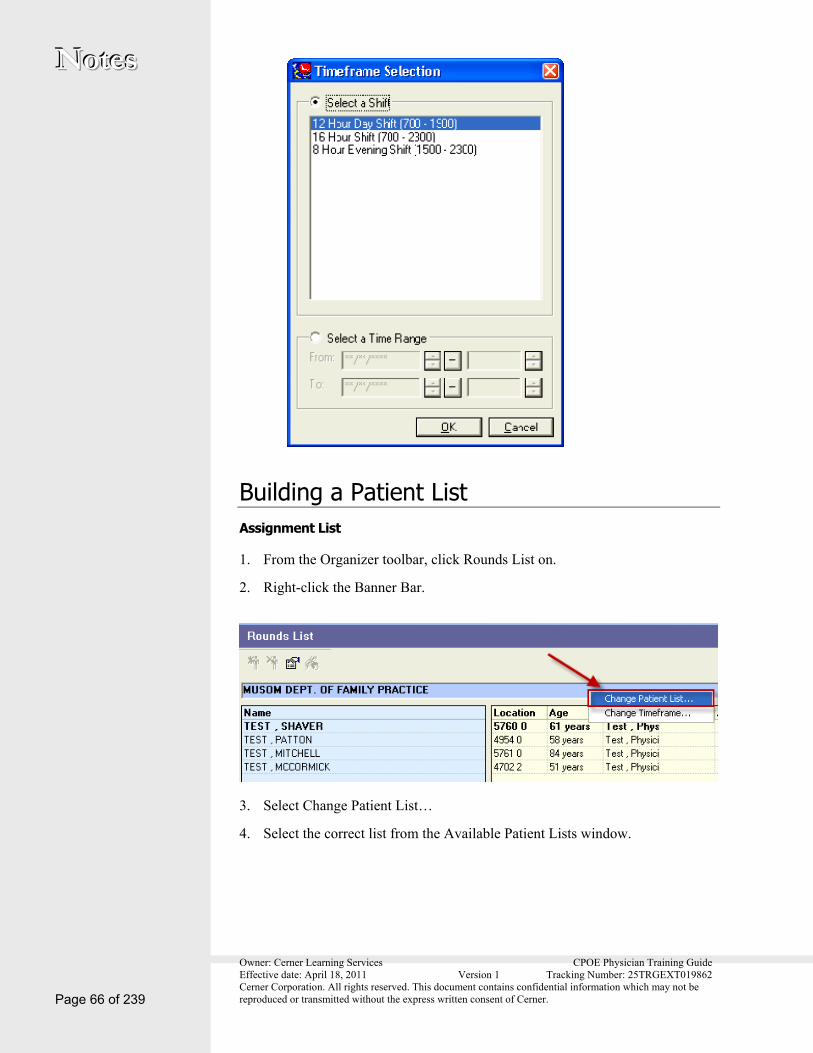
Owner: Cerner Learning Services CPOE Physician Training Guide Effective date: April 18, 2011 Version 1 Tracking Number: 25TRGEXT019862 Cerner Corporation. All rights reserved. This document contains confidential information which may not be reproduced or transmitted without the express written consent of Cerner. Page 66 of 239
NNNooottteeesss
Building a Patient List Assignment List
1. From the Organizer toolbar, click Rounds List on.
2. Right-click the Banner Bar.
3. Select Change Patient List…
4. Select the correct list from the Available Patient Lists window.

Owner: Cerner Learning Services CPOE Physician Training Guide Effective date: April 18, 2011 Version 1 Tracking Number: 25TRGEXT019862 Cerner Corporation. All rights reserved. This document contains confidential information which may not be reproduced or transmitted without the express written consent of Cerner.
NNNooottteeesss
Page 67 of 239
5. Click Ok.
Complete the following steps when you are prompted to establish a relationship with a patient:
1. From the Select an Appropriate Relationship box, select a relationship type from the list.
2. In the Patients Without Relationships box, names of patients on the patient list that do not have an established relationship with you are displayed. A

Owner: Cerner Learning Services CPOE Physician Training Guide Effective date: April 18, 2011 Version 1 Tracking Number: 25TRGEXT019862 Cerner Corporation. All rights reserved. This document contains confidential information which may not be reproduced or transmitted without the express written consent of Cerner. Page 68 of 239
NNNooottteeesss option is displayed to the left of each name. The system defaults to selecting all the patient names on the list. Deselect a patient name by clicking the option.
3. Click OK.
Note: Closing the relationship window before establishing a relationship does not remove the patient’s name from the Rounds List. The patient name is displayed, but each section has the statement No Relationship displayed instead of the correct information. The Establish Relationship window continues to display each time the Rounds List is accessed.
Rounds List Selection and Columns Patient list Selection
The patient list that displays on the Rounds List is selected by the user. For example, assignment list, location list, or users custom list.
Demographic Section
Allergy Indicator
The allergy icon provides a visual indicator that displays the state of allergy documentation. The icons represented in the allergy section indicate:
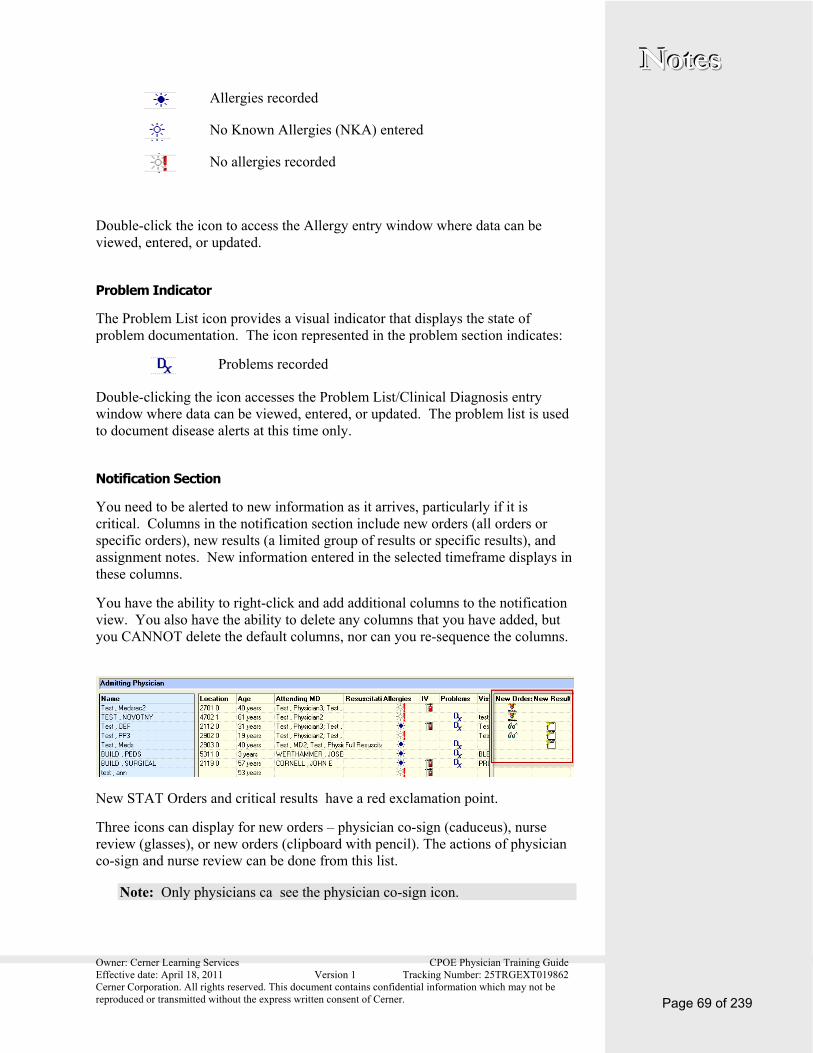
Owner: Cerner Learning Services CPOE Physician Training Guide Effective date: April 18, 2011 Version 1 Tracking Number: 25TRGEXT019862 Cerner Corporation. All rights reserved. This document contains confidential information which may not be reproduced or transmitted without the express written consent of Cerner.
NNNooottteeesss
Page 69 of 239
Allergies recorded
No Known Allergies (NKA) entered
No allergies recorded
Double-click the icon to access the Allergy entry window where data can be viewed, entered, or updated.
Problem Indicator
The Problem List icon provides a visual indicator that displays the state of problem documentation. The icon represented in the problem section indicates:
Problems recorded
Double-clicking the icon accesses the Problem List/Clinical Diagnosis entry window where data can be viewed, entered, or updated. The problem list is used to document disease alerts at this time only.
Notification Section
You need to be alerted to new information as it arrives, particularly if it is critical. Columns in the notification section include new orders (all orders or specific orders), new results (a limited group of results or specific results), and assignment notes. New information entered in the selected timeframe displays in these columns.
You have the ability to right-click and add additional columns to the notification view. You also have the ability to delete any columns that you have added, but you CANNOT delete the default columns, nor can you re-sequence the columns.
New STAT Orders and critical results have a red exclamation point.
Three icons can display for new orders – physician co-sign (caduceus), nurse review (glasses), or new orders (clipboard with pencil). The actions of physician co-sign and nurse review can be done from this list.
Note: Only physicians ca see the physician co-sign icon.

Owner: Cerner Learning Services CPOE Physician Training Guide Effective date: April 18, 2011 Version 1 Tracking Number: 25TRGEXT019862 Cerner Corporation. All rights reserved. This document contains confidential information which may not be reproduced or transmitted without the express written consent of Cerner. Page 70 of 239
NNNooottteeesss Review New Orders
The notification section can contain notification of new orders placed within the selected time frame. In addition, orders requiring review display in the notification section.
The following icons can display in the Orders Notification section:
New routine priority orders requiring nurse review,
New stat priority orders requiring nurse review,
New routine priority orders that do not require nurse review,
New stat priority orders that do not require nurse review,
Order needs to be cosigned,
Complete the following steps to review new orders or results:
1. Click the icon in the New Orders column to access the Orders window.
2. Stat priority orders display in red font. If the order requires nurse review, the
Nurse Review icon displays.
3. Right-click the order line and select Order Info to view additional order detail.

Owner: Cerner Learning Services CPOE Physician Training Guide Effective date: April 18, 2011 Version 1 Tracking Number: 25TRGEXT019862 Cerner Corporation. All rights reserved. This document contains confidential information which may not be reproduced or transmitted without the express written consent of Cerner.
NNNooottteeesss
Page 71 of 239
4. Review can be performed for an individual order by selecting review from the right-click menu.
5. The Actions Requiring Review window opens, click Review to review the individual order.
6. To Review all orders, click Apply in the Orders dialog box.
7. Click Review to sign off on the selected items.
Review New Results The notification section can contain notification of new results entered within the selected time frame.
The following icons can display in the Results Notification section:
New routine results
New critical results
Complete the following steps to review new results from the Rounds List:
Click the icon to access the Results window.
1. Critical results display in red font in the results display window.
2. Right-click the result line and select View Details for additional result detail.
3. Click Apply to acknowledge the results.
Results Section
This section provides a view of discrete results defined by position and location. The columns support the display of discrete results for each patient.

Owner: Cerner Learning Services CPOE Physician Training Guide Effective date: April 18, 2011 Version 1 Tracking Number: 25TRGEXT019862 Cerner Corporation. All rights reserved. This document contains confidential information which may not be reproduced or transmitted without the express written consent of Cerner. Page 72 of 239
NNNooottteeesss
The last result recorded for the patient is displayed. Position the pointer over the result to see the Result Date and Time.
Right-click and select View Details to access additional result details.
You have ability to right-click and add additional columns to the results view. You also have the ability to delete any columns that you have added, but you can NOT delete the default columns, nor can you re-sequence the columns.

Owner: Cerner Learning Services CPOE Physician Training Guide Effective date: April 18, 2011 Version 1 Tracking Number: 25TRGEXT019862 Cerner Corporation. All rights reserved. This document contains confidential information which may not be reproduced or transmitted without the express written consent of Cerner.
NNNooottteeesss
Page 73 of 239
Opening a Patients Chart from the Rounds List To open a patient chart, do one of the following:
1. From the names section, double-click the patient’s name on the Rounds List.
2. To return to the Rounds List window, close the patient’s chart by clicking X
next to the patient name or the Rounds List button
.

Owner: Cerner Learning Services CPOE Physician Training Guide Effective date: April 18, 2011 Version 1 Tracking Number: 25TRGEXT019862 Cerner Corporation. All rights reserved. This document contains confidential information which may not be reproduced or transmitted without the express written consent of Cerner. Page 74 of 239
NNNooottteeesss
7. Patient List The Patient List organizes patient charts in a way that is useful to your workflow and helps you organize and easily access a large amount of data. You can open a patient chart directly from a patient list.
Use Patient List to view patient lists according to a variety of criteria maintained by the system such patient Location, Medical Service, or Scheduled status. You build, view, and edit lists according to Relationships, Provider Groups, or Care Teams that you establish. You can also build and maintain custom lists based on your own set of criteria, individually selecting the patients that belong on the custom list.
By building a variety of lists, you can group patients by logical categories and easily locate a patient's chart rather than relying on a large single list. Some patient lists are populated automatically by the system while others must be built manually. In either case, you decide which lists you want displayed as Active patient lists in your Patient List organizer.
Viewing Active Patient Lists Complete the following steps to view your active patient lists:
1. From the Organizer toolbar, click Patient List . The Patient List organizer opens.
2. Your Active patient lists are listed on tabs beneath the Patient List toolbar. Select a patient list by click one of the Active Patient List tabs.

Owner: Cerner Learning Services CPOE Physician Training Guide Effective date: April 18, 2011 Version 1 Tracking Number: 25TRGEXT019862 Cerner Corporation. All rights reserved. This document contains confidential information which may not be reproduced or transmitted without the express written consent of Cerner.
NNNooottteeesss
Page 75 of 239
3. Open a patient chart directly from a patient list by double-clicking on a patient’s identifiers. The chart opens in a separate Patient Chart window, leaving the Organizer running in its own separate window.
Modify Your Patient List Organizer You can adjust which existing patient lists are active in your Patient List organizer by adding, removing, or rearranging the order in which the lists are displayed.
Complete the following steps to modify your Patient List organizer:
1. From the Patient List toolbar, click List Maintenance . The Modify Patient Lists window opens.

Owner: Cerner Learning Services CPOE Physician Training Guide Effective date: April 18, 2011 Version 1 Tracking Number: 25TRGEXT019862 Cerner Corporation. All rights reserved. This document contains confidential information which may not be reproduced or transmitted without the express written consent of Cerner. Page 76 of 239
NNNooottteeesss 2. Your current, active patient lists are listed in the Active Lists pane on the right.
3. If you want to add a patient list to your Active Lists, select a list from the
Available Lists pane on the left and click the right-facing arrow between the panes to transfer it to your Active Lists.
4. If you want to remove a list from your Active Lists, select a list from the
Active Lists pane on the right and click the left-facing arrow between the panes to transfer it to your Available Lists.
5. If you want to rearrange the order in which your Active Lists are displayed in your Patient List organizer, select a list in the Active Lists pane and use the
up or down arrows to rearrange the list to the wanted sequence.
6. When you are finished modifying your Patient List organizer, click OK.
Note: In the Active Lists pane, the list sequenced first is displayed on the far left tab in the Patient List organizer. Each subsequent list included in the Active List pane is displayed to the right of the immediate prior list in the Patient List organizer.
Adding a Patient List to your Available Lists Numerous lists are maintained by the system as patients are scheduled, admitted, transferred, or discharged. These lists are categorized by Location, Medical Service, Provider Group, or Scheduled status types. You cannot add or remove patients from these defined lists, but you can control whether you see these lists in your Patient List organizer.
1. From the List Maintenance dialog box, if a list is not available in the Available Lists pane to add to your Active lists, click New to add a list to your available lists.
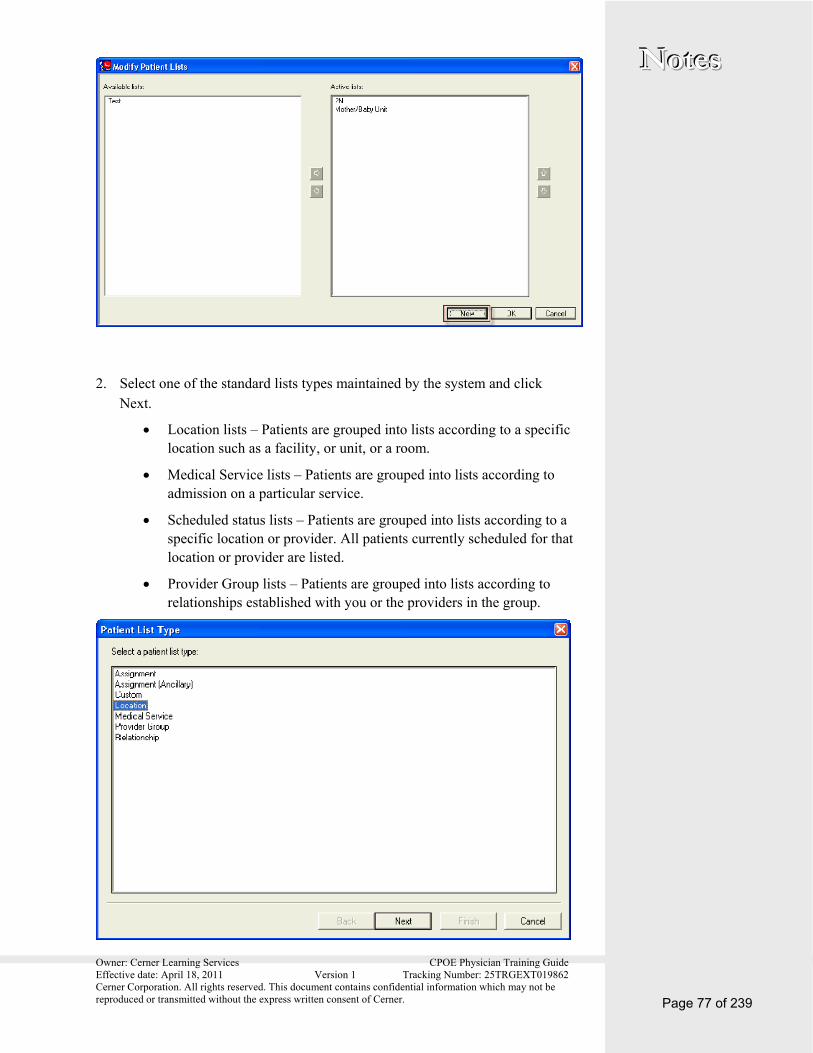
Owner: Cerner Learning Services CPOE Physician Training Guide Effective date: April 18, 2011 Version 1 Tracking Number: 25TRGEXT019862 Cerner Corporation. All rights reserved. This document contains confidential information which may not be reproduced or transmitted without the express written consent of Cerner.
NNNooottteeesss
Page 77 of 239
2. Select one of the standard lists types maintained by the system and click Next.
Location lists – Patients are grouped into lists according to a specific location such as a facility, or unit, or a room.
Medical Service lists – Patients are grouped into lists according to admission on a particular service.
Scheduled status lists – Patients are grouped into lists according to a specific location or provider. All patients currently scheduled for that location or provider are listed.
Provider Group lists – Patients are grouped into lists according to relationships established with you or the providers in the group.

Owner: Cerner Learning Services CPOE Physician Training Guide Effective date: April 18, 2011 Version 1 Tracking Number: 25TRGEXT019862 Cerner Corporation. All rights reserved. This document contains confidential information which may not be reproduced or transmitted without the express written consent of Cerner. Page 78 of 239
NNNooottteeesss
3. A Patient List builder window opens, and it is divided into two panes. The left pane lists the various types of patient lists (similar to the previous step), and the right pane displays a list tree composed of folders within the selected list type.
4. In the left pane, select the same list type as selected in Step 2.
Note: You cannot deviate at this point from the list type selected in Step 2. If you want to select a different list type, click Cancel to go back to the Patient Type Window to make a different selection.
5. In the right pane, click the plus sign next to the appropriate folder to open the list tree.
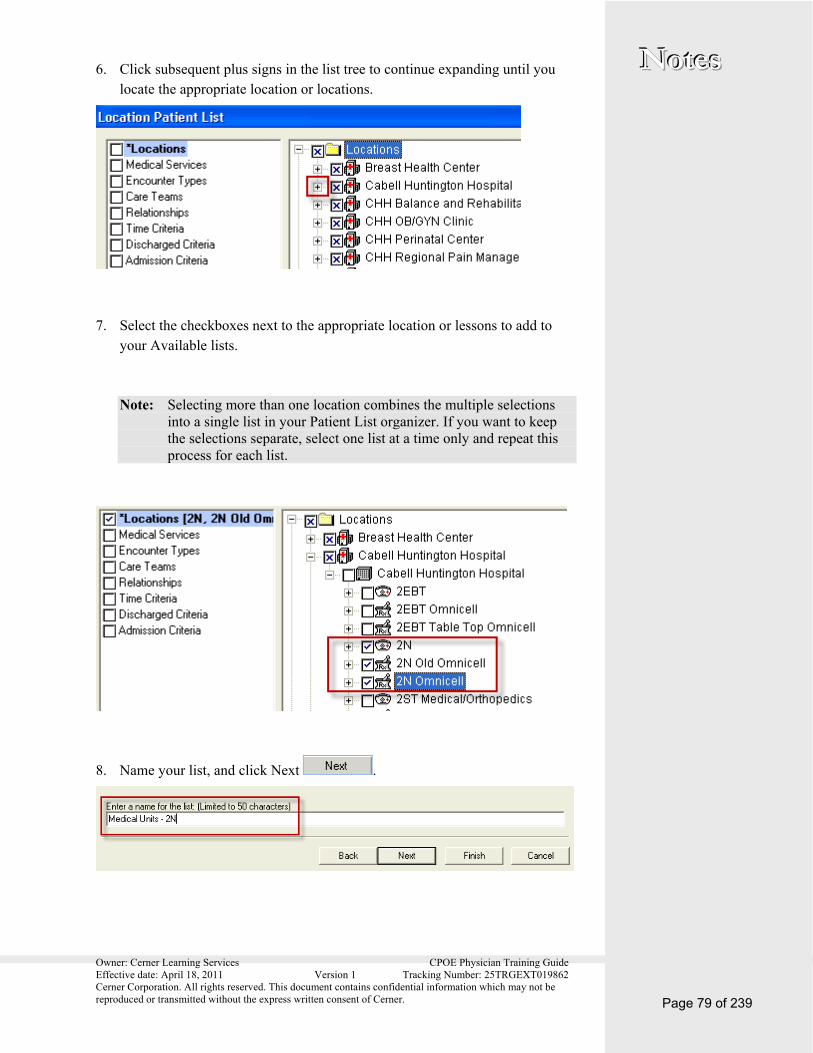
Owner: Cerner Learning Services CPOE Physician Training Guide Effective date: April 18, 2011 Version 1 Tracking Number: 25TRGEXT019862 Cerner Corporation. All rights reserved. This document contains confidential information which may not be reproduced or transmitted without the express written consent of Cerner.
NNNooottteeesss
Page 79 of 239
6. Click subsequent plus signs in the list tree to continue expanding until you locate the appropriate location or locations.
7. Select the checkboxes next to the appropriate location or lessons to add to your Available lists.
Note: Selecting more than one location combines the multiple selections into a single list in your Patient List organizer. If you want to keep the selections separate, select one list at a time only and repeat this process for each list.
8. Name your list, and click Next .

Owner: Cerner Learning Services CPOE Physician Training Guide Effective date: April 18, 2011 Version 1 Tracking Number: 25TRGEXT019862 Cerner Corporation. All rights reserved. This document contains confidential information which may not be reproduced or transmitted without the express written consent of Cerner. Page 80 of 239
NNNooottteeesss 9. A Proxy dialog box opens giving you the option to share this list with other
providers. Click New to share this list with another provider, or
click Finish to save your new list.
10. The new list is now available to add to your Active Lists. Select the new list
in the Available Lists pane, and click the right blue arrow to move the new list to the Active List pane.
11. Click OK to finish adding your new list to your Active patient lists.
Create a Custom Patient List Use custom patient lists to create specific lists of patients according the criteria that you define, such as all patients presently admitted to 2 North medical unit, Rooms 2701-2709.
Unlike lists that group patients according to categories maintained by the system such as Location, Medical Service, or Schedule, custom lists are not tied to system-defined criteria. Patients added to a custom list stay on that custom list until you manually remove the patient from the list, or until you delete the list, regardless of the patient’s schedule, admission, transfer, or discharge status .
Complete the following steps tocreate a custom list:

Owner: Cerner Learning Services CPOE Physician Training Guide Effective date: April 18, 2011 Version 1 Tracking Number: 25TRGEXT019862 Cerner Corporation. All rights reserved. This document contains confidential information which may not be reproduced or transmitted without the express written consent of Cerner.
NNNooottteeesss
Page 81 of 239
1. From the List Maintenance dialog box, click New to add a list to your available lists.
2. Select Custom, and click Next.
3. Select your custom criteria.
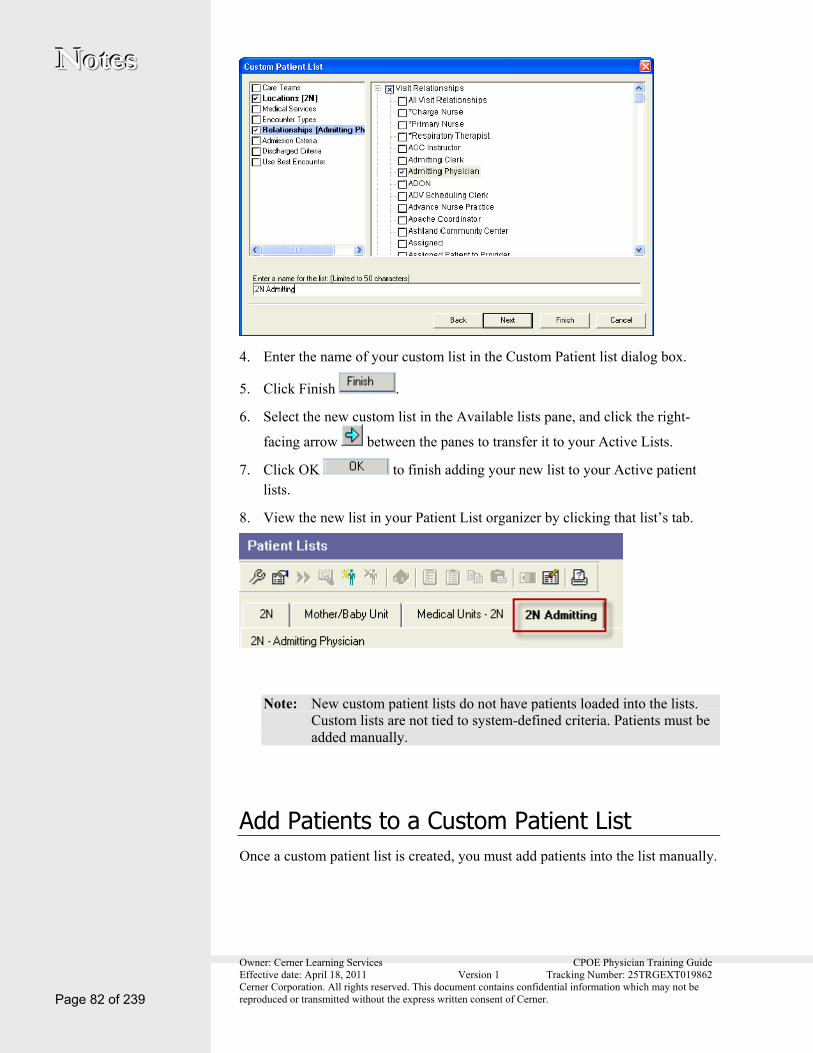
Owner: Cerner Learning Services CPOE Physician Training Guide Effective date: April 18, 2011 Version 1 Tracking Number: 25TRGEXT019862 Cerner Corporation. All rights reserved. This document contains confidential information which may not be reproduced or transmitted without the express written consent of Cerner. Page 82 of 239
NNNooottteeesss
4. Enter the name of your custom list in the Custom Patient list dialog box.
5. Click Finish .
6. Select the new custom list in the Available lists pane, and click the right-
facing arrow between the panes to transfer it to your Active Lists.
7. Click OK to finish adding your new list to your Active patient lists.
8. View the new list in your Patient List organizer by clicking that list’s tab.
Note: New custom patient lists do not have patients loaded into the lists. Custom lists are not tied to system-defined criteria. Patients must be added manually.
Add Patients to a Custom Patient List Once a custom patient list is created, you must add patients into the list manually.

Owner: Cerner Learning Services CPOE Physician Training Guide Effective date: April 18, 2011 Version 1 Tracking Number: 25TRGEXT019862 Cerner Corporation. All rights reserved. This document contains confidential information which may not be reproduced or transmitted without the express written consent of Cerner.
NNNooottteeesss
Page 83 of 239
Add a Patient from an Existing Patient List Complete the following steps if the patients are listed on one of your active patient lists in the Patient List organizer:
1. From the Organizer toolbar, click Patient List . The Patient List organizer opens.
2. Select the appropriate Active patient list containing the patient you want to add to your custom list.
3. Select the patient and click Copy on the Patient List toolbar.
Note: You can select several patients at once by holding down CTRL continuously while making your selections.

Owner: Cerner Learning Services CPOE Physician Training Guide Effective date: April 18, 2011 Version 1 Tracking Number: 25TRGEXT019862 Cerner Corporation. All rights reserved. This document contains confidential information which may not be reproduced or transmitted without the express written consent of Cerner. Page 84 of 239
NNNooottteeesss 4. Navigate to your custom patient list using the Active Patient List tabs.
Note: Remember that this is the tab that you created and named.
5. Click Paste on the Patient List toolbar to add the selected patients to your custom patient list.
Add a Patient using Patient Search Complete the following steps to add a patient who is not on one of your Active patient lists:
1. Select your custom patient list using the Active Patient List tabs.
2. Click Add Patient on the Patient List toolbar. The Patient Search window opens.
3. Search for the patient and the encounter, then click OK . The patient is added to your custom patient list.
Note: All patient encounters are listed in the bottom half of the Patient Search window. It is important to select the correct encounter.
Remove a Patient from a Custom List Complete the following steps to remove a patient from a custom list:
1. From the Active Patient List tab, select your custom patient list.
2. Select the patient name on the list.
3. Click Remove Patient on the Patient List toolbar.

Owner: Cerner Learning Services CPOE Physician Training Guide Effective date: April 18, 2011 Version 1 Tracking Number: 25TRGEXT019862 Cerner Corporation. All rights reserved. This document contains confidential information which may not be reproduced or transmitted without the express written consent of Cerner.
NNNooottteeesss
Page 85 of 239
Note: Removing a patient from a custom patient list does not delete them or discharge them from the system. It only removes them from your custom patient list.
Delete a Patient List You can delete patient lists that you no longer use. Once deleted, your patient list is gone and you must create a new one.
Complete the following steps to delete a patient list:
1. From the Patient List toolbar, click List Maintenance .
2. Select the list in the Active Lists pane.
3. Click the left-facing arrow located between the panes to transfer the selected list from the Active Lists pane to the Available Lists pane.
4. Right-click the list in the Available Lists pane, and click Delete Patient List.

Owner: Cerner Learning Services CPOE Physician Training Guide Effective date: April 18, 2011 Version 1 Tracking Number: 25TRGEXT019862 Cerner Corporation. All rights reserved. This document contains confidential information which may not be reproduced or transmitted without the express written consent of Cerner. Page 86 of 239
NNNooottteeesss
5. Click Yes in the Delete List dialog box to permanently delete the list.
6. Click OK to exit the Modify List dialog box and to return to the Patient List organizer.
Organizing Columns in a Patient List Columns can be added, removed, and resequenced in a Patient List.
1. Select the appropriate patient list using the Active Patient List tabs and click
Cusotmize Columns .

Owner: Cerner Learning Services CPOE Physician Training Guide Effective date: April 18, 2011 Version 1 Tracking Number: 25TRGEXT019862 Cerner Corporation. All rights reserved. This document contains confidential information which may not be reproduced or transmitted without the express written consent of Cerner.
NNNooottteeesss
Page 87 of 239
Your active, current columns are listed in the Existing Columns pane on the right, and all the potential columns are listed in the Available Columns pane on the left.
2. To add a column to your Existing Columns, select a column from the
Available Columns pane on the left and click the right-facing arrow between the panes to transfer it to your Existing Columns list.
Note: To add all available columns, click Select All Available Columns
, and click the right-facing arrow to move the available columns from the Available Columns box to the Existing Columns box.
3. If you want to remove a column from your Exising Columns list, select a column from the Existing Columns pane on the right and click the left-facing
arrow between the panes to transfer it to your Available Columns list.
4. If you want to resequence the order in which your Existing Columns are displayed across the patient list, select a column in the Existing Columns
pane and use the up or down arrows to rearrange the list to the wanted sequence.
5. When you are finished adjusting your Patient List columns, click Save.
6. Click Exit to exit Customized Columns Tool and return to the patient list.
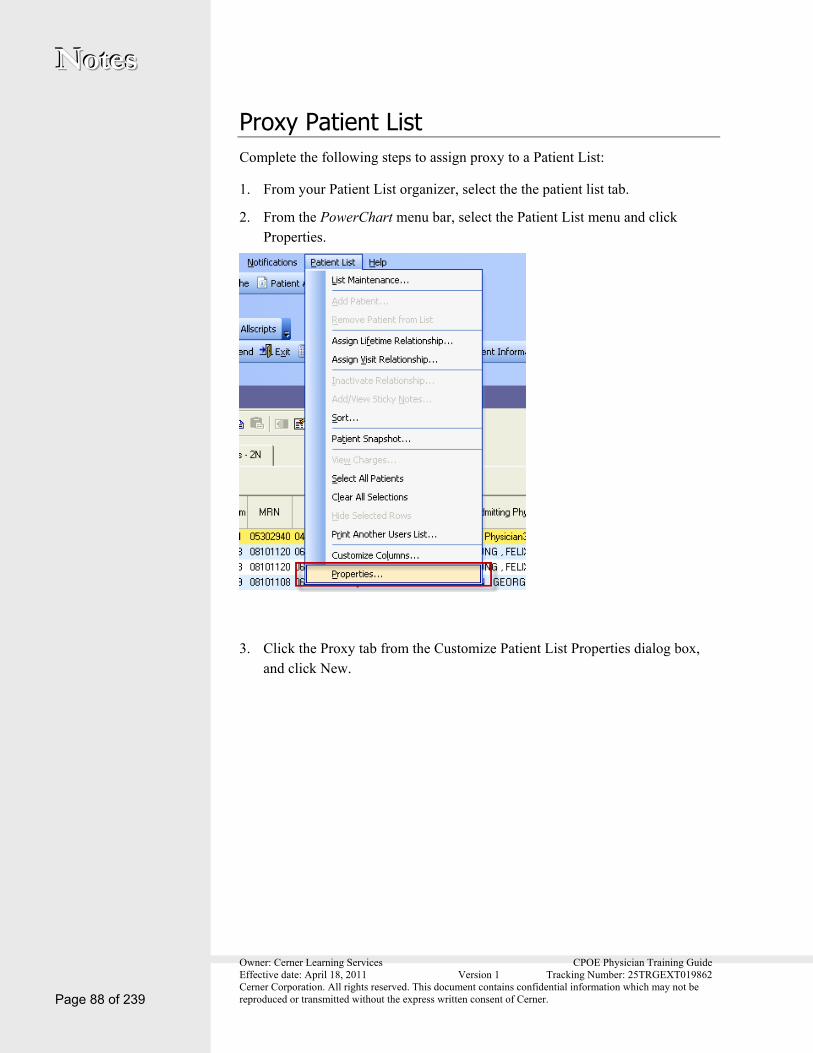
Owner: Cerner Learning Services CPOE Physician Training Guide Effective date: April 18, 2011 Version 1 Tracking Number: 25TRGEXT019862 Cerner Corporation. All rights reserved. This document contains confidential information which may not be reproduced or transmitted without the express written consent of Cerner. Page 88 of 239
NNNooottteeesss
Proxy Patient List Complete the following steps to assign proxy to a Patient List:
1. From your Patient List organizer, select the the patient list tab.
2. From the PowerChart menu bar, select the Patient List menu and click Properties.
3. Click the Proxy tab from the Customize Patient List Properties dialog box, and click New.

Owner: Cerner Learning Services CPOE Physician Training Guide Effective date: April 18, 2011 Version 1 Tracking Number: 25TRGEXT019862 Cerner Corporation. All rights reserved. This document contains confidential information which may not be reproduced or transmitted without the express written consent of Cerner.
NNNooottteeesss
Page 89 of 239
4. Select a group from the Group list, or select the Provider option and search
for the provider by clicking the binoculars .
5. Select the level of permissions to grant to the user using the Access list.

Owner: Cerner Learning Services CPOE Physician Training Guide Effective date: April 18, 2011 Version 1 Tracking Number: 25TRGEXT019862 Cerner Corporation. All rights reserved. This document contains confidential information which may not be reproduced or transmitted without the express written consent of Cerner. Page 90 of 239
NNNooottteeesss
6. Select a date and time range to establish when the list is available to the user.
Note: To input a current date and time, type T in the Date spin box for today's date, and type N in the Time spin box for the current time.
7. Click Apply to accept the settings. The group or provider is added to the Proxy pane.
8. Click OK to save the proxy settings and return to the patien t list.
Note: The group or provider that received proxy needs to add the list to their Active Lists using the List Maintenance tool in order to use the list.

Owner: Cerner Learning Services CPOE Physician Training Guide Effective date: April 18, 2011 Version 1 Tracking Number: 25TRGEXT019862 Cerner Corporation. All rights reserved. This document contains confidential information which may not be reproduced or transmitted without the express written consent of Cerner.
NNNooottteeesss
Page 91 of 239
8. Open a Patient Chart
Surgical Case Selection Select Locations 1. From the desktop, double-click the SurgiNet icon.
2. Log on with your user name and password.
3. The Case Selection window opens
Note: The first time you log in, the Location Selection window will open.
4. Click Location.
5. Select an area from the list.
6. Click OK.

Owner: Cerner Learning Services CPOE Physician Training Guide Effective date: April 18, 2011 Version 1 Tracking Number: 25TRGEXT019862 Cerner Corporation. All rights reserved. This document contains confidential information which may not be reproduced or transmitted without the express written consent of Cerner. Page 92 of 239
NNNooottteeesss
Select a Patient by Surgery Date 1. From the desktop, double-click the SurgiNet icon.
2. Log on with your user name and password.
3. The Case Selection window opens.
4. Verify the location at the top of the window.
5. Select a desired date by clicking the large arrow right of the From Date box.
6. In the To Date box type the letter T for today.
7. Click Retrieve.
8. Find your patient; verify that the patient’s FIN number and encounter is correct.
9. Double-click to open.
Select a Person 1. From the desktop, double-click the SurgiNet icon.
2. Log on with your user name and password.
3. The Case Selection window opens.
4. Verify the location at the top of the window.
5. Select the Person option.

Owner: Cerner Learning Services CPOE Physician Training Guide Effective date: April 18, 2011 Version 1 Tracking Number: 25TRGEXT019862 Cerner Corporation. All rights reserved. This document contains confidential information which may not be reproduced or transmitted without the express written consent of Cerner.
NNNooottteeesss
Page 93 of 239
6. Enter either the person's full name or partial name in the Person box.
Note: If you entered the full name, the Retrieve button is available.
7. Click the Ellipses button to open the Person Search dialog box
8. The Person Search dialog box opens with a list of persons that most closely match the name you entered.
Note: You also can enter patient data in the appropriate fields. The more information you enter, the closer the system can come to a direct match.
9. Select a name from the list of patient records that are returned.
10. Click OK to save the selection and exit the dialog box.
11. The selected name is displayed in the Person box.
12. Click Retrieve to display a list of cases scheduled for that patient.
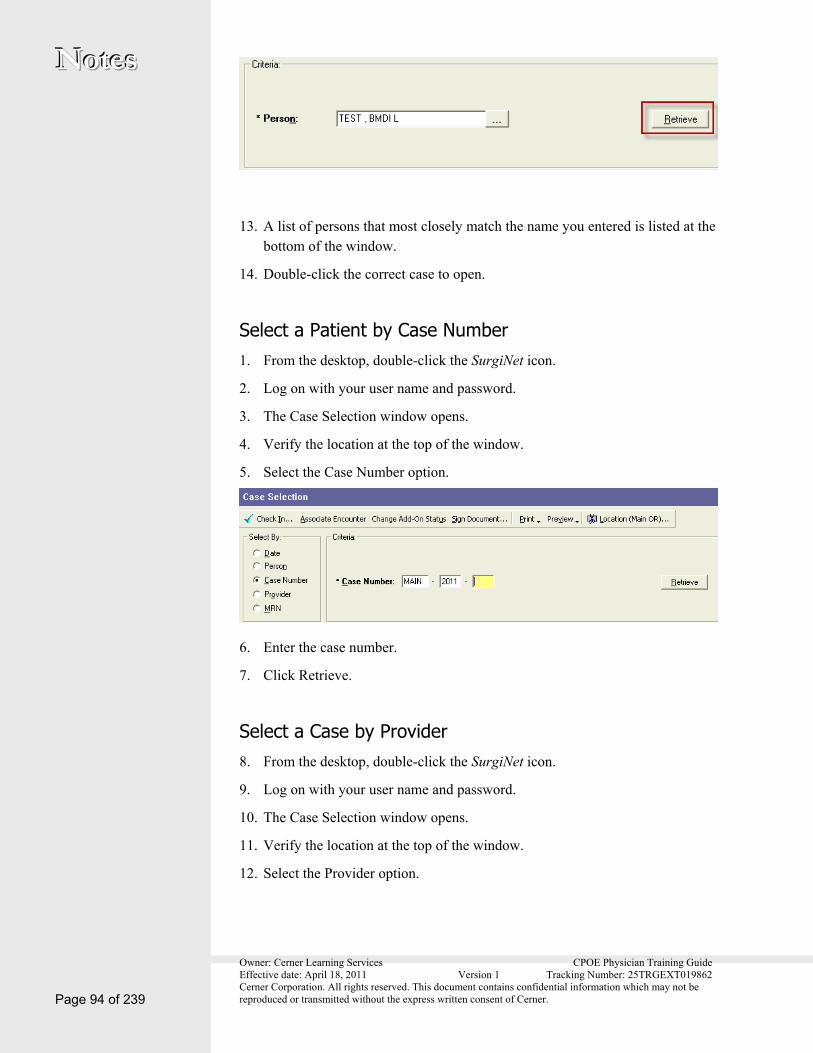
Owner: Cerner Learning Services CPOE Physician Training Guide Effective date: April 18, 2011 Version 1 Tracking Number: 25TRGEXT019862 Cerner Corporation. All rights reserved. This document contains confidential information which may not be reproduced or transmitted without the express written consent of Cerner. Page 94 of 239
NNNooottteeesss
13. A list of persons that most closely match the name you entered is listed at the bottom of the window.
14. Double-click the correct case to open.
Select a Patient by Case Number 1. From the desktop, double-click the SurgiNet icon.
2. Log on with your user name and password.
3. The Case Selection window opens.
4. Verify the location at the top of the window.
5. Select the Case Number option.
6. Enter the case number.
7. Click Retrieve.
Select a Case by Provider 8. From the desktop, double-click the SurgiNet icon.
9. Log on with your user name and password.
10. The Case Selection window opens.
11. Verify the location at the top of the window.
12. Select the Provider option.

Owner: Cerner Learning Services CPOE Physician Training Guide Effective date: April 18, 2011 Version 1 Tracking Number: 25TRGEXT019862 Cerner Corporation. All rights reserved. This document contains confidential information which may not be reproduced or transmitted without the express written consent of Cerner.
NNNooottteeesss
Page 95 of 239
13. Enter the required details.
14. Click Retrieve.
Select a Case by MRN 1. From the desktop, double-click the SurgiNet icon.
2. Log on with your user name and password.
3. The Case Selection window opens.
4. Verify the location at the top of the window.
5. Select the MRN option.
6. Enter the MRN.
7. Click Retrieve.
Open a Chart from the Tracking List Provider Check-In The first time you log on to FirstNet at the beginning of your shift, you are asked if you want to check in as an available provider.

Owner: Cerner Learning Services CPOE Physician Training Guide Effective date: April 18, 2011 Version 1 Tracking Number: 25TRGEXT019862 Cerner Corporation. All rights reserved. This document contains confidential information which may not be reproduced or transmitted without the express written consent of Cerner. Page 96 of 239
NNNooottteeesss 1. Click No if you are not a care provider.
2. If you do not receive this message, you need to select Check-In from the Provider menu.
The Provider Check-In dialog box opens.
3. Verify your name is correct in the Provider box.

Owner: Cerner Learning Services CPOE Physician Training Guide Effective date: April 18, 2011 Version 1 Tracking Number: 25TRGEXT019862 Cerner Corporation. All rights reserved. This document contains confidential information which may not be reproduced or transmitted without the express written consent of Cerner.
NNNooottteeesss
Page 97 of 239
4. In the Display Name box, enter your initials. In the Provider Role box, verify that your role is correct.
5. From the Default Relation list, select the appropriate default relationship.
Note: This is the relationship that is associated with your name when you open this patient’s chart. This relationship must be declared and is saved in the system to ensure that everyone opening a patient chart has an appropriate reason to do so.
6. Click the box next to Associated Provider Color. Select your color and click OK.
7. Select the Available Provider and Available Reviewer options if they apply to you.
8. Click OK.
Provider Check-Out When your shift ends, you must check out as a provider. Completing this step prompts you to check in automatically during your next shift when you log on to FirstNet. Other clinicians on staff also see that you no longer are available for patient care.
To check out of FirstNet, complete the following steps:
1. From the Provider menu, select Checkout.

Owner: Cerner Learning Services CPOE Physician Training Guide Effective date: April 18, 2011 Version 1 Tracking Number: 25TRGEXT019862 Cerner Corporation. All rights reserved. This document contains confidential information which may not be reproduced or transmitted without the express written consent of Cerner. Page 98 of 239
NNNooottteeesss
The Provider Checkout dialog box opens.
2. From the Reassign to Provider list, select a provider to reassign assigned patients.
3. Select patients to reassign.

Owner: Cerner Learning Services CPOE Physician Training Guide Effective date: April 18, 2011 Version 1 Tracking Number: 25TRGEXT019862 Cerner Corporation. All rights reserved. This document contains confidential information which may not be reproduced or transmitted without the express written consent of Cerner.
NNNooottteeesss
Page 99 of 239
4. Click the Assign All->> and Assign-> buttons to assign patients to another provider.
5. Deselect the Available Provider option.
6. Click OK.
Open the Patient Chart 1. Locate the patient on the tracking list and click the box at the beginning of
the row.
2. Double-click the triangle at the beginning of the patient’s row. This opens the patient’s chart to the ED Summary section.
Open a Chart from the Rounds List
1. To open a patient chart from the Rounds List in PowerChart, click Rounds
List . The Patient List organizer opens.
2. Select a patient from your Rounds List organizer.

Owner: Cerner Learning Services CPOE Physician Training Guide Effective date: April 18, 2011 Version 1 Tracking Number: 25TRGEXT019862 Cerner Corporation. All rights reserved. This document contains confidential information which may not be reproduced or transmitted without the express written consent of Cerner. Page 100 of 239
NNNooottteeesss
3. Double-click a patient on the list.
4. The chart opens in a separate Patient Chart window, leaving the Organizer running in its own separate window.
Note: If you do not have an established relationship with the patient documented in PowerChart, you are prompted to establish a relationship prior to opening the patient’s chart. Select your Relationship, and click OK.
Locate and Open a Chart by Searching for a Patient If a patient is not located on one of your current lists, you need to search for the patient.
Search using the Patient Defining Area 1. Navigate to the Person Search box located in the Patient Defining area.
2. Click the downward arrow to the right of the search box to select whether to search by Patient Name or by MRN. Click your preference.
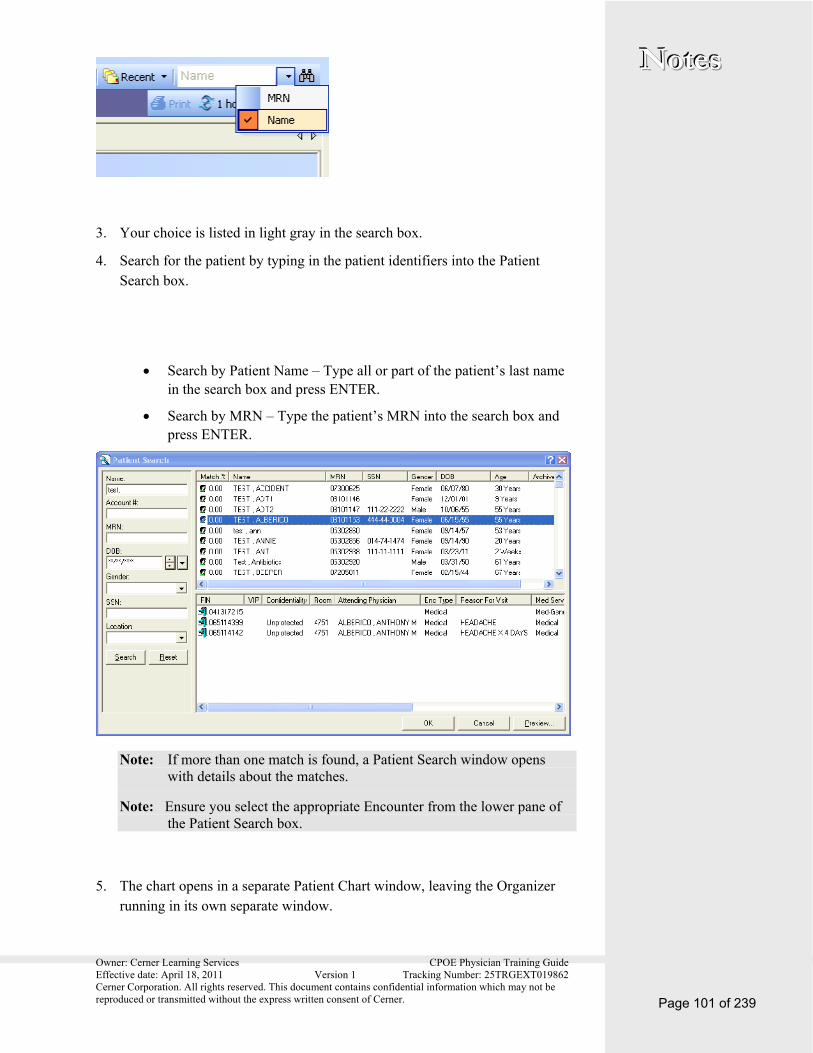
Owner: Cerner Learning Services CPOE Physician Training Guide Effective date: April 18, 2011 Version 1 Tracking Number: 25TRGEXT019862 Cerner Corporation. All rights reserved. This document contains confidential information which may not be reproduced or transmitted without the express written consent of Cerner.
NNNooottteeesss
Page 101 of 239
3. Your choice is listed in light gray in the search box.
4. Search for the patient by typing in the patient identifiers into the Patient Search box.
Search by Patient Name – Type all or part of the patient’s last name in the search box and press ENTER.
Search by MRN – Type the patient’s MRN into the search box and press ENTER.
Note: If more than one match is found, a Patient Search window opens with details about the matches.
Note: Ensure you select the appropriate Encounter from the lower pane of the Patient Search box.
5. The chart opens in a separate Patient Chart window, leaving the Organizer running in its own separate window.

Owner: Cerner Learning Services CPOE Physician Training Guide Effective date: April 18, 2011 Version 1 Tracking Number: 25TRGEXT019862 Cerner Corporation. All rights reserved. This document contains confidential information which may not be reproduced or transmitted without the express written consent of Cerner. Page 102 of 239
NNNooottteeesss Note: If you do not have an established relationship with the patient documented in PowerChart, you are prompted to establish a relationship prior to opening the patient’s chart. Select your Relationship, and click OK.
Search using the Patient Search Window If you want to perform a detailed search for a patient, or if the Patient Defining search box finds multiple matches, the Patient Search window runs and displays search results with greater detail.
The Patient Search window allows you to search by any combination of patient identifier including Last Name, First Name, Middle Initial, SSN, DOB, MRN, Gender, or Encounter No.
Complete the following steps to find and open a chart using the Patient Search window:
1. Click the Binoculars in the Patient Defining Area to open the Patient Search Window.
2. Type all or part of the patient identifiers in one or more of the search boxes, and click Search.

Owner: Cerner Learning Services CPOE Physician Training Guide Effective date: April 18, 2011 Version 1 Tracking Number: 25TRGEXT019862 Cerner Corporation. All rights reserved. This document contains confidential information which may not be reproduced or transmitted without the express written consent of Cerner.
NNNooottteeesss
Page 103 of 239
3. Select the appropriate patient in the top pane.
4. The patient’s encounters are listed in the bottom pane. If necessary use the horizontal scroll bar to view the details for each encounter.
Note: It is important to select an active encounter. Sometimes orders and documentation are missing or not complete if information is placed on the incorrect visit.
5. In the bottom pane, select the appropriate encounter.
6. Click OK to open the patient’s chart.
Note: If you do not have an established relationship with the patient documented in PowerChart, you are prompted to establish a relationship prior to opening the patient’s chart. Select your Relationship, and click OK.
Open a Recently-Opened Chart The Patient Defining Area maintains a record of the five charts you accessed most recently. Complete the following steps to open a recently-opened chart:

Owner: Cerner Learning Services CPOE Physician Training Guide Effective date: April 18, 2011 Version 1 Tracking Number: 25TRGEXT019862 Cerner Corporation. All rights reserved. This document contains confidential information which may not be reproduced or transmitted without the express written consent of Cerner. Page 104 of 239
NNNooottteeesss 1. Navigate to the Patient Defining area and click the downward arrow on
Recent .
2. Select the patient’s chart from the list.
Open Previous or Next Chart on Patient List When you are in an active patient chart opened from a patient list, you can navigate from chart to chart within the patient list by clicking the right arrow to go to the next chart on the list, or the left arrow to go to the previous chart on the list.
Note: When you are in a patient’s chart, their name is in the Title bar at the active patient chart.

Owner: Cerner Learning Services CPOE Physician Training Guide Effective date: April 18, 2011 Version 1 Tracking Number: 25TRGEXT019862 Cerner Corporation. All rights reserved. This document contains confidential information which may not be reproduced or transmitted without the express written consent of Cerner.
NNNooottteeesss
Page 105 of 239
9. Navigating the Patient Chart
Patient Chart Overview The Patient Chart is divided into three main areas: The Demographic Bar, the Chart Menu, and the Chart Documentation workspace.
Menu The Menu consists of the different sections of the patient’s chart. Click any section in the menu to view that portion of the patient’s chart in the Chart Documentation section of the window. The sections on the menu include the following components:

Owner: Cerner Learning Services CPOE Physician Training Guide Effective date: April 18, 2011 Version 1 Tracking Number: 25TRGEXT019862 Cerner Corporation. All rights reserved. This document contains confidential information which may not be reproduced or transmitted without the express written consent of Cerner. Page 106 of 239
NNNooottteeesss
Pin and Unpin the Menu If you want to hide the Menu in order to expand the Chart Documentation workspace, follow these steps to pin and unpin the Menu.
1. Click the tacked Push-Pin icon on the right edge of the Menu to unpin and collapse the Menu display.
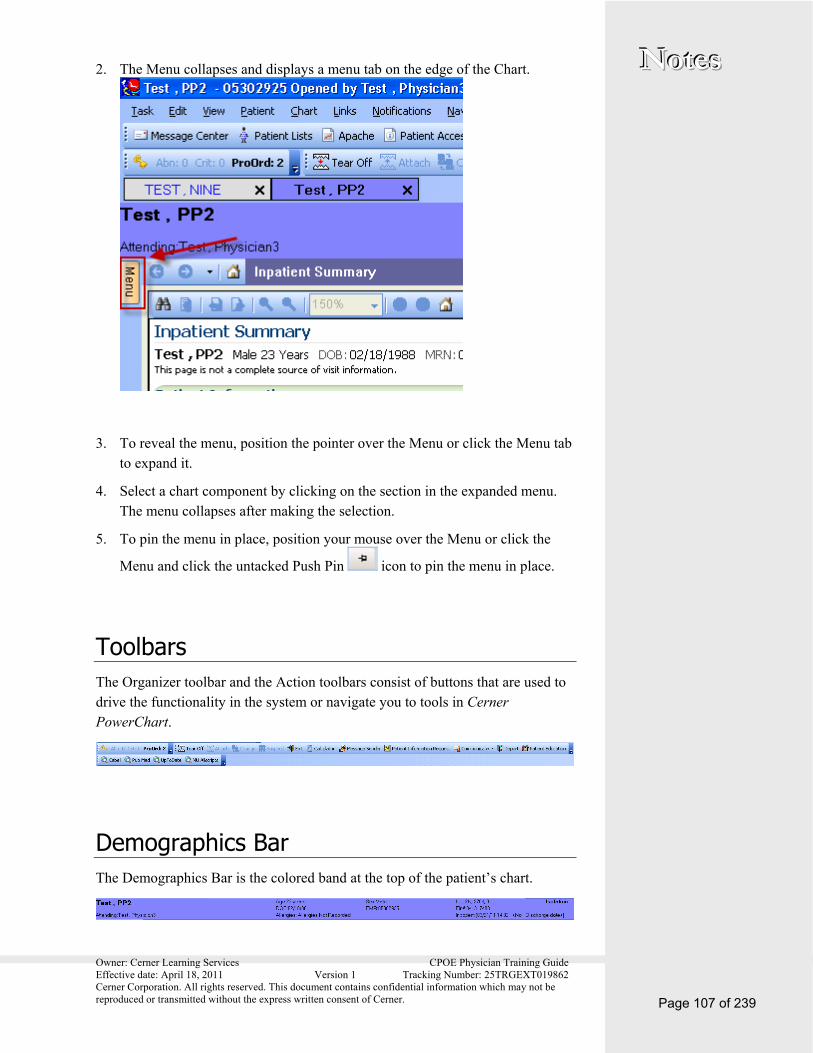
Owner: Cerner Learning Services CPOE Physician Training Guide Effective date: April 18, 2011 Version 1 Tracking Number: 25TRGEXT019862 Cerner Corporation. All rights reserved. This document contains confidential information which may not be reproduced or transmitted without the express written consent of Cerner.
NNNooottteeesss
Page 107 of 239
2. The Menu collapses and displays a menu tab on the edge of the Chart.
3. To reveal the menu, position the pointer over the Menu or click the Menu tab to expand it.
4. Select a chart component by clicking on the section in the expanded menu. The menu collapses after making the selection.
5. To pin the menu in place, position your mouse over the Menu or click the
Menu and click the untacked Push Pin icon to pin the menu in place.
Toolbars The Organizer toolbar and the Action toolbars consist of buttons that are used to drive the functionality in the system or navigate you to tools in Cerner PowerChart.
Demographics Bar The Demographics Bar is the colored band at the top of the patient’s chart.

Owner: Cerner Learning Services CPOE Physician Training Guide Effective date: April 18, 2011 Version 1 Tracking Number: 25TRGEXT019862 Cerner Corporation. All rights reserved. This document contains confidential information which may not be reproduced or transmitted without the express written consent of Cerner. Page 108 of 239
NNNooottteeesss
The Demographics Bar contains the patient’s name, demographic information, and MRN, plus details about the patient’s Allergies, Encounter, Location, and Visit Date.
Position your cursor over any of the following regions of the Demographic Bar to activate links to related information:
Name
Allergy
Location
Patient Name Hyperlink 1. From the Demographic Bar, click the patient name link to view additional
demographic information.
2. The Custom Information box opens.
3. Click OK to return to the chart.

Owner: Cerner Learning Services CPOE Physician Training Guide Effective date: April 18, 2011 Version 1 Tracking Number: 25TRGEXT019862 Cerner Corporation. All rights reserved. This document contains confidential information which may not be reproduced or transmitted without the express written consent of Cerner.
NNNooottteeesss
Page 109 of 239
Location Hyperlink 1. From the Demographic Bar, click the location link to view additional
information about the patient location and encounter.
2. The Custom Information box is displayed.
3. Click OK to return to the chart.
Allergy Hyperlink Existing allergies are displayed in the Demographic Bar according to the following methods:
Allergies are displayed based on the defined severity from highest to lowest.
Allergies with the same severity are listed in alphabetical order.
If the patient’s allergy list exceeds the horizontal space available in the Demographic Bar, the system truncates the list. To view the complete list of allergies, position your cursor over Allergies in the Demographic Bar and a list is displayed.

Owner: Cerner Learning Services CPOE Physician Training Guide Effective date: April 18, 2011 Version 1 Tracking Number: 25TRGEXT019862 Cerner Corporation. All rights reserved. This document contains confidential information which may not be reproduced or transmitted without the express written consent of Cerner. Page 110 of 239
NNNooottteeesss
If the patient does not have any allergies recorded, the Allergy List box displays Allergies Not Recorded.
If the patient has No Known Allergies (NKA), the Allergy List box displays No Known Allergies.
To view more information and to modify a patient’s allergies:
1. Click the Allergies link to open the Allergies window.
2. Right-click any allergy to view a list of actions.
3. Select the wanted action.
4. Click OK or Cancel to return to the Allergies window.
5. Click OK to close the Allergies window.

Owner: Cerner Learning Services CPOE Physician Training Guide Effective date: April 18, 2011 Version 1 Tracking Number: 25TRGEXT019862 Cerner Corporation. All rights reserved. This document contains confidential information which may not be reproduced or transmitted without the express written consent of Cerner.
NNNooottteeesss
Page 111 of 239
Chart Documentation Workspace The chart documentation section shows a patient’s chart information based on the section selected from the menu. By default, when opening a patient’s chart, the Inpatient Summary is selected from the Menu and is displayed in the documentation workspace.
Search Criteria Bar Frequently, data displayed in a patient’s chart ties to a particular time frame or interval, such as medication administration or intake and output. Forms and documents also tie to a time frame based on when you created the items.
If the chart data ties to a time frame, PowerChart displays a Search Criteria bar below the Demographic Bar.
To change the Search Criteria, right-click the bar and select the Search Criteria option to edit the time frame.

Owner: Cerner Learning Services CPOE Physician Training Guide Effective date: April 18, 2011 Version 1 Tracking Number: 25TRGEXT019862 Cerner Corporation. All rights reserved. This document contains confidential information which may not be reproduced or transmitted without the express written consent of Cerner. Page 112 of 239
NNNooottteeesss Refresh Button
The Refresh button reflects the time elapsed since the screen was last refreshed. Clicking the Refresh button refreshes the patient chart to show new information and updates the indicator. The Refresh button is located to the far right just under the Demographics Bar.
In the illustration above, the button displays 47 minutes ago. In this instance, the information is up to date only as of 47 minutes ago. If the chart has been edited within the past 47 minutes, the edited information is not displayed in the patient chart. The user needs to click Refresh to display the updated information.
When navigating to a section in the Menu, click Refresh after the section is displayed in the documentation workspace in order for the latest information to be displayed.
Note: The Refresh button is a very important button in the system. Refresh often to make sure your data is up-to-date. Also, you must refresh each section of the Menu as you are navigating through the patient’s chart.
Clinical Calculator There are approximately 30 pre-built formulas in the clinical calculator. One reason you might access the calculator is to convert inches to centimeters or pounds to kilograms.
To access the calculator:
1. From the Action toolbar, click the Calculator .
2. Select from the formulas in the Identify Formula list. You need relevant patient information to complete the calculations.
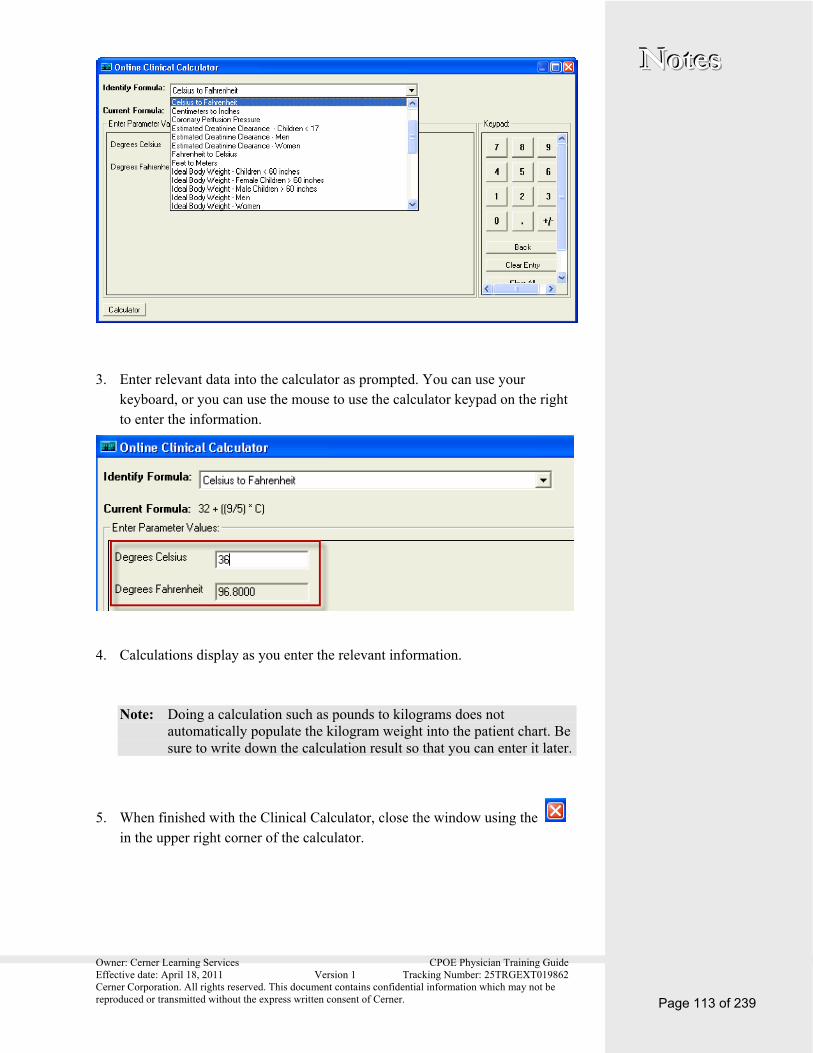
Owner: Cerner Learning Services CPOE Physician Training Guide Effective date: April 18, 2011 Version 1 Tracking Number: 25TRGEXT019862 Cerner Corporation. All rights reserved. This document contains confidential information which may not be reproduced or transmitted without the express written consent of Cerner.
NNNooottteeesss
Page 113 of 239
3. Enter relevant data into the calculator as prompted. You can use your keyboard, or you can use the mouse to use the calculator keypad on the right to enter the information.
4. Calculations display as you enter the relevant information.
Note: Doing a calculation such as pounds to kilograms does not automatically populate the kilogram weight into the patient chart. Be sure to write down the calculation result so that you can enter it later.
5. When finished with the Clinical Calculator, close the window using the in the upper right corner of the calculator.
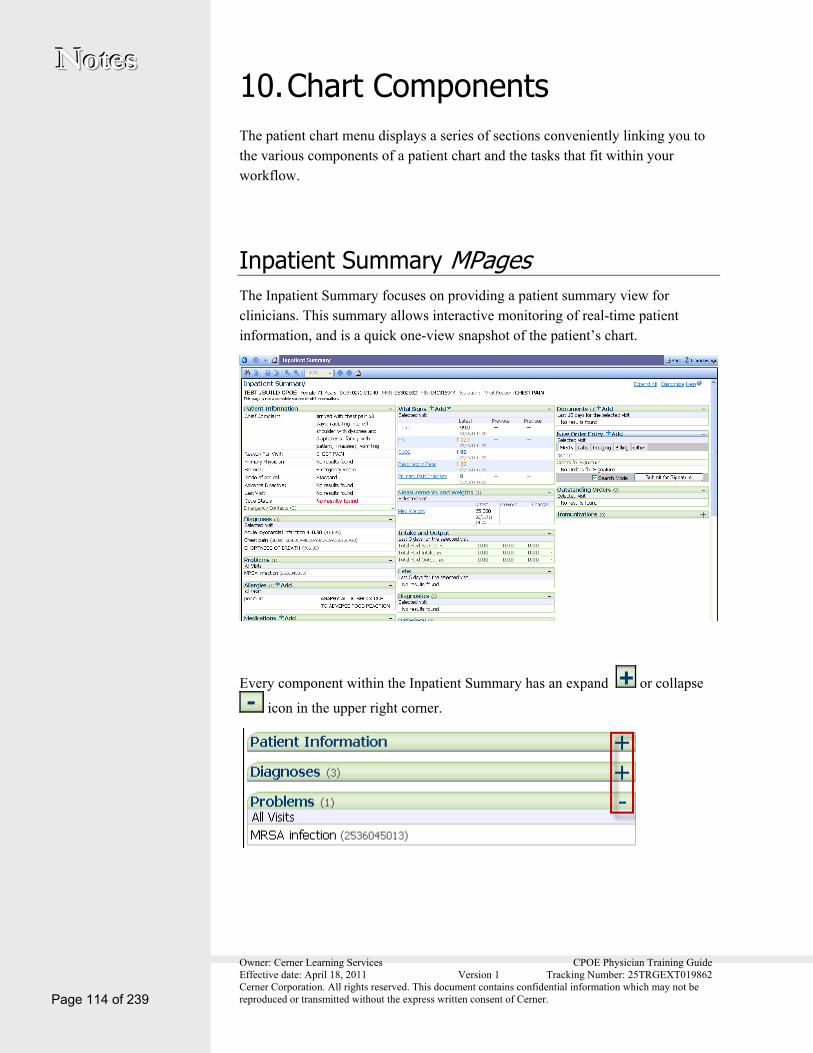
Owner: Cerner Learning Services CPOE Physician Training Guide Effective date: April 18, 2011 Version 1 Tracking Number: 25TRGEXT019862 Cerner Corporation. All rights reserved. This document contains confidential information which may not be reproduced or transmitted without the express written consent of Cerner. Page 114 of 239
NNNooottteeesss 10. Chart Components The patient chart menu displays a series of sections conveniently linking you to the various components of a patient chart and the tasks that fit within your workflow.
Inpatient Summary MPages The Inpatient Summary focuses on providing a patient summary view for clinicians. This summary allows interactive monitoring of real-time patient information, and is a quick one-view snapshot of the patient’s chart.
Every component within the Inpatient Summary has an expand or collapse
icon in the upper right corner.

Owner: Cerner Learning Services CPOE Physician Training Guide Effective date: April 18, 2011 Version 1 Tracking Number: 25TRGEXT019862 Cerner Corporation. All rights reserved. This document contains confidential information which may not be reproduced or transmitted without the express written consent of Cerner.
NNNooottteeesss
Page 115 of 239
The Inpatient Summary toolbar displays the Binoculars by default. Click this button to launch a Find window enabling you to search for a term or a value in the Inpatient Summary.
Each titled section of the Inpatient Summary is linked to the appropriate
component of the patient chart. The link is indicated with the link hand icon when positioning the pointer over the title. Click the title to go to the component.
Position the pointer over a reported result in the Inpatient Summary to view more information about the value in a tooltip window.

Owner: Cerner Learning Services CPOE Physician Training Guide Effective date: April 18, 2011 Version 1 Tracking Number: 25TRGEXT019862 Cerner Corporation. All rights reserved. This document contains confidential information which may not be reproduced or transmitted without the express written consent of Cerner. Page 116 of 239
NNNooottteeesss
Tips for Using the MPages
Click plus or minus in each box to expand or collapse the section.
Expand all sections by clicking Expand All .
Graph a result by clicking the result label . A graph displays all data points for the result.
Overview The Overview section provides a snapshot of a patient’s medical status. The Overview is organized into four tabbed sections: Since Last Time, This Visit, Summary, and Interdisciplinary Summary.
The information in the Overview reflects data relevant to the patient since the last
time you clicked Date / Time Stamp on the Since Last Time tab.
The Overview is a view-only section. Information cannot be edited through this route. You can view details about the items this section in two ways.
1. Click an item to view it in a Details pane.

Owner: Cerner Learning Services CPOE Physician Training Guide Effective date: April 18, 2011 Version 1 Tracking Number: 25TRGEXT019862 Cerner Corporation. All rights reserved. This document contains confidential information which may not be reproduced or transmitted without the express written consent of Cerner.
NNNooottteeesss
Page 117 of 239
2. Right-click an item and select an appropriate action.
Results Review PowerChart uses flowsheets to display patient results. Results charted from Task List, Ad Hoc Charting, or PowerNote can be displayed in a flowsheet in Results Review.
Navigate the Results Review
Sections within Results Review
The results are organized in categories displayed as tabs:
Flowsheet Toolbar
The features of a flowsheet are designed to make finding clinical information as efficient as possible. The flowsheet toolbar allows you to select the type of flowsheet to view; the Level, or scope of information to include; and how to display the results in an optimal manner such as in a table, by group, or as a list.
View Result Details
Double-click a result to display the Results Details window.

Owner: Cerner Learning Services CPOE Physician Training Guide Effective date: April 18, 2011 Version 1 Tracking Number: 25TRGEXT019862 Cerner Corporation. All rights reserved. This document contains confidential information which may not be reproduced or transmitted without the express written consent of Cerner. Page 118 of 239
NNNooottteeesss The Results Details window displays result history, general result information, and an action list. The action list displays Action, Performed By, Performed Date, Action Status, Comment, Proxy Personnel, Requested By, Requested Date, and Request Comment columns.
Forward a Result
To forward a result, right-click a result or document, then select Forward. When the box opens, select an Additional Forward Action. Then search for and select
the receiving physician using the binoculars . Click OK to send.
Navigate a Flowsheet When you select a flowsheet from the flowsheet toolbar, the results open in the chart documentation section below the flowsheet toolbar. The Navigator panel on the left lists the various sections of the selected flowsheet. The viewing panel on the right displays the results. The information bar shows the time frame associated with the results.

Owner: Cerner Learning Services CPOE Physician Training Guide Effective date: April 18, 2011 Version 1 Tracking Number: 25TRGEXT019862 Cerner Corporation. All rights reserved. This document contains confidential information which may not be reproduced or transmitted without the express written consent of Cerner.
NNNooottteeesss
Page 119 of 239
Use checkmarks in the Navigator to select which sections of the flowsheet display in the Results section.
Results displayed in red are critical, orange are high, brown are abnormal, and blue is low.
Use the scroll bar in the viewing panel to scroll up or down the list of results, or click a section in the Navigator to link directly to the section in the viewing panel.
Changing Search Criteria and Time Frame The Information Bar displays the date and time range for results.
1. Right-click the Information Bar to display the Search Criteria menu.
2. Select Change Search Criteria.
The Search Criteria box offers you several options to customize the results being displayed.
Clinical Range – Displays results within an occurrence time and within the specified time range.
Posting Range – Displays results that have posting times within the specified time range.
Result Count – Allows you to select the specific number of latest entries to the patients’ chart to be displayed from 1–1,000.

Owner: Cerner Learning Services CPOE Physician Training Guide Effective date: April 18, 2011 Version 1 Tracking Number: 25TRGEXT019862 Cerner Corporation. All rights reserved. This document contains confidential information which may not be reproduced or transmitted without the express written consent of Cerner. Page 120 of 239
NNNooottteeesss Admission Date to Current Date – View all results posted for the selected patient from admission date to current date.
3. Select the appropriate search criteria options.
4. Click OK to retrieve results in the chosen range.
Change Time Frame Bar The Time Frame bar can also be changed by clicking the arrows to the far left and right ends of the Time Frame bar. Each click moves the time frame a day before or a day after.
Result Legend Complete the following stepsto view the Result Legend to understand the colors displayed:
1. From the Menu bar, click Options.
2. Select Result Legend.
Iview/I&O Use Interactive View (I&O) to view a patient's results. The Intake and Output section can be used to view the intake and output of a patient.
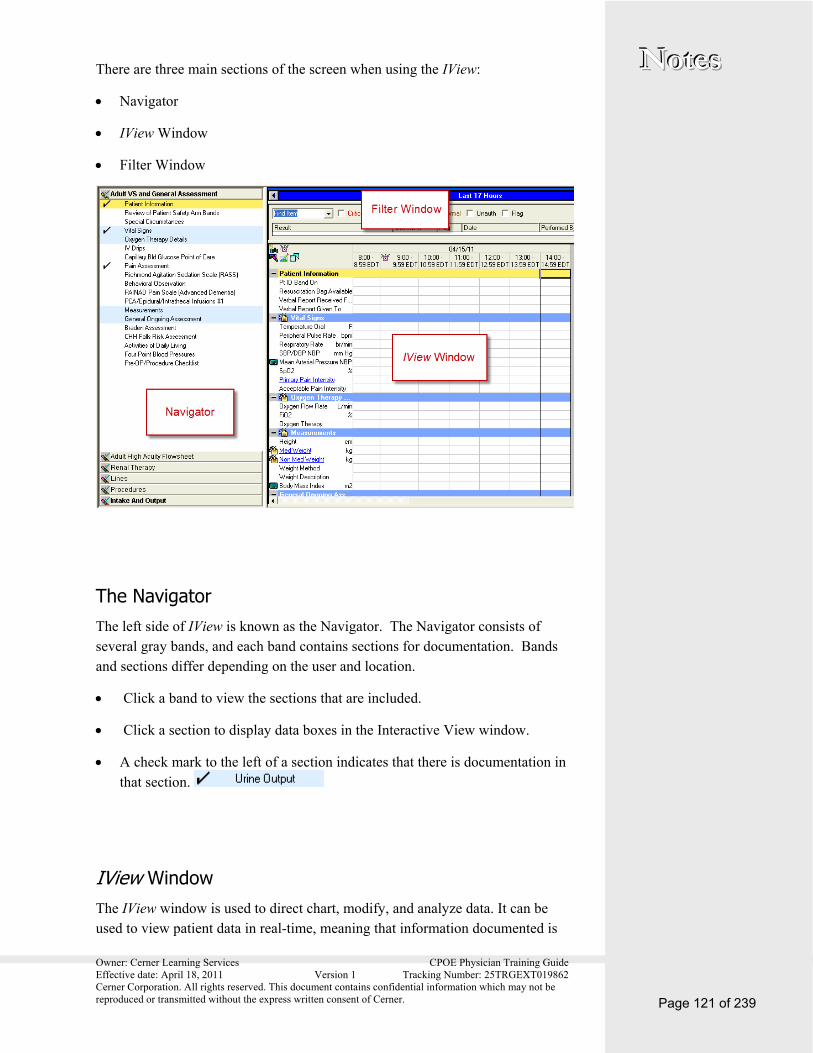
Owner: Cerner Learning Services CPOE Physician Training Guide Effective date: April 18, 2011 Version 1 Tracking Number: 25TRGEXT019862 Cerner Corporation. All rights reserved. This document contains confidential information which may not be reproduced or transmitted without the express written consent of Cerner.
NNNooottteeesss
Page 121 of 239
There are three main sections of the screen when using the IView:
Navigator
IView Window
Filter Window
The Navigator The left side of IView is known as the Navigator. The Navigator consists of several gray bands, and each band contains sections for documentation. Bands and sections differ depending on the user and location.
Click a band to view the sections that are included.
Click a section to display data boxes in the Interactive View window.
A check mark to the left of a section indicates that there is documentation in that section.
IView Window The IView window is used to direct chart, modify, and analyze data. It can be used to view patient data in real-time, meaning that information documented is

Owner: Cerner Learning Services CPOE Physician Training Guide Effective date: April 18, 2011 Version 1 Tracking Number: 25TRGEXT019862 Cerner Corporation. All rights reserved. This document contains confidential information which may not be reproduced or transmitted without the express written consent of Cerner. Page 122 of 239
NNNooottteeesss immediately available to all users. The window view is made up of several components:
Sections
Sub-Sections
Cells
Units of Measure
Timescale
Calculated Field
By right-clicking on the blue bar, you can change the results criteria.
Filter Window The Filter windows are located above the Interactive View window. These windows allow the caregiver to easily locate specific types of information. The selected results are then be displayed in the Filter window for the defined time frame.
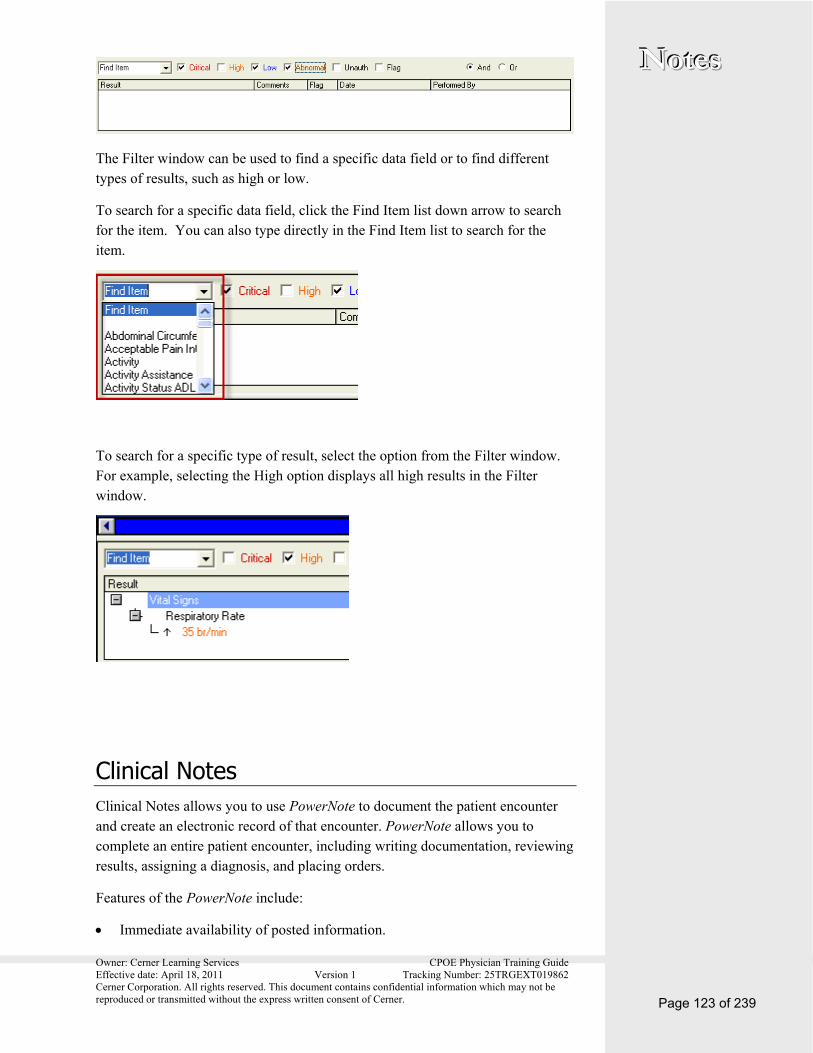
Owner: Cerner Learning Services CPOE Physician Training Guide Effective date: April 18, 2011 Version 1 Tracking Number: 25TRGEXT019862 Cerner Corporation. All rights reserved. This document contains confidential information which may not be reproduced or transmitted without the express written consent of Cerner.
NNNooottteeesss
Page 123 of 239
The Filter window can be used to find a specific data field or to find different types of results, such as high or low.
To search for a specific data field, click the Find Item list down arrow to search for the item. You can also type directly in the Find Item list to search for the item.
To search for a specific type of result, select the option from the Filter window. For example, selecting the High option displays all high results in the Filter window.
Clinical Notes Clinical Notes allows you to use PowerNote to document the patient encounter and create an electronic record of that encounter. PowerNote allows you to complete an entire patient encounter, including writing documentation, reviewing results, assigning a diagnosis, and placing orders.
Features of the PowerNote include:
Immediate availability of posted information.

Owner: Cerner Learning Services CPOE Physician Training Guide Effective date: April 18, 2011 Version 1 Tracking Number: 25TRGEXT019862 Cerner Corporation. All rights reserved. This document contains confidential information which may not be reproduced or transmitted without the express written consent of Cerner. Page 124 of 239
NNNooottteeesss Sort documents by author, date, encounter type, note type, and note status.
Accurately capture edits and addenda to documents. The original document remains preserved with an unlimited number of corrections and emendations attached to it.
Visual alerts in both icon and alphanumeric form show providers when clinical results are available in the system.
Note: Remember to use the Refresh button frequently.
Creating a PowerNote starts with selecting an encounter pathway, which is designed for a single, specific reason for encounter. The encounter pathway then expands to display all the elements of the diagnostic exam, from the symptoms of the present illness to treatment plans and a final diagnosis (including ICD-9 billing codes). The encounter pathway serves as a template, with data based on best practices, enabling the healthcare provider to focus on questioning, the examination, and overall patient evaluation.
Navigating Clinical Notes After selecting the Clinical Notes section from the chart menu, it is organized into a navigator pane on the left, listing the notes available, and a PowerNote workspace on the right.
Clinical Notes displays a toolbar just below the Demographic Bar enabling you create a new note, or to perform specific actions related to the selected PowerNote.
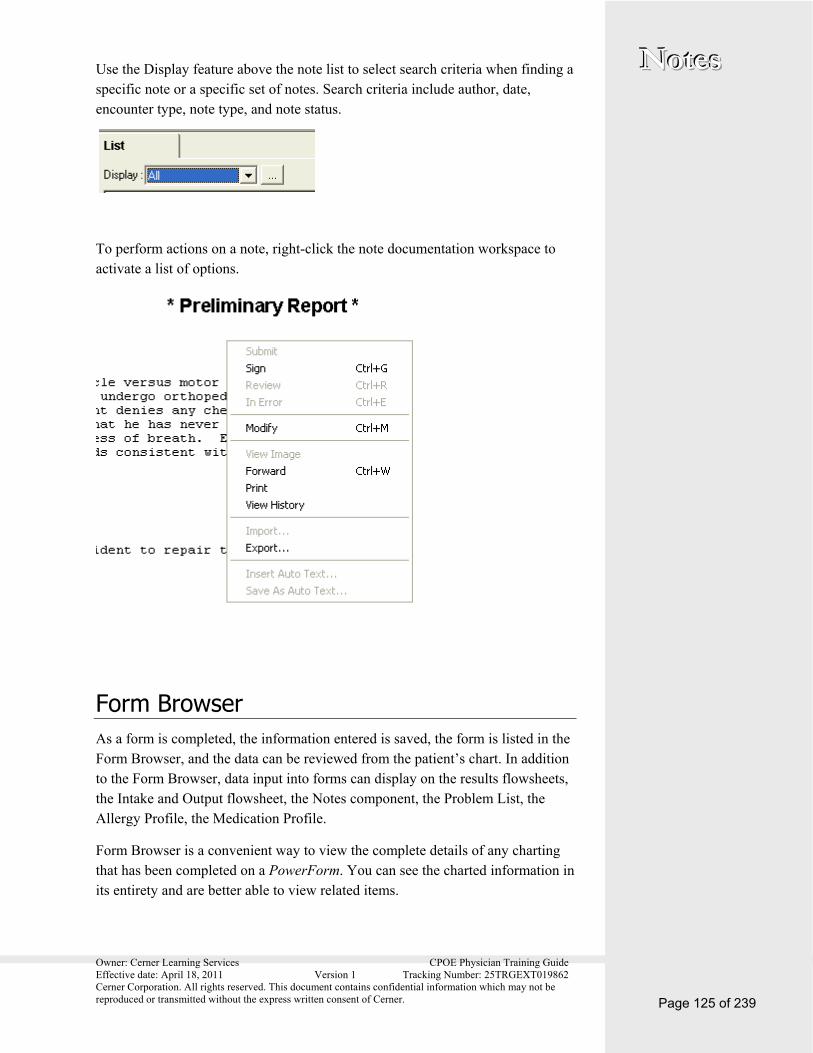
Owner: Cerner Learning Services CPOE Physician Training Guide Effective date: April 18, 2011 Version 1 Tracking Number: 25TRGEXT019862 Cerner Corporation. All rights reserved. This document contains confidential information which may not be reproduced or transmitted without the express written consent of Cerner.
NNNooottteeesss
Page 125 of 239
Use the Display feature above the note list to select search criteria when finding a specific note or a specific set of notes. Search criteria include author, date, encounter type, note type, and note status.
To perform actions on a note, right-click the note documentation workspace to activate a list of options.
Form Browser As a form is completed, the information entered is saved, the form is listed in the Form Browser, and the data can be reviewed from the patient’s chart. In addition to the Form Browser, data input into forms can display on the results flowsheets, the Intake and Output flowsheet, the Notes component, the Problem List, the Allergy Profile, the Medication Profile.
Form Browser is a convenient way to view the complete details of any charting that has been completed on a PowerForm. You can see the charted information in its entirety and are better able to view related items.

Owner: Cerner Learning Services CPOE Physician Training Guide Effective date: April 18, 2011 Version 1 Tracking Number: 25TRGEXT019862 Cerner Corporation. All rights reserved. This document contains confidential information which may not be reproduced or transmitted without the express written consent of Cerner. Page 126 of 239
NNNooottteeesss The Form Browser documentation workspace organizes all the completed forms for the selected patient in tree arrangement. Open a form to view the information in the same format used to capture it.
Note: The Form Browser displays an icon to the left of each listed form. A red icon indicates the form is missing required information. A blue icon indicates all required information is complete in the form.
Note: The recommended way to view PowerForms data is to use the flowsheet. The form gives only one instance of the assessment, versus how the assessment has progressed over time.
Open a Form Complete the following steps to view patient information that has been documented using a form:
1. From the Chart Menu, click Form Browser. A list of forms completed for this patient during the specified time range displays in a tree.
2. Arrange the forms using the Sort By list to easily locate the form. You can sort by date, form, status, encounter date, or encounter form by making a selection from the Sort By drop-down box.
3. To adjust the time range of the search, right-click the blue Search Criteria bar and select the Search Criteria option.
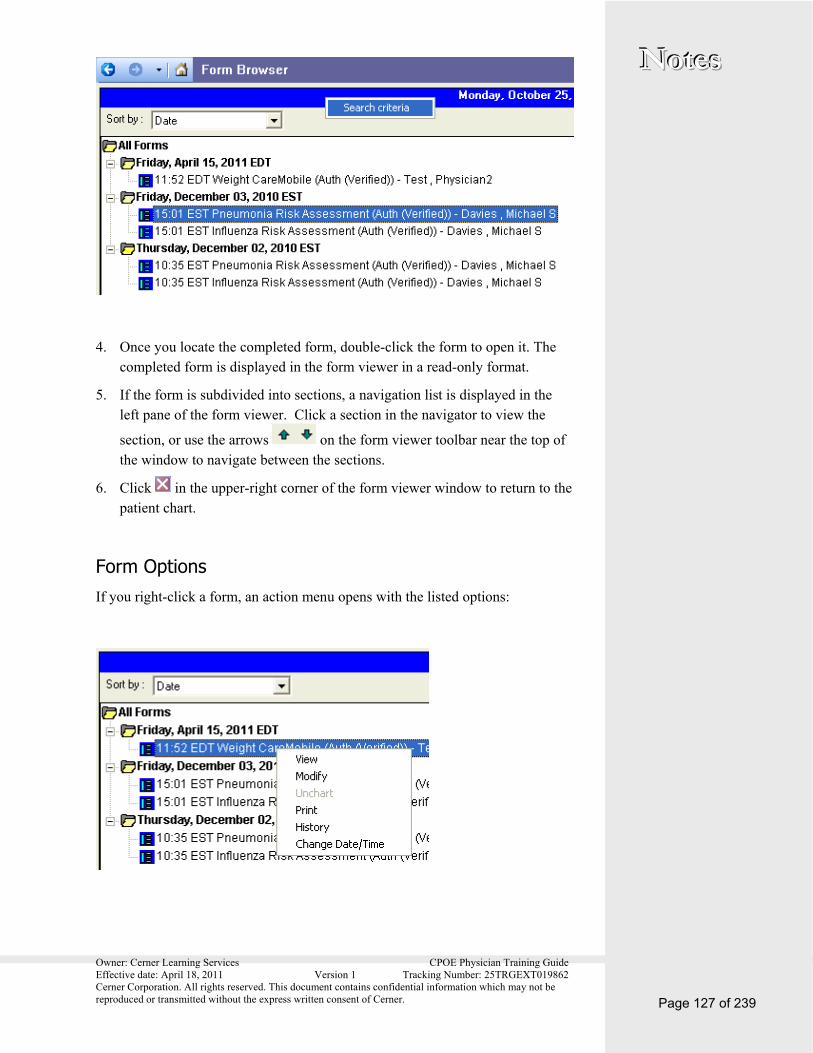
Owner: Cerner Learning Services CPOE Physician Training Guide Effective date: April 18, 2011 Version 1 Tracking Number: 25TRGEXT019862 Cerner Corporation. All rights reserved. This document contains confidential information which may not be reproduced or transmitted without the express written consent of Cerner.
NNNooottteeesss
Page 127 of 239
4. Once you locate the completed form, double-click the form to open it. The completed form is displayed in the form viewer in a read-only format.
5. If the form is subdivided into sections, a navigation list is displayed in the left pane of the form viewer. Click a section in the navigator to view the
section, or use the arrows on the form viewer toolbar near the top of the window to navigate between the sections.
6. Click in the upper-right corner of the form viewer window to return to the patient chart.
Form Options If you right-click a form, an action menu opens with the listed options:

Owner: Cerner Learning Services CPOE Physician Training Guide Effective date: April 18, 2011 Version 1 Tracking Number: 25TRGEXT019862 Cerner Corporation. All rights reserved. This document contains confidential information which may not be reproduced or transmitted without the express written consent of Cerner. Page 128 of 239
NNNooottteeesss Select from these options to open a dialog box enabling you to perform the selected action.
Documents The Documents section from the Menu enables providers to add a document to a patient chart by entering text freely. You categorize the note as a particular type before saving or signing the document.
The Notes section also displays notes generated through the PowerNotes section, as well as documents scanned in to PowerChart such as advanced directives.
1. From Menu, select Notes.
2. Right-click the Search Criteria Bar to adjust the time range or document count to reflect the appropriate range for document retrieval, and select Change Search Criteria.
3. If documents are found for the time range, they are listed in the navigator displayed as a tree. Double-click a folder to view its contents.
4. Double-click any sub-folders that represent the document category until you reach the documents in the folders. The individual documents are denoted by a colored icon that reflects document status.
5. The documents are color coordinated by status. If you forget what the colors represent you can right-click an empty space within the folders window to view the legend.
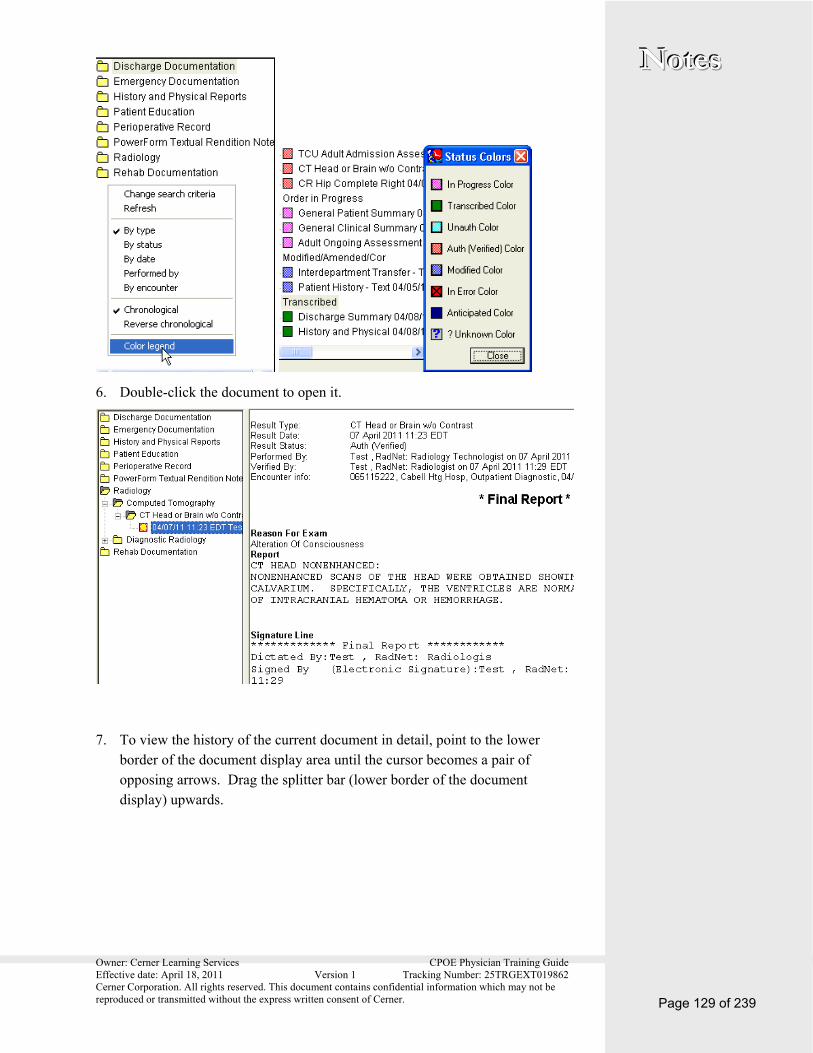
Owner: Cerner Learning Services CPOE Physician Training Guide Effective date: April 18, 2011 Version 1 Tracking Number: 25TRGEXT019862 Cerner Corporation. All rights reserved. This document contains confidential information which may not be reproduced or transmitted without the express written consent of Cerner.
NNNooottteeesss
Page 129 of 239
6. Double-click the document to open it.
7. To view the history of the current document in detail, point to the lower border of the document display area until the cursor becomes a pair of opposing arrows. Drag the splitter bar (lower border of the document display) upwards.
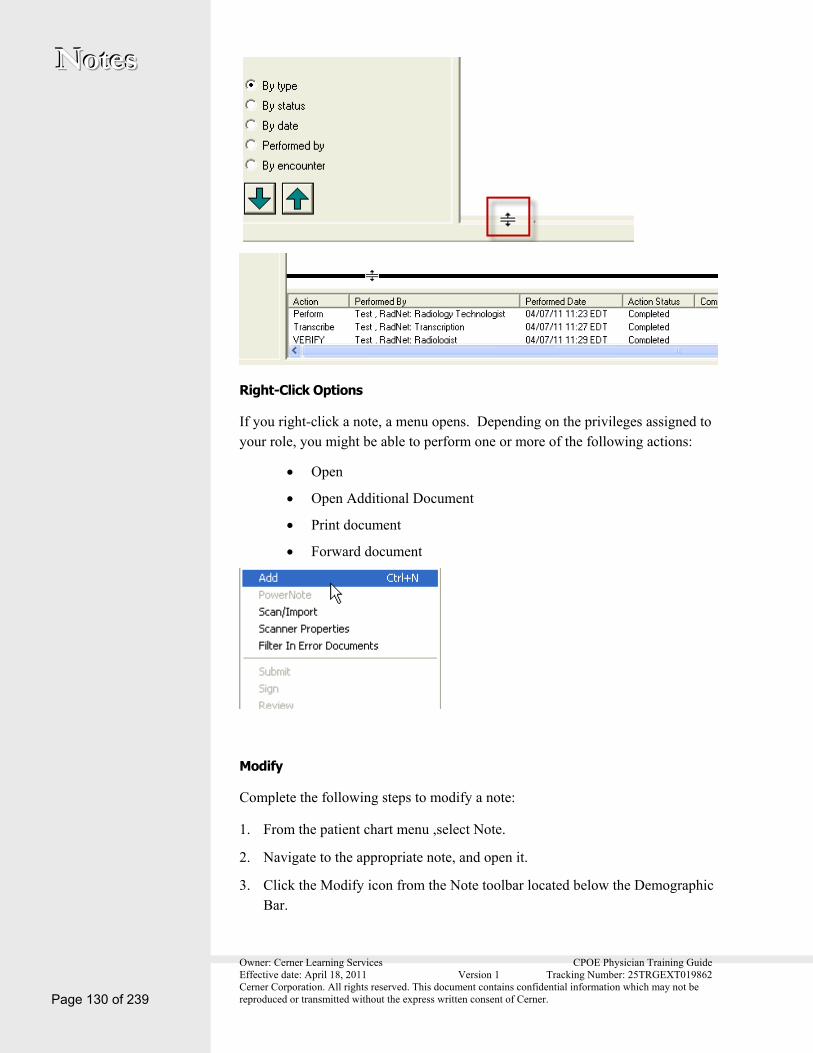
Owner: Cerner Learning Services CPOE Physician Training Guide Effective date: April 18, 2011 Version 1 Tracking Number: 25TRGEXT019862 Cerner Corporation. All rights reserved. This document contains confidential information which may not be reproduced or transmitted without the express written consent of Cerner. Page 130 of 239
NNNooottteeesss
Right-Click Options
If you right-click a note, a menu opens. Depending on the privileges assigned to your role, you might be able to perform one or more of the following actions:
Open
Open Additional Document
Print document
Forward document
Modify
Complete the following steps to modify a note:
1. From the patient chart menu ,select Note.
2. Navigate to the appropriate note, and open it.
3. Click the Modify icon from the Note toolbar located below the Demographic Bar.

Owner: Cerner Learning Services CPOE Physician Training Guide Effective date: April 18, 2011 Version 1 Tracking Number: 25TRGEXT019862 Cerner Corporation. All rights reserved. This document contains confidential information which may not be reproduced or transmitted without the express written consent of Cerner.
NNNooottteeesss
Page 131 of 239
4. Enter text below Insert Addendum Here, you may have to scroll down to find this portion.
5. Click Sign when you finish modifying the note.
Note: You cannot modify notes from Radiology.
Medication Administration Record Summary The Medication Administration Record (MAR) Summary is a view-only section that allows you to see a list of medications the patient is currently taking.
Time Interval Settings Time interval settings are customizable. The following displays the MAR Summary set with an three hour time interval displayed in Reverse Chronological order.

Owner: Cerner Learning Services CPOE Physician Training Guide Effective date: April 18, 2011 Version 1 Tracking Number: 25TRGEXT019862 Cerner Corporation. All rights reserved. This document contains confidential information which may not be reproduced or transmitted without the express written consent of Cerner. Page 132 of 239
NNNooottteeesss
Note: Always read the order in which the time interval it is displayed. The date and time can be displayed in reverse chronological or chronological order.
To change the time interval, right-click on the Search Criteria bar located below the Demographics Bar, and select the appropriate option.
Change Properties in MAR Summary You can modify the MAR Summary Properties as appropriate to your review of the current patient chart. When adjusting the properties, the changes apply to your current interaction with the MAR Summary in the present chart, but the changes are not saved. When you close the patient chart, the MAR Summary view returns to the default properties. Changes to MAR Summary properties do not apply to other patient charts that are also open.

Owner: Cerner Learning Services CPOE Physician Training Guide Effective date: April 18, 2011 Version 1 Tracking Number: 25TRGEXT019862 Cerner Corporation. All rights reserved. This document contains confidential information which may not be reproduced or transmitted without the express written consent of Cerner.
NNNooottteeesss
Page 133 of 239
Change Defaults in the MAR Summary You have the ability to change defaults for the MAR Summary. MAR Summary defaults and MAR Summary properties are saved when you exit PowerChart. The following are the default settings that can be modified:

Owner: Cerner Learning Services CPOE Physician Training Guide Effective date: April 18, 2011 Version 1 Tracking Number: 25TRGEXT019862 Cerner Corporation. All rights reserved. This document contains confidential information which may not be reproduced or transmitted without the express written consent of Cerner. Page 134 of 239
NNNooottteeesss Note: Use caution when adjusting the MAR Time Sort defaults. If you ask another provider to look at the chart with you, the other provider may be accustomed to viewing this section according to system-default Reverse Chronological order. This can create confusion when reading the data.
Note: Remember, the MAR Summary is view-only. You do not do any documentation or charting in this section of PowerChart.
Medication Administration Record (MAR) The MAR is used to view and to chart all active scheduled, unscheduled, PRN, and continuous medications for a specific patient. The MAR displays the medication orders, tasks, and documented administrations for the selected time frame, up to 16 hours forward from the time the medication order was placed, and selected order status in reverse chronological order.
MAR Screen Layout The MAR window includes the Search Criteria bar, the Navigator, and Medication documentation sections.
Allergies From the Menu, select Allergy to access the Allergy Profile.
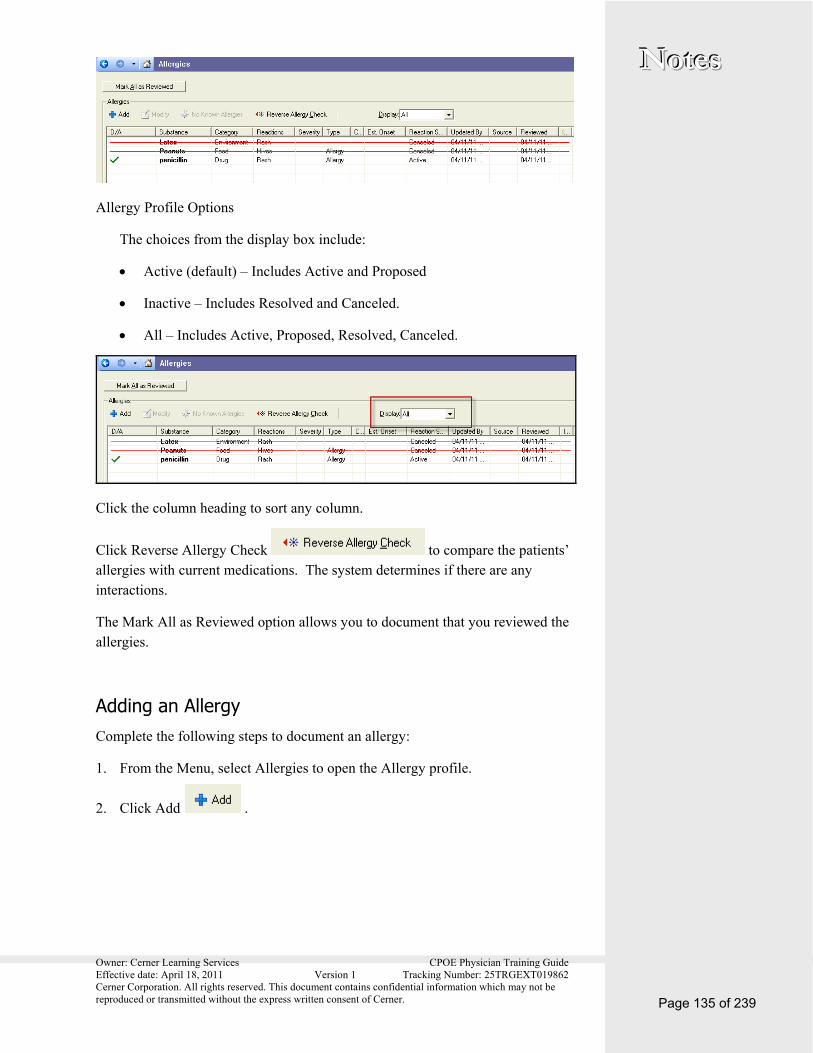
Owner: Cerner Learning Services CPOE Physician Training Guide Effective date: April 18, 2011 Version 1 Tracking Number: 25TRGEXT019862 Cerner Corporation. All rights reserved. This document contains confidential information which may not be reproduced or transmitted without the express written consent of Cerner.
NNNooottteeesss
Page 135 of 239
Allergy Profile Options
The choices from the display box include:
Active (default) – Includes Active and Proposed
Inactive – Includes Resolved and Canceled.
All – Includes Active, Proposed, Resolved, Canceled.
Click the column heading to sort any column.
Click Reverse Allergy Check to compare the patients’ allergies with current medications. The system determines if there are any interactions.
The Mark All as Reviewed option allows you to document that you reviewed the allergies.
Adding an Allergy Complete the following steps to document an allergy:
1. From the Menu, select Allergies to open the Allergy profile.
2. Click Add .
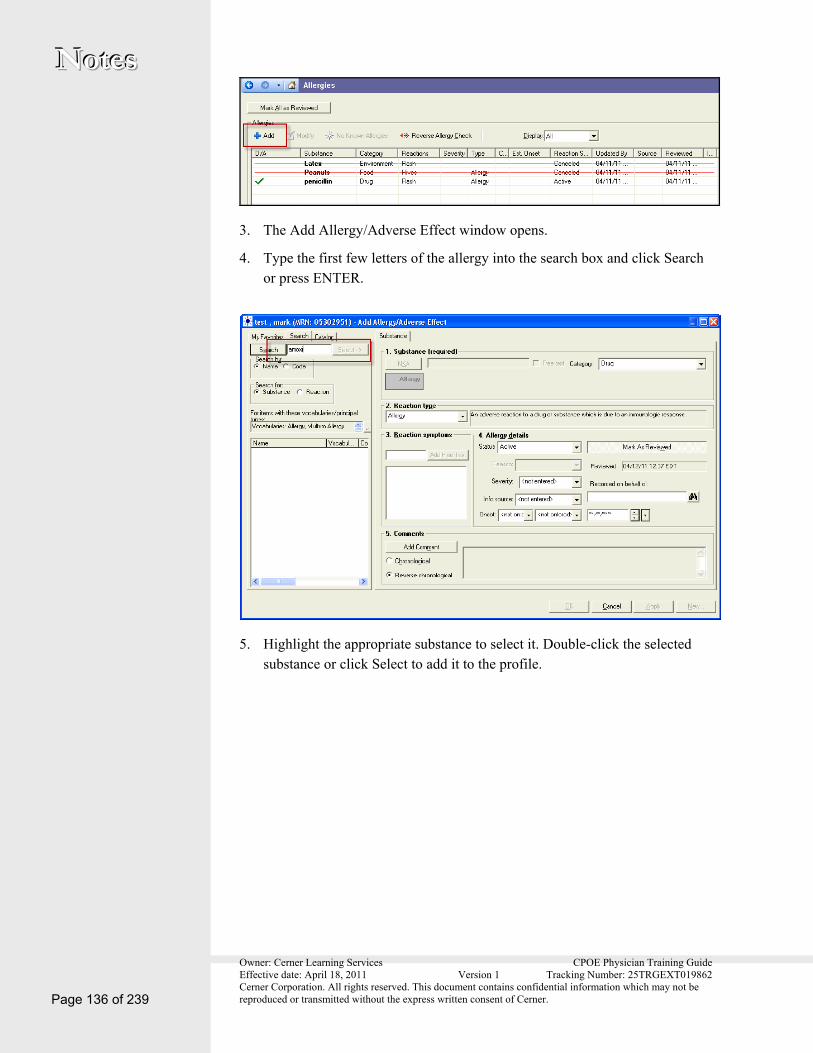
Owner: Cerner Learning Services CPOE Physician Training Guide Effective date: April 18, 2011 Version 1 Tracking Number: 25TRGEXT019862 Cerner Corporation. All rights reserved. This document contains confidential information which may not be reproduced or transmitted without the express written consent of Cerner. Page 136 of 239
NNNooottteeesss
3. The Add Allergy/Adverse Effect window opens.
4. Type the first few letters of the allergy into the search box and click Search or press ENTER.
5. Highlight the appropriate substance to select it. Double-click the selected substance or click Select to add it to the profile.

Owner: Cerner Learning Services CPOE Physician Training Guide Effective date: April 18, 2011 Version 1 Tracking Number: 25TRGEXT019862 Cerner Corporation. All rights reserved. This document contains confidential information which may not be reproduced or transmitted without the express written consent of Cerner.
NNNooottteeesss
Page 137 of 239
Note: Once a substance has been selected, the Search For box automatically changes to search for reactions.
6. Search for a Reaction Symptom using the Search For box. Confirm that the search is for Reaction, rather than Substance.
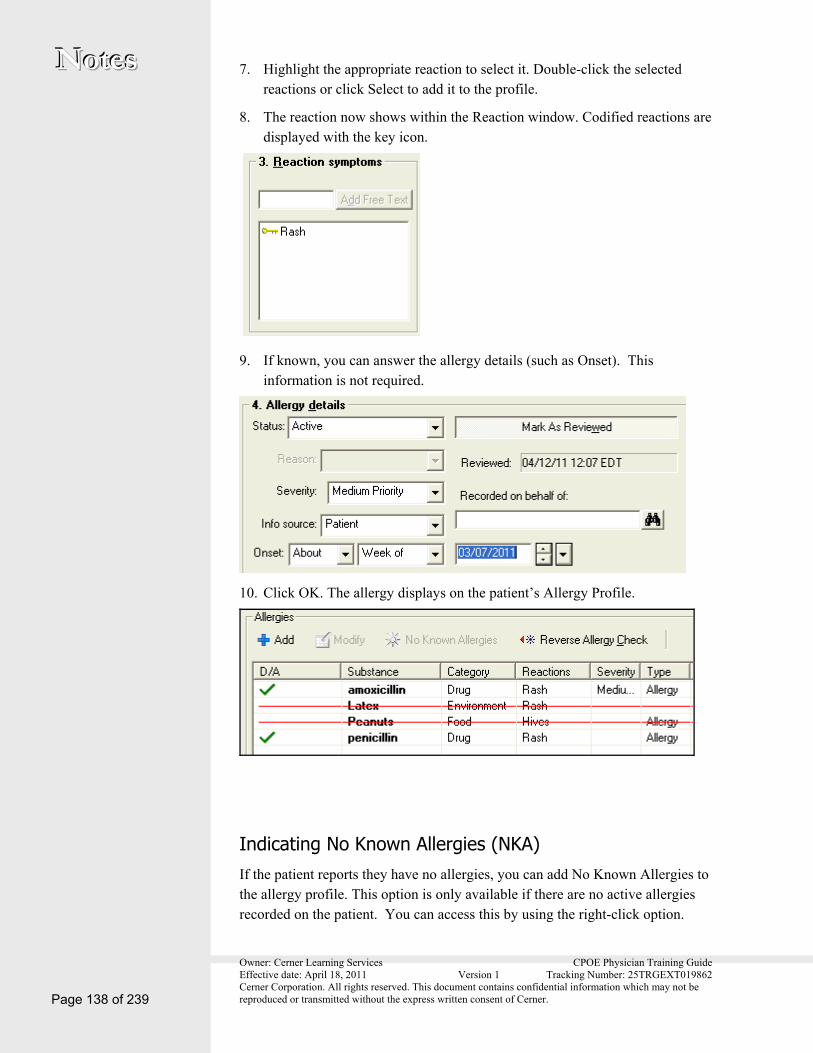
Owner: Cerner Learning Services CPOE Physician Training Guide Effective date: April 18, 2011 Version 1 Tracking Number: 25TRGEXT019862 Cerner Corporation. All rights reserved. This document contains confidential information which may not be reproduced or transmitted without the express written consent of Cerner. Page 138 of 239
NNNooottteeesss 7. Highlight the appropriate reaction to select it. Double-click the selected reactions or click Select to add it to the profile.
8. The reaction now shows within the Reaction window. Codified reactions are displayed with the key icon.
9. If known, you can answer the allergy details (such as Onset). This information is not required.
10. Click OK. The allergy displays on the patient’s Allergy Profile.
Indicating No Known Allergies (NKA) If the patient reports they have no allergies, you can add No Known Allergies to the allergy profile. This option is only available if there are no active allergies recorded on the patient. You can access this by using the right-click option.

Owner: Cerner Learning Services CPOE Physician Training Guide Effective date: April 18, 2011 Version 1 Tracking Number: 25TRGEXT019862 Cerner Corporation. All rights reserved. This document contains confidential information which may not be reproduced or transmitted without the express written consent of Cerner.
NNNooottteeesss
Page 139 of 239
1. From the Menu, select Allergies.
2. Click No Known Allergies.
3. The Add Allergy/Adverse Effect window opens.
4. No Known Allergies, or NKA, automatically populates in the box to the right.
5. Click OK.
Cancel an Allergy 1. From the Menu, select Allergies.
2. Right-click the allergy to be canceled.

Owner: Cerner Learning Services CPOE Physician Training Guide Effective date: April 18, 2011 Version 1 Tracking Number: 25TRGEXT019862 Cerner Corporation. All rights reserved. This document contains confidential information which may not be reproduced or transmitted without the express written consent of Cerner. Page 140 of 239
NNNooottteeesss
3. Select Cancel (substance name).
4. The Add Allergy/Adverse Effect window opens.
5. Click OK.
6. A red strikethrough is added to the canceled allergy.
Note: If your Display is set to All, you see the canceled allergies, if your Display is set to Active, you do not see canceled allergies.
Modify an Allergy 1. Open the Allergy Profile.
2. Right-click the allergy to be modified.

Owner: Cerner Learning Services CPOE Physician Training Guide Effective date: April 18, 2011 Version 1 Tracking Number: 25TRGEXT019862 Cerner Corporation. All rights reserved. This document contains confidential information which may not be reproduced or transmitted without the express written consent of Cerner.
NNNooottteeesss
Page 141 of 239
3. Select Modify (substance name).
4. Modify the details.
5. Click OK.
View Allergy History 1. Open the Allergy Profile.
2. Right-click the allergy to view the history.

Owner: Cerner Learning Services CPOE Physician Training Guide Effective date: April 18, 2011 Version 1 Tracking Number: 25TRGEXT019862 Cerner Corporation. All rights reserved. This document contains confidential information which may not be reproduced or transmitted without the express written consent of Cerner. Page 142 of 239
NNNooottteeesss
3. After viewing history Click Cancel to close window.
Mark All as Reviewed 1. Open the Allergy Profile.
2. Right-click the allergy to view the history.
3. Click Mark All as Reviewed.
4. Allergies have now been marked as reviewed.
Perform Reverse Allergy Check 1. Open the Allergy Profile.
2. Click Reverse Allergy Check on the toolbar.

Owner: Cerner Learning Services CPOE Physician Training Guide Effective date: April 18, 2011 Version 1 Tracking Number: 25TRGEXT019862 Cerner Corporation. All rights reserved. This document contains confidential information which may not be reproduced or transmitted without the express written consent of Cerner.
NNNooottteeesss
Page 143 of 239
3. If an alert displays and you need to override, select an override reason from the list.
4. If multiple alerts display, you may also select Apply to all interactions to provide the same Override Reason for all interactions in the lower-right corner.
5. Click Continue.
Medication List The medication list displays medication orders for the patient. Orders are grouped by venue to easily see the inpatient orders.

Owner: Cerner Learning Services CPOE Physician Training Guide Effective date: April 18, 2011 Version 1 Tracking Number: 25TRGEXT019862 Cerner Corporation. All rights reserved. This document contains confidential information which may not be reproduced or transmitted without the express written consent of Cerner. Page 144 of 239
NNNooottteeesss
Immunization Schedule Use the Immunization Schedule to display all recorded immunizations for a patient. If your immunization is not listed on the MAR to document administration, you can add an immunization record to the list, view the details of an immunization record, and modify the record.
Chart Historical Immunizations 1. From the Menu, click Immunization Schedule.
2. Click History.
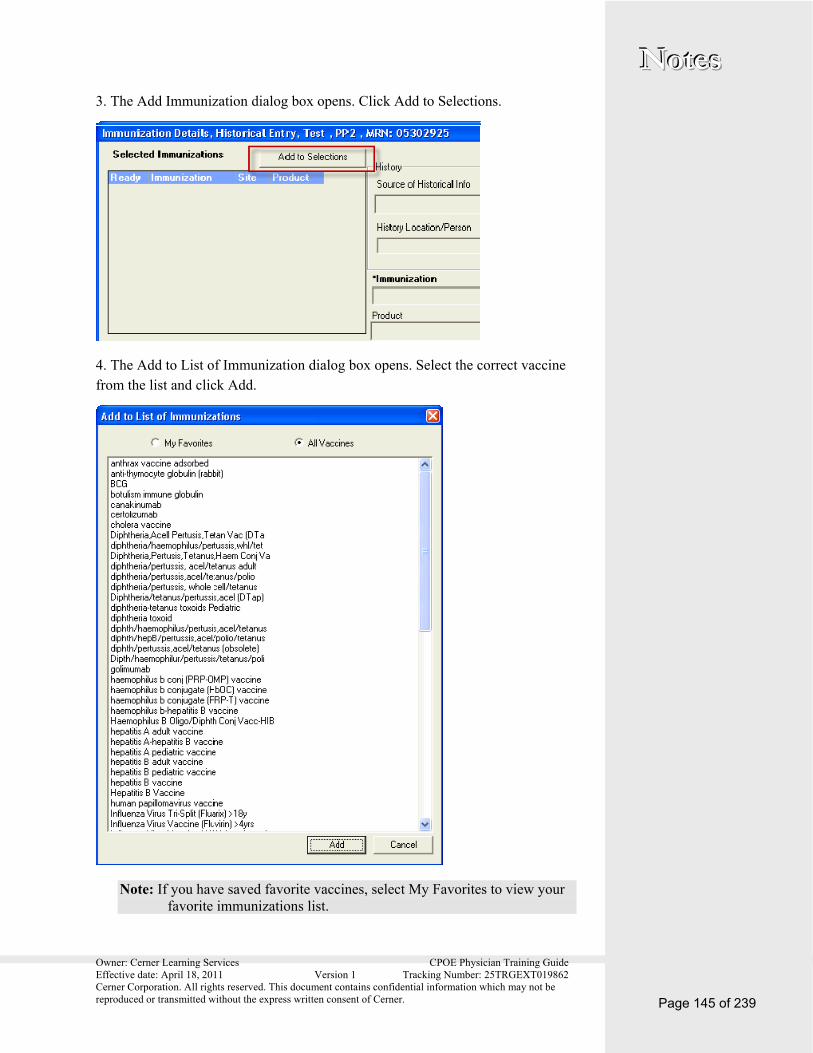
Owner: Cerner Learning Services CPOE Physician Training Guide Effective date: April 18, 2011 Version 1 Tracking Number: 25TRGEXT019862 Cerner Corporation. All rights reserved. This document contains confidential information which may not be reproduced or transmitted without the express written consent of Cerner.
NNNooottteeesss
Page 145 of 239
3. The Add Immunization dialog box opens. Click Add to Selections.
4. The Add to List of Immunization dialog box opens. Select the correct vaccine from the list and click Add.
Note: If you have saved favorite vaccines, select My Favorites to view your favorite immunizations list.

Owner: Cerner Learning Services CPOE Physician Training Guide Effective date: April 18, 2011 Version 1 Tracking Number: 25TRGEXT019862 Cerner Corporation. All rights reserved. This document contains confidential information which may not be reproduced or transmitted without the express written consent of Cerner. Page 146 of 239
NNNooottteeesss 5. Enter History Details.
Note: The bold areas marked with asterisks (*) are required boxes.
6. When you have completed the details, click Chart.
Modify Impatient Immunization 1. From the Menu, select Patient Information.
2. Click the Immunization Schedule tab.
3. Select the immunization to modify, click Modify.

Owner: Cerner Learning Services CPOE Physician Training Guide Effective date: April 18, 2011 Version 1 Tracking Number: 25TRGEXT019862 Cerner Corporation. All rights reserved. This document contains confidential information which may not be reproduced or transmitted without the express written consent of Cerner.
NNNooottteeesss
Page 147 of 239
4. Make any necessary changes.
5. Click OK to finish modifications.
Note: If the immunization was documented on the MAR, modify the immunization from the MAR.
Unchart an Immunization 1. From the Menu, select Patient Information.
2. Click the Immunization tab.
3. Right-click the immunization, select Unchart from the menu.
4. At the Results Uncharting window, enter a reason for uncharting in the Comments box.
5. Click OK.
6. The immunization you uncharted now has a strikethrough to indicate it was entered in error.
Note: Immunizations and MAR are integrated.

Owner: Cerner Learning Services CPOE Physician Training Guide Effective date: April 18, 2011 Version 1 Tracking Number: 25TRGEXT019862 Cerner Corporation. All rights reserved. This document contains confidential information which may not be reproduced or transmitted without the express written consent of Cerner. Page 148 of 239
NNNooottteeesss History The Histories component allows you to view medical history for a patient. This includes the patient’s family history, procedure history, and past medical history. The patient’s past medical and current problems can be found on the Problems and Diagnosis area and is maintained by the physician and other qualified providers.
Family The Family Member View displays a list of family members and their conditions. Family members are listed in this order: Mother, Father, Siblings, and Grandparents. Beneath each family member, the system lists those conditions for which they are documented as positive (to view all conditions, select Family Member View (All)).
The Family Member View only displays family conditions marked with positive responses in an Add action. Conditions marked negative are hidden unless the entire family history is marked as Negative. In this case, the condition is marked Family History Negative in both the Condition View and the Family History View. To view more information on a particular condition, click the Detail icon.
Marking Negative or Unknown for all Conditions If the patients’ biological family history is negative, unknown, unable to obtain for all conditions, or the patient is adopted you can mark the entire family history.
Complete the following steps to select the entire family history for a patient,:
1. From the Menu, select Histories.

Owner: Cerner Learning Services CPOE Physician Training Guide Effective date: April 18, 2011 Version 1 Tracking Number: 25TRGEXT019862 Cerner Corporation. All rights reserved. This document contains confidential information which may not be reproduced or transmitted without the express written consent of Cerner.
NNNooottteeesss
Page 149 of 239
2. Click the Family tab.
3. Select Negative, Unknown, Unable to Obtain, or Patient Adopted.
Documenting a Negative Condition You can select a family-member’s history as Negative for all conditions, and the system applies this value to that family member, for all conditions.
Complete the following steps to select a family member history as Negative or Unknown:
1. From the Family tab, click Add . The Add Family History pane opens and displays a list of family members in the following sequence: Mother, Father, Siblings, and Grandparents.
2. Select the relationship whose history you want to mark as Negative or Unknown (such as Mother or Sibling).
3. From the menu beneath the column heading (Mother or Sibling), select the left white box to mark as negative. A minus sign displays (-) in the box.
4. Click OK. The system applies that value to the entire record for that family member, until you change it.

Owner: Cerner Learning Services CPOE Physician Training Guide Effective date: April 18, 2011 Version 1 Tracking Number: 25TRGEXT019862 Cerner Corporation. All rights reserved. This document contains confidential information which may not be reproduced or transmitted without the express written consent of Cerner. Page 150 of 239
NNNooottteeesss Documenting a Positive Condition Complete the following steps to add positive conditions to Family History:
1. From the Family Member tab, click Add. The Add Family History pane opens. Displayed are condition categories with associated parent conditions beneath them.
2. Locate the condition category, such as Cardiology, that you want to add a condition to. Click in the blue box to mark as positive.
3. Double-click the plus sign to add details to the condition. Such as, comments, severity, condition status, condition details.
Social History The Social History tab allows you to document information on the patient's usage of alcohol, tobacco, and illegal substances. You can also document the patient's diet, home environment, exercise, nutrition and health, and sexual history to help you make the appropriate treatment decision.
You can give a patient a risk assessment value by selecting one of the values for each category. Risk assessments values for each category generally fall under the following values:
Denies Use (can also be Not Employed or Does not Exercise)
No Risk
Low Risk
Medium Risk
High Risk
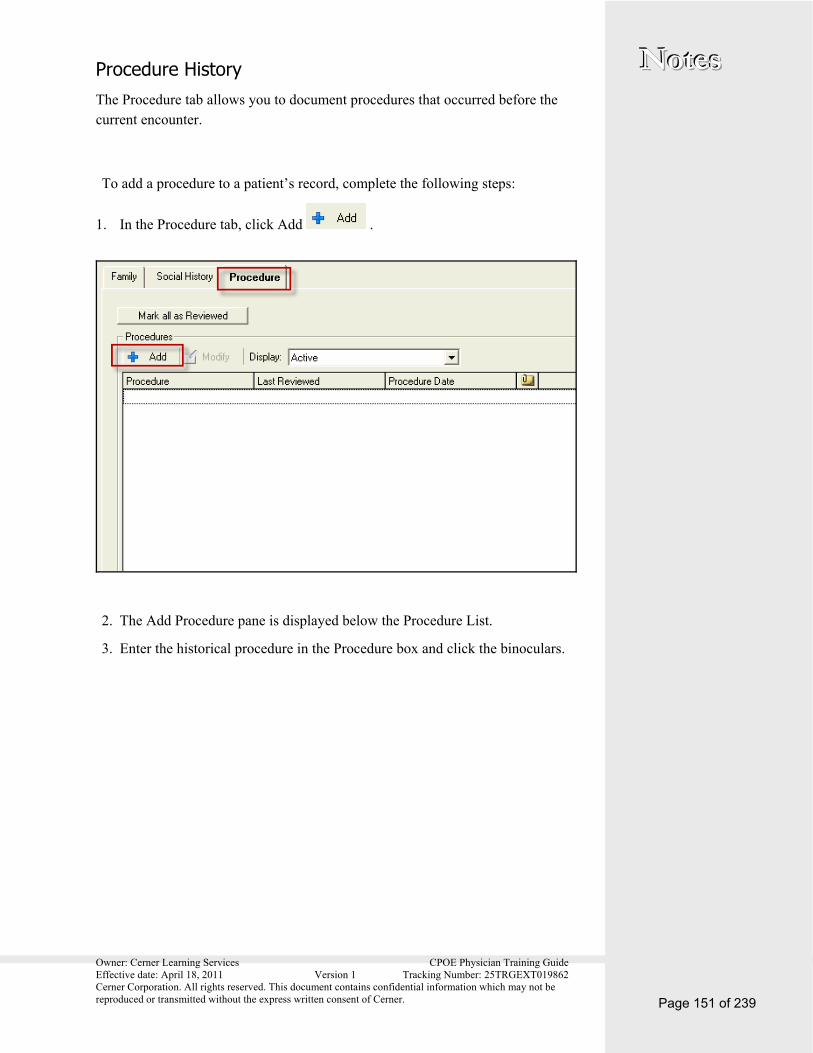
Owner: Cerner Learning Services CPOE Physician Training Guide Effective date: April 18, 2011 Version 1 Tracking Number: 25TRGEXT019862 Cerner Corporation. All rights reserved. This document contains confidential information which may not be reproduced or transmitted without the express written consent of Cerner.
NNNooottteeesss
Page 151 of 239
Procedure History The Procedure tab allows you to document procedures that occurred before the current encounter.
To add a procedure to a patient’s record, complete the following steps:
1. In the Procedure tab, click Add .
2. The Add Procedure pane is displayed below the Procedure List.
3. Enter the historical procedure in the Procedure box and click the binoculars.
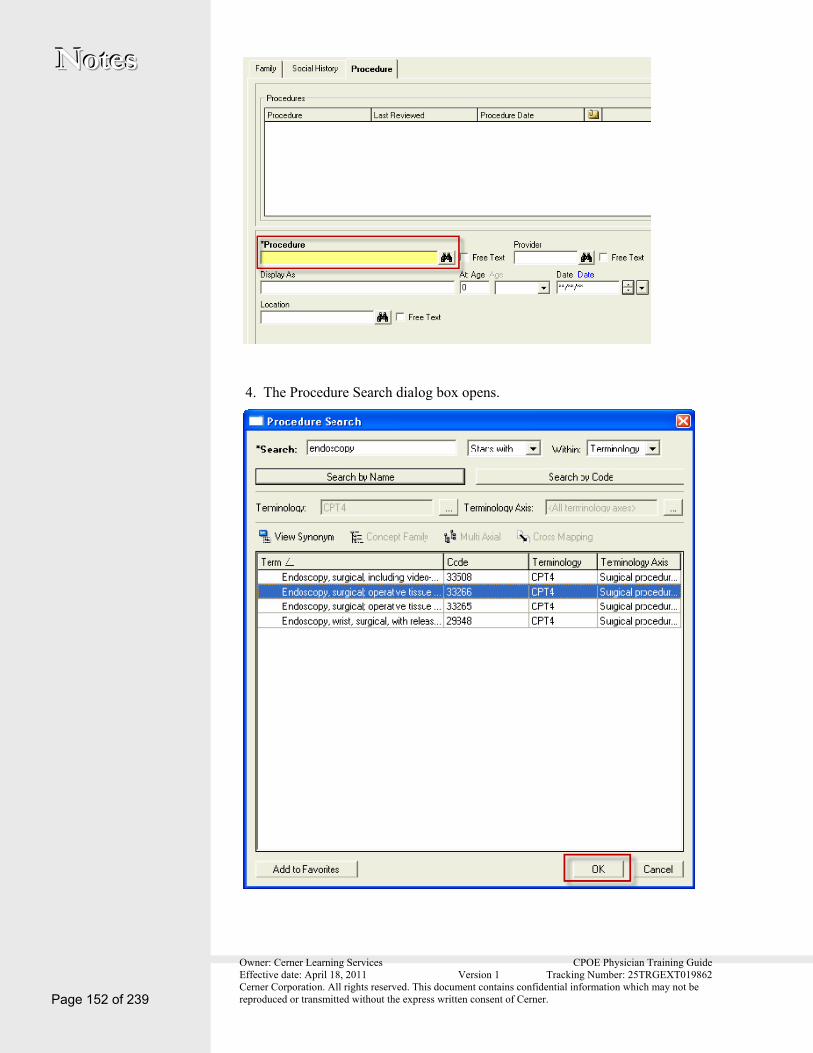
Owner: Cerner Learning Services CPOE Physician Training Guide Effective date: April 18, 2011 Version 1 Tracking Number: 25TRGEXT019862 Cerner Corporation. All rights reserved. This document contains confidential information which may not be reproduced or transmitted without the express written consent of Cerner. Page 152 of 239
NNNooottteeesss
4. The Procedure Search dialog box opens.

Owner: Cerner Learning Services CPOE Physician Training Guide Effective date: April 18, 2011 Version 1 Tracking Number: 25TRGEXT019862 Cerner Corporation. All rights reserved. This document contains confidential information which may not be reproduced or transmitted without the express written consent of Cerner.
NNNooottteeesss
Page 153 of 239
5. Select the term and click OK. The Procedure Search dialog box closes and you return to the Add Procedure pane.
6. Complete the remaining boxes as needed.
Note: By clicking on the Date hyperlink you can add a generic date if the exact is unknown.
7. Click OK. The historical condition displays on the Procedure List.
Modifying Procedure History To modify a previously entered procedure, complete the following steps:
1. Once you select the wanted procedure to modify, click Modify.
2. A modify pane is displayed below the list of historical procedures. The current details are populated.
3. Correct any information and click OK.
Patient Information The Demographics section of the patient chart consists of three sections organized by tabs: Patient Type, Visit Last, and Patient Provider Relationship (PPR) Summary.

Owner: Cerner Learning Services CPOE Physician Training Guide Effective date: April 18, 2011 Version 1 Tracking Number: 25TRGEXT019862 Cerner Corporation. All rights reserved. This document contains confidential information which may not be reproduced or transmitted without the express written consent of Cerner. Page 154 of 239
NNNooottteeesss Patient Demographics Use the Patient Demographics tab in the Patient Information view the same way that you would a paper chart’s face sheet. It displays general information regarding the selected patient. This is a read-only screen.
Visit List The Visit List tab displays a patient visit summary to help you outline past admissions. The top section of this tab displays a list of the patient’s visits including the admission and discharge date, facility, location, medical service, and visit type and reason. The highlighted visit corresponds to the visit details listed in the lower section of this tab.
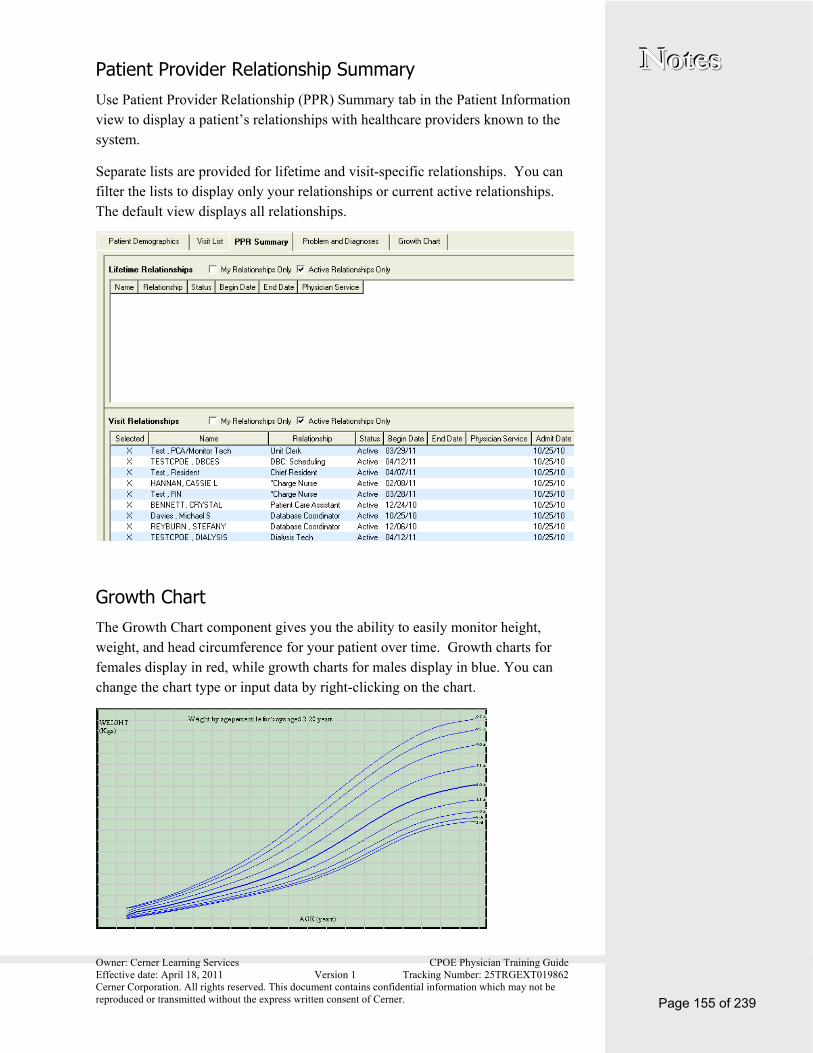
Owner: Cerner Learning Services CPOE Physician Training Guide Effective date: April 18, 2011 Version 1 Tracking Number: 25TRGEXT019862 Cerner Corporation. All rights reserved. This document contains confidential information which may not be reproduced or transmitted without the express written consent of Cerner.
NNNooottteeesss
Page 155 of 239
Patient Provider Relationship Summary Use Patient Provider Relationship (PPR) Summary tab in the Patient Information view to display a patient’s relationships with healthcare providers known to the system.
Separate lists are provided for lifetime and visit-specific relationships. You can filter the lists to display only your relationships or current active relationships. The default view displays all relationships.
Growth Chart The Growth Chart component gives you the ability to easily monitor height, weight, and head circumference for your patient over time. Growth charts for females display in red, while growth charts for males display in blue. You can change the chart type or input data by right-clicking on the chart.

Owner: Cerner Learning Services CPOE Physician Training Guide Effective date: April 18, 2011 Version 1 Tracking Number: 25TRGEXT019862 Cerner Corporation. All rights reserved. This document contains confidential information which may not be reproduced or transmitted without the express written consent of Cerner. Page 156 of 239
NNNooottteeesss Patient Care Summary The Patient Care Summary component pulls information entered or viewed in different areas of the chart into a single convenient view.
The primary purpose of this summary is to present pertinent, clinically relevant information to you to facilitate your workflow.
Problems and Diagnoses In the Problem and Diagnosis tab, you can view problems and diagnoses together on the same window. You can add and update problems or diagnoses, create advanced filters to display problems, and convert problems to diagnoses.
The Diagnosis window allows clinicians to document clinical diagnoses at natural points of care within the clinical workflow. The diagnoses are viewable and accessible from windows within relevant applications that require such information to support the care process and clinical workflow. In addition, Clinical Diagnosis can be used to complement the Problem List component to provide a thorough profile of the diagnostic state of the patient.
Note: Only providers can add a diagnosis whereas other clinicians can add to the Problem List.

Owner: Cerner Learning Services CPOE Physician Training Guide Effective date: April 18, 2011 Version 1 Tracking Number: 25TRGEXT019862 Cerner Corporation. All rights reserved. This document contains confidential information which may not be reproduced or transmitted without the express written consent of Cerner.
NNNooottteeesss
Page 157 of 239
The Problem List provides a way to sort and track patient problems across encounters. Use the Problem List to view, add to, or update a list of known health problems associated with a person. Anything that presents a problem to the patient's overall health can be listed in the Problem List. The Problem List uses duplicate checking to help prevent duplicated problems.
Problems and diagnoses are selected using nomenclature items from one or multiple vocabularies. Some examples of possible problems are listed below.
Anemia
Decreased vision
Renal failure syndrome
Mycardial infarction
Alcohol abuse
Add a Problem The system allows you to record all pertinent information about a patient’s problem. Below is a listing of steps to create a new problem.
1. To add a new problem, click Add .The Problem Search dialog box opens.
2. In the Search box, search for a problem by typing a few letters of the
problem and then selecting Search .
3. Once a problem is selected, complete the required fields. Select from the list in each box.
4. If a problem has a classification of Medical, you have the option to select File to Past Medical History at which point the problem is available on the Past Medical History profile.
Note: If a problem has a classification of Medical and is moved to a status of Resolved, a File to Past Medical History option is automatically selected. The resolved problem is available for display in the Past Medical History.

Owner: Cerner Learning Services CPOE Physician Training Guide Effective date: April 18, 2011 Version 1 Tracking Number: 25TRGEXT019862 Cerner Corporation. All rights reserved. This document contains confidential information which may not be reproduced or transmitted without the express written consent of Cerner. Page 158 of 239
NNNooottteeesss
5. Once all fields are completed, click OK.
6. To add a second problem, click OK & Add New. Continue to add a second problem.
Add a Problem to Diagnosis You can change a problem to a diagnosis when needed. Complete the following steps to convert a problem to a diagnosis:
1. From the Chart Menu, navigate to Diagnosis & Problems.
2. In the Problems section, right-click the wanted problem.
3. Select Add to Diagnosis from the list. The problem is then converted to a diagnosis and displayed in the Diagnosis section as well as in the Problems section.
Add a Diagnosis When you add a new diagnosis, there are many ways to enter the details of the diagnosis, allowing you to record all pertinent information about a person’s diagnosis. Some steps are required and others are optional. Below is a listing of steps you can follow to create a new problem. Optional, additional steps are referenced at the end.
1. From the patient’s chart, click the Problems and Diagnoses tab. You are now able to view the list of diagnoses in the top section.
2. To add a new diagnosis, click Add or right-click in the white area of the diagnosis section, and select Add. The Add Diagnosis window opens.
3. In the Diagnosis box, enter the first few letters of the diagnosis in the Diagnosis box and press ENTER.
4. Select the appropriate diagnosis, and click OK .
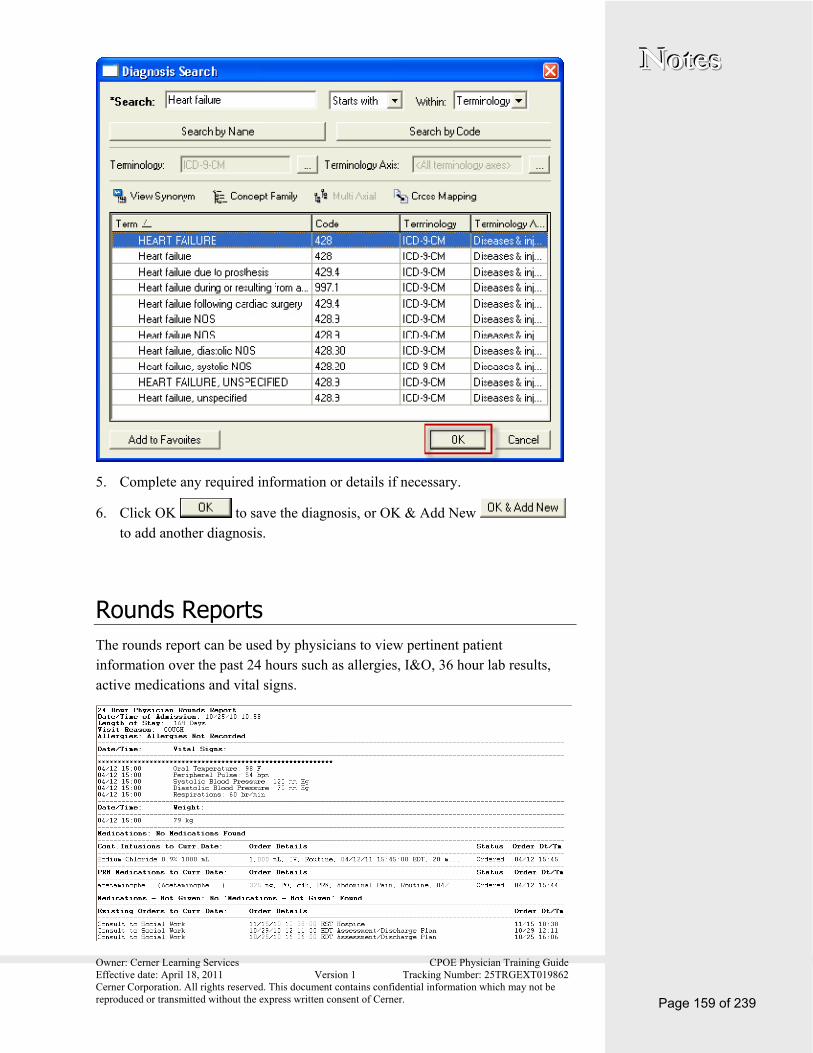
Owner: Cerner Learning Services CPOE Physician Training Guide Effective date: April 18, 2011 Version 1 Tracking Number: 25TRGEXT019862 Cerner Corporation. All rights reserved. This document contains confidential information which may not be reproduced or transmitted without the express written consent of Cerner.
NNNooottteeesss
Page 159 of 239
5. Complete any required information or details if necessary.
6. Click OK to save the diagnosis, or OK & Add New to add another diagnosis.
Rounds Reports The rounds report can be used by physicians to view pertinent patient information over the past 24 hours such as allergies, I&O, 36 hour lab results, active medications and vital signs.
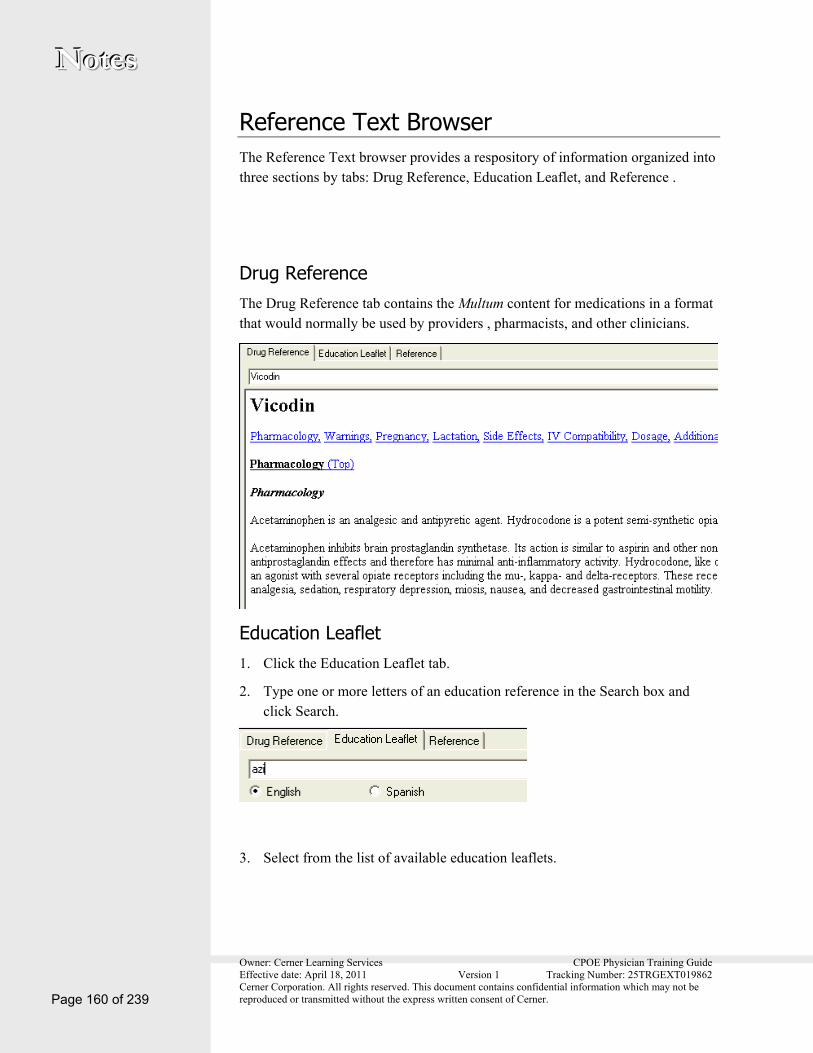
Owner: Cerner Learning Services CPOE Physician Training Guide Effective date: April 18, 2011 Version 1 Tracking Number: 25TRGEXT019862 Cerner Corporation. All rights reserved. This document contains confidential information which may not be reproduced or transmitted without the express written consent of Cerner. Page 160 of 239
NNNooottteeesss
Reference Text Browser The Reference Text browser provides a respository of information organized into three sections by tabs: Drug Reference, Education Leaflet, and Reference .
Drug Reference The Drug Reference tab contains the Multum content for medications in a format that would normally be used by providers , pharmacists, and other clinicians.
Education Leaflet 1. Click the Education Leaflet tab.
2. Type one or more letters of an education reference in the Search box and click Search.
3. Select from the list of available education leaflets.

Owner: Cerner Learning Services CPOE Physician Training Guide Effective date: April 18, 2011 Version 1 Tracking Number: 25TRGEXT019862 Cerner Corporation. All rights reserved. This document contains confidential information which may not be reproduced or transmitted without the express written consent of Cerner.
NNNooottteeesss
Page 161 of 239
4. Click Select .
5. To print, right-click anywhere in the white space and click Print.
Reference Finally, the Reference tab gives you access to reference text that has been built within the system as part of the design including nurse preparations.
To view reference text:
1. Type all or part of the item to be searched.
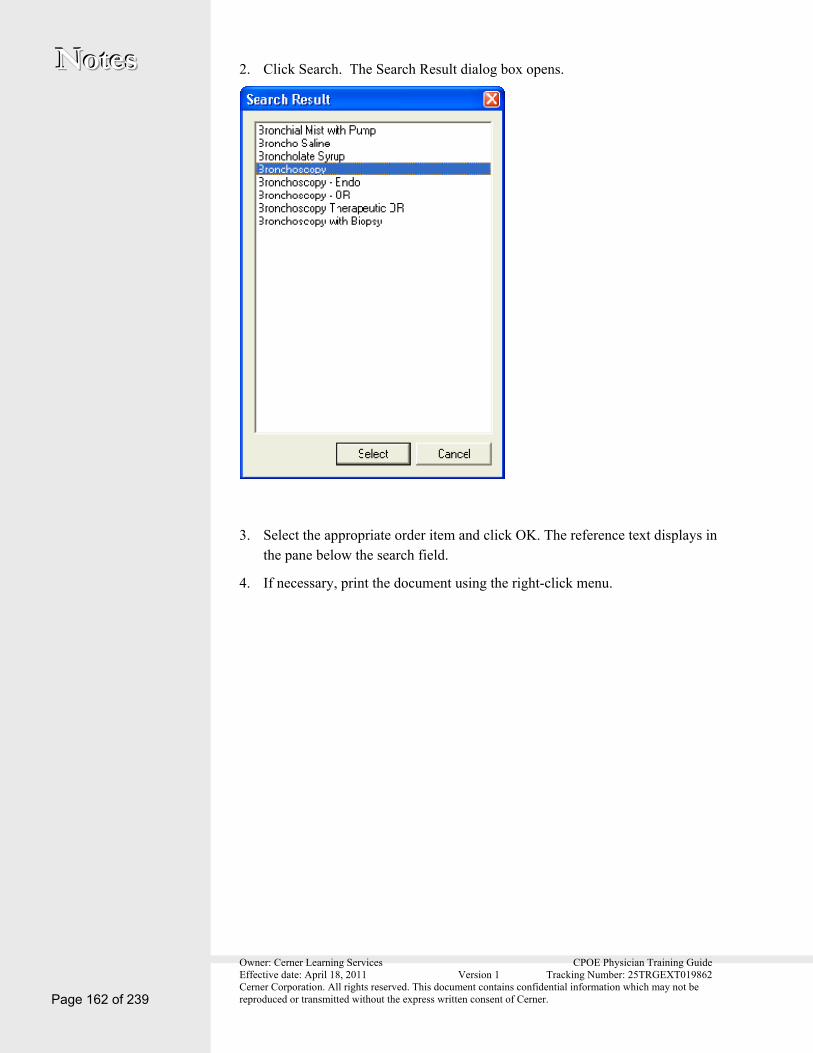
Owner: Cerner Learning Services CPOE Physician Training Guide Effective date: April 18, 2011 Version 1 Tracking Number: 25TRGEXT019862 Cerner Corporation. All rights reserved. This document contains confidential information which may not be reproduced or transmitted without the express written consent of Cerner. Page 162 of 239
NNNooottteeesss 2. Click Search. The Search Result dialog box opens.
3. Select the appropriate order item and click OK. The reference text displays in the pane below the search field.
4. If necessary, print the document using the right-click menu.

Owner: Cerner Learning Services CPOE Physician Training Guide Effective date: April 18, 2011 Version 1 Tracking Number: 25TRGEXT019862 Cerner Corporation. All rights reserved. This document contains confidential information which may not be reproduced or transmitted without the express written consent of Cerner.
NNNooottteeesss
Page 163 of 239
11. Medication Reconciliation Medication Reconciliation is a button that allows the physician to efficiently reconcile a patient’s documented medication list, to quickly and accurately make the appropriate decision on each medication order and document compliance on all medications. Central to the reconciliation process should be a single source of up-to-date medications with all necessary order details.
Note: Before Medication Reconciliation is preformed the medication profile needs to be reviewed and corrected. Medications that the patient has not taken for some time, duplicates, and obviously erroneous entries should be corrected or removed. If a nurse or clinician has documented med compliance and there are meds that a patient is not taking, the provider needs to verify with the patient before removing the medication from the medication profile.
Document Medications by History Documenting historical medications is the first step in reconciling medications. You can view the status of a patient's medication history in the upper-right corner of the Orders window.
Note: Nursing can reset the Adm. Meds Rec checkmark to signify that more home medications have been added. The medication reconciliation is a continuous process, the Provider should review and complete as needed.
Patient with Historical Medications Complete the following steps to document historical medications from the Add Order window:
1. From the Orders window, click Document Medications by History
.
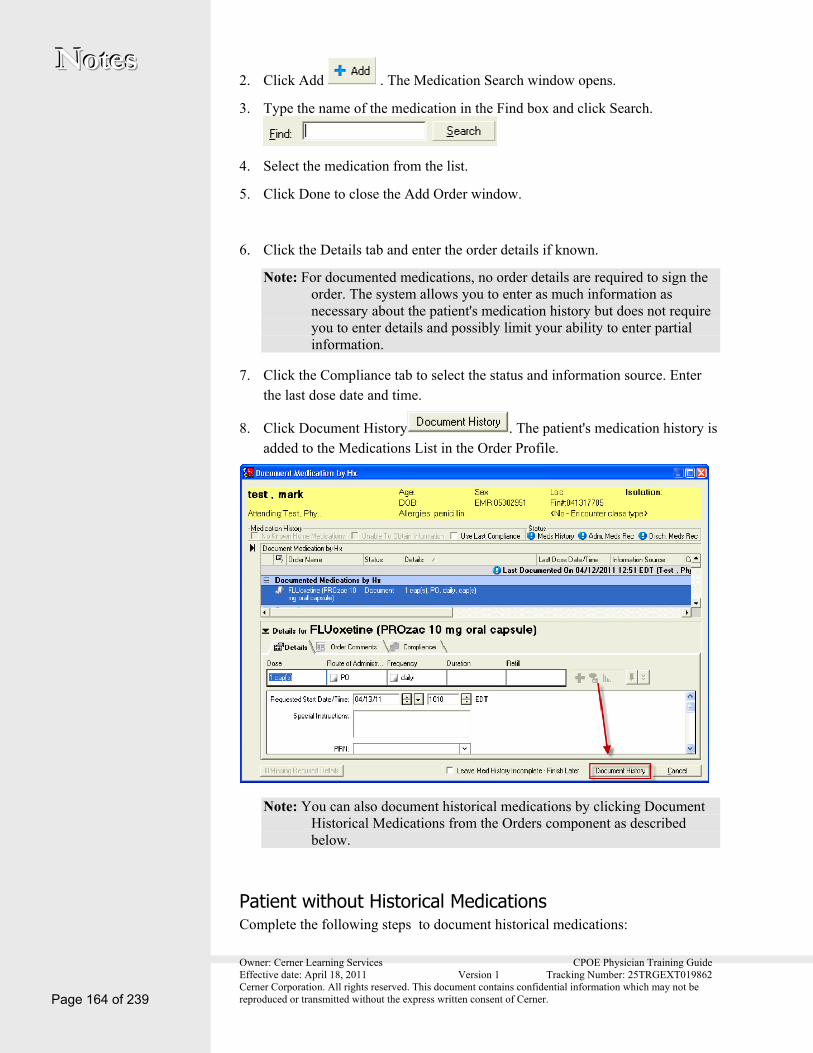
Owner: Cerner Learning Services CPOE Physician Training Guide Effective date: April 18, 2011 Version 1 Tracking Number: 25TRGEXT019862 Cerner Corporation. All rights reserved. This document contains confidential information which may not be reproduced or transmitted without the express written consent of Cerner. Page 164 of 239
NNNooottteeesss 2. Click Add . The Medication Search window opens.
3. Type the name of the medication in the Find box and click Search.
4. Select the medication from the list.
5. Click Done to close the Add Order window.
6. Click the Details tab and enter the order details if known.
Note: For documented medications, no order details are required to sign the order. The system allows you to enter as much information as necessary about the patient's medication history but does not require you to enter details and possibly limit your ability to enter partial information.
7. Click the Compliance tab to select the status and information source. Enter the last dose date and time.
8. Click Document History . The patient's medication history is added to the Medications List in the Order Profile.
Note: You can also document historical medications by clicking Document Historical Medications from the Orders component as described below.
Patient without Historical Medications Complete the following steps to document historical medications:
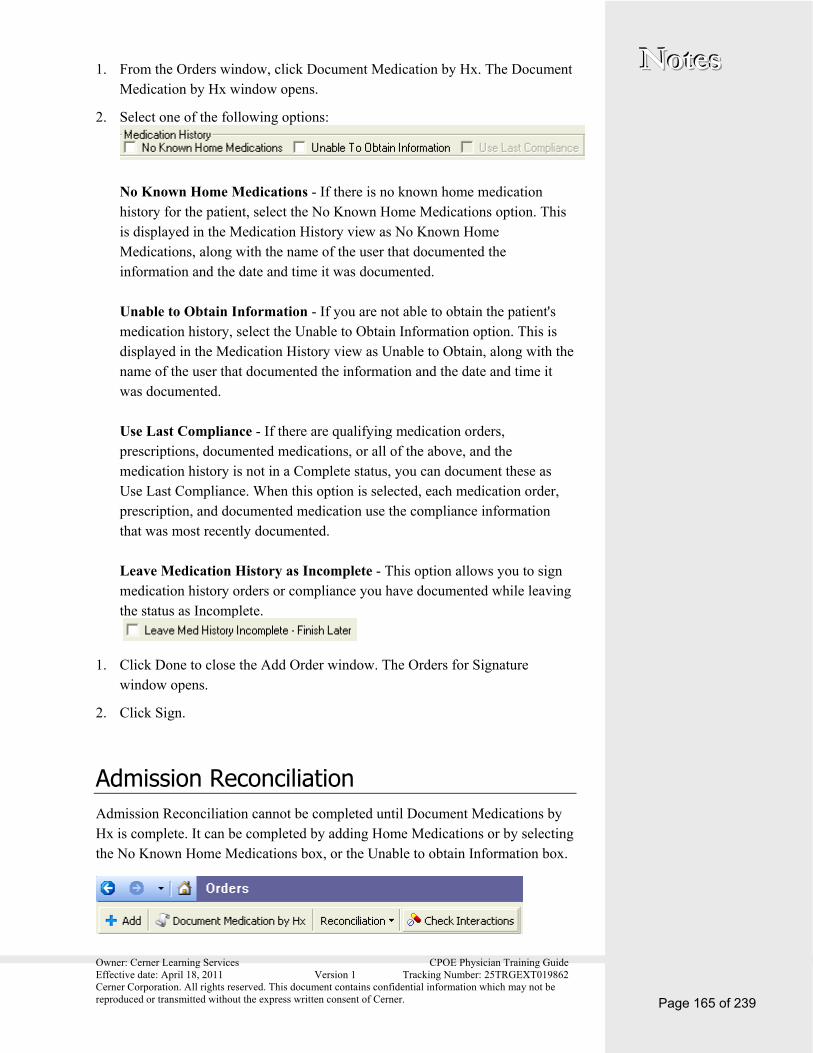
Owner: Cerner Learning Services CPOE Physician Training Guide Effective date: April 18, 2011 Version 1 Tracking Number: 25TRGEXT019862 Cerner Corporation. All rights reserved. This document contains confidential information which may not be reproduced or transmitted without the express written consent of Cerner.
NNNooottteeesss
Page 165 of 239
1. From the Orders window, click Document Medication by Hx. The Document Medication by Hx window opens.
2. Select one of the following options:
No Known Home Medications - If there is no known home medication history for the patient, select the No Known Home Medications option. This is displayed in the Medication History view as No Known Home Medications, along with the name of the user that documented the information and the date and time it was documented. Unable to Obtain Information - If you are not able to obtain the patient's medication history, select the Unable to Obtain Information option. This is displayed in the Medication History view as Unable to Obtain, along with the name of the user that documented the information and the date and time it was documented. Use Last Compliance - If there are qualifying medication orders, prescriptions, documented medications, or all of the above, and the medication history is not in a Complete status, you can document these as Use Last Compliance. When this option is selected, each medication order, prescription, and documented medication use the compliance information that was most recently documented. Leave Medication History as Incomplete - This option allows you to sign medication history orders or compliance you have documented while leaving the status as Incomplete.
1. Click Done to close the Add Order window. The Orders for Signature window opens.
2. Click Sign.
Admission Reconciliation Admission Reconciliation cannot be completed until Document Medications by Hx is complete. It can be completed by adding Home Medications or by selecting the No Known Home Medications box, or the Unable to obtain Information box.

Owner: Cerner Learning Services CPOE Physician Training Guide Effective date: April 18, 2011 Version 1 Tracking Number: 25TRGEXT019862 Cerner Corporation. All rights reserved. This document contains confidential information which may not be reproduced or transmitted without the express written consent of Cerner. Page 166 of 239
NNNooottteeesss Reconciling the medications on admission displays the following orders:
All active, historical, and prescription orders across the current patient encounter.
All active inpatient orders across the current patient encounter.
All active and previously active medication order from the past 24 hours.
Note: All medications selected in yellow are required to be reconciled.
1. From the Orders window, click Reconciliation.
2. Select Admission from the list.
3. Make the appropriate selections from the Reconciliation Action. You can select Continue or Do Not Continue.
4. When continuing the use of a home medication ( ), you may be prompted to select an available alternative. Select the appropriate available alternative.

Owner: Cerner Learning Services CPOE Physician Training Guide Effective date: April 18, 2011 Version 1 Tracking Number: 25TRGEXT019862 Cerner Corporation. All rights reserved. This document contains confidential information which may not be reproduced or transmitted without the express written consent of Cerner.
NNNooottteeesss
Page 167 of 239
Select the medication in the Medications After Admission column to make any modifications. If the Details window does not display in the bottom of the window, click the show/hide arrow.
5. Edit details as needed.
6. When all medications have been addressed, click Reconcile And Sign.
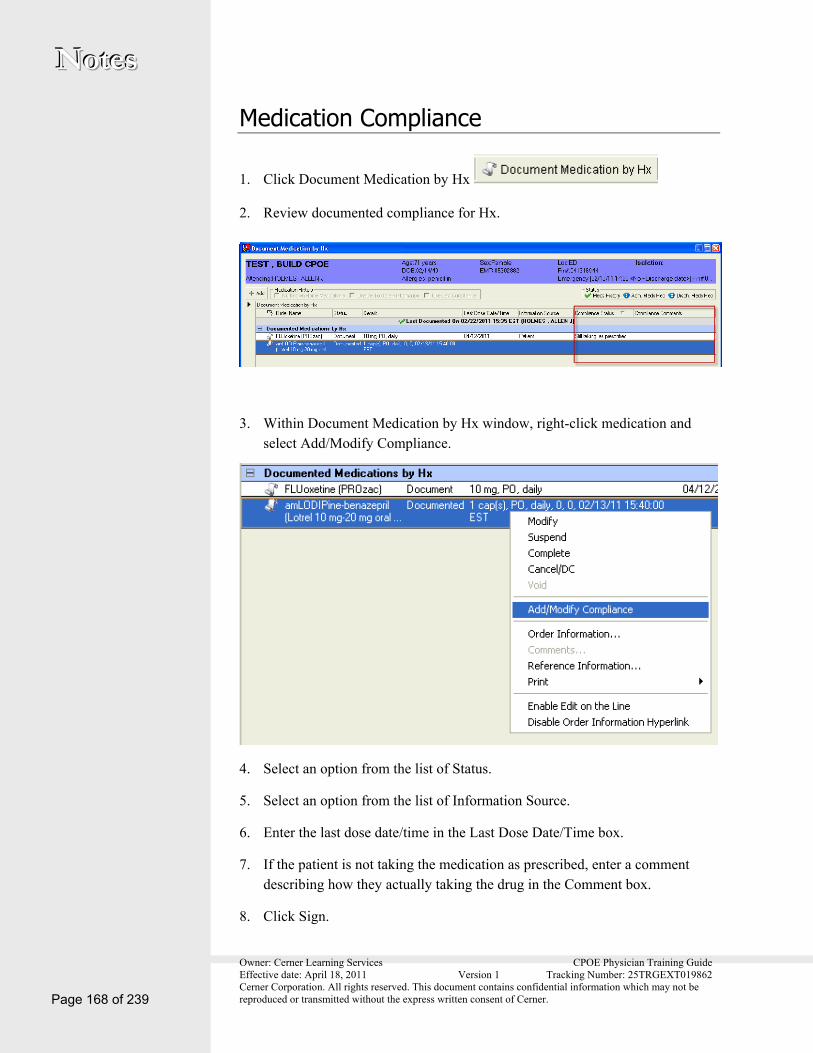
Owner: Cerner Learning Services CPOE Physician Training Guide Effective date: April 18, 2011 Version 1 Tracking Number: 25TRGEXT019862 Cerner Corporation. All rights reserved. This document contains confidential information which may not be reproduced or transmitted without the express written consent of Cerner. Page 168 of 239
NNNooottteeesss
Medication Compliance
1. Click Document Medication by Hx
2. Review documented compliance for Hx.
3. Within Document Medication by Hx window, right-click medication and select Add/Modify Compliance.
4. Select an option from the list of Status.
5. Select an option from the list of Information Source.
6. Enter the last dose date/time in the Last Dose Date/Time box.
7. If the patient is not taking the medication as prescribed, enter a comment describing how they actually taking the drug in the Comment box.
8. Click Sign.

Owner: Cerner Learning Services CPOE Physician Training Guide Effective date: April 18, 2011 Version 1 Tracking Number: 25TRGEXT019862 Cerner Corporation. All rights reserved. This document contains confidential information which may not be reproduced or transmitted without the express written consent of Cerner.
NNNooottteeesss
Page 169 of 239
Note: In a realistic environment, add compliance information to all of the home meds listed in your patients chart.
Transfer Reconciliation Reconciling medications on transfer displays the following orders:
All active and suspended historical and prescription orders across all patient encounters.
All active inpatient orders across the current patient encounter.
All active and previously active medication orders from the past 24 hours.
Note: The attending physician/team that patient is being transferred from must discontinue all orders that cannot be continued at the new location before the transfer has occured. Once the patient is transferred, it is the new attending physician/team’s responsibility to discontinue or add any other orders by completing the Transfer Reconciliation.
1. From the Orders window, click Reconciliation.
2. Select Transfer from the list.
3. Make the appropriate selections from the Reconciliation Action. You can select Continue or Do Not Continue.

Owner: Cerner Learning Services CPOE Physician Training Guide Effective date: April 18, 2011 Version 1 Tracking Number: 25TRGEXT019862 Cerner Corporation. All rights reserved. This document contains confidential information which may not be reproduced or transmitted without the express written consent of Cerner. Page 170 of 239
NNNooottteeesss 4. When continuing the use of a home medication ( ), you may be prompted to select an available alternative. Select the appropriate available alternative.
5. Select the medication in the Medications After Transfer column to make any modifications. If the Details window does not display in the bottom of the window, click the show/hide arrow. Edit details as needed.
6. When the medications have been addressed, click Reconcile And Sign.
View Reconciliation History from Navigator 1. From the navigation pane in the Orders window, expand the Reconciliation
History.

Owner: Cerner Learning Services CPOE Physician Training Guide Effective date: April 18, 2011 Version 1 Tracking Number: 25TRGEXT019862 Cerner Corporation. All rights reserved. This document contains confidential information which may not be reproduced or transmitted without the express written consent of Cerner.
NNNooottteeesss
Page 171 of 239
Review Orders for Transfer
1. From the navigation pane in the Orders window, expand the Reconciliation History.
2. Click Transfer in the navigator, and all of the medications that have been converted are displayed in the list.

Owner: Cerner Learning Services CPOE Physician Training Guide Effective date: April 18, 2011 Version 1 Tracking Number: 25TRGEXT019862 Cerner Corporation. All rights reserved. This document contains confidential information which may not be reproduced or transmitted without the express written consent of Cerner. Page 172 of 239
NNNooottteeesss
12. Orders Basics
Orders Overview Orders is a management solution tailored specifically for clinicians. An integral part of Cerner PowerChart, Orders presents a view of the ordering process in a display similar to the Flowsheet. Orders also handles medications and continuous infusion orders.
The Orders component of a patient chart streamlines order modification with an edit-on-the-line feature and provides access to patient allergies and diagnoses from the order window. Orders incorporates ambulatory and prescription ordering so that you can use this one component for all your patient ordering needs across all venues of care – inpatient, ambulatory, and prescriptions.
Before generating a new Order, familiarize yourself with the general features of Orders so that you understand its capabilities.
Orders Organization Select Orders from the patient chart menu. The Orders section is organized into two sections: the Navigator and the Orders Documentation Area.
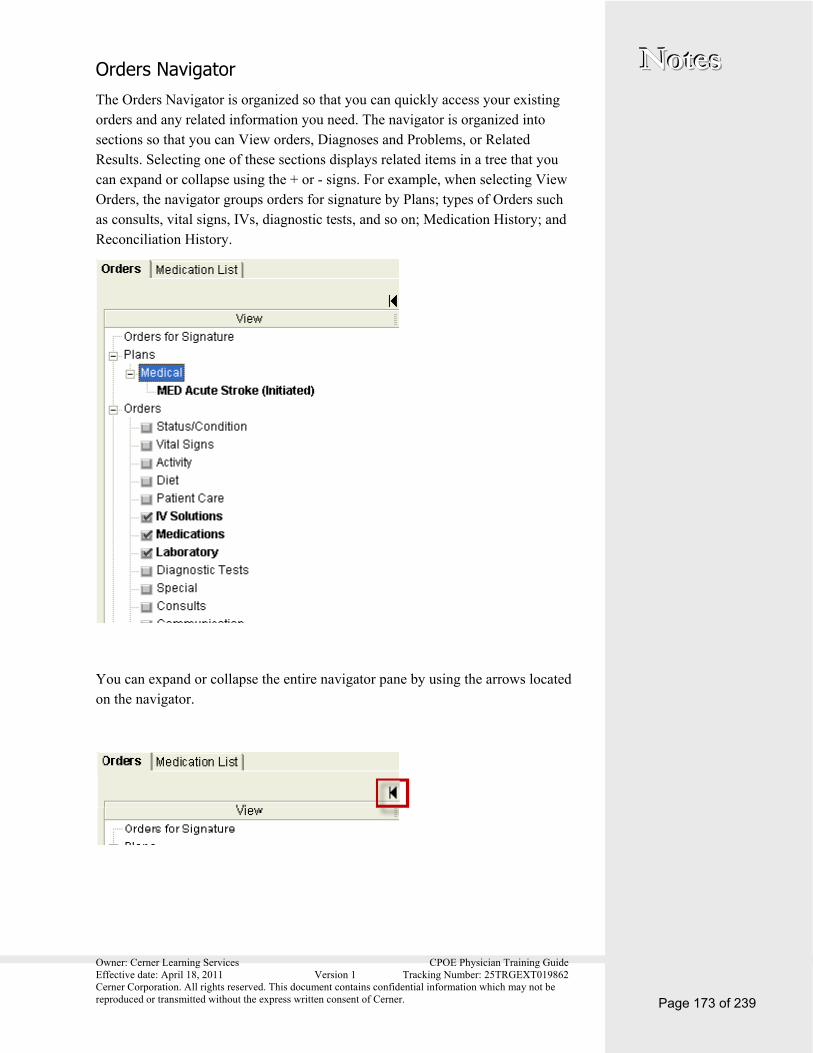
Owner: Cerner Learning Services CPOE Physician Training Guide Effective date: April 18, 2011 Version 1 Tracking Number: 25TRGEXT019862 Cerner Corporation. All rights reserved. This document contains confidential information which may not be reproduced or transmitted without the express written consent of Cerner.
NNNooottteeesss
Page 173 of 239
Orders Navigator The Orders Navigator is organized so that you can quickly access your existing orders and any related information you need. The navigator is organized into sections so that you can View orders, Diagnoses and Problems, or Related Results. Selecting one of these sections displays related items in a tree that you can expand or collapse using the + or - signs. For example, when selecting View Orders, the navigator groups orders for signature by Plans; types of Orders such as consults, vital signs, IVs, diagnostic tests, and so on; Medication History; and Reconciliation History.
You can expand or collapse the entire navigator pane by using the arrows located on the navigator.

Owner: Cerner Learning Services CPOE Physician Training Guide Effective date: April 18, 2011 Version 1 Tracking Number: 25TRGEXT019862 Cerner Corporation. All rights reserved. This document contains confidential information which may not be reproduced or transmitted without the express written consent of Cerner. Page 174 of 239
NNNooottteeesss Orders Documentation Area Selecting an order from the navigator displays the order in the documentation area.
Orders Toolbar Area The Orders toolbar area displays the options for the current order being viewed or edited. It includes options to customize the columns of data displayed in the documentation area, and filters to limit or expand the orders displayed.
Applying Filters The view of existing orders can be filtered to display selected statuses. A predefined set of orders filters are available, and a provider can create and save their own filter queries.
Use an Existing Filter 1. Navigate to the patient chart menu and select Orders.
2. Select a filter from the Display list in the Orders toolbar area. The filter applies to the active view.

Owner: Cerner Learning Services CPOE Physician Training Guide Effective date: April 18, 2011 Version 1 Tracking Number: 25TRGEXT019862 Cerner Corporation. All rights reserved. This document contains confidential information which may not be reproduced or transmitted without the express written consent of Cerner.
NNNooottteeesss
Page 175 of 239
Multum and Discern Alerts Decision Support provides you with alerts and warnings concerning medications you are ordering for the patient. You might be interrupted with a Decision Support alert when you place a medication order or add a new drug allergy for a patient who is already taking the drug.
When a Decision Support alert opens, you must take action before you can proceed. Such actions include removing the new order, removing the order already on the patient’s chart, or entering an override reason.
Alert Types Each alert is displayed with a type and severity level. The following symbols represent alert types displayed in the Decision Support window:
Therapeutic Duplication: This medication already has been prescribed for the patient.
Food Interaction: This medication has a specific food restriction.
Drug Interaction: This medication interacts with a drug already prescribed.
Allergy Reaction: The patient has a recorded allergy to this medication.
Alert Severity Levels Each alert is displayed with a type and severity level. The following symbols represent severity levels displayed in the Decision Support window:

Owner: Cerner Learning Services CPOE Physician Training Guide Effective date: April 18, 2011 Version 1 Tracking Number: 25TRGEXT019862 Cerner Corporation. All rights reserved. This document contains confidential information which may not be reproduced or transmitted without the express written consent of Cerner. Page 176 of 239
NNNooottteeesss
Minor: This interaction poses a minimal threat to the patient’s health.
Moderate: This interaction poses a moderate threat to the patient’s health and should be evaluated.
Major: This interaction poses a major threat to the patient’s health and is not recommended. This category includes the Cerner Multum-recognized levels of Major-Generally Avoid, Major-Additional Contraception Recommended, Major-Adjust Dosing Interval, Major-Adjust Dose, and Major-Monitor Closely.
Major: Contraindicated. This interaction poses such a major threat to the patient’s health that it belongs to the highest severity level. This category includes the Cerner Multum-recognized level of Major-Contraindicated.
Tool Tips The Orders documentation area is enabled to provide additional information about items using Tool Tips. Position your cursor over the icons or the text in the documentation area to view additional information about the relevant item.
Owner: Cerner Learning Services CPOE Physician Training Guide Effective date: April 18, 2011 Version 1 Tracking Number: 25TRGEXT019862 Cerner Corporation. All rights reserved. This document contains confidential information which may not be reproduced or transmitted without the express written consent of Cerner.
NNNooottteeesss
Page 177 of 239
Order Status Definitions Order statuses reflect the stage of completion for an order that has been entered into the system. The status progresses from blank (before the entered order is signed it has no status) to Complete, Discontinued, or some other final status. Other statuses reflect certain order actions as explained below.
Order - The status of Order indicates that the order needs to be completed and signed.
Processing Ordered - After signing a new order, the order status is displayed as Processing. Clicking the Refresh button updates the system so that the status changes to Ordered.
Ordered - An order successfully entered and signed has a status of Ordered until the order is completed.
Incomplete - If an order is entered, but the user has not supplied all the necessary information, the order is entered into the system but has a status of Incomplete. Incomplete orders are rarely used.
Completed – A completed order has reached its defined stop date and time, or the associated tasks or procedures have been completed.
Pending Complete - Pending Complete is the status given to a parent order when one or more of the child orders (but not all) have been completed. Pending Complete also applies to a parent order that has reached its defined stop date and time but still has tasks that have not been completed.
Discontinued - An order with a frequency or interval associated with it can be discontinued after the procedure or medication has been administered at least once. The Multum drug interaction checking continues for Discontinued orders for their defined time frame.
Canceled - Any order can be canceled to stop immediately, but certain conditions might cause the status of some orders to go to Discontinued rather than Canceled. The Canceled status for orders with frequencies or intervals associated with them indicates that the first instance was never administered. No Multum drug interaction checking is performed on orders with a status of Canceled.
Voided With Results - An order is voided instead of canceled or discontinued to indicate that the order was placed in error, for example, on the wrong patient or for the wrong orderable. Without results, the order is not subject to drug
Owner: Cerner Learning Services CPOE Physician Training Guide Effective date: April 18, 2011 Version 1 Tracking Number: 25TRGEXT019862 Cerner Corporation. All rights reserved. This document contains confidential information which may not be reproduced or transmitted without the express written consent of Cerner. Page 178 of 239
NNNooottteeesss interaction checking. If the order has been carried out (has results), then it is subject to interaction checking.
Transfer/Canceled - Orders suspended because of a patient's temporary change of location can be given a Transfer/Cancel status. For example, the nursing orders for a patient sent to surgery are put in this status until the patient returns. Such orders can then be reactivated.
Suspended - Orders that have a frequency associated with them can be suspended and later resumed. If the order has a stop date and time that has been exceeded, it must be reentered instead of resumed.
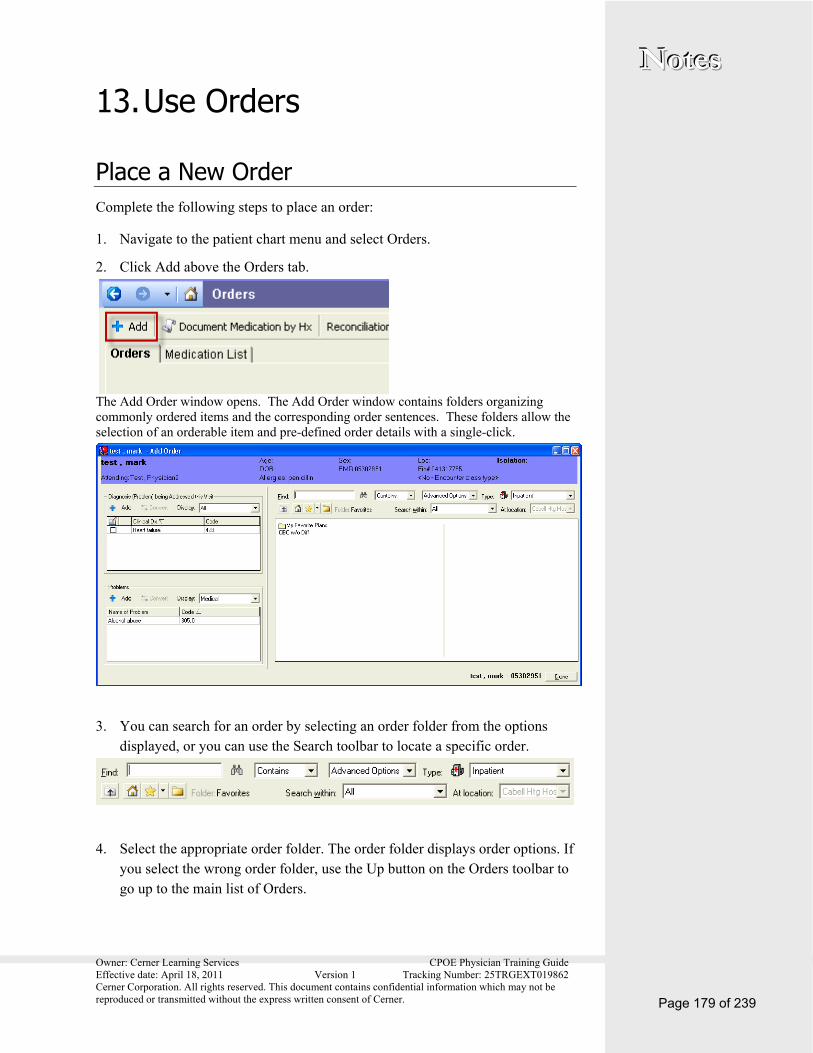
Owner: Cerner Learning Services CPOE Physician Training Guide Effective date: April 18, 2011 Version 1 Tracking Number: 25TRGEXT019862 Cerner Corporation. All rights reserved. This document contains confidential information which may not be reproduced or transmitted without the express written consent of Cerner.
NNNooottteeesss
Page 179 of 239
13. Use Orders
Place a New Order Complete the following steps to place an order:
1. Navigate to the patient chart menu and select Orders.
2. Click Add above the Orders tab.
The Add Order window opens. The Add Order window contains folders organizing commonly ordered items and the corresponding order sentences. These folders allow the selection of an orderable item and pre-defined order details with a single-click.
3. You can search for an order by selecting an order folder from the options displayed, or you can use the Search toolbar to locate a specific order.
4. Select the appropriate order folder. The order folder displays order options. If you select the wrong order folder, use the Up button on the Orders toolbar to go up to the main list of Orders.

Owner: Cerner Learning Services CPOE Physician Training Guide Effective date: April 18, 2011 Version 1 Tracking Number: 25TRGEXT019862 Cerner Corporation. All rights reserved. This document contains confidential information which may not be reproduced or transmitted without the express written consent of Cerner. Page 180 of 239
NNNooottteeesss
5. Click the order to open the selected order template.
6. If order sentences are associated with a selected order, a box opens listing them. Select the appropriate order sentence and click OK.
Note: You’re order sentence will most likely be displayed, if it is not you can select the closest one and easily make modifications.
7. Once the order is selected, it turns bold and the underline disappears. Click Done to close the search window and view the scratch pad.
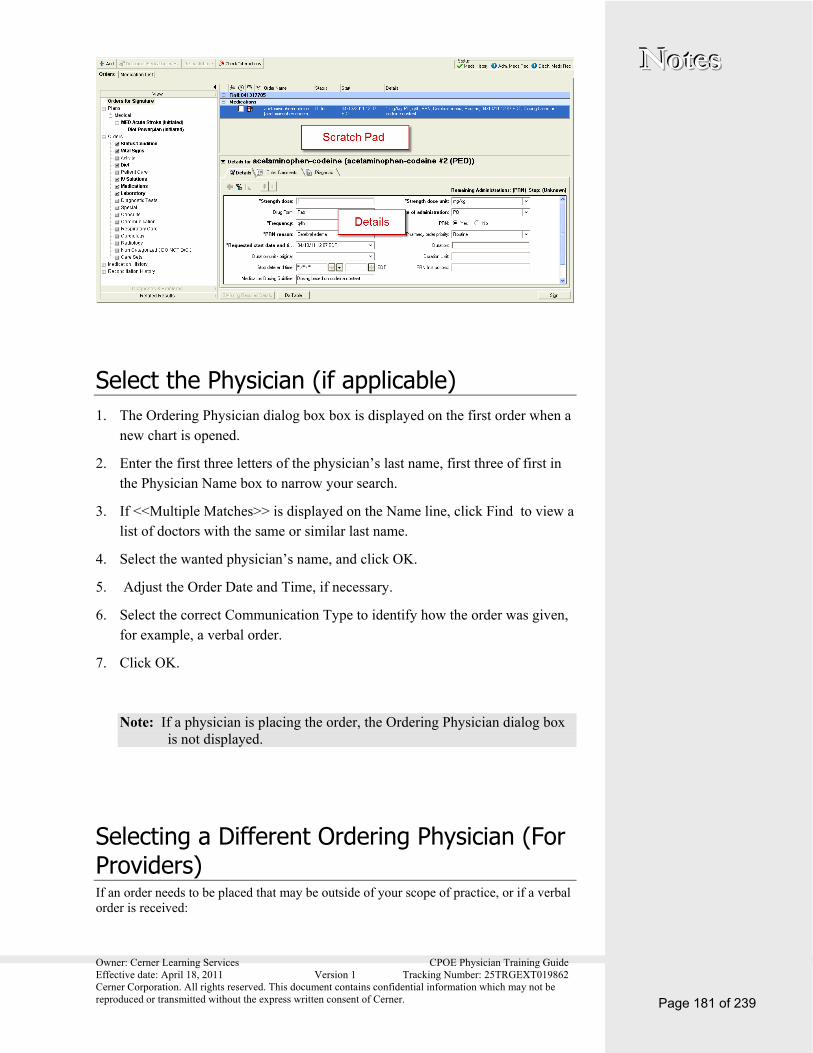
Owner: Cerner Learning Services CPOE Physician Training Guide Effective date: April 18, 2011 Version 1 Tracking Number: 25TRGEXT019862 Cerner Corporation. All rights reserved. This document contains confidential information which may not be reproduced or transmitted without the express written consent of Cerner.
NNNooottteeesss
Page 181 of 239
Select the Physician (if applicable) 1. The Ordering Physician dialog box box is displayed on the first order when a
new chart is opened.
2. Enter the first three letters of the physician’s last name, first three of first in the Physician Name box to narrow your search.
3. If <<Multiple Matches>> is displayed on the Name line, click Find to view a list of doctors with the same or similar last name.
4. Select the wanted physician’s name, and click OK.
5. Adjust the Order Date and Time, if necessary.
6. Select the correct Communication Type to identify how the order was given, for example, a verbal order.
7. Click OK.
Note: If a physician is placing the order, the Ordering Physician dialog box is not displayed.
Selecting a Different Ordering Physician (For Providers) If an order needs to be placed that may be outside of your scope of practice, or if a verbal order is received:
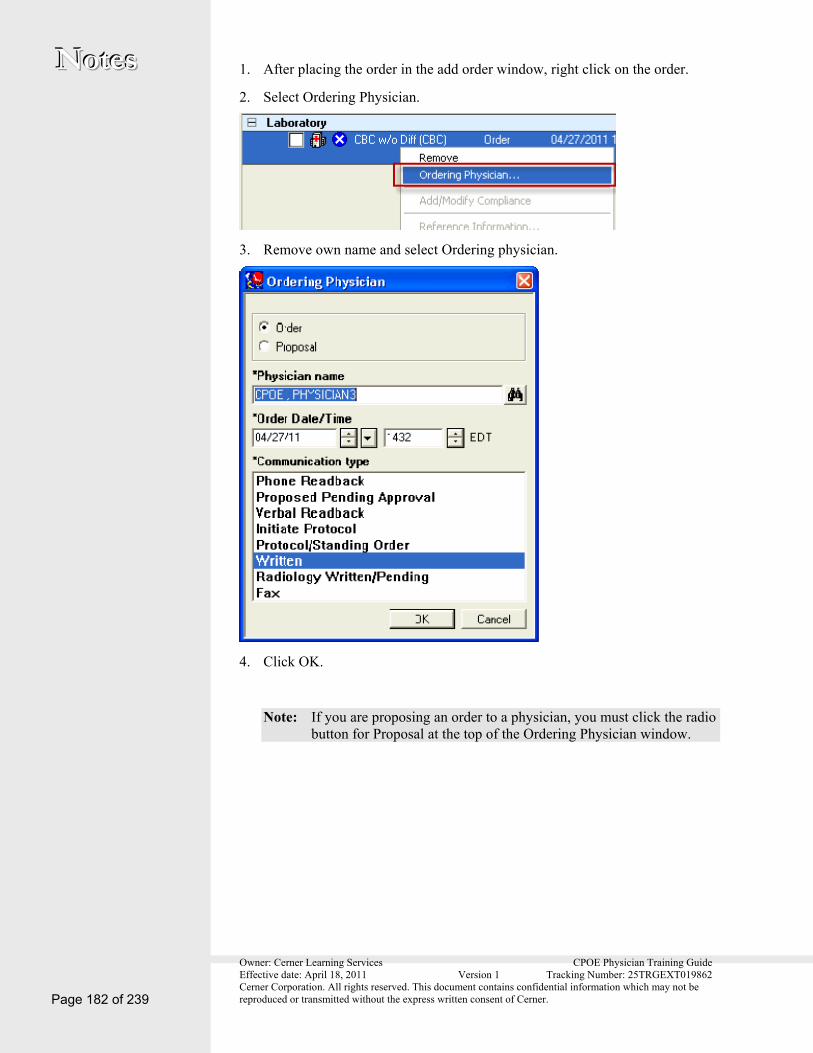
Owner: Cerner Learning Services CPOE Physician Training Guide Effective date: April 18, 2011 Version 1 Tracking Number: 25TRGEXT019862 Cerner Corporation. All rights reserved. This document contains confidential information which may not be reproduced or transmitted without the express written consent of Cerner. Page 182 of 239
NNNooottteeesss 1. After placing the order in the add order window, right click on the order.
2. Select Ordering Physician.
3. Remove own name and select Ordering physician.
4. Click OK.
Note: If you are proposing an order to a physician, you must click the radio button for Proposal at the top of the Ordering Physician window.
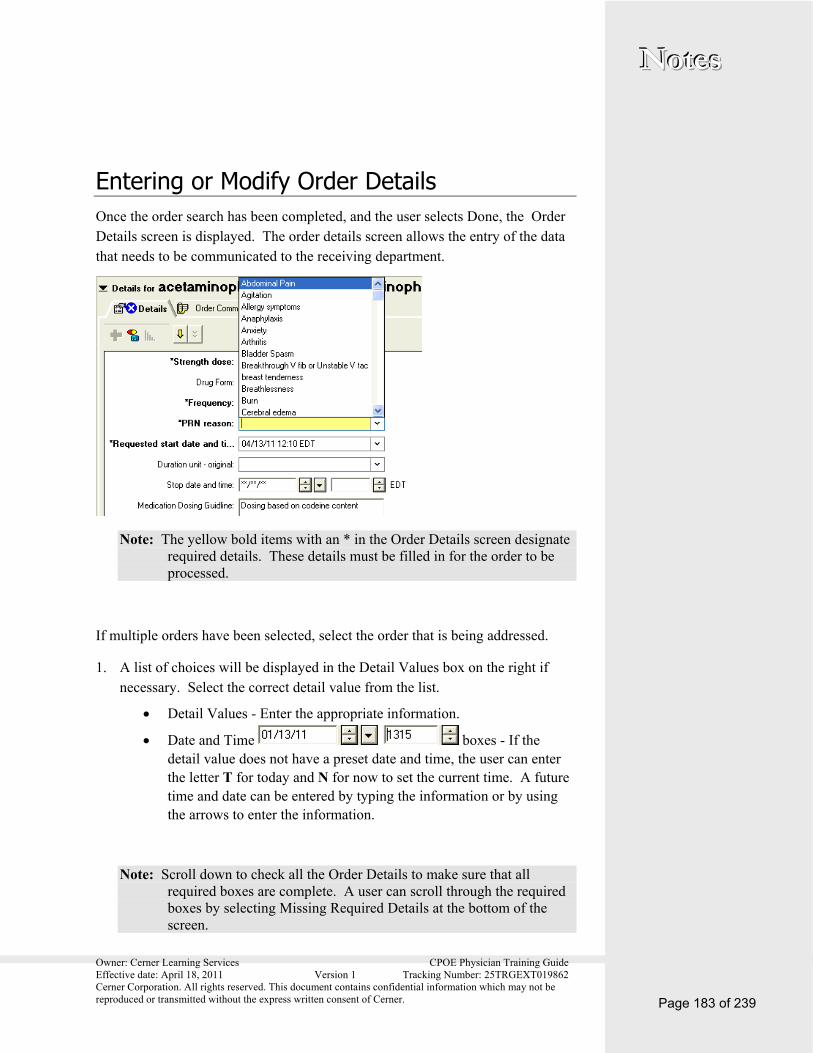
Owner: Cerner Learning Services CPOE Physician Training Guide Effective date: April 18, 2011 Version 1 Tracking Number: 25TRGEXT019862 Cerner Corporation. All rights reserved. This document contains confidential information which may not be reproduced or transmitted without the express written consent of Cerner.
NNNooottteeesss
Page 183 of 239
Entering or Modify Order Details Once the order search has been completed, and the user selects Done, the Order Details screen is displayed. The order details screen allows the entry of the data that needs to be communicated to the receiving department.
Note: The yellow bold items with an * in the Order Details screen designate required details. These details must be filled in for the order to be processed.
If multiple orders have been selected, select the order that is being addressed.
1. A list of choices will be displayed in the Detail Values box on the right if necessary. Select the correct detail value from the list.
Detail Values - Enter the appropriate information.
Date and Time boxes - If the detail value does not have a preset date and time, the user can enter the letter T for today and N for now to set the current time. A future time and date can be entered by typing the information or by using the arrows to enter the information.
Note: Scroll down to check all the Order Details to make sure that all required boxes are complete. A user can scroll through the required boxes by selecting Missing Required Details at the bottom of the screen.
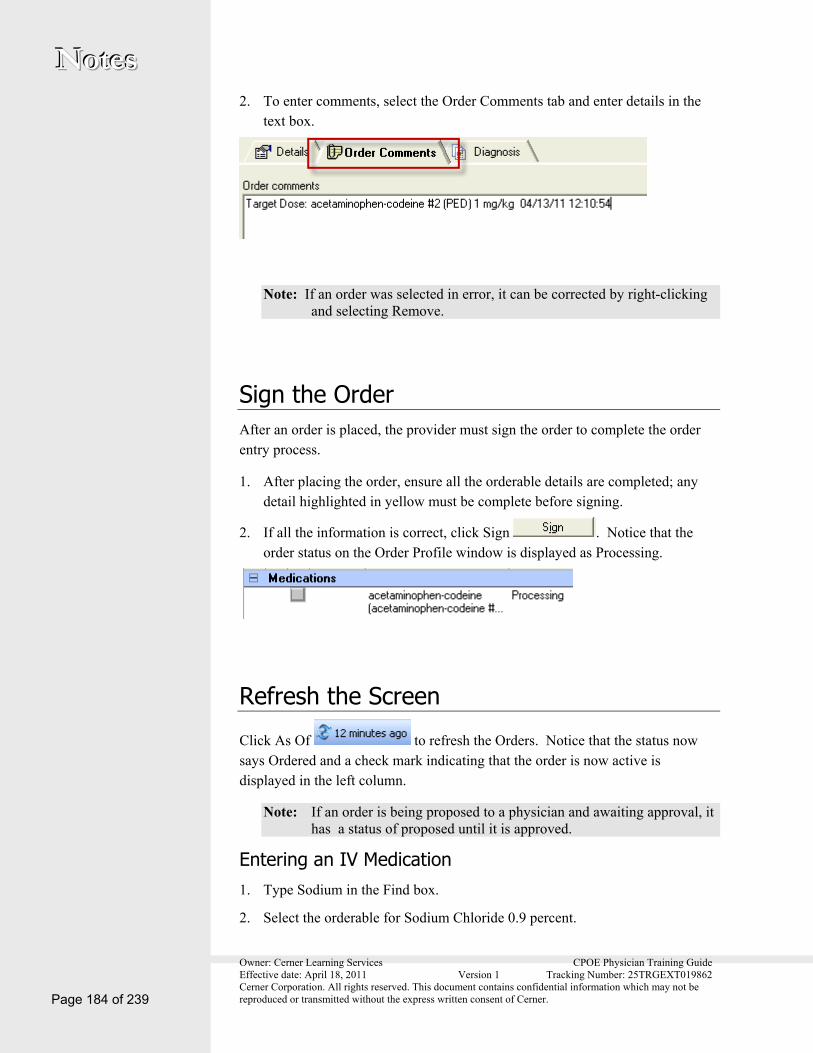
Owner: Cerner Learning Services CPOE Physician Training Guide Effective date: April 18, 2011 Version 1 Tracking Number: 25TRGEXT019862 Cerner Corporation. All rights reserved. This document contains confidential information which may not be reproduced or transmitted without the express written consent of Cerner. Page 184 of 239
NNNooottteeesss
2. To enter comments, select the Order Comments tab and enter details in the text box.
Note: If an order was selected in error, it can be corrected by right-clicking and selecting Remove.
Sign the Order After an order is placed, the provider must sign the order to complete the order entry process.
1. After placing the order, ensure all the orderable details are completed; any detail highlighted in yellow must be complete before signing.
2. If all the information is correct, click Sign . Notice that the order status on the Order Profile window is displayed as Processing.
Refresh the Screen
Click As Of to refresh the Orders. Notice that the status now says Ordered and a check mark indicating that the order is now active is displayed in the left column.
Note: If an order is being proposed to a physician and awaiting approval, it has a status of proposed until it is approved.
Entering an IV Medication 1. Type Sodium in the Find box.
2. Select the orderable for Sodium Chloride 0.9 percent.

Owner: Cerner Learning Services CPOE Physician Training Guide Effective date: April 18, 2011 Version 1 Tracking Number: 25TRGEXT019862 Cerner Corporation. All rights reserved. This document contains confidential information which may not be reproduced or transmitted without the express written consent of Cerner.
NNNooottteeesss
Page 185 of 239
3. From Order Sentences, select 1000mL, IV, 20 mL/hr, and click OK and then Done.
4. Review order information on the scratch pad.
5. Click Sign to complete the order.
6. Click Refresh to refresh the orders screen.
Modify the Order Orders can be modified once they have been placed.
1. Right-click the order and select Modify.
Note: Modifications submitted by someone besides the physicians come across as a proposed order for the physician to approve.
2. Modify the order using the order details.
3. Click Orders for Signature to display available orders for signature.
4. Review the order, and click Sign.
Note: To review the modification history right-click and select Order Information. Modification history is displayed in the History tab.
Cancel Orders Orders can be canceled after they have been placed; however, the original entry is always a part of the electronic record and the change is noted as a cancellation. Complete the following steps to cancel an order from the Quick Orders view:
1. Right-click the order and select Cancel/Discontinue.
Note: If the Cancel command is inactive, it could be because all or part of the order has already been carried out.

Owner: Cerner Learning Services CPOE Physician Training Guide Effective date: April 18, 2011 Version 1 Tracking Number: 25TRGEXT019862 Cerner Corporation. All rights reserved. This document contains confidential information which may not be reproduced or transmitted without the express written consent of Cerner. Page 186 of 239
NNNooottteeesss
2. The Order Details window is displayed at the bottom of the Orders Profile window. Enter the correct date and time and cancellation reason.
3. Chose your Discontinue Reason.
4. Click Orders for Signature.
5. Click Sign.
6. Click to refresh the screen.
Cancel/Reorder 1. If an order is signed and needs to be changed, right-click the order.
2. Select Cancel/Reorder. This allows the user to cancel an existing order and place another order for the same orderable item.
Duplicate Order Occasionally a Duplicate Order Alert is displayed after Sign is selected. This alert indicates that you are attempting to order something that has already been ordered.

Owner: Cerner Learning Services CPOE Physician Training Guide Effective date: April 18, 2011 Version 1 Tracking Number: 25TRGEXT019862 Cerner Corporation. All rights reserved. This document contains confidential information which may not be reproduced or transmitted without the express written consent of Cerner.
NNNooottteeesss
Page 187 of 239
1. The buttons along the bottom of the window indicate that the provider can Order Anyway, Remove, or Modify the duplicate order. The choices apply to the selected orderable. Make the appropriate selection.
Order Anyway – Allows the duplicate order to be placed.
Remove – Cancels the new order.
Modify – Lets the provider change the new order.
2. If more than one duplicate order is listed, repeat this procedure until all are completed.
3. Click OK.
4. Click As Of to refresh the screen.
Note: If a lab order is placed that is also within another lab order, the lab system cancels the order placed last. To avoid this, the orders must be placed with a different priority. For example, a CBC with a Stat priority and a RBC with RT priority would allow both orders to be placed.
Display Order Information A lot of information about an order can be viewed in a summary box. This includes who ordered the test, who and when the order was placed into the system, comments, details, and much more.
1. From the order profile, double-click the order, or right-click the order and from the shortcut menu, select Order Information.
2. The Order Information window is displayed. Click the tab you want to obtain information from.
The Order Info window can include the following tabs:
Additional Info – Displays the order name, start time, stop time, order ID number and department status.
Comments – Displays order comments entered for the selected order with the most recent listed on top.
Details – Displays the order format and the current details for the order. If any details have been modified, the newest values are displayed.

Owner: Cerner Learning Services CPOE Physician Training Guide Effective date: April 18, 2011 Version 1 Tracking Number: 25TRGEXT019862 Cerner Corporation. All rights reserved. This document contains confidential information which may not be reproduced or transmitted without the express written consent of Cerner. Page 188 of 239
NNNooottteeesss History – Displays each action taken on an order in reverse chronological order. The initial order action displays the order details. Subsequent modifications show before and after detail information for comparison.
Results – Displays results for an order.
Pharmacy – Displays more detailed information about the pharmacy order. You can view dispensing information, medication administration instructions and notes, and pharmacy/nursing communications.
Ingredients – Displays the ingredients of a pharmacy order.
3. Click Exit when finished.
Add Order Favorites Orders can be placed into favorite folders for easier access to commonly placed orders. Each provider can create and maintain their own favorites folders.
Favorites folders allow you to quickly select common orders, instead of searching for them each time.
Adding Orders to Favorites from Add Order Window Add orders to favorites folders for quicker access to commonly placed orders.
1. From the Add Order window, select the item to add to your Favorites folder.
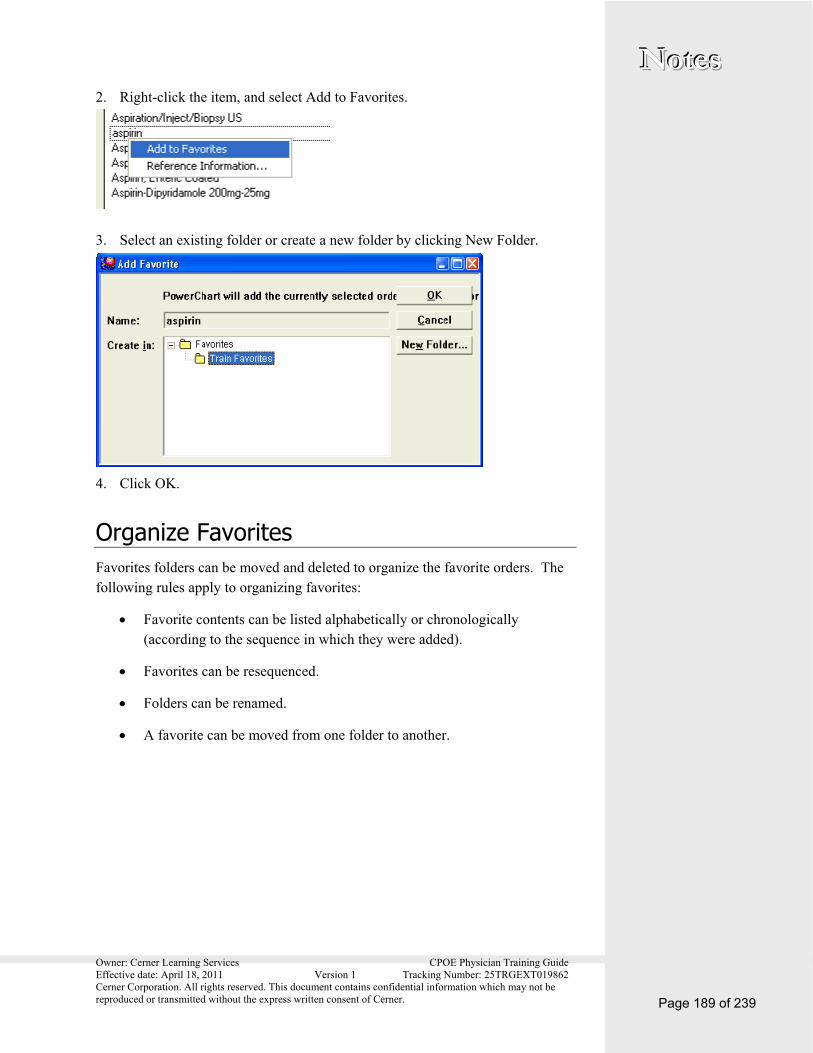
Owner: Cerner Learning Services CPOE Physician Training Guide Effective date: April 18, 2011 Version 1 Tracking Number: 25TRGEXT019862 Cerner Corporation. All rights reserved. This document contains confidential information which may not be reproduced or transmitted without the express written consent of Cerner.
NNNooottteeesss
Page 189 of 239
2. Right-click the item, and select Add to Favorites.
3. Select an existing folder or create a new folder by clicking New Folder.
4. Click OK.
Organize Favorites Favorites folders can be moved and deleted to organize the favorite orders. The following rules apply to organizing favorites:
Favorite contents can be listed alphabetically or chronologically (according to the sequence in which they were added).
Favorites can be resequenced.
Folders can be renamed.
A favorite can be moved from one folder to another.

Owner: Cerner Learning Services CPOE Physician Training Guide Effective date: April 18, 2011 Version 1 Tracking Number: 25TRGEXT019862 Cerner Corporation. All rights reserved. This document contains confidential information which may not be reproduced or transmitted without the express written consent of Cerner. Page 190 of 239
NNNooottteeesss Complete the following steps to organize the Favorites folders and orderables:
1. From the patient’s Order Profile, click Add to display the Add Order window.
2. Click and select Organize Favorites.
3. Organize Favorite window is displayed.
4. Select any of the following options:
To sort folders alphabetically by name, select Sort Favorites Alphabetically. The system sorts folders alphabetically.
Note: If you deselect this option, the folders resort themselves according to the original sequence in which they were added.
To re-sequence the items one by one, select the item and click the Up Arrow or Down Arrow to move it up or down in the listing.
Note: Re-sequencing is not available if the favorites are sorted alphabetically; the Up Arrow and Down Arrow icons are disabled.
To rename a folder or an orderable, select the item, click Rename, and enter the new name.
Note: If the Sort Favorites Alphabetically option is selected, the system automatically resorts the list.
To move an orderable from one Favorites folder to another, you can select, drag, and drop the orderable into its new location.

Owner: Cerner Learning Services CPOE Physician Training Guide Effective date: April 18, 2011 Version 1 Tracking Number: 25TRGEXT019862 Cerner Corporation. All rights reserved. This document contains confidential information which may not be reproduced or transmitted without the express written consent of Cerner.
NNNooottteeesss
Page 191 of 239
Delete Order from Favorites 1. From the Add Order window, using the instructions above, open the
Favorites folder that contains the item.
2. Select the order for removal by right-clicking the order name and choosing Remove from Favorites.
Continue Orders Complete the following steps to enter a continuing order:
1. Select the order and sentence (See Select Orders section of this guide.)
2. Enter the required Order details (in bold print) in the Orders Detail window. In addition to the required details, click Frequency in the Order Details pane.
3. Select the correct Frequency in the Detail Values pane.
4. If there is an ending time to this order, return to the Order Details pane and click Duration.
5. The Duration is now empty. Enter the number of days, doses, weeks, and so on to which this order would apply.
6. In the Order Details pane, select Duration Unit and the correct time unit.
7. Click Sign.
8. Click As Of to refresh the screen.
Note: When using the search feature for a medication, you must have 3 characters to begin search when using the filter ‘contains’. You may have as few as 1 when searching using the filter ‘starts with’.

Owner: Cerner Learning Services CPOE Physician Training Guide Effective date: April 18, 2011 Version 1 Tracking Number: 25TRGEXT019862 Cerner Corporation. All rights reserved. This document contains confidential information which may not be reproduced or transmitted without the express written consent of Cerner. Page 192 of 239
NNNooottteeesss Note: To order a non-formulary product, use the Template Non-Formulary order form. When the correct Nonformulary order is selected, a blank screen is provided for you to enter the medication requested.
Points to Remember If no duration and duration unit were entered for the parent order, the order is continually regenerated until someone cancels the parent order.
Canceling one of the child orders cancels only that occurrence.
Any child instances of continuing orders that are already generated and have a start date and time prior to the cancellation date and time remains in an ordered status. Child orders with a future start date and time are cancelled.
Canceling the parent order stops the additional generation of orders.
Changing the Ordering Physician, Order Date, or Order Communication Type (If Applicable) If entering orders from more than one physician but on the same patient, the user needs to change the ordering physician.
1. Enter orders from the first physician as previously instructed.
2. Enter an order from the second physician. In the Orders Profile window, right-click the order, and select Ordering Physician.
3. The Ordering Physician box is displayed. Modify the Physician Name, Order Date, or Communication Type as needed. Click OK.
4. Complete entering the required data and click Sign.
5. Click As Of to refresh the screen.

Owner: Cerner Learning Services CPOE Physician Training Guide Effective date: April 18, 2011 Version 1 Tracking Number: 25TRGEXT019862 Cerner Corporation. All rights reserved. This document contains confidential information which may not be reproduced or transmitted without the express written consent of Cerner.
NNNooottteeesss
Page 193 of 239
14. Order Sets
CareSets A careset is a set of orders grouped together under a single title for the convenience of users. Sometimes they are referred to as panels, protocols, or workups. Care sets are created according to the specifications of each organization.
1. Click the New Orders icon. The Add Order window opens.
2. Select the careset in the same manner as any other orderable. Care sets are
indicated by the care set icon . The Care Set window is displayed. Careset orders are included (displayed as pre-selected when the careset is selected), excluded (displayed as de-selected when the careset is selected) or required (displayed as included and the user cannot change).
3. Order sentences can be included to default the most commonly ordered information in the order details.
4. Modify order details for Components of the care set as needed. Order details are displayed in the details window and allow for modification when the item is selected in the careset window.
5. Click OK to save the care set, add it to the patient's profile, and return to the Add Order window. (Click Cancel to return to the Add Order window without saving.)
6. Click Done to return to the profile and sign the order.
7. After signing, click the As Of button to refresh the screen.

Owner: Cerner Learning Services CPOE Physician Training Guide Effective date: April 18, 2011 Version 1 Tracking Number: 25TRGEXT019862 Cerner Corporation. All rights reserved. This document contains confidential information which may not be reproduced or transmitted without the express written consent of Cerner. Page 194 of 239
NNNooottteeesss PowerPlan PowerPlan is a care planning tool that is accessible through Orders in PowerChart. This tool allows you to manage orders, outcomes and interventions as they relate to a predefined plan of care.
PowerPlan has many assets, a few of which are:
Proactive planning prior to activation.
Proactive duplicate checking.
Automatic or manual plan update options.
A Physician Order Set is a typically an ordered PowerPlan. These order sets replace current pre-printed providers order sets, and they can include details such as nursing, medication, diet, and consult orders in a single order as relevant to the need.
Note: Select a problem/diagnosis and suggest a PowerPlan. When ordering, select a diagnosis or problem that is associated with the order and incorporated into the order details. This is especially important for outpatient orders for medical necessity checking.
You may also be able to click on a hyperlinked (blue, underlined) diagnosis to see suggested PowerPlans.
PowerPlan Icons The following are the most common icons and symbols you encounter when working with PowerPlan.
Symbol Description
Merge View - Allows proactive duplicate checking.
Initiate - Activates plan orders, outcomes, and interventions.
Discontinue - Discontinuation of Plan.
Add to Phase - Allows Order, Outcome and Interventions to be added quickly.

Owner: Cerner Learning Services CPOE Physician Training Guide Effective date: April 18, 2011 Version 1 Tracking Number: 25TRGEXT019862 Cerner Corporation. All rights reserved. This document contains confidential information which may not be reproduced or transmitted without the express written consent of Cerner.
NNNooottteeesss
Page 195 of 239
Review Excluded Components - Review those items excluded.
Ordering a PowerPlan An order set, or PowerPlan, is a set of orders grouped together under a single title for your convenience.
Complete the following to place a PowerPlan order::
1. Navigate to the Orders section of the patient chart menu.
2. Click Add to open the Add Order dialog box. Enter the wanted order and click Search.
3. From within the search results, select the appropriate plan. A PowerPlan is indicated by the Physician Order Set icon . Click the order once and then click Done. The plan is added to the order profile.
Note: Entering MED in the search box populates the window with multiple order sets. See appendix A for a list of all ordering names.
4. The Order Set displays Planned Pending. You can select or deselect the components of the order set as needed.

Owner: Cerner Learning Services CPOE Physician Training Guide Effective date: April 18, 2011 Version 1 Tracking Number: 25TRGEXT019862 Cerner Corporation. All rights reserved. This document contains confidential information which may not be reproduced or transmitted without the express written consent of Cerner. Page 196 of 239
NNNooottteeesss
Note: Clicking Add to Phase allows you to add orders and Outcome and Interventions to the Order Set at any time.
5. You also have the option to change start and duration times in this window. To adjust the Start, click the ellipses (…) button next to the Start box.
6. To adjust the Duration, click the ellipses next to the Duration box. You can select the amount and designate hours, minutes or days. Click OK.
7. You can modify order details for components of the PowerPlan by clicking the wanted component. Order details display in the Details window and allow for modification when the item is selected in the PowerPlan window.
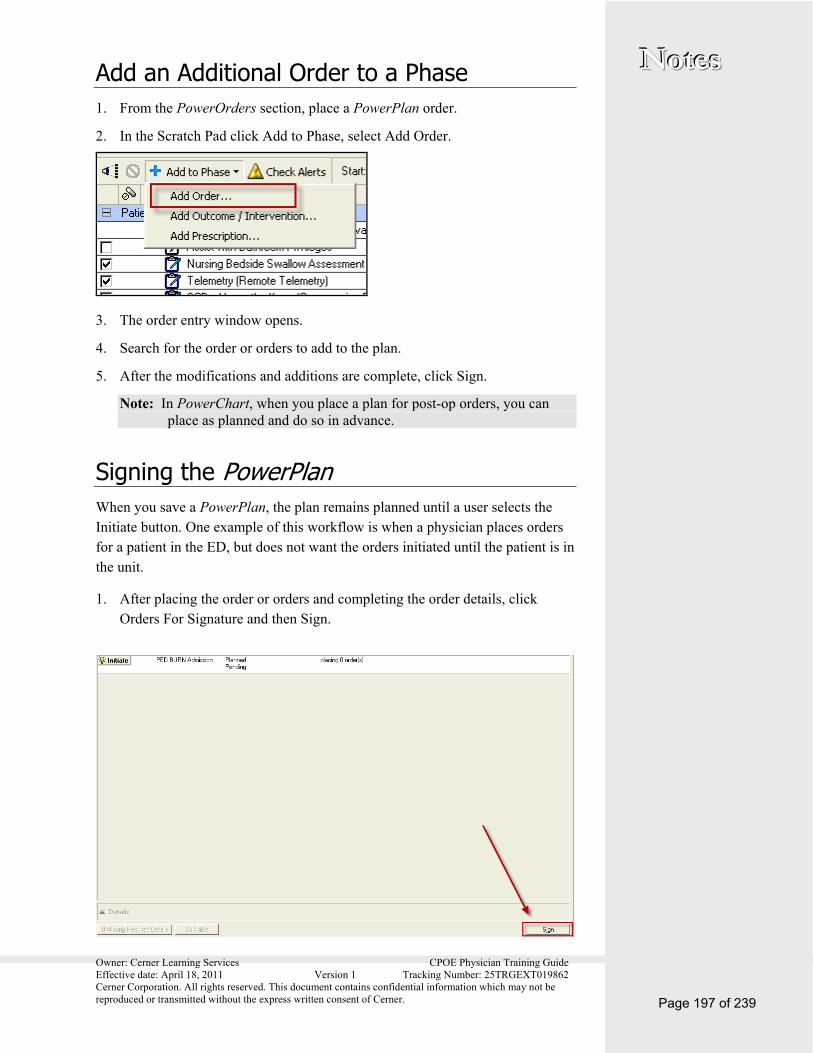
Owner: Cerner Learning Services CPOE Physician Training Guide Effective date: April 18, 2011 Version 1 Tracking Number: 25TRGEXT019862 Cerner Corporation. All rights reserved. This document contains confidential information which may not be reproduced or transmitted without the express written consent of Cerner.
NNNooottteeesss
Page 197 of 239
Add an Additional Order to a Phase 1. From the PowerOrders section, place a PowerPlan order.
2. In the Scratch Pad click Add to Phase, select Add Order.
3. The order entry window opens.
4. Search for the order or orders to add to the plan.
5. After the modifications and additions are complete, click Sign.
Note: In PowerChart, when you place a plan for post-op orders, you can place as planned and do so in advance.
Signing the PowerPlan When you save a PowerPlan, the plan remains planned until a user selects the Initiate button. One example of this workflow is when a physician places orders for a patient in the ED, but does not want the orders initiated until the patient is in the unit.
1. After placing the order or orders and completing the order details, click Orders For Signature and then Sign.

Owner: Cerner Learning Services CPOE Physician Training Guide Effective date: April 18, 2011 Version 1 Tracking Number: 25TRGEXT019862 Cerner Corporation. All rights reserved. This document contains confidential information which may not be reproduced or transmitted without the express written consent of Cerner. Page 198 of 239
NNNooottteeesss 2. Notice that the order status is displayed as Processing.
Refreshing the Screen
Click Refresh (circular arrows) to refresh the orders screen. The Refresh button displays the number of minutes since the last time the current screen was refreshed.
Note: Signing the plan without selecting the Initiate button, saves the plan but does not communicate all the orders to the appropriate departments.
Once the plan has been signed and refreshed, it is displayed s in a planned state in the View panel until the plan is initiated.
Initiating the Plan A plan can be initiated one of several ways:
Right-click the planned PowerPlan.

Owner: Cerner Learning Services CPOE Physician Training Guide Effective date: April 18, 2011 Version 1 Tracking Number: 25TRGEXT019862 Cerner Corporation. All rights reserved. This document contains confidential information which may not be reproduced or transmitted without the express written consent of Cerner.
NNNooottteeesss
Page 199 of 239
By clicking Initiate .
Note: Nursing and support staff can also initiate a plan.
1. At this time, the system prompts you to complete any order entry details required to process your order or orders (just like completing any other order).
2. Click Orders for Signature.
3. Review the order and click Sign.
Note: PowerPlans can still be associated to a diagnosis by clicking Dx Table,and making the appropriate selections.
4. Click Refresh. The PowerPlan now displays in an Initiated state.
5. Plan orders are displayed in the order profile once added.
Modify a Planned Order 1. From the PowerOrders section, select the initiated PowerPlan.
2. Right-click the order and select Modify Planned Order.

Owner: Cerner Learning Services CPOE Physician Training Guide Effective date: April 18, 2011 Version 1 Tracking Number: 25TRGEXT019862 Cerner Corporation. All rights reserved. This document contains confidential information which may not be reproduced or transmitted without the express written consent of Cerner. Page 200 of 239
NNNooottteeesss
3. The order details window is displayed and is available for modification. Complete the modification as you would with any other order.
4. Click Orders For Signature.
5. Click Sign and then Refresh the page.
Working with PowerPlan Sub-Phases A sub-phase is a single-phase plan that is added as a component to another plan. Notice that it is nested beneath the plan it is associated with and it follows the actions of the plan. An example of a Plan with Sub-Phases is the Hospitalization Order set and Alcohol withdrawal.
1. From the PowerOrders section, place a PowerPlan order.
2. Select the Sub-Phase option. Sub-Phases are indicated by an icon.
3. The status of the Sub-Phase is Initiated Pending.
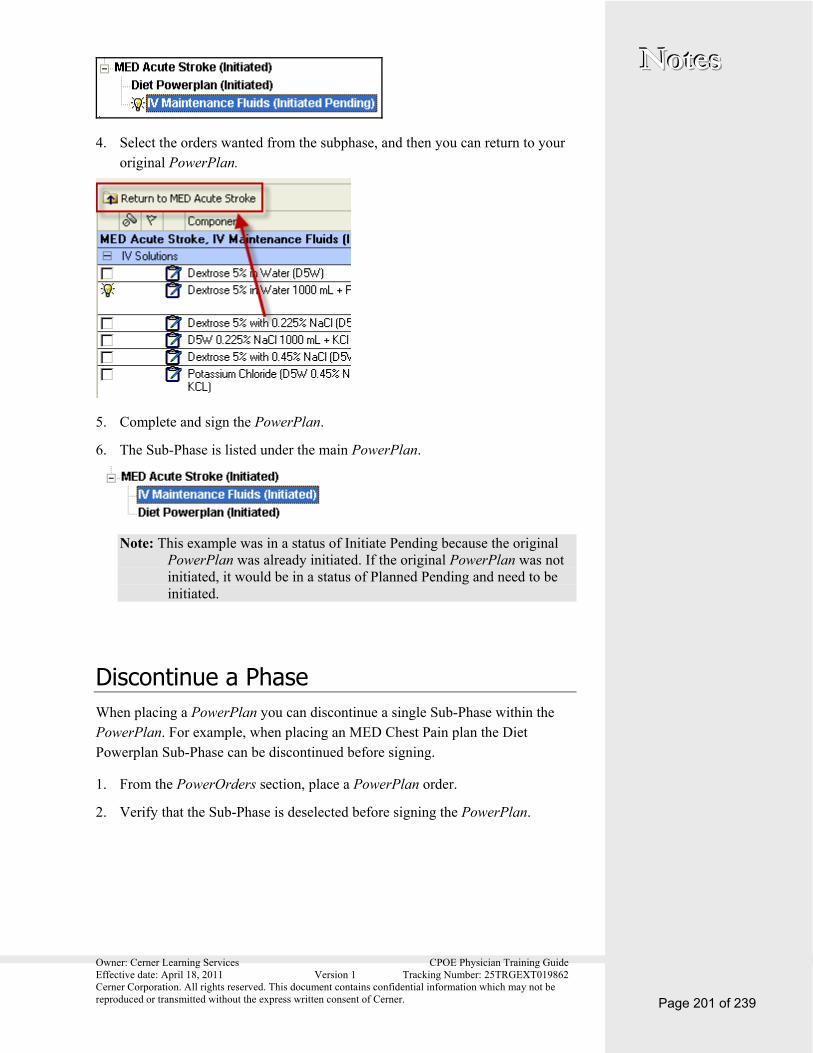
Owner: Cerner Learning Services CPOE Physician Training Guide Effective date: April 18, 2011 Version 1 Tracking Number: 25TRGEXT019862 Cerner Corporation. All rights reserved. This document contains confidential information which may not be reproduced or transmitted without the express written consent of Cerner.
NNNooottteeesss
Page 201 of 239
4. Select the orders wanted from the subphase, and then you can return to your original PowerPlan.
5. Complete and sign the PowerPlan.
6. The Sub-Phase is listed under the main PowerPlan.
Note: This example was in a status of Initiate Pending because the original PowerPlan was already initiated. If the original PowerPlan was not initiated, it would be in a status of Planned Pending and need to be initiated.
Discontinue a Phase When placing a PowerPlan you can discontinue a single Sub-Phase within the PowerPlan. For example, when placing an MED Chest Pain plan the Diet Powerplan Sub-Phase can be discontinued before signing.
1. From the PowerOrders section, place a PowerPlan order.
2. Verify that the Sub-Phase is deselected before signing the PowerPlan.

Owner: Cerner Learning Services CPOE Physician Training Guide Effective date: April 18, 2011 Version 1 Tracking Number: 25TRGEXT019862 Cerner Corporation. All rights reserved. This document contains confidential information which may not be reproduced or transmitted without the express written consent of Cerner. Page 202 of 239
NNNooottteeesss
Discontinue an Initiated PowerPlan Complete the following steptto discontinue an initiated plan:
1. From the View window, locate the PowerPlan you want to cancel and right-click.
2. Click Discontinue.
3. Select the orders you want to discontinue and click Ok.
4. The plan goes into a Discontinue Pending phase.
5. Click Orders for Signature.
6. Click Sign and then Refresh the page. The plan is now in a Discontinued phase.
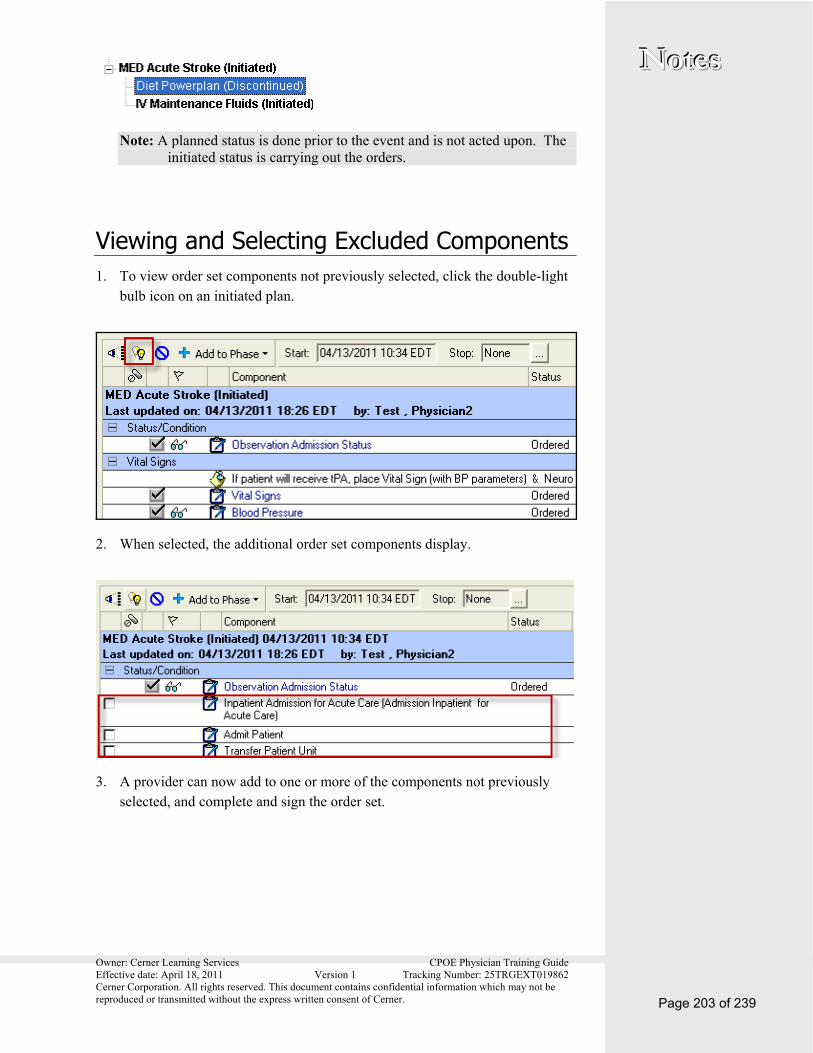
Owner: Cerner Learning Services CPOE Physician Training Guide Effective date: April 18, 2011 Version 1 Tracking Number: 25TRGEXT019862 Cerner Corporation. All rights reserved. This document contains confidential information which may not be reproduced or transmitted without the express written consent of Cerner.
NNNooottteeesss
Page 203 of 239
Note: A planned status is done prior to the event and is not acted upon. The initiated status is carrying out the orders.
Viewing and Selecting Excluded Components 1. To view order set components not previously selected, click the double-light
bulb icon on an initiated plan.
2. When selected, the additional order set components display.
3. A provider can now add to one or more of the components not previously selected, and complete and sign the order set.

Owner: Cerner Learning Services CPOE Physician Training Guide Effective date: April 18, 2011 Version 1 Tracking Number: 25TRGEXT019862 Cerner Corporation. All rights reserved. This document contains confidential information which may not be reproduced or transmitted without the express written consent of Cerner. Page 204 of 239
NNNooottteeesss 15. Clinical Notes (PowerNote)
Basics Use Clinical Notes to document the patient encounter and create an electronic record of that encounter. Clinical Notes allows you to complete an entire patient encounter, including writing documentation, reviewing results, assigning a diagnosis, and placing orders by using PowerNote.
Features of the PowerNote include:
Immediate availability of posted information.
Sort documents by author, date, encounter type, note type, and note status.
Accurately capture edits and addenda to documents. The original document remains preserved with an unlimited number of corrections and emendations attached to it.
Visual alerts in both icon and alphanumeric form show providers when clinical results are available in the system.
Note: Remember to use the Refresh button frequently.
Creating a PowerNote starts with selecting an encounter pathway, which is designed for a single, specific reason for encounter. The encounter pathway then expands to display all the elements of the diagnostic exam, from the symptoms of the present illness to treatment plans and a final diagnosis (including ICD-9 billing codes). The encounter pathway serves as a template, with data based on best practices, enabling the healthcare provider to focus on questioning, the examination, and overall patient evaluation
PowerNote Overview Before generating a new PowerNote, familiarize yourself with the general features of the PowerNote so that you understand its capabilities.
PowerNote Organization A PowerNote is organized into two sections: the Navigator and the PowerNote Documentation Area.

Owner: Cerner Learning Services CPOE Physician Training Guide Effective date: April 18, 2011 Version 1 Tracking Number: 25TRGEXT019862 Cerner Corporation. All rights reserved. This document contains confidential information which may not be reproduced or transmitted without the express written consent of Cerner.
NNNooottteeesss
Page 205 of 239
Navigating PowerNote After selecting the Clinical Notes section from the chart menu, Clinical Notes is organized into a navigator pane on the left, listing the notes available, and a PowerNote workspace on the right.
PowerNote Navigator
The navigator organizes the sections of the selected PowerNote, called paragraphs. The paragraphs are listed in a tree in the navigator. Click the plus sign next to a paragraph to reveal the available sections of information, called sentences. To navigate quickly throughout the note documentation, click a
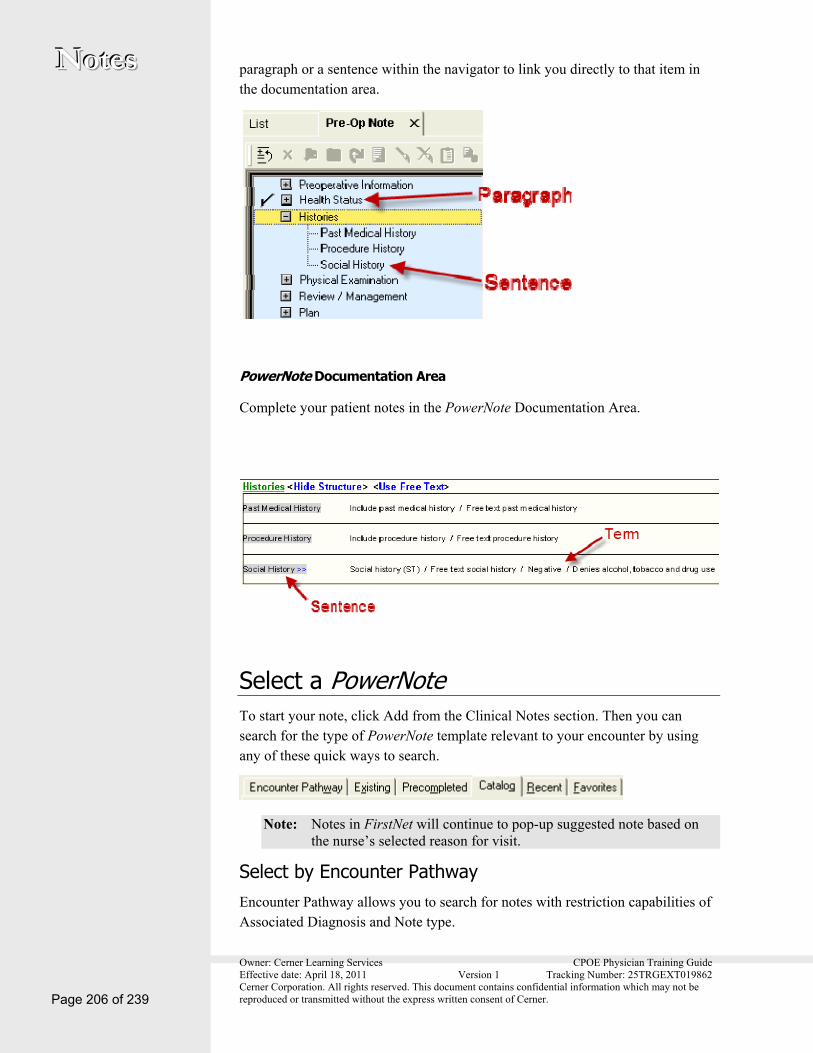
Owner: Cerner Learning Services CPOE Physician Training Guide Effective date: April 18, 2011 Version 1 Tracking Number: 25TRGEXT019862 Cerner Corporation. All rights reserved. This document contains confidential information which may not be reproduced or transmitted without the express written consent of Cerner. Page 206 of 239
NNNooottteeesss paragraph or a sentence within the navigator to link you directly to that item in the documentation area.
PowerNote Documentation Area
Complete your patient notes in the PowerNote Documentation Area.
Select a PowerNote To start your note, click Add from the Clinical Notes section. Then you can search for the type of PowerNote template relevant to your encounter by using any of these quick ways to search.
Note: Notes in FirstNet will continue to pop-up suggested note based on the nurse’s selected reason for visit.
Select by Encounter Pathway Encounter Pathway allows you to search for notes with restriction capabilities of Associated Diagnosis and Note type.
Owner: Cerner Learning Services CPOE Physician Training Guide Effective date: April 18, 2011 Version 1 Tracking Number: 25TRGEXT019862 Cerner Corporation. All rights reserved. This document contains confidential information which may not be reproduced or transmitted without the express written consent of Cerner.
NNNooottteeesss
Page 207 of 239
Select by Existing PowerNote Start a PowerNote by basing it on a note you previously saved or signed. Options exist for viewing notes from the current encounter or all encounters. There is also an option for viewing only your notes. You also have the ability to see only unsigned notes. You can finish notes that are in a saved status and sign them, or you can copy a signed note to a new note and edit the new note that is created by this action. If there is the need to delete a saved note, it can be done from this tab.
Select by Precompleted PowerNote If you create your patient notes using a consistent style or format, you can save a note as a Precompleted note and use this note format from one patient to the next. You can select whether you would like to see only your Precompleted notes, or the Precompleted notes that are shared across the organization. Remember to change or edit the date, time, and other patient-specific information when using Precompleted notes.
Select by PowerNote Catalog Start a new note by selecting a template from the PowerNote Catalog. Notes found in the Catalog tab are referred to as encounter pathways.
Select by Recent PowerNote This option displays the most recent notes that you have accessed, either through the care design or from the Precompleted notes list. The most recent note you have used is listed at the top.
Select by Favorite PowerNote When you add a PowerNote to your Favorites, you can easily find the note by searching your Favorites.
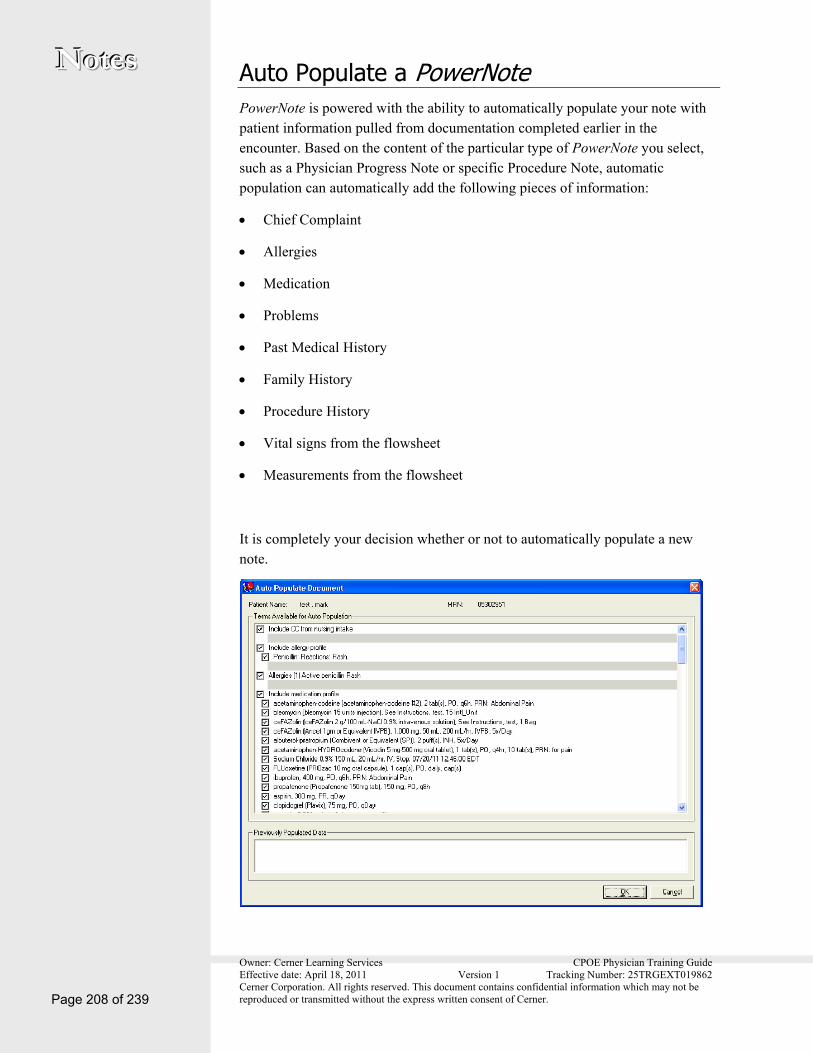
Owner: Cerner Learning Services CPOE Physician Training Guide Effective date: April 18, 2011 Version 1 Tracking Number: 25TRGEXT019862 Cerner Corporation. All rights reserved. This document contains confidential information which may not be reproduced or transmitted without the express written consent of Cerner. Page 208 of 239
NNNooottteeesss Auto Populate a PowerNote PowerNote is powered with the ability to automatically populate your note with patient information pulled from documentation completed earlier in the encounter. Based on the content of the particular type of PowerNote you select, such as a Physician Progress Note or specific Procedure Note, automatic population can automatically add the following pieces of information:
Chief Complaint
Allergies
Medication
Problems
Past Medical History
Family History
Procedure History
Vital signs from the flowsheet
Measurements from the flowsheet
It is completely your decision whether or not to automatically populate a new note.

Owner: Cerner Learning Services CPOE Physician Training Guide Effective date: April 18, 2011 Version 1 Tracking Number: 25TRGEXT019862 Cerner Corporation. All rights reserved. This document contains confidential information which may not be reproduced or transmitted without the express written consent of Cerner.
NNNooottteeesss
Page 209 of 239
View Sentences In PowerNote The right-facing double arrow next to each sentence enables you to expand the sentence to reveal additional terms. The left-facing double arrow enables you to collapse the sentence to hide the expanded terms.
Use Mouse for Data Entry in PowerNote Your mouse is the main tool for data entry in the PowerNote. By positioning the pointer over a term, you can perform the following actions:
Click a term once so that term is displayed in your final signed note.
Click a term a second time to chart a pertinent negative so the negative is displayed in your final signed note.
Click a term a third time to clear the selection.
Note: If you decide that you do not want to document anything for a particular sentence, right-click the sentence and clear the sentence. Doing this removes the heading from the text summary.
Add Comments to Terms in PowerNote You can add comments to a term in your note by peforming the following actions:
1. Right-click the term and select Comment.
2. Enter the comment, and click OK.
3. The comment is displayed in parentheses within the note.

Owner: Cerner Learning Services CPOE Physician Training Guide Effective date: April 18, 2011 Version 1 Tracking Number: 25TRGEXT019862 Cerner Corporation. All rights reserved. This document contains confidential information which may not be reproduced or transmitted without the express written consent of Cerner. Page 210 of 239
NNNooottteeesss In addition, you can enter comments in any sentence that has the term Other as an option. For example, when completing Review of Symptoms, selecting the finding, Cardiovascular Other, opens a text box allowing you to enter your comments accordingly.
View Paragraphs in PowerNote Hide or reveal whole paragraphs within the note Documentation Area using the Hide Structure or Show Structure link.
This can be very useful in organizing the note. If you hide the structure of each paragraph once you are finished you will see what it will look like in the actual note and be able to tell you are finished.
Free Text in PowerNote To enter free text into a paragraph structure, select the Use Free Text link to activate a free-text cursor within the paragraph.
Note: Use Free Text should be used by all clinicians to tell the story for History of Present Illness (HPI).
Insert Sentences in PowerNote Sentences can be added to a note by using the Insert Sentence function. This allows you to add documentation without the need to create an additional note.
1. Right-click the paragraph name in which you would like to insert a sentence, and select Insert Sentence from the menu.
2. A list of available sentences opens. Click a wanted sentence from the list to insert into your note. Click OK.

Owner: Cerner Learning Services CPOE Physician Training Guide Effective date: April 18, 2011 Version 1 Tracking Number: 25TRGEXT019862 Cerner Corporation. All rights reserved. This document contains confidential information which may not be reproduced or transmitted without the express written consent of Cerner.
NNNooottteeesss
Page 211 of 239
3. The inserted sentence is circled to indicate that it is an inserted sentence.
PowerNote Symbols Indicate Special Action Triple Bar Symbol (===) Some terms have the symbol, = = =.
This symbol indicates that this term requires data to be entered when selecting it, such as a date or number.
1. Click the data entry term, = = =.
2. Enter your data.
Note: Date terms default to today’s date.
3. Click OK when done.
Plus Symbol (+) Some terms have a plus sign (+) at the end of the word. The plus indicates that there are additional details you can document for this term, but they are visible only if you click the term with the plus sign. This is an illustration of a Laceration Repair sentence:
Asterisk Symbol (*) Some terms are repeatable or automatically repeat. This allows you to document the data for multiple occurrences. For example, if your patient received chest tubes in five locations, you need to document all five. To do this, click the asterisk (*) to add additional chest tube terms so you can document specifically about each one.
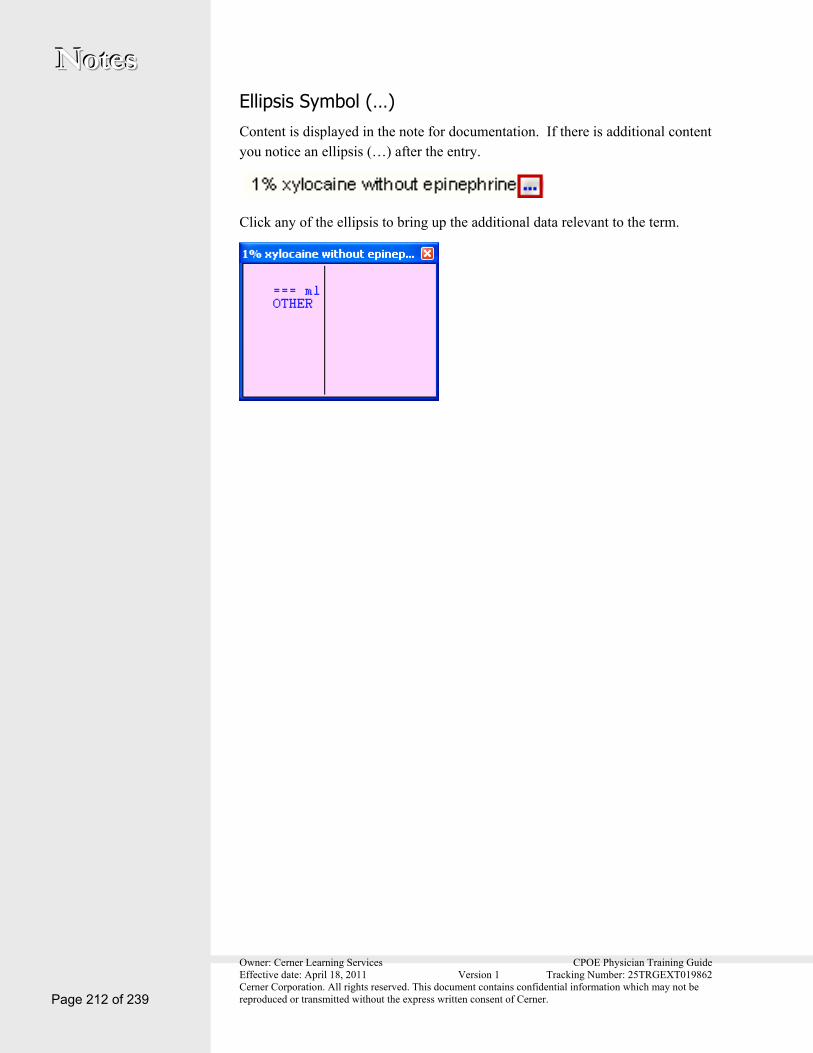
Owner: Cerner Learning Services CPOE Physician Training Guide Effective date: April 18, 2011 Version 1 Tracking Number: 25TRGEXT019862 Cerner Corporation. All rights reserved. This document contains confidential information which may not be reproduced or transmitted without the express written consent of Cerner. Page 212 of 239
NNNooottteeesss
Ellipsis Symbol (…) Content is displayed in the note for documentation. If there is additional content you notice an ellipsis (…) after the entry.
Click any of the ellipsis to bring up the additional data relevant to the term.

Owner: Cerner Learning Services CPOE Physician Training Guide Effective date: April 18, 2011 Version 1 Tracking Number: 25TRGEXT019862 Cerner Corporation. All rights reserved. This document contains confidential information which may not be reproduced or transmitted without the express written consent of Cerner.
NNNooottteeesss
Page 213 of 239
16. Use PowerNote
Start a PowerNote 1. From the Menu, open Clinical Notes.
2. Click Add.
3. The New Note dialog box opens.
4. In the Note Details section, select the type of note from the *Type list.
5. Leave the title field blank.

Owner: Cerner Learning Services CPOE Physician Training Guide Effective date: April 18, 2011 Version 1 Tracking Number: 25TRGEXT019862 Cerner Corporation. All rights reserved. This document contains confidential information which may not be reproduced or transmitted without the express written consent of Cerner. Page 214 of 239
NNNooottteeesss 6. Below the note details, navigate to the PowerNote selection area and search for the appropriate PowerNote template using the tabbed search options.
7. Select your wanted *2G note from the search results.
8. If you frequently use a PowerNote template, select the Add to Favorites button to save it to your Favorites tab. This creates a shortcut to the note so that you can quickly select it next time.
9. After making your selection, click OK to open the PowerNote template.
10. The Auto Populate Document dialog box is displayed. Items selected with a checkmark automatically populate into your note. Use the checkboxes to select or deselect items to automatically populate, and click OK.
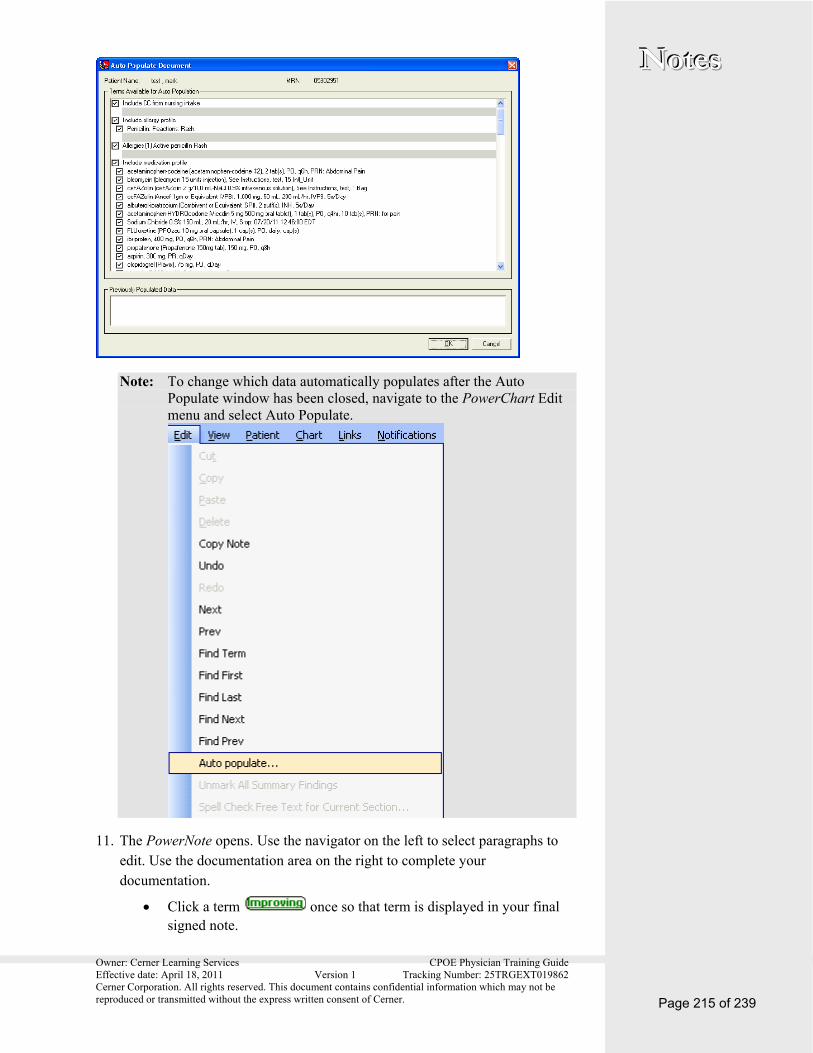
Owner: Cerner Learning Services CPOE Physician Training Guide Effective date: April 18, 2011 Version 1 Tracking Number: 25TRGEXT019862 Cerner Corporation. All rights reserved. This document contains confidential information which may not be reproduced or transmitted without the express written consent of Cerner.
NNNooottteeesss
Page 215 of 239
Note: To change which data automatically populates after the Auto Populate window has been closed, navigate to the PowerChart Edit menu and select Auto Populate.
11. The PowerNote opens. Use the navigator on the left to select paragraphs to edit. Use the documentation area on the right to complete your documentation.
Click a term once so that term is displayed in your final signed note.

Owner: Cerner Learning Services CPOE Physician Training Guide Effective date: April 18, 2011 Version 1 Tracking Number: 25TRGEXT019862 Cerner Corporation. All rights reserved. This document contains confidential information which may not be reproduced or transmitted without the express written consent of Cerner. Page 216 of 239
NNNooottteeesss Click a term a second time to chart a pertinent negative so the negative is displayed in your final signed note.
Click a term a third time to clear the selection.
Right-click a term to add a comment to the term.
Select Other in a sentence to add free text to that sentence.
See the PowerNote Basics chapter to review the features of the note documentation area.
12. When you finish editing your note, select Sign/Submit to complete your note.
Note: If you are not finished documenting and you need to return to complete your note later, click Save & Close. You can find your note later by returning to the PowerNote section in the patient chart.
Use Precompleted Notes PowerNote allows for the creation of precompleted notes that can streamline the documentation process for common conditions. Precompleted notes allow you to customize a template by adding additional sentences or other templates using the standard templates supplied.
Precompleted notes are especially helpful when patients present with common problems or conditions are commonly documented together (for example, coronary artery disease and hypertension).
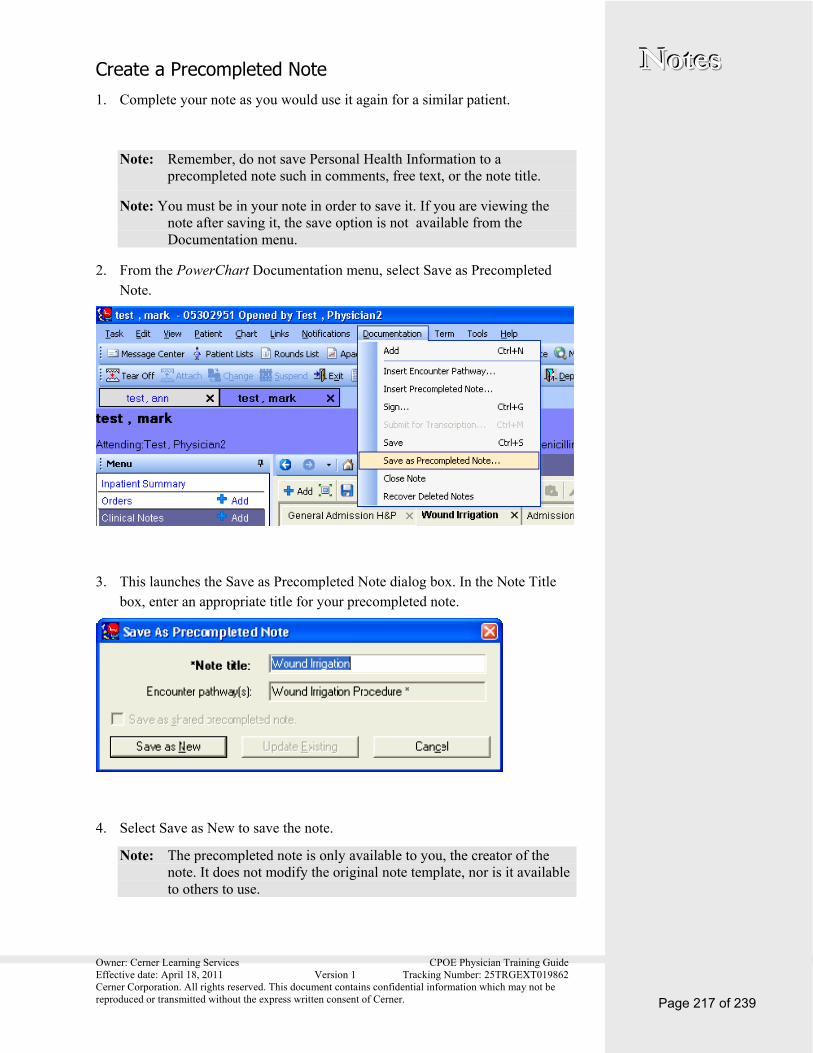
Owner: Cerner Learning Services CPOE Physician Training Guide Effective date: April 18, 2011 Version 1 Tracking Number: 25TRGEXT019862 Cerner Corporation. All rights reserved. This document contains confidential information which may not be reproduced or transmitted without the express written consent of Cerner.
NNNooottteeesss
Page 217 of 239
Create a Precompleted Note 1. Complete your note as you would use it again for a similar patient.
Note: Remember, do not save Personal Health Information to a precompleted note such in comments, free text, or the note title.
Note: You must be in your note in order to save it. If you are viewing the note after saving it, the save option is not available from the Documentation menu.
2. From the PowerChart Documentation menu, select Save as Precompleted Note.
3. This launches the Save as Precompleted Note dialog box. In the Note Title box, enter an appropriate title for your precompleted note.
4. Select Save as New to save the note.
Note: The precompleted note is only available to you, the creator of the note. It does not modify the original note template, nor is it available to others to use.
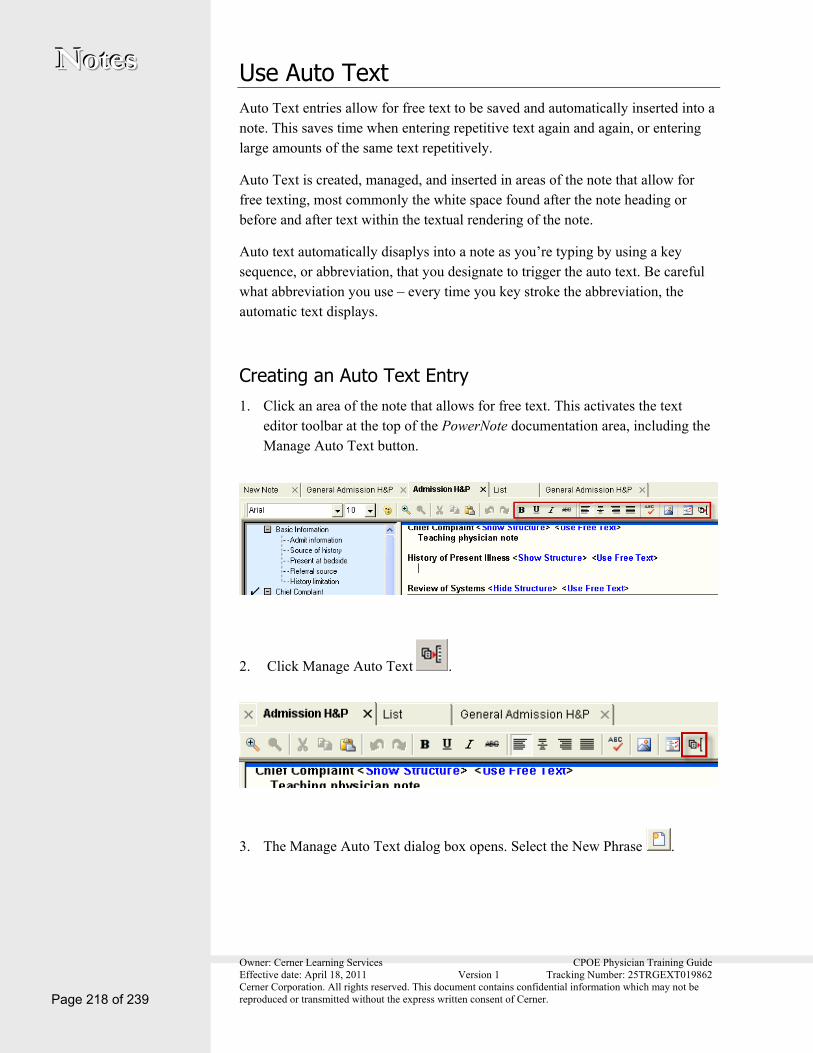
Owner: Cerner Learning Services CPOE Physician Training Guide Effective date: April 18, 2011 Version 1 Tracking Number: 25TRGEXT019862 Cerner Corporation. All rights reserved. This document contains confidential information which may not be reproduced or transmitted without the express written consent of Cerner. Page 218 of 239
NNNooottteeesss Use Auto Text Auto Text entries allow for free text to be saved and automatically inserted into a note. This saves time when entering repetitive text again and again, or entering large amounts of the same text repetitively.
Auto Text is created, managed, and inserted in areas of the note that allow for free texting, most commonly the white space found after the note heading or before and after text within the textual rendering of the note.
Auto text automatically disaplys into a note as you’re typing by using a key sequence, or abbreviation, that you designate to trigger the auto text. Be careful what abbreviation you use – every time you key stroke the abbreviation, the automatic text displays.
Creating an Auto Text Entry 1. Click an area of the note that allows for free text. This activates the text
editor toolbar at the top of the PowerNote documentation area, including the Manage Auto Text button.
2. Click Manage Auto Text .
3. The Manage Auto Text dialog box opens. Select the New Phrase .

Owner: Cerner Learning Services CPOE Physician Training Guide Effective date: April 18, 2011 Version 1 Tracking Number: 25TRGEXT019862 Cerner Corporation. All rights reserved. This document contains confidential information which may not be reproduced or transmitted without the express written consent of Cerner.
NNNooottteeesss
Page 219 of 239
4. In the Abbreviation box, add your free-text abbreviation. This is the method to use when you add your auto-text to the note.
Note: Carefully select your auto text abbreviation. Use an uncommon letter combination that is unlikely to be replicated at the start of ordinary words, such as zz. This helps eliminate your auto text displaying continuously as you type more common letters or letter combinations.
5. Add a description for the abbreviation so that you can easily identify the auto text.
6. Click Add Text to type the text you want displayed when you type the abbreviation.

Owner: Cerner Learning Services CPOE Physician Training Guide Effective date: April 18, 2011 Version 1 Tracking Number: 25TRGEXT019862 Cerner Corporation. All rights reserved. This document contains confidential information which may not be reproduced or transmitted without the express written consent of Cerner. Page 220 of 239
NNNooottteeesss
7. A Formatted Text Entry dialog box is displayed. Type the wanted text you want to save as auto text, and format the text using the options on the toolbar. Click OK when finished.
8. The formatted text displays in the Manage Auto Text box.
9. Click Save to save the automatic text settings, or click Discard to cancel without saving.
Use Macros When certain terms, sentences, or paragraphs of a note are routinely completed with the same information again and again, a macro can be created that automatically documents these in the note.

Owner: Cerner Learning Services CPOE Physician Training Guide Effective date: April 18, 2011 Version 1 Tracking Number: 25TRGEXT019862 Cerner Corporation. All rights reserved. This document contains confidential information which may not be reproduced or transmitted without the express written consent of Cerner.
NNNooottteeesss
Page 221 of 239
An example of using a macro to decrease repetitive patient data entry when the patient assessment or findings are normal is to create a Normal macro for specific sentences in the Review of Systems paragraph.
Create a Macro 1. Complete a section of a note as you would normally. Each paragraph,
sentence, or term that is selected can be saved as a macro.
For example, within the Constitutional sentence select the appropriate choices to reflect your pattern of documentation for ROS when a patient has the flu.
2. After your documentation is entered, right-click the Physical Examination sentence title and select Save Macro As… .
3. The Save As dialog box opens. Specify a name for your macro in the Title box.

Owner: Cerner Learning Services CPOE Physician Training Guide Effective date: April 18, 2011 Version 1 Tracking Number: 25TRGEXT019862 Cerner Corporation. All rights reserved. This document contains confidential information which may not be reproduced or transmitted without the express written consent of Cerner. Page 222 of 239
NNNooottteeesss
4. Click Create New to save the Macro. A blue M is displayed next to the paragraph, or sentence, indicating that a macro has been created.
Note: To run the macro in a future note, when the future note is open, click the M to apply the macro that was created.
Run a Macro Macros are created at the paragraph, sentence, or term level. A macro can be run on any note containing the standard paragraph, sentence, or term based upon which the macro was originally created. Complete the following actions to run a macro:
1. Click the M next to the paragraph, sentence or term containing a macro.

Owner: Cerner Learning Services CPOE Physician Training Guide Effective date: April 18, 2011 Version 1 Tracking Number: 25TRGEXT019862 Cerner Corporation. All rights reserved. This document contains confidential information which may not be reproduced or transmitted without the express written consent of Cerner.
NNNooottteeesss
Page 223 of 239
2. Select the Macro from the box that is displayed, or click More… to see all macros associated with the paragraph or sentence.
3. After selecting the appropriate macro, the macro reproduces whatever you placed in the term, sentence, or paragraph macro when you created it.
Note: If you believe you are using too many keystrokes for something you document frequently, use a macro or a precompleted note.
Update a Macro You can make modifications to a macro that you already created. Complete the following steps to make modifications to an existing macro:
1. Click the M and select the wanted macro to run in your note.
2. After the macro runs, make changes to the relevant paragraph, sentence, or term as affected by the macro.
3. Right-click the relevant paragraph title, sentence title, or term in order to update the macro.
4. Select the Save Macro As option.

Owner: Cerner Learning Services CPOE Physician Training Guide Effective date: April 18, 2011 Version 1 Tracking Number: 25TRGEXT019862 Cerner Corporation. All rights reserved. This document contains confidential information which may not be reproduced or transmitted without the express written consent of Cerner. Page 224 of 239
NNNooottteeesss
5. The Save As dialog box opens.
6. Click Update in order to save the changes that you made to the macro.
Deleting a Macro Complete the following steps to delete a macro that you created:
1. Right-click the paragraph, sentence, or term that the macro is based on.
2. Select Save Macro As from the menu.
3. The Save As dialog box opens. Select the appropriate macro to delete.
4. Click Delete to delete the macro.
5. The following message is displayed: You are about to delete a macro. Continue? Select Yes to delete the macro. The macro is deleted.

Owner: Cerner Learning Services CPOE Physician Training Guide Effective date: April 18, 2011 Version 1 Tracking Number: 25TRGEXT019862 Cerner Corporation. All rights reserved. This document contains confidential information which may not be reproduced or transmitted without the express written consent of Cerner.
NNNooottteeesss
Page 225 of 239
6. Click Cancel to close the dialog box.

Owner: Cerner Learning Services CPOE Physician Training Guide Effective date: April 18, 2011 Version 1 Tracking Number: 25TRGEXT019862 Cerner Corporation. All rights reserved. This document contains confidential information which may not be reproduced or transmitted without the express written consent of Cerner. Page 226 of 239
NNNooottteeesss
17. Depart Process The Depart Process allows you to efficiently manage the activities associated with the process of documenting and departing a patient. The window serves as a launch pad for depart-related activities including:
Discharge Diagnosis
Medication Reconciliation
Patient Education
Follow-Up
Orders
Both the Clinical Summary and Patient Summary are automatically created by the entries in each Depart Process Action.
Open Depart Process Open the depart process to begin discharge documentation.
1. Select a patient to be discharged.
2. Click Depart to open the Depart Process.
3. Complete each section by clicking the pencil box next to the Action.
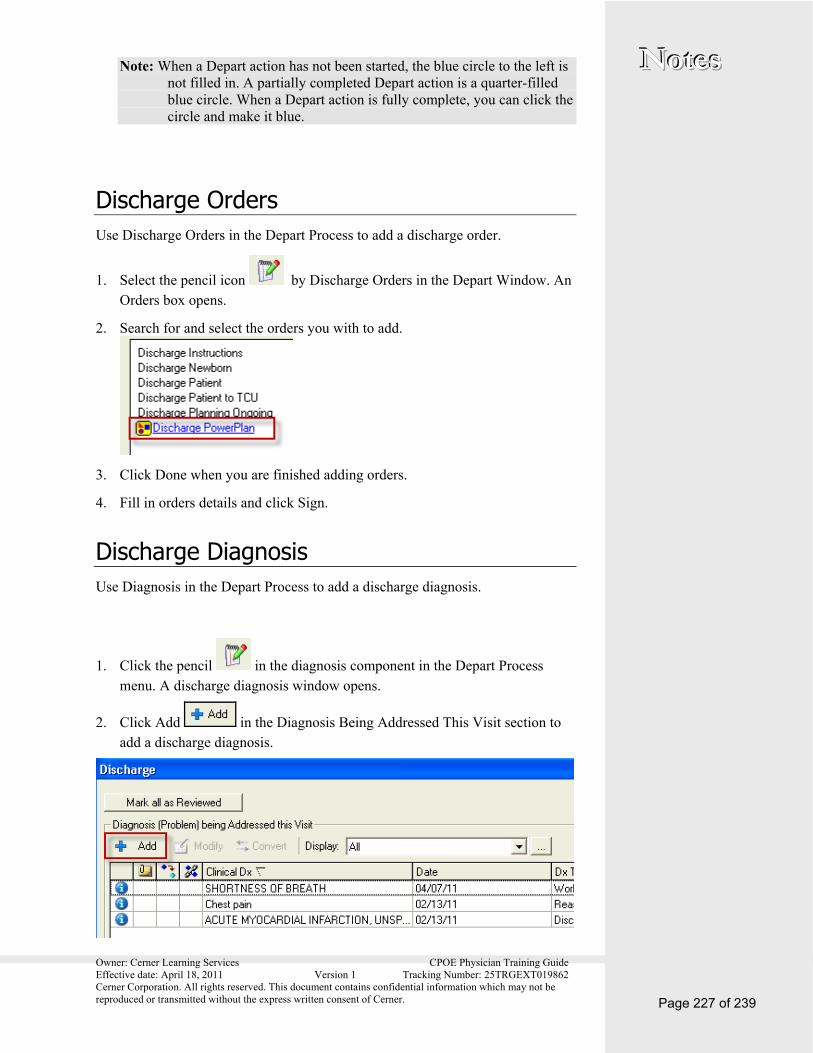
Owner: Cerner Learning Services CPOE Physician Training Guide Effective date: April 18, 2011 Version 1 Tracking Number: 25TRGEXT019862 Cerner Corporation. All rights reserved. This document contains confidential information which may not be reproduced or transmitted without the express written consent of Cerner.
NNNooottteeesss
Page 227 of 239
Note: When a Depart action has not been started, the blue circle to the left is not filled in. A partially completed Depart action is a quarter-filled blue circle. When a Depart action is fully complete, you can click the circle and make it blue.
Discharge Orders Use Discharge Orders in the Depart Process to add a discharge order.
1. Select the pencil icon by Discharge Orders in the Depart Window. An Orders box opens.
2. Search for and select the orders you with to add.
3. Click Done when you are finished adding orders.
4. Fill in orders details and click Sign.
Discharge Diagnosis Use Diagnosis in the Depart Process to add a discharge diagnosis.
1. Click the pencil in the diagnosis component in the Depart Process menu. A discharge diagnosis window opens.
2. Click Add in the Diagnosis Being Addressed This Visit section to add a discharge diagnosis.
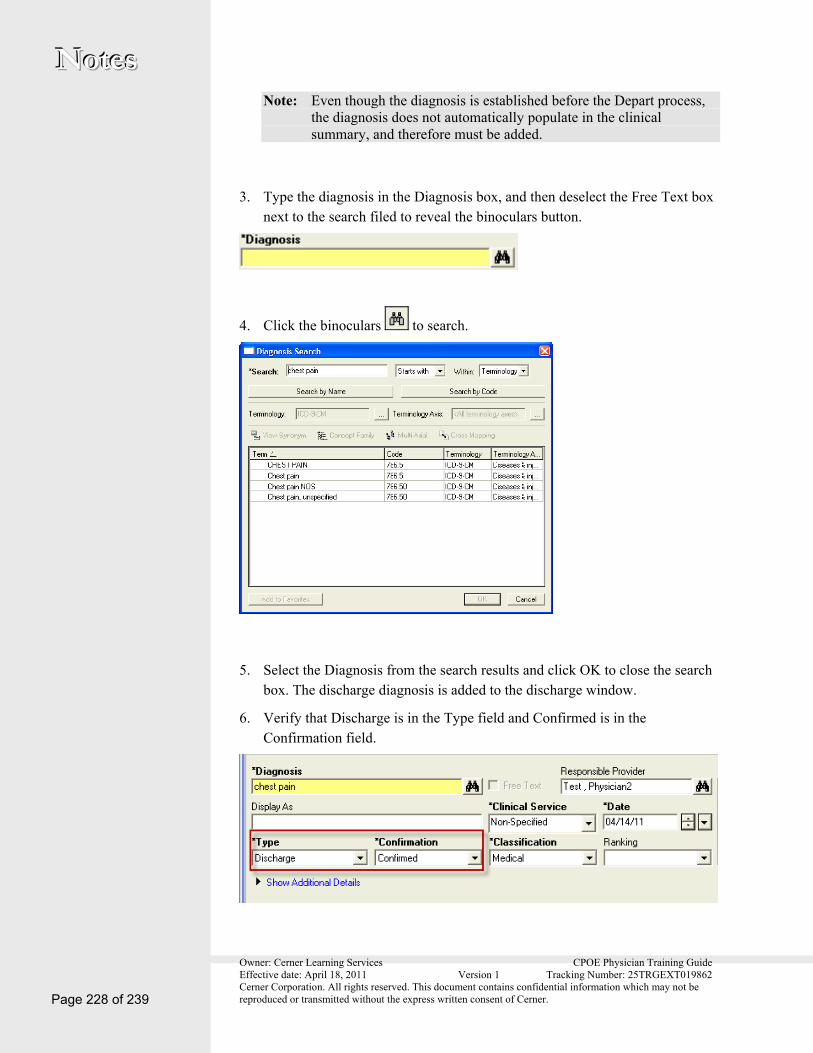
Owner: Cerner Learning Services CPOE Physician Training Guide Effective date: April 18, 2011 Version 1 Tracking Number: 25TRGEXT019862 Cerner Corporation. All rights reserved. This document contains confidential information which may not be reproduced or transmitted without the express written consent of Cerner. Page 228 of 239
NNNooottteeesss
Note: Even though the diagnosis is established before the Depart process, the diagnosis does not automatically populate in the clinical summary, and therefore must be added.
3. Type the diagnosis in the Diagnosis box, and then deselect the Free Text box next to the search filed to reveal the binoculars button.
4. Click the binoculars to search.
5. Select the Diagnosis from the search results and click OK to close the search box. The discharge diagnosis is added to the discharge window.
6. Verify that Discharge is in the Type field and Confirmed is in the Confirmation field.
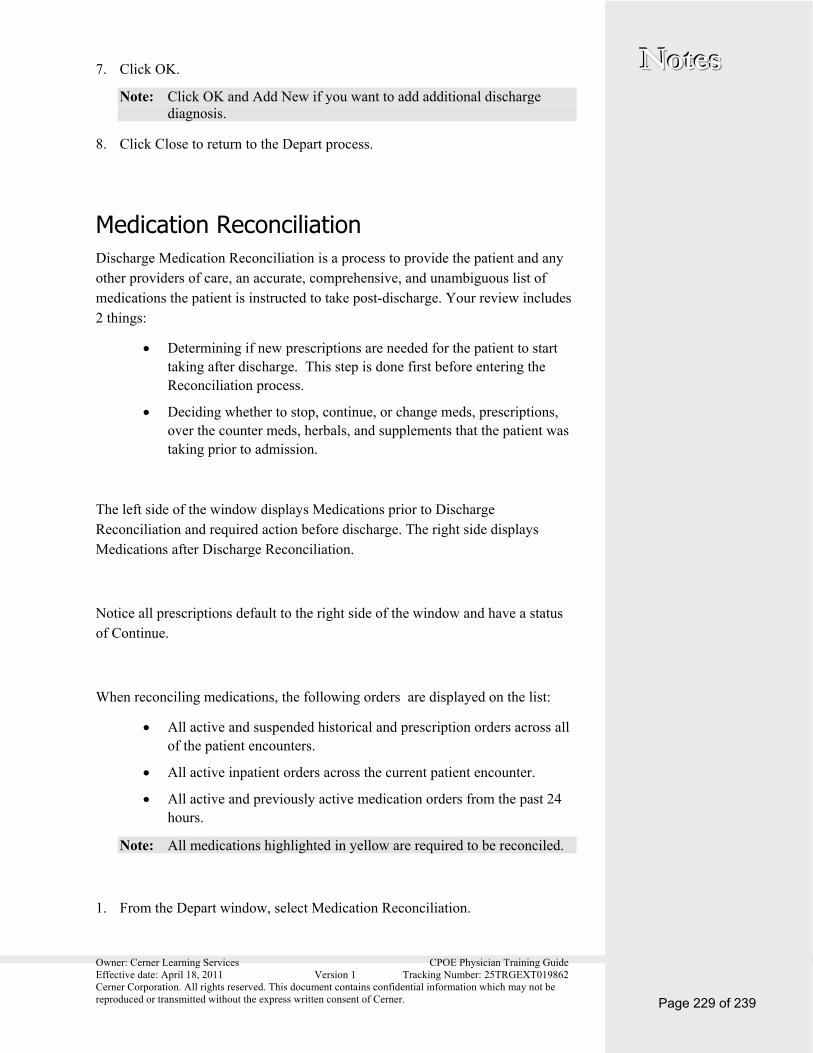
Owner: Cerner Learning Services CPOE Physician Training Guide Effective date: April 18, 2011 Version 1 Tracking Number: 25TRGEXT019862 Cerner Corporation. All rights reserved. This document contains confidential information which may not be reproduced or transmitted without the express written consent of Cerner.
NNNooottteeesss
Page 229 of 239
7. Click OK.
Note: Click OK and Add New if you want to add additional discharge diagnosis.
8. Click Close to return to the Depart process.
Medication Reconciliation Discharge Medication Reconciliation is a process to provide the patient and any other providers of care, an accurate, comprehensive, and unambiguous list of medications the patient is instructed to take post-discharge. Your review includes 2 things:
Determining if new prescriptions are needed for the patient to start taking after discharge. This step is done first before entering the Reconciliation process.
Deciding whether to stop, continue, or change meds, prescriptions, over the counter meds, herbals, and supplements that the patient was taking prior to admission.
The left side of the window displays Medications prior to Discharge Reconciliation and required action before discharge. The right side displays Medications after Discharge Reconciliation.
Notice all prescriptions default to the right side of the window and have a status of Continue.
When reconciling medications, the following orders are displayed on the list:
All active and suspended historical and prescription orders across all of the patient encounters.
All active inpatient orders across the current patient encounter.
All active and previously active medication orders from the past 24 hours.
Note: All medications highlighted in yellow are required to be reconciled.
1. From the Depart window, select Medication Reconciliation.
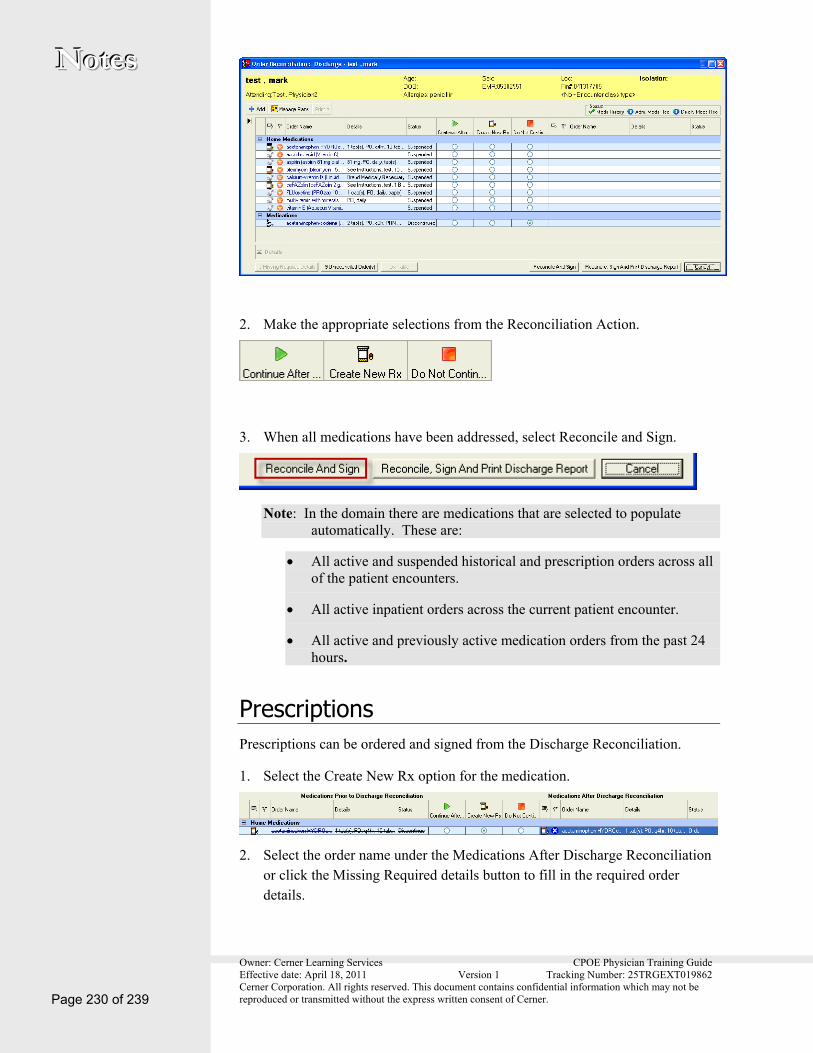
Owner: Cerner Learning Services CPOE Physician Training Guide Effective date: April 18, 2011 Version 1 Tracking Number: 25TRGEXT019862 Cerner Corporation. All rights reserved. This document contains confidential information which may not be reproduced or transmitted without the express written consent of Cerner. Page 230 of 239
NNNooottteeesss
2. Make the appropriate selections from the Reconciliation Action.
3. When all medications have been addressed, select Reconcile and Sign.
Note: In the domain there are medications that are selected to populate automatically. These are:
All active and suspended historical and prescription orders across all of the patient encounters.
All active inpatient orders across the current patient encounter.
All active and previously active medication orders from the past 24 hours.
Prescriptions Prescriptions can be ordered and signed from the Discharge Reconciliation.
1. Select the Create New Rx option for the medication.
2. Select the order name under the Medications After Discharge Reconciliation or click the Missing Required details button to fill in the required order details.

Owner: Cerner Learning Services CPOE Physician Training Guide Effective date: April 18, 2011 Version 1 Tracking Number: 25TRGEXT019862 Cerner Corporation. All rights reserved. This document contains confidential information which may not be reproduced or transmitted without the express written consent of Cerner.
NNNooottteeesss
Page 231 of 239
3. Fill in order details. All required details are highlighted in yellow.
4. Select the correct printer by clicking on the drop-down arrow and clicking on the appropriate choice.
Note: If you called the prescription in to the pharmacy, make that selection here.
5. Continue finishing your reconciliation. When you have it completed and click Reconcile and Sign, your prescriptions prints out tobe signed.
Discharge Summary A physician’s discharge summary can be completed using a PowerNote rather than dictating.
1. Click the pencil in the PowerNote component in the Depart Process menu. A Clinical Notes window opens.
2. Click Add to add a the *2G Discharge Summary PowerNote.
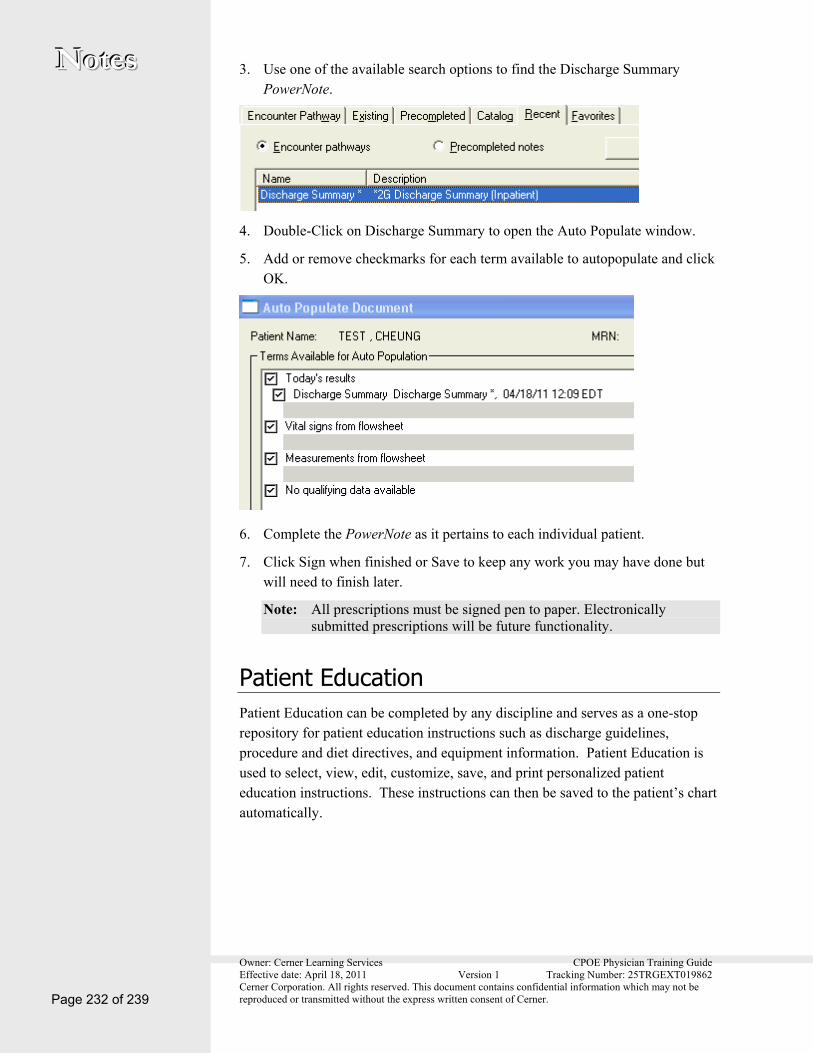
Owner: Cerner Learning Services CPOE Physician Training Guide Effective date: April 18, 2011 Version 1 Tracking Number: 25TRGEXT019862 Cerner Corporation. All rights reserved. This document contains confidential information which may not be reproduced or transmitted without the express written consent of Cerner. Page 232 of 239
NNNooottteeesss 3. Use one of the available search options to find the Discharge Summary PowerNote.
4. Double-Click on Discharge Summary to open the Auto Populate window.
5. Add or remove checkmarks for each term available to autopopulate and click OK.
6. Complete the PowerNote as it pertains to each individual patient.
7. Click Sign when finished or Save to keep any work you may have done but will need to finish later.
Note: All prescriptions must be signed pen to paper. Electronically submitted prescriptions will be future functionality.
Patient Education Patient Education can be completed by any discipline and serves as a one-stop repository for patient education instructions such as discharge guidelines, procedure and diet directives, and equipment information. Patient Education is used to select, view, edit, customize, save, and print personalized patient education instructions. These instructions can then be saved to the patient’s chart automatically.

Owner: Cerner Learning Services CPOE Physician Training Guide Effective date: April 18, 2011 Version 1 Tracking Number: 25TRGEXT019862 Cerner Corporation. All rights reserved. This document contains confidential information which may not be reproduced or transmitted without the express written consent of Cerner.
NNNooottteeesss
Page 233 of 239
When opening the Patient Education section from the Depart window, education categories display in the left navigation pane below the Search box.
Use the category buttons on the search bar to expand or narrow your selection of Patient Education materials.
Add Patient Education Materials 1. Search for the patient education materials you want by typing the name in the
search box or Patient Education tree by clicking on the plus signs.
2. Select the correct Patient Education materials desired by double-clicking the name.

Owner: Cerner Learning Services CPOE Physician Training Guide Effective date: April 18, 2011 Version 1 Tracking Number: 25TRGEXT019862 Cerner Corporation. All rights reserved. This document contains confidential information which may not be reproduced or transmitted without the express written consent of Cerner. Page 234 of 239
NNNooottteeesss
3. Once selected, the material is displayed in the lower-right window where you can add and edit the contents.
4. When finished, click Sign.
Remove Patient Education Materials 1. From the Selected Instructions pane located in the bottom left region of the
Patient Education window, select the red X next to the instruction to remove the instruction from the list. You receive a message: Are you sure you want to remove the instruction, Abdominal Pain?
2. Click Yes.
Follow-Up Use Follow-Up Date in the Depart Process to add follow-up instructions for the patient.
1. From the Depart window, select Follow-Up. A Patient Education window opens with the Follow Up tab selected.

Owner: Cerner Learning Services CPOE Physician Training Guide Effective date: April 18, 2011 Version 1 Tracking Number: 25TRGEXT019862 Cerner Corporation. All rights reserved. This document contains confidential information which may not be reproduced or transmitted without the express written consent of Cerner.
NNNooottteeesss
Page 235 of 239
2. Perform a provider search in the Who pane by typing in the last name of a provider in the Provider box, or select the Organization / Clinic Search
option to search accordingly. Click the binoculars to search.
Note: Use the Free-text Follow Up option to input follow-up location or provider if not found in the search. Click Add when finished.
3. Select a provider or location and click OK. The follow-up contact is added to the Selected Follow Up list located in the bottom pane of the Follow Up window.
4. Document the date and the location of the appointment in the When and Where panes of the Follow-Up Appointment window.
Note: You can select the number of days or weeks to follow up, or you can select a specific date.
5. Add a comment in the Comment area by double-clicking a template or typing in the Edit Comments box.
6. Click Sign when complete.
Owner: Cerner Learning Services CPOE Physician Training Guide Effective date: April 18, 2011 Version 1 Tracking Number: 25TRGEXT019862 Cerner Corporation. All rights reserved. This document contains confidential information which may not be reproduced or transmitted without the express written consent of Cerner. Page 236 of 239
NNNooottteeesss
Save Depart Process When the actions have been completed, save and close the Depart Process.
Note: The Physician is not responsible for printing. The nurse prints once their portion of the Depart Process is finished.

Owner: Cerner Learning Services CPOE Physician Training Guide Effective date: April 18, 2011 Version 1 Tracking Number: 25TRGEXT019862 Cerner Corporation. All rights reserved. This document contains confidential information which may not be reproduced or transmitted without the express written consent of Cerner.
NNNooottteeesss
Page 237 of 239
18. Appendix A – Order Naming Convention
The first word in the name of the order set is the medical specialty or service that is primarily used in that order set. This first word, which acts as a prefix to the remainder of the order set name, should be abbreviated for space considerations, and be displayed in all capital letters for quick delineation from the remaining portion of the order set name. Suggested abbreviations are listed below, but should be revised as indicated by the local medical staff to reflect their established medical staff department or division naming conventions. Suggested abbreviations include:
Anesthesia ANES Burn/ICU BURN Cardiology CARD Critical Care CRIT Emergency Medicine ED Gastrointestinal GI GYN Oncology GYNONC Gynecology GYN Hematology HEM Infectious Disease ID Internal Medicine IM Interventional Radiology IR Laboratory LAB Labor & Delivery LDR Medical - General MED Nephrology NEPH Neurology/Neurosurgery NEURO Newborn Intensive Care NICU Newborn ICU NBN Obstetrics OB Oncology ONC Ophthalmology OPHTH Orthopedics ORTHO Pediatrics PED Pediatric ICU PICU Pulmonology PULM Psychiatry PSYCH Radiology RAD Surgery SURG Trauma TRAUMA Urology URO

Owner: Cerner Learning Services CPOE Physician Training Guide Effective date: April 18, 2011 Version 1 Tracking Number: 25TRGEXT019862 Cerner Corporation. All rights reserved. This document contains confidential information which may not be reproduced or transmitted without the express written consent of Cerner.
19. Appendix B – Frequency Meanings and Times
Frequency Code Frequency Meaning Administration Times1x (once) Once
5x/Day 5 times a day 800 1100 1400 1700 2000
6x/Day 6 times a day 0 400 800 1200 1600 2000
8x/Day 8 times a day 0 300 600 900 1200 1500 1800 2100
AC (glucoscans) Before meals - glucoscans 700 1100 1600
ACHS (glucoscans) Before meals and at bedtime (glucoscans) 700 1100 1600 2100
ACHS (meds) Before meals and at bedtime (meds) 600 1100 1600 2100
ACHS-3AM Before meals, at bedtime and at 3am 300 700 1100 1600 2100
Ad lib Ad lib
Ad lib on demand On demand
after Dialysis After Dialysis
as directed As directed
BID 2 times a day 900 2100
BID With Meals Twice a day with a meal 800 1700
BID after eating Twice a day after eating 900 1800
BID empty stomach Twice a day on an empty stomach 600 1600
BIDMWF 2 times a day Monday, Wednesday and Friday 900 2100
BIDMWFSu
2 times a day on Monday, Wednesday, Friday and Sunday 900 2100
BID-respiratory Twice a day for respiratory meds 700 1900
daily Daily 900
days-FSaSu Daily-Fri,Sat,Sun 900
days-FSu Daily-Fri,Sun 900
days-MF Daily-Mon,Fri 900
days-MFSaSu Daily-Mon,Fri,Sat,Sun 900
days-MSa Daily-Mon,Sat 900
days-MTh Daily-Mon,Thurs 900
days-MThF Daily-Mon,Thurs,Fri 900
days-MThSa Daily-Mon,Thurs,Sat 900
days-MThSu Daily-Mon,Thurs,Sun 900
days-MTuSu Daily-Mon,Tues,Sun 900
days-MTuTh Daily-Mon,Tues,Thurs 900

Owner: Cerner Learning Services CPOE Physician Training Guide Effective date: April 18, 2011 Version 1 Tracking Number: 25TRGEXT019862 Cerner Corporation. All rights reserved. This document contains confidential information which may not be reproduced or transmitted without the express written consent of Cerner. Page 239 of 239
days-MTuThF Daily-Mon,Tues,Thurs,Fri 900
days-MTuThFSa Daily-Mon,Tues,Thurs,Fri,Sat 900
days-MTuThFSaSu Daily-Mon,Tues,Thurs,Fri,Sat,Sun 900
days-MTuThFSu Daily-Mon,Tues,Thurs,Fri,Sun 900
days-MTuThSa Daily-Mon,Tues,Thurs,Sat 900
days-MTuThSaSu Daily-Mon,Tues,Thurs,Sat,Sun 900
days-MTuW Daily-Mon,Tues,Wed 900
days-MTuWFSa Daily-Mon,Tues,Wed,Fri,Sat 900
days-MTuWFSaSu Daily-Mon,Tues,Wed,Fri,Sat,Sun 900
days-MTuWFSu Daily-Mon,Tues,Wed,Fri,Sun 900
days-MTuWSaSu Daily-Mon,Tues,Wed,Sat,Sun 900
days-MTuWTh Daily-Mon,Tues,Wed,Thurs 900
days-MTuWThF Daily-Mon,Tues,Wed,Thurs,Fri 900
days-MTuWThFSa Daily-Mon,Tues,Wed,Thurs,Fri,Sat 900
days-MTuWThFSu Daily-Mon,Tues,Wed,Thurs,Fri,Sun 900
days-MTuWThSaSu
Daily-Mon,Tues,Wed,Thurs,Sat,Sun 900
days-MTuWThSu Daily-Mon,Tues,Wed,Thurs,Sun 900
days-MW Daily-Mon,Wed 900
days-MWF Daily-Mon,Wed,Fri 900
days-MWFSa Daily-Mon,Wed,Fri,Sat 900
days-MWFSaSu Daily-Mon,Wed,Fri,Sat,Sun 900
days-MWFSu Daily-Mon,Wed,Fri,Sun 900
days-MWSa Daily-Mon,Wed,Sat 900
days-MWSu Daily-Mon,Wed,Sun 900
days-MWTh Daily-Mon,Wed,Thurs 900
days-MWThSa Daily-Mon,Wed,Thurs,Sat 900
days-MWThSaSu Daily-Mon,Wed,Thurs,Sat,Sun 900
days-SaSu Daily-Sat,Sun 900
days-ThF Daily-Thurs,Fri 900
days-ThFSa Daily-Thurs,Fri,Sat 900
days-ThFSaSu Daily-Thurs,Fri,Sat,Sun 900
days-ThSa Daily-Thurs,Sat 900
days-Tu,W,Th,F,Su Daily-Tues,Wed,Thurs,Fri,Sun 900
days-TuF Daily-Tues,Fri 900
days-TuFSaSu Daily-Tues,Fri,Sat,Sun 900
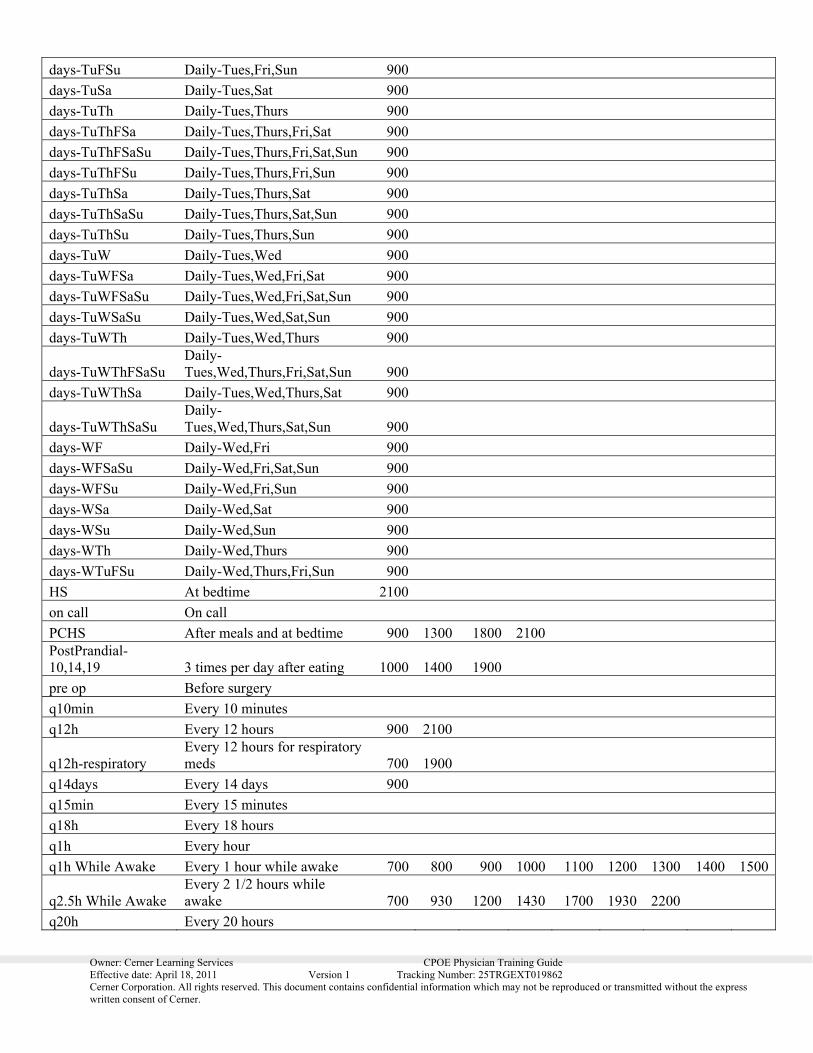
Owner: Cerner Learning Services CPOE Physician Training Guide Effective date: April 18, 2011 Version 1 Tracking Number: 25TRGEXT019862 Cerner Corporation. All rights reserved. This document contains confidential information which may not be reproduced or transmitted without the express written consent of Cerner.
days-TuFSu Daily-Tues,Fri,Sun 900
days-TuSa Daily-Tues,Sat 900
days-TuTh Daily-Tues,Thurs 900
days-TuThFSa Daily-Tues,Thurs,Fri,Sat 900
days-TuThFSaSu Daily-Tues,Thurs,Fri,Sat,Sun 900
days-TuThFSu Daily-Tues,Thurs,Fri,Sun 900
days-TuThSa Daily-Tues,Thurs,Sat 900
days-TuThSaSu Daily-Tues,Thurs,Sat,Sun 900
days-TuThSu Daily-Tues,Thurs,Sun 900
days-TuW Daily-Tues,Wed 900
days-TuWFSa Daily-Tues,Wed,Fri,Sat 900
days-TuWFSaSu Daily-Tues,Wed,Fri,Sat,Sun 900
days-TuWSaSu Daily-Tues,Wed,Sat,Sun 900
days-TuWTh Daily-Tues,Wed,Thurs 900
days-TuWThFSaSu Daily-Tues,Wed,Thurs,Fri,Sat,Sun 900
days-TuWThSa Daily-Tues,Wed,Thurs,Sat 900
days-TuWThSaSu Daily-Tues,Wed,Thurs,Sat,Sun 900
days-WF Daily-Wed,Fri 900
days-WFSaSu Daily-Wed,Fri,Sat,Sun 900
days-WFSu Daily-Wed,Fri,Sun 900
days-WSa Daily-Wed,Sat 900
days-WSu Daily-Wed,Sun 900
days-WTh Daily-Wed,Thurs 900
days-WTuFSu Daily-Wed,Thurs,Fri,Sun 900
HS At bedtime 2100
on call On call
PCHS After meals and at bedtime 900 1300 1800 2100 PostPrandial-10,14,19 3 times per day after eating 1000 1400 1900
pre op Before surgery
q10min Every 10 minutes
q12h Every 12 hours 900 2100
q12h-respiratory Every 12 hours for respiratory meds 700 1900
q14days Every 14 days 900
q15min Every 15 minutes
q18h Every 18 hours
q1h Every hour
q1h While Awake Every 1 hour while awake 700 800 900 1000 1100 1200 1300 1400 1500
q2.5h While Awake Every 2 1/2 hours while awake 700 930 1200 1430 1700 1930 2200
q20h Every 20 hours

Owner: Cerner Learning Services CPOE Physician Training Guide Effective date: April 18, 2011 Version 1 Tracking Number: 25TRGEXT019862 Cerner Corporation. All rights reserved. This document contains confidential information which may not be reproduced or transmitted without the express written consent of Cerner. Page 241 of 241
q20min Every 20 minutes
q21h Every 21 hours
q22h Every 22 hours
q24h Every 24 hours 900
q28days Every 28 days 900
q2days Every other day 900
q2h Every 2 hours 0 200 400 600 800 1000 1200 1400 1600
q2h While Awake Every 2 hours while awake 600 800 1000 1200 1400 1600 1800 2000 2200
q2h-respiratory Every two hours for respiratory meds 100 300 500 700 900 1100 1300 1500 1700
q30days Every 30 days 900
q30min Every 30 minutes
q3days Every 3 days 900
q3h Every 3 hours 0 300 600 900 1200 1500 1800 2100
q3h While Awake Every 3 hours while awake 600 900 1200 1500 1800 2100
q3h-respiratory Every 3 hours for respiratory meds 100 400 700 1000 1300 1600 1900 2200
q3months Every 3 months 900
q3wk Every 3 weeks 900
q48h Every 48 hours 900
q4day Every 4 days 900
q4h Every 4 hours 0 400 800 1200 1600 2000
q4h While Awake Every 4 hours while awake 600 1000 1400 1800 2200
q4h-respiratory Every 4 hours for respiratory meds 300 700 1100 1500 1900 2300
q4wk Every 4 weeks 900
q5days Every 5 days 900
q5h Every 5 hours
q5min Every 5 minutes
q6h Every 6 hours 0 600 1200 1800
q6h While Awake Every 6 hours while awake 600 1200 1800
q6h-3,9,15,21 Every 6 hours at 3am, 9am, 3pm and 9pm 300 900 1500 2100
q6h-6,12,18,24 Every 6 hours at 6am, 12 noon, 6pm and midnight 0 600 1200 1800
q6months Every 6 months 900
q6wk Every 6 weeks 900
q72h Every 72 hours 900
q72h-interval-ATC Every 72 hours around the clock
q7day Every 7 days 900 q7day-empty stomach
Every 7 days on an empty stomach 600
q7days-Friday Every 7 days on Friday 900
q7days-Monday Every 7 days on Monday 900
q7days-Saturday Every 7 days on Saturday 900

Owner: Cerner Learning Services CPOE Physician Training Guide Effective date: April 18, 2011 Version 1 Tracking Number: 25TRGEXT019862 Cerner Corporation. All rights reserved. This document contains confidential information which may not be reproduced or transmitted without the express written consent of Cerner.
q7days-Sunday Every 7 days on Sunday 900
q7days-Thursday Every 7 days on Thursday 900
q7days-Tuesday Every 7 days on Tuesday 900
q7days-Wednesday Every 7 days on Wednesday 900
q8h Every 8 hours 0 800 1600
q8h While Awake Every 8 hours while awake 800 1600
q8h-respiratory Every 8 hours for respiratory meds 700 1500 2300
q90mins Every 90 minutes
q96h Every 96 hours 900
qAM Once a day (in the morning) 900
qDay Once a day 900
qDayHS Once a day (at bedtime) 2100
QHS At bedtime 2100
QID 4 times a day 900 1300 1800 2100
QIDACHS Four times a day (before meals and at bedtime) 600 1100 1600 2100
QIDPCHS Four times a day (after meals and at bedtime) 900 1300 1800 2100
QID-respiratory Four times a day for respiratory meds 700 1100 1500 1900
QIDWith Meals & HS
Four times a day (with meals and at bedtime) 800 1200 1700 2100
qMonth Once a month 900
qOtherDay Every other day 900
qOtherDayBID Two times a day, every other day 900 2100
qOtherDayQID Four times a day, every other day 900 1300 1800 2100
qOtherDayTID Three times a day, every other day 900 1500 2100
qPM Once a day (in the evening) 2100
qShift Once per shift
qWeek Every week 900
qYear Yearly 900
TID 3 times a day 900 1500 2100
TID With Meals Three times a day (with meals) 800 1200 1700
TIDAC 3 times a day before meals 600 1100 1600 TIDE (pharmacy only) Three times daily 600 1300 2100
TIDPC 3 times a day after meals 900 1300 1800
TID-respiratory Three times a day for respiratory meds 700 1300 1900
With Meals & HS With meals and at bedtime 800 1200 1700 2100