7. patient list - home - cabell huntington...
TRANSCRIPT
Owner: Cerner Learning Services CPOE Physician Training Guide Effective date: April 18, 2011 Version 1 Tracking Number: 25TRGEXT019862 Cerner Corporation. All rights reserved. This document contains confidential information which may not be reproduced or transmitted without the express written consent of Cerner. Page 74 of 239
NNNooottteeesss
7. Patient List The Patient List organizes patient charts in a way that is useful to your workflow and helps you organize and easily access a large amount of data. You can open a patient chart directly from a patient list.
Use Patient List to view patient lists according to a variety of criteria maintained by the system such patient Location, Medical Service, or Scheduled status. You build, view, and edit lists according to Relationships, Provider Groups, or Care Teams that you establish. You can also build and maintain custom lists based on your own set of criteria, individually selecting the patients that belong on the custom list.
By building a variety of lists, you can group patients by logical categories and easily locate a patient's chart rather than relying on a large single list. Some patient lists are populated automatically by the system while others must be built manually. In either case, you decide which lists you want displayed as Active patient lists in your Patient List organizer.
Viewing Active Patient Lists Complete the following steps to view your active patient lists:
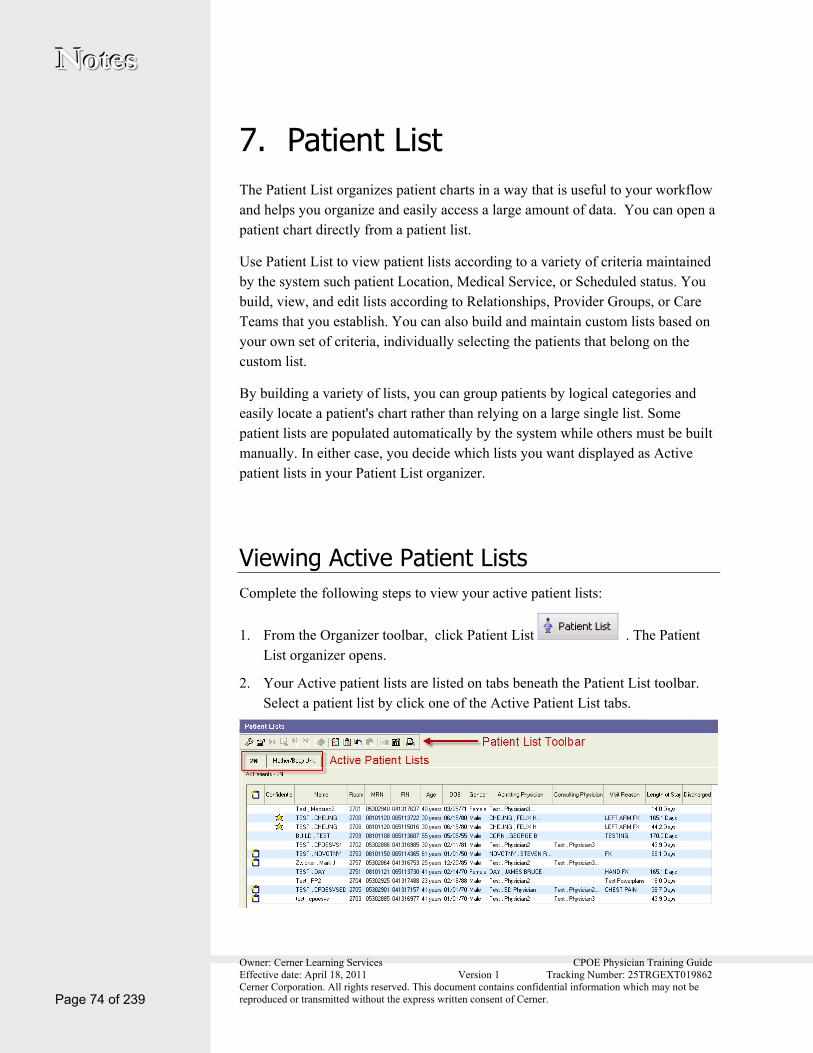
1. From the Organizer toolbar, click Patient List . The Patient List organizer opens.
2. Your Active patient lists are listed on tabs beneath the Patient List toolbar. Select a patient list by click one of the Active Patient List tabs.

Owner: Cerner Learning Services CPOE Physician Training Guide Effective date: April 18, 2011 Version 1 Tracking Number: 25TRGEXT019862 Cerner Corporation. All rights reserved. This document contains confidential information which may not be reproduced or transmitted without the express written consent of Cerner.
NNNooottteeesss
Page 75 of 239
3. Open a patient chart directly from a patient list by double-clicking on a patient’s identifiers. The chart opens in a separate Patient Chart window, leaving the Organizer running in its own separate window.
Modify Your Patient List Organizer You can adjust which existing patient lists are active in your Patient List organizer by adding, removing, or rearranging the order in which the lists are displayed.
Complete the following steps to modify your Patient List organizer:
1. From the Patient List toolbar, click List Maintenance . The Modify Patient Lists window opens.

Owner: Cerner Learning Services CPOE Physician Training Guide Effective date: April 18, 2011 Version 1 Tracking Number: 25TRGEXT019862 Cerner Corporation. All rights reserved. This document contains confidential information which may not be reproduced or transmitted without the express written consent of Cerner. Page 76 of 239
NNNooottteeesss 2. Your current, active patient lists are listed in the Active Lists pane on the right.
3. If you want to add a patient list to your Active Lists, select a list from the
Available Lists pane on the left and click the right-facing arrow between the panes to transfer it to your Active Lists.
4. If you want to remove a list from your Active Lists, select a list from the
Active Lists pane on the right and click the left-facing arrow between the panes to transfer it to your Available Lists.
5. If you want to rearrange the order in which your Active Lists are displayed in your Patient List organizer, select a list in the Active Lists pane and use the
up or down arrows to rearrange the list to the wanted sequence.
6. When you are finished modifying your Patient List organizer, click OK.
Note: In the Active Lists pane, the list sequenced first is displayed on the far left tab in the Patient List organizer. Each subsequent list included in the Active List pane is displayed to the right of the immediate prior list in the Patient List organizer.
Adding a Patient List to your Available Lists Numerous lists are maintained by the system as patients are scheduled, admitted, transferred, or discharged. These lists are categorized by Location, Medical Service, Provider Group, or Scheduled status types. You cannot add or remove patients from these defined lists, but you can control whether you see these lists in your Patient List organizer.
1. From the List Maintenance dialog box, if a list is not available in the Available Lists pane to add to your Active lists, click New to add a list to your available lists.

Owner: Cerner Learning Services CPOE Physician Training Guide Effective date: April 18, 2011 Version 1 Tracking Number: 25TRGEXT019862 Cerner Corporation. All rights reserved. This document contains confidential information which may not be reproduced or transmitted without the express written consent of Cerner.
NNNooottteeesss
Page 77 of 239
2. Select one of the standard lists types maintained by the system and click Next.
Location lists – Patients are grouped into lists according to a specific location such as a facility, or unit, or a room.
Medical Service lists – Patients are grouped into lists according to admission on a particular service.
Scheduled status lists – Patients are grouped into lists according to a specific location or provider. All patients currently scheduled for that location or provider are listed.
Provider Group lists – Patients are grouped into lists according to relationships established with you or the providers in the group.
Owner: Cerner Learning Services CPOE Physician Training Guide Effective date: April 18, 2011 Version 1 Tracking Number: 25TRGEXT019862 Cerner Corporation. All rights reserved. This document contains confidential information which may not be reproduced or transmitted without the express written consent of Cerner. Page 78 of 239
NNNooottteeesss
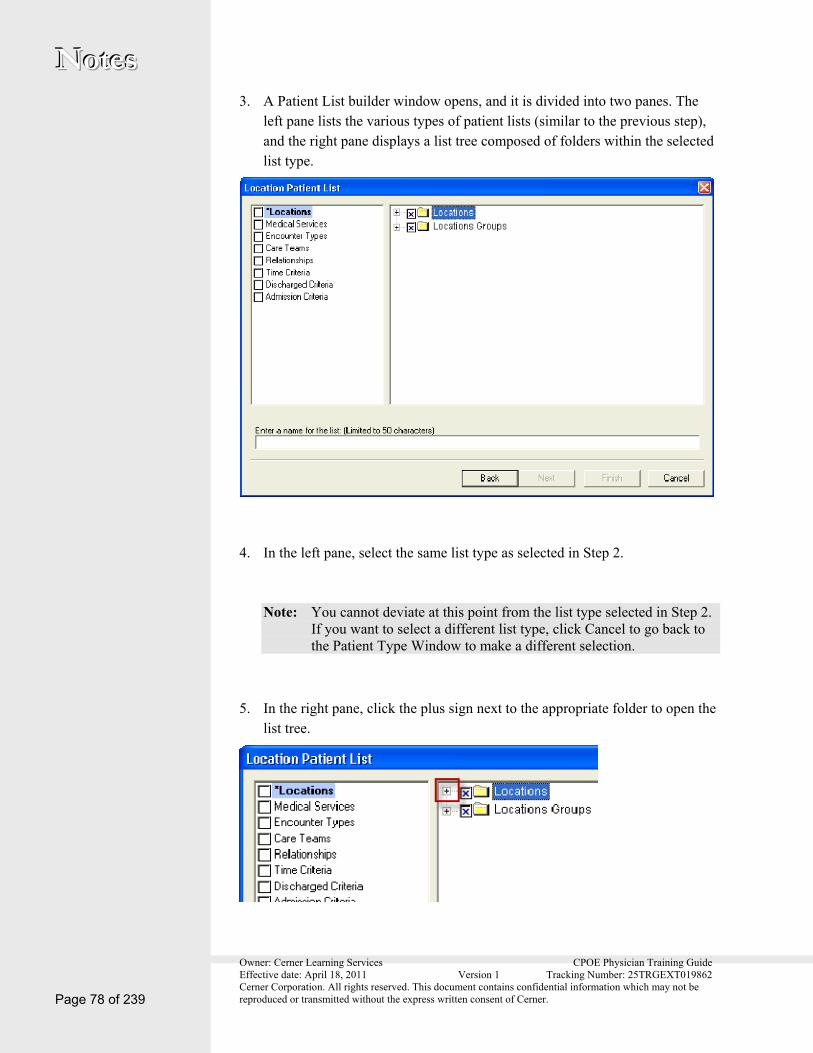
3. A Patient List builder window opens, and it is divided into two panes. The left pane lists the various types of patient lists (similar to the previous step), and the right pane displays a list tree composed of folders within the selected list type.
4. In the left pane, select the same list type as selected in Step 2.
Note: You cannot deviate at this point from the list type selected in Step 2. If you want to select a different list type, click Cancel to go back to the Patient Type Window to make a different selection.
5. In the right pane, click the plus sign next to the appropriate folder to open the list tree.

Owner: Cerner Learning Services CPOE Physician Training Guide Effective date: April 18, 2011 Version 1 Tracking Number: 25TRGEXT019862 Cerner Corporation. All rights reserved. This document contains confidential information which may not be reproduced or transmitted without the express written consent of Cerner.
NNNooottteeesss
Page 79 of 239
6. Click subsequent plus signs in the list tree to continue expanding until you locate the appropriate location or locations.
7. Select the checkboxes next to the appropriate location or lessons to add to your Available lists.
Note: Selecting more than one location combines the multiple selections into a single list in your Patient List organizer. If you want to keep the selections separate, select one list at a time only and repeat this process for each list.
8. Name your list, and click Next .

Owner: Cerner Learning Services CPOE Physician Training Guide Effective date: April 18, 2011 Version 1 Tracking Number: 25TRGEXT019862 Cerner Corporation. All rights reserved. This document contains confidential information which may not be reproduced or transmitted without the express written consent of Cerner. Page 80 of 239
NNNooottteeesss 9. A Proxy dialog box opens giving you the option to share this list with other
providers. Click New to share this list with another provider, or
click Finish to save your new list.
10. The new list is now available to add to your Active Lists. Select the new list
in the Available Lists pane, and click the right blue arrow to move the new list to the Active List pane.
11. Click OK to finish adding your new list to your Active patient lists.
Create a Custom Patient List Use custom patient lists to create specific lists of patients according the criteria that you define, such as all patients presently admitted to 2 North medical unit, Rooms 2701-2709.
Unlike lists that group patients according to categories maintained by the system such as Location, Medical Service, or Schedule, custom lists are not tied to system-defined criteria. Patients added to a custom list stay on that custom list until you manually remove the patient from the list, or until you delete the list, regardless of the patient’s schedule, admission, transfer, or discharge status .
Complete the following steps tocreate a custom list:

Owner: Cerner Learning Services CPOE Physician Training Guide Effective date: April 18, 2011 Version 1 Tracking Number: 25TRGEXT019862 Cerner Corporation. All rights reserved. This document contains confidential information which may not be reproduced or transmitted without the express written consent of Cerner.
NNNooottteeesss
Page 81 of 239
1. From the List Maintenance dialog box, click New to add a list to your available lists.
2. Select Custom, and click Next.
3. Select your custom criteria.

Owner: Cerner Learning Services CPOE Physician Training Guide Effective date: April 18, 2011 Version 1 Tracking Number: 25TRGEXT019862 Cerner Corporation. All rights reserved. This document contains confidential information which may not be reproduced or transmitted without the express written consent of Cerner. Page 82 of 239
NNNooottteeesss
4. Enter the name of your custom list in the Custom Patient list dialog box.
5. Click Finish .
6. Select the new custom list in the Available lists pane, and click the right-
facing arrow between the panes to transfer it to your Active Lists.
7. Click OK to finish adding your new list to your Active patient lists.
8. View the new list in your Patient List organizer by clicking that list’s tab.
Note: New custom patient lists do not have patients loaded into the lists. Custom lists are not tied to system-defined criteria. Patients must be added manually.
Add Patients to a Custom Patient List Once a custom patient list is created, you must add patients into the list manually.

Owner: Cerner Learning Services CPOE Physician Training Guide Effective date: April 18, 2011 Version 1 Tracking Number: 25TRGEXT019862 Cerner Corporation. All rights reserved. This document contains confidential information which may not be reproduced or transmitted without the express written consent of Cerner.
NNNooottteeesss
Page 83 of 239
Add a Patient from an Existing Patient List Complete the following steps if the patients are listed on one of your active patient lists in the Patient List organizer:
1. From the Organizer toolbar, click Patient List . The Patient List organizer opens.
2. Select the appropriate Active patient list containing the patient you want to add to your custom list.
3. Select the patient and click Copy on the Patient List toolbar.
Note: You can select several patients at once by holding down CTRL continuously while making your selections.

Owner: Cerner Learning Services CPOE Physician Training Guide Effective date: April 18, 2011 Version 1 Tracking Number: 25TRGEXT019862 Cerner Corporation. All rights reserved. This document contains confidential information which may not be reproduced or transmitted without the express written consent of Cerner. Page 84 of 239
NNNooottteeesss 4. Navigate to your custom patient list using the Active Patient List tabs.
Note: Remember that this is the tab that you created and named.
5. Click Paste on the Patient List toolbar to add the selected patients to your custom patient list.
Add a Patient using Patient Search Complete the following steps to add a patient who is not on one of your Active patient lists:
1. Select your custom patient list using the Active Patient List tabs.
2. Click Add Patient on the Patient List toolbar. The Patient Search window opens.
3. Search for the patient and the encounter, then click OK . The patient is added to your custom patient list.
Note: All patient encounters are listed in the bottom half of the Patient Search window. It is important to select the correct encounter.
Remove a Patient from a Custom List Complete the following steps to remove a patient from a custom list:
1. From the Active Patient List tab, select your custom patient list.
2. Select the patient name on the list.
3. Click Remove Patient on the Patient List toolbar.
Owner: Cerner Learning Services CPOE Physician Training Guide Effective date: April 18, 2011 Version 1 Tracking Number: 25TRGEXT019862 Cerner Corporation. All rights reserved. This document contains confidential information which may not be reproduced or transmitted without the express written consent of Cerner.
NNNooottteeesss
Page 85 of 239
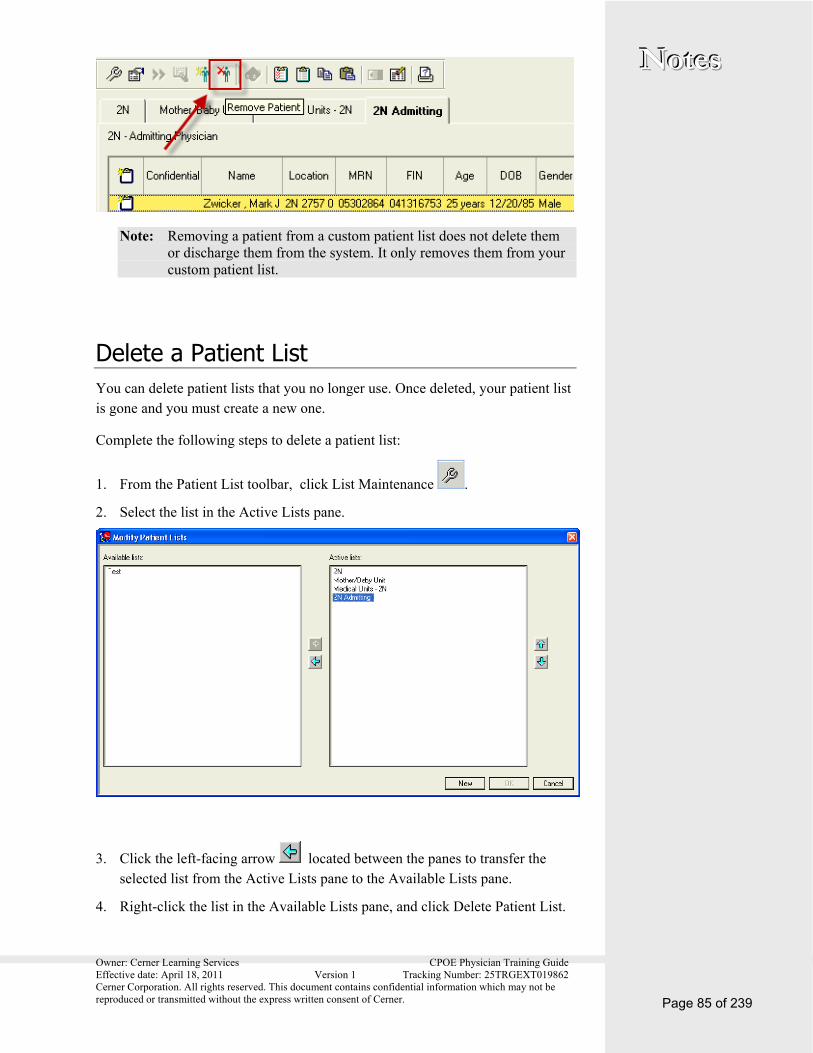
Note: Removing a patient from a custom patient list does not delete them or discharge them from the system. It only removes them from your custom patient list.
Delete a Patient List You can delete patient lists that you no longer use. Once deleted, your patient list is gone and you must create a new one.
Complete the following steps to delete a patient list:
1. From the Patient List toolbar, click List Maintenance .
2. Select the list in the Active Lists pane.
3. Click the left-facing arrow located between the panes to transfer the selected list from the Active Lists pane to the Available Lists pane.
4. Right-click the list in the Available Lists pane, and click Delete Patient List.

Owner: Cerner Learning Services CPOE Physician Training Guide Effective date: April 18, 2011 Version 1 Tracking Number: 25TRGEXT019862 Cerner Corporation. All rights reserved. This document contains confidential information which may not be reproduced or transmitted without the express written consent of Cerner. Page 86 of 239
NNNooottteeesss
5. Click Yes in the Delete List dialog box to permanently delete the list.
6. Click OK to exit the Modify List dialog box and to return to the Patient List organizer.
Organizing Columns in a Patient List Columns can be added, removed, and resequenced in a Patient List.
1. Select the appropriate patient list using the Active Patient List tabs and click
Cusotmize Columns .

Owner: Cerner Learning Services CPOE Physician Training Guide Effective date: April 18, 2011 Version 1 Tracking Number: 25TRGEXT019862 Cerner Corporation. All rights reserved. This document contains confidential information which may not be reproduced or transmitted without the express written consent of Cerner.
NNNooottteeesss
Page 87 of 239
Your active, current columns are listed in the Existing Columns pane on the right, and all the potential columns are listed in the Available Columns pane on the left.
2. To add a column to your Existing Columns, select a column from the
Available Columns pane on the left and click the right-facing arrow between the panes to transfer it to your Existing Columns list.
Note: To add all available columns, click Select All Available Columns
, and click the right-facing arrow to move the available columns from the Available Columns box to the Existing Columns box.
3. If you want to remove a column from your Exising Columns list, select a column from the Existing Columns pane on the right and click the left-facing
arrow between the panes to transfer it to your Available Columns list.
4. If you want to resequence the order in which your Existing Columns are displayed across the patient list, select a column in the Existing Columns
pane and use the up or down arrows to rearrange the list to the wanted sequence.
5. When you are finished adjusting your Patient List columns, click Save.
6. Click Exit to exit Customized Columns Tool and return to the patient list.
Owner: Cerner Learning Services CPOE Physician Training Guide Effective date: April 18, 2011 Version 1 Tracking Number: 25TRGEXT019862 Cerner Corporation. All rights reserved. This document contains confidential information which may not be reproduced or transmitted without the express written consent of Cerner. Page 88 of 239
NNNooottteeesss
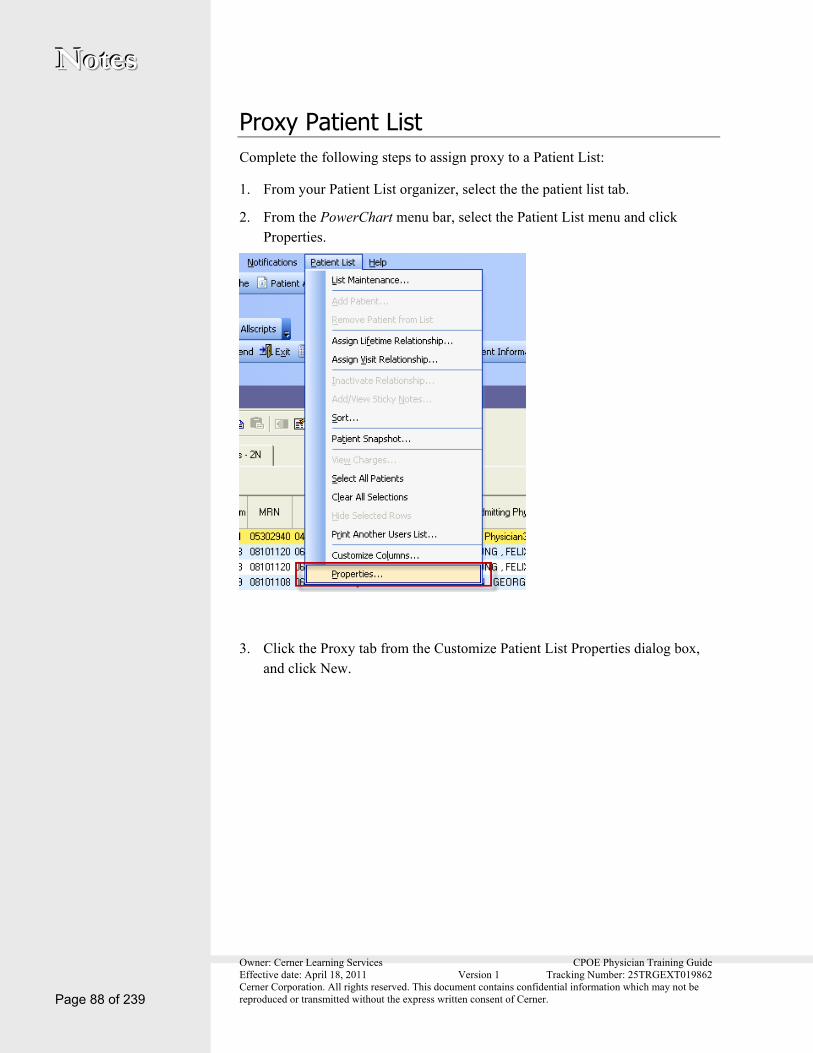
Proxy Patient List Complete the following steps to assign proxy to a Patient List:
1. From your Patient List organizer, select the the patient list tab.
2. From the PowerChart menu bar, select the Patient List menu and click Properties.
3. Click the Proxy tab from the Customize Patient List Properties dialog box, and click New.

Owner: Cerner Learning Services CPOE Physician Training Guide Effective date: April 18, 2011 Version 1 Tracking Number: 25TRGEXT019862 Cerner Corporation. All rights reserved. This document contains confidential information which may not be reproduced or transmitted without the express written consent of Cerner.
NNNooottteeesss
Page 89 of 239
4. Select a group from the Group list, or select the Provider option and search
for the provider by clicking the binoculars .
5. Select the level of permissions to grant to the user using the Access list.

Owner: Cerner Learning Services CPOE Physician Training Guide Effective date: April 18, 2011 Version 1 Tracking Number: 25TRGEXT019862 Cerner Corporation. All rights reserved. This document contains confidential information which may not be reproduced or transmitted without the express written consent of Cerner. Page 90 of 239
NNNooottteeesss
6. Select a date and time range to establish when the list is available to the user.
Note: To input a current date and time, type T in the Date spin box for today's date, and type N in the Time spin box for the current time.
7. Click Apply to accept the settings. The group or provider is added to the Proxy pane.
8. Click OK to save the proxy settings and return to the patien t list.
Note: The group or provider that received proxy needs to add the list to their Active Lists using the List Maintenance tool in order to use the list.