course material written · just like windows xp, windows 7, windows 8, and mac os x, linux is an...
TRANSCRIPT

Course material written
By
DR. Bhagirathi Nayak Ph.D (Computer Science)
Professor and Head (IT & Systems) Sri Sri University, Cuttack. Odisha
20 Years Experience from IIT Kharagpur.

2
Contents **********************************
1. Introduction 5
1.1 What is Linux ……………………………………………………………………… 5 1.2 Why use Linux ……………………………………………………………………… 6 1.3 History of Linux ……………………………………………………………………… 6
2. Distribution of Linux 8 2.1 What is a distribution? ……………………………………………………………………… 8 2.2 How to Find the Best Linux Desktop for You? ……………………………………………....... 8 2.3 Ubuntu ……………………………………………………………………… 9 2.4 Linux Mint ……………………………………………………………………… 10 2.5 Debian Linux ……………………………………………………………………… 10 2.6 Fedora Linux ……………………………………………………………………… 11 2.7 Red Hat Linux ……………………………………………………………………… 11 2.8 Open Suse Linux ……………………………………………………………………… 12 2.9 Mandriva Linux ……………………………………………………………………… 12 2.10 Arc Linux ……………………………………………………………………… 12 2.11 Slackware Linux ……………………………………………………………………… 13 3. Devises and drivers used in Linux 13 3.1 Kernel Code ……………………………………………………………………… 14 3.2 Kernel interfaces ……………………………………………………………………… 14 3.3 Kernel mechanisms and services……………………………………………………………………… 14 3.4 Loadable ……………………………………………………………………… 14 3.5 Configurable ……………………………………………………………………… 14 3.6 Dynamic ……………………………………………………………………… 14 4. Preparing to Install Linux 14 4.1 Taking Inventory ……………………………………………………………………… 15 4.2 Preparing Your Hard Drive ……………………………………………………………………… 15 4.3 Partitions and File Systems ……………………………………………………………………… 15 4.4 Partitions ……………………………………………………………………… 16 4.5 File Systems ……………………………………………………………………… 16 4.6 Caution ……………………………………………………………………… 16 4.7 Extended Partition ……………………………………………………………………… 16 5. Installing Linux 16
5.1 Getting Ubuntu ……………………………………………………………………… 17 5.2 Writing in a CD ……………………………………………………………………… 17 5.3 Installation Types ……………………………………………………………………… 17 5.4 Installation Instruction ……………………………………………………………………… 18 6. Starting Linux 24

Linux Course Material by Dr. Bhagirathi Nayak
3
7. Playing with the Shell 25 7.1 Starting the bash shell ……………………………………………………………………… 26 7.2 First Linux Commands ……………………………………………………………………… 26 7.3 Basic Linux Commands ……………………………………………………………………… 27 8. Shutting Down 31 9. GNOME Desktop 32 9.1 The Desktop ……………………………………………………………………… 33 9.2 Using the bash shell …………………………………………………………………….. 34 9.3 The syntax of shell commands ……………………………………………………………………… 34 9.4 Saving command ……………………………………………………………………… 36 9.5 Automatic command ……………………………………………………………………… 36 10. The Linux File System 36 10.1 Directory of the Linux file system………………………………………………………………… 38 11. Office Applications and Tools 39 11. 1 Apache Open Office Suit ……………………………………………………………………… 39 11.2 Text Documents ……………………………………………………………………… 39 11.3 Spreadsheet ……………………………………………………………………… 40 11.4 Presentation ……………………………………………………………………… 12. Basic Administration 41 13. Installing YUM 44 14. Installing Webmin 48 14.1 Running Webmin ……………………………………………………………………… 49 14.2 Adding Users ……………………………………………………………………… 50 15. Linux log file 52 16. Using Kerberos 53 16.1 Kerberos Authentication ……………………………………………………………………… 53 16.2 File Permissions ……………………………………………………………………… 54 17. Enable and Disable Service 55

4
17.1 Enable a Service ……………………………………………………………………… 55 17.2 Disable a Service ……………………………………………………………………… 56 17.3 NTP Setting ……………………………………………………………………… 56 18. Changing XFree86 58 19. Apache and MySQL 59 19.1 Install Apache ……………………………………………………………………… 59 19.2 Testing Apache ……………………………………………………………………… 59 19.3 Install PHP ……………………………………………………………………… 59 19.4 Testing PHP ……………………………………………………………………… 60 19.5 Installing MySQL ……………………………………………………………………… 60 19.6 Enable/Disable Service ……………………………………………………………………… 62 19.7 Temporary Enable/Disable Service ……………………………………………………………… 62 20. Using MySQL Administrator 63 20.1 User Administration ………………………………………………………………… 63 20.2 Server Health ……………………………………………………………………… 64 20.3 Backup ……………………………………………………………………… 64 20.4 Startup Parameters ………………………………………………………………… 65 20.5 Server Information …………………………………………………………………. 65 21. Working with phpMyAdmin 66 21.1 Create Database ……………………………………………………………………… 66 21.2 Create Table ……………………………………………………………………… 66 21.3 Run Queries ……………………………………………………………………… 67 22. Installing Wordpress 67
22.1 Prerequisites ……………………………………………………………………… 68 22.2 Create Database ……………………………………………………………………… 68 22.3 Download ……………………………………………………………………… 68 22.4 Installation ……………………………………………………………………… 71 22.5 Interface ……………………………………………………………………… 73 24. Putty & WinSCP 75 25. Wine & SAMBA 84 26. Networking Tools 92 27. Customizing the User Environment 94

Linux Course Material by Dr. Bhagirathi Nayak
5
What is Linux? Just like Windows XP, Windows 7, Windows 8, and Mac OS X, Linux is an Operating System (OS). An operating system is software that manages all of the hardware resources associated with your desktop or laptop. To put it simply – the operating system manages the communication between your software and your hardware. Without the operating system (often referred to as the “OS”), the software wouldn’t function. Linux is a free Unix-type Operating System (OS) for computer devices. The Operating System is what makes the hardware work together with the software. The OS is the interface that allows you to do the things, which you want with your computer. Linux is freely available to everyone. Linux gives you a graphical interface that makes it easy to use your computer, yet it still allows those with know-how to change settings by adjusting 0 to 1. It is only the kernel that is named Linux, the rest of the Operating System are GNU tools. The OS is comprised of a number of pieces:
The Bootloader: The software that manages the boot process of your computer. For most users, this will simply be a splash screen that pops up and eventually goes away to boot into the operating system.
The kernel: This is the one piece of the whole that is actually called “Linux”. The kernel is the core of the system and manages the CPU, memory, and peripheral devices. The kernel is the “lowest” level of the OS.
Daemons: These are background services (printing, sound, scheduling, etc.) that either startup during boot, or after you log into the desktop.
The Shell: You’ve probably heard mention of the Linux command line. This is the shell – a command process that allows you to control the computer via commands typed into a text interface. This is what, at one time, scared people away from Linux the most (assuming they had to learn a seemingly archaic command line structure to make Linux work). This is no longer the case. With modern desktop Linux, there is no need to ever touch the command line.
Graphical Server: This is the sub-system that displays the graphics on your monitor. It is commonly referred to as the X server or just “X”.
Desktop Environment: This is the piece of the puzzle that the users actually interact with. There are many desktop environments to choose from (Unity, GNOME, Cinnamon, Enlightenment, KDE, XFCE, etc). Each desktop environment includes built-in applications (such as file managers, configuration tools, web browsers, games, etc.).
Applications: Desktop environments do not offer the full array of apps. Just like Windows and Mac, Linux offers thousands upon thousands of high-quality software titles that can be easily found and installed. Most modern Linux distributions (more on this in a moment) include App Store-like tools that centralize and simplify application installation. For example: Ubuntu Linux has the Ubuntu Software Center (Figure 1) which allows you to quickly search among the thousands of apps and install them from one centralized location.

6
Why use Linux?
This is one of the questions that most people ask. Why bother learning a completely different computing environment, when the operating system that ships with most desktops, laptops, and servers works just fine?
To answer that question, I would pose another question. Does that operating system you’re currently using really work “just fine”? Or are you constantly battling viruses, malware, slow downs, crashes, costly repairs, and licensing fees?
If you struggle with the above, and want to free yourself from the constant fear of losing data or having to take your computer in for the “yearly clean up,” Linux might be the perfect platform for you. Linux has evolved into one of the most reliable computer ecosystems on the planet. Combine that reliability with zero cost of entry and you have the perfect solution for a desktop platform.
That’s right, zero cost of entry...as in free. You can install Linux on as many computers as you like without paying any money for software or server licensing (including costly Microsoft Client Access License – CALs). Working with Linux is a dream come true. No more daily babysitting servers. In fact, Linux is as close to “set it and forget it” as you will ever find. And, on the off chance, one service on the server requires restarting, re-configuring, upgrading, etc… most likely the rest of the server won’t be affected.
The Linux desktop or a server, if zero cost isn’t enough to win you over – what about having an operating system that will work, trouble free, for as long as you use it? It is not once have an issue with malware, viruses, or random computer slow-down and server reboots? Only if the kernel is want to update. It is not out of the ordinary for a Linux server to go years without being rebooted. That’s stability and dependability.
Linux is also distributed under an open source license. Open source follows the following key philosophies:
• The freedom to run the program, for any purpose. • The freedom to study how the program works, and change it to make it do what you wish. • The freedom to redistribute copies so you can help your neighbor. • The freedom to distribute copies of your modified versions to others.
The above are crucial to understanding the community that comes together to create the Linux platform. It is, without a doubt, an operating system that is “by the people, for the people”. These philosophies are also one of the main reasons a large percentage of people use Linux. It’s about freedom and freedom of choice.
History of Linux In order to understand the popularity of Linux, we need to travel back in time, about 30 years ago...
Imagine computers as big as houses, even stadiums. While the sizes of those computers posed substantial problems, there was one thing that made this even worse: every computer had a different operating system. Software was always customized to serve a specific purpose, and software for one given system didn't run on another system. Being able to work with one system didn't automatically mean that you could work with another. It was difficult, both for the users and the system administrators.
Computers were extremely expensive then, and sacrifices had to be made even after the original purchase just to get the users to understand how they worked. The total cost per unit of computing power was enormous.
Technologically the world was not quite that advanced, so they had to live with the size for another decade. In 1969, a team of developers in the Bell Labs laboratories started working on a solution for the software problem, to address these compatibility issues. They developed a new operating system, which was
Linux Course Material by Dr. Bhagirathi Nayak
7
• Simple and elegant. • Written in the C programming language. • Able to recycle code.
The Bell Labs developers named their project "UNIX."
The code recycling features were very important. Until then, all commercially available computer systems were written in a code specifically developed for one system. UNIX on the other hand needed only a small piece of that special code, which is now commonly named the kernel. This kernel is the only piece of code that needs to be adapted for every specific system and forms the base of the UNIX system. The operating system and all other functions were built around this kernel and written in a higher programming language, C. This language was especially developed for creating the UNIX system. Using this new technique, it was much easier to develop an operating system that could run on many different types of hardware.
The software vendors were quick to adapt, since they could sell ten times more software almost effortlessly. Weird new situations came in existence: imagine for instance computers from different vendors communicating in the same network, or users working on different systems without the need for extra education to use another computer. UNIX did a great deal to help users become compatible with different systems.
Throughout the next couple of decades the development of UNIX continued. More things became possible to do and more hardware and the software vendors added support for UNIX to their products.
UNIX was initially found only in very large environments with mainframes and minicomputers (note that a PC is a "micro" computer). You had to work at a university, for the government or for large financial corporations in order to get your hands on a UNIX system.
But smaller computers were being developed, and by the end of the 80's, many people had home computers. By that time, there were several versions of UNIX available for the PC architecture, but none of them were truly free and more important: they were all terribly slow, so most people ran MS DOS or Windows 3.1 on their home PCs.
Linus and Linux By the beginning of the 90s home PCs were finally powerful enough to run a full-blown UNIX. Linus Torvalds, a young man studying computer science at the university of Helsinki, thought it would be a good idea to have some sort of freely available academic version of UNIX, and promptly started to code.
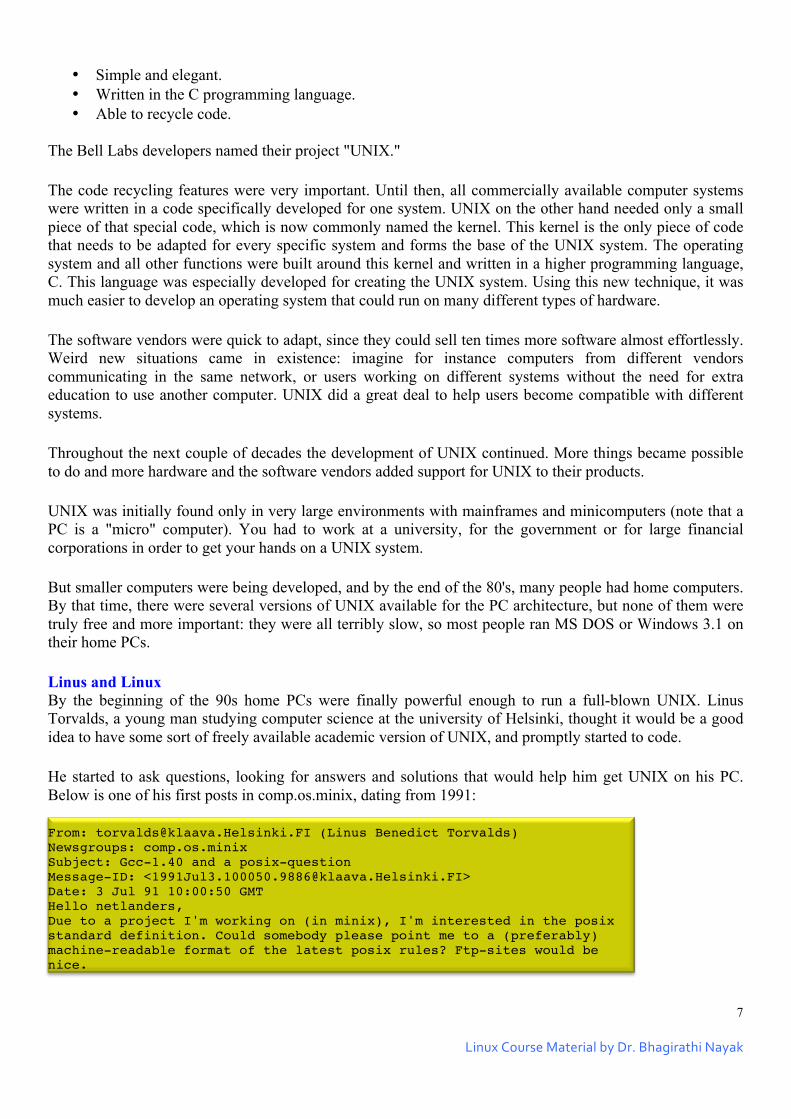
He started to ask questions, looking for answers and solutions that would help him get UNIX on his PC. Below is one of his first posts in comp.os.minix, dating from 1991:
From: [email protected] (Linus Benedict Torvalds) Newsgroups: comp.os.minix Subject: Gcc-1.40 and a posix-question Message-ID: <[email protected]> Date: 3 Jul 91 10:00:50 GMT Hello netlanders, Due to a project I'm working on (in minix), I'm interested in the posix standard definition. Could somebody please point me to a (preferably) machine-readable format of the latest posix rules? Ftp-sites would be nice.

8
From the start, it was Linus' goal to have a free system that was completely compliant with the original UNIX. That is why he asked for POSIX standards, POSIX still being the standard for UNIX.
In those days plug-and-play wasn't invented yet, but so many people were interested in having a UNIX system of their own, that this was only a small obstacle. New drivers became available for all kinds of new hardware, at a continuously rising speed. Almost as soon as a new piece of hardware became available, someone bought it and submitted it to the Linux test, as the system was gradually being called, releasing more free code for an ever wider range of hardware. These coders didn't stop at their PC's; every piece of hardware they could find was useful for Linux.
Back then, those people were called "nerds" or "freaks", but it didn't matter to them, as long as the supported hardware list grew longer and longer. Thanks to these people, Linux is now not only ideal to run on new PC's, but is also the system of choice for old and exotic hardware that would be useless if Linux didn't exist.
Two years after Linus' post, there were 12000 Linux users. The project, popular with hobbyists, grew steadily, all the while staying within the bounds of the POSIX standard. All the features of UNIX were added over the next couple of years, resulting in the mature operating system Linux has become today. Linux is a full UNIX clone, fit for use on workstations as well as on middle-range and high-end servers. Today, a lot of the important players on the hard- and software market each have their team of Linux developers; at your local dealer's you can even buy pre-installed Linux systems with official support - even though there is still a lot of hard- and software that is not supported, too.
Distributions of Linux
What is a distribution?
Linux has a number of different versions to suit nearly any type of user. From new users to hard-core users, you will find a “flavor” of Linux to match your needs. These versions are called distributions (or, in the short form, “distros.”) Nearly every distribution of Linux can be downloaded for free, burned onto disk (or USB thumb drive), and installed on as many machines as you like.
The most popular Linux distributions are:
• Ubuntu Linux • Linux Mint • Arch Linux • Deepin • Fedora • Debian • OpenSUSE
Each distribution has a different take on the desktop. Some are for very modern user interfaces (such as Ubuntu’s Unity, above, and Deepin’s Deepin Desktop), whereas others stick with a more traditional desktop environment (openSUSE uses K Desktop Environment (KDE).
How to Find the Best Linux Desktop for You?
With Linux comes choice. Along with that choice, comes debate. Which desktop is the best? Which offers the user-friendliest experience? The questions are not only never-ending, but date back over a decade where the “war” between KDE, GNOME, and every other desktop was given voice. It would, contend, however, that there is a desktop for every kind of user to be found within the Linux landscape. To that end, It want to take some of the most popular desktops and match them to end users.

Linux Course Material by Dr. Bhagirathi Nayak
9
There are no hard and fast rules, tests to take, or wizards to walk you through to your final Linux desktop destination. For most people it’s about taste and features. But if you look at each desktop long enough, you discover there is a clear connection between desktop and end user. You can examine the following Linux desktops:
• Ubuntu Unity • GNOME 3 • Cinnamon • KDE • Enlightenment • XFCE • Deepin Desktop
Each of the above desktops has a strong following (with good reason). As well, each desktop offers a wholly unique experience with plenty of features to please anyone. However -- getting connected with the right desktop, up front, can go a very long way to ensuring an overall positive experience with the Linux desktop. With that said, let’s connect users with desktops.
You can check out the top 100 distributions on the http://www.distrowatch.com site.
And don’t think the server has been left behind. For this arena, you can turn to:
• Red Hat Enterprise Linux • Ubuntu Server • CentOS • SUSE Enterprise Linux.
Some of the above server distributions are free (such as Ubuntu Server and CentOS) and some have an associated price (such as Red Hat Enterprise Linux and SUSE Enterprise Linux). Those with an associated price also include support.
Ubuntu Ubuntu is probably the most well known Linux distribution. Ubuntu is based on Debian, but it has its own software repositories. Much of the software in these repositories is synced from Debian’s repositories. The Ubuntu project has a focus on providing a solid desktop (and server) experience, and it isn’t afraid to build its own custom technology to do it. Ubuntu used to use the GNOME 2 desktop environment, but it now uses its own Unity desktop environment. Ubuntu is even building its own Mir graphical server while other distributions are working on the

10
Wayland. Ubuntu is modern without being too bleeding edge. It offers releases every six months, with a more stable LTS (Long Term Support) release every two years. Ubuntu is currently working on expanding the Ubuntu distribution to run on smartphones and tablets.
Linux Mint Mint is a Linux distribution built on top of Ubuntu. It uses Ubuntu’s software repositories, so the same packages are available on both. Originally, Mint was an alternative distribution loved mainly because it included media codecs and proprietary software that Ubuntu didn’t include by default.
This distribution now has its own identity. You won’t find Ubuntu’s own Unity desktop here — instead, you get a more traditional Cinnamon or MATE desktop. Mint takes a more relaxed approach to software updates and won’t
automatically install critical software updates. Controversially, this has led some Ubuntu developers to label it insecure.
Debian
Debian is an operating system composed only of free, open-source software. The Debian project has been operating since 1993 — over 20 years ago! This widely respected project is still releasing new versions of Debian, but it’s known for moving much more slowly than distributions like Ubuntu or Linux Mint. This can make it more stable and conservative, which is ideal for some systems. Ubuntu was originally founded to take the core bits of stable Debian and improve on them more quickly, packaging the software together into a user-friendly system that’s more
frequently updated.

Linux Course Material by Dr. Bhagirathi Nayak
11
Fedora Fedora is a project with a strong focus on free software — you won’t find an easy way to install proprietary graphics drivers here, although third-party repositories are available. Fedora is bleeding edge and contains the latest versions of software.
Unlike Ubuntu, Fedora doesn’t make its own desktop environment or other software. Instead, the Fedora project uses “upstream” software, providing a platform that integrates all this upstream software without adding their own custom tools or patching it too much. Fedora comes with the GNOME 3 desktop environment by default, although you can also get “spins” that come with other desktop environments.
Fedora is sponsored by Red Hat, and is the foundation for the commercial Red Hat Enterprise Linux project. Unlike RHEL, Fedora is bleeding edge and not supported for long. If you want a more stable release that’s supported for longer, Red Hat would prefer you use their Enterprise product.
Red Hat Enterprise Linux Red Hat Enterprise Linux is a commercial Linux distribution intended for servers and workstations. It’s based on the open-source Fedora project, but is designed to be a stable platform with long-term support.
Red Hat uses trademark law to prevent their official Red Hat Enterprise Linux software from being redistributed. However, the core software is free and open-source. CentOS is a community project that takes the Red Hat Enterprise Linux code, removes all Red Hat’s trademarks, and makes it available for
free use and distribution. It’s a free version. If you want a stable platform that
will be supported for a long time, Red Hat recently announced they’re collaborating, so CentOS is now part of Red Hat itself.

12
openSUSE / SUSE Linux Enterprise
openSUSE is a community-created Linux distribution sponsored by Novell. Novell purchased SuSE Linux in 2003, and they still create an enterprise Linux project known as SUSE Linux Enterprise. Where Red Hat has the Fedora project that feeds into Red Hat Enterprise Linux, Novell has the openSUSE project that feeds into SUSE Linux Enterprise. Like Fedora, openSUSE is a more bleeding edge version of Linux. SUSE was once one of the great user-friendly desktop Linux distributions, but Ubuntu eventually took that crown.
Megeia / Mandriva Mageia is a fork of Mandriva Linux created in 2011. Mandriva - known as Mandrake before that, it was one of the great user-friendly Linux distributions. Like Fedora and openSUSE, this is a community-created project to create an open-source Linux distribution. Mandriva SA no longer creates a consumer Linux distribution for desktop PCs, but their business Linux server projects are based on Mageia code — just like how Fedora and openSUSE provide code to their enterprise equivalents.
Arch Linux Arch Linux is more old school than many of the other Linux distributions here. It’s designed to be flexible, lightweight, minimal, and to “Keep it Simple.” Keeping it simple doesn’t mean Arch provides tons of graphical utilities and automatic configuration scripts to help you set up your system. Instead, it means Arch dispenses with that stuff and gets out of your way.
You’re in charge of configuring your system properly and installing the software you like. Arch
doesn’t provide an official graphical interface for its package manager or complex graphical configuration tools. Instead, it provides clean configuration files designed for easy editing. The installation disc dumps you at a terminal, where you’ll need to enter the appropriate commands to configure your system, partition your disks, and install the operating system yourself.

Linux Course Material by Dr. Bhagirathi Nayak
13
Arch uses a “rolling release” model, which means any installation image is just a snapshot of the current software. Every bit of software will be updated over time without you needing to upgrade to a new “release” of Arch. This distribution has a bit in common with Gentoo, which was popular at one time. Both Linux distributions are designed for users who know how their systems work or who are at least willing to learn. However, Arch uses binary packages while Gentoo had an (unnecessary) focus on compiling every bit of software from source - this means it’s quick to install software on Arch, as you don’t have to spend CPU cycles and time waiting for software to compile.
Slackware Linux Slackware is another institution. Founded in 1993, Slackware is the oldest Linux distribution that’s still maintained and putting out new releases today. Its pedigree shows — like Arch, Slackware dispenses with all those unnecessary graphical tools and automatic configuration scripts. There’s no graphical installation procedure — you’ll have to partition your disk manually and then run the setup program. Slackware boots to a command-line environment by default. It’s a very conservative Linux distribution.
Devises and drivers used in Linux
The CPU is not the only intelligent device in the systems. Every physical device has its own hardware controller. The keyboard, mouse and serial ports are controlled by a Super IO (Input Output) chip, the Integrated Drive Electronics (IDE) disks by an IDE controller, Small Computer System Interface (SCSI) disks by a SCSI controller and so on. Each hardware controller has its own control and status registers Certificate Signing Request (CSRs) and these differ between devices. The CSRs for an Adaptec 2940 SCSI controller are completely different from those of an NCR 810 SCSI controller. The CSRs are used to start and stop the device, to initialize it and to diagnose any problems with it. Instead of putting code to manage the hardware controllers in the system into every application, the code is kept in the Linux kernel. The software that handles or manages a hardware controller is known as a device driver. The Linux kernel device drivers are, essentially, a shared library of privileged, memory resident, low-level hardware handling routines. It is Linux's device drivers that handle the peculiarities of the devices they are managing. There are many different device drivers in the Linux kernel (that is one of Linux's strengths) but they all share some common attributes:

14
Kernel Code
Device drivers are part of the kernel and, like other code within the kernel, if they go wrong they can seriously damage the system. A badly written driver may even crash the system, possibly corrupting file systems and losing data, Kernel interfaces Device drivers must provide a standard interface to the Linux kernel or to the subsystem that they are part of. For example, the terminal driver provides a file IO interface to the Linux kernel and a SCSI device driver. Which provides a SCSI device interface to the SCSI subsystem in turn provides both file IO and buffer cache interfaces to the kernel.
Kernel mechanisms and services Device drivers make use of standard kernel services such as memory allocation, interrupt delivery and wait queues to operate, Loadable Most of the Linux device drivers can be loaded on demand as kernel modules when they are needed and unloaded when they are no longer being used. This makes the kernel very adaptable and efficient with the system's resources, Configurable Linux device drivers can be built into the kernel. Which devices are built is configurable when the kernel is compiled, Dynamic As the system boots and each device driver is initialized it looks for the hardware devices that it is controlling. It does not matter if the device being controlled by a particular device driver does not exist. In this case the device driver is simply redundant and causes no harm apart from occupying a little of the system's memory. Preparing to Install Linux
This is the guides you through the initial process of installing Linux on your machine. Planning is one of the most important factors in a successful installation of any operating system. Your installation plan needs to cover how to install, where to install, and what the installation might affect. Planning is not always a fun process, so it may help to keep in mind that working with the Linux operating system is a lot like being a hot rod mechanic back in 1955. All you’ve got is your parents’ old car and a box of parts that were heading to the junkyard. The right tools and knowledge can turn that car into the fastest dragster on the strip.
With the hot rod mechanic in mind, look over the three steps.
1. Take inventory of your computer 2. Create the installation diskettes 3. Prepare your hard drive for installation

Linux Course Material by Dr. Bhagirathi Nayak
15
Taking Inventory
First you need to take an inventory of your computer so that you can tell what you have to work with. Having an accurate inventory can come in handy if you have hardware problems. Taking inventory can be the most tedious part of the installation, but it also can eliminate a lot of larger headaches in the future. It is easiest to begin by listing what external hardware you have. The following is a list of external items you should inventory:
Keyboard Keyboards are a fairly standard item, but some are specialized for a language or other item. Monitor Make a note of the brand and size of your monitor. It’s helpful if you have the monitor’s manual, because it will have specifications like horizontal/vertical frequencies that you need later. Mouse The important information to know for your mouse is the brand, how many buttons it has, and what type of port (serial, PS/2, or bus mouse) it connects to. Printer you should write down the manufacturer, if the printer is capable of emulating another printer, and if your printer is a PostScript printer or not.
Now comes the trickier hardware—the items that are inside your computer. There are many different kinds of hardware, and many different acronyms can be involved (such as SCSI, IDE, BIOS, and so on). However, it’s not difficult to get through if you take things a step at a time.
In order to install Linux from the CD, you need to have an operating system (such as DOS or Windows) already installed— or access to another computer.
Although not necessary for installation, it is a good idea to inventory anything else outside your computer: speakers, external disk drives, and so on.
Most of the information that you need can be obtained from your machine’s BIOS. On many machines, as the system comes up you see instructions referring to a certain key (F1, Del, or some similar key) to enter the BIOS. Depending on the type, brand, and sophistication of the BIOS, you can find out all the information you need. If you’re running Microsoft Windows, most of the information can be found in the Control Panel’s system properties.
What’s important here is the card’s chipset and how much memory it contains. In the case of PCI video cards, this information can be probed during the installation. (This information is really only necessary if you plan to use the X Window environment.)
Preparing Your Hard Drive
Since you are installing Linux to a hard drive in your system, you need to make sure you have necessary room to perform the installation. If you already have a second hard drive or a partition set-aside for Linux, you’re pretty much ready to begin the installation. If you don’t, you have to make space available on your existing hard drive by using a program that comes with the CD called fips. Before you do that, however, you need to have a basic understanding of partitions and file systems.
Partitions and File Systems
Linux should be installed into its own partition. All hard drives need to be partitioned before they can be used. When you partition a drive, you’re designating a specific area of your hard drive for use. Partitions allow you to divide your hard drive so that not all information is stored in one area. Different operating systems write information to partitions in different ways, and these different ways are known as file systems.

16
Partitions
There are two types of partitions: primary and extended. Extended partitions can be subdivided into more parts through the use of logical drives; primary partitions cannot. A hard drive can contain both types of partitions at the same time, with some limitations. A drive can contain up to four primary partitions. To divide a hard drive up even further, one of these partitions may be designated as an extended partition. Each extended partition can be divided up using logical drives.
Figure 1.1 shows you an example of a drive that has been broken down into four distinct areas using one primary partition and one extended partition that has been further divided into three logical drives.
Figure 1.1. Hard Drive Partitions Example of hard drive partition types.
Primary Partition Logical Drive Logical Drive Logical Drive
File Systems
Whereas the partition tells the operating system “Write information in this area,” a file system tells the operating system “Write the files in this format!” DOS versions use a file system called FAT16 that allows for 512 MB partitions and Windows can use a FAT32 or NTFS file system, which allows for much larger partitions. Linux primarily uses two file systems called EXT2 and SWAP.
CAUTION If you’re using Windows with a FAT32 partition, you may have problems using the fips commands. You need to look to a commercial partition program (such as Partition Magic) to create the necessary space. Extended Partition
Creating Space
You need to have a minimum of 60 MB free on your hard drive for a bare bones Linux installation. A more reasonable estimate is around 250 MB, and a complete installation takes up around 600 megabytes. This section takes you through the creation of space on your hard drive by showing you how it would be done on a fictional 1GB hard drive with 1024 cylinders. The drive has 600MB of space free.
Installing Linux
For most, the idea of installing an operating system might seem like a very daunting task. Believe it or not, Linux offers one of the easiest installations of all operating systems. In fact, most versions of Linux offer what is called a Live distribution – which means you run the operating system from either a CD/DVD or USB flash drive without making any changes to your hard drive. You get the full functionality without having to commit to the installation. Once you’ve tried it out, and decided you wanted to use it, you simply double-click the “Install” icon and walk through the simple installation wizard.
Typically, the installation wizards walk you through the process with the following steps
Preparation: Make sure your machine meets the requirements for installation. This also may ask you if you want to install third-party software (such as plugins for MP3 playback, video codecs, and more).

Linux Course Material by Dr. Bhagirathi Nayak
17
Getting Ubuntu
To download Ubuntu, http://www.ubuntu.com/getubuntu/download
In addition to downloading, there are many companies that will mail you a CD or DVD for a small fee. Two examples of such companies are OSdisc.com and LinuxCD.org. Ubuntu ShipIt will send a CD with the latest version of the operating system for free, but it may take up to ten weeks to arrive. All you have to do is create an account on shipit.ubuntu.com.
Writing Ubuntu to a CD
1. Download and install Infra Recorder, a freehand open source image-burning program.
2. Insert a blank CD in the drive. Cancel the auto run dialog, which pops up.
3. Open Infra Recorder and click the ‘Write Image’ button in the main screen.
4. Alternatively you can select the ‘Actions’ menu, then ‘Burn image’.
5. Select the Ubuntu CD image file you want to use, and then click ‘Open’.
6. Click ‘OK’.
Installation Types
Since the Ubuntu CD is a “Live CD”, you can boot from it and select “Try Ubuntu Without Making Any Changes To My PC”. Ubuntu will start and will look and react as if it were installed on your PC. This way, you can comfortable with it before installing. There are four ways to install Ubuntu:
1. Erase your hard drive and install Ubuntu as the primary operating system. You need to backup all your data in order to restore it later, after Ubuntu is installed. This is the method you can use.
2. Use Wubi to easily install Ubuntu in a dual boot configuration: both Ubuntu and Windows installed on the same computer. Wubi doesn’t modify the partitions of your PC and takes the guesswork out of installing Ubuntu. Wubi keeps all its files in a single folder and can be uninstalled just like any other Windows application. More information about Wubi can be found at http://www.wubi-installer.org. Essentially, Wubi is a shortcut for inexperienced users that allows them to enjoy the full-blown Ubuntu installation without the headache of booting from a CD and running the installation script in an unfamiliar environment.
18
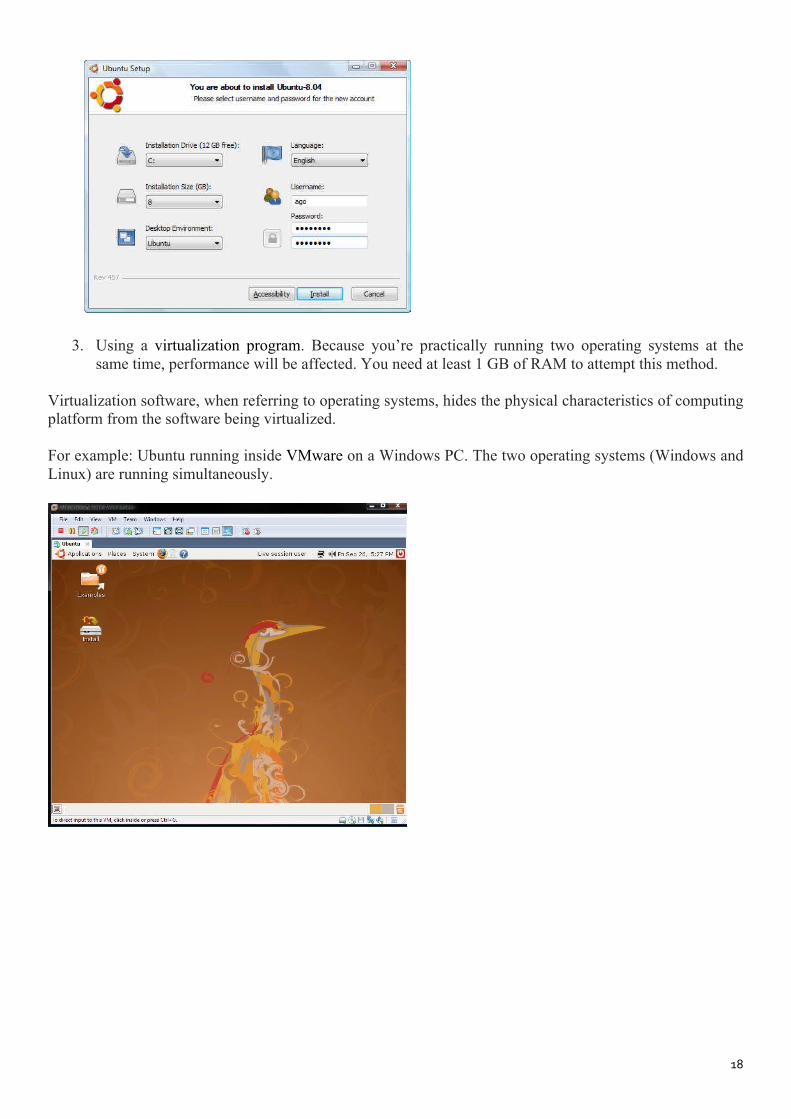
3. Using a virtualization program. Because you’re practically running two operating systems at the same time, performance will be affected. You need at least 1 GB of RAM to attempt this method.
Virtualization software, when referring to operating systems, hides the physical characteristics of computing platform from the software being virtualized. For example: Ubuntu running inside VMware on a Windows PC. The two operating systems (Windows and Linux) are running simultaneously.

Linux Course Material by Dr. Bhagirathi Nayak
19
Installation Instructions
• Insert the Ubuntu disc into your CD drive. • Boot Computer with Ubuntu Installation CD/DVD or ISO. • Welcome screen of Ubuntu
Preparing to install Ubuntu, select options and click continue.

20
Installation type selection.
Select nearest city in your time zone.

Linux Course Material by Dr. Bhagirathi Nayak
21
Keyboard selection.
Fill information and continue.

22
Installation is in progress. This may take several minutes.
Installation is completed, eject CD/DVD and restart.

Linux Course Material by Dr. Bhagirathi Nayak
23
Booting your Ubuntu Box.
Login screen.
Ubuntu Desktop.
User Name
Password

24
Ubuntu Desktop with system settings.
That’s it. Ubuntu is now installed.
Starting Linux
When you turn on the PC, it goes through the normal power-up sequence and loads the boot loader — GRUB or LILO, depending on your Linux distribution and what you select during installation. The boot loader (once known as the bootstrap loader) is a tiny computer program that loads the rest of the operating system from the hard drive into the computer’s memory. The entire process of starting a computer is called booting.
The LILO and GRUB boot loaders display a graphical screen with the names of the operating systems that the boot loader can load. For example, if your PC has Windows and Linux, you see both names listed. You can then use the up- and down-arrow keys to select the operating system you want to use. If the PC is set up to load Linux by default, wait a few seconds, and the boot loader starts Linux. To be more
precise, the boot loader loads the Linux kernel — the core of the Linux operating system — into the PC’s memory
While the Linux kernel starts, you see a long list of opening messages, often referred to as the boot messages. (You can see these messages at any time by typing the command dmesg in a terminal window.) These messages include the names of the devices that Linux detects.

Linux Course Material by Dr. Bhagirathi Nayak
25
After Linux booting you should not normally log in as root. When you log in as root, you could accidentally damage your system because you can do anything when you’re root. Always log in as a normal user. When you need to perform any task as root, type su - in a terminal window and enter the root password.
In Ubuntu, you define only a normal user account; Ubuntu doesn’t give you the opportunity to define a root
user account. Whenever you want to per- form any tasks that require you to be root, you have to use the sudo command (an abbreviation for “superuser”). The default password for root is the one you gave during the installation of the operating system.
Playing with the Shell
Linux is basically Unix, and Unix just doesn’t feel like Unix unless you can type cryptic commands in a text terminal. Although GNOME and KDE do a lot to bring us into the world of windows, icons, mouse, and pointer — affectionately known as WIMP — sometimes you’re stuck with nothing but a plain text screen with a prompt that looks something like this (when you log in as arun):
arun@linux:/etc>
You see the text screen most often when something is wrong with the X Window System, which is essentially the machinery that runs the windows and menus that you normally see. In those cases, you have to work with the shell and know some cryptic Linux commands. You can prepare for unexpected encounters with the shell by trying some Linux commands in a terminal window while you’re in the GNOME or KDE GUI. After you get the hang of using the terminal, you might even keep a terminal window open so you can use one of those cryptic commands — simply because it’s faster than pointing and clicking. Those two-letter commands do pack some punch!
Main Window

26
Starting the bash shell
Simply put, the shell is the Linux command interpreter — a program that reads what you type, interprets that text as a command, and does what the command is supposed to do.
Before you start playing with the shell, open a terminal window. In either GNOME or KDE, the panel typically includes an icon that looks like a monitor. When you click that icon, what appears is a window with a prompt.
That’s a terminal window, and it works just like an old-fashioned terminal. A shell program is running and ready to accept any text that you type. You type text, press Enter, and something happens (depending on what you typed).
If the GNOME or KDE panel on your desktop doesn’t seem to have an icon that starts a terminal or shell window, search through the Main menu hierarchy and you should be able to find an item labeled Console or Terminal. Choosing that item should open a terminal window. The prompt that you see depends on the shell that runs in that terminal window. The default Linux shell is bash (which stands for Bourne-Again SHell). Bash understands a host of standard Linux commands, which you can use to look at files, go from one directory to another; see what programs are running (and who else is logged in), and a whole lot more. In addition to the Linux commands, bash can run any program stored in an executable file. Bash can also execute shell scripts — text files that contain Linux commands. First Linux commands Now you should have managed to open a terminal shell and are ready to try your first Linux commands. Simply ask the computer to do the tasks you want it to using it's language and press the enter key (the big one with an arrow). You can add a & after the command to make it run in the background (your terminal will be available while the job is done). It can be practical to do things like moving big divx movies as a background process: cp movie.avi /pub &. Jobs - the basics of job control
man command $ man <mkdir> man command is the interface used to view the system's reference manuals.

Linux Course Material by Dr. Bhagirathi Nayak
27
ls -‐ short for list ls lists the files in the current working folder. This is probably the first command to try out.
Examples:
ls ls –l
pwd - print name of current/working directory pwd prints the fully resolved name of the current (working) directory.
cd -‐ change directory cd stands for change (working) directory and that's what it does. The folder below you (unless you are in /, where there is no lower directory) is called "..".
To go one folder down: cd ..
Change into the folder Documents in your current working directory: cd Documents
Change into a folder somewhere else: cd /pub/video
The / in front of pub means that the folder pub is located in the / (lowest folder).
The basic Linux commands chmod - Make a file executable
To make a file executable and runnable by any user: chmod a+x myfile
df - view file system disk space usage df –h

28
Filesystem Size Used Avail Use% Mounted on /dev/hda3 73G 67G 2.2G 97% / tmpfs 2.0M 24K 2.0M 2% /mnt/.init.d tmpfs 252M 0 252M 0% /dev/shm
The flags: -h, --human-readable Appends a size letter such as M for megabytes to each size. du - View the space used by files and folders Use du (Disk Usage) to view how much space files and folders occupy.
Example du usage:
du -‐sh Documents/ 409M Documents 7.4. mkdir -‐ makes folders Folders are created with the command mkdir:
mkdir folder
To make a long path, use mkdir -p :
mkdir -‐p /use/one/command/to/make/a/long/path/
Like most programs mkdir supports -v (verbose). Practical when used in scripts.
You can make multiple folders in bash and other shells with {folder1,folder2} :
mkdir /usr/local/src/bash/{old,new,dist,bugs}
The command rmdir removes folders.
rmdir /usr/local/src/bash/arun{arun folder will delete
passwd - changes your login password To change your password in Linux, type: Passwd
The root user can change the password of any user by running passwd with the user name as argument: passwd arun
will change aruns password. Running passwd without arguments as root changes the root password.
If you need to add several new users and give them password you can use a handy program like Another Password Generator to generate a large set of "random" passwords.
KDE From KDE you can change your password by going:
K -> Settings -> Change Password K -> Settings -> Control Center -> System Administration -> User Account

Linux Course Material by Dr. Bhagirathi Nayak
29
rm -‐ delete files and folders, short for remove
Files are deleted with the command rm: rm /home/you/youfile.txt
To delete folders, use rm together with -f (Do not prompt for confirmation) and -r (Recursively remove directory trees):
rm -‐rf /home/you/foo/ Like most programs rm supports -v (verbose).
ln - make symbolic links A symbolic link is a "file" pointing to another file. To make a symbolic link: ln /original/file /new/link
This makes /original/file and /new/link the same file - edit one and the other will change. The file will not be gone until both /original/file and /new/link are deleted. You can only do this with files. For folders, you must make a "soft" link. To make a soft symbolic link:
ln -‐s /original/file /new/link
Example:
ln -‐s /usr/src/linux-‐2.4.20 /usr/src/linux Note that -s makes an "empty" file pointing to the original file/folder. So if you delete the folder a symlink points to, you will be stuck with a dead symlink (just rm it).
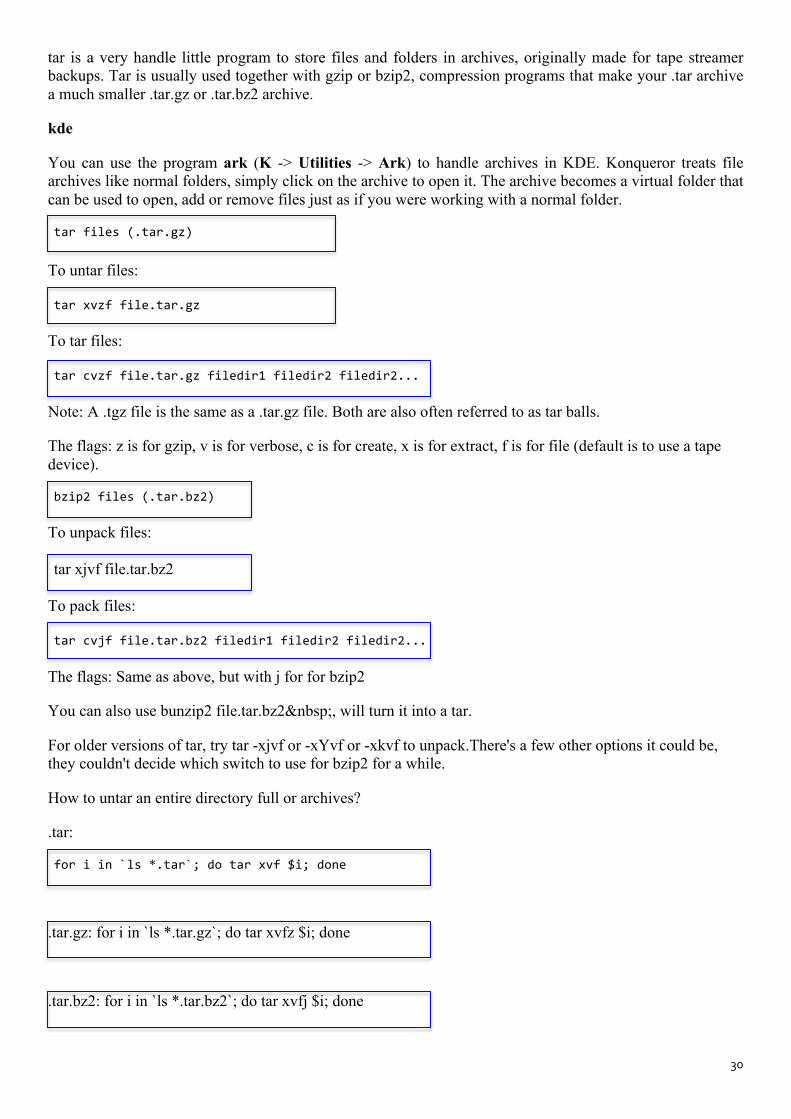
tar archiving utility -‐ tar.bz2 and tar.gz
30
tar is a very handle little program to store files and folders in archives, originally made for tape streamer backups. Tar is usually used together with gzip or bzip2, compression programs that make your .tar archive a much smaller .tar.gz or .tar.bz2 archive.
kde
You can use the program ark (K -> Utilities -> Ark) to handle archives in KDE. Konqueror treats file archives like normal folders, simply click on the archive to open it. The archive becomes a virtual folder that can be used to open, add or remove files just as if you were working with a normal folder.
tar files (.tar.gz)
To untar files: tar xvzf file.tar.gz
To tar files: tar cvzf file.tar.gz filedir1 filedir2 filedir2...
Note: A .tgz file is the same as a .tar.gz file. Both are also often referred to as tar balls.
The flags: z is for gzip, v is for verbose, c is for create, x is for extract, f is for file (default is to use a tape device).
bzip2 files (.tar.bz2) To unpack files: tar xjvf file.tar.bz2
To pack files: tar cvjf file.tar.bz2 filedir1 filedir2 filedir2...
The flags: Same as above, but with j for for bzip2
You can also use bunzip2 file.tar.bz2 , will turn it into a tar.
For older versions of tar, try tar -xjvf or -xYvf or -xkvf to unpack.There's a few other options it could be, they couldn't decide which switch to use for bzip2 for a while.
How to untar an entire directory full or archives?
.tar:
for i in `ls *.tar`; do tar xvf $i; done
.tar.gz: for i in `ls *.tar.gz`; do tar xvfz $i; done
.tar.bz2: for i in `ls *.tar.bz2`; do tar xvfj $i; done

Linux Course Material by Dr. Bhagirathi Nayak
31
ssh Command
With the ssh command you can log in to a remote computer and work on it remotely. That is, it enables you to connect to another computer on the Internet. That could be physically located anywhere in the world, and open a window on your local machine that lets you run programs interactively on the remote machine.
For example the following command would be used to login to a computer with the network id "comp.org.net":
ssh [email protected] assuming "wiki" is the username of the account we are tying log into on this machine. The system will ask you for the password before you get the prompt that allows you to run programs on the remote computer. If the user name of the remote machine is the same as on the local machine you can omit the user name:
ssh comp.org.net
You can also use ssh to run a command on a remote machine without login in. For example,
ssh [email protected] ps will execute the command "ps" on the computer "comp.org.net" and show the results in your local window.
32
Shutting Down
When you’re ready to shut down Linux, you must do so in an orderly manner. Even if you’re the sole user of a Linux PC, several other programs usually run in the background. Also, operating systems, such as Linux, try to optimize the way that they write data to the hard drive. Because hard-drive access is relatively slow (compared with the time needed to access memory locations), data generally is held in memory and written to the hard drive in large chunks. Therefore, if you simply turn off the power, you run the risk that some files aren’t updated properly.
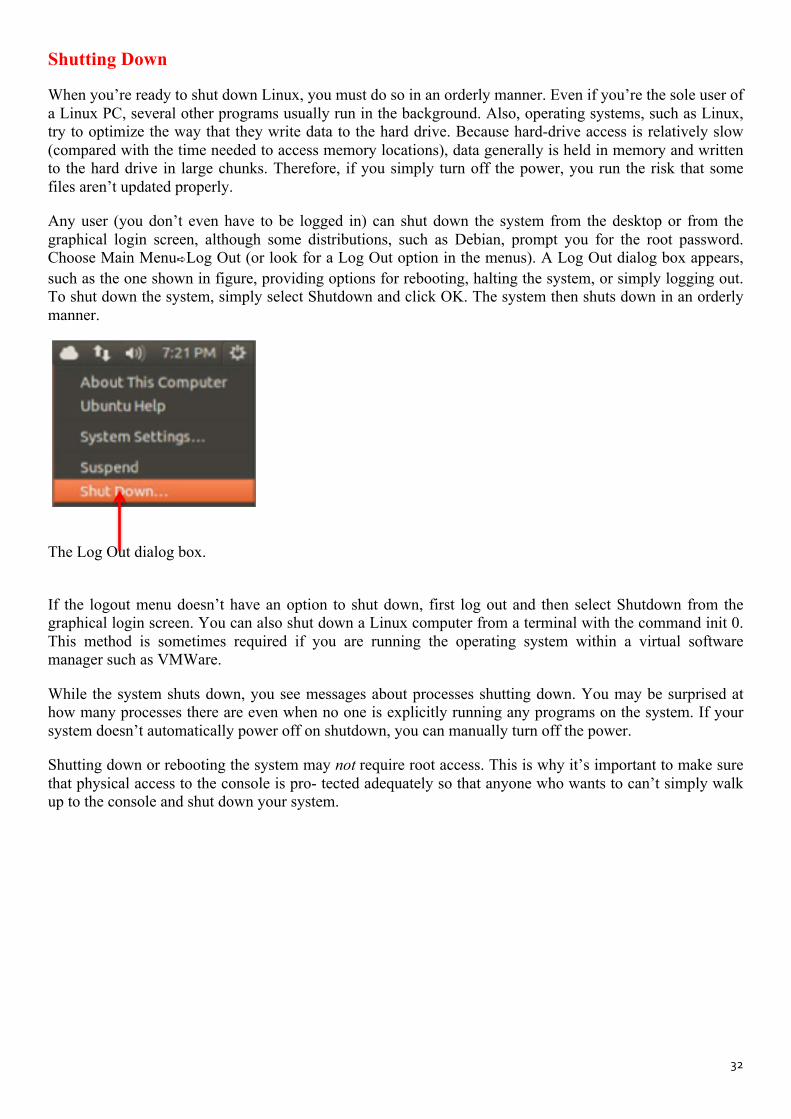
Any user (you don’t even have to be logged in) can shut down the system from the desktop or from the graphical login screen, although some distributions, such as Debian, prompt you for the root password. Choose Main Menu➪Log Out (or look for a Log Out option in the menus). A Log Out dialog box appears, such as the one shown in figure, providing options for rebooting, halting the system, or simply logging out. To shut down the system, simply select Shutdown and click OK. The system then shuts down in an orderly manner.
The Log Out dialog box.
If the logout menu doesn’t have an option to shut down, first log out and then select Shutdown from the graphical login screen. You can also shut down a Linux computer from a terminal with the command init 0. This method is sometimes required if you are running the operating system within a virtual software manager such as VMWare.
While the system shuts down, you see messages about processes shutting down. You may be surprised at how many processes there are even when no one is explicitly running any programs on the system. If your system doesn’t automatically power off on shutdown, you can manually turn off the power.
Shutting down or rebooting the system may not require root access. This is why it’s important to make sure that physical access to the console is pro- tected adequately so that anyone who wants to can’t simply walk up to the console and shut down your system.

Linux Course Material by Dr. Bhagirathi Nayak
33
GNOME Desktop
The initial desktop for GNOME looks like any other popular GUI, such as Microsoft Windows or the Mac OS X desktop. For example, shows the typical GNOME desktop.
Running the Live distribution, a number of icons that would be present if the operating system were installed will not be there. When the system is installed, the desktop initially shows icons for your computer, your home folder, and the trash can for deleted files. Unlike some other distributions, Fedora strives for a minimum of desktop icons and has a clean look.
The GNOME desktop displays a context menu when you right-click an object or anywhere on the desktop. Depending on where you click, the menu can offer the following:
New Folder to create a new folder in a directory
Properties to see the properties, including permissions, associated with a file or folder
Open to open a folder or file
Compress to reduce the size of the file
Make Link to create a shortcut shows the context menus in a typical GNOME folder. If there are any menu options with a right-pointing arrow, it indicates that they have other menus that appear when you put the mouse pointer over the arrow.

34
Many items on this context menu are the same no matter what icon you click, but right-clicking certain icons (for example, the Trash icon) produces a some- what different menu. For the Trash icon, the icon context menu typically pro- vides an option to permanently delete the items in the trash. (You get a chance to say Yes or No.) The right-click. No matter where you are in a GUI desktop, always right-click before you pick. You’re bound to find something useful when you right-click!
The desktop
After you choose Activities, the leftmost area of the desktop in GNOME shows the applications that can be opened in a panel that you can think of as the Main Menu. The Main Menu panel, like the Start button in Microsoft Windows, is where you typically find all your applications, organized into submenus. Shows an example of this, again from Fedora.
In the case of the live distribution version of Fedora, the default icons on this main menu (also known as the Favorites menu) represent the following features:
• Firefox web browser • Evolution email package • Empathy contact manager • Rhythmbox • Shotwell • LibreOffice Writer • Shortcut to your files • Shortcut to your documents • Install icon • Link to your recent applications
You can click any icon to start the application associated with it, or right- click to start it in a new window or remove it from the menu. This minibook looks at applications, including the Firefox web browser and others discussed here. On the right side of the desktop, you’ll see a quick method of accessing your various desktops — the Workplace Switcher. Assume, for example, that you’re working on a number of projects at once. You can bounce between them by choosing Activities, and then moving your mouse over to the panel on the right so it automatically expands to show you your options.

Linux Course Material by Dr. Bhagirathi Nayak
35
Using the bash Shell
If you’ve used MS-DOS, you may be familiar with COMMAND.COM, the DOS command interpreter. That program displays the infamous C:\> prompt. In Windows, you can see this prompt if you open a command window. (To open a command window in Microsoft Windows, choose Start➪Run, type command in the text box, and then click OK.)
Linux comes with a command interpreter that resembles COMMAND.COM in DOS, but it can do a whole lot more. The Linux command interpreter is called a shell.
The default shell in many Linux distributions is bash. When you open a terminal window or log in at a text console, the bash shell is what prompts you for commands. Then, when you type a command, the shell executes your command. Just as there are multiple GUIs (GNOME or KDE) for Linux, you have a choice of shells besides bash. For example, some people prefer the C shell. You can easily change your default shell by using the chsh command. In addition to the standard Linux commands, bash can execute any computer program. So you can type the name of an application (the name is usually more cryptic than what you see in GNOME or KDE menus) at the shell prompt, and the shell starts that application.
The syntax of shell commands
Because a shell interprets what you type, knowing how the shell processes the text you enter is important. All shell commands have the following gen- eral format. (Some commands have no options.)
command [option1] [option2] . . . [optionN]
Issuing such a command is a process commonly referred to as a command line. On a command line, you enter a command, followed by zero or more options (or arguments). These strings of options — the command-line options (or command-line arguments) — modify the way the command works so that you can get it to do specific tasks.
The shell uses a blank space or a tab to distinguish between the command and options. This means you must use a space or a tab to separate the command from the options and the options from one another.
If an option contains spaces, you put that option inside quotation marks. For example, to search for my name in the password file, I enter the following grep command (grep is used for searching for text in files):
grep "Emmett Dulaney" /etc/passwd When grep prints the line with my name, it looks like this:
edulaney:x:1000:100:Emmett Dulaney:/home/edulaney:/bin/bash
If you create a user account with your username, type the grep command with your username as an argument to look for that username in the /etc/ passwd file. In the output from the grep command, you can see the name of the shell (/bin/bash) following the last colon (:). Because the bash shell is an executable file, it resides in the /bin directory; you must provide the full path to it.

36
The number of command-line options and their format depend on the actual command. Typically, these options look like -X, where X is a single character. For example, you can use the -l option with the ls command. The command lists the contents of a directory, and the option provides additional details. Here is a result of typing ls -l in a user’s home directory:
total 0 drwxr-xr-x 2 edulaney users 48 2014-09-08 21:11 bin drwx------ 2 edulaney users 320 2014-09-08 21:16 Desktop drwx------ 2 edulaney users 80 2014-09-08 21:11 Documents drwxr-xr-x 2 edulaney users 80 2014-09-08 21:11 public_html drwxr-xr-x 2 edulaney users 464 2014-09-17 18:21 sdump
If a command is too long to fit on a single line, you can press the backslash key (\) followed by Enter. Then continue typing the command on the next line. For example, type the following command. (Press Enter after each line.)
cat \ /etc/passwd
The cat command then displays the contents of the /etc/passwd file. You can concatenate (that is, string together) several shorter commands on a single line by separating the commands by semicolons (;). For example, the following command
cd; ls -‐l; pwd
Changes the current directory to your home directory, lists the contents of that directory, and then shows the name of that directory.
Command input from a file If you want a command to get its instructions by reading from a file, you can redirect the standard input to come from that file instead of from the keyboard. For example, type the following command:
sort < /etc/passwd
This command displays a sorted list of the lines in the /etc/passwd file. In this case, the less-than sign (<) redirects stdin so that the sort command reads its input from the /etc/passwd file.
Saving command output in a file To save the output of a command in a file, redirect the standard output to a file. For example, type cd to change to your home directory, and then type the following command: grep typedef /usr/include/* > typedef.out

Linux Course Material by Dr. Bhagirathi Nayak
37
This command searches through all files in the /usr/include directory for the occurrence of the text typedef — and then saves the output in a file called typedef.out. The greaterthan sign (>) redirects stdout to a file. This command also illustrates another feature of bash: When you use an asterisk (*), bash replaces the asterisk with a list of all filenames in the specified directory. Thus /usr/include/* means all the files in the /usr/include director y. If you want to append a command’s output to the end of an existing file instead of saving the output in a new file, use two greater-than signs (>>) like this:
command >> filename
Automatic command completion
Many commands take a filename as an argument. To view the contents of the /etc/modprobe.conf text file, for example, type the following command:
cat /etc/modprobe.conf The cat command displays the /etc/modprobe.conf file. For any command that takes a filename as an argument, you can use a bash feature to avoid having to type the entire filename. All you have to type is enough characters to uniquely identify the file in its directory. To see an example, type cat /etc/mod but don’t press Enter; press Tab instead. Bash automatically completes the filename, so the command becomes cat /etc/modprobe.conf. Now press Enter to run the command.
The Linux File Systems Like any other operating system, Linux organizes information in files and directories. A directory is a special file that can contain other files and directories. Because a directory can contain other directories, this method of organizing files gives rise to a hierarchical structure. This hierarchical organization of files is the file system.
The Linux file system gives you a unified view of all storage on your PC. The file system has a single root directory, indicated by a forward slash (/). Within the root directory is a hierarchy of files and directories. Parts of the file system can reside in different physical media, such as a hard drive, an external drive, and a CD-ROM.

38
If you’re familiar with other operating systems such as Windows, you may find something missing in the Linux file system: You don’t find drive letters in Linux. All disk drives and CD-ROM drives are part of a single file system.
In Linux, you can have long filenames (up to 256 characters), and filenames are case sensitive. Often these filenames have multiple extensions, such as sample.tar.Z. Unix filenames can take many forms, such as the following: index.html, Makefile, binutils 2.15.92.0.2-5.i386.rpm, vsftpd_ 2.0.3-1_i386.deb, .bash_profile, and httpd_src.tar.gz.
To locate a file, you need more than just the filename. You also need information about the directory hierarchy. The extended filename, showing the full hierarchy of directories leading to the file, is the pathname. As the name implies, it’s the path to the file through the maze of the file system.
Shows a typical pathname for a file in Linux.
HDD
HDD

Linux Course Material by Dr. Bhagirathi Nayak
39
Directories in the Linux File System
Directory Content
/ Base of the file system. All files and directories are contained logically in the root, or /, directory, regardless of their physical locations.
/bin Executable programs that are part of the Linux operating system. Many Linux commands, such as cat, cp, ls, more, and tar, are located in /bin.
/boot Linux kernel and other files that the LILO and GRUB boot managers need. (The kernel and other files can be anywhere, but placing them in the /boot directory is customary.)
/dev Special files that represent devices attached to the system.
/etc Most system configuration files and the initialization scripts (in the /etc/rc.d subdirectory).
/home Home directories of all users. User edulaney’s home directory, for example, is /home/edulaney.
/lib Library files for all programs stored in /sbin and /bin directories (including the loadable driver modules) needed to start Linux.
/lost+found Lost files. Every disk partition has a lost+found directory.
/media The /media/cdrom or /media/cdrom0 directory is for mounting the CD/DVD-ROM drive. If you have a CD/DVD recorder, you find a /media/cdrecorder directory instead of /media/cdrom and may also find /media/ DVD. Used for mounting file systems on removable media, such as CD/DVD-ROM drives, flash drives, external drives, floppy disks, and Zip drives. If you have a very old machine that still has a floppy drive on it, then the /media/floppy directory will also exist for mounting floppy disks.
/mnt Temporarily mounted file systems.
/opt Storage for large application software packages. For example, some distributions install the LibreOffice.org Office suite in the/opt directory.
/proc Various information about the processes running in the Linux System.
/root Home directory for the root user.
/sbin Executable files representing commands typically used for system administration tasks and used by the root user. Commands such as halt and shutdown reside in the /sbin directory.
/srv Data for services (such as web and FTP) offered by this system.
/sys Information about the devices, as seen by the Linux kernel.
/temp Temporary directory that any user can use as a scratch directory, meaning that the contents of this directory are considered unimportant and usually are deleted every time the system boots.
/usr Subdirectories for many important programs, such as the X Window System (in the /usr/X11R6 directory) and the online manual.

40
/var Various system files (such as logs), as well as directories for holding other information, such as files for the web server and anonymous FTP server.
Office Applications and Tools Text Document, Spreadsheet, Presentation software, Database, Drawing — these are some office staples. Most Linux distributions come with the office applications and tools. You can try all of them one by one and see which one takes your fancy. Each application is fairly intuitive to use. Although some nuances of the user interface may be new to you, you’ll become comfortable with the interface after using it a few times. This section briefly introduces the following applications, as well as some other commercially available office applications for Linux:
Apache Open Office Suite: A Microsoft Office–like Apache Open Office suite with the Text Document, Spreadsheet, Presentation, Database, Drawing program. It is open source software. It can be downloaded from http//:www.openoffice.org/download/
Open Office is not an office suite similar to major office suites such as Microsoft Office. Its main components are the Text Document, Spreadsheet, Presentation, Database software and Drawing program.
Text Documents
Choosing File➪New➪Text Document from any Open Office window starts Office Writer with a blank document in its main window. Using Writer is simple — if you’re familiar with Microsoft Word, you should have no trouble finding your way around Writer. You can type text into the blank document, format text, and save text. It can also open documents that you’ve prepared with Microsoft Word on a Windows machine. Shows a Microsoft Word document opened in Open Office Writer.

Linux Course Material by Dr. Bhagirathi Nayak
41
Spreadsheet
The spreadsheet program is an Open Office application suite. To start spreadsheet, choose Spreadsheet from the Office category in the main menu or choose File➪New➪Spreadsheet from any Open Office window. Spreadsheet displays its main window, which looks similar to that of Windows-based spreadsheets such as Microsoft Excel. (Spreadsheet can read and write Microsoft Excel-format spreadsheet files.)
Use Spreadsheet in the same way you use Microsoft Excel. You can type entries in cells, use formulas, and format the cells. (For example, you can specify the type of value and the number of digits after the decimal point.) shows a typical spreadsheet.
42
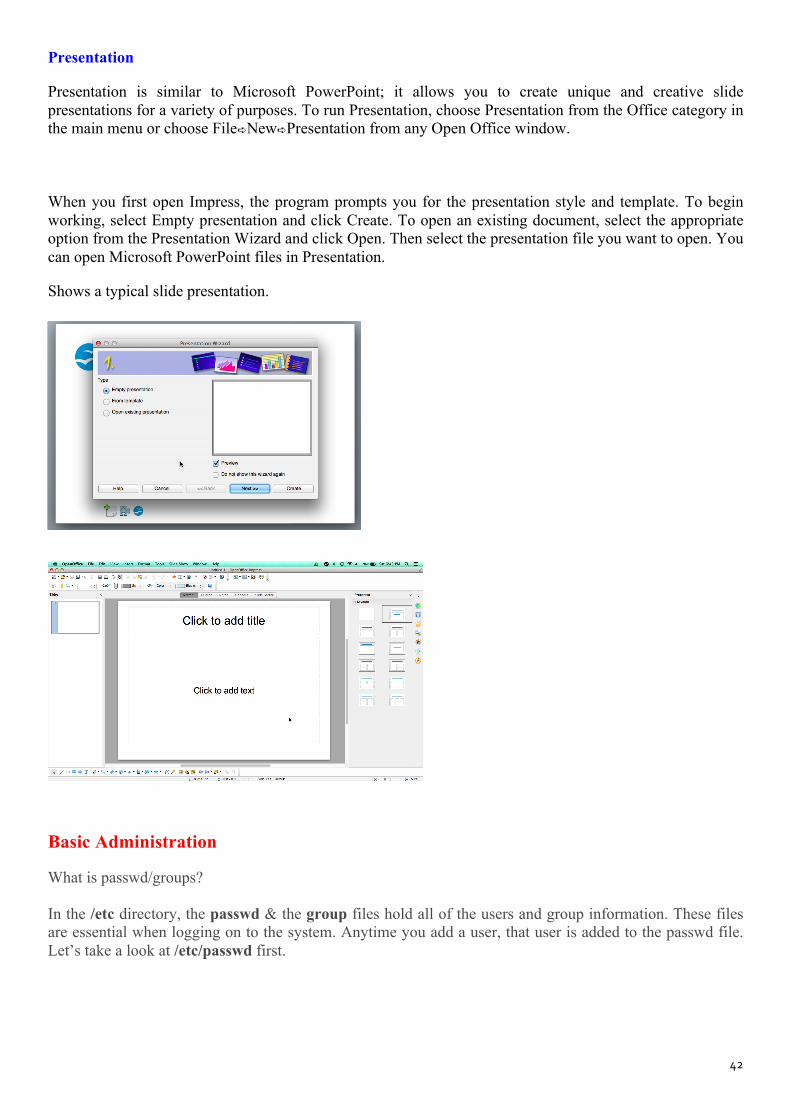
Presentation
Presentation is similar to Microsoft PowerPoint; it allows you to create unique and creative slide presentations for a variety of purposes. To run Presentation, choose Presentation from the Office category in the main menu or choose File➪New➪Presentation from any Open Office window.
When you first open Impress, the program prompts you for the presentation style and template. To begin working, select Empty presentation and click Create. To open an existing document, select the appropriate option from the Presentation Wizard and click Open. Then select the presentation file you want to open. You can open Microsoft PowerPoint files in Presentation.
Shows a typical slide presentation.
Basic Administration
What is passwd/groups?
In the /etc directory, the passwd & the group files hold all of the users and group information. These files are essential when logging on to the system. Anytime you add a user, that user is added to the passwd file. Let’s take a look at /etc/passwd first.

Linux Course Material by Dr. Bhagirathi Nayak
43
When you add a user to the system, that user is placed into the passwd file.
Issue command: less /etc/passwd
Use the arrows keys to go up and down and “q” to exit.
You can edit the file directly or use the commands we will go over shortly. I recommend using the commands especially if you are a beginner. You do not want to corrupt the passwd file.

44
Let’s take a look at the group file:
The /etc/group file holds all of the group information as well as the users belonging to each group. The structure is very similar to that of /etc/password.
.
Adding/Deleting Users
Adding a user is easy. The command used is: useradd “name of the user”
Note – You must be logged-in as root to add, delete, and modify users. It is not recommended to stay logged-in as root other than when necessary and only certain members should have root access.

Linux Course Material by Dr. Bhagirathi Nayak
45
Example: useradd roman
You can then use “su” plus the name of the user you just added to logon. “exit” will take you out.
The command for deleting a user is “userdel”. userdel roman
Working with sudo command
sudo allows a permitted user to execute a command as the superuser or another user, as specified in the sudoers file.

46
Installing Yum
YUM stands for Yellow dog Updater, Modified because it is based on YUP, the Yellow dog Updater. Yellow Dog is a version of Linux for the Power Architecture hardware. YUP, and later YUM, were written by the Linux community as a way to maintain an RPM-based system.
Whether you perform network installation or create yum repository file you need dump of RHEL CD. It is generally created on server in RHCE exam. Candidate is given a location of this dump to perform network installation. We will create dump of RHEL CD on /var/ftp/pub and use this for network installation or to create yum repository files. Check how many space is available on /var partition? It need minimum 4 GB space is required
Now mount RHEL dvd on mnt and copy entire disk on /var/ftp/pub
Dump is created on /var/ftp/pub now you can umount RHEL dvd
Configure yum server RHCE EXAM QUESTION Backup of the Redhat Enterprise Linux 5 is taken in /var/ftp/pub on server named Server.example.com. You can install all required packages using yum by creating the repository file. A Linux system with hostname Server.example.com and with ip address of 192.168.0.254 Dump of RHEL disk on /var/ftp/pub location Once you have completed these pre quests follow this guide. change directory to /var/ftp/pub/Server

Linux Course Material by Dr. Bhagirathi Nayak
47
yum and createrepo rpm are required for yum server install.
Now install createrepo rpm
After installing necessary package change directory to /var/ftp/pub
Now create repository of Server directory
Repository of all rpm will be created in few minute

48
Now create repository for VT
In few second all necessary repository will be created for VT
Now create errata directory and repository for it
During the process of creating repository two hidden directory with named .olddata is created automatically remove them
Now check hostname and change directory to /etc/yum.repos.d. copy sample repository file to the file with hostname And open it
Default repository file look like these

Linux Course Material by Dr. Bhagirathi Nayak
49
Remove defaults line and set new location of Sever and VT as shown here
Save file with: wq and exit Now remove all temporary data file with yum clean all command
Congratulation You have successful create yum server To test yum server remove telnet package
After checking all dependences it will ask for conformation press y
Now install telnet package from yum server

50
Installing Webmin
Download the required RPM file from http://download.webmin.com/download/yum/ using the command (note the root status):
# wget http://download.webmin.com/download/yum/webmin-‐1.580-‐1.noarch.rpm
Install the RPM file of Webmin with the following command:
# rpm -‐Uvh webmin-‐1.580-‐1.noarch.rpm
Start Webmin service using the command:
# systemctl start webmin.service To ensure you are able to login into your webmin administration interface, simply use the following
URL: https://your-linux-ip:10000, where "your-linux-ip" is your Linux server's or workstation's IP address.
Running Webmin
Open Firefox or any other browser, and type the URL https://Fedora-16:10000/:
You will be greeted with a welcome screen.
Login as root with your root password and once you are logged in, you should see the system information:

Linux Course Material by Dr. Bhagirathi Nayak
51
Webinar system information:
Adding users, groups and assigning them privileges
Expand the "System" Tab in the left column index, and select the last entry “Users and Groups”. You will be shown the list of the "Local Users" on the system:

52
You can add users or delete them from this window. If you want to change the parameters of any user, you can do so. By clicking on any user, you can see the groups and privileges assigned to them. These can be changed, as you like. For example, if you select the user "root", you can see all the details of the user as shown below:
Here, you can see the members in each group by selecting that group. You can delete a group or add a new one. You can select who will be the member of the group, and who can be removed from a group.
For example, you can see all the members in the group "mem", if you select and open it:

Linux Course Material by Dr. Bhagirathi Nayak
53
Here, you will be allowed to create a new group or delete selected groups. You can also add users to the groups or delete them as required. If required, you can also change group ID on files and modify a group other modules as well.
The "Reboot System" and "Shutdown System" function buttons are also located at the bottom, allowing the immediately reboot or shutdown the system.
Linux Log Files
Almost all logfiles are located under /var/log directory and its sub-directories on Linux.
Open the Terminal or login as root user using ssh command. Go to /var/log directory using the following cd command: # cd /var/log
System log file

54
To view a common log file called /var/log/messages use any one of the following commands:
# less /var/log/messages # more -f /var/log/messages # cat /var/log/messages # tail -f /var/log/messages # grep -i error /var/log/messages
tail prints the last 10 lines of each FILE to standard output tail command
# cd /var/log /var/log # ls
Using Kerberos Kerberos is a network authentication protocol created by MIT, and uses symmetric-key cryptography to authenticate users to network services, which means passwords are never actually sent over the network. Most conventional network services use password-based authentication schemes, where a user supplies a password to access a given network server. However, the transmission of authentication information for many services is unencrypted. For such a scheme to be secure, the network has to be inaccessible to outsiders, and all computers and users on the network must be trusted and trustworthy. With simple, password-based authentication, a network that is connected to the Internet cannot be assumed to be secure. Any attacker who gains access to the network can use a simple packet analyzer, or packet sniffer, to intercept usernames and passwords, compromising user accounts and, therefore, the integrity of the entire security infrastructure. Kerberos eliminates the transmission of unencrypted passwords across the network and removes the potential threat of an attacker sniffing the network. The KDC then checks for the principal in its database. If the principal is found, the KDC creates a TGT, encrypts it using the user's key, and sends the TGT to that user.

Linux Course Material by Dr. Bhagirathi Nayak
55
Kerberos Authentication
The login or kinit program on the client then decrypts the TGT using the user's key, which it computes from the user's password. The user's key is used only on the client machine and is not transmitted over the network. The ticket (or credentials) sent by the KDC is stored in a local file, the credentials cache, which can be checked by Kerberos-aware services. After authentication, servers can check an unencrypted list of recognized principals and their keys rather than checking kinit; this is kept in a keytab. The TGT is set to expire after a certain period of time (usually ten to twenty-four hours) and is stored in the client machine's credentials cache. An expiration time is set so that a compromised TGT is of use to an attacker for only a short period of time. After the TGT has been issued, the user does not have to reenter their password until the TGT expires or until they log out and log in again.
Whenever the user needs access to a network service, the client software uses the TGT to request a new ticket for that specific service from the ticket-granting server (TGS). The service ticket is then used to authenticate the user to that service transparently.
File Permissions Every file and directory in Linux system has following 3 permissions.
Read: This permission gives you the authority to open and read a file. Read permission on a directory gives you the ability to lists it's content. Write: The right permission gives you the authority to modify the contents of a file. The write permission on a directory gives you the authority to add, remove and rename files stored in the directory. Consider a scenario where you have write permission on the file but do not have write permission on the directory where the file is stored. You will be able to modify the file contents. But you will not be able rename, move

56
or remove the file from the directory. Execute: In windows an executable program usually has an extension ".exe" and which you can easily run. In Unix/Linux, you cannot run a program unless the execute permission is set. If the execute permission is not set, you might still be able to see/modify the program code (provided read & write permissions are set), but not actually run it.
ls - l on terminal gives
Here, we have highlighted '-rw-rw-r--'and this weird looking code is the one that tells us about the permissions given to the owner, user group and the world.
Here, the first '-' implies that we have selected a file.
Else, if it were a directory, d would have been shown.
The characters are pretty easy to remember. r = read permission w = write permission x = execute permission - = no permission

Linux Course Material by Dr. Bhagirathi Nayak
57
The first part of the code is 'rw-'. This suggests that the owner 'Home' can:
How to enable and disable services Red Hat, Fedora, and Red Hat based Linux distributions such as CentOS make use of the script called chkconfig to enable and disable the system services running in Linux. As an example, lets enable the Apache web server to start in run levels 2, 3, and 5. This is how it is done. First add the service using chkconfig script. Then turn on the service at the desired run levels. Enable a service # chkconfig httpd -‐-‐add # chkconfig httpd on -‐-‐level 2,3,5
This will enable the Apache web server to automatically start in the run levels 2, 3 and 5. You can check this by running the command # chkconfig -‐-‐list httpd
Disable a service # chkconfig httpd off # chkconfig httpd -‐-‐del
Red Hat/Fedora also has a useful script called services that can be used to start or stop any service. For example, to start Apache web server using the service script, the command is as follows and to stop the service... Start the service... # service httpd start Stop the service... # service httpd stop The options being start stop and restart which are self-explanatory.
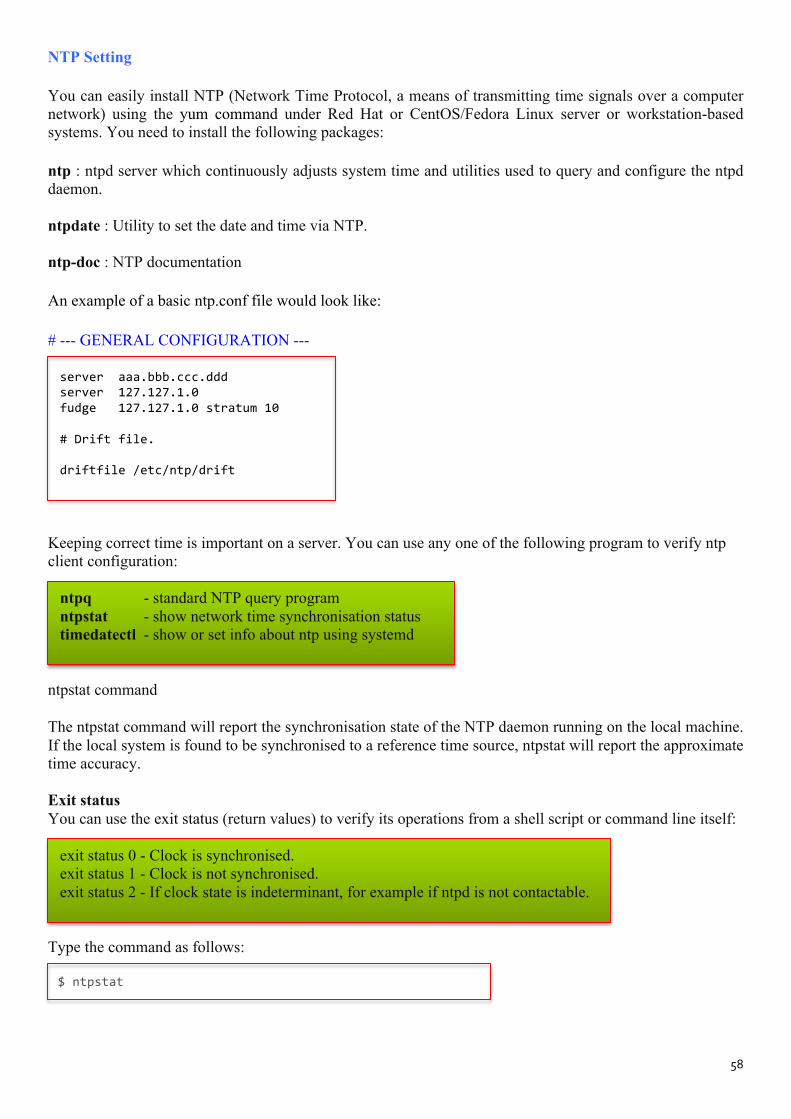
58
NTP Setting
You can easily install NTP (Network Time Protocol, a means of transmitting time signals over a computer network) using the yum command under Red Hat or CentOS/Fedora Linux server or workstation-based systems. You need to install the following packages:
ntp : ntpd server which continuously adjusts system time and utilities used to query and configure the ntpd daemon. ntpdate : Utility to set the date and time via NTP. ntp-doc : NTP documentation
An example of a basic ntp.conf file would look like:
# --- GENERAL CONFIGURATION ---
server aaa.bbb.ccc.ddd server 127.127.1.0 fudge 127.127.1.0 stratum 10 # Drift file. driftfile /etc/ntp/drift
Keeping correct time is important on a server. You can use any one of the following program to verify ntp client configuration:
ntpq - standard NTP query program ntpstat - show network time synchronisation status timedatectl - show or set info about ntp using systemd
ntpstat command
The ntpstat command will report the synchronisation state of the NTP daemon running on the local machine. If the local system is found to be synchronised to a reference time source, ntpstat will report the approximate time accuracy. Exit status You can use the exit status (return values) to verify its operations from a shell script or command line itself:
exit status 0 - Clock is synchronised. exit status 1 - Clock is not synchronised. exit status 2 - If clock state is indeterminant, for example if ntpd is not contactable.
Type the command as follows: $ ntpstat

Linux Course Material by Dr. Bhagirathi Nayak
59
Sample outputs: synchronized to NTP server (149.20.54.20) at stratum 3 time correct to within 42 ms polling server every 1024 s
Setting DNS Service
Need to edit the /etc/resolv.conf file and add the line:
nameserver {IP-OF-THE-DNS-1} nameserver {IP-OF-THEISP-DNS-SERVER-2} Login as the root, enter:
# vi /etc/resolv.conf
OR $ sudo vi /etc/resolv.conf Modify or enter nameserver as follows: nameserver 208.67.222.222 nameserver 208.67.220.220
Save and close the file. To test DNS configuration type any one of the following command:
$ host google.com $ dig google.com $ ping google.com $ nslookup your-‐domain.com
Output: google.com has address 72.14.207.99 google.com has address 64.233.187.99 google.com has address 64.233.167.99 google.com mail is handled by 10 smtp4.google.com. google.com mail is handled by 10 smtp1.google.com. google.com mail is handled by 10 smtp2.google.com. google.com mail is handled by 10 smtp3.google.com.
If you see valid output such as actual IP address or able to ping to remote server via hostname, it means that the dns is working for you. Also make sure you have valid default gateway setup, if you see the time out error.

60
Changing XFree86
First is sure that /usr/X11R6/bin is on your path.
The command to start up XFree86 is
startx
This command will start the X server and run the commands found in the file .xinitrc in home directory. .xinitrc is just a shell script containing X clients to run. If this file does not exist, the system default /usr/X11R6/lib/X11/xinit/xinitrc will be used.
A standard .xinitrc file looks like this:
#!/bin/sh xterm -‐fn 7x13bold -‐geometry 80x32+10+50 & xterm -‐fn 9x15bold -‐geometry 80x34+30-‐10 & oclock -‐geometry 70x70-‐7+7 & xsetroot -‐solid midnightblue &
Apache & MySQL
LAMP system. LAMP stands for Linux, Apache, MySQL and PHP.
Apache: Apache is the actual web server application that processes and delivers web content to a computer. Apache is the most popular web server online, powering nearly 54% of all websites. Apache is Default web server application.
MySQL: Every web application, howsoever simple or complicated, requires a database for storing collected data. MySQL, which is open source, is the world’s most popular database management system. It powers everything from hobbyist websites to professional platforms like WordPress. It is basically Database management system.
PHP: PHP stands for Hypertext Preprocessor. It is a server-side scripting language that powers some of the most popular websites in the world, including WordPress and Facebook. It is open source, relatively easy to learn, and works perfectly with MySQL, making it a popular choice for web developers.
Install Apache Step 1. Open up the Terminal (Applications > Accessories > Terminal).
Step 2. Copy/Paste or type the following line of code into Terminal and then press enter:
sudo apt-‐get install apache2
Step 3. The Terminal will then ask you for you're password, type it and then press enter.

Linux Course Material by Dr. Bhagirathi Nayak
61
Testing Apache To make sure everything installed correctly we will now test Apache to ensure it is working properly.
Open up any web browser and then enter the following into the web address:
http://localhost/
See a folder entitled apache2-default/. Open it and it will see a message saying "It works!", congrats to you! Or something likes that!
Install PHP
In this part we will install PHP 5.
Step 1. Again open up the Terminal (Applications > Accessories > Terminal).
Step 2. Copy/Paste or type the following line into Terminal and press enter:
sudo apt-‐get install php5 libapache2-‐mod-‐php5
Step 3. In order for PHP to work and be compatible with Apache we must restart Apache. Type the following code in Terminal to do this:
sudo /etc/init.d/apache2 restart
Testing PHP To ensure there are no issues with PHP let's give it a quick test run.
Step 1. In the terminal copy/paste or type the following line:
sudo gedit /var/www/testphp.php
This will open up a file called testphp.php
Step 2. Copy/Paste this line into the phptest file:
<?php phpinfo(); ?>
Step 3. Save and close the file.
Step 4. Now open you're web browser and type the following into the web address:

62
http://localhost/testphp.php
(It will show you the page that has all information about your php. If you have prior experience of installing php in some other OS, you must have seen this page.)
Congrats you have now installed both Apache and PHP!
Install MySQL
To finish this guide up we will install MySQL.
Step 1. Once again open up the amazing Terminal and then copy/paste or type this line:
sudo apt-‐get install mysql-‐server
Step 2. (optional). In order for other computers on your network to view the server you have created, you must first edit the "Bind Address". Begin by opening up Terminal to edit the my.cnf file.
gksudo gedit /etc/mysql/my.cnf
Change the line
bind-‐address = 127.0.0.1
And change the 127.0.0.1 to your IP address.
(In Linux Mint 11, terminal itself asked to the set password, but if it doesn't follow the step 3.)
Step 3. This is where things may start to get tricky. Begin by typing the following into Terminal:
mysql -‐u root
Following that copy/paste or type this line:
mysql> SET PASSWORD FOR 'root'@'localhost' = PASSWORD('yourpassword');
(Make sure to change yourpassword to a password of your choice.)
Step 4. We are now going to install a program called phpMyAdmin which is an easy tool to edit your databases. Copy/paste or type the following line into Terminal:
sudo apt-get install libapache2-mod-auth-mysql php5-mysql phpmyadmin
After that is installed our next task is to get PHP to work with MySQL. To do this we will need to open a file entitled php.ini. To open it type the following:

Linux Course Material by Dr. Bhagirathi Nayak
63
gksudo gedit /etc/php5/apache2/php.ini
Now we are going to have to uncomment the following line by taking out the semicolon (;).
Change this line:
;extension=mysql.so
Now just restart Apache and you are all set!
sudo /etc/init.d/apache2 restart
If you get a 404 error upon visiting http://localhost/phpmyadmin: You will need to configure apache2.conf to work with Phpmyadmin. sudo gedit /etc/apache2/apache2.conf
Include the following line at the bottom of the file, save and quit.
Include /etc/phpmyadmin/apache.conf
Then just restart Apache
sudo /etc/init.d/apache2 restart
Enabling / Disabling a service
There are services that can be enabled/disabled using the GUI (Like the startup application) and then other ways of doing the same through the terminal.
For the Terminal you have several options.
To toggle a service from starting or stopping permanently you would need to:
echo manual | sudo tee /etc/init/SERVICE.override
Where the stanza manual will stop Upstart from automatically loading the service on next boot. Any service with the. override ending will take precedence over the original service file. You will only be able to start the service manually afterwards. If you do not want this then simply delete the .override.
For example:
echo manual | sudo tee /etc/init/mysql.override

64
Will put the MySQL service into manual mode. If you do not want this, afterwards you can simply do
sudo rm /etc/init/mysql.override Reboot for the service to start automatically again.
Temporary enabling/disabling services
To stop and start services temporarily (Does not enable / disable them for future boots), you can type service SERVICE_NAME.
For example:
• sudo service apache2 stop (Will STOP the Apache service until Reboot or until you start it again). • sudo service apache2 start (Will START the Apache service assuming it was stopped before.). • service apache2 status (Will tell you the STATUS of the service, if it is either enabled/running of
disabled/NOT running.). • sudo service apache2 restart (Will RESTART the service. This is most commonly used when you
have changed, a config file. For example in this case, if you have changed either a PHP configuration or a Apache configuration. Restart will save you from having to stop/start with 2 command lines)
• service apache2 (In this case, since you did not mention the ACTION to execute for the service, so it will show you all options available for that specific service.)
Using MySQL Administrator
When first startup the MySQL Administrator tool the login window will appear from this window you can create a local or a remote login. If you go for a remote login you have to make sure your remote MySQL server will allow for remote connections.
Once enter the information click the Connect button to establish your connection. When the connection is made you will find yourself in the MySQL Administrator main window. This window will immediately give you plenty of information about your MySQL connection as well as all the tools you need to work with MySQL.

Linux Course Material by Dr. Bhagirathi Nayak
65
User Administration
Server health

66
Backup
Startup Parameters

Linux Course Material by Dr. Bhagirathi Nayak
67
Server Information
Working with phpMyadmin
How to create a database using phpMyadmin
Provide the name of the database and click on Create.

68
How to create a table using phpmyadmin
Click on the database within which you want to create a new table. Now provide the name and number of fields in the fields marked bellow and click on the Go.
The following image shows how you can enter name of the fields, their size, type and other attributes.
After you finish defining fields, click on the Save button.
How to run queries using phpmyadmin
Click on the SQL button to open query browser from where you can run queries. Remember that you have to select a database before you run any query on tables of that database.
.
After you write your query in the box, click on Go button to accomplish the task.

Linux Course Material by Dr. Bhagirathi Nayak
69
Installing Wordpress Introduction
At this time, WordPress is the most popular CMS (content management system) on the internet. It allows you to easily set up flexible blogs and websites on top of a MySQL backend with PHP processing. WordPress has seen incredible adoption and is a great choice for getting a website up and running quickly.
Prerequisites
Before start to install, there are some important steps that it need to complete on the server.
It will be proceeding through these steps as a non-root user with sudo privileges, so it will need to have one available. It can find out how to create a user with sudo privileges by following steps.
Step 1. — Create a MySQL Database and User for WordPress
The first step that we will take is a preparatory one. WordPress uses a relational database to manage and store site and user information.
We have MySQL installed, which can provide this functionality, but it need to make a database and a user for WordPress to work with.
To get started, log into the MySQL root (administrative) account by issuing this command:
mysql -‐u root –p First, create a separate database that WordPress can control.
Create Database in WordPress Every MySQL statement must end in a semi-colon (;),
Create User account
CREATE USER wordpressuser@localhost IDENTIFIED BY 'password'; Let's fix that by granting user account access to database with this command:
GRANT ALL PRIVILEGES ON wordpress.* TO wordpressuser@localhost; Now the user has access to the database. It needs to flush the privileges so that the current instance of MySQL knows about the recent privilege changes will make:

70
FLUSH PRIVILEGES; Now can exit out of the MySQL prompt by typing: exit Step 2. — Download WordPress
Download the actual WordPress files from the project's website.
URL: http://wordpress.org/latest.tar.gz This will download a compressed file that contains the archived directory contents of the WordPress files to home directory.
We can extract the files to rebuild the WordPress directory we need by typing:
tar xzvf latest.tar.gz
This will create a directory called wordpress in home directory.
sudo apt-‐get update sudo apt-‐get install php5-‐gd libssh2-‐php
This will allow working with images and will also allow installing plugins and update portions of site using SSH login credentials.
Step 3. — Configure WordPress
Most of the configuration that will be doing through a web interface later on. However, It needs to do some work from the command line before it can get this up and running.
Begin by moving into the WordPress directory that just unpacked:
cd ~/wordpress A sample configuration file that mostly matches the configuration it need is included by default. However, it needs to copy it to the default configuration file location to get WordPress to recognize the file.
cp wp-‐config-‐sample.php wp-‐config.php Now that we have a configuration file to work with, let's open it in a text editor: nano wp-‐config.php This file is almost entirely suitable for the needs. The only modifications are need to make the parameters that hold the database information.

Linux Course Material by Dr. Bhagirathi Nayak
71
It will need to find the settings for DB_NAME, DB_USER, and DB_PASSWORD in order for WordPress to correctly connect and authenticate to the database, which was created.
It needs to fill in the values of these parameters with the information for the database was created. It should look like this:
// ** MySQL settings - You can get this info from your web host ** // /** The name of the database for WordPress */ define('DB_NAME', 'wordpress'); /** MySQL database username */ define('DB_USER', 'wordpressuser'); /** MySQL database password */ define('DB_PASSWORD', 'password');
These are the only values that need to change. When it is finished, save and close the file.
Step 4. — Copy Files to the Document Root
Now that the application configured, it need to copy it into Apache's document root, where it can be served to visitors of the website.
One of the easiest and most reliable ways of transferring files from directory to directory is with the rsync command. This preserves permissions and has good data integrity features.
sudo rsync -‐avP ~/wordpress/ /var/www/html/
This will safely copy all of the contents from the directory you unpacked to the document root.
It should now move into the document root to make some final permission to changes.
cd /var/www/html It will need to change the ownership of files for increased security.
When it need to give user ownership to the regular, non-root user (with sudo privileges) that you plan on using to interact with your site. This can be your regular user if you wish, but some may suggest that you create an additional user for this process. It is up to you, which you choose.
The group ownership we will give to our web server process, which is www-data. This will allow Apache to interact with the content as necessary.

72
We can quickly assign these ownership values by typing:
sudo chown -‐R demo:www-‐data * This will set up the ownership properties that looking for.
While the dealing with ownership and permissions, it should also look into assigning correct ownership on uploads directory. This will allow uploading images and other content to web site. Currently, the permissions are too restrictive.
First, let's manually create the upload directory beneath the wp-content directory at our document root. This will be the parent directory of content:
mkdir /var/www/html/wp-‐content/uploads
We have a directory now to house uploaded files, however the permissions are still too restrictive. We need to allow the web server itself to write to this directory. We can do this by assigning group ownership of this directory to our web server, like this:
sudo chown -‐R :www-‐data /var/www/html/wp-‐content/uploads This will allow the web server to create files and directories under this directory, which will permit us to upload content to the server.
Step 5. — Complete Installation through the Web Interface Now that you have your files in place and your software is configured, you can complete the installation through the web interface. In your web browser, navigate to your server's domain name or public IP address:
http://server_domain_name_or_IP

Linux Course Material by Dr. Bhagirathi Nayak
73
The WordPress initial configuration page, where it create an initial administrator accounts: Fill out the information for the site and the administrative account you wish to make. When you are finished, click on the install button at the bottom.
WordPress will confirm the installation, and then ask you to log in with the account you just created:
Hit the button at the bottom and then fill out your account information

74
WordPress interface:
On

Linux Course Material by Dr. Bhagirathi Nayak
75
The left-hand side, under the Settings menu

76
PuTTY and WinSCP
After you have generated your SSH Key you will see it in the bottom of the SSH / Shell Access page.
Click on the Private Key link, which will get you to the corresponding page where you will be able to view and copy the key.
Then create a file called private_key.ppk, open it with notepad, and paste your private key inside and save the file.

Linux Course Material by Dr. Bhagirathi Nayak
77
After this start puttygen.exe and click on the Load button.
Select the private_key.ppk file that you have previously created with your private key and click on the Open button.

78
You will be prompted for the passphrase that you have used to generate your SSH Key. Enter this passphrase and your key will be loaded.
Once your key is loaded you need to change the Type of key to generate option from SSH-2 RSA to SSH-2 DSA.
After this click on the Save private key button and save it as another file (for example putty.ppk).

Linux Course Material by Dr. Bhagirathi Nayak
79
Next, you need to start the putty agent (pageant.exe), click on the Add Key button and select your private key:
You will be prompted to enter the key's passphrase again in order to load it in the putty agent. Then you will see your key loaded:

80
You can click the Close button and the agent will be minimized to the system tray.
Finally open the putty.exe software and enter your domain name or the server name in the Host Name field. The connection type should be selected to SSH and the port should be set to 18765 (for SiteGround servers).
Click on the Open button and the connection will be initiated.
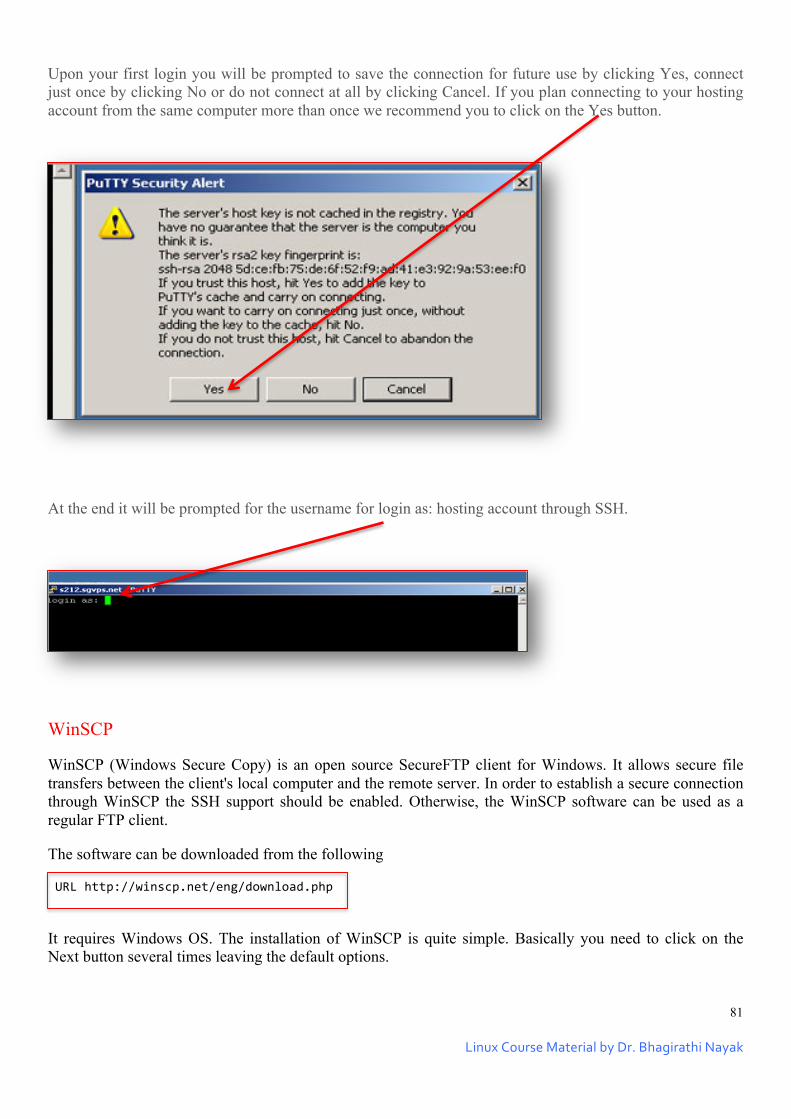
Linux Course Material by Dr. Bhagirathi Nayak
81
Upon your first login you will be prompted to save the connection for future use by clicking Yes, connect just once by clicking No or do not connect at all by clicking Cancel. If you plan connecting to your hosting account from the same computer more than once we recommend you to click on the Yes button.
At the end it will be prompted for the username for login as: hosting account through SSH.
WinSCP
WinSCP (Windows Secure Copy) is an open source SecureFTP client for Windows. It allows secure file transfers between the client's local computer and the remote server. In order to establish a secure connection through WinSCP the SSH support should be enabled. Otherwise, the WinSCP software can be used as a regular FTP client.
The software can be downloaded from the following
URL http://winscp.net/eng/download.php
It requires Windows OS. The installation of WinSCP is quite simple. Basically you need to click on the Next button several times leaving the default options.
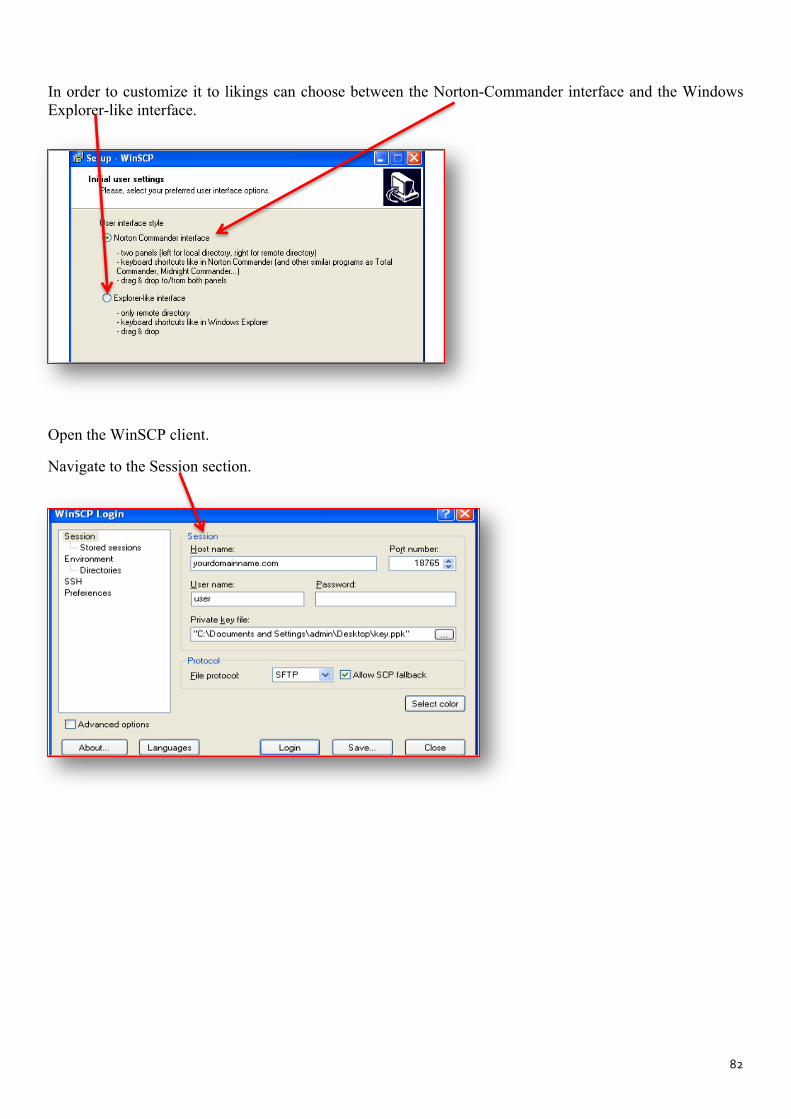
82
In order to customize it to likings can choose between the Norton-Commander interface and the Windows Explorer-like interface.
Open the WinSCP client.
Navigate to the Session section.

Linux Course Material by Dr. Bhagirathi Nayak
83
During the establishment of the connection it will be prompted for the pass phrase, which is entered during the ssh keys pair generation.
Once the session is opened, it can perform all the standard FTP actions. The difference is that the connection is secured.
It can keep the connection details by storing them in the Stored Sessions subsection.

84
In the Environment section you can modify the server environment setup and adjust the timestamp.
The Directory subsection allows to set the default remote and local directories.
In the SSH section you can pick the preferred SSH protocol version and adjust the encryption cypher selection policy.

Linux Course Material by Dr. Bhagirathi Nayak
85
The Explorer-like interface is more popular among the Windows users. In order to transfer files you can directly drag and drop them.
Additionally, you can alter other preferences like confirmation prompts, notifications, and preferred editors for the files modifications, allowed transfer actions and many more.
Working with Wine and SAMBA
Common Technologies
Wine and Samba face some common areas of development
• DCE/RPC, IDL and related technologies • Representing NTFS file system features on Posix • Multiple locking APIs

86
Open Source development is a place in software development where everybody can work on his own ideas, and finally do things the right way. The NIH syndrome, ”Not Invented here”, is common in a lot of projects. So why bother with integration when one can write one’s own version just as well? Of course, the obvious answers are that code reuse will save development time, bugs will only have to be fixed once, and the tried and true paradigm of rather doing one thing well than being mediocre to bad in a lot of things.
Wine
Back in the mid 90s and early 00s, Linux, being a fledgling operating system, suffered from a severe lack of useful applications. This issue was especially critical in the world of business ─ where Windows desktop applications could make or break productivity. To overcome this weakness, a compatibility layer called WINE was created. The name originally stood for Wine Is Not an Emulator (because everyone mistook the tool for a Windows emulator). The name is now simply Wine.
Wine is a translation layer (a program loader) capable of running Windows applications on Linux and other POSIX compatible operating systems. Windows programs running in Wine act as native programs would, running without the performance or memory usage penalties of an emulator, with a similar look and feel to other applications on desktop.
Samba
Samba is an Open Source/Free Software suite that provides seamless file and print services to SMB/CIFS clients. Samba is freely available, unlike other SMB/CIFS implementations, and allows for interoperability between Linux/Unix servers and Windows-based clients.
Samba is usable in a variety of roles in a CIFS-based network. It can be used as PDC (Primary Domain Controller), as a member file server and as a client computer.
Code Sharing
The code Samba can provide for Wine is mostly in the area of user management, which potentially is remote, as well as other code involving CIFS network interaction.
Wine Installation
Wine can be installed with the package wine, available in the official repositories.
https://wiki.archlinux.org/index.php/Official_repositories
If the system is running a 64-bit system, it will need to enable the Multilib repository first.
https://wiki.archlinux.org/index.php/Multilib
It can also want to install wine_gecko and wine-mono for applications that need support for Internet Explorer and .NET, respectively. These packages are not strictly required, as Wine will download the relevant files as needed. However, having the files downloaded in advance allows you to work off-line and makes it so Wine does not download the files for each Wine prefix needing them.
Wine located in the Software Center. Chances are, however, that version is outdated. Because of that, we want to avoid installing the “out of the box” version offered. To do this, we must add the official Wine repository. This can be done one of two ways, via command line or GUI. Since our goal is running
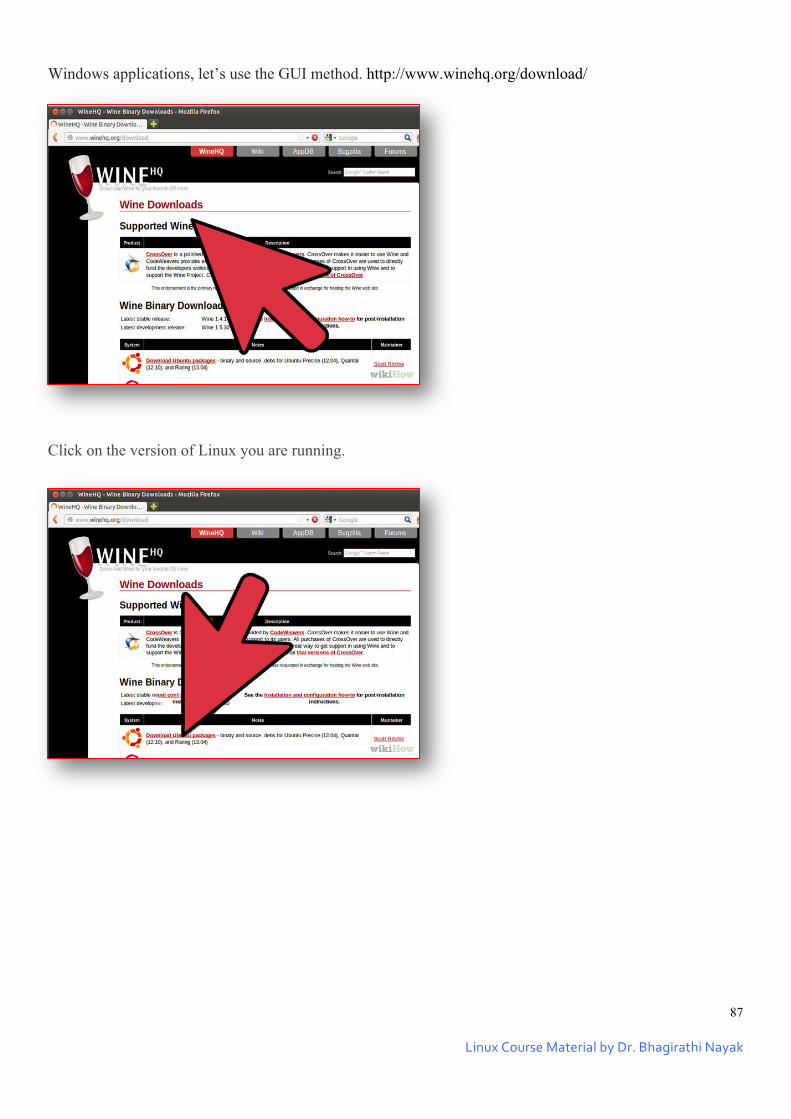
Linux Course Material by Dr. Bhagirathi Nayak
87
Windows applications, let’s use the GUI method. http://www.winehq.org/download/
Click on the version of Linux you are running.

88
Wine features in "Application} or "Start Menu"
Open .wine, then drive_C, then "Program Files"

Linux Course Material by Dr. Bhagirathi Nayak
89
Remember this folder.
Start downloading .exe programs (Windows programs).

90
Make sure you place them inside this "Program Files" folder before you try to install them.
Once placed in the "Programs Files", you can now right click on them

Linux Course Material by Dr. Bhagirathi Nayak
91
After this, it can go to the panel menu or start menu and see the programs are there.
Implement a Linux server with Samba
Designate the Linux server as domain controller.

92
Download and install Script Start Community. This is a free open source solution that enables you to create and manage Windows user profiles. It also serves as a logon script replacement solution.
During the simple install you'll be asked where the netlogon share of your domain controller is. You'll want to point it to the Linux domain controller.
Linux Course Material by Dr. Bhagirathi Nayak
93
Use Script Start Community's console interface to map drives, printers, setup MAPI profiles, or whatever else you'd like to rollout as part of a Windows profile.
Working with smbmount
Make the directory you want to mount the share to.
mkdir /mnt/share
Mount the share with user/pass: smbmount //winpc/shared /mnt/share -‐o username=user,password=pass,rw
Or mount the share without a user/pass (this is true if Everyone is still set) smbmount //winpc/shared /mnt/share -‐o rw
Now it can use the share. You cannot create symbolic links or chmod the system (this is restriction on the WinXP side). If you wish to allow users on the linux side access to the share then you will need to alter the options. Adding in uid= or gid= to allow access to users or groups respectively by mounting the drive with there permissions. Here's an example: smbmount //winpc/shared /mnt/share -‐o rw,uid=znx
This will mount the drive as if user znx had done it. Thus he will have rw access to the shared.
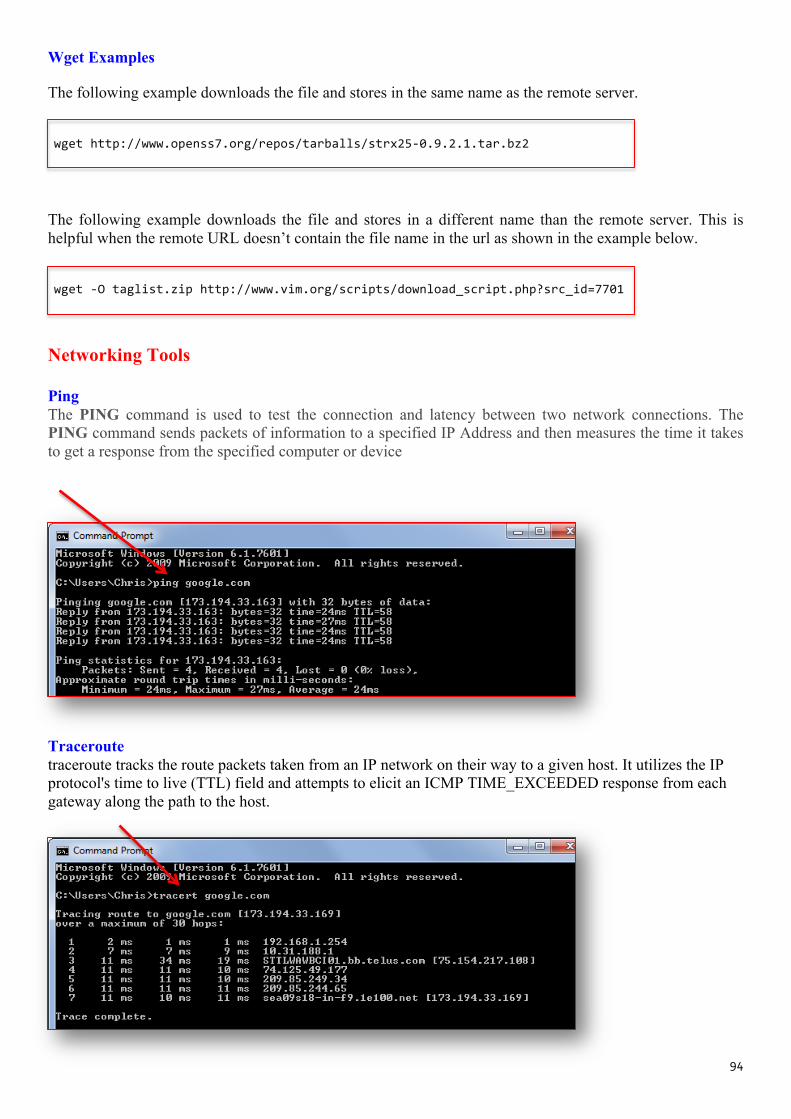
94
Wget Examples
The following example downloads the file and stores in the same name as the remote server.
wget http://www.openss7.org/repos/tarballs/strx25-‐0.9.2.1.tar.bz2
The following example downloads the file and stores in a different name than the remote server. This is helpful when the remote URL doesn’t contain the file name in the url as shown in the example below.
wget -‐O taglist.zip http://www.vim.org/scripts/download_script.php?src_id=7701
Networking Tools Ping The PING command is used to test the connection and latency between two network connections. The PING command sends packets of information to a specified IP Address and then measures the time it takes to get a response from the specified computer or device
Traceroute traceroute tracks the route packets taken from an IP network on their way to a given host. It utilizes the IP protocol's time to live (TTL) field and attempts to elicit an ICMP TIME_EXCEEDED response from each gateway along the path to the host.

Linux Course Material by Dr. Bhagirathi Nayak
95
Telnet
The telnet command is used for interactive communication with another host using the TELNET protocol. It begins in command mode, where it prints a telnet command prompt ("telnet>").
Nmap The Nmap aka Network Mapper is an open source and a very versatile tool for Linux system/network administrators. Nmap is used for exploring networks; perform security scans, network audit and finding open ports on remote machine.
Lsof lsof is a command meaning "list open files", which is used in many Unix-like systems to report a list of all open files and the processes that opened them.

96
Ethereal
Ethereal is a network packet analyzer. A network packet analyzer will try to capture network packets and tries to display that packet data as detailed as possible.
Customizing the user environment
Symbolic links In computing, a symbolic link (also symlink or soft link) is a special type of file that contains a reference to another file or directory in the form of an absolute or relative path and that affects pathname resolution.
Z Shell The Z shell (zsh) is a Unix shell that can be used as an interactive login shell and as a powerful command interpreter for shell scripting. Zsh can be thought of as an extended Bourne shell with a large number of improvements, including some features of bash, ksh, and tcsh.
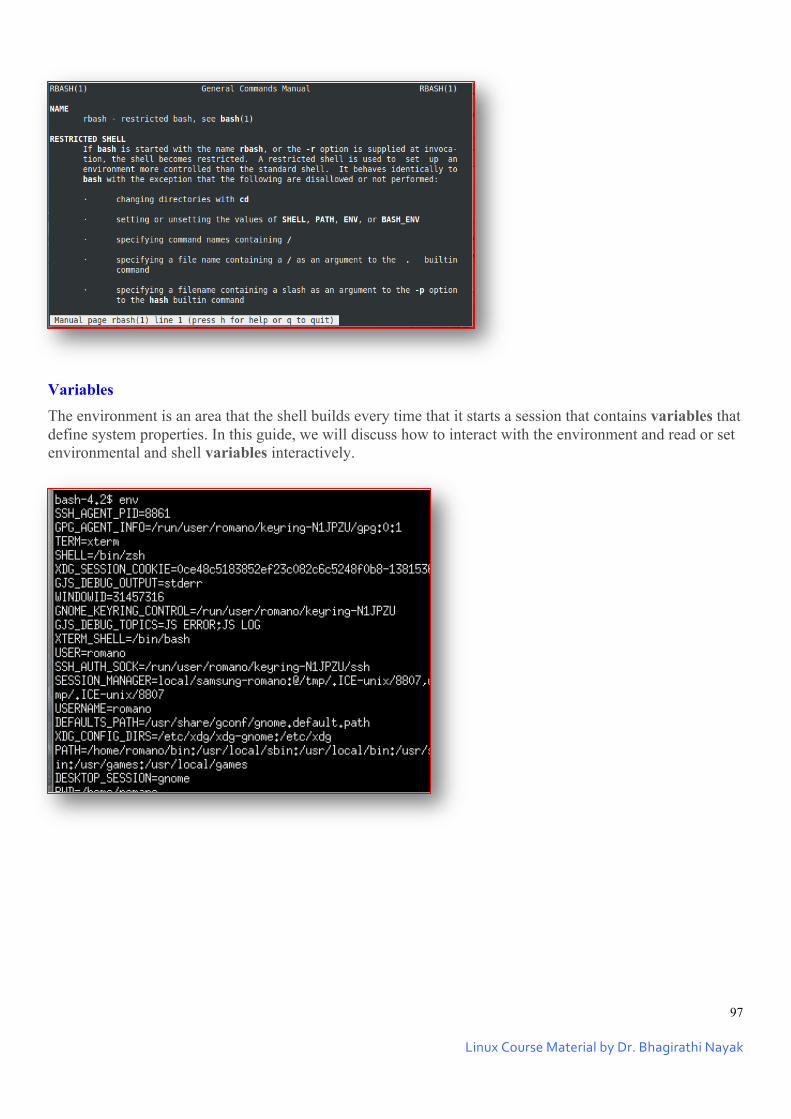
Linux Course Material by Dr. Bhagirathi Nayak
97
Variables The environment is an area that the shell builds every time that it starts a session that contains variables that define system properties. In this guide, we will discuss how to interact with the environment and read or set environmental and shell variables interactively.

98
Path The PATH is an environment variable. It is a colon-delimited list of directories that your shell searches through when you enter a command. All executable are kept in different directories on the Linux like operating systems.
Prompts
A command prompt, also referred to simply as a prompt, is a short text message at the start of the command line on a command line interface
Terminal Transparency
There are two popular ways of configuring a Linux terminal to work transparently over wallpaper, without any borders, menu bars or toolbars. This is very popular among developers because of its practical and coolness factor.

Linux Course Material by Dr. Bhagirathi Nayak
99
Transparency

100
References: 1. http://www.it-ebooks.info
2. http://www.tldp.org/LDP/khg/HyperNews/get/devices/devices.html
3. http://www.tldp.org/LDP/Linux-Filesystem-Hierarchy/html/Linux-Filesystem-Hierarchy.html
4. http://www.tldp.org/LDP/tlk/dd/drivers.html
5. https://en.wikipedia.org/wiki/GNOME
6. https://developer.gnome.org/hig/stable/
7. http://www.yolinux.com/TUTORIALS/GNOME.html
8. http://www.linux.com/learn/tutorials/783109-how-to-choose-the-best-linux-desktop-for-you
9. http://zach.in.tu-clausthal.de/teaching/werkzeuge_literatur/linux_in_24_hours.pdf
10. http://www.cyberciti.biz/faq/howto-linux-bsd-unix-set-dns-nameserver/
11. https://www.siteground.com/tutorials/ssh/ssh_winscp.htm
Book: Linux All in One for Dummies, A We (5th Edition)