coulter counter z2 - stlcc.edu :: users' server ::...
TRANSCRIPT

FVCC:BioTech;Morrison 6/22/2010Page 1
Coulter Counter
Instructor and Student Protocol(Preliminary)
Prepared by: Bob Morrison
FVCC, Instrumentation Specialist
Sep 2008
Footprint
43 cm W x 45 H cm x 63 depth
Link to Beckman Coulter Counter Z series Manual – pdf

Coulter Counter: Basic Controls
FVCC:BioTech;Morrison 6/22/2010Page 2
Raise/lower mixer in accuvette
Mixer; control speed
Push to raise/lower
accuvette platform
Waste canister
Clenz canister
Door; swing open to access
accuvette, mixer, and aperture
Keypad: Menu display
and control activation

FVCC:BioTech;Morrison 6/22/2010Page 3
In a Coulter counter, a tube with a small aperture on the wall is immersed into a beaker that contains particles suspended in a
low concentration electrolyte. Two electrodes, one inside the aperture tube and one outside the aperture tube but inside the
beaker, are placed and a current path is provided by the electrolyte when an electric field is applied (Figure 1). The impedance
between the electrodes is then measured. The aperture creates what is called a “sensing zone." Particles in low concentration,
suspended in the electrolyte, can be counted by passing them through the aperture. As a particle passes through the aperture,
a volume of electrolyte equivalent to the immersed volume of the particle is displaced from the sensing zone. This causes a
short-term change in the impedance across the aperture. This change can be measured as a voltage pulse or a current pulse.
The pulse height is proportional to the volume of the sensed particle. If constant particle density is assumed, the pulse height is
also proportional to the particle mass. This technology thus is also called aperture technology.
Coulter Principle : Description

FVCC:BioTech;Morrison 6/22/2010Page 4
Coulter Counter (CC) : Instructor Setup and Testing
1. The Aperture Tube should be immersed in an accuvette (AV) of Coulter
Clenz solution (recommended short term storage method). Open the swing
door for access to the AV. Lower the platform by depressing on the black
button on the front and pulling down on the platform
2. Remove (lift) and throw away the Clenz AV solution and prepare another AV
with 10uL of Coulter Isoton solution as a Blank. Gently mix this solution by
inversion and place the AV on the platform in the slotted square hole.
3. Depress the black button and raise the platform so that the aperture tube and
metal electrode are immersed in the AV solution. A light should come on
when the platform is in the fully raised and locked position.
4. Observe the aperture opening in the small display in the upper right corner of
the device. If necessary, open the swing door and adjust the focus knob.
5. Run the “Fill System” protocol using the Isoton solution.
6. Run the Isoton AV as a blank before student testing to confirm that particle
count is low (<50).
7. During Student testing, periodically inspect the aperture hole to make sure it
is not clogged. Rinse the aperture with DI water between student samples to
avoid contamination. (Use a spray bottle and catch spill in extra AV).
8. Run the Isoton blank AV after every 5 samples to ensure that particle count
is low.

FVCC:BioTech;Morrison 6/22/2010Page 5
Coulter Counter (CC) : Instructor Maintenance and Shutdown
NEVER LEAVE the Aperture exposed to air or in a sample with Cells for
more than a few hours.
1. Prepare an AV with the Isoton solution of 20ml and place this on the
platform.
2. Run a standard measurement using the Isoton solution.
3. For Maintenance of short term non-use (days) , periodically check
the level of the solution in the AV and make sure the level is always
above the actual aperture opening, replenish if necessary.
4. Run the Flush System protocol at least once per week.
5. For Maintenance during long-term non-use (weeks), prepare an AV
with the Clenz AV solution and repeat steps 1-3 above.
6. Periodically replenish the AV to keep solution levels covering the
aperture at all times.

FVCC:BioTech;Morrison 6/22/2010`Page 6
Coulter Counter (CC) : Instructor Calibration Setup
1. Each Aperture tube has its own characteristic calibration constant, Kd. In general
once this is determined and set within the device, it does not have to be redone
unless the tube is improperly stored or contaminated with solutions that leave
residue on the aperture.
2. To calibrate the aperture tube, use a CC Calibration latex particle solution
selected within 5% to 20% of the aperture opening (found printed on the side of
the aperture tube). The tube we currently have at FVCC is 100um
(Part#9912786). A 10um Calibration Standard Particle solution (Part#6602796)
is available as of Aug 2008 (RGM).
3. Prepare the calibration accuvette (AV) by extracting 10mL of the Isoton diluent
from the storage bottle tap.
4. Add one drop of the Calibration Index solution to this AV, close the cap on the
AV, and gently mix by inversion.
5. Open the CC swing door, push the black button, lower the platform, and place
the Calibration solution AV into the platform hole. Return the platform to the top
position and close the glass door.
6. A light should come on inside and a lens display of the aperture opening will
appear in the upper right corner of the device. If the aperture opening is not
clearly visible, open the swing door and use the focus knob to make
adjustments.

FVCC:BioTech;Morrison 6/22/2010Page 7
Coulter Counter (CC) : Instructor Calibration Execution
1. Press the [Setup] membrane button on the control panel. An S1: message will
appear called [Enter size Data] showing the aperture diameter, current Kd, and
lines for selecting units and setting the upper and lower size expected particle
sizes. Use the ^ and v arrows to move to these lines and set new values if
necessary. Since the NIST standard Calibration solution is non-biological, set
the units as “um”.
2. Press [Setup} again and an menu S2: [Enter Analysis Data] appears. If a Kd
already exist in the device for this tube diameter, it will be displayed. Make sure
the “Metered Volume” is set to .5 for a 100um aperture tube.
3. Press [Setup] to return to the S1 screen, then press [CAL] and the C1 screen will
display. Use the arrow keys to set the “Calibrator Size” value to that of the
provided calibrated solution , 10 um. Make sure the “Measure Aperture” line is
set to “YES” to force a remeasurement of the aperture paramenter.
4. Press [Start] and a C4: Calibration screen will appear with various messages
ending in a C3: “Instrument settings” menu.
5. Press [Start] and a c6: Calibrate screen appears while the calibration is being
accomplished. Follow subsequent instructions and/or refer to the device manual
Section 3.
6. If the Calibration is successful, and C7: Calibration Factor screen will display with
the new calculated Kd value. Press the [Start] button to overwrite and store this
value. Press [CAL] if you do not wish to store the new Kd value.

FVCC:BioTech;Morrison 6/22/2010Page 8
Coulter Counter (CC) : Student Operation
1. Prepare Student samples by diluting 1ml of cells in 9ml of Isoton in AV. Other
dilutions may be used, but you need at least 10ml total to trigger aperture
operations. Place a cap on the AV until immediately before running a count.
2. Students may access the Isoton from the CC pump dispenser by removing the
cap and unscrewing (CCW) the tap. Raise the pump to the desired level and
depress. Be sure to replace the cap screw when finished.
3. Gently mix the sample 2-3 times by inversion immediately before placing in on
the instrument stand.
4. Depress the SETUP button and verify or set Tupper and Tlower parameters per
your instructors guidance on the S1 screen. Depress the SETUP button again to
move to the S2 screen.
5. On the S2 screen, verify or set the Aperture and Metered Volume and inspect to
see that the Aperture Measure is set to <no>, and Optimize to <yes>. Do not
change the Kd value. It has been previously set by the instructor using a
Calibration protocol.
6. Depress the Start/Stop button one or more times to START the cell count.
7. On the A4 Screen, record the count data, and depress the Start/Stop button to
run at least 3 measurements on a given sample.
8. Rinse the Aperture with DI before releasing the CC for the next student.

Coulter Counter: Reference Information
FVCC:BioTech;Morrison 6/22/2010Page 9
Information on Cell Size, Consumables, and
Use of the Coulter for Blood Analysis is presented
In the following slides. (RGM)

Coulter Counter
Internal Pump and
Tubing Configuration
(taken by RGM 4/7/09 investigating
“metering pump failure”
FVCC:BioTech;Morrison 6/22/2010Page 10
FVCC:BioTech;Morrison 6/22/2010Page 11
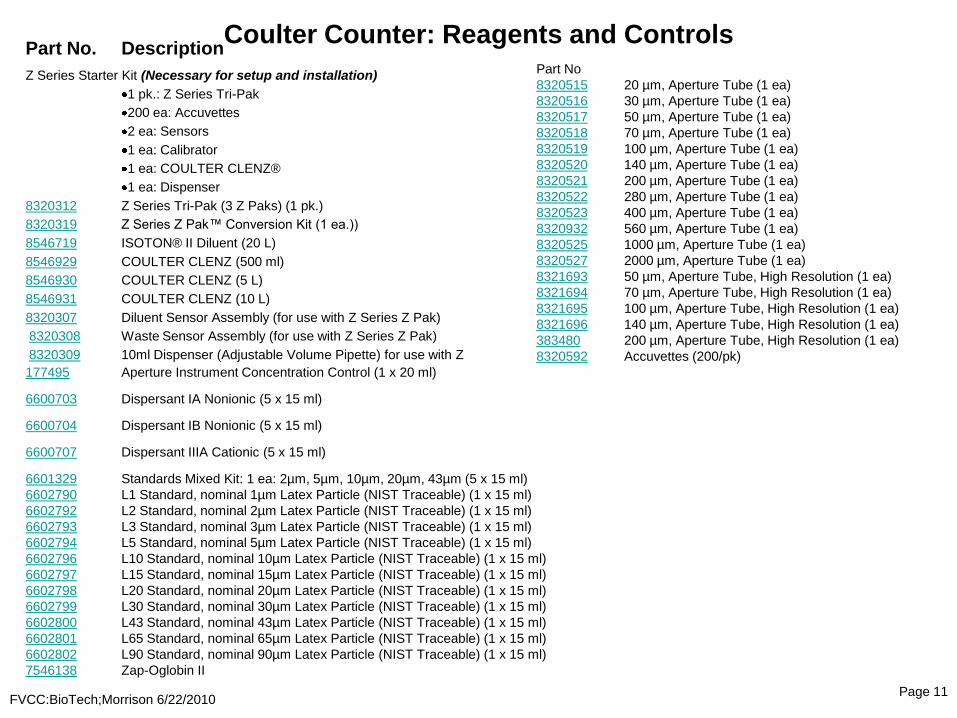
Coulter Counter: Reagents and ControlsPart No. Description
Z Series Starter Kit (Necessary for setup and installation)
1 pk.: Z Series Tri-Pak
200 ea: Accuvettes
2 ea: Sensors
1 ea: Calibrator
1 ea: COULTER CLENZ®
1 ea: Dispenser
8320312 Z Series Tri-Pak (3 Z Paks) (1 pk.)
8320319 Z Series Z Pak™ Conversion Kit (1 ea.))
8546719 ISOTON® II Diluent (20 L)
8546929 COULTER CLENZ (500 ml)
8546930 COULTER CLENZ (5 L)
8546931 COULTER CLENZ (10 L)
8320307 Diluent Sensor Assembly (for use with Z Series Z Pak)
8320308 Waste Sensor Assembly (for use with Z Series Z Pak)
8320309 10ml Dispenser (Adjustable Volume Pipette) for use with Z
177495 Aperture Instrument Concentration Control (1 x 20 ml)
6600703 Dispersant IA Nonionic (5 x 15 ml)
6600704 Dispersant IB Nonionic (5 x 15 ml)
6600707 Dispersant IIIA Cationic (5 x 15 ml)
6601329 Standards Mixed Kit: 1 ea: 2µm, 5µm, 10µm, 20µm, 43µm (5 x 15 ml)
6602790 L1 Standard, nominal 1µm Latex Particle (NIST Traceable) (1 x 15 ml)
6602792 L2 Standard, nominal 2µm Latex Particle (NIST Traceable) (1 x 15 ml)
6602793 L3 Standard, nominal 3µm Latex Particle (NIST Traceable) (1 x 15 ml)
6602794 L5 Standard, nominal 5µm Latex Particle (NIST Traceable) (1 x 15 ml)
6602796 L10 Standard, nominal 10µm Latex Particle (NIST Traceable) (1 x 15 ml)
6602797 L15 Standard, nominal 15µm Latex Particle (NIST Traceable) (1 x 15 ml)
6602798 L20 Standard, nominal 20µm Latex Particle (NIST Traceable) (1 x 15 ml)
6602799 L30 Standard, nominal 30µm Latex Particle (NIST Traceable) (1 x 15 ml)
6602800 L43 Standard, nominal 43µm Latex Particle (NIST Traceable) (1 x 15 ml)
6602801 L65 Standard, nominal 65µm Latex Particle (NIST Traceable) (1 x 15 ml)
6602802 L90 Standard, nominal 90µm Latex Particle (NIST Traceable) (1 x 15 ml)
7546138 Zap-Oglobin II
20 µm, Aperture Tube (1 ea)
30 µm, Aperture Tube (1 ea)
50 µm, Aperture Tube (1 ea)
70 µm, Aperture Tube (1 ea)
100 µm, Aperture Tube (1 ea)
140 µm, Aperture Tube (1 ea)
200 µm, Aperture Tube (1 ea)
280 µm, Aperture Tube (1 ea)
400 µm, Aperture Tube (1 ea)
560 µm, Aperture Tube (1 ea)
1000 µm, Aperture Tube (1 ea)
2000 µm, Aperture Tube (1 ea)
50 µm, Aperture Tube, High Resolution (1 ea)
70 µm, Aperture Tube, High Resolution (1 ea)
100 µm, Aperture Tube, High Resolution (1 ea)
140 µm, Aperture Tube, High Resolution (1 ea)
200 µm, Aperture Tube, High Resolution (1 ea)
Accuvettes (200/pk)
Part No
8320515
8320516
8320517
8320518
8320519
8320520
8320521
8320522
8320523
8320932
8320525
8320527
8321693
8321694
8321695
8321696
383480
8320592

Cell Size; Mouse Fibroblast
FVCC:BioTech;Morrison 6/22/2010Page 12

Cell, Bacteria, Virus, Particle Size; Examples
FVCC:BioTech;Morrison 6/22/2010Page 13
15um
2um
200nm
Thickness 200um
.

FVCC:BioTech;Morrison 6/22/2010Page 14
Complete Blood Count http://www.medicinenet.com/complete_blood_count/article.htm
• White blood cell count (WBC). The number of white blood cells in a volume of blood.
Normal range varies slightly between laboratories but is generally between 4,300 and
10,800 cells per cubic millimeter (cmm). This can also be referred to as the leukocyte count
and can be expressed in international units as 4.3 - 10.8 x 10⁹ cells per liter.
Automated white cell differential. A machine generated percentage of the different types of
white blood cells, usually split into granulocytes, lymphocytes, monocytes, eosinophils,
and basophils.
Red cell count (RBC). The number of red blood cells in a volume of blood. Normal range
varies slightly between laboratories but is generally between 4.2 - 5.9 million cells/cmm.
This can also be referred to as the erythrocyte count and can be expressed in international
units as 4.2 - 5.9 x 10¹² cells per liter.
• Hemoglobin (Hb). The amount of hemoglobin in a volume of blood. Hemoglobin is the
protein molecule within red blood cells that carries oxygen and gives blood its red color.
Normal range for hemoglobin is different between the sexes and is approximately 13 - 18
grams per deciliter for men and 12 - 16 for women (international units 8.1 - 11.2
millimoles/liter for men, 7.4 - 9.9 for women).
Hematocrit (Hct). The ratio of the volume of red cells to the volume of whole blood. Normal
range for hematocrit is different between the sexes and is approximately 45 - 52% for men
and 37 - 48% for women.

Complete Blood Count (continued) http://www.medicinenet.com/complete_blood_count/article.htm
Mean cell volume (MCV). The average volume of a red cell. This is a calculated value
derived from the hematocrit and red cell count. Normal range is 86 - 98 femtoliters.
Mean cell hemoglobin (MCH). The average amount of hemoglobin in the average red cell.
This is a calculated value derived from the measurement of hemoglobin and the red cell
count. Normal range is 27 - 32 picograms.
Mean cell hemoglobin concentration (MCHC). The average concentration of hemoglobin in
a given volume of red cells. This is a calculated volume derived from the hemoglobin
measurement and the hematocrit. Normal range is 32 - 36%.
Red cell distribution width (RDW). A measurement of the variability of red cell size. Higher
numbers indicate greater variation in size. Normal range is 11 - 15.
Platelet count. The number of platelets in a volume blood. Platelets are not complete cells,
but actually fragments of cytoplasm from a cell found in the bone marrow called a
megakaryocyte. Platelets play a vital role in blood clotting. Normal range varies slightly
between laboratories but is in the range of 150,000 - 400,000/ cmm (150 - 400 x 109/liter).
FVCC:BioTech;Morrison 6/22/2010Page 15