construction details · 2021. 1. 20. · new zealand. table of contents general information 3 ......
TRANSCRIPT
construction details
EQUITONE with concealed fixings
New Zealand

Table of contents
General information 3
Ventilation 4
Components 5
EQUITONE concealed fixing system with flexible air barrier 10
EQUITONE concealed fixing system with rigid air barrier 26
2

General information
This document provides generic construction details for EQUITONE façade systems to assist with the design ofEQUITONE façade.
Construction details in this document have been independently certified for the purpose of compliance withClause E2, External moisture, of the New Zealand Building Code within the scope of E2/VM1 and E2/VM2 forEQUITONE façade systems with the recommended pliable and rigid weather barrier, respectively, as described inthe ‘General components’.
The weatherproofing performance of any project specific detail or application that is different from or not includedin the construction details of this document shall be evaluated by the project engineer or consultant.
It is the responsibility of the project designer, architect and engineer to ensure that the information andconstruction details provided in this document are appropriate for the intended application.
Cladding support frame and its connection to substructure shall be designed by the project engineer inaccordance with the relevant standards. The support frame maximum deflection under the influence of load shallbe limited to Span/250.
The support frame, fixings, flashings and the like shall be of adequate corrosion resistance appropriate to thecorrosivity category of the project location.
Flashings and capping shall be designed with respect to project wind loading, relevant standards and regulations.
This document is not designed to serve as an installation guide, and is intended to be used in conjunction withother relevant technical and installation documents.
Construction details contained in this document are not to a specific scale, and are for illustration purposes only.
The information in this document is correct at the time of issuing. However, due to our committed program ofcontinuous material and system development we reserve the right to amend or alter the information containedtherein without prior notice. Please contact your local EQUITONE sales organisation to ensure you have the mostcurrent version.
This document is supplied in good faith and no liability can be accepted for any loss or damage resulting from itsuse. All the content of this document is © Copyright of Etex Group. All rights reserved.
This document is protected by International copyright laws. Reproduction and distribution in whole or in partwithout prior written permission is strictly prohibited. Cedral and logos are trademarks of Etex NV or an affiliatethereof. Any use without authorisation is strictly prohibited and may violate trademark laws.
3

Ventilation
A ventilated façade is a kind of two stage construction, an inner structurewith a protective outer skin, and the cladding panel or rainscreen. Aventilated façade consists of an insulated and weathertight structure, aventilated cavity formed with a cladding support frame, and the claddingpanel.
Allowance for adequate ventilation is paramount in ensuring a successfulEQUITONE façade. Ventilated façades provide a number of added benefitsto the building and its occupants. These may include but are not limited tothe following:
- Positive contribution to energy savings- Minimises thermal bridges- Assists with condensation management- Reduces thermal movement of the structure and cladding support
frame- Dissipates radiant heat- Increases acoustic performance of the external wall- Provides an effective drainage path for any moisture passing the
cladding skin- Eliminates the need for exposed caulking and sealant, therefore
reducing maintenance requirements- Assists with Keeping the weather barrier dry and healthy- Architectural design freedom- Provides opportunities for concealing external services such as
downpipes within the cavity- Proven to be a more sustainable and healthier façade construction
Air must be allowed to enter the cavity from bottom of the façade, windowhead, soffit, slab junctions, and the like, and exit from top of the façade,capping, window sill, slab and soffit interfaces, and the like.
All air inlets and outlets are protected against entry of birds and vermininto the cavity with a corrosion resistant perforated profile (angle).
The perforated angle should be of maximum 0.9mm in thickness, whereplaced between the cladding panel and support frame, and be of aminimum 50% open area with aperture size of maximum 3mm to 5mm.The perforations must be kept open and unobstructed to maintaindrainage and ventilation of the cavity. The perforated angle shall bepositioned to allow an adequate drip edge to the cladding panel.
4

Components
Material
Maximum available panel sizes
EQUITONE [tectiva] 8 mm thickEQUITONE [lines] 10 mm thick
EQUITONE [natura] 8 and 12 mm thickEQUITONE [natura] PRO 8 and 12 mm thickEQUITONE [pictura] 8 and 12 mm thick
Panel fixingsSFS TUF-S
Stainless Steel 316 grade concealed fixings
NotesThe application of the SFS TUF-S fixings shall be in strict accordance with SFS guidelines and recommendations.SFS TUF-S is available in various sizes suiting different panel thicknesses. SFS TUF-S panel edge distance: 50 – 110 mm
EQUITONE [tectiva] EQUITONE [lines] EQUITONE [natura] EQUITONE [pictura]
1250
2500
1250
3100
1220
2500
1220
3050
5

Components
Compressible EPDM gasketTesa® 61103
A compressible closed-cell EPDM gasket used for sealing interfaces withflashings and the like.
Minimum width:9mm where a narrow strip is required as specified on theconstruction details48mm where located on vertical joints as specified on theconstruction details
Expanding foam gasketpro clima CONTEGA® FIDEN EXO
A pre-compressed sealing tape used to seal interfaces with windowjoineries and the like as specified on the construction details.
The required tape size depends on the gap which needs to be sealed.Refer to pro clima CONTEGA® FIDEN EXO datasheet to determine therequired tape size.
Baffle
Black coated aluminium baffle used to close and form expressed panel horizontal joint.
Weather resistive barrier option 1Flexible air barrier (pliable membrane)
EQUITONE façade systems have been certified with pro clima SOLITEXEXTASANA® pliable membrane to E2/VM1 for the purpose of compliance with Clause E2 of the NZBC for the following scope:
Serviceability wind pressure: Up to ±1515PaUltimate wind pressure: Up to ±2500PaBuilding height: Up to 10m
pro clima SOLITEX EXTASANA® shall be applied in accordance with proclima SOLITEX EXTASANA® installation guidelines and relevant standards.
Vertical expressed joint profile
NV3 black coated aluminium T joint profile used to closeand form expressed vertical panel joint.
6

Components
Flashing tapepro clima TESCON EXTORA®
A pressure sensitive adhesive tape for overlaps and end laps used withboth weather resistive barrier options.
Sill tapepro clima TESCON EXTOSEAL®
A flexible tape for use around window and door openings, used with bothweather resistive barrier options.
Sealing tapepro clima TESCON® NAIDECK mono patch
A single-sided adhesive nail or screw sealing adhesive used with bothweather resistive barrier options.
Foil tapepro clima TESCON® ADHISO WS
A pure aluminium tape for wet seal connections to TESCONEXTOSEAL® and EXTORA® and SOLITEX EXTASANA®..
Grommetpro clima ROFLEX and KALFEX
pro clima ROFLEX is used to seal pipe and pro clima KAFLEX for cablepenetrations. pro clima ROFLEX and KALFEX are used with both weatherresistive barrier options.
Weather resistive barrier option 2Rigid air barrier
Where a rigid air barrier is required the ADHERO version of pro climaSOLITEX EXTASANA® may be used with 6mm Kalsi (RigidBacker) fibrecement sheeting.EQUITONE façade systems have been certified with pro clima SOLITEXEXTASANA® AHERO and Kalsi to E2/VM2 for the purpose of compliancewith Clause E2 of the NZBC for the following scope:
Serviceability wind pressure: Up to ±2250PaBuilding height: Up to 25m
pro clima SOLITEX EXTASANA® ADHERO shall be applied in accordancewith pro clima SOLITEX EXTASANA® ADHERO installation guidelines andrelevant standards.
7

Support frame
EQUITONE may be fixed to NVELOPE NV3 thermally broken aluminiumbracketry framing system.
Support frame shall be of adequate corrosion resistance required forthe project.
Structure and support frame shall be designed to relevant standardsincluding, but not limited to, the following:
• AS/NZS 1664.1 – Aluminium structures• AS/NZS 4600 – Cold-formed steel structures• NZS 3404 – Steel structures• NZS 3604 – Timber framed buildings
Thermal isolator gasket
Used to minimise thermal bridging, and to separate alu-minium from steel or concrete.
Bracket
NVELOPE aluminium brackets are available in two sizes, ie single and double, with various depths to suit a wide range of cavity widths from approx. 50 to 300mm.
Vertical rail (profile)
NVELOPE aluminium vertical L railsMinimum face width of L rail: 40 mm
Vertical aluminium Omega (top hat) or Z rail
These may substitute NVELOPE bracket and vertical L rails.
8

Support frame
NotesSupport frame and its connection to substructure shall be designed by project engineer in accordance with the relevant standards.The application of NVELOPE system shall be in accordance with its supplier’s recommendations and guidelines.Refer to NVELOPE and EQUITONE brochure for detailed information on NVELOPE components and their available sizes and options.
Horizontal rail
NV3 aluminium horizontal rail onto which EQUITONE panel is mounted.
Isometric view of the assembly
Hanger
NV3 aluminium hangers are fixed onto rear of EQUITONE panel with SFS TUF-S concealed fixings. There are two types of hanger – adjustable & static. Adjustable hanger only applies to the top row panel fixings (hangers).
9

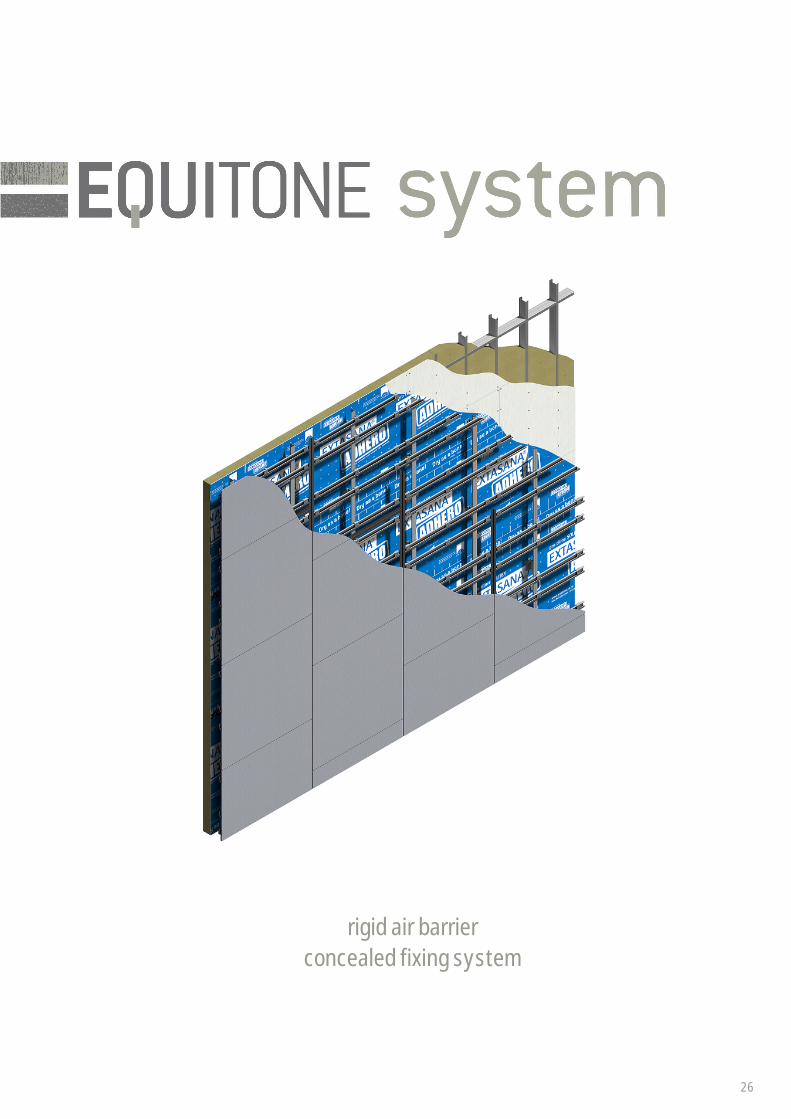
EQUITONE system
flexible air barrier (pliable membrane)concealed fixing system
10

Drawings index
Detail Figure Page
Baffled horizontal joint 1 12Baffled horizontal joint junction with vertical joint - Elevation 2 12Vertical joint - Detail 1 3 13Vertical joint - Detail 2 4 13Intermediate panel fixings connection 5 13Horizontal control joint 6 14Vertical control joint 7 14Flush window - Head and sill 8 15Flush window - Jamb 9 15Recessed window - Head and sill 10 16Recessed window jamb - Option 1 11 16Recessed window jamb - Option 2 12 16Meter box - Section 13 17Meter box - Plan view - Detail 1 14 17Meter box - Plan view - Detail 2 15 17Isometric view of window/meter box opening - Tape application 16 18Soffit junction 17 18Base detail 18 19Base detail - Covered area 19 19Base detail - Balcony 20 19Junction with other materials - flush detail 21 20Junction with other materials, eaves or the like - recessed detail 22 20Exposed concrete slab or beam - Cladding flush 23 21Exposed concrete slab or beam - Cladding recessed 24 21External corner 25 22Abutment 26 22Internal corner 27 22Pipe penetration - Plan view 28 23Pipe penetration - Elevation 29 23Pipe penetration - Section 30 23Capping - Detail 1 31 24Capping - Detail 2 32 24Parapet junction - Section 33 24Parapet junction - Plan view 34 25Corrosion resistant saddle flashing 35 25
11

8 - 12 mm
NVELOPE NV3 horizontal support frame
Aluminium baffle fixed to rear of the lower panel with UHBdouble sided tape or structural sealant, and riveted to theadjacent expressed joint profile or corner/end/jamb flashing
NVELOPE NV3 vertical support frame
NVELOPE NV3 hanger fixed topanel with SFS TUF-S fixings
NVELOPE thermalisolator gasket
Min. cavity width: 75 mm
NVELOPE NV3bracket
EQUITONE
Sill or sealing tape
Outline of baffle
NVELOPE NV3expressed joint profile
5 mm
Outline of NVELOPENV3 expressed jointprofile
Rivet fixing the baffle tothe expressed jointprofile, corner or jambflashing
Min. 12mm
EQUITONE
Figure 1: Baffled horizontal joint(Not suitable for EQUITONE [materia])
Figure 2: Baffled horizontal jointjunction with vertical joint - Elevation
Notes1) The length of NVELOPE NV3 vertical and horizontal rail, and expressed joint profile must NOT exceed 3,150mm.
12

8 - 12mmNVELOPE NV3 horizontal support frame
NVELOPE NV3 hanger fixed topanel with SFS TUF-S fixings
NVELOPE NV3 vertical support frame
NVELOPE NV3 bracketNVELOPE thermalisolator gasket
NVELOPE NV3 vertical expressed joint profile
EPDM compressible gasket
Outline of horizontal joint aluminium baffleriveted to horizontal support frame
EQUITONE
Sill or sealing tape
EPDM compressible gasket
Max. 0.9mm corrosionresistant aluminium strip
EQUITONE
10 - 12mm
NVELOPE NV1 bracket
NVELOPE NV1 vertical supportframe profile
NVELOPE thermalisolator gasket
NVELOPE NV3horizontal supportframe
NVELOPE NV3 hanger fixed topanel with SFS TUF-S fixings
Outline of horizontal joint aluminium baffleriveted to horizontal support frame
Sill or sealing tape
Intermediate (narrow) EPDM compressiblegasket may be applied as shown in dashed line,replacing the wide one, where the metal stripbehind is of desired colour
NVELOPE NV3 horizontal support frame
NVELOPE NV3 hanger fixed topanel with SFS TUF-S fixings
NVELOPE NV3 vertical support frame
NVELOPE thermalisolator gasket
NVELOPE NV3 bracket
EQUITONE
Sill or sealing tape
Figure 3: Vertical joint - Detail 1
Figure 4: Vertical joint - Detail 2
Figure 5: Intermediate panel fixings connection
Notes1) The deflection of NVELOPE NV3 vertical expressed joint profile (as included in Figure 3) and any aluminium strip located at the vertical joint (as included in Figure 4) shall be limited to an extentensuring the seal along the vertical joint is maintained with respect to project wind loading.2) The aluminium strip should be fixed ONLY to one of the support frame profiles (either left or right) where allowance for horizontal and/or vertical movement of the cladding frame is required.3) For EQUITONE [materia] refer to EQUITONE construction details with Kalsi RigidBacker.
13

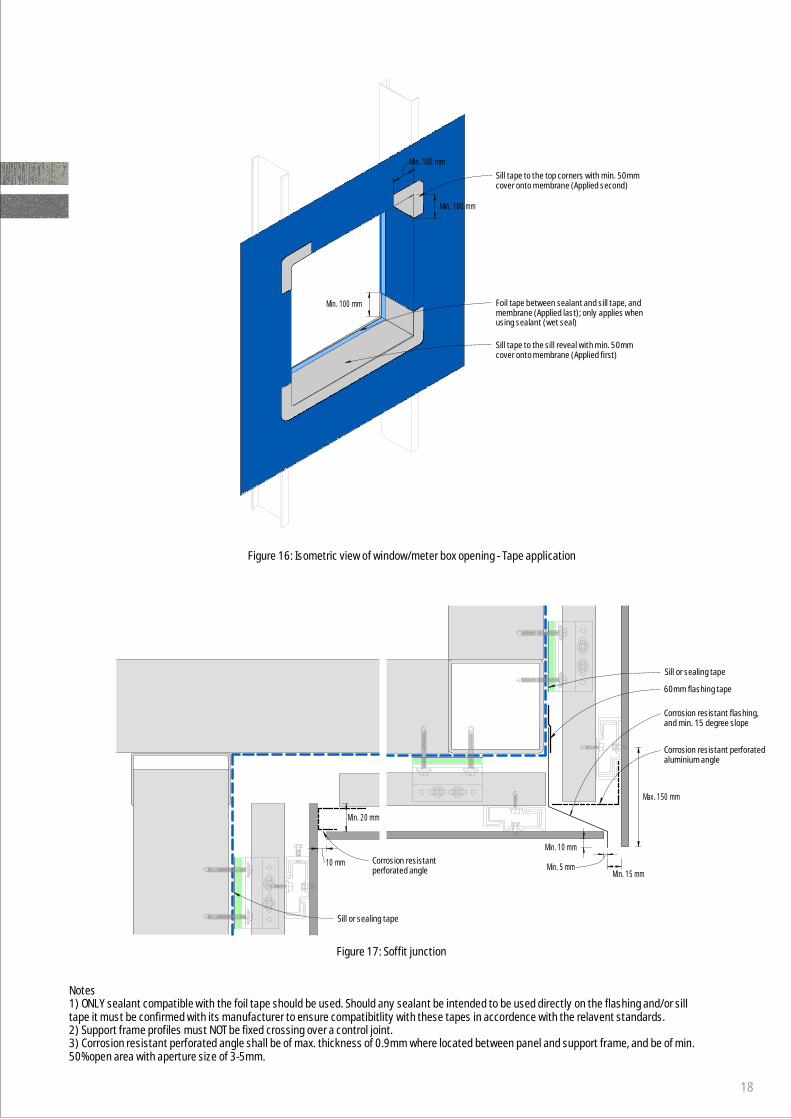
60mm flashing tape
Sill or sealing tape
Ventilated cavity fire barrier where required
Min. 40 mm
Corrosion resistant flashing with min. 15 degree slope
Min. 10 mm or larger as specified by project engineer
Corrosion resistant perforated angle
Min. 10 mm
10 - 15 mm
Min. 100 mm
10 - 15 mm drip edge
or as required20 mm
or as required20 mm Max. 150 mm
NVELOPE NV3 verticalexpressed joint profile
EPDM compressible gasket
Sill or sealing tape
Figure 6: Horizontal control joint
Figure 7: Vertical control joint
Notes1) Support frame profiles must NOT be fixed crossing over a control joint.2) The deflection of NVELOPE NV3 vertical expressed joint profile shall be limited to an extent ensuring the seal along the vertical joint ismaintained with respect to project wind loading.3) Allowance for movement at the location of any control joint must be made in the cladding and its support frame design and installation. Panel mustNOT be fixed bridging over any control joint.4) Corrosion resistant perforated angle shall be of max. thickness of 0.9mm where located between panel and support frame, and be of min. 50% openarea with aperture size of 3-5mm.
14

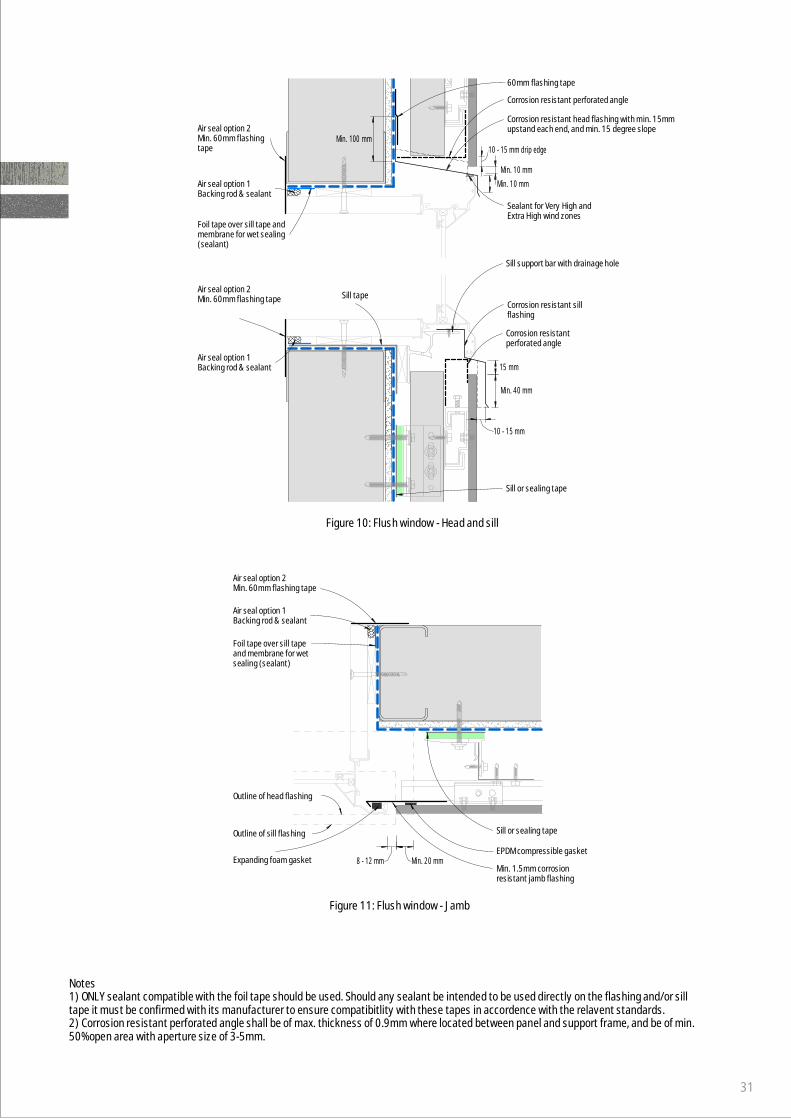
Min. 1.5mm corrosionresistant jamb flashingExpanding foam gasket
Outline of head flashing
Air seal option 1Backing rod & sealant
Air seal option 2Min. 60mm flashing tape
Foil tape over sill tapeand membrane for wetsealing (sealant)
Outline of sill flashing Sill or sealing tape
Min. 20 mm8 - 12 mmEPDM compressible gasket
Corrosion resistant head flashing with min. 15mmupstand each end, and min. 15 degree slope
Sill tape
Foil tape over sill tape andmembrane for wet sealing(sealant)
Air seal option 1Backing rod & sealant
60mm flashing tape
Min. 100 mm
Air seal option 2Min. 60mm flashing tape
Sealant for Very High andExtra High wind zones
Min. 10 mm
Corrosion resistantperforated angle
Corrosion resistant perforated angle
Sill support bar with drainage hole
Corrosion resistant sillflashing
Min. 10 mm
Air seal option 2Min. 60mm flashingtape
Air seal option 1Backing rod & sealant
Sill or sealing tape
Min. 40 mm
10 - 15 mm
15 mm
10 - 15 mm drip edge
Figure 8: Flush window - Head and sill
Figure 9: Flush window - Jamb
Notes1) ONLY sealant compatible with the foil tape should be used. Should any sealant be intended to be used directly on the flashing and/or silltape it must be confirmed with its manufacturer to ensure compatibitlity with these tapes in accordence with the relavent standards.2) Corrosion resistant perforated angle shall be of max. thickness of 0.9mm where located between panel and support frame, and be of min.50% open area with aperture size of 3-5mm.
15

Min. 50 mm
Outline of jamb flashing
Corrosion resistantperforated angle
Sill tape
Corrosion resistant sill flashing with min.15mm upstand each end passing behindjamb flashing, and min. 15 degree slope
60mm flashing tape
Corrosion resistant head flashing with min. 15mmupstand each end, and min. 15 degree slope
Min. 8 mm cover
Min. 35 mm cover
Corrosion resistant sillflashing with min. 15mmupstand each end
Air seal option 1Backing rod & sealant
Air seal option 2Min. 60mm flashing tape
Foil tape over sill tapeand membrane for wetsealing (sealant)
Corrosion resistantperforated angle
Air seal option 2Min. 60mm flashing tape
Air seal option 1Backing rod & sealant
Sealant for Very High andExtra High wind zones
5 mm
15 mm
Min. 40 mm
10 - 15 mm
Min. 10 mm cover
Min. 10 mm cover
Min. 50 mm
Min. 100 mm
Sill or sealing tape
Corrosion resistant jambflashing option 2
EPDM compressible gasket
Outline of sill flashing
Bond breaker & sealant
Air seal option 1Backing rod & sealant
Air seal option 2Min. 60mm flashing tape
Foil tape over sill tapeand membrane for wetsealing (sealant)
Outline of sill flashing
Bond breaker & sealant
Air seal option 1Backing rod & sealant
Air seal option 2Min. 60mm flashing tape
Foil tape over sill tapeand membrane for wetsealing (sealant)
Min. 10 mm cover
Outline of head flashingOutline of head flashing
Sill or sealing tape
Corrosion resistant jambflashing option 2
EPDM compressible gasket
Figure 10: Recessed window - Head and sill
Figure 11: Recessed window jamb - Option 1 Figure 12: Recessed window jamb - Option 2
Notes1) ONLY sealant compatible with the foil tape should be used. Should any sealant be intended to be used directly on the flashing and/or silltape it must be confirmed with its manufacturer to ensure compatibitlity with these tapes in accordence with the relavent standards.2) Corrosion resistant perforated angle shall be of max. thickness of 0.9mm where located between panel and support frame, and be of min.50% open area with aperture size of 3-5mm.
16

Min. 20 mm
Line of head flashing
Line of sill flashing
Max. 0.9mmcorrosion resistantmetal angle
Supporting angle, bondbreaker & sealant
Line of sill flashing
Line of head flashing
5 - 10 mm
Backing rod & sealant
Foil tape over sill tapeand membrane for wetsealing (sealant)
Backing rod & sealant
Foil tape over sill tapeand membrane for wetsealing (sealant)
EPDM compressiblegasket
Sill or sealing tape
Min. 20 mm
5 - 10 mm
Min. 10 mm
Corrosion resistant flashing with min. 15mmupstand on each end, and min. 15 degree slope
Corrosion resistant flashing
Sill tape
Min. 50 mm
Backing rod & sealant
60mm flashing tape
Foil tape over sill tapeand membrane for wetsealing (sealant)
Min. 40 mm
Corrosion resistant perforated angle
Corrosion resistantperforated angle
Min. 10 mm
Min. 10 mm
Sealant
Sill or sealing tape
10 - 15 mm
Min. 100 mm
10 - 15 mm drip edge
Figure 14: Meter box - Plan view - Detail 1 Figure 15: Meter box - Plan view - Detail 2
Figure 13: Meter box - Section
Notes1) ONLY sealant compatible with the foil tape should be used. Should any sealant be intended to be used directly on the flashing and/or silltape it must be confirmed with its manufacturer to ensure compatibitlity with these tapes in accordence with the relavent standards.2) Corrosion resistant perforated angle shall be of max. thickness of 0.9mm where located between panel and support frame, and be of min.50% open area with aperture size of 3-5mm.
17
Corrosion resistantperforated angle
Sill or sealing tape
10 mm
Min. 20 mm
Corrosion resistant flashing,and min. 15 degree slope
60mm flashing tape
Sill or sealing tape
Corrosion resistant perforatedaluminium angle
Min. 15 mmMin. 5 mm
Min. 10 mm
Max. 150 mm
Min. 100 mm
Min. 100 mm
Min. 100 mm
Figure 17: Soffit junction
Figure 16: Isometric view of window/meter box opening - Tape application
Sill tape to the sill reveal with min. 50mmcover onto membrane (Applied first)
Sill tape to the top corners with min. 50mmcover onto membrane (Applied second)
Foil tape between sealant and sill tape, andmembrane (Applied last); only applies whenusing sealant (wet seal)
Notes1) ONLY sealant compatible with the foil tape should be used. Should any sealant be intended to be used directly on the flashing and/or silltape it must be confirmed with its manufacturer to ensure compatibitlity with these tapes in accordence with the relavent standards.2) Support frame profiles must NOT be fixed crossing over a control joint.3) Corrosion resistant perforated angle shall be of max. thickness of 0.9mm where located between panel and support frame, and be of min.50% open area with aperture size of 3-5mm.
18

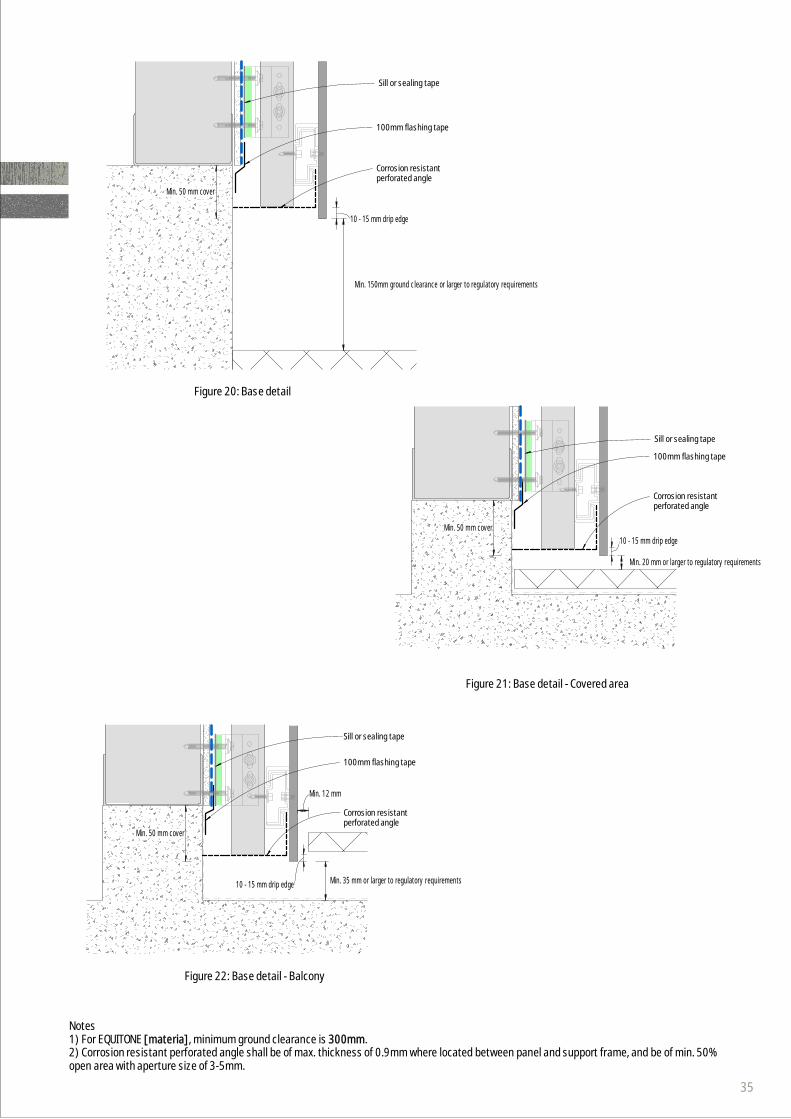
Corrosion resistantperforated angle
100mm flashing tape
Min. 50 mm cover
Sill or sealing tape
Min. 150mm ground clearance or larger to regulatory req uirements
10 - 15 mm drip edge
Corrosion resistantperforated angle
100mm flashing tape
Sill or sealing tape
Min. 20 mm or larger to regulatory requirements
Min. 50 mm cover
10 - 15 mm drip edge
Corrosion resistantperforated angle
100mm flashing tape
Sill or sealing tape
Min. 12 mm
Min. 35 mm or larger to regulatory requirements
Min. 50 mm cover
10 - 15 mm drip edge
Figure 18: Base detail
Figure 19: Base detail - Covered area
Figure 20: Base detail - Balcony
Notes1) For EQUITONE [materia], minimum ground clearance is 300mm.2) Corrosion resistant perforated angle shall be of max. thickness of 0.9mm where located between panel and support frame, and be of min. 50%open area with aperture size of 3-5mm.
19

Corrosion resistant flashing with min. 15 degree slope
Corrosion resistant perforated angle
60mm flashing tape
Corrosion resistant flashing with min. 15 degree slope
Min. 15 mm
Min. 35 mm
Corrosion resistantperforated angle
Sill or sealing tape
Min. 10 mm
Min. 40 mm
10 - 15 mm
10 - 15 mm drip edge
Min. 150 mm
Min. 100 mm
Corrosion resistant flashing
Corrosion resistant perforated angle
60mm flashing tape
Corrosion resistant flashing with min. 15 degree slope
Min. 15 mm
Soffit lining
Min. 35 mm
Corrosion resistantperforated angle fixedonly to soffit
Min. 40 mm
Sill or sealing tape
Min. 10 mm
10 mm
10 - 15 mm drip edge
Min. 150 mm
Figure 21: Junction with other materials - flush detail
Figure 22: Junction with other materials, eaves or the like - recessed detail
Notes1) Support frame profiles must NOT be fixed crossing over a control joint.2) Corrosion resistant perforated angle shall be of max. thickness of 0.9mm where located between panel and support frame, and be of min. 50% openarea with aperture size of 3-5mm.
20

Min. 35 mm
Sealant
Corrosion resistant flashing
Corrosion resistantperforated angle
60mm flashing tape
Corrosion resistant flashingwith min. 15 degree slope
Corrosion resistant perforated anglefixed only to soffit
60mm flashing tape
Sill or sealing tape
Min. 15 mm
Min. 10 mm or larger as specified by project engineer
Min. 40 mm
10 - 15 mm
60mm flashing tape
10 - 15 mm drip edge
Min. 150 mm
Min. 15 mm
Min. 35 mm
Sealant
Corrosion resistant flashing
Corrosion resistant perforated angle
60mm flashing tape
Corrosion resistant flashingwith min. 15 degree slope
Corrosion resistant perforated anglefixed only to soffit
60mm flashing tape
Sill or sealing tape
Min. 10 mm or larger as specified by project engineer
10 - 15 mm
Min. 40 mm
60mm flashing tape
10 - 15 mm drip edge
Min. 150 mm
Figure 23: Exposed concrete slab or beam - Cladding flush
Figure 24: Exposed concrete slab or beam - Cladding recessed
Notes1) Refer to Pro Clima's flashing tape application guide for any pre-treatment required on concrete or masonry for the application of the flashing tapeonto these substrates.2) Support frame profiles must NOT be fixed crossing over a control joint.3) Corrosion resistant perforated angle shall be of max. thickness of 0.9mm where located between panel and support frame, and be of min. 50% openarea with aperture size of 3-5mm.
21

Min. 0.9mm corrosionresistant metal angle
EPDM compressible gasket
8 - 12 mm
Sill or sealing tape
EPDM compressible gasket
Max. 0.9mmcorrosion resistantmetal angle
Sill or sealing tape
8 -12 mm
EPDM compressible gasket
Backing rod & sealant
60mm flashing tape
Max. 0.9mm corrosion resistant metal angle
Sill or sealing tape
Min. 10 mm
Figure 25: External corner
Figure 27: Internal corner
Figure 26: Abutment
22
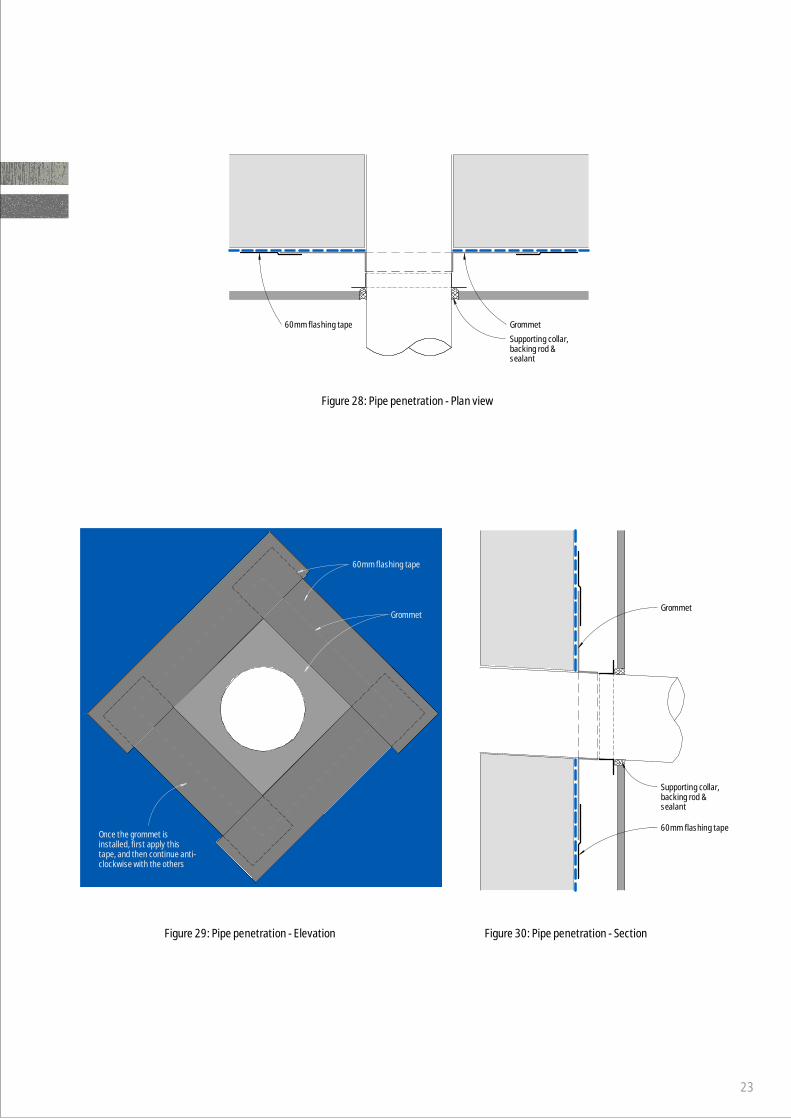
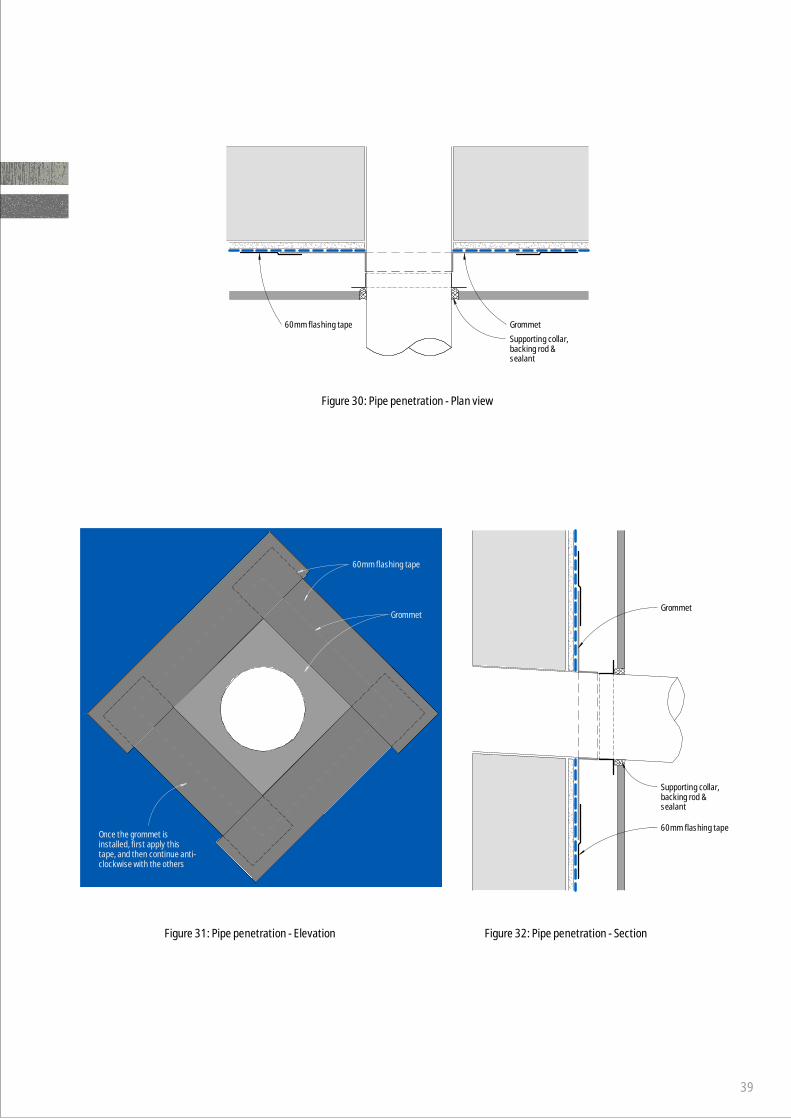
Grommet
60mm flashing tape
Supporting collar,backing rod &sealant
Grommet60mm flashing tape
Supporting collar,backing rod &sealant
60mm flashing tape
Grommet
Once the grommet isinstalled, first apply thistape, and then continue anti-clockwise with the others
Figure 28: Pipe penetration - Plan view
Figure 29: Pipe penetration - Elevation Figure 30: Pipe penetration - Section
23

15 mm
Min. 15 mm
Min. 50 mm or larger to regulatory requirements
60mm flashing tape Sill or sealing tape
Roof or gutterflashing
Corrosion resistantperforated angle
Sill or sealing tape
Min. 50 mm or larger to regulatory requirements
Suitable capping structural supportMin. 5 degree slope
60mm flashing tape
Sill or sealing tape
15 mm
Min. 15 mm
Min. 50 mm or larger to regulatory requirements
Air
Non-continuous packer
Roof or gutterflashing
Corrosion resistantperforated angle
Sill or sealing tape
Suitable capping structural support
Min. 50 mm or larger to regulatory requirements
Min. 5 degree slope
Sill tape
Capping with two rows of sealantto saddle flashing
Capping support
Corrosion resistant Saddleflashing with two rows ofsealant to capping support
Min. 50mm
60mm flashing tape
Supportingangle, backingrod & sealant
Sill or sealing tape
Min. 100 mm
Figure 31: Capping - Detail 1
Figure 32: Capping - Detail 2(Not suitable for EQUITONE [materia])
Figure 33: Parapet junction - Section
Notes1) For EQUITONE [materia], the following capping dimensions should be followed.
- A minimum 20mm between panel face and rear of the capping- A minimum 50mm overlap with the panel for building up to 8m or larger to regulatory requirements.- A minimum 80mm overlap with the panel for building up to 20m or larger to regulatory requirements.- A minimum 100mm overlap with the panel for building over 20m or larger to regulatory requirements.
2) Any face fixings of capping shall be through an over sized hole (by min 5mm) in the capping as well as the panel.3) Corrosion resistant perforated angle shall be of max. thickness of 0.9mm where located between panel and support frame, and be of min.50% open area with aperture size of 3-5mm.4) Capping shall be designed and engineered accordingly to provide adequate allowance for ventilation as shown in Figures 31 & 32.
24

Sill or sealing tape
Outline of saddle flashing
Min. 70 mm
Min. 50 mm
Min. 50 mm
Min.50 mm
Min. 150 mm
Min. 20 mm
Min. 50 mm
Min. 100 mm
Min. 5 degree slope
Figure 34: Parapet junction - Plan view
Figure 35: Corrosion resistant saddle flashing
25
EQUITONE system
rigid air barrier concealed fixing system
26

Drawings index
Detail Figure Page
Baffled horizontal joint 1 28Baffled horizontal joint junction with vertical joint - Elevation 2 28Open horizontal joint 3 28Open horizontal joint junction with vertical joint - Elevation 4 28Vertical joint - Detail 1 5 29Vertical joint - Detail 2 6 29Intermediate panel fixings connection 7 29Horizontal control joint 8 30Vertical control joint 9 30Flush window - Head and sill 10 31Flush window - Jamb 11 31Recessed window - Head and sill 12 32Recessed window jamb - Option 1 13 32Recessed window jamb - Option 2 14 32Meter box - Section 15 33Meter box - Plan view - Detail 1 16 33Meter box - Plan view - Detail 2 17 33Isometric view of window/meter box opening - Tape application 18 34Soffit junction 19 34Base detail 20 35Base detail - Covered area 21 35Base detail - Balcony 22 35Junction with other materials - flush detail 23 36Junction with other materials, eaves or the like - recessed detail 24 36Exposed concrete slab or beam - Cladding flush 25 37Exposed concrete slab or beam - Cladding recessed 26 37External corner 27 38Abutment 28 38Internal corner 29 38Pipe penetration - Plan view 30 39Pipe penetration - Elevation 31 39Pipe penetration - Section 32 39Capping - Detail 1 33 40Capping - Detail 2 34 40Parapet junction - Section 35 40Parapet junction - Plan view 36 41Corrosion resistant saddle flashing 37 41
27

8 - 12 mm
Outline of baffle
NVELOPE NV3expressed joint profile
NVELOPE NV3 horizontal support frame
Aluminium baffle fixed to rear of thelower panel with UHB double sidedtape or structural sealant, and rivetedto the adjacent expressed joint profileor corner/end/jamb flashing
NVELOPE NV3 vertical support frame
5 mm
NVELOPE NV3 hanger fixed topanel with SFS TUF-S fixings
NVELOPE thermalisolator gasket
Min. cavity width: 75 mm
Outline of NVELOPENV3 expressed jointprofile
Rivet fixing the baffle tothe expressed jointprofile, corner or jambflashing
Min. 12mm
NVELOPE NV3bracket
EQUITONE
EQUITONE
Sill or sealing tape
8 - 12 mm
NVELOPE NV3 horizontal support frame
NVELOPE NV3 vertical support frame
NVELOPE NV3 hanger fixed topanel with SFS TUF-S fixings
NVELOPE thermalisolator gasket
Min. cavity width: 75 mm
NVELOPE NV3bracket
NVELOPE NV3expressed joint profile
Support frame behind
Outline of NVELOPENV3 expressed jointprofile
EQUITONE
EQUITONE
Sill or sealing tape
Figure 1: Baffled horizontal joint(Not suitable for EQUITONE [materia])
Figure 2: Baffled horizontal jointjunction with vertical joint - Elevation
Figure 3: Open horizontal joint Figure 4: Open horizontal joint junctionwith vertical joint - Elevation
Notes1) Horizontal open joint detail (Figure 3 & 4) requires project engineer's evaluation and approval, and the selection of appropriate UV resistantweather resistive barrier (membrane).2) In Figure 4, visible part of the support frame profiles and weather barrier may be coated black with suitable paint.3) The length of NVELOPE NV3 vertical and horizontal rail, and expressed joint profile must NOT exceed 3,150mm.
28

8 - 12mmNVELOPE NV3 horizontal support frame
NVELOPE NV3 hanger fixed topanel with SFS TUF-S fixings
NVELOPE NV3 vertical support frame
NVELOPE NV3 bracketNVELOPE thermalisolator gasket
NVELOPE NV3 vertical expressed joint profile
EPDM compressible gasket
Outline of horizontal joint aluminium baffleriveted to horizontal support frame
EQUITONE
Sill or sealing tape
EPDM compressible gasket
Max. 0.9mm corrosionresistant aluminium strip
EQUITONE
10 - 12mm
NVELOPE NV1 bracket
NVELOPE NV1 vertical supportframe profile
NVELOPE thermalisolator gasket
NVELOPE NV3horizontal supportframe
NVELOPE NV3 hanger fixed topanel with SFS TUF-S fixings
Outline of horizontal joint aluminium baffleriveted to horizontal support frame
Sill or sealing tape
Intermediate (narrow) EPDM compressiblegasket may be applied as shown in dashed line,replacing the wide one, where the metal stripbehind is of desired colour
NVELOPE NV3 horizontal support frame
NVELOPE NV3 hanger fixed topanel with SFS TUF-S fixings
NVELOPE NV3 vertical support frame
NVELOPE thermalisolator gasket
NVELOPE NV3 bracket
EQUITONE
Sill or sealing tape
Figure 5: Vertical joint - Detail 1
Figure 6: Vertical joint - Detail 2
Figure 7: Intermediate panel fixings connection
Notes1) The deflection of NVELOPE NV3 vertical expressed joint profile (as included in Figure 5) and any aluminium strip located at the vertical joint (as included in Figure 6) shall be limited to an extentensuring the seal along the vertical joint is maintained with respect to project wind loading.2) The aluminium strip should be fixed ONLY to one of the support frame profiles (either left or right) where allowance for horizontal and/or vertical movement of the cladding frame is required.
29

60mm flashing tape
Sill or sealing tape
Ventilated cavity fire barrier where required
Min. 40 mm
Corrosion resistant flashing with min. 15 degree slope
Min. 10 mm or larger as specified by project engineer
Corrosion resistantperforated angle
Min. 10 mm
10 - 15 mm
Min. 100 mm
10 - 15 mm drip edge
or as required20 mm
or as required20 mm Max. 150 mm
NVELOPE NV3 verticalexpressed joint profile
EPDM compressible gasket
Sill or sealing tape
Figure 8: Horizontal control joint
Figure 9: Vertical control joint
Notes1) Support frame profiles and Kalsi RigidBacker must NOT be fixed crossing over a control joint.2) The deflection of NVELOPE NV3 vertical expressed joint profile shall be limited to an extent ensuring the seal along the vertical joint ismaintained with respect to project wind loading.3) Allowance for movement at the location of any control joint must be made in the cladding and its support frame design and installation. Panel mustNOT be fixed bridging over any control joint.4) Corrosion resistant perforated angle shall be of max. thickness of 0.9mm where located between panel and support frame, and be of min. 50% openarea with aperture size of 3-5mm.
30
Min. 1.5mm corrosionresistant jamb flashing
Expanding foam gasket
Outline of head flashing
Air seal option 1Backing rod & sealant
Air seal option 2Min. 60mm flashing tape
Foil tape over sill tapeand membrane for wetsealing (sealant)
Outline of sill flashing
EPDM compressible gasket
Sill or sealing tape
Min. 20 mm8 - 12 mm
Corrosion resistant head flashing with min. 15mmupstand each end, and min. 15 degree slope
Sill tape
Foil tape over sill tape andmembrane for wet sealing(sealant)
Air seal option 1Backing rod & sealant
60mm flashing tape
Min. 100 mm
Air seal option 2Min. 60mm flashing tape
Sealant for Very High andExtra High wind zones
Min. 10 mm
Corrosion resistantperforated angle
Corrosion resistant perforated angle
Sill support bar with drainage hole
Corrosion resistant sillflashing
Min. 10 mm
Air seal option 2Min. 60mm flashingtape
Air seal option 1Backing rod & sealant
Sill or sealing tape
Min. 40 mm
10 - 15 mm
15 mm
10 - 15 mm drip edge
Figure 10: Flush window - Head and sill
Figure 11: Flush window - Jamb
Notes1) ONLY sealant compatible with the foil tape should be used. Should any sealant be intended to be used directly on the flashing and/or silltape it must be confirmed with its manufacturer to ensure compatibitlity with these tapes in accordence with the relavent standards.2) Corrosion resistant perforated angle shall be of max. thickness of 0.9mm where located between panel and support frame, and be of min.50% open area with aperture size of 3-5mm.
31

Min. 50 mm
Outline of jamb flashing
Corrosion resistant perforated angle
Sill tape
Corrosion resistant sill flashing with min.15mm upstand each end passing behindjamb flashing, and min. 15 degree slope
60mm flashing tape
Corrosion resistant head flashing with min. 15mmupstand each end, and min. 15 degree slope
Min. 8 mm cover
Min. 35 mm cover
Corrosion resistant sillflashing with min. 15mmupstand each end
Air seal option 1Backing rod & sealant
Air seal option 2Min. 60mm flashing tape
Foil tape over sill tapeand membrane for wetsealing (sealant)
Corrosion resistantperforated angle
Air seal option 2Min. 60mm flashing tape
Air seal option 1Backing rod & sealant
Sealant for Very High andExtra High wind zones
5 mm
15 mm
Min. 40 mm
10 - 15 mm
Min. 10 mm cover
Min. 10 mm cover
Min. 50 mm
Min. 100 mm
Sill or sealing tape
Corrosion resistant jambflashing option 2
EPDM compressible gasket
Outline of sill flashing
Bond breaker & sealant
Air seal option 1Backing rod & sealant
Air seal option 2Min. 60mm flashing tape
Foil tape over sill tapeand membrane for wetsealing (sealant)
Outline of sill flashing
Bond breaker & sealant
Air seal option 1Backing rod & sealant
Air seal option 2Min. 60mm flashing tape
Foil tape over sill tapeand membrane for wetsealing (sealant)
Min. 10 mm cover
Outline of head flashingOutline of head flashing
Sill or sealing tape
Corrosion resistant jambflashing option 2
EPDM compressible gasket
Figure 12: Recessed window - Head and sill
Figure 13: Recessed window jamb - Option 1 Figure 14: Recessed window jamb - Option 2
Notes1) ONLY sealant compatible with the foil tape should be used. Should any sealant be intended to be used directly on the flashing and/or silltape it must be confirmed with its manufacturer to ensure compatibitlity with these tapes in accordence with the relavent standards.2) Corrosion resistant perforated angle shall be of max. thickness of 0.9mm where located between panel and support frame, and be of min.50% open area with aperture size of 3-5mm.
32

Min. 20 mm
Line of head flashing
Line of sill flashing
Max. 0.9mmcorrosion resistantmetal angle
Supporting angle, bondbreaker & sealant
Line of sill flashing
Line of head flashing
5 - 10 mm
Backing rod & sealant
Foil tape over sill tapeand membrane for wetsealing (sealant)
Backing rod & sealant
Foil tape over sill tapeand membrane for wetsealing (sealant)
EPDM compressiblegasket
Sill or sealing tape
Min. 20 mm
5 - 10 mm
Min. 10 mm
Corrosion resistant flashing with min. 15mmupstand on each end, and min. 15 degree slope
Corrosion resistant flashing
Sill tape
Min. 50 mm
Backing rod & sealant
60mm flashing tape
Foil tape over sill tapeand membrane for wetsealing (sealant)
Min. 40 mm
Corrosion resistant perforated angle
Corrosion resistantperforated angle
Min. 10 mm
Min. 10 mm
Sealant
Sill or sealing tape
10 - 15 mm
Min. 100 mm
10 - 15 mm drip edge
Figure 16: Meter box - Plan view - Detail 1 Figure 17: Meter box - Plan view - Detail 2
Figure 15: Meter box - Section
Notes1) ONLY sealant compatible with the foil tape should be used. Should any sealant be intended to be used directly on the flashing and/or silltape it must be confirmed with its manufacturer to ensure compatibitlity with these tapes in accordence with the relavent standards.2) Corrosion resistant perforated angle shall be of max. thickness of 0.9mm where located between panel and support frame, and be of min.50% open area with aperture size of 3-5mm.
33

Corrosion resistantperforated angle
Sill or sealing tape
10 mm
Min. 20 mm
Corrosion resistant flashing,and min. 15 degree slope
60mm flashing tape
Sill or sealing tape
Corrosion resistant perforatedaluminium angle
Min. 15 mmMin. 5 mm
Min. 10 mm
Max. 150 mm
Min. 100 mm
Min. 100 mm
Min. 100 mm
Figure 19: Soffit junction
Figure 18: Isometric view of window/meter box opening - Tape application
Sill tape to the sill reveal with min. 50mmcover onto membrane (Applied first)
Sill tape to the top corners with min. 50mmcover onto membrane (Applied second)
Foil tape between sealant and sill tape, andmembrane (Applied last); only applies whenusing sealant (wet seal)
Notes1) ONLY sealant compatible with the foil tape should be used. Should any sealant be intended to be used directly on the flashing and/or silltape it must be confirmed with its manufacturer to ensure compatibitlity with these tapes in accordence with the relavent standards.2) Support frame profiles and Kalsi RigidBacker must NOT be fixed crossing over a control joint.3) Corrosion resistant perforated angle shall be of max. thickness of 0.9mm where located between panel and support frame, and be of min.50% open area with aperture size of 3-5mm.
34
Corrosion resistantperforated angle
100mm flashing tape
Min. 50 mm cover
Sill or sealing tape
Min. 150mm ground clearance or larger to regulatory req uirements
10 - 15 mm drip edge
Corrosion resistantperforated angle
100mm flashing tape
Sill or sealing tape
Min. 20 mm or larger to regulatory requirements
Min. 50 mm cover
10 - 15 mm drip edge
Corrosion resistantperforated angle
100mm flashing tape
Sill or sealing tape
Min. 12 mm
Min. 35 mm or larger to regulatory requirements
Min. 50 mm cover
10 - 15 mm drip edge
Figure 20: Base detail
Figure 21: Base detail - Covered area
Figure 22: Base detail - Balcony
Notes1) For EQUITONE [materia], minimum ground clearance is 300mm.2) Corrosion resistant perforated angle shall be of max. thickness of 0.9mm where located between panel and support frame, and be of min. 50%open area with aperture size of 3-5mm.
35

Corrosion resistant flashing with min. 15 degree slope
Corrosion resistant perforated angle
60mm flashing tape
Corrosion resistant flashing with min. 15 degree slope
Min. 15 mm
Min. 35 mm
Corrosion resistantperforated angle
Sill or sealing tape
Min. 10 mm
Min. 40 mm
10 - 15 mm
10 - 15 mm drip edge
Min. 100 mm
Min. 150 mm
Corrosion resistant flashing
Corrosion resistant perforated angle
60mm flashing tape
Corrosion resistant flashing with min. 15 degree slope
Min. 15 mm
Soffit lining
Min. 35 mm
Corrosion resistantperforated angle fixedonly to soffit
Min. 40 mm
Sill or sealing tape
Min. 10 mm
10 mm
10 - 15 mm drip edge
Min. 150 mm
Figure 23: Junction with other materials - flush detail
Figure 24: Junction with other materials, eaves or the like - recessed detail
Notes1) Support frame profiles and Kalsi RigidBacker must NOT be fixed crossing over a control joint.2) Corrosion resistant perforated angle shall be of max. thickness of 0.9mm where located between panel and support frame, and be of min. 50% openarea with aperture size of 3-5mm.
36

Min. 35 mm
Sealant
Corrosion resistant flashing
Corrosion resistant perforated angle
60mm flashing tape
Corrosion resistant flashingwith min. 15 degree slope
Corrosion resistant perforated anglefixed only to soffit
100mm flashing tape
Sill or sealing tape
Min. 15 mm
Min. 10 mm or larger as specified by project engineer
Min. 40 mm
10 - 15 mm
10 - 15 mm drip edge
60mm flashing tape
Min. 150 mm
Min. 15 mm
Min. 35 mm
Sealant
Corrosion resistant flashing
Corrosion resistant perforated angle
60mm flashing tape
Corrosion resistant flashingwith min. 15 degree slope
Corrosion resistant perforated anglefixed only to soffit
100mm flashing tape
Sill or sealing tape
Min. 10 mm or larger as specified by project engineer
10 - 15 mm
Min. 40 mm
10 - 15 mm drip edge
60mm flashing tape
Min. 150 mm
Figure 25: Exposed concrete slab or beam - Cladding flush
Figure 26: Exposed concrete slab or beam - Cladding recessed
Notes1) Refer to Pro Clima's flashing tape application guide for any pre-treatment required on concrete or masonry for the application of the flashing tapeonto these substrates.2) Support frame profiles and Kalsi RigidBacker must NOT be fixed crossing over a control joint.3) Corrosion resistant perforated angle shall be of max. thickness of 0.9mm where located between panel and support frame, and be of min. 50% openarea with aperture size of 3-5mm.
37

Min. 0.9mm corrosionresistant metal angle
EPDM compressible gasket
8 - 12 mm
Sill or sealing tape
EPDM compressible gasket
Max. 0.9mmcorrosion resistantmetal angle
Sill or sealing tape
8 -12 mm
EPDM compressible gasket
Backing rod & sealant
60mm flashing tape
Max. 0.9mm corrosion resistant metal angle
Sill or sealing tape
Min. 10 mm
Figure 27: External corner
Figure 29: Internal corner
Figure 28: Abutment
38
Grommet
60mm flashing tape
Supporting collar,backing rod &sealant
Grommet60mm flashing tape
Supporting collar,backing rod &sealant
60mm flashing tape
Grommet
Once the grommet isinstalled, first apply thistape, and then continue anti-clockwise with the others
Figure 30: Pipe penetration - Plan view
Figure 31: Pipe penetration - Elevation Figure 32: Pipe penetration - Section
39

15 mm
Min. 15 mm
Min. 50 mm or larger to regulatory requirements
60mm flashing tape Sill or sealing tape
Roof or gutterflashing
Corrosion resistantperforated angle
Sill or sealing tape
Suitable capping structural support
To regulatory requirements
Min. 5 degree slope
60mm flashing tape
Sill or sealing tape
15 mm
Min. 15 mm
Min. 50 mm or larger to regulatory requirements
Air
Non-continuous packer
Roof or gutterflashing
Corrosion resistantperforated angle
Sill or sealing tape
Min. 50 mm or larger to regulatory requirements
Suitable capping structural support
Min. 5 degree slope
Sill tape
Capping with two rows of sealantto saddle flashing
Capping support
Corrosion resistant Saddleflashing with two rows ofsealant to capping support
Min. 50mm
60mm flashing tape
Supportingangle, backingrod & sealant
Sill or sealing tape
Min. 100 mm
Figure 33: Capping - Detail 1
Figure 34: Capping - Detail 2(Not suitable for EQUITONE [materia])
Figure 35: Parapet junction - Section
Notes1) For EQUITONE [materia], the following capping dimensions should be followed.
- A minimum 20mm between panel face and rear of the capping- A minimum 50mm overlap with the panel for building up to 8m or larger to regulatory requirements.- A minimum 80mm overlap with the panel for building up to 20m or larger to regulatory requirements.- A minimum 100mm overlap with the panel for building over 20m or larger to regulatory requirements.
2) Any face fixings of capping shall be through an over sized hole (by min 5mm) in the capping as well as the panel.3) Corrosion resistant perforated angle shall be of max. thickness of 0.9mm where located between panel and support frame, and be of min.50% open area with aperture size of 3-5mm.4) Capping shall be designed and engineered accordingly to provide adequate allowance for ventilation as shown in Figures 33 & 34.
40

Sill or sealing tape
Outline of saddle flashing
Min. 70 mm
Min. 50 mm
Min. 50 mm
Min.50 mm
Min. 150 mm
Min. 20 mm
Min. 50 mm
Min. 100 mm
Min. 5 degree slope
Figure 36: Parapet junction - Plan view
Figure 37: Corrosion resistant saddle flashing
41

Etex Exteriors ANZSuite 201198 Harbour EsplanadeDocklands VIC 3008Australia
+61 (03) 9988 [email protected]
Ed. 1 NOV2020