comprehensive solutions for forefoot and midfoot surgery
TRANSCRIPT

Comprehensive Solutions for Forefoot and MidfootSurgery using the Mini TightRope® System
Hallux Valgus Repair:
Mini TightRope FT Repair Kit
2.7 mm Drill Hole Technique
Mini TightRope 1.1 mm Disposables Kit
Metal Mini TightRope FT Repair Kit
Hallux Varus Repair:
Mini TightRope Disposables Kit
Lisfranc Ligament Repair:
Mini TightRope Disposables Kit
Six Surgical Techniques
This description of technique is provided as an educational tool and clinical aid to assist properly licensed medical professionals in the usage of specific Arthrex products. As part of this professional usage, the medical professional must
use their professional judgment in making any final determinations in product usage and technique. In doing so, the medical professional should rely on their own training and experience and should conduct
a thorough review of pertinent medical literature and the product’s Directions For Use.
© 2012, Arthrex Inc. All rights reserved. LB0004D
U.S. PATENTS NOS. 6,712,234; 6,991,636 and PATENT PENDING

The Mini TightRope System Comprehensive Solutions for Forefoot and Midfoot Surgery
Hallux Valgus RepairThe treatment of hallux valgus deformity includes the assessment of the hallux valgus angle, the intermetatarsal angle (IM angle) and the contribution of an interphalan-geus deformity. Additionally, there must be an assessment of the presence or absence of arthritic involvement of both the first metatarsocuneiform joint and the first metatarsopha-langeal joint. Other considerations are the orientation of the distal metatarsal articular angle and the orientation and stability of the first metatarsocuneiform joint.
Various methods have been described to correct the intermetatarsal angle. Soft tissue correction can be achieved by suturing the lateral capsule of the first metatarsal to the medial capsule of the second metatarsal, incorporating the intervening, previously released adductor tendon. A loss of reduction can occur due to the forces that oppose the suture repair, as well as the possibility that poor tissue quality can contribute to a loss of reduction.
In the presence of more rigid deformities, the IM angle is reduced by using a distal or proximal osteotomy of the first metatarsal. Such osteotomies can be technically challeng-ing. A rather daunting list of consequences and potential complications include delayed union, malunion, nonunion, excessive shortening of the first metatarsal, avascular necro-sis, hardware failure and prolonged protected ambulation.
The Mini TightRope is useful as an alternative and adjunct method for reduction of the IM angle. A FiberWire® and button construct (distal approach) or FiberWire and anchor construct (proximal) are placed across the first and second metatarsals. As the FiberWire is tightened, the IM angle is reduced to a normal value (less than 9-11°). Using the but-ton or anchor construct, the suture is tied over the button, maintaining a secure reduction of the IM angle. Used alone or in conjunction with the distal soft tissue intermetatarsal repair (distal approach), this technique affords a greater degree of strength and security than can be achieved with the soft tissue repair alone.
Hallux Varus RepairHallux varus is most often seen as a complication of bunion surgery, but can be related to other conditions as well. To date, the procedures described to correct the deformity involve transfer of either a portion or all the extensor hallucis longus or brevis tendons. These procedures often leave some deficit in extensor function and can necessitate more incisions, in addition to those used to perform the original procedure. The use of the Mini TightRope to correct hallux varus does not sacrifice tendons, can be done through two small incisions and is a more isometric reconstruction of the lateral structures of the first metatarsophalangeal joint.
Mini TightRope FT FixationThe Mini TightRope FT was developed to offer surgeons a new technique for the correction of the IM angle for hallux valgus. As is with the standard Mini TightRope placed distally, the Mini TightRope FT can support correction of the IM angle, if used proximally along the 1st metatarsal. The Mini TightRope FT utilizes a 4.5 mm (fully threaded) Bio-Corkscrew® FT, or 3.5 mm (fully threaded) titanium anchor, #2 FiberWire and a cupped stainless steel button. The proximally placed anchor/suture button construct will support reduction of the IM angle, while allowing soft tissue remodeling and stabilization.
Lisfranc Ligament RepairThe successful treatment of Lisfranc joint injuries includes the achievement and maintenance of an anatomic reduction. The failure to achieve an anatomic reduction, a failure of fixation or a failure to maintain proper postoperative immo-bilization can contribute to an unsuccessful outcome.
An early method of fixation involved the use of smooth pins or Kirschner wires. More recently, screw fixation has gained in popularity. The advantages of pin fixation include the relative ease of pin placement along with minimal injury to the articular surfaces. However, pin fixation lacks rigid fixation and usually necessitates a second procedure to remove the pins. There is also the risk of pin tract infection with protruding pins, as well as the risk of pin breakage.
Screw fixation has the advantages of rigid fixation, no protruding hardware and a lower risk of hardware failure. Possibly, the major disadvantage of screw fixation is the placement of a screw across articular surfaces of the Lisfranc joints which will certainly predispose those joints to the development of posttraumatic arthritis.
The Mini TightRope provides an alternative to both pin and screw fixation. The advantages include: 1) an absence of protruding hardware, 2) a second procedure is not required for its removal, and 3) far less joint disruption than that caused by a 3.5, 4, 4.5, 6.5 or 7.3 mm screw. For more complex fractures, this technique can easily be combined with other fixation techniques. The MiniTightRope provides a new approach to treatment ofLisfranc ligament disruptions.

The lateral capsular structures are released, followed by the manual reduction of the 1st intermetatarsal space.
Pass the cutting punch/tap through the 1st metatarsal and the 2nd metatarsal, making sure not to advance the instrument beyond the lateral wall of the 2nd metatarsal base. Confirm on fluoroscopy (AR-8912TC).
Insert a Guidewire, starting on the medial cortex of the 1st metatarsal, at least 1.5 - 2.5 cm distal to the 1st M-C joint aiming toward the base of the 2nd metatarsal. Surgeon should utilize an X-ray or C-arm to ensure proper placement of the tip of the pin.
Advance the Mini TightRope FT on the driver through the 1st metatarsal and thread the anchor into the 2nd metatarsal. Confirm on fluoroscopy. Note: You can visualize the anchor only by observing the metal tip. The bioabsorbable anchor is 6 mm past the metal driver tip. Optional: Prior to cinching down, pack the 1st metatarsal with medial eminence from the bunion.
Manually reduce the intermetatarsal angle and tighten the trailing medial button over the 1st metatarsal. Use at least three half-hitches to tie off suture and lock button in place medially. Cut the suture ends long enough to allow the knot and suture to lay down, reducing knot prominence. Note: This procedure can also be combined with a distal osteotomy (Chevron is shown) and secured with 3 mm QuickFixTM Screws (a).
Pass the step drill over the Guidewire until the pin tip of the drill penetrates the medial cortex of the 2nd metatarsal. Confirm proper alignment with fluoroscopy. Remove the drill bit and the K-wire. Note: Do not penetrate the medial cortex of the 2nd metatarsal farther than 3 mm (length of the step drill). Optional: For hard bone, advance the 4.5 mm drill through the 1st metatarsal and complete drilling through the 2nd metatarsal with the 2.7 mm drill.
a
Hallux Valgus Repair Mini TightRope FT
Hallux Valgus Repair Mini TightRope® FT Repair Kit Surgical Technique
1
4
2
5
3
6

Mini TightRope FT
Mini TightRope FTPunch/Tap
Lisfranc Ligament Fixation
Hallux Valgus Repair
© 2012 Arthrex Inc. All rights reserved. One of six inserts in LB0004D(Individual technique inserts cannot be ordered separately)
Mini TightRope FT Repair Kit (AR-8912DS), sterile, includes:
Bio-Corkscrew FT, 4.5 mm AR-1927B-45Cannulated Drill Bit for Mini TightRope AR-8911DCMini TightRope FT Drill Bit AR-8912DCDriver for Mini TightRope FT AR-8912DMini TightRope FT Punch/Tap, 4.5 mm AR-8912TCup Button, 7.8 mm AR-8912Guidewire AR-8920P
Accessories: Cannulated Tap, Mini TightRope FT AR-8912TC
Ordering Information:
Hallux Valgus Repair Mini TightRope FT Repair Kit
Hallux Valgus Repair Mini TightRope FT
Surgical Technique
Advantages:
• Minimallyinvasivedorsalmedialsingleincision • Anchorconstructstabilizesthemetatarsalcuneiform joint and acts as a ‘backstop’ to help prevent recurrence of the deformity
• IManglecorrectionwithorwithoutanosteotomy. Can be used with a distal osteotomy in cases of larger IM angles or semi-rigid deformities

For the distal approach, the incision is made between the 1st and 2nd metatarsals and inner space release is performed. A medial or dorsal medial incision can also be used with appropriate soft tissue retraction.
Using the C-arm for guidance, insert the 1.2 mm Guidewire from lateral to medial across the 2nd and 1st metatarsals. This enhances the accuracy of bisecting the 2nd metatarsal with reference to the dorsal and plantar aspects of the metatarsal. The Guidewire should exit the 1st metatarsal just proximal to the excised medial eminence.
To realign the fibular sesamoid, detach the adductor tendon from the base of the proximal phalanx and fibular sesamoid. Release the deep intermetatarsal ligament. If needed, free any sesamoid adhesions to the intermetatarsal lig-ament. Manually test for the reducibility of the angular deformity following the release of the adductor tendon, release of the lateral capsule of the 1st metatarsophalangeal joint and release of the intermetatarsal ligament between the 1st and 2nd metatarsals.
An adjustment in dorsal to plantar direction may assist in the accurate placement of theguide pin, allowing the pin to engage the 1st metatarsal in the midpoint between its dorsal and plantar borders. The entry point on the 2nd metatarsal should be about 2-5 mm proximal to the neck of the 2nd metatarsal head. Note: Place Guidewire while visualizing 1st - 2nd metatarsal webspace. A Freer Elevator can direct Guidewire penetration at 1st meta-tarsal midline if needed.
Using the 2.7 mm Cannulated Drill Bit, drill the tunnel for the Mini TightRope® over the Guidewire in a medial to lateral direction. Confirm proper placement with the C-arm.
Incise the medial capsule, exposing the entire medial eminence. Remove the medial eminence, preserving the sesamoid groove on the plantar aspect of the 1st metatarsal, avoiding excessive resection of the medial eminence.
Surgical TechniqueHallux Valgus Repair 2.7 mm Drill Hole Technique
Hallux Valgus Repair 2.7 mm Technique
1
3
2
4 5
2a

Pass the 1.6 mm guide pin with pull-through suture (attached to the Mini TightRope)from lateral (2nd metatarsal) to medial (1st metatarsal) and stop before the button enters the drill hole.
The Oblong Button is flipped upon exitingthe medial side of the 1st metatarsal cortex. Apply lateral tension on the blue suture.This will help seat the Oblong Button against the bone.
The white pull-through suture is cut and removed. The surgeon should manually push the 1st metatarsal and the 2nd metatarsal together to correct the intermetatarsal angular deformity. Once fluoroscopy confirms proper positioning, the trailing Round Button is tightened down by applying gradual tension on the remaining two strands of blue suture. Tie three half-hitches and cut the suture. Any previously placed sutures incorporating the lateral capsule of the 1st metatarsal, the adductor tendon and the medial capsule of the 2nd metatarsal are tied, thus completing the repair.
Repair is complete.
Note: Recovery is dependent on soft tissues scarring to hold correction and unload the device. If premature weight-bearing through medial forefoot is initiated, the 2nd meta-tarsal responds similarly to a stress fracturewith long-term edema and mild pain.
X-ray showing proper placement of medial and lateral button using the 2.7 mm drill hole technique.
The pull-through suture can now be advanced while the guide pin is pulled medially. At the same time, apply lateral tension on the blue suture just behind the Oblong Button. This will help the Oblong Button to lay sideways, and pass easily through both bone tunnels.
Mini TightRope Disposables Kit (AR-8911DS) includes:Cannulated Drill Bit, 2.7 mmRound Button, 5.5 mmOblong Button, 2.6 mmTightRope Guide Pin, 1.6 mmGuidewire 1.2 mm
© 2012 Arthrex Inc. All rights reserved. One of six inserts in LB0004D(Individual technique inserts cannot be ordered separately)
Post-op Protocol: Surgery & Post-op Day 1- 4Posterior fiberglass splintHeel weight-bearing only
Post-op Day 4 - 28 (4 weeks)Heel weight-bearing onlyPneumatic walking boot/Cam walkerDarco bunion splint to maintain position of great toe
Post-op Day 28 (4 - 6 weeks)Possible start in athletic shoe; only lateral or heel weight-bearing
Post-op Day 42 (6 weeks)Weight-bearing through great toe
Ordering Information:
Hallux Valgus Repair 2.7 mm Drill Hole Technique Surgical Technique
Hallux Valgus Repair 2.7 mm Technique
8
9
76
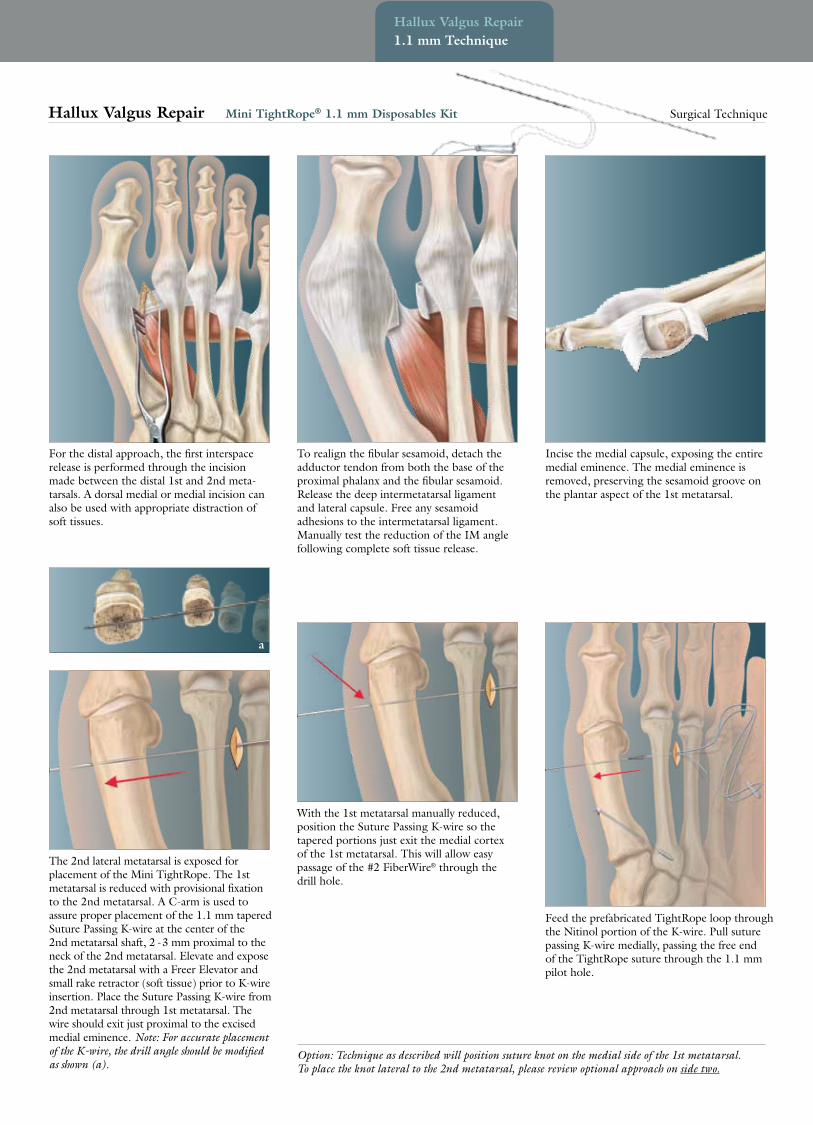
The 2nd lateral metatarsal is exposed for placement of the Mini TightRope. The 1st metatarsal is reduced with provisional fixation to the 2nd metatarsal. A C-arm is used to assure proper placement of the 1.1 mm tapered Suture Passing K-wire at the center of the 2nd metatarsal shaft, 2 - 3 mm proximal to the neck of the 2nd metatarsal. Elevate and expose the 2nd metatarsal with a Freer Elevator and small rake retractor (soft tissue) prior to K-wire insertion. Place the Suture Passing K-wire from 2nd metatarsal through 1st metatarsal. The wire should exit just proximal to the excised medial eminence. Note: For accurate placement of the K-wire, the drill angle should be modified as shown (a).
For the distal approach, the first interspace release is performed through the incision made between the distal 1st and 2nd meta-tarsals. A dorsal medial or medial incision can also be used with appropriate distraction of soft tissues.
To realign the fibular sesamoid, detach the adductor tendon from both the base of the proximal phalanx and the fibular sesamoid. Release the deep intermetatarsal ligament and lateral capsule. Free any sesamoid adhesions to the intermetatarsal ligament. Manually test the reduction of the IM angle following complete soft tissue release.
With the 1st metatarsal manually reduced, position the Suture Passing K-wire so the tapered portions just exit the medial cortex of the 1st metatarsal. This will allow easy passage of the #2 FiberWire® through the drill hole.
Incise the medial capsule, exposing the entire medial eminence. The medial eminence is removed, preserving the sesamoid groove on the plantar aspect of the 1st metatarsal.
Option: Technique as described will position suture knot on the medial side of the 1st metatarsal. To place the knot lateral to the 2nd metatarsal, please review optional approach on side two.
a
Feed the prefabricated TightRope loop through the Nitinol portion of the K-wire. Pull suture passing K-wire medially, passing the free end of the TightRope suture through the 1.1 mm pilot hole.
Surgical TechniqueHallux Valgus Repair Mini TightRope® 1.1 mm Disposables Kit
Hallux Valgus Repair 1.1 mm Technique
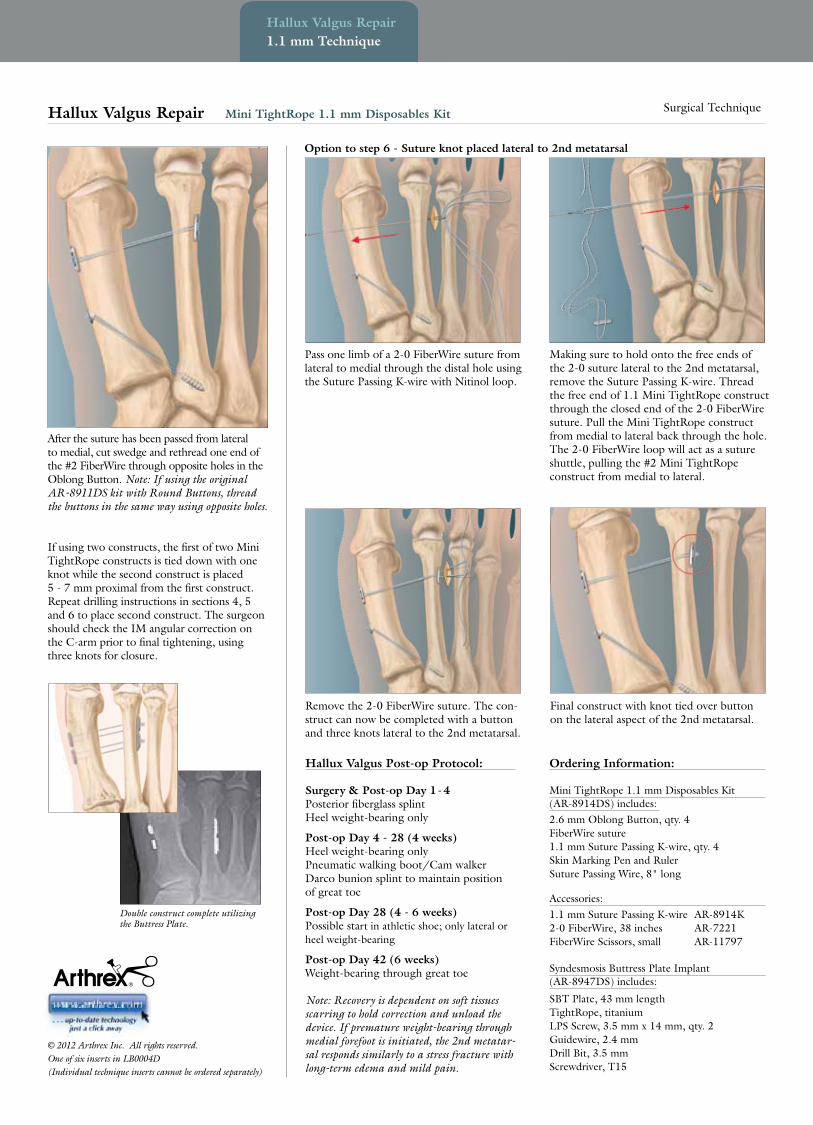
Double construct complete utilizing the Buttress Plate.
Pass one limb of a 2-0 FiberWire suture from lateral to medial through the distal hole using the Suture Passing K-wire with Nitinol loop.
Making sure to hold onto the free ends of the 2-0 suture lateral to the 2nd metatarsal, remove the Suture Passing K-wire. Thread the free end of 1.1 Mini TightRope construct through the closed end of the 2-0 FiberWire suture. Pull the Mini TightRope construct from medial to lateral back through the hole. The 2-0 FiberWire loop will act as a suture shuttle, pulling the #2 Mini TightRope construct from medial to lateral.
Hallux Valgus Post-op Protocol:
Surgery & Post-op Day 1-4Posterior fiberglass splintHeel weight-bearing only
Post-op Day 4 - 28 (4 weeks)Heel weight-bearing onlyPneumatic walking boot/Cam walkerDarco bunion splint to maintain position of great toe
Post-op Day 28 (4 - 6 weeks)Possible start in athletic shoe; only lateral or heel weight-bearing
Post-op Day 42 (6 weeks)Weight-bearing through great toe
Note: Recovery is dependent on soft tissues scarring to hold correction and unload the device. If premature weight-bearing through medial forefoot is initiated, the 2nd metatar-sal responds similarly to a stress fracture with long-term edema and mild pain.
© 2012 Arthrex Inc. All rights reserved. One of six inserts in LB0004D(Individual technique inserts cannot be ordered separately)
Option to step 6 - Suture knot placed lateral to 2nd metatarsal
After the suture has been passed from lateral to medial, cut swedge and rethread one end of the #2 FiberWire through opposite holes in the Oblong Button. Note: If using the original AR-8911DS kit with Round Buttons, thread the buttons in the same way using opposite holes.
If using two constructs, the first of two Mini TightRope constructs is tied down with one knot while the second construct is placed 5 - 7 mm proximal from the first construct. Repeat drilling instructions in sections 4, 5 and 6 to place second construct. The surgeon should check the IM angular correction on the C-arm prior to final tightening, using three knots for closure.
Remove the 2-0 FiberWire suture. The con-struct can now be completed with a button and three knots lateral to the 2nd metatarsal.
Final construct with knot tied over button on the lateral aspect of the 2nd metatarsal.
Surgical TechniqueHallux Valgus Repair Mini TightRope 1.1 mm Disposables Kit
Hallux Valgus Repair 1.1 mm Technique
Ordering Information:
Mini TightRope 1.1 mm Disposables Kit (AR-8914DS) includes: 2.6 mm Oblong Button, qty. 4 FiberWire suture1.1 mm Suture Passing K-wire, qty. 4Skin Marking Pen and RulerSuture Passing Wire, 8" long
Accessories: 1.1 mm Suture Passing K-wire AR-8914K2-0 FiberWire, 38 inches AR-7221FiberWire Scissors, small AR-11797
Syndesmosis Buttress Plate Implant (AR-8947DS) includes:
SBT Plate, 43 mm length TightRope, titaniumLPS Screw, 3.5 mm x 14 mm, qty. 2Guidewire, 2.4 mmDrill Bit, 3.5 mmScrewdriver, T15

The lateral capsular structures are released followed by the manual reduction of the 1st intermetatarsal space.
Use the 3.5 mm drill in the kit to overdrill through both cortices of the 1st metatarsal. Confirm on fluoroscopy.
Insert a Guidewire, starting on the medial cortex of the 1st metatarsal, at least 1.5 - 2.5 cm distal to the 1st M-C joint aiming toward the base of the 2nd metatarsal. Surgeon should utilize an X-ray or C-arm to ensure proper placement of the tip of the pin.
Advance the metal Mini TightRope FT on the driver through the 1st metatarsal and thread the anchor into the 2nd metatarsal. Confirm on fluoroscopy. The anchor is self-drilling and self-tapping. Optional: Prior to cinching down, pack the 1st metatarsal with medial eminence from the bunion.
Manually reduce the intermetatarsal angle and tighten the trailing medial button over the 1st metatarsal. Use at least three half-hitches to tie off suture and lock button in place medially. Cut the suture ends long enough to allow the knot and suture to lay down, reducing knot prominence. Note: This procedure can also be combined with a distal osteotomy (Chevron is shown) and secured with 3 mm QuickFixTM Screws (a).
Pass the 2.5 mm drill over the Guidewire until the drill penetrates through the lateral cortex of the 2nd metatarsal. Confirm proper alignment with fluoroscopy. Remove the 2.5 mm drill bit.
a
Surgical Technique
Hallux Valgus Repair Metal Mini TightRope FT
Hallux Valgus Repair Metal Mini TightRope® FT Repair Kit
1
4
2
5
3
6
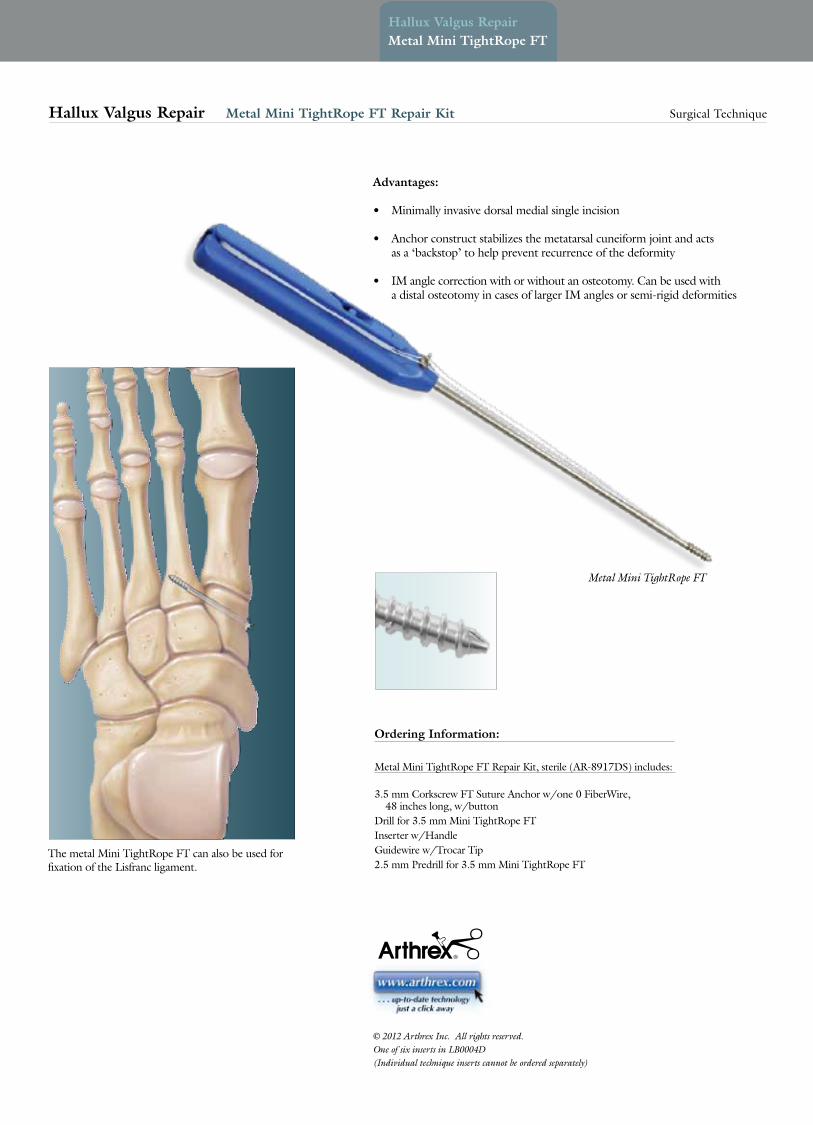
Advantages:
• Minimallyinvasivedorsalmedialsingleincision
• Anchorconstructstabilizesthemetatarsalcuneiformjointandacts as a ‘backstop’ to help prevent recurrence of the deformity
• IManglecorrectionwithorwithoutanosteotomy.Canbeusedwith a distal osteotomy in cases of larger IM angles or semi-rigid deformities
© 2012 Arthrex Inc. All rights reserved. One of six inserts in LB0004D(Individual technique inserts cannot be ordered separately)
Metal Mini TightRope FT
Ordering Information:
Metal Mini TightRope FT Repair Kit, sterile (AR-8917DS) includes:
3.5 mm Corkscrew FT Suture Anchor w/one 0 FiberWire, 48 inches long, w/buttonDrill for 3.5 mm Mini TightRope FTInserter w/HandleGuidewire w/Trocar Tip2.5 mm Predrill for 3.5 mm Mini TightRope FT
The metal Mini TightRope FT can also be used for fixation of the Lisfranc ligament.
Hallux Valgus Repair Metal Mini TightRope FT Repair Kit
Hallux Valgus Repair Metal Mini TightRope FT
Surgical Technique

Surgical Technique
Preoperative diagram demonstrating typical hallux varus deformity.
Passive correction should now be possible without the surgeon holding the toe. Ideally, the Mini TightRope would just hold the cor-rection obtained with the soft tissue release.
The abductor hallucis longus tendon is identi-fied and either released or lengthened from its insertion into the proximal phalanx and tibial sesamoid. The medial capsule is incised as well.
Hallux Varus Repair Mini TightRope® Disposables Kit
Dorsal first webspace incision. A dorsal medial or medial incision can also be used with approach distraction of soft tissues. Careful dissection should be done to expose the lateral base of the proximal phalanx and neck of the 1st metatarsal.
The Guidewire is placed in the medial midline of the 1st metatarsal. (Orient both K-wires so they angle obliquely 40° - 50°.) Position should be checked using fluoroscopy. Midline place-ment of the pin should be checked visually by inspecting entry and exit points on both the medial and lateral sides of the 1st metatarsal.
Similarly, a K-wire is placed in the midline of the medial side of the proximal phalanx into the first webspace. Once placement of the K-wires is complete, the 2.7 mm Cannulated Drill Bit is used over each Guidewire. The Guidewires are removed.
Hallux Varus Repair 2.7 mm Technique
1
4 5
3
6
2

The white traction suture is cut from the needle at the swedge point (suture and needle interface). Using the Micro SutureLassoTM, the white traction suture is pulled through the 1st metatarsal bone tunnel. Option: The pull-through guide pin can be bent slightly and passed through the 1st meta-tarsal bone tunnel and through the proximal phalanx.
A similar wire passing method is then used to pass the suture attached to the Oblong Button from the first webspace, through the proximal phalanx, exiting the medial side of the phalanx. The white suture attached to the Oblong Button can be removed.
Post-Op Treatment The patient's foot is placed in a spica wrap, holding the toe in slight valgus. Weight-bearing in a post-op shoe is allowed as tolerated. The spica wrap is changed weekly for six weeks. Transition to a shoe and ROM exercises are started. Patient may progress to activities as tolerated.
With tension on the suture now in the first web-space, and countertension on the FiberWire® of the Mini TightRope, the Oblong Button can be passed into the first webspace.
Post-op x-ray
Pre-op x-ray
© 2012 Arthrex Inc. All rights reserved. One of six inserts in LB0004D(Individual technique inserts cannot be ordered separately)
Hallux Varus Repair Mini TightRope Disposables Kit Surgical Technique
Mini TightRope Disposables Kit (AR-8911DS) includes:
Cannulated Drill Bit, 2.7 mmRound Button, 5.5 mmOblong Button, 2.6 mmTightRope Guide Pin, 1.6 mmGuidewire 1.2 mm
Accessories: Micro SutureLasso, straight AR-8703Micro SutureLasso, minor bend AR-8701FiberWire Scissors, small AR-11797
Ordering Information:
Hallux Varus Repair 2.7 mm Technique
With the toe held in a reduced position, pull on the suture attached to the Round Button on the medial side of the 1st metatarsal. The Oblong Button will now lay flat on the proximal phalanx. Pull simultaneously on the sutures to snug the round washer to the 1st metatarsal. It is suggested to place a small tubular structure between the small loop and the button to make fine adjustments easier. Check the tension of the suture in the web-space directly. Once satisfied, tie the sutures.
10
7 98
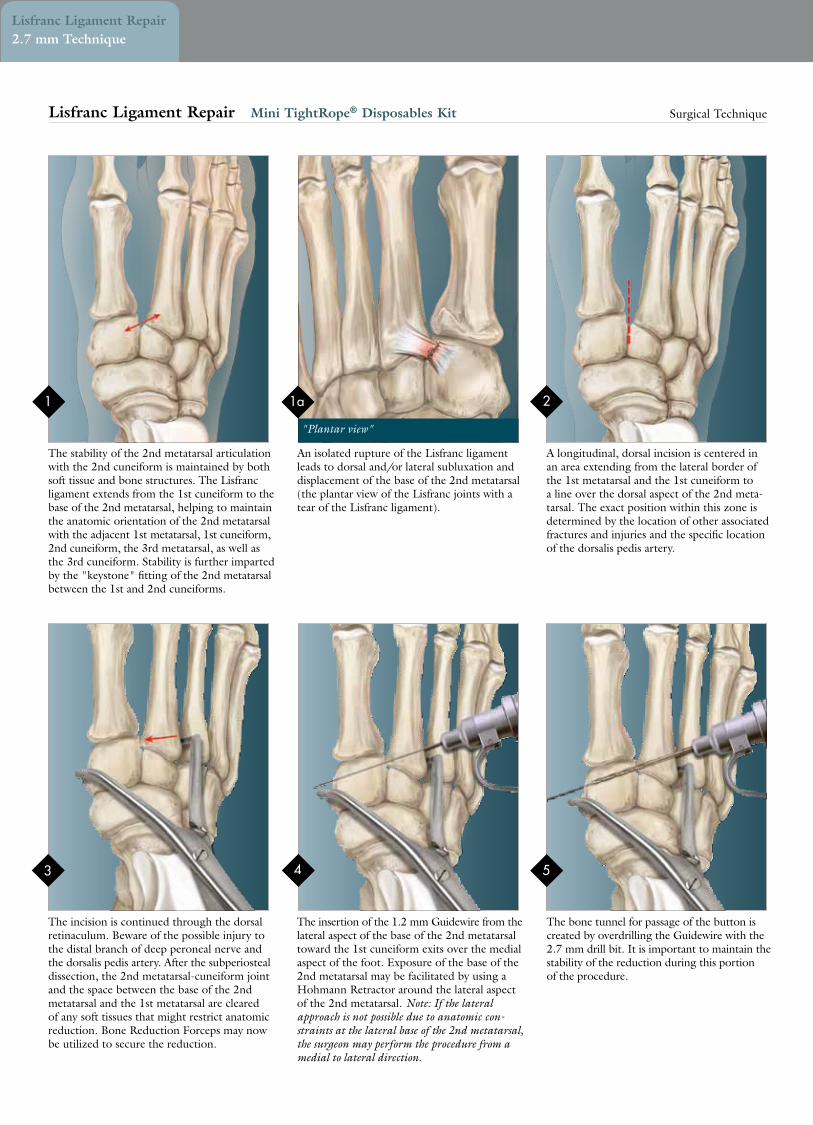
The stability of the 2nd metatarsal articulation with the 2nd cuneiform is maintained by both soft tissue and bone structures. The Lisfranc ligament extends from the 1st cuneiform to the base of the 2nd metatarsal, helping to maintain the anatomic orientation of the 2nd metatarsal with the adjacent 1st metatarsal, 1st cuneiform, 2nd cuneiform, the 3rd metatarsal, as well as the 3rd cuneiform. Stability is further imparted by the "keystone" fitting of the 2nd metatarsal between the 1st and 2nd cuneiforms.
The incision is continued through the dorsal retinaculum. Beware of the possible injury to the distal branch of deep peroneal nerve and the dorsalis pedis artery. After the subperiosteal dissection, the 2nd metatarsal-cuneiform joint and the space between the base of the 2nd metatarsal and the 1st metatarsal are cleared of any soft tissues that might restrict anatomic reduction. Bone Reduction Forceps may now be utilized to secure the reduction.
"Plantar view"
The insertion of the 1.2 mm Guidewire from the lateral aspect of the base of the 2nd metatarsal toward the 1st cuneiform exits over the medial aspect of the foot. Exposure of the base of the 2nd metatarsal may be facilitated by using a Hohmann Retractor around the lateral aspect of the 2nd metatarsal. Note: If the lateral approach is not possible due to anatomic con-straints at the lateral base of the 2nd metatarsal, the surgeon may perform the procedure from a medial to lateral direction.
A longitudinal, dorsal incision is centered in an area extending from the lateral border of the 1st metatarsal and the 1st cuneiform to a line over the dorsal aspect of the 2nd meta-tarsal. The exact position within this zone is determined by the location of other associated fractures and injuries and the specific location of the dorsalis pedis artery.
Lisfranc Ligament Repair2.7 mm Technique
Lisfranc Ligament Repair Mini TightRope® Disposables Kit Surgical Technique
An isolated rupture of the Lisfranc ligament leads to dorsal and/or lateral subluxation and displacement of the base of the 2nd metatarsal (the plantar view of the Lisfranc joints with a tear of the Lisfranc ligament).
The bone tunnel for passage of the button is created by overdrilling the Guidewire with the 2.7 mm drill bit. It is important to maintain the stability of the reduction during this portion of the procedure.
1
3
1a
4
2
5

The leading guide pin connected to the Oblong Button is passed in a lateral to medial direction through the bone tunnel.
The adequacy of the reduction is checked with an intraoperative film.
After exiting the medial aspect of the medial cuneiform, the button is turned 90° to engage the medial cortex. Confirm that there is no soft tissue interposed between the button and the cortex of the medial (1st) cuneiform.
The lateral Round Button is tightened to the cortex of the 2nd metatarsal by simultaneous-ly pulling (sometimes with an alternating dif-ferential pull) on the two lateral FiberWire® sutures. To prevent any possible shearing, the angle between the FiberWire sutures should be no more than about 20°.
Mini TightRope Disposables Kit (AR-8911DS) includes:Cannulated Drill Bit, 2.7 mmRound Button, 5.5 mmOblong Button, 2.6 mmTightRope Guide Pin, 1.6 mmGuidewire 1.2 mm
Accessories: FiberWire Scissors, small AR-11797
© 2012 Arthrex Inc. All rights reserved. One of six inserts in LB0004D(Individual technique inserts cannot be ordered separately)
Oblong Button placed lateral to 2nd metatarsal
Ordering Information:
Lisfranc Ligament Repair Mini TightRope Disposables Kit Surgical Technique
Plantar view.
2.7 mm Mini TightRope
Lisfranc Ligament Repair2.7 mm Technique
7
9
6
9a
8

Comprehensive Solutions for Forefoot and MidfootSurgery using the Mini TightRope® System
Hallux Valgus Repair:
Mini TightRope FT Repair Kit
2.7 mm Drill Hole Technique
Mini TightRope 1.1 mm Disposables Kit
Metal Mini TightRope FT Repair Kit
Hallux Varus Repair:
Mini TightRope Disposables Kit
Lisfranc Ligament Repair:
Mini TightRope Disposables Kit
Six Surgical Techniques
This description of technique is provided as an educational tool and clinical aid to assist properly licensed medical professionals in the usage of specific Arthrex products. As part of this professional usage, the medical professional must
use their professional judgment in making any final determinations in product usage and technique. In doing so, the medical professional should rely on their own training and experience and should conduct
a thorough review of pertinent medical literature and the product’s Directions For Use.
© 2012, Arthrex Inc. All rights reserved. LB0004D
U.S. PATENTS NOS. 6,712,234; 6,991,636 and PATENT PENDING