cms project team — training manual
TRANSCRIPT

CMS Project Team — Training Manual
Process: Asset Management
High Level Description Process Asset Management Document Type Training Manual
File Reference Psshr://Cms/Training, Doc & Support/~Finance Documentation /Asset Management/Training Manuals/TM_90_AM_Asset_Management.doc
Revision Control Date By Action Pages
08/06/2009 K Luna Document created from Draft_BPG_Asset_Management document created by S Goad All
08/18/2009 A Everett Document edited for accessibility and readability 60 10/01/2009 J Reeds Document reviewed and edited 78
SJSU CMS Project Team Asset Management Training Manual Page: 1

SJSU CMS Project Team Asset Management Training Manual Page: 2
Table of Contents
Add New Assets............................................................................................................................................................ 3 Edit Assets – Physical Adjustments............................................................................................................................ 12 Edit Assets – Cost Adjustments.................................................................................................................................. 14 Perform Asset Re-Categorizations and Transfers...................................................................................................... 17 Review Asset Cost History.......................................................................................................................................... 19 Retire Assets............................................................................................................................................................... 20 Reinstate Retired Assets ............................................................................................................................................ 23 Review Open Transactions......................................................................................................................................... 25 Update/Delete Pending Transactions ......................................................................................................................... 27 Run Depreciation Calculation ..................................................................................................................................... 31 Review Depreciation Calculation Result..................................................................................................................... 34 Load Depreciation Reporting Table ............................................................................................................................ 35 Review Asset Depreciation Information...................................................................................................................... 38 Create Asset Accounting Entries ................................................................................................................................ 40 Review Accounting Entries ......................................................................................................................................... 43 Verify Closed AM Depreciation Periods...................................................................................................................... 45 Run AM Depreciation Close ....................................................................................................................................... 47 Load Asset Net Book Value Table.............................................................................................................................. 50 Run CSU BU Derivation.............................................................................................................................................. 53 Run GAAP BU Derivation ........................................................................................................................................... 56 Load the Capital Asset Reporting Table ..................................................................................................................... 59 Enter Prior Period Adjustments .................................................................................................................................. 62 Construction Work In Progress (CWIP) ...................................................................................................................... 64 Run CSU Capital Asset Report 18, Report 19 and AM Report 18 Summary............................................................. 66 Reconcile AM to GL Asset Account............................................................................................................................ 69 Reconcile AM to GL Equipment Expense Account .................................................................................................... 73 Close AM Accounting Period ...................................................................................................................................... 77
Overview This training manual demonstrates the data entry and reporting processes run in the PeoleSoft Asset Management module.

Add New Assets This section demonstrates how to enter asset information into PeopleSoft Finance. You can add assets with partial information. For example, you can enter physical information related to an asset when it is received, and later add related financial information once the invoice has been received and paid. The asset financial information is not defined until the asset is capitalized by manually selecting the Capitalize button on the Asset Acquisition Detail page. Before completing additions for the month, query the ASSET table (public query SJ_ASSET_TO_BE_CAP) to make sure all assets entered into the system have been capitalized. The Main Menu displays. 1. From the Main Menu,
navigate to Asset Management > Asset Transactions > Owned Assets.
2. Click the Basic Add
hyperlink.
The Asset Basic Information search page displays. 3. Click the Add a New
Value tab.
The Asset Basic Information Add a New Value page displays. 4. Click the Add button.
SJSU CMS Project Team Asset Management Training Manual Page: 3

The General Information page displays. 5. Enter the following:
• Description
• Short Description
• Taggable Asset: Select this checkbox
• Tag Number
• Asset Type: Use the
drop-down menu to make selection
• Asset Subtype
(Optional) Use the Lookup button to view options
• Asset Status: In
Service
• Acquisition Code: Purchased
• Profile ID: Use the
Lookup button to view options
6. Click the
Operation/Maintenance tab.
SJSU CMS Project Team Asset Management Training Manual Page: 4

The Operation/Maintenance page displays. Note: Manufacturer Information is optional. The other sections are not used. 7. Enter Manufacturer
Information. (Optional.) 8. Click the Asset
Information tab.
The Define Asset Operational Information page displays. 9. Scroll down to view all
sections of the page.
SJSU CMS Project Team Asset Management Training Manual Page: 5
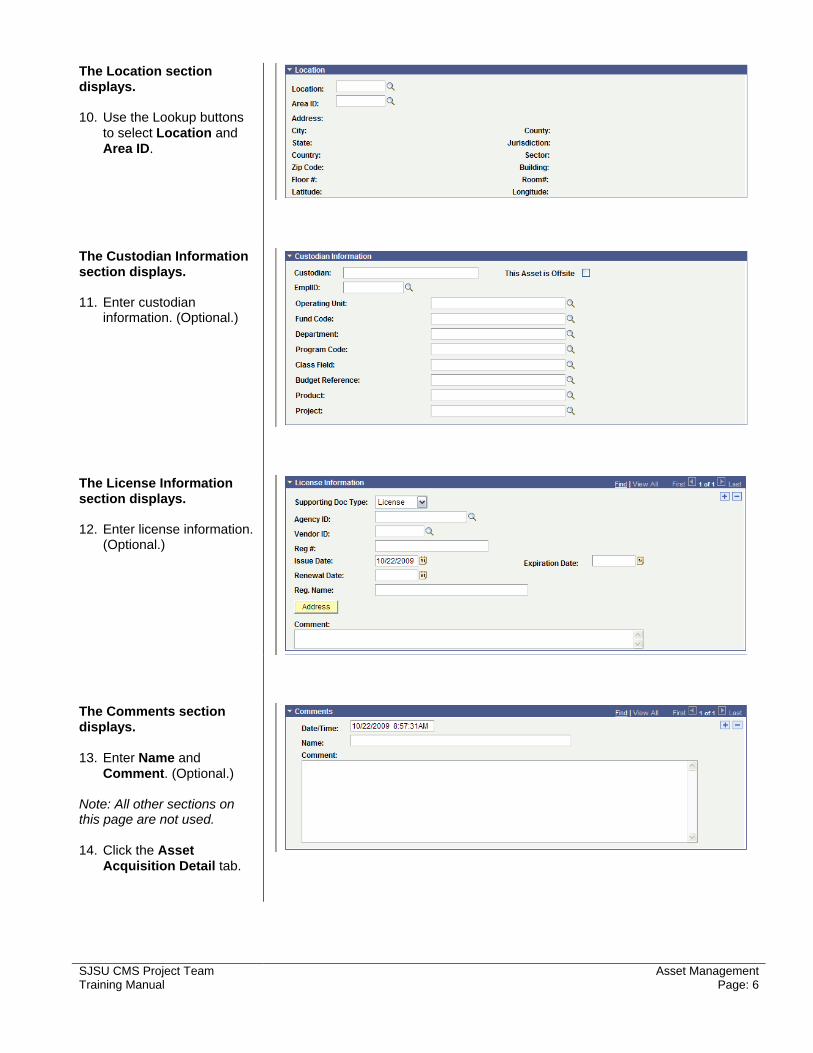
The Location section displays. 10. Use the Lookup buttons
to select Location and Area ID.
The Custodian Information section displays. 11. Enter custodian
information. (Optional.)
The License Information section displays. 12. Enter license information.
(Optional.)
The Comments section displays. 13. Enter Name and
Comment. (Optional.) Note: All other sections on this page are not used. 14. Click the Asset
Acquisition Detail tab.
SJSU CMS Project Team Asset Management Training Manual Page: 6
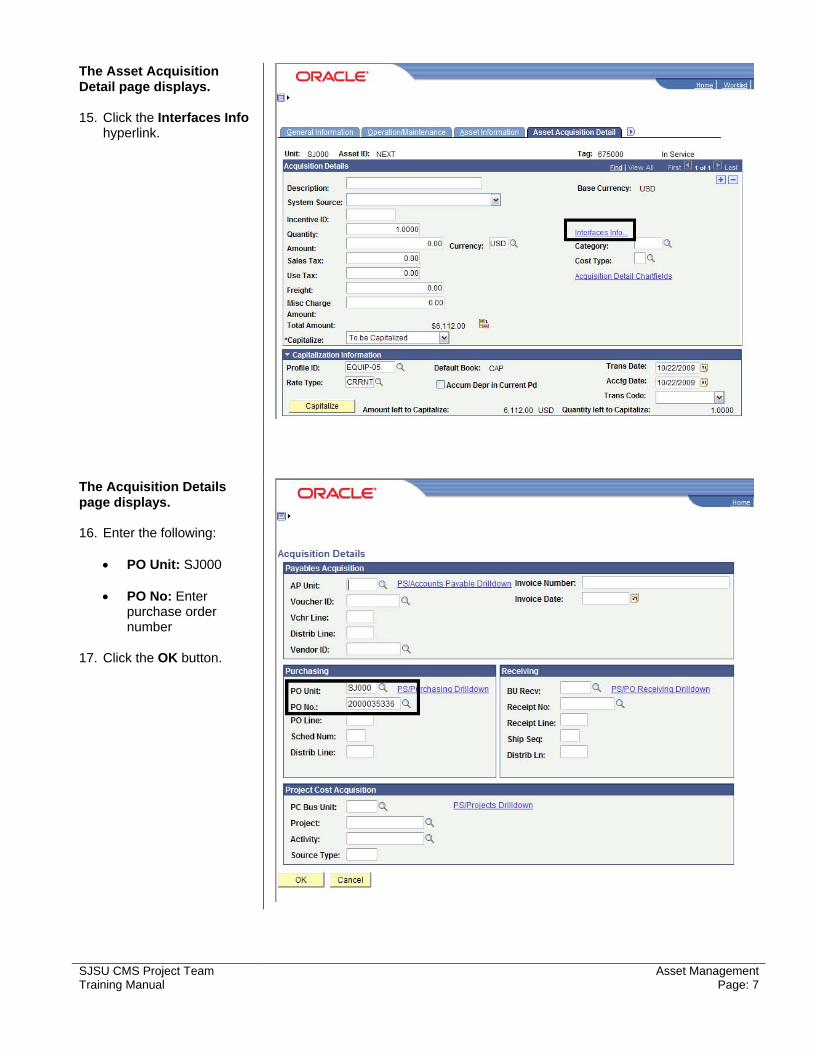
The Asset Acquisition Detail page displays. 15. Click the Interfaces Info
hyperlink.
The Acquisition Details page displays. 16. Enter the following:
• PO Unit: SJ000
• PO No: Enter purchase order number
17. Click the OK button.
SJSU CMS Project Team Asset Management Training Manual Page: 7

The Asset Acquisition Detail page displays. 18. If you wish, you can click
the Save button and then return later to enter cost information from the invoice
19. When ready, enter the
following cost information:
• Description
• System Source: AM
Online Entry Page
• Quantity
• Amount
• Sales Tax or Use Tax: Enter only if applicable and if not already included in amount
• Freight: Enter only if
applicable and if not already included in amount
20. Click the Acquisition
Detail Chartfields hyperlink.
The Acquisition Detail Chartfields page displays. 21. Enter the Chartfield
information. (Fund Code and Department ID are required.)
22. Click the OK button.
SJSU CMS Project Team Asset Management Training Manual Page: 8

The Asset Acquisition Detail page displays. Note: The Transaction Date defaults from the Acquisition Date and the Accounting Date defaults to current date. 23. Click the Save button.
A warning message displays. 24. Click the OK button.
SJSU CMS Project Team Asset Management Training Manual Page: 9

The Asset ID is Assigned. Note: At SJSU, the Property Coordinator enters assets and then the Property Accountant reviews and capitalizes them. 25. Click the Capitalize
button.
SJSU CMS Project Team Asset Management Training Manual Page: 10

The Capitalization Information displays. Note: The Capitalize button no longer displays. 26. Click the Save button.
SJSU CMS Project Team Asset Management Training Manual Page: 11

Edit Assets – Physical Adjustments This section demonstrates how to make physical adjustments to an asset. Changes to physical attributes, license information and comments are considered non-financial impact updates. The Main Menu displays. 1. From the Main Menu,
navigate to Asset Management > Asset Transactions > Owned Assets.
2. Click the Basic Add
hyperlink.
The Asset Basic Information search page displays. 3. Enter the following:
• Business Unit: SJ000
• Asset Identification:
Enter ID number 4. Click the Search button.
SJSU CMS Project Team Asset Management Training Manual Page: 12

The General Information page displays. 5. Click the Asset
Information tab.
The Define Asset Operational Information page displays. 6. Update the physical
information, as necessary.
7. Click the Save button.
SJSU CMS Project Team Asset Management Training Manual Page: 13
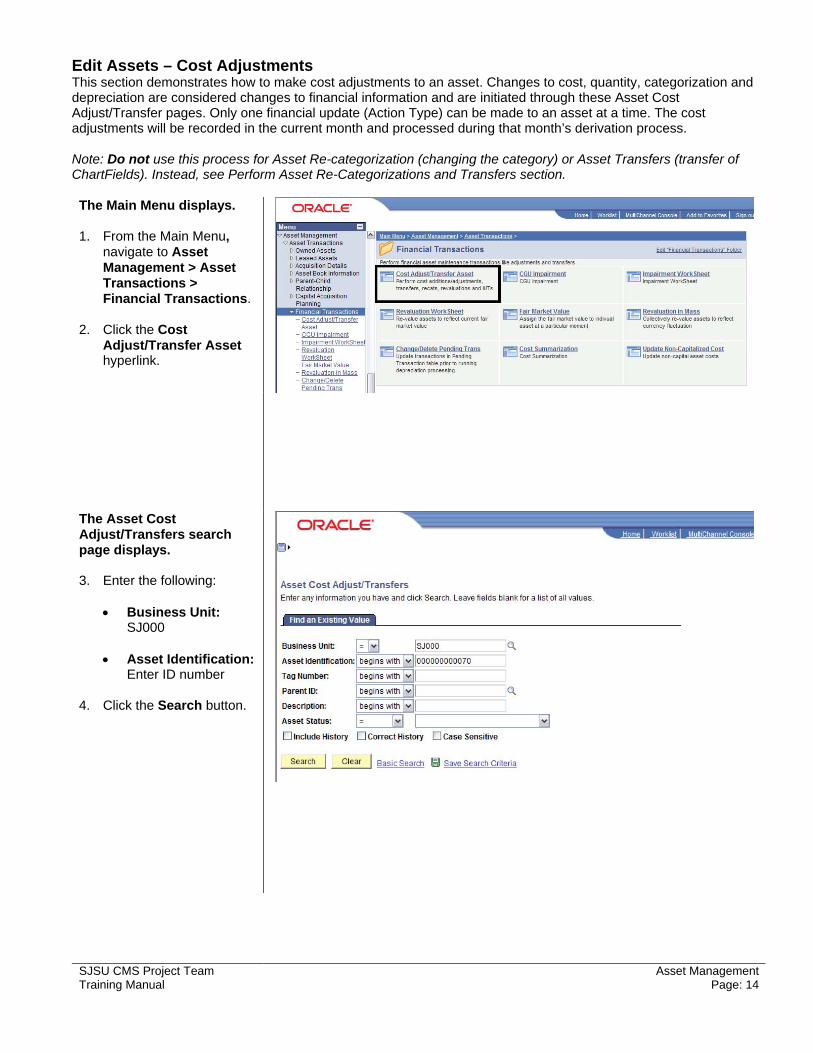
Edit Assets – Cost Adjustments This section demonstrates how to make cost adjustments to an asset. Changes to cost, quantity, categorization and depreciation are considered changes to financial information and are initiated through these Asset Cost Adjust/Transfer pages. Only one financial update (Action Type) can be made to an asset at a time. The cost adjustments will be recorded in the current month and processed during that month’s derivation process. Note: Do not use this process for Asset Re-categorization (changing the category) or Asset Transfers (transfer of ChartFields). Instead, see Perform Asset Re-Categorizations and Transfers section. The Main Menu displays. 1. From the Main Menu,
navigate to Asset Management > Asset Transactions > Financial Transactions.
2. Click the Cost
Adjust/Transfer Asset hyperlink.
The Asset Cost Adjust/Transfers search page displays. 3. Enter the following:
• Business Unit: SJ000
• Asset Identification:
Enter ID number 4. Click the Search button.
SJSU CMS Project Team Asset Management Training Manual Page: 14

The Main Transaction page displays. Notes: The accounting and transaction dates should be the same and should default to today’s date. Changes can only be made to open periods. No prior periods are allowed. 5. Action: Use the drop-
down menu to select one of the following:
• Addition: Adds a
new cost line
• Adjustment: Adjusts cost or quantity
6. Click the Go button.
SJSU CMS Project Team Asset Management Training Manual Page: 15
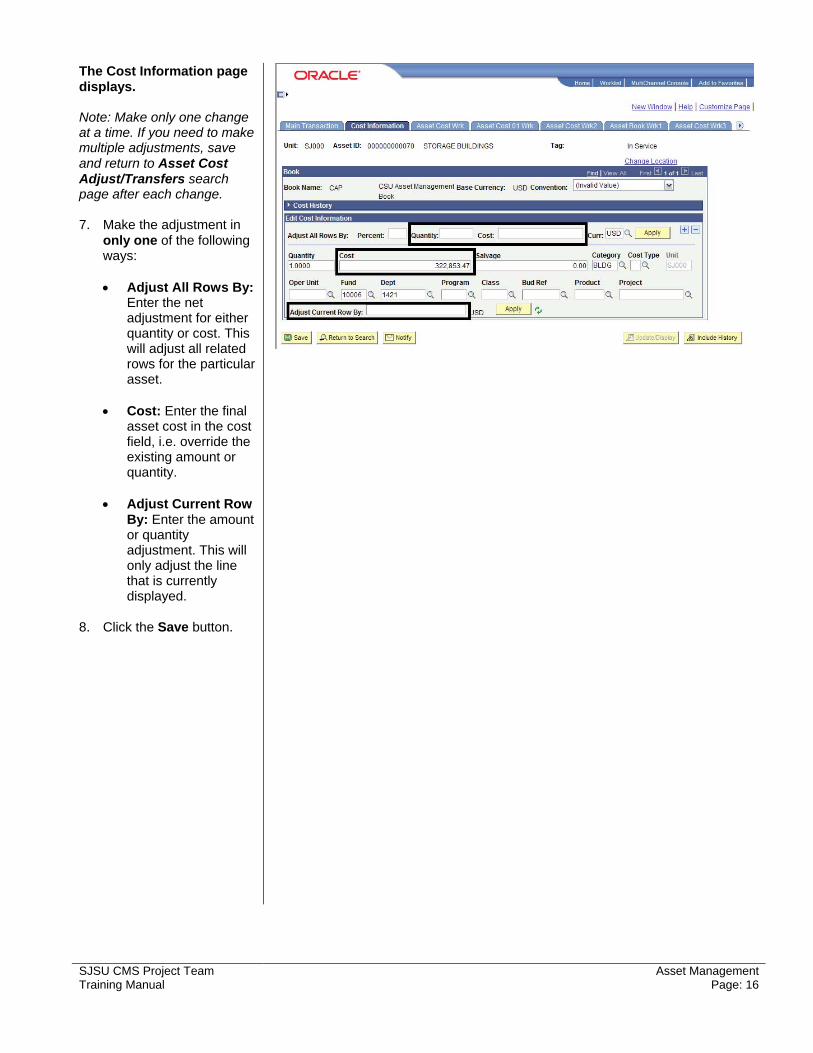
The Cost Information page displays. Note: Make only one change at a time. If you need to make multiple adjustments, save and return to Asset Cost Adjust/Transfers search page after each change. 7. Make the adjustment in
only one of the following ways:
• Adjust All Rows By:
Enter the net adjustment for either quantity or cost. This will adjust all related rows for the particular asset.
• Cost: Enter the final
asset cost in the cost field, i.e. override the existing amount or quantity.
• Adjust Current Row
By: Enter the amount or quantity adjustment. This will only adjust the line that is currently displayed.
8. Click the Save button.
SJSU CMS Project Team Asset Management Training Manual Page: 16

Perform Asset Re-Categorizations and Transfers This section demonstrates how to perform an asset re-categorization (change the category) or asset transfer (transfer of ChartFields). You cannot just edit the asset. Instead, perform re-categorizations and transfers by retiring the original asset and then re-adding it as a new asset with the correct information. Reverse any gain or loss via a journal entry. 1. Retire the asset (as described in the Retire Assets section). 2. Run Depreciation Calculation (as described in the Run Depreciation Calculation section). 3. Review the depreciation calculation (as described in the Review Depreciation Calculation Result section). 4. Add the asset again (as described in the Add New Assets section) and as follows: The General Information page displays. 5. Add N to the Tag Number
so the system will accept the entry.
SJSU CMS Project Team Asset Management Training Manual Page: 17

The Asset Acquisition Detail page displays. 6. In the Capitalization
Information section, select the Accum Depr in Current Pd checkbox.
The Asset Acquisition Detail page displays. 7. After clicking the
Capitalize button, enter the accumulated depreciation amount from step 3 (above) in the Accum Depr field.
The Asset Information page displays. 8. Reference the prior Asset
ID in the Comments box.
9. Review the Depreciation Calculation again. 10. Confirm that the Net Book Value of the old asset is zero. 11. Confirm that the Accumulated Depreciation for the new asset equals the amount retired for the old asset.
SJSU CMS Project Team Asset Management Training Manual Page: 18
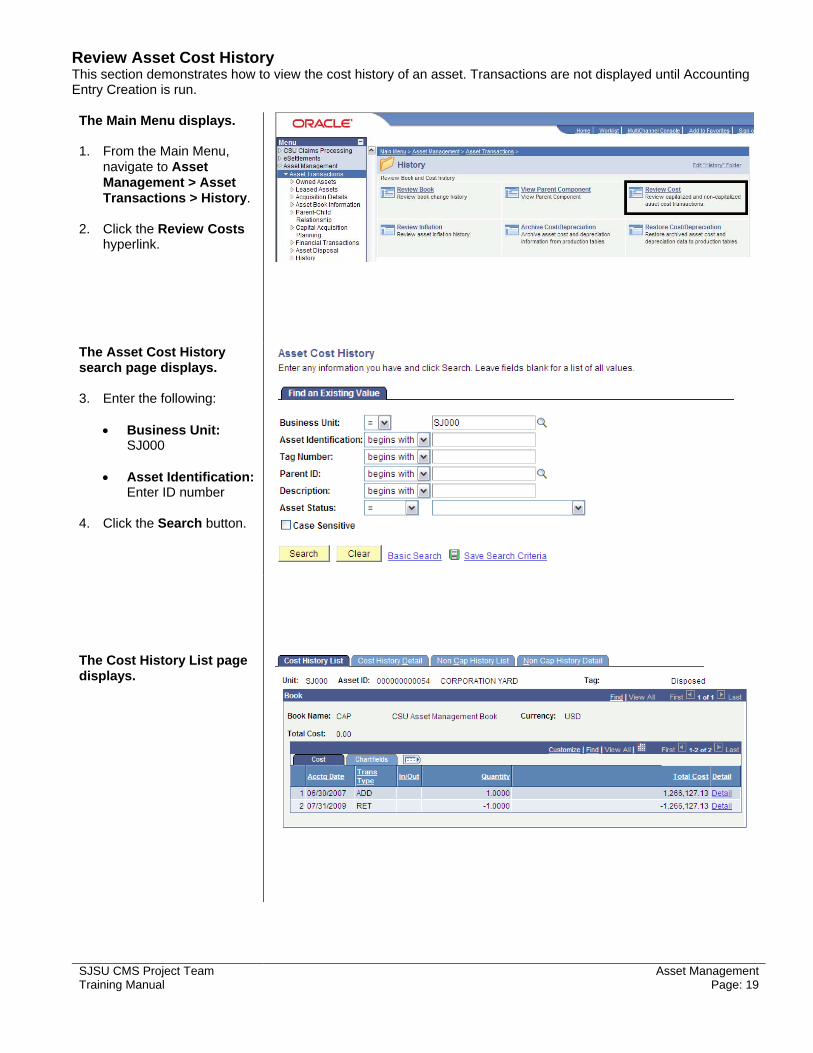
Review Asset Cost History This section demonstrates how to view the cost history of an asset. Transactions are not displayed until Accounting Entry Creation is run. The Main Menu displays. 1. From the Main Menu,
navigate to Asset Management > Asset Transactions > History.
2. Click the Review Costs
hyperlink.
The Asset Cost History search page displays. 3. Enter the following:
• Business Unit: SJ000
• Asset Identification:
Enter ID number 4. Click the Search button.
The Cost History List page displays.
SJSU CMS Project Team Asset Management Training Manual Page: 19
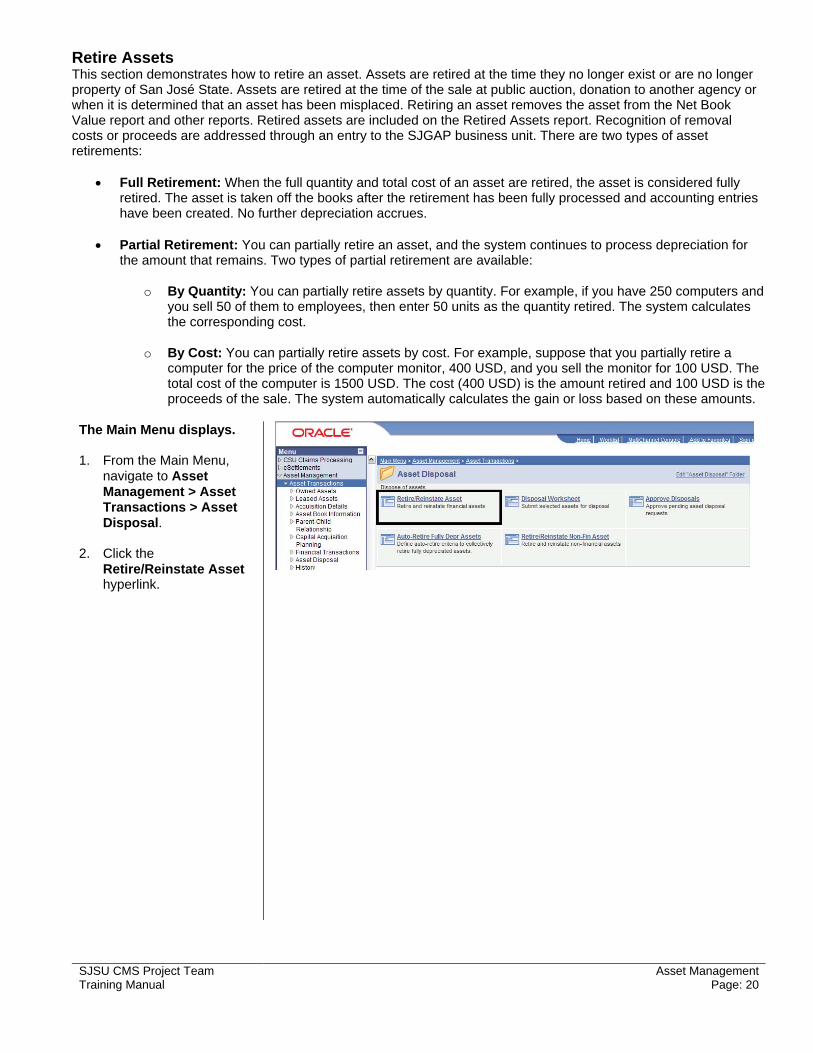
Retire Assets This section demonstrates how to retire an asset. Assets are retired at the time they no longer exist or are no longer property of San José State. Assets are retired at the time of the sale at public auction, donation to another agency or when it is determined that an asset has been misplaced. Retiring an asset removes the asset from the Net Book Value report and other reports. Retired assets are included on the Retired Assets report. Recognition of removal costs or proceeds are addressed through an entry to the SJGAP business unit. There are two types of asset retirements:
• Full Retirement: When the full quantity and total cost of an asset are retired, the asset is considered fully retired. The asset is taken off the books after the retirement has been fully processed and accounting entries have been created. No further depreciation accrues.
• Partial Retirement: You can partially retire an asset, and the system continues to process depreciation for
the amount that remains. Two types of partial retirement are available:
o By Quantity: You can partially retire assets by quantity. For example, if you have 250 computers and you sell 50 of them to employees, then enter 50 units as the quantity retired. The system calculates the corresponding cost.
o By Cost: You can partially retire assets by cost. For example, suppose that you partially retire a
computer for the price of the computer monitor, 400 USD, and you sell the monitor for 100 USD. The total cost of the computer is 1500 USD. The cost (400 USD) is the amount retired and 100 USD is the proceeds of the sale. The system automatically calculates the gain or loss based on these amounts.
The Main Menu displays. 1. From the Main Menu,
navigate to Asset Management > Asset Transactions > Asset Disposal.
2. Click the
Retire/Reinstate Asset hyperlink.
SJSU CMS Project Team Asset Management Training Manual Page: 20
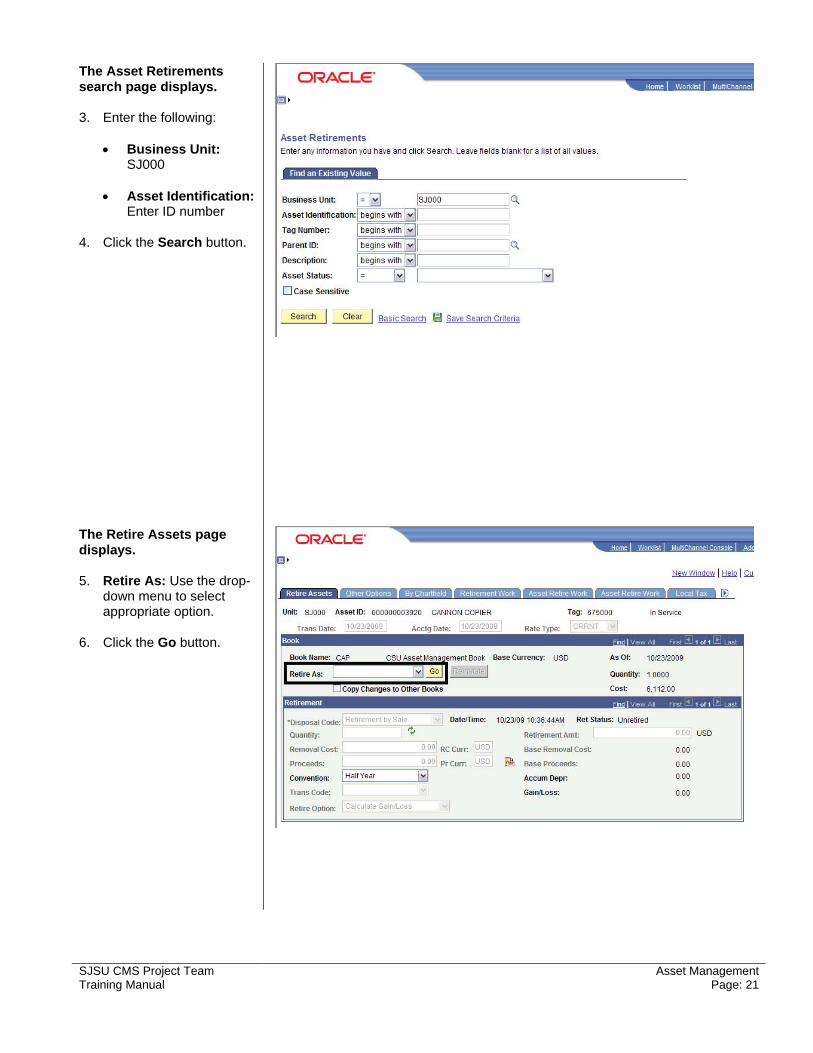
The Asset Retirements search page displays. 3. Enter the following:
• Business Unit: SJ000
• Asset Identification:
Enter ID number 4. Click the Search button.
The Retire Assets page displays. 5. Retire As: Use the drop-
down menu to select appropriate option.
6. Click the Go button.
SJSU CMS Project Team Asset Management Training Manual Page: 21

The Go button is grayed out. 7. Enter the following:
• Trans Date: Date the retirement actually occurred. The transaction date, accounting date, and the depreciation convention determine how much of the accumulated depreciation will be reversed.
• Acctg Date: Defaults
to current date. Must be an open accounting period.
• Quantity: Update
only if processing a partial retirement by quantity.
• Retirement Amount:
Update only if processing a partial retirement by amount.
Note: The Removal Cost and Proceeds fields are not used. Recognition of removal costs or proceeds are addressed through an entry to the SJGAP business unit. 8. Click the Save button.
SJSU CMS Project Team Asset Management Training Manual Page: 22

Reinstate Retired Assets This section demonstrates how to reinstate an asset. Reinstatement of an asset occurs when it is accidentally retired in error. You can perform the reinstatement process on the same page as a retirement. The reinstatement process reverses all retirement entries. If an asset is retired (RET) and then reinstated (REI) within the same accounting period before the monthly Depreciation Close, both transactions will be net to zero. No entry will be recorded by the system. The Main Menu displays. 1. From the Main Menu,
navigate to Asset Management > Asset Transactions > Asset Disposal.
2. Click the
Retire/Reinstate Asset hyperlink.
The Asset Retirements search page displays. 3. Enter the following:
• Business Unit: SJ000
• Asset Identification:
Enter ID number 4. Click the Search button.
SJSU CMS Project Team Asset Management Training Manual Page: 23

The Retire Assets page displays. 5. Click the Reinstate
button.
The Reinstate button grays out. 6. Click the Save button.
SJSU CMS Project Team Asset Management Training Manual Page: 24

Review Open Transactions This section demonstrates how to view open asset transactions. The Main Menu displays. 1. From the Main Menu,
navigate to Asset Management > Depreciation > Open Transactions.
2. Click the Review
hyperlink.
The Open Transactions search page displays. 3. Enter the following:
• Business Unit: SJ000
• Depreciation Calc
Status: Use the drop-down menu to select Pending Depreciation
4. Click the Search button.
SJSU CMS Project Team Asset Management Training Manual Page: 25

The Search Results displays. 5. Click the appropriate
hyperlink for the transaction you wish to view.
The Open Transaction Detail page displays.
SJSU CMS Project Team Asset Management Training Manual Page: 26

Update/Delete Pending Transactions This section demonstrates how to update or delete pending transactions. All financial asset transactions in Pending depreciation status can be deleted. This allows you to clean up any data entry errors or eliminate any duplicating entries. However, retirement, leased asset, group asset, joint venture or parent/child transactions cannot be changed or deleted. Deleting a transaction will delete the asset from the system entirely. Since deletions create no audit trail, it is very important to restrict user access to this process page. The Main Menu displays. 1. From the Main Menu,
navigate to Asset Management > Asset Transactions > Financial Transactions.
2. Click the Change/Delete
Pending Trans hyperlink.
The Change/Delete Pending Trans search page displays. 3. Enter the following:
• Business Unit: SJ000
• Asset Identification:
Enter ID number 4. Click the Search button.
The Pending Trans Update/Delete page displays. 5. Skip to appropriate
section on following pages:
• Update Pending
Transaction
• Delete Pending Transaction
• Edit Pending
Transaction Information
SJSU CMS Project Team Asset Management Training Manual Page: 27

Update Pending Transaction The Pending Trans Update/Delete page displays. 1. To modify Chartfield
information, click the Update button.
The Asset Addition page displays. 2. Update Chartfield
information as appropriate.
3. Click the OK button.
A warning message displays. Note: You must save the transaction in order to commit the changes. 4. Click the OK button.
The Pending Trans Update/Delete page displays. 5. Click the Save button.
SJSU CMS Project Team Asset Management Training Manual Page: 28

Delete Pending Transaction The Pending Trans Update/Delete page displays. 1. To delete a transaction,
click the Delete button.
The Asset Addition page displays. 2. Click the OK button.
A warning message displays. Note: You must save the transaction in order to commit the changes. 3. Click the OK button.
The Pending Trans Update/Delete page displays. 4. Click the Save button.
SJSU CMS Project Team Asset Management Training Manual Page: 29

Edit Pending Transaction Information The Pending Trans Update/Delete page displays. 1. To edit a transaction,
click the Edit Trans Info button.
The Transaction Information page displays. 2. Make the desired
corrections. 3. Click the OK button.
The Pending Trans Update/Delete page displays. 4. Click the Save button.
SJSU CMS Project Team Asset Management Training Manual Page: 30

Run Depreciation Calculation This section demonstrates how to run depreciation calculation. For each asset transaction (ADD, ADJ, TRF, RCT, RET, and REI) with financial impact, the depreciation calculation is run in order to properly update the PS_DEPRECIATION table. This process can be run more than once during an accounting period. The Main Menu displays. 1. From the Main Menu,
navigate to Asset Management > Depreciation > Processing.
2. Click the Calculate
hyperlink.
The Depreciation Calculation run control page displays. 3. If this is your first time
running this process, click the Add a New Value tab.
4. If this is not the first time,
click the Search button and then select appropriate Run Control ID.
The Add a New Value page displays. 5. Enter a Run Control ID,
and then click the Add button.
SJSU CMS Project Team Asset Management Training Manual Page: 31

The Run Depreciation Calculation run control parameters page displays. 6. Enter the following:
• Process Frequency: Always.
• Business Unit:
SJ000 7. If this is your first time
running this process, click the Save button.
8. Click the Run button.
The Process Scheduler Request page displays. 9. Select the following:
• Server Name: PSNT
• Type: Web
• Format: TXT 10. Click the OK button.
SJSU CMS Project Team Asset Management Training Manual Page: 32
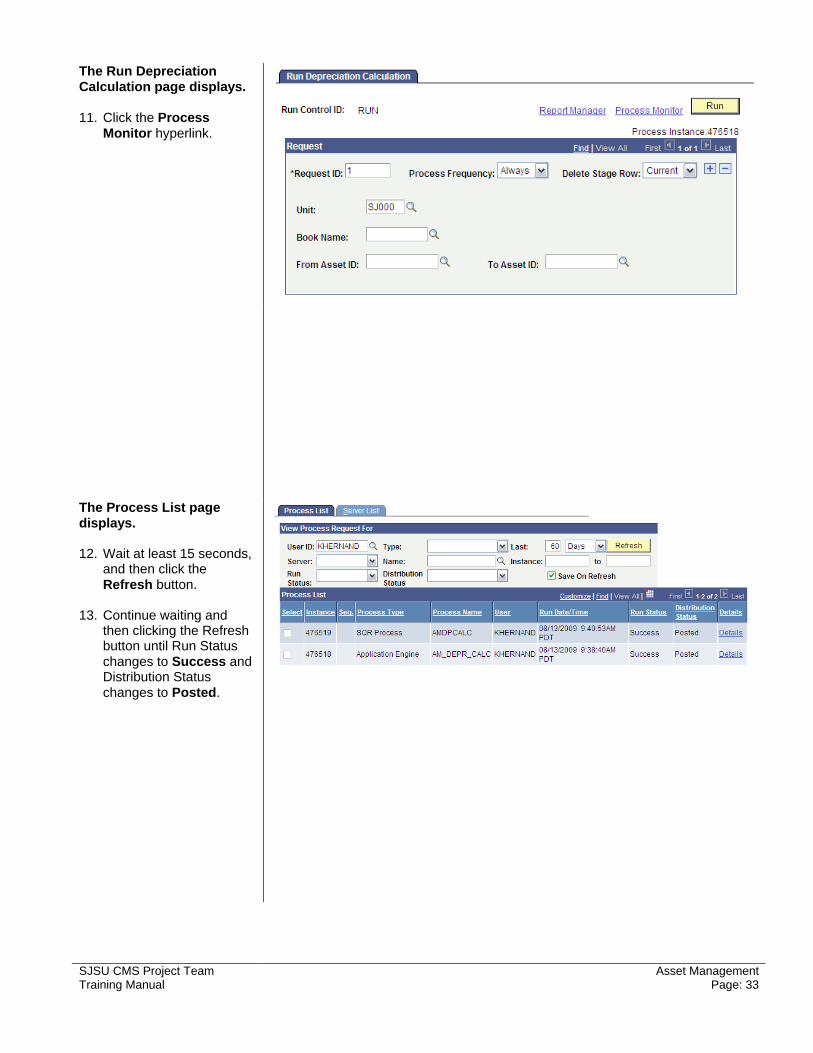
The Run Depreciation Calculation page displays. 11. Click the Process
Monitor hyperlink.
The Process List page displays. 12. Wait at least 15 seconds,
and then click the Refresh button.
13. Continue waiting and
then clicking the Refresh button until Run Status changes to Success and Distribution Status changes to Posted.
SJSU CMS Project Team Asset Management Training Manual Page: 33
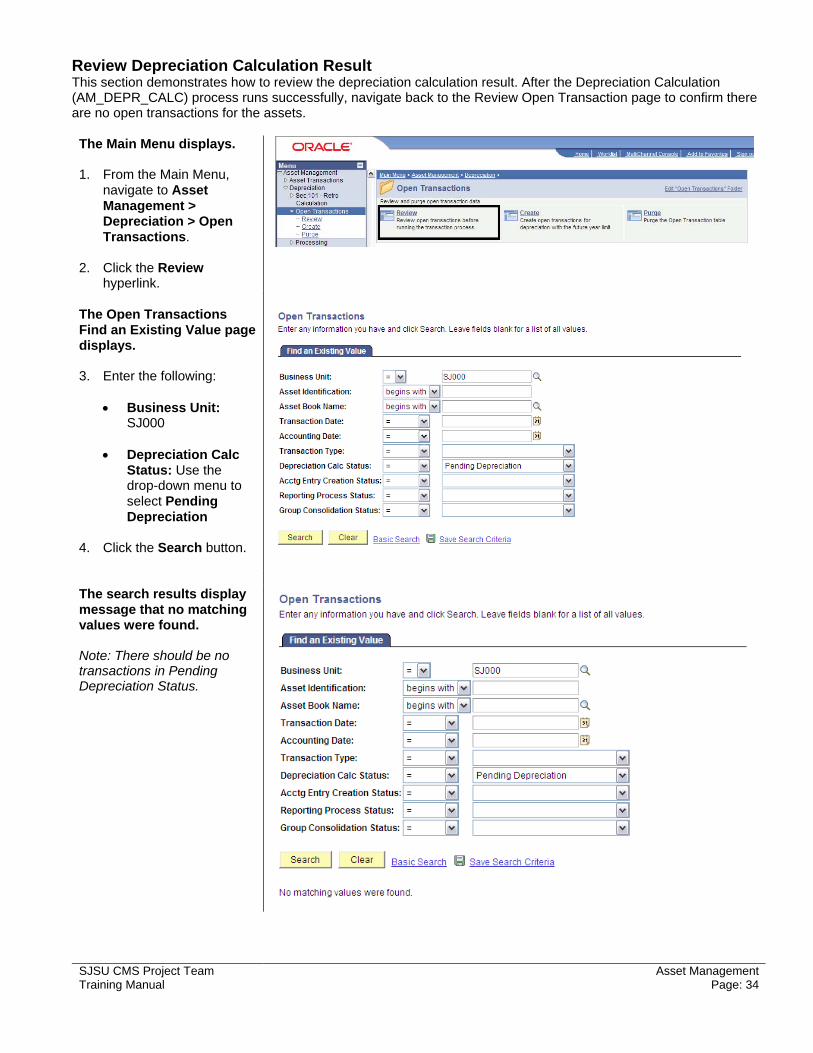
Review Depreciation Calculation Result This section demonstrates how to review the depreciation calculation result. After the Depreciation Calculation (AM_DEPR_CALC) process runs successfully, navigate back to the Review Open Transaction page to confirm there are no open transactions for the assets. The Main Menu displays. 1. From the Main Menu,
navigate to Asset Management > Depreciation > Open Transactions.
2. Click the Review
hyperlink.
The Open Transactions Find an Existing Value page displays. 3. Enter the following:
• Business Unit: SJ000
• Depreciation Calc
Status: Use the drop-down menu to select Pending Depreciation
4. Click the Search button.
The search results display message that no matching values were found. Note: There should be no transactions in Pending Depreciation Status.
SJSU CMS Project Team Asset Management Training Manual Page: 34

Load Depreciation Reporting Table This section demonstrates how to load asset depreciation calculation results to the PS_DEPR_RPT table. This is the table used for all delivered AM depreciation reports. The Main Menu displays. 1. From the Main Menu,
navigate to Asset Management > Financial Reports > Load Reporting Tables.
2. Click the Depr Reporting
Table hyperlink.
The Load Depr Reporting Table run control page displays. 3. If this is your first time
running this process, click the Add a New Value tab.
4. If this is not the first time,
click the Search button and then select appropriate Run Control ID.
The Add a New Value page displays. 5. Enter a Run Control ID,
and then click the Add button.
SJSU CMS Project Team Asset Management Training Manual Page: 35

The Load Depr Reporting Table run control parameters page displays. 6. Enter the following:
• Request ID: Leave default
• Process Frequency:
Always
• Select Use Open Trans checkbox
• Business Unit:
SJ000 7. If this is your first time
running this process, click the Save button.
8. Click the Run button.
The Process Scheduler Request page displays. 9. Select the following:
• Server Name: PSNT
• Type: Web
• Format: TXT 10. Click the OK button.
SJSU CMS Project Team Asset Management Training Manual Page: 36

The Load Depr Reporting Table page displays. 11. Click the Process
Monitor hyperlink.
The Process List page displays. 12. Wait at least 15 seconds,
and then click the Refresh button.
13. Continue waiting and
then clicking the Refresh button until Run Status changes to Success and Distribution Status changes to Posted.
SJSU CMS Project Team Asset Management Training Manual Page: 37

Review Asset Depreciation Information This section demonstrates how to review the asset depreciation information. This can only be done after you run the depreciation calculation process. The Main Menu displays. 1. From the Main Menu,
navigate to Asset Management > Depreciation > Review Depreciation Info.
2. Click the Asset
Depreciation hyperlink.
The Asset Depreciation search page displays. 3. Enter the following:
• Business Unit: SJ000
• Asset Identification:
Enter ID number 4. Click the Search button.
The Asset page displays. 5. View asset information. 6. Click the Depreciation
tab.
SJSU CMS Project Team Asset Management Training Manual Page: 38

The Depreciation page displays. 7. Enter the following:
• As Of Fiscal Year
• Period 8. Click the Calculate NBV
button. 9. View Net Book Value and
Yearly Depreciation. 10. Click the Period
Depreciation tab.
The Period Depreciation page displays. 11. View Period Depreciation
by accounting periods within a fiscal year.
SJSU CMS Project Team Asset Management Training Manual Page: 39

Create Asset Accounting Entries This section demonstrates how to create the asset accounting entries. Accounting Entry Creation (AM_AEDIST) generates accounting entries for all financial transactions and posts to the PS_DIST_LN table (asset accounting entries). The Main Menu displays. 1. From the Main Menu,
navigate to Asset Management > Accounting Entries.
2. Click the Create
Accounting Entries hyperlink.
The Accounting Entry Creation run control page displays. 3. If this is your first time
running this process, click the Add a New Value tab.
4. If this is not the first time,
click the Search button and then select appropriate Run Control ID.
The Add a New Value page displays. 5. Enter a Run Control ID,
and then click the Add button.
SJSU CMS Project Team Asset Management Training Manual Page: 40

The Create Accounting Entries run control parameters page displays. 6. Enter the following:
• Request ID: Leave default
• Process Frequency:
Always
• Business Unit: SJ000
• Book Name: CAP
7. If this is your first time
running this process, click the Save button.
8. Click the Run button.
The Process Scheduler Request page displays. 9. Select the following:
• Server Name: PSNT
• Type: Web
• Format: TXT 10. Click the OK button.
SJSU CMS Project Team Asset Management Training Manual Page: 41
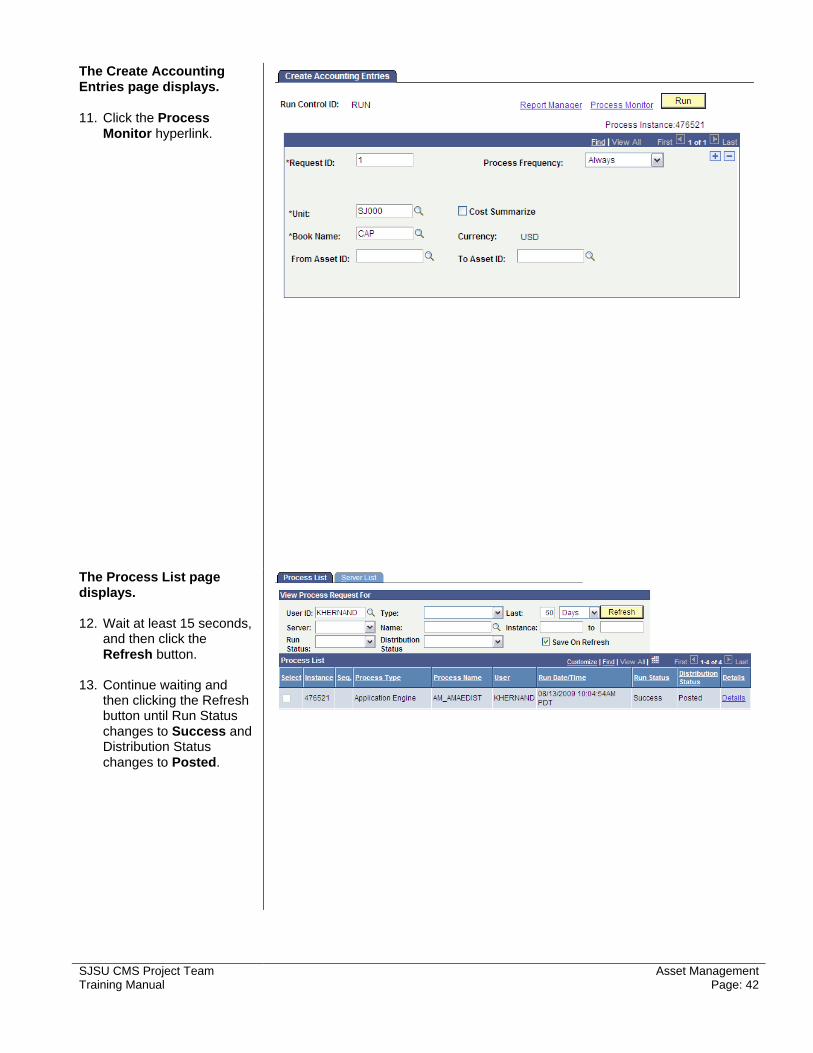
The Create Accounting Entries page displays. 11. Click the Process
Monitor hyperlink.
The Process List page displays. 12. Wait at least 15 seconds,
and then click the Refresh button.
13. Continue waiting and
then clicking the Refresh button until Run Status changes to Success and Distribution Status changes to Posted.
SJSU CMS Project Team Asset Management Training Manual Page: 42
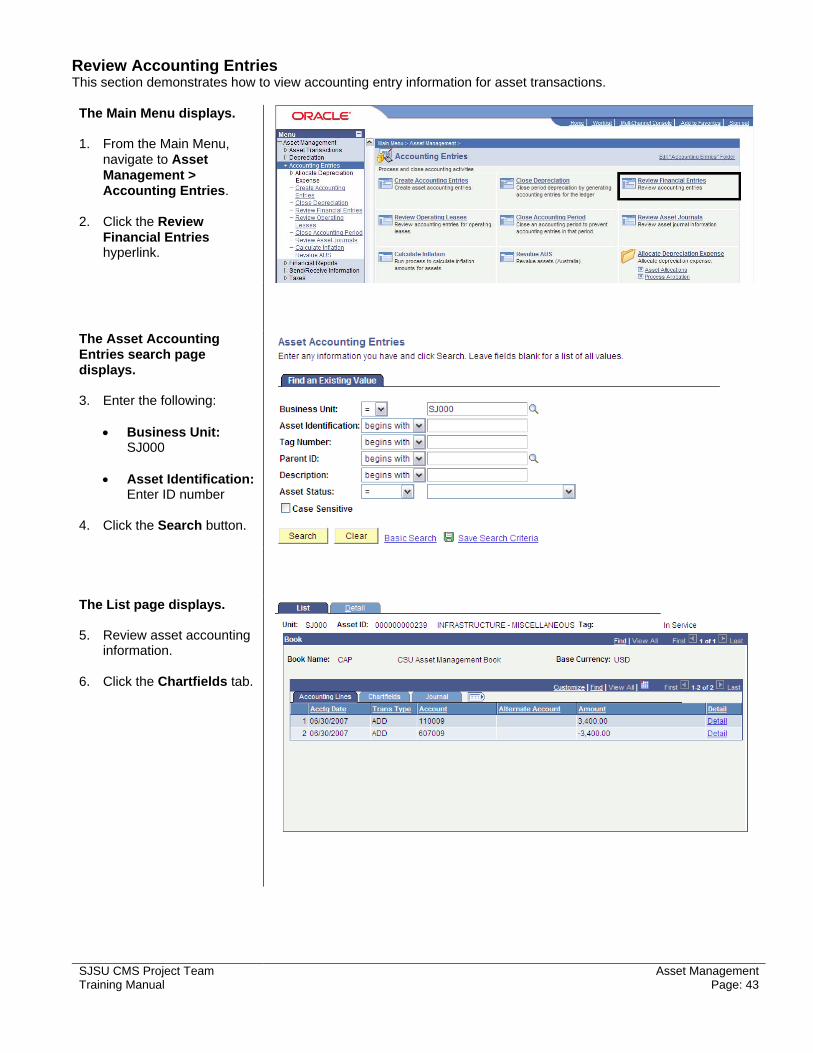
Review Accounting Entries This section demonstrates how to view accounting entry information for asset transactions. The Main Menu displays. 1. From the Main Menu,
navigate to Asset Management > Accounting Entries.
2. Click the Review
Financial Entries hyperlink.
The Asset Accounting Entries search page displays. 3. Enter the following:
• Business Unit: SJ000
• Asset Identification:
Enter ID number 4. Click the Search button.
The List page displays. 5. Review asset accounting
information. 6. Click the Chartfields tab.
SJSU CMS Project Team Asset Management Training Manual Page: 43

The ChartFields section displays. 7. Review asset chartfields
information. 8. Click the Journal tab.
The Journal section displays. 9. Review asset journal
information. 10. Click the Detail tab.
The Detail page displays. 11. Use Find or View All to
view all accounting entries for the asset.
SJSU CMS Project Team Asset Management Training Manual Page: 44

Verify Closed AM Depreciation Periods This section demonstrates how to verify closed AM depreciation periods. To avoid accidentally running Depreciation Close for the same accounting period, close the AM period after Depreciation Close. The Main Menu displays. 1. From the Main Menu,
navigate to Setup Financials/ Supply Chain > Business Unit Related > Assets.
2. Click the Asset
Management Definition hyperlink.
The Asset Management Definition search page displays. 3. Enter Business Unit:
SJ000 4. Click the Search button.
The AM Business Unit Definition page displays. 5. Click the Business
Unit/Book Definition tab.
SJSU CMS Project Team Asset Management Training Manual Page: 45

The Business Unit/Book Definition page displays. 6. Click the Depreciation
Close List hyperlink.
The Closed Accounting periods for the Asset depreciation display.
SJSU CMS Project Team Asset Management Training Manual Page: 46

Run AM Depreciation Close This section demonstrates how to run the AM Depreciation Close. This process creates depreciation entries for the current accounting period. Run this after you have verified the closed AM accounting periods. The Main Menu displays. 1. From the Main Menu,
navigate to Asset Management > Accounting Entries.
2. Click the Close
Depreciation hyperlink.
The Depreciation Close run control page displays. 3. If this is your first time
running this process, click the Add a New Value tab.
4. If this is not the first time,
click the Search button and then select appropriate Run Control ID.
The Add a New Value page displays. 5. Enter a Run Control ID,
and then click the Add button.
SJSU CMS Project Team Asset Management Training Manual Page: 47

The Run Depreciation Close Process run control parameters page displays. 6. Enter the following:
• Request ID: Leave default
• Process Frequency:
Always
• Business Unit: SJ000
• Book Name: CAP
• Fiscal Year: Enter 4-
digit year
• Period: Enter quarter (1, 2, 3 or 4)
• Options: Select
appropriate checkbox (See descriptions below)
7. If this is your first time
running this process, click the Save button.
8. Click the Run button.
Option Descriptions:
• Rerun Depreciation Close: Creates a new accounting entry and deletes the existing one (if any).
• Reverse Posted Entries: Not applicable for the CSU.
• Create Budgeted Depreciation: Not applicable for the CSU.
• Process a Range of Assets: Allows for a selected range of assets. Usually, we run depreciation for all assets, not a range.
SJSU CMS Project Team Asset Management Training Manual Page: 48
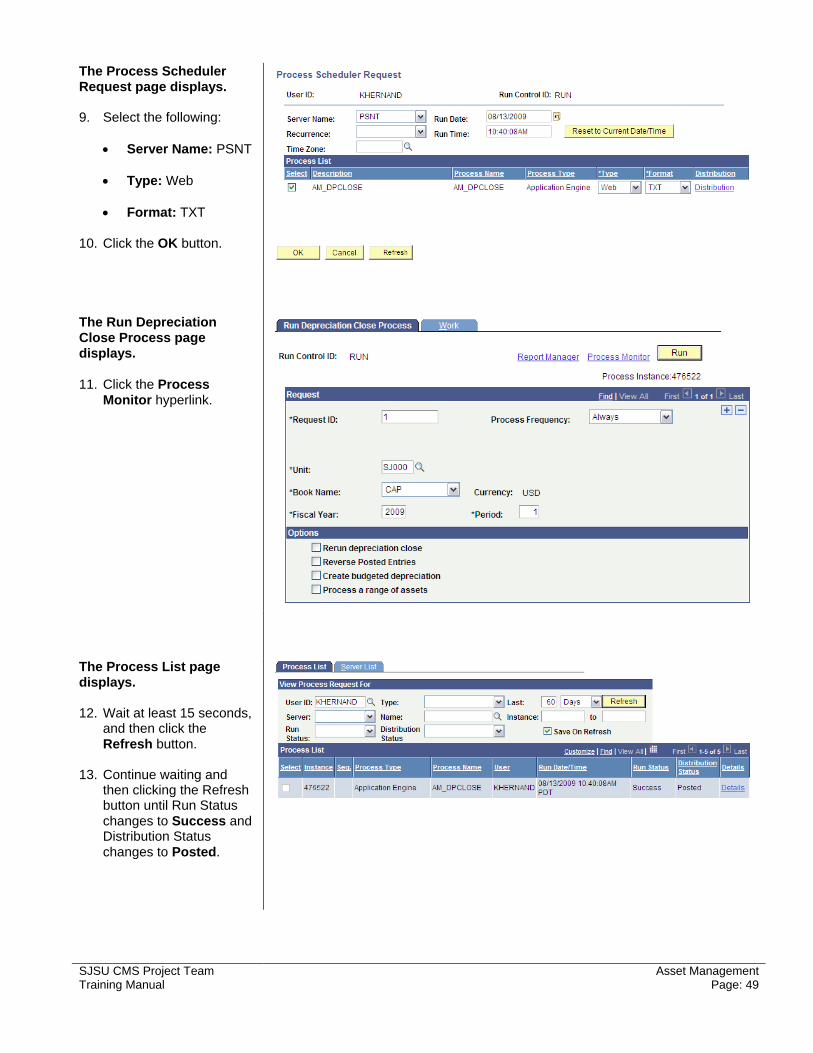
The Process Scheduler Request page displays. 9. Select the following:
• Server Name: PSNT
• Type: Web
• Format: TXT 10. Click the OK button.
The Run Depreciation Close Process page displays. 11. Click the Process
Monitor hyperlink.
The Process List page displays. 12. Wait at least 15 seconds,
and then click the Refresh button.
13. Continue waiting and
then clicking the Refresh button until Run Status changes to Success and Distribution Status changes to Posted.
SJSU CMS Project Team Asset Management Training Manual Page: 49
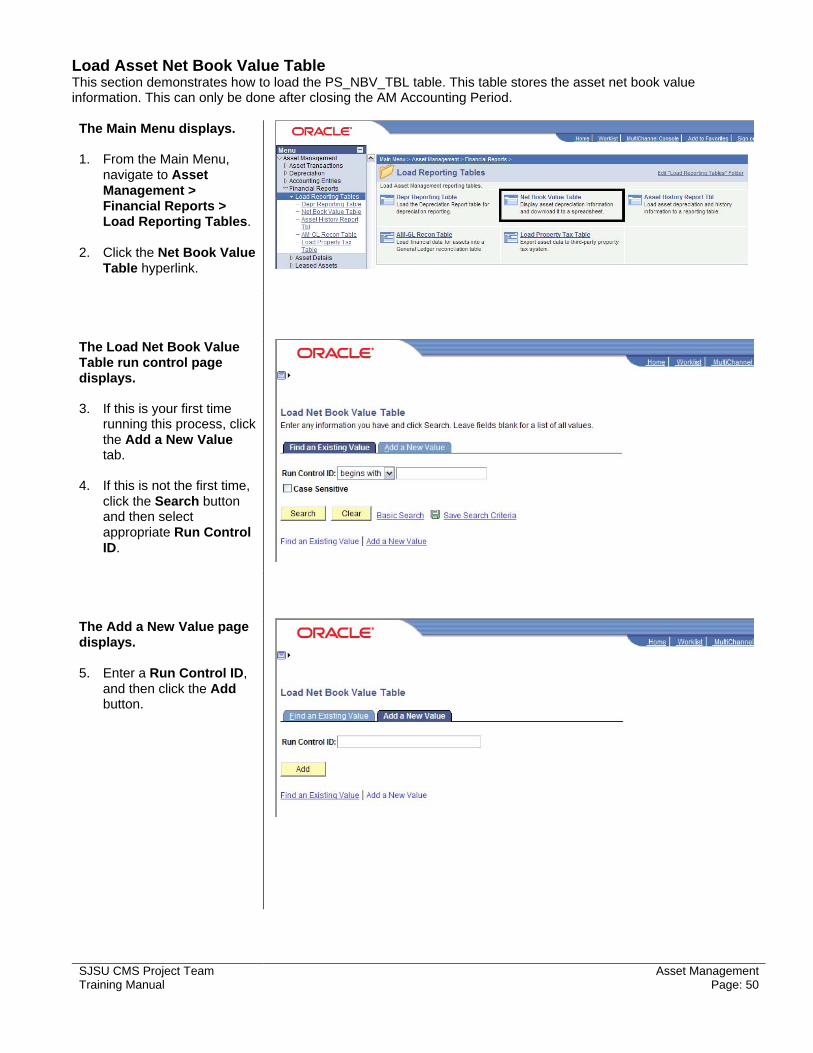
Load Asset Net Book Value Table This section demonstrates how to load the PS_NBV_TBL table. This table stores the asset net book value information. This can only be done after closing the AM Accounting Period. The Main Menu displays. 1. From the Main Menu,
navigate to Asset Management > Financial Reports > Load Reporting Tables.
2. Click the Net Book Value
Table hyperlink.
The Load Net Book Value Table run control page displays. 3. If this is your first time
running this process, click the Add a New Value tab.
4. If this is not the first time,
click the Search button and then select appropriate Run Control ID.
The Add a New Value page displays. 5. Enter a Run Control ID,
and then click the Add button.
SJSU CMS Project Team Asset Management Training Manual Page: 50
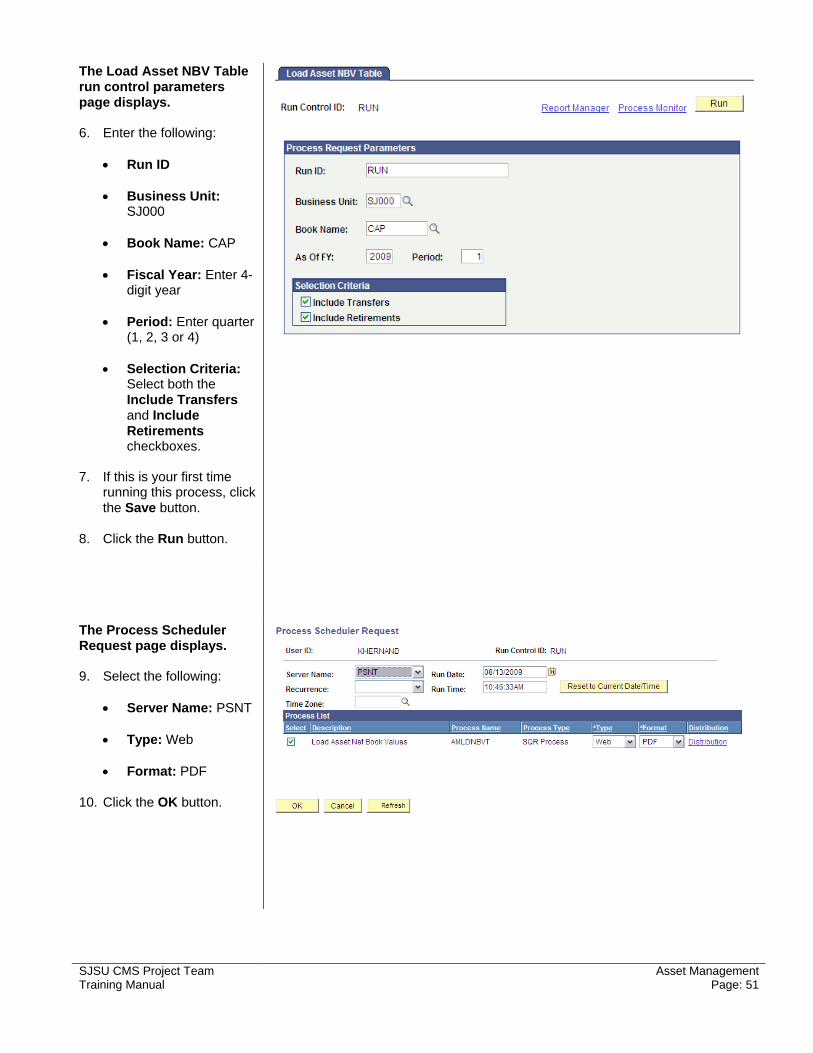
The Load Asset NBV Table run control parameters page displays. 6. Enter the following:
• Run ID
• Business Unit: SJ000
• Book Name: CAP
• Fiscal Year: Enter 4-
digit year
• Period: Enter quarter (1, 2, 3 or 4)
• Selection Criteria:
Select both the Include Transfers and Include Retirements checkboxes.
7. If this is your first time
running this process, click the Save button.
8. Click the Run button.
The Process Scheduler Request page displays. 9. Select the following:
• Server Name: PSNT
• Type: Web
• Format: PDF 10. Click the OK button.
SJSU CMS Project Team Asset Management Training Manual Page: 51

The Load Asset NBV Table page displays. 11. Click the Process
Monitor hyperlink.
The Process List page displays. 12. Wait at least 15 seconds,
and then click the Refresh button.
13. Continue waiting and
then clicking the Refresh button until Run Status changes to Success and Distribution Status changes to Posted.
SJSU CMS Project Team Asset Management Training Manual Page: 52
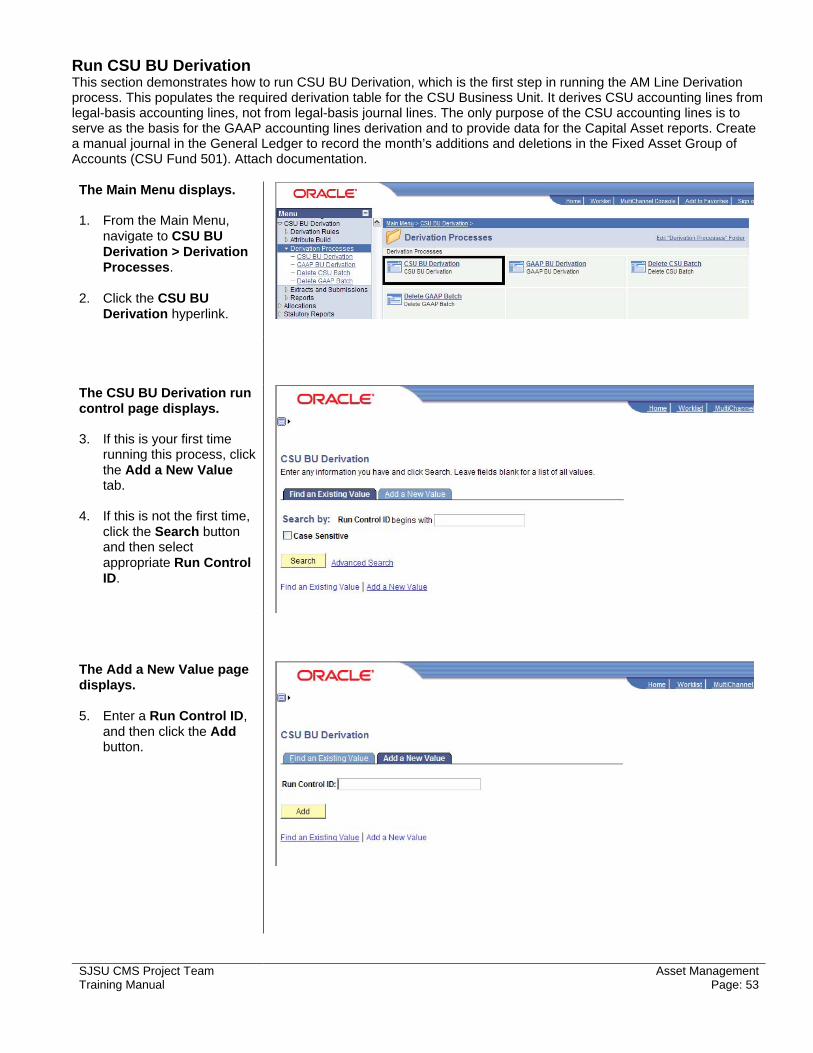
Run CSU BU Derivation This section demonstrates how to run CSU BU Derivation, which is the first step in running the AM Line Derivation process. This populates the required derivation table for the CSU Business Unit. It derives CSU accounting lines from legal-basis accounting lines, not from legal-basis journal lines. The only purpose of the CSU accounting lines is to serve as the basis for the GAAP accounting lines derivation and to provide data for the Capital Asset reports. Create a manual journal in the General Ledger to record the month’s additions and deletions in the Fixed Asset Group of Accounts (CSU Fund 501). Attach documentation. The Main Menu displays. 1. From the Main Menu,
navigate to CSU BU Derivation > Derivation Processes.
2. Click the CSU BU
Derivation hyperlink.
The CSU BU Derivation run control page displays. 3. If this is your first time
running this process, click the Add a New Value tab.
4. If this is not the first time,
click the Search button and then select appropriate Run Control ID.
The Add a New Value page displays. 5. Enter a Run Control ID,
and then click the Add button.
SJSU CMS Project Team Asset Management Training Manual Page: 53
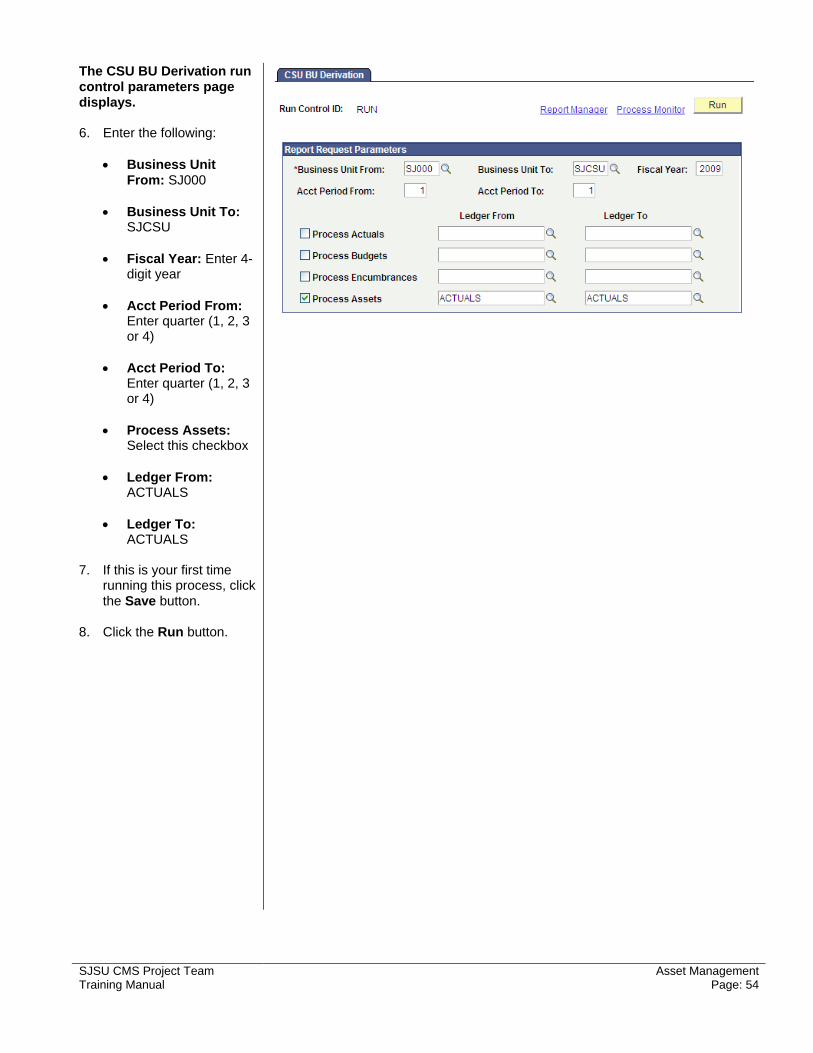
The CSU BU Derivation run control parameters page displays. 6. Enter the following:
• Business Unit From: SJ000
• Business Unit To:
SJCSU
• Fiscal Year: Enter 4-digit year
• Acct Period From:
Enter quarter (1, 2, 3 or 4)
• Acct Period To:
Enter quarter (1, 2, 3 or 4)
• Process Assets:
Select this checkbox
• Ledger From: ACTUALS
• Ledger To:
ACTUALS 7. If this is your first time
running this process, click the Save button.
8. Click the Run button.
SJSU CMS Project Team Asset Management Training Manual Page: 54

The Process Scheduler Request page displays. 9. Select the following:
• Server Name: PSUNX
• Type: Web
• Format: PDF
10. Click the OK button.
The CSU BU Derivation page displays. 11. Click the Process
Monitor hyperlink.
The Process List page displays. 12. Wait at least 15 seconds,
and then click the Refresh button.
13. Continue waiting and
then clicking the Refresh button until Run Status changes to Success and Distribution Status changes to Posted.
Note: You will also need to run the CSU_FIRMS_AL_AM public query to verify process runs to success, then Journal Generate and save the journal as Incomplete.
SJSU CMS Project Team Asset Management Training Manual Page: 55

Run GAAP BU Derivation This section demonstrates how to run the GAAP BU Derivation, which is the second step in running the AM Line Derivation process. It populates the required derivation table for the GAAP Business Unit. It derives GAAP basis accounting lines from CSU accounting lines. To facilitate AM accounting entries derivation to GAAP and the GAAP lookup processes, all AM related accounting information must be processed through the journal creation step to GL. However, all the AM journals are be saved as incomplete without going through the Journal Editing, Budget Checking, and Posting processes. The Main Menu displays. 1. From the Main Menu,
navigate to CSU BU Derivation > Derivation Processes.
2. Click the GAAP
Derivation hyperlink.
The GAAP Derivation run control page displays. 3. If this is your first time
running this process, click the Add a New Value tab.
4. If this is not the first time,
click the Search button and then select appropriate Run Control ID.
The Add a New Value page displays. 5. Enter a Run Control ID,
and then click the Add button.
SJSU CMS Project Team Asset Management Training Manual Page: 56

The GAAP Derivation run control parameters page displays. 6. Enter the following:
• Business Unit From: SJCSU
• Business Unit To:
SJGAP
• Fiscal Year: Enter 4-digit year
• Acct Period From:
Enter quarter (1, 2, 3 or 4)
• Acct Period To:
Enter quarter (1, 2, 3 or 4)
• Process Assets:
Select this checkbox
• Ledger From: ACTUALS
• Ledger To:
ACTUALS 7. If this is your first time
running this process, click the Save button.
8. Click the Run button.
The Process Scheduler Request page displays. 9. Select the following:
• Server Name: PSUNX
• Type: Web
• Format: PDF
10. Click the OK button.
SJSU CMS Project Team Asset Management Training Manual Page: 57

The GAAP Derivation page displays. 11. Click the Process
Monitor hyperlink.
The Process List page displays. 12. Wait at least 15 seconds,
and then click the Refresh button.
13. Continue waiting and
then clicking the Refresh button until Run Status changes to Success and Distribution Status changes to Posted.
Note: Once the process runs to success, the information can be queried from PS_CSU_GAAP_AL_AM record. Journal Generate and save the journal as Incomplete. It should not be posted as not all the entries are correct. Based on the generated journal, create and post the manual journal adjusting the legal-basis journal to GAAP basis.
SJSU CMS Project Team Asset Management Training Manual Page: 58
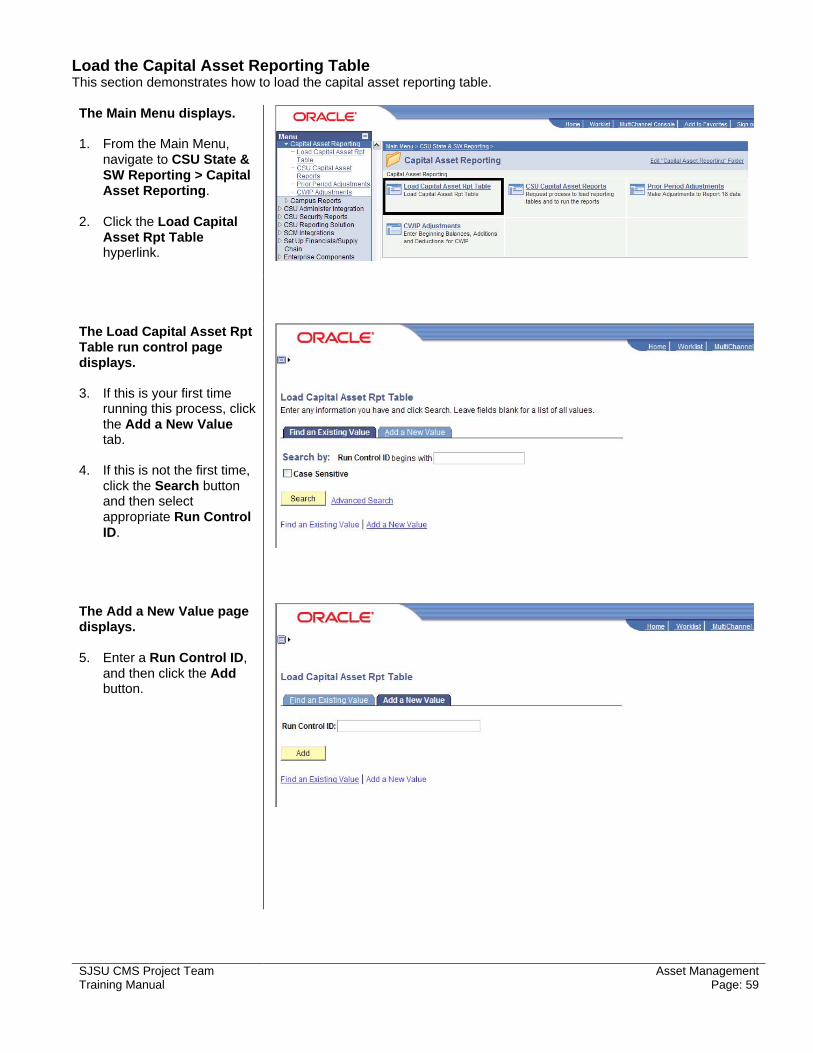
Load the Capital Asset Reporting Table This section demonstrates how to load the capital asset reporting table. The Main Menu displays. 1. From the Main Menu,
navigate to CSU State & SW Reporting > Capital Asset Reporting.
2. Click the Load Capital
Asset Rpt Table hyperlink.
The Load Capital Asset Rpt Table run control page displays. 3. If this is your first time
running this process, click the Add a New Value tab.
4. If this is not the first time,
click the Search button and then select appropriate Run Control ID.
The Add a New Value page displays. 5. Enter a Run Control ID,
and then click the Add button.
SJSU CMS Project Team Asset Management Training Manual Page: 59

The Load Data run control parameters page displays. 6. Enter the following:
• Description: CSU Asset Report Load
• Business Unit
From: SJ000
• CSU Business Unit: SJCSU
• Fiscal Year: Enter 4-
digit year
• Period: Enter quarter (1, 2, 3 or 4)
7. If this is your first time
running this process, click the Save button.
8. Click the Run button.
The Process Scheduler Request page displays. 9. Select the following:
• Server Name: PSUNX
• Type: Web
• Format: TXT
10. Click the OK button.
SJSU CMS Project Team Asset Management Training Manual Page: 60
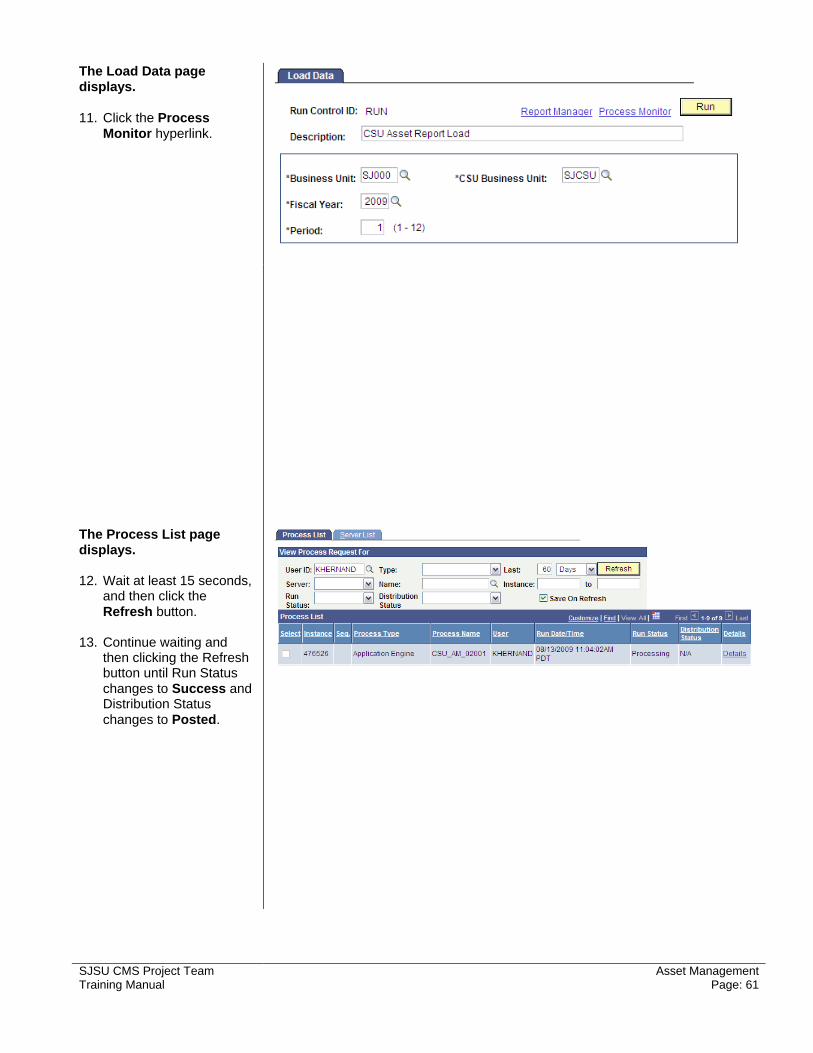
The Load Data page displays. 11. Click the Process
Monitor hyperlink.
The Process List page displays. 12. Wait at least 15 seconds,
and then click the Refresh button.
13. Continue waiting and
then clicking the Refresh button until Run Status changes to Success and Distribution Status changes to Posted.
SJSU CMS Project Team Asset Management Training Manual Page: 61
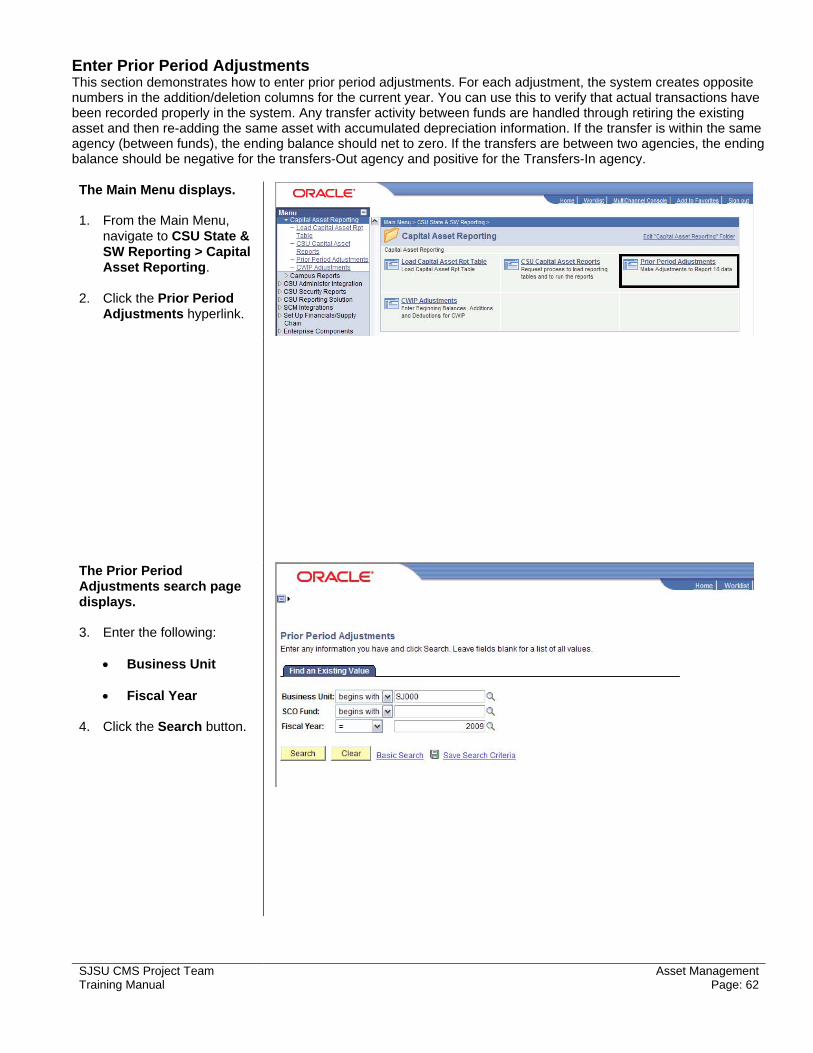
Enter Prior Period Adjustments This section demonstrates how to enter prior period adjustments. For each adjustment, the system creates opposite numbers in the addition/deletion columns for the current year. You can use this to verify that actual transactions have been recorded properly in the system. Any transfer activity between funds are handled through retiring the existing asset and then re-adding the same asset with accumulated depreciation information. If the transfer is within the same agency (between funds), the ending balance should net to zero. If the transfers are between two agencies, the ending balance should be negative for the transfers-Out agency and positive for the Transfers-In agency. The Main Menu displays. 1. From the Main Menu,
navigate to CSU State & SW Reporting > Capital Asset Reporting.
2. Click the Prior Period
Adjustments hyperlink.
The Prior Period Adjustments search page displays. 3. Enter the following:
• Business Unit
• Fiscal Year 4. Click the Search button.
SJSU CMS Project Team Asset Management Training Manual Page: 62

The Search Results display. 5. Select the desired Fund.
The Report Adjustments page displays. 6. Enter amounts in the
following fields, as applicable:
• Prior Period Adj
Additions
• Prior Period Adj Deductions
• Transfers In
• Transfers Out
7. Make sure amounts are either positive or negative numbers as follows:
• Capital Asset (Non-Depreciable/Depreciable) o Additions/Transfers In – Positive o Deductions/Transfers Out – Negative
• Accumulated Depreciation
o Addition/Transfers In – Negative o Deduction/Transfers Out – Positive
SJSU CMS Project Team Asset Management Training Manual Page: 63

Construction Work In Progress (CWIP) This section demonstrates how to enter CWIP adjustments. As CWIP activities are not tracked in PeopleSoft Asset Management, all activities need to be manually entered in the report adjustments page. The Main Menu displays. 1. From the Main Menu,
navigate to CSU State & SW Reporting > Capital Asset Reporting.
2. Click the CWIP
Adjustments hyperlink.
The CWIP Adjustments search page displays. 3. Enter the following:
• Business Unit
• Fiscal Year 4. Click the Search button.
SJSU CMS Project Team Asset Management Training Manual Page: 64

The CWIP Adjustments page displays. 5. Enter appropriate
amounts for:
• Beginning Balance
• Prior Period Adjustments
• Additions
• Deductions
• Transfers
Note: The CWIP beginning balance should only be manually entered once in the Go-Live Year. In all subsequent fiscal years, the Beginning Balance column is automatically populated by the system using the prior year Ending Balance. 8. Make sure amounts are either positive or negative numbers as follows:
• Prior Period Adjustments o Additions – Positive o Deductions – Negative
• Current Year Activities
o Additions – Positive o Deductions – Negative
• Transfers
o Transfers In – Positive o Transfers Out – Negative
SJSU CMS Project Team Asset Management Training Manual Page: 65

Run CSU Capital Asset Report 18, Report 19 and AM Report 18 Summary For convenience, the same run control used in loading the reporting temporary tables can be used to run the Capital Asset Reports since all the information is the same. A new run control can also be set up if desired. This section demonstrates how to enter a capital asset report 18.
• CSU Capital Asset Report 18 • CSU AM Report 18 Summary • CSU Capital Asset Report 19
The Main Menu displays. 1. From the Main Menu,
navigate to CSU State & SW Reporting > Capital Asset Reporting.
2. Click the CSU Capital
Asset Reports hyperlink.
The CSU Capital Asset Reports run control page displays. 3. If this is your first time
running this process, click the Add a New Value tab.
4. If this is not the first time,
click the Search button and then select appropriate Run Control ID.
The Add a New Value page displays. 5. Enter a Run Control ID,
and then click the Add button.
SJSU CMS Project Team Asset Management Training Manual Page: 66

The Capital Asset Reports run control parameters page displays. 6. Enter the following:
• Description
• Business Unit: SJ000
• CSU Business Unit:
SJCSU
• Fiscal Year: Enter 4-digit year
• Period: Enter period
7. If this is your first time
running this process, click the Save button.
8. Click the Run button.
The Process Scheduler Request page displays. 9. Select the following:
• Server Name: PSUNX
10. Select only one
checkbox:
• CSU Capital Asset Report 18
• CSU AM Report 18 Summary
• CSU Capital Asset Report 19
11. Select the following:
• Type: Web
• Format: PDF 12. Click the OK button.
SJSU CMS Project Team Asset Management Training Manual Page: 67

The Capital Asset Reports page displays. Note: The Process Instance number does not display. 13. Click the Process
Monitor hyperlink.
The Process List page displays. 14. Wait at least 15 seconds,
and then click the Refresh button.
15. Continue waiting and
then clicking the Refresh button until Run Status changes to Success and Distribution Status changes to Posted.
16. Repeat the entire process
until all three reports are run.
Notes: Alternatively, you can run both reports simultaneously. Compare analysis of DIST_LN table (see the Review Accounting Entries section) to change in Report 19 from prior month. If they agree, create a manual journal to record the month’s activity in the General Ledger (business unit SJ000). Totals of Report 19 Capital Assets section and investment in Capital Assets section must agree. If not, it may be due to a derivation problem.
SJSU CMS Project Team Asset Management Training Manual Page: 68
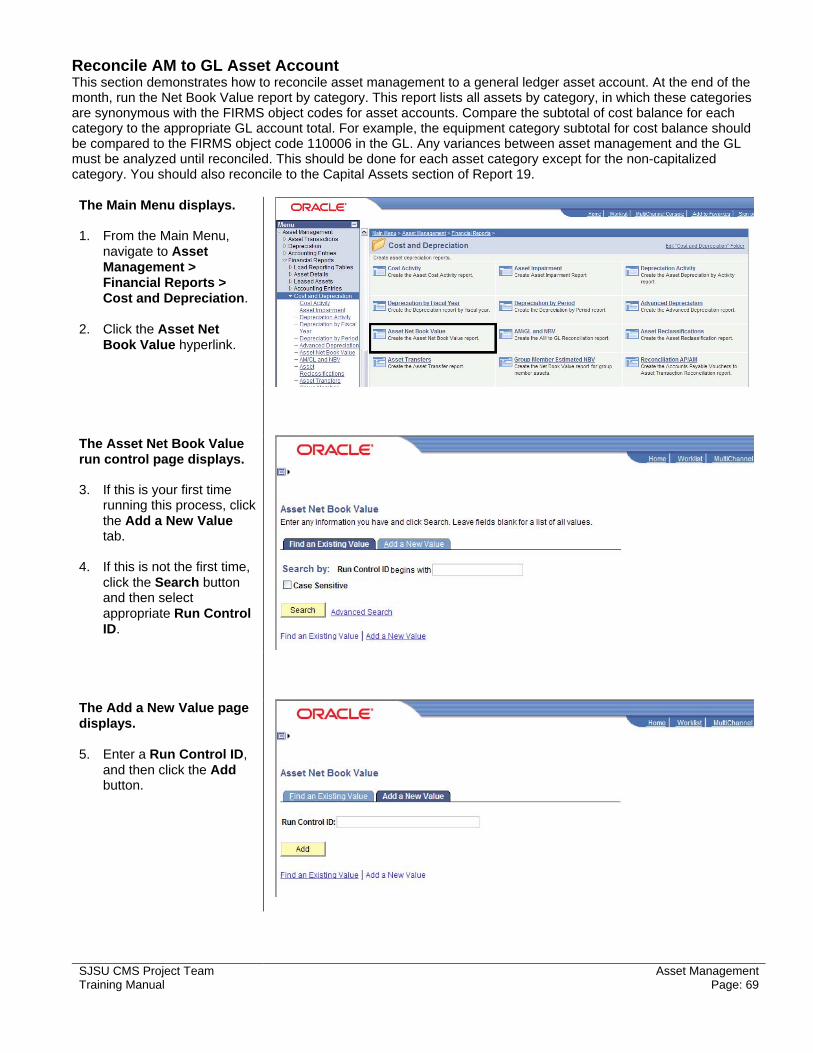
Reconcile AM to GL Asset Account This section demonstrates how to reconcile asset management to a general ledger asset account. At the end of the month, run the Net Book Value report by category. This report lists all assets by category, in which these categories are synonymous with the FIRMS object codes for asset accounts. Compare the subtotal of cost balance for each category to the appropriate GL account total. For example, the equipment category subtotal for cost balance should be compared to the FIRMS object code 110006 in the GL. Any variances between asset management and the GL must be analyzed until reconciled. This should be done for each asset category except for the non-capitalized category. You should also reconcile to the Capital Assets section of Report 19. The Main Menu displays. 1. From the Main Menu,
navigate to Asset Management > Financial Reports > Cost and Depreciation.
2. Click the Asset Net
Book Value hyperlink.
The Asset Net Book Value run control page displays. 3. If this is your first time
running this process, click the Add a New Value tab.
4. If this is not the first time,
click the Search button and then select appropriate Run Control ID.
The Add a New Value page displays. 5. Enter a Run Control ID,
and then click the Add button.
SJSU CMS Project Team Asset Management Training Manual Page: 69
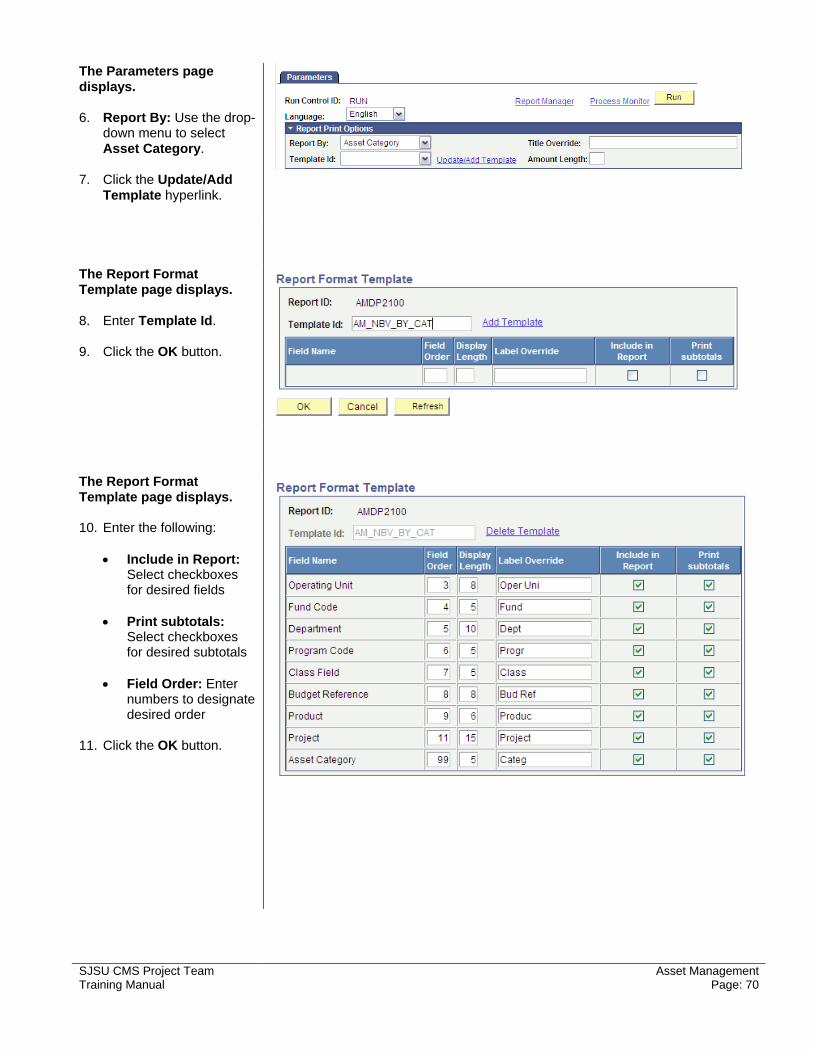
The Parameters page displays. 6. Report By: Use the drop-
down menu to select Asset Category.
7. Click the Update/Add
Template hyperlink.
The Report Format Template page displays. 8. Enter Template Id. 9. Click the OK button.
The Report Format Template page displays. 10. Enter the following:
• Include in Report: Select checkboxes for desired fields
• Print subtotals:
Select checkboxes for desired subtotals
• Field Order: Enter
numbers to designate desired order
11. Click the OK button.
SJSU CMS Project Team Asset Management Training Manual Page: 70
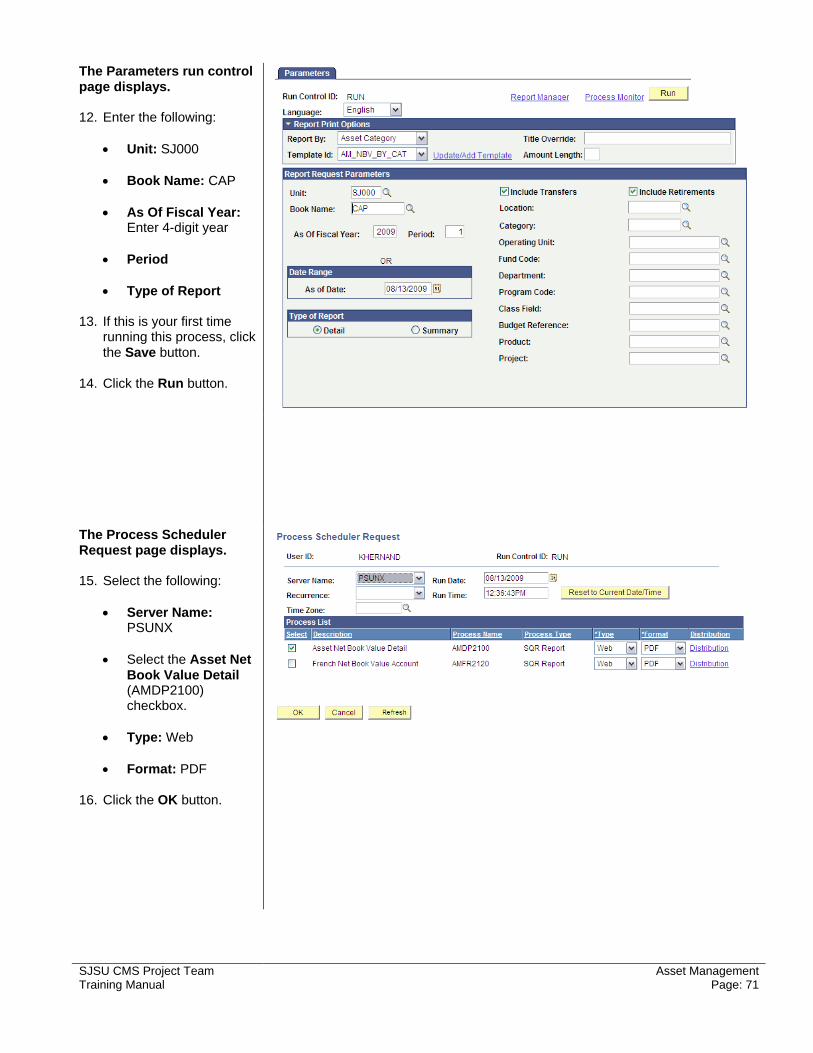
The Parameters run control page displays. 12. Enter the following:
• Unit: SJ000
• Book Name: CAP
• As Of Fiscal Year: Enter 4-digit year
• Period
• Type of Report
13. If this is your first time
running this process, click the Save button.
14. Click the Run button.
The Process Scheduler Request page displays. 15. Select the following:
• Server Name: PSUNX
• Select the Asset Net
Book Value Detail (AMDP2100) checkbox.
• Type: Web
• Format: PDF
16. Click the OK button.
SJSU CMS Project Team Asset Management Training Manual Page: 71

The Parameters page displays. 17. Click the Process
Monitor hyperlink.
The Process List page displays. 18. Wait at least 15 seconds,
and then click the Refresh button.
19. Continue waiting and
then clicking the Refresh button until Run Status changes to Success and Distribution Status changes to Posted.
SJSU CMS Project Team Asset Management Training Manual Page: 72

Reconcile AM to GL Equipment Expense Account This section demonstrates how to reconcile an asset management expense account to a general ledger equipment expense account. There are two FIRMS object codes that capture equipment expenses: account 619001 relates to all non-instructional equipment purchases, while 619002 relates to all instructional equipment purchases. Since these FIRMS accounts capture all equipment regardless of dollar value, and only capital equipment is recorded in the GL as an asset, it is necessary to have two separate accounts for each of the FIRMS equipment object codes. There should be a capital and a non-capital account for both instructional and non-instructional equipment. Compare the Property Coordinator’s queries of all vouchers over $5,000 to the Asset Acquisitions Report. Any capital acquisitions omitted from AM should be recorded in the next period (and, if at year-end, recorded as a GAAP adjustment). The Main Menu displays. 1. From the Main Menu,
navigate to Asset Management > Financial Reports > Asset Details.
2. Click the Acquisitions
hyperlink.
The Asset Acquisitions run control page displays. 3. If this is your first time
running this process, click the Add a New Value tab.
4. If this is not the first time,
click the Search button and then select appropriate Run Control ID.
The Add a New Value page displays. 5. Enter a Run Control ID,
and then click the Add button.
SJSU CMS Project Team Asset Management Training Manual Page: 73
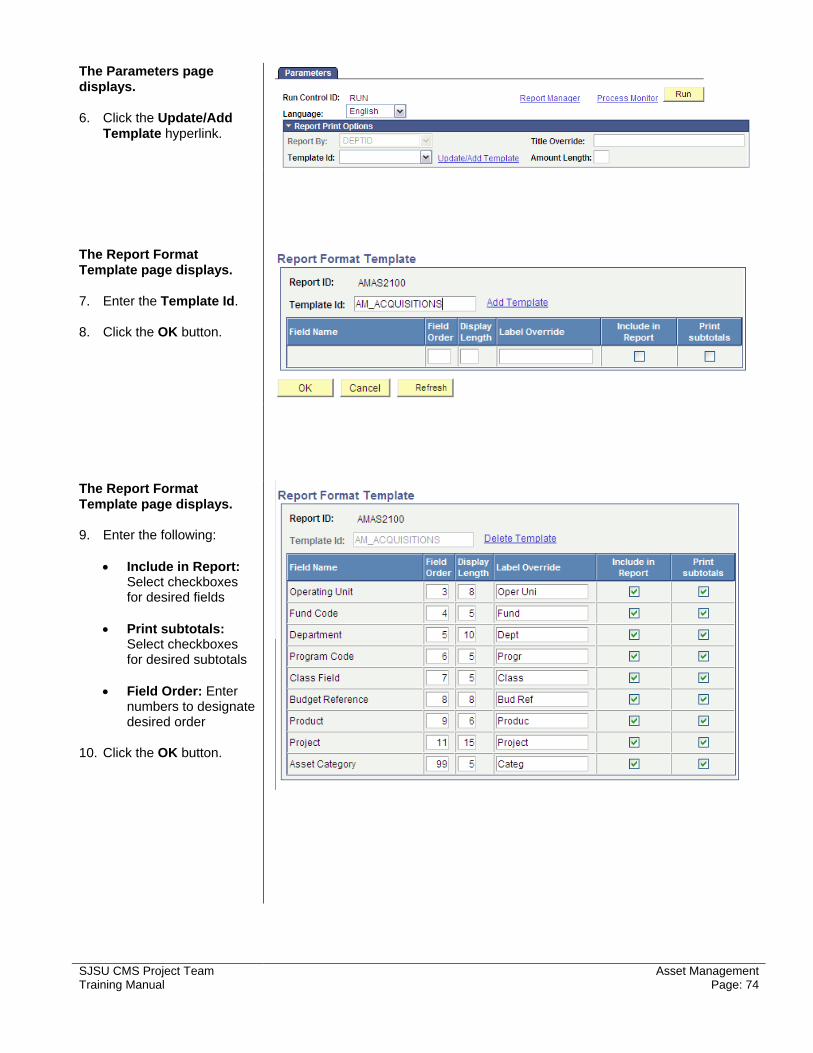
The Parameters page displays. 6. Click the Update/Add
Template hyperlink.
The Report Format Template page displays. 7. Enter the Template Id. 8. Click the OK button.
The Report Format Template page displays. 9. Enter the following:
• Include in Report: Select checkboxes for desired fields
• Print subtotals:
Select checkboxes for desired subtotals
• Field Order: Enter
numbers to designate desired order
10. Click the OK button.
SJSU CMS Project Team Asset Management Training Manual Page: 74
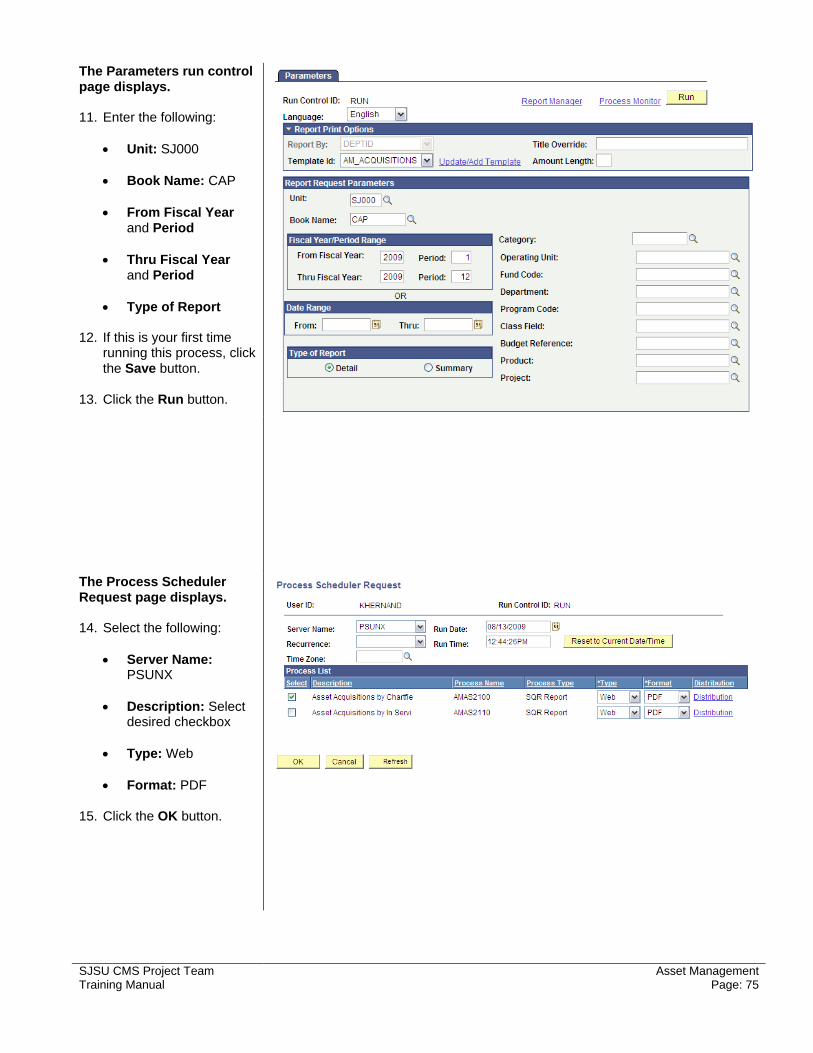
The Parameters run control page displays. 11. Enter the following:
• Unit: SJ000
• Book Name: CAP
• From Fiscal Year and Period
• Thru Fiscal Year
and Period
• Type of Report 12. If this is your first time
running this process, click the Save button.
13. Click the Run button.
The Process Scheduler Request page displays. 14. Select the following:
• Server Name: PSUNX
• Description: Select
desired checkbox
• Type: Web
• Format: PDF 15. Click the OK button.
SJSU CMS Project Team Asset Management Training Manual Page: 75
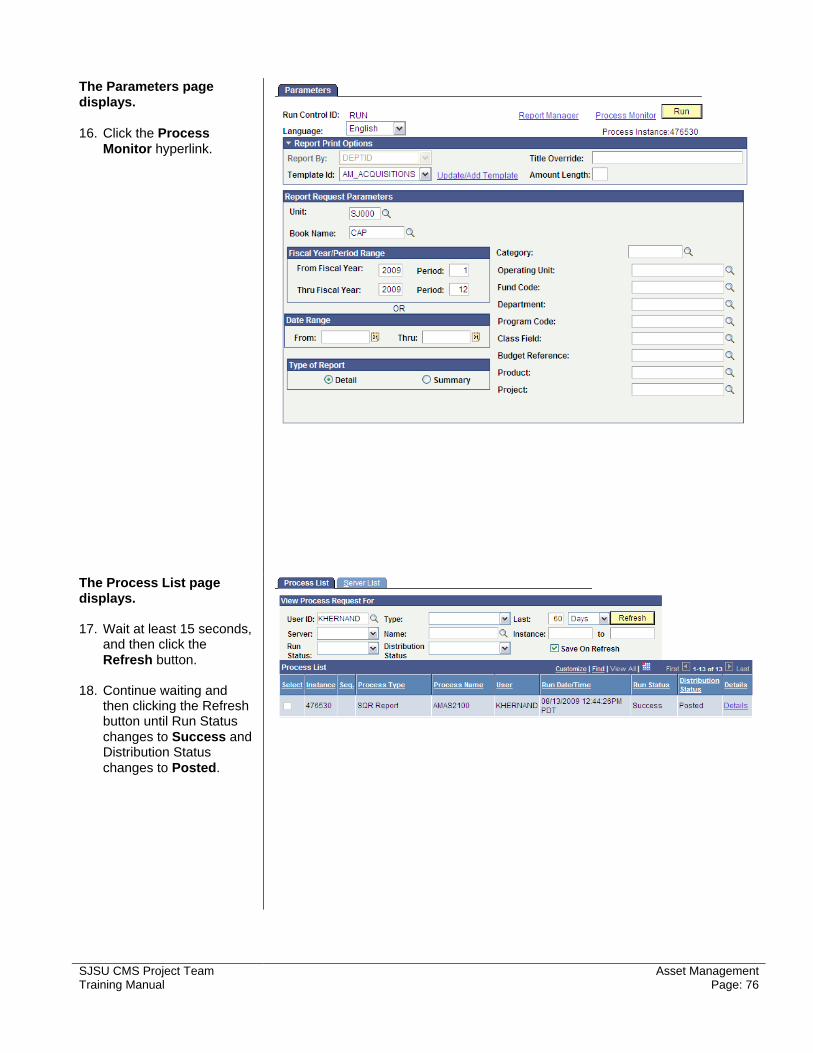
The Parameters page displays. 16. Click the Process
Monitor hyperlink.
The Process List page displays. 17. Wait at least 15 seconds,
and then click the Refresh button.
18. Continue waiting and
then clicking the Refresh button until Run Status changes to Success and Distribution Status changes to Posted.
SJSU CMS Project Team Asset Management Training Manual Page: 76

Close AM Accounting Period This section demonstrates how to close the asset management accounting period. Closing the AM accounting period is the last step in the monthly AM cycle. Once the period is closed, no depreciation-related accounting entries can be created. Closing the AM period cannot be undone. Do not close the period until you are sure the entries are complete and correct. The Main Menu displays. 1. From the Main Menu,
navigate to Setup Financials/Supply Chain > Business Unit Related > General Ledger > Open Periods.
2. Click the Open Period
Update hyperlink.
The Open Period Update search page displays. 3. Enter the following:
• PeopleSoft Product
• Business Unit
• Ledger Group 4. Click the Search button.
SJSU CMS Project Team Asset Management Training Manual Page: 77
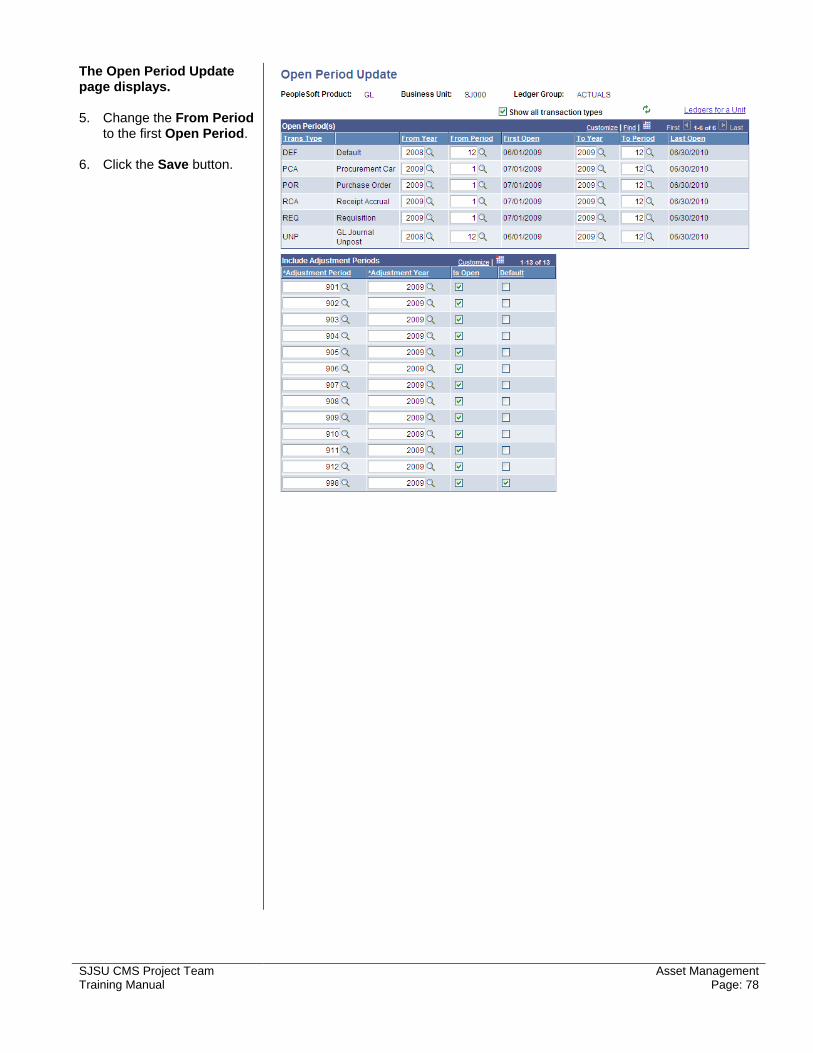
The Open Period Update page displays. 5. Change the From Period
to the first Open Period. 6. Click the Save button.
SJSU CMS Project Team Asset Management Training Manual Page: 78