ciser wonders
DESCRIPTION
Engaging Science Activities for ChildrenTRANSCRIPT

Engaging Science Activities for Children
C I S ER Spring 2012 Vol. 1 Issue 1
Wonders
What Patterns do you see?

CISER’s 20 years of commitment to STEM education in the region continues with our newest endeavor, . .This on-line magazine is designed to engage children in science activities that encourage exploration and wonder. The required materials are readily available and children can complete the activities in a classroom or at home. Additional activities are available through the CISER outreach site at http://www.ciser.ttu.outreach/curriculumforteachers.aspx
In this issue: (click titles to visit the activity)- Predict a Pop - Grow a Sweet Potato Vine- Explore: Colorful Chemistry- Make It Sweet with Camouflage- Blend the Butterfly
Spring 2012, Volume 1 - Issue 1 © CISER 2012Editor: Ashley Brimeyer, STEM Education ScholarContributing Writers: Ashley Brimeyer, STEM Education Scholar Susan Talkmitt, Associate Director of OutreachVisit us at
CISER Wonders
CISER Wonders: Elementary Science Curriculum Magazine
PAG E 2
http://www.ciser.ttu.edu/outreach/Supported by:
To give comments or ask
questions, email us at

CAN YOU SPOT THE BUTTERFLY ON EVERY ACTIVITY?
On any page, click the butterfly to return here
Welcome to
CISER Wonders
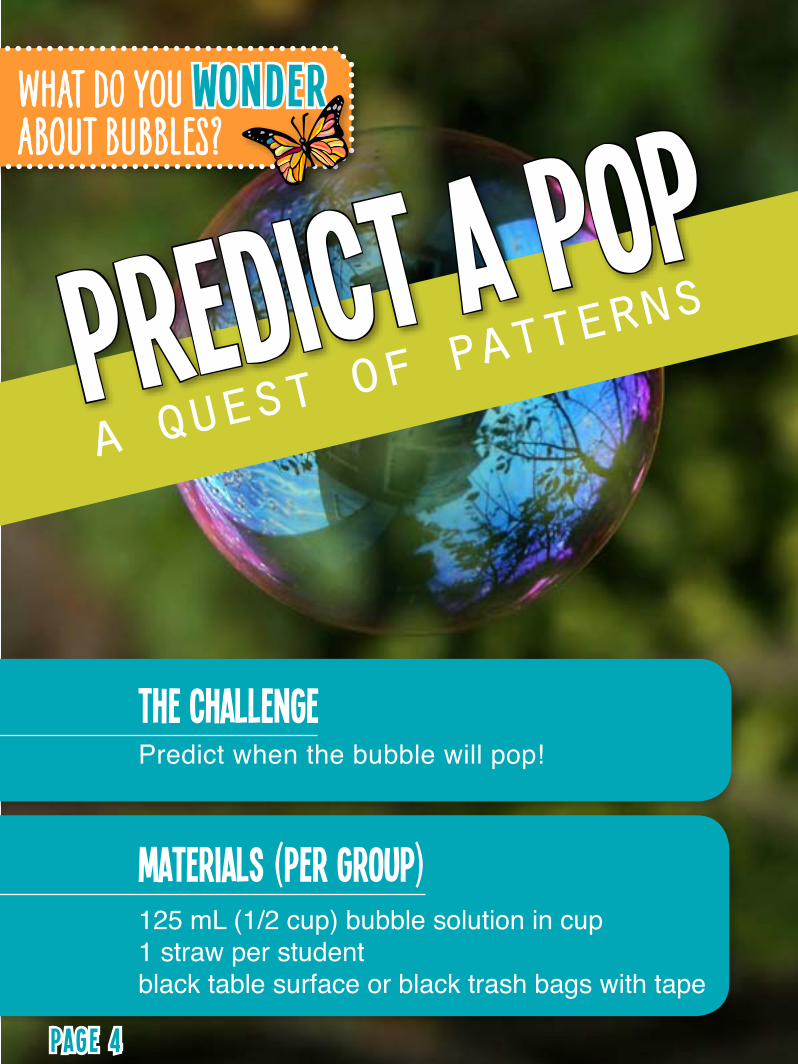
Predict a Popa ques
t of pattern
s
125 mL (1/2 cup) bubble solution in cup1 straw per studentblack table surface or black trash bags with tape
MATERIALS (per group)
THE CHALLENGEPredict when the bubble will pop!
WHAT DO YOU Wonder ABOUT BUBBLES?
PAG E 4

EXPLANTATION
1. Pour half of the bubble solution on the black table surface or black trash bag attached to the table. 2. With the straw just touching the edge of the bubble solution,
Let’s Get Started
As the bubble gets thinner on top (pulled down by gravity) the wavelengths begin to cancel out and black spots appear.
gently blow through the straw to make a bubble dome.3. Make several bubbles. This may take practice.4. Remove the straw. 5. Look for patterns just before the bubbles pop. 6. Discuss with your partner the patterns you observe as you watch the bubbles. 7. Record your observations. WHY?

you can grow a plant
Plants can be grown from other parts of plants including stems, leaves and roots. Try growing your own plant from a different plant part!
Grow a sweet potato vine!A sweet potato is a root that stores food produced by the plant. Why do you think the plant needs to store food?
without a seed! ! !
- A sweet potato- 6 toothpicks
- 1 jar slightly larger than the potato
- water
MATERIALS
Did you know?Plants use energy from the sun to make sugar through a process called photosynthesis. This sugar is the food that fuels the function of plant cells.
Fertilizer is sometimes called “plant food” on the label; however, fertilizer is a source of nutrients to help a plant make sugar. It is not the actual food used by plants for energy.
PAG E 6

1. Choose a sweet potato that is beginning to bud.
2. Stick toothpicks in the potato around the middle area as shown (see Figure 1). Toothpicks will help the potato to sit in the top of the jar. The toothpicks should stick out of the potato so it can sit on the jar.
3. Place the pointed end into the jar facing down. Half of the potato will be out of the jar (see Figure 2).
4. Add water just below the top edge of the jar. Set the jar in a sunny window and watch for changes. Add water as needed to keep the level consistant.
5. Watch the sweet potato as it grows and keep a journal to document what you see.
LET’s GET STARTED
DATE DRAW A PICTURE WRITE ABOUt IT
W H AT D O Y O U Wonder ? W H AT A R E O T H E R P L A N T S G R O W N F R O M R O O T S , S T E M S , O R L E AV E S ?
Figure 1
Figure 2
Click on chart for PDF
WHY?

To investigate the effect of acids and bases on cabbage juice.
purpose
- bowl of cabbage juice- scissors- 1 white paper plate- white paper towels- labeling marker- Q-tip for each Dixie cup
materials
advance preparation
the
W H AT D O Y O U WonderA B O U T A C I D S & B A S E S ?
COLORFUL CHEMISTRY
3 oz. Dixie cups (half full) for each of the following:- Milk - Vinegar- Baking soda solution (1/2 tsp baking soda and distilled water)
- Make cabbage juice indicator (with adult supervision).
1. Chop 1 head of red cabbage.2. Add cabbage to a pan.3. Cover the cabbage with 1 liter of distilled water.4. Heat (not boil) for 1 hour to remove pigment. 5. Drain the juice for the lab.
Cup 1 MilkCup 2 VinegarCup 3 Baking Soda
- Label the three paper cups as shown.
PAG E 8

COLORFUL CHEMISTRYof cabbage juice
let’s get started1. Design and cut animal shapes from white paper towels. Examples could include butterflies, fish, peacocks and zebras. 2. Dip a paper towel animal in the bowl of cabbage juice and put it on the paper plate. 3. Dip a Q-tip in a solution and then touch it to the animal cut-out on the plate. Notice the color change. Use one Q-tip per cup and do not mix Q-tips between solutions. 4. Decorate the animal using different solutions. Be creative in your design as you decorate your animals. 5. Let the animal dry. Suggestions: - Design a habitat for your animal - Use it as artwork
did you know?Cabbage juice is an indicator that changes colors to indicate if something is an acid or a base.
W H AT A R E S O M E O T H E R HOUSEHOLD SOLUTIONS Y O U W O U L D WA N T T O T E S T F O R p H ?
Red Cabbage pH Color Scale
WHY?
MATERIALS
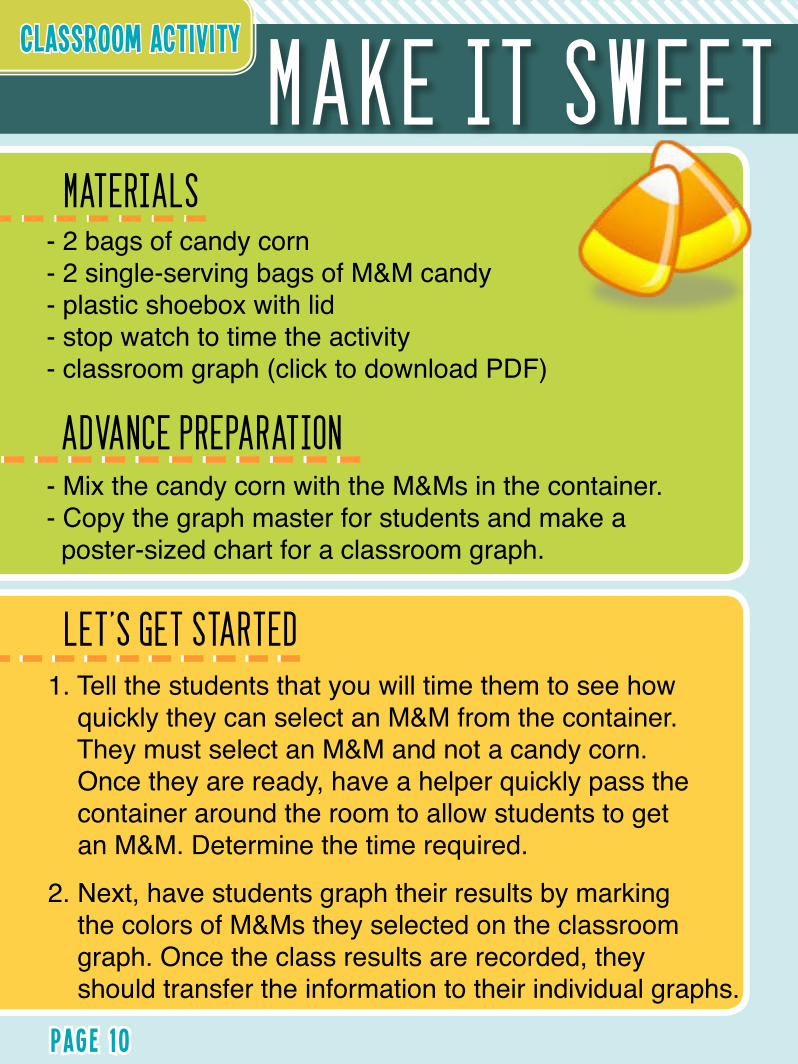
M A K E I T S W E E T
ADVANCE PREPARATION
LET’S GET STARTED
- Mix the candy corn with the M&Ms in the container. - Copy the graph master for students and make a poster-sized chart for a classroom graph.
1. Tell the students that you will time them to see how quickly they can select an M&M from the container. They must select an M&M and not a candy corn. Once they are ready, have a helper quickly pass the container around the room to allow students to get an M&M. Determine the time required.
2. Next, have students graph their results by marking the colors of M&Ms they selected on the classroom graph. Once the class results are recorded, they should transfer the information to their individual graphs.
- 2 bags of candy corn- 2 single-serving bags of M&M candy- plastic shoebox with lid- stop watch to time the activity- classroom graph (click to download PDF)
PAG E 1 0
Classroom Activity

3. Look at the results and have students discuss their observations. The results typically show a smaller number of yellow and orange, if any at all. Students suggest that these colors are removed or that the candy corn camouflages the colors. Once they have discussed their thoughts, share that the orange and yellow M&Ms were not removed. In fact, their next task will be to select an orange or a yellow M&M from the container. 4. Again, time the students as they select only one yellow or one orange M&M each, and have a helper quickly pass the container. Determine the time required. 5. Compare the times of the two trials and lead into a discussion fo the benefit of coloration in the natural world.
HAVE YOU EVER WonderED WHAT CAMOUFLAGE IS REALLY ABOUT? IT’S A LOT SWEETER THAN YOU’D THINK!
W I T H C A M O U F L A G E
WHY?

materials (per student)- 1 paper butterfly
- markers, crayons, or map colors- scissors- tape
advance preparation- Copy the butterflies for the students.- Set up a center of supplies if students do not individualy have the required materials.- Assign the job of “bird” to a student or teacher. (This person does not particiapte in coloring and hiding the butterflies.)
Click here for Butterfly PDF
W H AT D O Y O U Wonder A B O U T C A M O U F L A G E ?
PAG E 1 2
Classroom Activity

let’s get started1. Have each student color and cut out a butterfly to camouflauge in the room. Once the butterflies are finished, have students hide them in the room. Use tape (on backside) to secure the butterflies.
2. Ask a student from another room or a teacher to visit the classroom as a bird. The bird will fly around the room looking for food. It must find 4 butterflies within 1 minute to survive.
3. After one minute, stop the search. If the bird has not found 4 butterflies they will fly of or die. If the bird does find 4 butterflies, give them another minute to find 4 more. Students can repeat the activity for another minute if they want to bring in another bird. After the search, ask the students to show the locations of their butterflies.
4. Compare the butterfly patterns to see the adaptations that were useful in survival. Have the students share their observations in a classroom discussion.
CAMOUFLAGET H E B U T T E R F LY
WHY?