chapter #1 – introduction - state of oregon · r⋆stars training manual chapter #1 –...
TRANSCRIPT
R⋆STARS Training Manual Chapter #1 – Introduction
Revised 03/21/2014
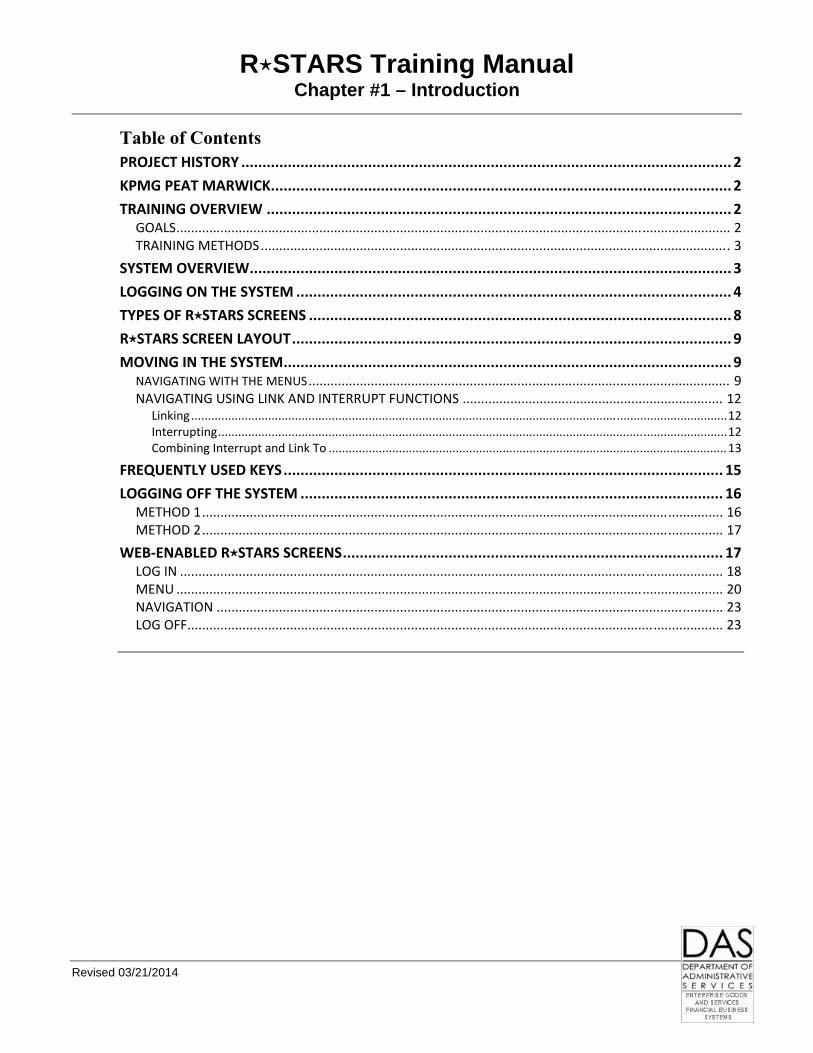
Table of Contents PROJECT HISTORY .................................................................................................................... 2
KPMG PEAT MARWICK ............................................................................................................. 2
TRAINING OVERVIEW .............................................................................................................. 2 GOALS ....................................................................................................................................................... 2 TRAINING METHODS ................................................................................................................................ 3
SYSTEM OVERVIEW .................................................................................................................. 3
LOGGING ON THE SYSTEM ....................................................................................................... 4
TYPES OF R⋆STARS SCREENS .................................................................................................... 8
R⋆STARS SCREEN LAYOUT ........................................................................................................ 9
MOVING IN THE SYSTEM .......................................................................................................... 9 NAVIGATING WITH THE MENUS ................................................................................................................... 9 NAVIGATING USING LINK AND INTERRUPT FUNCTIONS ....................................................................... 12
Linking ................................................................................................................................................................ 12 Interrupting ........................................................................................................................................................ 12 Combining Interrupt and Link To ....................................................................................................................... 13
FREQUENTLY USED KEYS ........................................................................................................ 15
LOGGING OFF THE SYSTEM .................................................................................................... 16 METHOD 1 .............................................................................................................................................. 16 METHOD 2 .............................................................................................................................................. 17
WEB‐ENABLED R⋆STARS SCREENS .......................................................................................... 17 LOG IN .................................................................................................................................................... 18 MENU ..................................................................................................................................................... 20 NAVIGATION .......................................................................................................................................... 23 LOG OFF .................................................................................................................................................. 23

R⋆STARS Training Manual Chapter #1 – Introduction
- 2 -
Project History
In 1989, the State of Oregon (Oregon) acted on then Secretary of State Tom McCall’s recommendation for a more integrated and centralized accounting system and established the Statewide Financial Management System (SFMS) Steering Committee. For the next four years this committee evaluated the financial management needs of the state and the organizations best suited to assist the state in meeting those needs.
After a lengthy selection process, the state chose KPMG Peat Marwick to provide the computer software and implementation services for the accounting and reporting system. This software became the Relational STatewide Accounting and Reporting System or R⋆STARS. This system is designed to interface with other systems that impact accounting, such as purchasing and payroll. Due to its size and complexity, Oregon implemented R⋆STARS in phases. Implementation began in March of 1995 and was complete in December 1997.
In addition to R⋆STARS, Oregon purchased another KPMG Peat Marwick product – the ADvanced Purchasing and Inventory Control System or ADPICS. This program provides the capability for on-line, real-time access to purchasing, receiving, and payment and interfaces directly with R⋆STARS.
Both R⋆STARS and ADPICS are part of the Statewide Financial Management Application (or SFMA). Today, the SFMA is maintained by the Statewide Financial Management Services (SFMS) section of Financial Business Systems (FBS). FBS is a subdivision of the Enterprise Goods and Services (EGS) Division of the Department of Administrative Services (DAS).
KPMG Peat Marwick
KPMG Peat Marwick brought a long history of professional excellence to the SFMA project. KPMG Consultants assisted SFMS in the implementation of ADPICS and R⋆STARS. The R⋆STARS software is being used in a number of states including Arizona, Maryland, Michigan and the District of Columbia to name a few.
Training Overview
GOALS
The PRIMARY goals of the R⋆STARS training program are:
▪ Creating Confidence in the use of R⋆STARS – It is common for people to have some fear and skepticism when Learning a new computer system, especially one as complex as R⋆STARS.
▪ Familiarizing the user with System Features – R⋆STARS is a complex system with numerous features that will be unfamiliar to users at the outset. This manual will familiarize users with the “basic” system features and operating procedures.

R⋆STARS Training Manual Chapter #1 – Introduction
- 3 -
▪ Understanding the “Language” – All systems have terminology unique to that system andR⋆STARS is no different. Being able to use the system terms is essential for performing operationsso that users can ask questions and understand instructions.
The SECONDARY goal of the R⋆STARS training program is to provide technical instruction. Although it is important to know technical information about R⋆STARS, it is also important that users are successful with the primary goals outlined above.
TRAINING METHODS
SFMS utilizes the following training methods in a computer lab training environment:
▪ Lectures – Since the class is composed of students taking various courses simultaneously, lecturetype instruction is limited.
▪ Hands-on Exercises – Most of the R⋆STARS training is hands-on exercises. Training courseshave been designed to give users the opportunity to learn by doing. The courses are self-paced withno specified time limit.
▪ On-line Interaction – During the training users will be asked to interact with the system. This isdesigned to give users as much exposure to the system as possible.
▪ Instructor Assistance – The instructor is available at any time during the training session to assistusers in the exercises users will be required to perform during users training time.
System Overview
R⋆STARS has several components. A key feature is the ability for different parts of the system to interact with each other. The graphic below depicts these different components.

R⋆STARS Training Manual Chapter #1 – Introduction
- 4 -
Logging On The System
The following are the basic steps showing the user how to log into R⋆STARS:
Step 01: Once the mainframe emulation program has started, the first screen that should appear on the computer screen is pictured below.
Note: The following instructions demonstrate using the standard R⋆STARS screen emulation. The instructions regarding the web-enabled R⋆STARS screens appear later in this chapter.
Department of Administrative Services Hosted By: Oregon State Data Center * * * Contact Your Agency Help/Service Desk * * * E1 – ROSCOE E24 – SFMSTRN E31 – CICSTSRI E8 – SWITCH E25 – SFMSACPT H2 – GCICS E15 – PEBBCICS E26 – SFMSTEST H3 – DHR TSO E18 – TSO E27 – CASPOOL L3 – AIRS PROD E19 – DASCICST E28 – SFMSUNIT L6 – AIRS TEST E21 – DASCICSP D28 – OSPSTRNG M2 – PPDS T8 – ODOT-MENU THIS MENU IS SUBJECT TO CHANGE Your IP Address: 000.000.000.000 Netname: ET000000 e24
Step 02: For training, type ‘e24’ and press ↵Enter . The following screen will appear.
WELCOME TO SFMS TRAINING REGION 10:24:35 ******\ ******\ ******\ ******\(R) ********\ ******\ ********\ ********\ **\\\\**\ **\\\ **\\\\**\ **\\\\**\ **\ \\ **\ **\ \\ **\ \\ **\ **\ **\ *******\ **\ **\ **\ *******\ **\ **\ **\ \\\\**\ **\ **\ **\ **\ **\ **\ **\ ********\ ******\ ********\ ********\ ******\\ ******\ ******\\ ******\\ \\\\\\ \\\\\\ \\\\\\ \\\\\\

R⋆STARS Training Manual Chapter #1 – Introduction
- 5 -
The DAS mainframe has different regions. During training, the Training Region will be used.
When users begin to enter actual financial transactions or do on-line inquiries for their agency, they will use the Production Region (E23).
Step 03: Press the key that clears your screen ( Pause/Break or Esc depending on which emulation program you use) and a blank screen will appear.
Step 04: Type ‘cesn’ and press ↵Enter . The following screen should appear.
CICS Signon Type your userid and password: Userid . . . . SFMSUSR1 Password . . . ******** Language . . . New Password . . . PF3=End DFHCE3520 Please type your userid.
Step 05: Type in the User ID assigned for training and press Tab
Step 06: Type the training day password in the password field and press ↵Enter . The following information will appear on the screen.
DFHCE3549 Sign-on is complete (Language E).

R⋆STARS Training Manual Chapter #1 – Introduction
- 6 -
Step 07: Type ‘fsys’ and press ↵Enter . The following screen will appear.
SSYS VER 2.0 STATE OF OREGON 10/23/13 11:39 AM TRNG *******\ ******\ ********\ **\ *******\ ******\ ********\ ********\ ********\ ****\ ********\ ********\ **\\\\**\ **\\\\**\ **\\\\ **\\**\ **\\\\**\ **\\\\**\ **\ **\ * * * **\ \\ **\ **\\ **\ **\ **\ **\ \\ ********\ *** *******\ **\ **********\ ********\ *******\ *******\ ******* *******\ **\ **********\ *******\ *******\ **\\\**\ *** \\\\**\ **\ **\\\\\\**\ **\\\**\ \\\\**\ **\ **\ * * * **\ **\ **\ **\ **\ **\ **\ **\ **\ **\ **\ ********\ **\ **\ **\ **\ **\ ********\ **\ **\ ******\\ **\ **\ **\ **\ **\ ******\\ \\\ \\\ \\\\\\ \\\ \\\ \\\ \\\ \\\ \\\\\\ OREGON PRODUCTION REGION USER CLASS: 10 ALTERNATE CLASSES: 10 17 19 99 CLEAR-EXIT
Note the USER CLASS and ALTERNATE CLASSES fields at the bottom of the screen above. These numbers reflect the security profiles that have been assigned to the user. The User Class determines the screens users can access and the accounting functions they can perform. For additional information, see chapter #5 on Entering Transactions – the Basics.
The system will default to the lowest numbered user class listed. Users can change the USER CLASS to one of the numbers on the ALTERNATE CLASSES list before they press ↵Enter to go to the News screen.

R⋆STARS Training Manual Chapter #1 – Introduction
- 7 -
Step 08: Press ↵Enter and the following screen will appear.
S002 UC: 17 STATE OF OREGON 10/23/13 11:46 AM NEWS DISPLAY TRNG WELCOME TO R*STARS – OREGON TRAINING REGION SFMA TRAINING REGION INFO CONTACT: JERRY OVARD 503-373-0263 WEBSITE: HTTP://WWW.OREGON.GOV/DAS/EGS/FBS/SFMS/PAGES/INDEX.ASPX *** *** *** *** *** DAILY NEWS *** *** *** *** *** SEE SCHEDULE AND CLASS DESCRIPTIONS AT: HTTP://WWW.OREGON.GOV/DAS/EGS/FBS/SFMS/PAGES/ALL_TRAINING.ASPX CLEAR-EXIT PRESS (ENTER) TO CONTINUE
The News screen in the Production Region will contain important updates that may impact the user. This screen should be read at each sign-on. See chapter #7 on On-line Help for instructions on accessing additional News screens.
Step 09: Press ↵Enter again and the Main Menu screen will appear.
S000 UC: 10 STATE OF OREGON 10/24/13 12:12 PM LINK TO: MAIN MAIN MENU TRNG (2) CAM COST ACCOUNTING MENU (3) DT DOCUMENT TRACKING MENU (4) FIN FINANCIAL DATA ENTRY MENU (5) PR PROFILE MAINTENANCE MENU (6) PAY PAYMENT PROCESSING MENU (7) RFM REPORTING/INQUIRY MENU (8) SYS SYSTEM CONTROL MENU F1-HELP F9-INTERRUPT CLEAR-EXIT

R⋆STARS Training Manual Chapter #1 – Introduction
- 8 -
Types Of R⋆STARS Screens
Menu Screens The Menu Screens are used to access other types of screens in the system. Each listing on a menu has an assigned function key. On the menu, users can press the respective function key to go to that screen.
Profile Screens
Profile Screens list the valid codes that can be entered in data element fields for transactions and inquiries. Some of them also establish system controls that impact data entry, reports, and on-line inquiries. The system looks to profiles to edit information entered into the system. Examples of Profiles include D02 Agency Profile, 28A Transaction Code Decision Profile, D11 Agency Object Profile, and 26 Program Cost Account Profile (PCA). See chapter #2 on Classification Structure in this manual for additional information.
Transaction Screens
Transaction Screens are used to enter financial transactions into the system. They include the 500 Batch Header Entry screen and specific Transaction Entry screens, depending upon the kind of transaction. An example is the 505 Pre-Enc/Enc/Expend Transaction Entry screen. See chapters #5 and #6 on Entering Transactions for more information.
Inquiry Screens
The Reporting/Inquiry Menu allow users to look up information on-line. They include document (specific transaction) and financial (summary) on-line inquiry screens. See chapters #12, #13 and #14 on On-line Inquiry for more information.
Reporting Screens
Reporting screens allow you to order and distribute of-line printed or electronic reports. See Chapters #3, #9 and #10 on Reports.
Help Screens Help Screens not only explain errors, but also provide information needed to correct the errors and, in some cases, provide lists of valid codes. See chapter #7 on on-line help and #8 on error correction.
System Mgmt Screens
System management screens are centrally controlled and are used to define the user’s ability to access and utilize R⋆STARS according to their specific roles. They are also used to set and control system parameters, titles, dates and other elements necessary for system operation.
R⋆STARS Training Manual Chapter #1 – Introduction
- 9 -
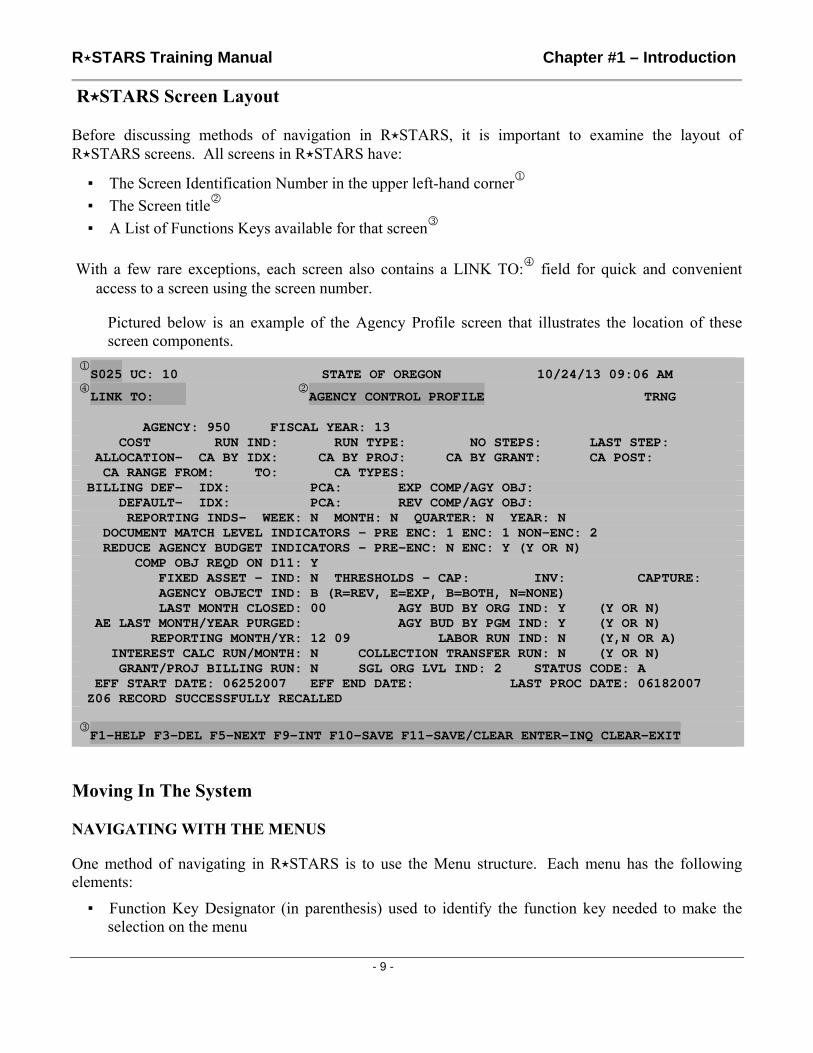
R⋆STARS Screen Layout
Before discussing methods of navigation in R⋆STARS, it is important to examine the layout of R⋆STARS screens. All screens in R⋆STARS have:
▪ The Screen Identification Number in the upper left-hand corner
▪ The Screen title
▪ A List of Functions Keys available for that screen
With a few rare exceptions, each screen also contains a LINK TO: field for quick and convenient access to a screen using the screen number.
Pictured below is an example of the Agency Profile screen that illustrates the location of these screen components.
S025 UC: 10 STATE OF OREGON 10/24/13 09:06 AM
LINK TO:
AGENCY CONTROL PROFILE TRNG
AGENCY: 950 FISCAL YEAR: 13 COST RUN IND: RUN TYPE: NO STEPS: LAST STEP: ALLOCATION- CA BY IDX: CA BY PROJ: CA BY GRANT: CA POST: CA RANGE FROM: TO: CA TYPES: BILLING DEF- IDX: PCA: EXP COMP/AGY OBJ: DEFAULT- IDX: PCA: REV COMP/AGY OBJ: REPORTING INDS- WEEK: N MONTH: N QUARTER: N YEAR: N DOCUMENT MATCH LEVEL INDICATORS – PRE ENC: 1 ENC: 1 NON-ENC: 2 REDUCE AGENCY BUDGET INDICATORS – PRE-ENC: N ENC: Y (Y OR N) COMP OBJ REQD ON D11: Y FIXED ASSET – IND: N THRESHOLDS – CAP: INV: CAPTURE: AGENCY OBJECT IND: B (R=REV, E=EXP, B=BOTH, N=NONE) LAST MONTH CLOSED: 00 AGY BUD BY ORG IND: Y (Y OR N) AE LAST MONTH/YEAR PURGED: AGY BUD BY PGM IND: Y (Y OR N) REPORTING MONTH/YR: 12 09 LABOR RUN IND: N (Y,N OR A) INTEREST CALC RUN/MONTH: N COLLECTION TRANSFER RUN: N (Y OR N) GRANT/PROJ BILLING RUN: N SGL ORG LVL IND: 2 STATUS CODE: A EFF START DATE: 06252007 EFF END DATE: LAST PROC DATE: 06182007 Z06 RECORD SUCCESSFULLY RECALLED F1-HELP F3-DEL F5-NEXT F9-INT F10-SAVE F11-SAVE/CLEAR ENTER-INQ CLEAR-EXIT
Moving In The System
NAVIGATING WITH THE MENUS
One method of navigating in R⋆STARS is to use the Menu structure. Each menu has the following elements:
▪ Function Key Designator (in parenthesis) used to identify the function key needed to make the selection on the menu

R⋆STARS Training Manual Chapter #1 – Introduction
- 10 -
▪ Screen Identification for the menu selection (used in Link and Interrupt functions described later)
▪ Screen Title
Step 01: If you are not presently at the Main Menu, press the Pause/Break or Esc key until it appears (Screen: S000 - Menu ID: MAIN).
Step 02: From the Main Menu, press the function key that corresponds to the destination. In this example, press F5 to go to the Profile Maintenance Menu (Submenu ID: PR).
S000 UC: 10 STATE OF OREGON 10/24/13 12:12 PM LINK TO: MAIN MAIN MENU TRNG (2) CAM COST ACCOUNTING MENU (3) DT DOCUMENT TRACKING MENU (4) FIN FINANCIAL DATA ENTRY MENU (5) PR PROFILE MAINTENANCE MENU (6) PAY PAYMENT PROCESSING MENU (7) RFM REPORTING/INQUIRY MENU (8) SYS SYSTEM CONTROL MENU F1-HELP F9-INTERRUPT CLEAR-EXIT
Step 03: Continue moving through the menus by selecting an appropriate function key from the list on the screen. In this example, on the Profile Maintenance Menu, press F8 to go to the Vendor Menu (Submenu ID: VEN).
S000 UC: 10 STATE OF OREGON 10/24/13 02:05 PM LINK TO: PR PROFILE MAINTENANCE MENU TRNG (2) APPR APPROPRIATION (3) TRAN GENERAL LEDGER/TRANS MENU (4) MISC MISCELLANEOUS MENU (5) NACU NACUBO MENU (6) OBJM OBJECT MENU (7) ORGM ORGANIZATION/PROGRAM MENU (8) VEN VENDOR MENU F1-HELP F9-INTERRUPT CLEAR-EXIT
R⋆STARS Training Manual Chapter #1 – Introduction
- 11 -
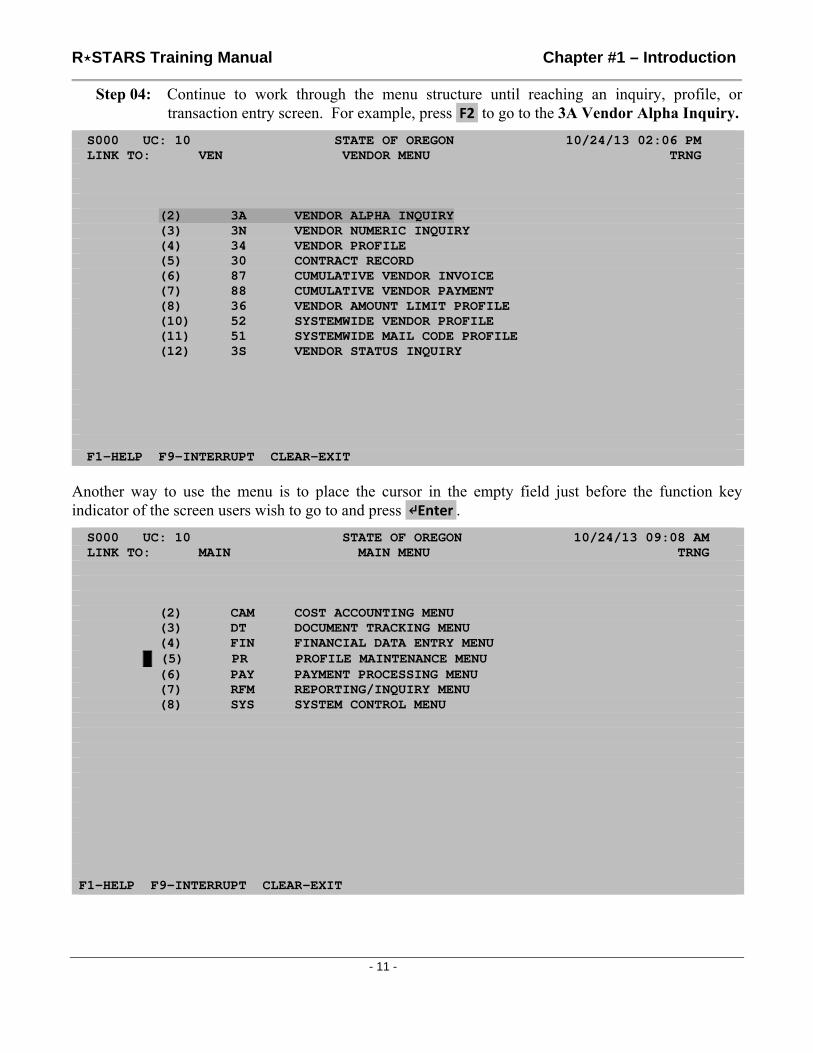
Step 04: Continue to work through the menu structure until reaching an inquiry, profile, or transaction entry screen. For example, press F2 to go to the 3A Vendor Alpha Inquiry.
S000 UC: 10 STATE OF OREGON 10/24/13 02:06 PM LINK TO: VEN VENDOR MENU TRNG (2) 3A VENDOR ALPHA INQUIRY (3) 3N VENDOR NUMERIC INQUIRY (4) 34 VENDOR PROFILE (5) 30 CONTRACT RECORD (6) 87 CUMULATIVE VENDOR INVOICE (7) 88 CUMULATIVE VENDOR PAYMENT (8) 36 VENDOR AMOUNT LIMIT PROFILE (10) 52 SYSTEMWIDE VENDOR PROFILE (11) 51 SYSTEMWIDE MAIL CODE PROFILE (12) 3S VENDOR STATUS INQUIRY F1-HELP F9-INTERRUPT CLEAR-EXIT
Another way to use the menu is to place the cursor in the empty field just before the function key indicator of the screen users wish to go to and press ↵Enter .
S000 UC: 10 STATE OF OREGON 10/24/13 09:08 AM LINK TO: MAIN MAIN MENU TRNG (2) CAM COST ACCOUNTING MENU (3) DT DOCUMENT TRACKING MENU (4) FIN FINANCIAL DATA ENTRY MENU - (5) PR PROFILE MAINTENANCE MENU (6) PAY PAYMENT PROCESSING MENU (7) RFM REPORTING/INQUIRY MENU (8) SYS SYSTEM CONTROL MENU F1-HELP F9-INTERRUPT CLEAR-EXIT

R⋆STARS Training Manual Chapter #1 – Introduction
- 12 -
NAVIGATING USING LINK AND INTERRUPT FUNCTIONS
In this section users will learn the more advanced methods of navigating in R⋆STARS. Instead of working through the Menu Tree, users can go directly to a specific screen. Two terms that users need to be familiar with are Linking and Interrupting.
▪ Users use Linking to simply move from one screen to another. ▪ Users use Interrupt when they wish to move from one screen to another but intend to
eventually return to the original screen. Linking
To use the Linking function, enter the Menu, Submenu or Screen Identification in the LINK TO field and press ↵Enter . R⋆STARS will go directly to that screen. See the example below:
Screen Title Screen ID
Main Menu MAIN Transaction Code Profile 28A Comptroller Object Profile D10 Agency Profile D02
The following steps take users through the process:
Step 01: From the Main Menu (MAIN), press the Home key. The cursor will to move to the LINK TO field.
Step 02: Type ‘28a’ in the LINK TO field and press ↵Enter . The 28A profile screen will display.
Step 03: Press the Home key to move the cursor to the LINK TO field.
Step 04: Type ‘d10’ in the LINK TO field and press ↵Enter . The D10 profile will display.
Step 05: Press the Home key to move the cursor to the LINK TO field.
Step 06: Type ‘d02’ in the LINK TO field and press ↵Enter . The D02 profile will display. This is the final destination.
Interrupting
Users use the Interrupt Function when they wish to look-up information on one or more screens and return to their original screen with all the original information intact. They enter the Screen ID in the LINK TO field as before and press F9 -INT (interrupt) rather than the ↵Enter Key.

R⋆STARS Training Manual Chapter #1 – Introduction
- 13 -
See the demonstration of Interrupting below – going from the D02 profile to the D42 Project Number Profile and returning to the D02 profile.
Step 01: From the D02 profile press the Home key and the cursor will move to the LINK TO field.
Step 02: Type ‘d42’ in the LINK TO field and press F9 -INT. The D42 profile will display.
Notice the word “ACTIVE” has appeared in the upper left corner of the screen. This indicates that the Interrupt function is now operating.
Step 03: Press F9 -INT. The system will return to the D02 profile.
Notice that “ACTIVE” has disappeared from the screen indicating that the Interrupt function has ended.
Combining Interrupt and Link To
Interrupt and Link To functions can be combined for moving to several different screens and return to the original screen.
The steps below show a combination of linking and interrupting from the D02 profile to a number of other screens and then returning to the D02 profile:
Screen Title Screen ID
Agency Profile D02 Project Number Profile D42 Transaction Code Profile 28A Grant Number Profile D47 Agency Profile D02

R⋆STARS Training Manual Chapter #1 – Introduction
- 14 -
Step 01: From the D02 profile, press the Home key. The cursor will move to the LINK TO field.
Step 02: Type ‘d42’ in the LINK TO field and press F9 -INT The D42 profile will be displayed (“ACTIVE” appears in the upper left corner of the screen).
Step 03: Press the Home key. The cursor will move to the LINK TO field.
Step 04: Type ‘28a’ in the LINK TO field and press ↵Enter . The 28A profile will be displayed (“ACTIVE” remains).
Step 05: Press the Home key. The cursor will move to the LINK TO field.
Step 06: Type ‘d47’ into the LINK TO field and press ↵Enter . The D47 Grant Number Profile will be displayed.
Step 07: From the D47 profile, press F9 -INT. The system will return to the D02 profile screen (“ACTIVE” disappears from the screen).
Note: Certain activities (e.g., creating a batch header) cannot be performed while in interrupt mode. If users attempt an unauthorized activity, they will receive error code: Z41 - CANNOT PROCESS - INTERRUPT ACTIVE. They will have to press function key F9 -INTER(rupt) again to return to the original screen.

R⋆STARS Training Manual Chapter #1 – Introduction
- 15 -
Frequently Used Keys
Following is a list of frequently used keys and what they do.
Not all keyboards have the same layout. If the keyboard is not configured in the way described below, ask for assistance from a supervisor or from technical support personnel.
↵Enter On screens where function keys are not assigned – when users press this key, the system will take them to the next logical screen or function. On screens where function keys are assigned, they should be used instead. On these screens, ↵Enter acts as a “return” key and should only be used for input in large multi-line fields (e.g., notes, item descriptions, etc.) Pressing the ↵Enter key will move the cursor to the first enterable position on the next line.
Home This key returns the cursor to the LINK TO field (or in the case where there is no LINK TO field on the screen, the first enterable field of the screen).
Tab Moves the cursor to the next enterable field on the screen.
Shift Plus Tab Moves the cursor back one enterable field on the screen.
Pause/Break or Esc
Takes users to the menu listing the screen they are on.
Delete Deletes a single character to the right of the cursor.
Ctrl Plus Delete or Ctrl Plus End
Deletes everything in a field to the right of the cursor.
Backspace Deletes a single character to the left of the cursor.
Insert Cancels the overtype function in a field (default). Allows existing characters to be “pushed” to the right as new characters are typed into the field.
Note: if users are attempting to type and the cursor is not moving, check to see if the Insert key is on. When Insert is active and the field is full, it will not allow any more characters to be typed.

R⋆STARS Training Manual Chapter #1 – Introduction
- 16 -
Logging Off The System
There are two ways to log off in R⋆STARS.
METHOD 1
Step 01: From most screens in R⋆STARS simply type ‘quit’ in the LINK TO field and press ↵Enter .
S085 UC: 10 STATE OF OREGON 10/25/13 02:08 PM LINK TO: quit VENDOR TRANSACTION INQUIRY TRNG PAGE 0001 VEND NO/MC: 1888888222 500 AGY: DOC TYPE: VC INV#: VEND NAME: BOISE CASCADE OFFICE PRODUCTS REC TYPE: A APPR FUND: FUND: EFF DATE RANGE: TO 063009 DOC NO / SFX REF DOC/SFX INVOICE # TC PDT PMT- # DATE APPR DT AP FUND FUND INDEX PCA AY COBJ AOBJ TRANS AMT R S VC196393 001 PO154035 001 IV203068 960 MA 000010286 010709 112008 3200 1200 44100 42410 09 4428 5301 23.78 VC196393 002 PO154035 002 IV203068 960 MA 000010286 010709 112008 3200 1200 44200 42420 09 4428 5301 23.80 VC196393 003 PO154035 003 IV203068 960 MA 000010286 010709 112008 6400 4632 43200 46320 09 4428 5301 15.87 VC196323 001 PO154035 001 IV203068 960 MA 000010012 111908 093008 3200 1200 44100 42410 09 4428 5301 63.14 VC196323 002 PO154035 002 IV203068 960 MA 000010012 111908 093008 3200 1200 44200 42420 09 4428 5301 63.15 VC196323 003 PO154035 003 IV203068 960 MA 000010012 111908 093008 6400 4632 43200 46320 09 4428 5301 42.10 F1-HELP F2-84 F7-PRIOR PG F8-NEXT PG F9-INTERRUPT ENTER-INQ CLEAR-EXIT
Step 02: The screen should clear and the following line should appear at the top:
LOGOFF <== TYPE OVER THE C AND PRESS ENTER TO LOGOFF OF CICS
Step 03: As per the directions – type ‘c’ over the C in CESF and press ↵Enter as shown below:
cESF LOGOFF <== TYPE OVER THE C AND PRESS ENTER TO LOGOFF OF CICS
The system will return to the opening banner.
R⋆STARS Training Manual Chapter #1 – Introduction
- 17 -
METHOD 2
Step 01: From any screen, press Pause/Break or Esc until the line in Step 02 above appears. Repeat Step 03.
Web-Enabled R⋆STARS Screens
SFMS in conjunction with the DAS Shared Application Maintenance & Support (SAMS) developed web-enabled R⋆STARS screens accessible through the internet for Production and Acceptance Regions. Web-enabled screens went active in Production Region on September 22, 2008. This enhancement was requested by R⋆STARS users who were not comfortable using the current “green screen” technology and wanted a type of “facelift” to the system that was more user-friendly.
The web-enabled screens can be accessed by using the following web sites:
Production Region:
https://columbia.das.state.or.us:3045/CICS/WSFM/DFHWBTTb/FSYS
Acceptance Region:
https://columbia.das.state.or.us:3075/CICS/WSFM/DFHWBTTb/FSYS
Just as with standard R⋆STARS screens, access to web-enabled screens is limited to those with the necessary security. Desktop I.P. addresses and net names must be identified and authorized for users to access R⋆STARS through the firewall.
Only basic data entry and inquiry screens were created in web-enabled form. More R⋆STARS screens may be added to the program later depending upon user response.

R⋆STARS Training Manual Chapter #1 – Introduction
- 18 -
LOG IN
Clicking on the site above will bring up the following screen:
Step 01: Enter your RACFID and password:
Step 02: Click the Submit button or press ↵Enter on your keyboard. The following screen will appear:

R⋆STARS Training Manual Chapter #1 – Introduction
- 19 -
Step 03: Click the Continue button. Keyboard entry is not available for this screen. The following screen will appear:
Step 04: Enter the appropriate User Class and click the Enter button or press the ↵Enter key.

R⋆STARS Training Manual Chapter #1 – Introduction
- 20 -
The News Display screen will display next.
Step 05: Finally, click the Enter button or press the ↵Enter key one more time to get to the main menu.
MENU
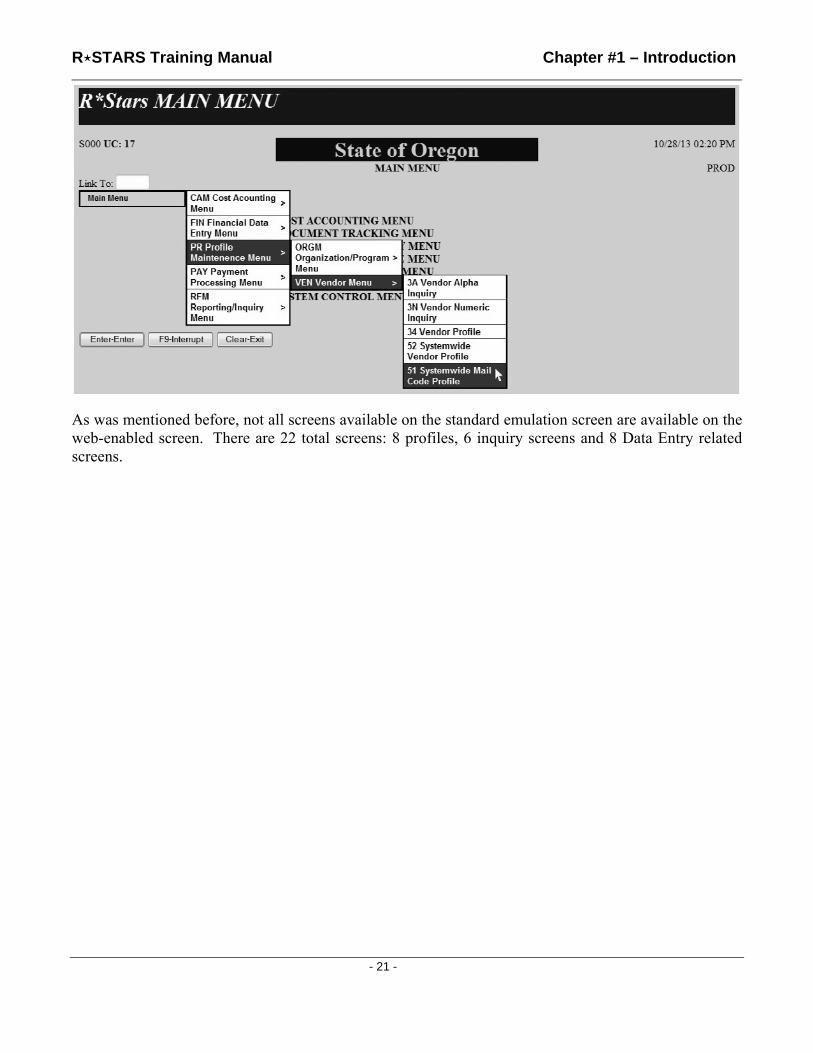
Once you have logged in, you can place the mouse on the Main Menu box and drag it across and down to click on the screen you want. You may also enter the menu ID or screen number into the Link To: field and click or press ↵Enter just like with the standard screens.
R⋆STARS Training Manual Chapter #1 – Introduction
- 21 -
As was mentioned before, not all screens available on the standard emulation screen are available on the web-enabled screen. There are 22 total screens: 8 profiles, 6 inquiry screens and 8 Data Entry related screens.

R⋆STARS Training Manual Chapter #1 – Introduction
- 22 -
Below is a graphic of the drop-down menu:
CAM Cost Accounting Menu
> PA Project Accounting Menu
> 27 Project Control Profile
FIN Financial Data Entry Menu
> 500 Batch Entry Header
> 510 Recall a Batch for Correction
> 530 View Batch Headers
PR Profile Maintenance Menu
> ORGM Organization/Program Menu
> 24 Index Code Profile
> 26 Program Cost Account Profile
> VEN Vendor Menu > 3A Vendor Alpha Inquiry
>
3N Vendor Numeric Inquiry
> 34 Vendor Profile
>
52 Systemwide Vendor Profile
>
51 Systemwide Mail Code Profile
PAY Payment Processing Menu
> PAYR Reconciliation Processing Menu
> 47 Payment Maintenance
RFM Reporting/Inquiry Menu
> DIM Document Inquiry Menu
> 84 Accounting Event
> 86 Document Transaction
> FI Financial Inquiry Menu
> 63 Cash Control Menu
>
89 Summary GL Account Inquiry
Available web-enabled screens not shown on the menu:
▪ 502 Batch Balancing ▪ 504 Revenue Transaction Entry ▪ 505 Pre-Enc/Enc/Expend Transaction Entry ▪ 507 Multiple Vendor Fast Entry ▪ 511 Correct Batch Header ▪ 520 View a Batch

R⋆STARS Training Manual Chapter #1 – Introduction
- 23 -
NAVIGATION
With a few exceptions, mouse buttons relate directly to a specific keyboard key, e.g. the ↵Enter key, any of the 12 function keys, or the Pause/Break key (identified as Clear–Exit ). The buttons or the keyboard can be used interchangeably.
The Linking and Interrupt functions work the same on the web-enabled screens as they do on the standard format.
LOG OFF
To Log off from the web-enabled screen, just continually click on the Clear–Exit button or press the Pause/Break key until you see the following window:
Click Yes and the internet session will terminate.