bombs-at-trincomale… · web view91 bombs: the japanese attack on trincomalee. ... a number of...
TRANSCRIPT
© Robert Stuart 2017
91 Bombs: The Japanese Attack on TrincomaleeIntroduction
The Japanese attack on Trincomalee on 9 April 1942 has not been given the attention it deserves. It was part of the last operation conducted by Kidō Butai (KdB),1 the Japanese carrier force which attacked Pearl Harbor, before it was decimated off Midway two months later, and is well worth studying for that reason alone. It was also the first attack in which KdB did not enjoy the element of surprise at any level, Midway turning out to be the second, and the sole KdB attack in which only level bombers were employed. The present article is a first step toward addressing this gap in the historiography of the war.
This article is focused on the attack on Trincomalee itself. It does not examine in detail the sinking later the same morning of the aircraft carrier HMS Hermes, the destroyer HMAS Vampire, the corvette HMS Hollyhock and the merchant vessels British Sergeant, Athelstane and Norviken some 60 miles south of Trincomalee, or the attack by nine Blenheim bombers of XI Squadron RAF on KdB.
Note: Local time (Zone F, GMT+6) is used in this article and distances are in nautical miles.
_____________________________________________________________________________________
Map 1 – From S. W. Roskill, War at Sea 1939-1945, Volume II, The Period of Balance, HMSO, 1956(Can be accessed and enlarged at http://www.ibiblio.org/hyperwar/UN/UK/UK-RN-II/maps/map4.jpg)

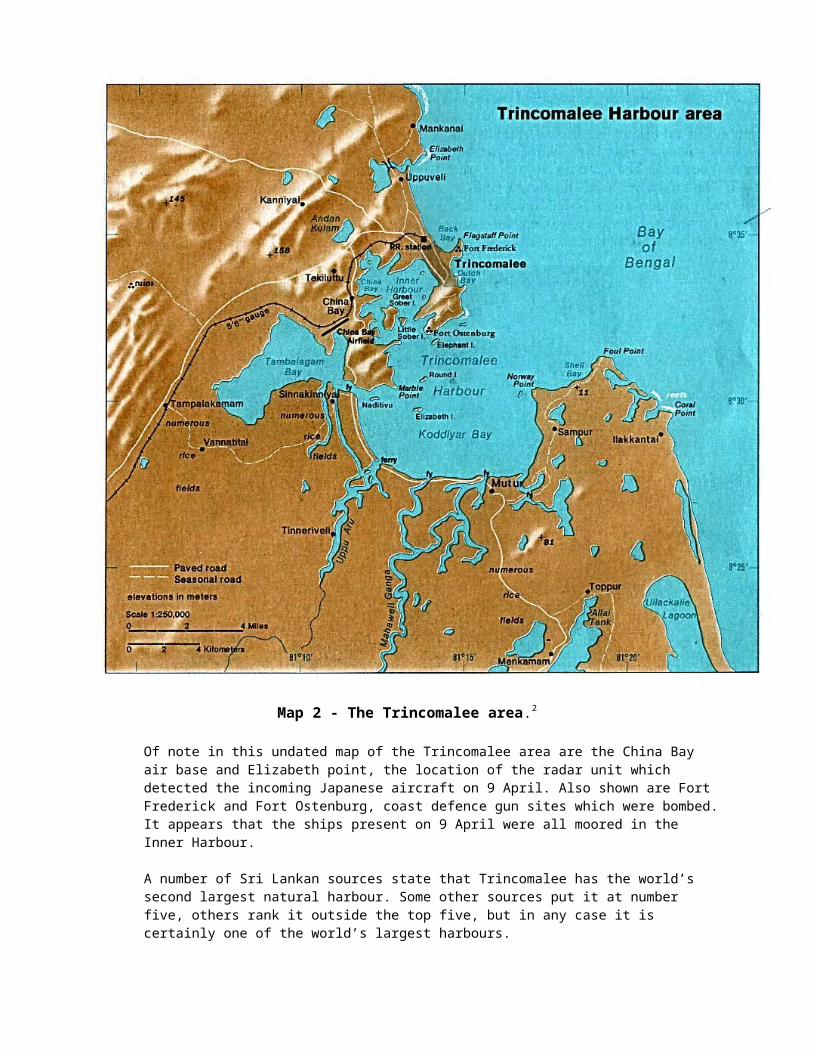
Map 2 - The Trincomalee area.2
Of note in this undated map of the Trincomalee area are the China Bay air base and Elizabeth point, the location of the radar unit which detected the incoming Japanese aircraft on 9 April. Also shown are Fort Frederick and Fort Ostenburg, coast defence gun sites which were bombed. It appears that the ships present on 9 April were all moored in the Inner Harbour.
A number of Sri Lankan sources state that Trincomalee has the world’s second largest natural harbour. Some other sources put it at number five, others rank it outside the top five, but in any case it is certainly one of the world’s largest harbours.
Trincomalee’s inner harbour in 1942, looking roughly southwest from a 273 Squadron Vildebeest.3
The aircraft carrier at centre right is HMS Indomitable, with an unidentified probable naval auxiliary alongside, and the light cruiser in the centre of the photo is HMS Enterprise. The photo was most likely taken 14-16 February, the only dates when Indomitable and Enterprise were both present. The two-funnelled ship to left of Enterprise is possibly the Dutch light cruiser Sumatra, which arrived on 15 February, but this is a very tentative identification. A battleship’s stern is just visible on the left edge of the photo. This must be Royal Sovereign, present 8-17 February.
Looking up from Enterprise, the two large buildings are the main hangars at the RAF’s China Bay base, home to 261 Squadron’s Hurricanes, 273 Squadron’s Fulmars and 788 Squadron’s assorted aircraft. Visible just above Indomitable’s stern are two or three of the Royal Navy’s oil storage tanks. There were 101 tanks of 12,000 tons capacity each, with a total capacity of 1,212,000 tons, more than twice the 563,000 tons capacity of the 54 tanks at Pearl Harbor.
This image highlights the proximity of the anchorage, the air base and the oil tank farm.

Not a Surprise Attack
The attack on Trincomalee was part of Operation C, the Imperial Japanese Navy’s (IJN) brief April 1942 campaign in the Indian Ocean and Bay of Bengal. (See Map 1.) Operation C did not achieve strategic surprise. As the author has written elsewhere4, the IJN’s switch on 4 December 1941 to a new additive table for JN-25B, its main operational code, temporarily cut off the Allies’ best potential source of intelligence on Japanese intentions. But the authorities in London still knew how to read a map, foresaw that Ceylon was vulnerable to attack, and diverted numerous reinforcements thither, including Hurricane and Fulmar fighters, Catalina flying boats, anti-aircraft regiments and radar units.
Neither did Operation C achieve operational surprise. The Allies gradually recovered their ability to read JN-25B, and on or about 20 March the codebreakers at the Far East Combined Bureau (FECB), the signals intelligence (Sigint) centre at Colombo, read or partially read a number of Japanese messages concerning “an operation by a Japanese carrier force, accompanied by another force (thought to be heavy cruisers), in the D area, including an air raid on DG on 2nd April.” The identity of “DG” was unknown initially, but on 28 March, from additional decrypts, FECB “estimated that D was the Ceylon area and DG a town in Ceylon—probably Colombo.”5
The attack on Colombo nevertheless enjoyed a degree of tactical surprise, for the codebreakers got the date wrong and KdB, under the command of Vice Admiral Nagumo, showed up on 4 April, two days later than expected, launching its attack on Colombo the next morning. The Eastern Fleet had been deployed to ambush KdB but by 4 April, when a Catalina sighted KdB, it was 600 miles to the southwest, at Addu Atoll, and completely wrong footed. However, after 5 April the RAF’s 222 Group, which commanded the Ceylon-based air units, continued to employ its limited force of Catalinas to search for the Japanese, with which contact had been lost. By 7 April “It was considered that the Japanese warships operating in the Indian Ocean would rendezvous with those operating in the Bay of Bengal, and jointly attack Trincomalee. Consequently, a Catalina was ordered to carry out a cross over patrol at a depth of 400 miles east of Ceylon, covering an area from which the enemy might make an approach”.6
This Catalina was 240 Squadron’s BN-K, captained by Flying Officer Round, which took off from Koggala lagoon at 0200 on 8 April. Round arrived on station around dawn and spent the day crisscrossing a box measuring 175 miles from north to south and 35 miles from east to west. This proved to be a shrewdly chosen search plan, especially since BN-K was the only Catalina to fly a patrol on 8 April, because at 1507 Round reported sighting three battleships and one carrier steering 350 degrees at 6.10N, 88.49E, which was about 475 miles ESE of Trincomalee – and about 15 miles east of the eastern face of Round’s search box.7 (See Map 1.)
As it happened, Round’s was not the first warning of KdB’s approach. At 1135, three and a half hours before Round sent his sighting report, the direction finding (DF) station on the very appropriately named Direction Island, in the Cocos Islands, intercepted a signal on 7650 KHz from call sign “M E H U”, believed to be that of Akagi, Nagumo’s flagship, on a bearing of 347 degrees. No cross bearing from any other DF station seems to have been obtained, so the transmitting ship’s position could not be determined, but quite plainly a carrier task force on a line running 347 degrees from Direction Island could have been close enough to Trincomalee to reach a launching position by the next morning.8
These two warnings, and especially Round’s sighting of KdB about 15 hours before it launched its strike aircraft, put the kibosh on any remaining chance that the attack on Trincomalee would be a surprise at any level.

Harbour Partially Cleared
Round’s report was received ashore and, according to the British official history, “That night the harbour of Trincomalee was cleared of shipping”.9 This implies that it was cleared of all shipping, but, as shown in Table 1, only four warships, three tankers, and four Armament Stores Issuing Ships (ASIS) were sortied and ordered to sail south along the coast. It seems that the aim was to send away the most valuable ships and those which might have done a lot of damage if they blew up. The only naval vessels left behind were the Dutch light cruiser Sumatra, which was not seaworthy, the monitor Erebus, which had a decent anti-aircraft outfit and had been “nominated for […] AA defence at Trincomalee”, and a few small units. Eight merchantmen and one Naval Stores Issuing Ship (NSIS) were also left in the harbour.
Table 1 – Ships at Trincomalee, 8-9 April 1942
Ship Type Tons Year Nationality Particulars
Sortied on 8 April10
HMS Hermes Aircraft Carrier 10,850 1924 UK Sunk south of TrincomaleeHMAS Vampire Destroyer 1188 1917 Australian Sunk escorting HermesBritish Sergeant Tanker 5868 1922 UK Sunk near HermesAthelstane Tanker 5571 1918 UK Sunk south of HermesHMS Hollyhock Corvette 925 1940 UK Sunk escorting AthelstaneHMS Teviotbank Minelayer 5087 1939 UK Escaped attackRFA Pearleaf Tanker 5911 1917 UK Escaped attackBamora ASIS 3285 1914 UK Escaped attackHeron ASIS 2374 1937 UK Escaped attackProme ASIS 7043 1937 UK Escaped attackTing Sang ASIS 2256 1922 UK Escaped attack
Confirmed Present in Port or Nearby During Air Raid11
HMS Erebus Monitor 8000 1916 UK Near missed, damagedHNLMS Sumatra Light cruiser 8210 1926 Dutch Hit by dud bomb, damagedHMS Balta Minesweeping trawler 545 1941 UK 1 KIA, but prob not damagedHMS Barbour Boom defence vessel 533 1941 UK No known report of damageSagaing Freighter 7958 1925 UK SunkGaroet Freighter 7118 1917 Dutch No known report of damageSembilan Freighter 6556 1922 Dutch No known report of damageCity of Agra Freighter 6361 1936 UK No known report of damageBendoran Freighter 5567 1910 UK No known report of damageSalando Freighter 5272 1920 Dutch No known report of damageClan MacInnes Freighter 4672 1920 UK No known report of damageHong Siang NSIS 3886 1912 UK No known report of damageWarina Freighter 3120 1918 UK No known report of damageMarionga D. Thermiotis Freighter 4784 1904 Greek Strafed off harbour, damaged
Stationed at Trincomalee and Likely Present in Port or Nearby During Air Raid12
HMS Hoxa Minesweeping trawler 545 1941 UK No known report of damageHMS Sandgate Barrage/gate vessel 270 1917 UK No known report of damageHMS Southgate Barrage/gate vessel 270 1917 UK No known report of damageC.405 Minesweeping tug ? ? Ceylonese No known report of damageMajestic Boom defence tender ? ? Ceylonese? No known report of damageSamson Minesweeping tug 310 1903 Ceylonese Reportedly a “casualty”. TBC.
Also sunk south of Trincomalee was the 2924 ton Norwegian freighter Norviken, which was not at Trincomalee on 8 April. On 9 April it was in route from Madras to Bombay and was unlucky enough to be caught by some of the 85 dive bombers sent to attack Hermes as it passed through the area.13

KdB Launches its Attack
About 13 minutes after sending his sighting report, Flying Officer Round was detected by the Japanese combat air patrol (CAP) but he escaped “due to a squall” and arrived back at Koggala at 2045.14 Between the CAP and the weather, the crew of BN-K evidently had no opportunity to see more than a portion of KdB, for it was much larger than they reported. Under Nagumo’s command were the carriers Akagi, Soryu, Hiryu, Shokaku and Zuikaku, the battleships Kongo, Hiei, Haruna and Kirishima, heavy cruisers Tone and Chikuma, light cruiser Abukuma, and eight destroyers. Nagumo’s oilers, escorted by his remaining three destroyers, were loitering well to the east, out of harm’s way.
Submarines were also in support. I-2 sailed from Penang on 22 March to reconnoiter Trincomalee, becoming the first unit to deploy for Operation C. It arrived on 31 March, but could get no closer than 10 miles from the harbour, due to patrol boat activity. Apart from weather reports, I-2 reported little of intelligence value. Apparently it did not detect the departure of any of the ships which sortied on 8 April. A second submarine, I-7, left Penang on 28 March, with orders to use its E9W11 floatplane to conduct aerial reconnaissance of Colombo and Trincomalee. However, it was attacked by a Catalina from Ceylon on 1 April and also encountered several patrol vessels, and the CO, LtCdr Koizumi, cancelled the aerial reconnaissance. I-3, tasked to reconnoiter Colombo, likewise accomplished very little, due to enemy patrolling. (In contrast, I-168 conducted a successful reconnaissance of Midway from 2 to 4 June.)15
The five carriers had 268 aircraft, as shown in Table 2, and there were 23 floatplanes aboard KdB’s battleships and cruisers. There were also a number of H6K Mavis flying boats at Port Blair in the Andaman Islands, 700 nautical miles away. They were capable of reaching the Trincomalee area but were to play no role in the events of 9 April.
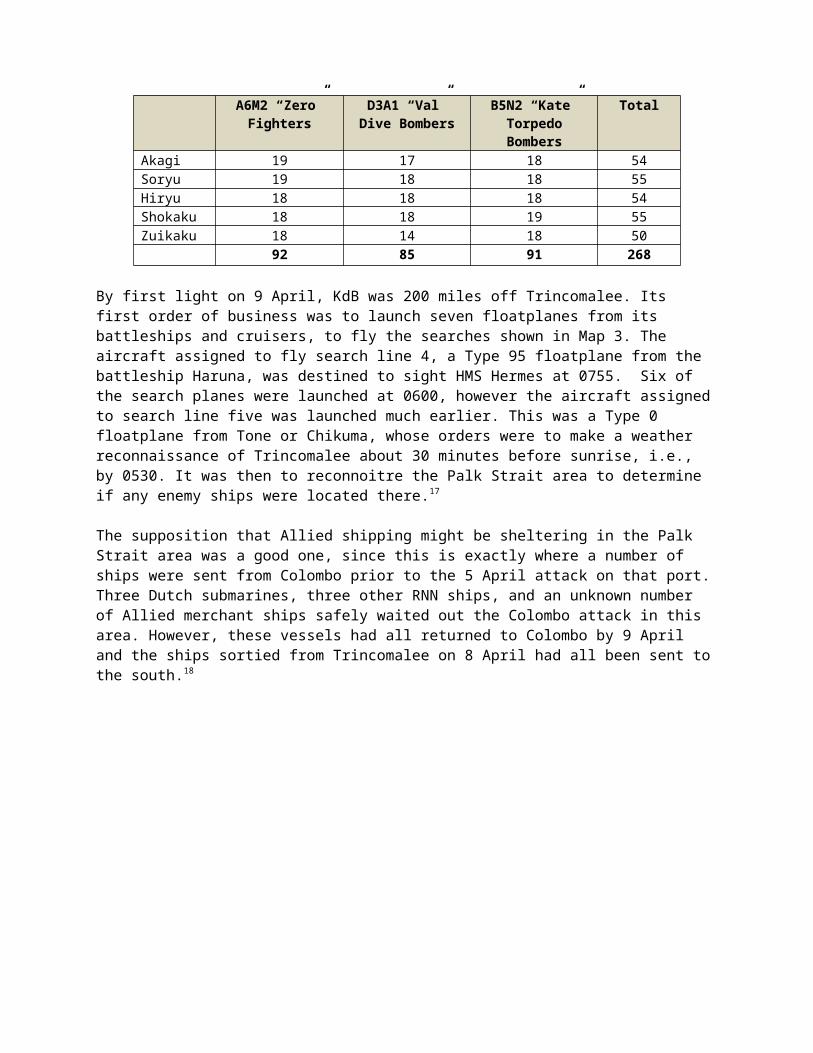
Table 2 – KdB’s Carrier-based Aircraft, 9 April 194216
A6M2 “Zero” Fighters
D3A1 “Val”Dive Bombers
B5N2 “Kate” Torpedo Bombers
Total
Akagi 19 17 18 54Soryu 19 18 18 55Hiryu 18 18 18 54Shokaku 18 18 19 55Zuikaku 18 14 18 50
92 85 91 268
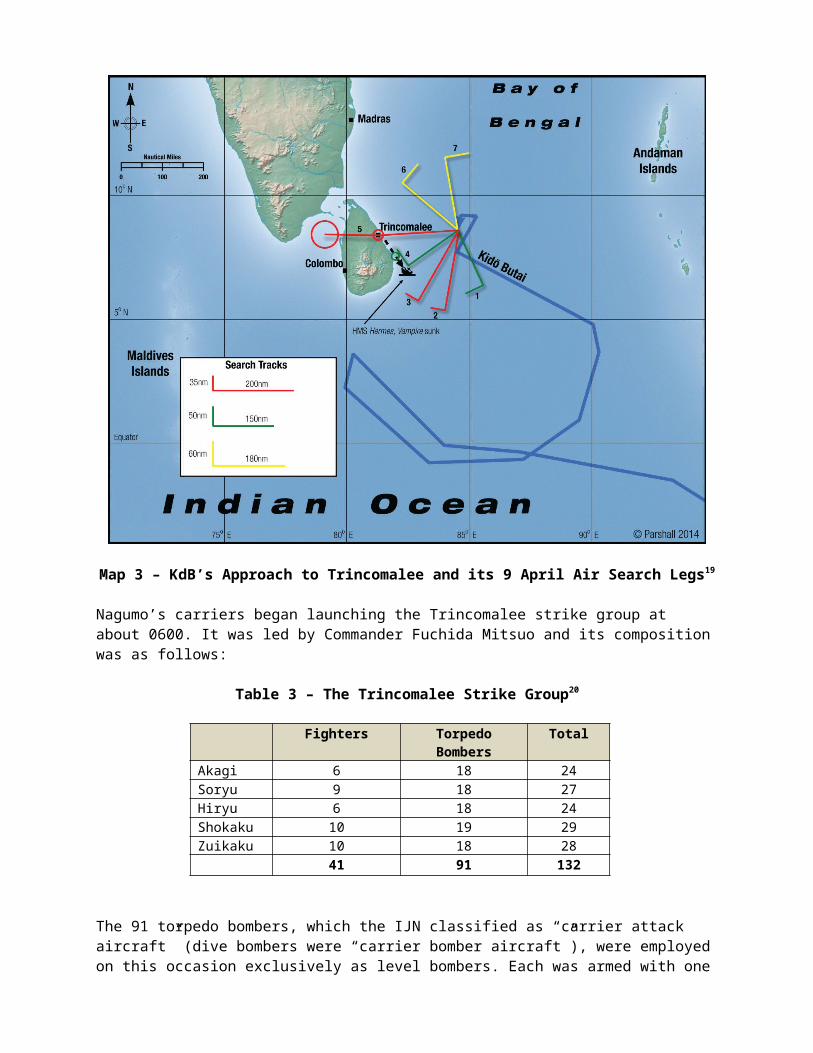
By first light on 9 April, KdB was 200 miles off Trincomalee. Its first order of business was to launch seven floatplanes from its battleships and cruisers, to fly the searches shown in Map 3. The aircraft assigned to fly search line 4, a Type 95 floatplane from the battleship Haruna, was destined to sight HMS Hermes at 0755. Six of the search planes were launched at 0600, however the aircraft assigned to search line five was launched much earlier. This was a Type 0 floatplane from Tone or Chikuma, whose orders were to make a weather reconnaissance of Trincomalee about 30 minutes before sunrise, i.e., by 0530. It was then to reconnoitre the Palk Strait area to determine if any enemy ships were located there.17
The supposition that Allied shipping might be sheltering in the Palk Strait area was a good one, since this is exactly where a number of ships were sent from Colombo prior to the 5 April attack on that port. Three Dutch submarines, three other RNN ships, and an unknown number of Allied merchant ships safely waited out the Colombo attack in this area. However, these vessels had all returned to Colombo by 9 April and the ships sortied from Trincomalee on 8 April had all been sent to the south.18

Map 3 – KdB’s Approach to Trincomalee and its 9 April Air Search Legs19
Nagumo’s carriers began launching the Trincomalee strike group at about 0600. It was led by Commander Fuchida Mitsuo and its composition was as follows:
Table 3 – The Trincomalee Strike Group20
Fighters Torpedo Bombers TotalAkagi 6 18 24Soryu 9 18 27Hiryu 6 18 24Shokaku 10 19 29Zuikaku 10 18 28
41 91 132
The 91 torpedo bombers, which the IJN classified as “carrier attack aircraft” (dive bombers were “carrier bomber aircraft”), were employed on this occasion exclusively as level bombers. Each was armed with one Type 97 No. 80 800kg (actually 805kg) “land” (i.e., High Explosive (HE) rather than Semi-Armour Piercing (SAP)) bomb - see sketch on next page.21 For the B5N crews from Shokaku and Zuikaku (Carrier Division 5), the attack on Trincomalee was their first and only mission during all of Operation C.
It was most unusual that no dive bombers were included in the attack on Trincomalee. During the 7 December attack on Pearl Harbour and the 19 February attack on Darwin, the Japanese had committed every serviceable dive bomber and torpedo bomber to the attack, holding none in reserve. On 5 April roughly half of the dive bombers and half of the torpedo bombers were sent to attack Colombo while the remaining aircraft were kept on the carriers as a reserve, and the same was to be done on 4 June when Midway was attacked. But on 9 April Nagumo sent all his torpedo bombers to attack Trincomalee and held back all his dive bombers. It is not clear why he did this, but one can speculate that the following considerations may have been factors:
The defences at Colombo had been strong enough to bring down six dive bombers and one fighter, the highest loss sustained by KdB in a single day since 7 December, but none of the torpedo bombers, employed as level bombers, had been lost. Possibly there was some concern that similar losses might be incurred by the dive bombers if they were sent against Trincomalee too.
The Japanese had been pleasantly surprised on 5 April when they were able to sink the heavy cruisers Cornwall and Dorsetshire, found at sea southwest of Ceylon, using dive bombers only. Newly confident that their dive bombers could sink anything other than a battleship, of which they expected to encounter none, and generally reluctant to expend torpedoes on merchantmen or small warships, they may have decided that holding all their dive bombers in reserve, in readiness to attack ships fleeing Trincomalee as and when they were found, would maximize their bag.
It took a significant amount of time to remove a torpedo from a B5N and replace it with an 800kg bomb, but a 250kg SAP bomb could be removed from a D3A and replaced with a 242kg HE bomb fairly quickly. Furthermore, any D3A force on standby to attack ships found at sea would not need to be re-armed at all if employed instead to attack ships still in the harbour.
Contact
The defenders had the following air defence assets in the Trincomalee area:
o 261 Squadron RAF, with probably 18 Hurricanes – probably 17 Mark IIB and one Mark I
o 273 Squadron RAF, with 16 Fulmar IIs
o Two Martlets (the British name for the Wildcat) from HMS Indomitable
o 196 Heavy Anti-Aircraft (HAA) Battery, Royal Artillery, with four 3.7-inch guns ready for action
o B and D Batteries, 1 HAA Regiment, Royal Marines, with sixteen 3.7-inch guns ready for action

o 163 Light Anti-Aircraft (LAA) Battery, RA, with twelve 40mm Bofors guns, all ready for action
o 264 LAA Battery, RA, with ten 40mm Bofors guns ready for action
o B, C and D Troops, 22 LAA Battery, RM, with twelve 40mm Bofors guns ready for action
o A Gun Operations Room (GOR), to control and coordinate the shore-based AA guns
o A RAF radar unit, AMES 272, with one radar set, at Elizabeth Point just north of Trincomalee
o A balloon barrage, courtesy of 990 Balloon Squadron
There were thus in all 36 fighters and 54 operational shore-based anti-aircraft guns. In addition, Erebus had six 4-inch AA guns, Sumatra had six 40mm Vickers pompoms, and several other vessels present had some AA weapons. Hoxa, for example, had one 12-pounder (3-inch) gun and three 20mm guns.22
The main air base was RAF China Bay, but there was also a satellite field at Kokkilai, 35 miles to the northwest, and by 9 April at least six of the Hurricanes and most of the Fulmars were located there. The Swordfish of 788 and 814 Squadrons were probably also there. The Japanese were unaware of the existence of Kokkilai, so the dispersal there of these aircraft spared them from being bombed.
The radar operators earned their pay on 9 April. At 0519 they reported their first plot of the day, and the “red” air raid warning was sounded at 0525. “Various plots were given which showed the movement to be mainly parallel to the coast about 35 miles distant at sea. The nearest approach was 13 miles. After a considerable period all the plots retired again to the East, until there was nothing left on the board”, and “raiders past” was sounded at 0645.23
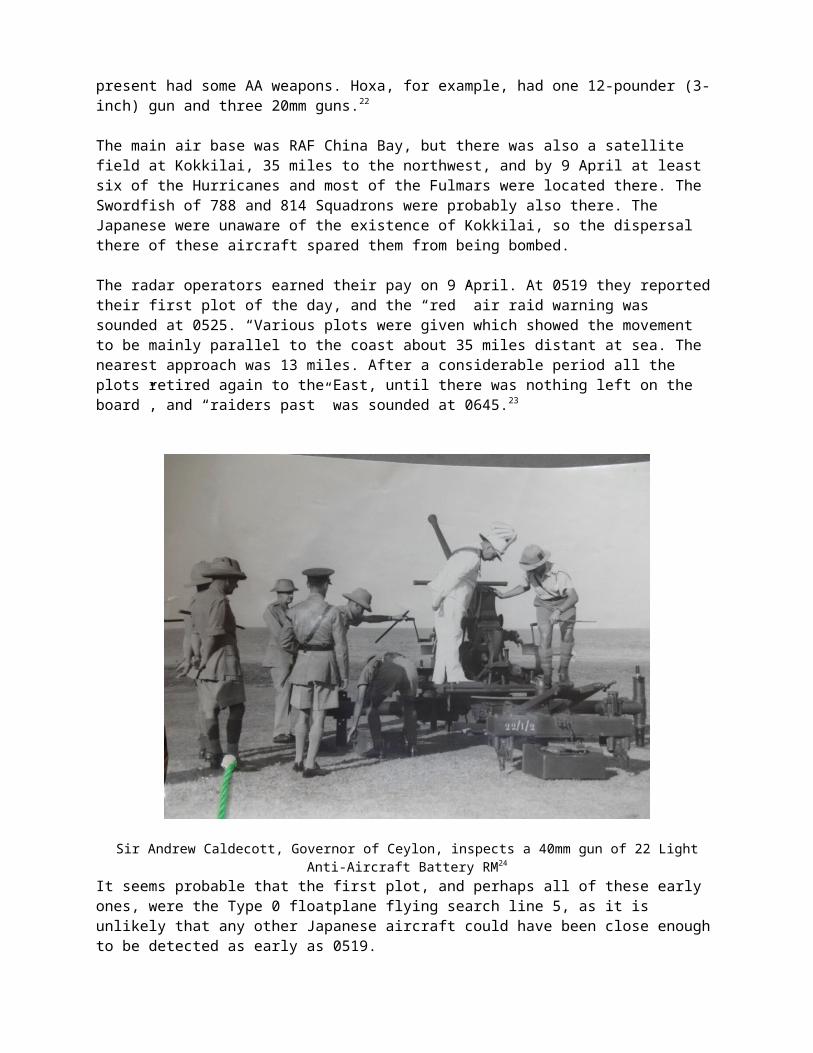
Sir Andrew Caldecott, Governor of Ceylon, inspects a 40mm gun of 22 Light Anti-Aircraft Battery RM24
It seems probable that the first plot, and perhaps all of these early ones, were the Type 0 floatplane flying search line 5, as it is unlikely that any other Japanese aircraft could have been close enough to be detected as early as 0519.
The radar operators soon picked up more plots. At 0706 three waves of aircraft were seen approaching along a bearing of 78 degrees at a range of 91 miles. (At Midway the incoming aircraft were detected 93 miles from the atoll.) The red warning was sounded at China Bay at 0715 and at Trincomalee at 0720.25
KdB was found again at virtually the same moment. Catalina QL-Y from 413 Squadron RCAF, captained by Flt Lt Rae Thomas (a South African in the RAF), took off from Koggala at 0256 on 9 April with orders to fly a cross over patrol between 6.40N and 9.40N, on the meridian 84.30E, which is approximately 200 miles east of Trincomalee, starting at 0500. At 0716 (time given in Allied accounts) QL-Y reported a large enemy force 93 degrees and 205 nautical miles from Trincomalee, course 330. The signal faded before being completely received ashore and it was presumed that QL-Y had been shot down. It was in fact sighted at 0708 and shot down by Zeros from Hiryu at 0715 (time given in Japanese accounts), apparently while sending its report. Thomas and his whole crew were lost – the third Catalina shot down by KdB’s CAP since 4 April.26
It is perhaps worth noting that while the Ceylon-based Catalinas took off early enough to be on station by dawn, KdB’s searches, including those to be flown on 4 June, were generally launched at dawn.
Battle
The defenders drew first blood. A dawn patrol of three Hurricanes from 261 Squadron, led by Flt Lt David Fulford, took off from China Bay at 0635 and orbited the airfield at 15,000 feet. These three fighters were sent forward to intercept the raiders shortly after 0706. At 0715 they sighted the Japanese aircraft 30 miles from the coast. According to Fulford, the Japanese
were at 15,000 feet and flying due west, straight at the harbour and I saw two formations of twin-engined bombers, each comprising two vics of seven in line astern, escorted by a number of Navy O’s.
… I climbed north behind some cloud. I climbed to 22,000 feet and then turned west until I was over the rear formation. I saw several enemy fighters weaving behind the formation, so we dived down and selected one machine each.
The three Zeros were from Zuikaku and two of them were shot down, but one of the three Hurricanes was also lost during this encounter or immediately afterward.27
Fulford was of course incorrect in identifying the Japanese bombers as being twin-engine aircraft. All of the Japanese aircraft involved in the attack on Trincomalee were single-engine.
Meanwhile, 261 Squadron put up 12 more Hurricanes. Six were scrambled from China Bay at 0710 and six from Kokkilai at 0715, bringing to 15 the number getting airborne before the Japanese arrived. Most accounts say that 16 Hurricanes IIBs and 1 Hurricane I were scrambled but these two additional aircraft did not engage the raiders. The sixteenth Hurricane IIB was flown by 261 Squadron’s commanding officer, Squadron Leader A.G. Lewis, a Battle of Britain veteran credited with 18 victories. Lewis did not take off until 0745 and barely got his undercarriage up before he was shot down by Zeros. He was supposedly delayed in taking off because the station commander, Group Captain G.V. Howard, wished
to discuss the disciplinary action to be taken against a pilot who had previously cracked up a Hurricane, but Howard took off in a Hurricane I at 0650, flew to Kokkilai and landed back at China Bay at 0820. His sortie has evidently been counted as the seventeenth scramble against the Japanese but while there is no record of what he did it’s doubtful that Howard engaged the Japanese.28
The six Hurricanes scrambled at 0710 were led by Flt Lt Richard Cleaver. His section of three - himself, Sgt G. Lockwood and Flt Sgt J.D. Martin - was ordered to orbit China Bay while his second section was sent to orbit the eastern edge of the harbour. Sent forward shortly thereafter Cleaver climbed to 21,000 feet but was not able to attack any of the raiders until after the first bombs were dropped. His section then attacked a group of B5Ns withdrawing after attacking the harbour. They were able to make at least one attack on the bombers before the escorts intervened and drove the three Hurricanes off. Lockwood’s aircraft was shot down and destroyed, while Cleaver and Martin were damaged and had to make forced landings. All three pilot’s survived.29
Cleaver’s second section consisted of Flg Off C.F. Counter, Sgt D.D.P. Bowie and Sgt W.E. Pearce (RAAF). They also appear to have been able to make one attack on the raiders before the Japanese fighters could intervene, but once they did it became a very one sided affair. Counter was damaged and returned to China Bay, where he was attacked by a Zero while attempting to land. Counter crash-landed but the Zero was reportedly shot down by a 40mm Bofors gun which scored a direct hit. Bowie and Pearce were both shot down. Bowie was wounded and Pearce was killed.30
The six Hurricanes scrambled at 0715 were led by Flg Off J.V. Marshall. He too was unable to launch an attack until after the bombing of the harbour had commenced, and Marshall and his two wingmen, Sgt A.T. Warnick (RCAF?) and Sgt K.A.S. Mann (RAAF) were intercepted by Zeros when they tried to attack a number of the bombers. Marshall and Warnick survived with no injuries and with little or no damage to their aircraft. Mann had to bail out of his damaged fighter but survived, apparently unscathed.31
The final three Hurricanes, from Marshall’s flight, were flown by Plt Off R.G. Hall (an American in the RCAF), Plt Off E. Mayes and Flt Sgt C.J. Gauthier (RCAF). All three pilots were able to attack a group of B5Ns, but Hall and Mayes were both hit by return fire from the bombers. Hall sustained only minor damage and made in all four attacks without any Zero interfering, returning to Kokkilai only when out of ammunition. Mayes was wounded in the face but he and his fighter survived. Gauthier made two attacks on bomber formations and then attacked 20 (!) Zeros, getting shot down and wounded for his troubles.32
Many accounts claim that six Fulmars from 273 Squadron also rose to defend Trincomalee, and that one of these aircraft was shot down, but this now seems doubtful. The 273 Squadron Operations Record Book (ORB) makes no mention of any Fulmars being scrambled to defend Trincomalee. It does note that a Fulmar piloted by Flg Off A.M. Gregg was lost, but it is known that his aircraft crashed after an early morning reconnaissance mission, before the Japanese arrived. A flight of six Fulmars was scrambled later in the morning and dispatched to defend Hermes, and it seems likely that they have been wrongly recorded as having been scrambled to defend Trincomalee.33
The two Martlets at China Bay also remained on the ground.34 It appears, then, that the raiders were engaged only by 261 Squadron, and the anti-aircraft guns:
The heavy guns were very late in opening fire, due entirely to the tactics employed by the enemy. The morning had dawned with a cloudless sky and shortly after sunrise the conditions looking to the eastward were extremely difficult. The Japanese flew out of the sun and considerable glare, and, until the first formation had been sighted, it was difficult for the guns crews to focus correctly and pick up the aircraft.
At the commencement of the raid, shooting was poor, due to excitement and lack of training. As the engagement progressed, however, the crews settled down and were finally shooting very steadily and with good effect. The conduct of all personnel was excellent.35
The RA and RM gunners ashore fired 764 heavy (3.7 inch) and 953 light (40mm) rounds, and the Japanese described the anti-aircraft fire as being “heavy”. The heavy anti-aircraft gunners claimed to have destroyed two B5Ns and two Zeros, while their brethren on the 40mm guns claimed five unidentified aircraft.36 It appears that the shipboard gunners made no claims.
There is limited supporting information for two of the gunners’ claims. It is known that a B5N from Hiryu crashed into tank 91 in the Royal Navy’s oil tank farm, setting it ablaze and destroying it. Two British reports state that this aircraft was shot down by anti-aircraft fire, but Hiryu’s B5Ns were also attacked by 261 Squadron, so the gunners’ claim for this aircraft cannot be confirmed.37 The second claim for which there is some supporting information concerns the Zero from Shokaku which was lost. As already noted, there is one eye witness account saying this aircraft was shot down by one of the Bofors guns defending China Bay, but this is not conclusive.38
Bombs Away
Moored in the harbour were Erebus, which the attackers mistook for a cruiser; Sumatra; nine merchantmen of 3,000 tons or more; and up to eight small warships and naval auxiliaries (see Table 1). Only three of these vessels were attacked. The B5Ns flew in formations of six aircraft (chutai; one from Shokaku must have had seven aircraft) and dropped their bombs together in six-bomb salvos.39
Erebus was near-missed by six bombs on the port side and "her hull was well peppered by splinter damage”. Casualties were 9 killed and 22 wounded, four of whom later succumbed to their wounds.40

Sumatra was hit by one bomb which failed to explode, according to the only source which provides any details. The same source says that Sumatra was attacked by three chutai, but, as discussed below, it may have been attacked by only one. The extent to which the ship was damaged is unclear, but it was able to depart on 16 April without assistance and repairs were completed at Bombay by 31 July.41
The freighter Sagaing was the only ship sunk. It was hit by one or two bombs and set on fire. Abandoned, it drifted into Malay Cove where it was later sunk by shellfire aimed below the waterline. Sagaing was carrying ammunition and a deck cargo of four aircraft – a Walrus and three disassembled Albacores – all of which was lost. At least three crew members were killed.42

In addition, the Greek freighter Marionga D. Thermiotis, off Trincomalee and heading south for Colombo, was attacked by four Japanese aircraft. Reportedly, at least two bombs were dropped but missed. The ship was then strafed and seven men were wounded, none seriously. Another source says that fighters from Akagi strafed “a small ship” during their return flight. This was presumably Marionga D. Thermiotis and, also presumably, the mention of bombs being dropped was mistaken.43
China Bay was also attacked. The 273 Squadron ORB and a report by the anti-aircraft command (see below) agree that “two flights of Japanese bombers”, so probably two chutai of 12 aircraft in all, dropped salvos of heavy bombs on China Bay. The 261 Squadron ORB describes the damage in the following terms:
The officers Mess and the hangars suffer considerable damage, and 16 people are killed and a number wounded. Two Fulmars were machine gunned on the ground, in the dispersal area.
The Squadron Orderly Room was blown down by a bomb and all office equipment was lost. Many of the files and all airmen’s documents were later salvaged but some had been damaged by bomb splinters.
A petrol bowser containing about 700 Gallons of petrol was hit by bullets and burnt out. One aircraft which was in the hangar and from which the engine and all useful spares had been removed was destroyed.44
A more comprehensive 222 Group report produced a few weeks later lists the following losses and damage:
The south hangar, pyrotechnic store, motor transport yard and main stores were completely destroyed by fire.
One bowser, one oil tank and four vehicles were completely destroyed.
Thirteen aircraft under repair or being assembled were destroyed on the ground - seven Swordfish, four Fulmars and two Albacores.
A bomb dump near the north hangar was hit, and bombs continued to explode throughout most of the morning.
The petrol tank store shed, north hangar, armoury, officers’ mess and other buildings were badly damaged by blast.
Three airmen were killed and six wounded.45
This was obviously an effective attack, but China Bay was not knocked out. The six serviceable Hurricanes remaining to 261 Squadron were refueled, re-armed and flown again later in the day. Four were scrambled at 1050, the remaining two followed at 1105, and a dusk patrol of two Hurricanes was sent aloft at 1745. As well, six Fulmars from Colombo landed at China Bay at 1305 after an engagement off Batticaloa with D3As from Soryu, and there were sufficient intact maintenance facilities to permit groundcrew to repair two of the damaged Hurricanes by 10 April. 261 Squadron continued to operate from China Bay, and by 13 April they were joined by 12 Fulmars of 273 Squadron.46
Which Chutai Bombed Which Target?
Among the people on the ground most carefully watching the attackers were the anti-aircraft gunners, and a 10 April report attached to the war diary of 1 Heavy Anti-Aircraft Regiment notes that:
Patterns of at least six bombs were dropped as follows:-
(1) Ostenburg Point(2) By Naval Offices(3) Ostenburg Fort(4) On Naval Armament Depot(5) On Hangars, R.A.F. Aerodrome, and Officers’ Mess, possibly two formations(6) On a Merchant Ship in harbour [Sagaing](7) Round H.M.S. ‘Erebus’(8) By N.A. [Naval Armament] Store, Ostenburg(9) Near Admiralty House(10) & (11) In Fort Frederick47
The Japanese air group operations records (“kodochoshos”) provide the following information on the targets attacked by the B5Ns:
Soryu - attacked the arsenal
Akagi- attacked ships in the harbour and the arsenal
Zuikaku - attacked ships in the harbour and coastal batteries
Hiryu - 1st chutai attacked barracks, 2nd attacked and sank a "Linder" [Leander] class cruiser, 3rd attacked a headquarters
Shokaku - attacked hangars and fuel tanks48
We can compare the above lists with one given in Monograph 113, which states that the attackers scored a total of 54 hits on the following targets:
“thirty hits on arsenals”. This would imply that all 18 aircraft from Soryu and 12 from Akagi attacked arsenals, meaning that only one chutai from Akagi attacked ships in the harbour. “Arsenals” presumably refers to targets such as (4) and (8) on the 1 Heavy Anti-Aircraft Regiment list. A British report refers to “Three direct hits in dockyard. Electric power lines, water mains, workshops, two cranes, two motor boats, destroyed, damaged or put out of action.”49
“twelve hits on a fortress”. Presumably this was Fort Frederick – items (10) and (11) on the 1 Heavy Anti-Aircraft Regiment list. The same unit’s war diary states that “Two patterns of bombs were dropped in Fort Frederick. The first one being aimed at the flank O.P. and Signal Station on top of the rock and was remarkably accurate as all six bombs landed in the small area demolishing the signal station but leaving the F.O.P. undamaged. There were two Naval casualties in this attack. The second pattern was dropped all round the R.A. Officers’ Mess, but most of the bombs landed just in the sea and little damage resulted except to roof structures.”50
This would seem to indicate that two of Zuikaku’s three chutai attacked “coastal batteries” and only one attacked ships in the harbour.
“six hits on governor’s official residence” and “six hits on barracks south of governor’s official residence”. These were probably the targets of Hiryu’s 1st and 3rd chutai. Admiralty House, item (9) on the 1 Heavy Anti-Aircraft Regiment list, was presumably mistaken for the governor’s residence. According to British reports, a Bofors gun site manned by 163 Light Anti-Aircraft Battery was hit by a pattern of bombs thought to have been aimed at nearby Admiralty House. Six gunners were killed and a number wounded when it “received a very heavy bomb within 20 yards of the emplacement”. A nearby dump of 1,400 rounds of 40mm ammunition caught fire and some rounds were exploding, and two members of the battery were awarded the Military Medal for their efforts to extinguish it. (A second Bofors gun, from 264 Light Anti-Aircraft Battery, was also attacked and two gunners killed, but it is not clear where this gun was located, nor whether it was bombed or strafed.)51
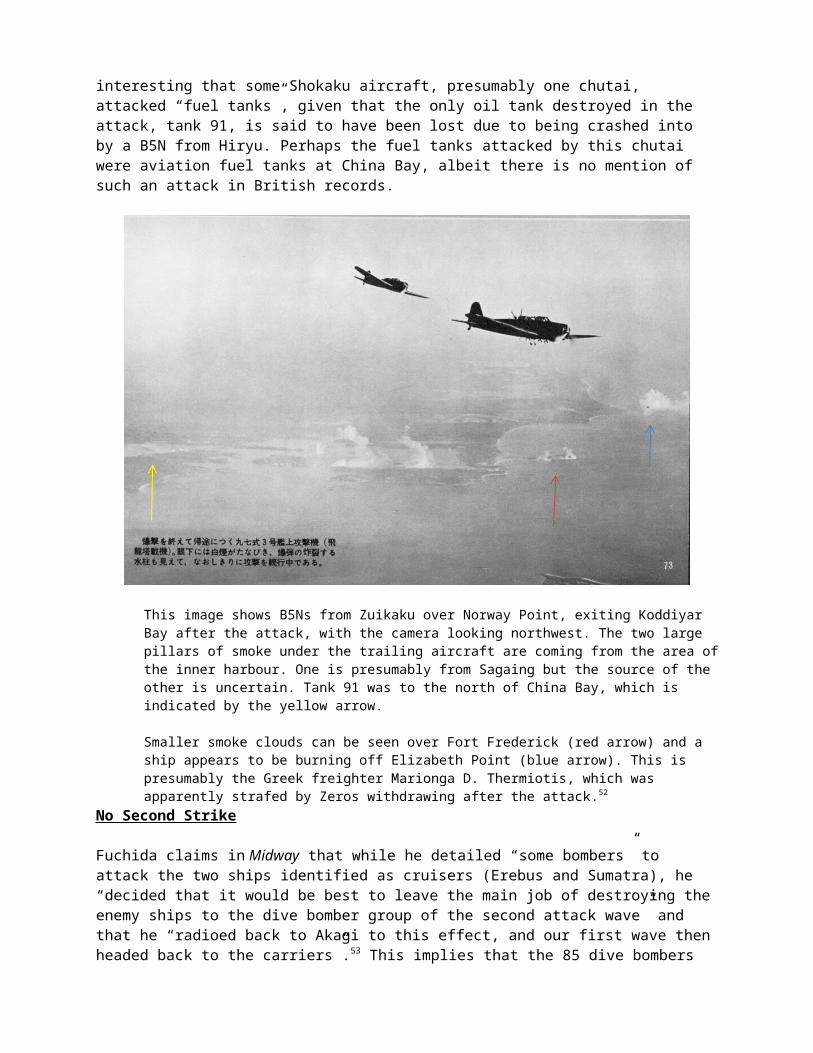
If this reconciliation of these three lists is correct, then as few as three chutai, just 18 aircraft, may have attacked the ships in the harbour, which in turn means that Sumatra may have been attacked by just one chutai. We can also say that the two chutai noted by the British to have attacked China Bay were from Shokaku. It is interesting that some Shokaku aircraft, presumably one chutai, attacked “fuel tanks”, given that the only oil tank destroyed in the attack, tank 91, is said to have been lost due to being crashed into by a B5N from Hiryu. Perhaps the fuel tanks attacked by this chutai were aviation fuel tanks at China Bay, albeit there is no mention of such an attack in British records.
This image shows B5Ns from Zuikaku over Norway Point, exiting Koddiyar Bay after the attack, with the camera looking northwest. The two large pillars of smoke under the trailing aircraft are coming from the area of the inner harbour. One is presumably from Sagaing but the source of the other is uncertain. Tank 91 was to the north of China Bay, which is indicated by the yellow arrow.
Smaller smoke clouds can be seen over Fort Frederick (red arrow) and a ship appears to be burning off Elizabeth Point (blue arrow). This is presumably the Greek freighter Marionga D. Thermiotis, which was apparently strafed by Zeros withdrawing after the attack.52

No Second Strike
Fuchida claims in Midway that while he detailed “some bombers” to attack the two ships identified as cruisers (Erebus and Sumatra), he “decided that it would be best to leave the main job of destroying the enemy ships to the dive bomber group of the second attack wave” and that he “radioed back to Akagi to this effect, and our first wave then headed back to the carriers”.53 This implies that the 85 dive bombers held in reserve on the carriers to “cope with any enemy that may be encountered”, as Monograph 113 puts it, would have been sent to attack Trincomalee if Hermes had not been sighted some 60 miles to the south. It cannot be confirmed that this was Nagumo’s intention, but it is at least plausible.
No record has been found of Fuchida having sent any message back to KdB, but it would be strange if he did not radio ahead a report on the results of the strike and it is as likely as not that he would have included a suggestion regarding target allocation for an attack on Trincomalee by the dive bombers. If he did send such a message, it would have been between 0730, when the attack started, and probably 0800, the earliest time given for the end of the raid in any British or Japanese record. However, Haruna’s No. 3 floatplane reported sighting Hermes at 0755 and the 85 dive bombers started taking off to attack her at 0843.54 The sighting report from Haruna No. 3 likely arrived hard on the heels of any message from Fuchida, or even before it. In either case, it seems that no order was given for the dive bombers to attack Trincomalee, with or without being re-armed, and instead they were launched against Hermes within the hour. This is contrary to what was to happen on 4 June, when the Midway strike commander’s message that there was a need for a second strike against the atoll resulted in the re-arming of the reserve strike force being started and then being reversed when US ships were belatedly sighted.
Hermes sank at 1055 and the last of the dive bombers arrived back on their carriers by 1330. By then the 89 surviving B5Ns had been in their hangars for nearly four hours, and it had been known for 2.5 hours that they would not be needed for a second strike against Hermes. Even if one assumes that some of the 11 damaged ones could not have participated, Nagumo still had at least 78 operational B5Ns, and there appears to have been no reason why they could not have been armed with 800kg bombs and launched by say 1430 to attack Trincomalee again. With sunset at about 1850, the B5Ns probably could have been recovered before last light, however, it is unlikely that the dive bombers could have been refueled, re-armed, launched and flown back from attacking Trincomalee in time to avoid landing in the dark.
There remained at Trincomalee two ships identified as cruisers, several undamaged merchantmen, a large oil tank farm, and other still operational targets. In not attacking Trincomalee again, Nagumo followed the Pearl Harbor model, where he had launched no “third wave”. His reasons for withdrawing without taking any further offensive action have been given as follows:
a. Enemy naval strength in the Bay of Bengal area is believed to be small.
b. About half of the enemy air strength in the Ceylon area is believed destroyed.
c. The number of large-type Torpedo bombers in the India area is small.
d. The enemy lacks aggressiveness.
e. The objective of this operation is believed fulfilled, and thus it would be of no advantage for the task force to linger in the Indian Ocean area.
f. Further large air attacks are necessary against the Africa-Australia supply line.54

Nagumo’s reluctance to “linger” in the area was no doubt due in part to the threat of attack by submarine and/or a more successful repetition of the day’s attack on KdB by shore-based aircraft. In reality, the decimation of XI Squadron by Nagumo’s Zeros had all but removed the chance of another air attack, but the Japanese could not have known that, and the submarine threat was real enough.
At 1750 on 8 April, Dutch submarine K-XI sailed from Colombo for a patrol north of the Palk Strait, which it could have reached only by sailing counter-clockwise around Ceylon. After first light on 9 April it apparently proceeded around the southeastern and eastern coasts on the surface, since it later reported that it was approached by unidentified aircraft and forced to submerge on several occasions. At 1610, K-XI was ordered to intercept KdB at 06.02N, 84.40E, and the British submarine Truant, returning from a patrol off the Malacca Strait, was ordered to 09.40N, 84.35E.56 These positions were respectively 175 miles southeast and 100 miles northeast of KdB’s position when it was attacked by XI Squadron at 1100, which was the last sighting of KdB by the defenders. There was little prospect of the two submarines reaching these positions before last light, let alone actually making contact with KdB, so Nagumo could have safely lingered long enough to launch an afternoon strike on Trincomalee. However, it is unlikely that he would have tarried even if he had known this.
The Tally
Nagumo seems to have been satisfied by the results of the attack on Trincomalee, but of course his returning aircrew’s claims were higher than actual Allied losses. An announcement from Tokyo on 13 April on the overall results of Operation C included this claim:
At Trincomalee, shot down 41 enemy aircraft (including Hurricanes, Blenheims and Supermarines), and set four aircraft ablaze on the ground. Also heavily damaged a B class cruiser of the Leander type, sank two large and one small vessel, and destroyed a naval arsenal, two large hangars, a magazine, army barracks, oil tanks, and other military objectives, including air facilities.57
This honestly reflected the reports of the aircrews and was not exaggerated by Tokyo, which also accurately reported that the Japanese lost 17 aircraft during Operation C.58 But, as we have seen, the Japanese sank only one ship, Sagaing, and not three. They also damaged Sumatra and Erebus, although it is not clear which one they took to be a Leander class light cruiser, and the Marionga D. Thermiotis.
The Allied losses in aircraft are given in Table 4, and it can be seen that they lost 28 aircraft, and not the 45 claimed by the Japanese - and only 8, rather than 41, were shot down over Trincomalee.
Table 4 – Allied Aircraft Losses
Allied Losses59
Unit/Service Lost Damaged Cause413 Squadron 1 Catalina Shot down by KdB CAP273 Squadron 1 Fulmar Crashed in jungle on return from morning search261 Squadron 9 Hurricanes 8 lost in aerial combat, 1 lost on ground261 Squadron 3 Hurricanes Aerial combatRoyal Navy 3 Albacores
1 WalrusLost on Sagaing
Royal Navy 7 Swordfish4 Fulmars2 Albacores
Lost on the ground at China Bay
Total 28 3
Back at full strength: 261 Squadron Hurricane IIBs on parade in their Sunday best, June 1942.60
Several of the Royal Navy’s oil tanks are visible in the background, just beyond the airfield perimeter.
The Japanese were not the only ones to over claim. As summarized in Table 5, they lost only five aircraft, but the Hurricane pilots and anti-aircraft gunners together claimed 21 destroyed or probably destroyed.
Table 5 – Japanese Aircraft Losses, Claimed and Actual
Allied ClaimsClaim Made By Destroyed Probable Damaged Remarks
261 Squadron total 8 4 6From Bloody Shambles.61B5Ns 4 1 5
A6Ms 4 3 1
AA Gun total62 9B Bty, 1 HAA Regt 2 B5N Includes B5N which hit tank 91?D Bty, 1 HAA Regt 2 A6M
163 Bty, 55 LAA Regt 1 unidentified
22 LAA Bty 4 unidentified Includes A6M shot down at China Bay?Total 17 4 6
Japanese Losses63
Ship Lost Damaged CauseZuikaku 2 A6M Fulford and RawnsleyShokaku 1 A6M 22 LAA Bty?Hiryu 2 B5N 1 x B5N Probably all attacked by 261 Sqn, but B Bty, 1 HAA Regt,
claimed the B5N which crashed into tank 91Shokaku 7 x B5N
Majority probably damaged by HurricanesSoryu 3 x B5NTotal 5 11

Neither did the defenders suffer heavy personnel losses. As shown in Table 6, total casualties amounted to just over 100, civilian labourers at the dockyard representing almost one quarter of the 68 fatalities. Only three Allied pilots were killed during the attack on Trincomalee itself. The Japanese sustained only eight fatal casualties, but of course they were all aircrew, including four pilots.
Table 6 – Killed and Wounded in Attack on Trincomalee
JAPANESE64
Ship Killed Wounded RemarksZuikaku 2 Zero pilotsShokaku 1 Zero pilotHiryu 5 1 1 pilot, 1 observer, 3 gunners killed, 1 observer wounded
Total 8 1ALLIES65
Unit/Ship Killed & DOW
Wounded Remarks
413 Sqn 8 Crew of Catalina shot down by KdB CAP273 Sqn 2 Crew of Fulmar lost in pre-raid accident261 Sqn 3 4 Includes a pilot killed on the ground by a strafing ZeroRAF China Bay 3 6 261 Sqn ORB probably wrong to say that there were 16 dead990 Balloon Sqn 3 2 Unknown if sustained at China Bay or at balloon sites43 LAA Regt 255 LAA Regt 6 At least 2?Other Army 2 RE and RAOC. Probably at Fort FrederickHMS Erebus 13 18HMS Balta 1Sagaing 3Marionga D. Thermiotis 7HMS Lanka 5 HMS Lanka was the RN shore baseDockyard 17 2 15 of the fatal casualties were Indian labourers
Total 68 41
Fuchida’s B5N2, AI-301, lands on Akagi on either 5 April or 9 April.66

Results
For the Japanese, the attack on Trincomalee produced meagre results. Of the 12 ships of over 3,000 tons present, only Sagaing was sunk. Another three, Erebus, Sumatra, and Marionga D. Thermiotis, were damaged. Erebus was a fairly valuable ship, but was soon put to rights and later provided gunfire support off Sicily, Salerno, Normandy, Le Havre and Walcheren. Sumatra, on the other hand, was the very definition of a low value target. Unlike sister ship Java, it had not been employed in the defence of the East Indies, due to its poor condition and manpower shortages. Its only contribution to the Allied war effort came when it was sunk on 9 June 1944 as a block ship in one of the “Gooseberry” breakwaters off Normandy. As for the strafing of the Marionga D. Thermiotis, it may have denied the services of this ship to the Allies for a little as eight hours, for it resumed its voyage to Colombo at 1600. This was a far cry from the results realized at Pearl Harbour, Tjiltjap or Darwin, and less even than the rather limited results of the attack on Colombo four days earlier.
Neither did the damage inflicted on other targets amount to much. China Bay was given a decent battering but it was not knocked out. The 30 bombs aimed at such targets as the dockyard and naval armament stores might have reduced the ability of the Eastern Fleet to operate from Trincomalee, but the 24 bombs aimed at the supposed governor’s residence, barracks and coastal defence guns were wasted. It would have been better if these four chutai had instead attacked another four merchant ships. Sinking or disabling additional merchantmen would certainly have hindered the Allied cause more than taking out coastal defence guns when the Japanese had no intention of putting any ships within range of them – and none of these guns were in fact knocked out.
The attackers did better in terms of aircraft destroyed, shooting down or otherwise eliminating 28, and temporarily leaving 261 Squadron with only six operational Hurricanes, but, the short term decimation of the defending fighters meant little in the absence of an immediate follow-up attack. The nine Hurricanes lost represented only about one day’s production from the factories in Britain and Canada,67 so 261 Squadron was soon once again at full strength.
The limited results obtained by the 91 800kg bombs dropped at Trincomalee can also be compared with the damage inflicted on the Allies by the 85 much smaller 250kg bombs dropped by the D3A dive bombers sent to attack Hermes south of Trincomalee. In all, these 85 bombs sank three warships, Hermes, Vampire and Hollyhock, two valuable tankers, British Sergeant, Athelstane, and the freighter Norviken. Three of these ships, Hollyhock, Athelstane and Norviken, were sunk by the 18 D3As from Soryu, and it could be argued that these 18 250kg bombs inflicted more harm on the Allied war effort than the 91 800kg bombs dropped at Trincomalee. These 91 bombs sank only one ship. Apart from that, the damage they inflicted was local, repairable and of no lasting significance. Were it not for the ships sunk by the dive bombers, the commitment of KdB to attack Trincomalee would not have been worth the trip.
Notes
1. Kido Butai means “Mobile Force” but is usually rendered as “Striking Force”.
2. Map 2 is from http://4.bp.blogspot.com/-5SKJA_8mtu4/TprH-iHPbkI/AAAAAAAAAa8/x2VeGCJPSmA/s1600/trincomalee-harbour.jpg but it is available on other sites and its provenance is unknown.
3. This photo was taken by a RNZAF pilot, the late Don Mackenzie, who was posted to Ceylon in July 1941. He served with 273 Squadron and was at Colombo on 5 April and at Trincomalee on 9 April. It is one of 15 photos from his collection posted on the Wings Over New Zealand site, at http://rnzaf.proboards.com/thread/20621/infamy-ceylon. Seven of the photos were taken at China Bay immediately after the attack and depict some of the damage sustained there.
4. Stuart, Robert, “Air Raid Colombo, 5 April 1942: The Fully Expected Surprise Attack”, in The Royal Canadian Air Force Journal, Volume 3, Issue 4, Fall 2014, pp. 34-35. Accessible at http://www.rcaf-arc.forces.gc.ca/assets/AIRFORCE_Internet/docs/en/cf-aerospace-warfare-centre/elibrary/journal/2014-vol3-iss4-06-air-raid-colombo-5-april-1942.pdf.
5. The National Archives (UK), file HW 4/25, Captain H. L. Shaw, The History of HMS Anderson, 24 May 1946, p. 6. HMS Anderson was the intercept and direction finding station at Colombo.
6. 222 Group report “Japanese Air Attack on Trincomalee on 9th April, 1932”, 24 July 1942, in AIR 23/4801, para 1. For further information on the operations of the Japanese force operating in the Bay of Bengal, see the author’s article “20 Ships, Not 23: Ozawa’s Score, 5-6 April 1942”, on the Combined Fleet site at http://www.combinedfleet.com/articles.htm.
7. AIR 28/431, Operations Records Book (ORB), RAF Station Koggala (copy kindly provided by Michael Wenger); Enclosure No.1 in East Indies’ No. E.I. 3181 of 22 April 1942, in ADM 199/623; signals Deputy C-in-C Eastern Fleet 1935Z/8, 222 Group 0015Z/8 and 1st Sea Lord 1930B/8, and Round’s sighting report, in ADM 223/259. Flying Officer Round was probably Arthur Round, service number 82894, RAFVR. See http://www.rafcommands.com/forum/showthread.php?19750-First-name-or-initials-of-F-O-Round. I am indebted to Dr. Malcolm Cooper and to Tony Cooper (the two are not related, so far as I know) for providing many of the “ADM” series files from the UK National Archives which are cited here. Dr. Cooper is the author of Glen and Shire Lines, J & C Harrison: The History of a Family Shipping Venture, and other works. Tony Cooper is a researcher with Convoy Web.
8. ADM 223/259, Chief of Intelligence Staff (COIS) Colombo signal sent at 0839Z on 8 April 1942; Michael Smith, The Emperor’s Codes: The Breaking of Japan’s Secret Ciphers (New York: Arcade, 2000), pp. 130. See also the thread “Was Akagi's call sign M E H U in April 1942?” at http://www.j-aircraft.org/smf/index.php?topic=12445.0.
9. S. W. Roskill, War at Sea 1939-1945, Volume II, The Period of Balance, HMSO, 1956, p. 27. (Accessed at http://www.ibiblio.org/hyperwar/UN/UK/UK-RN-II/UK-RN-II-1.html.) The partial clearance of the harbour was ordered by Vice Admiral Geoffrey Arbuthnot, the Commander-in-Chief, East Indies. He is quoted as saying after the fact that he decided “to sail the Hermes and all other shipping from Trincomalee”. See Battle Summary No. 15, Naval Operations off Ceylon, 29th March to 10th April, 1942, produced by the Admiralty in 1943, p. 13, accessed at http://www.navy.gov.au/sites/default/files/documents/Battle_Summary_No_15_and_16.pdf.
10. Battle Summary No. 15, op cit; Commander in Chief, East Indies Station, monthly report for April 1942, entry for 8 April, accessed at http://www.naval-history.net/xDKWD-EF1942a.htm, but wrongly labelled there as the Eastern Fleet War Diary; East Indies Station No. E.I. 3181 of 22 April 1942, in ADM 199/623; C-in-C EI signal 0814Z/11, in Admiralty War Diary; Deputy C-in-C Eastern Fleet signal 1436Z/9, in ADM 223/259.
11. Battle Summary No. 15, p. 14; Ian Buxton, Big Gun Monitors: The History of the Design, Construction and Operation of the Royal Navy's Monitors, Seaforth Publishing, 2008, p. 166; Mahrie Locket, Radio Man, iUniverse, Lincoln, 2007, pp. 160-169; J. Anten, H. Klom, D. van Lunsen, R.F. van Oosten, D. Pilkes and M.G.J. van Zeeland, Hr. Ms. Kruisers 'Java' en 'Sumatra', Zierikzee, Netherlands: Asia Maior, 2001, pp. 121, 144; Dr. Ray Solly, Athel Line: A Fleet History, The History Press, 2009, pp. 65-66; entry for HMS Erebus on the Naval-History site, at http://www.naval-history.net/xGM-Chrono-03Mon-Erebus.htm; ship movement information from the Naval-History site and from the Convoy Web site, at http://www.convoyweb.org.uk/; 2009-2012 correspondence between the author and Tony Cooper; email exchange with Dutch naval historian Jan Viser, 23-24 January 2011; C-in-C EI signal 0814Z/11, op cit.
12. Ship movement and location information from the Naval-History site, accessed at http://www.naval-
history.net/xDKWW2-4201-40RNShips4Overseas.htm, http://www.naval-history.net/xDKWW2-4006-15RNOverseas-Dominion.htm, and http://www.naval-history.net/xDKWW2-4107-34aRNOverseas-Dominion.htm; Commander in Chief, East Indies Station, monthly report for April 1942, op cit, and monthly reports for January through March 1942, accessed at http://www.naval-history.net/xDKWD-EF1942.htm; Solly, p. 66.
13. Entry for Norviken on the Warsailors site, accessed at http://www.warsailors.com/singleships/norviken.html.
14. Kōichiro Kageyama, “The Third Mobile Operation in the Indian Ocean (Operation C)”, National Institute for Defense Studies, War History Department, Tokyo (accessible at http://www.combinedfleet.com/articles.htm), p. 4; “Japanese Monograph 113, Task Force Operations”, p. 75; Koggala ORB.
15. TROMs for I-2, I-3, I-7 and I-168, at http://www.combinedfleet.com/sensuikan.htm#tromsi; Monograph 113, pp. 65-66, chart “Disposition of Forces”, pp. 70-71; DesRon1 War Diary, via 30 January 2013 email from Lu Yu.
16. According to research by Marc Horan and Eugen Pinak (see http://propnturret.com/tully/viewtopic.php?f=4&t=297 and http://propnturret.com/tully/viewtopic.php?f=5&t=1430&p=8715#p8715), KdB had 275 carrier-borne aircraft at the start of Operation C, and this figure is consistent with other sources. Seven aircraft were lost during the attack on Colombo, leaving 268 on 9 April.
17. KdB Radiogram Order No. 80, summarized in Monograph 113, pp. 76-77, was issued at 1745 on 8 April and promulgated Nagumo’s search plan for 9 April.
18. Commander in Chief, East Indies Station, monthly reports for March and April 1942; Deputy C-in-C EF signal 1433Z/4, in ADM 223/259; 28 January 2011 email from Jan Viser; Gerard Horneman, 20 October 2009 posting on http://www.dutchsubmarines.com/ (no longer accessible).
19. Map 3 is from “A Question of Estimates – How Faulty Intelligence Drove Scouting at the Battle of Midway”, by Anthony Tully and Lu Yu, in the Naval War College Review, Vol. 68, No. 2, Spring 2015. It has been included in this article with the permission of Jon Parshall.
20. The figures are from the Japanese air group operations records (“kodochoshos”).
21. Ibid; Monograph 113, p.77; posts by Don Kehn, Jr., Bob Alford, and “genie854” in the thread “Question on use of land versus anti-ship bombs during attack on Trincomalee” at http://www.j-aircraft.org/smf/index.php?topic=16604.msg117629#msg117629. The sketch is from “Japanese Bombs”, a December 1945 report by the U.S. Naval Technical Mission to Japan, accessed at http://www.fischer-tropsch.org/primary_documents/gvt_reports/USNAVY/USNTMJ%20Reports/USNTMJ-200E-0465-0531%20Report%200-23.pdf.
22. Routledge, N.W., History of the Royal Regiment of Artillery, Anti-Aircraft Artillery 1914-55, Brassey’s, 1994; Christopher Shores and Brian Cull, with Yasuho Izawa, Bloody Shambles, Volume Two, The Defence of Sumatra to the Fall of Burma, London: Grub Street, 1993 (hereinafter cited as “Shores et al”), pp. 384-392, p. 411; 222 Group report, op cit; Battle Summary No. 15, op cit; Signals Volume IV, Radar in Raid Reporting, Air Historical Branch, 1950, in AIR 10/5519; Ceylon Anti-Aircraft Command War Diary, in WO 172/1521; 1 Heavy Anti-Aircraft Regiment RM War Diary, in ADM 202/153; 261 Squadron ORB, in AIR 27/1540; 273 Squadron ORB, in AIR 27/1581 and AIR 27/1586; AMES 272 ORB, in AIR 29/175; Commander-in-Chief Ceylon signal IZ 155, 1353Z/2, 2 May 1942, in AIR 20/4693; Buxton, p. 173; Anten, et al, p. 176; uboat.net website, Isles class page, at http://uboat.net/allies/warships/class.html?ID=339&navy=HMS.
23. AMES 272 ORB, op cit; 1 Heavy Anti-Aircraft Regiment RM War Diary, op cit, Appendix C, 10 April 1942; 222 Group report.
24. 1 Heavy Anti-Aircraft Regiment RM War Diary. The photo was taken at Colombo on 9 February 1942, just after a parade at which an officer was invested with the OBE, hence the formal attire.
25. Ibid; Ceylon Anti-Aircraft Command War Diary.
26. Shores et al, p. 413; 413 Squadron ORB; BS15, p. 13; 222 Group report para 2; Enclosure No.1 in East Indies’ No. E.I. 3181, in ADM 199/623; Commander in Chief, East Indies Station, monthly report for April 1942, op cit; Kageyama, p. 4; Hiryu Detailed Action Report (DAR) track chart, kindly pervaded to the author by Lu Yu; Eugen Pinak post on 9 May 2012 at http://www.j-aircraft.org/smf/index.php?topic=11931.135; Colombo WT 0154Z/9, in ADM 223/259.
27. Thomas, Andrew, Hurricane Aces 1941-45, Osprey, 2003, pp. 74-75; Michael Tomlinson, The Most Dangerous Moment, William Kimber, 1976, pp. 139-141; Shores et al, p. 413; 261 Squadron ORB; 222 Group report, para 12; Battle of Britain Monument website, entry for Fulford, at http://www.bbm.org.uk/airmen/Fulford.htm. Fulford’s account is from Tomlinson.
28. Shores, et al, pp. 391, 414, 415-417, 419; Tomlinson, p. 139; 261 Squadron ORB; 222 Group report, para 12.
29. Shores, et al, pp. 414-416; 222 Group, para 12-13; Biplane Fighter Aces from the Second World War website, entry for Cleaver, at http://surfcity.kund.dalnet.se/commonwealth_cleaver.htm.
30. Ibid, pp. 416-417; Thomas, p. 75; Shores, Christopher, Those Other Eagles, Grub Street, 2004 (hereinafter cited as “Those Other Eagles”), p. 126.
31. Ibid, pp. 417-418.
32. Shores, et al, pp. 418-419; Those Other Eagles, p. 206; Shores, Christopher, and Williams, Clive, Aces High. The Fighter Aces of the British and Commonwealth Air Forces in World War II, Neville Spearman, 1966, p. 159; Halliday, Hugh A, “Far East Flyers”, in Legion, Canada’s Military History Magazine, March 28, 2014, online at https://legionmagazine.com/en/2014/03/far-east-flyers/; “FIGHTING REPORT BY F/SGT. GAUTHIER. 9/4/42.”, in AIR 27/1540; Aircrew Remembered website, entry for Gauthier, at http://www.aircrewremembered.com/RCAFNotesDatabase/?q=gauthier.
33. Battle Summary No. 15, p. 14; 222 Group report; 273 Squadron ORB; Shores et al, pp. 415, 422-424. The author is indebted to Duncan Monroe for drawing attention to the evidence that 273 Squadron did not participate in the defence of Trincomalee, in the thread at http://propnturret.com/tully/viewtopic.php?f=20&t=2689&hilit=273.
34. Shores et al, p. 421, quotes one of the Martlet pilots saying that these Royal Navy fighters were not scrambled, and no other source indicates otherwise.
35. 222 Group report, op cit, paragraphs 16 and 18.
36. Ceylon Anti-Aircraft Command War Diary, op cit; 1 Heavy Anti-Aircraft Regiment RM War Diary, op cit.
37. 100 Indian Infantry Brigade report, op cit; 1 Heavy Anti-Aircraft Regiment RM War Diary, Appendix C, 10 April 1942; March 2017 posts by Eugen Pinak and Jim Sawruk, citing Hiryu’s kodochosho, in the thread at http://propnturret.com/tully/viewtopic.php?f=4&t=3071; Monograph 113, p. 77, which states that the “ground fire was extremely heavy”; Fuchida, Mitsuo and Okumiya, Masatake, Midway: The Battle That Doomed Japan, The Japanese Navy’s Story, United States Naval Institute, p. 43, which says there was “a heavy barrage”.
38. Shores et al, pp 416-417. Ledet, Michel, Samouraï sur Porte-Avions, Éditions Lela Presse, 2006, p. 161, also says that AA fire destroyed this Zero, but no source is cited and Ledet is possibly just repeating the account in Bloody Shambles. The Bofors guns defending China Bay were manned by D Troop, 22 Light Anti-Aircraft Battery, RM.
39. Monograph 113 p. 77 states “There were one B-class cruiser, one light cruiser and nine transports at anchor in the port”. The bomb-armed B5Ns which attacked battleship row at Pearl Harbor flew in five-plane formations, but thereafter the six-plane formation was used most of the time when B5Ns made level bombing attacks with 800kg bombs, including the attack on Trincomalee. See the discussion in the thread “Size of B5N formations which attacked Darwin”, at http://propnturret.com/tully/viewtopic.php?f=4&t=2456&p=12517&hilit=trincomalee#p12517 .
40. Buxton, p. 166; “Casualty Lists of the Royal Navy and Dominion Navies, World War 2”, http://www.naval-history.net/xDKCas1942-04APR.htm .
41. J. Anten, et al, p. 144; Royal Netherlands Navy Warships of World War II site, at http://netherlandsnavy.nl/Sumatra_his.htm and
http://www.netherlandsnavy.nl/Cruisers/Sumatra_pside.jpg.
42. 222 Group report; Shores et al, p. 422; Solly, pp. 65-66; entry on The Wrecksite website, at http://www.wrecksite.eu/wreck.aspx?139948; Commonwealth War Graves Commission casualty data. The photo is from http://www.wrecksite.eu/img/wrecks/sagaing.jpg?61dd561c-b34a-43ea-ad88-13c49c9cdf63.
43. Movement card for Marionga D. Thermiotis, in BT/389/33; 100 Indian Infantry Brigade report on the
bombing of the Marionga D. Thermiotis, in ADM 199/623; Shores et al, p. 421. The Indian brigade, one of six brigades sent to protect Ceylon, was deployed in the Trincomalee area. There is a photo of Marionga D. Thermiotis at http://www.greekshippingmiracle.org/images/4-1919/29_MARIONGA_D-2.jpg
44. 273 Squadron and 261 Squadron ORBs, op cit.
45. 222 Group report, para 27.
46. 261 Squadron ORB; China Bay Intelligence Officer report, attached to Enclosure No. 1 in East Indies’ No. E.I. 3181; C-in-C EI signal 104 1316Z/13, in AIR 20/4693.
47. 1 Heavy Anti-Aircraft Regiment RM War Diary, Appendix C, 10 April 1942, op cit.
48. Translation is from the 9 March 2017 post by Eugen Pinak in the thread at http://propnturret.com/tully/viewtopic.php?f=4&t=3071.
49. 100 Indian Infantry Brigade report, op cit.
50. 1 Heavy Anti-Aircraft Regiment RM War Diary, Appendix C, 10 April 1942, op cit.
51. 100 Indian Infantry Brigade report, op cit; 1 Heavy Anti-Aircraft Regiment RM War Diary, Appendix C, 10 April 1942, op cit; WO 373/43/276; WO 373/43/277.
52. The photo is from http://www.armouredcarriers.com/battle-for-ceylon-hms-indomitable-formidable/ but is probably from Maru magazine originally. The location of tank 91 is shown at http://amazinglanka.com/wp/trincomalee-oil-tank-farm/.
53. Fuchida, p. 44.
54. Tagaya, Osamu, Aichi 99 Kanbaku ‘Val’ Units 1937-42, Osprey, 2011, p. 59.
55. Monograph 113, pp. 78-79; Kageyama, p. 3.
56. Horneman, op cit; Jan Viser emails, 5 Feb 2011, 13 March 2011; Deputy C.inC. EF 1016Z/9, in ADM 223/259.
57. ADM 223/259; The Globe and Mail, 14 April 1942.
58. The total of 17 aircraft lost counts only those shot down outright. Total combat losses amounted to 18 if the B5N which ditched near KdB on 9 April is counted. In addition, a D3A from Soryu was apparently lost on 9 April in a landing accident.
59. 413 Squadron ORB; 261 Squadron ORB; 273 Squadron ORB; 222 Group report para 2, 26, 27; Shores et al, pp. 391, 414-419, 422-424.
60. Image is from the Royal Air Force Commands site, at http://www.rafcommands.com/galleries/SEAC/Cpl-Kennedy.
61. Shores et al, p. 422. Other sources give drastically different figures for 261 Squadron’s claims. For example, the 222 Group report puts them at 14 destroyed, 14 probably destroyed and three damaged. The totals on page 422 cannot easily be reconciled with the pilots’ individual claims recounted earlier in the same chapter or such sources as Ace High, but they are probably the best available.
62. Anti-Aircraft Command Ceylon War Diary; 1 Heavy Anti-Aircraft Regiment RM War Diary.
63. Shores et al, pp. 414, 416, 421; Brown, David, Carrier Operations in World War II, Volume II, the Pacific Navies, Dec 1941 – Feb 1943, Naval Institute Press, 1974, p. 44; Ledet, p. 161; 24 March 2009 post by Mark Horan in the thread “Operation C” at http://propnturret.com/tully/viewtopic.php?f=4&t=297; March 2017 posts by Eugen Pinak and Jim Sawruk, citing Hiryu’s kodochosho, in the thread at http://propnturret.com/tully/viewtopic.php?f=4&t=3071. The deduction that one B5N from Hiryu was damaged is based on the information, posted by Sawruk, that one B5N returned with a dead gunner.
64. Ibid.
65. 413 Squadron ORB; 261 Squadron ORB; 273 Squadron ORB; RAF Station Koggala ORB; 222 Group report para 2, 26, 27; Shores et al, pp. 414-420; Commonwealth War Graves Commission website casualty data.
66. From the Japanese Aviation site, at http://japanese-aviation.forumeiros.com/t21-41-ceylon-raid-april-5-1942.
67. Website “Hawker Hurricane - Defender Of The Empire”, at http://www.k5083.mistral.co.uk/APS.HTM.