biol2281 pre-lab e2: microscopy ( 10 pts) · 2016-04-18 · biol 2281, spring 2016 e2 lab procedure...
TRANSCRIPT
BIOL2281 Pre-Lab E2: Microscopy ( 10 pts)
Name: _______________________________ Lab Section: _______________ Score: _______
1. (3 pts) Describe the functions for the parts listed below:
• Ocular lenses –
• Concentric X-Y control knobs –
• Aperture (iris) diaphragm –
2. (1 pts) Compare/contrast prokaryotes and eukaryotes in terms of size and nuclear membrane.
3. (1 pt) How do you calculate total magnification?
4. (1 pt) Which of the following terms explains why you should only have to move the fine adjustment
knob very little in order to bring the image into focus when you move to a higher power objective?
a. Magnification
b. Parcentric
c. Parfocality
d. Resolving power
5. (1 pt) Why does oil immersion microscopy provide greater resolution than microscopy without oil?
6. (2 pts) Describe the materials used to clean the microscope lenses and the prepared slides,
respectively.
For prepared slides:
For microscope lenses:
7. (1 pt) Name one biological specimen you will be observing using wet mount techniques in this lab.
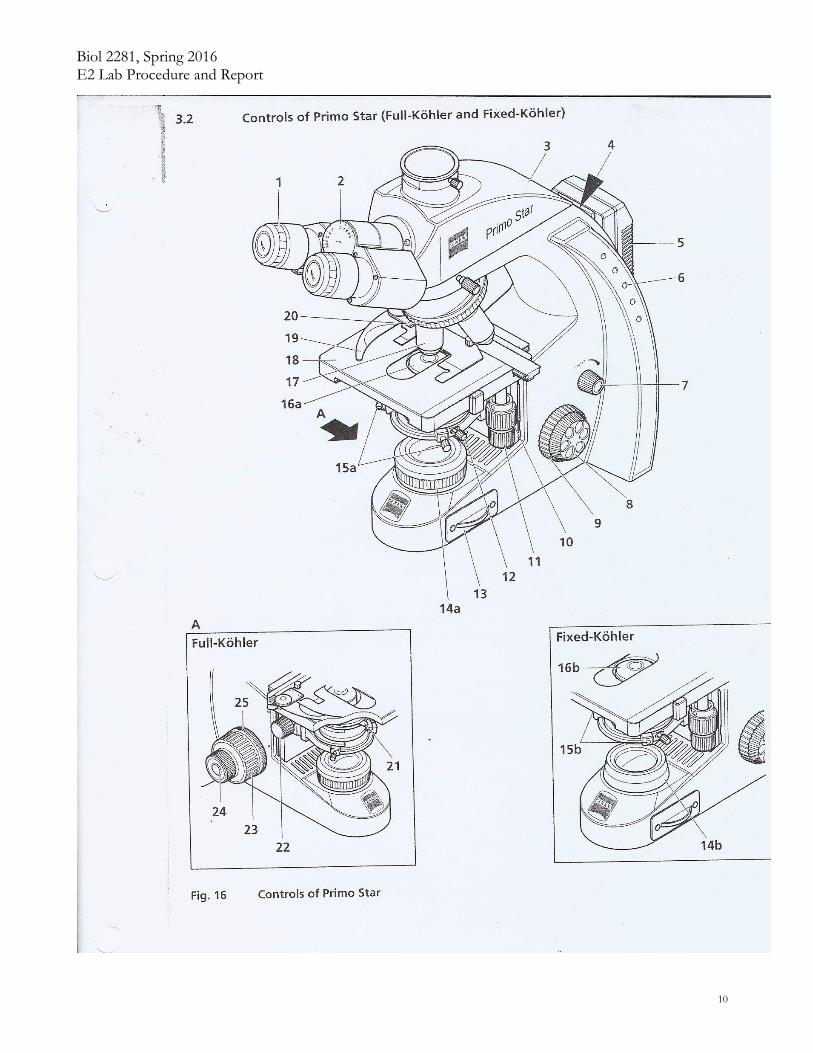
Biol 2281, Spring 2016 E2 Lab Procedure and Report
1
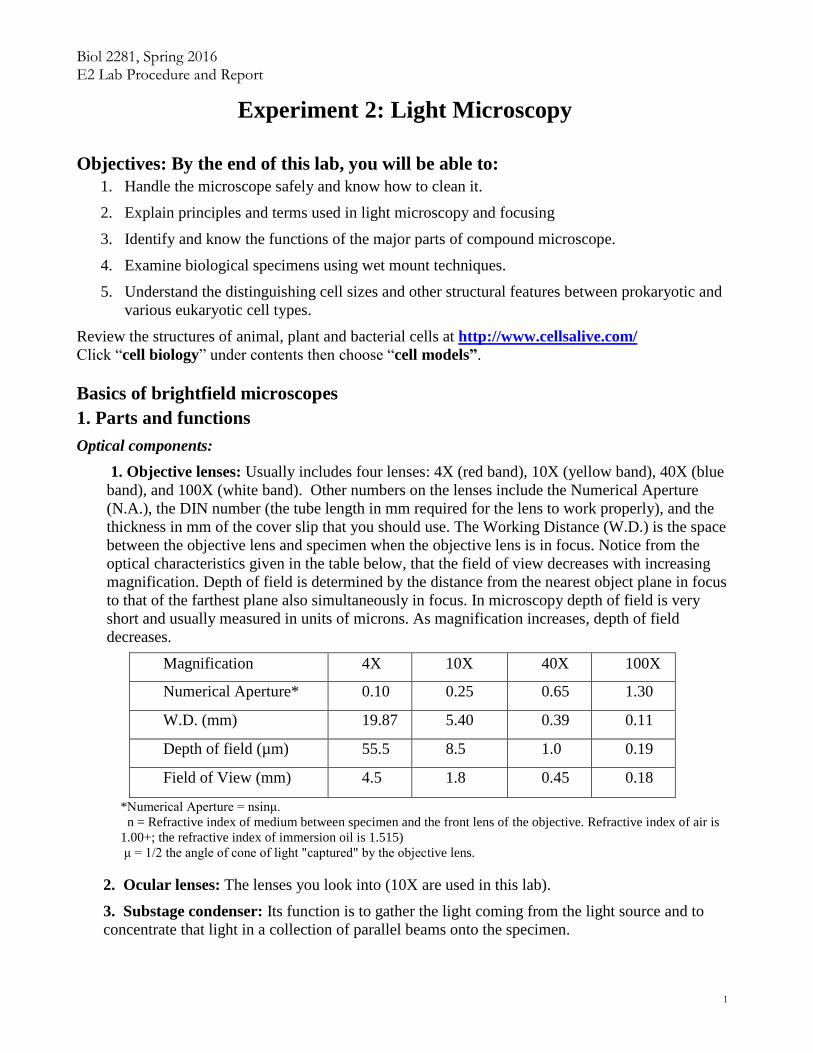
Experiment 2: Light Microscopy
Objectives: By the end of this lab, you will be able to:
1. Handle the microscope safely and know how to clean it.
2. Explain principles and terms used in light microscopy and focusing
3. Identify and know the functions of the major parts of compound microscope.
4. Examine biological specimens using wet mount techniques.
5. Understand the distinguishing cell sizes and other structural features between prokaryotic and
various eukaryotic cell types.
Review the structures of animal, plant and bacterial cells at http://www.cellsalive.com/
Click “cell biology” under contents then choose “cell models”.
Basics of brightfield microscopes
1. Parts and functions
Optical components:
1. Objective lenses: Usually includes four lenses: 4X (red band), 10X (yellow band), 40X (blue
band), and 100X (white band). Other numbers on the lenses include the Numerical Aperture
(N.A.), the DIN number (the tube length in mm required for the lens to work properly), and the
thickness in mm of the cover slip that you should use. The Working Distance (W.D.) is the space
between the objective lens and specimen when the objective lens is in focus. Notice from the
optical characteristics given in the table below, that the field of view decreases with increasing
magnification. Depth of field is determined by the distance from the nearest object plane in focus
to that of the farthest plane also simultaneously in focus. In microscopy depth of field is very
short and usually measured in units of microns. As magnification increases, depth of field
decreases.
*Numerical Aperture = nsinμ.
n = Refractive index of medium between specimen and the front lens of the objective. Refractive index of air is
1.00+; the refractive index of immersion oil is 1.515)
μ = 1/2 the angle of cone of light "captured" by the objective lens.
2. Ocular lenses: The lenses you look into (10X are used in this lab).
3. Substage condenser: Its function is to gather the light coming from the light source and to
concentrate that light in a collection of parallel beams onto the specimen.
Magnification 4X 10X 40X 100X
Numerical Aperture* 0.10 0.25 0.65 1.30
W.D. (mm) 19.87 5.40 0.39 0.11
Depth of field (µm) 55.5 8.5 1.0 0.19
Field of View (mm) 4.5 1.8 0.45 0.18
Biol 2281, Spring 2016 E2 Lab Procedure and Report
2
Mechanical/Electrical Components
1. Base: It houses the electrical components for operating and controlling the intensity of the
lamp. A colorful translucent stop plate may be placed over the lamp for greater contrast.
2. Stage: The specimen is placed on top of the stage and held in place by a specimen holder.
Attached to the stage are concentric X-Y control knobs which move the specimen
forward/back or left/right.
3. Coarse and Fine focusing Knobs: On the lower right and left side of the stand are the
concentric coarse and fine focusing Knobs. These raise or lower the stage in larger or smaller
increments to bring the specimen into focus.
4. Observation tubes: either binocular or trinocular, are attached to the stand above the
nosepiece. The binocular is used for viewing and the trinocular is used for viewing and /or
photography.
5. Nosepiece: It holds the objective lenses of varying magnifications. The rotation of the
nosepiece can bring any one of the attached objective lens into the light path.
6. Condenser Holder: It is under the stage to hold a condenser. Adjacent to the condenser
holder is the knob for raising or lowering the condenser. The adjustable aperture iris
diaphragm sometimes is incorporated in the condenser or just below it. It is t important to
use aperture (iris) diaphragm properly in securing excellent illumination and contrast.
Opening the iris diaphragm too much results in glare and loss of contrast, while closing it too
far results in increased diffraction and loss of resolution.
7. Interpupillary distance adjustment: This design sets the interpupillary distance for your
eyes.
8. Diopter adjustment: It is an adjustable viewfinder, on each ocular lens, to suit the eyesight
of the user.
9. Phase contrast revolving turret: It is a rotating disk under the stage to use for phase-
contrast optics (normal setting is at zero. When in use, the turret setting must correspond to
the magnifying power of the objective being used). Phase contrast is very useful in showing
details in certain specimens of unstained cells.
2. Concepts
Magnification: How much larger the object appears compared to its real size. Total
magnification of the specimen is determined by multiplying the magnification of the objective lens
by the magnification of the ocular lens. Light microscopes can magnify up to 1000 or 1500 times.
Resolving power: A measure of the clarity with which an objective can clearly separate points or
lines lying close together in the specimen. The shorter the distance between points or lines, the
greater the resolving power. Also, the higher the NA of the objective, the greater its resolving
power is. Limited by the wavelengths of visible light, light microscopes can never resolve detail
finer than ~ 0.2 microns.
Contrast: A measure of the gradation in luminance that provides gray scale (or color)
information. Contrast is expressed as the ratio (difference in luminance)/ (average luminance) in
adjoining areas of the scene. Contrast should not to be confused with resolution. Contrast can be
Biol 2281, Spring 2016 E2 Lab Procedure and Report
3
enhanced by specimen staining, adjusting condenser aperture diaphragm settings and using several
contrast-enhancement techniques, including differential interference contrast (DIC), darkfield, and
phase contrast.
3. Operation and Handling of a Light Microscope
1) Handling and cleaning
Tighten the screw between nosepiece and observing tubes before moving a
microscope. Carry it with both hands—one on the arm and the other supporting the
base.
It is always a good idea to clean all of the lenses with lens paper and lens cleaner
before you begin. It is IMPERATIVE that you clean all lenses after you finish using
the microscope. DO NOT use Kimwipes on the lenses.
Remove all the slides and patch stops and rotate the lowest power objective in the light
path when you finish. Place the microscope back to the cabinet with the arms toward
you.
2) Focusing a Compound Light Microscope
1. Turn on the lamp and adjust the intensity.
2. To set the interpupillary distance for your eyes, grasp the binocular observation tubes
with both hands and bring the tubes closer together (or further apart) to fuse the two
circles of light into one circle.
3. With the 10X objective on the nosepiece in the light path, place a specimen slide on the
stage. Raise the stage to the highest position (the 10X objective should not touch the slide
under normal condition). Using your RIGHT eye only, slowly lower the stage by use of
the coarse adjustment knob. Bring the image into focus and then use the fine adjustment
knob to perfect the focus. Now using your left eye only, rotate the diopter adjustment
ring on the left eyepiece tube without touching the focusing knobs to bring the image into
focus for your left eye.
4. You should only move the fine adjustment knob very little to bring the image into focus
when you move to a higher power objective because the microscope has a built-in feature
which is known as parfocality. The specimen should remain at the center of the viewing
field when objective lenses are rotated because this microscope is parcentric.
3) Using an Oil immersion objective (optional, with TA assistance ONLY)
The 100X objective lens is used for oil immersion in order to achieve the greatest resolution.
(The refractive index of oil is close to that of glass, reducing the refraction of light.) Proper
technique must be followed when using oil immersion. Lenses are expensive and dried oil
renders them dysfunctional! In order to use oil immersion, follow these steps:
1. Focus the specimen with the 10X objective. Then switch to the 40X objective lens and center
a desired feature in the field of view.
2. Rotate 40 X objective lens away from the specimen and before rotating the 100X lens into
position, (do not lower the stage) gently place a drop of immersion oil on top of the cover
slip.
3. Rotate the 100X objective into the light path.
4. Using the fine adjustment only, adjust the stage until the specimen comes into focus.
Biol 2281, Spring 2016 E2 Lab Procedure and Report
4
5. When finished with observations with the oil immersion objective, lower the stage and rotate
objective out of the light path so that you do not inadvertently dip the 40X objective into oil.
6. You must thoroughly clean the lens with lens cleaner and lens paper after using oil! Clean the
prepared slides with lens cleaner and KimWipes®. Do not use KimWipes® on the lenses as it
will scratch them.
4) Preparing a Wet mount and Staining
1. Place a drop of water on a microscope slide.
2. Use a toothpick to scrape the inside of your cheek. Roll the scraping into a drop of water on
the slide.
3. Place the edge of a coverslip at an edge of the drop at a 45º angle; gently lower the
coverslip into place with support of a dissecting needle to prevent trapping air bubbles.
4. In order to stain a wet mount, place a drop of methylene blue next to the coverslip and
position a small piece of paper towel on its opposite edge. Diffusion will draw an
appropriate amount of stain into the specimen. Be very careful when using stains. They will
stain your skin, clothing, and floor as well.
5. Do not use 100X objective for wet mount. Adjust the condenser iris diaphragm to increase
brightness if necessary.
* This technique also applies to viewing onion skin cells
Biological Specimen for Observation in today’s lab:
Bacterial Cells Prepared slides (prepared demo slide)
Eukaryotic Cells Fresh budding yeast cells (demo slide) Mold (prepared slide)
Amoeba (prepared slides) Paramecium (prepared demo slide)
Diatoms (prepared slide) Volvox (prepared slide)
Spirogyra (prepared slide) Fresh plant stem and leaf
Fresh onion skin (methylene blue stain) Fresh Elodea
Human cheek cells (methylene blue stain) Human Blood smear (prepared slide)
Materials per student: one Microscope (Pick up microscope according to your sign-in number)
one book of lens paper, one bottle of Lens cleaner, one box of Kim wipes
A box of prepared slides, legend page for microscope, identification guide for fungi
References:
Mortimer Abramowitz, “Microscope basics and beyond” Published by Olympus America Inc., 2003,
http://www.olympusmicro.com/
Molecular Expressions http://micro.magnet.fsu.edu/index.html

Biol 2281, Spring 2016 E2 Lab Procedure and Report
5
The report of Experiment 2 should include a title page (with your name, course
number, section number and the title of the experiment) and pages 5 to 9. Failure to
include a title page will result in the loss of 1 point from your score.
Section I: Plant Cells
1 Make a wet mount of a whole live Elodea (or Anacharis) leaf. The chloroplasts may seem to be
“crawling” along the inner wall. This phenomenon is described in biology as cytoplasmic
streaming. The purpose of the motion is to transports nutrients, proteins, and organelles within
cells. Draw what you see under the 40X objective lens. Label the chloroplasts within a cell. (2
pts)
Elodea leaf cells at total magnification of _____ X
2. Make a wet mount of celery stalk. Slice a very thin cross section and place it in a drop of water on
a microscope slide. Draw what you see under the 10X or 40X objective lens. Label the vascular
bundles. (2 pts)
Celery stalk at total magnification of _________X
3. Make a wet mount of onion skin and stain with methylene blue. Snap a piece of onion backward
and remove of the thin piece of epidermis formed at the breaking point. Place the epidermal tissue
in a drop of water on a microscope slide. Add a coverslip then stain the cells following procedures
on page 4. Draw what you see under the 40X objective lens. (1 pt)
Onion skin cells at total magnification of ______X
Biol 2281, Spring 2016 E2 Lab Procedure and Report
6
Section II: Animal Cells
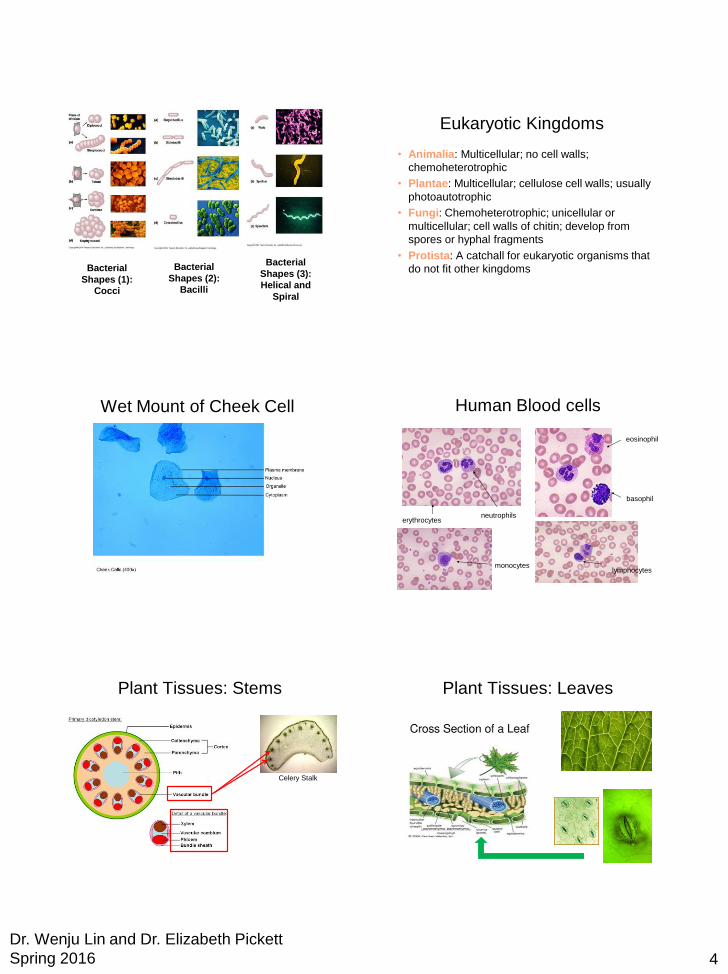
3. Make a wet mount of your cheek cells and stain with methylene blue. Draw what you see under the
40X objective lens. Label the nucleus within a cell. (2 pts) Dispose used slides into broken glass
boxes under front sinks.
Human cheek (epidermis) cells at total magnification of ___________X
What causes the structural differences observed in the Elodea cells compared to the cheek cells?
4. Examine a prepared human peripheral blood smear slide. This smear was prepared with
polychromatic Wright's stain, which stains both basophilic and acidophilic cellular components.
Identify red blood cells (erythrocytes), the most numerous cells present. White blood cells
(leukocytes) have several distinct cell types: neutrophils, eosinophils, basophils, monocytes and
lymphocytes. The first three cell types are grouped together as granulocytes or polymorphonuclear
(PMN) leukocytes. The latter two types are categorized as mononuclear leukocytes.
Using the 10X objective, identify white blood cells (leukocytes) with lobulated nuclei, the
granulocytes. The most abundant granulocytes are neutrophils. Examine with the 40X objective the
nuclei and the lightly stained cytoplasmic granules of several neutrophils (Examples at WebPath).
Sketch at least one leukocyte (label it/them) and some surrounding erythrocytes under the 40X
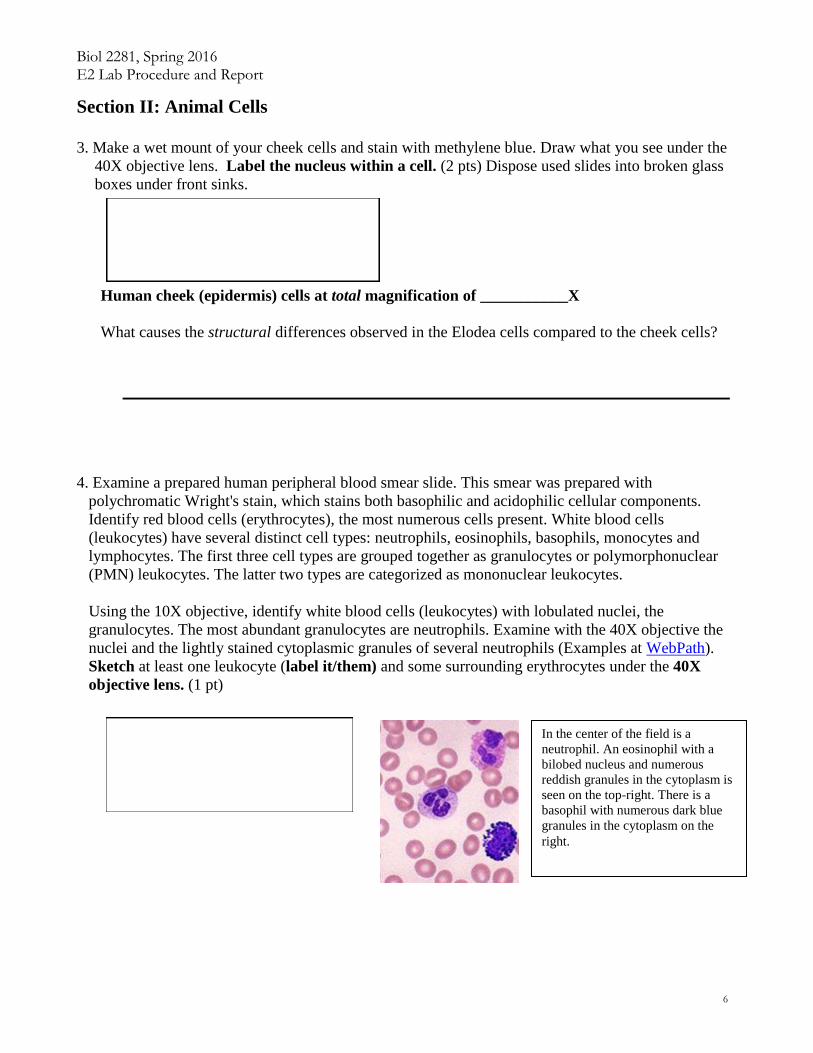
objective lens. (1 pt)
In the center of the field is a
neutrophil. An eosinophil with a
bilobed nucleus and numerous
reddish granules in the cytoplasm is
seen on the top-right. There is a
basophil with numerous dark blue
granules in the cytoplasm on the
right.
Biol 2281, Spring 2016 E2 Lab Procedure and Report
7
Section III: Bacterial Cells
5. Prokaryotes are now divided into two Domains, the Archaea and the Bacteria. At the
demonstration microscope, observe one of the three most common shapes of Bacteria: bacillus
(rod), coccus (spheres), or helices under oil immersion and draw what you see. Identify the type
of bacteria using the poster in lab. (1 pt)
____________ shape/type at total magnification __________X
Visit Link: http://www.cellsalive.com/howbig.htm to view an animation to compare the relative sizes
of cells and organisms.
Section IV: Fungal Cells
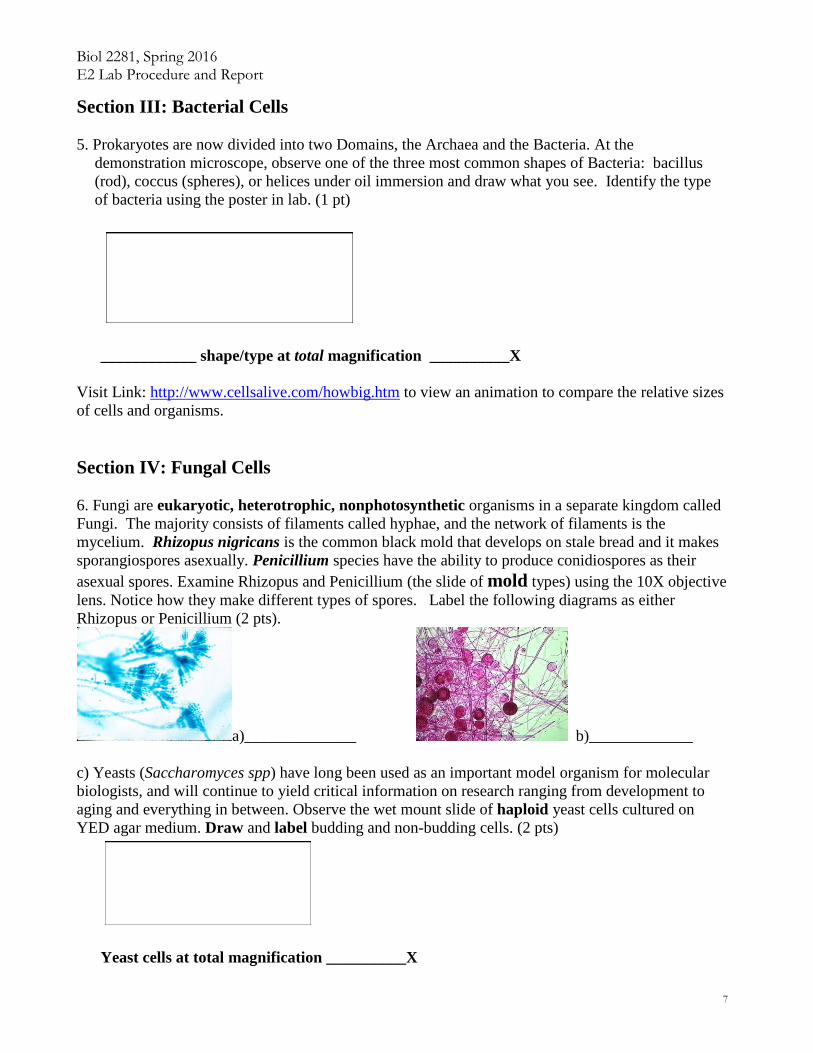
6. Fungi are eukaryotic, heterotrophic, nonphotosynthetic organisms in a separate kingdom called
Fungi. The majority consists of filaments called hyphae, and the network of filaments is the
mycelium. Rhizopus nigricans is the common black mold that develops on stale bread and it makes
sporangiospores asexually. Penicillium species have the ability to produce conidiospores as their
asexual spores. Examine Rhizopus and Penicillium (the slide of mold types) using the 10X objective
lens. Notice how they make different types of spores. Label the following diagrams as either
Rhizopus or Penicillium (2 pts).
a)______________ b)_____________
c) Yeasts (Saccharomyces spp) have long been used as an important model organism for molecular
biologists, and will continue to yield critical information on research ranging from development to
aging and everything in between. Observe the wet mount slide of haploid yeast cells cultured on
YED agar medium. Draw and label budding and non-budding cells. (2 pts)
Yeast cells at total magnification __________X

Biol 2281, Spring 2016 E2 Lab Procedure and Report
8
Section V: Protozoan and Algal Cells
7. Kingdom Protista can be subdivided into Subkingdom Protozoa (animal-like protists) and
Subkingdom Algae (plant-like protists). Algae are either unicellular, colonial, or have simple
multicellular bodies called thalli, which are commonly composed of branched filaments or sheets. In
this lab, you will observe three types of algae: Diatoms, Volvox and Spirogyra. Be careful with this
group of slides, many slides were smashed by objective the lens in previous semesters.
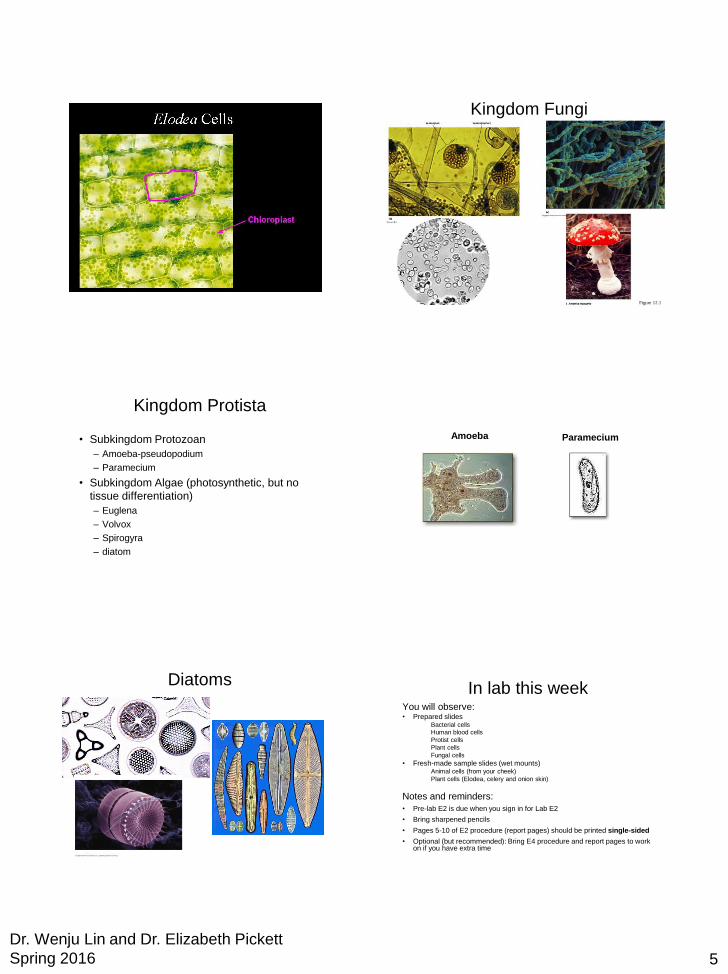
a) Diatoms are unicellular and unique in that they have hard cell walls of pectin, cellulose, or
silicon oxide that are constructed in two halves. The two halves fit together like lid and box.
The diversity and beauty of these single-celled organisms is astounding. Draw several
different diatom cells under 10 or 40X objective (1 pt).
Objective lens used: _______X
b) Examine the prepared slides for Volvox and Spirogyra using the 10X objective lens. Volvox
is a colonial photosynthetic algae composed of numerous small cells and daughter colonies.
Note the unusual feature of the spiraling chloroplasts in Spirogyra.
Draw below (2 pts):
Spirogyra (under 10X objective lens) Volvox (under 10X objective lens)
Are these organisms capable of photosynthesis? ______________
7. Members of subkingdom protozoan are categorized based on their modes of locomotion.
Amoebas move using pseudopodia (cellular extensions).
Flagellates move using flagella (e.g. Trypanosoma spp).
Ciliates move using cilia (e.g. Paramecium spp.)
Others that lack motility (e.g. Plasmodium spp.)
View the prepared slide of Amoeba (from your slide box) and a prepared slide of Paramecium (at
the demo scope) and observe under the 10X or 40X objective lens. Draw what you see. (2 pts)
Amoeba (under ____X objective) Paramecium (under ____X objective)
Biol 2281, Spring 2016 E2 Lab Procedure and Report
9
Label the parts of a microscope using a legend guide (provided in lab, 2 pts):
Biol 2281, Spring 2016 E2 Lab Procedure and Report
10
Biol 2281, Spring 2016 E2 Lab Procedure and Report
11
Clean up: Remove slide from the stage.
Lower the stage and rotate 4X objective to the center.
Collect and examine all prepared slides upon completion of this lab.
Report to your instructor any damage or concern.
Have the TA check your microscope before you return your microscope to the cabinet.
Clean your bench area, return materials and supply items and sign out.
1
Dr. Wenju Lin and Dr. Elizabeth Pickett
Spring 2016
Experiment 2 Microscopy
BIOL2281
Parts of the Microscope
Basic Microscope Techniques
Observing Cells and Organisms
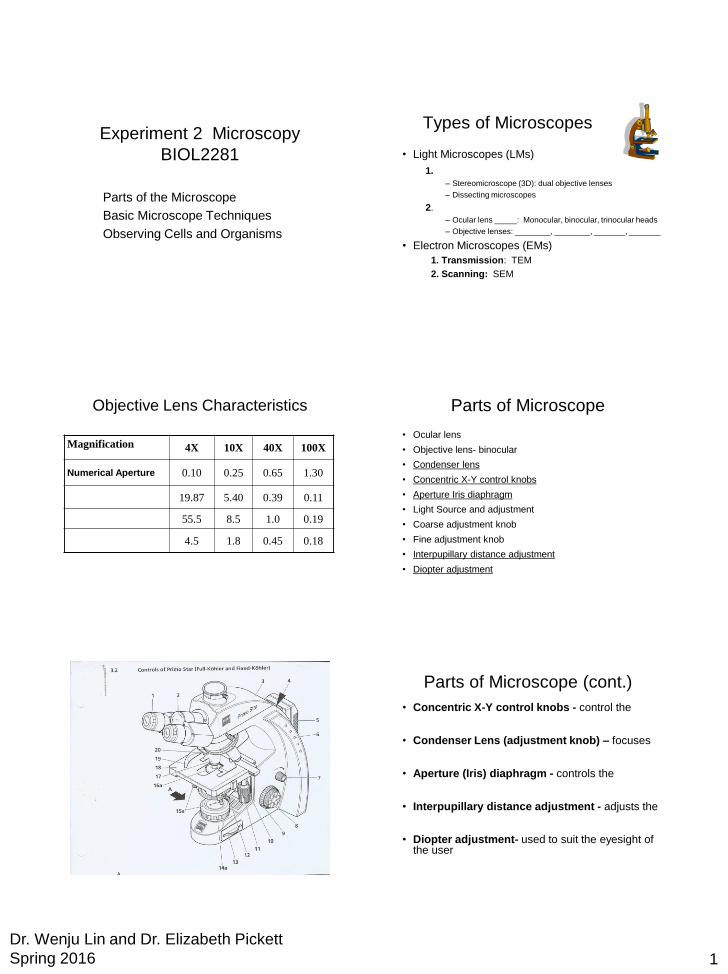
Types of Microscopes
• Light Microscopes (LMs)
1.
– Stereomicroscope (3D): dual objective lenses
– Dissecting microscopes
2.
– Ocular lens _____: Monocular, binocular, trinocular heads
– Objective lenses: ________, ________, _______, _______
• Electron Microscopes (EMs)
1. Transmission: TEM
2. Scanning: SEM
Objective Lens Characteristics
Magnification 4X 10X 40X 100X
Numerical Aperture 0.10 0.25 0.65 1.30
19.87 5.40 0.39 0.11
55.5 8.5 1.0 0.19
4.5 1.8 0.45 0.18
Parts of Microscope
• Ocular lens
• Objective lens- binocular
• Condenser lens
• Concentric X-Y control knobs
• Aperture Iris diaphragm
• Light Source and adjustment
• Coarse adjustment knob
• Fine adjustment knob
• Interpupillary distance adjustment
• Diopter adjustment
Parts of Microscope (cont.)
• Concentric X-Y control knobs - control the
• Condenser Lens (adjustment knob) – focuses
• Aperture (Iris) diaphragm - controls the
• Interpupillary distance adjustment - adjusts the
• Diopter adjustment- used to suit the eyesight of the user
2
Dr. Wenju Lin and Dr. Elizabeth Pickett
Spring 2016
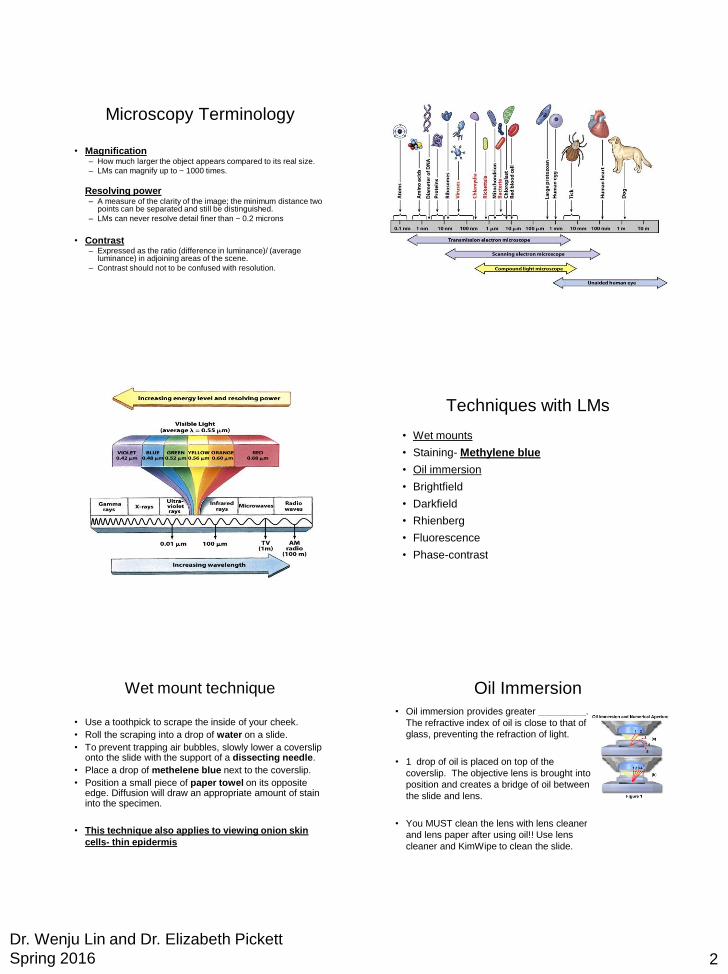
Microscopy Terminology
• Magnification – How much larger the object appears compared to its real size.
– LMs can magnify up to ~ 1000 times.
Resolving power – A measure of the clarity of the image; the minimum distance two
points can be separated and still be distinguished.
– LMs can never resolve detail finer than ~ 0.2 microns
• Contrast – Expressed as the ratio (difference in luminance)/ (average
luminance) in adjoining areas of the scene.
– Contrast should not to be confused with resolution.
Techniques with LMs
• Wet mounts
• Staining- Methylene blue
• Oil immersion
• Brightfield
• Darkfield
• Rhienberg
• Fluorescence
• Phase-contrast
Wet mount technique
• Use a toothpick to scrape the inside of your cheek.
• Roll the scraping into a drop of water on a slide.
• To prevent trapping air bubbles, slowly lower a coverslip onto the slide with the support of a dissecting needle.
• Place a drop of methelene blue next to the coverslip.
• Position a small piece of paper towel on its opposite edge. Diffusion will draw an appropriate amount of stain into the specimen.
• This technique also applies to viewing onion skin
cells- thin epidermis
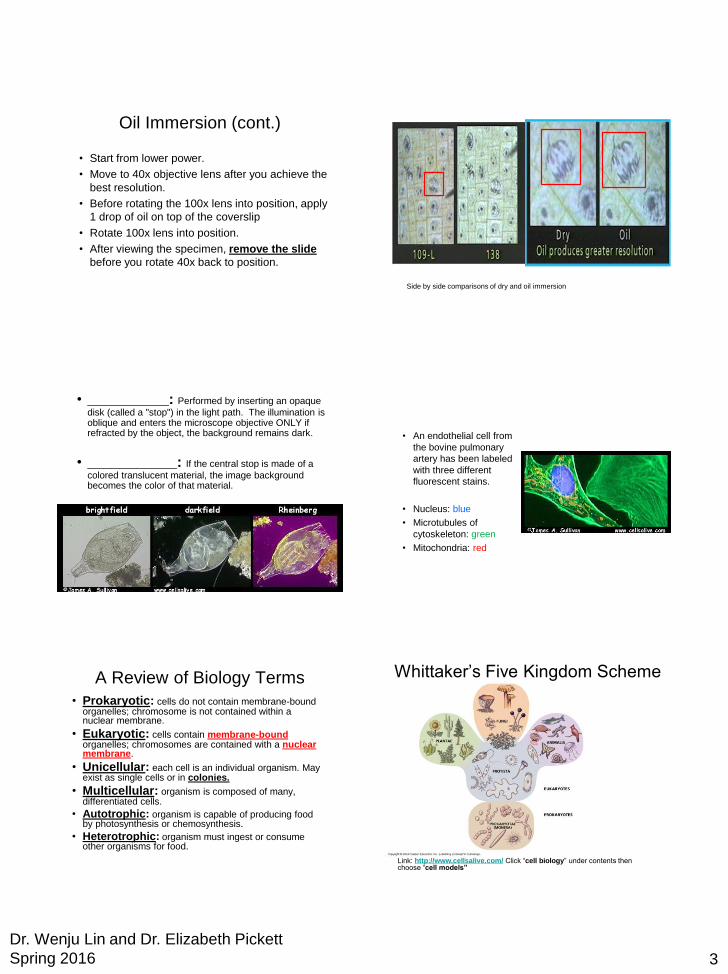
Oil Immersion
• Oil immersion provides greater _________.
The refractive index of oil is close to that of
glass, preventing the refraction of light.
• 1 drop of oil is placed on top of the
coverslip. The objective lens is brought into
position and creates a bridge of oil between
the slide and lens.
• You MUST clean the lens with lens cleaner
and lens paper after using oil!! Use lens
cleaner and KimWipe to clean the slide.
3
Dr. Wenju Lin and Dr. Elizabeth Pickett
Spring 2016
Oil Immersion (cont.)
• Start from lower power.
• Move to 40x objective lens after you achieve the
best resolution.
• Before rotating the 100x lens into position, apply
1 drop of oil on top of the coverslip
• Rotate 100x lens into position.
• After viewing the specimen, remove the slide
before you rotate 40x back to position.
Side by side comparisons of dry and oil immersion
• __________: Performed by inserting an opaque
disk (called a "stop") in the light path. The illumination is oblique and enters the microscope objective ONLY if refracted by the object, the background remains dark.
• ___________: If the central stop is made of a
colored translucent material, the image background becomes the color of that material.
• An endothelial cell from
the bovine pulmonary
artery has been labeled
with three different
fluorescent stains.
• Nucleus: blue
• Microtubules of
cytoskeleton: green
• Mitochondria: red
A Review of Biology Terms
• Prokaryotic: cells do not contain membrane-bound organelles; chromosome is not contained within a nuclear membrane.
• Eukaryotic: cells contain membrane-bound organelles; chromosomes are contained with a nuclear membrane.
• Unicellular: each cell is an individual organism. May exist as single cells or in colonies.
• Multicellular: organism is composed of many, differentiated cells.
• Autotrophic: organism is capable of producing food by photosynthesis or chemosynthesis.
• Heterotrophic: organism must ingest or consume other organisms for food.
Whittaker’s Five Kingdom Scheme
Link: http://www.cellsalive.com/ Click “cell biology” under contents then choose “cell models”
4
Dr. Wenju Lin and Dr. Elizabeth Pickett
Spring 2016
Bacterial
Shapes (1):
Cocci
Bacterial
Shapes (2):
Bacilli
Bacterial
Shapes (3):
Helical and
Spiral
• Animalia: Multicellular; no cell walls;
chemoheterotrophic
• Plantae: Multicellular; cellulose cell walls; usually
photoautotrophic
• Fungi: Chemoheterotrophic; unicellular or
multicellular; cell walls of chitin; develop from
spores or hyphal fragments
• Protista: A catchall for eukaryotic organisms that
do not fit other kingdoms
Eukaryotic Kingdoms
Wet Mount of Cheek Cell Human Blood cells
erythrocytes neutrophils
eosinophil
basophil
lymphocytes monocytes
Plant Tissues: Stems
Celery Stalk
Plant Tissues: Leaves
5
Dr. Wenju Lin and Dr. Elizabeth Pickett
Spring 2016
Kingdom Fungi
Figure 12.1
Kingdom Protista
• Subkingdom Protozoan
– Amoeba-pseudopodium
– Paramecium
• Subkingdom Algae (photosynthetic, but no
tissue differentiation)
– Euglena
– Volvox
– Spirogyra
– diatom
Amoeba
Paramecium
Diatoms In lab this week
You will observe: • Prepared slides Bacterial cells
Human blood cells
Protist cells
Plant cells
Fungal cells
• Fresh-made sample slides (wet mounts) Animal cells (from your cheek)
Plant cells (Elodea, celery and onion skin)
Notes and reminders:
• Pre-lab E2 is due when you sign in for Lab E2
• Bring sharpened pencils
• Pages 5-10 of E2 procedure (report pages) should be printed single-sided
• Optional (but recommended): Bring E4 procedure and report pages to work on if you have extra time