backupify for google apps - datto knowledge base · pdf filebackupify for google apps ......
TRANSCRIPT

1 | datto.com
USER MANUAL
Backupify for Google AppsUser Guide for Administrator Accounts
CONTENTSIntroduction to Backupify .................................................................................................................................................................................................................. 3
Quick-start guide...................................................................................................................................................................................................................................3
Administration ........................................................................................................................................................................................................................................4
Navigating to the Backupify login .................................................................................................................................................................... 4
The Backupify login can be accessed in three ways .............................................................................................................................. 5
Logging in ...................................................................................................................................................................................................................... 5
Administrative dashboard .....................................................................................................................................................................................7
Header: switching domains or services ........................................................................................................................................................ 8
Header: notifications ............................................................................................................................................................................................... 8
Header: settings ......................................................................................................................................................................................................... 9
Dashboard: finding users and their data ....................................................................................................................................................... 9
Dashboard: managing users ...............................................................................................................................................................................10
Dashboard: removing users ................................................................................................................................................................................13
Dashboard: storage usage ...................................................................................................................................................................................14
Dashboard: domain watch...................................................................................................................................................................................14
Settings: adding a new service or sub-domain ........................................................................................................................................14
Settings: account overview .................................................................................................................................................................................16
Settings: domain settings ....................................................................................................................................................................................17
Settings: multiple administrator users ........................................................................................................................................................17
Settings: support ......................................................................................................................................................................................................18
Settings: API tokens ................................................................................................................................................................................................18
Service configuration options ...........................................................................................................................................................................19
Full domain export ...................................................................................................................................................................................................19
Weekly status summary emails ......................................................................................................................................................................20
Using backups ...................................................................................................................................................................................................................................... 20
Logging in ....................................................................................................................................................................................................................20
Setting a Backupify password..........................................................................................................................................................................20
Navigating to archives ...........................................................................................................................................................................................21
Viewing archives ......................................................................................................................................................................................................22
Searching archives .................................................................................................................................................................................................23
Restoring archived data .......................................................................................................................................................................................23
Downloading archives ..........................................................................................................................................................................................26
Initiating a backup ..................................................................................................................................................................................................29
Best practices ..................................................................................................................................................................................................................................... 29
User management: batch import ...................................................................................................................................................................29
User management: auto-add users ..............................................................................................................................................................30
Multiple administrators .......................................................................................................................................................................................32
Setting a Backupify password..........................................................................................................................................................................33
Audit log .......................................................................................................................................................................................................................34
Customize domain settings ..............................................................................................................................................................................................................37
3 | datto.com
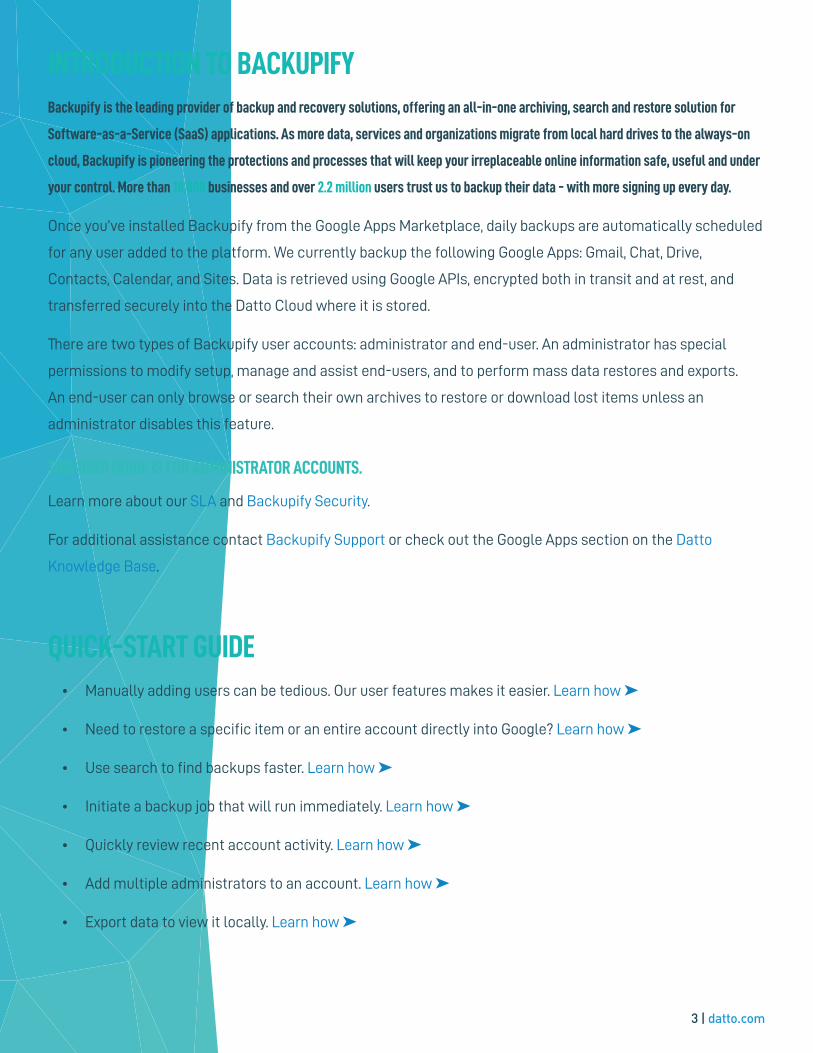
INTRODUCTION TO BACKUPIFYBackupify is the leading provider of backup and recovery solutions, offering an all-in-one archiving, search and restore solution for
Software-as-a-Service (SaaS) applications. As more data, services and organizations migrate from local hard drives to the always-on
cloud, Backupify is pioneering the protections and processes that will keep your irreplaceable online information safe, useful and under
your control. More than 10,000 businesses and over 2.2 million users trust us to backup their data - with more signing up every day.
Once you’ve installed Backupify from the Google Apps Marketplace, daily backups are automatically scheduled
for any user added to the platform. We currently backup the following Google Apps: Gmail, Chat, Drive,
Contacts, Calendar, and Sites. Data is retrieved using Google APIs, encrypted both in transit and at rest, and
transferred securely into the Datto Cloud where it is stored.
There are two types of Backupify user accounts: administrator and end-user. An administrator has special
permissions to modify setup, manage and assist end-users, and to perform mass data restores and exports.
An end-user can only browse or search their own archives to restore or download lost items unless an
administrator disables this feature.
THIS USER GUIDE IS FOR ADMINISTRATOR ACCOUNTS.
Learn more about our SLA and Backupify Security.
For additional assistance contact Backupify Support or check out the Google Apps section on the Datto
Knowledge Base.
QUICK-START GUIDE• Manually adding users can be tedious. Our user features makes it easier. Learn how ➤
• Need to restore a specific item or an entire account directly into Google? Learn how ➤
• Use search to find backups faster. Learn how ➤
• Initiate a backup job that will run immediately. Learn how ➤
• Quickly review recent account activity. Learn how ➤
• Add multiple administrators to an account. Learn how ➤
• Export data to view it locally. Learn how ➤
4 | datto.com
ADMINISTRATION
NAVIGATING TO THE BACKUPIFY LOGIN
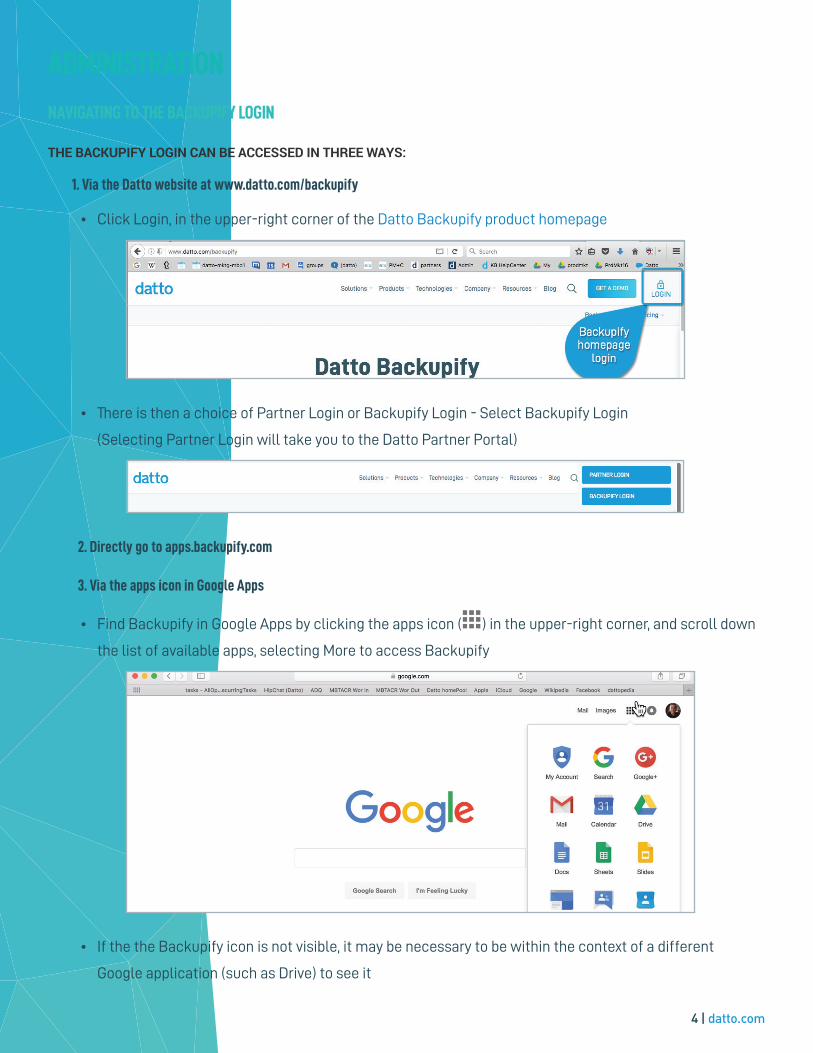
THE BACKUPIFY LOGIN CAN BE ACCESSED IN THREE WAYS:
1. Via the Datto website at www.datto.com/backupify
• Click Login, in the upper-right corner of the Datto Backupify product homepage
• There is then a choice of Partner Login or Backupify Login - Select Backupify Login
(Selecting Partner Login will take you to the Datto Partner Portal)
2. Directly go to apps.backupify.com
3. Via the apps icon in Google Apps
• Find Backupify in Google Apps by clicking the apps icon ( ) in the upper-right corner, and scroll down
the list of available apps, selecting More to access Backupify
• If the the Backupify icon is not visible, it may be necessary to be within the context of a different
Google application (such as Drive) to see it
5 | datto.com
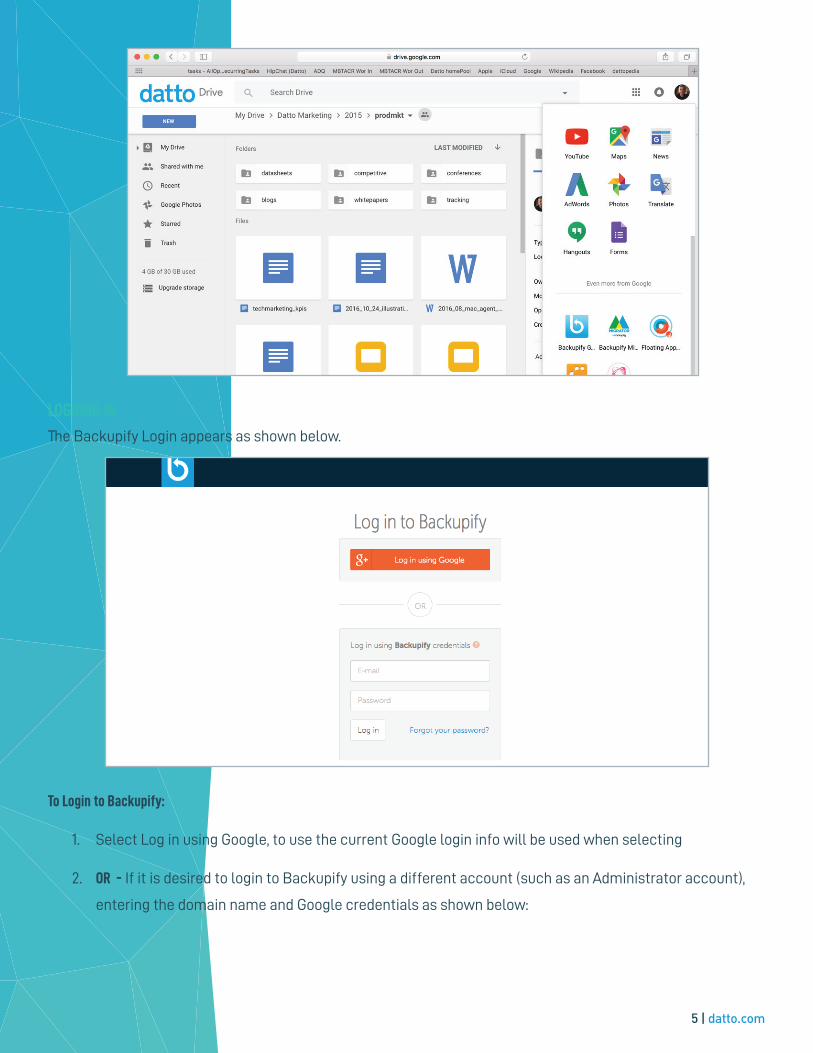
LOGGING IN
The Backupify Login appears as shown below.
To Login to Backupify:
1. Select Log in using Google, to use the current Google login info will be used when selecting
2. OR - If it is desired to login to Backupify using a different account (such as an Administrator account),
entering the domain name and Google credentials as shown below:
6 | datto.com
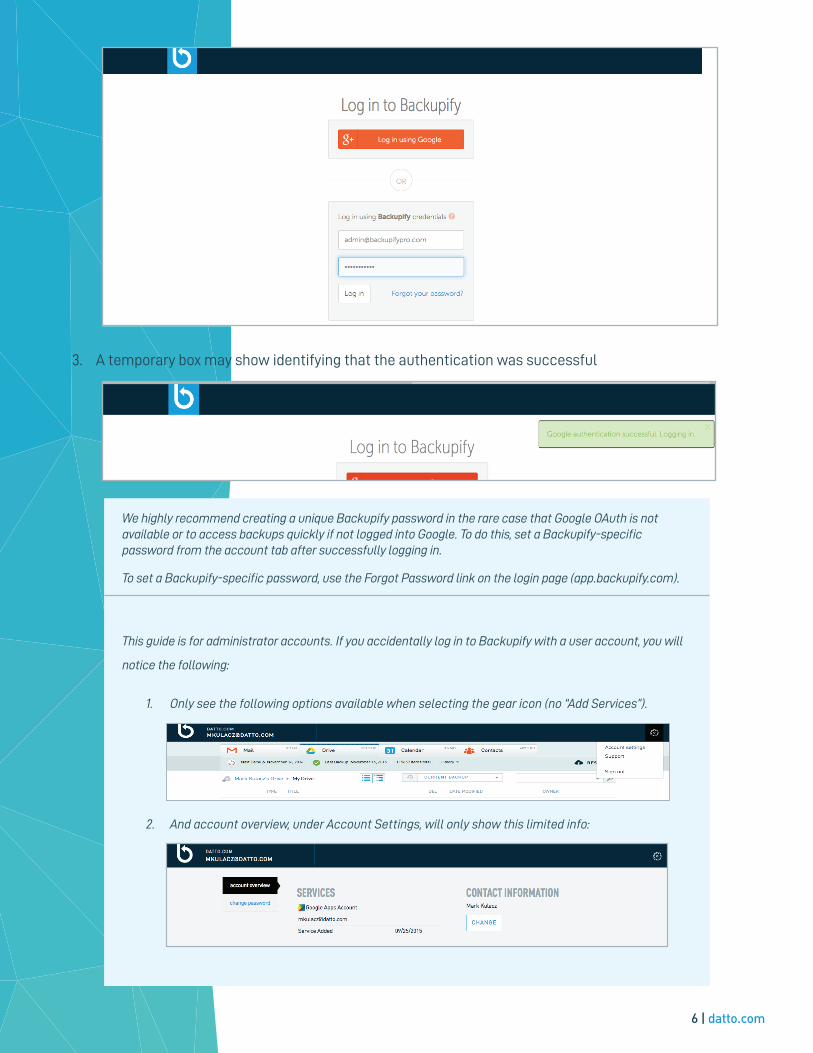
3. A temporary box may show identifying that the authentication was successful
We highly recommend creating a unique Backupify password in the rare case that Google OAuth is not available or to access backups quickly if not logged into Google. To do this, set a Backupify-specific password from the account tab after successfully logging in.
To set a Backupify-specific password, use the Forgot Password link on the login page (app.backupify.com).
This guide is for administrator accounts. If you accidentally log in to Backupify with a user account, you will
notice the following:
1. Only see the following options available when selecting the gear icon (no “Add Services”).
2. And account overview, under Account Settings, will only show this limited info:
7 | datto.com
ADMINISTRATIVE DASHBOARD
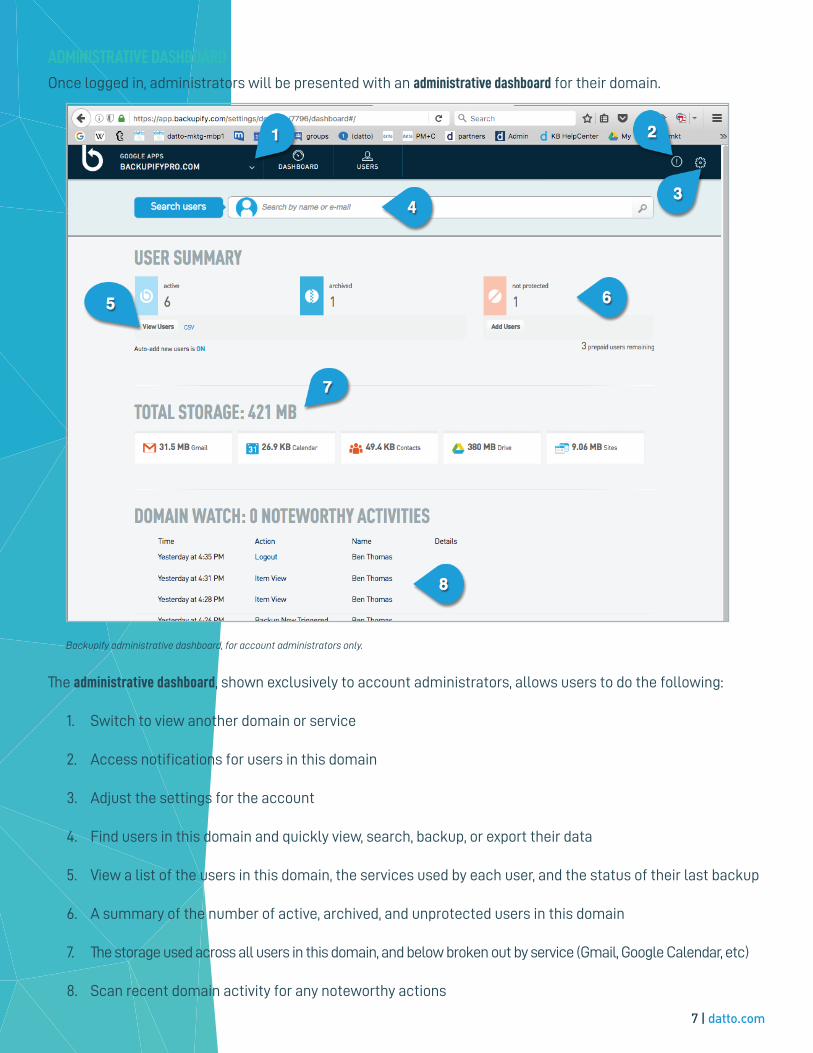
Once logged in, administrators will be presented with an administrative dashboard for their domain.
Backupify administrative dashboard, for account administrators only.
The administrative dashboard, shown exclusively to account administrators, allows users to do the following:
1. Switch to view another domain or service
2. Access notifications for users in this domain
3. Adjust the settings for the account
4. Find users in this domain and quickly view, search, backup, or export their data
5. View a list of the users in this domain, the services used by each user, and the status of their last backup
6. A summary of the number of active, archived, and unprotected users in this domain
7. The storage used across all users in this domain, and below broken out by service (Gmail, Google Calendar, etc)
8. Scan recent domain activity for any noteworthy actions
8 | datto.com
Let’s take a tour of the administrative dashboard, starting with the header.
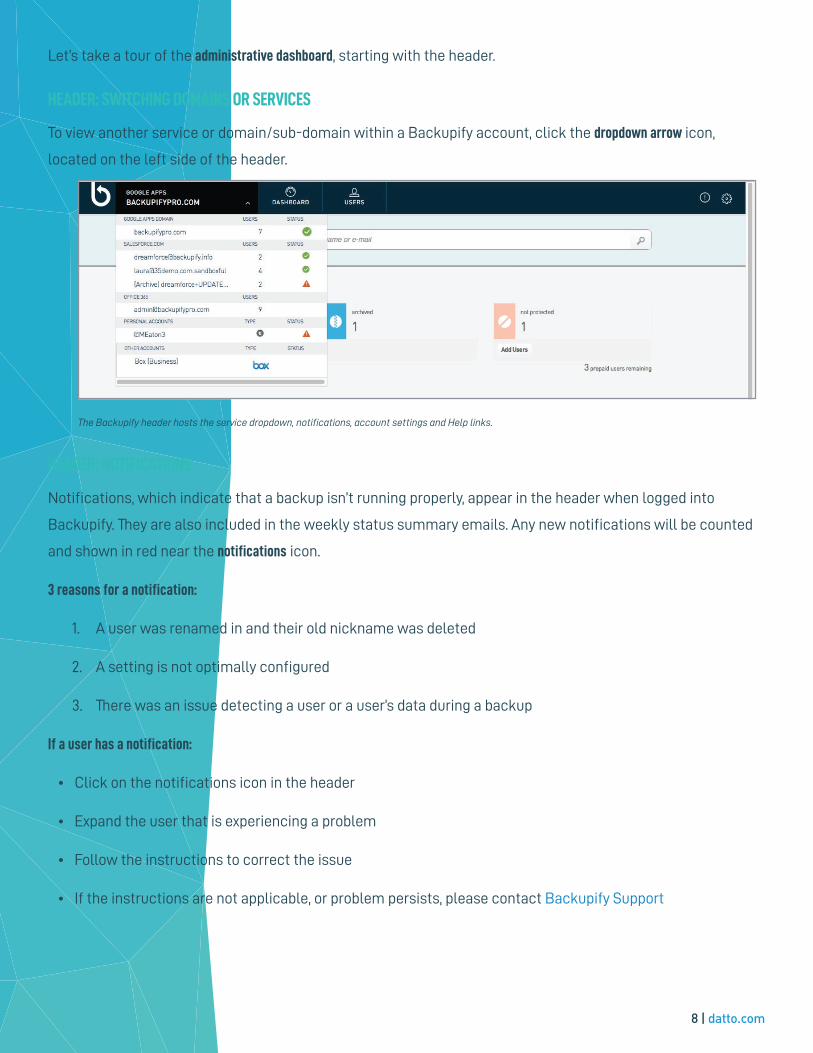
HEADER: SWITCHING DOMAINS OR SERVICES
To view another service or domain/sub-domain within a Backupify account, click the dropdown arrow icon,
located on the left side of the header.
The Backupify header hosts the service dropdown, notifications, account settings and Help links.
HEADER: NOTIFICATIONS
Notifications, which indicate that a backup isn’t running properly, appear in the header when logged into
Backupify. They are also included in the weekly status summary emails. Any new notifications will be counted
and shown in red near the notifications icon.
3 reasons for a notification:
1. A user was renamed in and their old nickname was deleted
2. A setting is not optimally configured
3. There was an issue detecting a user or a user’s data during a backup
If a user has a notification:
• Click on the notifications icon in the header
• Expand the user that is experiencing a problem
• Follow the instructions to correct the issue
• If the instructions are not applicable, or problem persists, please contact Backupify Support
9 | datto.com
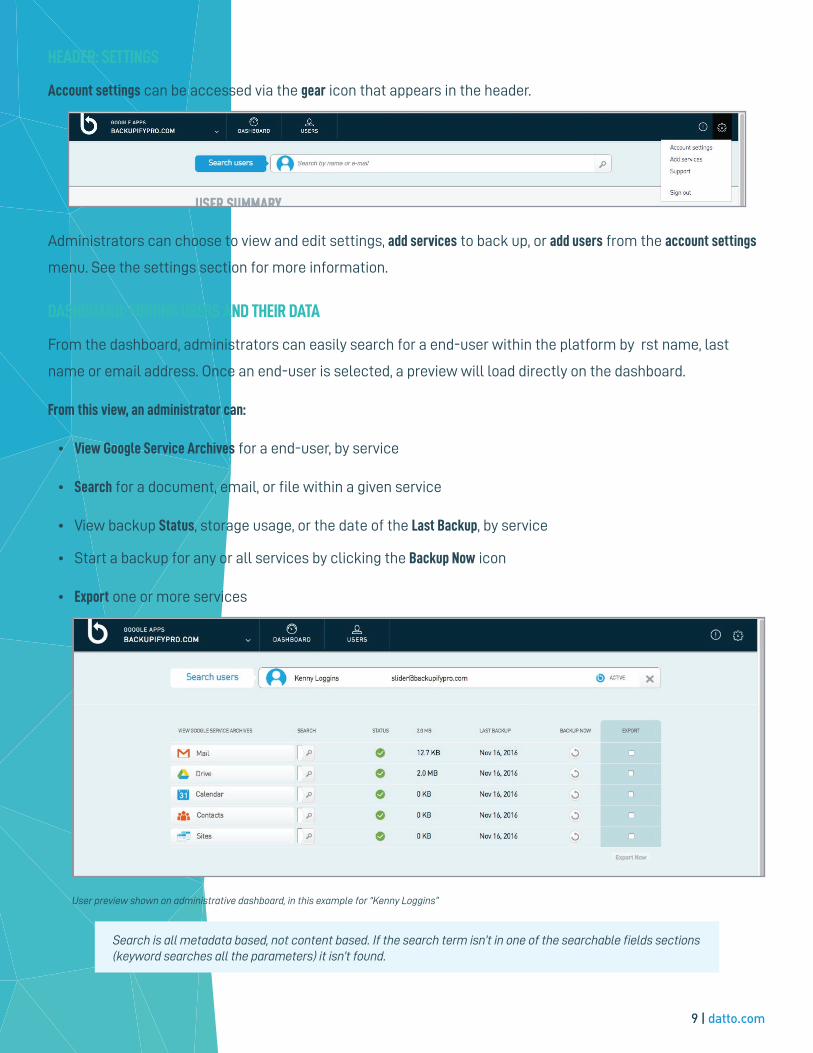
HEADER: SETTINGS
Account settings can be accessed via the gear icon that appears in the header.
Administrators can choose to view and edit settings, add services to back up, or add users from the account settings
menu. See the settings section for more information.
DASHBOARD: FINDING USERS AND THEIR DATA
From the dashboard, administrators can easily search for a end-user within the platform by rst name, last
name or email address. Once an end-user is selected, a preview will load directly on the dashboard.
From this view, an administrator can:
• View Google Service Archives for a end-user, by service
• Search for a document, email, or file within a given service
• View backup Status, storage usage, or the date of the Last Backup, by service
• Start a backup for any or all services by clicking the Backup Now icon
• Export one or more services
User preview shown on administrative dashboard, in this example for “Kenny Loggins”
Search is all metadata based, not content based. If the search term isn’t in one of the searchable fields sections (keyword searches all the parameters) it isn’t found.
10 | datto.com
Additional resources:
Help article on the different backup statuses
DASHBOARD: MANAGING USERS
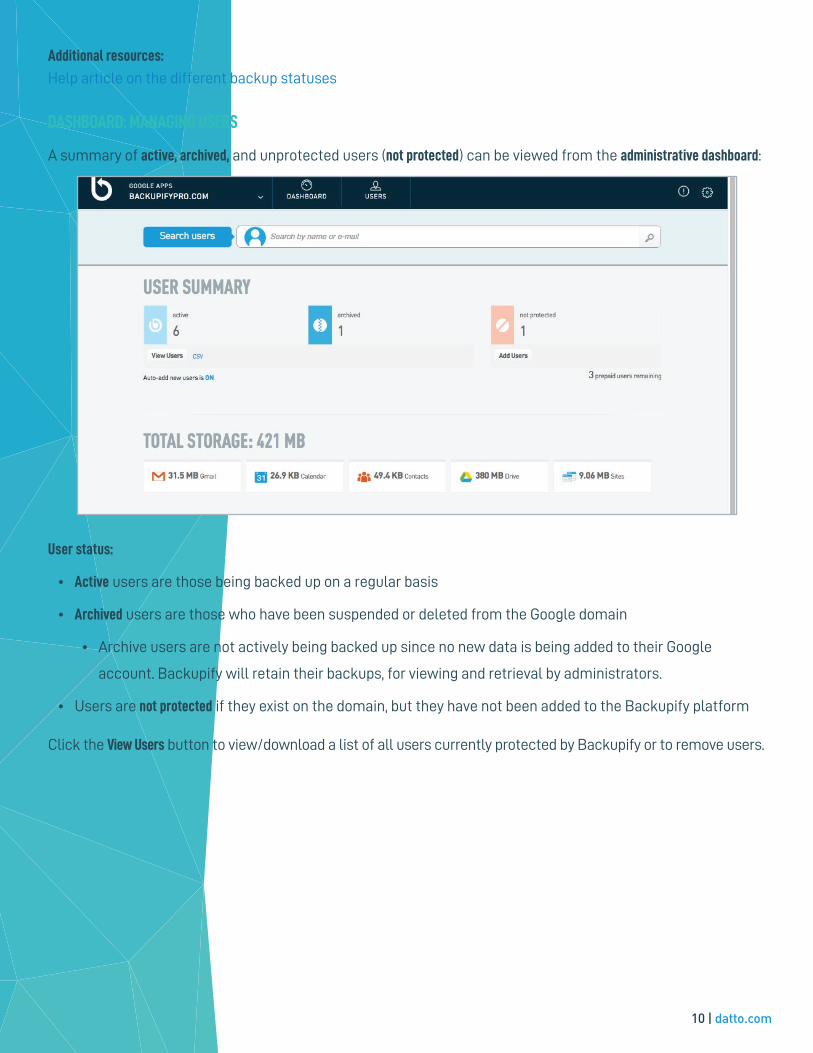
A summary of active, archived, and unprotected users (not protected) can be viewed from the administrative dashboard:
User status:
• Active users are those being backed up on a regular basis
• Archived users are those who have been suspended or deleted from the Google domain
• Archive users are not actively being backed up since no new data is being added to their Google
account. Backupify will retain their backups, for viewing and retrieval by administrators.
• Users are not protected if they exist on the domain, but they have not been added to the Backupify platform
Click the View Users button to view/download a list of all users currently protected by Backupify or to remove users.
11 | datto.com
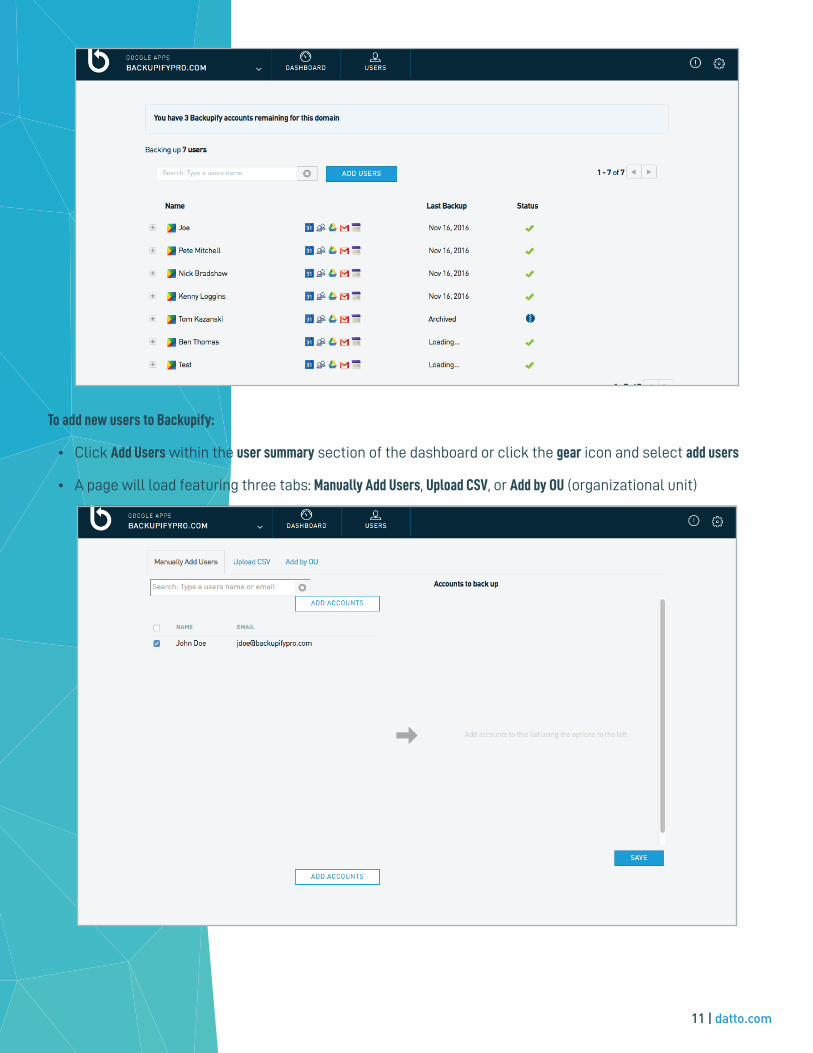
To add new users to Backupify:
• Click Add Users within the user summary section of the dashboard or click the gear icon and select add users
• A page will load featuring three tabs: Manually Add Users, Upload CSV, or Add by OU (organizational unit)
12 | datto.com
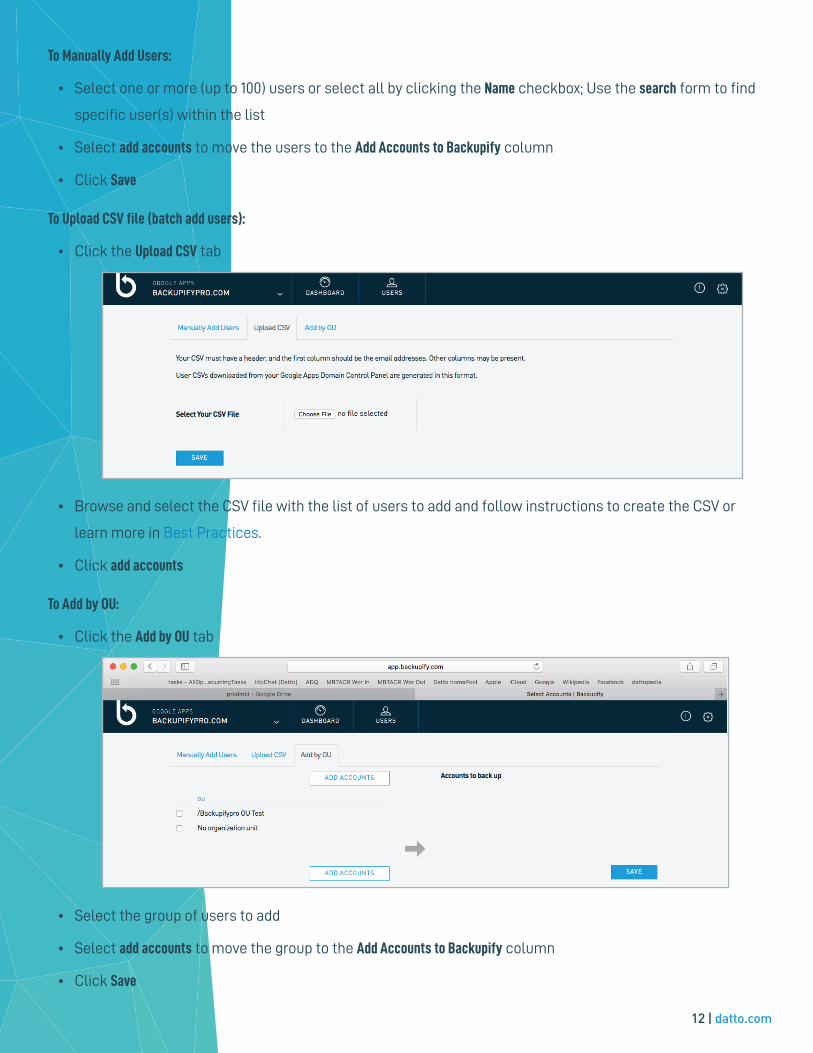
To Manually Add Users:
• Select one or more (up to 100) users or select all by clicking the Name checkbox; Use the search form to find
specific user(s) within the list
• Select add accounts to move the users to the Add Accounts to Backupify column
• Click Save
To Upload CSV file (batch add users):
• Click the Upload CSV tab
• Browse and select the CSV file with the list of users to add and follow instructions to create the CSV or
learn more in Best Practices.
• Click add accounts
To Add by OU:
• Click the Add by OU tab
• Select the group of users to add
• Select add accounts to move the group to the Add Accounts to Backupify column
• Click Save
13 | datto.com
Enterprise and Enterprise+ customers can also add users via our Backupify User Management APIs by visiting API Documentation
It may take time for new OUs just added to Google to populate (especially on initial setup). Additionally, only OUs with users in them will appear in this section.
DASHBOARD: REMOVING USERS
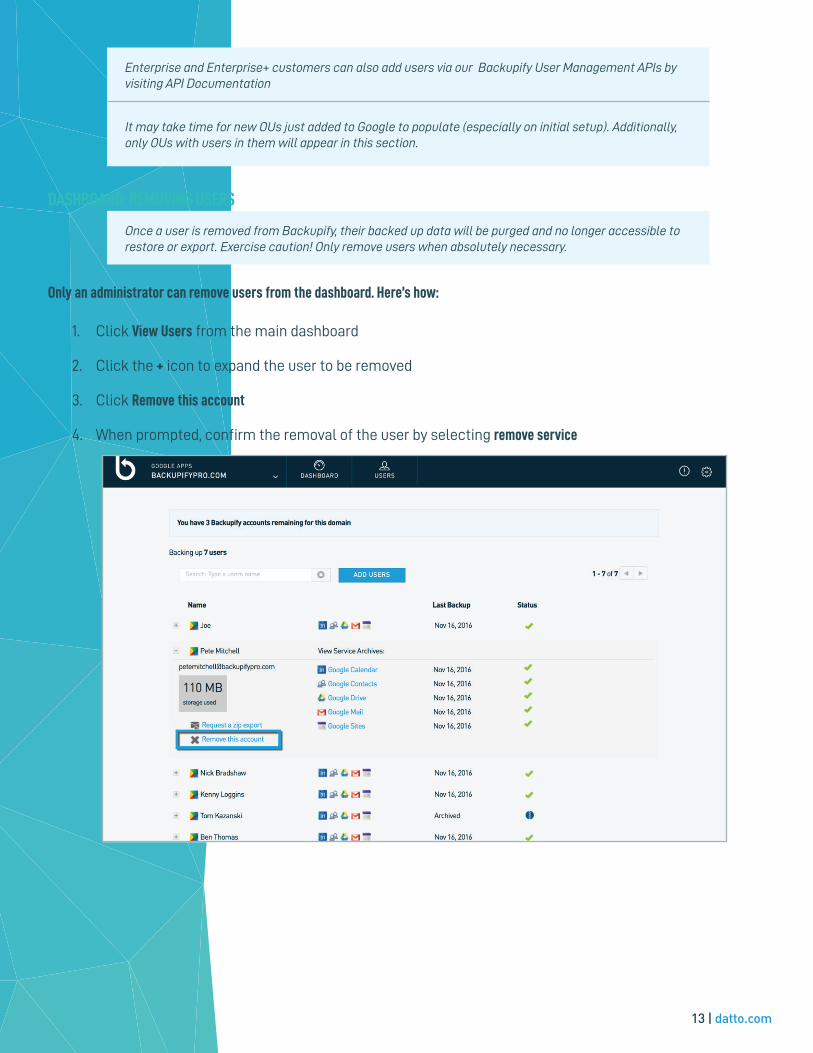
Once a user is removed from Backupify, their backed up data will be purged and no longer accessible to restore or export. Exercise caution! Only remove users when absolutely necessary.
Only an administrator can remove users from the dashboard. Here’s how:
1. Click View Users from the main dashboard
2. Click the + icon to expand the user to be removed
3. Click Remove this account
4. When prompted, confirm the removal of the user by selecting remove service
14 | datto.com
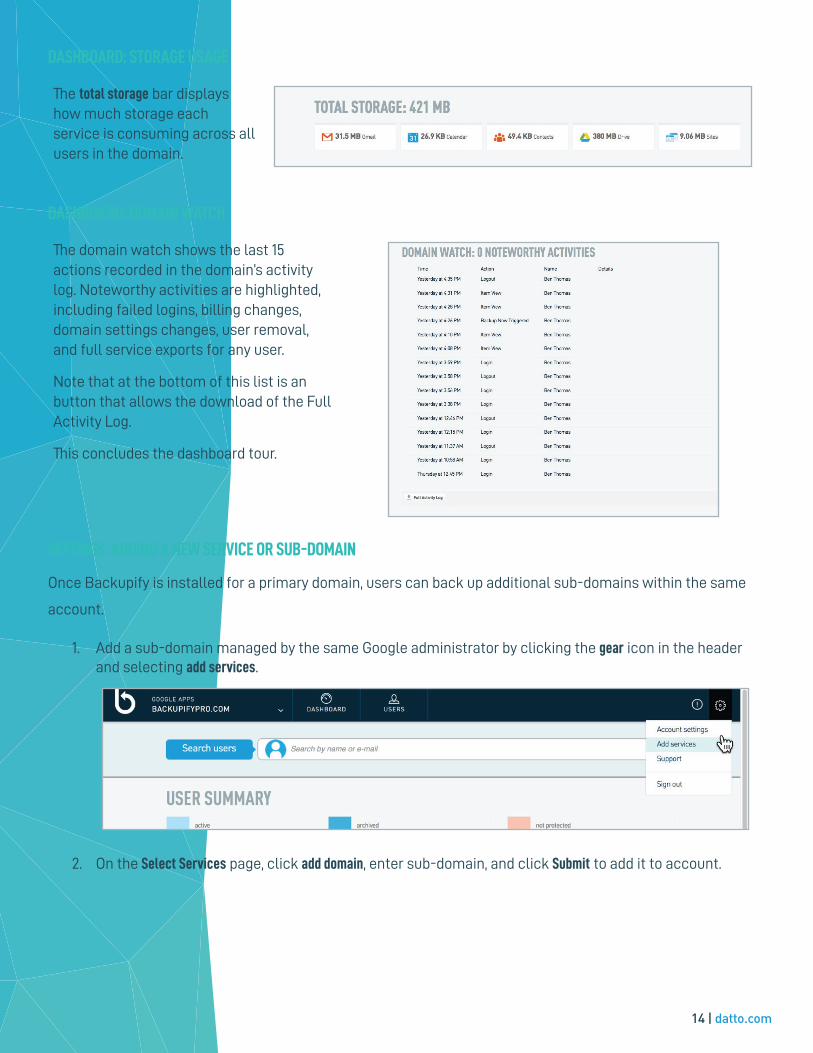
DASHBOARD: STORAGE USAGE
The total storage bar displays how much storage each service is consuming across all users in the domain.
DASHBOARD: DOMAIN WATCH
The domain watch shows the last 15 actions recorded in the domain’s activity log. Noteworthy activities are highlighted, including failed logins, billing changes, domain settings changes, user removal, and full service exports for any user.
Note that at the bottom of this list is an button that allows the download of the Full Activity Log.
This concludes the dashboard tour.
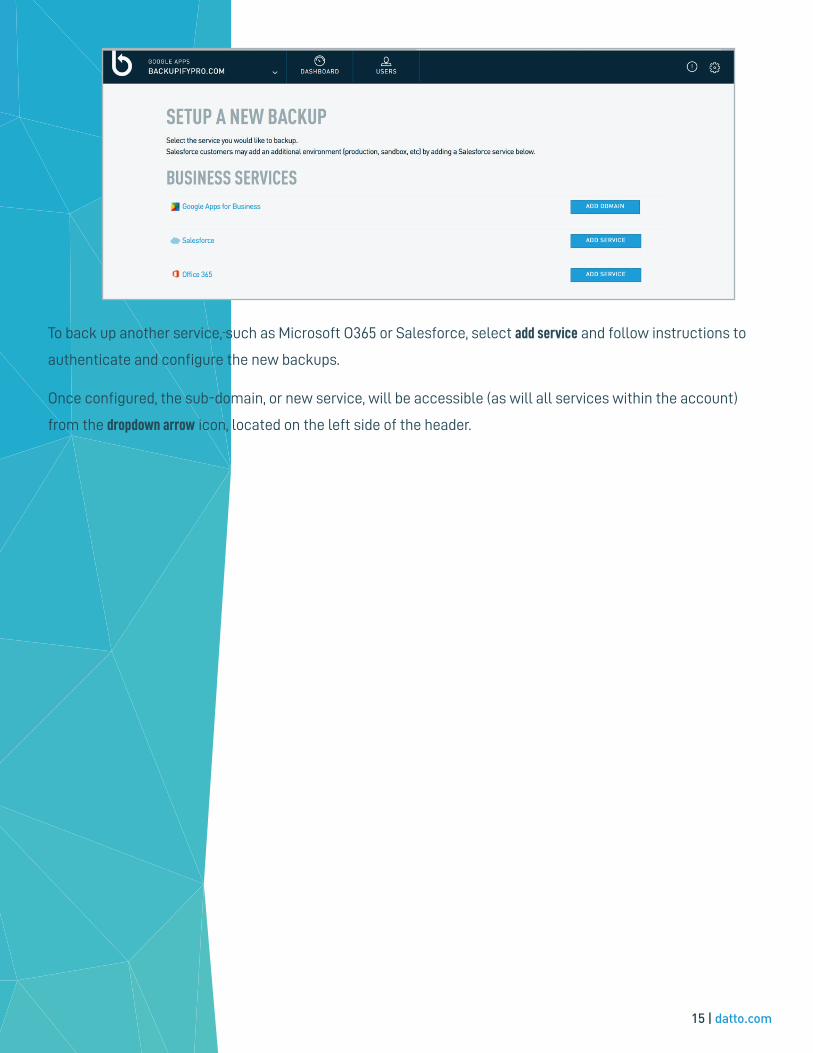
SETTINGS: ADDING A NEW SERVICE OR SUB-DOMAIN
Once Backupify is installed for a primary domain, users can back up additional sub-domains within the same
account.
1. Add a sub-domain managed by the same Google administrator by clicking the gear icon in the header and selecting add services.
2. On the Select Services page, click add domain, enter sub-domain, and click Submit to add it to account.
15 | datto.com
To back up another service, such as Microsoft O365 or Salesforce, select add service and follow instructions to
authenticate and configure the new backups.
Once configured, the sub-domain, or new service, will be accessible (as will all services within the account)
from the dropdown arrow icon, located on the left side of the header.
16 | datto.com
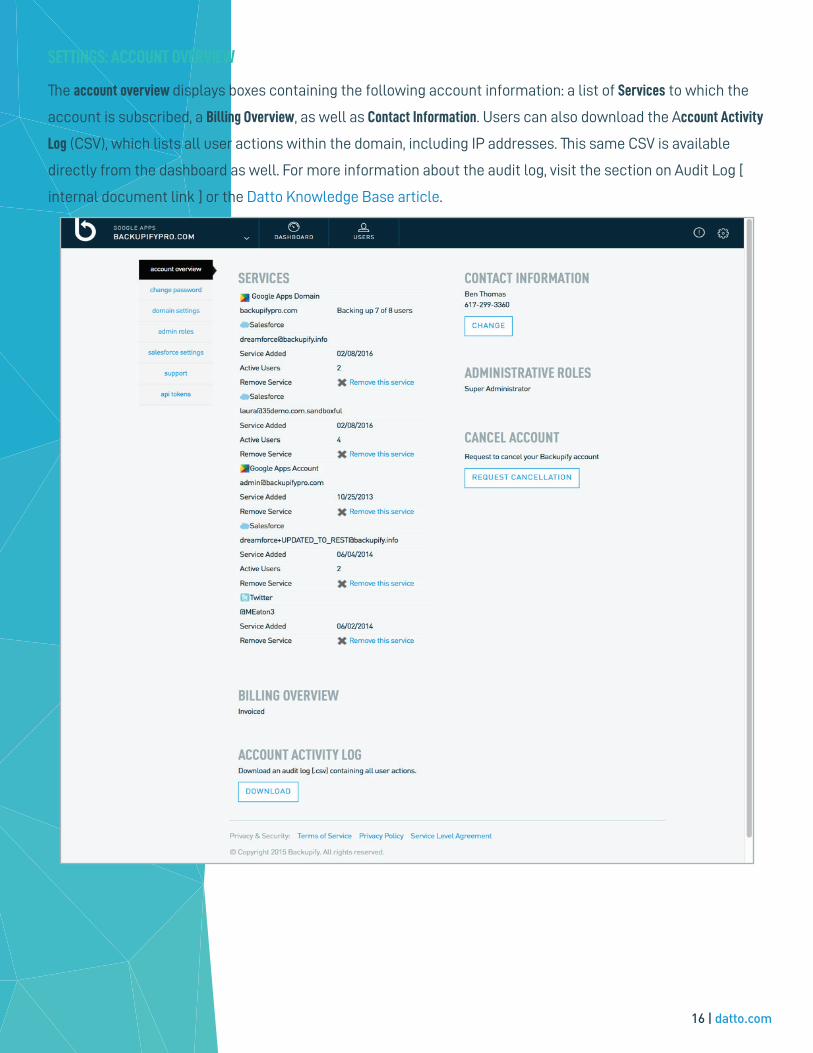
SETTINGS: ACCOUNT OVERVIEW
The account overview displays boxes containing the following account information: a list of Services to which the
account is subscribed, a Billing Overview, as well as Contact Information. Users can also download the Account Activity
Log (CSV), which lists all user actions within the domain, including IP addresses. This same CSV is available
directly from the dashboard as well. For more information about the audit log, visit the section on Audit Log [
internal document link ] or the Datto Knowledge Base article.
17 | datto.com
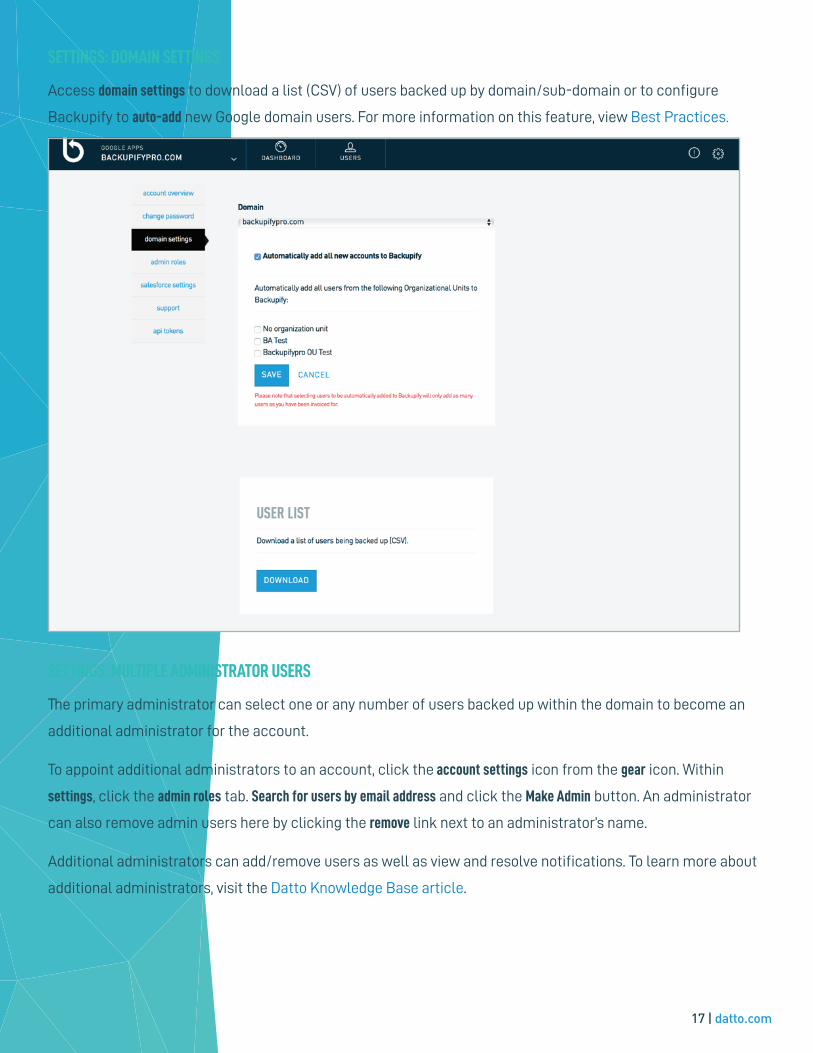
SETTINGS: DOMAIN SETTINGS
Access domain settings to download a list (CSV) of users backed up by domain/sub-domain or to configure
Backupify to auto-add new Google domain users. For more information on this feature, view Best Practices.
SETTINGS: MULTIPLE ADMINISTRATOR USERS
The primary administrator can select one or any number of users backed up within the domain to become an
additional administrator for the account.
To appoint additional administrators to an account, click the account settings icon from the gear icon. Within
settings, click the admin roles tab. Search for users by email address and click the Make Admin button. An administrator
can also remove admin users here by clicking the remove link next to an administrator’s name.
Additional administrators can add/remove users as well as view and resolve notifications. To learn more about
additional administrators, visit the Datto Knowledge Base article.
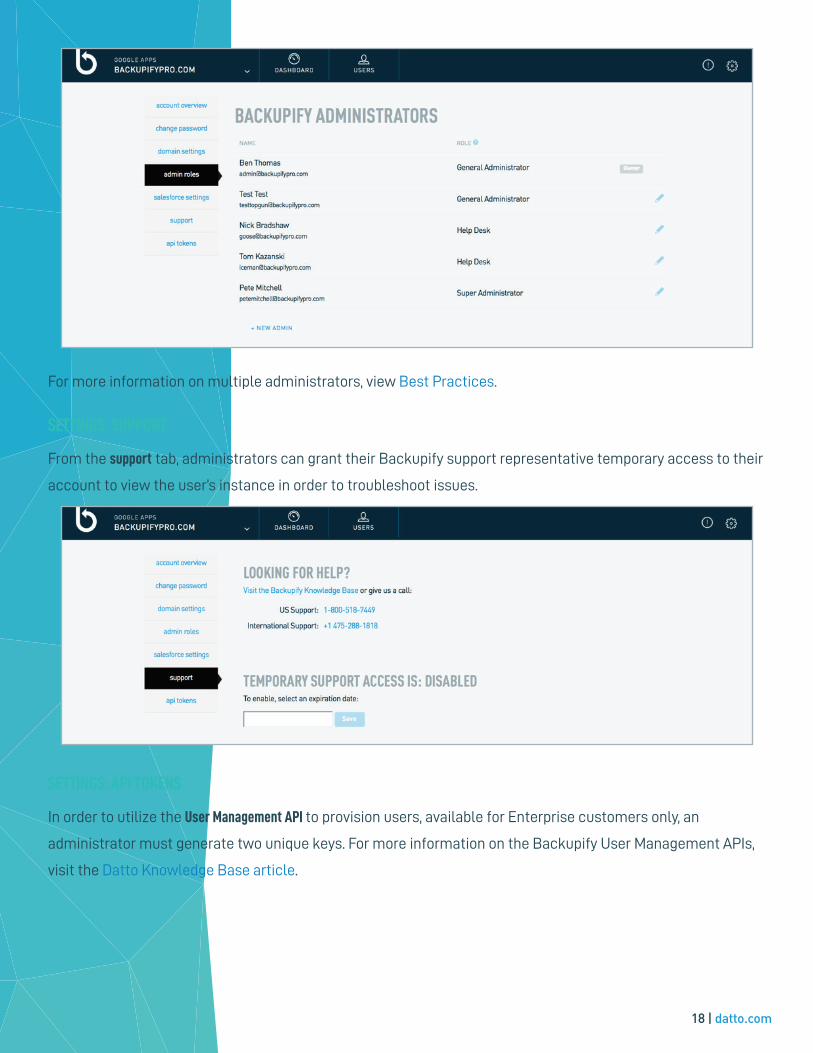
18 | datto.com
For more information on multiple administrators, view Best Practices.
SETTINGS: SUPPORT
From the support tab, administrators can grant their Backupify support representative temporary access to their
account to view the user’s instance in order to troubleshoot issues.
SETTINGS: API TOKENS
In order to utilize the User Management API to provision users, available for Enterprise customers only, an
administrator must generate two unique keys. For more information on the Backupify User Management APIs,
visit the Datto Knowledge Base article.

19 | datto.com
SERVICE CONFIGURATION OPTIONS
There are a few more service configuration options available to primary administrators. Note that these can only be configured by a
member of the Datto Backupify support team, upon customer request.
• Disabling backup of service(s) across the domain: If an administrator does not use one of the Google services or
simply doesn’t opt to back a specific service up, they may request to remove backup for said service. For
example, if a customer does not use Google Calendar, they may request to disable Calendar backups for all
users in a domain. This rule will also apply to any new users added to the account.
• Disabling end-user access to Backupify: A primary administrator can prevent end-users from accessing
Backupify by submitting a request to the Customer Support team. When end-users log in, they will see the
message as shown below.
• Shared docs backup: By default, Backupify only backs up the documents owned by a user.
• Gmail data retention: Enterprise and Enterprise+ customers can specify a data retention period for emails in
an account.. This data retention period can be set at any number of days. For example, if an administrator
sets the data retention period to 180 days, all user email across a domain that is older than 6 months will be
purged from backups.
FULL DOMAIN EXPORT
A full domain export, which is a paid feature, can be requested by the primary administrator of a domain by
contacting Sales or Customer Support. Learn more about full domain exports in the Datto Knowledge Base article.
20 | datto.com
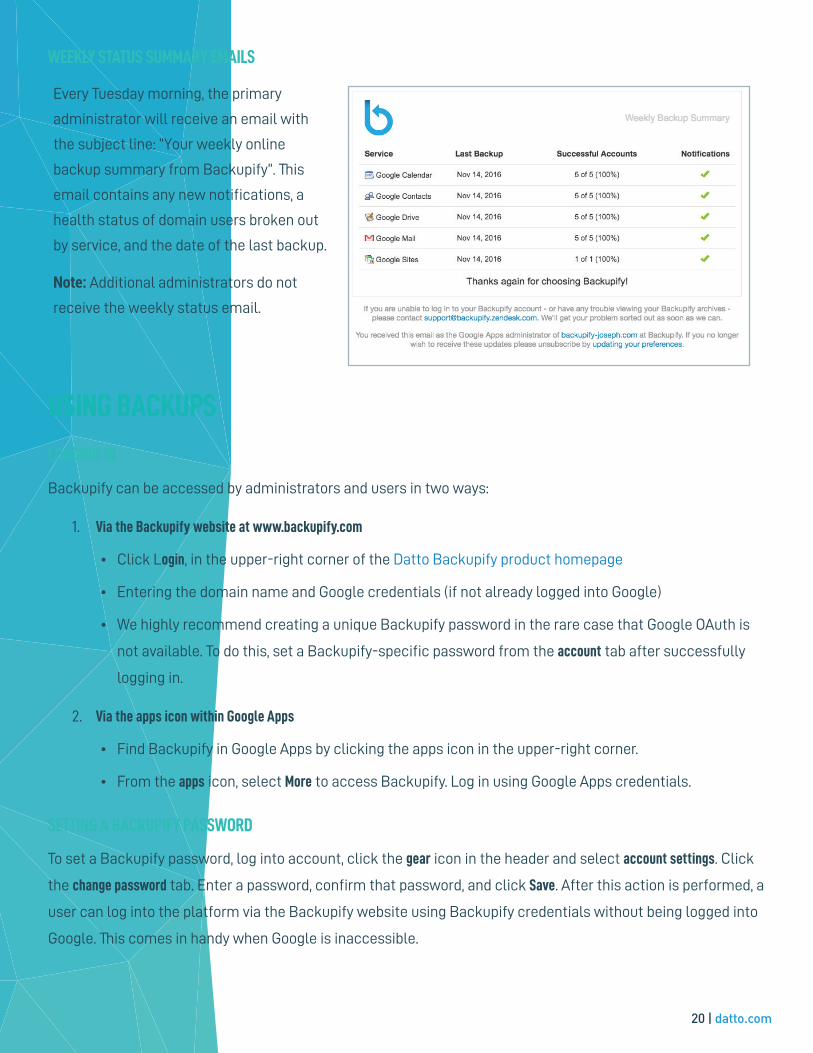
WEEKLY STATUS SUMMARY EMAILS
Every Tuesday morning, the primary
administrator will receive an email with
the subject line: “Your weekly online
backup summary from Backupify”. This
email contains any new notifications, a
health status of domain users broken out
by service, and the date of the last backup.
Note: Additional administrators do not
receive the weekly status email.
USING BACKUPS
LOGGING IN
Backupify can be accessed by administrators and users in two ways:
1. Via the Backupify website at www.backupify.com
• Click Login, in the upper-right corner of the Datto Backupify product homepage
• Entering the domain name and Google credentials (if not already logged into Google)
• We highly recommend creating a unique Backupify password in the rare case that Google OAuth is
not available. To do this, set a Backupify-specific password from the account tab after successfully
logging in.
2. Via the apps icon within Google Apps
• Find Backupify in Google Apps by clicking the apps icon in the upper-right corner.
• From the apps icon, select More to access Backupify. Log in using Google Apps credentials.
SETTING A BACKUPIFY PASSWORD
To set a Backupify password, log into account, click the gear icon in the header and select account settings. Click
the change password tab. Enter a password, confirm that password, and click Save. After this action is performed, a
user can log into the platform via the Backupify website using Backupify credentials without being logged into
Google. This comes in handy when Google is inaccessible.
21 | datto.com
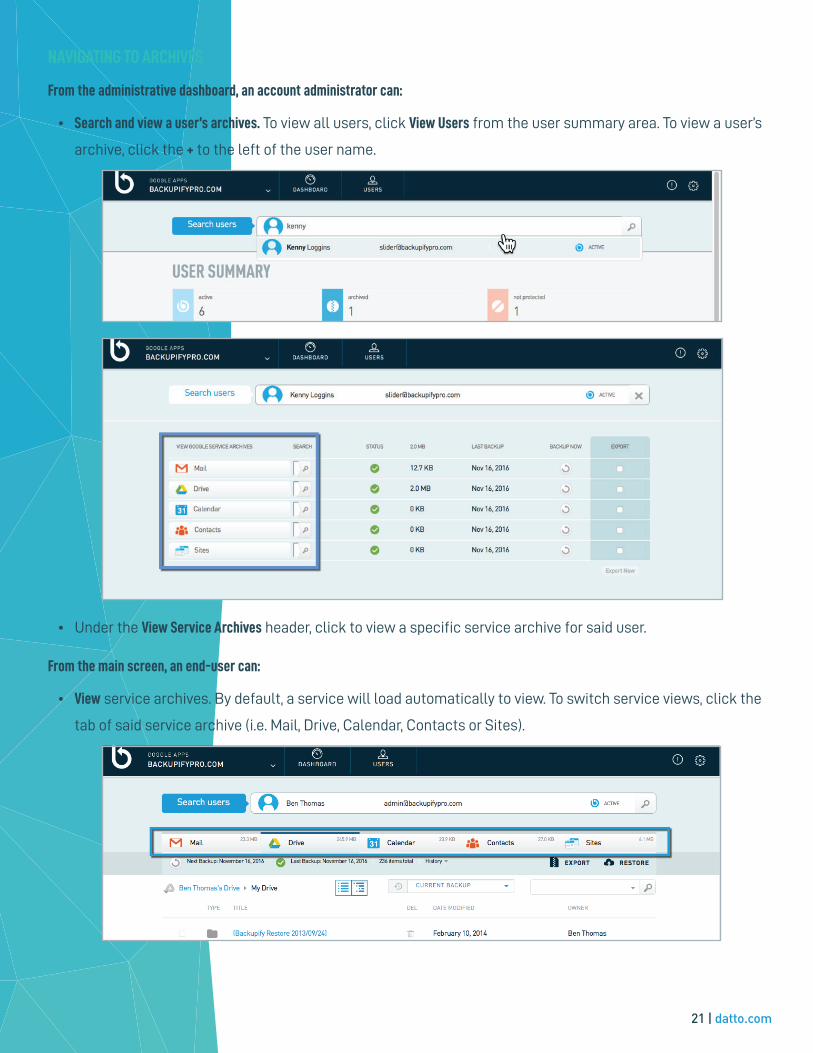
NAVIGATING TO ARCHIVES
From the administrative dashboard, an account administrator can:
• Search and view a user’s archives. To view all users, click View Users from the user summary area. To view a user’s
archive, click the + to the left of the user name.
• Under the View Service Archives header, click to view a specific service archive for said user.
From the main screen, an end-user can:
• View service archives. By default, a service will load automatically to view. To switch service views, click the
tab of said service archive (i.e. Mail, Drive, Calendar, Contacts or Sites).
22 | datto.com
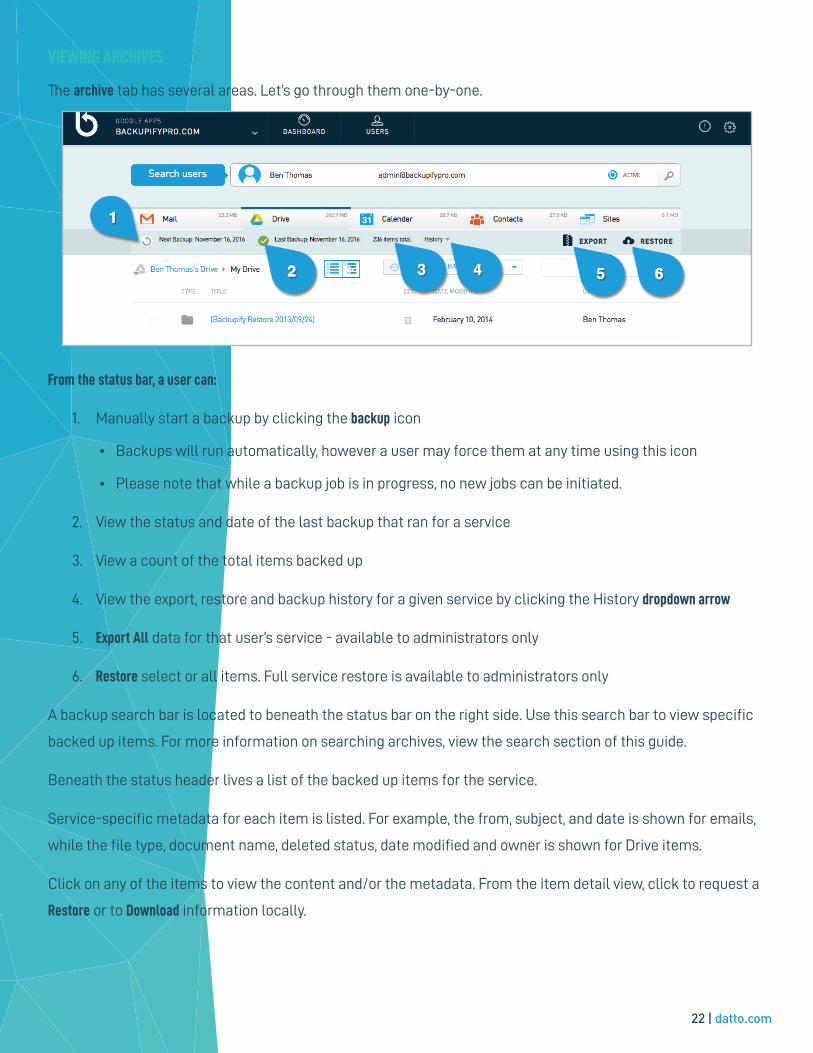
VIEWING ARCHIVES
The archive tab has several areas. Let’s go through them one-by-one.
From the status bar, a user can:
1. Manually start a backup by clicking the backup icon
• Backups will run automatically, however a user may force them at any time using this icon
• Please note that while a backup job is in progress, no new jobs can be initiated.
2. View the status and date of the last backup that ran for a service
3. View a count of the total items backed up
4. View the export, restore and backup history for a given service by clicking the History dropdown arrow
5. Export All data for that user’s service - available to administrators only
6. Restore select or all items. Full service restore is available to administrators only
A backup search bar is located to beneath the status bar on the right side. Use this search bar to view specific
backed up items. For more information on searching archives, view the search section of this guide.
Beneath the status header lives a list of the backed up items for the service.
Service-specific metadata for each item is listed. For example, the from, subject, and date is shown for emails,
while the file type, document name, deleted status, date modified and owner is shown for Drive items.
Click on any of the items to view the content and/or the metadata. From the item detail view, click to request a
Restore or to Download information locally.
23 | datto.com
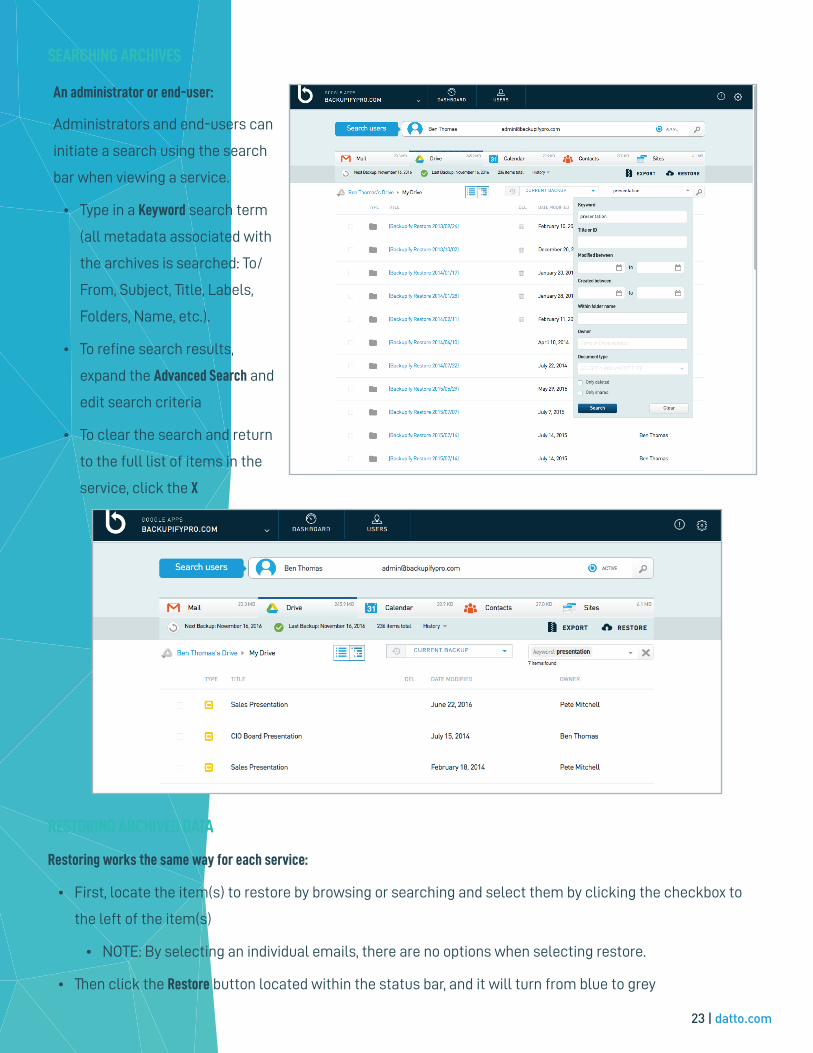
SEARCHING ARCHIVES
An administrator or end-user:
Administrators and end-users can
initiate a search using the search
bar when viewing a service.
• Type in a Keyword search term
(all metadata associated with
the archives is searched: To/
From, Subject, Title, Labels,
Folders, Name, etc.).
• To refine search results,
expand the Advanced Search and
edit search criteria
• To clear the search and return
to the full list of items in the
service, click the X
RESTORING ARCHIVED DATA
Restoring works the same way for each service:
• First, locate the item(s) to restore by browsing or searching and select them by clicking the checkbox to
the left of the item(s)
• NOTE: By selecting an individual emails, there are no options when selecting restore.
• Then click the Restore button located within the status bar, and it will turn from blue to grey
24 | datto.com
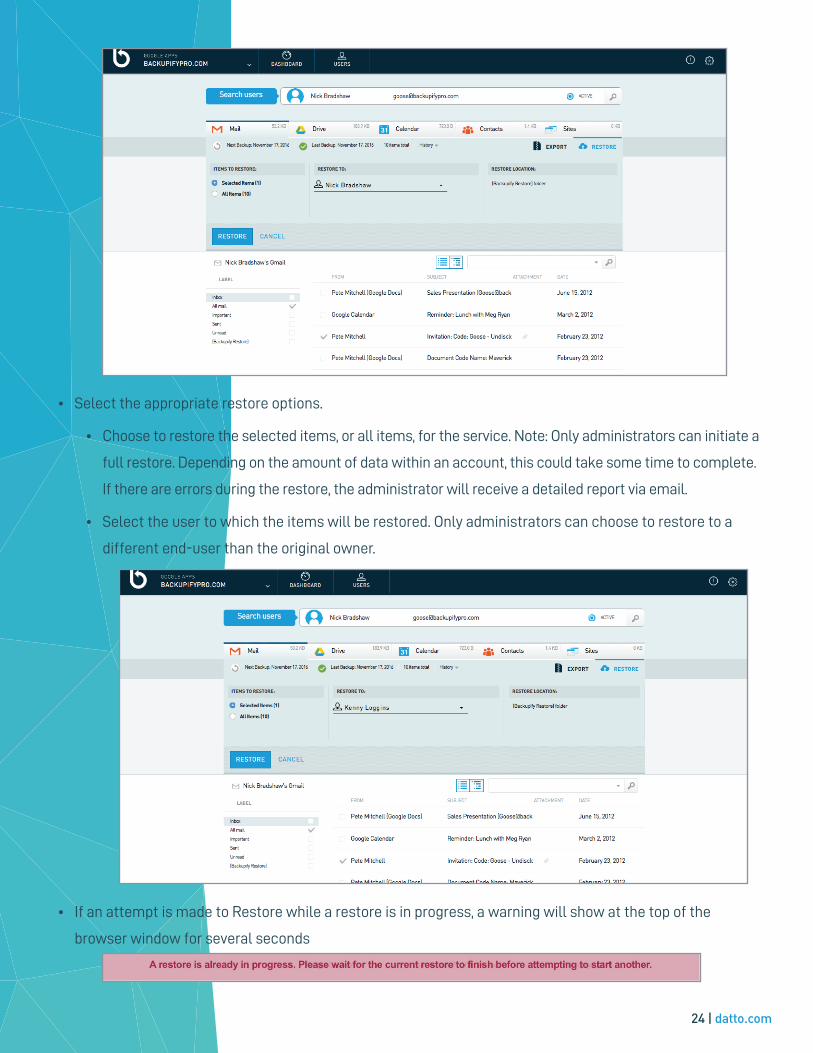
• Select the appropriate restore options.
• Choose to restore the selected items, or all items, for the service. Note: Only administrators can initiate a
full restore. Depending on the amount of data within an account, this could take some time to complete.
If there are errors during the restore, the administrator will receive a detailed report via email.
• Select the user to which the items will be restored. Only administrators can choose to restore to a
different end-user than the original owner.
• If an attempt is made to Restore while a restore is in progress, a warning will show at the top of the
browser window for several seconds
25 | datto.com
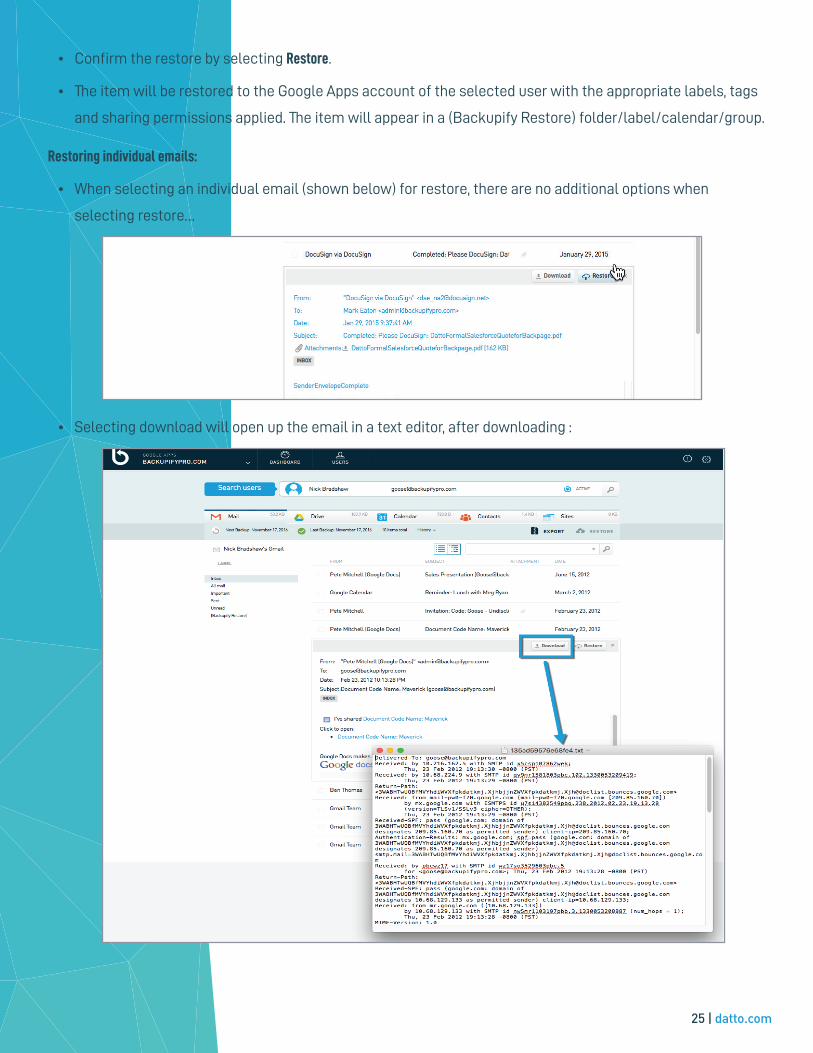
• Confirm the restore by selecting Restore.
• The item will be restored to the Google Apps account of the selected user with the appropriate labels, tags
and sharing permissions applied. The item will appear in a (Backupify Restore) folder/label/calendar/group.
Restoring individual emails:
• When selecting an individual email (shown below) for restore, there are no additional options when
selecting restore…
• Selecting download will open up the email in a text editor, after downloading :
26 | datto.com
DOWNLOADING ARCHIVES
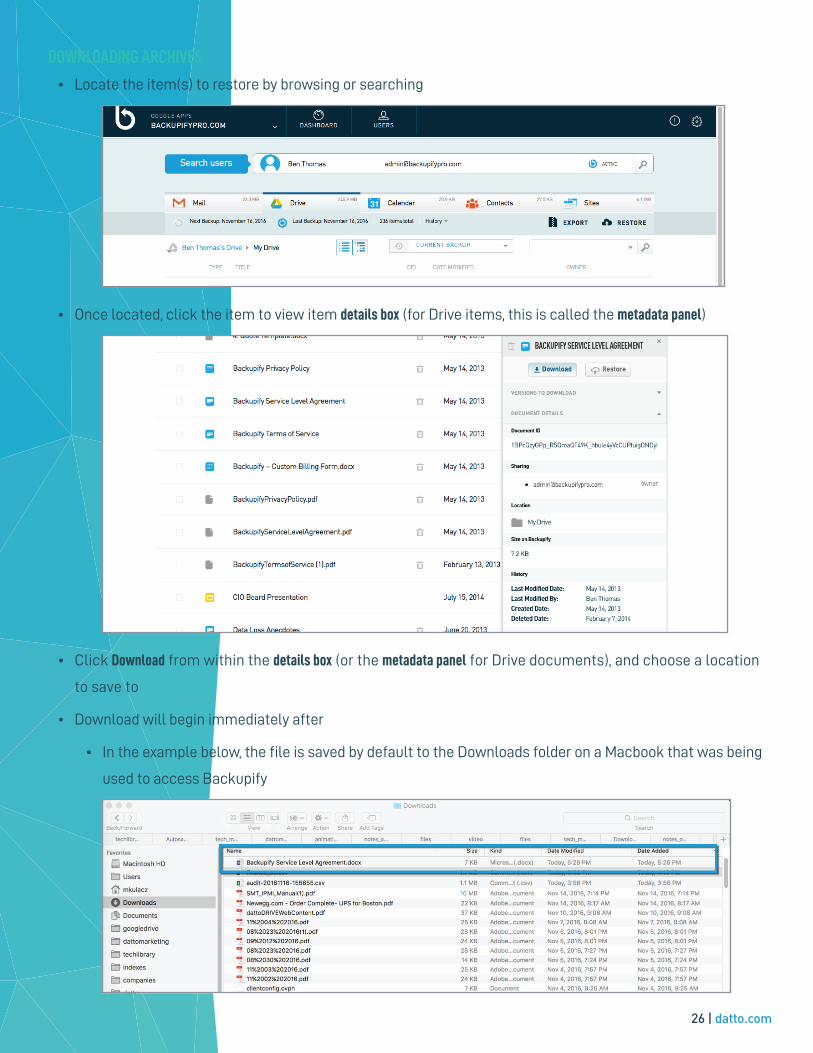
• Locate the item(s) to restore by browsing or searching
• Once located, click the item to view item details box (for Drive items, this is called the metadata panel)
• Click Download from within the details box (or the metadata panel for Drive documents), and choose a location
to save to
• Download will begin immediately after
• In the example below, the file is saved by default to the Downloads folder on a Macbook that was being
used to access Backupify
27 | datto.com
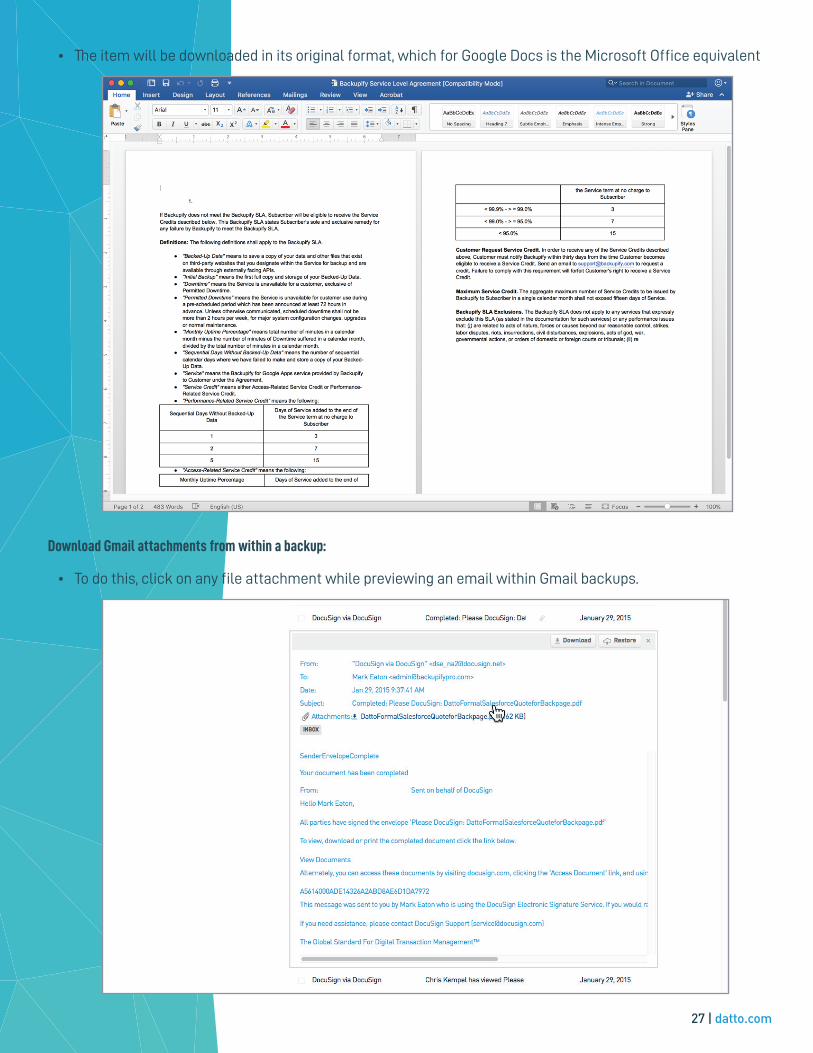
• The item will be downloaded in its original format, which for Google Docs is the Microsoft Office equivalent
Download Gmail attachments from within a backup:
• To do this, click on any file attachment while previewing an email within Gmail backups.
28 | datto.com
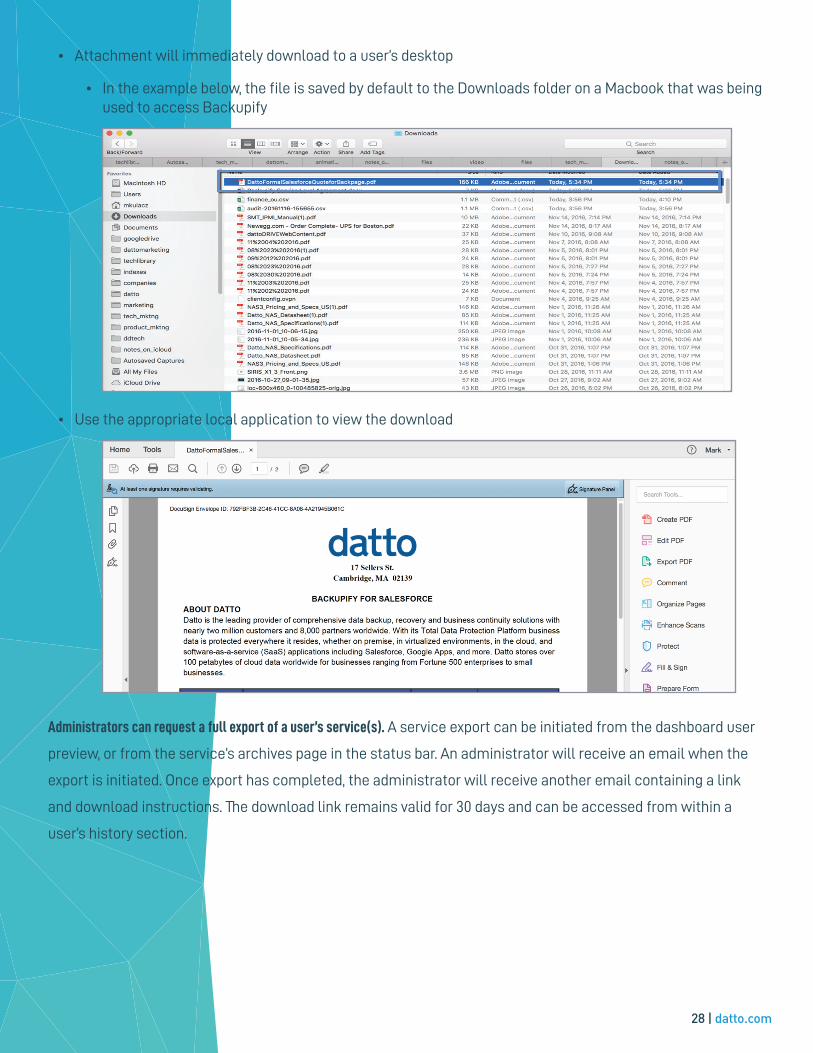
• Attachment will immediately download to a user’s desktop
• In the example below, the file is saved by default to the Downloads folder on a Macbook that was being used to access Backupify
• Use the appropriate local application to view the download
Administrators can request a full export of a user’s service(s). A service export can be initiated from the dashboard user
preview, or from the service’s archives page in the status bar. An administrator will receive an email when the
export is initiated. Once export has completed, the administrator will receive another email containing a link
and download instructions. The download link remains valid for 30 days and can be accessed from within a
user’s history section.
29 | datto.com
Downloading previous versions:
Backupify keeps unlimited daily versions of user documents. To access previous versions for an archive, browse
or search for the relevant item. Next steps:
• Once item is selected, click the Previous Versions button located in the upper-right corner of the page, or,
from the item’s details box or metadata panel, click Download Previous Versions to expand the section.
• If there are additional versions of the document, the dates will be listed here.
• Select any version to immediately begin the download.
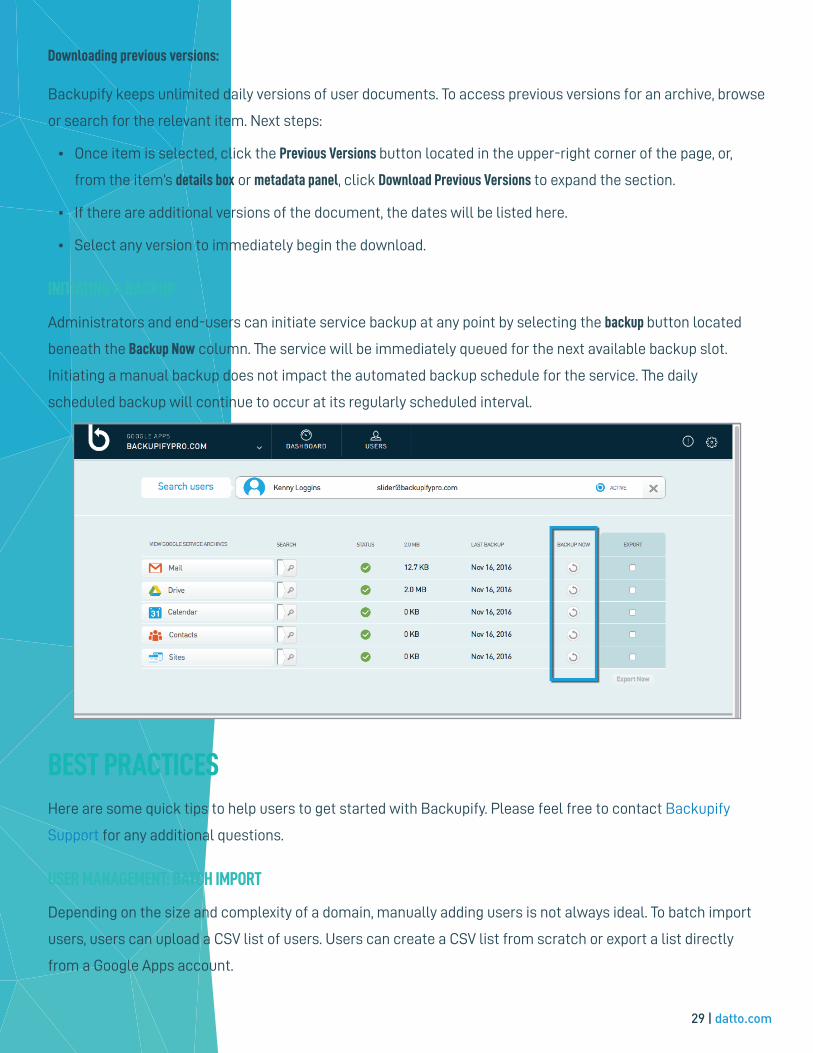
INITIATING A BACKUP
Administrators and end-users can initiate service backup at any point by selecting the backup button located
beneath the Backup Now column. The service will be immediately queued for the next available backup slot.
Initiating a manual backup does not impact the automated backup schedule for the service. The daily
scheduled backup will continue to occur at its regularly scheduled interval.
BEST PRACTICESHere are some quick tips to help users to get started with Backupify. Please feel free to contact Backupify
Support for any additional questions.
USER MANAGEMENT: BATCH IMPORT
Depending on the size and complexity of a domain, manually adding users is not always ideal. To batch import
users, users can upload a CSV list of users. Users can create a CSV list from scratch or export a list directly
from a Google Apps account.
30 | datto.com
To import a CSV list of users:
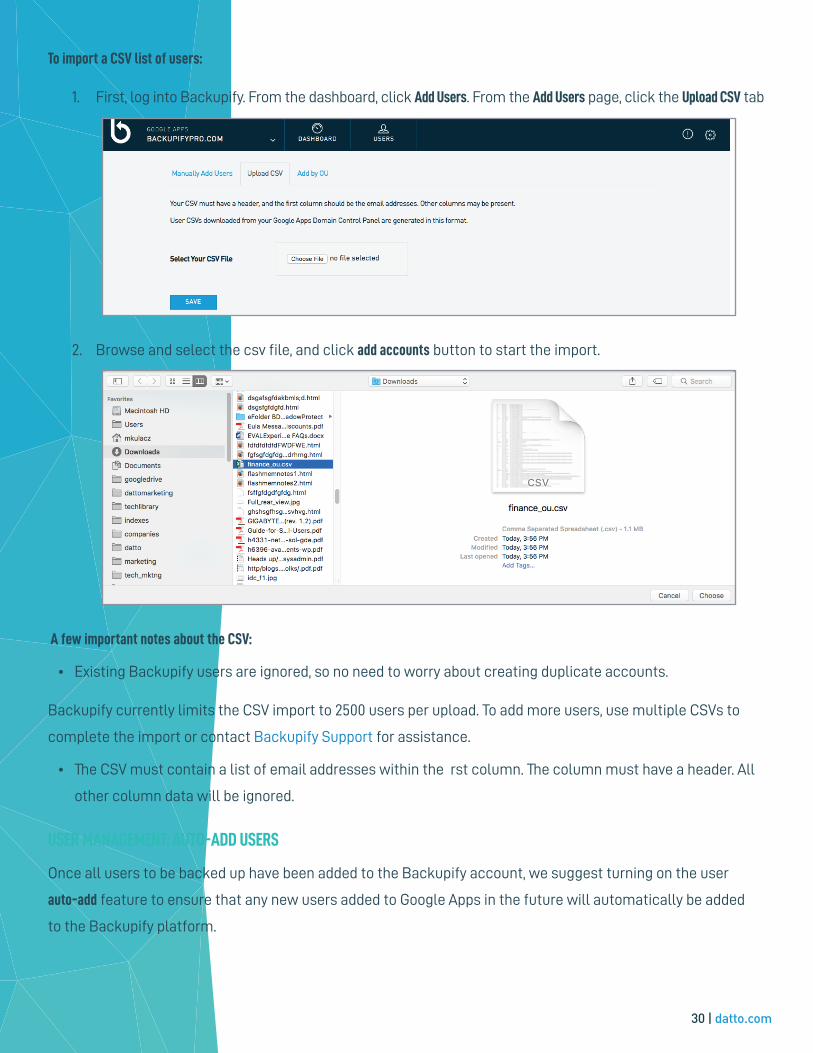
1. First, log into Backupify. From the dashboard, click Add Users. From the Add Users page, click the Upload CSV tab
2. Browse and select the csv file, and click add accounts button to start the import.
A few important notes about the CSV:
• Existing Backupify users are ignored, so no need to worry about creating duplicate accounts.
Backupify currently limits the CSV import to 2500 users per upload. To add more users, use multiple CSVs to
complete the import or contact Backupify Support for assistance.
• The CSV must contain a list of email addresses within the rst column. The column must have a header. All
other column data will be ignored.
USER MANAGEMENT: AUTO-ADD USERS
Once all users to be backed up have been added to the Backupify account, we suggest turning on the user
auto-add feature to ensure that any new users added to Google Apps in the future will automatically be added
to the Backupify platform.
31 | datto.com
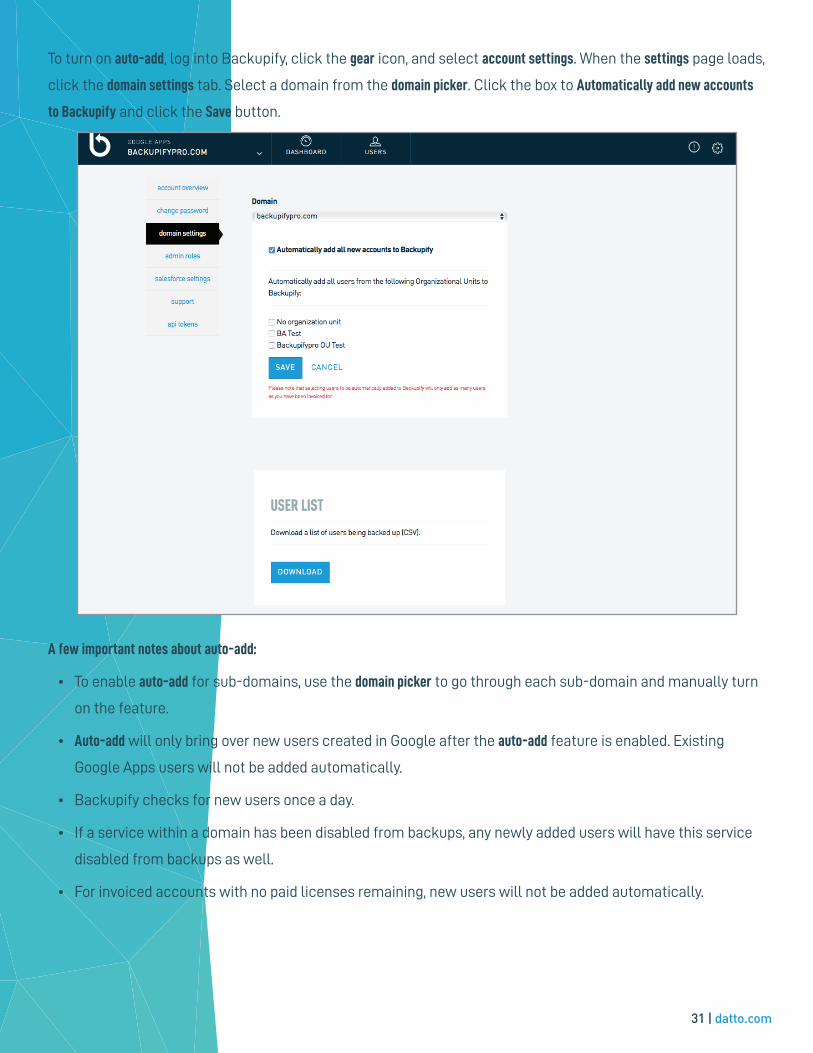
To turn on auto-add, log into Backupify, click the gear icon, and select account settings. When the settings page loads,
click the domain settings tab. Select a domain from the domain picker. Click the box to Automatically add new accounts
to Backupify and click the Save button.
A few important notes about auto-add:
• To enable auto-add for sub-domains, use the domain picker to go through each sub-domain and manually turn
on the feature.
• Auto-add will only bring over new users created in Google after the auto-add feature is enabled. Existing
Google Apps users will not be added automatically.
• Backupify checks for new users once a day.
• If a service within a domain has been disabled from backups, any newly added users will have this service
disabled from backups as well.
• For invoiced accounts with no paid licenses remaining, new users will not be added automatically.

32 | datto.com
MULTIPLE ADMINISTRATORS
We suggest that every account on Backupify have at least one additional administrator because it allows other
users within an organization to access backups in case the account owner is not available. This eliminates a
single point of failure when needing to recover critical backed up data.
To add an additional administrator:
1. Log into Backupify account, click the gear icon in the header and select account settings
2. From the settings page, click the admin roles tab and search for user
3. Click the + Make Admin to add selected user as an additional administrator (note there are several options
under role)
4. Alternatively, revoke a user’s administrator status by clicking the remove link within the list of current
administrators
33 | datto.com
Additional administrators can:
• View content, view metadata, search metadata, download, and restore.
• Perform full service restores and exports.
• View backup history, trigger an immediate backup.
• Add and remove users, view a user’s audit log.
A few important notes about multiple admins:
• If using sub-domains, only users from the primary domain can be an additional administrator.
• Additional administrator functionality is only available for Enterprise customers.
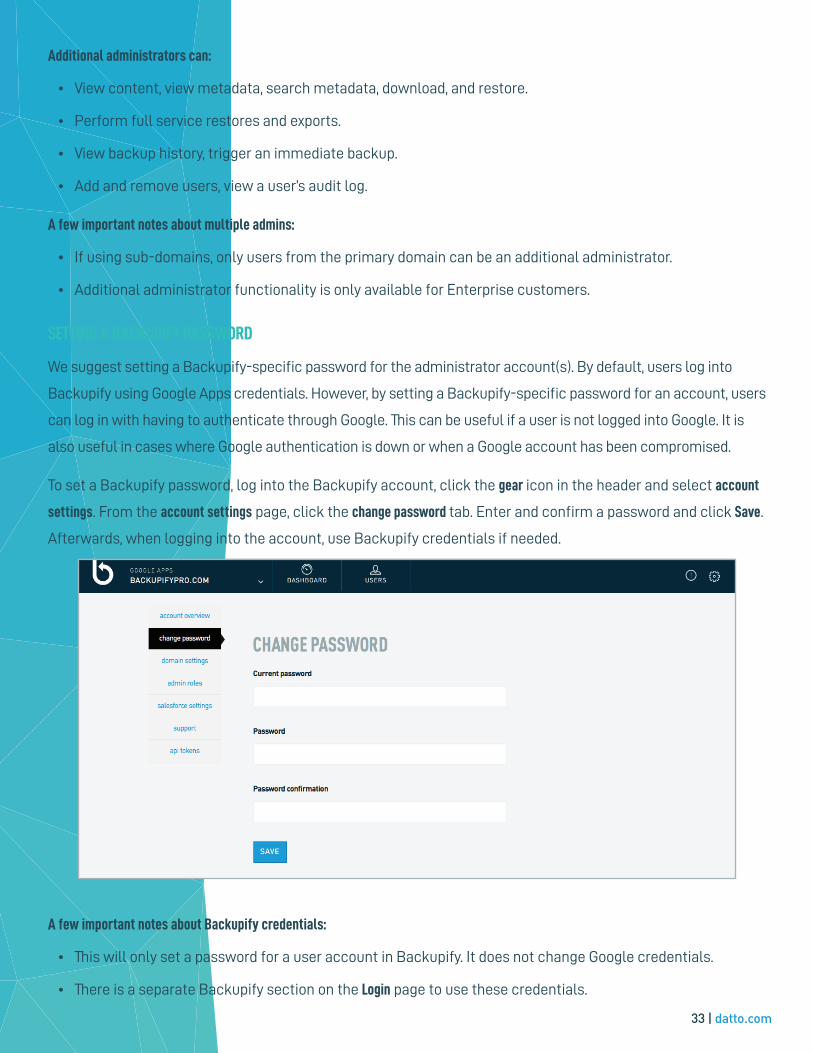
SETTING A BACKUPIFY PASSWORD
We suggest setting a Backupify-specific password for the administrator account(s). By default, users log into
Backupify using Google Apps credentials. However, by setting a Backupify-specific password for an account, users
can log in with having to authenticate through Google. This can be useful if a user is not logged into Google. It is
also useful in cases where Google authentication is down or when a Google account has been compromised.
To set a Backupify password, log into the Backupify account, click the gear icon in the header and select account
settings. From the account settings page, click the change password tab. Enter and confirm a password and click Save.
Afterwards, when logging into the account, use Backupify credentials if needed.
A few important notes about Backupify credentials:
• This will only set a password for a user account in Backupify. It does not change Google credentials.
• There is a separate Backupify section on the Login page to use these credentials.
34 | datto.com
AUDIT LOG
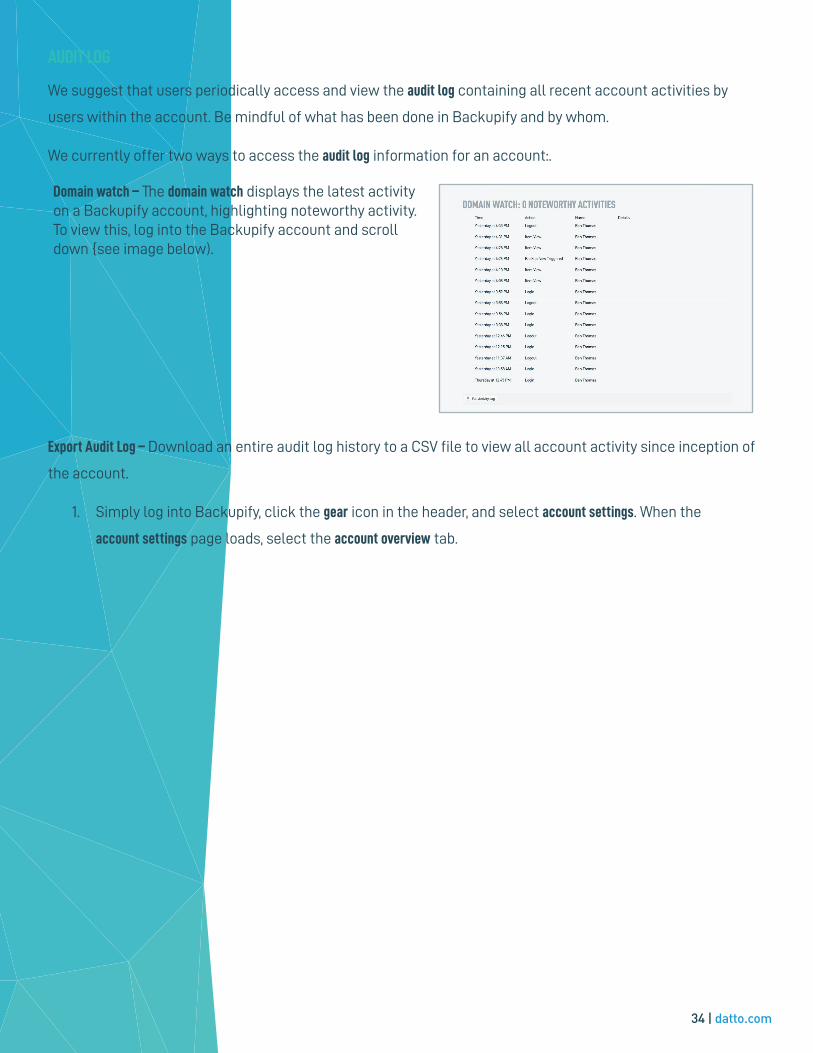
We suggest that users periodically access and view the audit log containing all recent account activities by
users within the account. Be mindful of what has been done in Backupify and by whom.
We currently offer two ways to access the audit log information for an account:.
Domain watch – The domain watch displays the latest activity on a Backupify account, highlighting noteworthy activity. To view this, log into the Backupify account and scroll down {see image below).
Export Audit Log – Download an entire audit log history to a CSV file to view all account activity since inception of
the account.
1. Simply log into Backupify, click the gear icon in the header, and select account settings. When the
account settings page loads, select the account overview tab.
35 | datto.com
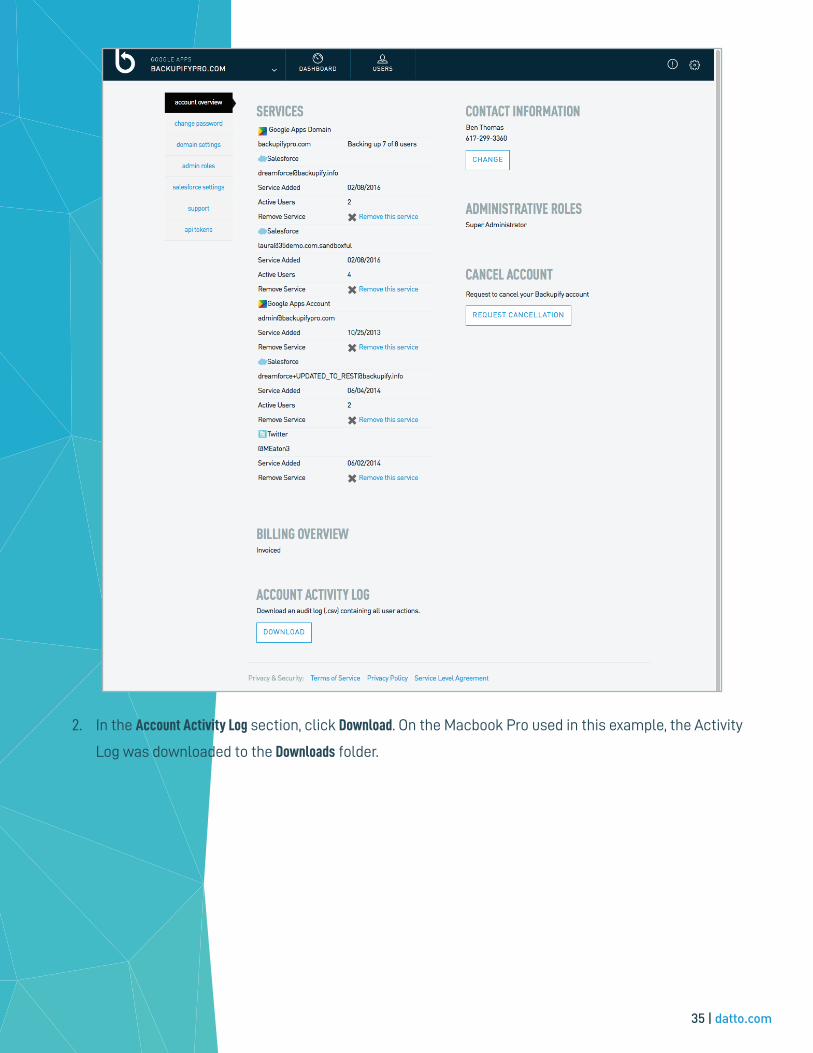
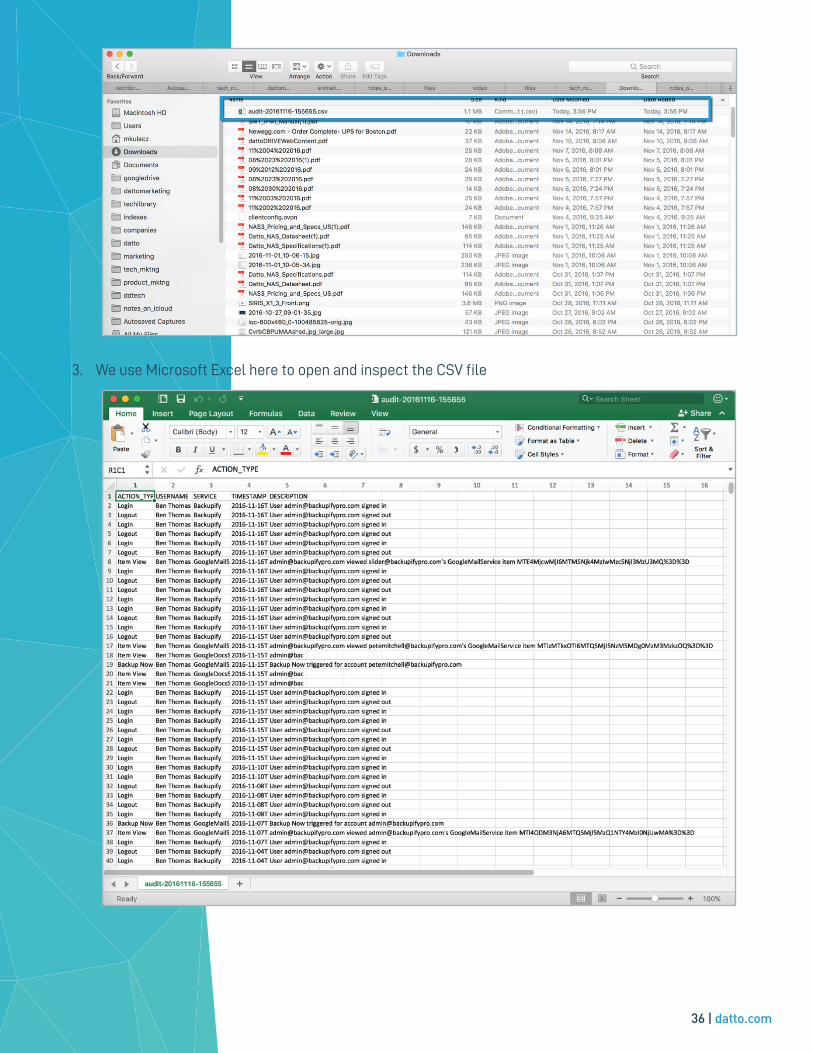
2. In the Account Activity Log section, click Download. On the Macbook Pro used in this example, the Activity
Log was downloaded to the Downloads folder.
36 | datto.com
3. We use Microsoft Excel here to open and inspect the CSV file

37 | datto.com
A few important notes about the audit log:
• Actions tracked: Item Restore, Full Service Restore, Item download, Full Service Export, User(s) added to/
removed from backup, Services removed from backup, Backup Now triggered, Change to Domain Settings,
Change to Billing Information, Sub-Domain Added for Backup, Item Detail Page Viewed, Login \ Logout
(explicit), Salesforce API limit change.
• Information logged: Action Type, Username for the backupify user who performed the action, Service
name (Google Apps, GMail, Google Drive, Salesforce, etc), Day and time the change was committed (UTC
timestamp), IP address, Event description.
CUSTOMIZE DOMAIN SETTINGSTo further customize a Backupify account for an organization’s needs, we suggest users review the following
configuration options and contact Backupify Support to enable any of them.
Shared docs backup: By default, Backupify only backs up the Google Drive documents of which the user is the
owner. Documents that have been shared with the user are not backed up. To backup all owned and shared
Drive documents, contact Backupify Support .
Disabling child login: By default, all users added to Backupify can log into their Backupify account using their
Google Apps credentials. Many administrators prefer this as it empowers their end-users to restore backed
up records on their own. However, others prefer that only administrators can log into the account. To disable
domain children from logging into Backupify, contact Backupify Support .
Removing Google services: By default, Backupify backs up all ve Google services (Gmail, Drive, Calendar, Contacts,
Sites) for every user added to the account. To customize the services backed up within an account, contact
Backupify Support . Remember: when a service is disabled from backing up within a domain, all users within the
account will be disabled from this backup.
Configurable data retention - Enterprise plans only: By default, Backupify backs up all Gmail records for users and
retains those backups forever. However, some organizations have specific legal, or other, data compliance
regulations that require them to retain data for a set period of time. For these customers, a configurable data
retention policy can be applied to a Gmail backup service. Enabling this feature discards all backed up Gmail
records older than the specified retention period. For more information on configurable data retention and how
to enable it, contact Backupify Support .This service is only available on Enterprise plans.
Full domain export: Administrators can export all backed up records for a user/service and store or view it
locally. This process works well when exporting a few users’ services. For a full domain export, Backupify
leverages a professional service, which is available for an additional cost. To obtain a full domain export,
contact Backupify Support.
38 | datto.com
Corporate Headquarters Datto, Inc.101 Merritt 7 Norwalk, CT 06851United [email protected]
Global OfficesUSA: 888.294.6312Canada: 877.811.0577EMEA: +44 (0) 118 402 9606Australia: +61 (02) 9696 8190Singapore: +65-31586291
©2016 Datto, Inc. All rights reserved.
AM18-2016-12