automotive report
TRANSCRIPT

Obstacle avoidance with Ultra-sonic
and Bluetooth module
Names________________________________ID
- Mohamed Mostafa Ahmed Eltopgy ______________________214
-Mohamed Mostafa Gaber Esawy ________________________215
- Mohamed Mostafa khalil Mohamed Mandour _____________216
- Mohamed Mostafa Adbelfatah Wahdan __________________217
- Mohamed Nabil Adbelkader Elnidany ____________________220
- Mohamed Waheed Abdo Hassan Hindawy ________________221
[1]
Obstacle avoidance robot
The content: _______________________________________________ page
1. Introduction___________________________________________________2
2. Elements and components___________________________________4
2.1. Microcontroller (Arduino Uno) 2.2. Ultrasonic Sensor 2.3. Motor drive IC 2.4. Motors 2.5. Breadboard , jumpers cables and 9v battery 2.6. Rechargeable batteries 2.7. Bluetooth Module HC-05 2.8. Circuit of all component and Simulink
3. Circuit of all component_____________________________________11
4. Arduino code________________________________________________12
5. Problems faced_____________________________________________16
5.1. Suitable fixation for Ultrasonic sensor on Micro servo 5.2. Power distribution 5.3. Suitable distance that manage robot stop before hit
obstacle 6. Cost____________________________________________________ 17
7. References_________________________________________________ 18

[2]
1. INTRODUCTION
Robotics is part of Today’s communication. In today’s world ROBOTICS is fast growing
and interesting field. It is simplest way for latest technology modification. Now a day’s
communication is part of advancement of technology, so we decided to work on robotics
field, and design something which will make human life simpler in day today aspect.
Thus we are supporting this cause.
Robotics is the branch of technology that deals with the design, construction, operation,
structural disposition, manufacture and application of robots and computer systems for
their control, sensory feedback, and information processing.
Obstacle detection and avoidance robots are intelligent robots which can perform desired
tasks in unstructured environments by finding and overcoming obstacles in their way
without continuous human guidance.
In robotics, obstacle avoidance is the task of satisfying some control objective subject to
non-intersection or non-collision position constraints. Normally obstacle avoidance is
considered to be distinct from path planning in that one is usually implemented as a
reactive control law while the other involves the pre-computation of an obstacle-free path
which a controller will then guide a robot along. A practical real-time system for passive
obstacle detection and avoidance is presented.
Robot Sensors are essential components in creating autonomous robots as they are the
only means for a robot to detect information about itself and its environment. As little as
one sensor is needed by a robot, though increasing the number and variety of sensors
tends to increase the robot’s ability to get a more thorough understanding of the world
around it.
There are a wide variety of sensors available which are capable of measuring almost
anything from environmental conditions (distance, light, sound, temperature) to angular
and linear acceleration, forces and distances.
The first sensor often incorporated into a mobile robot is a distance sensor, which is
usually in the form of an infrared or ultrasonic sensor. In both cases, a pulse (of light or
sound) is sent and its reflection is timed to get a sense of distance. Usually these values
are sent to the controller many times each second.
Robot Shop offers a wide variety of sensors applicable to almost any robotics project.
For example : Scanning laser rangefinders which are able to scan over >180 degrees (and
less than 1 degree of accuracy) in well under 1 second. IR Pair is used as sensor to detect the presence of objects.
IR LED is used for detecting objects.

[3]
Ultrasonic sensor can measure the distance to an object by using sound waves.
In our project mainly when ever robot senses any obstacle automatically diverts its
position to left or right and follows the path. Robot consists of two motors, which control
the side pair wheels of each and help in moving forward and backward direction. Robot
senses the object with help of obstacle sensor. Ultrasonic sensor is used for detecting the
obstacle.
2. Elements and components
Performing this task started by analyzing the system technical requirements. The following major components need to be purchased:
2.1. Microcontroller (Arduino Uno)
2.2. Ultrasonic Sensor
2.3. Motor drive IC
2.4. Motors (DC motor & Micro servo motor)
2.5. Breadboard , jumpers cables and 9v battery
2.6. Rechargeable batteries
2.7. Bluetooth Module HC-05

[4]
2.1 Microcontroller (Arduino Uno): Arduino is an open-source prototyping platform based on easy-to-use hardware and
software.
The properties of the Arduino Uno can show in the following Table(1)
1a Microcontroller7- 6- 40 Pin 2 ATmega328 Operating Voltage 5V
Input Voltage (recommended) 7-12V
Input Voltage (limits) 6-20v Digital I/O Pins 14 (of which 6 provide PWM output)
Analog Input Pins 6 DC Current per I/O Pin 50 40mA
DC Current for 3.3V 50mA
Flash Memory 32 KB of which 0.5 KB used by boot loader
KBSRAM 2 KB EEPROM 1 KB
Clock Speed 16 MHz
Fig(1)
Table(1)

[5]
The Arduino Uno can be programmed with the Arduino software. Select "Arduino Uno
from the Tools > Board menu Fig(2)
2.2. Ultrasonic Sensor Ranging Module HC - SR04: Ultrasonic ranging module HC - SR04 provides 2cm - 400cm non-contact measurement function, the ranging accuracy can reach to 3mm. The modules includes ultrasonic transmitters, receiver and control circuit.Fig(3)
Electric Parameter of ultrasonic shown in Table(2)
Working Voltage DC 5 V
Working Current 15mA
Working Frequency 40Hz
Max Range 4m
Min Range 2cm
Measuring Angle 15 degree
Trigger Input Signal 10uS TTL pulse
Echo Output Signal Input TTL lever signal
Dimension 45*20*15mm
Fig(2)
Fig(3)
Table(2)

[6]
The basic principle of work :
1. Using IO trigger for at least 10us high level signal. 2. The Module automatically sends eight 40 kHz and detect whether there is a pulse
signal back. 3. IF the signal back, through high level , time of high output IO duration is the time
from sending ultrasonic to returning. 4. Test distance = (high level time*velocity of sound (340M/S)/2).
Timing diagram:
The Timing diagram is shown below. You only need to supply a short 10uS pulse to the trigger input to start the ranging, and then the module will send out an 8 cycle burst of ultrasound at 40 kHz and raise its echo. The Echo is a distance object that is pulse width and the range in proportion .You can calculate the range through the time interval between sending trigger signal and receiving echo signal. the range = high level time * velocity (340M/S) / 2; we suggest to use over 60ms measurement cycle, in order to prevent trigger signal to the echo signal.Fig(4)
Timing diagram
Fig(4)

[7]
2.3. Motor drive IC:
L293D is used as driver IC. Motors are connected to this IC. According to program in µc it drives the left and right motor. L293D is a dual H-bridge motor driver integrated circuit (IC). Motor drivers act as current amplifiers since they take a low-current control signal and provide a higher-current signal. This higher current signal is used to drive the motors. Fig(5-a)& Fig(5-b)
L293D contains two inbuilt H-bridge driver circuits. In its common mode of operation, two DC motors can be driven simultaneously, both in forward and reverse direction. The motor operations of two motors can be controlled by input logic at pins 2 & 7 and 10 & 15. Enable pins 1 and 9 (corresponding to the two motors) must be high for motors to start operating. When an enable input is high, the associated driver gets enabled. As a result, the outputs become active and work in phase with their inputs. Similarly, when the enable input is low, that driver is disabled, and their outputs
are off and in the high-impedance state.as shown in table. Table(3)
Fig(5-a)
Fig(5-b)
Table(3)

[8]
2.4. Motors (DC motor & Micro servo motor): An electric motor is an electromechanical device that converts electrical energy into mechanical energy. We used two types of motors :
DC Motors : fig(6)
• Motor Voltage: 3 - 12 V
• Motor Current: 70 mA (typical) - 250 mA (max)
• Speed: up to 170 RPM
• Torque: up to 0.8 Kg
• Gear Ration: 1:48
• Wheel Diameter: 66 mm
• Wheel Width: 27 mm
Micro servo motor : fig(7)
• Weight: 9 g
• Dimension: 22.2 x 11.8 x 31 mm approx.
• Stall torque: 1.8 kgf.cm
• Operating speed: 0.1 s/60 degree
• Operating voltage: 4.8 V (~5V)
• Dead band width: 10 µs
• Temperature range: 0 ºC – 55 ºC
2.5. Breadboard , jumpers cables and 9v battery : Fig(8)
Fig(6)
Fig(7)
Fig(8-a) Fig(8-b)
Fig(8-c)

[9]
2.6. Rechargeable batteries: Two 3.7V 1800mah Lipo Battery Fig(9)
2.7.Bluetooth Module HC-05:
HC-05 module is an easy to use Bluetooth SPP (Serial Port Protocol) module, designed for transparent wireless serial connection setup. So we can use it to Control Arduino with voice commands using an Android smartphone! Here we used it to control motors. Fig(10-a)& Fig(10-b)
1. Rx: connected to Tx of Arduino. 2. TX: connected to Rx of Arduino.
*Both works at 3.3V. 3. GND: connected to ground of Arduino. 4. VCC: it needs power (3.6-6 V).
5. EN/key: if set to high, module goes into command mode for configuration – only 3.3V input!,(not connected).
6. STATE: not connected.
Fig(9)
Fig(10-a)
Fig(10-a)

[10]
How does Bluetooth work ?
Bluetooth sends and receives radio waves in a band of 79 different frequencies centered on 2.45 GHZ . One of the ways Bluetooth devices avoid interfering with other systems is by sending out very weak signals of about 1 mW. By comparison the most powerful cell phones can transmit a signal of 3 watts. The low power limits the range of a Bluetooth device to about 10 meters cutting the chances of interference between your computer system and your portable telephone. Fig(11)
Fig(11)

[11]
3. Circuit of all component
Fig(12)

[12]
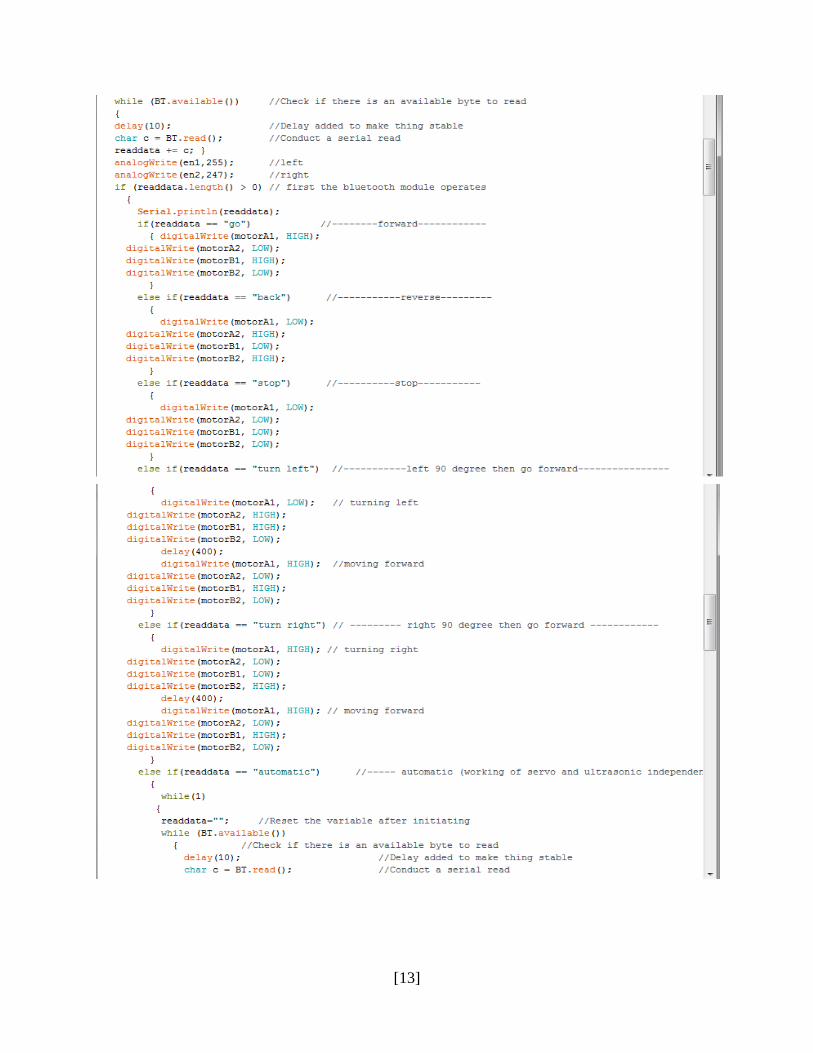
4. Arduino code
[13]

[14]

[15]

[16]
5. Problems faced and its solving
5.1. suitable fixation for Ultrasonic sensor on Micro servo : We design a support that can carry Ultrasonic sensor and don't make heavy load on Micro servo by 3 printer as shown in Fig(13).
5.2. power distribution
There are two supplies, First one from 9V battery for Arduino as Vcc .Second one we used voltage regulator 7805 to get 5v from two batteries (connect series with 7.4v) for All elements that need +5V as Vcc (Motor drive ,Ultrasonic, Bluetooth Module) , Also two batteries supply motors with current .
5.3 Suitable distance that manage robot stop before hit obstacle
We get it by many attempts.
Fig(13)

[17]
7. Cost:
Cost Item
2*20=40LE DC geared motor
1*10=10LE L293D
Purchased before Wheel
1*6=6LE battery 9V
2*35=70LE 3.7V,1800mAh,Lipo battery
(rechargeable)
Purchased before Body
1*85=85LE Bluetooth module
1*35=35LE Ultrasonic Sensor HC - SR04
1*50=50LE Micro Servo SG90
7.5LE 3D printing
20*0.75=15LE Jumper wires
Total cost=318.5LE

[18]
7.Links: http://www.instructables.com/id/Arduino-AND-Bluetooth-HC-05-Connecting-easily/
http://www.electronicshub.org/obstacle-avoiding-robot-arduino/
http://fritzing.org/projects/obstacle-avoidance-robot-using-ultrasonic-and-eviv
http://www.instructables.com/id/Arduino-Obstacle-Avoidance-Robot/
https://diyhacking.com/arduino-bluetooth-basics/
https://create.arduino.cc/projecthub/user206876468/arduino-bluetooth-basic-tutorial-d8b737
*********************************