autodes k certif ied professiona l -...
TRANSCRIPT
Autodesk® Certified Professional
PREPARE FOR SUCCESS
Your preparation for the exam will be critical. As Autodesk’s exclusive provider
Impetus makes Autodesk Inventor ®
three-step pathway:
1. LEARN Obtain the skills you need to use Autodesk Inventor® at a professional level.
2. PRACTICE
preparation tools and practice tests. Build the
Inventor®
3. CERTIFY Validate your skills by passing the exam and
RECOMMENDED EXPERIENCE LEVELS
There’s no substitute for training and hands-on
Professional exam. Impetus recommends the following. For comparison, we’ve also included
Certified User
Training — Inventor® 2011–2015 course (or equivalent)
Hands-on Experience — 50 hours
Certified Professional
Training — Inventor® 2015 course (or equivalent)
Hands-on Experience — 400 hours
THE TIME IS NOW
Professional, you’ll enjoy several career-
• Prove your skill level with an
recognized by employers
•
• Include your name in the database of
CERTIFIED PROFESSIONAL EXAMThe beauty of gears. The power of the machine. The adrenaline of a working prototype. As a mechanical design professional, you crave these things.
®, you set yourself apart as a mechanical designer with professional skills and abilities demanded by the industry’s best.
productivity, and enhanced credibility. In short, it can help get you where you want to go.
Contact a Impetusrepresentative today:
[email protected], 9730012775,7755920776
www.impetusits.in
Get internship and genuine placement
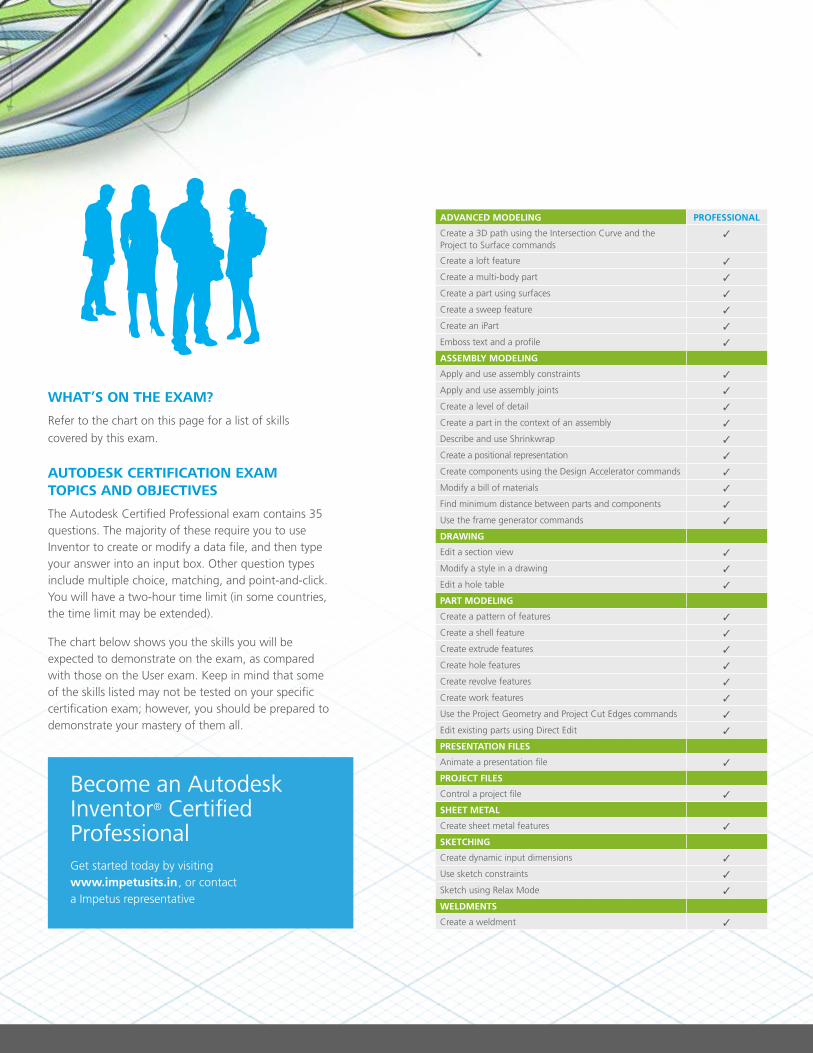
WHAT’S ON THE EXAM?
Refer to the chart on this page for a list of skills
covered by this exam.
AUTODESK CERTIFICATION EXAM TOPICS AND OBJECTIVES
questions. The majority of these require you to use
your answer into an input box. Other question types include multiple choice, matching, and point-and-click. You will have a two-hour time limit (in some countries, the time limit may be extended).
The chart below shows you the skills you will be expected to demonstrate on the exam, as compared with those on the User exam. Keep in mind that some
demonstrate your mastery of them all.
Become an Autodesk Inventor® Certified Professional Get started today by visiting www.impetusits.in, or contact a Impetus representative
ADVANCED MODELING PROFESSIONAL
Create a 3D path using the Intersection Curve and the Project to Surface commands
Create a loft feature
Create a multi-body part
Create a part using surfaces
Create a sweep feature
Create an iPart
ASSEMBLY MODELING
Apply and use assembly constraints
Apply and use assembly joints
Create a level of detail
Create a part in the context of an assembly
Describe and use Shrinkwrap
Create a positional representation
Create components using the Design Accelerator commands
Modify a bill of materials
Find minimum distance between parts and components
Use the frame generator commands
DRAWING
Edit a section view
Modify a style in a drawing
Edit a hole table
PART MODELING
Create a pattern of features
Create a shell feature
Create extrude features
Create hole features
Create revolve features
Create work features
Use the Project Geometry and Project Cut Edges commands
Edit existing parts using Direct Edit
PRESENTATION FILES
PROJECT FILES
SHEET METAL
Create sheet metal features
SKETCHING
Create dynamic input dimensions
Use sketch constraints
Sketch using Relax Mode
WELDMENTS
Create a weldment