approval process 2018-19 - all india council for ... | p a g e 04. process overview for approval...
TRANSCRIPT

1 | P a g e
APPROVAL PROCESS 2018-19
All India Council for Technical Education (AICTE)
User Manual for Existing Institutes/University
Departments/Constituent Colleges Applying for
Extension of AICTE Approval on Web Portal
2018-19

2 | P a g e
Contents
Sr.no. Particulars Page No.
1. Icons for Buttons .................................................................................................................................... 4
2. Login in to AICTE Web Portal .................................................................................................................. 5
3. Change of Password ............................................................................................................................... 5
4. Process Overview for Approval Process 2018-19 .................................................................................... 7
5. Creating ‘Application’ for Existing Institutes/University Department/Constitutent College ................. 8
6. Quicklinks ............................................................................................................................................. 12
7. Institute Details .................................................................................................................................... 12
8. Change of Name of Institute ................................................................................................................ 14
9. Change of Institute Site/Address .......................................................................................................... 14
10. Change of Co-Ed Institute to Women's Institute.................................................................................. 15
11. Organization/Trust/Society .................................................................................................................. 16
12. Applying for Change in Organization .................................................................................................... 17
13. Trustee .................................................................................................................................................. 18
14. Contact Person ..................................................................................................................................... 18
15. Land Details .......................................................................................................................................... 19
16. Land Details Per Land Registration ....................................................................................................... 19
17. Building Details ..................................................................................................................................... 21
18. Principal/Director/Vice Chancellor ....................................................................................................... 23
19. Programme ........................................................................................................................................... 24
20. Course Details ....................................................................................................................................... 24
21. Conversion of courses .......................................................................................................................... 27
22. Merging of courses ............................................................................................................................... 28
23. Restoration of courses.......................................................................................................................... 30

3 | P a g e
24. Add new course at diploma level under UG pharmacy program or vice versa.................................... 30
25. Change of Shift from second to First .................................................................................................... 32
26. Conversion from PGDM to MBA........................................................................................................... 33
27. Important Validations ........................................................................................................................... 34
28. Vocational Courses ............................................................................................................................... 34
29. Validation for Vocational Courses ........................................................................................................ 34
30. Closed Courses ..................................................................................................................................... 34
31. University name change ....................................................................................................................... 34
32. Faculty Details ...................................................................................................................................... 35
33. Faculty Details ....................................................................................................................................... 36
34. Adjunct faculty/Resource Persons from Industry ................................................................................ 37
35. Left the Institute (Faculty) .................................................................................................................... 38
36. Instructional Area ................................................................................................................................. 39
37. Instructional Area – Common Facilities ................................................................................................ 40
38. Administrative Area .............................................................................................................................. 40
39. Amenities Area ..................................................................................................................................... 41
40. Other Facilities ...................................................................................................................................... 42
41. Laboratory Details ................................................................................................................................ 42
42. Library Facilities .................................................................................................................................... 43
43. Computational Facilities ....................................................................................................................... 44
44. Circulation Area .................................................................................................................................... 45
45. Hostel Facilities ..................................................................................................................................... 45
46. OMBUDSMAN Details ........................................................................................................................... 46
47. Anti-Ragging Details ............................................................................................................................. 47
48. eJournal Subscription Proofs ................................................................................................................ 49
4 | P a g e
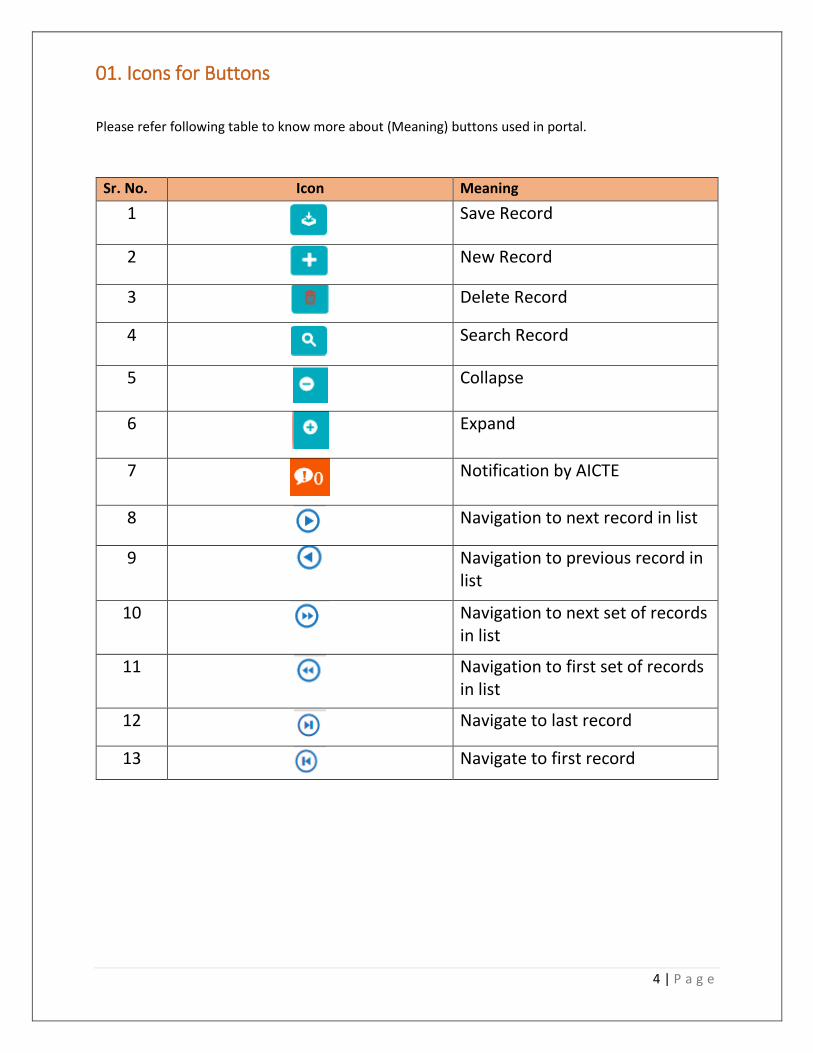
01. Icons for Buttons
Please refer following table to know more about (Meaning) buttons used in portal.
Sr. No. Icon Meaning
1
Save Record
2
New Record
3
Delete Record
4
Search Record
5
Collapse
6
Expand
7
Notification by AICTE
8
Navigation to next record in list
9
Navigation to previous record in list
10
Navigation to next set of records in list
11
Navigation to first set of records in list
12
Navigate to last record
13
Navigate to first record

5 | P a g e
02. Login into AICTE Web Portal
Navigate to AICTE Website and Click on AICTE Web Portal
Login with credentials
03. Change Password Click on 3 bar icon beside home.
Click on Change Password
You will be navigated to My Profile. Change the details and Click on Save.

6 | P a g e
Click on Change Password Available in the dropdown beside My Profile.
Enter old and New Password and Click on Save.

7 | P a g e
04. Process Overview for Approval Process 2018-19
Login into AICTE Web Portal
Institute needs to login with existing credentials.
Apply for Application 18-19
Go to New Extension Approval Screen, Click on Apply for 18-19 Application. Instructions will be loaded. Read it carefully. Answer the Questions in Questionnaire tab carefully, and then Click on Proceed Further.
Update details
Update the data in the Different tabs wherever required. FSI and built up area to be entered in Land details for institutes in mega and metro cities.
Payments
Required Payments can be checked in TER Charges Tab. Navigate to Payments tab to make the payments. After making the complete payment successfully, the sub-status will be updated to
“Payment Received”
Reports
Reports will be available after the Submission of application. Generate Application Report part
1, 2 and Deficiency and Submit to Regional Office
Course details
As per the Questionnaire selected, Institute can avail facility in Courses tab (Conversion, Merger, Shift change, Restoration)

8 | P a g e
05. Creating ‘Application’ for Existing Institutes/University
Department/Constituent College
Login into AICTE Portal with Credentials
Click on the ‘New/Extension Approval’ tab

9 | P a g e
Click on Apply for 2018-2019 Application button, Instructions will be loaded. Read it carefully
and then Click on Proceed Further.

10 | P a g e
The Current Application Number is automatically generated by the system. Note down the
Number for future reference.
Current Status is set to ‘Not Submitted’ while the Sub-Status field is blank. Academic year is set
to 2018-2019
Answer the questionnaire (below screen shot) very carefully.
If an Institute is not falling under any of the category mentioned in the Questionnaire, then
select N against all the questions and proceed to enter data in all the active tabs.

11 | P a g e
Click on Institute details Tab from the Quicklinks and click on proceed further button as shown in the
screenshot below:

12 | P a g e
06.Quicklinks
Quick links are created for reference
Click on the required tab for navigating
07.Institute Details
Name of the Institution/University/Department: Enter full Name of the institute
(University/Department name to be entered if application is for University/Dept. Approval)
Address of the institution University/Department: Enter Address of the institution in the area
provided.
Town/City/Village: Enter Name or Town or City or Village of the institute.
State/UT: Select State/UT from the Dropdown List Values.
District: Select District. The list of Districts displayed is dependent on the State selected. This is a
Required Field.
AICTE Region: It’s a system generated value. This Column will populate the Region Name
Automatically Once state is selected.
Pin: Enter 6-digit postal code.

13 | P a g e
Approval Year of First Course: Select year from the options in which First course was Approved
for the Institute or going to be Approved.
Date of First Approval by AICTE letter: Enter the Date of First Approval by AICTE letter. Keep
blank for new application.
Bank Name: Enter institute’s Bank Name
Bank Account Number: Enter Institute’s Bank Account Number
Prefix: Enter Prefix of AISHE code
Numeric Code: Enter Numeric Code of AISHE Code
AISHE Code: It will be auto populated
NSP ID: Enter NSP Id
Bank IFSC Code: Enter Institute’s Bank IFSC Code
PAN: Enter PAN Number
Institution Type – Select carefully from the available dropdown
Minority Institute: Select Y if the institute/department is linguistic/religious minority
Type Of minority Institute: “Select from dropdown. It can be edited if Minority Institute is Y
Name of the Minority: Select a Value if ‘Type of Minority institute’ is religious. This becomes
required when type of minority institute is ‘Religious’.
Minority Name if Linguistic: Enter Name of Minority if type of minority Institute is ‘Linguistic’.
This Becomes required when ‘Type Of Minority Institute’ is ‘Linguistic’.
STD Code: Enter STD code. It should not be more than 6 digits.
Land Phone Number: Enter valid Land Phone Number of the Institute.
Cell Number: Enter 10-digit valid Institute Cell Number for Correspondence.
FAX Number: Enter FAX Number.
Primary Email: Enter Valid Email Address of the Institute. Ex: [email protected]
Alternate Email: Enter another domain email address different from the primary email address.
Website: Enter Institute Website’s URL. Ex: www.institutename.com
Do you wish to change Institute Name? NA for New Application. Select N from dropdown
Please Enter New Institute Name: NA for New Application.
Do you wish to change Institute site Address: NA for New Application
Please Enter New Institute Site Address: NA for New Application
Distance between Old site and New site (in kms)? NA for New Application
Web Site Administrator Details: First Name: Enter the First Name Last Name: Enter the Last
Name
Administrator Email: Enter the Administrator Email
Mobile Number: Enter the Mobile Number
Land Phone Number: Enter the Land Phone Number

14 | P a g e
08.Change of Name of Institute
Navigate to the Institute tab
For applying for the change of Institute name fill in the below details:
Do you wish to change Institute Name? Select Y from dropdown
Please Enter New Institute Name: Provide the new name for the Institute.
Click on “Save” button to save the record.
09. Change of Institute Site/Address
Navigate to the Institute tab
For applying for the change of Institute site address fill in the below details:
Do you wish to change Institute site address? Select Y from dropdown
Please Enter Institute site address: Provide the new site address for the Institute.
Enter distance between new and old site

15 | P a g e
Click on “Save” button to save the record.
10. Change of Co-Ed to Women's Institute Navigate to the Institute tab
For applying for the change of Co-Ed to Women's Institute fill in the below details:
Do you wish to change from Co-Ed to Women's Institute? Select Y from dropdown
Please enter new Name for Institute after Conversion to Co-Ed/ Women's Institute:
Provide the new name for the Institute.
Click on “Save” button to save the record

16 | P a g e
11.Organization/Trust/Society
Navigate to Organization tab
Name of the Parent Organization (Trust/Society/Company): Enter full Name of the
Organization.
Type of the Organization (Trust/Society/Company: Select a value from the dropdown
depending on the Type of your Organization. Values are:
1. Trust: If the organization is a Trust.
2. Society: If the organization is a Society
3. Government: If the organization is a Government owned
4. PPP:
5. University Managed: If the organization is university managed
6. Sector 25 Company:
Registered with: Enter registration Details.
Registration Date: Enter the date of Registration
Registration Number: Enter Registration Number.
Organization Address: Enter Address of the Organization.
Town/City/Village: Enter Name of Town or City or village of the Organization.
State/UT: Select State or Union Territory from the Dropdown Values.
District: Select District from the dropdown after selecting the State.

17 | P a g e
PIN: Enter 6 Digit Pin code.
Land Phone STD Code: Enter STD Code. It should not be more than 6 digits.
Land Phone Number: enter Land Phone Number of the Institute which contains 5 to 10 digits.
FAX Number: Enter 5 to 10-digit FAX Number.
Organization website: Enter URL of the Website (ex: www.organization.com)
Click on “Save” button to save the record.
12.Applying Change in Organization
Navigate to Organization tab
Select ‘Y’ to change the organization name.
Enter New Organization Name, Address and type.
Click on “Save” button to save the record.

18 | P a g e
13.Trustee
Trustee: To add Trustee Details. Click “Add” (Plus) button Enter data in all the fields and Click on Save
14.Contact Person/Registrar • Click on ‘Contact Person’ Tab. Please provide all correct information for this since Communication (Email/SMS) will take place with this contact.
Title: Select title from the values given
First Name: Enter First name of the Person to be contacted for all communication
Last Name: Enter Last name of the Person to be contacted for all communication
Address: Enter address of the Contact Person
Town/City/Village: Enter Name of Town/City/Village
State/UT: Select state/UT from the Dropdown values
District: Select District from the dropdown
Postal code: Enter 6 digit pin code
Designation: Enter Designation of the Contact Person

19 | P a g e
STD Code: Enter STD Code. It should not be more than 6 digits
Land Phone Number: enter Land Phone Number which contains 5 to 10 digits
FAX Number: Enter 5 to 10 digit FAX Number
Cell Number: Enter valid 10 digit cell number. All SMS communication will be sent at this mobile
Number
Alternate Cell Number: Enter valid 10 digit Alternate Cell Number
Email Address: Enter valid 10 digit Email Address ex: [email protected]
Alternate Email Address: Enter valid Alternate Email Address ex: [email protected]
15.Land Details
Click the “Land Details” Tab and provide all and related details
Land Details is not Editable for Existing Institutes.
Only FSI and built-up area to be added for Mega metro cities
Click on “Save” button to save the record.
16.Land Details Per Land Registration Click on Add button to create record
Enter details in all fields and click on save

20 | P a g e
Sno: Serial Number will set automatically at the time of Submit.
Land Registration Number: Please Enter “Land Registration Number”, this is a required field.
Date of registration: Please enter ‘Date of Registration’ of Land, this date should not be beyond
the Current date.
Area of Land: Please Enter ‘Area of Land’ it is a required field.
Khasra number: Please Enter ‘Khasra Number’ it is a required field.
Plot Number/Survey Number: Enter details.
Land Situated at: Enter details
Land registered in the name of: Please Enter ‘Land Registered in the Name of’ it is a required
field.
Ownership or Government Lease: Select options from Drop Down for Ownership or
Government Lease.
1. Gift Deed: Select this if gift deed
2. Government Land: Select this if Land Belongs to Government Lease.
3. Registered Sale Deed
4. Government Lease
5. Other
Land use Certificate Issued: Select from Drop Down if ‘Land Use Certificate issued’. By default it
is set to no.
Name of Land use Certificate Issuing Authority: Please Enter ‘Name of Land Use Certificate
Issuing Authority’ Name, this becomes required when ‘Land use Certificate Issued’ is Yes.
Is this land Mortgaged: select from Drop Down if Land is mortgaged. By default it is set to No.
Details of Bank if Land is Mortgaged: Please enter ‘Details of Bank if Land is Mortgaged’, this
becomes Required when ‘is this land Mortgaged’ is Yes.
Land Required at the Time of First AICTE Approval (In Acres): Please ‘Land required at the Time
of First AICTE Approval’. The land size should be in Acres Only and it is a required field.

21 | P a g e
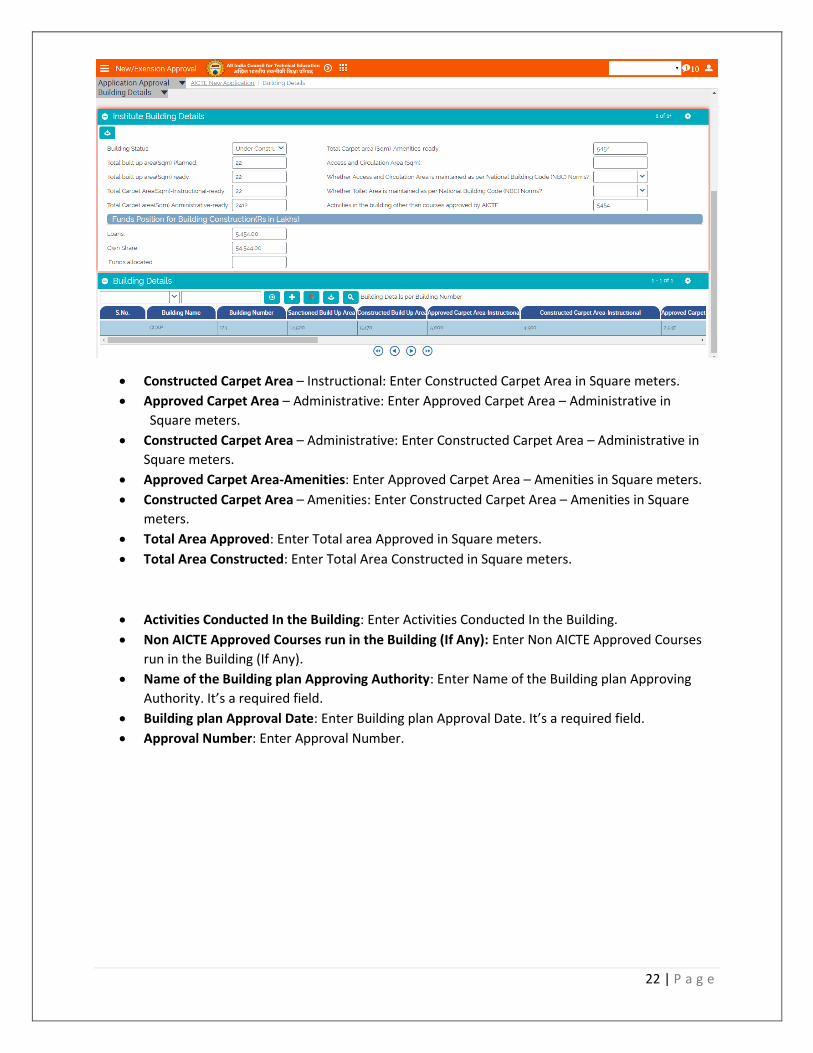
17.Building Details
Click on ‘Building Details’ tab
Provide details for all the fields displayed on the form
Building status: Select a value from the dropdown. Values are:
1. Available: If the Building Construction is completed
2. Under Construction: If the Building is Under construction
3. Proposal: If proposal for Constructing the Building is given
Total built up area(sqm) Planned: Enter planned total built up area in Square meters
Total built up area (sqm) ready: Enter Total Built up area in square meters and is Ready
Total Carpet area (sqm)-Instructional-ready: Enter Instructional Carpet Area in Square meters
Total Carpet area(sqm)-Amenities- ready : Enter Amenities Carpet Area in Square meters
Total Carpet area(sqm)-Administrative- ready : Enter Administrative Area in Square meters
Activities in the building other than courses approved by AICTE: Enter Activities other than
courses Approved by AICTE
Whether Access and Circulation Area is maintained as per National Building Code (NBC)
Norms? Enter Details
Whether Toilet Area is maintained as per National Building Code (NBC) Norms?:: Enter Details
Access and Circulation Area (Sqm): Enter Details
Funds Allocated: Enter the amount of Funds allocated in rupees.
Loans: Enter the amount of loans
Own share: Enter the amount of own share.
Click on “Save” button to save record.
22 | P a g e
Constructed Carpet Area – Instructional: Enter Constructed Carpet Area in Square meters.
Approved Carpet Area – Administrative: Enter Approved Carpet Area – Administrative in
Square meters.
Constructed Carpet Area – Administrative: Enter Constructed Carpet Area – Administrative in
Square meters.
Approved Carpet Area-Amenities: Enter Approved Carpet Area – Amenities in Square meters.
Constructed Carpet Area – Amenities: Enter Constructed Carpet Area – Amenities in Square
meters.
Total Area Approved: Enter Total area Approved in Square meters.
Total Area Constructed: Enter Total Area Constructed in Square meters.
Activities Conducted In the Building: Enter Activities Conducted In the Building.
Non AICTE Approved Courses run in the Building (If Any): Enter Non AICTE Approved Courses
run in the Building (If Any).
Name of the Building plan Approving Authority: Enter Name of the Building plan Approving
Authority. It’s a required field.
Building plan Approval Date: Enter Building plan Approval Date. It’s a required field.
Approval Number: Enter Approval Number.

23 | P a g e
18.Principal/Director/Vice Chancellor Click on “Principal/Director/Vice Chancellor” Tab
Enter Personal details/Educational/Professional Details:
Surname/Family name: Enter Surname of Principal/Director.
First Name: Enter First name of Principal/Director.
Father’s Name: Enter Father’s name of Principal/Director.
Mother’s Name: Enter Mother’s name of Principal/Director.
Date of Birth: Enter date of Birth
Cell Number: Enter valid 10 digits Cell Number. Communication will be done on this.
STD code: Enter valid STD Code not more than 6 digits.
Land Phone Number: Enter Land phone Number of 5 to 10 digits.
FAX number: Enter valid 10 digits FAX Number.
Email: Enter Valid Email Address Containing “@” and dot (.) Ex: [email protected].
Communication will be done on this.
PAN no.: Enter PAN Number.
Doctorate Degree: Enter details about Doctorate Degree.
Master Degree: Enter details about Master’s Degree.
Bachelor’s Degree: Enter details about Bachelor’s Degree.
Other Qualifications: Enter Details about any other relevant Qualifications.
International Certification If Any: Enter Details about International certifications if any.
Field of Specialization: Enter Field of Specialization.
Enter Profession details: Enter Your Professional Detail.
Date of joining the Institute: Enter Date of joining the Institute as Principal/Director.
Appointment Type: Select a value from the dropdown.

24 | P a g e
Exact Designation: Select a value from the dropdown.
Enter Work experience details: Enter Your Work Experience Detail.
Teaching Experience (Years): Enter Teaching experience in Years.
Research Experience (Years): Enter Research experience in Years.
Industry Experience (Years): Enter Industry experience (total work experience) in Years.
Enter other details: Enter any other Detail if you acquire.
Research Projects Guided – UG: Enter Number of UG Projects Guided.
Research Projects Guided - PG: Enter Number of PG Projects Guided.
Research Projects Guided – PhD: Enter Number of PhD Projects Guided.
Number of Books Published: Enter Number of books Published.
Papers Published - National Level: Enter No. of Papers Published at National Level.
Papers Published - International Level: Enter No. of Papers Published at International Level
19.Programme
Click on Programme Tab.
Existing Institutes can view Programmes in Programme tab.
Note:
New Programme cannot be added.
The ‘View all Programmes’ Button on the Programs Tab, is for viewing all programs added for
the institute.
20.Course Details In Course details tab two sub tabs are present
1. Courses (Shift 1 & 2) 2. Closed Courses
Click on Course Details tab
Click ‘Courses (Shift 1 & 2)’ Tab

25 | P a g e
Enter all details related to the Courses in the fields of the list. Click on “Add Courses” button to
add courses
Institute can add new course by clicking on Add icon. New course/ Increase in intake can be taken as per Approval Process handbook 18-19.
Programme: Select the programme from the dropdown. Select the program which is available
in Program tab.
Affiliating Board: Select the Board Name form the dropdown.
Level of course: Select the Level of the programme from the dropdown. (Only UNDER
GRADUATE DIPLOMA, POST DIPLOMA, POST GRADUATE DIPLOMA, POST GRADUATE
CERTIFCATE, FELLOWSHIP levels will be available for selection).
Department: Select the department of the course from the dropdown.
Name of the course: Select the name of the course from the dropdown. NOTE: If any course
name is not found, user has to call AICTE-HELP DESK. Shift: Select the shift from the dropdown.
Course Duration (CD): Select duration of the course from the dropdown.
Year Started: Select starting year of the course from the dropdown. For New Applications, Year
started has to be 2018.
Full Time/Part Time: Select whether the course is Full Time or Part Time from the dropdown
Accreditation Status: Select the accreditation status for the course from the dropdown
Accreditation From: Enter the Accreditation From for the course
Accreditation Till: Enter the Accreditation Till Date for the course
Accreditation Letter Date: Enter the Accreditation Letter Date for the course
Accreditation Letter Reference Number: Enter the Accreditation Letter Reference Number for
the course
Approved Intake 15-16: Automatic sets to 0 for new applications
Approved Intake 14-15: Automatic sets to 0 for new applications
Approved Intake 13-14: Automatic sets to 0 for new applications
Approved Intake 16-17: Automatic sets to 0 for new applications
Approved Intake 17-18: Automatic sets to 0 for new applications
Intake Applied for 18-19: Enter the Applied no. of students for the academic year 18-19
NRI: Select the NRI status for the course from the dropdown

26 | P a g e
PIO: Select the PIO status for the course from the dropdown
Number of Faculty: Enter the number of faculty appointed for the previous academic year for
that course
State/Govt Recommendation: Select the State Government Recommendation Status for the
course from the dropdown.
Univ/Board Recommendation: Select the University Recommendation Status for the course
from the dropdown.
Course Type: Select the Course Type from the dropdown.
The ‘Validate Course’ button on the Course Tab is for checking all the course with the validations
as specified by AICTE. Please continue validating the courses till you see the message as “Course
validations” done. No errors found.”
The ‘View all Courses’ button on the Courses Tab, is for viewing all courses added for the institute.
Based on answer of question 4 in Questionnaire tab following operations can be performed
Conversion Merging Restoration Add New Course at Diploma level under existing UG Pharmacy Program or Vice –Versa Change of Shift from Second to First Conversion from PGDM to MBA
Navigate to Questionnaire tab to view or edit questionnaire.

27 | P a g e
21. Conversion of courses For Conversion of courses from DIPLOMA to UG or vice versa institute has to answer first in Question 4(i).
Based on the answer, convert course button will appear in course detail tab
After answering of question institute has to click on “Course Details” tab. When institute clicks on “Convert Course” one confirmation will be asked. After
confirming, courses will get convert to other level. Converted to and converted from will be populated.

28 | P a g e
22.Merging of courses For merging of courses of same broad classification, institute has to answer Question 4(ii) first.
After answering of question, institute has to click on “Course Details” tab.
Following fields will be visible related to merger of courses in course detail tab.

29 | P a g e
Two fields
Merger Flag Course to Merge with
Institute has to choose Y against the courses to be merged and the course name with it will be merged.
A pop up will appear on clicking on Course to merge with, as shown below. Select the course with which you want to merge the selected course.

30 | P a g e
23.Restoration of courses The institute under punitive action can restore their courses by answering the question 4(iii).
Steps for restoration.
Institute has to select ‘Y’ from drop down in field “Do you want to restore Course?” against each course. Institute can restore only that course on which punitive action taken last year.
If “Y” then institute has to fill “Last AICTE Approved Intake “column.
24.Add new course at diploma level under UG pharmacy program or vice
versa Institute can add new course at diploma level under UG Pharmacy Program or Vice versa by answering the question 4(iv).
After answering of question, institute has to click on “Course Details” tab.

31 | P a g e

32 | P a g e
25.Change of Shift from second to First Institute can change shift from Second to first by answering the question 4(v).
After answering of question, institute has to click on “Course Details” tab.
Institute can select ‘Y’ or ‘N’ on the basis of their preference to change Shift. This will be
available for only second shift courses.
Once the flag is select to ‘Y’ the shift will automatically change to Ist Shift.

33 | P a g e
26. Conversion from PGDM to MBA Institute can apply for Conversion from PGDM to MBA by first answering the question 4(vi).
After answering of question, institute has to click on “Course Details” tab.
Institute can select ‘Y’ or ‘N’ for conversion from PGDM to MBA. It is available for Management
Programme with Post Graduate Diploma.
After the value is selected as ‘Y’ enter the Affiliating University name,
Verify the name of course

34 | P a g e
27.Important Validations The ‘Validate Course’ button on the Course Tab is for checking all the course with the
validations as specified by AICTE. Please continue validating the courses till you see the
message as “Course validations done. No errors found.”
Please refer Approval Process Handbook 2018-2019 to check eligibility of institute for applying
new course or Increase in intake.
Please refer Approval Process Handbook 2018-2019 to check eligibility of institute for applying
NRI/FC/PIO
28. Vocational Courses Navigate to Vocational Courses under Courses main tab
Click on New Button to create record
Select program from the dropdown
Select Level as B.Voc., D.Voc or Skill Diploma
Select Vocational Course. Course will be displayed according to selected program
Enter Intake applied for 18-19
29. Validation for Vocational Courses Intake can be taken in multiples of 25
A maximum of 100 intake can be applied by an Institute
30. Closed Courses Courses closed in previous Academic Year can be seen in Closed Courses tab
31.University name change Navigate to Questionnaire tab
Select ‘Y’ to change the University name.

35 | P a g e
Navigate to University Name Change
Enter Existing University name, New University name, level.
Click on “Save” button to save record.
32.Faculty Details
Click on “Faculty-Institute” Tab.
There are three sub tabs in faculty details as follows
1. Faculty Details
2. Adjunct faculty/ Resource persons from Industry
3. Left the faculty

36 | P a g e
33. Faculty Details
Click on “New” button to Enter details of the faculty
Faculty Unique ID: System Generates a Unique id for the facuty
Left the Institute: Click this check box if the faculty left Institute. NA for new added for faculties
Faculty Relieved Date: Enter Date when faculty left the institute.NA for new added for faculties
Title: Select title from the values given
Surname: Enter Surname of the faculty
First Name: Enter First name of the faculty
Middle Name: Enter Middle name of the faculty
Gender: Select Gender from the Dropdown
Father's Name: Enter father’s name of the faculty
Mother's Name: Enter Mother’s name of the faculty
Address Line 1/Address Line 2: Enter Address of faculty
Postal Code: Enter 6 digit postal Code
City/Village: Enter City/ Village of the faculty
State: Select State from the options
Religion: Select Religion from the options
Caste: Select Caste from the options
Date of Birth: Enter date of birth of the faculty
PAN: Enter Valid PAN Number
STD Code: Enter Valid STD Code
Land Line #: Enter Landline Number between 5 to 10 digits
Mobile Phone #: Enter Valid 10 digit Mobile Phone Number of Faculty

37 | P a g e
Email Address: Enter Valid Email Address
Fax Phone #: Enter 5 to10 digits FAX Number. Enter details related to the profession
Exact Designation: Select appropriate Designation of the faculty from dropdown
Appointment Type: Select a Value from the Dropdown. Values are: 1. Regular, 2. Adhoc, 3.
Contract, 4. Visiting
Programme: Select programme to which faculty is teaching from the options.
Course: Select a course from the options after selecting a program.
Appointment FT/PT: Select Appropriate Option from the Dropdown FT/PT (Full Time/Part
Time)
Faculty Type: Select a value from the options to which faculty is teaching (1. UG, 2. PG, 3.
Diploma)
Salary Mode: Select a Value from the Dropdown. (Values are: 1. Cash, 2. Cheque, 3. Credit to
Bank Account)
Date of Joining: Enter Date of joining as faculty.
Gross Pay per month: Enter Gross pay per month in Rupees.
Pay Scale: Select a Value from the Dropdown.
Is physically handicapped: Check in this if Faculty is physically handicapped.
FY/Common Subject Teacher: Click it if faculty is first year or common subject teacher. This is a
Read Only field if courses are selected in the course field.
FY/Common Subject: Enter the common subject
Aadhaar Card (UID): Enter the valid 12 digit Aadhaar card number.(Required)
Enrollment Id (EID): Enter valid 28 digit Enrollment Id.
Click on “Save” button to save the record.
Note:
Existing Faculty Record cannot be deleted
Click on validate faculty to verify the faculty records
Please check Approval Handbook to verify what all faculties will be considered for deficiency
calculation
34.Adjunct faculty/Resource Persons from Industry Click on “New” button for adding faculty.
Select Appointment Type :
1. Adjunct
2. Resource Person From Industry
Enter the data in all fields, Click save and then Validate

38 | P a g e
35. Left the Institute (Faculty)
Navigate to Left the Institute
Search for the faculty which has rejoined
Enter Date of Rejoining and Click on Button Faculty Rejoin
The faculty will be moved to main faculty tab

39 | P a g e
36. Instructional Area
Click on “Instructional Area” to add Instructional Area details. To add a record, click “Add
button”.
In this form, please Enter one room information per row
Program: Select a Program from the Dropdown. Program should be present in course tab.
Level : Select from dropdown. It should be present in course tab.
Room Type: Select a value from the Dropdown depending on the room type.
Room Id/Name: Enter room number
Area of Room in Sqm: Enter area of room in Sqm not more than 7 digits in it
Building Name: Enter Building Name
Building Number: Enter Building Number
Readiness of flooring: Select a value from the options either Ready or Not Ready
Readiness of Wall & Painting: Select a value from the options
Readiness of Electrification & Lighting: Select a value from the options
Readiness of Furniture/Fixtures: Select a value from the options
Air Conditioning: Select a value from the options
Click “save” button to save the record.

40 | P a g e
37.Instructional Area – Common Facilities
Click on “Instructional Area – Common facilities”.
To add a record Click “Add” button
Room Type: Select a value from the Dropdown depending on the room type.
Room Id/Name: Enter room number.
Area of Room in Sqm: Enter area of room in Sqm not more than 7 digits in it.
Readiness of flooring: Select a value from the options either Ready or Not Ready.
Readiness of Wall & Painting: Select a value from the options.
Readiness of Electrification & Lighting: Select a value from the options.
Readiness of Furniture/Fixtures: Select a value from the options.
Air Conditioning: Select a value from the options.
Building Name: Enter Building Name (Required)
Building Number: Enter Building Number (Required)
38. Administrative Area
Click on “Administrative Area” and to add a record Click “Add” button In this form
Please Enter one room information per row
Room Type: Select a value from the Dropdown depending on the room type.
Room Id/name: Enter room number containing not more than 6 alpha numeric characters.
Area of Room in Sqm: Enter area of room in Sqm not more than 7 digits in it.
Building Name: Enter Building Name (Required)
Building Number: Enter Building Number (Required)

41 | P a g e
Readiness of flooring: Select a value from the dropdown either Ready or Not Ready
Readiness of Wall & Painting: Select a value from the dropdown
Readiness of Electricity: Select a value from the dropdown.
Readiness of Furniture/Fixtures: Select a value from the dropdown.
Air Conditioning: Select a value from the dropdown.
Click “save” button to save the record.
39. Amenities Area Click on “Amenities Area” and to add a record Click “Add” button In this form
Please Enter one room information per row
Room Type: Select a value from the Dropdown depending on the room type.
Room Id/name: Enter room number containing not more than 6 alpha numeric characters.
Area of Room in Sqm: Enter area of room in Sqm not more than 7 digits in it.
Building Name: Enter Building Name (Required)
Building Number: Enter Building Number (Required)
Readiness of flooring: Select a value from the dropdown either Ready or Not Ready
Readiness of Wall & Painting: Select a value from the dropdown
Readiness of Electricity: Select a value from the dropdown.
Readiness of Furniture/Fixtures: Select a value from the dropdown.
Air Conditioning: Select a value from the dropdown.
Click “save” button to save the record.

42 | P a g e
40. Other Facilities Click on “Other Facilities” to add details about Facilities in the Institute and to add a record
Click “Add” button.
Only One Record is allowed in Other Facilities
Answer all questions by selecting Y/N from dropdown
Scroll right to see all questions
Click on Save
41. Laboratory Details Click on “Laboratory details” to add details about Lab Facilities in the Institute and to add a
record
Click “Add” button.
Program: Select a Program from the Dropdown
Level: Select from Dropdown
Department: After Program is Selected Corresponding departments are available here. Select a
department.
Course: After Program is Selected Corresponding courses will be available here. Select a Course.
The combination of course, program and level should be present in Courses tab
Yearly Budget-Equipment’s: Enter yearly budget Equipment’s. Value should not contain more
than 10 digits
Yearly Budget-consumables: Enter yearly budget consumables. Value should not contain more
than 10 digits.
Is it Research lab for PG course? : Click in it if “Yes”
Name of the Laboratory: Enter Name of the Lab

43 | P a g e
Lab / Major Equipment’s: Enter Details about Lab Equipment’s
Investment till Date: Enter Investment on Lab till date. Value should not contain more than 10
digits
Building Name: Enter Building Name
Building Number: Enter Building Number
Click “save” button to save the record
42. Library Facilities Click on “Library Facilities” to add details about library Facilities in the Institute Click “Add” button
Only 1 record can be added
Working Hours from to: Enter working timings of the Library.
Name of E Journal Subscription available: Enter Name of e Journal Subscription available.
Current annual budget Rs: Enter Current annual Budget in rupees for Library.
Total Library area in Sqm: Enter total library area in Square meters
Library Networking
Reprographic Facility: Click it if “yes”
No. of Multimedia PC’s: Enter Number of multimedia Pc’s available in the library

44 | P a g e
Reading Room seating capacity: Enter Reading room seating capacity. Value shouldn’t be more
than 999
Bar Code or RF Tab Book Handling?: Select a value from the drop down list
Library Management Software?: Select value from the drop down list
Click “save” button to save the record.
43. Computational Facilities Click on “computational Facilities” to Add details about Computational facilities in the Institute
Click “Add Details” button
Only 1 record can be added
PCs exclusively available to students: Enter Number of PC’s available for Students use
PCs available in library: Enter number of PCs available in library
PCs available in Administrative Office: Enter number of PCs available in Administrative Office
PCs available to Faculty Member: Enter number of PCs available to Faculty members
Number of PCs in Language lab: Enter number of PCs available in Language lab
Internet Bandwidth in Mbps: Enter Internet Bandwidth in Mbps
Internet Contention Ratio: Enter Internet Contention Ration from the Dropdown
Printers available to students: Enter Number of Printers available for use
Number of Legal System software: Enter number of Legal System Software
Number of Legal application software: Enter number of Legal application software
Click “save” button to save the record

45 | P a g e
44.Circulation Area Click on “Circulation Area” tab and Click “Add” button to add Circulation area details
Area Type: Select a Value from the Drop down. Values are: 1. Corridors, 2. Other Common
Area (in Sq. m), 3. Other areas (in Sq. m)
Average Carpet Area: Enter average carpet area
Flooring: Select value depending on whether flooring is done or not
Painting Done: Select ready or Not ready depending on whether painting is done or not
Sanitary Fittings done: Click in Check box if ‘yes’
Electrification & Lightning: Select ready or Not ready depending on whether Electrification &
Lightning is done or not
Furniture: Select ready or Not ready depending on whether Furniture is available or not
Building Name: Enter Building Name
Building Number: Enter Building Number
Click “save” Button to save the Record
45.Hostel Facilities Click on “Hostel Facilities” tab and Click “New” button to Enter details about Hostel Facilities

46 | P a g e
Hostel accommodation Boys (1/Room): Enter Number of one bed/room for Boys
Room Area in sq m_B1: Enter area of one bed/ room
Name of the Building_B1: Enter the name of the building of one bed/room for Boys
Building Number_B1: Enter the building number of one bed/room for Boys
Hostel accommodation Boys (2/Room): Enter Number of two beds/room for Boys
Room Area in sq m_B2: Enter area of two bed/ room
Name of the Building_B2: Enter the name of the building of two beds/room for Boys
Building Number_B2: Enter the building number of two beds/room for Boys
Hostel accommodation Boys (3/Room): Enter Number of three beds /room for Boys
Room Area in sq m_B3: Enter area of three bed/ room
Name of the Building_B3: Enter the name of the building of three beds/room for Boys
Building Number_B3: Enter the building number of three beds/room for Boys
Hostel accommodation Boys (4/Room): Enter Number of four beds /room for Boys
Room Area in sq m_B4: Enter area of four bed/ room
Name of the Building_B4: Enter the name of the building of four beds/room for Boys
Building Number_B4: Enter the building number of four beds/room for Boys
Hostel accommodation Girls (1/Room): Enter Number of one bed/room for girls
Room Area in sq m_G1: Enter area of single bed/ room
Name of the Building_G1: Enter the name of the building of one bed/room for girls
Building Number_G1: Enter the building number of one bed/room for girls
Hostel accommodation Girls (2/Room): Enter Number of two beds /room for girls
Room Area in sq m_G2: Enter area of two beds/ room
Name of the Building_G2: Enter the name of the building of two beds/room for girls
Building Number_G2: Enter the building number of two beds/room for girls
Hostel accommodation Girls (3/Room): Enter Number of three beds /room for girls
Room Area in sq m_G3: Enter area of three beds/ room
Name of the Building_G3: Enter the name of the building of three beds/room for girls
Building Number_G3: Enter the building number of three beds/room for girls
Hostel accommodation Girls (4/Room): Enter Number of four beds/room for girls
Room Area in sq m_G4: Enter area of four beds/ room
Name of the Building_G4: Enter the name of the building of four beds/room for girls
Building Number_G4: Enter the building number of four beds/room for girls
Backup Electric Supply: Click it if “Yes”
Electric Supply: Click it if “Yes”
Click “Save” button to save the record.
46.OMBUDSMAN Details Click on “OMBUDSMAN Details” tab and Click “New” button to Enter OMBUDSMAN Details.
Grievance Committee: It is a non-editable field with default value as “No”. The value for this field is set to “Yes” when the user adds a new record in the field Committee Type – “Grievance Redressal‟ in the list Form below.
OMBUDSMAN Appointment: It is a non-editable field with default value as “No”. The value for this field is set to “Yes” when the user adds a new record in the field Committee Type – “OMBUDSMAN” in the list Form below
Click on “New” button to add OMBUDSMAN/ Grievance Details.

47 | P a g e
Committee Type: Select value From Dropdown. It’s a required field.
1. Grievance Redressal 2. OMBUDSMAN
Appointment Order Reference Number: Enter Appointment Order Reference No.(Required).
Date of Appointment: Enter Date of Appointment. It’s a required field.
Name of the Committee Member: Enter Committee Member Name. It’s a required field.
Profession: Enter Profession
Address: Enter Address
Associated with: Enter the Name of Organization with which committee Member is associated.
Mobile Number: Enter valid 10 digits Mobile Number. It’s a required field.
E-mail Address: Enter Valid Email Number ex. [email protected]. It’s a required field.
Fax no.: Enter Valid Fax Number.
Designation: Enter value not below the rank of District Retired Judge or a Retired Professor
Department: Enter Department Name
47.Anti-Ragging Details
Click on “Anti-Ragging” in Quick Links to go to Anti-Ragging Details Tab.
Constitution of Anti-Ragging Committee: It is a non-editable field with default value as “No”. The value for this field is set to “Yes” when the user adds a new record in the field Committee Type – “Anti-Ragging Committee” in the list Form below.
Constitution of Anti-Ragging Squad: It is a non-editable field with default value as „No‟. The value for this field is set to „Yes‟ when the user adds a new record in the field Committee Type – “Anti-Ragging Squad” in the list Form below.

48 | P a g e
Affidavit obtained from all Students: Select Yes/No. By default the field is set as “No”.
Appointment of Counsellors: Select Yes/No. By default the field is set as “No”.
Affidavit obtained from parents of all the students: Select Yes/No. By default the field is set as “No”.
Affidavit obtained from students staying in Hostel: Select Yes/No/New Hostel. By default the field is set as “No”.
Affidavit obtained from parents of students staying in Hostel: Select Yes/No/New Hostel. By default the field is set as “No”.
Click on “New” button to add details about Anti-Ragging.
Committee type: Select Committee Type. It is a required field. 1. Anti-Ragging Committee Selection of this value changes the value of field “Constitution of Anti-Ragging Committee”: in the form Form as “Yes”. 2. Anti-Ragging Squad
Selection of this field changes the value of field “Constitution of Anti-Ragging Squad”: in the form Form as “Yes”.
Appointment Order Reference Number: Please enter an Appointment Order Reference number which can be alphanumeric. It is a required field.
Date of Appointment: Please enter a date less than the current date. It is a required field.
Name of the Committee Member: Please enter name of the Committee Member. It is a required field.
Profession: Please enter the Profession.
Address: Please enter the address. It is a required field.
Associated with: Please enter an appropriate value.
Mobile Number: Please enter a valid 10-digit mobile number. It is a required field.
E-mail Address: Please enter a valid e-mail address. It is a required field.
Fax No.: Please enter a Fax number. Click on “Save” button to save the record.

49 | P a g e
48. e-Journal Subscription Proofs
To add eJournal Publishers for specific application user should navigate to New/Extension
Approval Screen In the below available tabs select eJournal Subscription Proofs tab
Click on “New” Button to enter Program name, publisher name and attachment.
User can able to select list of programs available in Programme tab otherwise it will be pop up with following error message