transaction approval process - vanderbilt university approval...transaction approval process...
TRANSCRIPT
Access Online Transaction Approval Process User Guide
ApproverVersion 1.4

Transaction Approval Process
Contents Introduction...............................................................................3
TAP Overview............................................................................4 View-Only Access ................................................................................ 5
Approve Your Own Transactions..............................................6 View Transactions ................................................................................... 7
Validation Status Icons Table ........................................................... 12 CSV Real-Time Process Diagram ..................................................... 13
Approve a Transaction .......................................................................... 14 Pull Back a Transaction ........................................................................ 20 Manage a Rejected Transaction ........................................................... 23 View Approval History........................................................................... 25
Approval Manager Transaction Approval Process .................27 View and Approve Transactions .......................................................... 28 Reject a Transaction.............................................................................. 36 Pull Back a Transaction ........................................................................ 42 Manage a Rejected Transaction ........................................................... 45 View Approval History........................................................................... 47
Approver 2

Transaction Approval Process
Introduction The transaction approval process (TAP) lets your organization use Access Online to approve and audit transactions using your existing internal approval hierarchy and procedures. By using the TAP function, you can eliminate paper approvals and easily approve transactions and view approval history. The TAP function’s flexibility also enables you to mirror your own internal auditing procedures, from simple to complex.
Two basic users will use the TAP function:
• Cardholders—Cardholders will use TAP to approve and forward transactions to an approval manager.
• Approval managers—Approval managers will use TAP to review, final approve, and forward (if needed) transactions to another approval manager.
The system lets only one user modify a transaction at a given point in time. In other words, the same transaction will never be in the work queue of more than one user. This feature reduces the chance of fraud and ensures that only one person can modify a transaction at a time.
Both approval managers and cardholders can perform the following basic procedures:
• Approve transactions—Cardholders and approval managers can approve transactions and forward them to an approval manager for additional approval. Cardholders approve and forward only their own transactions, while approval managers approve and forward transactions from cardholders and other approval managers.
• Pull back transactions—Cardholders and approval managers can pull back transactions that an approval manager has not approved, rejected, or modified (e.g. reallocated) yet. Both cardholders and approval managers can pull back transactions they previously approved as long as the pending approval managers have not yet approved, rejected or modified the transactions (e.g., reallocated, added comments, changed user line items).
• Manage rejected transactions—Both cardholders and approval managers can manage transactions that approval managers reject back to them.
In addition, approval managers can:
• Reject transactions—Approval managers can reject transactions and send them back to the cardholder, previous approval manager, or to another approval manager. The rejecting approval manager must specify a rejection reason so that the cardholder or approval manager receiving the rejected transaction knows how to manage the rejected transaction.
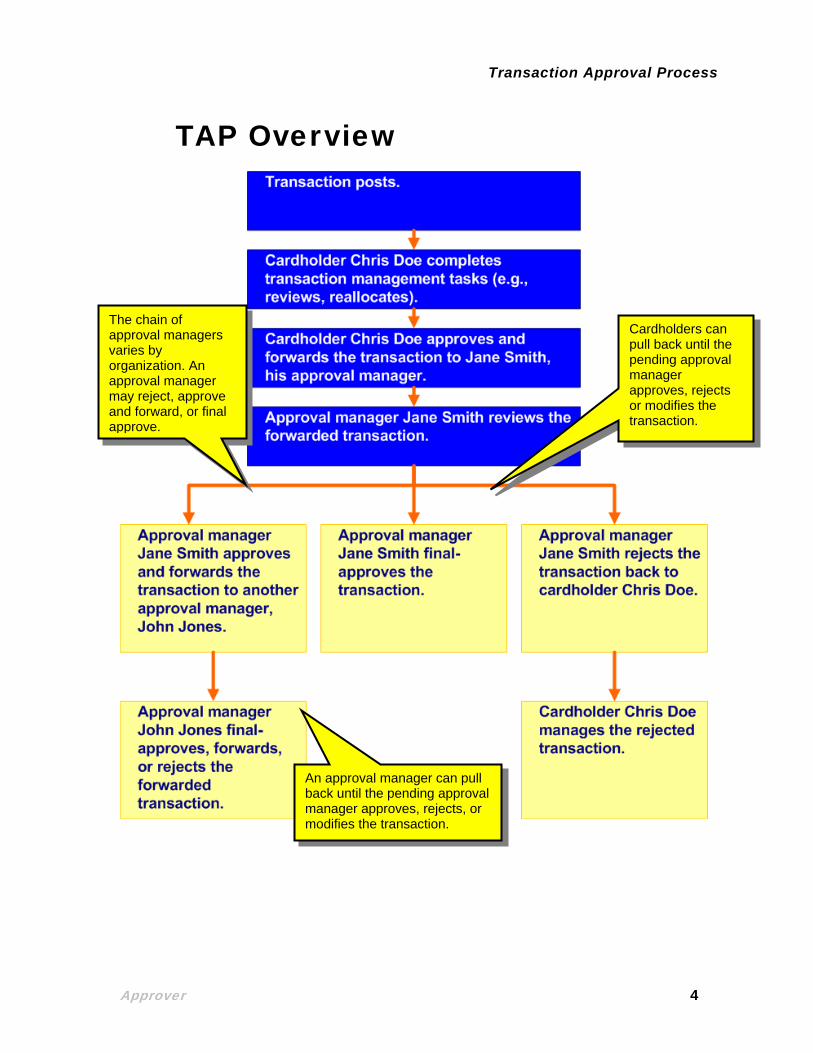
The flow chart on the following page provides an overview of the entire process.
Approver 3
Transaction Approval Process
TAP Overview
An approval manager can pull back until the pending approval manager approves, rejects, or modifies the transaction.
The chain of approval managers varies by organization. An approval manager may reject, approve and forward, or final approve.
Cardholders can pull back until the pending approval manager approves, rejects or modifies the transaction.
Approver 4
Transaction Approval Process
View-Only Access You may only be able to view transaction approval screens, without being able to perform any approval tasks. Your organization may have set you up with this view-only access so that you can see the transactions and their approval status in the system, without being able to make any changes to the information. For example, if you are an internal auditor in your organization, you might have such view-only access. The screens and tasks will display as shown in this user guide, but the action buttons for performing tasks will not be active. In this way, your Program Administrator can give you the access to the information you need, while maintaining control over who can modify the information in the system, leading to greater overall program control.
Learn More: If your organization’s procedures require you to approve accounts, including cardholder and managing accounts, as well as transactions, you should refer to the Access Online: Account Approval Process user guide.
Approver 5

Transaction Approval Process
Approve Your Own Transactions As an approval manager, you need to approve your own transactions using the procedures in this section. To manage your own transactions, you act as a cardholder. Later in this user guide, you will learn how to approve and manage the transactions that cardholders send to you for approval. To manage your own transactions, you can:
• View a list your transactions, filtered by approval status (e.g., pending, pulled back) and other parameters
• Approve and forward a transaction to an approval manager
• Pull back a transaction as long as the approval manager (also called the pending approver) has not approved, rejected, or modified the transaction (e.g., reallocated, added comments, changed user line items).
• Manage a rejected transaction if your approval manager sends it back to you
• View the approval history to see the current approval status of the transaction, along with each user who approved a transaction, the date and time of each approval, and whether or not each user modified the transaction’s allocation, comments, or line items.
Approver 6

Transaction Approval Process
View Transactions The first step in using the TAP function is to access a list of your transactions, as you do for other transaction management functions.
1
To view transactions:
1. Select the Transaction Management high-level task. The Transaction Management screen displays.
2
Click a link to view transactions for the previous cycle, transactions that are not yet approved, or transactions that are not yet matched to an order, payment request, or payment instruction.
2. Click the Transaction List link. The Transaction Management: Search and Select an Account screen displays.
Approver 7
Transaction Approval Process
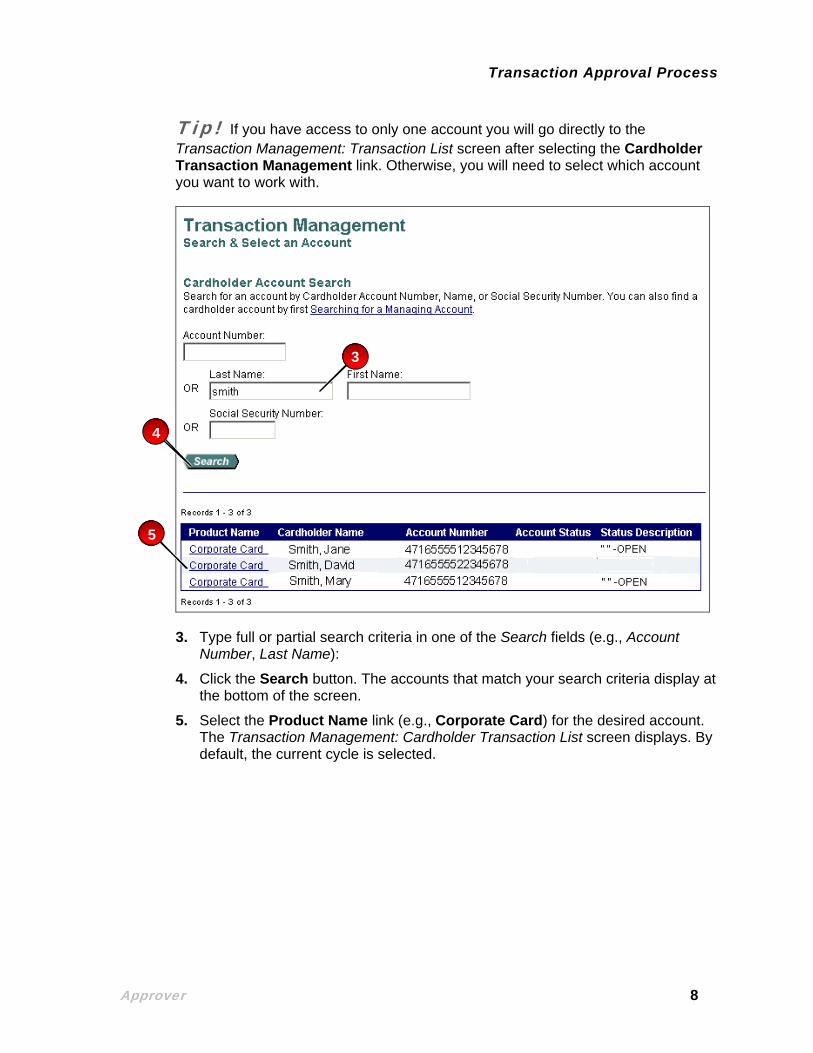
Tip! If you have access to only one account you will go directly to the Transaction Management: Transaction List screen after selecting the Cardholder Transaction Management link. Otherwise, you will need to select which account you want to work with.
3
4
5
3. Type full or partial search criteria in one of the Search fields (e.g., Account Number, Last Name):
4. Click the Search button. The accounts that match your search criteria display at the bottom of the screen.
5. Select the Product Name link (e.g., Corporate Card) for the desired account. The Transaction Management: Cardholder Transaction List screen displays. By default, the current cycle is selected.
Approver 8

Transaction Approval Process
Click the Advanced Search link to search for a specific transaction or set of transactions. Click Switch Accounts to switch accounts
6a
6b
6d
7
6c
8
6. Filter your transactions by any of the following criteria:
a. Select a cycle date from the Billing Cycle End Date drop-down list.
b. To filter by transaction amount, select a qualifier (e.g., <=, >=, Exact, or All)
from the Transaction Amount drop-down list and type an amount in the Transaction Amount $ field.
c. Type a purchase ID in the Purchase ID field, if desired.
d. To filter the list by status, select an approval status, pull-back eligibility status, match status, reallocation status, and/or reviewed status.
7. Select the number of transactions to display from the Display drop-down list.
8. Click the Search button. The transactions that match your filtering criteria display.
Approver 9

Transaction Approval Process
Tip! From this screen, you can perform transaction management tasks described in the Access Online: Transaction Management user guide. Once you have completed any necessary transaction management tasks (e.g., reallocated the transaction), you are ready to approve the transaction.
Approver 10

Transaction Approval Process
Learn More: Your screen may also have additional icons displayed to indicate the availability of level II and level III data and/or to indicate if the transaction has been extracted. Note the II icons and the E icons in the sample screen below. If a transaction does not have a II or III icon, then only basic, level I data is available. For detailed information, refer to the Access Online: Transaction Management user guide.
These icons indicate the type additional detail available and if the transaction has been extracted.
For detailed information on marking transactions for extract (if you are responsible for that task), refer to the Access Online: Marking Transactions for Extract user guide.
Approver 11
Transaction Approval Process
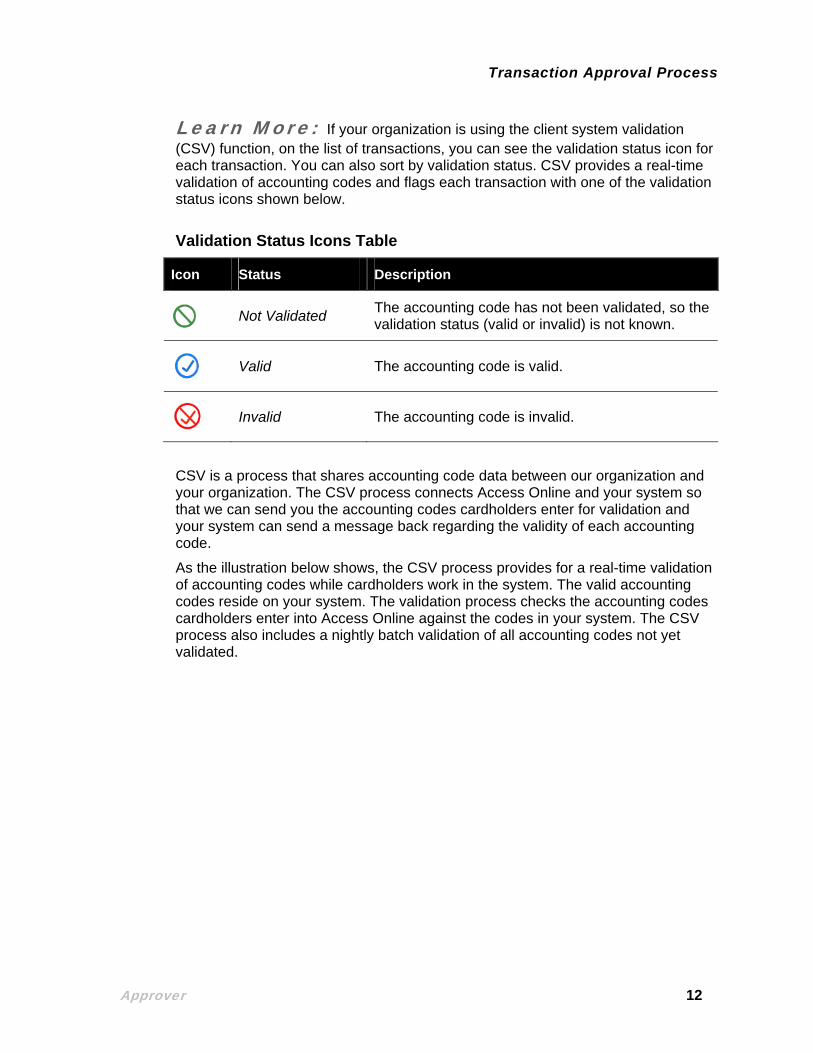
Learn More: If your organization is using the client system validation (CSV) function, on the list of transactions, you can see the validation status icon for each transaction. You can also sort by validation status. CSV provides a real-time validation of accounting codes and flags each transaction with one of the validation status icons shown below.
Validation Status Icons Table
Icon Status Description
Not Validated The accounting code has not been validated, so the validation status (valid or invalid) is not known.
Valid The accounting code is valid.
Invalid The accounting code is invalid.
CSV is a process that shares accounting code data between our organization and your organization. The CSV process connects Access Online and your system so that we can send you the accounting codes cardholders enter for validation and your system can send a message back regarding the validity of each accounting code.
As the illustration below shows, the CSV process provides for a real-time validation of accounting codes while cardholders work in the system. The valid accounting codes reside on your system. The validation process checks the accounting codes cardholders enter into Access Online against the codes in your system. The CSV process also includes a nightly batch validation of all accounting codes not yet validated.
Approver 12

Transaction Approval Process
CSV Real-Time Process Diagram
Your program administrator has set up the parameters for how your organization will use CSV in TAP. For example, you may not be able to approve a transaction with a Not Validated accounting code.
Approver 13

Transaction Approval Process
Approve a Transaction As an approval manager, you can approve a transaction from the list of transactions on the Transaction Management: Cardholder Transaction List screen. You can also approve a group of transactions together, as long as you are forwarding them to the same approval manager.
1
2
To approve a transaction from the transaction list:
1. Select a check box for a transaction with a Pending or Pulled Back status.
Tip! You can select multiple transactions, but be sure they are all going to the same place. Also, you can select the Check all shown link if you want to approve all the displayed transactions and they are all going to the same approval manager.
2. Click the Approve button. The Transaction Management: Approve Transaction(s) screen displays.
Approver 14

Transaction Approval Process
3
If you select multiple transactions, the number and dollar value of all the transactions display.
Tip! If you are selecting an approval manager for the first time, you will need to search and select an approval manager. As you select approval managers, the system builds a drop-down list for you. Once the system creates this list, you can simply select an approval manager name from it. Also, once you select the same approval manager four times, the system will set that approval manager as your default approval manager. You can also manually specify a default approval manager.
3. Click the Select Approver link. The Approve Transaction(s): Search and Select an Approver screen displays.
Approver 15

Transaction Approval Process
4a
4b 4c
4. To search for an approval manager:
a. Type search criteria in the Last Name field and/or the First Name field to search for a specific approval manager.
–Or–
b. Leave the fields blank to return a complete list.
c. Click the Search button. A list of approval managers who match your search criteria displays.
Approver 16

Transaction Approval Process
5
6
7
5. Select the radio button for the approval manager you want to forward your approved transaction to.
6. If desired, select the Set selection as your default approver check box to make the selected person your default approval manager.
7. Click the Select Approver button. The Transaction Management: Approve Transaction(s) screen displays with your selected approval manager in the Approver’s Name field.
Approver 17

Transaction Approval Process
Click Switch Approver if the name in the Approver’s Name field is incorrect.
8
Tip! If you had selected multiple transactions, they will all go to the listed approval manager. Also, if you selected a group of transactions, but decide at this point to send to different approval managers, click the Cancel button to return to the transaction list and revise your selections.
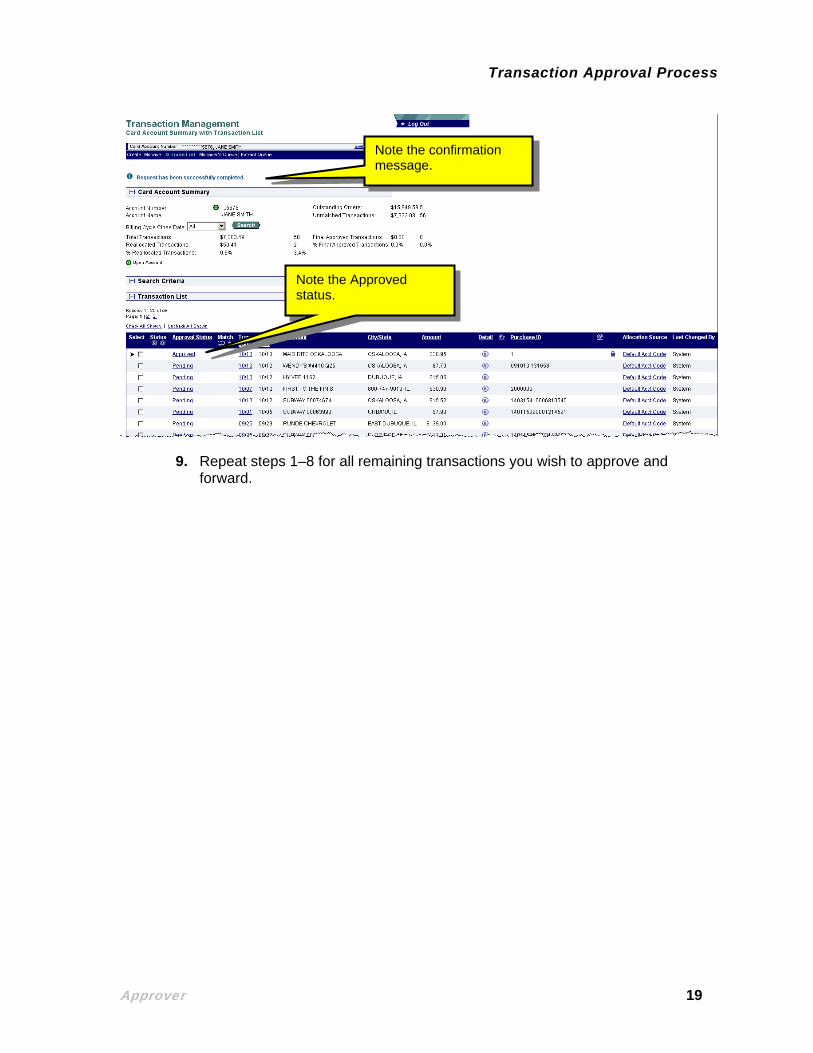
8. Click the Approve button. The system forwards the approved transaction(s) to the specified approval manager and includes your transaction in the e-mail summary of transactions that goes to the approval manager. You return to the Transaction Management: Cardholder Transaction List screen, on which a confirmation message displays and the transaction’s status displays as Approved.
Tip! You cannot approve a transaction without selecting an approval manager. If you try to, the system displays an error message. Simply select an approval manager and then click Approve.
Note the error message.
Approver 18
Transaction Approval Process
Note the confirmation message.
Note the Approved status.
9. Repeat steps 1–8 for all remaining transactions you wish to approve and forward.
Approver 19

Transaction Approval Process
Pull Back a Transaction You can pull back a transaction before the approval manager you forwarded the transaction to has approved, rejected, or modified (e.g., reallocated) the transaction. After an approval manager takes action on a transaction, the transaction belongs to the current approval manager and you can no longer pull back the transaction.
1
2
To pull back a transaction:
1. Select the Eligible for Pullback option from the Pull Back Eligibility drop-down list.
2. Click the Search button. Transactions that you can pull back display at the bottom of the screen.
Approver 20
Transaction Approval Process
3
4
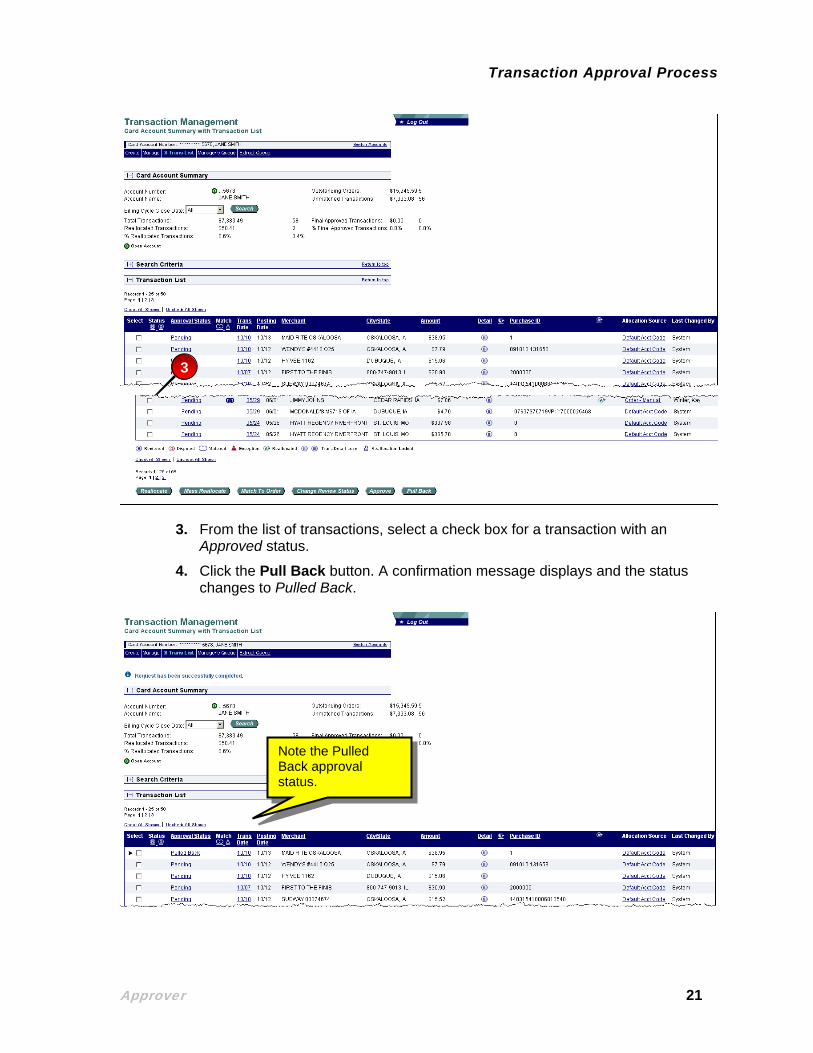
3. From the list of transactions, select a check box for a transaction with an Approved status.
4. Click the Pull Back button. A confirmation message displays and the status changes to Pulled Back.
Note the Pulled Back approval status.
Approver 21
Transaction Approval Process
Learn More: You can now modify the transaction (e.g., reallocate, add line item information) as described in the Access Online: Transaction Management user guide. After you modify the transaction, repeat the steps in Approve a Transaction on page 14 to approve and forward the transaction again.
Approver 22

Transaction Approval Process
Manage a Rejected Transaction The approval manager you forward a transaction to may reject a transaction. When an approval manager rejects a transaction, the system requires the rejecting approval manager to provide a reason and/or comments, so you know how to modify the transaction to make it acceptable. After you modify the transaction, using the transaction management functions (refer to the Access Online: Transaction Management user guide), you can re-approve and forward the transaction. Depending on your organization’s internal procedures, you may send the transaction back to whomever rejected it you, or you may send it back up the chain, beginning with your approval manager.
For example, you send a transaction to your approval manager, Richard Anderson, and he approves the transaction and sends the transaction to Kate Jones, who rejects the transaction back to you to reallocate. Once you reallocate the transaction, you might need to send it to Richard again for approval or you might send to back directly to Kate for final approval. Whether you send to Richard or Kate depends entirely on how your organization handles your internal transaction approval procedures. If you are uncertain which approval manager to resend a rejected transaction to, check with your program administrator.
1
2
3
To manage a rejected transaction:
1. Select Rejected from the Approval Status drop-down list.
2. Click the Search button.
3. Clicked the Rejected link for the transaction you want to work with. The Transaction Management: Transaction Detail screen displays.
Approver 23

Transaction Approval Process
4. Review the codes (e.g., 1, 2, 3), modifications (e.g., A, C, U) and comments for the transaction using the on-screen keys.
5. Click the Back to Transaction List link. You return to the Transaction Management: Cardholder Transaction List screen.
6. Follow the instructions from the approval manager (e.g., reallocate the transaction to the sales department). Refer to the Access Online: Transaction Management user guide if you need assistance with transaction management functions.
7. Follow the steps in Approve a Transaction on page 14 to re-approve and forward the modified transaction.
This transaction has been rejected for 1–Incorrect accounting code allocation and 7–Other with comments (reallocate to sales).
4
These keys explain the approval action and approver modification codes.
5
Approver 24

Transaction Approval Process
View Approval History If you want to see the history of a transaction, you can view the approval history for a specific transaction on the Approval History tab. The Approval History tab provides an audit trail, including the name of each approval manager and what action each approval manager took related to the transaction.
1
To view approval history:
1. Select the link in the Approval Status column for the transaction you want to view the approving history of. The Transaction Management: Transaction Detail screen displays with the Approval History tab open.
Approver 25

Transaction Approval Process
2
Note the cardholder approver and the current pending approver.
The Approval Actions table lists all approvers, their actions, and the date and time of their actions.
3
2. Review the approval action information.
3. Click the Back to Transaction List link. You return to the Transaction Management: Cardholder Transaction List screen.
Approver 26

Transaction Approval Process
Approval Manager Transaction Approval Process Aside from managing your own transactions, if you are an approving manager, you manage the transactions other users send to you for approval. Depending on how your program is set up and which internal approval procedures you follow, you may approve transactions from other approval managers or only from cardholders.
As an approval manager, you can:
• View transactions that cardholders and other approving managers have sent to you for approval
• Approve a transaction and either final-approve the transaction or forward it to another approval manager. You cannot approve and forward a transaction to yourself.
• Reject a transaction, by selecting a reject reason and sending the transaction back to the cardholder, a previous approval manager or another approval manager.
• Pull back a transaction, if the approval manager has not approved, rejected or modified (e.g., reallocated) the transaction
• Manage a rejected transaction, if the approval manager has rejected a transaction and sent it back to you to address and resubmit for approval
• View the approval history and current approval status for transactions that you have approved
• Opt to receive an e-mail summary of pending transactions on a daily or weekly basis, on a day of the week you select. You can turn this function on, off, or modify the e-mail frequency on the My Personal Information: Contact Information screen.
• Complete transaction management tasks as described in the Access Online: Transaction Management user guide before you approve or reject the transaction. Once you approve or reject the transaction, you can no longer modify the transaction, unless you pull it back. If you do modify the transaction, the system records your changes along with your approval actions.
Whether you can final-approve a transaction or whether you need to approve and send a transaction to another approval manager depends on your organization’s internal procedures.
Approver 27
Transaction Approval Process
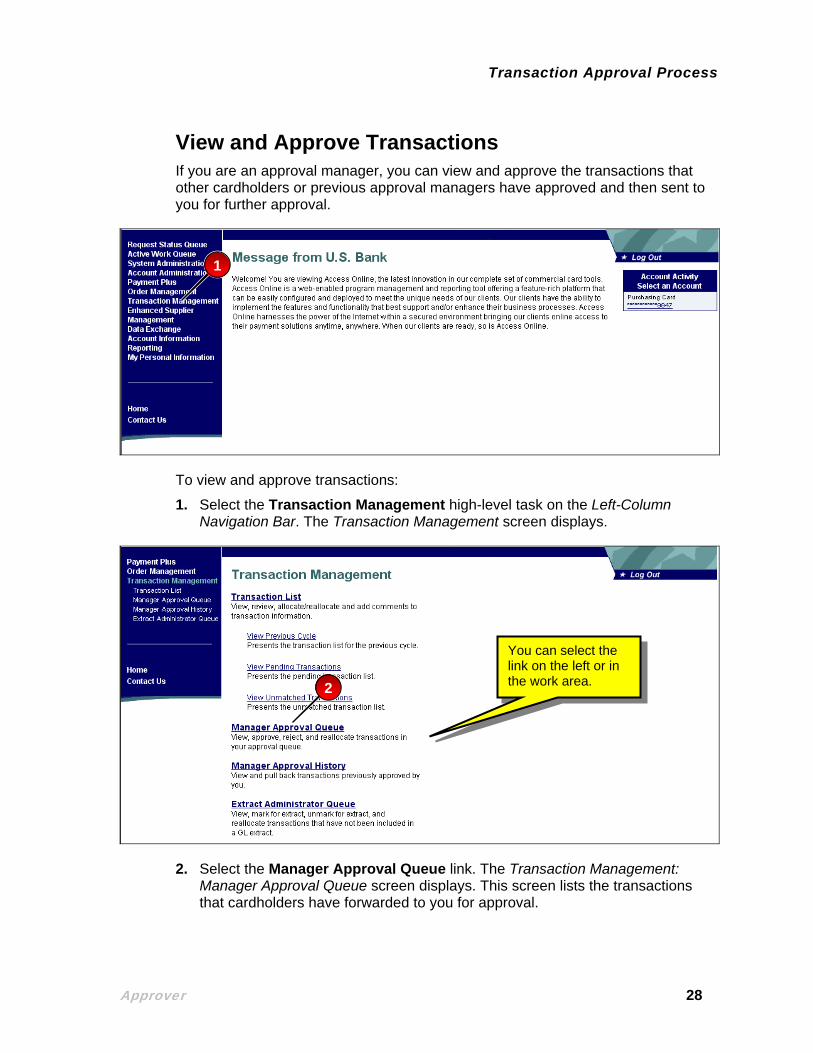
View and Approve Transactions If you are an approval manager, you can view and approve the transactions that other cardholders or previous approval managers have approved and then sent to you for further approval.
1
To view and approve transactions:
1. Select the Transaction Management high-level task on the Left-Column Navigation Bar. The Transaction Management screen displays.
2
You can select the link on the left or in the work area.
2. Select the Manager Approval Queue link. The Transaction Management: Manager Approval Queue screen displays. This screen lists the transactions that cardholders have forwarded to you for approval.
Approver 28
Transaction Approval Process
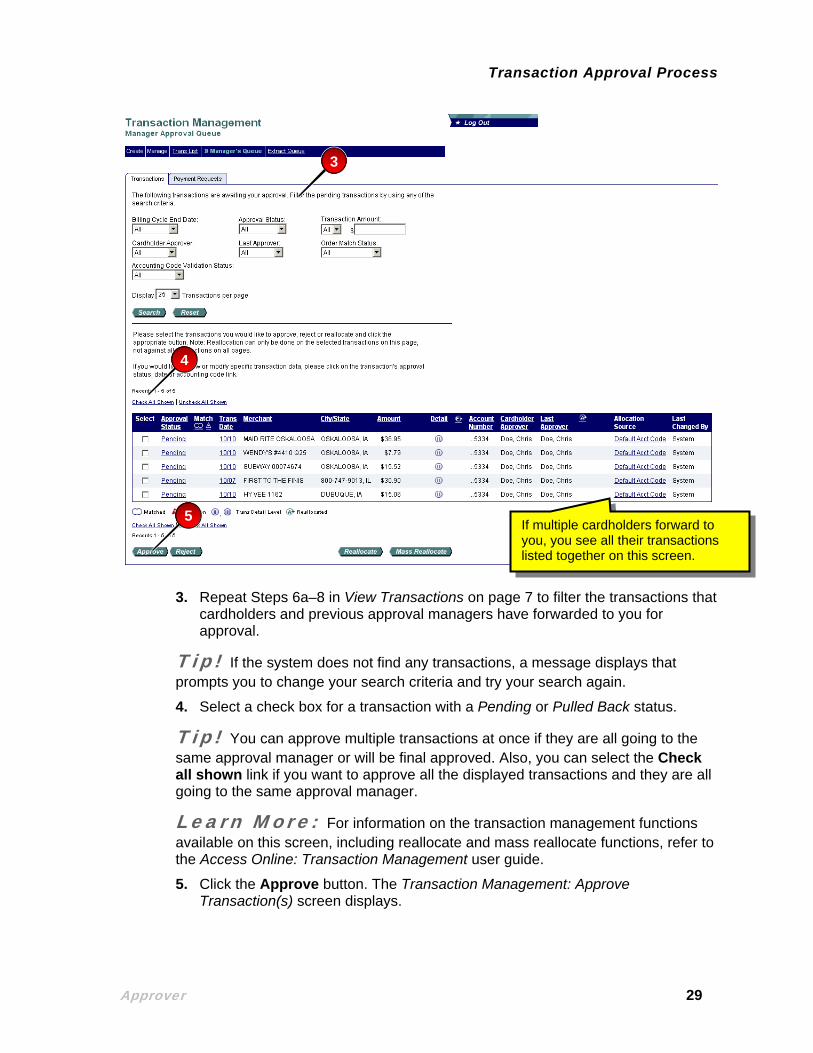
If multiple cardholders forward to you, you see all their transactions listed together on this screen.
3
4
5
3. Repeat Steps 6a–8 in View Transactions on page 7 to filter the transactions that cardholders and previous approval managers have forwarded to you for approval.
Tip! If the system does not find any transactions, a message displays that prompts you to change your search criteria and try your search again.
4. Select a check box for a transaction with a Pending or Pulled Back status.
Tip! You can approve multiple transactions at once if they are all going to the same approval manager or will be final approved. Also, you can select the Check all shown link if you want to approve all the displayed transactions and they are all going to the same approval manager.
Learn More: For information on the transaction management functions available on this screen, including reallocate and mass reallocate functions, refer to the Access Online: Transaction Management user guide.
5. Click the Approve button. The Transaction Management: Approve Transaction(s) screen displays.
Approver 29
Transaction Approval Process
6c
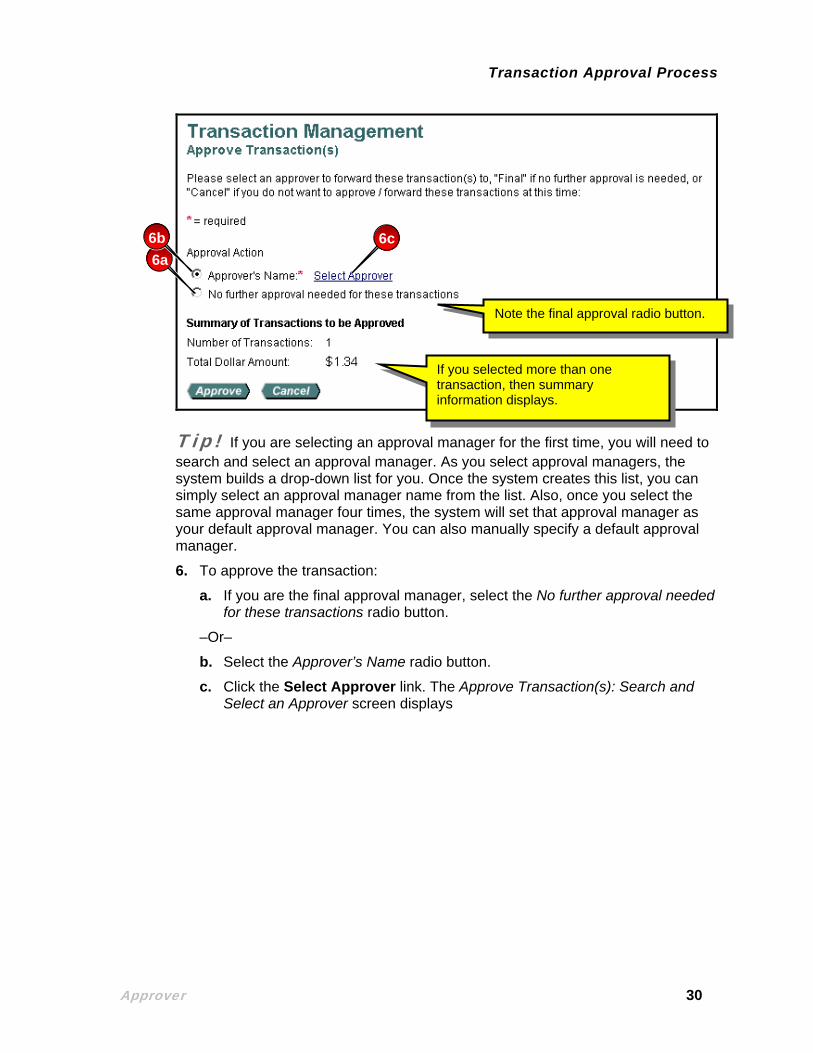
Note the final approval radio button.
If you selected more than one transaction, then summary information displays.
Tip! If you are selecting an approval manager for the first time, you will need to search and select an approval manager. As you select approval managers, the system builds a drop-down list for you. Once the system creates this list, you can simply select an approval manager name from the list. Also, once you select the same approval manager four times, the system will set that approval manager as your default approval manager. You can also manually specify a default approval manager.
6a 6b
6. To approve the transaction:
a. If you are the final approval manager, select the No further approval needed for these transactions radio button.
–Or–
b. Select the Approver’s Name radio button.
c. Click the Select Approver link. The Approve Transaction(s): Search and Select an Approver screen displays
Approver 30

Transaction Approval Process
d. Type search criteria in the Last Name field and/or the First Name field.
6d
6e Leave the fields blank and click Search to display all approvers.
e. Click Search. A list of approval managers who match your search criteria displays.
Tip! You can also click the Search button without typing search criteria to display a list of all available approval managers.
Approver 31

Transaction Approval Process
Your name will not be on the list even though you are an approval manager, since you cannot select yourself as an approval manager.
6f
6g 6h
Click to cancel the approval manager selection.
f. Select the radio button for the approval manager you want to forward your approved transaction to.
g. If desired, select the Set selection as your default approver check box to make the selected person your default approval manager.
h. Click Select Approver button. The Transaction Management: Approve Transaction(s) screen displays with your selected approval manager in the Approver’s Name field.
Approver 32

Transaction Approval Process
Tip! If you selected multiple transactions, they all go to the listed approval manager. Also, if you selected a group of transactions, but decide at this point to send the transactions to different approval managers, click the Cancel button to return to the transaction list and revise your selections.
Click Switch Approver if the name in the Approver’s Name field is incorrect.
Note the approval manager’s name.
7
Click Cancel to return to the list of transactions.
7. Click the Approve button. Based on your selection, the system either records the transaction as final approved or forwards the transaction to the specified approval manager. The system also removes it from the list of transactions on the Transaction Management: Manager Approval Queue screen.
Tip! You cannot select approve without selecting an approval manager. If you try to, the system displays an error message. Simply select an approval manager and then click Approve.
Note the error message.
Approver 33

Transaction Approval Process
View the transaction’s approval history by clicking the approval status link.
Once you approve a transaction, it no longer displays on this screen.
View the transaction’s detail by clicking the date link in the Tran Date column.
Click Manager Approval History to see all your approval actions.
Approver 34

Transaction Approval Process
Learn More: If your organization uses CSV, then you can only approve and forward transactions based on the parameters your program administrator set up. For example, you may not be able to approve or final-approve transactions with an Invalid and/or Not Validated accounting code status. Some program administrators set up their programs to allow approval of transactions with Not Validated and/or Invalid accounting codes, but do not allow final-approval of the same transactions until the accounting code is valid. In this way, cardholders and approval managers can continue to process transactions, but final approval requires a valid accounting code. Other program administrators may not allow any approval of transactions with Invalid and/or Not Validated accounting codes. However your program administrator set up the CSV function for your organization, if you attempt to save an approval not authorized by your program administrator, an error message displays, as shown in the example below.
Your program administrator may have set limits on which accounting code statuses you can approve and/or final-approve. Note that in this example, the approver has selected to final approve.
Note the error message.
Approver 35

Transaction Approval Process
Reject a Transaction As an approval manager, you can also reject a transaction.
You can reject a group of transactions, but it must be for the same reason.
1
2
To reject a transaction:
1. Select the check box in the Select column for the transaction you want to reject.
2. Click the Reject button. The Transaction Management: Reject Transaction(s) screen displays.
Approver 36

Transaction Approval Process
4
5d
3
5a 5b
5c
3. Select the appropriate Reject Reason check box(es).
4. If you selected the Other check box, then type comments.
Tip! If you select the Other check box, then you must type comments. You can also select more than one reject reason. Add comments to any rejection by selecting Other as well and typing comments.
5. Select the appropriate Rejection Destination radio button:
a. Select the Reject each transaction to its cardholder account to send the transaction (or each transaction in the selected group) back to the cardholder.
Approver 37
Transaction Approval Process
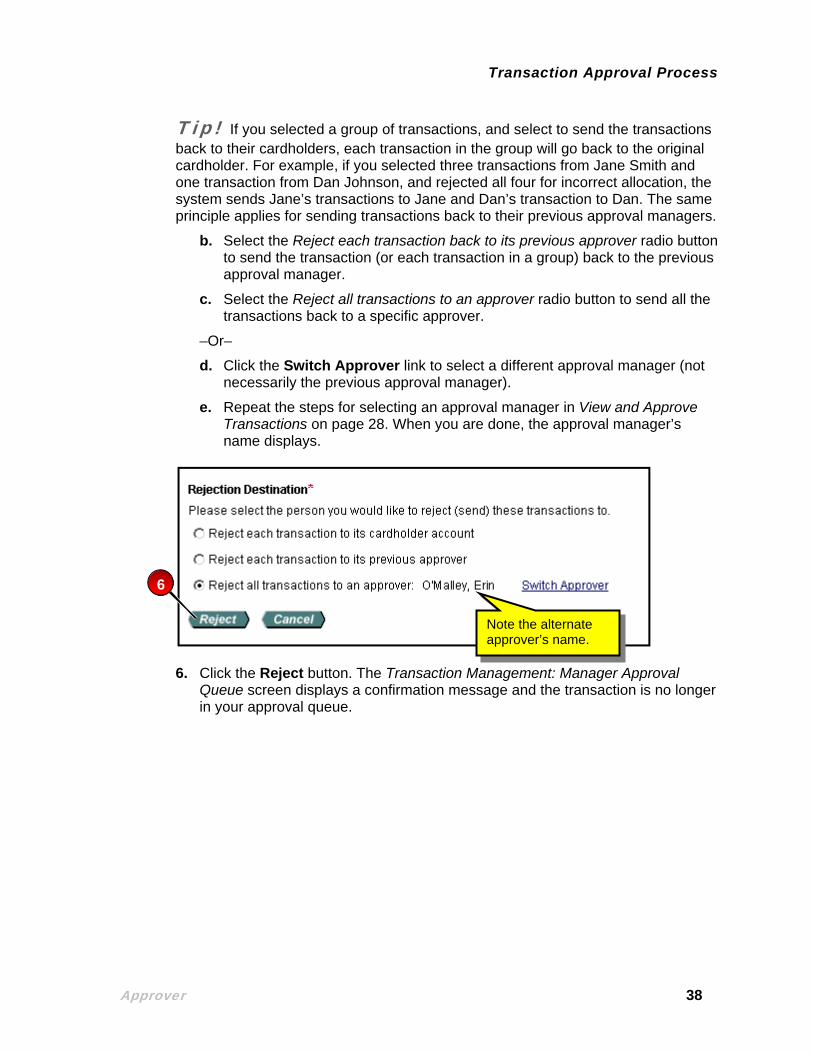
Tip! If you selected a group of transactions, and select to send the transactions back to their cardholders, each transaction in the group will go back to the original cardholder. For example, if you selected three transactions from Jane Smith and one transaction from Dan Johnson, and rejected all four for incorrect allocation, the system sends Jane’s transactions to Jane and Dan’s transaction to Dan. The same principle applies for sending transactions back to their previous approval managers.
b. Select the Reject each transaction back to its previous approver radio button to send the transaction (or each transaction in a group) back to the previous approval manager.
c. Select the Reject all transactions to an approver radio button to send all the transactions back to a specific approver.
–Or–
d. Click the Switch Approver link to select a different approval manager (not necessarily the previous approval manager).
e. Repeat the steps for selecting an approval manager in View and Approve Transactions on page 28. When you are done, the approval manager’s name displays.
Note the alternate approver’s name.
6
6. Click the Reject button. The Transaction Management: Manager Approval Queue screen displays a confirmation message and the transaction is no longer in your approval queue.
Approver 38

Transaction Approval Process
7
Note the confirmation message.
Once you reject a transaction, it no longer displays in your approval queue.
7. Select the Manager Approval History link in the Left-Column Navigation Bar to view the transaction. The Transaction Management: Manager Approval History screen displays the transaction with a Rejected status.
Approver 39
Transaction Approval Process
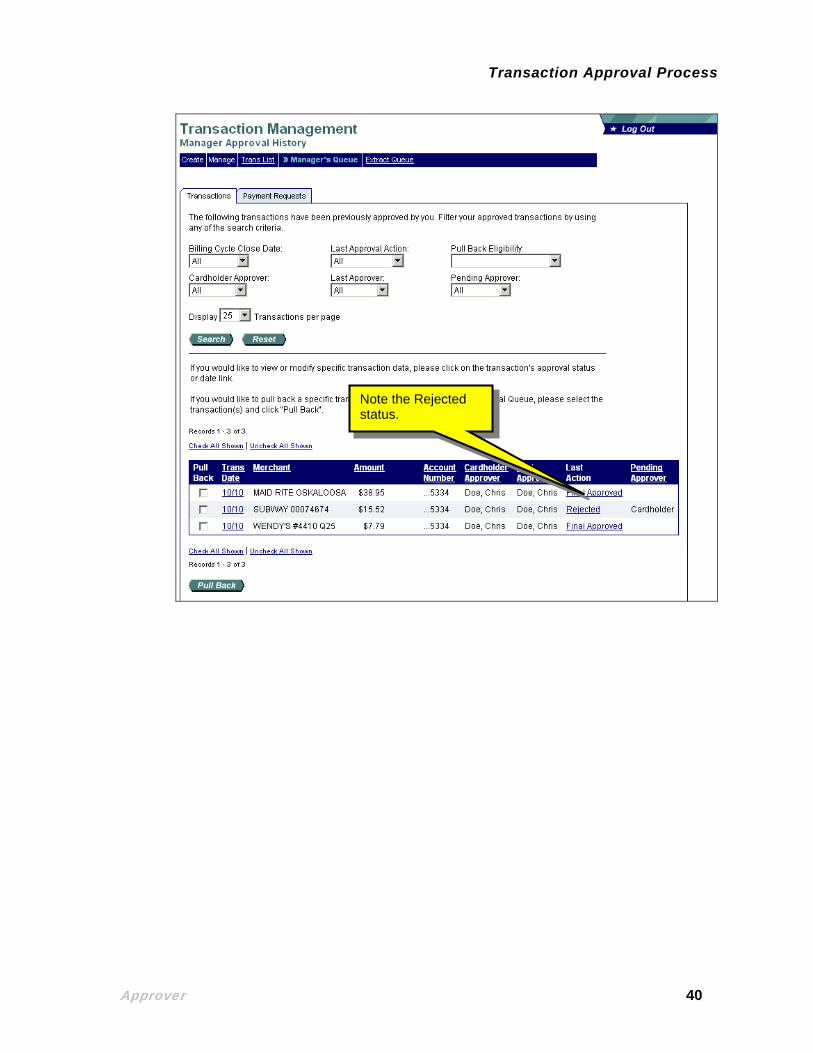
Note the Rejected status.
Approver 40
Transaction Approval Process
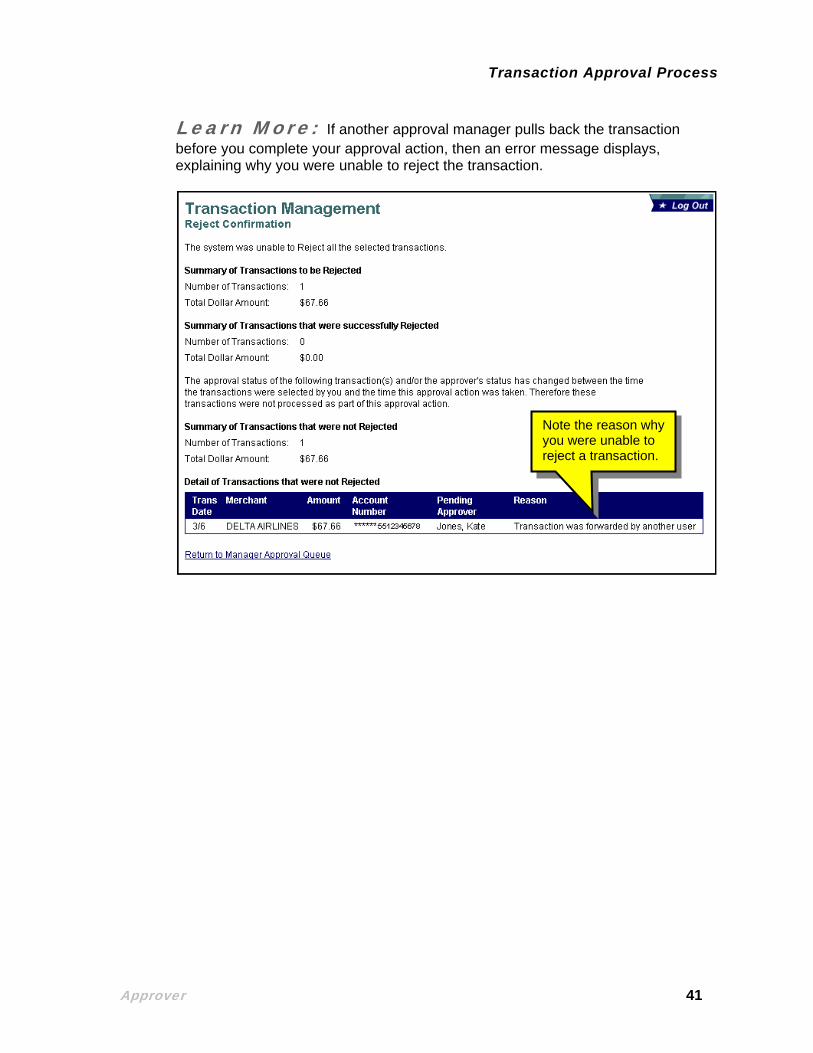
Learn More: If another approval manager pulls back the transaction before you complete your approval action, then an error message displays, explaining why you were unable to reject the transaction.
Note the reason why you were unable to reject a transaction.
Approver 41

Transaction Approval Process
Pull Back a Transaction As an approval manager, you can pull back a transaction after you approve or reject it, as long as the approval manager or cardholder (if you rejected back to the cardholder) has not approved, rejected, or modified (e.g., reallocated) the transaction.
1
To pull back a transaction:
1. Select the Manager Approval History link on the Left-Column Navigation Bar. The Transaction Management: Manager Approval History screen displays.
Approver 42
Transaction Approval Process
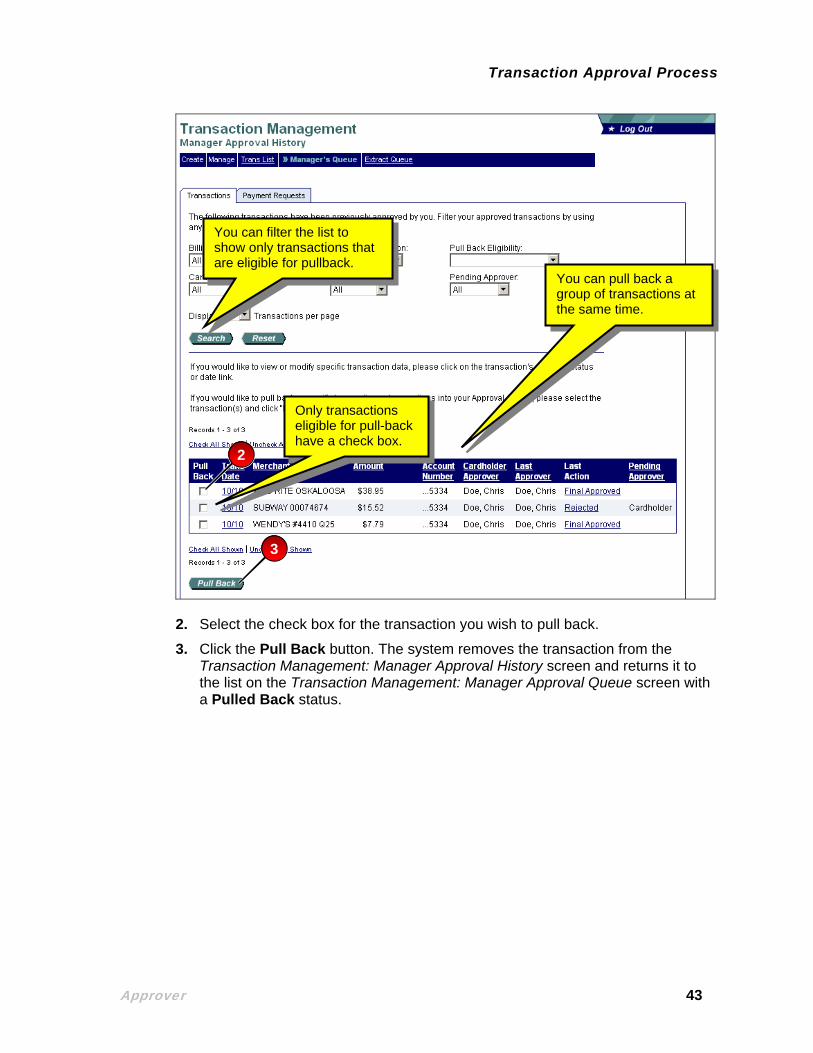
You can filter the list to show only transactions that are eligible for pullback.
You can pull back a group of transactions at the same time.
2
Only transactions eligible for pull-back have a check box.
3
2. Select the check box for the transaction you wish to pull back.
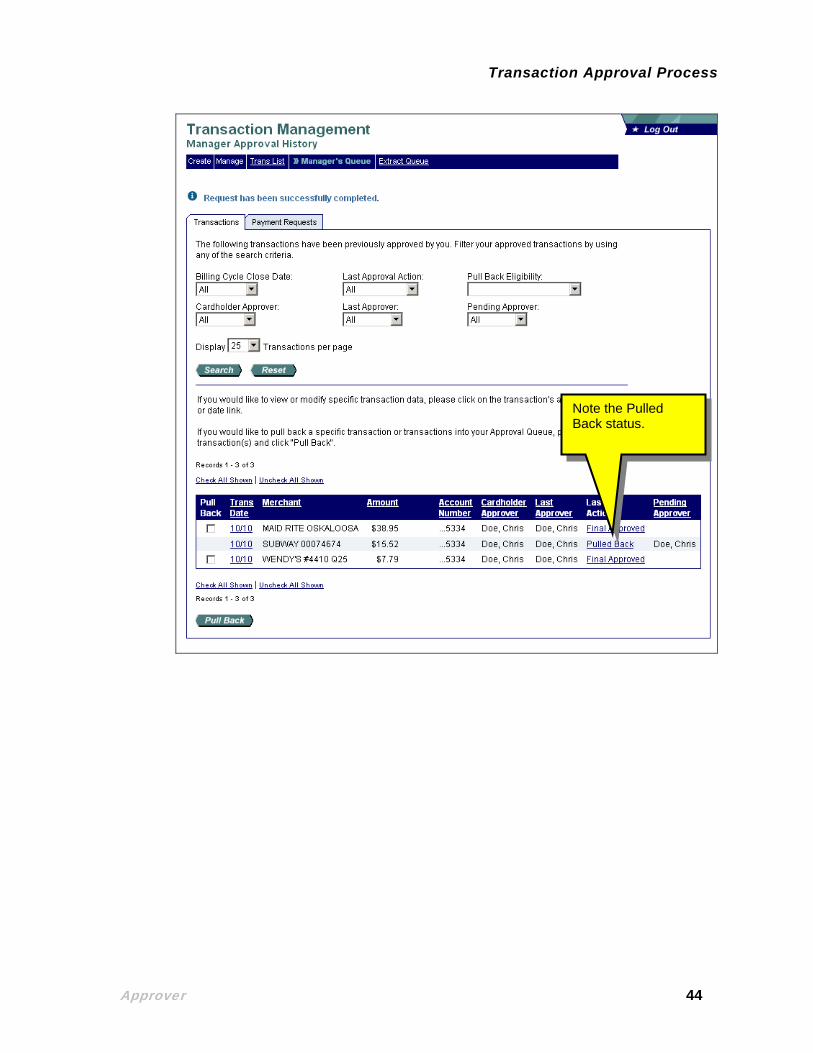
3. Click the Pull Back button. The system removes the transaction from the Transaction Management: Manager Approval History screen and returns it to the list on the Transaction Management: Manager Approval Queue screen with a Pulled Back status.
Approver 43
Transaction Approval Process
Note the Pulled Back status.
Approver 44
Transaction Approval Process
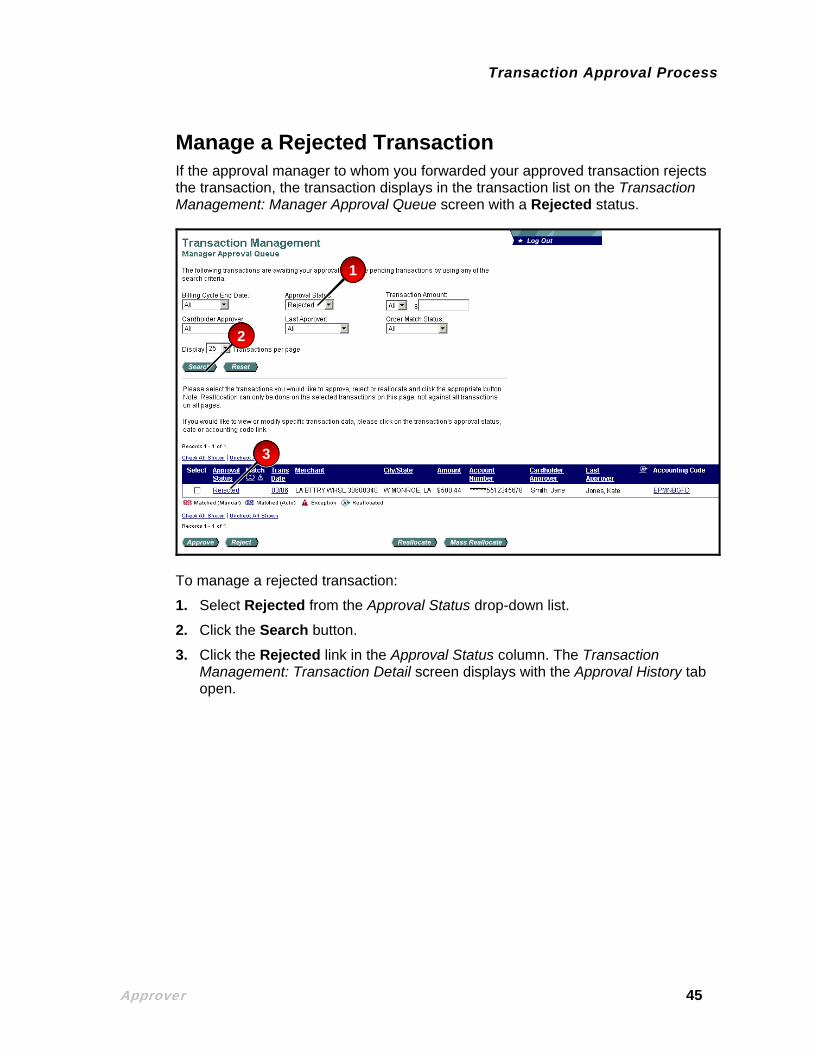
Manage a Rejected Transaction If the approval manager to whom you forwarded your approved transaction rejects the transaction, the transaction displays in the transaction list on the Transaction Management: Manager Approval Queue screen with a Rejected status.
1
2
3
To manage a rejected transaction:
1. Select Rejected from the Approval Status drop-down list.
2. Click the Search button.
3. Click the Rejected link in the Approval Status column. The Transaction Management: Transaction Detail screen displays with the Approval History tab
open.
Approver 45

Transaction Approval Process
4This transaction has been rejected for 1–Incorrect accounting code allocation.
These keys explain the approval action and approver modification codes.
5
4. Review the codes (e.g., 1, 2, 3), modifications (e.g., A, C, U) and comments for the transaction using on the on-screen keys.
5. Click the Back to Manager Approval Queue link. You return to the Transaction Management: Manager Approval Queue screen.
6. Follow the instructions from the approval manager (e.g., reallocate the transaction). Refer to the Access Online: Transaction Management user guide if you need assistance with transaction management functions.
7. Follow the steps in View and Approve Transactions on page 28 to re-approve and forward the modified transaction.
Approver 46

Transaction Approval Process
View Approval History If you are an approval manager, you can view a list of the transactions that you have previously approved or rejected, as well as the complete approval history of each transaction.
This screen lists all transactions you have approved or rejected, including the last approver, the last action, and the pending approver.
1
2
To view approval history:
1. From any transaction management screen, select the Manager Approval History link on the Left-Column Navigation Bar. The Transaction Management: Manager Approval History screen displays.
2. To view detailed approval history for a specific transaction, select a link in the Last Action column. The Transaction Management: Transaction Detail screen displays with the Approval History tab open.
Approver 47
Transaction Approval Process
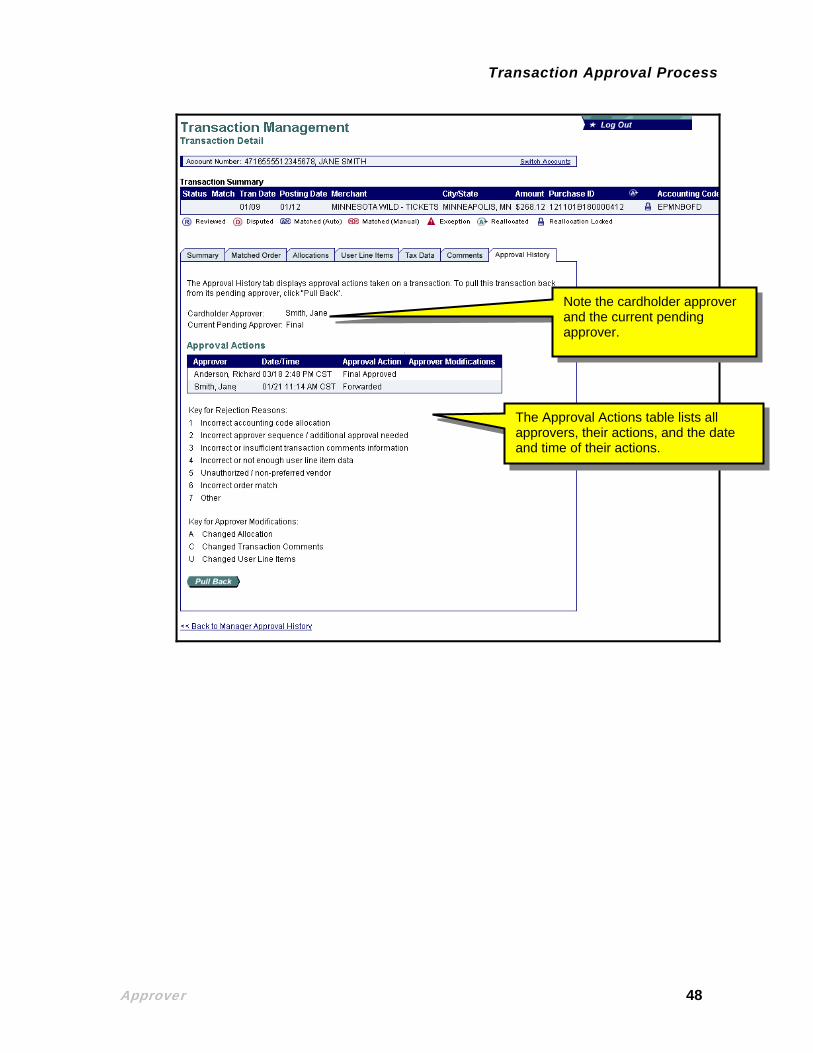
Note the cardholder approver and the current pending approver.
The Approval Actions table lists all approvers, their actions, and the date and time of their actions.
Approver 48
Transaction Approval Process
©2009 U.S. Bancorp. All rights reserved. U.S. Bank Corporate Payment Systems is a division of U.S. Bank National Association ND. All other trademarks are the property of their respective owners.
You may not reproduce this document, in whole or in part, without written permission from U.S. Bank.
Approver 49