application note of best practical jitter tolerance ... · pdf filebest practical jitter...
TRANSCRIPT

Application Note
Best Practical Jitter Tolerance Testing with MP1800A
MP1800A Series Signal Quality Analyzer

1 MP1800A_Jitter_Tolerance-E-F-2
Contents
1. Introduction .............................................................................................................................................................. 2
2. Definition of Jitter Component Types.................................................................................................................... 3
3. Tips for Jitter Tolerance Measurement .................................................................................................................. 9
4. Summary ................................................................................................................................................................ 17
2 MP1800A_Jitter_Tolerance-E-F-2
1. Introduction
The recent improvement to semiconductor device performance has seen bit rates of 28 Gbps become
commonplace. When using high-speed signals like the 28 Gbps band, the impact of jitter components from various
sources in the surrounding environment on the transmission quality cannot be ignored. As a result, accurate
evaluation of device characteristics requires testing by injecting multiple types of jitter on the device under test
(DUT). Previously, jitter tolerance tests for the optical market required only applying of sinusoidal jitter (SJ). More
recently, applying just SJ has caused difficulties in performing accurate evaluation of device characteristics
including the impact of the surrounding environment. This Application Note explains each type of jitter, gives some
guidance about measurements for complex jitter tests, and describes some concrete examples of jitter tolerance
measurements using the Anritsu MP1800A.

3 MP1800A_Jitter_Tolerance-E-F-2
2. Definition of Jitter Component Types
2.1 SJ (Sinusoidal Jitter)
Sinusoidal Jitter is jitter with a single frequency component; it is the most basic jitter component of jitter tolerance
tests. There are various jitter frequency components in the natural world and SJ is used for confirming the jitter
tolerance at each frequency.
In transmission methods where the Data and Clock are not transmitted in parallel, the Data signal generated from
the transmitting device is retimed by the Clock Recovery circuit at the receiving device. The jitter tolerance
characteristics are a key index in evaluating this re-timing operation. Generally, Clock Recovery uses an internal
Phase Locked Loop (PLL) circuit. Figure 2.1.1 shows a Clock Recovery circuit.
Input Data Signal
Loop Filter
VCO Phase Detector
Data Output
D-FF
Figure 2.1.1 Clock Recovery Circuit
Figure 2.1.2 Loop Bandwidth
Similar to a basic PLL circuit, the Clock Recovery circuit determines the Loop Bandwidth (Figure 2.1.2). When the
Loop Bandwidth is wide, the jitter tolerance is excellent; a shorter Clock Recovery circuit lock time has merits but
on the other hand it increases the amount of carrier jitter in circuits downstream of the Clock Recovery. If the Clock
Recovery lock time is short so as to recover the normal signal status, only a short time is required until the entire
system recovers normal operation when the signal input to the Clock Recovery is lost or when the frequency has
slipped momentarily. Although a wide loop band achieves this short lock time, a disadvantage is that jitter in the
input clock is easily transferred to circuits downstream of the Clock Recovery. For example, stacking-up several
wide Loop Bandwidth Clock Recovery circuits may cause jitter summing in subsequent stages, risking incorrect
operation of the entire system.
4 MP1800A_Jitter_Tolerance-E-F-2
At a jitter tolerance test, it is important to confirm that the Loop Bandwidth of the above-described PLL is in
accordance with the design and the degree to which it varies; as already described, the Clock Recovery has its
own unique Loop Bandwidth. When the input Data signal jitter frequency and amount are within the Loop
Bandwidth, an error does not occur due to a phase mismatch because recovered clock tracks input Data signal in
terms of jitter. In other words, for the input Data and recovered Clock to have the same amount of jitter, the
relationship between the Clock and Data at D-FF in Figure 2.1.1 must be maintained so that no errors occur.
However, when the jitter in the input signal is out-of-band, the recovered Clock jitter is suppressed to be smaller
than the jitter in the input Data signal. As a result, the relationship between the Clock and Data at D-FF in Figure
2.1.1 is changed and an error occurs.
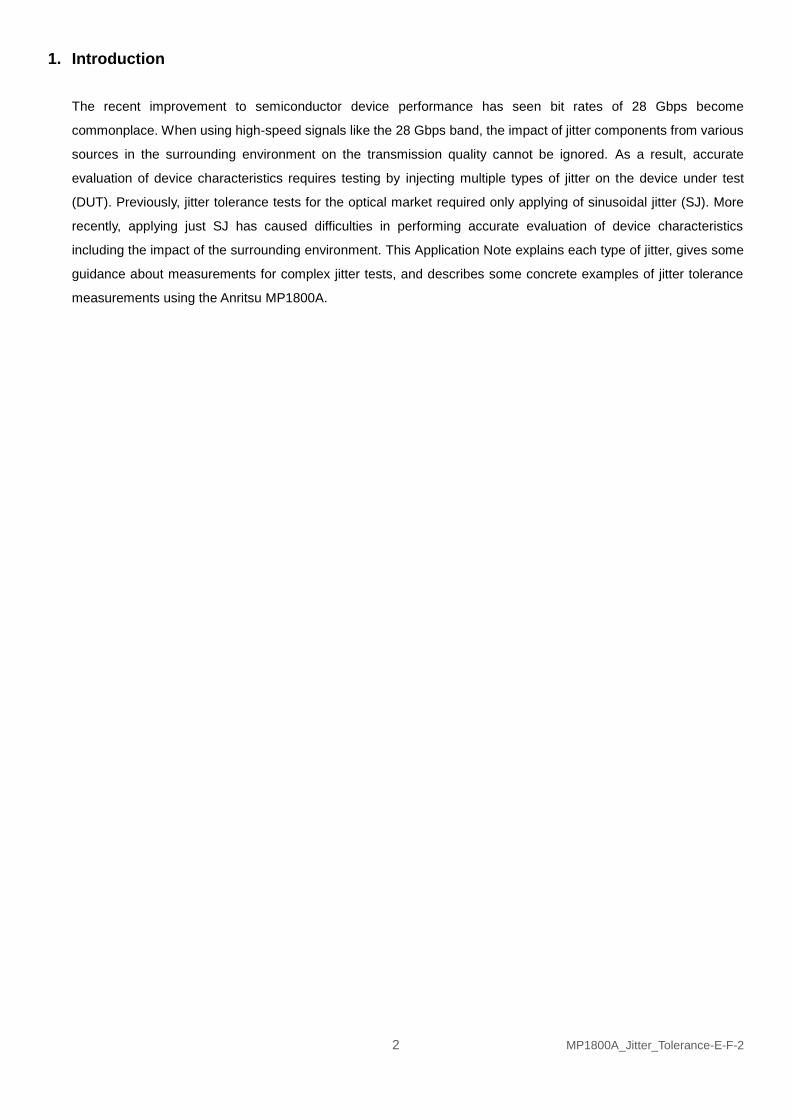
SJ is the most basic jitter component used at the jitter tolerance test for confirming the performance limits
caused by errors by changing the modulation frequency and amount in this manner.
In addition, the jitter tolerance test for PCI Express, specifies applying two SJs; the MP1800A supports either one
or independent two SJs addition using option configurations.
Moreover, it can apply sufficient SJ of 1UI at jitter tolerance tests in the high-speed modulation area for
modulation frequencies above 10 MHz.
Figure 2.1.3 MP1800A SJ Setting Screen
2000
1
Modulation Frequency [MHz]
10 250 0.00001
Jitte
r A
mplit
ude [
UIp
-p]
20dB/decade
10 15
1 0.0075
Figure 2.1.4 MP1800A SJ Mask at 32 Gbps
5 MP1800A_Jitter_Tolerance-E-F-2
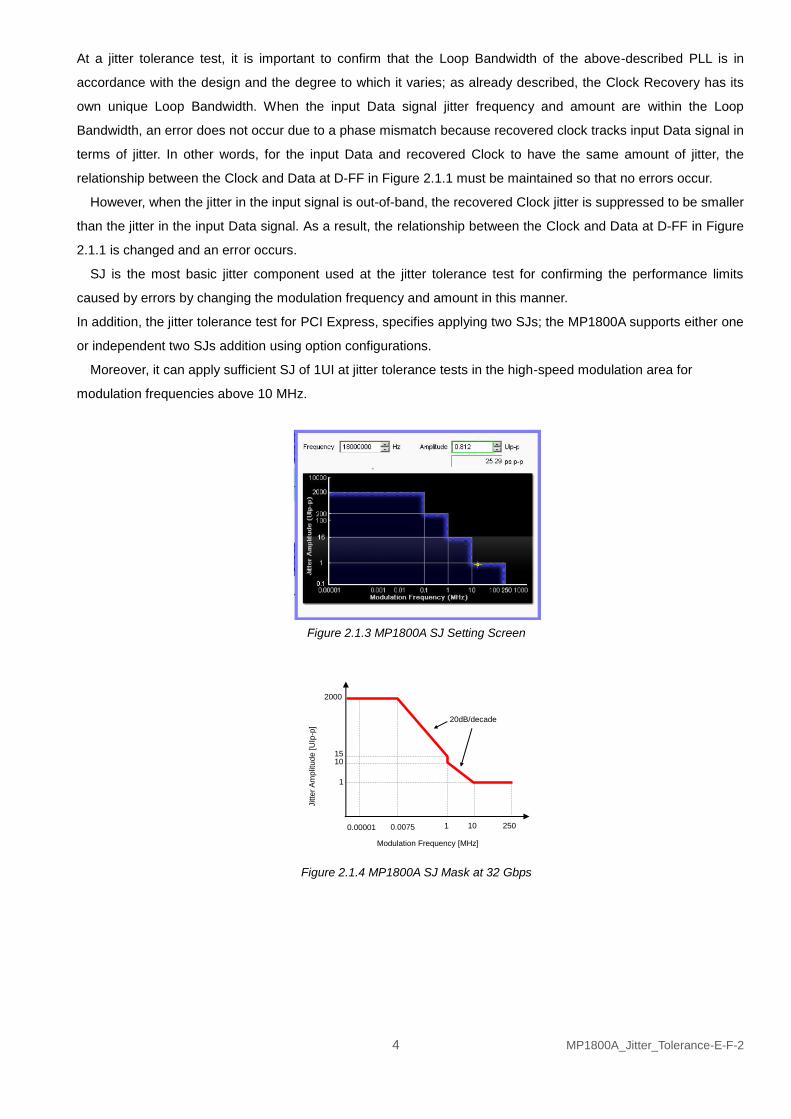
2.2 RJ (Random Jitter)
Random Jitter is a jitter component that is generated by noise effects that have no dependent relationship with
frequency, such as thermal noise commonly occurring within systems, and it covers a wide frequency range.
For RJ, the CEI 3.0 jitter tolerance test standardizes use of a High Pass Filter (HPF) to remove RJ components
within the PLL band as shown below and applies only PLL out-of-band components as the load.
Figure 2.2.1 CEI 3.0 RJ Filter Mask
Using this standard, the HPF is set for frequency components below 10 MHz but it is necessary to apply frequency
components at least exceeding the CDR bandwidth. The maximum amount of applied RJ is half the Baud rate so if
the Baud rate is 28 Gbps, the applied RJ max. is 14 GHz. However, the actual CDR bandwidth does not extend to
half the Baud rate, and it is usually sufficient to test a range of about 10 times the normal PLL bandwidth.
Consequently, if the measuring instrument RJ band is from 100 to 200 MHz, the range required by the test will be
sufficiently covered. As described in item 2.1 above, this is because jitter accumulates as the CDR bandwidth
becomes wider, causing overall system instability.

6 MP1800A_Jitter_Tolerance-E-F-2
The MP1800A has a built-in HPF and LPF for easy RJ injection. The built-in HPF and LPF should be used in
combination to increase the reproducibility of jitter tolerance tests instead of attaching external filters.
Figure 2.2.2 MP1800A RJ Setting Screen
Additionally, RJ has an MP1800A Filter setting item; when PCIe is selected at Filter, the amounts of RJ (ps rms) for
the Low and High Frequency bands required by PCI Express can be set independently.
Figure 2.2.3 MP1800A RJ Setting Screen for PCIe

7 MP1800A_Jitter_Tolerance-E-F-2
2.3 BUJ (Bounded Uncorrelated Jitter)
Bounded Uncorrelated Jitter is generally jitter caused by crosstalk caused by nearby Data signals. When it is
generated from a measuring instrument, a PRBS signal generated from an independent clock source that is
unaffected by correlation from Data signals is used as the measurement target. If a PRBS15 signal is used as the
measured Data signal, it is better to use something other than PRBS15 to avoid interference. Moreover, it is best
to set a value that is a multiple of the measured target bit rate to suppress interference even at the BUJ PRBS bit
rate.
The CEI 3.1 standard recommends using PRBS31 as a general test pattern as well as for jitter tolerance tests
using measured target Data signals. The BUJ PRBS patterns are from 7 to 11 stages with baud rates of 1/10 to 1/3
of the measurement target; the standard recommends using an LPF of 1/20 to 1/10 of the BUJ PRBS baud rate.
An example setting prescribed by the existing CEI 3.0 standard when using a 28-Gbps PRBS31 signal as the
measurement target Data signal is described below. Since the measurement target is 28 Gbps, the required baud
rate is from 1/10 to 1/3 of this, or from 2.8 Gbps to 9.3 Gbps; since the LPF is 1/20 to 1/10 of the BUJ baud rate,
the value is set from 140 MHz to 930 MHz. Moreover, the BUJ PRBS is selected from 7, 9 or 11 stages. If PRBS 7
stages is used as the measurement target signal, it is better to use either 9 or 11 stages for the BUJ instead of
using the same PRBS pattern as the measurement target.
The following table 2.3.1 shows the range of baud rate settings when impressing BUJ using the MP1800A.
Table 2.3.1 BUJ Settings
Items Value Note
PRBS 7, 9, 11 Uses different pattern from main
signal
Bit rate 1/10 to 1/3 2.8 to 9.3 Gbps (@28 Gbps)
LPF 1/20 to 1/10 140 to 930 MHz (@28 Gbps)
Table 2.3.2 MP1800A BUJ Baud Rate Setting Range
Baud rate (Gbps) Step (kbps)
0.1 to 3.2 1
4.9 to 6.25 1
9.8 to 12.5 1
Using the previous example, BUJ baud rate for 28 Gbps is from 2.8 Gbps to 9.3 Gbps, the highest baud rate for
BUJ is 6.25 Gbps. In this case, the standard specifies a setting range from 312.5 MHz to 625 MHz for the LPF.
Since the MP1800A LPF used for BUJ can be selected from 500 MHz, 300 MHz, 200 MHz, 100 MHz, and 50 MHz.
500 MHz should be selected in this example. Although the BUJ pattern can be selected from any of 7, 9, 11, 15, 23,
and 31 when using the MP1800A, either 7, 9, or 11 is selected based on the CEI 3.0 standard.
8 MP1800A_Jitter_Tolerance-E-F-2
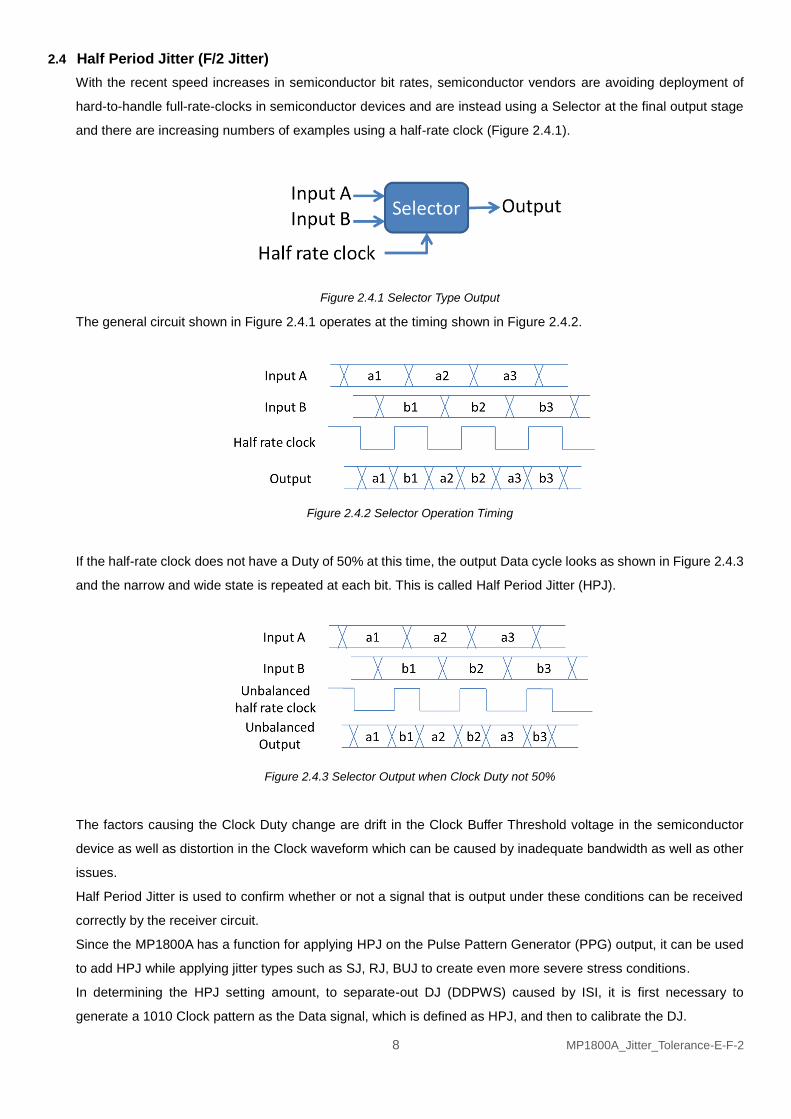
2.4 Half Period Jitter (F/2 Jitter)
With the recent speed increases in semiconductor bit rates, semiconductor vendors are avoiding deployment of
hard-to-handle full-rate-clocks in semiconductor devices and are instead using a Selector at the final output stage
and there are increasing numbers of examples using a half-rate clock (Figure 2.4.1).
Figure 2.4.1 Selector Type Output
The general circuit shown in Figure 2.4.1 operates at the timing shown in Figure 2.4.2.
Figure 2.4.2 Selector Operation Timing
If the half-rate clock does not have a Duty of 50% at this time, the output Data cycle looks as shown in Figure 2.4.3
and the narrow and wide state is repeated at each bit. This is called Half Period Jitter (HPJ).
Figure 2.4.3 Selector Output when Clock Duty not 50%
The factors causing the Clock Duty change are drift in the Clock Buffer Threshold voltage in the semiconductor
device as well as distortion in the Clock waveform which can be caused by inadequate bandwidth as well as other
issues.
Half Period Jitter is used to confirm whether or not a signal that is output under these conditions can be received
correctly by the receiver circuit.
Since the MP1800A has a function for applying HPJ on the Pulse Pattern Generator (PPG) output, it can be used
to add HPJ while applying jitter types such as SJ, RJ, BUJ to create even more severe stress conditions.
In determining the HPJ setting amount, to separate-out DJ (DDPWS) caused by ISI, it is first necessary to
generate a 1010 Clock pattern as the Data signal, which is defined as HPJ, and then to calibrate the DJ.

9 MP1800A_Jitter_Tolerance-E-F-2
3. Tips for Jitter Tolerance Measurement
Generally, jitter tolerance measurements of semiconductor devices are performed repeatedly on multiple devices while
changing multiple parameters including temperature, voltage and bit rate. Excluding the changed parameters, the other
test conditions must be kept the same to assure high test repeatability. This section describes the items, such as the
connection cables between the measuring instruments as well as the settings themselves, to consider for performing a
jitter tolerance test with high repeatability.
3.1 Cable Lengths
Figure 3.1.1 shows a typical jitter tolerance test setup.
Figure 3.1.1 Jitter Tolerance Test System
The point requiring attention here is the length of the Data and Clock paths connecting the Clock and Data
between the blocks. In Figure 3.1.1 these are the connections between the CRU (Clock Recovery Unit) and ED
(Error Detector).
Although jitter from the transmitter side is transmitted over both the Data and Clock paths at the same timing, if
there are differences in the path lengths, the phase relationship between Clock and Data drift at the receive side
decision circuit (D-FF in the ED in Figure 3.1.1) causing errors to occur. To prevent errors caused by different path
lengths, it is important that the length of the Data and Clock paths are the same including transmission delay times
in the upstream and downstream blocks. In the example of Figure 3.1.1, it is necessary to pay attention to: 1. The
lengths of the Clock and Data paths after the Data is separated into Clock and Data in the CRU; 2. The lengths of
the Clock and Data paths in the ED; and 3. The lengths of the cables connecting the CRU and ED Clock and Data.
If the above-described total Data path length and total Clock path length are the same, errors caused by the
measurement system setup can be prevented. Since it is difficult to evaluate the length of the Data and Clock
paths in the blocks from outside, the measuring instrument vendors offer this length.

10 MP1800A_Jitter_Tolerance-E-F-2
For details about handling of the Clock and Data cables refer to our company note on Effect of Transmission Line
Length on BER Testing – How to Handle High-Speed Digital Signals, Technical Note, 2013 (MP1800A-E-E-1).
Additionally, Anritsu also offers a Clock Recovery option that can be embedded in the ED. Embedding Clock
Recovery into the ED offers a big advantage over using an external CRU.
Embedded Clock Recovery in the ED eliminates the need for users to have any knowledge about the length of the
Data and Clock paths between the CRU and ED. In addition, the connections are simplified because there is no
need to connect a Clock cable. Moreover, the simple cable connections cut the need for re-testing due to set-up
errors and eliminate wasted time. Based on these considerations, Anritsu strongly recommends using the ED
built-in Clock Recovery option for jitter tolerance tests. Figure 3.1.2 shows an example of an Anritsu jitter tolerance
test system using an ED incorporating Clock Recovery circuit.
Figure 3.1.2 Anritsu Jitter Tolerance Test System with Embedded CRU
When there is no Clock Recovery, it is necessary to use appropriate cable lengths to assure accurate
measurement results. Please refer to Appdendix
11 MP1800A_Jitter_Tolerance-E-F-2
3.2 Cable Lengths when using MP1800A
The recommended MP1800A cable lengths including equipment internal propagation delay times when performing
an actual jitter tolerance test are described here. In the following PPG means the MU183020A or MU18103021A
28G/32G bit/s Pulse Pattern Generator, and ED means the MU183040A/B or MU183041A/B 28G/32G bit/s Error
Detector.
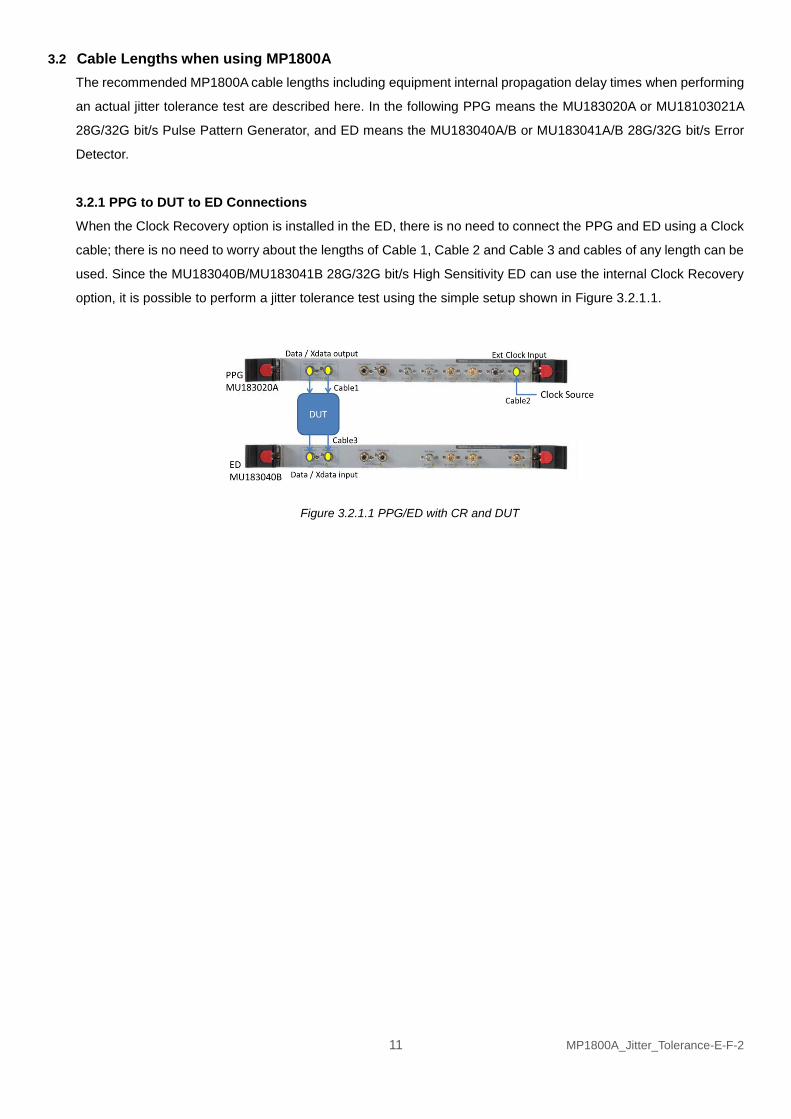
3.2.1 PPG to DUT to ED Connections
When the Clock Recovery option is installed in the ED, there is no need to connect the PPG and ED using a Clock
cable; there is no need to worry about the lengths of Cable 1, Cable 2 and Cable 3 and cables of any length can be
used. Since the MU183040B/MU183041B 28G/32G bit/s High Sensitivity ED can use the internal Clock Recovery
option, it is possible to perform a jitter tolerance test using the simple setup shown in Figure 3.2.1.1.
Figure 3.2.1.1 PPG/ED with CR and DUT

12 MP1800A_Jitter_Tolerance-E-F-2
3.2.2 PPG to Emphasis Connection
Standards such as IEEE802.3bj (100GBase-KR-4, CR4, KP4) and IEEE802.3ap regulate the Emphasis
impressed on the transmitted signal.
Figure 3.2.2.1 PPG with Emphasis
For adding Emphasis to the PPG output, Anritsu offers the MP1825B 4Tap Emphasis unit supporting high-quality
waveforms at up to 32 Gbps. As shown in Figure 3.2.2.2, the Clock and Data signals are connected to the D-FF
inside the Emphasis unit, requiring knowledge about the Clock and Data signal path lengths.
Figure 3.2.2.2 MP1825B Emphasis Block Diagram

13 MP1800A_Jitter_Tolerance-E-F-2
As a result, when connecting the PPG and Emphasis as shown in Figure 3.2.2.1, the lengths of the Clock and
Data paths must maintain the following relationship.
[Cable 2 length = Cable1 length + α cm] ・・・ Eq. 3.2.2.1
α represents the different optimum length for each bit rate as shown in Table 3.2.2.1.
Table 3.2.2.1 Optimum Cable Length
Bit rate (Gbps) Cable length difference (α cm)
2.40 to 4.00 59 to 91
4.00 to 6.64 64 to 85
6.64 to 8.50 56 to 77
8.50 to 13.24 61 to 72
13.24 to 15.00 59 to 70
15.00 to 16.44 34 to 55
16.44 to 17.00 33 to 54
17.00 to 19.84 38 to 49
19.84 to 25.00 43 to 54
25.00 to 30.00 43 to 54
30.00 to 32.10 35 to 56
In addition, Anritsu offers the following cables for creating cable length differences of 50 cm to support most usage
cases in Table 3.2.2.1.
Cable Name PPG Connection
Connector
Emphasis Connection
Connector
Note
J1439A Coaxial Cable (0.8 m, K Connector) Data Output Data Input Cable 1
J1611A Coaxial Cable (1.3 m, K Connector) Clock Output Clock Input Cable 2

14 MP1800A_Jitter_Tolerance-E-F-2
3.3 MP1800A Settings
This section explains the key MP1800A settings for an actual jitter tolerance test.
Figure 3.3.1 Jitter Input Setting for PPG/ED/Emphasis Screen
The MU18302xA 28G/32G bit/s PPG, MU18304xA/B 28G/32G bit/s ED, and MP1825B 4Tap Emphasis all have a
phase adjustment circuit to adjust the phase between the Data and Clock. A negative feedback circuit is used to
increase the setting accuracy of this phase adjustment circuit. With jitter applied on the Clock signal, this negative
feedback circuit handles jitter as a fluctuation of the phase adjustment circuit, which it attempts to track to stabilize
the phase setting position but sometimes the phase setting value may drift. To prevent this when using the
PPG/ED/Emphasis with jitter-applied signal, it is possible to disable the negative feedback circuit by using the
so-called [Jitter Input] setting. Setting [Jitter Input] to ON while jitter is applied disables the negative feedback to
set the phase to the required value. Set Jitter Input to OFF when using without applied jitter.
Set [Jitter Input] to ON when performing a jitter tolerance test to disable the negative feedback circuit. Conversely,
when accurate phase setting is important like at Bathtub measurement, set [Jitter Input] to OFF.

15 MP1800A_Jitter_Tolerance-E-F-2
3.4 MX181500A Jitter/Noise Tolerance Test Software
To simplify jitter tolerance tests, Anritsu offers the MX181500A application software. This section explains the
simple usage method. Figure 3.4.1 shows the opening screen when the MX181500A software starts.
Figure 3.4.1 MX81500A Screen
Choose [Jitter Tolerance] to check the DUT jitter tolerance limits. The jitter tolerance test adds jitter until either the
DUT generates an error or the measuring instrument jitter generation limit is reached, helping clarify whether the
DUT’s actual performance exceeds the standard requirements. The [Jitter Sweep] function is useful when the DUT
performance is already known and wanting to perform a test just to confirm whether the jitter tolerance
specifications are satisfied. The preset modulation frequency and modulation amount are generated to perform a
Go /No Go evaluation that is faster than a full [Jitter Tolerance] test.
In both the above settings, the setting parameters are the SJ modulation frequency and modulation amount, but
fixed amounts of any two of SJ, RJ, BUJ, and SSC can be applied as background jitter at measurement.
At the jitter tolerance test, a search is performed while changing the jitter amount until the specified error occurs.
There are other two types of search in addition to binary search: Downwards from the largest to smallest value and
Upwards from smallest to largest. In addition, either a Linear (value changes in fixed steps) or a Log (value
changes at fixed ratio) search can be selected for both Downward and Upward searches.
Lastly, since the MX181500 itself can be controlled by remote commands, it can be incorporated into automation
software for DUT inspection.

16 MP1800A_Jitter_Tolerance-E-F-2
3.5 Passive Equalizer
With the increasing bit rates noted at the start of this report, at the jitter tolerance test, it is necessary to
consider the impact of signal degradation on the measurement results for a DUT, such as a semiconductor
chip, mounted on a PC board. Even if no DUT errors occur after impressing jitter from the measuring
instrument, the output signal waveform of a DUT mounted on a PCB may be degraded, sometimes resulting
in complete closure of the EYE signal input to the ED as shown in Figure 3.5.1.
Figure 3.5.1 Closed DUT Output EYE on PCB
In these cases, even if the DUT has sufficient jitter tolerance, it is impossible to measure errors with an ED
because the EYE is closed. Consequently, accurate jitter tolerance test results cannot be obtained. To get
good jitter tolerance test results, it is necessary to use an Equalizer to correct the effect of waveform
distortion caused by PC board transmission paths and other factors.
Figure 3.5.2 DUT Output Waveform after Equalizer
Anritsu offers the J1621A (3 dB) and J1622AS (6 dB) Passive Equalizers for the 25 and 28-Gbps signal
bands to correct the effects of signal degradation caused by the transmission path and support error
measurements with an ED.
17 MP1800A_Jitter_Tolerance-E-F-2
4. Summary
This Application Note has explained the complex meaning of jitter and how jitter can be generated using the MP1800A.
It has also explained jitter tolerance measurement methods using the MP1800A.
Anritsu continues to offer measurement solutions meeting its customers’ business needs.
References
- Implementation Agreement OIF-CEI-3.1 February 18, 2014
- Methods and Problems in Evaluating High-Speed Jitter Tolerance, Anritsu Corporation, Application note, January
2010 (MP1800A_Jitter_Tolerance_EF1100).
- Effect of Transmission Line Length on BER Testing – How to Handle High-Speed Digital Signals, Technical Note,
2013 (MP1800A-EE1100).
18 MP1800A_Jitter_Tolerance-E-F-2
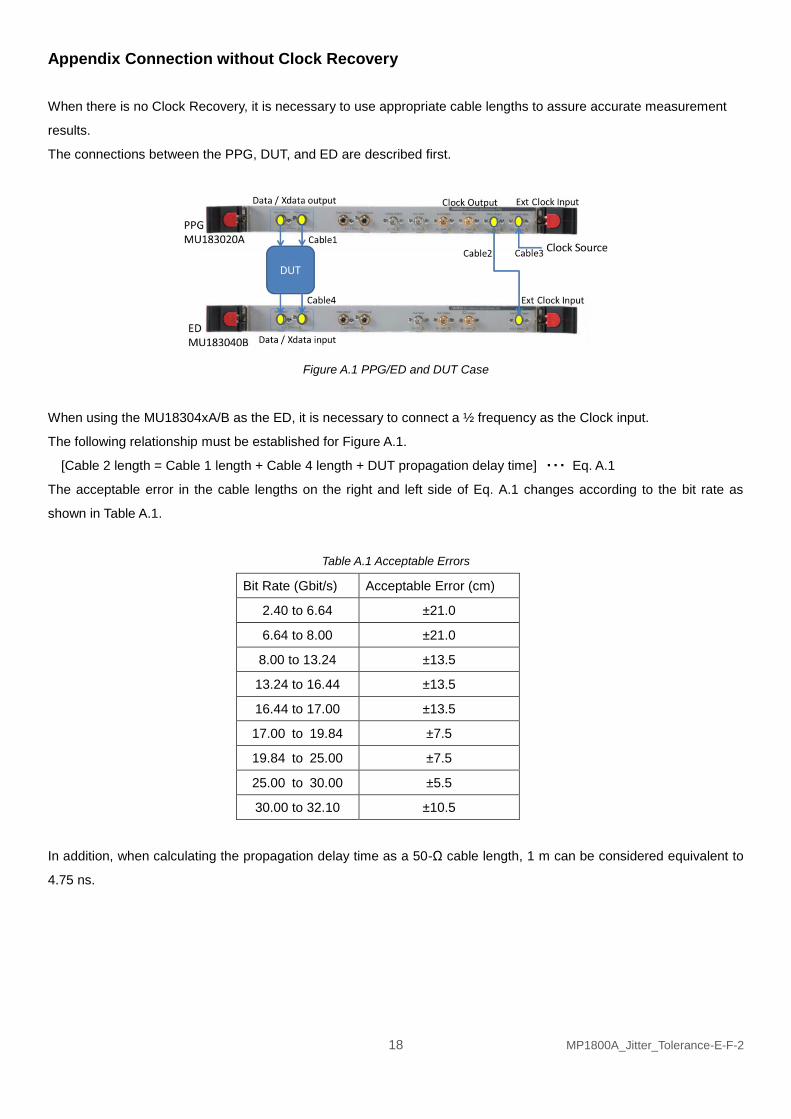
Appendix Connection without Clock Recovery
When there is no Clock Recovery, it is necessary to use appropriate cable lengths to assure accurate measurement
results.
The connections between the PPG, DUT, and ED are described first.
Figure A.1 PPG/ED and DUT Case
When using the MU18304xA/B as the ED, it is necessary to connect a ½ frequency as the Clock input.
The following relationship must be established for Figure A.1.
[Cable 2 length = Cable 1 length + Cable 4 length + DUT propagation delay time] ・・・ Eq. A.1
The acceptable error in the cable lengths on the right and left side of Eq. A.1 changes according to the bit rate as
shown in Table A.1.
Table A.1 Acceptable Errors
Bit Rate (Gbit/s) Acceptable Error (cm)
2.40 to 6.64 ±21.0
6.64 to 8.00 ±21.0
8.00 to 13.24 ±13.5
13.24 to 16.44 ±13.5
16.44 to 17.00 ±13.5
17.00 to 19.84 ±7.5
19.84 to 25.00 ±7.5
25.00 to 30.00 ±5.5
30.00 to 32.10 ±10.5
In addition, when calculating the propagation delay time as a 50-Ω cable length, 1 m can be considered equivalent to
4.75 ns.
19 MP1800A_Jitter_Tolerance-E-F-2
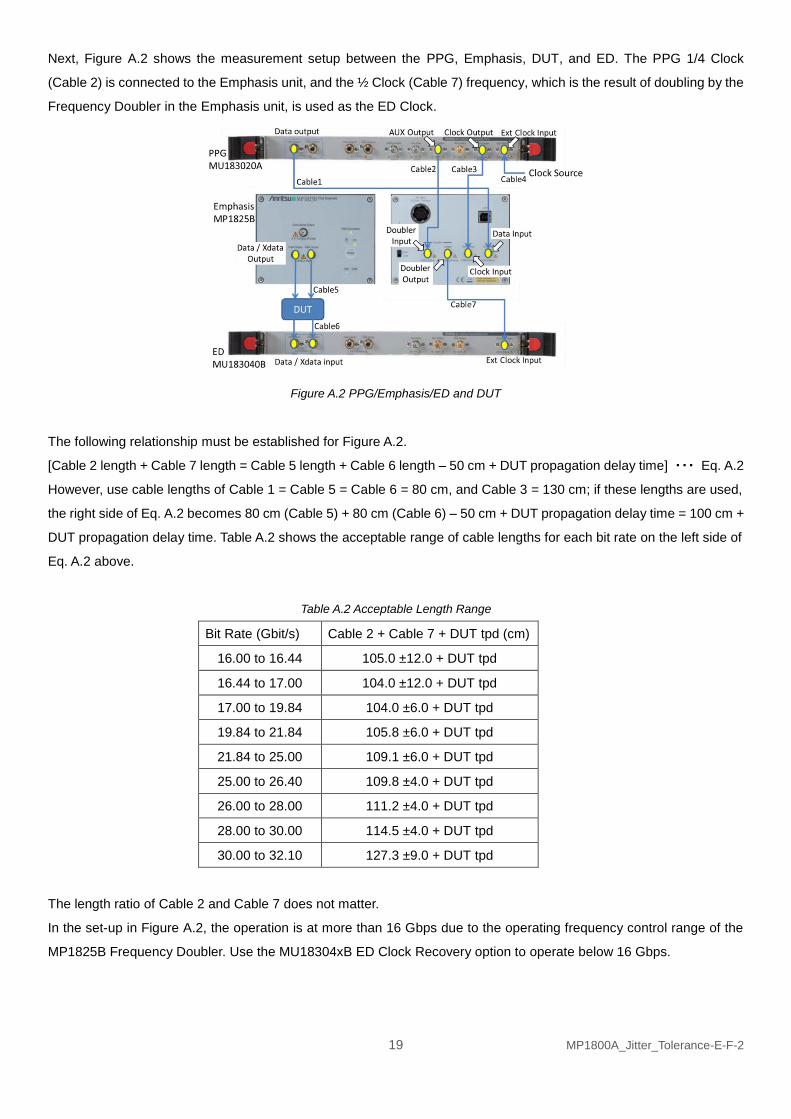
Next, Figure A.2 shows the measurement setup between the PPG, Emphasis, DUT, and ED. The PPG 1/4 Clock
(Cable 2) is connected to the Emphasis unit, and the ½ Clock (Cable 7) frequency, which is the result of doubling by the
Frequency Doubler in the Emphasis unit, is used as the ED Clock.
Figure A.2 PPG/Emphasis/ED and DUT
The following relationship must be established for Figure A.2.
[Cable 2 length + Cable 7 length = Cable 5 length + Cable 6 length – 50 cm + DUT propagation delay time] ・・・ Eq. A.2
However, use cable lengths of Cable 1 = Cable 5 = Cable 6 = 80 cm, and Cable 3 = 130 cm; if these lengths are used,
the right side of Eq. A.2 becomes 80 cm (Cable 5) + 80 cm (Cable 6) – 50 cm + DUT propagation delay time = 100 cm +
DUT propagation delay time. Table A.2 shows the acceptable range of cable lengths for each bit rate on the left side of
Eq. A.2 above.
Table A.2 Acceptable Length Range
Bit Rate (Gbit/s) Cable 2 + Cable 7 + DUT tpd (cm)
16.00 to 16.44 105.0 ±12.0 + DUT tpd
16.44 to 17.00 104.0 ±12.0 + DUT tpd
17.00 to 19.84 104.0 ±6.0 + DUT tpd
19.84 to 21.84 105.8 ±6.0 + DUT tpd
21.84 to 25.00 109.1 ±6.0 + DUT tpd
25.00 to 26.40 109.8 ±4.0 + DUT tpd
26.00 to 28.00 111.2 ±4.0 + DUT tpd
28.00 to 30.00 114.5 ±4.0 + DUT tpd
30.00 to 32.10 127.3 ±9.0 + DUT tpd
The length ratio of Cable 2 and Cable 7 does not matter.
In the set-up in Figure A.2, the operation is at more than 16 Gbps due to the operating frequency control range of the
MP1825B Frequency Doubler. Use the MU18304xB ED Clock Recovery option to operate below 16 Gbps.

20 MP1800A_Jitter_Tolerance-E-F-2
Furthermore, as well as satisfying the above described relationship, at the same time, the following relationship must
be established as described in item 3.2.2 for the length of Cable 1 and Cable 3 between the PPG and Emphasis units.
[Cable 3 length = Cable 1 length + α cm] ・・・ Eq. A.3
Table A. 3 shows the range of α for Eq. A.3 for each bit rate.
Table A.3 Optimum Cable Length
Bit Rate (Gbps) Cable Length Difference (α cm)
2.40 to 4.00 59 to 91
4.00 to 6.64 64 to 85
6.64 to 8.50 56 to 77
8.50 to 13.24 61 to 72
13.24 to 15.00 59 to 70
15.00 to 16.44 34 to 55
16.44 to 17.00 33 to 54
17.00 to 19.84 38 to 49
19.84 to 25.00 43 to 54
25.00 to 30.00 43 to 54
30.00 to 32.10 35 to 56
• United StatesAnritsu Company1155 East Collins Blvd., Suite 100, Richardson, TX 75081, U.S.A.Toll Free: 1-800-267-4878Phone: +1-972-644-1777Fax: +1-972-671-1877
• CanadaAnritsu Electronics Ltd.700 Silver Seven Road, Suite 120, Kanata, Ontario K2V 1C3, CanadaPhone: +1-613-591-2003 Fax: +1-613-591-1006
• BrazilAnritsu Eletrônica Ltda.Praça Amadeu Amaral, 27 - 1 Andar01327-010 - Bela Vista - São Paulo - SP - BrazilPhone: +55-11-3283-2511Fax: +55-11-3288-6940
• MexicoAnritsu Company, S.A. de C.V.Av. Ejército Nacional No. 579 Piso 9, Col. Granada11520 México, D.F., MéxicoPhone: +52-55-1101-2370Fax: +52-55-5254-3147
• United KingdomAnritsu EMEA Ltd.200 Capability Green, Luton, Bedfordshire, LU1 3LU, U.K.Phone: +44-1582-433200 Fax: +44-1582-731303
• FranceAnritsu S.A.12 avenue du Québec, Bâtiment Iris 1- Silic 612,91140 VILLEBON SUR YVETTE, FrancePhone: +33-1-60-92-15-50Fax: +33-1-64-46-10-65
• GermanyAnritsu GmbHNemetschek Haus, Konrad-Zuse-Platz 1 81829 München, Germany Phone: +49-89-442308-0 Fax: +49-89-442308-55
• ItalyAnritsu S.r.l.Via Elio Vittorini 129, 00144 Roma, ItalyPhone: +39-6-509-9711 Fax: +39-6-502-2425
• SwedenAnritsu ABKistagången 20B, 164 40 KISTA, SwedenPhone: +46-8-534-707-00 Fax: +46-8-534-707-30
• FinlandAnritsu ABTeknobulevardi 3-5, FI-01530 VANTAA, FinlandPhone: +358-20-741-8100Fax: +358-20-741-8111
• DenmarkAnritsu A/SKay Fiskers Plads 9, 2300 Copenhagen S, DenmarkPhone: +45-7211-2200Fax: +45-7211-2210
• RussiaAnritsu EMEA Ltd. Representation Office in RussiaTverskaya str. 16/2, bld. 1, 7th floor.Russia, 125009, MoscowPhone: +7-495-363-1694Fax: +7-495-935-8962
• United Arab EmiratesAnritsu EMEA Ltd.Dubai Liaison OfficeP O Box 500413 - Dubai Internet CityAl Thuraya Building, Tower 1, Suit 701, 7th FloorDubai, United Arab EmiratesPhone: +971-4-3670352Fax: +971-4-3688460
• IndiaAnritsu India Private Limited2nd & 3rd Floor, #837/1, Binnamangla 1st Stage, Indiranagar, 100ft Road, Bangalore - 560038, IndiaPhone: +91-80-4058-1300Fax: +91-80-4058-1301
• SingaporeAnritsu Pte. Ltd.11 Chang Charn Road, #04-01, Shriro HouseSingapore 159640Phone: +65-6282-2400Fax: +65-6282-2533
• P.R. China (Shanghai)Anritsu (China) Co., Ltd.Room 2701-2705, Tower A, New Caohejing International Business CenterNo. 391 Gui Ping Road Shanghai, 200233, P.R. ChinaPhone: +86-21-6237-0898Fax: +86-21-6237-0899
• P.R. China (Hong Kong)Anritsu Company Ltd.Unit 1006-7, 10/F., Greenfield Tower, Concordia Plaza,No. 1 Science Museum Road, Tsim Sha Tsui East, Kowloon, Hong Kong, P.R. ChinaPhone: +852-2301-4980Fax: +852-2301-3545
• JapanAnritsu Corporation8-5, Tamura-cho, Atsugi-shi, Kanagawa, 243-0016 JapanPhone: +81-46-296-1221Fax: +81-46-296-1238
• KoreaAnritsu Corporation, Ltd.5FL, 235 Pangyoyeok-ro, Bundang-gu, Seongnam-si, Gyeonggi-do, 463-400 KoreaPhone: +82-31-696-7750Fax: +82-31-696-7751
• AustraliaAnritsu Pty. Ltd.Unit 21/270 Ferntree Gully Road, Notting Hill, Victoria 3168, AustraliaPhone: +61-3-9558-8177Fax: +61-3-9558-8255
• TaiwanAnritsu Company Inc.7F, No. 316, Sec. 1, NeiHu Rd., Taipei 114, TaiwanPhone: +886-2-8751-1816Fax: +886-2-8751-1817
Specifications are subject to change without notice.
1404
Printed on Recycled Paper
Please Contact:
No. MP1800A_Jitter_Tolerance-E-F-2-(2.00) Printed in Japan 2015-4 MG