applicant guide - tamarac
TRANSCRIPT

Applicant Guide

1 ePermits Applicant Guide
May 6, 2015
Overview The ePermits system is a web-based solution that allows
plans for Building Permits, Engineering Permits and Zoning
Projects to be submitted electronically, replacing the
traditional paper-based review method. ePermits will
improve the plan review cycle and reduce costs associated
with obtaining building permits and development approvals
as well as support green initiatives.
This manual provides basic instructions on the steps involved
in the ePermits process. It has been prepared as a general
reference guide, including instructions and screen images of
the step-by-step tasks necessary to complete a submittal and
review using ePermits.
If at any time in the process you have questions or concerns,
do not hesitate to call the department below of where your permit is located.
Building Department
Planning & Zoning Division
Engineering Division
(954) 597 3420 (954) 597 3530 (954) 597 3712
[email protected] [email protected]
http://www.tamarac.org/epermits http://www.tamarac.org/engineering http://www.tamarac.org/PlanningandZoning

2 ePermits Applicant Guide
May 6, 2015
Table of Contents
Overview ................................................................................................................................................................................. 1
How to Apply for a Permit Online ......................................................................................................................................... 3
Appling for a Permit online and ePermits Invitation ............................................................................................................ 3
Logging in New Users ....................................................................................................................................................... 4 – 5
Install Electronic Plan Review Components (BRAVA)........................................................................................................ 4
Logging in Existing Users ........................................................................................................................................................ 6
Adding an Authorized User to a Project ........................................................................................................................... 6 - 8
Uploading Plans and Documents .......................................................................................................................................... 8
Prescreen ......................................................................................................................................................................... 9 - 11
Correction Items and Plan Resubmit ............................................................................................................................ 12 - 15
Plan Review Status Report ............................................................................................................................................ 16 - 18
Markups and Changemarks .......................................................................................................................................... 19 - 24
Color Standards ................................................................................................................................................................. 19
Open Markup Files ..................................................................................................................................................... 20 - 21
Open Existing Markups ..................................................................................................................................................... 22
Uploading Corrections ............................................................................................................................................... 23 - 24
Approved Plans ............................................................................................................................................................. 25 - 26
Downloading Approved Plans ........................................................................................................................................... 27
Plan Revisions During construction....................................................................................................................................... 28
Apply for a Permit
Click this link to apply for a Permit Online

3 ePermits Applicant Guide
May 6, 2015
ePermits Invitation
After submitting a new permit application for a Building Permit, Engineering Permit or Zoning Project and it is reviewed
and accepted, an Electronic Plan Review invitation will be sent to your email address.
For first time users, the invitation email will contain your login information, temporary password and information about
the project, including a link to the ePermits web portal.
When your application for a Building Permit, Engineering Permit or Zoning Project is reviewed and accepted, an
Electronic Plan Review invitation will be sent to your email address.
For first time users, the invitation email will contain your login information, temporary password and information about
the project, including a link to the ePermits web portal.
Logging in – New Users
Prior to logging into the Electronic Plan Review web portal, the following actions must be completed:

4 ePermits Applicant Guide
May 6, 2015
The login page has an MSI (Microsoft Silent Install) component required to install all necessary Electronic Plan
Review ActiveX controls (see image below). This installation will only need to be done once; however, if you
utilize a different computer it will require another installation for each different computer used for ePermits
Click on the link below to Install Electronic Plan Review Components.
To sign in, enter your email address and temporary password provided in your invitation email and click the
“Login” button, as shown in the image below:
Enter your new password and personal account information. All fields in yellow are required. Click on the “Save”
button to save your profile.
Remember!
Passwords are case-sensitive.

5 ePermits Applicant Guide
May 6, 2015
Logging in Existing Users
If you are a returning user, login to ePermits with your full email address and password.
If you have forgotten your password, click on the “Forgot Password” button so that you can retrieve it using
your security question.
NOTE: No one can see your password or security question answer. If you cannot access your account after trying
to retrieve your account information, email us at [email protected] to reset your password. An email
will be automatically generated and sent to the account holder email address with a temporary password.

6 ePermits Applicant Guide
May 6, 2015
For any additional forms and applications that will be needed for your project click this link
below:
Permitting Forms and Applications
Adding an Authorized User to your Project
To request that an authorized user have access to your plans documents and any other requested corrections, follow the
steps outlined below:
The Submissions Group needs to know that you would like to add a user to the project for viewing access
only. Do this by clicking the icon near the top right corner of the ePermits window.
A window will pop up; click the “Add Topic” button.
Select the “Request Additional User”” category from the drop down menu and Click Save & Prepare Email.
7 ePermits Applicant Guide
May 6, 2015
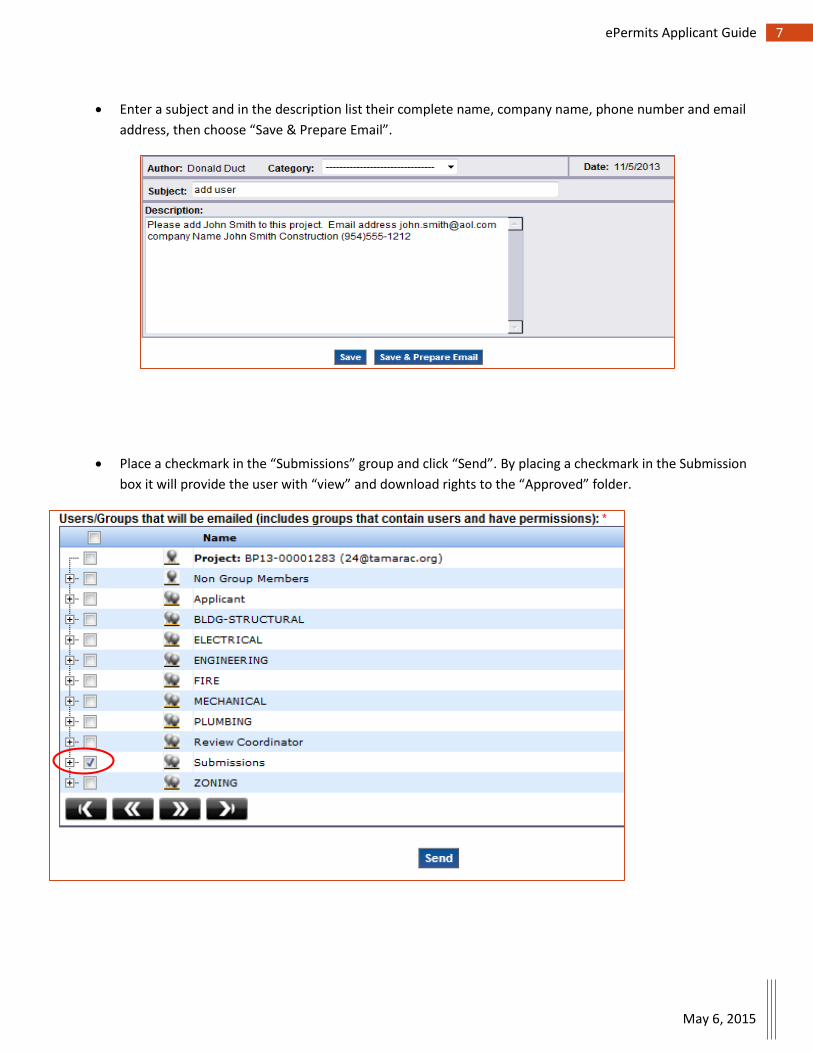
Enter a subject and in the description list their complete name, company name, phone number and email
address, then choose “Save & Prepare Email”.
Place a checkmark in the “Submissions” group and click “Send”. By placing a checkmark in the Submission
box it will provide the user with “view” and download rights to the “Approved” folder.

8 ePermits Applicant Guide
May 6, 2015
Please click this link for Instructions on Uploading Drawings and Documents
When you have finished uploading your plans and documents and completing the Applicant Upload Task,
You have successfully finished the first part of submitting your plans electronically.
Prescreening
Prescreening Has Been Approved
If all the requirements are met your submittal is approved and plan review fees are paid, your plans and documents will continue through the ePermits system for review by City of Tamarac.
Prescreening Has Been Returned
If your submittal requirements were not complete, you will receive an e-mail notification that prescreening has been denied and corrections are needed.

9 ePermits Applicant Guide
May 6, 2015
Log in to Electronic Plan Review. Find the project and associated task in the Task List, click on the
CorrectionComplete task.
Click OK to accept the task

10 ePermits Applicant Guide
May 6, 2015
An eForm will open showing the items to be corrected. Click on the Checklist Items tab and read any items in the Task Instructions section. Once completed click on Corrections Complete at the bottom of the page or if you are not ready to complete this correction Click the “Save and Close” button at the bottom of the screen until you are ready to respond to the items needing corrections.
After you have identified the items that need corrections, go to the project window and click on the project.
Upload the corrections. Corrected plans and/or documents MUST be re-submitted with the EXACT file name as
the original submitted file. The system will automatically add a version number to the resubmitted plans and/or
documents. If no changes were made to the file, a new version will not be created.
Once you have satisfied all requirements, click on the CorrectionComplete task and select the “I have uploaded
the corrected documents and/or drawings as indicated below”. Click the “Corrections Complete” button at the
bottom of the form.
This will notify the Electronic Plan Review Submission Group that you are ready for Prescreen Review again.

11 ePermits Applicant Guide
May 6, 2015
Correction Items and Plan Resubmit
After plan review for your project is completed, correction items and/or review comments may require plan corrections
or changes.
You will receive a system generated email notification requesting corrected plans and/or documents.
Click the link “Login to Electronic Plan Review” in the email to access your projects.

12 ePermits Applicant Guide
May 6, 2015
Once logged in, select the “ApplicantResubmit” task for the project requiring correction to accept it and open
the eForm to show the corrections requested.

13 ePermits Applicant Guide
May 6, 2015
The eForm has four sections that provide you with correction information:
1. Review Information
2. Correction List Items (located on the “Checklist Items” tab at the top of the eForm)
3. Changemarks (click refresh changemarks link to access markups)
4. Department Review section (who requested the corrections)
In the “Department Review” section, the agency requesting the corrections is displayed. If there are markups attached,
you will see the markup links in the comments/markup section at the bottom of the eForm

14 ePermits Applicant Guide
May 6, 2015
Corrected plans and/or documents MUST be re-submitted with the EXACT file name as the original
submitted file. The system will automatically add a version number to the resubmitted plans and/or
documents. If no changes were made to the file, a new version will not be created.
After all corrections are made ensure you check the 3 boxes in the Task Instruction area and then click
Complete

15 ePermits Applicant Guide
May 6, 2015
Plan Review Status Report
The Plan Review Status Report gives you information about the plan review comments. When you receive, an Applicant
Resubmit Task, you can then follow the instructions below to run this report:
Click on the Project
Click on Project Reports

16 ePermits Applicant Guide
May 6, 2015
Click on the blue icon to run Workflow-Department Review Status
Select the workflow and click View Report

17 ePermits Applicant Guide
May 6, 2015
You will see the screen below with all of the current review cycles
Click on each Review Cycle to see the comments

18 ePermits Applicant Guide
May 6, 2015
Markups and Changemarks
Color Standards
REVIEW AGENCY MARKUP NAME CHANGEMARK TITLE MARKUP COLOR
BUILDING BLDG–Initials Issue Name ORANGE
ELECTRICAL ELEC- Initials Issue Name TEAL
ENGINEERING ENG - Initials Issue Name BROWN
FIRE FIRE- Initials Issue Name RED
ZONING ZONE- Initials Issue Name YELLOW
HISTORIC HIST- Initials Issue Name VIOLET
MECHANCIAL MECH- Initials Issue Name PINK
PLUMBING PLBG- Initials Issue Name BLUE
GAS GAS- Initials Issue Name GREEN
Standard markup names and colors will be used for each reviewing agency for easy identification.
A markup can have one or more changemarks.
A changemark is a plan callout created by review staff to quickly identify a markup and associated comments.
Each agency changemark will be titled with an issue name for each sheet/file.

19 ePermits Applicant Guide
May 6, 2015
How to Open Files with Markups
Click the task link “ApplicantResubmit”. Click the review link in the “markup” section to open the file that
contains markups for your review and correction.
Clicking the Markup link opens the plans and shows the markup section.

20 ePermits Applicant Guide
May 6, 2015
Or from your task list click the permit number to open the folder view. Select your project number and left click
any folder with a markup icon. If markups exist on the file a markup icon will be displayed.

21 ePermits Applicant Guide
May 6, 2015
How to Open Existing Markups
Double click the markups icon to open the list of markups attached to the file. To view the markups on the
file, check the “View” box beside the markup name(s) and then click the “View” button. If there are multiple
markups, check all of the “View” boxes and click the “Select All for View”.
Click “Review” and, if applicable, you can select any additional markups open for review. Click on “Publish” to
save markup as a PDF. (This option also allows you to save the markup as a file or email attachment).
Correction Items can be exported to Excel by selecting the “Checklist Items” tab and selecting the “Export to
Excel” link.

22 ePermits Applicant Guide
May 6, 2015
Uploading Corrections
After corrections have been made to the Plans and/or documents, you are ready to upload again.
Corrected plans and/or documents MUST be re-submitted with the EXACT file name as the original submitted
file. The system will automatically add a version number to the resubmitted plans and/or documents. If no
changes were made to the file, a new version will not be created.
Verify all corrected plans and documents that have markups or comments have been corrected.
Failure to submit corrected plans with the same exact name will result in your re-submittal being returned for
corrections again, please click
Drawings and Documents Naming Standards
Applicant comments may be added in the “Applicant Response” box located in the “changemark” section of the
eForm. If you are submitting a narrative explaining the plan corrections, it should be submitted to the document
folder and labeled as Plan Corrections Narrative.
Once you have successfully uploaded plans and documents into the correct folders, click on the
“ApplicantResubmit” task. If navigating from the eForm, you can be in any of the following tabs “Review
Information”, “Correction Item” or “Folder List”.

23 ePermits Applicant Guide
May 6, 2015
Scroll down and confirm you have completed all tasks by reading and checking the box. In the Task Instructions
area, click the “Complete” button to move your application forward in the review process.

24 ePermits Applicant Guide
May 6, 2015
Approved Plans
When all agencies have approved the plans, you will receive an email notifying you that the review is complete.
You will receive an email that final payment is due. Fees can be paid online at https://e-gov.tamarac.org/Click2GovBP/index.html.
Once payment is made, you will need to send the Submission Group an email advising that permit fees have
been paid. Login to Electronic Plan Review. Click on your project. Review and click the icon. This will open the Team Mail window.

25 ePermits Applicant Guide
May 6, 2015
Check the box for “Submissions” and put Fees Paid in the subject and body of the email.
Once payment is verified, you will receive an email notifying you that your plans are ready to be downloaded. All
plans in the Approved folder must be printed and on the job site before construction begins. Your permit card,
required inspections and access codes and any other approved documents are also in the Approved folder.

26 ePermits Applicant Guide
May 6, 2015
Downloading Approved Plans
Click on Approved folder to view/download/print the files. Check the “Select All” box and click the download
button to download the files.

27 ePermits Applicant Guide
May 6, 2015
Plan Revisions during Construction
If changes arise that require revisions to your approved plans or documents after your plans have been approved and
construction has begun, please follow the steps below:
Login to Electronic Plan Review
ePermits and open the project for which you wish to submit a revision.
Click the “Email” icon near the top right corner of the ePermits window. In the subject line, put “Plan Revision
Requested”, and in the body of the email, indicate what trades you need a revision for.
Select the Submissions group and click “Send”.
Once the Submissions Group reviews the request, the project will be re-opened and returned to the applicant.
Accept the “Applicant Upload” ask to open the eForm.

28 ePermits Applicant Guide
May 6, 2015
After uploading the revised plans and/or documents to the correct Revision folder (Ex. Revision 1 Structural
NOA) Click “Upload Process Complete”.
Please make sure to include a completed permit application indicating the type of revision.
Click on Upload Process Complete
The review process for the plan revision will begin, you will receive a system generated email when the plan
review is complete.