aloha pos enhancement release v6 · aloha pos enhancement release v6.4 revised: 03/05/2008 ......
TRANSCRIPT

Aloha POS
Enhancement Release v6.4Revised: 03/05/2008This document contains instructions on how to set up and use the enhancements implemented in the v6.4enhancement release. In some instances, we combine features together to better explain the new enhance-ments. When applicable, we include a scenario, how to configure the feature in the Back-of-House (BOH),how to use the feature in the Front-of-House (FOH), and references to other materials to fully implementthe feature. This document is not intended to fully explain a particular function or other options availableor surrounding the function. For your convenience, the material for each enhancement begins on a newpage, so you can properly remove and distribute the material to the necessary recipients. This documentdoes not guarantee the options are in the same location, nor that the functionality remains the same due toenhancements implemented in future versions of the affected products.
What do I need to know before installing v6.x?
When you begin the standard installation process, it first performs checks on the operating system of theBOH file server to determine if the following two conditions are true:
• 128-bit encryption is installed.• DCOM is installed, active, and its version is v1.3 or higher.
By using Microsoft® Windows© 2000 or later, the operating system satisfies these prerequisites, if all ser-vice packs and security patches are up to date. Installing Internet Explorer v6.0, normally installed as partof the operating system, satisfies the 128-bit encryption prerequisite, as this installation updates the nativeencryption libraries.
Although SetupPOS.exe for v6.x verifies the operating system of the BOH file server, it does not check theoperating system on your terminals. All computers on the Aloha network must use a supported operatingsystem to support this version of Aloha. If any of your FOH terminals use older operating systems, youmust upgrade them, in accordance with the list provided later in this section.
This document has not been fully completed at this time and is still in a working state. Please look for an updated document to be published at a later date.
Radiant Systems Page 1

March 5, 2008Aloha POS Enhancement Release v6.4
When you install Aloha v6.x from a CD, SetupPOS.exe installs Windows Installer v3.1, andVcredist_x86.exe as part of the installation process. If you perform a manual upgrade, however, you mustobtain and install these two components separately before you begin.
• Windows Installer v3.1 — This installation upgrades the Windows Installer currently used by SetupPOS.exe to install Aloha. Other installation programs also make use of the Windows Installer. Obtain this installation file from Microsoft or Radiant Systems prior to attempting the upgrade. Copy the installation file to a staging directory on the Aloha BOH file server, and install it from that location.
• Vcredist_x86.exe — This program file installs runtime components of Visual C++ libraries to enable programs developed with Visual C++ to run, on systems that do not have Visual C++ installed. Obtain this file from Radiant Systems prior to attempting the upgrade. Copy the file to a staging directory on the Aloha BOH file server, and run it from that location.
What operating systems does this version of Aloha support?
Radiant Systems is maximizing its efforts to bring products to the market that leverage the latest in productarchitecture, and maximize reliability in meeting customer needs. The Aloha BOH file server and all termi-nals must have one of the following operating systems installed, prior to installing Aloha QuickService orTableService:
• Windows 2000, Service Pack 3• Windows XP, Service Pack 2• Windows Server, 2003
Windows XP Embedded, as provided as part of the original build on Radiant terminals, satisfies operatingsystem requirements. In rare cases, you may need to obtain an updated image from Radiant Systems, Inc.,for a given terminal using this operating system.
Accessing Aloha Manager and Aloha EDC
As security requirements intensify with regard to protecting payment card data, Radiant Systems, Inc. isenhancing security for all Aloha products, especially QuickService, TableService, and EDC.
The most dramatic change in Aloha with regard to security enhancements relates to the method of access-ing the program itself. Sole access to Aloha Manager and Aloha EDC is now through the use of a uniqueuser name and complex, expiring password, unless a ‘super-key’ is available. This makes Payment CardIndustry Data Security Standards (PCI DSS) compliance possible at the site level, as requirements becomeever more restrictive.
Our recommendation is to control access to Aloha Manager and Aloha EDC using Back Office SecurityLevels.
If you attempt to install Aloha v6.3 or higher on a computer running an unsup-ported operating system, or if Windows Installer v3.1 is not installed, the Aloha installation fails with no warning or error message. The installation process sim-ply fails to start.
Radiant Systems Page 2

Aloha POS Enhancement Release v6.4
• Create a new Back Office Security Level, with access to functions, reports, and other activities appropriate at the site level.
• Assign this security level to the specific personnel at the site who need administrative access to the database.
After upgrading Aloha to v6.3 or higher, you must use a super-key to give site administrators access to newfunctions. If it is not possible to use a super-key at a given site, the procedure for giving a local administra-tor access to new features is as follows:
1. Copy the %Iberdir%\NewData\SecLvl.dbf and SecLvlDT.dbf files from the Aloha BOH file server at the site to a computer with a super-key attached, perhaps at corporate headquarters or the reseller office.
2. Make the files from the site active on the computer with the super-key.3. Launch Aloha Manager.4. Select Maintenance > Labor > Back Office Security Levels.5. Locate the new features in the list, and provide the necessary access, i.e. Run, Add, Edit, or
Delete.6. Close Aloha Manager.7. Copy the SecLvl.dbf and SecLvlDT.dbf files back to the Aloha BOH file server at the site.
Disabling Masking in Grind Files
Beginning with Aloha v6.3, we have completely removed the ‘Disable Masking in Grind File’ setting fromthe Aloha Manager interface, in Aloha QuickService and TableService, as part of making the Aloha systemPCI compliant with PCI DSS. This setting is located in Maintenance > Payments > Tenders > Type tab.You must examine each credit card and debit card tender record, and clear this setting, if currently enabled,prior to the upgrade. If you are unable to make these changes prior to upgrading to v6.3 or higher, youmust obtain help from your Radiant representative to edit the payment card tenders and clear the ‘DisableMasking in Grind File’ setting, now removed from the Aloha Manager user interface.
Disabling Expiration Date Printing
One important security change that occurs ‘behind the scenes’ as part of the v6.3 installation (or higher), isthat all settings relevant to printing the payment card expiration date automatically change to prevent print-ing this value in any location in the restaurant. This modification is in response to the requirements out-lined in the Fair and Accurate Credit Transactions Act (FACTA). After you upgrade to Aloha v6.3 orhigher, we recommend you verify that Aloha does not print this information for all payment card types,when processed.
Do I need to enable Remote File Storage?
After verifying your operating system meets all prerequisites, SetupPOS.exe asks if you want to enableRemote File Storage (RFS), a new, more secure method of communicating data between the Front-of-House and Back-of-House. The installation process displays a message, at the appropriate time, asking ifyou want to enable the RFS feature during installation. We recommend you do not enable RFS upon initialinstallation, unless your Aloha network has already been running RFS, and you are reinstalling Aloha onyour BOH file server. After a successful installation, you can enable RFS in Aloha Manager by selectingMaintenance > Store Settings > Security group > RFS tab. Using RFS is completely optional, unless you
Radiant Systems Page 3

March 5, 2008Aloha POS Enhancement Release v6.4
are using more than nine terminals. You can make RFS active during the installation process, or you canactivate it any time after installation. SetupPOS.exe installs all files necessary for supporting RFS, includ-ing entries in the Windows Registry, on each computer in the Aloha network.
Refer to the ‘Installation for Aloha v6.x’ document and the Remote File Storage (RFS) Feature Focus Guide for more information about installing Aloha 6.4, and configuring the Aloha system to use RFS.
Version RFC Number DescriptionQuickService and TableService Enhancementsv6.4 RFC 02477 “Printing Auto-Calculated Suggested Gratuities” on page 6
v6.4 RFC 09867 “Auditing Petty Cash Transactions” on page 11
v6.4 RFC 21270 “Enhancing the Aloha COM Interface” on page 12
v6.4 RFC 24988 “Supporting Performance Measures Over Dates” on page 13
v6.4 RFC 48982 “Supporting Enhanced Breaks Functionality” on page 14
v6.2.11v6.3.7v6.4.1
RFC 56747 “Disallowing Repeat with Weighed Items” on page 15
v6.4 RFC 57151 “Suppressing Voucher Printing When Under Required Ceilings” on page 16
v6.4 RFC 57639 “Using Common Terminology Between Aloha Manager and MenuLink” on page 20
v6.2 RFC 59137RFC 59217
“Enhancing the Create Diagnostic File Utility” on page 23
v6.4 RFC 59262RFC 59633RFC 59909
“Updating Aloha Fingerprint Scanner Software” on page 24
v6.4.0 RFC 60288RFC 60289RFC 60290
“Expanding Debugging Capabilities in Aloha Manager” on page 25
v6.2.7v6.3.3v6.4.0
RFC 60326 “Supporting PAR Vigo Pole Display” on page 27
v6.2.8, v6.3.4, v6.4.0
RFC 60819 “Supporting FACTA Requirements for US Upgrades” on page 28
v6.1.15, v6.2.8, v6.3.4, v6.4.0
RFC 61041 “Suppressing Pipe Characters on Customer Survey” on page 29
v6.4 RFC 61555 “Adding the Time Items Appear on the Guest Check Window in GndItem.dbf” on page 30
QuickService Only Enhancements
Radiant Systems Page 4

Aloha POS Enhancement Release v6.4
v6.4 RFC 05184 “Supporting Recipes in QuickService” on page 31
v6.4 RFC 28789 “Supporting FOH Quick Lookup for Promotions” on page 32
v6.4 RFC 52639 “Enhancing QS Quick Combo Functionality and Design” on page 34
v6.4 RFC 54586 “Requiring Manager Approval for Cash Drops” on page 49
TableService Only Enhancementsv6.4 RFC 14404 “Supporting Tipshare Distribution” on page 52
Version RFC Number Description
Radiant Systems Page 5

March 5, 2008Aloha POS Enhancement Release v6.4
Printing Auto-Calculated Suggested Gratuities
In the restaurant industry, the guest is often confronted with the dilemma of not knowing the appropriateamount of gratuity to leave for the server. They are either not proficient in mathematics or unaware of whatis sufficient for good service. In v6.4 and higher, you can configure the system to automatically calculateand print suggested gratuity amounts on the bottom of the guest check for the guest to use as a guidelinewhen leaving a gratuity for the server.
SCENARIO: The wait staff repeatedly claims they are under-tipped by the clientele so the restaurant con-figures the system to print auto-calculated suggested gratuity amounts on the guest check. Upon deliveryfor payment, the guest notices the suggested gratuity amounts on the guest check. In doing so, this bringsawareness to the clientele and the wait staff receives a more accurate gratuity percentage.
Configuring Auto-Calculated Suggested Gratuities
Configuring auto-calculated suggested gratuities to print on the guest check requires you to create a guestcheck message, using supported variables, and then set up an event to print the message on the guest check.
Configuring a Guest Check Message with Variables
To print auto-calculated suggested gratuities on the guest check, you must configure a customized guestcheck message. You can use formulas that include variables, enclosed with lesser and greater than sym-bols, to insert system-generated information and calculated values. The following table lists the supportedvariables you can use in guest check message formulas.
Version RFC Number Products Audiencev6.4 RFC 02477 Aloha QuickService, Aloha TableService Configuration Technician
End User
Variable Description$TIPSALE Tippable sales for the check.#S Total count of all sales categories for the check.$S Total amount of all sales categories for the check.#Snnnn Total count of sales category nnnn for the check where nnnn is the ID number of the
category.$Snnnn Total amount of sales category nnnn for the check where nnnn is the ID number of the
category.#GUESTS Total count of guests for the check.#OMCnnnn Total count of order mode charges for order mode nnnn for the check where nnnn is
the ID number of the order mode.$OMCnnnn Total amount of order mode charges for order mode nnnn for the check where nnnn is
the ID number of the order mode.#ENTREES Total count of entrees sold for the check.DOB Date of business.FIRSTNAME The first name of the employee.LASTNAME The last name of the employee.
Radiant Systems Page 6

Aloha POS Enhancement Release v6.4
The supported variables adhere to the following rules:
To configure the suggested gratuity message to print on guest checks:
1. Select Maintenance > Messages > Guest Check Messages. 2. Type an unused number in the ‘ID’ drop-down list and press Enter. 3. Type a name for the message, such as ‘Suggested Tip.’4. Type a title for the message to appear at the top of the guest check, if desired. Include variables to
allow the system to automatically calculate values. Remember the title appears at the very first of the guest check so you may not want to fill in the title. See the Variable table for the supported variables you can use.
NICKNAME The nickname of the employee.FILL(x) Inserts a line composed entirely of a single character, designated in parenthesis.LEFT Left justify. By default, the printed text is centered.RIGHT Right justify. By default, the printed text is centered.( ), +, -, *, / Standard algebraic operators. The * and / symbols have a higher precedence than +
and -.Constant Constant numbers, such as ‘1, 1.5, 2, 2.5, 3, etc’
Variable RulesAll variables use the following format: <VARIABLE>. For example: <NICKNAME> inserts the nickname of the employee. Any text outside of the less than and greater than symbols prints on the guest check as typed. All variables containing formulas use the following format: <VAL(width:formula)>. • Width specifies the total number of digits to reserve for a value, not including a decimal point. The
width cannot be zero. If the width is smaller than the number of characters of the value, the system prints the value. For example: <VAL(2:LASTNAME)> inserts the last name even if the last name is more than two digits. If the width is larger than the number of characters of the value, the system prints the value padded with blanks. For example, if you type <VAL(10:LASTNAME)> and the last name is Smith, the system prints five empty spaces and then SMITH.
• Formula specifies the numeric value for the equation. If the formula contains a $ symbol, the value dis-plays as currency, as defined for the system. If the formula contains a # symbol, the value displays as a whole number with no decimals. If the formula contains any other character or includes an unsup-ported variable, the variable prints on the guest check as typed. For example: if you type <VAL(5:$TIPSALE*0.20)> the system inserts the suggested 20% gratuity amount on the tippable sales for the check, using a five digit format.
Variable Description
Radiant Systems Page 7

March 5, 2008Aloha POS Enhancement Release v6.4
5. Type the message to appear at the bottom of the check to indicate the suggested tip. Include vari-ables to allow the system to automatically calculate values. See the Variable table for the supported variables you can use.
6. Click Save. If any completed text line contains more than 30 characters, a warning appears. Some lines may require long formulas; however, the output only prints a portion of the characters. Any printed text over 30 characters might not print on the guest check as desired, depending on the printer you are using.
7. Click OK to continue.8. Exit the Guest Check Messages function.
Using existing functionality, you can also configure your suggested gratuity message to print on all creditcard vouchers.
To configure the suggested gratuity message to print on credit card vouchers:
1. Select Maintenance > Store Settings > Credit Card group > Voucher Printing 1 tab.2. Select Print Check Message on Vouchers.3. Select the message to print from the ‘Message’ drop-down list.4. Click Save and exit the Store Settings function.
Figure 1 Guest Check Message for Suggested Gratuity
Figure 2 30 Character Warning for Guest Check Text Lines
Radiant Systems Page 8

Aloha POS Enhancement Release v6.4
Activating a Suggested Gratuity Message
The system defaults to printing the guest check message defined with the lowest ID. Most likely, this mes-sage is already in use for a salutation message. If your suggested gratuity message is not the lowest ID, youmust configure the existing Set Guest Chk Msg event in System Events to activate and use the message.
To configure an event for printing the suggested gratuity message:
1. Select Maintenance > System > Events. The System Events function tab appears.2. Click Add Event. The Event Time & Type dialog box appears.3. Select Set Guest Chk Msg from the ‘Event Type’ drop-down list.4. Select Daily, or a time frequency of your choice. 5. Type the time the event will begin. To keep the event activated all day, leave the value at 00:00.6. Click OK. The Set Guest Chk Msg dialog box appears. 7. Select the guest check message you created for suggested gratuity from the ‘ID’ drop-down list.
The message appears as a preview.8. Click OK. The event is added as an event task.9. Exit the System Events function.
When you perform a refund, the system assumes a ‘refund’ mode and enters items in negative amounts, including the auto-calculated suggested gratuity. To avoid this, we recommend using the existing Set Footer Message by Terminal event to activate your suggested gratuity message at each terminal, except for one terminal that you designate as where you perform refunds.
Radiant Systems Page 9

March 5, 2008Aloha POS Enhancement Release v6.4
Using Auto-Calculated Suggested Gratuities
When the guest check or the credit card voucher prints, the system prints the message at the bottom of theappropriate slip.
Figure 3 Guest Check with Auto-Calculated Suggested Gratuities
Radiant Systems Page 10

Aloha POS Enhancement Release v6.4
Auditing Petty Cash Transactions
Petty cash accounts allow you to define a tracking system for such things as paid in and paid out transac-tions. In v6.4, you can now run an audit report on these transactions.
To audit petty cash transactions:
1. Select Reports > Audits. The Select Date dialog box appears.2. Select a date and click OK. The Select Transactions to Audit dialog box appears.
3. Select Petty Cash.
Petty Cash — Reports transactions related to petty cash accounts.
4. Click View to view the report or click Print to print the report.
On the BOH Audit report, petty cash transactions report as follows:
Version RFC Number Products Audiencev6.4 RFC 09867 Aloha QuickService, Aloha TableService Store Managers
Figure 4 Select Transactions to Audit Dialog Box
Time Type Transaction11:18 PETTY ACCOUNT Petty Account: 00001 Starting bank 20.00 (-)
Emp: 200 FRANCES Manager Emp: 101 APRIL
Radiant Systems Page 11

March 5, 2008Aloha POS Enhancement Release v6.4
Enhancing the Aloha COM Interface
We have made the following enhancements to the Aloha COM Interface. There is no configurationrequired.
• RFC 21270 - This enhancement allows QuickService and TableService users to use the ‘Get Check’ functionality through the Aloha COM interface.
• RFC 21270 - This enhancement allows TableService users to use the Team Get Check feature through the Aloha COM interface.
Version RFC Number Products Audiencev6.4 RFC 21270 Aloha QuickService, Aloha TableService
COM InterfaceConfiguration Technician
Radiant Systems Page 12

Aloha POS Enhancement Release v6.4
Supporting Performance Measures Over Dates Version RFC Number Products Audiencev6.4 RFC 24988 Aloha QuickService, Aloha TableService Configuration Technician
This enhancement has not been fully documented at this time. We only include the necessary steps for con-figuring and using this feature. Please look for an updated document to be published at a later date.
Radiant Systems Page 13

March 5, 2008Aloha POS Enhancement Release v6.4
Supporting Enhanced Breaks Functionality Version RFC Number Products Audiencev6.4 RFC 48982 Aloha QuickService, Aloha TableService Configuration Technician,
Store Managers
Refer to the Employee Breaks Feature Focus Guide for complete information on configuring and using employee breaks with break rules.
Radiant Systems Page 14

Aloha POS Enhancement Release v6.4
Disallowing Repeat with Weighed Items
In accordance with the National Conference on Weights and Measures, the use of the Repeat and Quantitybutton functions for an item ordered by weight is no longer allowed. This is partly driven by the fact thattwo weighed items seldom carry the same weight and adding the exact copy of an item to the guest checkwould not be accurate most of the time. When you touch the Repeat or Quantity button for an item enteredby weight, the error message “You cannot repeat weighed items” appears.
Version RFC Number Products Audiencev6.2.11v6.3.7v6.4.1
RFC 56747 Aloha QuickService, Aloha TableService Store Managers, End User
Radiant Systems Page 15

March 5, 2008Aloha POS Enhancement Release v6.4
Suppressing Voucher Printing When Under Required Ceilings
In Aloha v5.3.26e or Aloha v6.0 and higher, we introduced the ability to configure a signature ceiling, sothat a customer only has to sign the voucher when a credit card transaction is over a specified amount, thusincreasing the speed of service for credit card transactions. In Aloha v6.4, you can suppress the printing ofthe credit card voucher altogether, when the credit card transaction is less than the specified ceiling.
SCENARIO: During busy times, a restaurant experiences a large amount of credit card usage, and theprinting of the voucher causes a backup when guests pay and leave. Increase your speed of service by con-figuring the system so that the voucher does not print at all for credit card transactions that are less thanthe specified ceiling amount.
Configuring Signature Ceilings for Credit Cards
To configure a ceiling for requiring credit card signatures, you must first define the signature rules and thenspecify the tenders to which the rules apply. Refresh the system to update your configuration.
To configure the credit card ceiling:
1. Select Maintenance > Store Settings.2. Select the Credit Card group > Options tab.
3. Type the ceiling amount in the ‘No Signature Required if less than ___’ text box.
Version RFC Number Products Audiencev6.4 RFC 57151 Aloha QuickService, Aloha TableService Configuration Technician,
Store Managers
Figure 5 Store Settings - EDC Group - Options Tab
Radiant Systems Page 16

Aloha POS Enhancement Release v6.4
No Signature Required if less than ___ — Specifies the minimum amount of credit card pur-chase to require a signature. When a credit card purchase is less than the defined amount, a signa-ture line does not print on the voucher. Type 0 to indicate all credit cards require a signature.Related Options: 1) To exclude specific tenders from these rules clear ‘Apply Signature CeilingRules’ in Maintenance > Payments > Tenders > Type tab. 2) To suppress the voucher from printingaltogether for a specific tender, when ceiling conditions are met, select ‘Do Not Print Voucher’ inMaintenance > Payments > Tenders > Type tab.
4. Select Manually Entered Cards, if necessary.5. Select Swiped Cards, if necessary.6. Click Save and exit the Store Settings function.
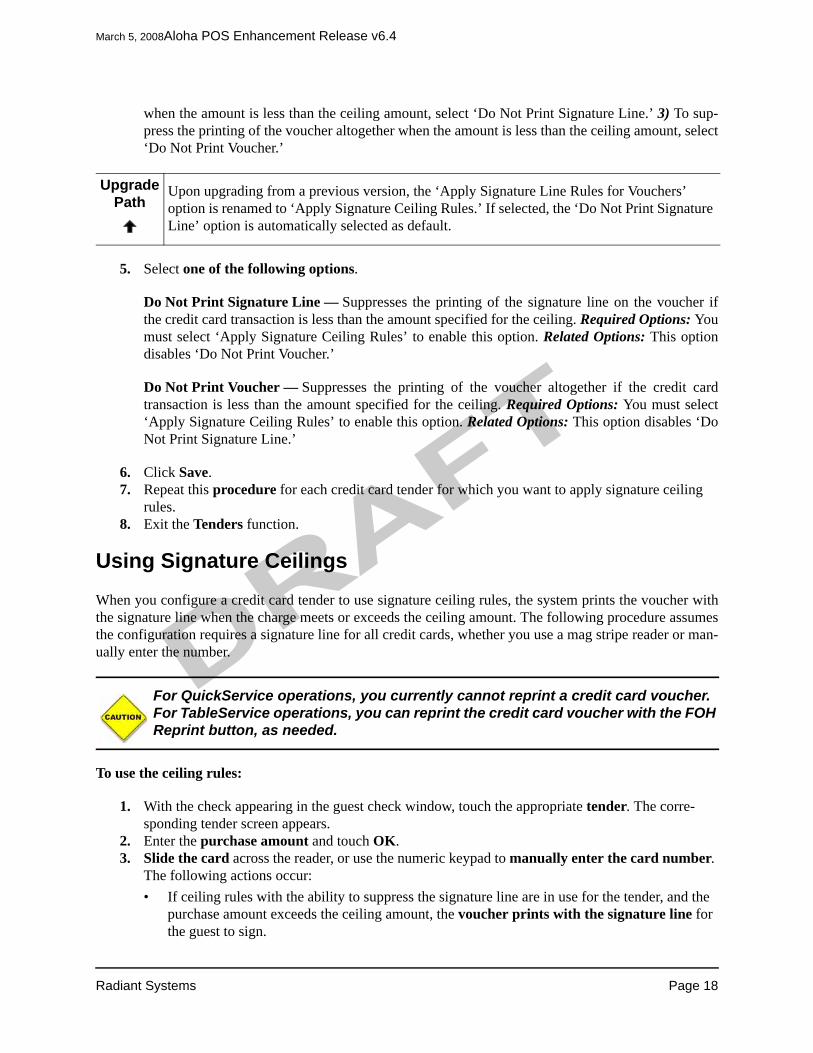
To configure a credit card tender to use signature ceiling rules:
1. Select Maintenance > Payments > Tenders.2. Select the appropriate credit card tender and press Enter.3. Select the Type tab.
4. Select Apply Signature Ceiling Rules.
Apply Signature Ceiling Rules — Applies signature ceiling rules, as defined in Maintenance >Store Settings > Credit Card group > Options tab, to the tender when it is used as a form of pay-ment. Required Options: 1) You must select ‘Credit Card’ as the tender type to enable the ‘ApplySignature Ceiling Rules’ option. 2) Define the ceiling amount to require a signature line in Mainte-nance > Store Settings > Credit Card group > Options tab. Related Options: 1) When you select‘Apply Signature Ceiling Rules,’ the ‘Do Not Print Vouchers’ option, which applies to the tenderregardless if ceilings are used, is not available. 2) To suppress the signature line on the voucher
Figure 6 Tenders - Type Tab
Radiant Systems Page 17
March 5, 2008Aloha POS Enhancement Release v6.4
when the amount is less than the ceiling amount, select ‘Do Not Print Signature Line.’ 3) To sup-press the printing of the voucher altogether when the amount is less than the ceiling amount, select‘Do Not Print Voucher.’
5. Select one of the following options.
Do Not Print Signature Line — Suppresses the printing of the signature line on the voucher ifthe credit card transaction is less than the amount specified for the ceiling. Required Options: Youmust select ‘Apply Signature Ceiling Rules’ to enable this option. Related Options: This optiondisables ‘Do Not Print Voucher.’
Do Not Print Voucher — Suppresses the printing of the voucher altogether if the credit cardtransaction is less than the amount specified for the ceiling. Required Options: You must select‘Apply Signature Ceiling Rules’ to enable this option. Related Options: This option disables ‘DoNot Print Signature Line.’
6. Click Save.7. Repeat this procedure for each credit card tender for which you want to apply signature ceiling
rules. 8. Exit the Tenders function.
Using Signature Ceilings
When you configure a credit card tender to use signature ceiling rules, the system prints the voucher withthe signature line when the charge meets or exceeds the ceiling amount. The following procedure assumesthe configuration requires a signature line for all credit cards, whether you use a mag stripe reader or man-ually enter the number.
To use the ceiling rules:
1. With the check appearing in the guest check window, touch the appropriate tender. The corre-sponding tender screen appears.
2. Enter the purchase amount and touch OK.3. Slide the card across the reader, or use the numeric keypad to manually enter the card number.
The following actions occur:• If ceiling rules with the ability to suppress the signature line are in use for the tender, and the
purchase amount exceeds the ceiling amount, the voucher prints with the signature line for the guest to sign.
Upgrade Path
Upon upgrading from a previous version, the ‘Apply Signature Line Rules for Vouchers’ option is renamed to ‘Apply Signature Ceiling Rules.’ If selected, the ‘Do Not Print Signature Line’ option is automatically selected as default.
For QuickService operations, you currently cannot reprint a credit card voucher. For TableService operations, you can reprint the credit card voucher with the FOH Reprint button, as needed.
Radiant Systems Page 18
Aloha POS Enhancement Release v6.4
• If ceiling rules with the ability to suppress the signature line are in use for the tender, and the purchase amount does not exceed the ceiling amount, the voucher prints without the signa-ture line.
• If ceiling rules with the ability to suppress the printing of the voucher are in use for the tender, and the purchase amount exceeds the ceiling amount, the voucher prints with the signature line for the guest to sign.
• If ceiling rules with the ability to suppress the printing of the voucher are in use for the tender, and the purchase amount does not exceed the ceiling amount, the voucher does not print.
• If ceiling rules are not applied to the tender, the voucher prints with a signature line, as nor-mal.
4. Close the check as normal.
Refund checks always print a voucher without a signature line, even if the tender used on the refunded check has ceiling rules applied.
Radiant Systems Page 19
March 5, 2008Aloha POS Enhancement Release v6.4
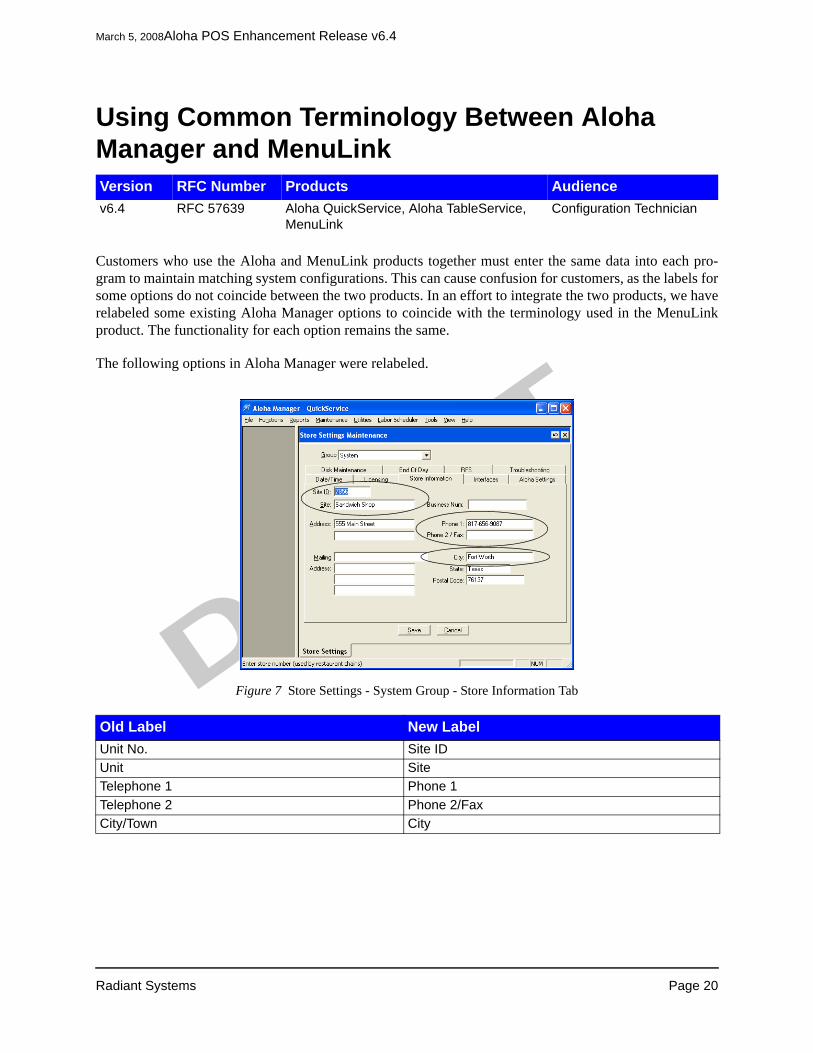
Using Common Terminology Between Aloha Manager and MenuLink
Customers who use the Aloha and MenuLink products together must enter the same data into each pro-gram to maintain matching system configurations. This can cause confusion for customers, as the labels forsome options do not coincide between the two products. In an effort to integrate the two products, we haverelabeled some existing Aloha Manager options to coincide with the terminology used in the MenuLinkproduct. The functionality for each option remains the same.
The following options in Aloha Manager were relabeled.
Version RFC Number Products Audiencev6.4 RFC 57639 Aloha QuickService, Aloha TableService,
MenuLinkConfiguration Technician
Figure 7 Store Settings - System Group - Store Information Tab
Old Label New LabelUnit No. Site IDUnit SiteTelephone 1 Phone 1Telephone 2 Phone 2/FaxCity/Town City
Radiant Systems Page 20

Aloha POS Enhancement Release v6.4
Figure 8 Store Settings - System Group - Date/Time Tab
Old Label New LabelFirst Day of Week Start of Week for Payroll
Figure 9 Store Settings - Labor Group - Employee Settings Tab
Old Label New LabelMin Wage Minimum WageMin Wage Tipped (TableService only) Minimum Wage Tipped (TableService only)
Radiant Systems Page 21

March 5, 2008Aloha POS Enhancement Release v6.4
Figure 10 Maintenance - Menu - Items - Item Tab
Old Label New LabelCost Recipe Cost
Radiant Systems Page 22

Aloha POS Enhancement Release v6.4
Enhancing the Create Diagnostic File Utility
During normal operation of the Aloha system, the program interacts with the operating system to createdebout files, and to make entries in those files to record events as they happen in the system. These files areseldom needed, so the information recorded in them is periodically replaced. However, when problemsoccur, the information in these files may be invaluable in identifying the causes. Occasionally, it is neces-sary to obtain more information than the set of files normally available through the View Debugging Filefeature. When more information is needed, the Create Diagnostic Files feature is invaluable in diagnosingproblems experienced in the system.
The following enhancements were implemented in regards to the creation of the diagnostic files that aresent to the customer service center to help troubleshoot specific problems:
• RFC 59137 Including Windows Application, Security, and System Event Logs in the Diag-nostic File - The diagnostic file now includes a WinLogs.zip which contains the Windows applica-tion (Application.evt), security (Security.evt), and system (System.evt) event files.
• RFC 59217 Including Thorn versions in the Diagnostic File - Thorn versions are created from an existing build and includes an extended build number. They are created for special reasons. The diagnostic file now includes any available thorn build numbers.
Version RFC Number Products Audiencev6.3.4v6.4.0
RFC 59137 Aloha QuickService, Aloha TableService Store Managers
v6.3.1v6.4.0
RFC 59217 Aloha QuickService, Aloha TableService Store Managers
Radiant Systems Page 23

March 5, 2008Aloha POS Enhancement Release v6.4
Updating Aloha Fingerprint Scanner Software
We have updated the fingerprint scanner software and drivers to version 2.0, incorporating multiple bene-fits for sites using Radiant P1220 and P1520 terminals with integrated fingerprint scanners.
The new software incorporates the following improvements:
• Faster search and response times. • Enhanced communication between the BOH file server and the FOH terminals, for more efficient
communication. • The appearance of a small, white hand, the standard Windows ‘link select’ pointer, while the fin-
gerprint scanner software is busy identifying an employee or registering a new employee. A user knows the terminal is busy, if the pointer is visible.
• Support for using Authentec and UPEK fingerprint scanners together in the same network. This version automatically detects the type of scanner in use on each terminal, and loads the appropriate drivers on that terminal.
Obtain v2.0 from the Radiant FTP site, or from an appropriate Aloha installation CD. Contact your Radiantrepresentative for more information about how to upgrade your installation.
Version RFC Number Products Audiencev6.4 RFC 59262,
RFC 59633, RFC 59909
Aloha QuickService, Aloha TableService Configuration Technicians
Radiant Systems Page 24

Aloha POS Enhancement Release v6.4
Expanding Debugging Capabilities in Aloha Manager
Debug information aides you and Aloha customer support in troubleshooting problems within the Alohasystem and communication passed to and from Aloha EDC and PMS. When an issue occurs, the siteenables debugging and reproduces the problem to write to the debout for the terminal. This process cancause a significant delay in correcting the problem for the site.
The following enhancements were implemented in regards to the debugging of the Aloha POS system tohelp troubleshoot specific problems:
RFC 60288 - Relocating Debugging Options in Aloha Manager
To centralize the debugging options in Aloha Manager, as well as any future options relating to debugging,a new tab is created in Maintenance > Store Settings > System group. All options were previously locatedon the Aloha Settings tab.
Version RFC Number Products Audiencev6.4.0 RFC 60288
RFC 60289RFC 60290RFC 60553RFC 60554
Aloha QuickService, Aloha TableService Configuration Technicians, Store Managers
Figure 11 Store Settings - System Group - Troubleshooting Tab
Radiant Systems Page 25

March 5, 2008Aloha POS Enhancement Release v6.4
RFC 60289, 60290 - Supporting Store-wide FOH COM Debugging in Aloha Manager
Currently, if you want to debug FOH COM, you must create a Debug_COM system environment variableon a specific terminal and assign the value to True. You can now perform a system-wide debug across allterminals with the Debug FOH COM option in Maintenance > Store Settings > System group > Trouble-shooting tab. This enhancement introduces the new DebugFOHCOM variable in Aloha.ini. We still sup-port the system variable for situations when you want to debug a specific terminal, rather than the entirestore.
RFC 60553, 60554 - Supporting Store-wide FOH PMS Debugging in Aloha Manager
Currently, if you want to debug FOH PMS, you must create a PMSDebug marker file in the Aloha direc-tory on a specific terminal and assign the value to True. You can now perform a system-wide debug acrossall terminals with the Debug FOH PMS option in Maintenance > Store Settings > System group > Trouble-shooting tab. This enhancement introduces the new DebugFOHPMS variable in Aloha.ini. We still supportthe PMSDebug marker file for situations when you want to debug a specific terminal, rather than the entirestore.
Radiant Systems Page 26

Aloha POS Enhancement Release v6.4
Supporting PAR Vigo Pole Display
In an effort to support language localization on pole displays for the Aloha POS system, we now supportthe Vigo pole display manufactured by PAR. The system uses the existing OPOS Line Display interfacetype and a new option to select an available code page. A code page is the traditional IBM term used for aspecific character encoding table. A mapping in which a sequence of bits, usually a single octet represent-ing integer values 0 to 255, is associated with a specific character. In this case, the code page tells the oper-ating system the language to use and the characters to display the PAR Vigo pole display, using a OPOSLine Display type.
The Aloha system uses the codepage.csv file that contains the list of code pages supported by the respec-tive operating system. You must place the codepage.csv file in the Data directory.
To support PAR Vigo pole display:
1. Select Maintenance > Hardware > Terminals > Readers tab.2. Select a terminal from the Term ID drop-down list.3. Select Use Pole Display.4. Select OPOS Line Display from the ‘Type’ drop-down list.5. Type the name of the OPOS MSR driver file as it appears in the Registry Editor of the operating
system. 6. Select the code page from the ‘Code Page’ drop-down list. 7. Click Save and exit the Terminals function.
Supporting Radiant-Brand Pole Displays
Version RFC Number Products Audiencev6.2.7v6.3.3v6.4.0
RFC 60326 Aloha QuickService, Aloha TableService Configuration Technicians
This enhancement has not been fully documented at this time. We only include the necessary steps for con-figuring and using this feature. Please look for an updated document to be published at a later date.
Refer to the list of code pages on www.microsoft.com for more information on code pages.
Radiant Systems Page 27

March 5, 2008Aloha POS Enhancement Release v6.4
Supporting FACTA Requirements for US Upgrades
The provisions of the U.S. Federal law known as FACTA (Fair and Accurate Credit Transactions Act) con-tain two requirements that impact the configuration of an Aloha site. One provision requires that a paymentcard expiration date must not appear in print on receipts, vouchers, or other printed chits in the restaurant.The other requirement specifies that no more than the last five digits of a payment card number may beexposed in print.
Although we recommend suppressing the expiration date and masking all but the last four digits of the pay-ment card, we felt it would be very helpful to the Aloha POS community to make these changes occurautomatically, whenever possible. Beginning with versions of Aloha that become available after Novem-ber, 2007, the affected settings change automatically to the PCI-compliant state any time you upgrade theAloha database for a U.S. installation.
The affected settings are as follows:
• • In Maintenance > Payments > Tenders > Type tab > Options group box, clear the ‘Print Expiration’ check box.
• • In Maintenance > Store Settings > Credit Card group > Voucher Printing tab, select the ‘Suppress Expira-tion Dates’ check box.
• • In the same location in Store Settings, immediately beneath the ‘Suppress Expiration Dates’ option, select ‘Only show last 4 digits’ from the ‘Credit Card Number Mask’ drop-down list.
If your installation is outside the U.S., we recommend you verify the legal requirements in your area withregard to printing or suppressing the expiration date and the payment card number. If the regulations underwhich you operate do not require printing this information, we recommend you configure Aloha to omitprinting the expiration date, and to mask all but the last four digits of the payment card number, as a bestpractice to protect your customers, and your business. Check with your Radiant Systems representative, todetermine if a specific release includes this feature.
Version RFC Number Products Audiencev6.2.8, v6.3.4, v6.4.0
RFC 60819 Aloha QuickService, Aloha TableService Configuration Technicians
Radiant Systems Page 28
Aloha POS Enhancement Release v6.4
Suppressing Pipe Characters on Customer Survey
The Customer Survey feature provides restaurants the ability to prompt randomly selected guests for feed-back about their dining experience. The prompts print on the guest check, along with a phone number forthe customer to call and take a customer survey, or poll, in exchange for a reward or discount. You candefine the times the survey is valid, the frequency the survey prints for a specific day part, the text toappear in the survey, and can print up to a 16-digit code for reference information.
On the printed receipt, the survey code is framed by a beginning and ending pipe character. This is some-times perceived as the number ‘one’ and reflects an incorrect survey code. In v6.1.15, v6.2.8, v6.3.4,v6.4.0, and all versions higher, you can now suppress the pipe characters from printing by adding the fol-lowing variable to Aloha.ini:
NoSurveyPipe=True
Version RFC Number Products Audiencev6.1.15, v6.2.8, v6.3.4, v6.4.0
RFC 61041 Aloha QuickService, Aloha TableService Configuration Technicians
Radiant Systems Page 29

March 5, 2008Aloha POS Enhancement Release v6.4
Adding the Time Items Appear on the Guest Check Window in GndItem.dbf
To generate correct information from the Aloha POS system for the Speed of Service (SOS) report in theMenuLink product, you can now track the time an item is placed on the FOH guest check window. Withv6.4 and higher, GndItem.dbf now includes the following columns:
• ETime_Hour• ETime_Min• ETime_Sec• TableID
Version RFC Number Products Audiencev6.4 RFC 61555 Aloha QuickService, Aloha TableService
MenuLinkConfiguration Technicians
Radiant Systems Page 30

Aloha POS Enhancement Release v6.4
Supporting Recipes in QuickService
A recipe is a list of ingredients with directions for making or preparing an item. For the Aloha POS system,recipes can be used for a wide range of purposes, from empowering employees with the ability to answeringredient questions for the guest, to providing the bartender instructions on how to prepare a drink. Theyare not to be confused with recipes created in Inventory Control for inventory tracking.
Most of the time, you access recipes on demand, but you can configure the system to display or print a rec-ipe each time, or for a defined number of times, you order the item. You can also optionally provide animage of the item and an instructional movie for how to prepare the item.
The Recipe feature has been available in the Aloha TableService product since v3.6. With v6.4 and above,you can now configure and use recipes in the Aloha QuickService product.
Version RFC Number Products Audiencev6.4 RFC 05184 Aloha QuickService Configuration Technicians
Figure 12 FOH Recipe Information Screen
Refer to the Recipes Feature Focus Guide for complete information on configuring and using recipes.
Radiant Systems Page 31

March 5, 2008Aloha POS Enhancement Release v6.4
Supporting FOH Quick Lookup for Promotions
For sites that use a large number of promotions, you must select a promotion from continuing pages fromthe FOH Promo Lookup screen. In Aloha QuickService v6.4, you can now enable the Aloha ‘quicklookup’ functionality that enables you to select a promotion from the FOH by entering search criteria untilyou find the one you want.
Configuring FOH Quick Lookup for Promotions
To enable quick lookup functionality for the Promo Lookup button:
1. Select Maintenance > Menu > Panel Editor to access Panel Editor.2. Select a desktop size and click OK. 3. From the Commands menu, select the panel to which you want to add the Promo Lookup button
function. 4. Double-click an available button. The Edit Buttons - QuickService dialog box appears.
5. Select Promo Lookup from the ‘Function’ drop-down list.
Promo Lookup — Displays the FOH Promo Lookup screen and allows you to select, or scan abar code for, a promotion to apply to the check. Required Options: You must select Maintenance >Payments > Promotions and configure a promotion to appear in the list. Related Options: 1) If you
Version RFC Number Products Audiencev6.4 RFC 28789 Aloha QuickService Store Managers
End Users
Figure 13 Promo Lookup Button Function
Radiant Systems Page 32

Aloha POS Enhancement Release v6.4
select ‘Auto Apply’ for a promotion, it does not appear for selection. 2) If you clear ‘Active’ for apromotion, it does not appear for selection. 3) If you select ‘Do Not Appear in Promo List’ for apromotion, it does not appear for selection.
6. Select Use Quick Lookup Screen.
Use Quick Lookup Screen — Enables you to enter search criteria using an alphanumeric key-board, to select an active promotion to apply to the guest check. If cleared, the list of promotionsappear on continuing pages.
7. Type a name, up to 15 characters, for the button. The text, ‘Promo Lookup’ is the default button name.
8. Set the remaining button attributes the same as you would any other button. 9. Click OK to add the button to the panel.
Using FOH Quick Lookup for Promotions
When you look up promotions, using the Quick Lookup functionality, the system displays the FOH PromoLookup screen with a selection list of all active promotions. The list displays the promotions by name. Ifthe name of the promotion starts with a number, such as 1/2 Off Burgers, the promotion appears at the top.You must touch the Add to Check button to apply the promotion.
To use the FOH Quick Lookup for promotions:
1. Start a new order and add items to the check that qualify for the promotion. 2. Touch the button configured for Promo Lookup. The FOH Promo Lookup screen appears.
3. Select the name of the promotion in the list, or filter the list of promotions by entering the first few letters of the promotion, until you find a unique match.
4. Touch Add to Check to apply the promotion, if eligible, and return to the order entry screen.
Figure 14 FOH Promo Lookup Screen
Radiant Systems Page 33
March 5, 2008Aloha POS Enhancement Release v6.4
Enhancing QS Quick Combo Functionality and Design
In v6.4, there were multiple enhancements implemented for Aloha QuickService quick combos under RFC52639. These enhancements include:
Redesigning of the Quick Combo Dialog Box - To ease
Increasing the Number of Items per Quick Combo Component - This new feature increases the num-ber of items that you can assign to quick combo components from 15 to 45, thus reducing the number ofduplicate quick combos you must maintain. Additionally, you can now view all components and items in asingle tree-view display in the Quick Combo Promotion Maintenance dialog box.
Configuring Item Surcharges for all Quick Combo Levels - This enhancement allows you to defineitem surcharges for Regular, Upsell #1, and Upsell #2 levels separately.
Automatically Calculating Size Surcharges for Quick Combos - This new option automatically calcu-lates Quick Combo size surcharges based on the item price difference between quick combo levels.
Supporting Mixed Level Quick Combos - When working with quick combos, you are able to order amixture of items from different pricing levels and have the system price the combo accordingly. For exam-ple, the customer can order a sandwich, medium fries, and a large soda. You can configure the system toreport these items as a medium or large combo.
Redesigning of the Quick Combo Dialog Box
With the recent expansion of features available for quick combos, and the already limited space availableon the existing quick combo dialog box, we have redesigned the dialog box to a tabular format to simplifythe configuration of quick combos.
In the process, we have renamed several existing options for clarification and exposed hidden options thatwere only visible on the interface only when you selected a required option. For example, prior to v6.4,you had to choose ‘Upsell 2’ from the ‘Upsell’ drop-down list to change the names on the ‘Surcharge,’‘Upsell Name,’ and ‘Upsell Price’ options to reflect a second upsell level. With the redesign of the quickcombo dialog box, these options are no longer hidden and dependent on a choice from the drop-down list.Additionally, the new Items tab introduces a tree view design that you expand and collapse so you canvisually manage long lists of component items, and their associated prices, in a more organized fashion.
Version RFC Number Products Audiencev6.4 RFC 52639 Aloha QuickService Store Managers
End Users
This enhancement has not been fully documented at this time. We only include the necessary steps for con-figuring and using this feature. Please look for an updated document to be published at a later date.
Radiant Systems Page 34

Aloha POS Enhancement Release v6.4
Select Maintenance > Payments > Payments > Promotions > Promotion tab, then ‘Quick Combo’ from the‘Type’ drop-down list and click Type Specifics to display the Promotions - Quick Combo dialog box.
Regular Name — Holds the descriptive name for the promotion.
Regular Price — specifies the base price of the quick combo without an upsell charge. The system vali-dates if the price is lower than the total of each item included in the quick combo if it were priced sepa-rately.
Figure 15 Quick Combo Promotion - Setup Tab
EXPOSED OPTION
Upsell #1 Name — Specifies the description for the first upsell level, such as ‘Biggie Size.’
EXPOSED OPTION
Upsell #1 Additional Charge — Specifies the additional price for the first upsell level, on top of the previous level. A valid range is -999,999.99 to 999,999.99.
EXPOSED OPTION
Upsell #2 Name — Specifies the description for the second upsell level, such as ‘MegaSize.’
EXPOSED OPTION
Upsell #2 Additional Charge — Specifies the additional price for the second upsell level, on top of the previous level. A valid range is -999,999.99 to 999,999.99.
NAME CHANGE
Auto Apply — Automatically applies the promotion to all eligible items on the check andsuppresses the FOH Select Items screen. Related Options: 1) This option disables the ‘MaxPer Check’ and ‘Max Per Table’ options in Maintenance > Payments > Promotions > Restric-tions tab. 2) This option overrides the ‘Manager Needed’ option in Maintenance > Payments> Promotions > Promotion tab.
Radiant Systems Page 35
March 5, 2008Aloha POS Enhancement Release v6.4
Group Delete — Deletes the individual items from the check and only shows the order as a combo.
Show Upsell as Modifier — Displays the quick combo upcharge charge on the check as a modifier.
Only Print Combo Name on Guest Check — Causes the system to print the name of the combo on theguest check without summarizing the items contained in the combo.
Consolidate Like Components — Causes the system to list multiple instances of items together on theguest check.
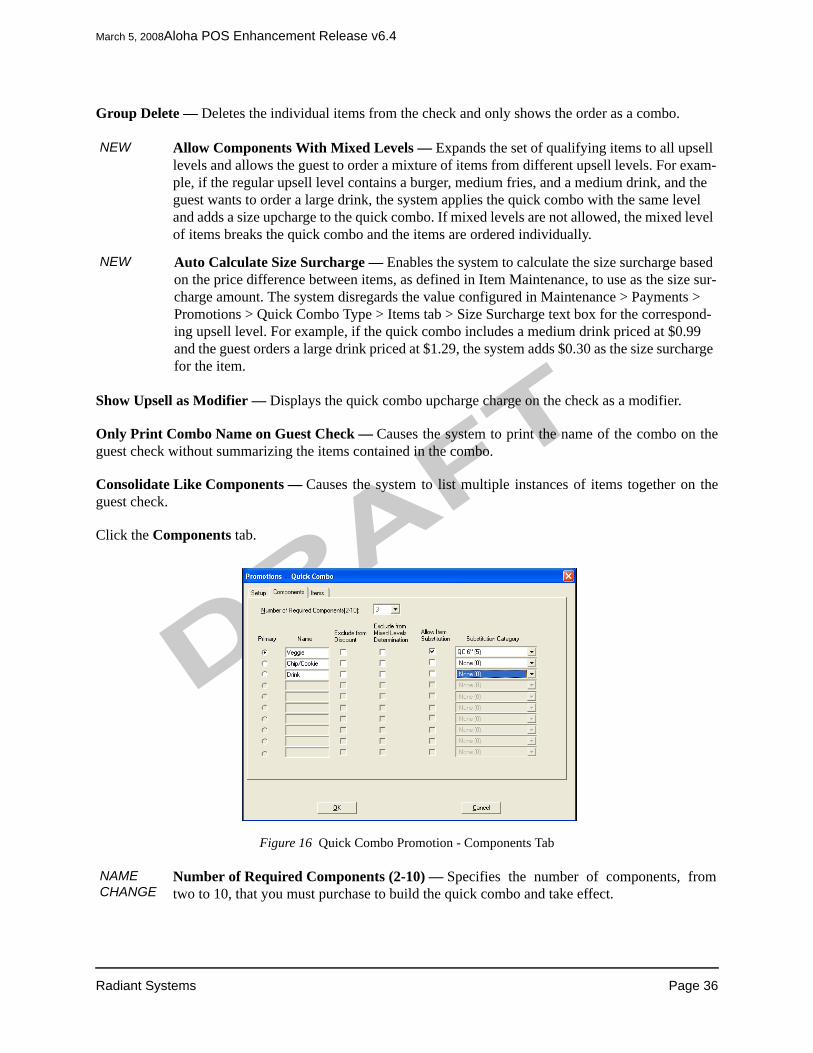
Click the Components tab.
NEW Allow Components With Mixed Levels — Expands the set of qualifying items to all upsell levels and allows the guest to order a mixture of items from different upsell levels. For exam-ple, if the regular upsell level contains a burger, medium fries, and a medium drink, and the guest wants to order a large drink, the system applies the quick combo with the same level and adds a size upcharge to the quick combo. If mixed levels are not allowed, the mixed level of items breaks the quick combo and the items are ordered individually.
NEW Auto Calculate Size Surcharge — Enables the system to calculate the size surcharge based on the price difference between items, as defined in Item Maintenance, to use as the size sur-charge amount. The system disregards the value configured in Maintenance > Payments > Promotions > Quick Combo Type > Items tab > Size Surcharge text box for the correspond-ing upsell level. For example, if the quick combo includes a medium drink priced at $0.99 and the guest orders a large drink priced at $1.29, the system adds $0.30 as the size surcharge for the item.
Figure 16 Quick Combo Promotion - Components Tab
NAME CHANGE
Number of Required Components (2-10) — Specifies the number of components, fromtwo to 10, that you must purchase to build the quick combo and take effect.
Radiant Systems Page 36

Aloha POS Enhancement Release v6.4
Primary — Specifies the component is a required entry on the order before you can apply the quickcombo using the Quick Combo Toggle button function. You can designate only one component as the pri-mary. Required Option: You must access Panel Editor and add the Quick Combo Toggle button function toa panel, to toggle between the primary component and its respective quick combo promotion.
Name — Defines the name of the component, such as Sandwich, Side, or Drink.
Substitution Category — Specifies a category of items to use for item substitution for the selected com-ponent. The system places the items on a FOH system-generated item substitution panel. The items in thecategory must be defined as an eligible component of the quick combo or the system ‘breaks’ the quickcombo into ala carte items. Enable this option in situations where a site must configure multiple quickcombo promotions to report as one, to accommodate for more than 45 items per component. You can alsouse this method to substitute the primary component item, such as ‘burgers’ to change the quick combo toa different quick combo. Required Option: You must select ‘Allow Item Substitution’ to enable thisoption.
Select the Items tab. The tab displays in a collapsed tree view window.
NAME CHANGE
Exclude from Discount — Excludes the component from discounting calculations. Thisapplies the total discount to only the components not marked with ‘Exclude’ in the promo-tion. If the price of the discounted amount is greater than the full price of the components notmarked with ‘Exclude,’ then you can not apply the promotion.
NEW Exclude from Mixed Levels Determination — Does not include the component in the determination of the level when you configure the quick combo for mixed levels.
NAME CHANGE
Allow Item Substitution — Enables item substitution for the selected component. The sys-tem places the eligible items for the component, including upsell items, on a FOH system-generated item substitution panel. Related Option: This option enables the ‘Substitution Cat-egory’ drop-down list.
Figure 17 Quick Combo Promotion - Items Tab (Collapsed Tree View)
Radiant Systems Page 37

March 5, 2008Aloha POS Enhancement Release v6.4
Click the ‘x’ for the corresponding component or click Expand All to display in an expanded tree view.
Item — Specifies the item group associated with the corresponding selected component.
Adding an Item to a Quick Combo ComponentPrior to v6.4, you could only add up to 15 items for any given component when you implemented a quickcombo. Although this may be a sufficient number for the components representing the main entree or theside item, many quick service restaurants offer a large variety of drinks to include in a quick combo. Itemsubstitutions, such a small shake for a soda, are often allowed at a charge, which increases the choices evenmore. To accommodate these scenarios, you would have to set up multiple quick combos that report as asingle quick combo. In v6.4, you can now add up to 45 items per quick combo component.
Quick combo levels are very important in reporting, especially for franchise organizations. In most corpo-rations, the higher the level the store reports, the more benefits the franchise receives. For the quick combotype, you can configure up to 10 component with different sets of qualifying items in each component. Youcan also configure up to three different levels and each level to which you upsell, changes the set of quali-fying items to upgrade the quick combo. In v6.4, you can now order a mixture of components from alldefined levels and the quick combo prices accordingly.
You can configure the use of quick combo upsell levels as strict or mixed.
Figure 18 Quick Combo Promotion - Items Tab (Expanded Tree View)
NAME CHANGE
Item Surcharge — Specifies an extra charge associated with the quick combo item, for the level of the quick combo. This value only displays in an expanded tree view.
NEW Size Surcharge — Specifies an extra charge associated with the quick combo item, for the size level of the quick combo. This value only displays in an expanded tree view.
Radiant Systems Page 38

Aloha POS Enhancement Release v6.4
Strict Upsell Levels
A strict upsell level configuration requires the guest to order the correct set of components configured forthe level before the system upgrades to the next quick combo level. If you mix items from different levels,the system does not upgrade to the next level and, if the item is not configured for the component, does notapply the quick combo and then prices the items individually. To do this, you must clear ‘Allow Compo-nents With Mixed Levels’ on the Setup tab of the Promotions - Quick Combo dialog box.
The following are examples of typical menu designs that support strict upsell levels with QuickServicequick combos:
Example 1: Strict Upsell Levels
In example 1, the guest can order Value Meal #1, which includes a burger, medium fries, and mediumdrink, for a discounted price of $3.99. The guest can ‘Go Large’ and upsell the meal to a cheeseburger,large fries, and large drink and ‘Go XLarge’ and upsell the meal to a double-meat burger, extra large fries,and extra large drink. With each upsell level, an extra $1.00 is charged. Therefore, when the guest ordersthe following combinations, the system records the appropriate level.
Example 2: Strict Upsell Levels with Item Surcharges
Value Meal #1 $3.99Regular Go Large Go XLarge
Go Large Upcharge $1.00 Go XLarge Upcharge $2.00Burger Cheeseburger Double-meat BurgerMed Fries Large Fries XLarge FriesMed Drink Large Drink XLarge Drink
Item 1 (Burger) Item 2 (Side) Item 3 (Drink) Price Calculation Quick Combo Level1. Burger Med Fries Med Drink $3.99 Regular level2. Burger Large Fries Med Drink NA Promotion does not
apply.3. Cheeseburger Large Fries Large Drink $3.99 + $1.00 =
$4.99Go Large upsell level
4. Cheeseburger Large Fries XLarge Drink NA Promotion does not apply.
5. Double-meat Burger
XLarge Fries XLarge Drink $3.99 + $2.00 =$5.99
Go XLarge upsell level
Value Meal #1 $3.99Regular Go Large Go XLarge
Go Large Upcharge $1.00 Go XLarge Upcharge $2.00Burger Cheeseburger Double-meat BurgerMed Fries Large Fries XLarge FriesSmall Shake $0.45 Med Shake $0.35 Large Shake $0.25
Radiant Systems Page 39

March 5, 2008Aloha POS Enhancement Release v6.4
In example 2, the guest can substitute the drink for a shake for an extra charge; thereby, increasing the priceof the quick combo. When the guest orders the following combinations, the system calculates the totalprice and records the appropriate level.
Mixed Upsell Levels
A mixed upsell level configuration allows the guest to order a mixed set of items from all components con-figured for the quick combo and the system upgrades to the next quick combo level. The system deter-mines the lowest common level between all components and records the level as appropriate. Then if theguest orders an item from a higher level without upgrading the quick combo to the next level, the restau-rant can add an extra charge on the item to compensate for the extra portion being sold. To do this, youmust select ‘Allow Components With Mixed Levels’ and clear ‘Auto Calculate Size Surcharge’ on theSetup tab of the Promotions - Quick Combo dialog box.
The following are examples of typical menu designs that support mixed upsell levels with QuickServicequick combos:
Example 1: Mixed Upsell Levels
In example 1, the guest can order Value Meal #1, which includes a burger, medium fries, and mediumdrink, for a discounted price of $3.99. The guest can ‘Go Large’ and upsell the meal to a cheeseburger,large fries, and large drink and ‘Go XLarge’ and upsell the meal to a double-meat burger, extra large fries,and extra large drink. With each upsell level, an extra $1.00 is charged. The guest can also substitute thedrink for a shake for an extra charge; thereby, increasing the price of the quick combo. By allowing mixed
Item 1 (Burger) Item 2 (Side) Item 3 (Drink) Price Calculation Quick Combo Level1. Burger Med Fries Small Shake (.45) $3.99 + $0.45 =
$4.44Regular level
2. Burger Large Fries Small Shake (.45) NA Promotion does not apply.
3. Cheeseburger Large Fries Med Shake (.35) $3.99 + $1.00 +$0.35 = $5.34
Go Large upsell level
4. Cheeseburger Large Fries Large Shake (.25) NA Promotion does not apply.
5. Double-meat Burger
XLarge Fries Large Shake (.25) $3.99 + $2.00 +$0.25 = $6.24
Go XLarge upsell level
Value Meal #1 $3.99Regular Go Large Go XLarge
Go Large Upcharge
$1.00 Go XLarge Upcharge
$2.00
Item Size Item Size Item SizeBurger Cheeseburger $0.20 Double-meat
Burger$0.30
Med Fries Large Fries $0.25 XLarge Fries $0.35Small Shake
$0.45 Med Shake $0.35 $0.15 Large Shake $0.25 $0.35
Radiant Systems Page 40

Aloha POS Enhancement Release v6.4
levels, the guest can also order a larger portion of an item that resides in a higher upsell level for an extracharge; thereby, increasing the price of the quick combo more. When the guest orders the following combi-nations, the system calculates the total price and records the appropriate level.
Example 2: Mixed Upsell Levels with Same Item for All Levels
In example 2, the menu has another common configuration. The quick combo does not upgrade the burger;however, the fries and drink remains the same. The guest can ‘Go Large’ and ‘Go XLarge’ and receive thesame size burger for each upsell level. When the guest orders the following combinations, the system cal-culates the total price and records the appropriate level.
Item 1 (Burger) Item 2 (Side) Item 3 (Drink) Price Calculation Quick Combo Level1. Burger Med Fries Small Shake (.45) $3.99 + $0.45 =
$4.44Regular level
2. Burger Large Fries (.25) Small Shake (.45) $3.99 + $0.25 +$0.45 = $4.64
Regular level
3. Cheeseburger Large Fries Med Shake (.35) $3.99 + $1.00 +$0.35 = $5.34
Go Large upsell level
4. Cheeseburger Large Fries Large Shake (.35) $3.99 + $1.00 +$0.25 + $0.35 =
$5.54
Go Large upsell level
5. Double-meat Burger
XLarge Fries Large Shake (.25) $3.99 + $2.00 +$0.25 = $6.24
Go XLarge upsell level
Value Meal #1 $3.99Regular Go Large Go XLarge
Go Large Upcharge
$1.00 Go XLarge Upcharge
$2.00
Item Size Item Size Item SizeBurger Burger BurgerMed Fries Large Fries $0.25 XLarge Fries $0.35Small Shake
$0.45 Med Shake $0.35 $0.15 Large Shake $0.25 $0.35
Item 1 (Burger) Item 2 (Side) Item 3 (Drink) Price Calculation Quick Combo Level1. Burger Med Fries Small Shake (.45) $3.99 + $0.45 =
$4.44Regular level
2. Burger Large Fries (.25) Small Shake (.45) $3.99 + $0.25 +$0.45 = $4.64
Regular level
3. Burger Large Fries Med Shake (.35) $3.99 + $1.00 +$0.35 = $5.34
Regular level
4. Burger Large Fries Large Shake (.35) $3.99 + $1.00 +$0.25 + $0.35 =
$5.54
Regular level
5. Burger XLarge Fries Large Shake (.25) $3.99 + $2.00 +$0.25 = $6.24
Regular level
Radiant Systems Page 41

March 5, 2008Aloha POS Enhancement Release v6.4
Since the burger is the lowest common component for each level, the system records the quick combo as aregular level in each of these examples. To avoid this, you can exclude individual items from determiningthe upsell level with the ‘Exclude from Mixed Levels Determination’ option for the corresponding item onthe Components tab of the Promotions - Quick Combo dialog box. If you exclude the burger as a determin-ing factor and the guest orders the following combinations, the system calculates the total price and recordsthe appropriate level.
Example 3: Mixed Upsell Levels with Negative Surcharge
Item 1 (Burger) Item 2 (Side) Item 3 (Drink) Price Calculation Quick Combo Level1. Burger * Med Fries Small Shake (.45) $3.99 + $0.45 =
$4.44Regular level
2. Burger * Large Fries (.25) Small Shake (.45) $3.99 + $0.25 +$0.45 = $4.64
Regular upsell level
3. Burger * Large Fries Med Shake (.35) $3.99 + $1.00 +$0.35 = $5.34
Go Large upsell level
4. Burger * Large Fries Large Shake (.35) $3.99 + $1.00 +$0.25 + $0.35 =
$5.54
Go Large upsell level
5. Burger * XLarge Fries Large Shake (.25) $3.99 + $2.00 +$0.25 = $6.24
Go XLarge upsell level
* Indicates the item is excluded from the mixed level determination.
Value Meal #1 $3.99Regular Go Large Go XLarge
Go Large Upcharge
$1.00 Go XLarge Upcharge
$2.00
Item Size Item Size Item SizeBurger Burger BurgerMed Fries Large Fries $0.25 XLarge Fries $0.35Sml Shake Med Shake $0.15 Large Shake $0.35OR Med Drink
-$0.15 OR Large Drink -$0.30 $0.15 OR XLarge Drink -$0.45 $0.35
Radiant Systems Page 42

Aloha POS Enhancement Release v6.4
In example 3, the quick combo includes a shake by default, instead of a drink. The guest can downgradethe shake to a drink at a reduced item surcharge price for a further discount. When the guest orders the fol-lowing combinations, the system calculates the total price and records the appropriate level.
Example 4: Mixed Upsell Levels with System-generated Size Surcharges
In example 4, the menu uses system-generated size surcharge calculations. In this case, the system does notuse the defined size surcharge amount and uses the difference between the item price of the two items toachieve the size surcharge price. To do this, you must select ‘Allow Components With Mixed Levels’ andselect ‘Auto Calculate Size Surcharge’ on the Setup tab of the Promotions - Quick Combo dialog box.
To accompany the menu example, the following table lists the price of the items as defined in Item Mainte-nance.
Item 1 (Burger) Item 2 (Side) Item 3 (Drink) Price Calculation Quick Combo Level1. Burger * Med Fries Med Drink (-.15) $3.99 - $0.15 =
$3.84Regular level
2. Burger * Large Fries (.25) Med Drink (-.15) $3.99 + $0.25 -$0.15 = $4.09
Regular level
3. Burger * Large Fries Large Drink (-.30) $3.99 + $1.00 -$0.30 = $4.69
Go Large upsell level
4. Burger * Large Fries XLarge Drink (.35 -.45)
$3.99 + $1.00 +$0.35 - $0.45 =
$4.89
Go Large upsell level
5. Burger * XLarge Fries XLarge Drink (-.45) $3.99 + $2.00 -$0.25 = $5.54
Go XLarge upsell level
* Indicates the item is excluded from the mixed level determination.
Value Meal #1 $3.99Regular Go Large Go XLarge
Go Large Upcharge
$1.00 Go XLarge Upcharge
$2.00
Item Size Item Size Item SizeBurger Burger BurgerMed Fries NA Large Fries NA XLarge Fries NAMed Drink NA Large Drink NA XLarge Drink NAOR Small Shake
$0.45 NA OR Med Shake $0.35 NA OR Large Shake $0.25 NA
Sides Item Level Price
Drinks Item Level Price
Medium Fries $1.49 Medium Drink $0.99Large Fries $1.99 Large Drink $1.29XLarge Fries $2.49 XLarge Drink $1.59
Radiant Systems Page 43
March 5, 2008Aloha POS Enhancement Release v6.4
When the guest orders the following combinations, the system calculates the total price and records theappropriate level.
To configure upsell levels for a QS Quick Combo type:
1. Select Maintenance > Payments > Promotions. 2. Select a quick combo promotion, and press Enter.3. Select Quick Combo from the ‘Type’ drop-down list.4. Click Type Specifics. The Promotions - Quick Combo dialog box appears.
5. Complete the following options for a basic QuickService quick combo, as needed:
Upsell #1 Name — Specifies the description for the first upsell level, such as ‘Biggie Size.’
Upsell #1 Additional Charge — Specifies the additional price for the first upsell level, on top ofthe previous level. A valid range is -999,999.99 to 999,999.99.
Item 1 (Burger) Item 2 (Side) Item 3 (Drink) Price Calculation Quick Combo Level1. Burger * Med Fries Med Drink $3.99 Regular upsell level2. Burger * Large Fries Med Drink $3.99 + (Large Fries
$1.99 - Medium Fries$1.49 = $0.50) =
$4.49
Regular upsell level
3. Burger * Large Fries Large Drink $3.99 + $1.00 = $4.99 Go Large upsell level4. Burger * Large Fries XLarge Drink $3.99 + $1.00 +
(XLarge Drink $1.59 -Large Drink $1.29 =
$0.30) = $5.29
Go Large upsell level
5. Burger * XLarge Fries XLarge Drink $3.99 + $2.00 = $5.99 Go XLarge upsell level
* Indicates the item is excluded from the mixed level determination.
Figure 19 Quick Combo Promotion - Setup Tab
Radiant Systems Page 44

Aloha POS Enhancement Release v6.4
Upsell #2 Name — Specifies the description for the first upsell level, such as ‘Mega Size.’
Upsell #2 Additional Charge — Specifies the additional price for the second upsell level, on topof the previous level. A valid range is -999,999.99 to 999,999.99.
Allow Components With Mixed Levels — Expands the set of qualifying items to all upsell lev-els and allows the guest to order a mixture of items from all defined upsell levels. For example, ifthe regular upsell level contains a burger, medium fries, and a medium drink, and the guest wantsto order a large drink, the system applies the quick combo with the same level and adds a sizeupcharge to the quick combo. If mixed levels are not allowed, the mixed level of items breaks thequick combo and the items are ordered individually.
Auto Calculate Size Surcharge — Enables the system to calculate the size surcharge based onthe price difference between items, as defined in Item Maintenance, to use as the size surchargeamount. The system disregards the value configured in Maintenance > Payments > Promotions >Quick Combo Type > Items tab > Size Surcharge text box for the corresponding upsell level. Forexample, if the quick combo includes a medium drink priced at $0.99 and the guest orders a largedrink priced at $1.29, the system adds $0.30 as the size surcharge for the item.
Show Upsell as Modifier — Displays the quick combo upcharge charge on the check as a modifier.Upsell #1 Name — Specifies the description for the first upsell level, such as ‘BiggieSize.’
Upsell #1 Additional Charge — Specifies the additional price for the first upsell level, on top ofthe previous level. A valid range is -999,999.99 to 999,999.99.
Upsell #2 Name — Specifies the description for the first upsell level, such as ‘Mega Size.’
Upsell #2 Additional Charge — Specifies the additional price for the second upsell level, on topof the previous level. A valid range is -999,999.99 to 999,999.99.
Allow Components With Mixed Levels — Expands the set of qualifying items to all upsell lev-els and allows the guest to order a mixture of items from all defined upsell levels. For example, ifthe regular upsell level contains a burger, medium fries, and a medium drink, and the guest wantsto order a large drink, the system applies the quick combo with the same level and adds a sizeupcharge to the quick combo. If mixed levels are not allowed, the mixed level of items breaks thequick combo and the items are ordered individually.
Auto Calculate Size Surcharge — Enables the system to calculate the size surcharge based onthe price difference between items, as defined in Item Maintenance, to use as the size surchargeamount. The system disregards the value configured in Maintenance > Payments > Promotions >Quick Combo Type > Items tab > Size Surcharge text box for the corresponding upsell level. Forexample, if the quick combo includes a medium drink priced at $0.99 and the guest orders a largedrink priced at $1.29, the system adds $0.30 as the size surcharge for the item.
Show Upsell as Modifier — Displays the quick combo upcharge charge on the check as a modi-fier.
Radiant Systems Page 45

March 5, 2008Aloha POS Enhancement Release v6.4
6. Click the Components tab.
7. Complete the following options for the first component, as needed:
Exclude from Mixed Levels Determination — Does not include the component in the determi-nation of the level when you configure the quick combo for mixed levels.
8. Click the Items tab.9. Select a component from the drop-down list. If you are editing an existing quick combo, only the
groups display in Collapsed view.
Figure 20 Quick Combo Promotion - Components Tab
Figure 21 Quick Combo Promotion - Items Tab (Collapsed View)
Radiant Systems Page 46

Aloha POS Enhancement Release v6.4
10. Click Expand to view items within each group, with their corresponding size and item surcharges.
11. Perform the following procedures, as needed:
To add or edit a quick combo item:
a. Click Add to display the Add Quick Combo Item dialog box appears or click Edit to display the Edit Quick Combo Item dialog box.
b. Complete the following options for a regular-sized QS quick combo component.
Upsell 1 — Specifies the item to be sold at a second level of the quick combo.
Upsell 1 Item Surcharge — Specifies an extra charge associated with the quick combo item, forthe second level of the quick combo.
Upsell 1 Size Surcharge — Specifies an extra charge associated with the quick combo item, forthe second level of the quick combo.
Upsell 2 — Specifies the item to be sold at a third level of the quick combo.
Figure 22 Quick Combo Promotion - Items Tab (Expanded View)
Figure 23 Edit Quick Combo Item Dialog Box
Radiant Systems Page 47

March 5, 2008Aloha POS Enhancement Release v6.4
Upsell 2 Item Surcharge — Specifies an extra charge associated with the quick combo item, forthe third level of the quick combo.
Upsell 2 Size Surcharge — Specifies an extra charge associated with the quick combo item, forthe third level of the quick combo.
c. Click OK.
To delete a quick combo item:
Click Delete to remove the quick combo item from the component.
12. Repeat the procedure for each component for the quick combo.13. Click OK to return to the Promotions function.14. Click Save and exit the Promotions function.
Radiant Systems Page 48

Aloha POS Enhancement Release v6.4
Requiring Manager Approval for Cash Drops
The ‘Prompt for Cash Drop’ feature in Aloha QuickService displays FOH prompts to make a cash dropwhen the drawer has reached a defined threshold. You can define a threshold for the initial prompt, forevery following subsequent prompt, and for when you are required to make a cash drop. In v6.4 andhigher, you can now configure the system to require manager approval for performing a cash drop.
To require manager approval for cash drops:
1. Select Maintenance > Store Settings > Financials group > Banks tab.
2. Select Require Manager approval for Cash Drops.
Require Manager approval for Cash Drops — Displays the manager approval screen when youare prompted to perform a cash drop from the FOH. Required Options: 1) You must type a valuehigher than 0.00 in the corresponding text boxes to enable the ‘Prompt for Cash Drop’ feature. 2)To allow an employee to approve a cash drop, you must select ‘Cash Drop’ in Maintenance >Labor > Access Levels > Financial tab and assign the employee to the access level.
3. Click Save and exit the Store Settings function.
Version RFC Number Products Audiencev6.4 RFC 54586 Aloha QuickService Configuration Technician,
Store Managers
Figure 24 Store Settings - Financials Group - Banks Tab
Radiant Systems Page 49

March 5, 2008Aloha POS Enhancement Release v6.4
To provide the ability to approve a cash drop:
1. Select Maintenance > Labor > Access Levels > Financial tab.
2. Select Cash Drops.
Cash Drops — Allows all employees using this access level to either do a cash drop without man-ager approval or to approve a cash drop. Required Options: You must select ‘Require Managerapproval for Cash Drops’ in Maintenance > Store Settings > Financials group > Banks tab toenable this feature.
3. Click Save and exit the Access Levels function.
Figure 25 Store Settings - Access Levels - Financial Tab
Radiant Systems Page 50

Aloha POS Enhancement Release v6.4
To perform a cash drop with manager approval:
When the expected cash in the drawer reaches the amount defined for any threshold, either the ‘Would youlike to do a Cash Drop now?’ screen or the ‘You are required to make a Cash Drop’ screen appears.
1. Touch Yes or OK to continue. If you do not have sufficient access to perform a cash drop, the man-ager approval screen appears.
2. A manager, or employee with sufficient access, must enter their password to continue with the cash drop.
3. Complete the cash drop, as normal.
Figure 26 FOH Manager Approval Screen for Performing a Cash Drop
Radiant Systems Page 51

March 5, 2008Aloha POS Enhancement Release v6.4
Supporting Tipshare Distribution
Tipsharing is common in a table service environment where employees who do not directly receive tipsfrom the guests, referred to as the support staff, are compensated for their efforts by sharing in the tips theguests give to the wait staff. The practice is often a company policy that is either mandatory or stronglysuggested. Restaurants use tipsharing as a hiring incentive for the support staff, which ordinarily are lessdesirable positions and have a higher turnover rate. These positions are indirectly tipped on top of thewages they already receive; thereby, providing a more satisfied and long-lasting employee for the restau-rant.
When the employees who contribute to the tipshare pool checkout, they contribute a portion of their tipsinto a tipshare pool, based on a percentage of their sales. The positions who receive money from the tip-share pool generally include bussers, dishwashers, food runners, and greeters. Although bartenders are nor-mally a higher-level position, they are also considered part of the support team because they preparealcoholic beverages for the wait staff.
A server can also contribute more than the default tipshare percentage to reward the support team or spe-cific employees for making their job easier and allowing them to spend more time serving their guests. Forexample, if a server feels that a busser cleaned their station extra well, the server can tip out more than theallotted amount to that busser.
Version RFC Number Products Audiencev6.4 RFC 14404 Aloha TableService Store Managers
End Users
Figure 27 Tipshare Diagram
Radiant Systems Page 52
Aloha POS Enhancement Release v6.4
Once the contributions are put into the tipshare pool, a manager can distribute the default tipshare contribu-tions to the appropriate recipients.
You can configure the distribution to occur either daily or weekly, but not both.
Refer to the Tipshare Distribution Feature Focus Guide for complete information on configuring and using Tipshare Distribution.
Radiant Systems Page 53

March 5, 2008Aloha POS Enhancement Release v6.4
Radiant Systems Page 54