academic institution module - united states navy | p a g e academic institution module (aim) asics...
TRANSCRIPT

ACADEMIC INSTITUTION MODULE
USER GUIDE for
Navy College Management Information System
(NCMIS)
Version 5.0
10 August, 2017
1 | P a g e
Table of Contents
Academic Institution Module (AIM) Basics ......................................................................................... 3
Introduction....................................................................................................................................... 3
Requesting an Account ..................................................................................................................... 3
Password Reset/Account Reactivation............................................................................................ 5
Login ................................................................................................................................................... 6
Degrees Awarded.................................................................................................................................. 7
Uploading Degree Awarded Files..................................................................................................... 7
File Format .................................................................................................................................... 7
File Format (contents) .................................................................................................................. 7
Uploading a Degree Conferral File .............................................................................................. 8
Grades.................................................................................................................................................. 10
Grade File Format ........................................................................................................................... 10
Upload Grades................................................................................................................................. 11
Modify Grades ................................................................................................................................. 11
Courses ................................................................................................................................................ 13
Course Catalog ................................................................................................................................ 13
File Format Downloads .............................................................................................................. 13
File Format Contents and Troubleshooting .............................................................................. 15
Uploading a Course Catalog File ................................................................................................ 17
Search Existing Catalog ................................................................................................................... 19
Remove and Add Courses .............................................................................................................. 19
Editing Course Catalogs: ................................................................................................................. 20
Tuition Rates ....................................................................................................................................... 21
Remove Tuition Rate ...................................................................................................................... 21
Add\Edit Tuition Rate ..................................................................................................................... 22
Tuition Type Naming Convention: ................................................................................................. 22
Academic Institution Module Help .................................................................................................... 23
Help Requests, Academic Institution Module issues ................................................................... 23
NCMIS Academic Institution Module (AIM) Account Request Form .............................................. 24
2 | P a g e
Table of Figures
Figure 1: Apply for account .................................................................................................................. 3
Figure 2: Contact Us.............................................................................................................................. 4
Figure 3: Assistance Center Help Request .......................................................................................... 4
Figure 4: Reset password link .............................................................................................................. 5
Figure 5: Password Reset ..................................................................................................................... 5
Figure 6: Temporary password sent via email .................................................................................... 5
Figure 7: Password Requirements ....................................................................................................... 5
Figure 8: Login Page .............................................................................................................................. 6
Figure 9: Home Page............................................................................................................................. 6
Figure 10: Degree upload format ........................................................................................................ 7
Figure 11: Upload degree file ............................................................................................................... 8
Figure 12: Select degree file ................................................................................................................. 8
Figure 13: Degrees with errors ............................................................................................................ 8
Figure 14: Degree Edit .......................................................................................................................... 9
Figure 15: Uploaded Grades Files ...................................................................................................... 10
Figure 16: Grades Excel Spreadsheet ................................................................................................ 10
Figure 17: Select grade file ................................................................................................................. 11
Figure 18: Edit grades with errors ..................................................................................................... 11
Figure 19: Manual Grade Search ....................................................................................................... 12
Figure 20: Missing grade search ........................................................................................................ 12
Figure 21: Select schools tab.............................................................................................................. 13
Figure 22: Select course catalog-sample .xml ................................................................................... 14
Figure 23: Sample File to Upload Couse Catalog .............................................................................. 14
Figure 24: AI Course Catalog Management ...................................................................................... 17
Figure 25: AI Course Catalog Management ...................................................................................... 17
Figure 26: Upload Course Catalog ..................................................................................................... 18
Figure 27: Course listing ..................................................................................................................... 18
Figure 28: AI Course Catalog Management ...................................................................................... 19
Figure 29: AI Course Catalog Management ...................................................................................... 19
Figure 30: Add Course to School........................................................................................................ 20
Figure 31: AI Course Catalog Management ...................................................................................... 20
Figure 32: Edit Couse .......................................................................................................................... 20
Figure 33: AI Course Catalog search page ......................................................................................... 21
Figure 34: Tuition Rates...................................................................................................................... 21
Figure 35: Tuition Rates...................................................................................................................... 22
3 | P a g e
Academic Institution Module (AIM) Basics
Introduction
The Navy College Management Information System (NCMIS) Academic Institution Module (AIM) allows academic institutions to post grades, upload course catalogs, and submit degree completions for Navy, Marine Corps and Coast Guard service members using TA (Tuition Assistance) and Navy College Program for Afloat College Education (NCPACE).
NCMIS uses personally identifiable information (PII) such as SSN to positively identify service
members. To safeguard the system from unauthorized access, each academic institution should
assign a supervisor to request individual user accounts who will be using AIM. User accounts
are assigned to a single individual and no two individuals should share an account. After the
designated school supervisor confirms their employee’s information on the My Academic
Institution User Request Form, a user account will be created for the individual. When user
accounts are no longer required, notify the NCMIS Program Office at 850-473-6053 or submit a
Help Request ticket at the Navy College Program website to have the account closed. Access to
NCMIS may be revoked at any time without notification if guidelines are not followed.
This User guide will be updated as the functionality of the Academic Institution Module is
expanded.
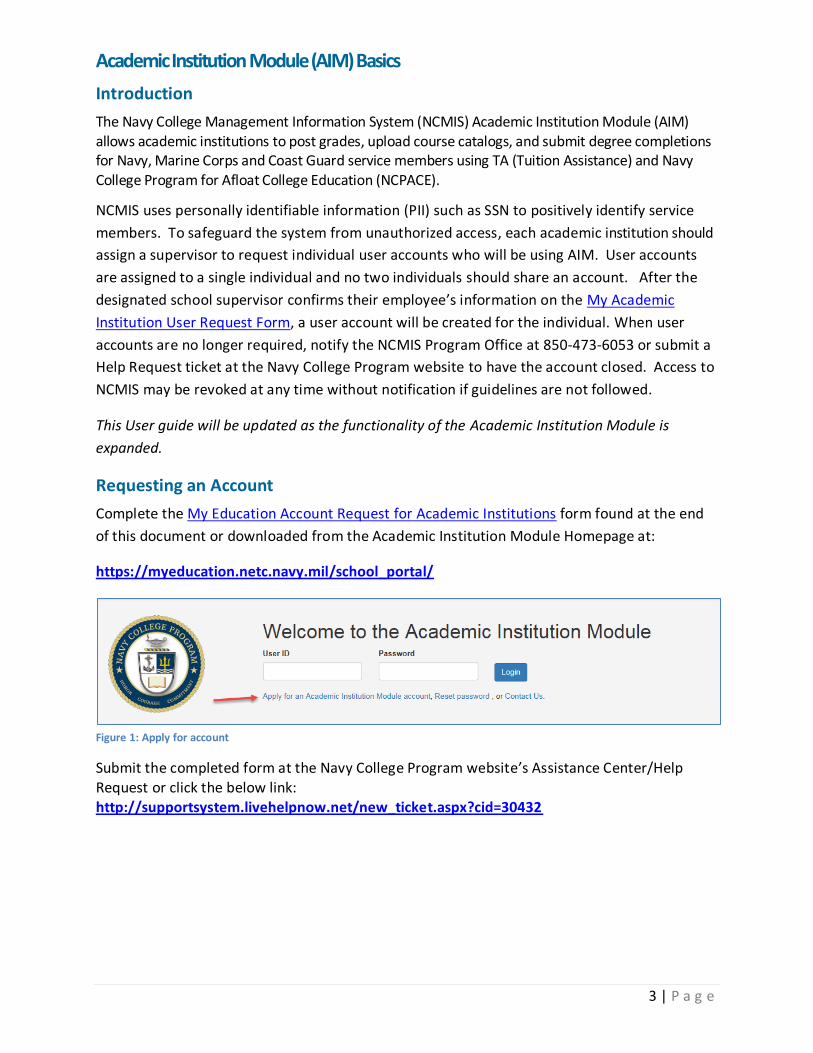
Requesting an Account
Complete the My Education Account Request for Academic Institutions form found at the end
of this document or downloaded from the Academic Institution Module Homepage at:
https://myeducation.netc.navy.mil/school_portal/
Figure 1: Apply for account
Submit the completed form at the Navy College Program website’s Assistance Center/Help Request or click the below link: http://supportsystem.livehelpnow.net/new_ticket.aspx?cid=30432

4 | P a g e
You can also use the “Contact Us” link on the “Welcome to the Academic Institution Module” login page to submit the form.
Figure 2: Contact Us
Provide required information for each box. Select Academic Institution Support (TECHNICAL) as the category. Upload completed MyEducation Account Request form.
Figure 3: Assistance Center Help Request
After the internal vetting process has been finalized, a User ID will be emailed to the requester.
5 | P a g e
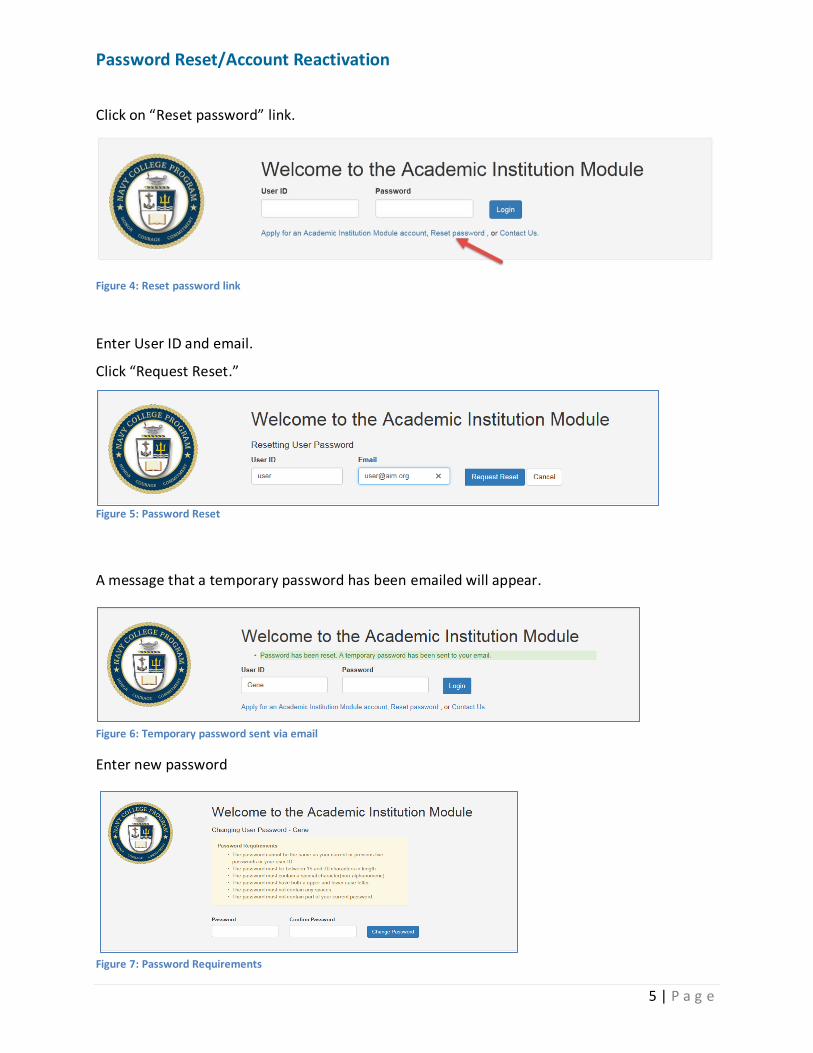
Password Reset/Account Reactivation
Click on “Reset password” link.
Figure 4: Reset password link
Enter User ID and email.
Click “Request Reset.”
Figure 5: Password Reset
A message that a temporary password has been emailed will appear.
Figure 6: Temporary password sent via email
Enter new password
Figure 7: Password Requirements
6 | P a g e
Login
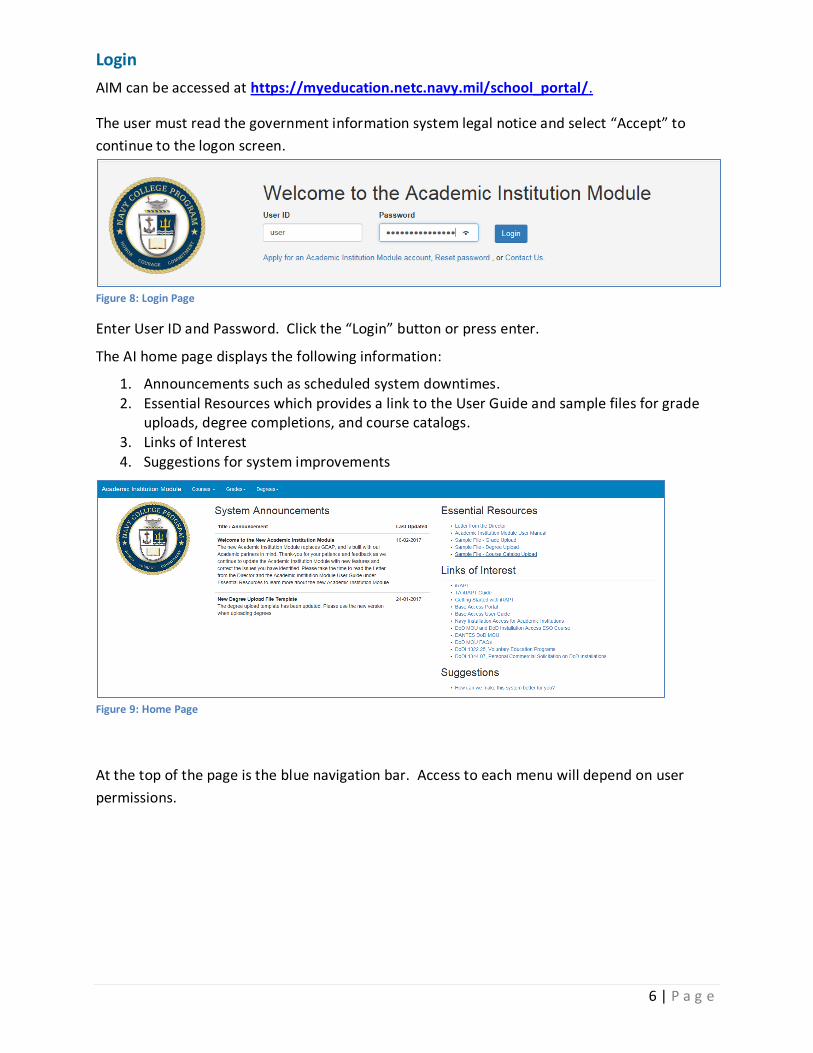
AIM can be accessed at https://myeducation.netc.navy.mil/school_portal/.
The user must read the government information system legal notice and select “Accept” to
continue to the logon screen.
Figure 8: Login Page
Enter User ID and Password. Click the “Login” button or press enter.
The AI home page displays the following information:
1. Announcements such as scheduled system downtimes. 2. Essential Resources which provides a link to the User Guide and sample files for grade
uploads, degree completions, and course catalogs. 3. Links of Interest 4. Suggestions for system improvements
Figure 9: Home Page
At the top of the page is the blue navigation bar. Access to each menu will depend on user
permissions.

7 | P a g e
Degrees Awarded
Academic Institutions are able to report degrees awarded by creating a spreadsheet. On the
navigation bar, select “Degrees”, then “Upload Degrees”. The “My Uploaded Degree Files”
page allows upload of degree completions and a view of previously uploaded degree awarded
files.
Uploading Degree Awarded Files
File Format
Degree files must be in the correct format and must be .xls, .xlsx, .txt, or .csv format. Excel
version must be 97-Excel format or newer.
The degree template has been updated. Please use the new version when uploading degrees.
For any questions on school code, email Tiawania Zajac - [email protected].
Figure 10: Degree upload format
File Format (contents)
The spreadsheet must contain the following.
School code:
SSN
First name
Last name
Degree Level: Enter a single numerical digit for degree type
o 3 = Associates
o 4 = Bachelors
o 5 = Masters
o 6 = PhD
o 7 = Doctorate
o 8 = Certificate/Diploma
Degree Type (AS, BA, MBA, etc.)
Degree Title
Degree ID - 6 digit code
Award Date – mm/dd/yyyy
GPA – optional
Credits – optional
8 | P a g e
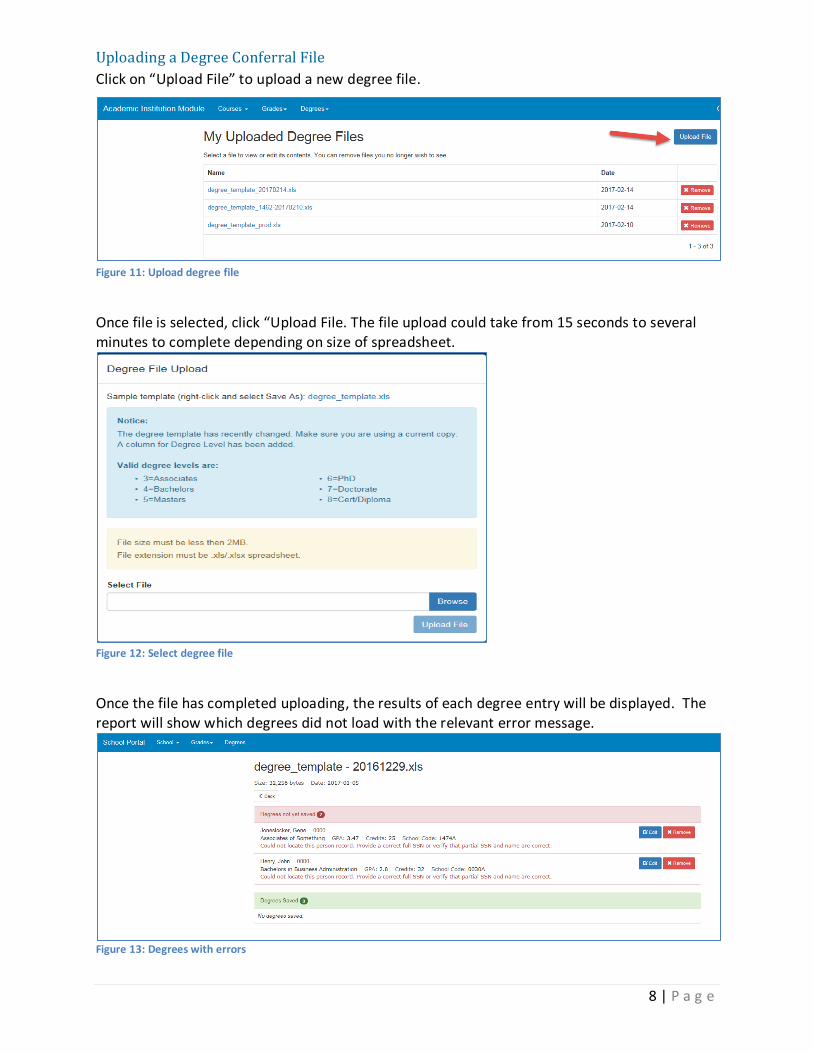
Uploading a Degree Conferral File
Click on “Upload File” to upload a new degree file.
Figure 11: Upload degree file
Once file is selected, click “Upload File. The file upload could take from 15 seconds to several minutes to complete depending on size of spreadsheet.
Figure 12: Select degree file
Once the file has completed uploading, the results of each degree entry will be displayed. The report will show which degrees did not load with the relevant error message.
Figure 13: Degrees with errors
9 | P a g e
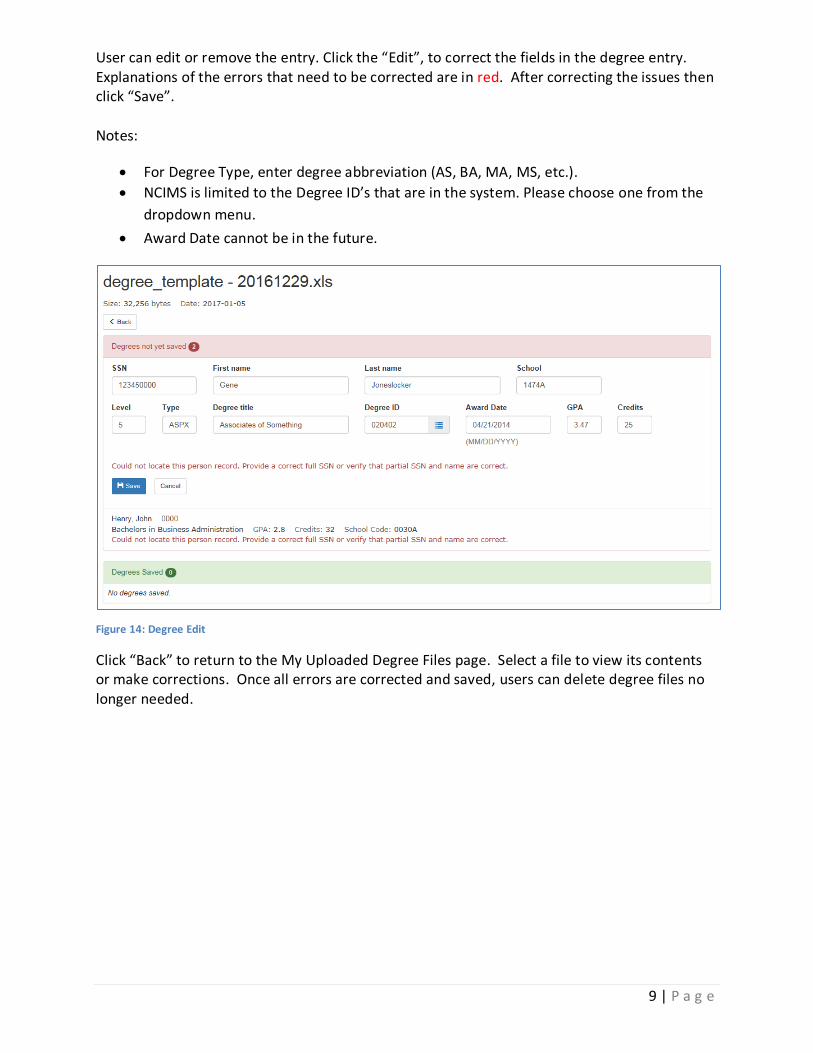
User can edit or remove the entry. Click the “Edit”, to correct the fields in the degree entry. Explanations of the errors that need to be corrected are in red. After correcting the issues then click “Save”. Notes:
For Degree Type, enter degree abbreviation (AS, BA, MA, MS, etc.).
NCIMS is limited to the Degree ID’s that are in the system. Please choose one from the
dropdown menu.
Award Date cannot be in the future.
Figure 14: Degree Edit
Click “Back” to return to the My Uploaded Degree Files page. Select a file to view its contents or make corrections. Once all errors are corrected and saved, users can delete degree files no longer needed.
10 | P a g e
Grades
Upload final grades using a spreadsheet file (i.e. MS Excel). On the navigation bar, select Grades
--> Upload Grades.
Figure 15: Uploaded Grades Files
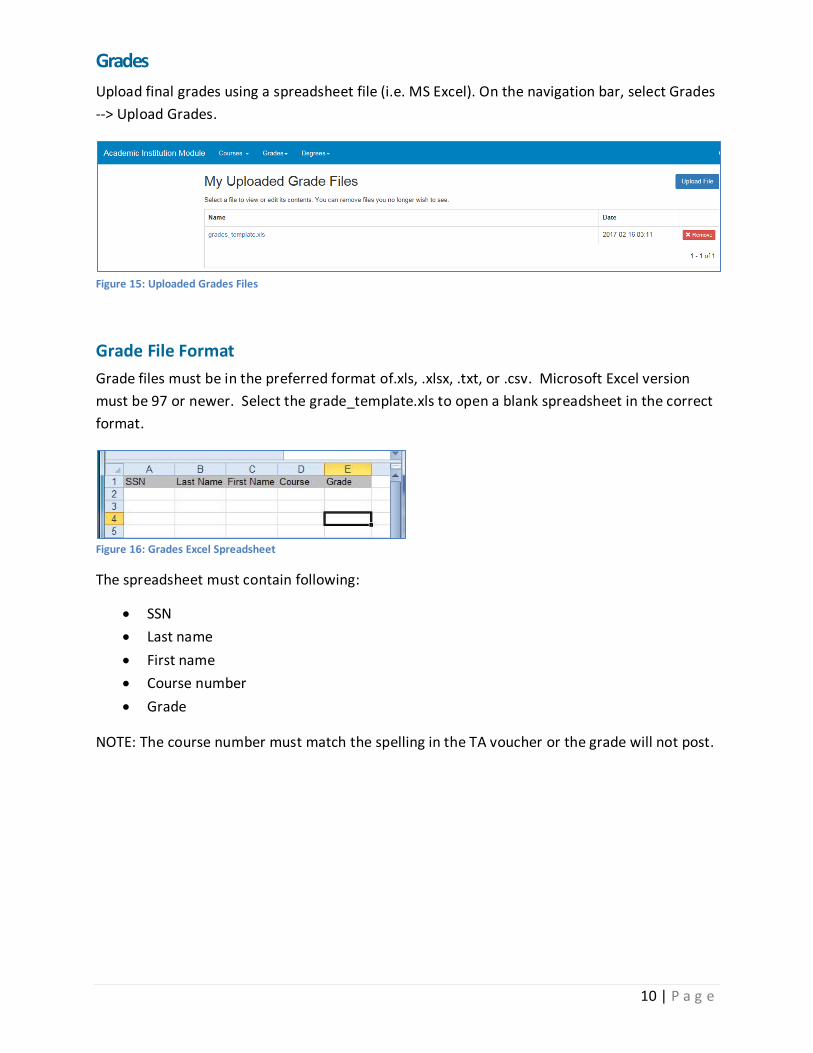
Grade File Format
Grade files must be in the preferred format of.xls, .xlsx, .txt, or .csv. Microsoft Excel version
must be 97 or newer. Select the grade_template.xls to open a blank spreadsheet in the correct
format.
Figure 16: Grades Excel Spreadsheet
The spreadsheet must contain following:
SSN
Last name
First name
Course number
Grade
NOTE: The course number must match the spelling in the TA voucher or the grade will not post.

11 | P a g e
Upload Grades
Select the “Upload File” button to upload a new grades file.
Figure 17: Select grade file
Once the file has completed uploading, a “Grades not yet saved” report may display. This report displays if any grades did not upload correctly.
Figure 18: Edit grades with errors
The option to edit or remove the grade entry error will display. Choose “Edit” to update the fields in the grade entry. Explanations of the errors that need to be corrected are in red. After correcting the issues, click “Save”. Click “Back” to return to the My Uploaded Grade Files page. Select a file to view its contents or make corrections. Files can be deleted if no longer needed. Unsaved grades in the file may be corrected and saved.
Modify Grades
To modify grades, select the Grades tab on the navigation bar --> Search Grades. The “My
Uploaded Grade Search” page opens, allowing the ability to add or change grades manually.

12 | P a g e
Figure 19: Manual Grade Search
Search for grades by using any of the search criteria. Search for all grades, or limit the search to
missing grades only.
Figure 20: Missing grade search
Update missing grade using the drop-down or cancel the course entirely.
Entries that do not have a grade drop-down cannot be changed.
Entries that do not have a “Cancel Course” cannot be cancelled.
If unable to manually post a student’s grade due to technical difficulty, submit a Help Request at the Navy College Program website’s Assistance Center:
http://supportsystem.livehelpnow.net/new_ticket.aspx?cid=30432.
TA Grades and Billing as the ticket category. Include a screen shot with the URL on top of the Grade Search page. Save this page as a PNG file and attach it to the Help Request.
13 | P a g e
Courses
In the navigation bar, select the School’s tab and then click on “Courses Catalog”. The “Course
Catalog” page opens and allows upload and the view the academic institution Course Catalog.
Course Catalog
File Format Downloads
Course Catalog file must be in the correct format and be an xml file. The file may be generated
from a database or manually created with a text only editor. Several tools are provided to
assist with the course catalog file development from the AIM Homepage under Essential
Resources:
1. An XSD schema definition file can be downloaded or viewed by clicking on the “XSD
Schema – Course Catalog Upload”.
2. An example XML file can be downloaded “Sample File - Course Catalog Upload”.
Instructions below demonstrate how to download these files.
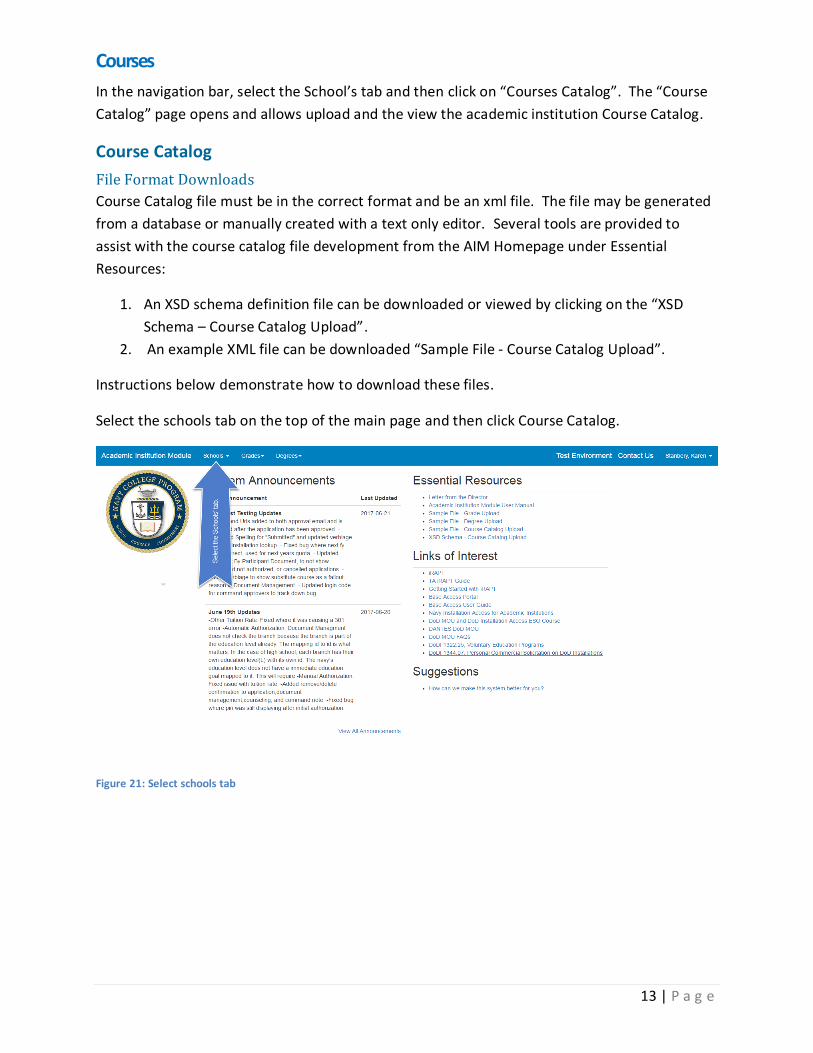
Select the schools tab on the top of the main page and then click Course Catalog.
Figure 21: Select schools tab
14 | P a g e
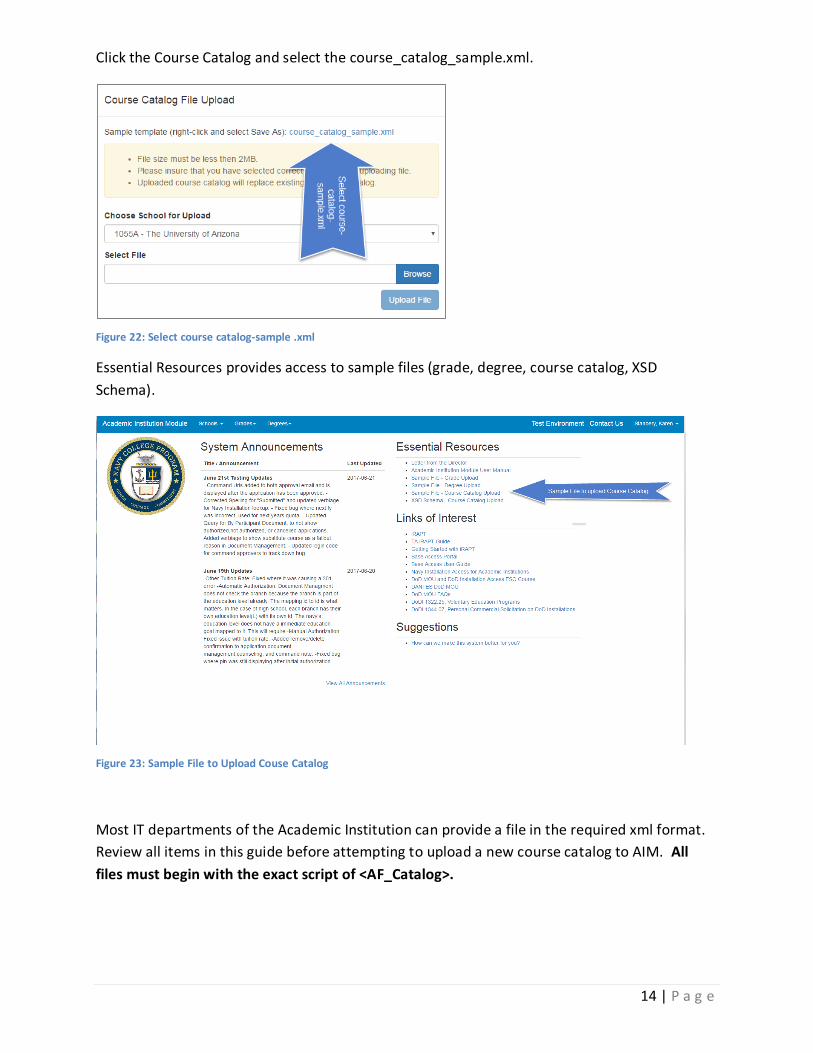
Click the Course Catalog and select the course_catalog_sample.xml.
Figure 22: Select course catalog-sample .xml
Essential Resources provides access to sample files (grade, degree, course catalog, XSD
Schema).
Figure 23: Sample File to Upload Couse Catalog
Most IT departments of the Academic Institution can provide a file in the required xml format.
Review all items in this guide before attempting to upload a new course catalog to AIM. All
files must begin with the exact script of <AF_Catalog>.
15 | P a g e
File Format Contents and Troubleshooting
The XML file format:
1. The xml must be well formed. Otherwise, this error appears, “There was an error parsing your file. Please insure that the XML is well-formed, and elements are within length requirements, and try again. Error: The element type "AF_Course" must be terminated by the matching end-tag "</AF_Course>". Example: <AF_Catalog> <AF_Course>
<Crs_Subject>CHEM</Crs_Subject> <Crs_Number>1210</Crs_Number> <Crs_Title /> <Crs_LongTitle>Chemical Principles I</Crs_LongTitle> <Crs_Credits>3</Crs_Credits> <Crs_Level>L</Crs_Level> <Prerequisites /> <Crs_Description>This is Chemical Principles 1 of 2.</Crs_Description> <Crs_Materials /> <Crs_TA>Y</Crs_TA> <Crs_NCPACE>N</Crs_NCPACE>
</AF_Course> <AF_Catalog>
2. The new course catalog template MUST be used. Download the template and schema definition from the AIM homepage.
3. All 11 AF_Course elements must be present. If the file doesn’t have a not-required field, such as prerequisites, include an empty element as <Prerequisites />. If an element is missing, this error appears, “There was an error reading your file at course ACCT 100. Please correct any missing elements and try again. Error: null”.
a. Crs_Subject
b. Crs_Number
c. Crs_Title
d. Crs_LongTitle
e. Crs_Credits
f. Crs_Level
g. Prerequisites
h. Crs_Description
i. Crs_Materials
j. Crs_TA
k. Crs_NCPACE
4. The following elements must have valid data and cannot be empty. If one of these
elements has a missing value, this error appears, “There were required elements
missing a value at course ACCT 100. Please make corrections and try again”.
a. Crs_Subject
b. Crs_Number
c. Crs_LongTitle

16 | P a g e
d. Crs_Credits
e. Crs_Level
f. Crs_Description
5. The Crs_Level element must have one of the following CAPITALIZED values: D, L, U, G, V.
This error appears, “Course ACCT 100 Course Level must be D, L, U, G, V. Please make
corrections and try again”.
a. D (Developmental), L (Lower), U (Upper), G (Graduate), V (VoTech).
b. You may use U for all undergrad courses if desired.
6. The Crs_TA and Crs_NCPACE elements must have one of the following CAPITALIZED
values: Y, N. This error appears, “TA/NCPACE indicators on course ACCT 100 must have
Y/N values.”
a. Y (Yes), N(No)
7. Maximum lengths for the elements are as follows. The upload will fail if the maximum
length is exceeded. This error appears,”Course ACCT 100 Long title is longer than 100
chars (340). Please make corrections and try again”.
a. Crs_Subject max 8 chars
b. Crs_Number max 8 chars
c. Crs_Title max 30 chars
d. Crs_LongTitle max 100 chars
e. Crs_Credits number
f. Crs_Level max 50 chars
g. Prerequisites max 1000 chars
h. Crs_Description max 1000 chars
i. Crs_Materials max 1000 chars
j. Crs_TA max 1 chars (Y/N)
k. Crs_NCPACE max 1 chars (Y/N)
8. The following elements make a course unique. If more than one course has the same
values for subject, number, level, credits, NCPACE, and TA, the second course will be
considered a duplicate and will be ignored. (NOTE: NCPACE indicator should not be used
at this time.)
a. subject
b. course number
c. course level
d. credits
e. NCPACE
f. TA
9. Truncated fields: The following fields will be cut off at the maximum length if they are
too long. The course will upload successfully, but the element will only have the
maximum characters.
a. title (30 chars)
b. description (1000 chars)

17 | P a g e
10. To submit a trouble ticket for course catalog upload issues, please send an email to
[email protected] with the following information.
a. your school code and username
b. a screenshot showing the error received
c. the course catalog file you are attempting to upload
Uploading a Course Catalog File
In the navigation bar, click on “Schools”, then “Course Catalog”.
Figure 24: AI Course Catalog Management
The AI Course Catalog Management page opens.
Note:
A. Maximum file size is 2MB.
B. Uploaded course catalog REPLACES all existing courses in catalog.
C. Academic Institution’s with multiple locations must upload a catalog file for each
location.
D. To add a few courses to the school catalog, use the “Add New Course” button.
Click on “Upload Catalog File” to upload a new catalog.
Figure 25: AI Course Catalog Management
18 | P a g e
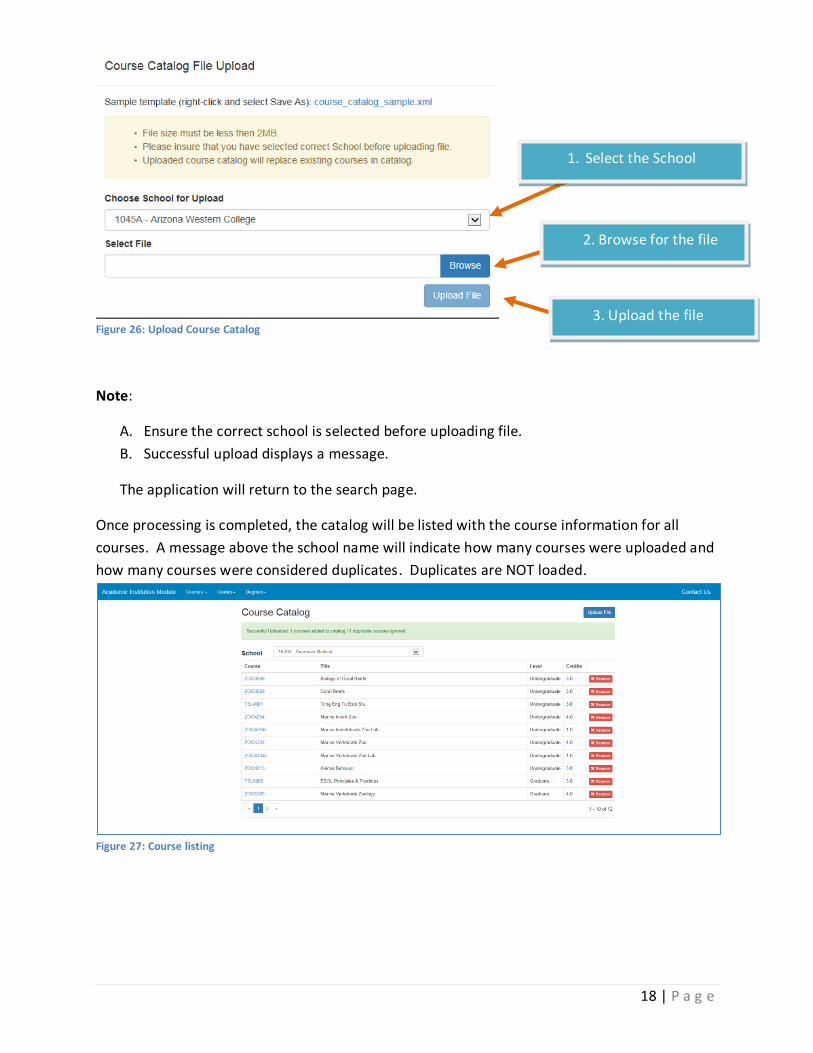
Figure 26: Upload Course Catalog
Note:
A. Ensure the correct school is selected before uploading file.
B. Successful upload displays a message.
The application will return to the search page.
Once processing is completed, the catalog will be listed with the course information for all
courses. A message above the school name will indicate how many courses were uploaded and
how many courses were considered duplicates. Duplicates are NOT loaded.
Figure 27: Course listing
1. Select the School
2. Browse for the file
3. Upload the file
19 | P a g e
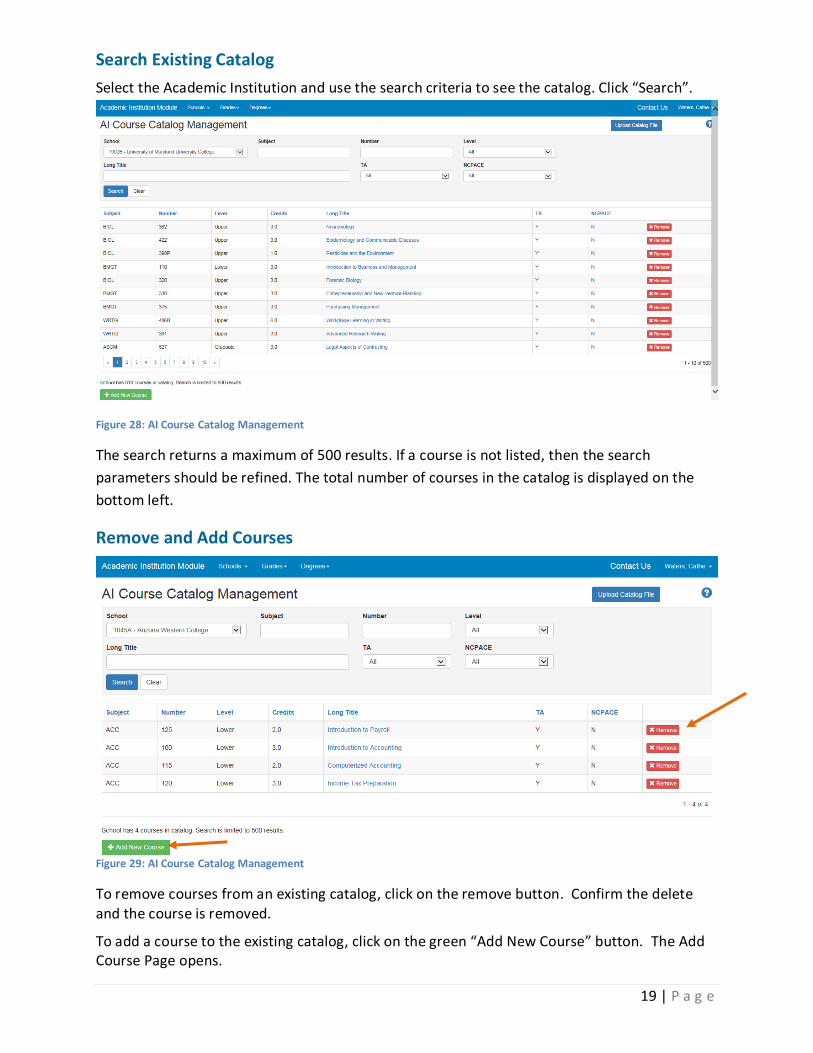
Search Existing Catalog
Select the Academic Institution and use the search criteria to see the catalog. Click “Search”.
Figure 28: AI Course Catalog Management
The search returns a maximum of 500 results. If a course is not listed, then the search
parameters should be refined. The total number of courses in the catalog is displayed on the
bottom left.
Remove and Add Courses
Figure 29: AI Course Catalog Management
To remove courses from an existing catalog, click on the remove button. Confirm the delete and the course is removed.
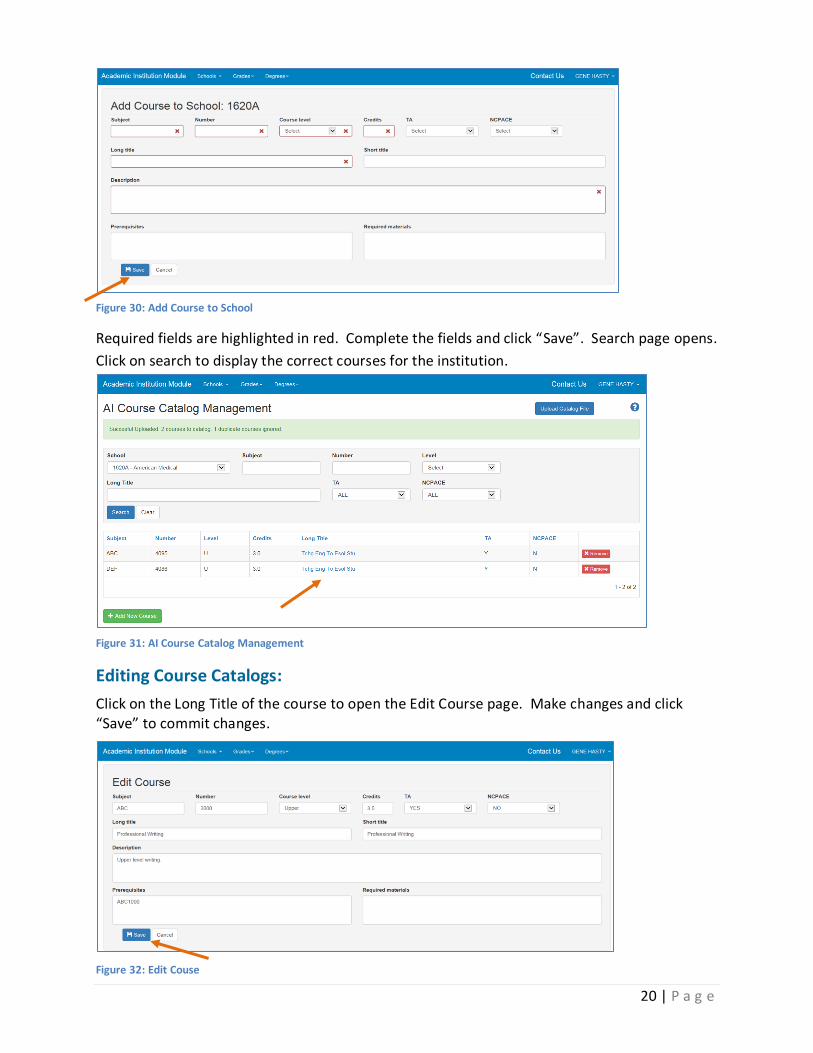
To add a course to the existing catalog, click on the green “Add New Course” button. The Add Course Page opens.
20 | P a g e
Figure 30: Add Course to School
Required fields are highlighted in red. Complete the fields and click “Save”. Search page opens.
Click on search to display the correct courses for the institution.
Figure 31: AI Course Catalog Management
Editing Course Catalogs:
Click on the Long Title of the course to open the Edit Course page. Make changes and click “Save” to commit changes.
Figure 32: Edit Couse

21 | P a g e
After saving, the search page is displayed.
Figure 33: AI Course Catalog search page
Tuition Rates
Tuition rates are critical to the Tuition Assistance process. Correct tuition rates will generate
faster TA authorizations and less corrections for the student, school, and the military education
offices. Ensure tuition rates are accurate and up-to-date. On the navigation bar, click the tab
for “Schools”, then “Tuition Rates”.
View an Institution's tuition rates.
Manually add, edit, or remove an Institution's tuition rates.
Figure 34: Tuition Rates
Remove Tuition Rate
To remove a tuition rate, click the red “Remove” button. Confirm the tuition rate deletion.
22 | P a g e
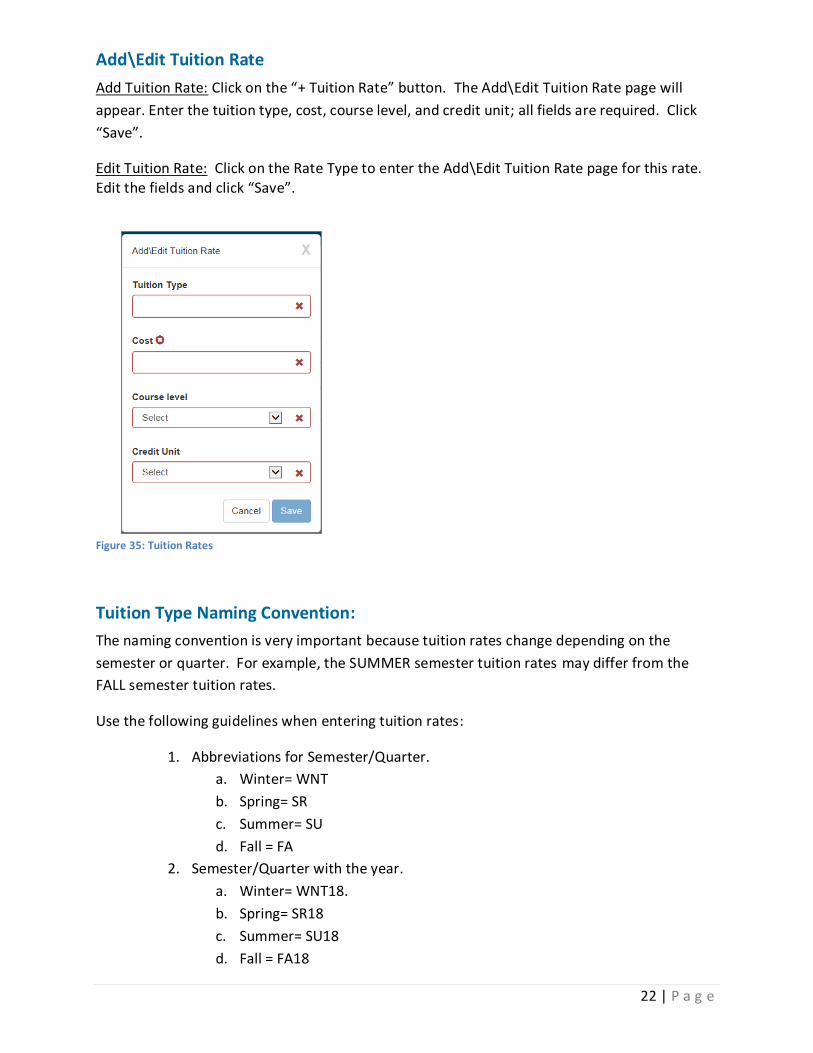
Add\Edit Tuition Rate
Add Tuition Rate: Click on the “+ Tuition Rate” button. The Add\Edit Tuition Rate page will
appear. Enter the tuition type, cost, course level, and credit unit; all fields are required. Click
“Save”.
Edit Tuition Rate: Click on the Rate Type to enter the Add\Edit Tuition Rate page for this rate. Edit the fields and click “Save”.
Figure 35: Tuition Rates
Tuition Type Naming Convention:
The naming convention is very important because tuition rates change depending on the
semester or quarter. For example, the SUMMER semester tuition rates may differ from the
FALL semester tuition rates.
Use the following guidelines when entering tuition rates:
1. Abbreviations for Semester/Quarter.
a. Winter= WNT
b. Spring= SR
c. Summer= SU
d. Fall = FA
2. Semester/Quarter with the year.
a. Winter= WNT18.
b. Spring= SR18
c. Summer= SU18
d. Fall = FA18
23 | P a g e
3. Semester/Quarter with the year and degree level.
a. Winter= WNT18 Undergraduate or WNT18 Graduate
b. Spring= SR18 Undergraduate or SR18 Graduate
c. Summer= SU18 Undergraduate or SU18 Graduate
d. Fall = FA28 Undergraduate or FA28 Graduate
4. Semester/Quarter with the year, degree level, and course level.
a. Winter= WNT18 LOWER Undergraduate
b. Spring= SR18 LOWER Undergraduate
c. Summer= SU18 LOWER Undergraduate
d. Fall = FA18 LOWER Undergraduate
Academic Institution Module Help
Help Requests, Academic Institution Module issues
To report technical issues or functionality suggestions, submit a Help Request ticket at the Navy
College Program website Assistance Center and select “Academic Institution Support
(TECHNICAL)” as the category.
http://supportsystem.livehelpnow.net/new_ticket.aspx?cid=30432
Thank you
Thank you for using the NCMIS Academic Institution Module. This User guide will be
periodically updated as the functionality of the Academic Institution Module is expanded.
Together we will ensure seamless TA funding for our service members. Your suggestions for
improvements are important. Please follow the suggestions link on the home page to give us
your feedback!
24 | P a g e
(V6) 7/15 For Official Use Only Classified
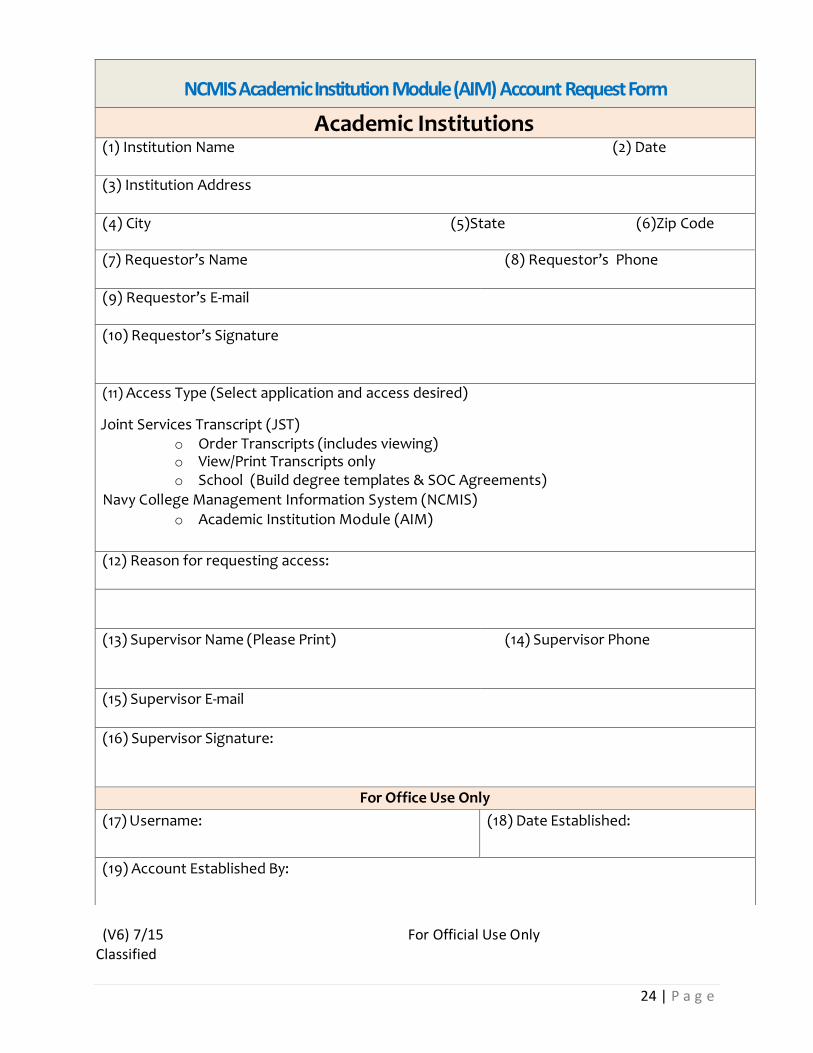
NCMIS Academic Institution Module (AIM) Account Request Form
Academic Institutions
(1) Institution Name (2) Date
(3) Institution Address
(4) City (5)State (6)Zip Code
(7) Requestor’s Name (8) Requestor’s Phone
(9) Requestor’s E-mail
(10) Requestor’s Signature
(11) Access Type (Select application and access desired) Joint Services Transcript (JST)
o Order Transcripts (includes viewing) o View/Print Transcripts only o School (Build degree templates & SOC Agreements)
Navy College Management Information System (NCMIS) o Academic Institution Module (AIM)
(12) Reason for requesting access:
(13) Supervisor Name (Please Print) (14) Supervisor Phone
(15) Supervisor E-mail
(16) Supervisor Signature:
For Office Use Only
(17) Username: (18) Date Established:
(19) Account Established By:
25 | P a g e
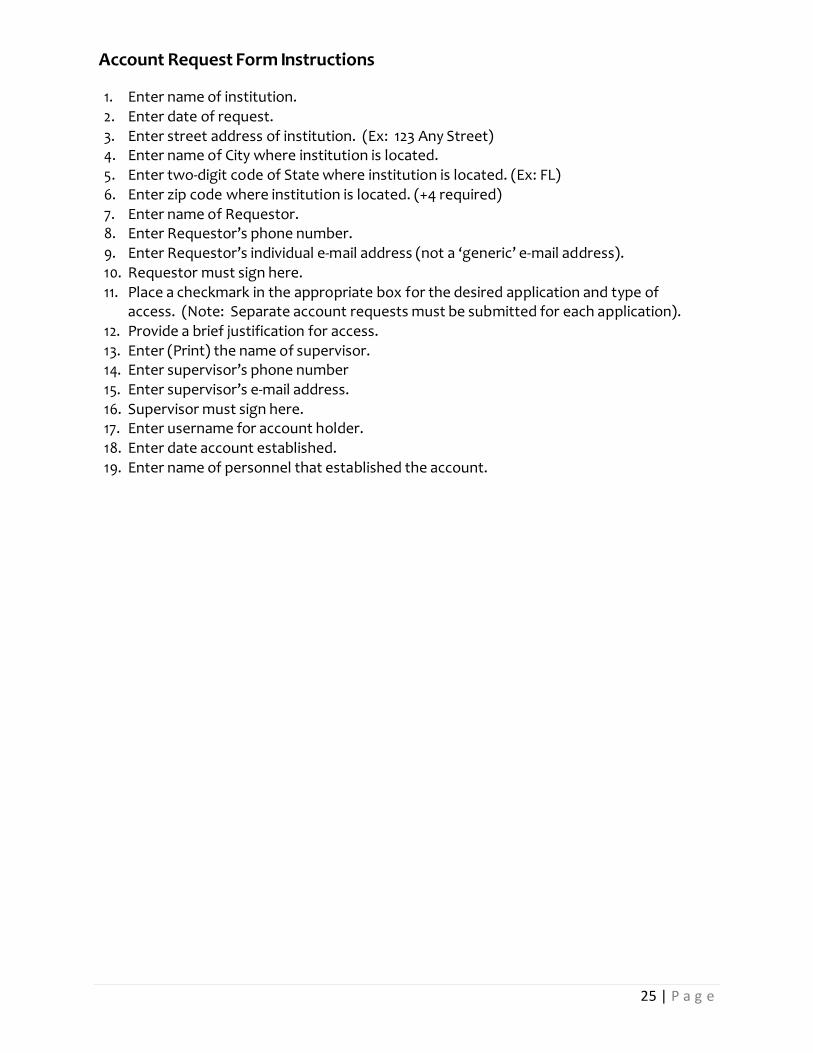
Account Request Form Instructions
1. Enter name of institution. 2. Enter date of request. 3. Enter street address of institution. (Ex: 123 Any Street) 4. Enter name of City where institution is located. 5. Enter two-digit code of State where institution is located. (Ex: FL) 6. Enter zip code where institution is located. (+4 required) 7. Enter name of Requestor. 8. Enter Requestor’s phone number. 9. Enter Requestor’s individual e-mail address (not a ‘generic’ e-mail address). 10. Requestor must sign here. 11. Place a checkmark in the appropriate box for the desired application and type of
access. (Note: Separate account requests must be submitted for each application). 12. Provide a brief justification for access. 13. Enter (Print) the name of supervisor. 14. Enter supervisor’s phone number 15. Enter supervisor’s e-mail address. 16. Supervisor must sign here. 17. Enter username for account holder. 18. Enter date account established. 19. Enter name of personnel that established the account.