5 basic robotics with lego nxt - dalhousie university
TRANSCRIPT
5 Basic robotics with Lego NXT
5.1 Introduction
We will use the LEGO mindstorm system in this course. Besides having commonLEGO building blocks to construct different designs, this system consist of a micro-processor, called the brick, which is programmable and which controls the sensorsand actuators. The actuators are stepping motors that can be told to run for a specificduration, a specific number of rotations, or with a specific speed. Our tool kit alsoincludes several sensors, a light sensor that can be used to measure the wavelengthof reflecting light and also small distances, an ultrasonic sensor to measure largerdistances, a touch sensor, and a microphone. The motors can also be used to sensesome externally applied movements.
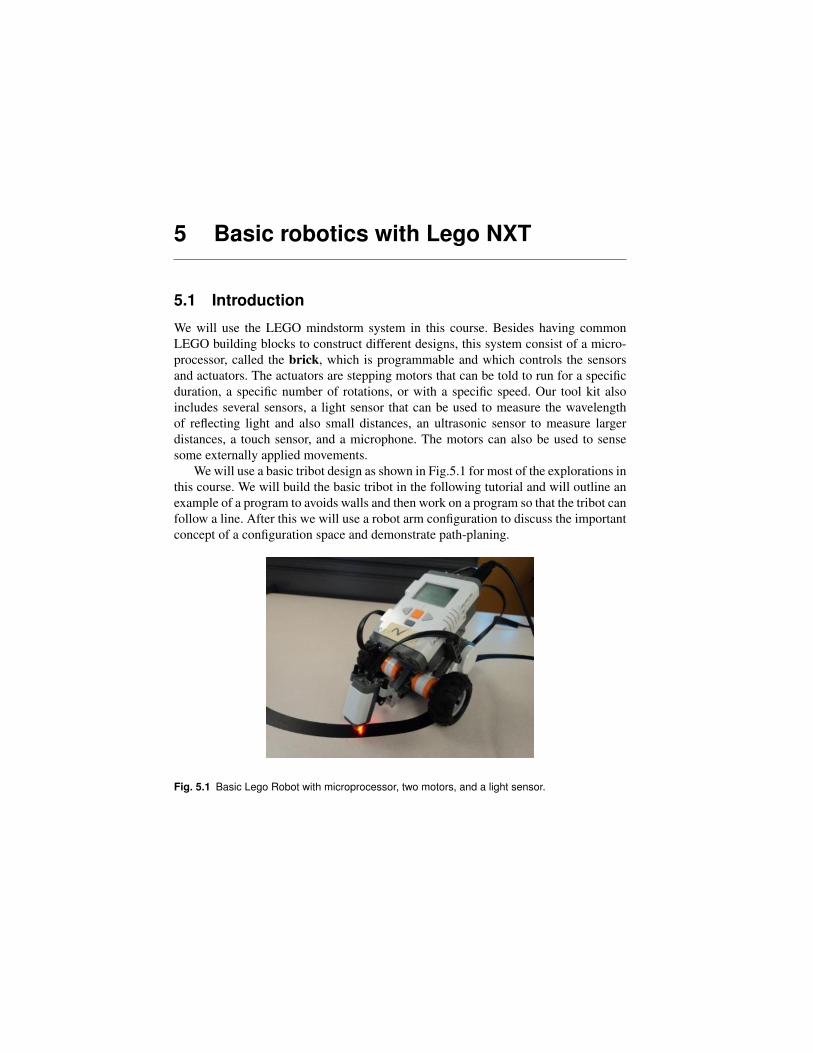
We will use a basic tribot design as shown in Fig.5.1 for most of the explorations inthis course. We will build the basic tribot in the following tutorial and will outline anexample of a program to avoids walls and then work on a program so that the tribot canfollow a line. After this we will use a robot arm configuration to discuss the importantconcept of a configuration space and demonstrate path-planing.
Fig. 5.1 Basic Lego Robot with microprocessor, two motors, and a light sensor.
Basic robotics with Lego NXT48 |
5.2 Building a basic robot with Lego NXT
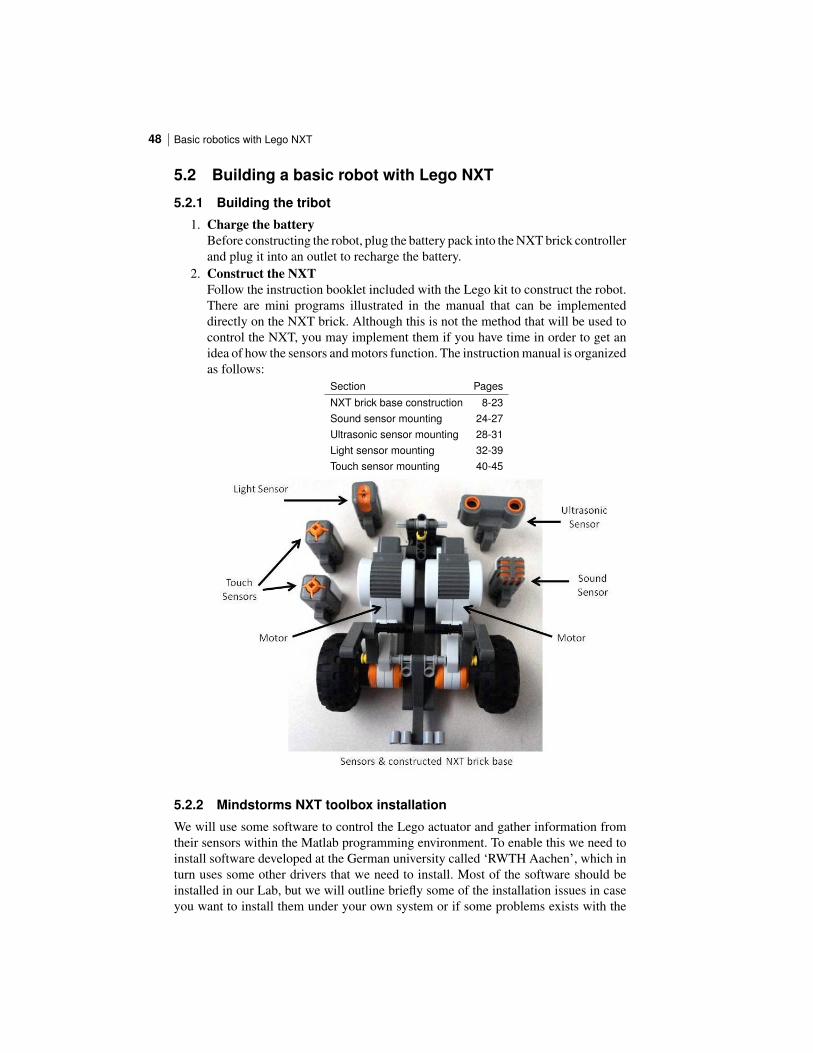
5.2.1 Building the tribot
1. Charge the battery
Before constructing the robot, plug the battery pack into the NXT brick controllerand plug it into an outlet to recharge the battery.
2. Construct the NXT
Follow the instruction booklet included with the Lego kit to construct the robot.There are mini programs illustrated in the manual that can be implementeddirectly on the NXT brick. Although this is not the method that will be used tocontrol the NXT, you may implement them if you have time in order to get anidea of how the sensors and motors function. The instruction manual is organizedas follows:
Section PagesNXT brick base construction 8-23Sound sensor mounting 24-27Ultrasonic sensor mounting 28-31Light sensor mounting 32-39Touch sensor mounting 40-45
5.2.2 Mindstorms NXT toolbox installation
We will use some software to control the Lego actuator and gather information fromtheir sensors within the Matlab programming environment. To enable this we need toinstall software developed at the German university called ‘RWTH Aachen’, which inturn uses some other drivers that we need to install. Most of the software should beinstalled in our Lab, but we will outline briefly some of the installation issues in caseyou want to install them under your own system or if some problems exists with the

| 49Building a basic robot with Lego NXT
current installation. The following software installation instructions are adapted fromRWTH Aachen University’s NXT Toolbox website:http://www.mindstorms.rwth-aachen.de/trac/wiki/Download4.04Currently, the toolbox is not available for USB connections are not available on Macbecause of 64-bit compatibility issues; therefore, you will only be able to connect tothe NXT via Bluetooth if you are using a Mac.
1. Check NXT Firmware version
Check what version of NXT Firmware is running on the NXT brick by goingto "Settings" > "NXT Version". Firmware version ("FW") should be 1.28 orgreater. If it does not, it needs to be updated (Note: The NXT toolbox websiteclaims version 1.26 will work, however it will not)To update the firmware:
The Lego Mindstorms Education NXT Programming software is required toupdate the firmware. In the NXT Programming software, look under "tools"> "Update NXT Firmware" > "browse", select the firmware’s directory, click"download".
2. Setting up a USB Connection [Windows Users only]
The toolbox requires different installation instructions depending on whetheryou are running 32 or 64-bit Matlab. To check which version you are running,in Matlab go to"Help">"About".
On 32-bit Matlab [Windows Users only]
• Install USB (Fantom) Driver
If the Lego Mindstorms Education NXT Programming software is alreadyon your computer, this should already be installed. Otherwise, downloadit from: http://mindstorms.lego.com/support/updates/∗ If you run into problems with the Fantom Library on windows go to
this site for help:http://bricxcc.sourceforge.net/NXTFantomDriverHelp.pdf
∗ If you have Windows 7 Starter edition the standard setup file will notrun properly. To install the Fantom Driver go into Products and thenLEGO NXT Driver 32 and run LegoMindstormsNXTdriver32.
• Download the Mindstorms NXT Toolbox 4.04:
Download: http://www.mindstorms.rwth-aachen.de/trac/wiki/Download4.04∗ Save and extract the files anywhere, but do not change the directory
structure.∗ The folder will appear as "RWTHMindstormsNXT"
On 64-bit Matlab [Windows Users only]
• Download libusb-win32
Download: http://sourceforge.net/projects/libusb-win32/files/∗ Save and extract the files anywhere.∗ Open the extracted folder and go to "bin". Run the inf-wizard and
follow the instructions. This will install a device driver for the NXTconnection.

Basic robotics with Lego NXT50 |
• Download the Mindstorms NXT Toolbox 4.04:
Download: http://projects.cs.dal.ca/hallab/wiki/index.php/RWTH Mindstorms NXT Toolbox (64-bit)∗ Save and extract the files anywhere, but do not change the directory
structure.∗ The folder will appear as "RWTHMindstormsNXT64"
3. Install NXT Toolbox into Matlab
In Matlab: "File" > "SetPath" > "Add Folder", and browse and select "RWTH-MindstormsNXT" or "RWTHMindstormsNXT64"- the which is a subfolder offile you saved in the previous step.
• Also add the "tools" folder, which is a subdirectory of the RWTHMind-stormsNXT folder.
• Click "save" when finished.4. Download MotorControl to NXT brick
Use the USB cable for this step. Lego’s Fantom Driver is also required for thisstep. This will already be installed if you have the Lego Mindstorms Educa-tion NXT Programming software or if you downloaded it when setting up aUSB connection with 32-bit Matlab in Windows. Otherwise, download it from:http://mindstorms.lego.com/en-us/support/files/default.aspx#Driver
• Windows: Download the NBC compiler (http://bricxcc.sourceforge.net/nbc/).Unzip the folder and move the file "nbc.exe" to RWTHMindstormsNXT/tools/MotorControl.Under RWTHMindstormsNXT/tools/MotorControl, double click Trans-ferMotorControlBinaryToNXT, and follow the onscreen instructions. Ifthis fails, try using NeXTTool instead of nbc; download from http://bricxcc.sourceforge.net/utilities.html(be careful to download NeXTTool not NexTTools!). Again, unzip thefolder and move the file "NeXTTool.exe" to the MotorControl folder.
• Mac: Download the NeXT Tools for Mac OS X fromhttp://bricxcc.sourceforge.net/utilities.html. Run the toolbar and open theNXT Explorer (the globe in the toolbar). With the arrow key at thetop, transfer the file MotorControl22.rxe (found in RWTHMindstorm-sNXT/tools/MotorControl) to the brick.
5. Setting up a Bluetooth connection [optional if you’re connecting via USB]
• To connect to the NXT via bluetooth you must first turn on the bluetoothin the NXT and make sure that the visibility is set to on. Then use thebluetooth device on your computer to search for your specific NXT. Thename of your NXT can be found at the top center of your NXT’s screen.
• Create a connection between the computer and the NXT. When you createthe connection between the NXT and the bluetooth device the NXT willask for a passkey (usually either 0000 or 1234 on the NXT screen and pressthe orange button. The computer will then ask for the same passkey. To testthe connection, type the command COM OpenNXT(’bluetooth.ini’);
in the Matlab command window. The command should run without anyred error messages.
• Make sure that the bluetooth.ini file is present. There are sample files forWindows and Linux (Mac) in the main RWTH toolbox folder. If it is not
| 51Building a basic robot with Lego NXT
present, create one by running the command COM MakeBTConfigFile inMatlab.
• Check if the serial ports are correct in the "bluetooth.ini" file are correct. InWindows, go to the Control Panel, click "Hardware and Sound">"Devicesand Printers". Find the NXT device, right click it and go to "Properties".The COMPort will be listed under the "Services" tab (i.e. "COM3"). OnMac, The port name can be found by typing ls -ltr /dev in a terminalwindow, or by going to "System Preferences">"Bluetooth Devices". Selectyour NXT and click on the gear symbol (left hand bottom corner). TheCOMPort should be listed there.
• Turning the NXT off and back on again can help. After every failedCOM OpenNXT(’bluetooth.ini’); command typeCOM CloseNXT(’all’);
to close the failed connection for a clean new attempt.• To switch on a debug mode enter the command DebugMode on before
entering the command COM OpenNXT(’bluetooth.ini’); .6. Does it work?
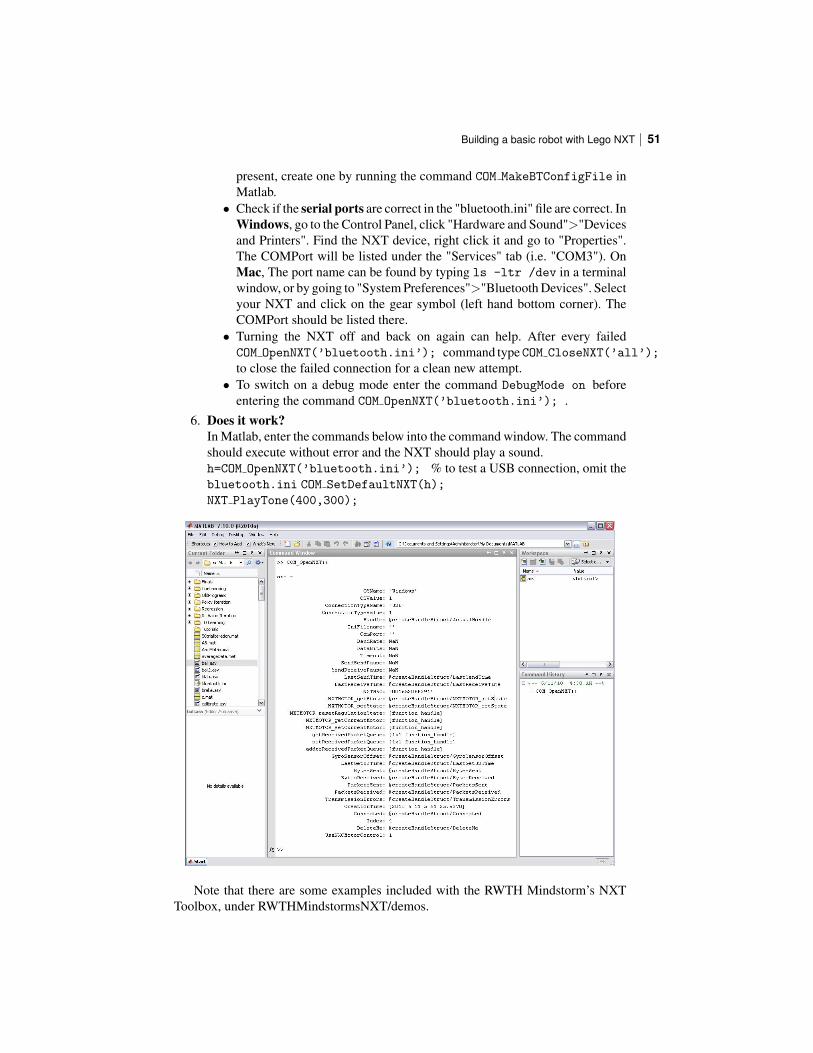
In Matlab, enter the commands below into the command window. The commandshould execute without error and the NXT should play a sound.h=COM OpenNXT(’bluetooth.ini’); % to test a USB connection, omit thebluetooth.ini COM SetDefaultNXT(h);
NXT PlayTone(400,300);
Note that there are some examples included with the RWTH Mindstorm’s NXTToolbox, under RWTHMindstormsNXT/demos.

Basic robotics with Lego NXT52 |
5.3 Basic NXT toolbox commands
The instructions in this section have been adapted from RWTH’s website. Installationinstructions from:
http://www.mindstorms.rwth-aachen.de/trac/wiki/Download4.03Coding instructions from:
http://www.mindstorms.rwth-aachen.de/trac/wiki/Documentation
You can find more instruction on installation and usage of the RWTH MindstormsNXT Toolbox from both of these sites.
5.3.1 Startup NXT
The first thing to do is make sure the workspace is clear. Enter:COM CloseNXT(’all’);
close all;
clear all;
To start, enter:hNXT=COM OpenNXT; %hNXT is an arbitrary nameCOM SetDefaultNXT(hNXT); %sets opened NXT as the
%default handle
5.3.2 NXT Motors
Motors are treated as objects. To create one, enter:motorA = NXTMotor(’a’); %motorA is an arbitrary name, ’a’ is
%the port the motor connected to
This will give:
NXTMotor object properties:Port(s): 0 (A)Power: 0
SpeedRegulation: 1 (on)SmoothStart: 0 (off)
TachoLimit: 0 (no limit)ActionAtTachoLimit: ’Brake’ (brake, turn off when stopped)
5.3.3 Basic Motor Commands & Properties
Below is a list of these properties and how to change them:
Power
Determines speed of the motormotorA.Power=50; % value must be between -100 and 100 (negative
% will cause the motor to rotate in reverse)
SpeedRegulation

| 53Basic NXT toolbox commands
If the motor encounters some sort of load, the motor will (if possible) increase it powerto keep a constant speed
motorA.SpeedRegulation=true; % either true or false, oralternatively, 1 for true, 0 forfalse
SmoothStart
Causes the motor to slowly accelerate and build up to full speed.Works only if ActionAtTachoLimit is not set to ’coast’ and if TachoLimit>0
motorA.ActionAtTachoLimit= true; % either true or false, or% 1 for true, 0 for false
ActionAtTachoLimit
Determines how the motor will come to rest after the TachoLimit has been reached.There are three options:1. ’brake’: the motor brakes2. ’Holdbrake’: the motor brakes, and then holds the brakes3. ’coast’ the motor stops moving, but there is no braking
motorA.ActionAtTachoLimit=’coast’;
TachoLimit
Determines how far the motor will turn
motorA.TachoLimit= 360; % input is in terms of degrees
Alternative Motor Initiation
Motors can also be created this way:
motorA=NXTMotor(’a’, ’Power’, 50, ’TachoLimit’, 360);
5.3.4 Other Motor Commands
SendToNXT
This is required to send the settings of the motor to the robot so the motors will actuallyrun.
motorA.SendToNXT();
Stop
Stops the motor. There are two ways to do this:1. ’off’ will turn off the motor, letting it come to rest by coasting.2. ’brake’ will turn cause the motor to be stopped by braking, however the motors willneed to be turned off after the braking.
Basic robotics with Lego NXT54 |
motorA.Stop(’off’);
ReadFromNXT();
Returns a list of information pertaining to a motor
motorA.ReadFromNXT();
Entering motorA.ReadFromNXT.Position(); will return the position of the motorin degrees.
ResetPosition
Resets the position of the motor back to 0motorA.ResetPosition();
WaitFor
Program will wait for motor to finish current command. For example:
motorA=(’a’, ’Power’, 30, ’TachoLimit’, 360);motorA.SendToNXT();motorA.SendToNXT();
This command will cause problems as the motor can only process one command at atime. Instead, the following should be entered:
motorA=(’a’, ’Power’, 30, ’TachoLimit’, 360)motorA.SendToNXT();motorA.WaitFor();motorA.SendToNXT();
The exception to this is if TachoLimit of the motor is set to 0.
5.3.5 Using Two Motors At Once
Some operations, for example driving forward and backwards, require the simultaneous
use of two motors. Entering:
B=NXTMotor(’b’, ’Power’, 50, ’TachoLimit’, 360);C=NXTMotor(’c’, ’Power’, 50, ’TachoLimit’, 360);B.SendToNXT();C.SendToNXT();
will start the bot moving, but the signals for both motors to start at will not be sent atexactly the same time, so the robot will curve a little and fail to drive in a straight line.Instead, you should enter:
BC=NXTMotor(’bc’, ’Power’, 50, ’TachoLimit’, 360);
OR
BC = NXTMotor(’bc);
BC.Power=50;
BC.TachoLimit=360;
| 55Basic NXT toolbox commands
Turning left or right can be achieved by only running one motor at a time, or by movingboth motors, but one slower than the other.
5.3.6 Sensors
The following commands are used to open a sensor, plugged into port 1:
OpenSwitch(SENSOR 1); % initiates touch sensorOpenSound(SENSOR 1, ’DB’); % initiates sound sensor, using
% either ’DB’ or ’DBA’OpenLight(SENSOR 1, ’ACTIVE’); % initiates light sensor as
% either’ACTIVE’ or ’INACTIVE’,% plugged into Port 1
OpenUltrasonic(SENSOR 1); % initiates ultrasonic sensor% plugged into Port 1
The following com-
mands are used to get values from the sensor plugged into port 2:
GetSwitch(SENSOR 2); % returns 1 if pressed, 0 if depressedGetSound(SENSOR 2); % returns a value ranging from 0-1023GetLight(SENSOR 2); % returns a value ranging from 0 to
% a few thousandGetUltrasonic(SENSOR 2); % returns a value in cm
To close a sensor, ex. Sensor 1:
CloseSensor(SENSOR 1); %properly closes the sensor
5.3.7 Direct NXT Commands
PlayTone
Plays a tone at a specified frequency for a specified amount of time
NXT PlayTone(400,300); % Plays a tone at 400Hz for 300 ms
KeepAlive
Send this command every once in a while to prevent the robot from going into sleepmode:
NXT SendKeepAlive(’dontreply’);
Send this command to see how long the robot will stay awake, in milliseconds:
[status SleepTimeLimit] = NXT SendKeepAlive(’reply’);
GetBatteryLevel
Returns the voltage left in the battery in millivolts
Basic robotics with Lego NXT56 |
NXT GetBatteryLevel;
StartProgram/StopProgram
To run programs written on LEGO Mindstorms NXT software, enter:NXT StartProgram(’MyDemo.rxe’) % the file extension ’.rxe’ can be
% omitted, it will then be automatically% added
Entering NXT StopProgram stops the program mid-run.
5.4 First examples
The following exercises are intended to explore how to use RWTH’s Mindstorms NXTToolbox.
5.4.1 Example 1: Wall avoidance
The following is a simple example of how to drive a robot and use the ultrasonic sensor.The robot will drive forward until it is around 20 cm away from a barrier (i.e. a wall),stop, beep, turn right, and continue moving forward. The robot will repeat this 5 times.Attach the Ultrasonic sensor and connect it to port 1. The study and run the followingprogram.

| 57First examples
COM CloseNXT(’all’); %cleans up workspaceclose all;clear all;hNXT=COM OpenNXT(’bluetooth.ini’); % initiates NXT, hNXT is an arbitrary nameCOM SetDefaultNXT(hNXT); %sets default handle
OpenUltrasonic(SENSOR 1);
forward=NXTMotor(’BC’;); &% setting motors B C to drive forwardforward.Power=50;forward.TachoLimit=0;turnRight=NXTMotor(’B’); &% setting motor B to turn rightturnRight.Power=50;turnRight.TachoLimit=360;for i= 1:5
while GetUltrasonic(SENSOR 1)>20forward.SendToNXT(); %sends command for robot to move forward
%TachoLimit=0; no need for a WaitFor() statementend %whileforward.Stop(’brake’); %robot brakes from going forwardNXT PlayTone(400,300); %plays a noteturnRight.SendToNXT; %sends the command to turn rightturnRight.WaitFor; %TachoLimit is not 0; WaitFor() statement required
end %forturnRight.Stop(’off’); %properly closes motorsforward.Stop(’off’);CloseSensor(SENSOR 1); %properly closes the sensorCOM CloseNXT(hNXT); % properly closes the NXTclose all;clear all;
5.4.2 Example 2: Line following
The next exercise is writing your own program that uses readings from its light sensorto drive the NXT and follow a line.
Setup:
Basic robotics with Lego NXT58 |
1. Mount light sensor, facing downwards on front of NXT and plugged into Port 3.2. Mount a switch sensor on the NXT, plugged into Port 2.3. Use a piece of dark tape (i.e. electrical tape) to mark a track on a flat, light
coloured surface. Make sure the tape and the surface are coloured differentlyenough that the light sensor returns reasonably different values between the twosurfaces.
4. Write a program so that the tribot follows the line.