4–point harness kit - .net framework
TRANSCRIPT

APPLICATIONVerify accessory fitment at Polaris.com.
BEFORE YOU BEGINRead these instructions and check to be sure all parts and tools are accounted for.Please retain these installation instructions for future reference and parts orderinginformation.
KIT CONTENTSThis Kit includes:
REF QTY PART DESCRIPTION PART NUMBER1 1 Harness, Four-Point 2636737
2* 4 Bolt, Hex Flange - M12 X 1.75 X 25 7519072
3* 4 Nut, Hex - M12 X 1.75 7540000
4 1 Boot -
1 Instructions 9927977
Items marked (*) are included in Hardware Kit PN 2207191.
TOOLS REQUIRED• Safety Glasses• Socket Set, Metric
• Torque Wrench• Wrench Set, Metric
Instr 9927977 Rev 01 2017-05 Page 1 of 4
P/N 2882709
4–POINT HARNESS KIT

Instr 9927977 Rev 01 2017-05 Page 2 of 4
IMPORTANTYour 4–Point Harness Kit is exclusively designed for your vehicle. Please read the installation instructionsthoroughly before beginning. Installation is easier if the vehicle is clean and free of debris. For your safety, and toensure a satisfactory installation, perform all installation steps correctly in the sequence shown.
ASSEMBLY TIMEApproximately 25 minutes
INSTALLATION INSTRUCTIONS1. Shift vehicle transmission into “PARK”. Turn key to
“OFF” position and remove from vehicle.2. Remove seat.3. Remove existing seat belt.
a. Remove boltA and nutB from upper LHvehicle mount bracket. Bolt and nut will not bereused.
b. Remove boltC and nutD from lower LHvehicle mount bracket. Bolt and nut will not bereused.
c. Remove nutE from retractor unit, then removeretractor. Nut will not be reused.
d. Detach RH seat belt bootF from trim panel,then slide boot up to gain access to seat beltattach fastener.
Instr 9927977 Rev 01 2017-05 Page 3 of 4
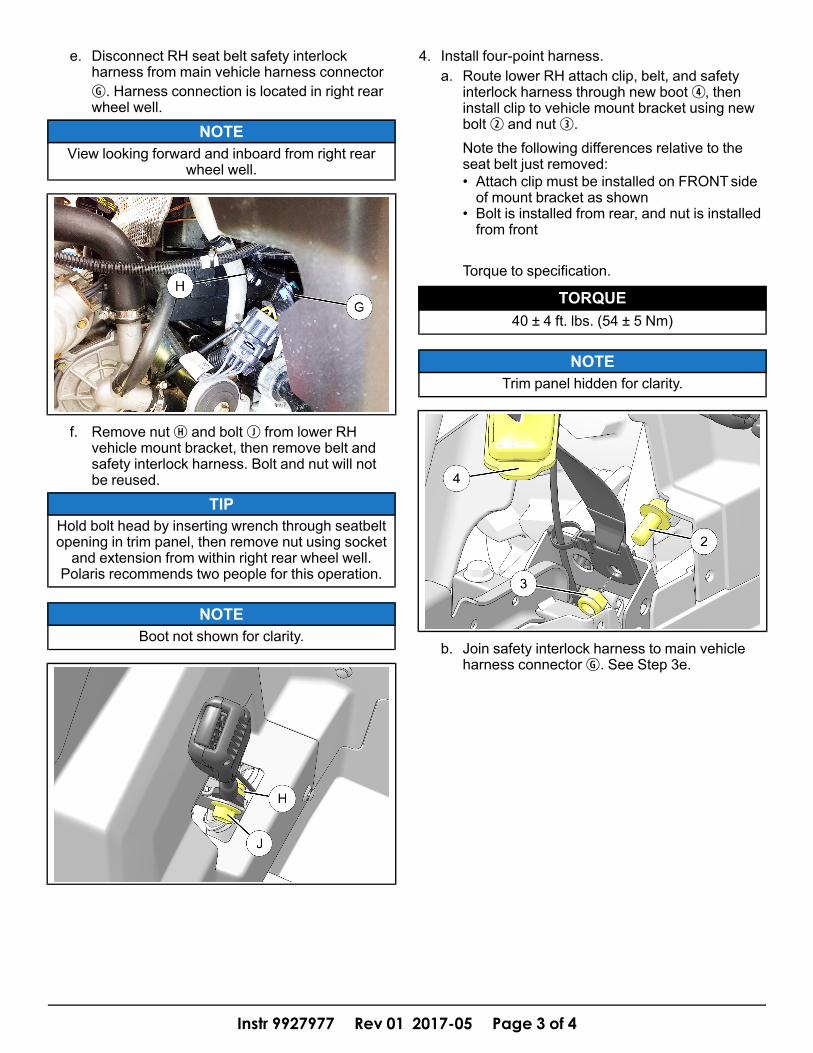
e. Disconnect RH seat belt safety interlockharness from main vehicle harness connectorG. Harness connection is located in right rearwheel well.
NOTEView looking forward and inboard from right rear
wheel well.
f. Remove nutH and boltJ from lower RHvehicle mount bracket, then remove belt andsafety interlock harness. Bolt and nut will notbe reused.
TIPHold bolt head by inserting wrench through seatbeltopening in trim panel, then remove nut using socketand extension from within right rear wheel well.
Polaris recommends two people for this operation.
NOTEBoot not shown for clarity.
4. Install four-point harness.a. Route lower RH attach clip, belt, and safety
interlock harness through new bootr, theninstall clip to vehicle mount bracket using newboltw and nute.Note the following differences relative to theseat belt just removed:• Attach clip must be installed on FRONTsideof mount bracket as shown
• Bolt is installed from rear, and nut is installedfrom front
Torque to specification.
TORQUE40 ± 4 ft. lbs. (54 ± 5 Nm)
NOTETrim panel hidden for clarity.
b. Join safety interlock harness to main vehicleharness connectorG. See Step 3e.

Instr 9927977 Rev 01 2017-05 Page 4 of 4
c. Install lower LH attach clip to vehicle mountbracket using new boltw and nute.Ensure proper orientation: Attach clip isinstalled on INBOARD side of mount bracket.Torque to specification.
TORQUE40 ± 4 ft. lbs. (54 ± 5 Nm)
d. Route upper LH attach clip over top of ROPscross-member, then install to vehicle mountbracket using new boltw and nute. Repeatfor upper RH attach clip. Torque tospecification.
TORQUE40 ± 4 ft. lbs. (54 ± 5 Nm)
5. Reinstall seat.
FEEDBACK FORMA feedback form has been created for the installer to provide any comments, questionsor concerns about the installation instructions. The form is viewable on mobile devicesby scanning the QR code or by clicking HERE if viewing on a PC.
FEEDBACK FORM