42 50pf7320g english 93 06 june 06 - … keys and connectors ... vol increases or decreases the ......
TRANSCRIPT

42PF7320G50PF7320G
Engl
ish

1
Thank you for purchasing this television set.This handbook has been designed to help you install and operate your TV set.We strongly recommend that you read it thoroughly.
Safety Information . . . . . . . . . . . . . . . . . . . . . . . . . . . . . . . . . . . . . . . . . . . . . . . . . . . . . . . . . . . . . . 2Preparation / Getting started . . . . . . . . . . . . . . . . . . . . . . . . . . . . . . . . . . . . . . . . . . . . . . . . . . . . . 3Television keys and connectors . . . . . . . . . . . . . . . . . . . . . . . . . . . . . . . . . . . . . . . . . . . . . . . . . . . 4Remote Control keys . . . . . . . . . . . . . . . . . . . . . . . . . . . . . . . . . . . . . . . . . . . . . . . . . . . . . . . . . . . 5Remote Control keys (DVD or AUX) . . . . . . . . . . . . . . . . . . . . . . . . . . . . . . . . . . . . . . . . . . . . . 7Menu Language . . . . . . . . . . . . . . . . . . . . . . . . . . . . . . . . . . . . . . . . . . . . . . . . . . . . . . . . . . . . . . . . 7Auto Store . . .Ð 8Manual Store . .Ð 8Sort . . . . . . . . .Ð 9Name . . . . . . . .Ð 9Channel Edit .Ð 10Picture and Sound . . . . . . . . . . . . . . . . . . . . . . . . . . . . . . . . . . . . . . . . . . . . . . . . . . . . . . . . . . . . . 10Timer . . . . . . .Ð 11Contrast+ and NR (Noise Reduction) . . . . . . . . . . . . . . . . . . . . . . . . . . . . . . . . . . . . . . . . . . . . 11Child Lock . . .Ð 12Screen Formats . . . . . . . . . . . . . . . . . . . . . . . . . . . . . . . . . . . . . . . . . . . . . . . . . . . . . . . . . . . . . . . 13Smart Picture and Sound . . . . . . . . . . . . . . . . . . . . . . . . . . . . . . . . . . . . . . . . . . . . . . . . . . . . . . . 14Active Control . . . . . . . . . . . . . . . . . . . . . . . . . . . . . . . . . . . . . . . . . . . . . . . . . . . . . . . . . . . . . . . 14TV as a PC monitor . . . . . . . . . . . . . . . . . . . . . . . . . . . . . . . . . . . . . . . . . . . . . . . . . . . . . . . . . . . 15TV in HD (High Definition) Mode . . . . . . . . . . . . . . . . . . . . . . . . . . . . . . . . . . . . . . . . . . . . . . . . 16PIP (Picture-in-Picture) . . . . . . . . . . . . . . . . . . . . . . . . . . . . . . . . . . . . . . . . . . . . . . . . . . . . . . . . . 19Troubleshooting Tips . . . . . . . . . . . . . . . . . . . . . . . . . . . . . . . . . . . . . . . . . . . . . . . . . . . . . . . . . . 21Glossary . . . .Ð 22Specifications .Ð 23
Introduction
Table of Contents
RecyclingThe packaging of this product is intended to be recycled. Apply to the local authoritiesfor correct disposal.
Disposal of your old productYour product is designed and manufactured with highly quality material and components, which can be recycled and reused. When this crossed-out wheeled bin symbol is attached to a product, it means the product is covered by the European Directive 2002/976/EC. Please inform yourself about the local separate collection system for electrical and electronic products.Please act according to your local rules and do not dispose off your old products with your normal household waste. The correct disposal of your product will help prevent potential negative consequences for the environment and human health.

2
X
X
X
X
10 cm 10 cm
10 cm
X
Safety Information
Avoid placing your TV set under direct sunlight or heat.
To prevent fire or shock hazard, do not expose your TV to rain or moisture.
Take care not to connect too many equipment to the same mains socket as it may cause overloading resulting in fire or electric shock.
Pull the power lead by the plug. Do not pull on the power lead. Do not use a poor fitting mains socket. Insert the plug fully into the mains. If it is loose, it may cause arching and result in fire.
When cleaning the surface or the screen of the set, wipe gently with absorbent cotton or cloth or other soft material like chamois. Do not use too wet a cloth which is dripping with water. Do not use acetone, toulene or alcohol to clean the TV. As a safety precaution, unplug the power cord from the mains.
As a safety precaution, do not touch any part of the TV, power lead or aerial lead during lightning storms.
Installation of the TV set on the wall should becarried out by qualified serviceman. Improper and incorrect installation may render the set unsafe.
Avoid placing vase filled with water on the TV. Water spilled into the set could result in electric shock. Do not operate set if water is spilled into it. Have it checked immediately by a qualified serviceman.
Leave at least 10 cm around each side of the TV set to allow for proper ventilation. Place the set on a stable, level surface. Never cover the ventilation slots of the TV with a cloth or other material. It may cause overheating. Do not insert anything in the ventilation holes. If metal or something flammable is inserted in these holes, it may result in fire or electric shock.
X

3
2
3 Using the Remote Control
Pull out the plastic sheet from the battery to enable the remote control to operate. Switching on the TV set
• To switch on the TV set, press the POWER key. A green indicator comes on and the screen lights up.• If the TV set remains in standby mode (red indicator), press the PROGRAM – / + key on the keyboard or the P – / + key on the remote control.
4
1
Preparation / Getting started
10 cm10 cm
10 cm
Positioning the TV set
Place your TV set on a solid stable surface, leaving a space of at 10 cm around the set.
Connections
• Insert the aerial plug into the 75Ω : socket at the bottom of the set.
• Insert the mains plug into a wall socket (220-240V / 50/60Hz).
NOTEFor more details on other connections, refer to the connection guide “CONNECT”.
Do not remove the protective sheet until you have completed the stand/wallmounting and connections. Please handle with care. Use only the soft cloth provided to clean the glossy black front of the TV.
w

4
Televison keys and connectors
NOTEFor more details on connections, refer to the guide “CONNECT”.
1 POWER .key: to switch the TV on and off. A little power remains on even when the Power switch is turned off. 2 VOLUME –/+ key: to adjust sound level.
3 MENU key: to access or close menus. The PROGRAM –/+ keys can be used to select a menu item and the VOLUME –/+ keys to enter into the selected menu item and make adjustments.
4 PROGRAM –/+ key: to select programmes. 5 POWER socket : Insert the mains plug into
a wall socket.
6 DVI Audio In socket: for connecting a HD (high definition) equipment or computer with DVI output.
7 Component Video Inputs - 2 / VGA / Audio In sockets: to connect to equipment like VCR, Set-Top box, games console and other devices or to an Analogue PC which have the same sockets.
8 AV sockets: to connect to equipment like VCR, Set-Top box, games console and other devices which have the same sockets.
9 Component Video Inputs - 1 / Audio In sockets: to connect to equipment like DVD, Set-Top box which have the same sockets. Connect the audio inputs of the TV to the outputs of the device together with the Component Video Inputs.
10 TV : socket : Insert the aerial plug into the 75 Ω : socket.
11 HDMI 1 /HDMI 2 sockets : to connect to set-top boxes, DVD player/recorder, High Definition equipment or Personal Computer.
12 For service use only.
13 Side sockets: for connecting to devices like camera or camcorder. Also allows you to connect your headphone for your personal listening pleasure.
13
5
MAINS ~
CAUTION : This a Class 1 apparatus. It must be connected to a MAINS socket out with a protective earthing connection.
6 7 10
11
8
TV
CVI-1AV(AUDIO IN)CVI-2 / VGADVI (AUDIO IN)
HDMI 2 HDMI 1
L L
R
L
R
L
R
R
YPr Pb
VIDEO IIN
SERV U SERV C
AUDIO IIN
:
9
12
2
3
4
1

5
1 Standby To set the TV to standby mode. To switch the TV set on again, press , to , P – / + or key.
2 Pixel Plus Offers a unique combination of ultimate sharpness, increased depth impression, true natural detail, brilliant and vivid colours. Press key for a Pixel Plus demonstration. Press key again to exit demonstration.
3 DVD / AUX
(see “Remote Control (DVD or AUX) on
page 7).
4 Surround Sound To turn on or off the surround sound effect. In stereo, this gives an audio experience the speakers are further apart. For models equipped with Virtual Dolby Surround, you can enjoy Dolby Surround Pro Logic sound effects.
5 AV To display Source List to select TV or peripheral equipment connected to AV, SIDE/SVHS, CVI 1, CVI 2/VGA, HDMI 1 or HDMI 2.
6 Active Control (See page 14).
7 MENU
To call up or exit the TV menus.
8 Cursors These 4 keys are used for selection and adjustment of menu items.
9 OK
Confirms selection.
10 Volume ( + VOL – ) Increases or decreases the sound level.
11 Smart Picture /Sound Used to access a series of predefined picture and sound settings (see page 14).
Remote Control keys
11
AUX
1 2 3
5 6 7 8 9
4
10

6
Remote Control keys
12 / Numerical keys For direct selection of channels. For a 2 digit channel number, the 2nd digit must be entered before the dash disappears.
13 Screen information To display/remove the channel number, the sound mode, the remaining time of the sleeptimer and the *signal strength indicator. Press key for more than 5 seconds to permanently display the channel number on screen. to remove channel number, press key again for more than 5 seconds.
14 Mode
Select between TV, DVD and AUX mode (see “Remote Control (DVD or AUX) on page 7).
15 Programme List
To display / clear the list of programmes. Press Î ï keys to select a programme and Æ key to display it.
16 Picture-in-Picture
To display a PIP window on the TV screen (see pages 19-20 on “PIP (Picture-in-Picture) feature”.
17 Sound mode Used to force programmes in Stereo and Nicam Stereo to Mono or, for bilingual programmes, to choose between Dualå or Dual». The Mono indication is red when in forced position.
18 Screen Format (see page 13).
19 DVD / AUX
(See “Remote Control (DVD or AUX) on page 7).
20 Mute
Press key to turn off sound and press again to turn on sound again.
21 Selecting TV programmes (P – / +) To select the next or previous programme. The number and the sound mode are displayed for a few seconds. For some TV programmes, the title of the programme appears at the bottom of the screen. 22 Previous/Present programme
To alternate between the last viewed and present programme.
* The signal strength indicator shows the signal strength of the reception of the programme you are watching.
AUX
12
13
14
15
16
17
18
19
20
21
22

7
Menu Language
Before you proceed to do Auto Store of channels, select your desired TV menu language.
1 Press key on the remote control to access the TV menu on the screen.
2 Press Î ï keys repeatedly until Install is selected.
3 Press Æ / key to access Install menu. (Language is highlighted).
4 Press Í Æ keys to select your language.
5 To return to previous menu, press key.
6 To exit the menu, press the key.
TV Menu
PictureSound
FeaturesInstall
Install
Language Auto Store
Manual StoreSort
NameChannel Edit
Æ
Æ Æ Æ Æ Æ
English
* Selecting the languageIf you have selected the wrong language for one reason or another and do not understand the language to operate the set, do the following to bring you back to your preferred language :
– press key to exit the existing menu.
– press key to access the TV menu.
– press ï key repeatedly until the FOURTH item in the TV menu is highlighted.– press Æ / key to go into the Install menu. – press Í Æ keys to select your preferred language (the menu will now appear in the chosen language). You can proceed to install the TV channels automatically.
Remote Control keys (DVD or AUX)
The remote control also allows you to control the main functions of some Philips DVD players.
Press the key to select the required mode: DVD or AUX.The remote control indicator lights up to display the selected mode. It switches off automaticallyafter 20 seconds if left idle. The mode automatically returns to TV mode.The following keys are operational, depending on the equipment:
to
standby
fast rewind
stop
play
fast forward
record
pause
display and exit menu
programme selection
navigation and adjustments,confirms selection
digit keys
Note : Functions not available to DVD-R device.
8
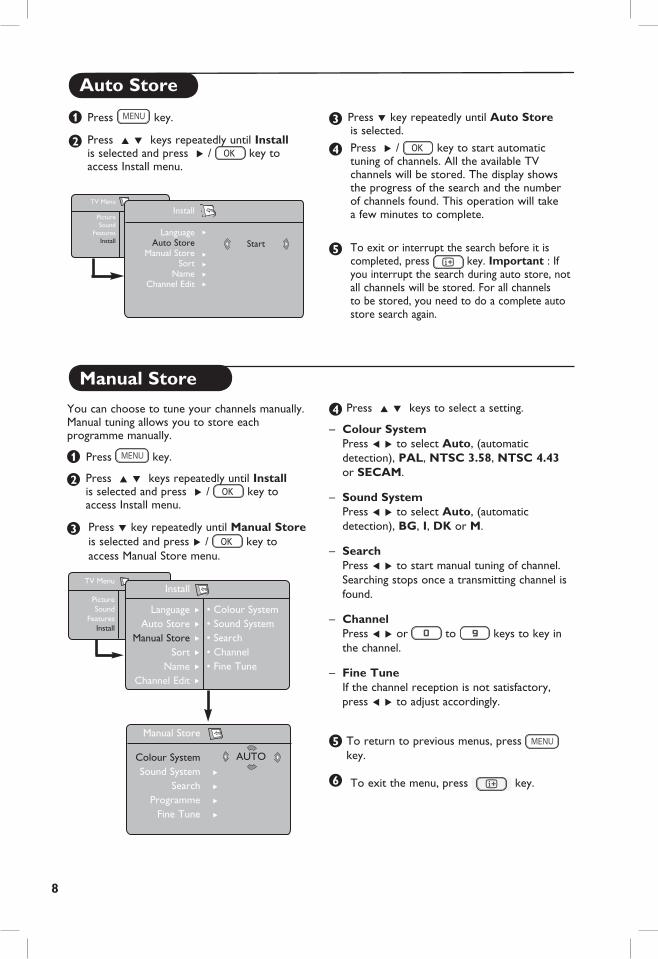
Auto Store
3 Press ï key repeatedly until Auto Store is selected.
4 Press Æ / key to start automatic tuning of channels. All the available TV channels will be stored. The display shows the progress of the search and the number of channels found. This operation will take a few minutes to complete.
5 To exit or interrupt the search before it is completed, press key. Important : If you interrupt the search during auto store, not all channels will be stored. For all channels to be stored, you need to do a complete auto store search again.
1 Press key.
2 Press Î ï keys repeatedly until Install is selected and press Æ / key to access Install menu.
TV Menu
PictureSound
FeaturesInstall
Install
Language Auto Store
Manual StoreSort
NameChannel Edit
Æ
Æ Æ Æ Æ
Start
Manual Store
You can choose to tune your channels manually. Manual tuning allows you to store each programme manually.
1 Press key.
2 Press Î ï keys repeatedly until Install is selected and press Æ / key to access Install menu.
3 Press ï key repeatedly until Manual Store is selected and press Æ / key to access Manual Store menu.
4 Press Î ï keys to select a setting.
– Colour System Press Í Æ to select Auto, (automatic detection), PAL, NTSC 3.58, NTSC 4.43 or SECAM. – Sound System Press Í Æ to select Auto, (automatic detection), BG, I, DK or M.
– Search Press Í Æ to start manual tuning of channel. Searching stops once a transmitting channel is found.
– Channel Press Í Æ or to keys to key in the channel.
– Fine Tune If the channel reception is not satisfactory, press Í Æ to adjust accordingly.
5 To return to previous menus, press key.
6 To exit the menu, press key.
TV Menu
PictureSound
FeaturesInstall
Install
Language Auto Store
Manual StoreSort
NameChannel Edit
Æ
Æ
Æ
Æ
Æ
Æ
• Colour System • Sound System• Search• Channel• Fine Tune
Manual Store
Colour System Sound System
SearchProgramme
Fine Tune
Æ
Æ
Æ
Æ
AUTO

9
Name
Name feature allows you to enter a name for any channel you select.
1 Press key.
2 Press Î ï keys repeatedly until Install is selected and press Æ / key to access Install menu.
3 Press Æ / key to access Install menu.
4 Press ï key repeatedly until Name is selected and press Æ / key to access Name mode.
5 Press Î ï keys to select the channel you want to name.
6 Press Æ key to move to the first character display area and press Î ï keys to key in the first character.
7 Press Æ key to move to the next character display area and continue to key the next character with the Î ï keys. (You can key up to a maximum of 5 characters). 8 Press Æ key to store name. The name is now indicated on the top left corner.
9 To return to previous menu, press key.
10 To exit the menu, press key.
TV Menu
PictureSound
FeaturesInstall
Install
Language Auto StoreManual Store
SortName
Channel Edit
Æ
Æ
Æ
Æ
Æ
Æ
8 ELLIE
Sort
Sort feature allows you to change the channel number for a particular TV station
1 Press key.
2 Press Î ï keys repeatedly until Install is selected and press Æ / key to access Install menu.
.
3 Press ï key repeatedly until Sort is selected and press Æ / key to access sort mode.
4 Press Î ï keys to select the channel number you want to sort to and press Æ/ key to enter sorting mode (The arrow cursor now points to the left).
5 Press Î ï keys to select the new channel number and confirm with the Í / key. (The arrow points to the right and sorting is completed).
6 Repeat steps 4 and 5 for each channel number you wish to re-number.
7 To return to previous menu, press key.
8 To exit the menu, press key.
TV Menu
PictureSound
FeaturesInstall
Install
Language Auto Store
Manual StoreSort
NameChannel Edit
Æ • 0
Æ • 1Æ • 2Æ • 3 Æ • 4Æ • 5

10
Channel EditChannel Edit feature allows you to edit or skip programmes which have bad or weak signal or programme you do not watch often.
1 Press key.
2 Press Î ï keys repeatedly until Install is selected and press Æ / key to access Install menu.
3 Press ï key repeatedly until Channel Edit is selected and press Æ / key to access Channel Edit mode.
4 Press Í Æ or to keys to select the channel you want to skip. 5 Press ï key to select Skipped and press Í Æ keys to select On option to activate skipping of channel. To deactivate, select Off option.
6 To return to previous menu, press key.
7 To exit the menu, press key.
Picture and Sound
1 Press key.
2 Press Î ï keys to select Picture or Sound.
3 Press Æ / key to access Picture or Sound menu.
4 Press Î ï keys to select a Picture or Sound setting and the Í Æ keys to adjust.
5 To return to previous menu, press key.
6 To exit the menu, press the key.
TV Menu
PictureSound
FeaturesInstall
Picture
BrightnessColour
ContrastSharpness
HueColour Temp.
39
TV Menu
PictureSound
FeaturesInstall
Sound
• 120 Hz• 500 Hz• 1500 Hz• 5 KHz• 10 KHz
Equalizer Æ Balance Æ
AVL ÆDolby Virtual Æ
Description of the Picture settingsBrightness : this changes picture brilliance.
Colour : this changes the intensity of the colour.
Contrast : this changes the difference between the light and dark tones.
Sharpness : this increases or decreases thesharpness level to improve details in the picture.
Hue : this increases or decreases thecolour intensity. Note : Hue is applicable to NTSC programmes only.
Colour Temp. : this changes the colour rendering: Cool (bluer), Normal (balanced) or Warm (redder).
Description of the Sound settingsEqualizer : to adjust the sound tone (from bass: 120 Hz to treble : 10 KHz).
Balance : this balances the sound on the left and right speakers.
AVL (Automatic Volume Leveller) : this is used to limit sudden increases in sound, for example, during a programme change or advertising slots.
Dolby Virtual : To activate / deactivate the surround sound effect. You can also access these settings with the key.
TV Menu
PictureSound
FeaturesInstall
Install
Language Auto StoreManual Store
SortName
Channel Edit
Æ
Æ
Æ
Æ
Æ
Æ
Channel Skipped
11
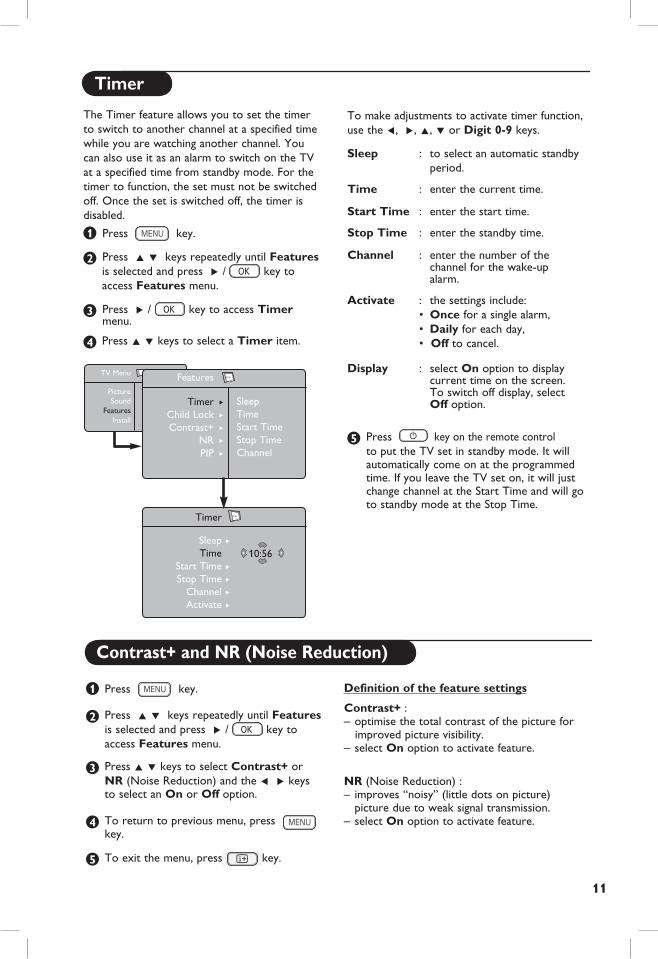
Contrast+ and NR (Noise Reduction)
1 Press key.
2 Press Î ï keys repeatedly until Features is selected and press Æ / key to access Features menu. 3 Press Î ï keys to select Contrast+ or NR (Noise Reduction) and the Í Æ keys to select an On or Off option.
4 To return to previous menu, press key.
5 To exit the menu, press key.
Definition of the feature settings
Contrast+ : – optimise the total contrast of the picture for improved picture visibility.– select On option to activate feature.
NR (Noise Reduction) :– improves “noisy” (little dots on picture) picture due to weak signal transmission.– select On option to activate feature.
The Timer feature allows you to set the timer to switch to another channel at a specified time while you are watching another channel. You can also use it as an alarm to switch on the TV at a specified time from standby mode. For the timer to function, the set must not be switched off. Once the set is switched off, the timer is disabled.
1 Press key.
2 Press Î ï keys repeatedly until Features is selected and press Æ / key to access Features menu.
3 Press Æ / key to access Timer menu.
4 Press Î ï keys to select a Timer item.
To make adjustments to activate timer function, use the Í, Æ, Î, ï or Digit 0-9 keys.
Sleep : to select an automatic standby period.
Time : enter the current time.
Start Time : enter the start time.
Stop Time : enter the standby time.
Channel : enter the number of the channel for the wake-up alarm.
Activate : the settings include: • Once for a single alarm, • Daily for each day, • Off to cancel.
Display : select On option to display current time on the screen. To switch off display, select Off option.
5 Press key on the remote control to put the TV set in standby mode. It will automatically come on at the programmed time. If you leave the TV set on, it will just change channel at the Start Time and will go to standby mode at the Stop Time.
Timer
Timer
Sleep Time
Start TimeStop Time
ChannelActivate
10:56Æ
Æ
Æ
Æ
Æ
TV Menu
PictureSound
FeaturesInstall
Features
Timer Child Lock
Contrast+NRPIP
Æ
Æ
Æ
Æ
Æ
Sleep TimeStart TimeStop TimeChannel

12
Child Lock The Child Lock feature allows you to lock channels to prevent your children from watching certain programmes.
1 Press key.
2 Press Î ï keys repeatedly until Features is selected and press Æ / key to access Features menu.
Press Î ï keys repeatedly until Child Lock is selected and press Æ / key to access Child Lock mode.
4 Key in the access code 0711 by the Digit 0-9 keys.. A message Incorrect will appear. Key in the access code 0711 again.
5 It will then prompt you to change code. Key in your own 4-digit code by the Digit 0-9 keys and confirm the new code.
Once the new code is confirmed, the Child Lock menu will appear.
In the Child Lock menu, use the Î, ï, Í, Æ, Digit 0-9 and keys to access and activate the Child Lock functions.
Description of the settings:– Lock Channel Lock individual channel. A keylock symbol + appears besides the locked channel number or the symbol ? for an unlocked channel number. Press Æ key to enter channel lock mode and Î ï keys to select the channel to lock or unlock. Press Í Æ keys to lock or unlock selected channel. To exit from Lock Channel mode and return to Child Lock menu, press key.
– Change Code Key in your new four-digit code using the Digit 0-9 keys and confirm by keying in the new four-digit again.
– Clear All Press Æ key to unlock all locked channels.
– Lock All Press Æ key to lock all locked channels.
Note : If you switch on the TV set and select a channel that has been locked, you need to key in the Access Code to enter the selected locked channel. To unlock the channel, go the Lock Channel in the Child Lock menu and press Í Æ keys until you see this symbol ?.
TV Menu
PictureSound
FeaturesInstall
Features
Timer Child Lock
Contrast+NRPIP
Æ
Æ
Æ
Æ
Æ
Æ
Æ
Æ
Æ
Æ
- - - -
Features
Timer Child Lock
Contrast+NRPIP
Access Code
Æ
Æ
Æ
Æ
Child Lock
Lock Channel Change Code
Clear AllLock All
+5
PIP (Picture-in-Picture) The PIP (Picture-in-Picture) feature allows you to call up a PIP screen of the PC (Personal Computer) or HD (High Defintion) device while watching a TV programme.
For description of PIP menu items and how it works, refer to the section “PIP (Picture-in Picture)” on pages 19-20.
TV Menu
PictureSound
FeaturesInstall
Features
Timer Child Lock
Contrast+NRPIP
Æ
Æ
Æ
Æ
Æ
• PIP Size• Horizontal• Vertical• HDMI

13
Screen Formats
The pictures you receive may be transmitted in 16:9 format (wide screen) or 4:3 format (conventional screen). 4:3 pictures sometimes have a black band at the left and right of the screen when viewed on a widescreen TV. This function allows you to optimise the picture display on screen.
Press key (or Í Æ) to select the different modes. This TV set is also equipped with automatic tuning which will select the correct screen format, provided the specific signals are transmitted with the programmes.
4:3The picture is reproduced in 4:3 format and a black band is displayed on either side of the picture.
Movie expand 14:9The picture is enlarged to 14:9 format, a thin black band remains on both sides of the picture.
Movie expand 16:9The picture is enlarged to 16:9 format. This mode is recommended when displaying pictures which have black bands at the top and bottom (letterbox format).
Subtitle ZoomThis mode is used to display 4:3 pictures using the full surface of the screen leaving the sub-titles visible.
SuperzoomThis mode is used to display 4:3 pictures using the full surface of the screen by enlarging the sides of the picture.
WidescreenThe picture is displayed in the correct proportions of images transmitted in 16:9.Note: If you display a 4:3 picture in this mode, it will be enlarged horizontally.

14
Smart Picture and Sound
Active ControlActive Control feature automatically adjusts the picture setting for optimal picture quality continuously under any signal conditions.
& Press key repeatedly to alternate between Active Control Off and Active Control On options.
Active Control On
Active Control Off
é Select the Active Control On option to activate the Active Control feature.
“ Select the Active Control Off option to deactivate the Active Control feature.
Smart Picture feature offers you a choice of 5 picture settings namely : Rich, Natural, Soft, Multimedia and Personal.
Smart Sound feature offers you a choice of 4 sound settings namely : Theatre, Music, Voice, and Personal.
Note : The Personal setting is the setting that you set up using the Picture/Sound menu in the main menu. This is the only setting in the Smart Picture/Sound settings that can be changed. All other settings are pre-set at the factory.
Press (Smart Picture) or (Smart Sound) key repeatedly to cycle through the settings to select your desired mode.
Rich or
Personal
Multimedia
Natural
Soft
Definition of Smart Picture settings
Rich : Brilliant and sharp picture settings suitable for bright environment and for use in demonstrations to show off the quality of the TV on good sources.
Natural : Reference mode for living room conditions and average signals.
Soft : Intended for bad-quality signals. Suitable for living room viewing.
Multimedia : Best for graphical applications. Personal : Pictures settings are set to your preference.
Definition of Smart Sound settings
Theatre : Emphasize high and low tone (Bass and Treble boosted).
Music : Emphasize low tone (Bass boosted).
Voice : Emphasize high tone (Treble boosted).
Personal : Sound settings are set to your preference.or
Music
Voice
Personal Theatre
Smart Picture settings
Smart Sound settings

15
TV as a PC Monitor
Your TV can be used as a computer monitor.
Important
For the TV to function as PC monitor, the following steps must be taken :
STEP 1 Connect the PC
Via CVI 2/VGA – Connect VGA output of the PC to the
CVI 2/VGA input of the TV. Use a VGA to
CVI adaptor.
STEP 2 Select the Source
– Press key to display Source List.
– Select CVI 2/VGA.
– Press Æ / key to switch to the selected source.
Accessing the PC menu
1 Press key to display menu.
2 Press ï key to select Features.3 Press Æ / key to access Features menu.
4 Press ï key to select Mode Selection
5 If HD is displayed at Mode Selection,
press Æ key to select PC.
Source
TV Æ
AV Æ
SIDE / SVHS Æ CVI 1 Æ
CVI 2/VGA Æ
HDMI 1 Æ
HDMI 2 Æ
TV
CVI-1AV(AUDIO IN)CVI-2 / VGADVI (AUDIO IN)
HDMI 2 HDMI 1
L L
R
L
R
L
R
R
YPr Pb
VIDEO IIN
SERV U SERV C
AUDIO IIN
:
CVI 2/VGA inputs at bottom of TV
6 Press key to display PC menu.
7 Press Î ï key to select the PC settings :
Picture, Audio Selection or Features.
8 Press Í Æ key to select or adjust setting.
Description of Picture settings
Brightness: Adjusts the brightness.
Contrast: Adjusts the contrast.
Horizontal: Adjusts the horizontal position ofthe image.
Vertical: Adjusts the vertical position of the image.
Colour Temp.: Changes the colour setting – Cool (bluer), Normal (balance) or Warm (redder).
Description of Audio Selection
– Select the audio from the TV or PC/HD. – Press Í Æ key to select the audio source.
Description of Features
Phase: Eliminates the horizontal interfeing lines.
Clock: Eliminates the horizontal interfeing lines.
Format: Select between full screen or native format of the PC screen. Press Í Æ key to select the screen format.
PIP (Picture-in Picture): Allows you to call up a PIP screen of the TV or HD (High Defintion) device. For description of PIP menu items and how it works, refer to the section on “PIP (Picture-in-Picture)” on pages 19-20.
Auto Adjust: Position of image is set automatically.
Description of Reset to Factory Setting:To return to factory settings (default settings).
NOTEFor more details on connection to the PC equipment, see guide “CONNECT”.

16
Supported PC Resolutions 640 x 480, 60 Hz 800 x 600, 72 Hz 640 x 480, 67 Hz 800 x 600, 75 Hz 640 x 480, 72 Hz 1024 x 768, 60 Hz 640 x 480, 75 Hz 1024 x 768, 70 Hz 800 x 600, 56 Hz 1024 x 768, 75 Hz 800 x 600, 60 Hz
TV as a PC Monitor
4 Press ï key to select or Mode Selection
5 If HD is displayed at Mode Selection,
press Æ key to select PC.
6 Press key to display PC menu.
7 Press Î ï key to select the PC settings :
Picture, Audio Selection or Features.
8 Press Í Æ key to select or adjust setting.
Description of Picture settings
Brightness: Adjusts the brightness.
Contrast: Adjusts the contrast.
Colour Temp.: Changes the colour setting – Cool (bluer), Normal (balance) or Warm (redder).
Description of Audio Selection
– Select the audio from the TV or PC/HD. – Press Í Æ key to select the audio source.
Description of Features
Format: Select between full screen or native format of the PC screen. Press Í Æ key to select the screen format.
PIP (Picture-in Picture): Allows you to call up a PIP screen of the TV or HD (High Defintion) device. For description of PIP menu items and how it works, refer to the section on “PIP (Picture-in-Picture)” on pages 19-20.
Mode Selection: Select between HD or PC mode. Press Í Æ key to select the mode.
STEP 1 Connect the PC
Via HDMI – Connect DVI output of the PC to the HDMI 1
or HDMI 2 input of the TV. Use a DVI to
HDMI adaptor.
STEP 2 Select the Source
– Press key to display Source List.
– Press Î ï key to select HDMI 1 or
HDMI 2.
– Select HDMI 1 or HDMI 2.
– Press Æ / key to switch to the selected source.
Accessing the PC menu
1 Press key to display menu.
2 Press ï key to select the Features.
3 Press Æ / key to access Features menu.
TV
CVI-1AV(AUDIO IN)CVI-2 / VGADVI (AUDIO IN)
HDMI 2 HDMI 1
L L
R
L
R
L
R
R
YPr Pb
VIDEO IIN
SERV U SERV C
AUDIO IIN
:
HDMI 1 / HDMI 2 inputs at bottom of TV
Source
TV Æ
AV Æ
SIDE / SVHS Æ CVI 1 Æ
CVI 2/VGA Æ
HDMI 1 Æ
HDMI 2 Æ
Source
TV Æ
AV Æ
SIDE / SVHS Æ CVI 1 Æ
CVI 2/VGA Æ
HDMI 1 Æ
HDMI 2 Æ

17
TV in HD (High Definition) Mode
The HD (High Definition) mode allows you to enjoy clearer and sharper pictures if you are using a HD equipment that can produce high definition programming.
Important
For the TV to function in HD mode, the following steps must be taken :
STEP 1 Connect the HD equipment
Via CV1 or CVI 2/VGA
– Connect VGA output of the HD equipment to the CVI 1 or CVI 2/VGA input of the TV. Use a VGA to CVI adaptor.
Via HDMI
– Connect HDMI/DVI output of the HD equipment to the HDMI 1 or HDMI 2 input of the TV. Use a HDMI to DVI adaptor if DVI is connected.
Source
TV Æ
AV Æ
SIDE / SVHS Æ CVI 1 Æ
CVI 2/VGA Æ
HDMI 1 Æ
HDMI 2 Æ
Source
TV Æ
AV Æ
SIDE / SVHS Æ CVI 1 Æ
CVI 2/VGA Æ
HDMI 1 Æ
HDMI 2 Æ
Source
TV Æ
AV Æ
SIDE / SVHS Æ CVI 1 Æ
CVI 2/VGA Æ
HDMI 1 Æ
HDMI 2 Æ
Source
TV Æ
AV Æ
SIDE / SVHS Æ CVI 1 Æ
CVI 2/VGA Æ
HDMI 1 Æ
HDMI 2 Æ
TV
CVI-1AV(AUDIO IN)CVI-2 / VGADVI (AUDIO IN)
HDMI 2 HDMI 1
L L
R
L
R
L
R
R
YPr Pb
VIDEO IIN
SERV U SERV C
AUDIO IIN
:
CVI 2/VGA inputs CVI 1 inputs
Bottom of TV
TV
CVI-1AV(AUDIO IN)CVI-2 / VGADVI (AUDIO IN)
HDMI 2 HDMI 1
L L
R
L
R
L
R
R
YPr Pb
VIDEO IIN
SERV U SERV C
AUDIO IIN
:
HDMI 1 / HDMI 2 inputs at bottom of TV
STEP 2 Select the Source
– Press key to display Source List.
– Press Î ï key to select HDMI 1 or HDMI 2 if you connect to a Digital HD equipment.
Select CVI 1 or CVI 2/VGA if you connect to a Analogue HD equipment.
– Press Æ / key to switch to the selected source.

18
NOTE : For more details on connection to the HD equipment, see guide “ CONNECT”.
Supported HD format480p 576p 720p 1080i
Your Philips TV is HDMI compliant. If you do not get a good picture, please change the video format on your device (DVD player, cable set-top box, etc.) to a standard format. For example, for DVD player, select 480P, 576p, 720p or 1080i. For PC, select 640 x 480, 800 x 600 or 1024 x 768. If the problem persists, please refer to your PC user manual on possible software upgrades to your graphics card.
Please note that this is not a defect of the TV set.
Accessing the HD menu
– Press key to display the HD menu.
– Press Î ï key to select the HD settings : Picture, Sound or Features.
– Press Æ / key to access selected setting.
– Press Í Æ key to select and adjust setting.
HD Picture and Sound settingsFunctions of HD Picture and Sound settings work in exactly the same way as the TV Picture and Sound settings (see page 10).
HD Features Timer: Functions of the Sleeptimer and Timer work in exactly the same way as the TV Sleeptimer and Timer (see page 11).
PIP (Picture-in Picture): Allows you to call up a PIP screen of the TV or PC. For description of PIP menu items and how it works, refer to the section on “PIP (Picture-in-Picture)” on pages 19-20.
Horizontal Shift : Adjust the horizontal position of the image.
Vertical Shift : Adjust the vertical position of the image.
TV in HD (High Definition) Mode
* Mode Selection : When you connect PC or HD equipment supporting resolutions of 480p, 576p or 720p, the Mode Selection in the Features menu will be highlighted. This will allow you to select between the PC and HD mode. If it does not support the 480p, 576p or 720p resolutions, you cannot access this function.

19
PIP (Picture-in-Picture)
The PIP (Picture-in-Picture) feature allows you to call up a PIP screen of the PC (Personal Computer) or HD (High Defintion) equipment while watching a TV programme. Likewise, you can also call up a PIP screen of the TV while you are in PC or HD mode.
ImportantTo call up a PIP screen, the following steps must be taken :
Connect your PC equipment
Via HDMI 1 or HDMI 2 – Connect HDMI 1 or HDMI 2 input of the TV to the DVI output of the PC. Use a DVI to HDMI adaptor.
NOTE : For more details on connection to the HD equipment, see guide “ CONNECT”.
TV
CVI-1AV(AUDIO IN)CVI-2 / VGADVI (AUDIO IN)
HDMI 2 HDMI 1
L L
R
L
R
L
R
R
YPr Pb
VIDEO IIN
SERV U SERV C
AUDIO IIN
:
HDMI 1 / HDMI 2 inputs at bottom of TV
Connect your HD equipment
Via HDMI 1 or HDMI 2
– Connect HDMI 1 or HDMI 2 input of the TV to the HDMI/DVI output of the HD equipment. Use a HDMI to DVI adaptor if DVI is connected.
TV
CVI-1AV(AUDIO IN)CVI-2 / VGADVI (AUDIO IN)
HDMI 2 HDMI 1
L L
R
L
R
L
R
R
YPr Pb
VIDEO IIN
SERV U SERV C
AUDIO IIN
:
HDMI 1 / HDMI 2 inputs at bottom of TV

20
Accessing the PIP via the PIP menuNote : This is only possible when PIP signal is detected.
& Press key to display main menu.
é Press Î ï key, select Features and the Æ / key to enter the Features menu.
“ Press Î ï keys to select PIP
‘ Press Æ / key to enter PIP menu.
( Press Î ï keys to select PIP menu items. § Press Í Æ Î ï keys to access the PIP menu items, make the following adjustments or options. è To exit the PIP screen, select PIP Size. followed by the Off option.
Accessing PIP with the PIP key
& Press key on the remote control to display PIP screen. A small PIP screen will appear on the TV screen.
é Press key a second time to change the small PIP screen to a medium PIP screen size.
PIP
PIP Size
Horizontal
Vertical
HDMI
Æ
Æ
Æ
Æ
Off
TV Menu
PictureSound
FeaturesInstall
Features
Timer Child Lock
Contrast+NRPIP
Æ
Æ
Æ
Æ
Æ
• PIP Size• Horizontal• Vertical• HDMI
PIP (Picture-in-Picture)
“ Press key a third time to change the medium PIP screen to large PIP screen size
‘ Press key a fourth time to change the large PIP screen to a Side-by-Side (a TV screen on one side and the PIP screen on the other side).
( Press key a fifth time to exit PIP screen.
Definitions of PIP items
PIP Size : Select your PIP size (Off, Small, Medium, Large and Side-by- Side).
Horizontal : Move the PIP screen horizontally from left to right and vice-versa.
Vertical : Move the PIP screen vertically from top to bottom and vice-versa.
HDMIIf you call up a PIP screen from the HDMI 1 or HDMI 2 source, you have no access to HDMI selection.
If you call up a PIP screen from the other sources, you can select between HDMI 1 or HDMI 2 in the PIP menu.
PIP
PIP Size
Horizontal
Vertical
HDMI
Æ
Æ
Æ
Æ HDMI 1
PIP
PIP Size
Horizontal
Vertical
HDMI
Æ
Æ
Æ
Æ HDMI 2

21
Troubleshooting Tips
Below is a list of symptoms you may encounter with your TV. Before you call for service, make these simple checks.
Symptom Possible Causes What you should do
No display on screen • Faulty power supply • Check whether power cord is properly connected • TV’s Power not turned into the mains socket and to your TV. If there is still no power, disconnect plug. Wait for 60 seconds and re-insert plug. Switch on TV again. • Press the key on the remote control.
Poor reception • Faulty antenna connection • Check antenna connection at rear of TV.(snowish picture and • Weak transmission • Try to fine tune your picture (see to page 8).noise) • Wrong TV system • Have you chosen the right TV system? (see to page 8).
No picture • Faulty aerial and cable • Check whether cables or aerial sockets are properly connected. • Wrong source selected • Check whether the source is correctly selected. Press button to enter Source list and select the correct source.
No sound on • Wrong TV system • Check whether the correct TV system is selectedcertain channels (see to page 8). No sound • Zero volume level • Try increasing volume. • Sound muted • Check that the mute ( ) mode is not on. If mute mode is on, press the key to deactivate mute mode.
Sound interference • Electrical appliances • Try switching off any electrical appliances, for interference example, hairdryer, vacuum cleaner that are in use.
TV not responding • Wrong placement of • Check the placement of the batteries.to remote control batteries • Flat batteries • Try changing the batteries. • Aim remote control directly at sensor on front of TV.
Intermittent or • * HDCP (see glossary) • Noise is displayed if the connected digital equipment’s flickering picture authentication failed (DVD player or Set-Top box) *HDCP authentication in HD mode failed. Check user manual for the digital equipment you are connecting. • Use a standard HDMI to DVI cable.
No sound or picture but • Set on standby mode • Press the key on the remote control.front panel red light is on
Cannot access Install • In AV, EXTERNAL or • Press AV key and select TV mode. You can now menu HD mode access the Install menu by using the Menu key.
S-Video colour • Wrong detection of • Check whether power cord is properly connectedbecomes faint signal • Press the P + key on the remote control to do a channel up and then press the P – key to do a channel down.

22
Troubleshooting Tips
Glossary
DVI (Digital Visual Interface) : A digital interface standard created by the Digital Display Working Group (DDWG) to convert analog signals into digital signals to accommodate both analog and digital monitors.
VGA (Video Graphics Array) : a common standard graphics display system for PCs.
RGB signals : These are the three video signals, Red Green Blue, which make up the picture. Using these signals improves picture quality.
S-VHS signals : These are 2 separate Y/C video signals from the S-VHS and Hi-8 recording standards. The luminance signals Y (black and white) and chrominance signals C (colour) are recorded separately on the tape. This provides better picture quality than with standard video (VHS and 8 mm) where the Y/C signals are combined to provide only one video signal.
16:9 : Refers to the ratio between the length and height of the screen. Wide screen televisions have a ratio of 16:9, conventional screen TV sets have a ratio of 4:3.
HDMI (High-Definition Multimedia Interface) : Provides an uncompressed, all digital audio/video interface between the TV and any HDMI-equipped audio/video component, such as set-top box, DVD player and A/V receiver. HDMI supports enhanced or high-definition video plus two-channel digital audio.
NTSC : NTSC is the analog television system in use in Korea, Japan, United States, Canada and certain other places, mostly in the Americas (see map). It is named for the National Television System(s) Committee, the industry-wide standardization body that created it.
PAL (Phase Alternating Line): is a colour encoding system used in broadcast television systems in large parts of the world.
HDCP (High-bandwidth Digital-Content Protection): HDCP encrypts the transmission of digital content between the video source or transmitter such as a computer, DVD player or set-top box and the digital display or receiver such as a monitor, television or projector.
Symptom Possible Causes What you should do
PC modes do not • Wrong connections • Check whether connections are correct. (see work “TV as PC Monitor” on page 15). For more details on connection to the PC equipment, see guide “Connect”. • Wrong source selected. • Check whether the source is correctly selected. Press button to enter Source list and select the correct source. • Wrong display resolution • Check whether you have configured the computer on a compatible display resolution (see “TV as PC Monitor” on page 16). • Wrong setting of PC • Check graphic card setting of PC. graphic card
Black bar on top • PC refresh rate too high • Change PC refresh rate to 60 Hz.and bottom of screen in PC mode
Warning concerning stationary images on the TV screenA characteristic of Plasma Display Panels is that displaying the same image for a long time can cause a permanent after-image to remain on the screen. This is called phosphor burn in.Normal use of the TV should involve the showing of pictures that contain constantly moving and changing images that fill the screen.

23
Specifications
42PF7320G 50PF7320G
Panel screen size 1070 mm (42”) 1270 mm (52”)
Audio output 2 x 15 W
TV System PAL, SECAM
Video playback NTSC, PAL, SECAM
Sound System Mono, Nicam Stereo, Virtual Dolby Surround
Connectivity Rear TV 75 Ω, AV In, CVI 1, CVI 2 / VGA, VGA Audio In DVI Audio In, HDMI 1, HDMI 2,
Side Audio In, Video In, S-Video In, Headphone
Power consumption 230 W 450 W
Standby power consumption < 1 W < 1 W
Set dimensions (with stand)
Width 1236 mm 1416 mm Depth 280 mm 280 mm
Height 720 mm 812 mm
Nett Weight (with stand) 39 kg 50 kg

Specifications are subject to change without notice.
Trademarks are the property of Koninklijke Philips Electronics N.V. or their respective owners.
2005 © Koninklijke Philips Electronics N.V. All rights reserved.
www.philips.com
3139 125 36483