2005 - samples recording and using samples in zims 1
TRANSCRIPT
1
2005 - Samples
Recording and Using Samples in ZIMS
2
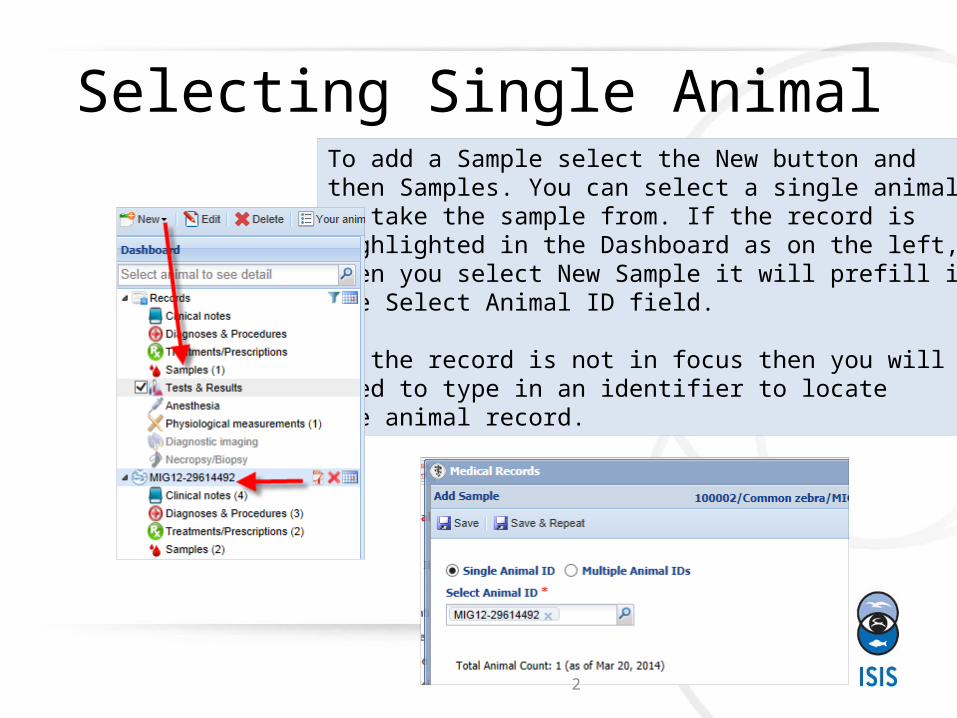
Selecting Single AnimalTo add a Sample select the New button andthen Samples. You can select a single animal to take the sample from. If the record is highlighted in the Dashboard as on the left, when you select New Sample it will prefill inthe Select Animal ID field.
If the record is not in focus then you willneed to type in an identifier to locatethe animal record.
3
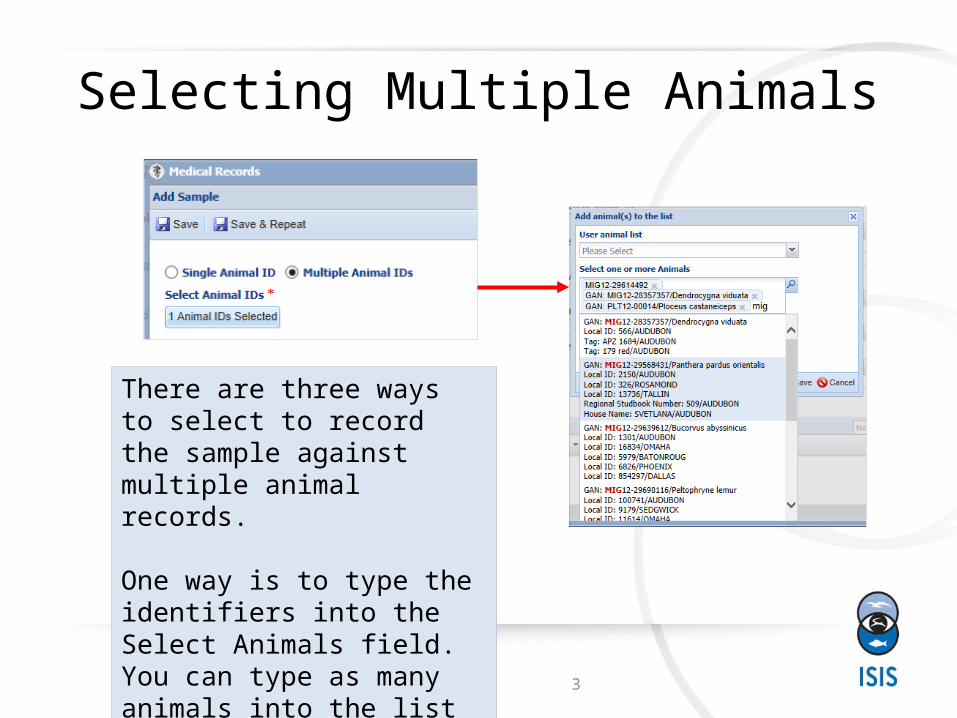
Selecting Multiple Animals
There are three ways to select to record the sample against multiple animal records.
One way is to type the identifiers into the Select Animals field. You can type as many animals into the list as desired.
4
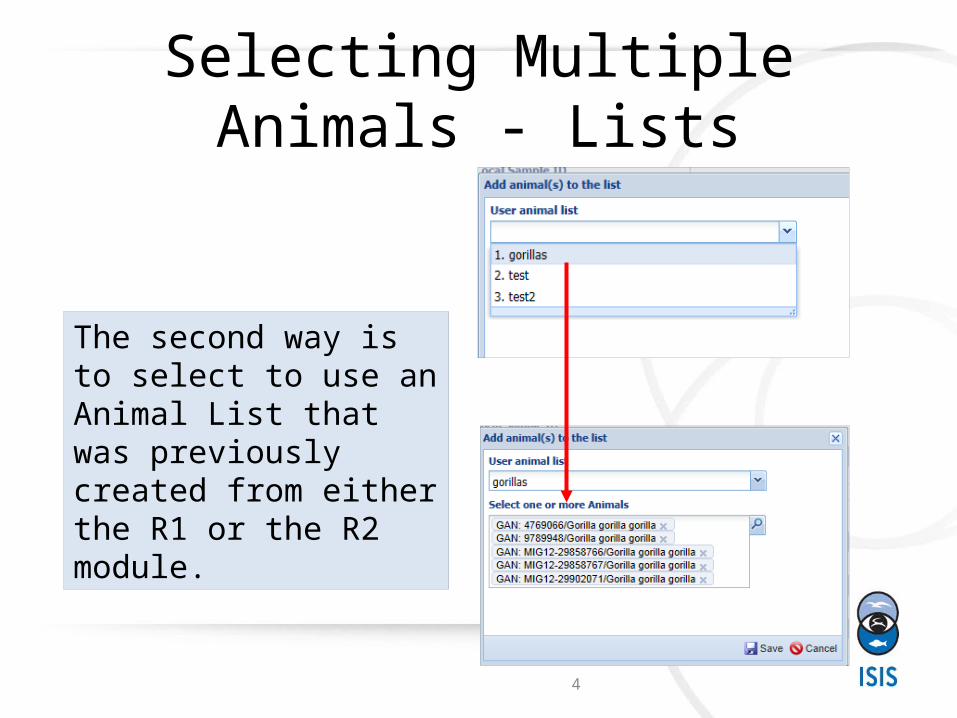
Selecting Multiple Animals - Lists
The second way is to select to use an Animal List that was previously created from either the R1 or the R2 module.
5
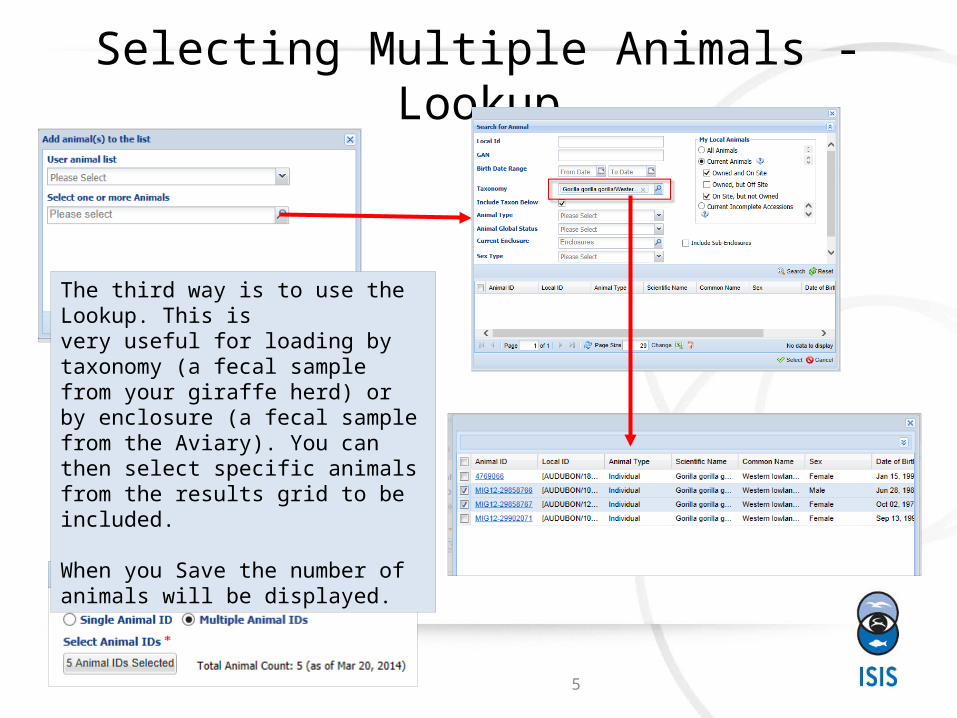
Selecting Multiple Animals - Lookup
The third way is to use the Lookup. This isvery useful for loading by taxonomy (a fecal sample from your giraffe herd) or by enclosure (a fecal sample from the Aviary). You can then select specific animals from the results grid to be included.
When you Save the number of animals will be displayed.
6
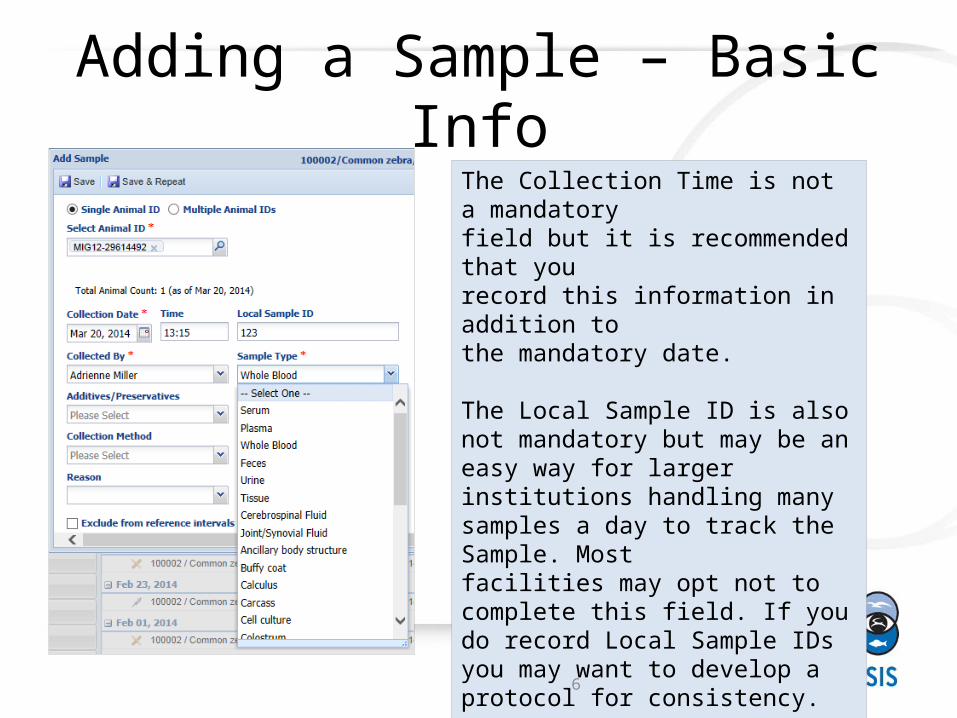
Adding a Sample – Basic InfoThe Collection Time is not a mandatoryfield but it is recommended that yourecord this information in addition tothe mandatory date.
The Local Sample ID is also not mandatory but may be an easy way for larger institutions handling many samples a day to track the Sample. Mostfacilities may opt not to complete this field. If you do record Local Sample IDs you may want to develop a protocol for consistency.
The Sample Type is a data standard drop down list.
7
Adding a Sample – Basic Info
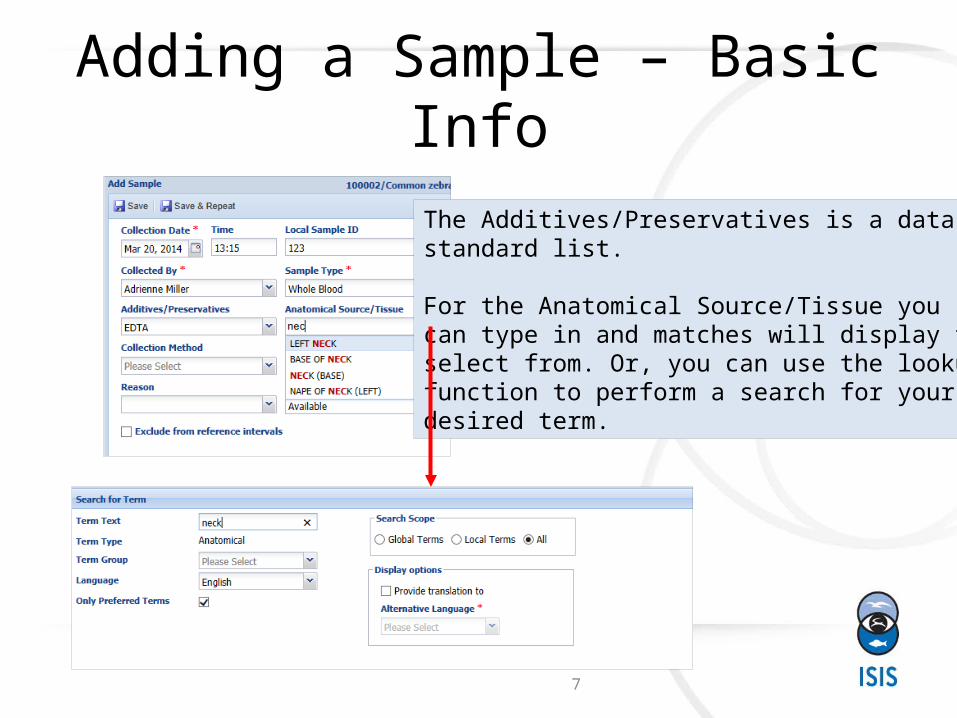
The Additives/Preservatives is a datastandard list.
For the Anatomical Source/Tissue youcan type in and matches will display toselect from. Or, you can use the lookupfunction to perform a search for yourdesired term.
8
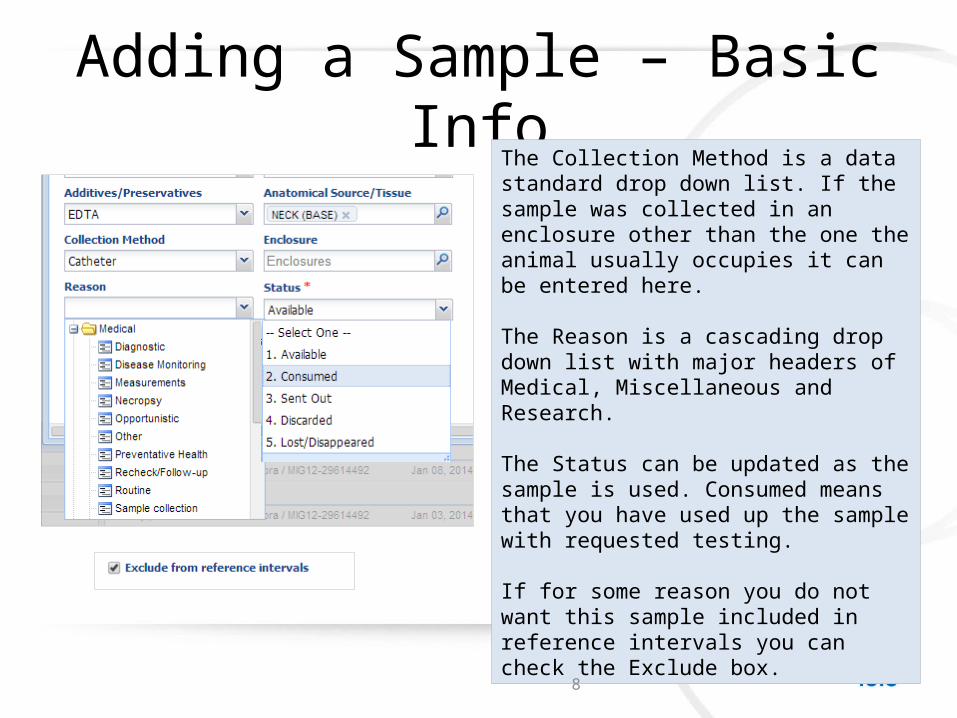
Adding a Sample – Basic InfoThe Collection Method is a data standard drop down list. If the sample was collected in an enclosure other than the one the animal usually occupies it can be entered here.
The Reason is a cascading drop down list with major headers of Medical, Miscellaneous and Research.
The Status can be updated as the sample is used. Consumed means that you have used up the sample with requested testing.
If for some reason you do not want this sample included in reference intervals you can check the Exclude box.
9
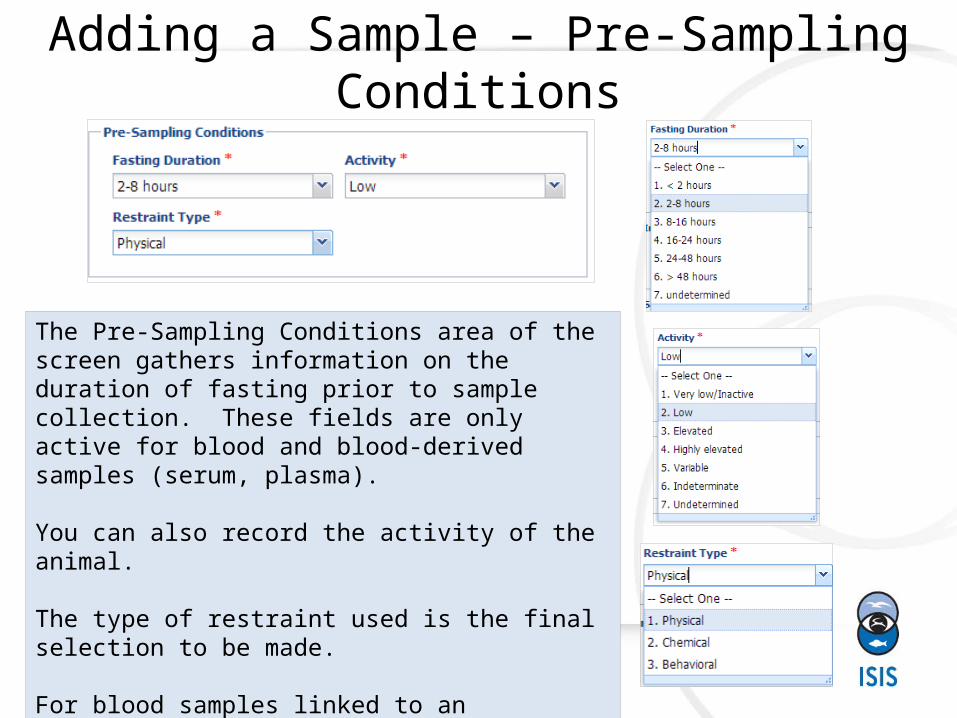
Adding a Sample – Pre-Sampling Conditions
The Pre-Sampling Conditions area of the screen gathers information on the duration of fasting prior to sample collection. These fields are only active for blood and blood-derived samples (serum, plasma).
You can also record the activity of the animal.
The type of restraint used is the final selection to be made.
For blood samples linked to an anesthesia record, the values of these fields are set by the same fields in the anesthesia record and cannot be edited.
10
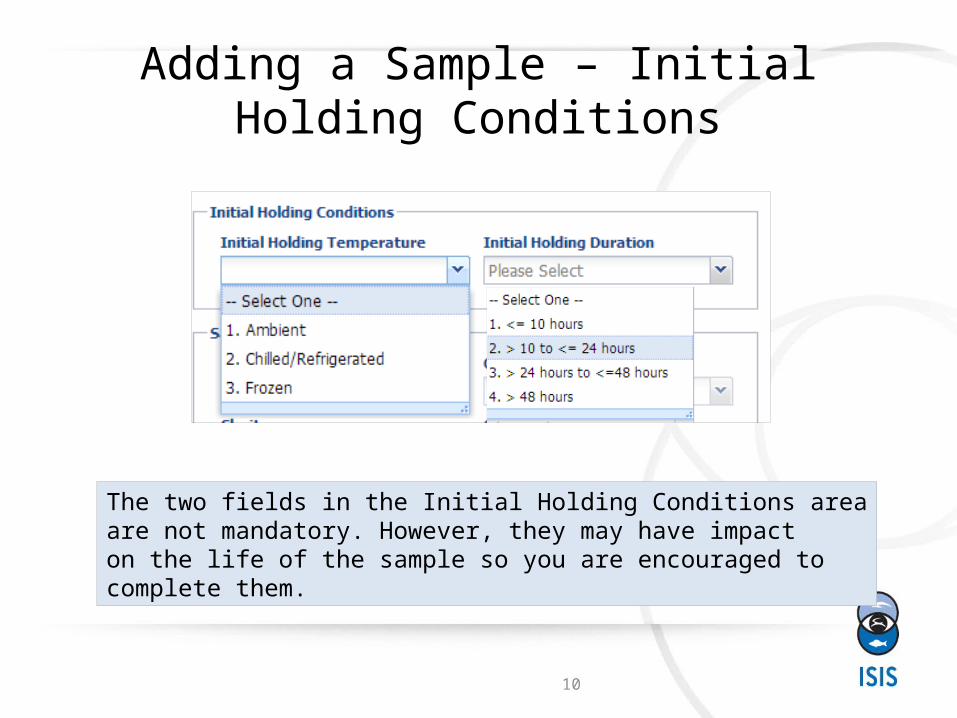
Adding a Sample – Initial Holding Conditions
The two fields in the Initial Holding Conditions areaare not mandatory. However, they may have impacton the life of the sample so you are encouraged tocomplete them.
11
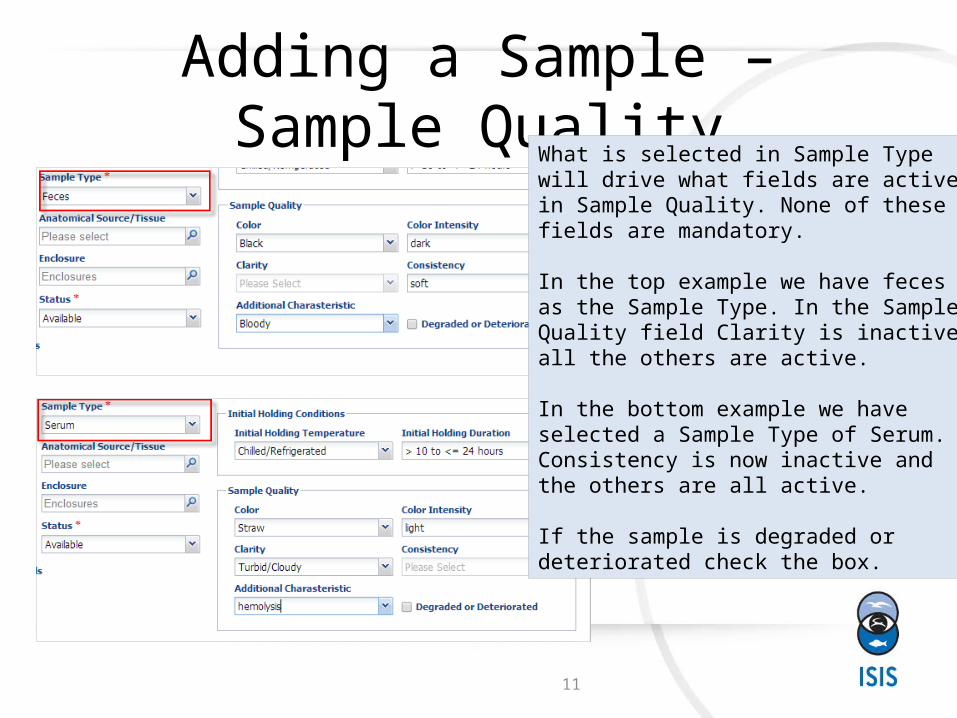
Adding a Sample – Sample QualityWhat is selected in Sample Typewill drive what fields are activein Sample Quality. None of thesefields are mandatory.
In the top example we have fecesas the Sample Type. In the SampleQuality field Clarity is inactive butall the others are active.
In the bottom example we haveselected a Sample Type of Serum.Consistency is now inactive andthe others are all active.
If the sample is degraded ordeteriorated check the box.
12
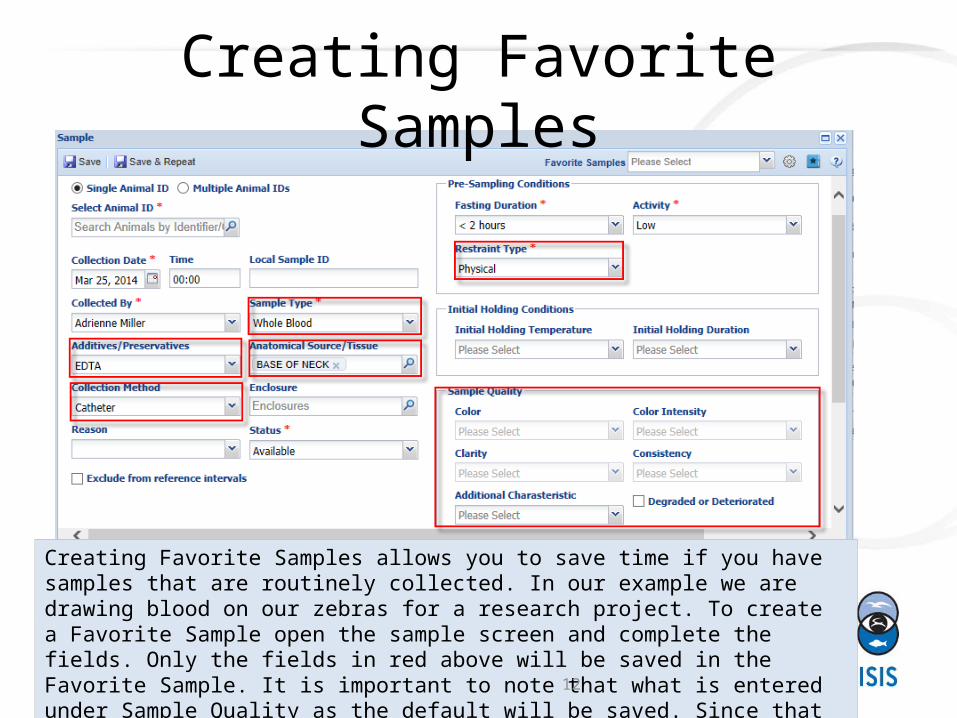
Creating Favorite Samples allows you to save time if you have samples that are routinely collected. In our example we are drawing blood on our zebras for a research project. To create a Favorite Sample open the sample screen and complete the fields. Only the fields in red above will be saved in the Favorite Sample. It is important to note that what is entered under Sample Quality as the default will be saved. Since that can vary from sample to sample, remember to edit it if appropriate.
Creating Favorite Samples
13
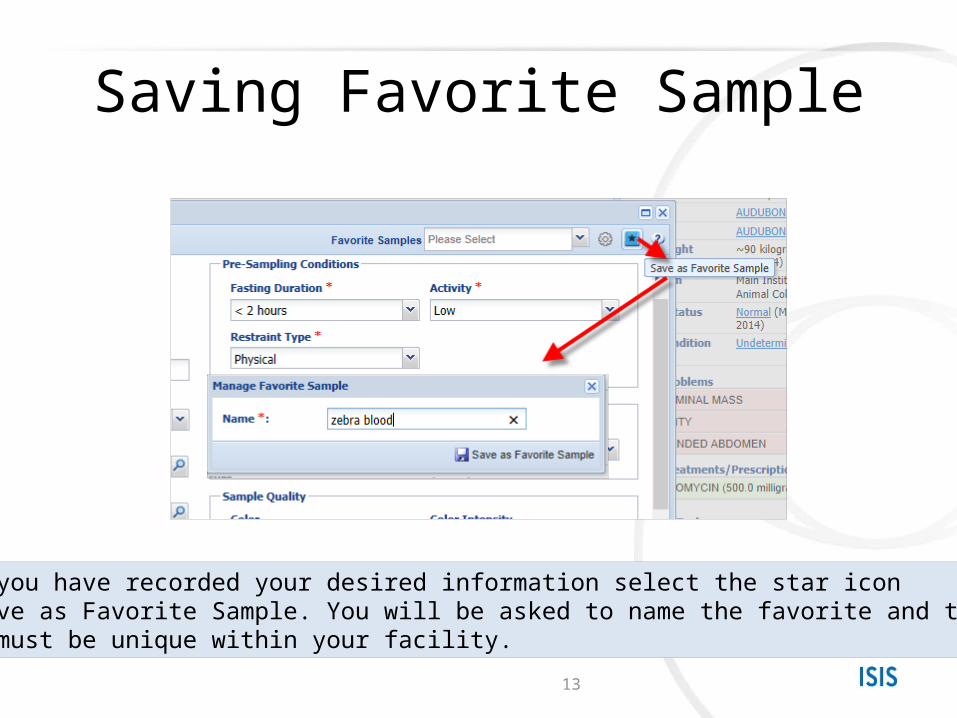
Saving Favorite Sample
When you have recorded your desired information select the star iconto Save as Favorite Sample. You will be asked to name the favorite and thisname must be unique within your facility.
14
Using Favorite Samples
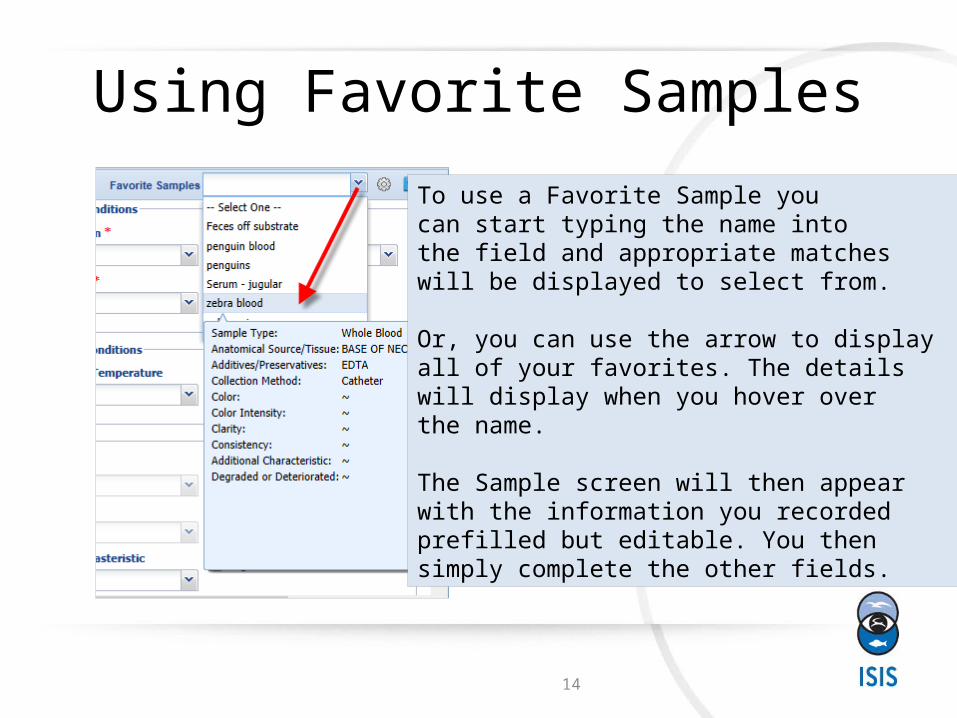
To use a Favorite Sample youcan start typing the name into the field and appropriate matcheswill be displayed to select from.
Or, you can use the arrow to display all of your favorites. The detailswill display when you hover overthe name.
The Sample screen will then appearwith the information you recordedprefilled but editable. You thensimply complete the other fields.
15
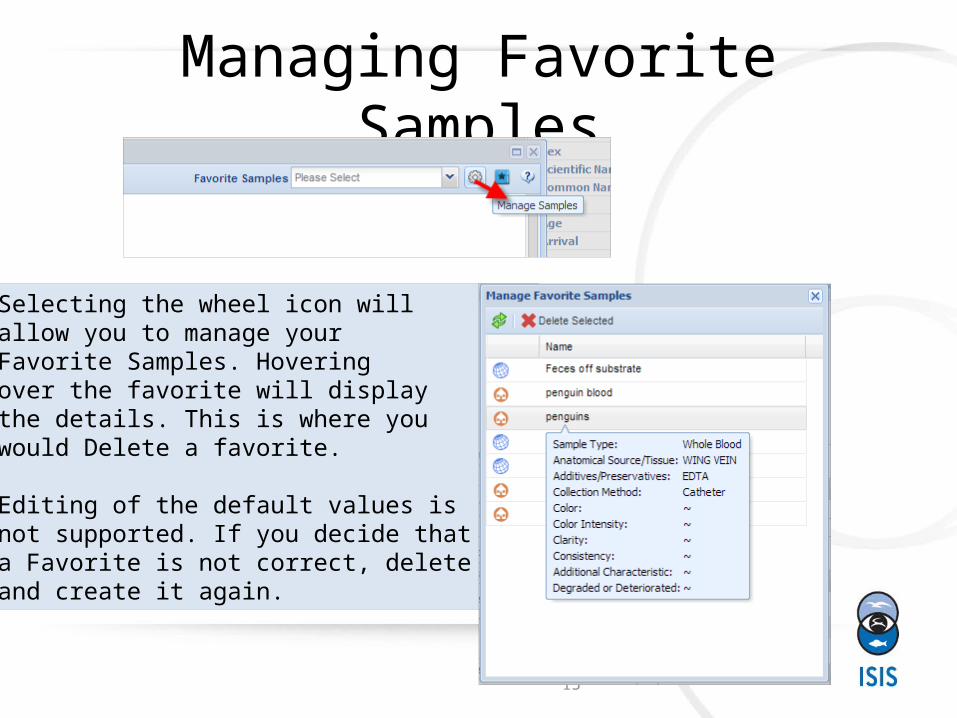
Managing Favorite Samples
Selecting the wheel icon willallow you to manage your Favorite Samples. Hoveringover the favorite will displaythe details. This is where youwould Delete a favorite.
Editing of the default values is not supported. If you decide that a Favorite is not correct, delete it and create it again.
16
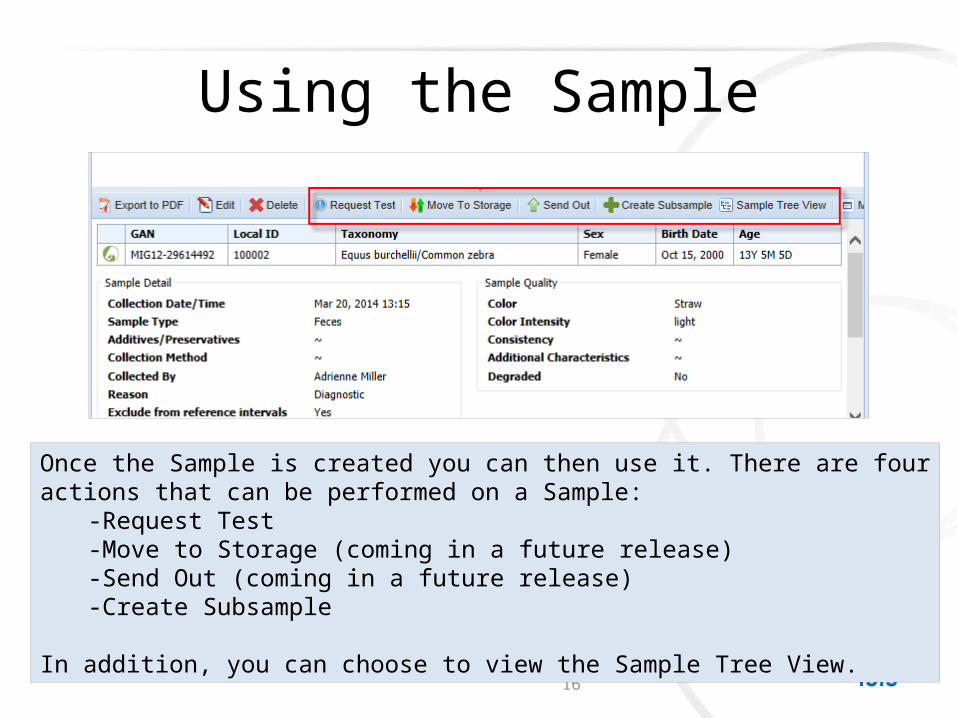
Using the Sample
Once the Sample is created you can then use it. There are fouractions that can be performed on a Sample:
-Request Test-Move to Storage (coming in a future release)-Send Out (coming in a future release)-Create Subsample
In addition, you can choose to view the Sample Tree View.
17
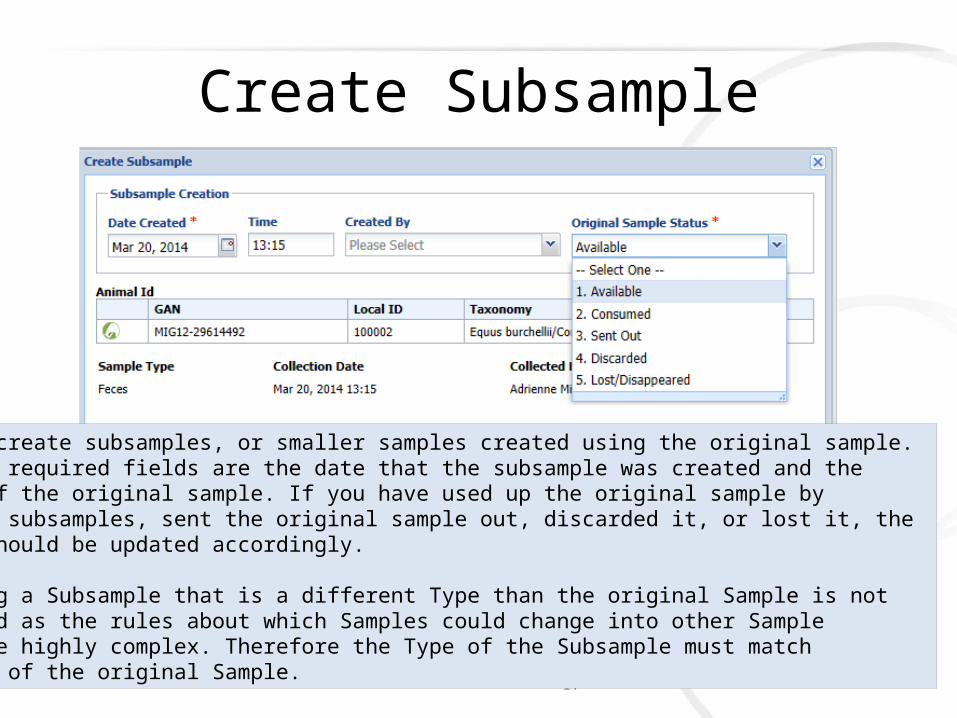
Create Subsample
You can create subsamples, or smaller samples created using the original sample.The only required fields are the date that the subsample was created and thestatus of the original sample. If you have used up the original sample by creating subsamples, sent the original sample out, discarded it, or lost it, the status should be updated accordingly.
Recording a Subsample that is a different Type than the original Sample is not supported as the rules about which Samples could change into other SampleTypes are highly complex. Therefore the Type of the Subsample must matchthe Type of the original Sample.
18
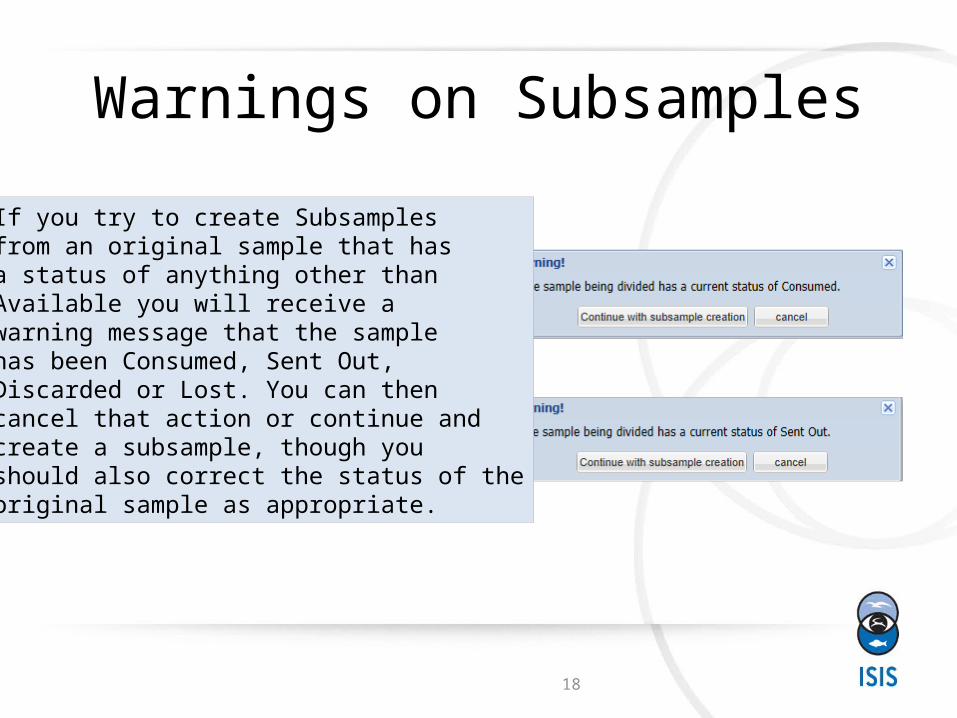
Warnings on Subsamples
If you try to create Subsamplesfrom an original sample that hasa status of anything other thanAvailable you will receive awarning message that the samplehas been Consumed, Sent Out, Discarded or Lost. You can thencancel that action or continue andcreate a subsample, though youshould also correct the status of theoriginal sample as appropriate.
19
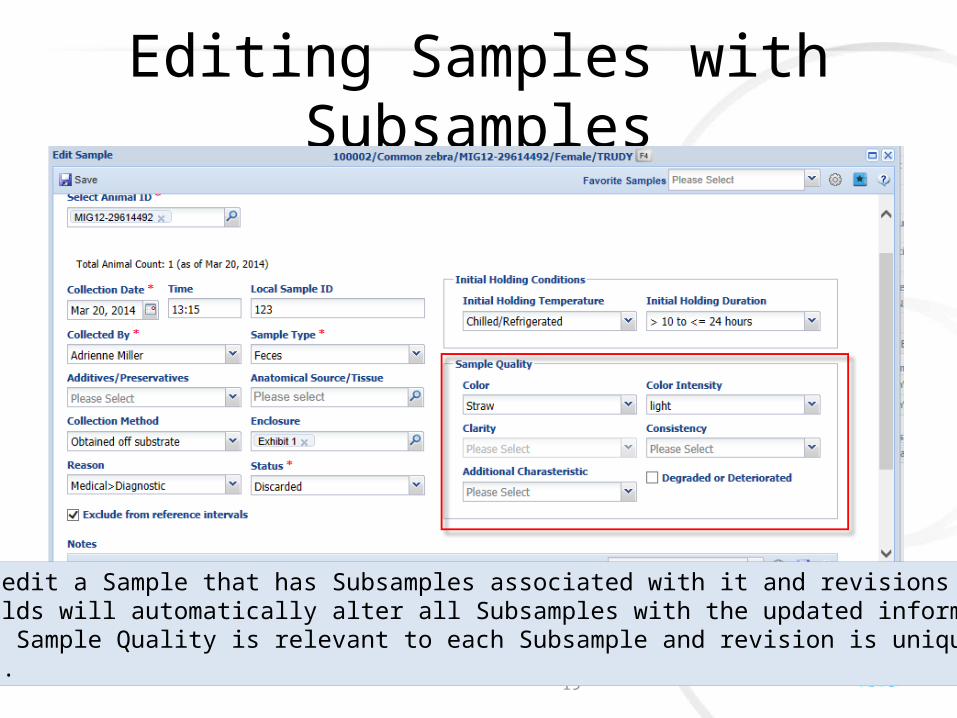
Editing Samples with Subsamples
You can edit a Sample that has Subsamples associated with it and revisions formost fields will automatically alter all Subsamples with the updated information.However, Sample Quality is relevant to each Subsample and revision is unique toeach one.
20
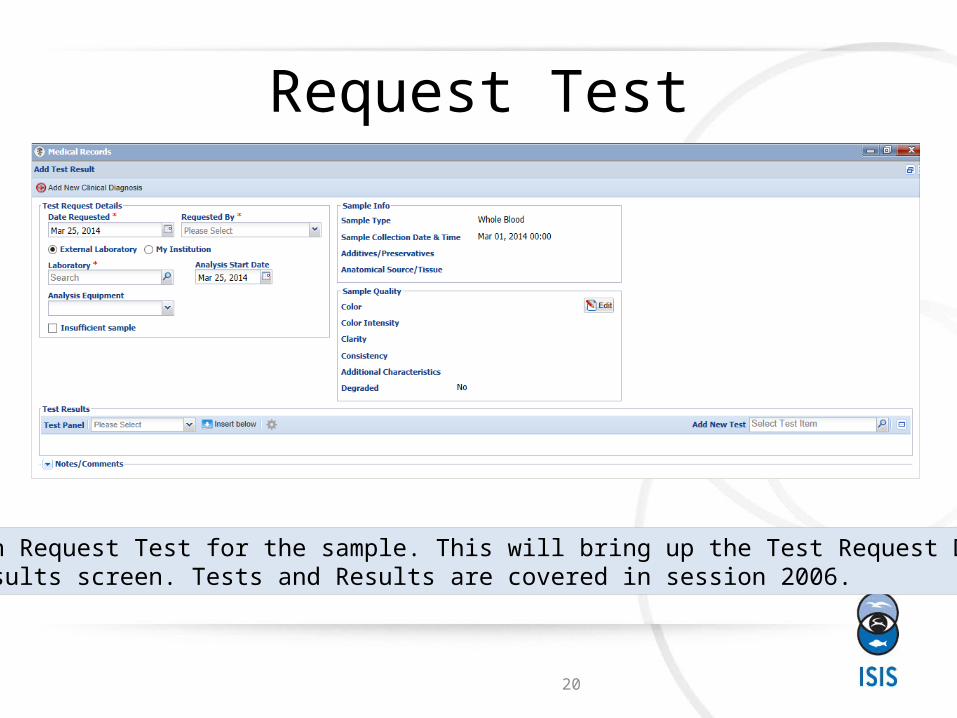
Request Test
You can Request Test for the sample. This will bring up the Test Request Detailsand Results screen. Tests and Results are covered in session 2006.
21
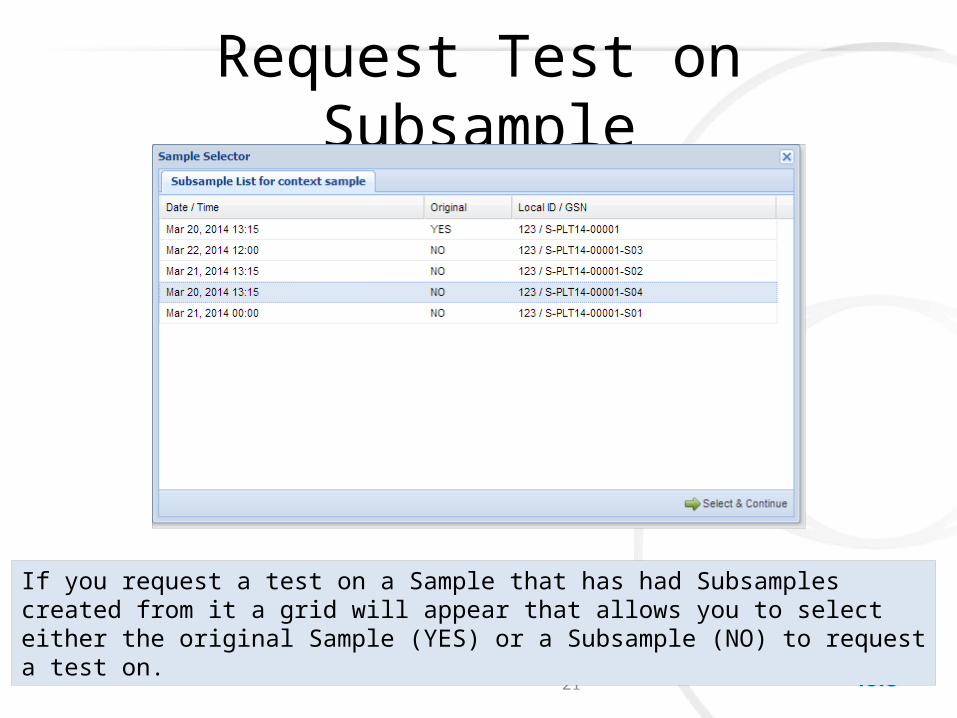
Request Test on Subsample
If you request a test on a Sample that has had Subsamplescreated from it a grid will appear that allows you to selecteither the original Sample (YES) or a Subsample (NO) to requesta test on.
22
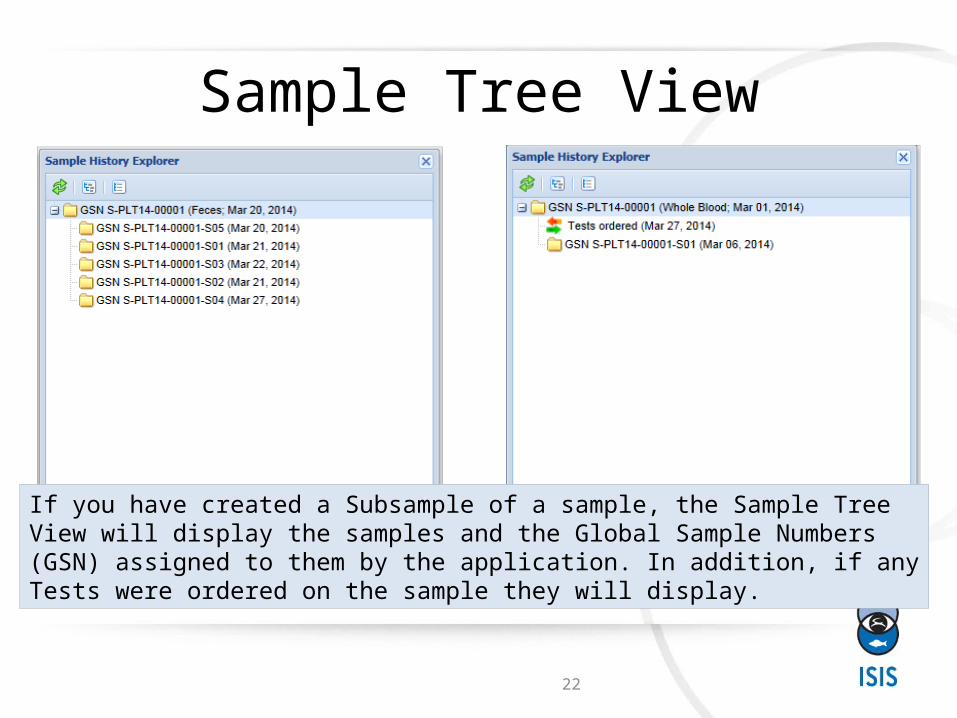
Sample Tree View
If you have created a Subsample of a sample, the Sample TreeView will display the samples and the Global Sample Numbers(GSN) assigned to them by the application. In addition, if anyTests were ordered on the sample they will display.
23
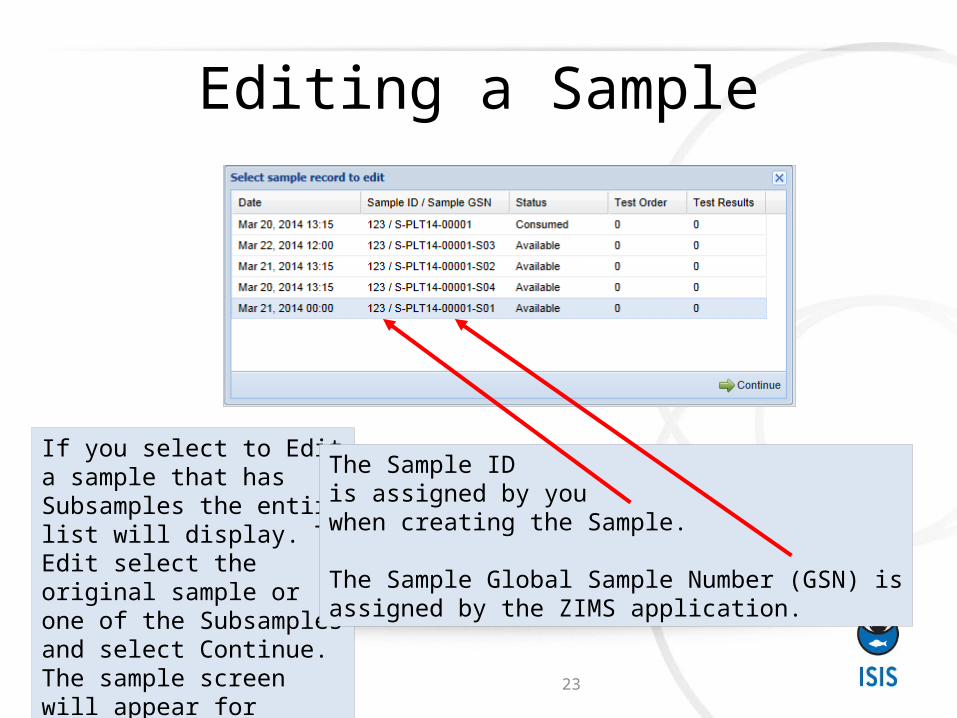
Editing a Sample
If you select to Edit a sample that has Subsamples the entire list will display. To Edit select the original sample or one of the Subsamples and select Continue. The sample screen will appear for editing.
The Sample ID is assigned by you when creating the Sample.
The Sample Global Sample Number (GSN) isassigned by the ZIMS application.

24
SamplesTracking them in ZIMS