11 quantities and reports - florida department … · fdot traffic plans ©2016 fdot 11-1 11...
TRANSCRIPT

FDOT Traffic Plans ©2016 FDOT 11-1
11 QUANTITIES AND REPORTS
OBJECTIVE
In this chapter the CADD Quantity Workflow will be covered. Topics include:
• Generate Quantities and Export to Quantity Manager
• Quantity Manager Overview
• Create Tabulation of Quantities Sheet using Linked Data Manager (LDM)
INTRODUCTION
This chapter covers applications used to generate and document quantities in the plans. This workflow includes
calculating the quantities using the D&C Manager, exporting the quantities to Quantity Manager, and using Linked
Data Manager (LDM) to create the Tabulation of Quantities sheet using the Quantity Manager database.
The workflow to export quantities from Quantity Manager to Designer Interface for AASHTOWare Project
Preconstruction and create the Summary of Pay Items sheet is documented in the FDOT Automated Quantities training
manual.
GENERATE QUANTITIES
Quantities can be generated from the elements drawn in MicroStation using D&C Manager or tagged with the
GEOPAK attribute. The GEOPAK Draw Cell by Feature tools and the Open Roads Civil Tools use the D&C Manager
database in the background to set and tag the elements being drawn. Quantities may also be generated manually or
using other software.
Traffic Plans components use Tabulation of Quantities sheets to document quantities. D&C Manager has the ability
to generate individual sheet quantities using the clip borders created using the Plan/Profile Sheet Composition tool.
Note In order to use this method, the clip borders must be in the active file. It is recommended to calculate
the quantities in the CLIPXX file with the DSGNXX file referenced.
D&C MANAGER COMPUTE MODE
The Compute mode tabulates quantities of items placed as Pay Items by the D&C Manager. When the Compute
option is selected, D&C Manager expands to add a list box at the bottom of the dialog. This is the Collection
bin. Using this bin is optional. Quantities may also be calculated with a single item or category selected. To load
items into the collection bin double click on the item or right click and select Add to Collection. Categories can
be added by right clicking and selecting Add to Collection. To clear the collection bin, right click in the collection
bin area and select Clear Collection. Once all of the items are added to the collection bin, the list can be saved for

Chapter 11 _____________________________________________________ QUANTITIES AND REPORTS - Generate Quantities
11-2 ©2016 FDOT FDOT Traffic Plans
future use. To save a collection right click in the collection bin area and select Save Collection. Save the file to
the project discipline directory.
COMPUTING QUANTITIES
Plan Quantity Computation opens when the Compute is selected.
• Job COGO database for the project used for chain information (GEOPAK gpk file)
• Extents List of options for limiting the area and elements included in the quantity calculations.
o Active Design File – All elements in the Active Design File are candidates for computation.
o View – Only the selected items that are displayed in MicroStation view one are computed.
QUANTITIES AND REPORTS - Generate Quantities _____________________________________________________ Chapter 11
FDOT Traffic Plans ©2016 FDOT 11-3
o Fence – A MicroStation fence must be placed, and all specified graphical features, which satisfy both
the fence and the Range, will be tabulated.
o Boundary Element – A previously drawn closed shape is used to determine quantities. When selected,
you are prompted to select the closed shape. This mode is sensitive to the MicroStation Inside, Overlap
and Clip modes.
o Station Range – A Baseline Reference (chain or dgn) must be defined for this option. The range fields
default to the extent of the chain. Key-in a station or by clicking Begin or End Station icons, graphically
define the station range. Perpendicular projections to the station(s) define the extent of the computations.
This option is not ideal for sheet quantities.
o Sheet Range – Sheets (clip borders) placed with the Plan/Profile Sheet Composition tool are used to
define the area of computation.
o Selection Set – A MicroStation selection set is defined to set the elements to be computed.
o Boundary Selection Set – A MicroStation selection set of the Boundary (not the actual candidate
compute elements) must be created prior to computing.
• Baseline Reference allows the designer to define a Chain or DGN Element for offsets and station values
for reports. In addition the Range, if set, is measured from the selected Chain or DGN Element to search
for candidate items. Setting the Baseline Reference to None limits the type of output that can be generated
as no station / offset values can be computed.
• Highlight During Computation, when selected, all MicroStation elements computed are highlighted in
the selected highlight color.
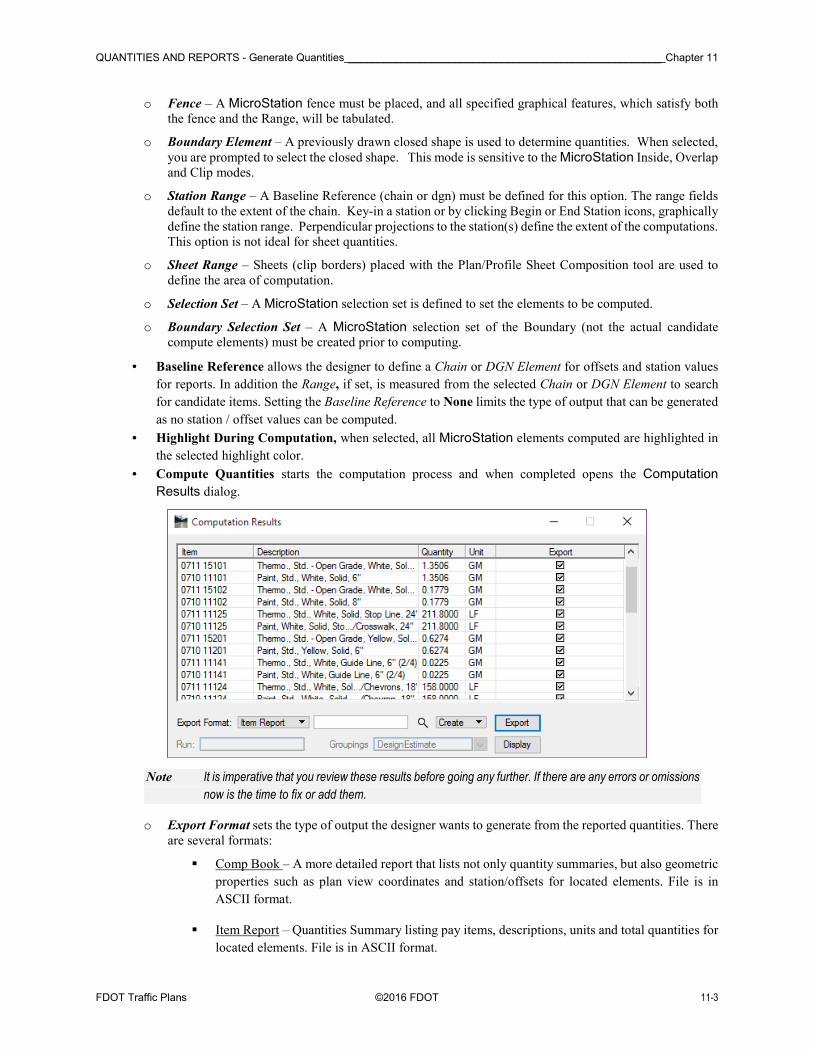
• Compute Quantities starts the computation process and when completed opens the Computation
Results dialog.
Note It is imperative that you review these results before going any further. If there are any errors or omissions
now is the time to fix or add them.
o Export Format sets the type of output the designer wants to generate from the reported quantities. There
are several formats:
� Comp Book – A more detailed report that lists not only quantity summaries, but also geometric
properties such as plan view coordinates and station/offsets for located elements. File is in
ASCII format.
� Item Report – Quantities Summary listing pay items, descriptions, units and total quantities for
located elements. File is in ASCII format.
Chapter 11 _____________________________________________________ QUANTITIES AND REPORTS - Generate Quantities
11-4 ©2016 FDOT FDOT Traffic Plans
� Item Table – Contains the same information as the Item Report, but formatted in tabular form.
� DBMS – Very detailed information including calculated and rounded quantities, geometric
properties, pay item numbers, descriptions, station / offset values, etc. The format is the selected
database (i.e., Microsoft Access, Oracle, SQL Server) defined in the Compute Settings. This
option is required when taking the quantities into Quantity Manager.
� CSV By Item –Summary listing pay items, descriptions, units and total quantities for located
elements. Format is CSV (coma separated values).
� CSV By Element – A more detailed report that lists not only quantity summaries, but also
geometric properties such as plan view coordinates and station/offsets for located elements.
Format is CSV (coma separated values).
� Table – User defined table column properties. A column for designating the appropriate symbol
is also included, as well as Adhoc attribute data. This option is used to generate legends such
as for landscape plans.
o File Name field next to the Export Format is the output file. Using the hourglass allows the designer to
browse to a specific folder.
o Create or Append are the two export options for the quantities. This will place the quantities into a new
file or append them to a previously created file.
o Run and Groupings are only used for the DBMS export format to Quantity Manager.
� Run is a user key-in and any logical description, like Pavement Marking or Preliminary, can be
used. This description will be passed to Quantity Manager.
� Groupings Value to define the TRNSPORT Grouping in Quantity Manager.
o Export commences the output file process and creates the quantity file. In this training, you will be
exporting to DBMS, which will create an MDB file that can then be opened with Quantity Manager.
QUANTITIES AND REPORTS - Generate Quantities _____________________________________________________ Chapter 11
FDOT Traffic Plans ©2016 FDOT 11-5
Exercise 11.1 Generate Quantities and Export to Quantity Manager
� Create a Collection (Part 1)
In this part of the exercise the student will create a collection of items used to generate.
1. If closed, open CLIPSP01.dgn in the Signing folder.
2. Open D&C Manager and click the Compute icon. (This is the Calculator icon).
Note If there are items in the collection bin of D&C Manager, right click in the collection area and select
Clear Collection.
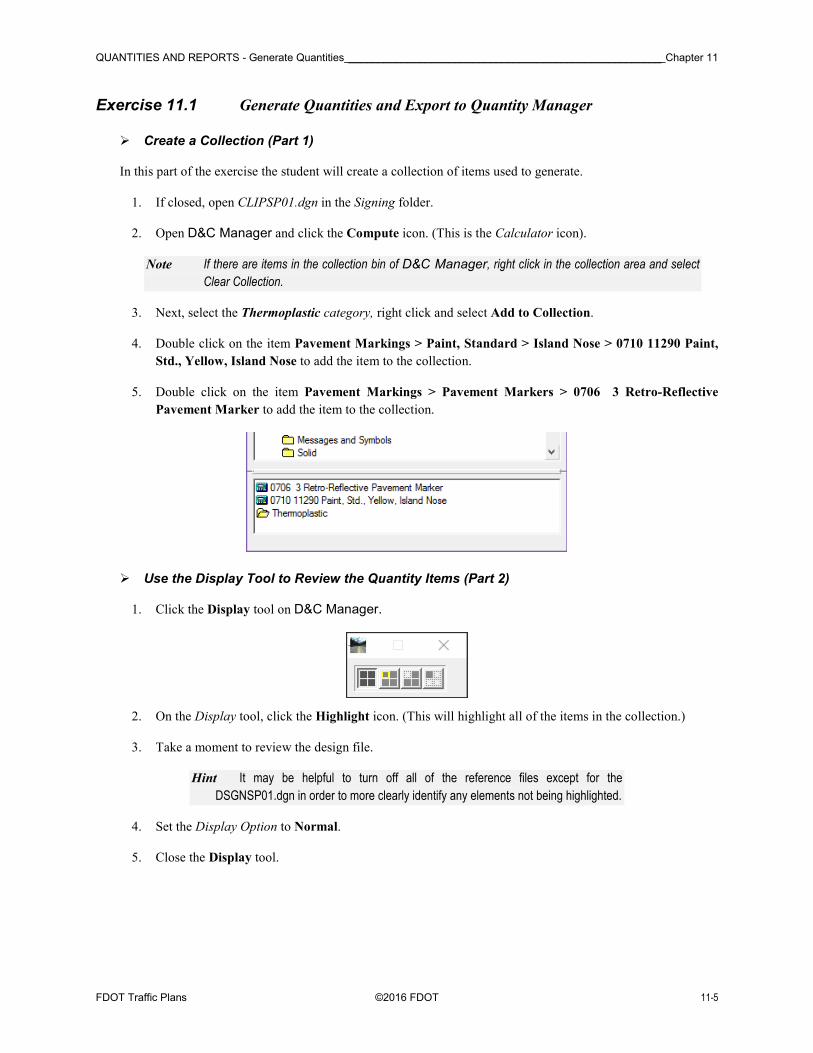
3. Next, select the Thermoplastic category, right click and select Add to Collection.
4. Double click on the item Pavement Markings > Paint, Standard > Island Nose > 0710 11290 Paint,
Std., Yellow, Island Nose to add the item to the collection.
5. Double click on the item Pavement Markings > Pavement Markers > 0706 3 Retro-Reflective
Pavement Marker to add the item to the collection.
� Use the Display Tool to Review the Quantity Items (Part 2)
1. Click the Display tool on D&C Manager.
2. On the Display tool, click the Highlight icon. (This will highlight all of the items in the collection.)
3. Take a moment to review the design file.
Hint It may be helpful to turn off all of the reference files except for the
DSGNSP01.dgn in order to more clearly identify any elements not being highlighted.
4. Set the Display Option to Normal.
5. Close the Display tool.
Chapter 11 _____________________________________________________ QUANTITIES AND REPORTS - Generate Quantities
11-6 ©2016 FDOT FDOT Traffic Plans
� Compute quantities (Part 3)
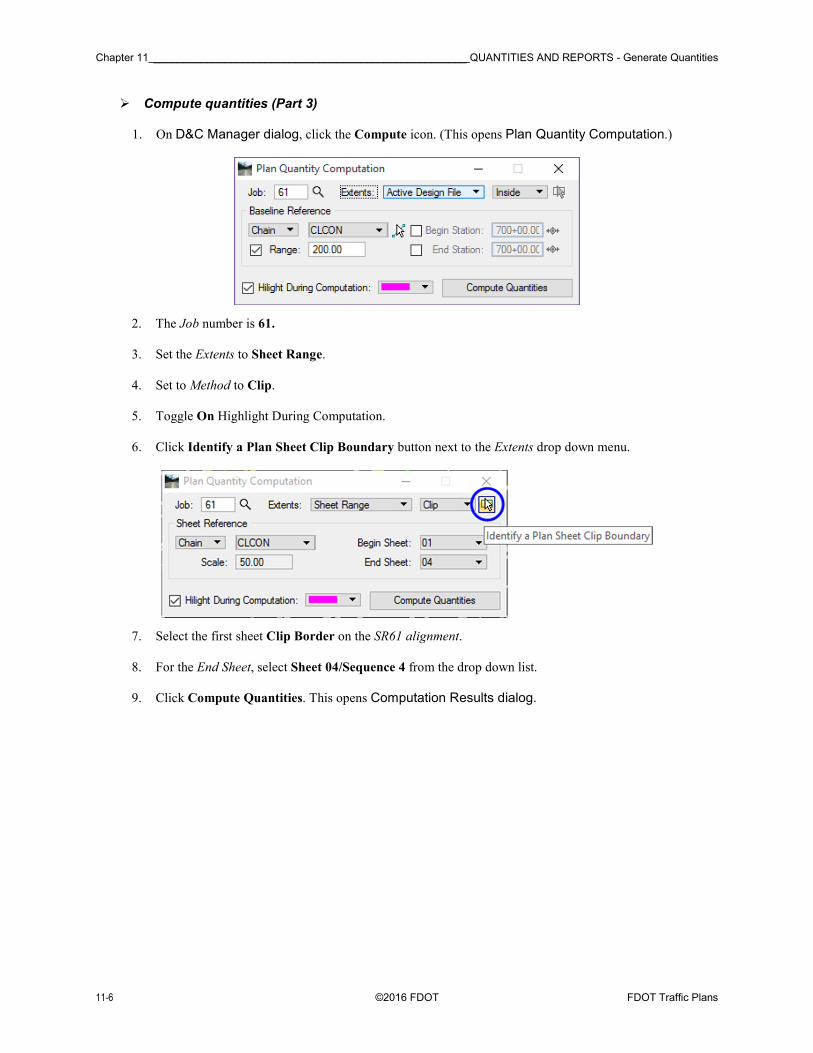
1. On D&C Manager dialog, click the Compute icon. (This opens Plan Quantity Computation.)
2. The Job number is 61.
3. Set the Extents to Sheet Range.
4. Set to Method to Clip.
5. Toggle On Highlight During Computation.
6. Click Identify a Plan Sheet Clip Boundary button next to the Extents drop down menu.
7. Select the first sheet Clip Border on the SR61 alignment.
8. For the End Sheet, select Sheet 04/Sequence 4 from the drop down list.
9. Click Compute Quantities. This opens Computation Results dialog.
QUANTITIES AND REPORTS - Generate Quantities _____________________________________________________ Chapter 11
FDOT Traffic Plans ©2016 FDOT 11-7
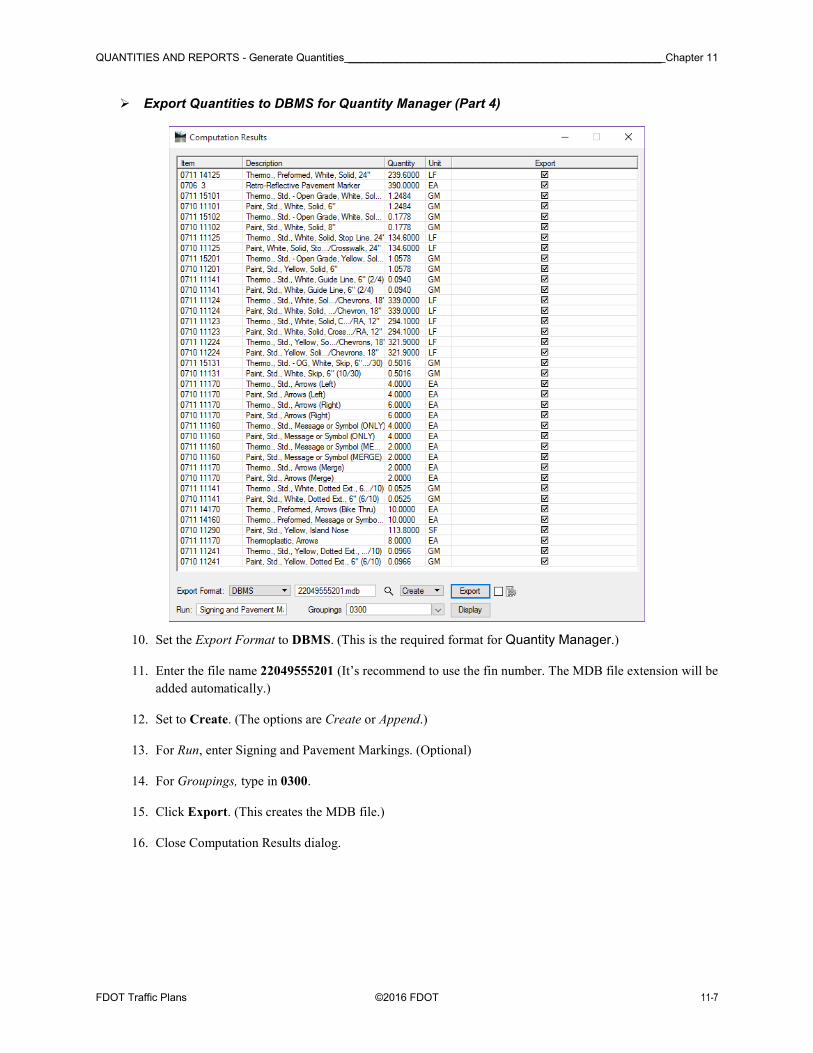
� Export Quantities to DBMS for Quantity Manager (Part 4)
10. Set the Export Format to DBMS. (This is the required format for Quantity Manager.)
11. Enter the file name 22049555201 (It’s recommend to use the fin number. The MDB file extension will be
added automatically.)
12. Set to Create. (The options are Create or Append.)
13. For Run, enter Signing and Pavement Markings. (Optional)
14. For Groupings, type in 0300.
15. Click Export. (This creates the MDB file.)
16. Close Computation Results dialog.
Chapter 11 _____________________________________________________ QUANTITIES AND REPORTS - Generate Quantities
11-8 ©2016 FDOT FDOT Traffic Plans
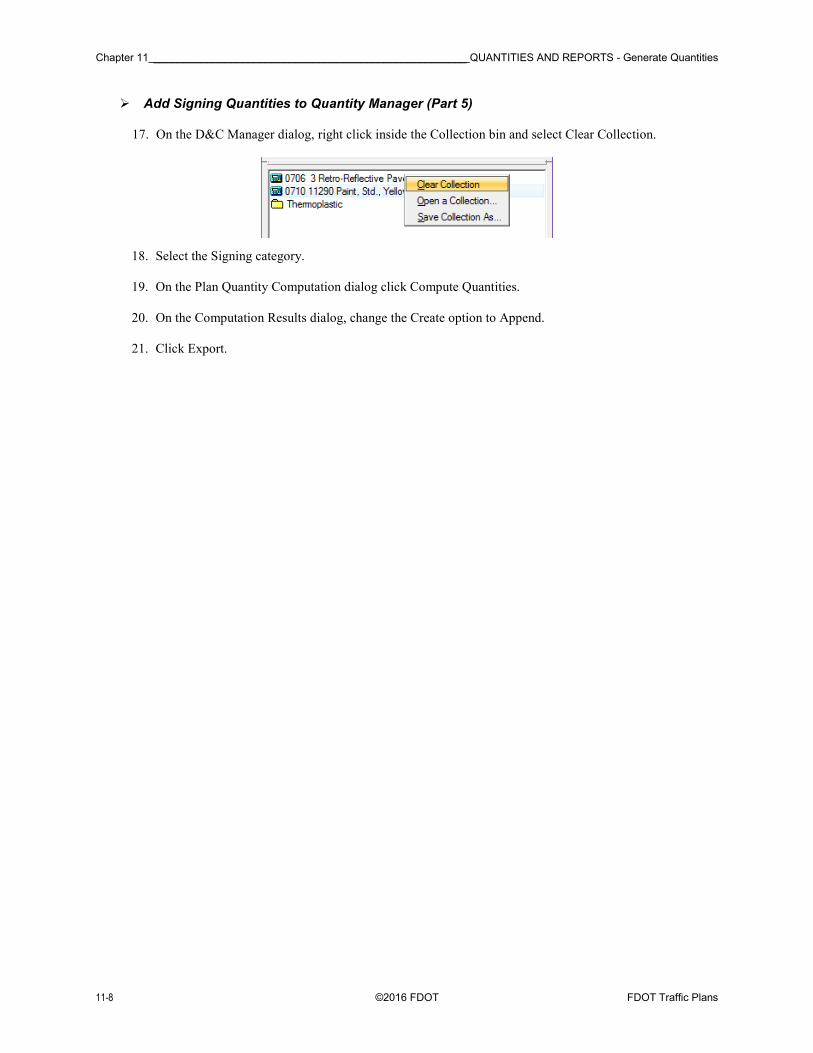
� Add Signing Quantities to Quantity Manager (Part 5)
17. On the D&C Manager dialog, right click inside the Collection bin and select Clear Collection.
18. Select the Signing category.
19. On the Plan Quantity Computation dialog click Compute Quantities.
20. On the Computation Results dialog, change the Create option to Append.
21. Click Export.

QUANTITIES AND REPORTS - Quantity Manager Dialog _________________________________________________ Chapter 11
FDOT Traffic Plans ©2016 FDOT 11-9
QUANTITY MANAGER
Quantity Manager is the GEOPAK tool used to store, organize, and manipulate quantities generated by the D&C
Manager. Pay items and quantities can also be stored in the database manually. Once the information is loaded into
Quantity Manager, the designer can then export the data from Quantity Manager in a format that can be imported
into Designer Interface. Linked Data Manager uses the Quantity Manager database to automate the creation of the
Tabulation of Quantities Sheets. It is not the intent of this chapter is to provide full training on all of the functions
within Quantity Manager. For more in depth information, see the Bentley Help files.
Quantity Manager can be loaded from the Road toolbox, from the MicroStation menu, select GEOPAK > ROAD
> Quantity Manager, or from the FDOT Plans Development > Quantities Task menu, select the Quantity
Manager icon.
QUANTITY MANAGER DIALOG
Quantity Manager has three parts, as shown in the following figure: Menu bar, Tool Bar and Window Area. The
Window area has three panes: Pay Item, Quantity, and Element.
PAY ITEM PANE
The Pay Item Pane is located on the left side of Quantity Manager in Normal View and is the top pane when
tiled horizontally. Two tabs control the display type for the Pay Item pane:
o Payitem Tree – This tab displays the contents in a hierarchical structure easily navigated in the same
manner as D&C Manager.
o Payitem Table – This tab displays the database Pay Items in a table format that contains additional
information about Pay Items and is useful for selecting multiple items.
Chapter 11 _________________________________________________ QUANTITIES AND REPORTS - Quantity Manager Dialog
11-10 ©2016 FDOT FDOT Traffic Plans
QUANTITY PANE
The Quantity Pane displays only quantity information under the current Phase selected on the tool bar about
the specifically selected Pay Item or Category. The information is customizable by selecting which
columns to display and sorts by clicking on any of the column headers.
ELEMENT PANE
The Element Pane displays information specific to the selected Quantity. Each tab displays different
attributes. The Elements tab shows all the elements that make up that Quantity. Adhoc Attributes tab
displays any Adhoc related to the Quantity. Funding Participation, Funding Rules, and Payer
Participation tab displays information related to funding sources.

QUANTITIES AND REPORTS - Quantity Manager Dialog _________________________________________________ Chapter 11
FDOT Traffic Plans ©2016 FDOT 11-11
Exercise 11.2 Navigating Quantity Manager
In this exercise, Quantity Manager will be opened using the previously created database to review the items.
� Opening a Project
1. From the MicroStation Menu, select Applications > GEOPAK Road > Quantity Manager.
2. From the Quantity Manager Menu, select Project > Open. Connect to Database dialog displays.
3. In the File box, enter the path to the database, 22049555201.mdb
<OR> click the Select Database Filename icon and navigate to the file.
4. Leave the User Name and Password boxes blank.
5. Click the Connect button. The database displays.
6. From Quantity Manager, select the Pay Item Tree tab.
7. Navigate through the database and select Pay Item 0711 15101.
Chapter 11 _________________________________________________ QUANTITIES AND REPORTS - Quantity Manager Dialog
11-12 ©2016 FDOT FDOT Traffic Plans
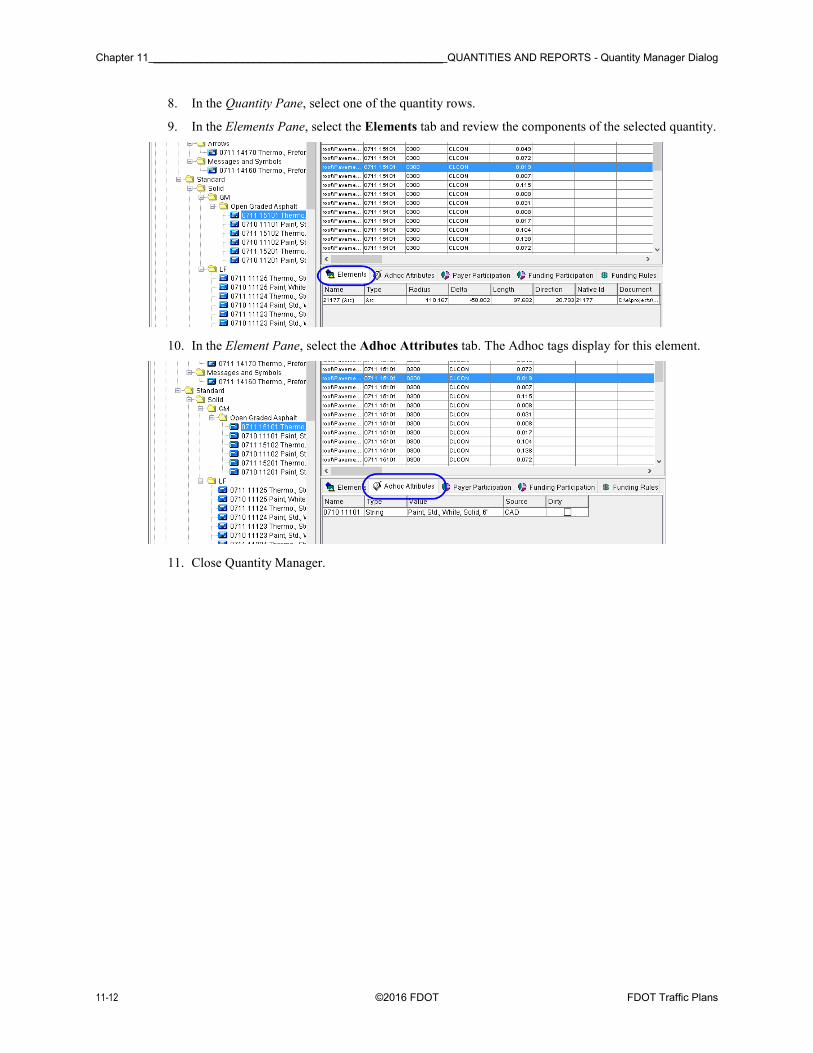
8. In the Quantity Pane, select one of the quantity rows.
9. In the Elements Pane, select the Elements tab and review the components of the selected quantity.
10. In the Element Pane, select the Adhoc Attributes tab. The Adhoc tags display for this element.
11. Close Quantity Manager.

QUANTITIES AND REPORTS - Linked Data Manager Basics ______________________________________________ Chapter 11
FDOT Traffic Plans ©2016 FDOT 11-13
LINKED DATA MANAGER BASICS
Access LDM through the FDOT Menu to create a link between Excel spreadsheet files and the MicroStation design
(DGN) file for easy placement and updating of Summary Boxes. The LDM link provides easy access to the Excel
spreadsheet for modification and update with a simple right-click on the link.
Access LDM from the FDOT Menu by selecting Actions > Linked Data Manager.
<OR>
From the FDOT Plans Development > Quantities Tasks menu, select the Linked Data Manager icon.
<OR>
Select Linked Data Manager from the Right Click Context Menu. (if available)
Note For more in-depth information on the features of this tool, refer to the LDM Help file or Posted Webinars.
Chapter 11 ______________________________________________ QUANTITIES AND REPORTS - Linked Data Manager Basics
11-14 ©2016 FDOT FDOT Traffic Plans
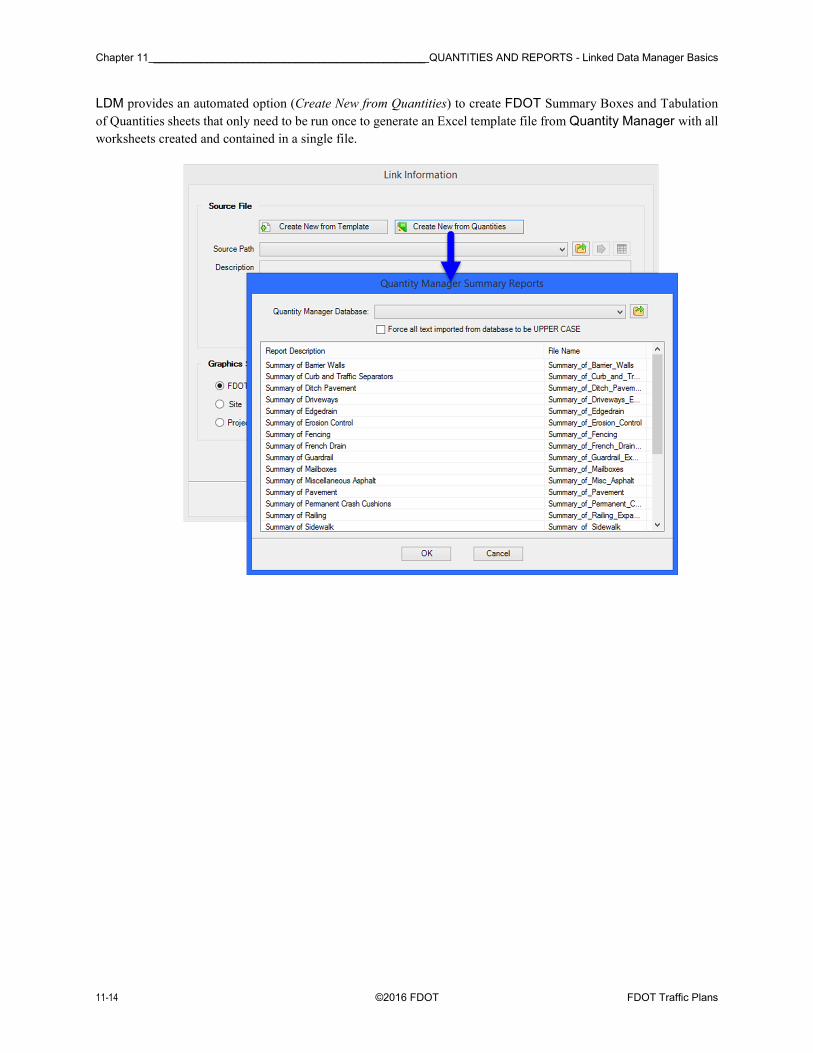
LDM provides an automated option (Create New from Quantities) to create FDOT Summary Boxes and Tabulation
of Quantities sheets that only need to be run once to generate an Excel template file from Quantity Manager with all
worksheets created and contained in a single file.
QUANTITIES AND REPORTS - Linked Data Manager Basics ______________________________________________ Chapter 11
FDOT Traffic Plans ©2016 FDOT 11-15
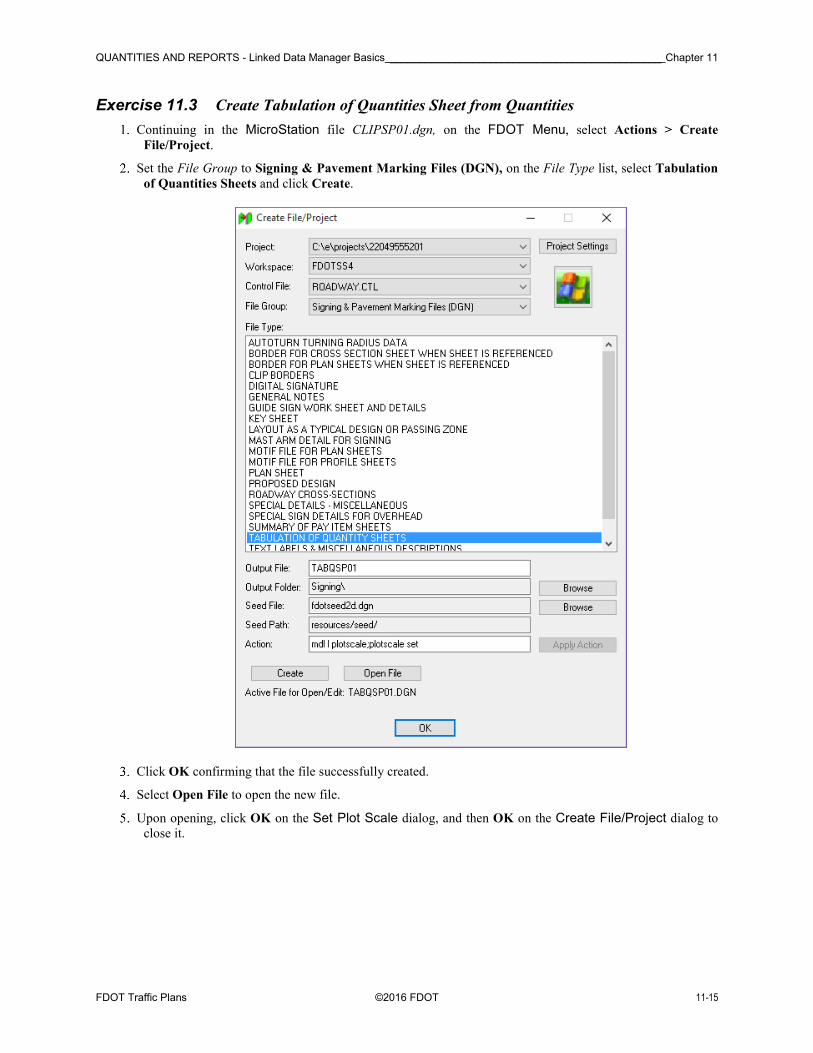
Exercise 11.3 Create Tabulation of Quantities Sheet from Quantities
Continuing in the MicroStation file CLIPSP01.dgn, on the FDOT Menu, select Actions > Create
File/Project.
Set the File Group to Signing & Pavement Marking Files (DGN), on the File Type list, select Tabulation
of Quantities Sheets and click Create.
Click OK confirming that the file successfully created.
Select Open File to open the new file.
Upon opening, click OK on the Set Plot Scale dialog, and then OK on the Create File/Project dialog to
close it.
Chapter 11 ______________________________________________ QUANTITIES AND REPORTS - Linked Data Manager Basics
11-16 ©2016 FDOT FDOT Traffic Plans
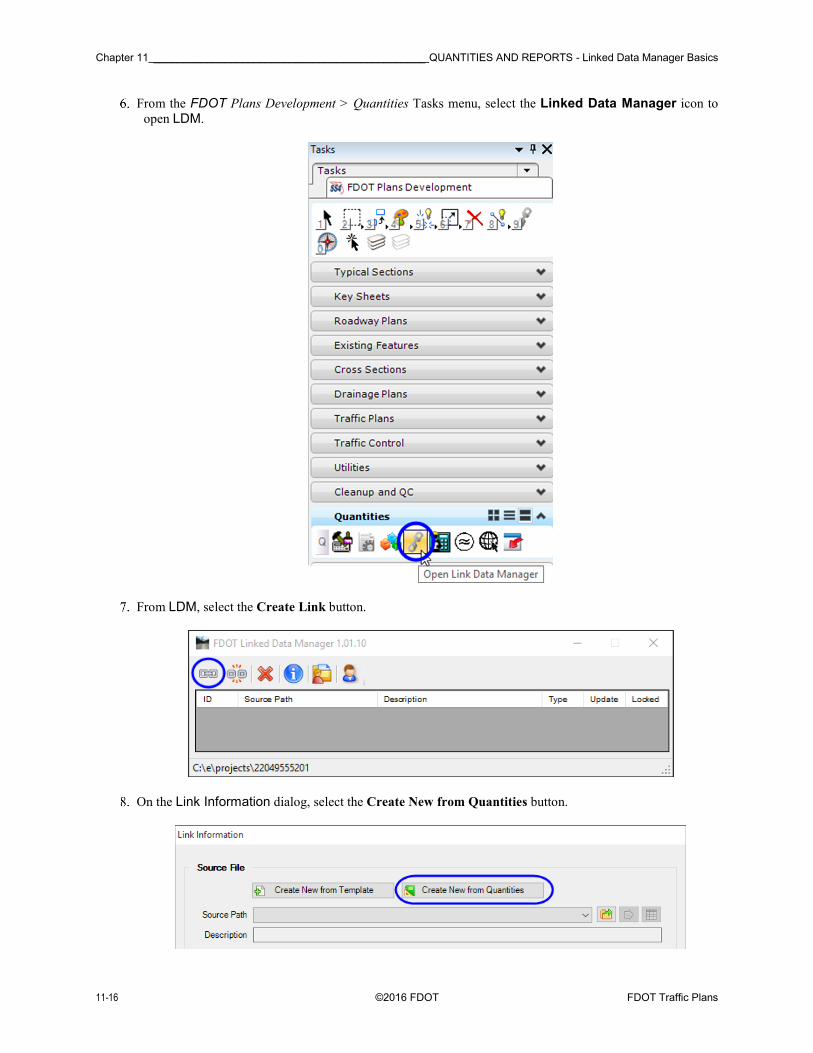
From the FDOT Plans Development > Quantities Tasks menu, select the Linked Data Manager icon to
open LDM.
From LDM, select the Create Link button.
On the Link Information dialog, select the Create New from Quantities button.
QUANTITIES AND REPORTS - Linked Data Manager Basics ______________________________________________ Chapter 11
FDOT Traffic Plans ©2016 FDOT 11-17
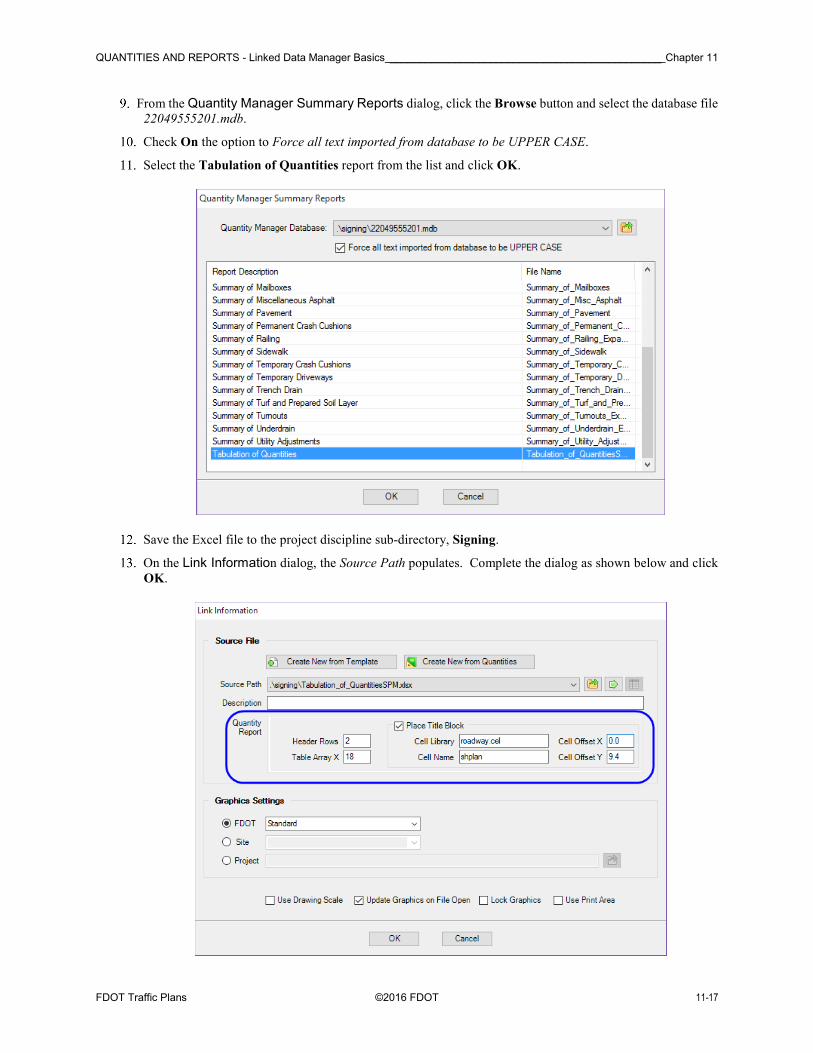
From the Quantity Manager Summary Reports dialog, click the Browse button and select the database file
22049555201.mdb.
Check On the option to Force all text imported from database to be UPPER CASE.
Select the Tabulation of Quantities report from the list and click OK.
Save the Excel file to the project discipline sub-directory, Signing.
On the Link Information dialog, the Source Path populates. Complete the dialog as shown below and click
OK.
Chapter 11 ______________________________________________ QUANTITIES AND REPORTS - Linked Data Manager Basics
11-18 ©2016 FDOT FDOT Traffic Plans
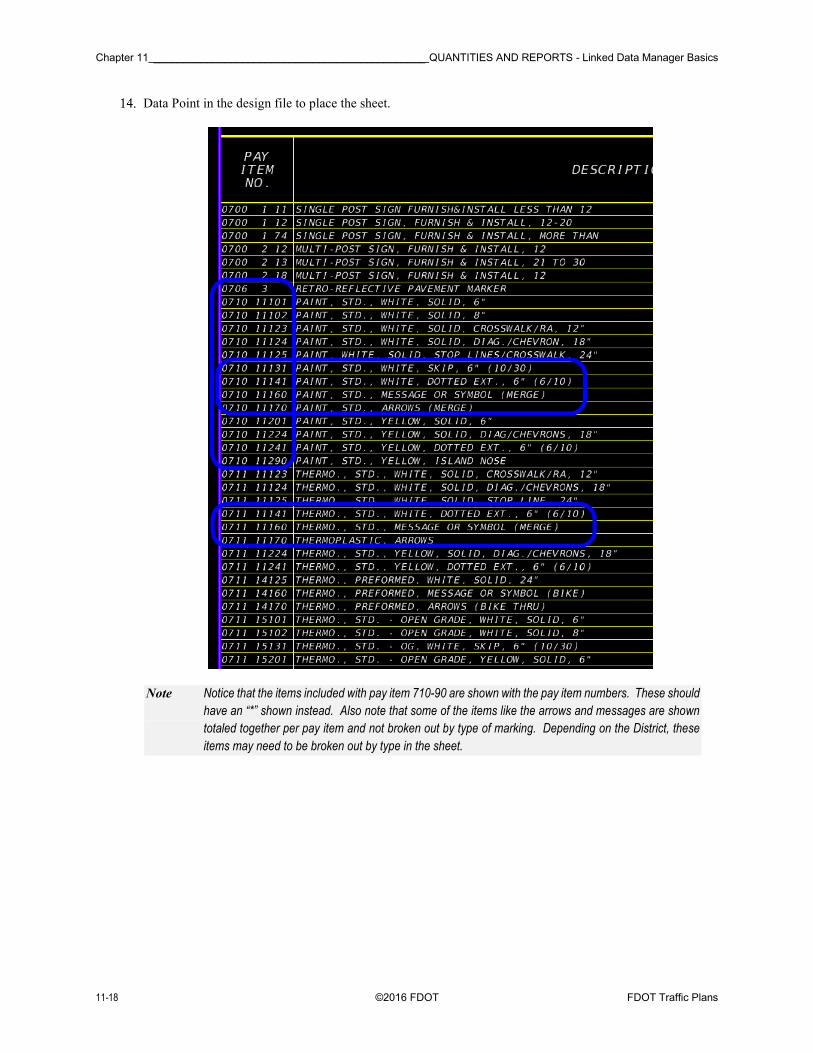
Data Point in the design file to place the sheet.
Note Notice that the items included with pay item 710-90 are shown with the pay item numbers. These should
have an “*” shown instead. Also note that some of the items like the arrows and messages are shown
totaled together per pay item and not broken out by type of marking. Depending on the District, these
items may need to be broken out by type in the sheet.

QUANTITIES AND REPORTS - Linked Data Manager Basics ______________________________________________ Chapter 11
FDOT Traffic Plans ©2016 FDOT 11-19
Right-click on the new link in the LDM dialog and select Open Source. Excel opens.
In Column A, select the pay item 0706 3 for the Retro-reflective Pavement Markers. Type in an asterisk (*).
Using the cursor, select the green square at the bottom right corner of the cell and drag it down to copy the
value to the paint items. (Do not include the pay item 0710 11290, Paint, Std. Yellow, Island Nose. This
item is not included in the 710-90 pay item.)
Hint Hold down the shift key in Excel to select multiple worksheets when the same
change needs to made for multiple sheets. Don’t forget to Un-Group the worksheets
when finished before modifying individual cells or text.
Select File > Save to save the changes in the Excel file.
Chapter 11 ______________________________________________ QUANTITIES AND REPORTS - Linked Data Manager Basics
11-20 ©2016 FDOT FDOT Traffic Plans
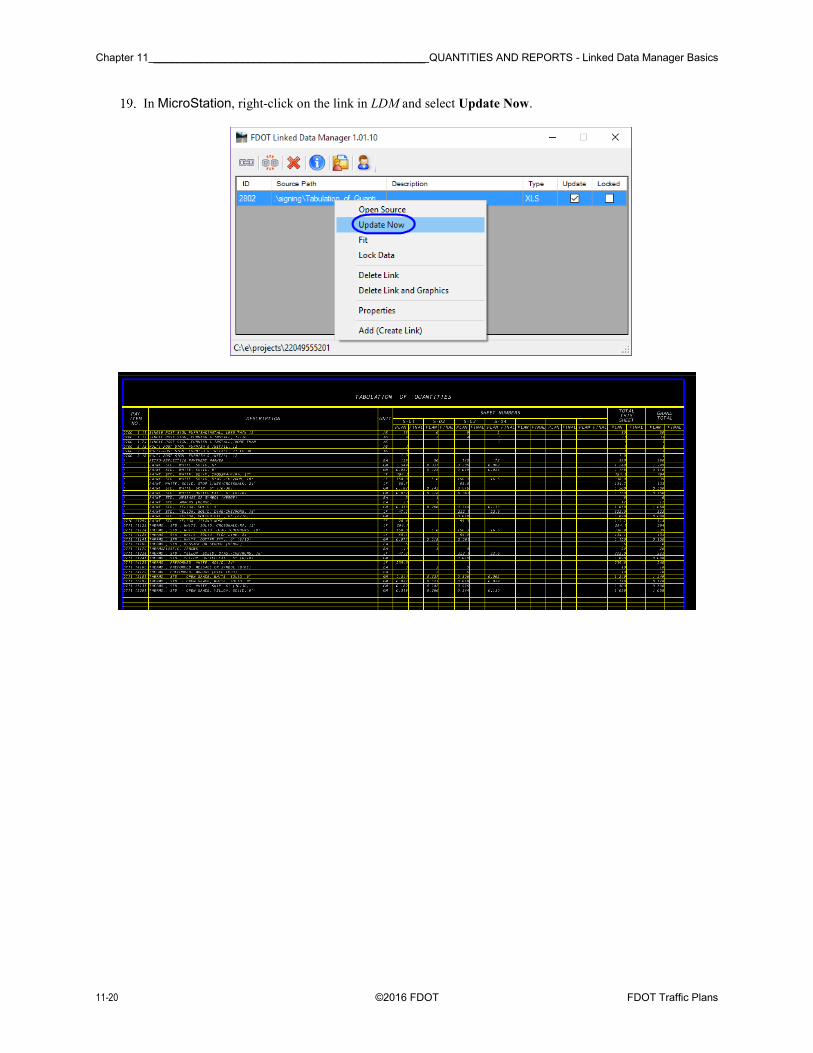
In MicroStation, right-click on the link in LDM and select Update Now.

- Linked Data Manager Basics _______________________________________________________________________ Chapter 11
FDOT Traffic Plans ©2016 FDOT 21