1.0 game overview 2.0 combat units 4.0 sequence of … · how this book is organized this rulebook...
TRANSCRIPT

1.0 GAME OVERVIEW1.1 Game Components1.2 Game Abbreviations1.3 Game scale1.4 Game Terrain
2.0 COMBAT UNITS3.0 STACKING4.0 SEQUENCE OF PLAY
4.1 Special Rules5.0 FORMATION ACTIVATION6.0 UNIT FACING AND ZONES OF CONTROL
6.1 Unit Facing6.1 Zone of Control
7.0 MOVEMENT7.1 Movement Overview7.2 Changing facing7.3 Leaving an enemy ZOC7.4 Commander movement
8.0 COMMANDERS8.1 Commanders Overview8.2 Command8.3 Out of Command formations8.4 Death of a Commander
9.0 GENERALS9.1 Unit command9.2 Out of Command combat units9.3 Battle line9.4 Death of a General
10.0 ARTILLERY10.1 Artillery Fire Capability10.2 Artillery Range10.3 Artillery Fire Resolution10.4 Destroying Artillery
11.0 COMBAT11.1 Fire Combat11.2 Melee Combat11.3 Cavalry charges11.4 Melee combat procedure11.5 Melee combat modifiers11.6 Melee combat results11.7 Unit retreats11.8 Advance after combat11.9 Combat Examples
12.0 MORALE CHECK, DISORGANIZATION, AND ROUT12.1 Morale check12.2 Disorganization12.3 Rout12.4 Rally checks
13.0 VICTORY13.1 Final Line of Communications Check13.2 Victory due to Commander elimination or surrender13.3 Victory due to Victory points:
14.0 SETUP
how this book is organizedThis rulebook is structured to introduce concepts following the game’s sequence of play. They are written in a format known as the Case System. This approach divides the rules into Modules, each dealing with an important aspect of play. Modules are numbered sequentially and possess a title. Each Module is divided into Sections, dealing with major sub-topics within the Module. These are also numbered sequentially. 3.1 The first Section of the third Module of the rules.
learning to play the gameBegin by familiarizing yourself with all of the components listed for this game. Then skim through the charts and rules, reading all the titles of the Modules and Sections. Set up a game scenario or portion of a scenario (after reading the applicable Module) and play a trial game against yourself. Try referring to the rules only when you have a question and remember the numbering system we employ makes it easy to look up rules. While a trial game may take you an hour or two, it is the quickest and most pleasant way to learn (short of having an experienced friend teach you). We don’t recommend attempting to learn the rules word-for-word. We’ve written these rules to be as comprehensive as possible—but they are not designed to be memorized. Taking in the rules as you play along is the best approach to mastering this game. We’re always open to suggestions on how to improve the comprehension of our rules. Write to us (see addresses below) if you have an idea on how we can communicate better with you.
If any of the supplied parts are missing or dam-aged, write to:
Turning Point Simulations PO Box 165 Southeastern, PA 19399-0165 USA Attn: Blenheim
Or e-mail us at: [email protected]
We hope you enjoy this game. Should you have any difficulty interpreting the rules, please write to us at the above postal address, or send an e-mail to: [email protected], phrasing your questions so that a simple sentence, word, or number can answer them. If you send a letter by mail, you must enclose a stamped, self-addressed envelope to receive a reply. We recommend e-mail as the best way to resolve a query. Although we welcome comments and suggestions about the game’s interpretation of events, we cannot promise to respond to questions on theory or design intent. Additionally, check out the Turning Point Simu-lations discussion folder at consimworld.com.
1.0 game overviewThe Battle of Blenheim was a decisive battle of the War of the Spanish Succession. France was threatening to defeat Austria, a part of the Allied Coalition, but Marlborough won the battle and Austria stayed in the war. The Battle of Blenheim is also known as the Second Battle of Höchstädt in French and German sources. One of the players controls the Franco-Bavarian armies of Tallard and Marsin; the other the Allied armies of Marlborough and Prince Eugene. 1.1 Game ComponentsEach copy of Blenheim is comprised of the following:• This set of rules.
• One 11″ by 17″ map of the Blenheim battlefield. A hexagonal grid has been superimposed on the map to regulate game functions. See the Terrain Effects Chart (TEC) on the back of this rulebook for information on how to read the symbols on the map.
• 176 counters.
• One six-sided die and one ten-sided die. The game uses one six-sided die (noted 1d6, with a possible result ranging from 1 to 6) and one ten-sided die (noted 1d10) for which 0 is read as 0 (and not 10; that is, a possible die roll result ranges from 0 to 9). The ten-sided die is used to determine initiative and for fire combat. The six-sided die is used for melee combat, cavalry charges, and morale checks.
1.2 Game Abbreviations Hex is an abbreviation for hexagon, the plural of hex is hexes. There were many countries that were represented in the armies. Country abbreviations found on counters:
An - Anhalt-Dessau Au - Austria Ba - Bavaria Br - BritainDn - Denmark Du - Dutch (The Netherlands)Fr - France Gr - German states HK - Hesse-Kassel Hn - HanoverIr - Ireland It - ItalyPr - Prussia Sp - SpainSw - Swabia Sx - Saxony Wu - Wurtemberg
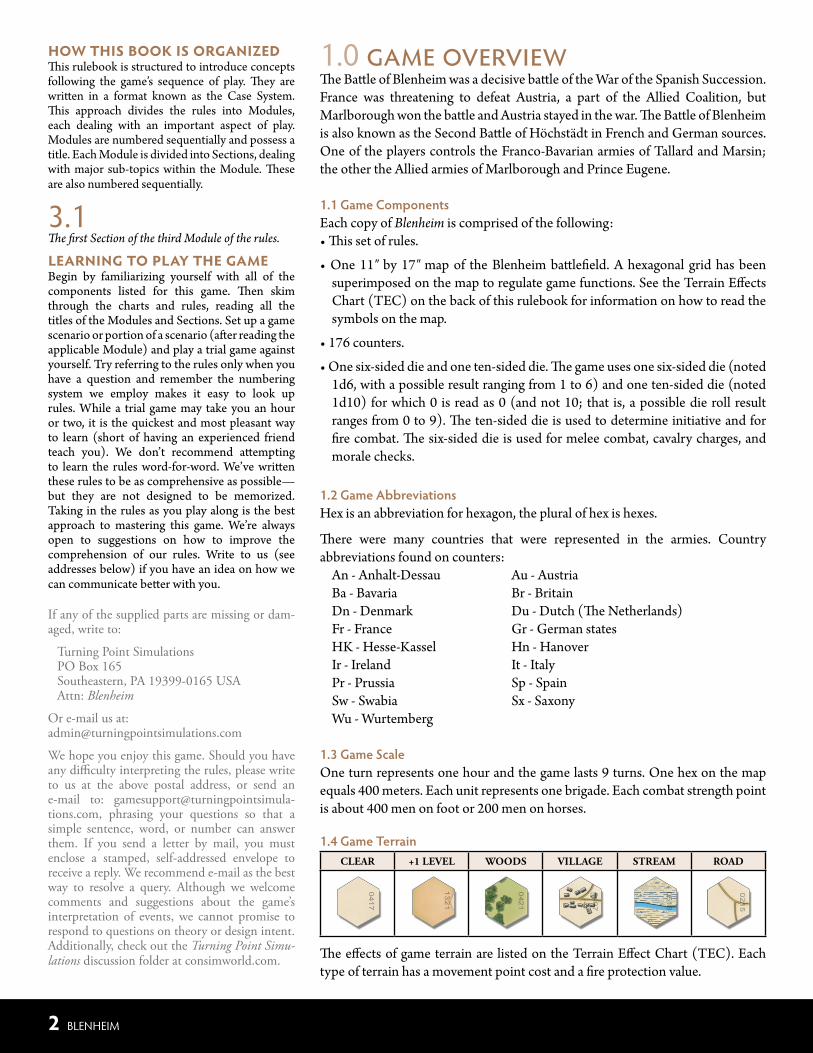
1.3 Game ScaleOne turn represents one hour and the game lasts 9 turns. One hex on the map equals 400 meters. Each unit represents one brigade. Each combat strength point is about 400 men on foot or 200 men on horses. 1.4 Game Terrain
Clear +1 level Woods village stream road
The effects of game terrain are listed on the Terrain Effect Chart (TEC). Each type of terrain has a movement point cost and a fire protection value.
2 BLENHEIM

2.0 combat units Combat units are grouped into formations, according to their General, identified by a colored symbol. This organization is important for the activation rules, with units of the same formation always acting together (Module 5.0).
Each combat unit has from 1 to 4 steps represented on either one or two counters. Each infantry and cavalry unit possesses a combat strength, a morale factor and a movement allowance (in movement points) for each of its steps; these 3 numbers are read in that order at the bottom of each unit. Each artillery unit possesses a fire value and a movement allowance for each of its steps; these 2 numbers are read in that order at the bottom of each unit.
A unit loses steps to show combat losses. Units starting with 2 steps have 1 counter. Units starting with 3 or 4 steps will have 2 counters to represent the unit. Use the appropriate counter on the correct side depending on the current number of steps of the unit. Units may not voluntarily break down into smaller units or combine into larger ones. When a combat unit only has one step remaining, the unit also becomes disorganized (Section 12.2).
3.0 stackingStacking is putting more than one counter in a hex. Leaders (Commanders and Generals) stack for free. Stacking for combat units in a hex is limited to:
(A) one cavalry unit. (B) one infantry unit and one artillery
unit (such a stack suffers no penalties).(C) two infantry units and one
artillery unit (but such a stack suffers overstacking penalties).
The number of steps in a unit has no effect on stacking.
4.0 sequence of playBlenheim is played in nine turns, consisting of six phases each.
A. Command Verification phaseEach player verifies that his Generals are in command range of their Commander. Place an Out of Command marker on Generals that are out of command (Section 8.3).
B. Artillery Barrage phase• The Allied player fires artillery units he wishes and places an initial fire marker on them.• The Franco-Bavarian player fires artillery units he wishes and places an initial fire marker on them.
C. Operations phaseThe Operations phase is composed of a number of repeated Operations segments, during which each player activates Generals that have not yet been activated this Operations phase.
The procedure for each Operations segment is as follows:• Determine the initiative for this Operations segment. Each player rolls 1d10 (with a possible result ranging from 0 to 9) and the Allied player adds 2 to their die roll for being on the tactical offensive. The player with the higher modified die roll wins the initiative with the Allied player winning ties. The player with the initiative decides which player will move first in this Operations Segment. If the player that wins the initiative does so with a die roll at least double his opponent’s die roll, he may choose to activate two formations at the same time when he also decides to be the first player for this Operations Segment (only).
• The first player activates one General and his formation (or possibly two Generals and their formations).
• The second player activates one General and his formation.
During an Operations Segment, a player may move the units belonging to one General (or possibly two) and their formation(s) (Module 5.0). When a General and his formation is activated, all of the units of that formation may move and attack (including the General). Rotate the General so it is upside down when the formation’s activation is finished. When a player has no remaining Generals to activate, then his opportunity to activate a General is skipped.
Once both players have activated their formations for this specific Operations segment, the dice are rolled again to begin a new Operations segment until all Generals of both sides have been activated.
D. Command phase• Remove all Out of Command markers and rotate all Generals so they are right side up.
• The Franco-Bavarians may move their 2 Commanders.
• The Allies may move their 2 Commanders.
E. Rally phaseRouted units perform a morale check.
F. Turn PhaseAdvance the turn marker if is not yet turn 9. At the end of turn 9, game victory is determined.
BLENHEIM 3

4.1 Special Rules1) On the first turn during the first initiative check (only): Each player rolls the dice normally, but the Allied player always wins the initiative; the dice rolls only determines whether the Allied player may choose to activate two formations (if the dice rolls allow) or if the Allied player only gets to activate one formation.
Historical Note: Tallard was not expecting an attack on his strong position when Marlborough decided to advance to battle.
2) When units in Clerambault’s formation (near Blenheim) are attacked for the first time by fire and/or melee combat, then all other unattacked units in his formation (which has a total of 6 units) must move to reinforce the defending units in their hexes to create as many hexes as possible with an overstack condition using legal movement. This movement is mandatory, free from normal activation requirements, and does not count as an activation by Tallard, but Clerambault is considered activated and the counter is rotated. While units in Clearambault’s formation are overstacked, they can only unstack by first moving or advancing to the N or NE of the hex they are on. When a unit is this formation is no longer overstacked, it is free to move normally.
Historical Note: This restriction simulates what happened in game terms when Clerambault panicked and did this without consulting Tallard.
Optional: Players may choose to omit this historical restriction to see how the battle would go if Clerambault did not panic and do this.
5.0 formation activationA General and his formation’s units that are in command may be activated in an Operations segment. The activation of a General activates all units of the General’s formation. The player designates one (or possibly two) of his Generals that has not already been activated. The units belonging to an activated General’s formation may then move. A formation’s activation consists of two parts: movement and combat. When the General counter had finished moving, rotate the leader counter. A General and his formation may only be activated once per turn and each unit may only move once and attack once per turn.
During that Operations segment, all units of the General’s formation may move. They may then engage in combat with adjacent enemy units. Artillery units that have already fired in the Artillery Barrage phase of the turn (those with an Initial Fire marker) may not fire again in the Operations Segment.
The different Generals and their formations of each army (each identified by a different color band) are as follows:
Franco-BavariansTALLARD (Commander) • French (dark blue) army
Clérambault (red), Marinvaux (sky), Zurlauben (blue), Humières (green), Saint-Pierre (gold)
MARSIN (Commander) • Bavarian (light blue) armyBourg (blue), Rosel (gray), D’Arco (green), Sauffrey (mustard)
AlliesMARLBOROUGH (Commander) • British (red) army
Cutts (burgundy), Lumley (green), Churchill (pink), Bülow (gray), Orkney (gold)
EUGENE (Commander) • Austrian (gray) armyMaximilian (gray), Anhalt-Dessau (white)
6.0 unit facing and zones of control6.1 Unit FacingAll combat units follow facing rules that influence movement and combat. Leaders have no facing. The top of a combat unit (opposite the numbers) is pointed to one of the six vertices of the hex the unit is in, the top indicates the front as specified below:
• Cavalry (and artillery) always have four front hexes and two rear hexes.• Infantry not in a village has two front hexes, two flank hexes, and two rear hexes.• Infantry in a village has six front hexes. (Note: the unit will still face to a hex vertex, which will
matter if it moves to a hex that is not a village.)
4 BLENHEIM
7.0 movement7.1 Movement OverviewAn active unit or Leader may move using all or part of its movement allowance. Entering a hex costs a certain number of Movement points (MP) to the moving unit. Terrain costs are listed on the Terrain Effects Chart.
Movement points may not be accumulated from one turn to the next. The movement of a unit or stack of units must be completed before moving another unit or stack.
A unit that moves only along a road gains one additional MP. Moving along a road negates the terrain cost and cancels the effect of a level change.
Movement from hex to hex may only be made into a unit’s front hexes and the unit retains its facing after movement. An active unit may always move one hex regardless of MP costs unless moving into the hex is prohibited.
The stacking rules must be obeyed during movement (no passing through units).
Artillery units (Module 10.0) may not move if they fired during the Artillery Barrage phase.
Commanders have their own rules for movement (Section 7.4).
7.2 Changing facingA unit not in an enemy ZOC may change its facing by spending 1 MP per hex vertex.
Changing facing in an enemy ZOC costs 2 MP per hex vertex and requires one Facing check for any number of vertices changed: the player rolls 1d6 and adds the morale of the unit. If the result is more than or equal to four the unit changes facing, if not it fails and keeps its previous facing. 7.3 Leaving an enemy ZOCA unit may leave a hex located in an enemy ZOC by only two methods:• A unit may advance into a frontal hex that is not occupied by an enemy unit nor in an enemy
unit’s ZOC. The cost is 1 MP plus the cost of terrain.• A unit may withdraw into a rear-facing hex (not a flank or front hex) by following the retreat
rules (Section 11.6) maintaining its facing. An infantry unit in a village may withdraw to any adjacent hex (which are all frontal), but it must maintain its facing. The MP cost is half of its MPs plus the MP cost of the terrain. The unit may then change its facing normally.
7.4 Commander movementDuring the Command phase, a Commander may move four hexes by himself, but may not enter a front or flank hex of an enemy unit unless a friendly unit occupies it. A Commander must start and end his movement stacked with a friendly combat unit; if he cannot do this, he cannot move.
8.0 commandersCommanders represent the army leaders. Each side possesses two Commanders: Tallard and Marsin for the Franco-Bavarian; Marlborough and Eugene for the Allies. 8.1 Commanders OverviewEach Commander possesses a command factor (expressed in the number of hexes, regardless of terrain) that represents his ability to control Generals and their formations.
A commander must always be stacked with a combat unit at the end of his movement.
Each commander may control the following formations (Module 5.0): • Tallard: Formations with dark blue units • Marsin: Formations with light blue units• Marlborough: Formations with red units • Eugene: Formations with gray units
Front hexes: Infantry and cavalry units exert a Zone of Control (ZOC) into their front hexes, which affect all adjacent enemy units located in those hexes. A unit that retreats into an enemy front hex as a result of combat suffers a step loss.
Flank hexes of enemy units do not interdict movement. A unit that retreats into an enemy flank hex as a result of combat may suffer a step loss (Section 11.6).
Rear hexes of an enemy unit do not interdict movement. A unit may retreat into an enemy rear hex as a result of combat without penalty. 6.2 Zones of ControlArtillery units and Leaders do not exert a ZOC. The ZOC of an infantry or cavalry unit does not extend into a forest or village, or across a stream or river. A ZOC has the following properties:
• A unit that enters an enemy ZOC must stop moving.
• A unit that retreats into an enemy ZOC as a result of combat suffers a step loss (Section 11.7).
• Moving directly from one enemy ZOC hex to another is prohibited.
• Leaving an enemy ZOC costs one additional movement point (Exception: withdrawal retreat, Section 7.3).
• The presence of a friendly unit in an enemy ZOC cancels this last case for command limitations and leader movement.
BLENHEIM 5

8.2 CommandTo be in command, a General must be within the command range of his Commander. This range is traced from the Commander to the General by a chain of hexes (terrain does not matter, but the distance may only be a maximum of 5 hexes) that does not enter an enemy frontal or flank hex that is not occupied by a friendly unit. 8.3 Out of Command formationsA General that is not in command at the beginning of the turn receives an Out of Command marker. A General with an Out of Command marker may be chosen for activation during an Operations phase, but his units may not function unless it passes an Activation check, as follows: an Out of Command General is activated if he rolls on 1d6 less than or equal to his activation value. If he passes, all of the units in his formation may function normally. If he fails, the units may not be used but the formation is still considered to have been activated and the General is rotated upside down. 8.4 Death of a CommanderA Commander is eliminated whenever the units with which he is stacked are completely eliminated by combat or retreat. When a Commander is eliminated, the remaining Commander on that side immediately takes command of all Generals and units on that side.
9.0 generalsGenerals represent the formation leaders of each army. They each command several brigades.
A General is activated under the rules for activation (Module 5.0) and command (Module 8.0). A General may only be activated once per turn; his counter is rotated upside down to indicate that he has been activated.
A General moves like a cavalry unit. A General must always be stacked with a combat unit at the end of its movement; he may stack with a unit of any formation, not just his own.
9.1 Unit commandWhen activated, a General enables all of his formation’s combat units to act that are within his command range at the instant of activation. To be in command, a combat unit must be within the command range of the General using the same procedure as in rule 8.2. A unit may also be In Command if it is part of a battle line that is within the range of the General (Section 9.3).
Verification of unit command is made at the beginning of a formation’s activation, before any movement. A unit Out of Command at the beginning of an activation will remain so, even if the Leader moves within range. A General does not need to be stacked with any of his units in order to command them. 9.2 Out of Command combat unitsA combat unit that is Out of Command at the moment of its formation’s activation has the following constraints:• Its movement allowance is halved.• It may not move further away from its
General. • It may withdraw from an enemy ZOC,
but uses its entire movement allowance to do so.
• It may not attack. 9.3 Battle lineA unit outside the command range of its General may still be In Command if it is located adjacent to a unit of the same formation not through the other unit’s rear hex and at least one unit in the battle line is within range of the General. Cavalry units need only be adjacent to one another to form a battle line. 9.4 Death of a General A General is eliminated when all units with which he is stacked are eliminated due to combat or retreat. The General is immediately replaced by an aide de camp (on the back of the General counter) which may be placed on friendly units anywhere on the map. If an aide de camp is eliminated, he is replaced with another aide de camp in the same manner.
10.0 artillery10.1 Artillery Fire CapabilityAn artillery unit may fire: • During the Artillery Barrage
phase;• During the Operations phase
if it did not fire in the Artillery Barrage phase;
• In reaction to an enemy melee attack, even if the artillery unit has already fired in the Barrage phase or the Operations phase. Artillery Reaction Fire is resolved just before melee combat.
10.2 Artillery RangeRange and field of fire: the maximum range of artillery is three hexes. Artillery may only fire through one of their frontal hexes.
Line of sight: an artillery battery must have a line of sight to its target in order to fire. The following items block line of sight:
• any unit between the firing unit and the potential target unit;
• any obstacle hex (village, forest, elevation), excluding hex edges, between the firing unit and the potential target unit. However, the line of sight of an artillery battery at a lower elevation is not blocked if the obstacle is adjacent to the target.
An artillery battery always has a line of sight to an adjacent unit. 10.3 Artillery Fire Resolution To resolve artillery fire, the player rolls 1d10 (with a possible result ranging from 0 to 9) and applies the following modifiers:
• less the artillery modifier (unit’s fire value);
• adjacent target: -1;• target is a cavalry unit or an
infantry unit (or units) with at least 4 steps: -1
• target at three hex range: +1;• plus the fire protection value of
the target hex (see TEC).
6 BLENHEIM

11.3 Cavalry chargesCavalry units may charge, which gives them a melee bonus (Section 11.5). The unit being charged must be in clear terrain. The cavalry unit’s last 2 hexes of movement must be through clear terrain. The cavalry unit cannot change its facing during those last 2 hexes of movement. The 3 clear hexes involved need not be a straight line of hexes. 11.4 Melee combat procedureCalculate the ratio of the sum of the attackers against the sum of the defenders. The ratio is always rounded in favor of the defender.
The different modifiers are applied and the attacker rolls 1d6. He consults the Combat Results Table (see back of rules) and obtains, for the terrain occupied by the defender, the combat result. The result is applied immediately before moving on to another combat.
Terrain effects and morale are integrated into the Combat Results Table.
Terrain: when several units are attacked simultaneously, apply the terrain most favorable to the defender for combat resolution.
Morale: obtain the morale difference between the attacker and the defender. When units with different morale participate on the same side (in attack or defense), use the lowest morale rating. 11.5 Melee combat modifiersThe melee combat modifiers are as follows:• Flank and rear: an infantry unit attacked from its flank causes
a +1 column shift to the right on the table (benefiting the attacker). A unit attacked from the rear causes a +2 column shift to the right. For multiple attackers, use the orientation most favorable to the attacker.
• Routed units: an attack against a routed unit causes a +2 column shift to the right on the table.
• Cavalry charge: a cavalry charge causes a +1 column shift to the right.
• Cavalry attacking a village: cavalry attacking a unit in a village causes a –1 column shift to the left.
All combat modifiers are cumulative. 11.6 Melee combat resultsThe possible melee combat results are as follows (see Combat Results Table):
• Red results affect the Attacker• Black results affect the Defender
• 1 or 2: Loss of 1 or 2 steps• R or R2: Retreat of 1 or 2 hexes• E: Elimination
• If the result is 0 or less, the target loses one step and routs;• If the result is 1 or 2, the target routs;• If the result is 3 or 4, the target loses one step;• If the result is 5 or 6, the target makes a morale check; if it
fails, a unit loses one step;• If the result is 7-9, the fire has no effect. 10.4 Destroying ArtilleryAn artillery unit is immediately destroyed if the infantry unit it is stacked with is destroyed or must retreat. An artillery unit that is not stacked with an infantry unit is automatically destroyed by any attack after its reaction fire.
11.0 combatUnits of an active formation may attack adjacent enemy units that are in their ZOC. A unit may attack once per turn, when its formation is active. Attacking is voluntary. The player whose Activation phase is called the attacker and his opponent is called the defender. Attacks may be made as either fire or melee (not both). An infantry unit (not cavalry) being attacked by melee may perform reaction fire before resolving the melee attack. 11.1 Fire CombatA unit may fire on one target unit of its choice that occupies one of its frontal hexes.
To resolve fire by infantry, the player rolls 1d10 (with a possible result from 0 to 9) and adds the protection value of the target hex (see Terrain Effects Chart on the back of the rules).
To resolve fire by cavalry, calculate as for fire by infantry and then add +1 to the die roll.• If the result is 0 then the target unit loses one step.• If the result is less than or equal to than the firing unit’s
combat strength (but not 0) then the target unit must make a morale check; if it fails, then the target unit loses one step.
• Otherwise, the fire has no effect. 11.2 Melee CombatIn melee combat, the defender must be in the attacker’s ZOC. A unit may attack multiple units at once as long as they are all adjacent and in the attacker’s ZOC; they are attacked together by combining their combat strengths. Similarly, multiple friendly units may attack the same enemy unit by combining their attacking combat strengths. However, multiple friendly units may not attack multiple enemy units; the attacks must be resolved separately.
A unit may be attacked several times per turn but only once each Operations segment (that is, a unit may only be attacked once by an active formation).
A cavalry unit may not melee attack an enemy unit in terrain that it could not move into.
BLENHEIM 7

11.7 Unit retreatsUnit retreats must be made, as much as possible, in the following priority: into terrain the unit may enter, outside of enemy ZOCs or flank hexes, and free of friendly units in accordance with the stacking rules. Units that retreat maintain their starting facing.
• A unit whose retreat is impossible due to the presence of enemy occupied hexes or impassible terrain is eliminated.
• A unit that must retreat into an enemy ZOC must take a step loss.
• A unit that must retreat into an enemy flank hex might take a step loss. The player rolls 1d6 and adds the morale of the retreating unit. Die roll of 4 or less = step loss; 5+ = no effect.
• A unit that must retreat into a friendly-occupied hex in violation of the stacking limits displaces the already present units. Displaced units automatically each take a step loss and must retreat. Displacement may cause a chain reaction of further displacement to occur. The owning player may choose to eliminate a unit to avoid causing other units to displace.
11.8 Advance after combatIn the event of a retreat or elimination, one of the victorious units, attacker or defender, may choose to advance into the vacated hex (after either melee or fire combat). The advance is limited to one hex, even if the retreat was two hexes. The choice of whether to advance or not must be made immediately, before any other actions.
11.9 Combat ExamplesCombat Example 1) The Franco-Bavarian player has Commander Marsin activate General Bourg and his formation: After movement Nangis (5-3-2) is in 0717 and Coetquen (4-3-2) is in 0716 and both are facing Finck (6-2-2) in 0616:
The Franco-Bavarian player decides to not do any fire by infantry (Section 11.1) but only do melee combat (Section 11.2). • Finck does reaction fire on Nangis, but rolls a 9 for no effect. • The melee odds are 9 to 6 which reduces to 1:1. The defender is in clear terrain with +1 to the die roll for attacker morale (Franco-Bavarian 3 versus Allied 2). • The Franco-Bavarian player rolls a six-sided die (with results from 1 to 6) and the roll is 4 for a final result of 5 giving a 1R result (11.6 and Combat table). • Finck loses one step and retreats one hex into 0517 (Section 11.7). • The Franco-Bavarian player chooses to advance Nangis into 0616 (Section 11.8):
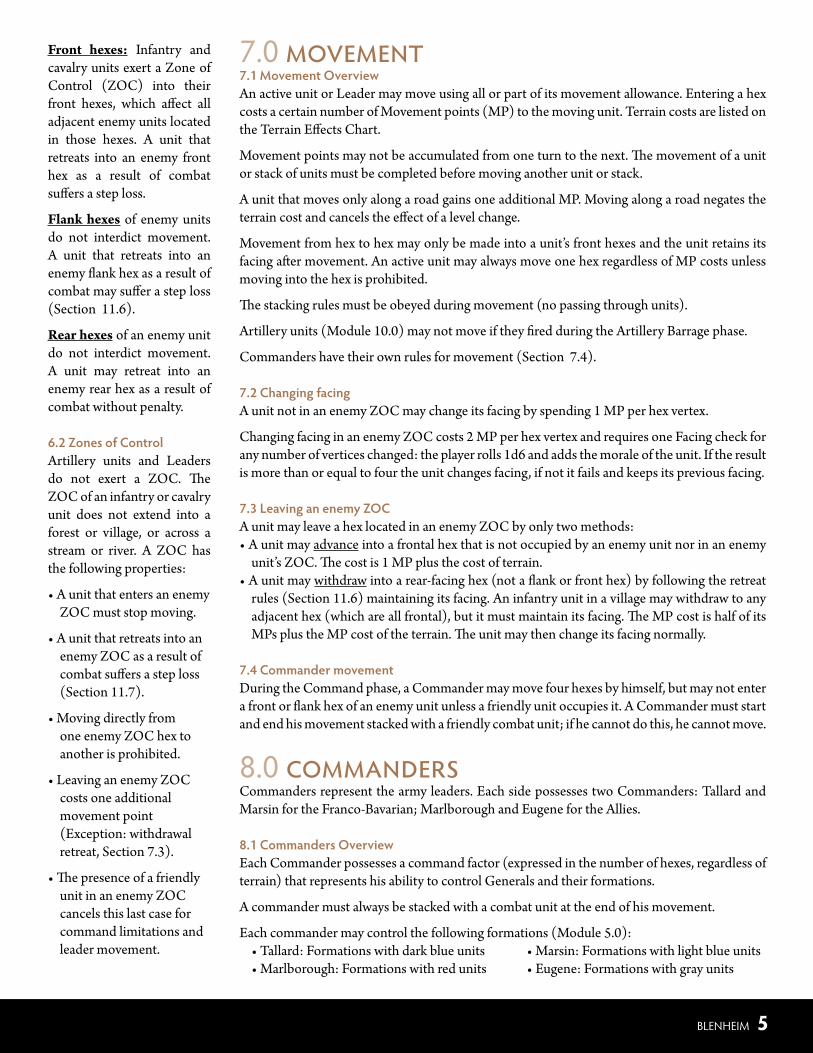
Combat Example 2) The Allied player has Commander Marlborough activate General Bülow and his formation. • Before movement, Erbach (4-3-3) is in 0508 and Rantzau (8-3-3) is in 0507. • After movement, Erbach (4-3-3) is in 0709 and Rantzau (8-3-3) is in 0708 and both are facing Vertilly (8-4-3) in 0808:
8 BLENHEIM
The Allied player decides to have Erbach perform fire by cavalry on Vertilly (Section 11.1). • The Fire protection value for Clear terrain is 0 (Terrain Effects Chart). • The Allied player rolls a ten-sided die (with results from 0 to 9) and rolls a 2. He adds 1 to the die roll because Erbach is a cavalry unit for a final result of 3. • The final result is less than or equal to than the firing unit’s combat strength which is 4 (but not 0) so the target unit must make a morale check (Section 12.1): The Franco-Bavarian player rolls a six-sided die and rolls a 4, so the morale check is passed and has no effect. Erbach cannot later engage in melee as he has fired. • Rantzau has moved through two clear hexes without changing facing and so can do a cavalry charge melee combat against Vertilly as it is also in a clear hex. • The Franco-Bavarian player cannot do reaction fire as Vertilly is cavalry (Module 11.0). • The melee combat odds are 8 against 8, 1:1 odds but the odds shift one column to the right because of the cavalry charge (Section 11.5) resulting in 2:1 odds with Defender in clear terrain. Morale comparison results in a -1 modifier. • The Allied player throws a six-sided die (with possible results from 1 to 6) and the roll is 6 giving a 1R result (Section 11.6 and Combat Results Table), which means that Vertilly loses one step and retreats. The Allied player decides to not have Rantzau advance after combat:
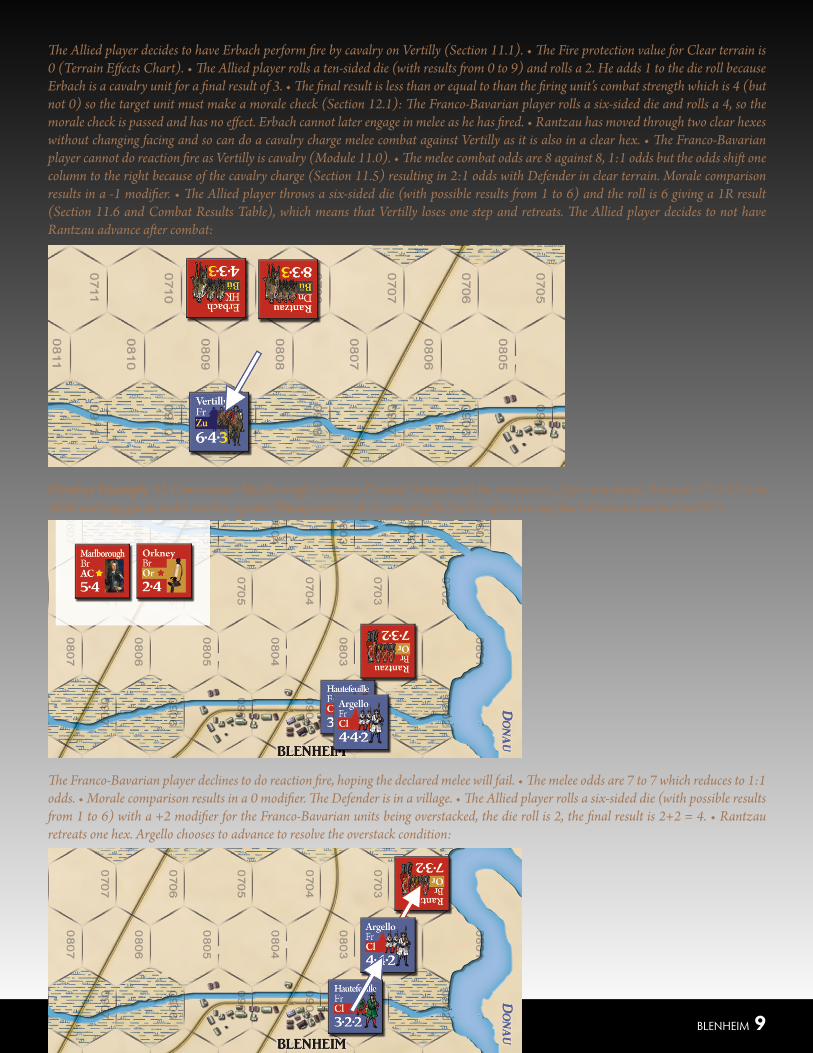
Combat Example 3) Commander Marlborough activates General Orkney and his formation: After movement, Rantzau (7-3-2) is in 0802 and engages in melee combat against Hautefeuille (3-2-2) and Argello (4-4-2 after one step loss) which are stacked in 0903:
The Franco-Bavarian player declines to do reaction fire, hoping the declared melee will fail. • The melee odds are 7 to 7 which reduces to 1:1 odds. • Morale comparison results in a 0 modifier. The Defender is in a village. • The Allied player rolls a six-sided die (with possible results from 1 to 6) with a +2 modifier for the Franco-Bavarian units being overstacked, the die roll is 2, the final result is 2+2 = 4. • Rantzau retreats one hex. Argello chooses to advance to resolve the overstack condition:
BLENHEIM 9

12.0 morale check, disorganization, and rout12.1 Morale checkWhenever a unit must make a morale check, the player rolls 1d6. If the result is less than or equal to the unit’s morale rating, it passes the morale check; otherwise, it fails. 12.2 DisorganizationWhen a unit takes step losses and only has one step remaining it becomes disorganized. A disorganized unit may no longer fire or melee attack but defends normally and keeps its ZOC. 12.3 RoutA unit may become routed as a result of fire or melee;
place a rout marker on the unit.• A Routed unit may not attack and does not possess a
ZOC. It may not move voluntarily.• A unit with a rout marker must immediately retreat
directly towards the closest friendly road map edge hex and then off the map (South for the Franco Bavarians, North for the Allies) by the shortest route, obeying the retreat rules.
• Exception: A routed unit may move through friendly units in excess of the stacking limits.
• Routing units are retreated three hexes, regardless of terrain type (impassible terrain is prohibited) and change their facing orientation to match their movement. If the third hex would be overstacked, the unit continues to retreat until it enters a free hex. Routed units that cannot retreat at least three hexes are eliminated. Routed units that retreat off the map always stay Routed for victory point purposes.
12.4 Rally checksIn the Rally phase, Routed units of both sides make Rally checks. A Routed unit located in an enemy ZOC does not make a check and must Rout again. A Routed unit that is not in an enemy ZOC must make a morale check with the following modifiers (rally modifiers are not cumulative; use the best one if more than one applies):
• -1 if their Commander is adjacent to the unit or if a General is adjacent or stacked with the unit;
• -2 if their Commander is stacked with the unit.If the modified result is less than or equal to the unit’s morale rating, it is rallied and the Routed marker is removed. If the result is greater than the unit’s morale rating, it keeps the Routed maker and must immediately retreat three more hexes subject to the same restrictions as before. A leader with a unit that routs again moves with that unit.
13.0 victory13.1 Final Line of Communications Check After the last turn of the game, every unit and leader needs to trace a Line of Communications (LoC) to a friendly road map edge hex; for the Allies the road hex must be on the North map edge (hexes 0120, 0116, 0108, 0103) and for the Franco-Bavarians the road hex must be on the South map edge (road hexes 1520, 1515, 1513, 1510). A LoC is a line of hexes of any length that goes from the hex with a unit or Leader to a friendly road map edge hex such that this line of hexes may not be traced through a hex occupied by an enemy unit nor through an enemy ZoC that is not occupied by a friendly combat unit. In addition, a LoC may not be traced off the map or across the Donau river. Any unit or Leader that cannot trace a LoC surrenders and is removed from the map after all units and Leaders have tried to trace their required LoC and all such surrenders are considered simultaneous. A unit that surrenders is removed from the map and placed in a pile of surrendered units to use when determining victory. When an enemy unit surrenders, a friendly unit that is adjacent to the surrendering unit and is itself not surrendering may advance into the hex to accept the surrender. 13.2 Victory due to Commander elimination or surrenderHistorical Note: Tallard surrendered but no other Leader was eliminated or surrendered.• If both Commanders on both sides end up eliminated and/or
surrendered at the same point in time, then the game is immediately a draw.
• If both Tallard and Marsin end up eliminated or surrendered but at least one Allied Commander is not eliminated or surrendered at the same point in time, then the Allies immediately win the game.
• If both Marlborough and Eugene end up eliminated or surrendered but least one Franco-Bavarian Commander is not eliminated or surrendered at the same point in time, then the Franco-Bavarians immediately win the game.
13.3 Victory due to Victory pointsAssuming that at least one Commander for each side is not eliminated and not surrendered at the end of nine turns, then game victory is awarded to the player who scores at least 7 Victory Points (VPs) more than his opponent. If the difference between the VP scored by the two sides is 6 or less, then the game is a draw. VPs are scored as follows: • 1 VP for control of each of the following 7 hexes of Blenheim and
Lutzingen: 0903, 0904, 0905, 0919, 0920, 1018, 1019. For this purpose, a player controls a hex if one of his infantry, cavalry or artillery units was the last unit to be in the hex and they are able to trace a LoC from that hex to a friendly map edge road hex.
• 2 VP per enemy combat unit eliminated.• 1 VP per enemy combat unit with a routed marker.• 1 VP per enemy combat unit that has surrendered.• 3 VP per enemy formation (as given in 14.0 Setup) that has had all
combat units eliminated, surrendered, routed, and/or disorganized (reduced to one step).
Note: Each bulleted item that results in VPs is determined separately from, and in addition to, all other items.
10 BLENHEIM