wtid rulebook
DESCRIPTION
WTID RulebookTRANSCRIPT

1

2 3
Introduction 3
Setup 4
1.0 The Turn Track 5
2.0 The Situation Report Cards 6
3.0 The Task Force Display 7
4.0 The War Opinion Display 9
5.0 Argentine Air Operations 11 6.0 Surveillance and Early Warning 12
7.0 British Air Operations 13
8.0 Targeting the Task Force 14 9.0 Air-to-Air Combat 15
10.0 Surface-to-Air Combat 17
11.0 Air-to-Surface Combat 21
12.0 San Carlos Landings 22
13.0 Naval Combat 28
14.0 Combat Losses 34
15.0 Argentine Supply 35
16.0 Event Cards 36 17.0 Ceasefire 37
18.0 Reinforcements 37
19.0 Weather 38
20.0 Campaign Assessment 39 21.0 Sequence of Play 41 Sample Standard Turn (pre-Landings) 44 Sample San Carlos Turn (post-Landings) 49
Play Tips from the Designer 53
Unit Historical Notes 54 Task Force Deployment Table 57
Additional Tables 58
Designer’s Notes 59
Where There Is Discord is a solitaire game recreating the struggle between the armed forces of Argentina and Great Britain for control of the Falkland/Malvinas Islands during May of 1982.
In the game, you play the part of the commander of the British Task Force charged with “re-capturing” the Islands, whilst the game system simulates the actions of the Argentine air force, navy and army as they attempt to repel the British forces. The ultimate object of the game is to secure as many Landing Zones in San Carlos Water as possible by the end of May [see 20.0].
Counters are used to represent British Task Force vessels and the ground Units of both sides, as well as planes of the Royal Navy Sea Harrier force. Additional Counters represent (in a more abstracted way) the vessels and aircraft of the Armada de la República Argentina and the Fuerza Aérea Argentina. A further set of red-bordered Markers assists the player in keeping track of various game conditions such as Weather, Argentine Supply and Public Opinion.
Two decks of cards are also provided: a set of Situation Report Cards, which are used to monitor the progress of the Task Force towards the Islands and coordinate Argentine air Raids, and a set of Event Cards which describe various random Events that influence the conflict at the political, diplomatic and military level. Also find enclosed the Intelligence Briefing Booklet, which will tell you the details of how each Event Card that comes into effect during the game affects your operations.
A series of different-valued dice are included to replicate random factors and the operation of the various weapons systems utilised during the conflict. One d6 is coloured [see 12.2.3]. On ten-sided dice, a result of 0 always reads as 10.
Note: Die rolls are listed in a standardized format, with the number of dice followed by the value of the die. There are five values of dice included in the game: d4, d6, d8, d10 and d12. So, a notation of 1d12 would call for a roll of one twelve-sided die, 2d10 would call for a roll of two ten-sided dice, 3d4 for a roll of three four-sided dice, and so forth. There is also a D12 notation, calling for the roll of two six-sided dice and adding their results to obtain a single number ranging from 2-12. Observe all these notations carefully, as they are the heart of the game’s probability system.
The Sequence of Play can be found beginning on page 41. It will be useful to reference whilst reading the rules. Rules references are listed as decimal numbers throughout this booklet, and cross references are listed in square brackets. Any references to the Sequence of Play [21.0] are listed as letters.
Do not be discouraged by the length of the rules - they are intentionally written in a detailed step-by-step style, with examples and commentary throughout. The game itself is not particularly complex once you’ve gotten into the swing of things. It’s best to set up and play along as you go through the rules for the first time.
* * *
Tab
le o
f Co
nte
nts
Intro
du
ctio
n

4 5
Board: Begin by unfolding both halves of the Board and placing them side by side, with the Turn Track to the upper left.
Event Cards: Shuffle the Event Card deck and place it face-down in its place on the Board.
Situation Report Cards: Sort the Situation Report (SitRep) Cards in order, and place the deck face-down in its place on the Board with Card No. 1 at the top of the deck (first) and the “Operation Sutton” Card at the bottom (last).
Argentine aircraft: Deploy the Argentine aircraft Counters to their respective Airbases, with each Squadron placed in one of the following boxes on-Board:
4 Canberras (• Grupo 2 de Bombardeo) Trelew 4 Mirages (• Grupo 8 de Caza) Commodoro Rivadavia4 Daggers (• Grupo 6 de Caza) San Julian4 Skyhawks (• Grupo 5 de Caza) Rio Gallegos2 Super Étendards (• Escuadrilla 2 de Caza y Ataque) Rio Grande
Argentine vessels: Place the two Argentine Submarine Counters in their base at Puerto Belgrano; they are ready to put to sea. Then take the three Argentine Task Group Counters and place them beside the Board. They have yet to be readied for sea and are not placed on the Board until indicated [13.3].
British Troop Transports: Load the ten British Units onto their Troop Transports by placing Unit Counters onto each of the ten on-Board boxes (of your choice) above the San Carlos Display. They should be placed on their front (full-strength) side, as denoted by the black combat number. Note: The ‘Blues & Royals’ Counter may not be placed on the QE2 or Canberra.
British Sea Harriers: Deploy the British Sea Harrier force to their Carriers. Place all the blue Harrier Counters marked “Invincible” in the Invincible Ready Box on the Sea Harriers Display, then place all the red Harrier Counters marked “Hermes” in the corresponding Hermes Ready Box. The Harrier Counters are designated A-E, which indicates the five individual Flights. Note: You may find it useful to stack the aircraft by Flight, but this is not mandatory.
War Opinion Display: Place both the Domestic and International Opinion Markers at Level 10 on the War Opinion Display. Also, place the five International Event Markers in their appropriate spaces around the War Opinion Display Track [see 4.2].
Turn Track: Place the Turn Marker at 1 May on the Turn Track.
Argentine Supply: Place the Supply Marker in the 14 May space on the Turn Track. Note: This indicates a Level of 14, not anything to do with the date or Turn - several Markers in the game simply use the Turn Track as a convenient means to track certain important numbers.
Exocet Stock: Place the Exocet Stock Marker in the 5 May space on the Turn Track. Again, representing 5 Exocets, not the 5th of May.
Scramble Modifier: Place the Scramble Marker on the zero space on the Scramble Modifier Track
Task Force Deployment: Finally, you must deploy the Task Force for war. Consult the Task Force Deployment Table (page 57), and place those Counters listed as “Task Group 317.8” onto the Task Force Display on the Board [see 3.0].
Combat Chart & Naval Attack Resolution Chart: These two player aids list important game information, and you should consult them at the appropriate times. There is also a Weather Chart [19.0] and a series of Additional Tables for the game (page 58). Note: the same data shown on the Combat Chart is also included on the back sides of the vessel and aircraft Counters in the game; you may use any combination of these during the game that suits you. The same is true of the Weather Chart and Weather Markers.
* * *
1.1 The Turn Track
The Turn Track follows the course of the conflict from 1 May, when the bulk of the Task Force enters the combat zone, to 28 May, when the British forces either secure a firm lodgement on the Islands or are finally repulsed. At the start of the game place the Turn Marker on 1 May. As each full turn is completed advance the Turn Marker one space on the Turn Track.
Various Markers are placed on the Turn Track to indicate certain game conditions or modifiers. The value represented is equivalent to the date the Marker currently occupies (2 May would indicate a value of 2, 6 May a value of 6, etc.).
The Turn Track also indicates the dates of arrival for Reinforcements (and the return to play of damaged units and/or units that may have been performing special operations as a result of the Event Cards). When the appropriate turn is reached, consult the Task Force Deployment Table (page 57) to see which smaller elements arrive on that Turn to assist your war effort.
1.2 Operation Sutton
21 May is specially marked as the scheduled opening for Operation Sutton, the British invasion to re-take the Falkland Islands from Argentina. British Units are not forced to commence their Landings on this date, but from this point onward Argentine Ground Forces will start to occupy positions around San Carlos Water [12.2.9].
* * *
Se
tup
1.0 T
he
Turn
Trac
k
6 7
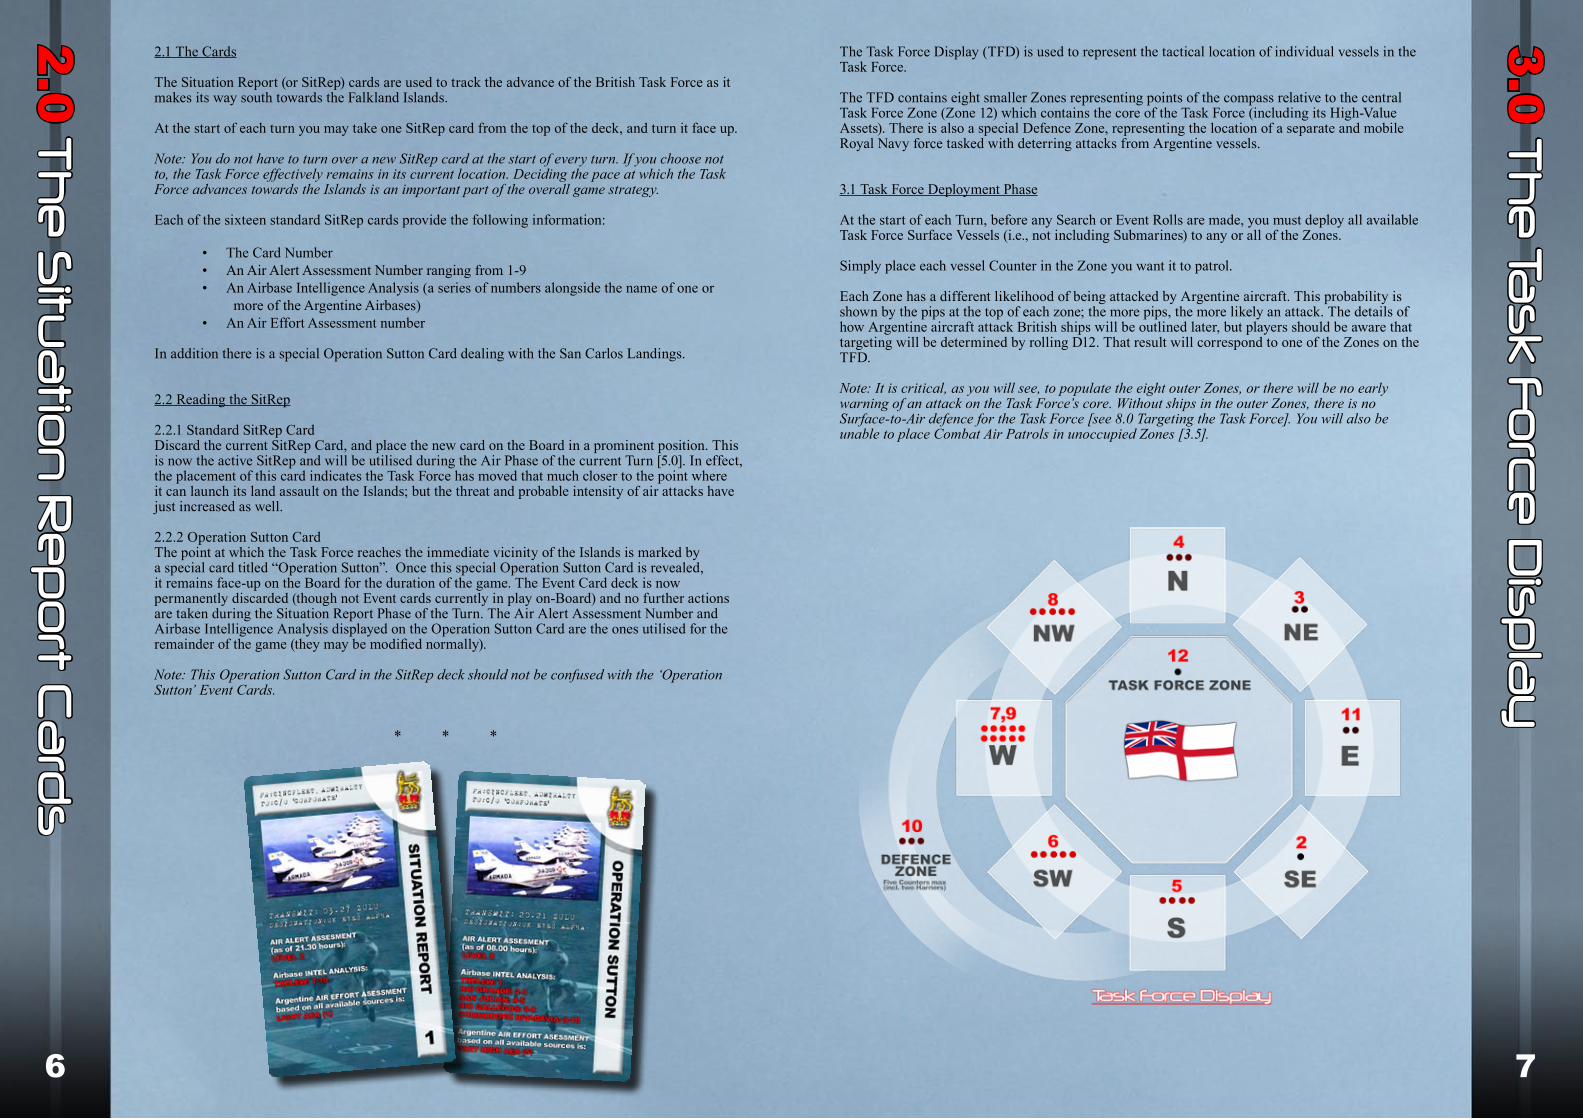
2.1 The Cards
The Situation Report (or SitRep) cards are used to track the advance of the British Task Force as it makes its way south towards the Falkland Islands.
At the start of each turn you may take one SitRep card from the top of the deck, and turn it face up.
Note: You do not have to turn over a new SitRep card at the start of every turn. If you choose not to, the Task Force effectively remains in its current location. Deciding the pace at which the Task Force advances towards the Islands is an important part of the overall game strategy.
Each of the sixteen standard SitRep cards provide the following information:
The Card Number• An Air Alert Assessment Number ranging from 1-9• An Airbase Intelligence Analysis (a series of numbers alongside the name of one or • more of the Argentine Airbases)An Air Effort Assessment number•
In addition there is a special Operation Sutton Card dealing with the San Carlos Landings.
2.2 Reading the SitRep
2.2.1 Standard SitRep CardDiscard the current SitRep Card, and place the new card on the Board in a prominent position. This is now the active SitRep and will be utilised during the Air Phase of the current Turn [5.0]. In effect, the placement of this card indicates the Task Force has moved that much closer to the point where it can launch its land assault on the Islands; but the threat and probable intensity of air attacks have just increased as well.
2.2.2 Operation Sutton CardThe point at which the Task Force reaches the immediate vicinity of the Islands is marked by a special card titled “Operation Sutton”. Once this special Operation Sutton Card is revealed, it remains face-up on the Board for the duration of the game. The Event Card deck is now permanently discarded (though not Event cards currently in play on-Board) and no further actions are taken during the Situation Report Phase of the Turn. The Air Alert Assessment Number and Airbase Intelligence Analysis displayed on the Operation Sutton Card are the ones utilised for the remainder of the game (they may be modified normally).
Note: This Operation Sutton Card in the SitRep deck should not be confused with the ‘Operation Sutton’ Event Cards.
* * *
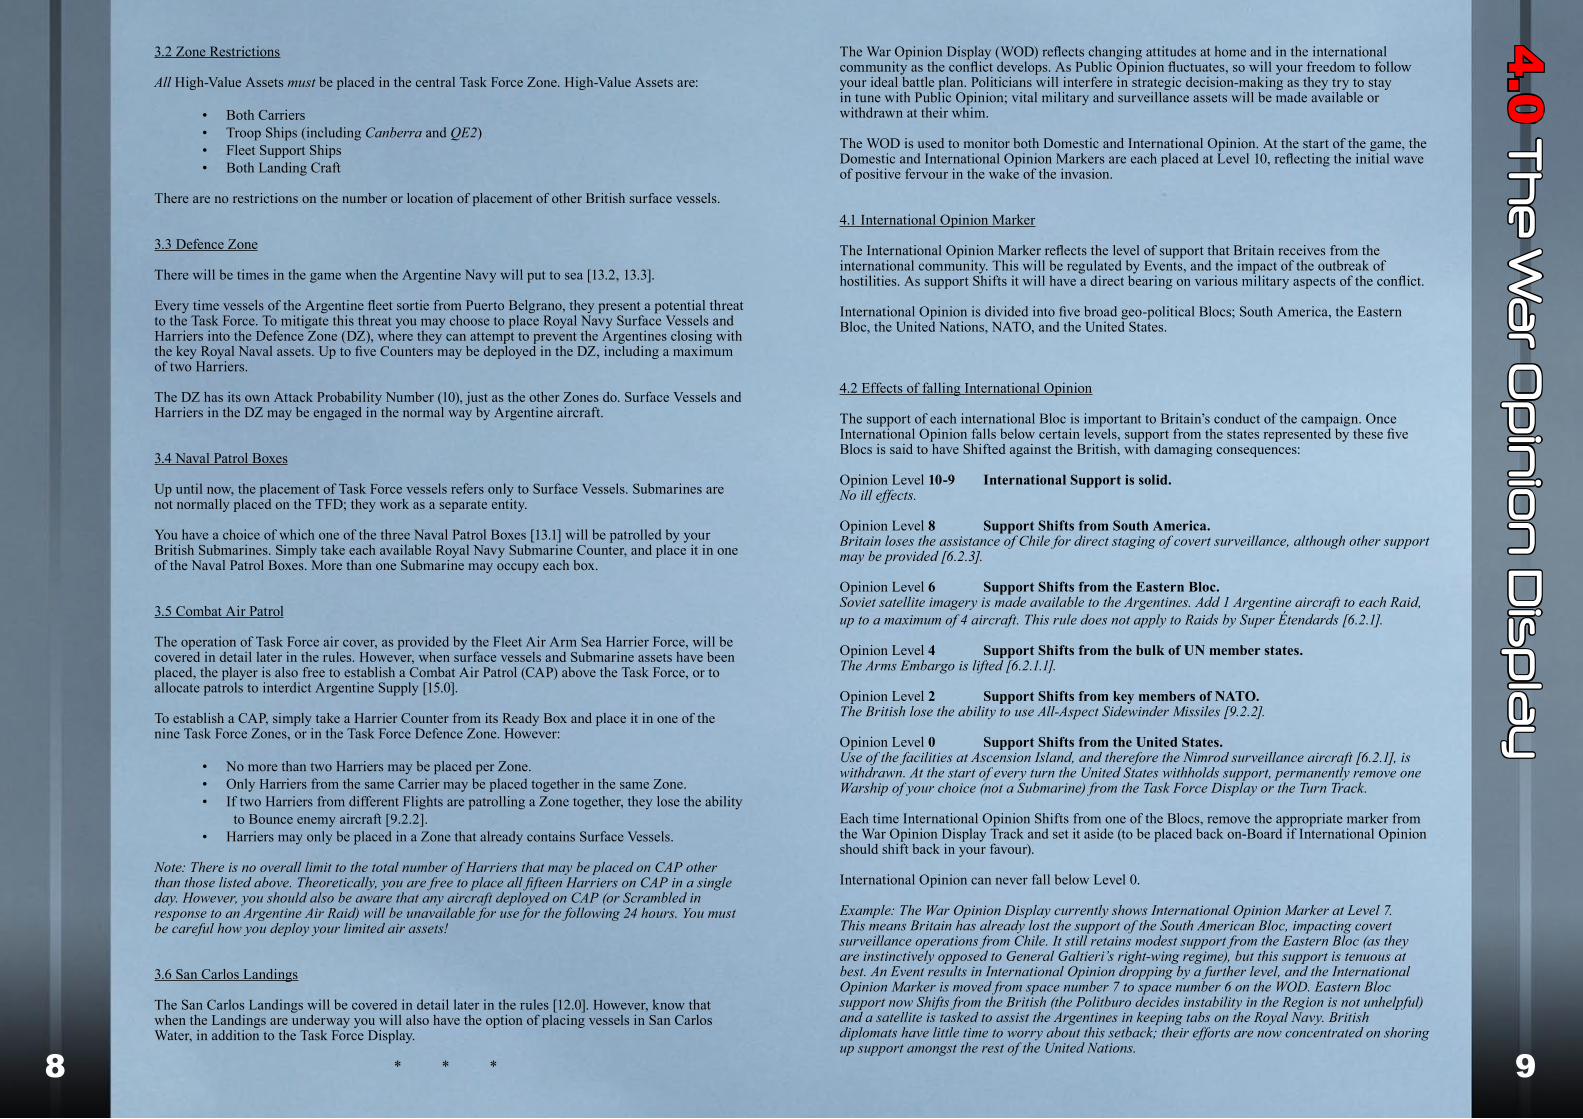
The Task Force Display (TFD) is used to represent the tactical location of individual vessels in the Task Force.
The TFD contains eight smaller Zones representing points of the compass relative to the central Task Force Zone (Zone 12) which contains the core of the Task Force (including its High-Value Assets). There is also a special Defence Zone, representing the location of a separate and mobile Royal Navy force tasked with deterring attacks from Argentine vessels.
3.1 Task Force Deployment Phase
At the start of each Turn, before any Search or Event Rolls are made, you must deploy all available Task Force Surface Vessels (i.e., not including Submarines) to any or all of the Zones.
Simply place each vessel Counter in the Zone you want it to patrol.
Each Zone has a different likelihood of being attacked by Argentine aircraft. This probability is shown by the pips at the top of each zone; the more pips, the more likely an attack. The details of how Argentine aircraft attack British ships will be outlined later, but players should be aware that targeting will be determined by rolling D12. That result will correspond to one of the Zones on the TFD.
Note: It is critical, as you will see, to populate the eight outer Zones, or there will be no early warning of an attack on the Task Force’s core. Without ships in the outer Zones, there is no Surface-to-Air defence for the Task Force [see 8.0 Targeting the Task Force]. You will also be unable to place Combat Air Patrols in unoccupied Zones [3.5].
2.0 T
he
Situ
atio
n R
ep
ort C
ard
s
3.0 T
he
Tas
k Fo
rce
Dis
pla
y
8 9
3.2 Zone Restrictions
All High-Value Assets must be placed in the central Task Force Zone. High-Value Assets are:
Both Carriers• Troop Ships (including • Canberra and QE2)Fleet Support Ships• Both Landing Craft•
There are no restrictions on the number or location of placement of other British surface vessels.
3.3 Defence Zone
There will be times in the game when the Argentine Navy will put to sea [13.2, 13.3].
Every time vessels of the Argentine fleet sortie from Puerto Belgrano, they present a potential threat to the Task Force. To mitigate this threat you may choose to place Royal Navy Surface Vessels and Harriers into the Defence Zone (DZ), where they can attempt to prevent the Argentines closing with the key Royal Naval assets. Up to five Counters may be deployed in the DZ, including a maximum of two Harriers.
The DZ has its own Attack Probability Number (10), just as the other Zones do. Surface Vessels and Harriers in the DZ may be engaged in the normal way by Argentine aircraft.
3.4 Naval Patrol Boxes
Up until now, the placement of Task Force vessels refers only to Surface Vessels. Submarines are not normally placed on the TFD; they work as a separate entity.
You have a choice of which one of the three Naval Patrol Boxes [13.1] will be patrolled by your British Submarines. Simply take each available Royal Navy Submarine Counter, and place it in one of the Naval Patrol Boxes. More than one Submarine may occupy each box.
3.5 Combat Air Patrol
The operation of Task Force air cover, as provided by the Fleet Air Arm Sea Harrier Force, will be covered in detail later in the rules. However, when surface vessels and Submarine assets have been placed, the player is also free to establish a Combat Air Patrol (CAP) above the Task Force, or to allocate patrols to interdict Argentine Supply [15.0].
To establish a CAP, simply take a Harrier Counter from its Ready Box and place it in one of the nine Task Force Zones, or in the Task Force Defence Zone. However:
No more than two Harriers may be placed per Zone.• Only Harriers from the same Carrier may be placed together in the same Zone.• If two Harriers from different Flights are patrolling a Zone together, they lose the ability • to Bounce enemy aircraft [9.2.2].Harriers may only be placed in a Zone that already contains Surface Vessels.•
Note: There is no overall limit to the total number of Harriers that may be placed on CAP other than those listed above. Theoretically, you are free to place all fifteen Harriers on CAP in a single day. However, you should also be aware that any aircraft deployed on CAP (or Scrambled in response to an Argentine Air Raid) will be unavailable for use for the following 24 hours. You must be careful how you deploy your limited air assets!
3.6 San Carlos Landings
The San Carlos Landings will be covered in detail later in the rules [12.0]. However, know that when the Landings are underway you will also have the option of placing vessels in San Carlos Water, in addition to the Task Force Display.
* * *
The War Opinion Display (WOD) reflects changing attitudes at home and in the international community as the conflict develops. As Public Opinion fluctuates, so will your freedom to follow your ideal battle plan. Politicians will interfere in strategic decision-making as they try to stay in tune with Public Opinion; vital military and surveillance assets will be made available or withdrawn at their whim.
The WOD is used to monitor both Domestic and International Opinion. At the start of the game, the Domestic and International Opinion Markers are each placed at Level 10, reflecting the initial wave of positive fervour in the wake of the invasion.
4.1 International Opinion Marker
The International Opinion Marker reflects the level of support that Britain receives from the international community. This will be regulated by Events, and the impact of the outbreak of hostilities. As support Shifts it will have a direct bearing on various military aspects of the conflict.
International Opinion is divided into five broad geo-political Blocs; South America, the Eastern Bloc, the United Nations, NATO, and the United States.
4.2 Effects of falling International Opinion
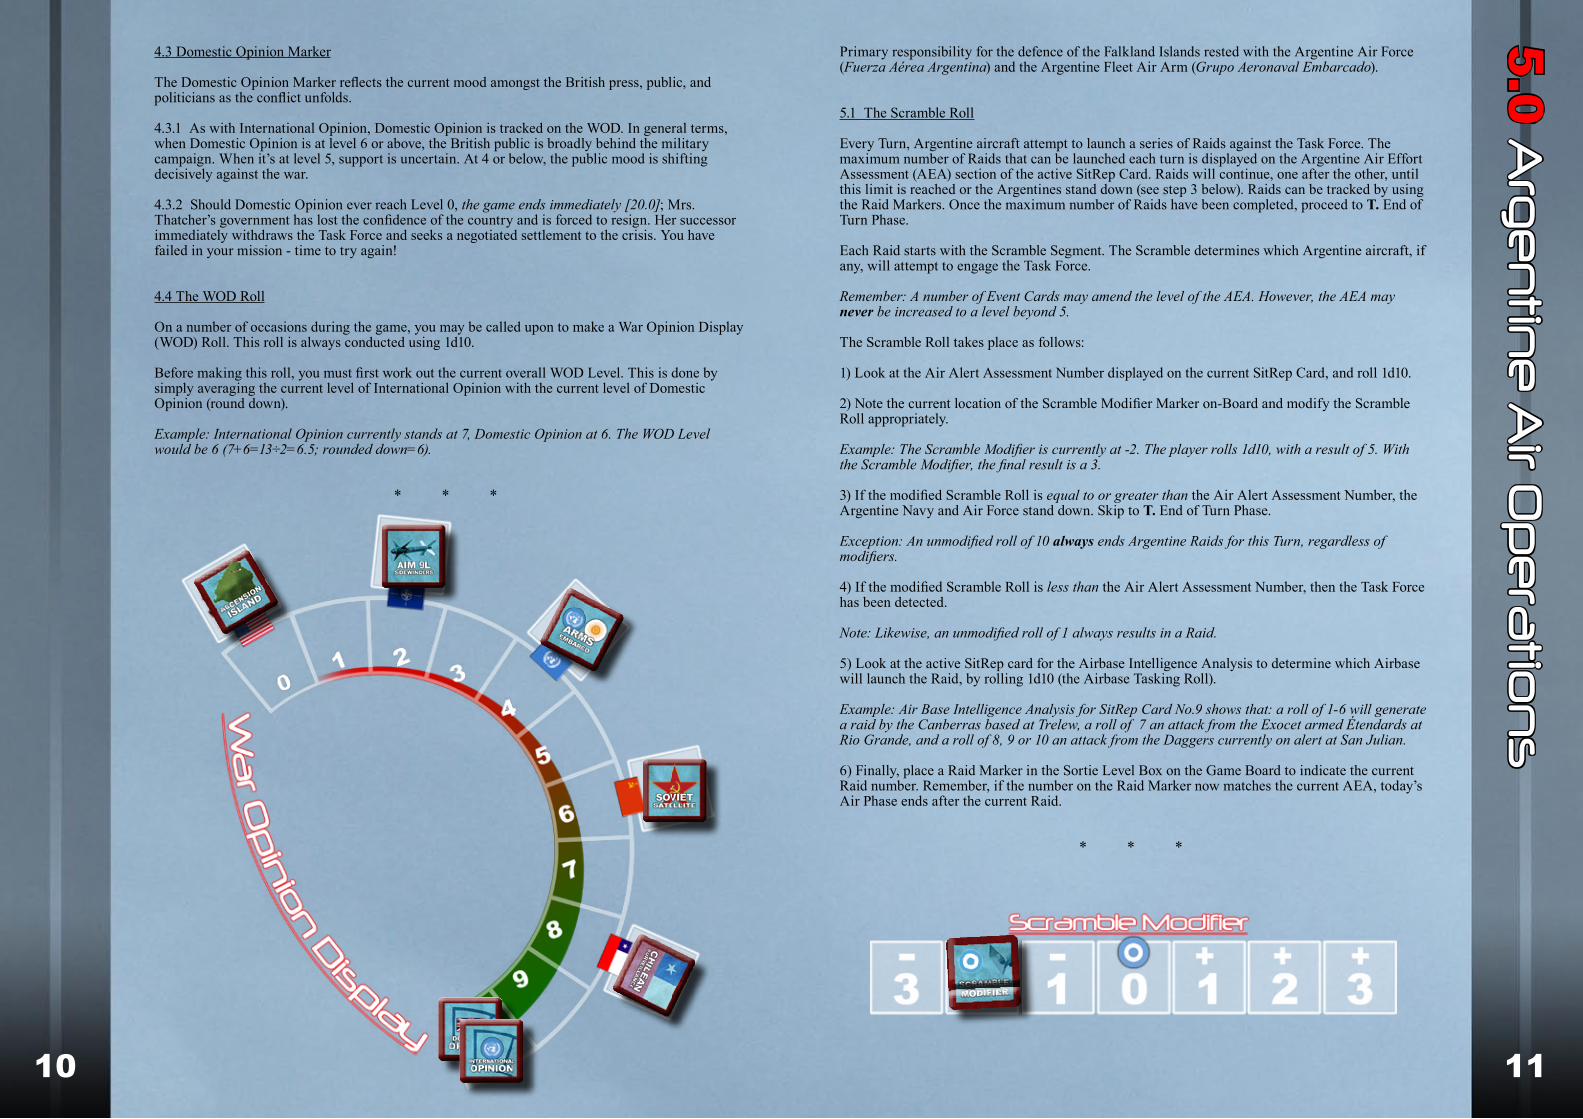
The support of each international Bloc is important to Britain’s conduct of the campaign. Once International Opinion falls below certain levels, support from the states represented by these five Blocs is said to have Shifted against the British, with damaging consequences:
Opinion Level 10-9 International Support is solid.No ill effects.
Opinion Level 8 Support Shifts from South America. Britain loses the assistance of Chile for direct staging of covert surveillance, although other support may be provided [6.2.3].
Opinion Level 6 Support Shifts from the Eastern Bloc. Soviet satellite imagery is made available to the Argentines. Add 1 Argentine aircraft to each Raid, up to a maximum of 4 aircraft. This rule does not apply to Raids by Super Étendards [6.2.1].
Opinion Level 4 Support Shifts from the bulk of UN member states. The Arms Embargo is lifted [6.2.1.1].
Opinion Level 2 Support Shifts from key members of NATO. The British lose the ability to use All-Aspect Sidewinder Missiles [9.2.2].
Opinion Level 0 Support Shifts from the United States. Use of the facilities at Ascension Island, and therefore the Nimrod surveillance aircraft [6.2.1], is withdrawn. At the start of every turn the United States withholds support, permanently remove one Warship of your choice (not a Submarine) from the Task Force Display or the Turn Track.
Each time International Opinion Shifts from one of the Blocs, remove the appropriate marker from the War Opinion Display Track and set it aside (to be placed back on-Board if International Opinion should shift back in your favour).
International Opinion can never fall below Level 0.
Example: The War Opinion Display currently shows International Opinion Marker at Level 7. This means Britain has already lost the support of the South American Bloc, impacting covert surveillance operations from Chile. It still retains modest support from the Eastern Bloc (as they are instinctively opposed to General Galtieri’s right-wing regime), but this support is tenuous at best. An Event results in International Opinion dropping by a further level, and the International Opinion Marker is moved from space number 7 to space number 6 on the WOD. Eastern Bloc support now Shifts from the British (the Politburo decides instability in the Region is not unhelpful) and a satellite is tasked to assist the Argentines in keeping tabs on the Royal Navy. British diplomats have little time to worry about this setback; their efforts are now concentrated on shoring up support amongst the rest of the United Nations.
4.0 T
he
Wa
r Op
inio
n D
isp
lay
10 11
4.3 Domestic Opinion Marker
The Domestic Opinion Marker reflects the current mood amongst the British press, public, and politicians as the conflict unfolds.
4.3.1 As with International Opinion, Domestic Opinion is tracked on the WOD. In general terms, when Domestic Opinion is at level 6 or above, the British public is broadly behind the military campaign. When it’s at level 5, support is uncertain. At 4 or below, the public mood is shifting decisively against the war.
4.3.2 Should Domestic Opinion ever reach Level 0, the game ends immediately [20.0]; Mrs. Thatcher’s government has lost the confidence of the country and is forced to resign. Her successor immediately withdraws the Task Force and seeks a negotiated settlement to the crisis. You have failed in your mission - time to try again!
4.4 The WOD Roll
On a number of occasions during the game, you may be called upon to make a War Opinion Display (WOD) Roll. This roll is always conducted using 1d10.
Before making this roll, you must first work out the current overall WOD Level. This is done by simply averaging the current level of International Opinion with the current level of Domestic Opinion (round down).
Example: International Opinion currently stands at 7, Domestic Opinion at 6. The WOD Level would be 6 (7+6=13÷2=6.5; rounded down=6).
* * *
Primary responsibility for the defence of the Falkland Islands rested with the Argentine Air Force (Fuerza Aérea Argentina) and the Argentine Fleet Air Arm (Grupo Aeronaval Embarcado).
5.1 The Scramble Roll
Every Turn, Argentine aircraft attempt to launch a series of Raids against the Task Force. The maximum number of Raids that can be launched each turn is displayed on the Argentine Air Effort Assessment (AEA) section of the active SitRep Card. Raids will continue, one after the other, until this limit is reached or the Argentines stand down (see step 3 below). Raids can be tracked by using the Raid Markers. Once the maximum number of Raids have been completed, proceed to T. End of Turn Phase.
Each Raid starts with the Scramble Segment. The Scramble determines which Argentine aircraft, if any, will attempt to engage the Task Force.
Remember: A number of Event Cards may amend the level of the AEA. However, the AEA may never be increased to a level beyond 5.
The Scramble Roll takes place as follows:
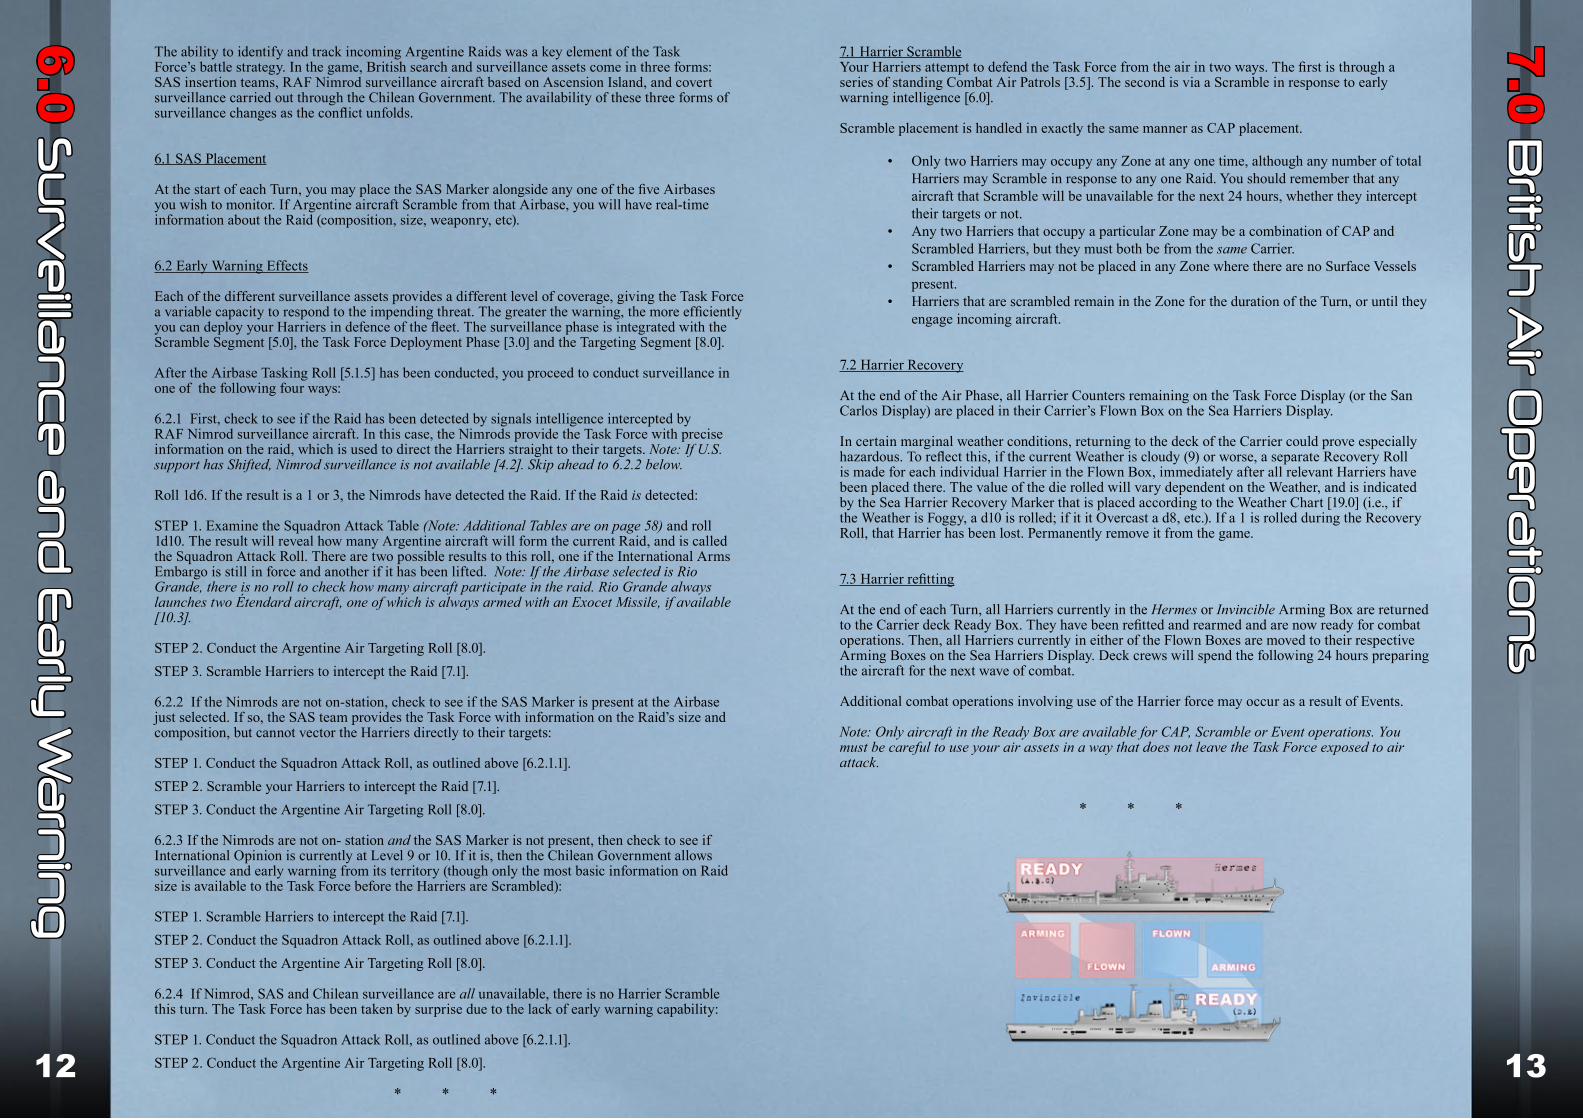
1) Look at the Air Alert Assessment Number displayed on the current SitRep Card, and roll 1d10.
2) Note the current location of the Scramble Modifier Marker on-Board and modify the Scramble Roll appropriately.
Example: The Scramble Modifier is currently at -2. The player rolls 1d10, with a result of 5. With the Scramble Modifier, the final result is a 3.
3) If the modified Scramble Roll is equal to or greater than the Air Alert Assessment Number, the Argentine Navy and Air Force stand down. Skip to T. End of Turn Phase.
Exception: An unmodified roll of 10 always ends Argentine Raids for this Turn, regardless of modifiers.
4) If the modified Scramble Roll is less than the Air Alert Assessment Number, then the Task Force has been detected.
Note: Likewise, an unmodified roll of 1 always results in a Raid.
5) Look at the active SitRep card for the Airbase Intelligence Analysis to determine which Airbase will launch the Raid, by rolling 1d10 (the Airbase Tasking Roll).
Example: Air Base Intelligence Analysis for SitRep Card No.9 shows that: a roll of 1-6 will generate a raid by the Canberras based at Trelew, a roll of 7 an attack from the Exocet armed Étendards at Rio Grande, and a roll of 8, 9 or 10 an attack from the Daggers currently on alert at San Julian.
6) Finally, place a Raid Marker in the Sortie Level Box on the Game Board to indicate the current Raid number. Remember, if the number on the Raid Marker now matches the current AEA, today’s Air Phase ends after the current Raid.
* * *
5.0 A
rge
ntin
e A
ir Op
era
tion
s
12 13
The ability to identify and track incoming Argentine Raids was a key element of the Task Force’s battle strategy. In the game, British search and surveillance assets come in three forms: SAS insertion teams, RAF Nimrod surveillance aircraft based on Ascension Island, and covert surveillance carried out through the Chilean Government. The availability of these three forms of surveillance changes as the conflict unfolds.
6.1 SAS Placement
At the start of each Turn, you may place the SAS Marker alongside any one of the five Airbases you wish to monitor. If Argentine aircraft Scramble from that Airbase, you will have real-time information about the Raid (composition, size, weaponry, etc).
6.2 Early Warning Effects
Each of the different surveillance assets provides a different level of coverage, giving the Task Force a variable capacity to respond to the impending threat. The greater the warning, the more efficiently you can deploy your Harriers in defence of the fleet. The surveillance phase is integrated with the Scramble Segment [5.0], the Task Force Deployment Phase [3.0] and the Targeting Segment [8.0].
After the Airbase Tasking Roll [5.1.5] has been conducted, you proceed to conduct surveillance in one of the following four ways:
6.2.1 First, check to see if the Raid has been detected by signals intelligence intercepted by RAF Nimrod surveillance aircraft. In this case, the Nimrods provide the Task Force with precise information on the raid, which is used to direct the Harriers straight to their targets. Note: If U.S. support has Shifted, Nimrod surveillance is not available [4.2]. Skip ahead to 6.2.2 below.
Roll 1d6. If the result is a 1 or 3, the Nimrods have detected the Raid. If the Raid is detected:
STEP 1. Examine the Squadron Attack Table (Note: Additional Tables are on page 58) and roll 1d10. The result will reveal how many Argentine aircraft will form the current Raid, and is called the Squadron Attack Roll. There are two possible results to this roll, one if the International Arms Embargo is still in force and another if it has been lifted. Note: If the Airbase selected is Rio Grande, there is no roll to check how many aircraft participate in the raid. Rio Grande always launches two Étendard aircraft, one of which is always armed with an Exocet Missile, if available [10.3].
STEP 2. Conduct the Argentine Air Targeting Roll [8.0].STEP 3. Scramble Harriers to intercept the Raid [7.1].
6.2.2 If the Nimrods are not on-station, check to see if the SAS Marker is present at the Airbase just selected. If so, the SAS team provides the Task Force with information on the Raid’s size and composition, but cannot vector the Harriers directly to their targets:
STEP 1. Conduct the Squadron Attack Roll, as outlined above [6.2.1.1].STEP 2. Scramble your Harriers to intercept the Raid [7.1].STEP 3. Conduct the Argentine Air Targeting Roll [8.0].
6.2.3 If the Nimrods are not on- station and the SAS Marker is not present, then check to see if International Opinion is currently at Level 9 or 10. If it is, then the Chilean Government allows surveillance and early warning from its territory (though only the most basic information on Raid size is available to the Task Force before the Harriers are Scrambled):
STEP 1. Scramble Harriers to intercept the Raid [7.1].STEP 2. Conduct the Squadron Attack Roll, as outlined above [6.2.1.1]. STEP 3. Conduct the Argentine Air Targeting Roll [8.0].
6.2.4 If Nimrod, SAS and Chilean surveillance are all unavailable, there is no Harrier Scramble this turn. The Task Force has been taken by surprise due to the lack of early warning capability:
STEP 1. Conduct the Squadron Attack Roll, as outlined above [6.2.1.1]. STEP 2. Conduct the Argentine Air Targeting Roll [8.0].
* * *
7.1 Harrier ScrambleYour Harriers attempt to defend the Task Force from the air in two ways. The first is through a series of standing Combat Air Patrols [3.5]. The second is via a Scramble in response to early warning intelligence [6.0].
Scramble placement is handled in exactly the same manner as CAP placement.
Only two Harriers may occupy any Zone at any one time, although any number of total • Harriers may Scramble in response to any one Raid. You should remember that any aircraft that Scramble will be unavailable for the next 24 hours, whether they intercept their targets or not. Any two Harriers that occupy a particular Zone may be a combination of CAP and • Scrambled Harriers, but they must both be from the same Carrier. Scrambled Harriers may not be placed in any Zone where there are no Surface Vessels • present.Harriers that are scrambled remain in the Zone for the duration of the Turn, or until they • engage incoming aircraft.
7.2 Harrier Recovery
At the end of the Air Phase, all Harrier Counters remaining on the Task Force Display (or the San Carlos Display) are placed in their Carrier’s Flown Box on the Sea Harriers Display.
In certain marginal weather conditions, returning to the deck of the Carrier could prove especially hazardous. To reflect this, if the current Weather is cloudy (9) or worse, a separate Recovery Roll is made for each individual Harrier in the Flown Box, immediately after all relevant Harriers have been placed there. The value of the die rolled will vary dependent on the Weather, and is indicated by the Sea Harrier Recovery Marker that is placed according to the Weather Chart [19.0] (i.e., if the Weather is Foggy, a d10 is rolled; if it it Overcast a d8, etc.). If a 1 is rolled during the Recovery Roll, that Harrier has been lost. Permanently remove it from the game.
7.3 Harrier refitting
At the end of each Turn, all Harriers currently in the Hermes or Invincible Arming Box are returned to the Carrier deck Ready Box. They have been refitted and rearmed and are now ready for combat operations. Then, all Harriers currently in either of the Flown Boxes are moved to their respective Arming Boxes on the Sea Harriers Display. Deck crews will spend the following 24 hours preparing the aircraft for the next wave of combat.
Additional combat operations involving use of the Harrier force may occur as a result of Events.
Note: Only aircraft in the Ready Box are available for CAP, Scramble or Event operations. You must be careful to use your air assets in a way that does not leave the Task Force exposed to air attack.
* * *
6.0 S
urv
eilla
nc
e a
nd
Ea
rly W
arn
ing
7.0 B
ritish
Air O
pe
ratio
ns

14 15
Once the Scramble segment of the Air Phase has been completed and the Early Warning Level has been identified, you should now determine which components of the Task Force will be the subject of the Raid.
This is known as the Targeting Segment of the Air Phase.
Targeting is resolved by simply rolling D12, and comparing the result to the numbers located on the Task Force Display. This is called the Argentine Air Targeting Roll and identifies the Target Zone that the Argentine aircraft are planning to attack. All the ships in this Zone are now the Target Vessels.
Note: If the Targeting Roll is a 10, and the Defence Zone is empty (or only contains Submarines) re-roll. If another 10 results, continue the process until a new Zone is targeted.
You should then:
1) Check if the Target Zone currently contains any Harrier Counters or British Surface Vessels. If it does, place the Air Alert Marker in the Target Zone to remind you which Task Force Zone this is occurring in. If there are Harriers present, proceed to the Air-To-Air segment of the Air Phase [9.0]. If there are no Harriers present, proceed to the Surface-to-Air Combat Phase [10.0].
2) If the Target Zone is empty, and is a Zone other than the Defence Zone, place the ‘Air Alert Handbrake!’ Marker in the Task Force Zone (the Argentines have evaded the Royal Navy’s picket line and reached the main Task Force unopposed). The Task Force Zone is now the Target Zone.
Historical Note: “Handbrake” was the Task Force code word for Super Étendards, and therefore, for an Exocet attack.
If the ‘Air Alert Handbrake!’ Marker is in place, then there is no Surface-to-Air Combat Phase this Turn. If there are Harriers present, proceed to the Air-To-Air segment of the Air Phase [9.0]. If there are no Harriers present, proceed directly to the Air-to-Surface Combat Phase [11.0].
* * *
The Combat Display is used to resolve almost all of the combat conducted in the game, including the Air-To-Air Combat that takes place during this segment of the Air Phase.
9.1 The Combat Display
Air battles are conducted on the Combat Display, which comprises a number of individual Battle Boxes:
4 Argentine Air Force Boxes (identified by the circular Argentine Air Force roundel)• 2 Fleet Air Arm Boxes (identified by the circular Fleet Air Arm roundel)• 1 Royal Navy Box (identified by the white Royal Navy ensign)• 1 Argentine Army Box (identified by the Argentine national flag)• 1 British Army Box (identified by the Union Jack flag)• 1 Naval Range Box (identified by the funny little Range-looking thing)•
Each of the boxes is linked to a Target Lock Box positioned directly below.
Note: Several of these Battle Boxes double for use in different forms of combat, as identified by more than one roundel or flag in the same space.
9.2 Air Combat Procedure
Air combat is conducted in the following way:
9.2.1 Look to see what type of Argentine aircraft are engaged in the attack on the Task Force. Depending on the aircraft type, roll the following Target Lock die for each attacking aircraft:
Canberra 1d4• Skyhawk 1d6• Étendard 1d8• Dagger 1d8• Mirage 1d10•
Note: These values are also listed on the back of each aircraft Counter.
This is the Target Lock Roll, and represents British attempts to get their weapons systems fixed on the incoming Argentine Aircraft. After the first roll, place a Target Lock Marker (equivalent to the number just rolled) in the Target Lock Box on the Combat Display, below the first Argentine Air Force Box. Then place the first Argentine Aircraft in the Argentine Air Force Box itself. If there are other Argentine aircraft present, place the Target Lock and Argentine Aircraft Counters in the second, third and fourth Argentine Air Force and Target Lock Boxes.
If the result of the Target Lock roll is the same for more than one Argentine aircraft, simply place their Counters in the same Argentine Air Force Box, and a single Target Lock Marker in the Target Lock Box below.
Example: Three Skyhawks are attacking the Task Force. You attempt to secure a Target Lock for the engaging Harrier(s). You note the Target Lock die for Skyhawks is 1d6, and you therefore roll 3d6 (once for each attacking aircraft), rolling a 4, a 6 and another 6. You take the ‘4’ Target Lock Marker, and place it in the first Target Lock box on the Argentine half of the Combat Display. You then place the first Skyhawk Counter in the Argentine Air Force box directly above. You repeat the process, placing the ‘6’ Target Lock Marker in the adjacent Target Lock box, and the Second Skyhawk Counter in the second Argentine Air Force box directly above. Finally you note that the Target Lock roll for the third Skyhawk was also a 6. Therefore you simply place the third Skyhawk Counter in the Argentine Air Force box directly above the number 6 Target Lock Marker (two Skyhawk Counters now occupy the same box).
9.2.2 Each Harrier in the Target Zone may now open fire on their targets. Note: The value of the dice rolled in the following rule are identical to those just rolled during the Argentine Aircraft Placement [9.2.1].
If International Opinion is 3 or more, then the Task Force still has access to AIM-9L Sidewinder (All -Aspect) Missiles [4.2]. Roll two dice for each Harrier engaging.
8.0 Ta
rge
ting
the
Tas
k Fo
rce
9.0 A
ir-to-A
ir Co
mb
at
16 17
If the Task Force has lost All-Aspect Missile capability, roll just one die for each plane.
The sole exception to this rule is the two Squadron Leaders, who are marked on their counters with their Squadron Emblem. They may always fire with two dice, regardless of AIM-9L availability.
Note: All-Aspect Missiles gave the Harrier a significant advantage in combat as they enabled the pilots to engage Argentine aircraft from virtually any position, rather than requiring them to manoeuvre directly behind their intended target.
The die rolled is identical to that rolled for the Target Lock above (i.e. the black numbers next to the target aircraft on the Combat Chart).
Each die roll that matches a Target Lock Marker destroys - or forces the abort of - ALL the aircraft in the box above. Note: In game terms, there is no distinction between an aircraft being destroyed and being aborted. Flip each aircraft to its reverse (destroyed) side. The Sidewinders have found a target.
Note: If the destroyed aircraft was a Super Étendard, see rule [10.3.3] to determine if it was the one carrying the Exocet missile.
If, and only if, a pair of Harriers from the same Flight were attacking, they have managed to Bounce the Argentines. In this case, immediately remove all destroyed or aborted Argentine aircraft from the Combat Display and return them to their respective Airbase; they do not get the chance to fight back.
9.2.3 Now, if there are surviving Argentine Dagger or Mirage aircraft, they will attempt to target the Sea Harriers. Roll 1d12 for each attacking aircraft’s Target Lock roll. In an identical manner to that outlined for Argentine aircraft placement, place a Target Lock Marker in one or more of the Target Lock Boxes located below the Fleet Air Arm Boxes on the Combat Display. Then place each of the Sea Harrier Counters in the Fleet Air Arm Boxes themselves. Again, if more than one aircraft received the same Target Lock number, place one Target Lock Marker for these aircraft and place all of their aircraft Counters in the same linked box.
9.2.4 The Argentine aircraft may now attempt to return fire.
1) Roll 1d12 for each Argentine Dagger or Mirage left on the Combat Display, including any that have been flipped (these aircraft were not Bounced and managed to fire their missiles before being destroyed).
Note: Canberras, Skyhawks and Étendards are carrying bomb or anti-ship missile ordnance only, and cannot return fire.
Each die roll that matches the Target Lock Marker of a Harrier destroys one (or if they occupy the same box, both) aircraft. The Harrier Counter(s) are immediately and permanently removed from the game.
2) Now remove all destroyed or aborted Argentine Counters from the Combat Display and return them to their Airbase. Unlike the Task Force, the Argentines have unlimited air assets.
3) Finally, if any Harriers survive the attack, remove them from the Combat Display, and place them in the appropriate Flown Box on the Sea Harriers Display.
Any surviving Argentine aircraft now proceed to the Surface-to-Air Combat segment.
* * *
Having evaded the Harrier patrols, the surviving Argentine aircraft are closing in on their targets. The Task Force must now rely on ship-based defence systems for its protection.
Efforts by the Royal Navy to protect itself from the approaching threat are conducted in the Surface-to-Air segment of the Air Phase, whilst combat itself is again conducted on the Combat Display.
Note: If the ‘Air Alert Handbrake!’ Marker is currently placed in the Target Zone there is no Surface-to-Air Combat phase. Proceed to [11.0].
10.1 Combat Chart
Surface-to-Air combat is conducted utilising both the Combat Display and the Combat Chart.
The Combat Chart is used to determine the availability and hit probability of the weapons systems carried on each of the Royal Navy surface vessels, as well as determining the probability of incoming aircraft being detected by the various on-board Surface-to-Air radar systems.
10.2 Surface-to-Air Combat Procedure
Surface-to-Air combat is conducted via a series of up to four Combat Rounds. As each round passes, the Range between the attacking aircraft and their targets closes rapidly (30 miles, 20 miles, 10 miles, 1 mile). This directly affects the ability of the various shipboard weapons systems to track and engage the incoming aircraft.
Note: If the attacking aircraft are Étendards, continue to follow the rules as outlined below for the first Surface-to-Air Combat Round, but note that special rules will apply for subsequent Combat Rounds.
10.2.1 Starting RangeAt the start of the Combat Round, place the ‘30 Mile’ Range Marker in the Naval Range Box on the Combat Display. This indicates the Range of the attacking aircraft from the Target Vessels.
10.2.2 Radar LockTo activate their defence systems, at least one of the Target Vessels must first secure a Radar Lock on the incoming aircraft. At the start of each Combat Round, you must choose one vessel to attempt this. Logically, choose the vessel possessing the most effective radar system, as indicated by its Radar Lock Number (as shown on the Combat Chart, as well as on the back of the Counter itself). The higher the Radar Lock Number, the higher the likelihood of the system securing the Radar Lock. If none of the targeted Vessels contain missile systems that can engage at the current range, then skip ahead to [10.2.4.6].
Note: A Radar Lock is different than a Target Lock. The Radar Lock simply identifies that there are aircraft approaching and provides basic data (range, speed, heading, etc.) whilst a Target Lock is an aircraft/vessel’s particular weapon system attempting to seek out and destroy its target.
Once a vessel is selected, roll 1d10 and compare the result with the Radar Lock Number.
Note: On occasion, the Radar Lock roll may be subject to a modifier, but a roll of 10 always fails to secure a Radar Lock, and a roll of 1 always succeeds in securing one.
If the result is greater than the Radar Lock Number, the system has failed to locate a target. Skip ahead to [10.2.4.6].
If the result is less than or equal to the Radar Lock Number, however, then Radar Lock has been achieved. All Royal Naval vessels that have not already fired are now free to engage their attackers. Remember, only one vessel has to achieve a Radar Lock for all Target Vessels to fire their weapons.
10.2.3 Missile SystemsAt the start of each Combat Round you must decide which of your vessels will engage the attacking aircraft. Examine the missile system displays, and identify which missile systems are carried on each vessel.
Each system has a Range Indicator, indicating its ability to engage aircraft at a particular distance. Unlike the Radar Lock, the LOWER the number, the more effective the missile system. Where the Range Indicator is blank, it means a system cannot engage at the indicated Range.
10.0 S
urfa
ce
-to-A
ir Co
mb
at

18 19
Example: Sea Dart can engage aircraft at 30,20, and 10 mile Ranges, but not at 1 mile. Sea Cat can only engage targets at distances of 10 miles or 1 mile.
10.2.4 Firing missilesEach vessel can fire only once per Raid (not once per Combat Round). As a result, you must carefully weigh when each ship should engage the attacking aircraft in a given Combat Round.
Now, select which ships (and therefore which Missile Systems) will fire this Combat Round.
1) First, attempt to secure a Target Lock in the same manner as with Air-To-Air combat [9.2.1]. Look at the number located on the relevant Range Indicator of each Missile System you intend to fire this Combat Round. You will roll one die equivalent to the lowest of these numbers (i.e. if the number is 4, you roll 1d4; if the number is 8, you would roll 1d8).
Example: A Type 42 and two Type 22s are both preparing to engage three attacking Mirages at a Range of 10 miles, using the Sea Dart and Sea Wolf missile systems respectively. A look at the Combat Chart indicates that at this Range the Sea Dart has a Range Indicator of 4, whilst Sea Wolf has a Range Indicator of 6. As the Sea Dart’s Range Indicator is lowest, this is the one that will be used. You will therefore roll 1d4 to achieve a Target Lock.
2) When the Target Lock die has been selected you should roll one die of that value for each attacking Argentine aircraft, and then place those aircraft on the Combat Display in exactly the same manner outlined in the Air-To-Air combat procedure.
Example: Using the same example, you roll 1d4 for each of the three attacking Mirages, rolling a 4, 2 and another 4. Two Mirages are placed in the first Argentine Air Force Box, and a (value 4) Target Lock Marker is placed in the Target Lock box directly below. The third Argentine Mirage is then placed in the next free Argentine Air Force box, with a (value 2) Target Lock Marker placed in the Target Lock box directly below it.
3) Now that a Target Lock has been secured, the time has arrived for the Royal Navy to engage its attackers. For each vessel firing this round, you should roll one die of the same value as the Range Indicator displayed for the weapons system carried by the firing ship.
Example: Using the same example above, the Type 42 will now fire its Sea Dart system. As we have already seen, a look at Combat Chart shows the Range Indicator for Sea Dart firing at a target 10 miles away is 4. You therefore roll 1d4 to send the Sea Dart streaking towards the Argentine aircraft. Again, a look at the Combat Chart reveals the Range Indicator for the Sea Wolf system engaging at this Range is 6. You therefore roll 1d6 twice, once for each defending Type 22. Two more missiles are launched into the grey South Atlantic sky.
4) Each die roll that matches a Target Lock Marker destroys or aborts all the aircraft in the box above. Immediately remove the Counters of the destroyed/aborted aircraft and return them to their respective Airbase.
If there are no aircraft remaining, the Raid is over. Go to [11.1.8].
Note: If the aircraft destroyed was a Super Étendard then see rule [10.3.3] to determine if it was the one carrying the Exocet missile.
5) Note which vessels fired this Round. Remember, they cannot fire again during this Raid. However, a vessel which has fired its missiles may still utilise its Radar to obtain a Radar Lock for other vessels under attack.
6) Finally, if no Radar Lock was achieved, or all vessels firing this Round have fired, change the Range Marker to decrease the Range between the incoming aircraft and their targets. If the Range Marker was already indicating ‘1 Mile,’ or all vessels have now fired, then the attacking aircraft have survived and are ready to bomb their targets; go on to [11.0] Air-to-Surface Combat.
If the Range Marker previously indicated ‘10 Miles’ or more, and there are still vessels able to fire, then go back to Step 1) above and conduct another Combat Round of the Raid.
Example: Three Skyhawks are closing on two Royal Navy Type 42s and one Type 21. You note that the Type 42s are equipped with the more effective Radar (6 on the Radar Lock Number) than the Type 21 (Radar Lock Number of 3). You therefore decide that one of the Type 42s will attempt to ‘paint’ the incoming aircraft.
You roll 1d10 and obtain a 5. The Type 42 has acquired the incoming Skyhawks, and immediately passes the data to its own attack computer and that of the accompanying vessels.
The Skyhawks have been detected at 30 miles, beyond the Range of the Type 21’s Sea Cat missile system. However, they are within maximum Range of the Sea Dart system operated by the Type 42s. You decide that both Type 42s will fire their missiles at the approaching threat.
As the Range Indicator for the Sea Dart at 30 miles is an 8, you roll 3d8 (1 die for each Skyhawk), rolling a 3, a 1, and another 3. You therefore place a Target Lock Marker with the value 3 in the first Target Lock box on the Combat Display, and two Skyhawk Counters in the Argentine Air Force box above. The third Skyhawk Counter is then placed in the adjacent Argentine Air Force box, with the final value 1 Target Lock Marker, in the Target Lock box below. The Skyhawks have been analysed by the Type 42 targeting computers, and are about to be engaged.
You now roll 2d8 (1 die for each firing vessel; d8 to match the Sea Dart Range Indicator) and the missiles are launched towards their targets.
The result of the roll is a 2 and a 3. The first missiles explode prematurely, showering the lead Skyhawk with shrapnel, but doing little damage. However, the second salvo scores a direct hit on Skyhawk number 2, destroying it instantly, and disabling Skyhawk number 3, which is forced to abort its mission. Both Skyhawk Counters are removed from the Combat Display.
However, one of the Skyhawks has survived, and the Type 21 Destroyer has still to engage with its own missile system. The player therefore moves on to a second Round of Surface-to-Air combat.
The player places the next Range Marker, which shows the final Skyhawk has now closed to a Range of 20 miles. Worryingly for the Royal Navy vessels, the Sea Cat is unable to engage at this Range. Had one of the Type 42s held its fire, it would have been in a position to attempt to engage the target. However, because they chose to deploy at the optimum Range of the Sea Dart system (30 miles), that opportunity has passed.
As you cannot engage at this Range, you forgo the attempt to secure a Radar Lock and move on to a third Round.
Placing the next Range Marker, which indicates the Skyhawk is now 10 miles out, you note that the aircraft is now in Range of the Sea Cat system, although its optimum firing Range is 1 mile rather than the current 10 miles. Despite this, you think you cannot take the risk of allowing the Skyhawk to close any further, and opt to engage at the longer Range. You attempt to secure a Radar Lock (again with one of the Type 42s’ radar) but roll a 9. Missile control informs the Captain that there is too much radar clutter and it will take a few more moments to secure a lock onto the Skyhawk…
You place the fourth, and final, Range Marker. The Skyhawk is now less than 1 mile from the three warships, and closing fast. You again attempt to secure a Radar Lock and this time roll a 2. Missile Control shouts that they now have a definite lock.
You note the Range Indicator for Sea Cat at 1 mile, and roll 1d6. The result is a 5, and the Skyhawk is placed in the first Argentine Air Force Box, with a value 5 Marker in the Target Lock box below. You now have your final chance to down the remaining attacker.
As the Sea Cat rises up towards its target you again roll 1d6; and roll a 6! The missile explodes harmlessly above the Skyhawk. Aware that his Bomb Run is now virtually complete, the Argentine pilot arcs his aircraft to the left, slowly raises its nose, and heads directly for three Royal Navy vessels…
10.3 Exocet attackThe Exocet missile was the most dangerous weapon in the Argentine armoury. Special rules are used to simulate this threat.
1) Follow exactly the same Surface-to-Air procedure outlined above, except:
a) If any Exocet carrying Étendards survive the first Surface-to-Air combat round (or if none of the defending British ships can engage at a distance of 30 miles), remove all surviving aircraft and place them back at their Airbase at Rio Grande.
b) Place the Exocet counter on the Combat Display in the first Argentine Air Force Box, and the Range Marker at 30 miles.
20 21
c) Continue with the Surface-to-Air Combat Round as normal, except that the Radar Lock Number used by any detecting vessels is reduced by 2. The Exocet is treated as a Raiding aircraft, but with a significantly reduced radar signature.
d) If at any point the Exocet is detected, the Surface-to-Air Combat phase immediately ceases. Resolve the Raid as detailed below.
e) If the Exocet is not detected, then, similarly, at the end of the Surface-to-Air Combat Phase, resolve the Raid as detailed below.
2) The outcome of the Exocet attack depends on the range the missile was detected, if at all. To resolve the Raid, randomly choose which vessel will be targeted in the normal way [11.1]. Then roll 1d6. The result of the Raid is determined by the range at which the Exocet was detected (if at all):
30 miles Exocet hits on a roll of 1 or 2• 20 miles Exocet hits on a roll of 1 or 2• 10 miles Exocet hits on a roll of 1,2 or 3• 1 mile Exocet hits on a roll of 1,2,3 or 4• No Detection Exocet hits on a roll of 1,2,3,4 or 5 •
A hit destroys the target vessel. Remove it permanently from the game.
3) The Argentines start the game with five Exocet missiles, as demonstrated by the placement of the Exocet Stock Marker on space 5 of the Turn Track. Every time an Étendard Raid is scrambled, reduce the level of the Exocet Stock by one, adjusting the Marker accordingly.
If a single Étendard is ever destroyed, roll 1d6. On a 1 or 2 result, the aircraft destroyed was the Exocet carrier; the other aircraft is immediately returned to its Airbase, and the attack ends.
Note: The Exocet Stock is only ever reduced by a maximum of one for each Étendard raid, no matter what happens to the attacking aircraft.
If the Exocet Stock ever falls to zero, remove the Exocet Counter from the Board (it can be replaced if the Exocet Stock is replenished as the result of an Event).
If the Exocet Counter is off the Board, Étendard Raids are not conducted. If Rio Grande is selected via the Airbase Targeting Roll, and there are no Exocets in stock, this Raid is cancelled. The Raid Marker is still advanced in the normal way.
Example: Two Super Étendards are approaching the Task Force from the North, where the Type 42 HMS Exeter is on station. The ‘30 mile’ Range Marker is placed as normal, and Exeter attempts to detect the incoming aircraft. The Radar Lock roll of 1d10 results in a roll of 9. Skimming the wavetops, the Super Étendards remain undetected. The two Super Étendard Counters are returned to their Airbase, and replaced by the Exocet Counter. The ‘30 mile’ Range Marker remains in place. The deadly missile has been launched towards its target. Once again, Exeter’s radar sweeps the horizon, looking for threats. You roll for another Radar Lock, and roll a 6. Normally, this would be result in a detection, but the smaller profile of the Exocet means the Type 42’s Radar Lock Number is reduced from 6 to 4. Exeter remains oblivious to the danger streaking towards her. The Range Marker is reduced to ‘20 miles.’ You roll again for a Radar Lock, and roll another 6. The Exocet is now 10 miles from the warship. You place the ‘10 mile’ marker, and roll again. This time your roll a 2. On board the Exeter, wailing klaxons indicate the Exocet has finally been detected. Looking at the Combat Chart, you now resolve the attack. As the missile was detected at a Range of 10 miles, the Exocet will hit its target on a roll of 1-3 on 1d6. You roll... a 5. Half a mile from Exeter’s port bow, a lookout sees a large plume of water rising from the waves. The missile has run out of fuel. Exeter lives to fight another day.
* * *
Argentine bombing attacks on the Task Force are resolved via a series of Raids called Bomb Runs, in the Air-to-Surface segment of the Air Attack Phase.
11.1 Air-to-Surface Combat Procedure
Air-to-Surface combat is conducted in the following way:
Target Selection: Place all Target Vessels in an opaque container.
1) Draw one Surface Vessel randomly from the container. Place it in the Royal Navy box on the Combat Display. This ship is the Target for the current attack.
2) If the ship drawn was the last one in the container, then all remaining Argentine aircraft will attack this Target during the current Bomb Run.
3) If there is only one remaining attacking aircraft, or there are still ships left in the container, then only one aircraft will attack the Target during the current Bomb Run.
4) Argentine aircraft now engage their targets. Depending on the type of attacker, roll the following die, a result of 1 yielding a Hit:
Canberra 1d12• Dagger 1d10• Mirage 1d10• Skyhawk 1d8•
If the roll results in a Hit, the Target is sunk or so badly damaged it is inoperable. Immediately and permanently remove the Target’s Counter from the game (see [14.4] and [14.5] for the impact of these losses).
5) Any aircraft that just attacked is now returned to its respective Airbase.
6) Any surviving vessel that has just been bombed is now returned to its place on the Task Force Display (not the container) as marked by the Air Alert Marker [8.1].
7) If there are additional Raiding aircraft, return to Step 1) above.
8) If there are no more Raiding aircraft, place all remaining vessels from the container back in their Zone on the Task Force Display, remove the ‘Air Alert’ or ‘Air Alert Handbrake!’ Markers, and return to Section [5.0] to begin the next wave of attacks; unless the attack was a Carrier-based strike, in which case proceed to [13.9.4].
Example: Three Skyhawks are attacking two Type 42 Destroyers: Sheffield and Glasgow. You begin the Phase by placing both vessels’ Counters in a container.
The first Bomb Run commences with you randomly drawing one of the Counters. On this occasion you select HMS Sheffield, which is now placed in the Royal Navy box on the Combat Display.
The first Skyhawk peels away, and starts to manoeuvre towards Sheffield. Carefully lining up his manual bomb sight, the Argentine pilot points the nose of his aircraft directly at the funnel of the British vessel. As the Captain orders his crew to “Brace, Brace, Brace!” you pick up 1d8 and roll… a 2.
The Skyhawk’s bombs straddle the Sheffield, showering her with shrapnel, but resulting in only superficial damage. A roll of 1 would have resulted in a direct hit. The destroyer has survived.
The Skyhawk Counter is now returned to its Airbase, and the Sheffield Counter to the Task Force Display box currently containing the reminding Air Alert Marker.
As there is still one vessel left in the container, you now conduct a second Bomb Run with both remaining aircraft attacking the Glasgow. This attack is carried out in exactly the same way, except that two attack rolls are made this time (one for each aircraft).
* * *
11.0 A
ir-to-S
urfa
ce
Co
mb
at

22 23
The game culminates with the British landings in San Carlos Water. The on-board San Carlos Display and special rules are utilised to simulate the intense fighting that characterised this stage of the conflict.
12.1 San Carlos Display
The San Carlos Display is comprised of ten Landing Zones (each displaying the insignia of the British Regiment tasked with securing this area) each with a linked, numbered Naval Box that can be occupied by a Troop Ship (used to transport the British Units to their Landing Zones), a Landing Craft (used to transport heavy weapons, equipment and supplies), or a Warship (used to provide Anti-Aircraft and Naval Gunfire Support).
12.2 San Carlos Landings
The San Carlos Landings may commence from the 21 May Turn, so long as the Operation Sutton card is the Active SitRep card (i.e., currently face up on-Board). Landings by British ground forces cannot start before this date, even if the Operation Sutton card has already been drawn. Equally, the Landings do not have to start on this date, but from this time Argentine ground forces will start to take up defensive positions around the landing sites.
At the start of the Turn you wish to begin the invasion, you must first place the Operation Sutton Marker in the space on the Turn Track currently occupied by the Turn Marker. The British are now committed to the Landings.
Once the Landings have begun, a modified Sequence of Play is used [see 21.1]. The San Carlos Landings are integrated with the standard Sequence of Play in the following manner:
12.2.1 Event Cards. Remove all remaining Event Cards in the pack permanently from the game, but leave in play all those Event Cards currently face up on the Board (they may subsequently be removed if the conditions detailed for the card are met).
12.2.2 Deployment Phase. At the start of the Deployment Phase you may now move forces to or from San Carlos Water. This is done by simply taking Counters from the Task Force Display, and placing them in one of the ten numbered Naval Boxes on the San Carlos Display, or vice versa. Important: Only one vessel may ever occupy any one San Carlos Naval Box.
Vessels and ground Units are deployed in the following way:
1) Troop Ships wishing to disembark attached Units are placed in the Landing Box next to the Landing Zone they intend the Units to occupy. Remember, only one Troop Ship may occupy any one Naval Box in any one Turn. Similarly, only one British Ground Unit may occupy any one Landing Zone in any one Turn. Although the QE2 and Canberra each carry three British Units, they may only land one Unit per Turn.
2) The two Landing Craft may each be placed in separate Naval Boxes adjacent to the Troop Ships and Units they wish to support this turn. The presence of a Landing Craft enables the appropriate Unit to be put ashore with its full complement of Heavy Weapons, which in turn allows it to fight with its full Combat Strength. Note: An ‘adjacent’ Naval Box is any non-diagonal connected box. i.e. San Carlos Naval Box 4 is adjacent to boxes 2,3 and 6; but not to boxes 1 and 5.
The Landing Craft do not have to deploy to San Carlos in any particular Turn, but any Units landed without Landing Craft support will be subject to a penalty when involved in combat.
Again, only one Landing Craft may be placed in any one Naval Box per Turn. The presence of one Landing Craft is sufficient to provide support to any ONE Unit.
Example: A Troop Ship is landing 40 Commando at Chanco Point. It is placed in Naval Box number 1. If the player wishes to support this landing, they must place one of the Landing Craft in either Naval Box 2 or 3. Naval Box 4 is not adjacent to Naval Box 1, and would not be a valid mooring for support of troops landing at Chanco Point.
3) Warships (i.e., all vessels excluding Carriers and Submarines) may be placed in any Naval Zone on the San Carlos display, to provide AA cover and Naval Gunfire Support. As ever, only one Warship may be placed in any one Naval Box per Turn. Each Warship that is placed provides AA defence for its own Naval Box, and each adjacent naval box as well as providing Naval Gunfire Support for Ground Units in the immediately adjacent Landing Zone.
Example: A Type 42 Destroyer is stationed off Wreck Point (Naval Box 3). It could therefore defend itself, plus any Naval Units stationed off Chanco Point (Naval Box 1), Port San Carlos (Naval Box 4), and Ajax Bay (Naval Box 5); as well as providing Naval Gunfire Support to Wreck Point itself.
4) Once the Landings have commenced, you may wish to place up to two Sea Harriers on CAP on the San Carlos Display to protect Vessels in San Carlos Water. Simply place the Harriers on the San Carlos Display’s CAP box - as if it were a Task Force Defence Zone. CAP over San Carlos follows exactly the same rules as CAP or Scramble as used in normal defence of the Task Force [3.5].
5) On the first turn of the Landings, all Argentine Task Groups currently off-Board are automatically moved to the Ready For War Box.
12.2.3 Targeting Segment. The targeting dice are rolled as normal. However, if there are naval Counters or British ground Units on the San Carlos Display, examine the Coloured die, and compare it to the value of the white die. If the value of the coloured die is greater than or equal to the value of the white die, the Argentine aircraft are tasked with attacking San Carlos Water. If the value of the coloured die is less than the value of the white die, or there are no naval Counters or British ground Units in San Carlos Water, then add the value of the two dice and target vessels on the Task Force Display as normal.
Note: The exception to this Rule is if a roll of 2 or 12 is made. In this case the appropriate Task Force Zone is attacked as normal.
Important: Exocet attacks are never launched in San Carlos Water. An Étendard attack is always launched at the Task Force, never a Landing Zone.
12.2.4 Scramble Segment. Air cover may be Scrambled to intercept Argentine aircraft attacking San Carlos Water in the normal way. Treat the San Carlos Display as if it were a Task Force Zone for Scramble purposes. All normal Scramble restrictions and procedures apply [6.0].
12.0 S
an
Ca
rlos
La
nd
ing
s

24 25
12.2.5 Air Combat Segment. Air combat is conducted normally [9.0].
12.2.6 Surface-to-Air Combat Segment. Whilst operating in the confines of San Carlos Water, the Royal Navy was constrained in its ability to engage attacking aircraft. As a result, a special Surface-to-Air combat procedure is used for attacks on vessels on the San Carlos Display:
1) Begin the San Carlos Surface-to-Air Combat Round by making a San Carlos Attack Roll of 1d10 for each aircraft.
2) Each Aircraft is then placed in the Naval Box matching the number just rolled (more than one attacking aircraft may attack the same Naval Box).
3) If the Naval Box that corresponds to any individual San Carlos Attack Roll is empty, place the attacking aircraft in the nearest occupied Naval Box. If there are equidistant Naval Boxes occupied, the aircraft is placed in the lowest-numbered Naval Box. If there are currently no vessels in San Carlos Water, then the Aircraft attack the British ground Unit closest to the Naval Box identified by the San Carlos Attack Roll.
If there are no naval Counters or ground Units in San Carlos Water, the Task Force Display is attacked as normal.
4) Before naval Surface-to-Air combat is conducted, the Argentine aircraft must run the gauntlet of small arms fire from British ground forces and shore-based Rapier missile systems. To simulate this, roll one die for each attacking aircraft. The value of the die depends on how long the British Units have been ashore, and how much time they have had to deploy and test their shore-based AA defences. To determine the level of shore based AA preparedness, simply look at the Turn Track and count the number of days between the current date and the location of the Operation Sutton Marker:
Zero or One day • 1d10Two or Three days • 1d8All subsequent days • 1d6
Now roll one die of the value indicated above for each Argentine aircraft currently on the San Carlos Display. Each roll of 1 destroys one aircraft. Return it to its Airbase. Note: This process is also reflected in the table on page 58.
5) Each Warship may now engage one attacking aircraft that is currently occupying its own or an adjacent Naval Box.
6) Only Warships whose weapons systems have the capacity to engage targets at 1 Mile Range may fire. Note: In desperate circumstances, you may wish to place Warships that do not have these weapons systems in San Carlos Water to lure Argentine Aircraft away from the Troop Ships and Landing Craft.
7) Before firing, Warships do not need to try to obtain a Radar Lock. Note: This is a major change from the standard Surface-to-Air combat rules.
8) The Warship may now fire at its selected target, rolling a die equivalent to its 1 Mile Range Indicator.
9) A roll of 1 destroys the attacking aircraft. Return the Counter to its Airbase.
10) Surface-to-Air combat on the San Carlos Display is conducted sequentially. Each Warship completes the process of attacking one aircraft, before the next Warship can engage.
11) There is only one Round of Surface-to-Air combat per Raid conducted on the San Carlos Display. Once all eligible Warships have engaged, the Surface-to-Air combat Round is over.
Note: Warships may only fire once per Round.
12.2.7 Air-to-Surface Combat.Just as the confined waters of San Carlos made engaging incoming aircraft more difficult, they also provided a rich target environment for the Argentine pilots. This is reflected in the following rule changes for combat conducted on the San Carlos Display:
1) For any Bomb Run carried out in San Carlos Water, the following special targeting dice are used:Canberra 1d10• Dagger 1d8• Mirage 1d8• Skyhawk 1d6•
2) Each attacking aircraft rolls one die of the value indicated above, targeting the Troop Ship, Landing Craft or Warship in the Naval Box it currently occupies (or if there are no vessels present, British troops). Consult the “San Carlos Bomb Run” column on the Combat Chart. One Hit sinks or immobilises the target vessel. Remove it permanently from the game [14.4 & 14.5]. A Hit on a full-strength ground Unit flips it to its reduced side (red Combat Number). A Hit on a reduced ground Unit destroys it. Remove the Unit permanently from the game.
3) Air-to-Surface combat is conducted sequentially. Combat in one Naval Box is completed before moving on to the next Naval Box.
4) There is only one Air-to-Surface combat round during each Air Raid conducted on the San Carlos Display. When all aircraft have bombed their targets, the Air Raid is over.
12.2.8 Landings.The actual landing of British Units on the Falklands is conducted during the Landing Phase of each Turn in the following manner:
1) Units attached to Troop Ships that currently occupy a Landing Box may be moved to the adjacent Landing Zone. Simply take the selected Unit from its position on the Troop Ship Display and place it in the appropriate Landing Zone. Once ashore, the Unit must stay in its present location for the remainder of the game (unless destroyed). It cannot move to another Landing Zone, nor re-embark onto a Troop Ship.
2) No more than one British Unit may occupy any one Landing Zone at any given time - though if a British Unit occupies a Landing Zone, and is subsequently destroyed in combat, another British Unit may attempt to occupy that Landing Zone in a later Turn.
3) If a Landing Zone is currently occupied by one or more Argentine Units, a British Unit may still attempt an Opposed Landing. Simply place the British Unit beneath the Argentine to indicate the Argentines currently control this particular Landing Zone.
4) A British Unit may be landed in a Landing Zone that has a different Unit designation to the Landing Unit. However, as this represents a last minute change of objective, the Unit will be at a disadvantage when engaging in combat in the new Landing Zone.
5) If the British Unit that is about to be landed is on a Landing Craft adjacent to a Naval Zone occupied by one of the two Landing Craft, the Unit is landed at Full Strength, with all its heavy support weapons. If it does not occupy such a row, and it is landed without Landing Craft support, it will be placed at a disadvantage when engaging in combat. In these circumstances, flip the Unit to its reverse side (which shows a reduced factor in red) to indicate its amended status.
Note: The requirement for a LAnding Craft to be adjacent applies ONLY when the Unit is first landed. Once it is ashore with its Heavy Weapons, it is free to fight on its full-strength side for the remainder of the game. Similarly, if it is landed without its Heavy Weapons it will be forced to fight on its reduced-strength side for the remainder of the game. Heavy Weapons can’t be ‘landed later.’
12.2.9 Argentine Deployment Segment.From 21 May onward, Argentine Units will start to deploy around San Carlos Water. This Argentine Land Deployment Phase first occurs on the 21 May Turn, and continues until the end of the Game. Argentine Deployment takes place regardless of whether British landings have commenced, or if any British Landings are taking place this Turn. Argentine Deployment is also unaffected by Ceasefires.
To deploy Argentine Land Units:
1) At the start of the 21 May Turn all Argentine Land Units are placed in an opaque container.
2) During each Argentine Deployment phase, draw two Argentine Units randomly from the container.
26 27
3) Roll 1d10 for each Argentine Land Unit, placing it in the Landing Zone corresponding to the result. The counter is placed on its full-strength side (with the black combat number).
4) If the Landing Zone is currently occupied by a British Unit, the Argentine Unit will attempt to Counterattack. Place the Argentine Unit under the British Unit to indicate the Zone is currently British-controlled.
5) If the Landing Zone is already occupied by an Argentine Unit, place the new Argentine Unit in the nearest unoccupied Landing Zone instead. If there are two equidistant unoccupied Landing Zones, the highest numbered Zone is chosen. If there are no unoccupied Landing Zones, place the new Argentine Unit in the nearest occupied British Landing Zone (again, if there are two equidistant British-occupied Landing Zones, the highest numbered Zone is chosen).
6) If there are Argentine Units in each of the ten Landing Zones (an unlikely but possible event), place the Argentine Unit in the Landing Zone indicated by the die. This Zone has now been Reinforced.
12.2.10 Ground Combat Preparation.The initial landings on the Islands were regarded by the British as the riskiest element of the entire Falklands Operation. Initial battle damage estimates predicted casualty rates as high as 20% of the landing force. The following rules are used to simulate combat between British and Argentine land units:
Each Landing Zone that contains both British and Argentine Land Units will be subject to Ground Combat to determine who controls the Zone at the end of the current Turn.To prepare Units for Ground Combat use the following procedure:
1) Each Zone that contains both Argentine and British Units is called the Combat Zone. For each Combat Zone it is first necessary to determine who has control of the area. If the Zone is the subject of an Opposed Landing, control currently rests with the Argentine forces; place an Opposed Landing Marker in this Zone (the Argentines will win ties in combat). If the Zone is the subject of a Counterattack, control currently rests with the British Forces; place a Counterattack Marker in this Zone (the British will win ties).
2) Next, place the British Unit from the first Contested Landing Zone on the Combat Display in the box containing the Union Jack. If it is currently on its unsupported (reverse) side, be sure to keep it that way.
3) Then place the Argentine Unit from the same Zone onto the Combat Display in the Argentine Army Box. If there is currently more than one Argentine Unit in the Landing Zone use the bottom Unit for this phase of combat.
4) If the Zone was the subject of an Opposed Landing by the British Unit, place the Dug In Marker in any of the free boxes on the Argentine half of the Combat Display.
5) Look at the single number printed on the respective ground Unit Counters. This is the base Combat Value of the Unit, and represents the value of Combat Die that will be used by this Unit during the Combat Round (note that this value may be subject to several modifiers).
6) Now look to see if either Counter contains an Asterisk in the top right hand corner (these represent special equipment, training or experience that will give the Unit a particular edge in combat). If it does, place the appropriate Elite Marker in any of the free boxes on the Argentine half of the Combat Display. Make this placement on each occasion a Unit prepares for battle.
7) Look to see if the British Unit was taken from a Landing Zone which contained a matching regimental insignia. If it was not, place the Wrong Landing Zone Marker in any of the free boxes on the Argentine half of the Combat Display.
8) Look to see if there are any Warships (not Landing Craft) in the Naval Zone directly opposite the currently contested Landing Zone. If there are, then British Units receive Naval Gunfire Support. Place a Naval Gunfire Support Marker in a free space on the British half of the Combat Display.
9) Look to see if there are any Harriers in the CAP Box. If there are NOT then Argentine Pucara Ground Attack aircraft are free to engage British Units. Place the Ground Attack Marker in a free space on the Argentine half of the Combat Display.
10) Finally, look to see if the Supply Marker is currently in place on the Turn track. If it is, retreat it one space (or if it is on 1 May, remove it from the board). If the Supply Marker has been removed from the Board, then Argentine Units are Out-of-Supply. See the impact of this below [12.2.11.1].
12.2.11 Ground Combat.Ground Combat is now conducted via a series of Ground Combat Rounds.
1) If the Supply Marker is no longer on the board, flip the Argentine Unit to its reverse (out-of-supply) side, and use the reduced red factor.
2) Now, look at the base Combat values of the Argentine and British Units. This number (the only number on the Counter) reflects the value of the die they will roll in this Ground Combat Round.
3) Roll the Combat dice, using the appropriate value die for each Unit. The highest result wins this round of combat. If the rolls are equal and the attack is part of an Argentine Counterattack, the British Unit wins. If the rolls are equal and the attack is part of an Opposed Landing, the Argentine Unit wins.
4) If the Unit that just lost the Combat Round is currently displaying one or more Markers alongside its Counter on the Combat Display, then remove one of these Markers (it doesn’t matter which) and commence a new Combat Round.
5) If the Unit that just lost the current Combat Round is not displaying a Marker, it takes casualties. Rotate the Counter 90˚ counter-clockwise.
6) If the Unit has now received four hits, it is destroyed. Permanently remove the Unit Counter from the game.
7) If the Unit has not been destroyed, commence a new Combat Round - return to Step 3) above.
8) If there are no additional enemy Units left in the relevant Landing Zone, the remaining Unit Counter now controls this Zone. Remove the Unit from the Combat Board, and place it back in the appropriate Landing Zone on the San Carlos Display. Units on their unsupported (reverse) side should remain so.
Note: Casualties are retained (i.e. Units do not return to full strength) when the Unit returns to the San Carlos Display.
9) If there are additional Argentine reinforcement Units left in the Landing Zone, a new Segment of Ground combat involving these Units is immediately conducted (remove all remaining displayed Markers as described above and return again to [12.2.10]).
Note: If a British Unit conducted an Opposed Landing against the first Argentine Unit occupying a Zone, any subsequent combat conducted by this Unit this Turn is also treated as an Opposed Landing. Similarly, if an Argentine Unit Counterattacked a Zone, any additional Argentine attacks in this Zone during this turn will be treated as Counterattacks as well.
10) When all combat in this Zone has been concluded, remove any Counterattack or Opposed Landing Markers.
11) If there are additional Landing Zones that remain contested, return to [12.2.10] and commence another Ground Combat segment.
Ground Combat is fought to a conclusion one Zone at a time. At the end of each Ground Combat Segment only one nation’s Unit(s) can be in control of each Landing Zone.
* * *

28 29
During the Falklands conflict, direct hostilities between the Royal Navy and Armada Argentina were primarily restricted to Submarine engagements. As a result, the operation of surface vessels is abstracted during the game; although as in the real conflict, Argentine naval assets present a real threat to an unwary British commander.
13.1 British Submarine Deployment
At the start of the Deployment Phase, place each available British Submarine Counter in any one of the three Naval Patrol Boxes: COASTAL (the immediate vicinity of the Argentine coast), SEARCH (the general area between the coast and the British-imposed Total Exclusion Zone), and EXCLUSION (the Total Exclusion Zone, containing the Royal Navy Task Force itself).
The COASTAL Box is where detecting Argentine vessels is easiest. However, for political reasons, obtaining rules of engagement to attack in this area is hard. The shallow waters make detection of the British Submarines more likely. It is also less likely that Argentine surface vessels will be able to launch an effective attack on the Task Force from this location.
The SEARCH Box is an area where detecting Argentine vessels is more difficult. Equally, British Submarines have greater freedom to patrol without fear of detection. It is politically more acceptable to engage targets in this area, although there are still difficulties, especially with International Opinion. This location will also bring Argentine vessels within striking distance of the Task Force.
The EXCLUSION Box is the area where British Submarines will have greatest difficulty in detecting the enemy, due to prevailing sea conditions and limited ASW detection assets - though this equally applies to detection of the British by Argentine vessels. The Argentine Government has already been warned that any military vessels entering the Total Exclusion Zone will be subject to immediate attack, and so engagement of Argentine forces in this area is at the discretion of local commanders. Argentine vessels that reach this area constitute a real and present danger to the Task Force.
13.2 Argentine Submarine Deployment
The danger posed by the Argentine navy’s diesel-powered Submarines was identified by Task Force commanders as one of the greatest threats faced by the Royal Navy. At the start of each Deployment Phase, roll 3d4 for each available Argentine Submarine in the Puerto Belgrano Box or at sea.
If one 1 is rolled, place the Submarine in the COASTAL Box. If two 1s are rolled, place it in the SEARCH Box. If three 1s are rolled, place it in the EXCLUSION Box.
If no 1s are rolled, the Submarine remains in its current location.
Now move any Argentine Submarines in the Ready for War Box to the Puerto Belgrano Box.
13.3 Argentine Fleet Deployment
Argentine naval commanders were wary of deploying their relatively vulnerable surface assets too close to the Royal Navy’s Task Force. As a result, the three Argentine Task Group Counters start the game off-Board.
1) At the start of each deployment phase, roll the following die for each Group Counter currently off-Board (if some of the Counters are already deployed on-Board, either in port or at sea, do not bother to roll for that unit):
1d4 Patrol Group (“79.4”)• 1d6 Battle Group (“79.3”)• 1d8 Carrier Group (“79.1”)•
2) On any result of 1, that group is about to be readied for war. Place its Counter in the Ready for War Box.
3) If after these rolls, all Argentine Task Group Counters remain off-board, then Argentine Fleet Deployment is over for this turn. Move on to [13.4] below.
4) If there are Task Group Counters in-Port or at sea, they now prepare to hunt the Royal Navy. Roll 3d6 for each Task Group. If one 1 is rolled, place the Task Group Counter in the COASTAL box. If two 1s are rolled place it in the SEARCH box. If three 1s are rolled place it in the EXCLUSION Box. If no 1s are rolled, the Task Group stays in its location, (either in-Port or in the Search Box it currently occupies).
Once these rolls are completed move all Task Group Counters from the Ready for War Box to the Puerto Belgrano Box.
Note: The placement of Argentine Submarines and Task Groups is based on assumptions made by British intelligence as to their location at any particular time. Unless actively detected by British units there is no guarantee a particular submarine or Task Group is actually in its presumed location. Similarly, unsuccessful ‘attacks’ made on particular naval units do not always mean a vessel has fired ordnance at its target. As occurred many times in the conflict, attacks were aborted because of adverse weather, weapons malfunction, changes to ROE, failure to obtain an optimum firing solution, etc.
13.4 Search, Detection & Combat
Once Argentine vessels put to sea they begin a deadly game of cat and mouse, first with the screen of Royal Navy hunter-killer nuclear Submarines patrolling the Argentine coastline, and then with the Task Force itself.
Search, Detection and Combat is carried out in the following order, using the Combat Chart:
1) Argentine and British Submarines attempt to detect and attack one another [13.5].
2) British Submarines attempt to detect and attack Argentine Task Groups, within constraints imposed by their current Rules of Engagement [13.6].
3) Argentine Task Groups attempt to detect and attack British Submarines [13.7].
4) Argentine Submarines and Task Groups attempt to detect and attack the Task Force itself [13.8-10].
13.5 Submarine vs. Submarine Combat
The Submarine vs. Submarine Phase replicates the efforts of Argentine and British Submarines to play the role of hunter-killers.
1) First, look to see which of the Naval Patrol Boxes contain both British and Argentine Submarines. These Boxes are “Contested.”
2) Then for each British Submarine in a Contested Box, roll one die of the value indicated on the Detection Roll section of the Combat Chart, cross referencing the appropriate red-numbered Naval Patrol Box column with the British Submarine row (for example, a British Submarine attempting to detect an Argentine Submarine in the Search Zone would roll 1d8, and if the detection had been attempted in the Coastal Zone the roll would have been 1d6). For each 1 that is rolled, one Argentine Submarine has been detected. For each 1 rolled, place a detected Argentine Submarine and a detecting British Submarine on the Combat Display (your choice as to which).
3) Each British Submarine on the Combat Display can now attack one detected Argentine Submarine. For each attack, roll one die as indicated on the red numbered “vs. Submarine” Attack Roll column of the Combat Chart (in this case, a British Submarine attacking an Argentine Submarine, 1d6). If a 1 is rolled, the Argentine Submarine is destroyed. Remove it permanently from the game. If any other number is rolled, the Argentine submarine escapes the attack. Immediately consult the Naval Attack Resolution Chart to determine the outcome of the failed attack. All British submarines that were involved in the attack are now rotated 180 degrees, removed from the Combat Display and placed back in the Naval Patrol Box where they made the initial detection.
4) When rolls have been made for all British Submarines, repeat the detection process for any Argentine Submarines remaining in a Contested Box (now, naturally, using the Argentine Submarine row on the Combat Chart). As before, detected British Submarines and the Argentine Submarines that detected them are also placed on the Combat Display.
13.0 N
av
al C
om
ba
t
30 31
5) Once all detection rolls have been made, Argentine Submarines can now attack detected British Submarines. Repeat the process outlined above for any detected British Submarines, this time using the Argentine Submarine row on the Combat Chart (in this case, a 1 result on 1d10 is required to sink a British Submarine).
6) Remove all surviving British Submarines from the Combat Display, placing them back in their appropriate Naval Patrol Box, and rotate them 180˚ to indicate that they cannot engage Argentine Task Groups this Turn (the Submarine is too busy attacking or evading Argentine Submarines to hunt the Task Groups). Rotate them back to normal at the end of the Turn.
7) Remove all surviving Argentine Submarines from the Combat Display, and place them back in the Ready for War Box (Argentine naval assets were ordered to adopt a conservative strategy when engaging or engaged by the British).
13.6 British Submarine vs. Argentine Task Group Combat
Unrotated British Submarines in a Contested Box with Argentine Task Groups may now attempt detection. Make one roll for each sub (in this case, 1d4, 1d6, or 1d8 depending on the Naval Patrol Box being Contested), choosing in advance of the roll which Task Group each Submarine will attempt to detect. As usual, a roll of 1 means a detection. Detected Argentine Task Group Counters are placed on the Combat Display as normal.
However, if no British vessels (including submarines) or Argentine vessels (including submarines) have so far been sunk, then, prior to engaging Task Groups outside of the Total Exclusion Zone, British Submarine commanders are required to get confirmation from CINCFLEET that their Rules of Engagement allow combat with Argentine forces.
If the player wishes to engage detected Argentine Task Groups they must first:
1) Conduct one Rules of Engagement (ROE) roll for each Naval Patrol Box that is the location of an attack. Roll 1d10 and compare the result to the number of the current SitRep Card. If the result is less than or equal to the SitRep number, the attack has been authorised for this turn. Note: Regardless of the SitRep number, a roll of 10 always means the attack has NOT been authorised.
2) If the result is greater than the SitRep number, no attacks on Task Groups in that box are authorised for this turn.
3) If the attack would take place in the SEARCH Box, then the player must modify the ROE roll by -2. If the vessels to be attacked are in the COASTAL Box, no addition to the roll is made. If the attack is in the EXCLUSION Box, you’ll recall from above that no ROE roll is required.
Note: Remember, if any British or Argentine vessels have been sunk, CINCFLEET confirmation is no longer required; the shooting war has started in earnest. Also remember that regardless of any modifier, a roll of 10 always means the attack has NOT been authorised.
Example: Two British Submarines have both detected the Argentine Carrier Group within in the SEARCH Box. The current SitRep is No.4. One roll is made, resulting in an 8. Although the roll is modified by -2 (the location of the Carrier Group outside of coastal waters does indicate hostile intent), the modified roll of 6 is still greater than the current SitRep number; politicians remain nervous of such a dramatic escalation of the crisis and CINCFLEET refuses to authorise the attack. Neither of the Submarines may engage the Carrier Group this turn.
4) Continue with any attacks that have been authorised, or that occur within the EXCLUSION Box, in the normal way (using 1d4 for the Attack Roll, as indicated for this type of attack). Hit Argentine Counters are permanently removed from play.
Note: Successful attacks on targets outside the EXCLUSION Box will have an impact on International and Domestic Opinion [14.3].
5) If the attack is unsuccessful immediately consult the Naval Attack Resolution Chart to determine the outcome of the failed attack.
13.7 Argentine Task Group vs. British Submarine Combat
Argentine Task Groups now attempt to detect and engage British nuclear Submarines in a similar way to Submarine vs. Submarine combat.
1) Look to see which of the Naval Patrol Boxes contain both British Submarines and Argentine Task Group(s). These Boxes are “Contested.” For each Argentine Task Group Counter in a Contested Naval Patrol Box, roll one die as indicated on the Combat Chart (in this case cross-referencing the appropriate Task Group row with the red-numbered column of the Naval Patrol Box they are in). For each 1 result (positive detection), remove one British Submarine from the Contested Naval Patrol Box and place it on the Combat Display. If no British submarines are detected, got to [13.8].
2) Each Task Group in a Contested Box can now attack one detected British Submarine. For each attack, roll one die (as indicated by the red combat value in the Attack Roll column on the Combat Chart); in this case either 1d12, 1d10, or 1d8 depending on which Task Group is attacking.
Note: This process is different from Submarine vs. Submarine combat, in that once a Submarine is detected by one Task Group ALL Task Groups may attack it.
Results are handled in the same way as Submarine vs. Submarine combat.
3) Remove all surviving British Submarines from the Combat Display, and place them back in their appropriate Naval Patrol Box.
4) All Argentine Task Groups in the Contested Naval Patrol Box are immediately placed Off-Board (Argentine naval assets were ordered to adopt a conservative strategy when engaging the British).
13.8 Argentine vs. British Fleet Detection
After defending themselves from patrolling British Submarines, the Argentine Navy prepares to go on the offensive and attempt to attack the bulk of the British fleet.
1) Argentine Task Groups or Submarines currently occupying a Naval Patrol Box will attempt to detect the Task Force. In the game, this detection is abstracted, and effectively involves the Units transiting from their current location undetected to engage the Task Force close to the Islands.
2) To detect the Task Force, each Argentine Submarine and Argentine Task Group currently at sea rolls once on the appropriate Detection Roll row on the Combat Chart, cross-referencing the appropriate Naval Group or Submarine with the Grey detection number indicated in the Naval Patrol Box column. If the roll is successful, place the Argentine Vessel on the Combat Display (the Royal Navy vessels to be targeted will be identified in a moment). For example, the Argentine Carrier Group (79.1) is currently operating in the Search Zone. To detect the Task Force it will need a roll of 1 on 1d6.
3) Now for each British Unit currently occupying the Task Force Defence Zone (not including Harriers if the Vessel the British are trying to detect is a Submarine; Harriers have no ASW capability), roll 1d6 to try to detect each Argentine Submarine or Task Group. If the number rolled is 1 or 2, the Argentine Submarine or Task Group has been detected. The Argentine forces immediately call off their attack. Place all detected Task Groups off-Board and all detected Submarines in the Ready for War Box.
4) If no rolls of 1 or 2 are made, the Task Force Defence Group has been successfully evaded. For each Argentine Unit that has evaded now conduct an Engagement Roll (1d12), and place the Unit in the matching Task Force Zone, (including the Defence Zone should a 10 be rolled). If the Engagement Roll indicates a Task Force Zone that does not contain any British units, the Argentine Vessels immediately transfer to and attack the Central Task Force Zone (12). If the roll is a 1, the Argentine Vessels also attack the Central Task Force Zone.
Exception: If the detecting Task Group is the Carrier Group (79.1), there is no Engagement Roll. The Carrier Group marker is automatically placed in Zone 12.
Example: Both Argentine Submarines and the Argentine Battle Group have manoeuvredinto position to attack the Task Force - quite a worrying situation for the British Commander. The Task Force Defence Zone is currently patrolled by two Harriers on CAP, two Type 42 Destroyers, and a Leander Class Frigate. You roll 3d6 for the first Argentine Submarine (one for each warship, but NOT the patrolling Sea Harriers), resulting in a 3, a 5 and a 6. As no rolls of 1 or 2 have been
32 33
made, the Submarine has evaded the Royal Navy vessels. You now roll 1d12, resulting in a 5. The attacking Submarine is therefore placed in Zone 5 (the S Task Force Zone).
You now roll again for the second Argentine Submarine, this time rolling a 2, a 4 and another 2. The second Argentine submarine has been detected and is immediately removed to the Ready for War Box. Finally, you roll 1d6 for the Argentine Battle Group. This time you get 5 rolls, including the 2 Sea Harriers. The result is a 4, 3, 6, 4 and a 1. The Argentine Battle Group has been detected; at the very last moment! The Argentine Battle Group Counter is therefore placed off-Board.
13.9 Argentine vs. British Fleet Combat
Combat between the British fleet and Argentine Navy is now conducted. Each Zone on the Task Force Display that contains an Argentine Unit is Contested. For each Contested Zone, use the following procedure to resolve attacks in this order:
1) For each Argentine Submarine, randomly select one British vessel from the zone. Then make an Attack Roll with 1d6. If the roll is a 1, the British vessel is Hit and permanently removed from the game.
2) For each Argentine Task Group, make the following attack:
a) If the attack is conducted by the Patrol Group (79.4), roll 1d6 for each British vessel in the Target Zone. Each roll of 1 destroys the ship. Remove it from the Board. Each roll of 2 damages the vessel. For each damaged vessel, roll 1d6 and place its Counter on the Turn Track that number of places ahead of the Turn Marker. The vessel can return to the Task Force, repaired, on that Turn. If placement would put it beyond the 28 May space the vessels is permanently removed from the game, but there is no change to the level of Domestic opinion as a result of this loss.
Exception: Support Vessels, Troop Ships and Landing Craft are never damaged. They are automatically destroyed on a roll of 1 or 2.
b) If the attack is conducted by the Battle Group (79.3), roll 1d6 for each British vessel in the Target Zone. Each roll of 1 destroys the vessel. Remove its Counter from the Board. Each roll of 2 damages the vessel. For each damaged vessel, roll a second 1d6. A second roll of 1 or 2 destroys the vessel. Now, for each surviving damaged vessel roll 1d6 and place it on the Turn Track that number of places ahead of the Turn Marker. The vessel can return to the Task Force, repaired, on that Turn. If placement would put it beyond the 28 May space the vessels is permanently removed from the game, but there is no change to the level of Domestic opinion as a result of this loss. Note: The Argentine battle plan for the Belgrano Group was for the escorting destroyers to attack the Task Force with their Exocet missiles, and the Cruiser to then close with any damaged vessels and engage them with her 6 and 5 inch guns.
c) If the attack is conducted by the Carrier Group (79.1), launch an air attack by four Skyhawks on Task Force Zone 12, as per the Surface-Air and Air-Surface attack rules outlined in 10.0 and 11.0. All vessels present in the Target Zone are subject to this attack, and may defend themselves and other vessels normally.
3) Once all Argentine attacks have been resolved, the British may attempt to respond. Note that as the Argentine naval surface forces are represented collectively, British attacks are resolved in a more abstract manner than the Argentine attacks. For each British asset in the Contested Box that has attack capability (i.e., whose class is listed on the Combat Chart), select one Argentine Target (note that Harriers may attack Task Groups, though not Submarines). Make an Attack Roll on the appropriate row of the Combat Chart, cross referencing the firing British Vessel or Sea Harrier with the Task Group (grey Attack Numbers) or Submarine (red Attack Numbers). If the roll is a 1, the Argentine Submarine or Task Group is Hit and permanently removed from the game.
Exception: No British attack can be launched on the Argentine Carrier Group. This is because the Skyawk attack has been launched well beyond the range of the Task Force’s weapons systems.
4) Once all attacks on the Task Force have been resolved, then:
a) If any vessels on either side have been hit, all Argentine Task Groups involved in the combat are placed off–Board, and all Argentine Submarines are placed in the Ready For War Box.
b) If no vessels on either side have been hit, roll on the Naval Attack Resolution Chart to discover the outcome of the attacks.
Example 1: The first Argentine Submarine is silently approaching the Task Force from the North Task Force Zone. This area is currently being patrolled by one Type 42 Destroyer, HMS Exeter and one Leander Class Frigate, HMS Argonaut. The player places both ship Counters into a cup, and draws out the Type 42. The Argentine Submarine has Exeter firmly in her sights. Examining the Combat Chart, the player sees that a roll of 1 on 1d6 will sink his vessel. As the Argentine captain orders a wide torpedo spread, the die is rolled; three deadly Mk37 torpedoes speed towards their target. The roll is 2; the salvo narrowly misses its target. Both Royal Navy vessels are now only too aware of the Submarine’s presence. As the Argentine Captain orders his ship to “dive deep,” Exeter and Argonaut close for the kill. A look at the Combat Chart shows the Exeter requires a successful 1d10 Attack Roll to hit the Submarine target. As its depth charges hit the water the player rolls… a 7. The Submarine is already well below the detonation depth. As the Argonaut lines up for its attack run , the player sees that its more sophisticated ASW defences require a 1d6 Attack Roll to hit. Again the depth charges arc towards their target, and this time the player rolls… a 1! A muffled explosion and a slowly emerging oil slick announce that the Argentine navy has suffered its first loss of the campaign…
Example 2: The Battle Group (79.3), including the General Belgrano, has eluded the Royal Navy SSN screen and is currently positioned alone in the Search Box. As there are no Submarines present, the player moves directly to the Argentine vs British Fleet detection phase [13.8]. There are no search modifiers due to weather or events, so the surface search roll for a Battle Group in the Search Box is 1d8. The player rolls... a 1. The Task Force has been detected. Unwisely, given the location of the Battle Group, the player has elected not to place any surface vessels in the Task Force Defence Zone. The Battle Group is therefore able to approach the Task Force unapposed (i.e. there is no Task Force Defence roll as per rule [13.8.3]). The player now conducts the Engagement roll, and rolls a 6. The Battle Group is approaching the Task Force from the Southwest, where the Type 42 HMS Glasgow, and Rothesay Class HMS Plymouth are on-station. The Battle Group Counter is placed in the Southwest Task Force Zone alongside the British units. The first the Royal Navy is aware of the impending attack is when the darkness of the South Atlantic night explodes with the flash of 3 Exocet surface-to-surface missiles, and the roar of the Belgrano’s 6 inch gun battery. Rolling for the attack, the player rolls 2d6, one die each for HMS Plymouth and HMS Glasgow. The rolls are a 3 and a 5. Plymouth miraculously avoids the bombardment, but Glasgow takes a direct Exocet hit to the starboard bow, and begins listing heavily. A Damaged Marker is placed on Glasgow, and a fresh roar from the Belgrano indicates a new salvo is hurtling towards the stricken vessel. The player rolls another 1d6, and rolls a second 5... Glasgow’s fate is sealed, and the Counter is removed from the Board. Plymouth can now attempt to fight back. Cross-referencing the grey surface attack number on the Combat Chart for the Rothesay class vessel indicates another 1d6 will be rolled. The result is a 4, when a 1 was needed. Taken by surprise, Plymouth’s attempts to fight back are unsuccessful. The Battle Group Counter is now removed from the Task Force Display and placed Off-Board. The Argentine Navy has struck a major blow in defence of their Islands...
13.10 Enhanced/Degraded Search
At times during the game, Argentine Task Group Detection Rolls (not Deployment rolls) may be affected by Weather.
Place a relevant Enhanced or Degraded Search Marker on-board beside the Naval Patrol Boxes,. As you can see from the Markers, either the Carrier Group (with its aerial search capability) or all Task Groups will be affected.
If search rolls are Enhanced, the relevant Task Groups search with a die value one • increment less than normal. If search rolls are Degraded, the relevant Task Groups searches with a die value one • more than normal. Search rolls can never be Degraded below 1d10 or Enhanced above 1d4.•
So, the change to the Detection Rolls:
Normal Enhanced Degraded 1d4 1d4 1d6 1d6 1d4 1d8 1d8 1d6 1d10 1d10 1d8 1d10
* * *
34 35
As both Argentine and British forces begin to sustain casualties, the direct impact of these losses is further exacerbated by the effect on Public Opinion, as well as affecting broader strategic aims of the Commanders on both sides.
14.1 Argentine Submarine Losses
At the end of any turn in which an Argentine submarine is lost, all Argentine Task Groups are placed off-Board and Submarines are placed in the Ready For War Box (they can re-enter the game if the appropriate rolls are made during a subsequent Deployment Phase).
14.2 Argentine Task Group Losses
If any Task Group is lost (in reality this represents the loss of one or two major assets), then all Argentine Submarines are immediately placed in the Ready for War Box, and all surviving Task Groups are placed off-Board (they can re-enter the game if the appropriate rolls are made during a subsequent Deployment Phase).
14.3 Political Impact of Argentine Losses.
The impact on War Opinion is dependent on where and when in the conflict Argentine losses occur. Argentine losses sustained in the EXCLUSION Box have no political impact.
14.3.1 SEARCH Box Losses. If an Argentine Task Group or Submarine is sunk within the SEARCH Box, and no British Vessels have yet been lost, International Opinion falls by one.
In addition, if Domestic Opinion is currently at 4 or less, and an Argentine Task Group or Submarine is sunk within the SEARCH Box and no British Vessels have yet been lost, Domestic Opinion also falls by one.
These changes to International and Domestic Opinion are applicable on each occasion they occur. In all other circumstances, losses within the SEARCH Box have no political impact.
14.3.2 COASTAL Box Losses. If an Argentine Task Group or Submarine is sunk within the COASTAL Box, and no British Vessels have yet been lost, International Opinion falls by two.
In addition, if Domestic Opinion is currently 4 or less, and any Argentine Task Group or Submarine is sunk within the COASTAL Box and no British vessels have so far been lost, Domestic Opinion FALLS by two.
These changes to International and Domestic Opinion are applicable on each occasion they occur. In all other circumstances, losses within the COASTAL Box have no political impact.
14.4 Political Impact of British Losses
The political impact of losses of British vessels represents actual changes to public opinion - but also perceptions of politicians about the likely impact those future losses will have on public opinion, especially if the losses prove to be sustained.
British surface losses have the following impact, dependent on the vessels Hit.:
If • Hermes, Invincible, QE2, Canberra or a loaded Troop Transport are Hit, Domestic Opinion drops by two. If any other surface Vessel is Hit, Domestic Opinion drops by • one.If a British Nuclear Submarine is Hit roll 1d10, and apply the result below:•
1-3. Submarine develops technical problems whilst evading the enemy and is secretly recalled to Faslane naval base. The Submarine is permanently removed from the game, but there is no effect on Domestic Opinion.
4-7. Submarine suffers minor damage but is forced to withdraw to Ascension Island for repairs. News of its withdrawal is leaked on arrival at the base. The Submarine is permanently removed from the game and Domestic Opinion falls by 1.
8-9. Submarine suffers serious damage and publicly limps into the Chilean Naval Base at Punta Arenas. The Submarine is permanently removed from the game and Domestic Opinion falls by 2.
10. Submarine is sunk with the loss of all hands. The loss has a major psychological impact at home and abroad. Domestic Opinion falls by 2, International Opinion by 2.
14.5 Operational Impact of British Losses
As well as the direct impact of the loss of personnel and assets, the destruction and disabling of certain vessels has military implications for the operation of the Task Force:
14.5.1 When Troop Ships are Hit, all attached Units are immediately and permanently removed from the game.
14.5.2 If a Fleet Support Ship is sunk, the final Victory Level [20.0] is reduced by one. This effect is cumulative for each Fleet Support Ship that is hit. (Historically, the loss of logistics vessels, such as the Atlantic Conveyor, had a serious impact on the ability of British land forces to prosecute the Ground War.)
14.5.3 If a Carrier is sunk, roll 1d6. Up to this number of aircraft may transfer to the remaining Carrier (if there is one). The rest are permanently removed from the game. The surviving aircraft must be chosen randomly (except a Squadron Commander may automatically transfer, still counting as one of the surviving aircraft). All rules regarding CAP and Scramble placement remain in force, and transferred aircraft are still regarded as being assigned to the former Carrier for these purposes.
Note: British vessels damaged (but not destroyed) by Argentine Task Groups are not defined as ‘Hits’ for purposes of the rules outlined in Section 14.0
* * *
Efforts to break the Total Exclusion Zone around the Falkland Islands and re-supply the Argentine ground forces by air proved a major logistical headache for both the Argentines, who had to mount the re-supply operation, and the British, who had to try to stop it.
1) At the start of the game, the Argentine Supply Marker was placed on space 14 of the Turn track.
2) At the start of any Turn in which the Active SitRep card is numbered 4 or above, British forces may attempt to interdict Argentine supply lines.
3) To attempt interdiction, simply take up to five Harriers from one or both of the Ready Boxes on the Sea Harrier Display, and place them on the Combat Display. They have been tasked with intercepting the incoming supply flights.
4) Now roll 1d6 for each Harrier.
5) If any of the dice rolled are a 1 or 2, that night’s supply missions have been successfully intercepted. Place all the intercepting Harriers in their respective Flown Boxes, retreat the Supply Marker one space on the Turn Track (or if it is on space 1, remove it from the Board), and proceed with the game.
6) If no 1s or 2s are rolled, the supply flight has snuck through. The Supply Marker retains its space on the Turn track. Place all the intercepting Harriers in their respective Flown Boxes and proceed with the game.
Note: For the impact of supply, see [12.2.10].
* * *
14.0 C
om
ba
t Lo
ss
es
15.0 A
rge
ntin
e S
up
ply

36 37
The war in the South Atlantic was influenced by dozens of incidents that had a daily impact on the military, political, and diplomatic conduct of the campaign.
These events are replicated in the Event Cards that are drawn every Turn until the launch of Operation Sutton.
16.1 At the start of each turn, draw one Event Card from the top of the deck. The Event Card will be either a Standard Event Card, or a San Carlos Event Card.
If the Event Card drawn is a San Carlos Event Card place it face-down on the Board.
If the Event Card drawn is a Standard Event Card, place it face-up on the Board. The card will contain a general description of the event (in the form of a communication forwarded to the Cabinet Intelligence Committee) and a Card Number. The player should turn to the appropriate page of the Intelligence Briefing Booklet and implement the current Event as described therein.
16.2 If there are additional Event Cards remaining face-up on the Board, they may also be resolved, one after the other.
16.3 If the Event Card was a San Carlos card, it is resolved in the following way:
1) On the Turn you decide to launch the San Carlos Landings (immediately after the placement of the Operation Sutton Marker), you may choose to conduct reconnaissance of the Landing Zones.
2) To conduct reconnaissance during the Task Force Deployment phase, pick one or more Warships and place them on any San Carlos Event Cards that are currently face down on the Board. They have been dispatched to directly survey the waters around the landing area, or insert Special Forces teams to carry out surveillance on the ground.
3) Next roll 1d8 for each vessel placed on a card. On a roll of 1, the vessel is intercepted in some manner by Argentine forces, and destroyed. The Landings have suffered their first casualties. Remove it from the Board. Note: If a vessel is destroyed the reconnaissance has not been successful. Leave the card face down.
4) Once the die rolls have been completed, remove the surviving vessels and place them on the Turn Track one space on from the Turn Marker. This is to indicate that they can rejoin the Task Force during the Deployment Phase of the following Turn. They have successfully completed their reconnaissance and the cards they were placed on should now be turned face-up.
5) Now place the five ‘San Carlos Event’ Markers in a container, and randomly draw one Marker for each event card on the board. This will indicate which specific San Carlos Landing Events should now be resolved. You should note which events were the subject of successful reconnaissance and which were not.
6) These cards will influence the landings in various ways, depending in large part on whether they were the subject of successful British reconnaissance. The player notes the conditions of the cards, and implements them when appropriate.
7) All of the Operation Sutton Event Cards give the option of delaying the landings for 24 hours. If you decide to delay the landings for any reason, this applies to all the Operation Sutton cards that have been drawn. If the landings are delayed or suspended for any reason (including Bad Weather), advance the Operation Sutton Marker one space on the Turn Track. You still do not draw any additional Event Cards, and the Operation Sutton Card remains the active SitRep Card.
* * *
As a result of some Event Cards, a temporary Ceasefire may be imposed during the game. A Ceasefire halts almost all military operations for the period over which it is observed. The Ceasefire’s duration will be expressed as a certain number of days, and the first day of the ceasefire is counted from the moment the Event card bringing the Ceasefire into effect is played.
Example: An Event Card is played on the 5 May Turn resulting in the introduction of a two-day Ceasefire. This means the Ceasefire will be observed for the rest of the 5 May Turn, and the whole of the 6 May Turn.
Only a few actions are performed during Ceasefire Turns, as shown in the abbreviated Ceasefire Sequence of Play [21.2]. They are:
a) Turn Marker. The Turn Marker is advanced as normal. This may work for or against the Task Force, depending on the prevailing military situation.
b) International & Domestic Opinion adjustment. The introduction of the Ceasefire usually results in a shift in Domestic and/or International Opinion. This is reflected as normal on the WOD.
c) Argentine San Carlos Deployment. Argentine Troops will continue to reinforce their positions under cover of the Ceasefire.
d) Argentine Naval Deployment rolls for Task Groups off-Board (but NOT in Puerto Belgrano or at Sea) are made normally. Argentine Task Groups and Submarines in the Ready for War Box are also advanced normally.
e) Sea Harriers in ‘Flown’ and ‘Re-arming’ boxes are advanced normally.
f) British reinforcements are placed normally.
* * *
Certain British vessels do not start with the main Task Force on 1 May, but arrive later in the conflict. The Reinforcements schedule on the Task Force Deployment Table (page 57) shows which vessels arrive, and on which turns. A reminder is printed on the Turn Track for each turn when Reinforcements are to arrive.
When a Reinforcement arrives, simply place it on the Task Force Display during the Task Force Deployment phase.
Reinforcements must be placed on their scheduled turn of arrival; they cannot be held back for later turns.
Damaged vessels (and vessels that have been performing special operations as a result of Event Cards) are also returned to play during the Reinforcement segment of the Task Force Deployment Phase.
* * *
16.0 E
ve
nt C
ard
s
17.0 C
ea
se
fire 18.0
Re
info
rce
me
nts

38 39
Weather can have a major impact on operations during the game. At the start of each Turn roll D12 and place the appropriate Weather Marker on the Board. Then, check the Weather Chart below to see the impact the current Weather conditions will have during the coming Turn. You can also place an appropriate Weather Marker on the Board in the Current Weather Box as a reminder.
D12 Result:
The key to victory in Where There Is Discord is the ability of the British forces to secure a lodgement in San Carlos Water. Every Landing Zone controlled by a British Unit at the end of the 28 May Turn counts towards this objective. Thus, the game may end in one of two manners:
a) If Domestic Opinion drops to zero [4.3.2], Britain has suffered a catastrophic defeat. The Task Force is recalled, Mrs. Thatcher’s government resigns, and the 1982 Falklands conflict is remembered as a national humiliation without modern precedent. The public inquiry ordered by new Labour Prime Minister Michael Foot finds that, “the conduct of ministers, service chiefs and officials before, during and after the conflict was negligent as to border treason.”
or
b) At the end of the 28 May Turn, when the game reaches its conclusion. In this case, the player counts the number of Landing Zones currently under British control. Depending on that number, the following campaign assessments apply:
0 ZONES or less [14.5.2] - HISTORIC ARGENTINE VICTORY. The British attempt to land on the Islands has failed. On 29 May, with the weather deteriorating, Task Force Commander Woodward signals CINCFLEET that he is withdrawing his forces. In Argentina, 29 May becomes “Malvinas Day,” and Port Stanley is renamed “Puerto Galtieri.” Margaret Thatcher resigns in disgrace (and immediately emigrates to South Africa) whilst the Chief of the Defence Staff, the Head of MI6 and the Permanent Secretary to the Foreign Office are all summarily dismissed. Eight weeks later Labour Party Leader, Michael Foot, is elected Prime Minister with a working majority of 47.
1 ZONE – TOTAL ARGENTINE VICTORY. The lone British Unit to be successfully landed on the Islands defends its position against repeated Argentine Counterattacks before finally surrendering on 1 June. Prime Minister Thatcher announces the surrender, to a silent House of Commons, in a speech tendering her resignation. In Argentina 1 June becomes “San Carlos Day” and Port Stanley is renamed “Puerto Menendez.” Mrs. Thatcher’s resignation leads to the appointment of Foreign Secretary Francis Pym as Prime Minister. His first month is spent dealing with myriad crises as the Spanish and Chinese, sensing the demise of the Empire, demand the immediate handover of Gibraltar and Hong Kong.
2 ZONES – MAJOR ARGENTINE VICTORY. The two British Units successfully defend their positions against a series of sustained Counterattacks, but it quickly becomes apparent that the military situation is untenable. At 04.00 hours on Thursday, 3 June, both regiments are withdrawn from the beaches. In Argentina, 4 June becomes “South Atlantic Day” and Port Stanley is renamed “Puerto General Montes.” Back in Britain, Mrs. Thatcher calls an immediate General Election - which results in a hung Parliament and her resignation. The Prime Minister of the new Alliance/Labour coalition government, David Owen, starts immediate negotiations with the Argentines for the repatriation of the Falkland Islanders, whilst his colleague David Steel is appointed Defence Secretary with a brief to “clean house” at the Ministry of Defence.
3 ZONES – CLEAR ARGENTINE VICTORY. After spirited debate amongst senior Task Force commanders, the three British Units that were successfully landed attempt a breakout from the beachhead, at dawn on Wednesday, 2 June. After savage hand-to-hand fighting, the British attack stalls and then falters after advancing only three miles inland. Additional British forces are landed, and for the next five weeks repeated attempts to make further inroads into the Argentine defences make little headway. On 10 July a formal ceasefire is declared, in order to give the United Nations “the opportunity to facilitate a just end to the conflict.” Six months later a Commission of Mediation grants sovereignty of the Islands to Argentina, whilst guaranteeing Falkland Islanders “the innate right of national self expression,” including the retention of the Queen’s likeness on all postage stamps. In the immediate wake of the ceasefire Mrs. Thatcher calls a snap election, announcing it will be a “referendum on the bravery of our troops who, as we speak, sit mere yards from an armed and dangerous foe.” The Conservatives are returned with a majority of 3, but following the United Nations settlement Mrs. Thatcher is forced to resign, with Willie Whitelaw taking over as Caretaker Prime Minister. In Argentina, 10 July is declared “Sovereignty Day” and Port Stanley is renamed “Puerto Perez de Cueller.” 4 ZONES – NARROW ARGENTINE VICTORY. After intense fighting on the beaches around San Carlos, the Argentines withdraw their forces to new defensive positions around the settlement of Goose Green, 30 miles south of the British Landing Zone. On the night of 24 May, the four British regiments spearheading the advance launch a concerted assault on the heavily defended Argentine positions. Over the next 36 hours, savage artillery bombardments followed by a series of bayonet charges and hand-to-hand fighting culminate in the withdrawal of the Argentine forces, but only after the British suffer 60% casualties. The commander of British land forces, Brigadier Julian Thompson, signals London that further attrition on this scale is unsustainable and three days later a ceasefire is declared, to allow “ full and thorough negotiations about the future status of the Islands.” After four months, the British and Argentine Governments announce sovereignty of the Islands will be transferred to Argentina, but that they will then be transferred back to Britain on a 99-year lease. Mrs. Thatcher continues as Prime Minister, and wins the 1983 General Election with a majority of 17 (she finally loses power to Labour Leader Neil Kinnock in 1987). In Argentina, 24 May becomes “National Honour Day” and Port Stanley is renamed “Administrative Centre One.”
19.0 W
ea
the
r
20.0 C
am
pa
ign
As
se
ss
me
nt

40 41
5 ZONES – STALEMATE. With five regiments safely landed, the British quickly consolidate the beachhead and start to probe inland. A major battle at the settlement of Goose Green leaves the route to Port Stanley open, but as the weather deteriorates and the Argentines mount a series of cleverly executed harassing raids, British lines of supply are threatened. On the night of 12 June, British forces mount a major assault on Mt. Longdon, Two Sisters Ridge, and Mt. Harriet. After 20 hours of the most intense fighting of the war, the British manage to secure control of the high ground overlooking Stanley. But with their forces exhausted, and supply lines stretched to breaking point, Major General Jeremy Moore signals London that a full frontal assault on the well-prepared and dug-in Argentine forces in Port Stanley is out of the question. Both sides consolidate their positions, and settle into a routine of minor skirmishes and intermittent artillery barrages. On 1 May, 2006, (National Resolve Day in Argentina), British Prime Minister Peter Mandelson and Argentine President Carlos Menem announce they have agreed to enter into talks (brokered by US President Al Gore) to discuss the partition of East and West Falkland. On the same day a routine artillery barrage injures three Argentine soldiers manning an observation platform on the outskirts of the former Port Stanley (known since the evacuation of the civilian population as “Camp Azul” by the Argentines, and “Map Reference 48 Bravo” by the British).
6 ZONES – NARROW BRITISH VICTORY. The British lodgement on the Islands is quickly secured, and after a period of consolidation British forces start to press inland. Despite logistical difficulties, the troops make rapid progress and engage in a series of brief but violent battles at Goose Green, Mt. London, Two Sisters Ridge, Mt. Harriet, Tumbledown, Mt. William and Wireless Ridge. With Port Stanley effectively defenceless, the Argentine Command on the Islands announces an unconditional surrender of all Argentine forces at 20.59 local time, 14 June. In Argentina, General Galtieri is ousted and replaced by General Reynaldo Bignone, paving the way for the election of President Raúl Alfonsín a year later. In Britain, Margaret Thatcher sees her political fortunes transformed, and goes on to win the 1982 and 1987 General Elections (finally resigning from office on 28 November, 1990). On 25 June, British Governor Rex Hunt returns to Port Stanley.
7 ZONES – CLEAR BRITISH VICTORY. The Beaches around San Carlos are quickly secured, and British commanders waste no time in splitting their forces and advancing on two fronts; south towards the major Argentine troop concentration at Goose Green and east, directly towards Port Stanley. On 6 June, simultaneous assaults are launched on Goose Green and the high ground overlooking Stanley, resulting in a hard-won but decisive victory for the British. Two days later the Argentine Command announces its unconditional surrender of all Malvinas-based forces. In Britain, Margaret Thatcher announces a snap election for 1 July, and is returned with a majority of 189. In Argentina, the Junta resigns en-masse, and Isabel Peron is re-instated as President. Back in Britain, the May Day Bank Holiday is renamed “Falklands Day.”
8 ZONES – MAJOR BRITISH VICTORY. Realising that the bulk of Argentine forces have been destroyed or disrupted in their attempts to prevent a British landing, British commanders launch a dramatic Coup-de-Main on the beaches outside Stanley, on 1 June. After heavy fighting, elements of 45 Commando reach the Governor’s Mansion, and at 17.20 local time, the Union Jack is hoisted. Ten hours later, the formal surrender of all Argentine forces is announced. In Britain, Margaret Thatcher is spirited out of the country by an RAF Hercules, and 24 hours later makes a triumphant landing at the newly re-opened Port Stanley airport. In the election campaign that is called a week later, the Conservatives are returned with a majority of 211; with Mrs. Thatcher going on to serve for a further thirteen years before handing over power to Michael Heseltine in January, 1995. In Argentina, military units returning from the Malvinas campaign mount a bloodless coup, and four months later previously unknown Malvinas veteran Sergeant Roberto Menendez is elected President. In Britain, 1 June becomes “South Atlantic Day,” whilst in the Falklands, Port Stanley is renamed “Port Victory.”
9 ZONES – OVERWHELMING BRITISH VICTORY. Recognising that the bulk of his force has been destroyed on the beaches of San Carlos, General Mario Menendez flies personally by helicopter to Green Beach, to offer his formal surrender. In Britain, Margaret Thatcher calls an immediate General Election, winning a new majority of 342. Emboldened by her military and political success, she orders the Task Force to blockade Argentine ports until the Junta agrees to the payment of war reparations totaling some £5 billion. In Argentina, General Galtieri is replaced by Vice Admiral Juan Lombardo, who pledges to “resist this British piracy by all means necessary.” The conflict is finally resolved three weeks later, when US President Ronald Reagan privately warns his British ally that he will dispatch the USS Nimitz to run the blockade if it is not lifted within 48 hours. Mrs. Thatcher goes on to win the next five General Elections, finally handing over power to Conservative Prime Minister Tony Blair, in January 2004. 21 May becomes “Victory Day” in Britain and Port Stanley is renamed “Port Britannia.”
10 ZONES – HISTORIC BRITISH VICTORY. The complete destruction of all Argentine units at San Carlos results in the immediate surrender of the Argentine force on the Islands. On 18 June, three British Divisions, supported by Vulcan Bombers and Tornado fighters operating from the recently lengthened Port Stanley runway, land on the Argentine coast at Mar del Plata and establish a bridgehead. Mrs. Thatcher demands “the complete surrender of all Argentine forces, and the acceptance by the Junta of British dominion status of Argentina and her peoples.” The crisis is ended ten days later, when a United Nations intervention force headed by the American 101st Airborne Division (the “Screaming Eagles”) is airlifted into Buenos Aires to “separate the belligerents.” In Britain, Margaret Thatcher is re-elected unopposed as both major opposition parties decline to field candidates in the upcoming General Election. In 2009, she celebrates thirty years as British Prime Minister, an achievement marked by US President Karl Rove awarding her with the Medal of Freedom. In Britain, 28 May becomes “Mrs. Thatcher Day” and Port Stanley is renamed “Port Thatcher.” In Argentina, President and air force veteran Carlos Tomba announces:“One day soon we will be returning to the Malvinas for good…”
21.1 Standard & San Carlos Sequence of PlayThe sequence of play is outlined in detail below. Different sections are used depending on what stage you have reached in your Campaign, and these sections are highlighted in different colours for ease of reference, as follows:
Text in Black identifies elements of the Sequence of Play that are in use throughout the game.
Text in Blue identifies elements of the Standard Sequence of Play, that are no longer used once the Operation Sutton Marker is on the Board. After Sutton commences, ignore these steps entirely.
Text in Red identifies elements of the San Carlos Sequence of Play, that are only used once the Operation Sutton Marker is on the Board. Do not use these steps until after Sutton has commenced.
A. ADVANCE TURN MARKER [1.0] Note: Skip this, of course, on the first turn…
B. WEATHER [19.0]
C. EVENTS [16.0] a. Event Card Draw [16.1] b. Resolve current Event Card [16.1] c. Resolve on-Board Event Card(s) [16.2]
D. SITUATION REPORT [2.0] a. Turn New Sit. Rep. Card [2.2.1] b. Place Operation Sutton Marker [2.2.2]
E. TASK FORCE DEPLOYMENT [3.0] a. Reinforcement arrival [18.0] b. British Submarine placement [13.1] c. Task Force Display placement [3.1] d. CAP placement [3.5] e. Supply Interdiction [15.0] f. SAS Marker Placement [6.1] g. Operation Sutton Event Card Reconnaissance [16.3] h. San Carlos Display placement [12.2.2]
F. ARGENTINE NAVAL DEPLOYMENT [13.0] a. Submarine Deployment roll [13.2] b. Surface Group Readiness Roll [13.3] c. Surface Group Deployment roll [13.3]
G. SUBMARINE vs. SUBMARINE COMBAT [13.5] a. British Submarine search roll [13.5.2] b. British Submarine attack roll [13.5.3] c. Argentine Submarine search roll [13.5.4] d. Argentine Submarine attack roll [13.5.5] e. End of Phase [13.5.6]
H. BRITISH SUBMARINE vs. ARGENTINE SURFACE GROUP COMBAT [13.6] a. British Submarine search roll [13.6.0] b. ROE roll [13.6.1] c. British Submarine attack roll [13.6.4] d. Failed attack resolution [13.6.5]
I. ARGENTINE SURFACE GROUP vs. BRITISH SUBMARINE COMBAT [13.7] a. Argentine Surface Group search roll [13.7.1] b. Argentine Surface Group attack roll [13.7.2] c. End of Phase [13.7.3]
21.0 S
eq
ue
nc
es
of P
lay

42 43
J. ARGENTINE NAVY vs. TASK FORCE COMBAT [13.8] a. Argentine Surface Group & Submarine search rolls [13.8.2] b. Task Force Defence Zone Roll [13.8.3] c. Argentine Surface Group & Submarine engagement roll [13.8.4] d. Argentine Submarine attack roll [13.9.1] e. Argentine Surface Group attack roll [13.9.2] f. British surface vessel & Harrier attack roll [13.9.3] g. End of Phase [13.9.4]
K. SCRAMBLE, SURVEILLANCE, and EARLY WARNING [5.0, 6.0, 7.0] a. Scramble Roll [5.1] b. Scramblemodifiercheck[5.1.2] c. Airbase Tasking Roll [5.1.5] d. Raid Marker placement [5.1.6] e. Nimrod Early Warning Procedure [6.2.1] f. SAS Early Warning Procedure [6.2.2] g. Chilean Early Warning Procedure [6.2.3] h. No Early Warning Procedure [6.2.4] i. Harrier Scramble [7.1] Note: Harrier Scramble is integrated with sub-phases e, f & g above
L. ARGENTINE AIR FORCE TARGETING [8.0] Note: AAF Targeting is integrated with Phase K above. a. San Carlos Attack roll [12.2.3] b. Air Alert Marker placement [8.1] c. Air Alert Handbrake! Marker Placement [8.2]
M. AIR-TO-AIR COMBAT [9.0] a. Harrier Target Lock acquisition roll [9.2.1] b. Harrier Firing roll [9.2.2] c. Bounced Argentine combat loss removal [9.2.2] d. Argentine Target Lock acquisition roll [9.2.3] e. Argentine Firing Roll [9.2.4.1] f. British and Argentine combat loss removal [9.2.4.2] g. Harrier Flown Box placement [9.2.4.3]
N. SURFACE-TO-AIR COMBAT [10.0]A) Standard Surface-to-Air Combat a. Range Marker placement [10.2.1] b. Radar Lock acquisition roll [10.2.2] c. Target Lock acquisition rolls [10.2.4.1] d. Royal Navy Firing roll [10.2.4.3] e. Argentine combat loss removal [10.2.4.4] f. End of Round/Phase [10.2.4.5]
B) San Carlos Surface-to-Air Combat a. Rapier/Small Arms roll [12.2.6.4] b. Royal Navy Firing roll [12.2.6.5]
O. EXOCET and STANDARD BOMB RUN [10.0, 11.0]A) Standard Air-To-Surface Combat [11.0] a. Target Selection draw [11.1.1] b. Argentine bombing roll [11.1.4] c. Naval loss removal [11.1.4] d. Argentine aircraft re-basing [11.1.5] e. End of Round/Phase [11.1.8]
B) Exocet Combat [10.3] a. Exocet Detection [10.3.1] b. Exocet Attack Resolution [10.3.2] c. End of Phase [10.3.3]
C) San Carlos Air-To-Surface Combat a. Argentine bombing roll [12.2.7.1] b. Naval loss removal [12.2.7.2]
P. ARGENTINE SAN CARLOS DEPLOYMENT a. Argentine Ground Unit placement [12.2.9]
Q. BRITISH SAN CARLOS DEPLOYMENT a. British Ground Unit placement [12.2.8]
R. SAN CARLOS GROUND COMBAT PREPARATION a. Opposed Landing & Counterattack Marker placement [12.2.10.1] b. British Ground Unit placement[12.2.10.2] c. Argentine Ground Unit placement [12.2.10.3] d. Dug In Marker placement [12.2.10.4] e. Elite Unit Marker placement [12.2.10.6] f. Wrong Landing Zone Marker placement [12.2.10.7] g. NavalGunfireSupportMarkerplacement[12.2.10.8] h. Ground Attack Marker placement [12.2.10.9] i. Supply Marker movement [12.2.10.10]
S. SAN CARLOS GROUND COMBAT [12.2.11] a. Combat Dice roll [12.2.11.3] b. Status Marker removal [12.2.11.4] c. Casualty Marker rotation [12.2.11.5] d. Destroyed Unit removal [12.2.11.6] e. End of Round/Phase [12.2.11.8]
T. END OF TURN a. Harrier recovery [7.2] b. Harrierrefitting[7.3] c. Remove Scramble Marker [5.1.2] d. Remove Naval Detection Marker [13.10] e. Remove Harrier Recovery Marker [7.2] f. British Submarine Counter rotation [13.5.6] g. Weather Marker removal [19.0]
U. END OF GAME a. Campaign Assessment [20.0]
21.2 Ceasefire Sequence Of Play
a) Advance Turn Marker [A]
b) Adjust International & Domestic Opinion (if called for by the current or any on-Board Event Cards). Note: If the current Ceasefire lasts for more than one turn, no new Events are drawn while this Ceasefire is in effect. c) Argentine San Carlos Deployment [P]
d) Argentine Naval Deployment rolls for Surface Groups off-Board [F] (but NOT in Puerto Belgrano or at Sea)
e) Sea Harriers in ‘Flown’ and ‘Re-arming’ boxes are advanced normally [T]
f) British reinforcements are placed normally [E]
* * *
44 45
(Following [21.1] Standard Sequence of Play)
Turn: May 7British Losses: NoneArgentine Losses: NoneInternational Opinion: 10Domestic Opinion: 9Exocet Stock: 5Argentine Supply Level: 14
SitRep Card: No.5
Event Cards ‘On Board’: No.39 San Carlos Event No.10 we need a success
Event Cards Played: No.16 we must mention this to the Germans No.12 the fish must be biting No.7 Stick It Up Your Junta No.4 there are commercial considerations
Off-Board: Patrol (79.4) and Carrier (79.1) GroupsIn Port: Santa Fe, Battle Group (79.3)At Sea: Santiago (Search Zone)
The turn begins with the player advancing the Turn Marker to the 7 May space.
He then rolls D12 for today’s weather; and rolls a 10. May 7 dawns with the Task Force in thick cloud cover, a good omen. The cloud will make it more difficult for the Argentines to detect the British vessels. The player places the Scramble Marker in the +1 box (this indicates any Argentine Scramble Rolls will be modified by +1). He also takes the Carrier Group Degraded Detection Marker and places it by the Naval Patrol Boxes. Finally, he takes the Sea Harrier Recovery 10 Marker, and places it by the Sea Harrier Display. The thick cloud has a potential impact on British carrier operations.
The player now draws today’s Event Card. It’s No. 15, there’s a Bear in the air. The player has two choices. First, he could send a warning to the Soviet Union, telling them to withdraw their surveillance flights (preventing intelligence on the location of the Task Force being passed to the Argentines) but this is bound to provoke a reaction from the international community. Alternatively, he could do nothing, but that runs the risk of a dangerous incident at some point later in the conflict, involving Soviet forces. Given that international opinion is currently holding up well, the player decides it’s best to risk offending the Soviets now, rather than run the danger of an “accident” later in the campaign. Accordingly the International Opinion Marker is reduced one level (to 9) on the War Opinion Display, and the Event Card is discarded. The player could also now choose to play Event Card No.10, we need a success, as it is currently on-Board. However, he decides the time is not yet right to mount an operation to retake South Georgia, and so the Events Phase ends.
The player must now decide whether to continue to advance the Task Force closer to the Islands. Given that this inclement weather is providing a significant degree of cloud cover, he decides to maintain his current course, and replaces SitRep Card No.5 with SitRep Card No.6. The current Air Alert Assessment is Level 4 - unchanged from the previous day. This means that when it comes to the Argentine Scramble Roll, a roll of 2 or less will result in a raid (as the roll is modified by +1 due to the weather). The Argentine Air Effort Assessment (AEA) is Moderate, indicating that if the Task Force is detected it can expect a maximum of two air raids to be launched. Again, this assessment is unchanged from the previous day. However, a look at the Air Base Intelligence Analysis shows that if raids are launched there is a greater chance they will involve the dangerous Super Étendards operating out of Rio Grande than was the case 24 hours earlier (a roll of 1-7 will result in an attack by the Canberras stationed at Trelew, a roll of 8-10 the Super Étendards. On SitRep Card No.5 the roll was 1-8 Canberras, 9-10 the Super Étendards).
The player now begins to position his units. He checks to see if any reinforcements are due today - but notes from the Turn Track that the next units are not scheduled to arrive in-theatre until 13 May.
Next he deploys his SSN force. Of greatest concern at present are reports that the submarine ARA Santiago has evaded HMS Spartan and HMS Conqueror (currently on station just off the Argentine coast) and commenced a combat patrol just outside the Total Exclusion Zone (i.e. the Search Box). To counter the threat, the player decides to order both Splendid and Conqueror to the Search Box
in an attempt to intercept Santiago, and places both their counters in that box. Spartan is left where she is, the Coastal Box, in case the second submarine, Santa Fe, also knavishly decides to put to sea.
Now it is time to position the bulk of the Task Force. As required by the rules, all High Value Assets (in this case the two aircraft carriers, the two Support Vessels, and the Troop Ship) are placed in the Central Task Force Zone, Zone 12. The greatest “threat axis” to the Task Force is from the West, so the three Type 42 destroyers (Sheffield, Coventry, and Glasgow) are placed in the NW, W, and SW zones respectively. Although they have long range radar and missile capability, the Type 42s do not have an effective short range defensive system. To counter this weakness, the player matches them up with two Type 22s: HMS Brilliant and HMS Broadsword - who are placed in the W and SW Zones - and the Rothesay Class vessel Plymouth, which is placed in the NW Zone. The second Rothesay (Yarmouth) and the two County Class destroyers (Glamorgan and Antrim) are placed in the N, S, and NE Zones - where there is a real, if reduced, threat of attack. The final two available vessels, the Type 21s Arrow and Alacrity are (with their short range radar and defensive systems) posted to the E and SE Zones, where the threat is minimal.
Although the player is aware of the risk posed by the Santiago, he decides that given the limited assets at his disposal and the very potent threat posed by the Super Étendards at Rio Grande, he will not deploy any vessels to the Task Force Defence Zone this turn. It will be left to his SSNs to manage the Argentine submarine threat.
The player now needs to decide which, if any, elements of the Sea Harrier force he intends to fly on Combat Air Patrol (CAP). Fortunately, International Opinion remains solid enough for the British to enjoy the continued assistance of the Chilean government in providing early warning capability. Therefore the Task Force is guaranteed to enjoy some minimum warning of any impending raid. As a result, the player decides not to launch any CAP patrols this turn.
As SitRep Card No.4 has already been played, the player is also now close enough to the Islands to begin tasking his Sea Harriers to disrupt Argentine supply flights. Although the weather is poor, he feels he should take the opportunity to try to interdict the supply routes whilst the overall air threat is only Moderate. When the Argentines begin their all-out assault on the Task Force, it is questionable whether he will have the aircraft available to mount an effective supply interdiction. He therefore takes the three Harriers from the Hermes’ ‘A’ Flight, and places them on the Combat Display. He then rolls 1d6 for each aircraft. The roll for Black Leader is a 2. In the poor search conditions, he has been unable to locate the incoming supply aircraft. However the second roll (for Black 1), results in a 5. The supply flight has been detected, and is forced to turn away and dive into cloud cover rather than attempting to run the gauntlet of the patrolling Sea Harriers. The Argentine Supply Level is reduced from 14 to 13, as indicated by moving the Supply counter from the 14 May space to the 13 May space on the Turn Track. A roll for the third Sea Harrier is not required, as today’s supply flight has already been intercepted. All three Harriers are now placed in the Hermes’ Flown box on the Sea Harrier Display.
The final preparation for today’s action involves the insertion of an SAS team to monitor Argentine air activity. Due to limited resources, only one SAS team is available each day - so the player must choose carefully which air base should be the subject of covert surveillance. This information is still important even though Chilean intelligence is still available; the real-time data supplied by the troops will give the Task Force precise details on the exact composition of any raid. Although the current position of the Task Force means most attacks are likely to be launched from the Canberra base at Trelew, there is also the possibility of an attack by the Exocet-armed Super Étendards at Rio Grande. However, given that the Super Étendards always attack in pairs, and any raid will be detected by the Chileans, the player decides to monitor the Canberras. He therefore places the SAS counter adjacent to the Trelew box.
With the Task Force now at full alert, the focus shifts to the Argentine Navy.
The player first needs to assess the current location of the two Argentine Submarines. To do this he rolls 3d4 for each sub (the Santa Fe, which is currently In-Port, and the Santiago, which is currently reported to be somewhere in the Search Box between the Argentine coast and the Total Exclusion Zone). Throwing first for the Santa Fe, the player rolls a 2, a 1, and another 2. As a single 1 has been rolled, the Santa Fe is placed in the Coastal Box (which is currently being patrolled by HMS Spartan). He then rolls again for the Santiago, obtaining a 2, a 3, and a 4. As no 1s have been rolled, Santiago maintains her current position in the Search Box, where she is the subject of an intensive search by HMS Splendid and HMS Conqueror.
Next the player must determine the intentions of the two Argentine Naval Groups which are currently ‘Off-Board.’ The player begins by rolling two dice: 1d4 for Patrol Group 79.4 (which
Sa
mp
le S
tan
da
rd Tu
rn

46 47
consists of three Exocet-equipped Frigates) and 1d8 for Carrier Group 79.1 (the carrier Veinticinco de Mayo and her escorts). The rolls are 1 and 3. The Patrol Group is therefore ready to prepare for sea, and its counter is placed in the Ready for War Box. The Carrier Group has not yet begun its preparations, and remains where it is.
Finally, the player must determine whether Battle Group (79.3), which is currently ‘In Port,’ is ordered to sea this turn. To determine this, a similar roll is made to the one just completed for the Argentine submarines (except that 3d6 are used instead of 3d4). The roll for the Battle Group results in a 3, a 1, and a 6. The roll of a single 1 means the Battle Group is placed in the Coastal Box along with Sante Fe and Spartan. The fact that the General Belgrano and her escorts are now at sea will be a matter of serious concern for Task Force commanders.
Finally, the Patrol Group is moved from the Ready for War Box to the Puerto Belgrano Box, where it will be ready to put to sea next turn (if ordered).
Now that the various Naval vessels have been placed, search and combat operations commence.
The initiative rests with the British SSNs who have two tasks: first, to detect and intercept both of the Argentine submarines (in particular the Santiago which is reported to be manoeuvring close to the Task force), and secondly to locate the Carrier Group which is now at sea.
First to be resolved is the attempt by the Spartan to detect the Santa Fe, which has recently left port. Royal Navy submarines attempting to detect Argentine submarines in the Coastal Box use 1d6 for their search roll, and the throw is a 5. The Santa Fe has so far managed to elude her pursuer.
Next it is the turn of Splendid and Conqueror to seek out Santiago. As this search is being conducted in the deeper waters between the Argentine coast and the Exclusion Zone, the roll within the Search Box is made with 1d8 rather than 1d6. Splendid rolls a 7 - no success - but Conqueror rolls a 1, meaning her sonar operators have picked up a clear target. Both Conqueror and Santiago are now moved to the Combat Display to resolve the attack. British submarines use 1d6 for their attack rolls against Argentine submarines (with a 1 being a hit), and the British sub manoeuvres silently into position. However, the result is a 5; the attack fails. Rolling 2d6 on the Naval Attack Resolution Chart, the player rolls a 3; before the Conqueror can achieve a firing solution, the Santiago turns hard to port and dives deep. The Santiago counter is removed from the Combat Display and placed back in the Ready For War Box. It has escaped to fight another day. Meanwhile, Conqueror is placed back in the Search Box - where it has so far done its job of protecting the Task Force from the Argentine submarine threat.
Now comes the Santa Fe’s turn to try to turn the tables on HMS Spartan. A look at the Argentine Submarine column of the Combat Chart shows that attempts to locate a British sub within the Coastal Box are made with 1d8. Unfortunately for the Argentines, the roll is a 7. The British SSN remains undetected.
The priority for Spartan is now simple and clear: find the Belgrano. The Task Group detection roll within the Coastal Zone is 1d4, making it vital for Spartan to locate Battle Group 79.1 before it can reach open water. The die is rolled - and the result is a 1. An excited cry in Spartan’s operations room indicates a large contact has been identified on bearing 180, and the submarine begins to slip into attack position just off the starboard bow of the giant cruiser. However, as the Belgrano is outside of the Total Exclusion Zone, and no British vessels have so far been lost, the submarine cannot attack without a specific order from CINCFLEET. First the player has to conduct an ROE roll and compare it with the level of the current SitRep Card. As the Battle Group has barely left Port (it is located in the Coastal Box) and is still a relatively long way from the Task Force, the roll will not be subject to any modifiers (the politicians are especially nervous about justifying an attack in these circumstances). The player rolls the die; and rolls an 8! Despite the pleas of the military chiefs, the War Cabinet refuses to authorise such a dramatic escalation in the conflict. No attack roll can be made this turn.
The Battle Group is operating under no such restrictions. The Belgrano’s escorts are on constant guard against the British submarines that have been patrolling these waters from the early days of the crisis, and within these shallow coastal waters detection is a real possibility. Fortunately for the British a roll of 3 on 1d6 means HMS Spartan remains safely clear of the accompanying destroyers.
Finally, the Argentine Battle Group, unaware of its reprieve from the politicians in Whitehall, attempts to locate the Task Force. The Task Force Detection Roll for the Battle Group operating within the Coastal Box is 1d10. A roll of 3 means that at this range, and in these conditions, discovering the British Fleet is proving a difficult task. For the moment, the order to suspend an attack on the Belgrano has not proved costly to the Task Force.
With today’s naval activity complete, battle in the South Atlantic moves on to the air.
As we have already noted, SitRep Card No. 6 has an Air Alert Assessment Level of 4, meaning a Scramble Roll of 3 or less will result in a Raid. However, because of today’s prevailing cloud cover, that roll is subject to a modifier of +1. The player rolls 1d10, resulting in a 2. Despite the poor weather, Argentina is about to launch the defence of her Malvinas.
The player places the Raid Marker in the Sortie Box. He then rolls a second 1d10; the Air Base Tasking roll. The result is an 8. Two Super Étendards which having been sitting on the runway at Rio Grande airbase for the past five hours begin to taxi forward.
Some three hundred miles to the east, the ships of the Task Force continue to plough through the grey seas of the South Atlantic. The player must now determine how much warning they will receive of the deadly threat moving towards them.
First he rolls 1d6 to see whether the lone Nimrod R1 surveillance aircraft supporting the fleet is currently airborne. The roll of 1 indicates that worryingly, it is not yet on-station. Similarly, as the SAS observation team are currently in position overlooking the Canberra base at Trelew, they too are unable to give warning of the Super Étendard threat. However, as the current level of International Opinion is 9, the Chileans continue to provide an early warning capability to their British allies. This means that the player does have the opportunity to scramble his Sea Harriers to attempt to intercept the raid, although given the limited nature of the Chilean intelligence he does not know which direction the attack is coming from (nor would he know the precise composition of the raid, were it not for the fact that it has been launched from Rio Grande, and the Super Étendards based there always attack in pairs).
Acutely aware of the threat posed by the Exocet-equipped Étendards, the player decides on a major scramble. Gold 1 and Gold 2 from Invincible are placed in the Central Task Force Zone, where they can protect the Carriers and support ships. Trident 1 and Trident 2 are placed in the W Zone (the most direct attack axis) to provide cover for Brilliant and Coventry. The other two likeliest points of attack, the NW and SW Zones, are covered by Trident Leader and Gold 3 respectively. Half of the available Sea Harrier force is now airborne.
Normally the player would now conduct the Squadron Attack roll to see how many aircraft accompany the raid. However, as this raid has been launched from Rio Grande, no roll is required. So the player rolls 2d6 (the Argentine Air Targeting Roll) to determine which of the Task Force Zones is the subject of the attack. The roll is a 6; the Super Étendards are taking the southwesterly route towards the Task Force, a course which places them on a heading directly towards the picket ships HMS Glasgow and HMS Broadsword, sailing below the recently scrambled Sea Harrier of Trident Leader.
The player takes the Air Alert Marker and places it in the SW Task Force Zone. He then takes the Sea Harrier counter from the Zone, and places it on the Combat Display, in the first box containing the RAF Roundel. Trident Leader is being vectored towards the incoming threat. The player then takes the two Super Étendards from the Rio Grande airbase and places them on the Combat Display, in the first two spaces containing the Argentine Air Force Roundel. The Super Étendards begin to descend through the thick cloud, their pilots scanning their radar for a target.
In the Sea Harrier, two bright squares illuminate Trident Leader’s own radar display. He has located his target. Examining the Combat Chart, the player sees that the Targeting Die for a Super Étendard is a 1d8. He picks up two dice and rolls one for each aircraft. The results are a 2 and an 8 and Radar Lock Markers with those values are placed below the two Super Étendards on the Combat Display. The screech in Trident Leader’s headset indicates he has a lock on both aircraft. As he depresses the red button on his joystick, two AIM 9L Sidewinder missiles detach from their firing rails and streak towards their target. The player picks up 2d8 and rolls for the result of the missile attack (two dice are used as Britain yet enjoys the support of her NATO Allies, and therefore has access to the modern “all-aspect” Sidewinder stock) and the result is a 4 and an 8. The first missile streaks harmlessly below the first Étendard, which rolls to the left and dives for the wave tops. The second Étendard (whose Targeting Lock number 8 matches the 8 just rolled) disintegrates in a ball of fire... the air war in the South Atlantic has begun in earnest.
The player now takes the Super Étendard that has just been destroyed, and places it back in the Rio Grande box (the Super Étendards do not have an air-to-air combat capability so there is no Argentine air-to-air combat round). He then takes Trident Leader, and places him back in the Invincible Flown box on the Sea Harrier Display. Finally, he rolls 1d6 - and rolls a 6. The destroyed aircraft was not carrying the Exocet. The threat to the Task Force remains.The surviving Super Étendard is now closing on its targets. The player takes Glasgow and

48 49
Broadsword and places them on the Combat Display. The 30 Mile target marker is placed, to indicate the Étendard is now just 30 miles from the two Royal Navy vessels. The player notes that Glasgow has a Radar Lock Number of 6, whilst Broadsword has a Radar Lock Number of 3. Rolling 1d10 for Glasgow results in a 2. In the control room of the Type 42 destroyer, a cry of “Agave Radar!” indicates the Super Étendard has been detected.
A check on the Combat Chart reveals that Glasgow can engage targets at 30 miles range, but Broadsword cannot. For a Type 42 to secure a Target Lock at that range the player rolls 1d8; the result is a 5. A number 5 Target lock Marker is placed below the Super Étendard on the Combat Display. Glasgow’s Air Warfare Officer confirms that Sea Dart has successfully acquired the Argentine aircraft and punches the launch button on his console, and a dull roar informs the missile is airborne. Again, 1d8 is used for the “hit roll,” with a 5 result needed to match the Target Lock number and secure a kill. The roll is a 4; Glasgow has missed. She will not get a second chance.
The Super Étendard is removed from the Combat Display and replaced with the Exocet marker. The ‘30 mile’ range marker is retained to indicate that as the Super Étendard banks hard to port and heads for home the Exocet she carried is now arrowing towards the two British warships.
Again, the player rolls 1d10 to attempt to secure a Radar Lock for both Glasgow and Broadsword. This time he rolls a 10. Neither vessel has spotted the deadly missile.
The ‘30 mile’ Range Marker is replaced with the ‘20 mile’ one. Again the player rolls for a Radar Lock. This time he achieves a 6. Again, the British fail to detect the danger skimming towards them across the wave tops.
The ‘20 mile’ Marker is replaced by the ‘10 mile’. Again the Target Lock roll is made. Glasgow rolls a 9. There are now approximately thirty seconds left to detect the missile. The ‘1 Mile’ marker is placed. The final roll is a 1! Broadsword’s Operations Room is suddenly brought to life by a desperate shout of “Incoming! Bearing two three zero!” Both vessels shudder as their helmsman veer hard to starboard, the frantic whoosh of chaff rockets evidence of their final desperate attempt to deflect the Exocet from her course. As the missile was detected at 1 mile, only a roll of 1 or 2 on 1d6 will make these countermeasures effective.
The player removes the two warships from the Combat Display and places them in a plastic cup. He then draws one counter – HMS Broadsword. Across the Type 22’s tannoy comes one final, calm instruction: “Brace for impact.” The player rolls 1d6, the Exocet Hit Die. The roll is a 3. The Argentines have struck their first blow in the battle of the South Atlantic.
The player removes Broadsword from the board and places her aside. He returns HMS Glasgow to her original position in the SW Task Force Zone, and removes the Air Alert Marker. He also removes the Exocet marker from the Combat Display and places it alongside the airbase at Rio Grande, and reduces the level of the Exocet Stock from 5 to 4.
News of the loss of Broadsword is met with shock back in Britain. The Domestic Opinion Marker is immediately reduced one level. The day’s second Scramble Roll is conducted, but results in a 10. No more Air Raids are launched today.
The player now concludes the turn. He takes the remaining five aircraft that were scrambled from Invincible and places them back in her Flown box. As the ‘Recovery 10’ Marker is on-board, he then conducts a Recovery Roll for each of the aircraft currently occupying the Flown boxes on the Sea Harrier Display, using 1d10. The rolls for the three on Hermes (the aircraft that conducted supply interdiction at the start of the turn) are 5, 10, and 7. All the aircraft landed safely. The rolls for the three aircraft of Invincible’s ‘A’ Flight are 10, 8, and 2; again all return safely, although it was touch and go for the final aircraft. The rolls for the three ‘B’ flight aircraft are 7, 3, and 7. Despite the cloudy conditions, all the aircraft are recovered.
The Recovery 10, Carrier Task Group Degraded Detection, Sortie 1 and Scramble Modifier Markers are all now removed from the Board.
7 May 1982 draws to an end, having proved a costly day for the Task Force.
* * *
(Following [21.1] San Carlos Sequence of Play)
Turn: 21 MayBritish Losses: HMS’s Broadsword, Coventry, Argonaut Gold 1 (Hermes), Trident 2 (Invincible)Argentine Losses: Patrol Group (79.4), Santa FeInternational Opinion: 3Domestic Opinion: 5Exocet Stock: 2Argentine Supply Level: 11SitRep Card: Operation SuttonEvent Cards On-Board: Two San Carlos Event CardsEvent Cards Played: n/a
Ready For War Box: Carrier Group, Battle GroupIn-Port: NoneAt Sea: San Luis (Search Box)
The player advances the Turn Marker to the 21 May box. He then rolls for the weather; a 7. The skies are grey, and they will have no appreciable effect on combat operations today.
He then draws what will prove to be the final Event Card: No.41, Whitehall Pen Pushers. On the eve of Operation Sutton, the War Cabinet is having last minute doubts. The player calculates the current WOD Level, (5+3/2)=4, and rolls 1d10; a 3. The Prime Minister brings the debate to an abrupt end. Approval to proceed is granted.
The final SitRep Card is turned over; Operation Sutton. The landings to retake the Islands are about to begin.
First, the player places the Operation Sutton Marker on the 21 May space of the Turn Track. Next, he turns his attention to the two Operation Sutton Event Cards currently sitting face down on the Board. Deciding it is vital to know what the Argentines have planned for the landing force, he tasks two warships to conduct reconnaissance. HMS Ambuscade and HMS Ardent are placed on top of the two event cards, and 1d8 is rolled for each ship. The result is a 2 and a 4. The two warships complete their reconnaissance safely, and are placed on the Turn Track in the 22 May space, indicating when they can return to the Task Force. The two San Carlos Event Cards are now turned over. The player now draws two San Carlos Event Markers, one for each card. They are who told them we’re coming and I don’t think that’s a Sea Urchin. The player decides, despite the probability that the waters are mined, that the reports of the Argentines already moving troops to the landing area means the landings must commence at once. Although the cards provide the option of delaying for 24 hours, the player opts to go ahead with the invasion. Amongst the Task Force the final preparations are made. HMS Splendid and Conqueror take up position just off the Argentine Coast (the Coastal Box), whilst Valiant and Spartan patrol the edge of the Exclusion Zone (the Search Box) in an attempt to locate the Argentine San Luis, which is believed to be in the area.
The central Task Force Zone is occupied by the two Carriers, the Troop Ships Canberra, Norland, Europe and Elk , the two Landing Craft Fearless and Intrepid, and four Support Ships. The rest of the Task Force is deployed in the following formation: W – Glasgow and Brilliant; NW – Sheffield and Plymouth; SW - Exeter and Yarmouth; N - Glamorgan; S – Ardent; NE – Arrow; SE – Antrim; E – Alacrity.
The first choice the player must make is which units will lead the first wave of the assault. 2 Para, 3 Para and 45 Commando are currently embarked on Canberra, and the player is reluctant to place such a major target into San Carlos Water until the AA defences have been established. He therefore decides that the initial assault will be led by 40 Commando, landing opposite Look Out Hill, and the Welsh Guards, coming ashore at Poker Point. The player therefore places Norland, which is carrying 40 Commando into San Carlos Box 6, and St Edmund, which embarked the Welsh Guards, in San Carlos Box 9. To ensure both units land with their heavy equipment (and therefore their full combat strength), the Landing Craft Fearless and Intrepid are placed alongside them in San Carlos Boxes 7 and 8. Finally, the player places Antelope, Arrow and Alacrity into San Carlos Boxes 4, 5 and 10 - to provide protection for the troops and landing craft.
Back in the Exclusion Zone, the bulk of the Task Force now adjusts its formation to accommodate the departure of the Landing Group. Plymouth is deployed to the N, Yarmouth to the S, and
Sa
mp
le S
an
Ca
rlos
Turn

50 51
Glamorgan to the E. The NE is left undefended; the player decides to take that gamble rather than reduce cover from the main threat axis to the West.
The CAP is now placed, with two aircraft from Hermes ‘A’ flight placed over San Carlos Water, two from Invincible ‘A’ flight placed over the Task Force Zone, and one aircraft each from Hermes ‘B’ flight placed W, NW, & SW.
The player decides not to attempt Supply Interdiction this turn - the Sea Harriers have enough to contend with now the landings are underway. Finally, he places the SAS Marker so it can monitor Mirage activity at the airbase in Commodoro Rivadavia.
With preparations for the landings complete, the player now proceeds with the naval phase. This process has been described in detail in earlier play examples, and it passes uneventfully. The Argentine Navy is not yet in a position to interfere with the Landings.
The Argentine air force now prepares to launch a maximum effort against the fleet and landing group. A check of the relevant Air Attack modifiers shows that there is a +1 modifier to the number of attacking aircraft this turn (resulting from the loss of diplomatic support from the Eastern Bloc countries as the Soviets are providing satellite intelligence on the movements of the Task Force).
The player conducts the Scramble Roll, and rolls a 1. The first Raid is about to be launched.
The player performs the Air Base Tasking roll, the result is a 7. The Skyhawks at Rio Gallegos are armed and ready for take-off. He then conducts the Nimrod check, and rolls a 1. Again, the Nimrod is not on station. As the SAS marker is currently placed at Commodoro Rivadavia, he will also not receive early warning from the SAS insertion team. The Chilean government has also had second thoughts about their own surveillance assistance, and so there will be no warning of the impending raid.
The player conducts the Squadron Attack Roll, resulting in a 9. As Britain has lost the support of the UN, and the international arms embargo against Argentina has been lifted, four Skyhawks will take part in the Raid (in this instance the +1 modifier to the number of attacking aircraft is irrelevant, as there can never be more than 4 attackers on any one Raid). Finally, he conducts the Air Targeting Roll, and rolls an 11. Normally, this would result in an attack to the East of the Task Force. However as the red die is a 6 and the white die a 5, the raid will instead be conducted on the forces currently located in San Carlos Water.
The four Argentine Skyhawks streak low across East Falkland, and high above the two patrolling CAP Harriers of Hermes ‘A’ flight dive to intercept.
The four Argentine Aircraft are placed on the Combat Display and the Target Lock dice are rolled, resulting in a 6, 6, 5, and a 3. Both Sea Harriers launch their AIM9L missiles (still being supplied from NATO stocks, given that support amongst Britain’s European allies is just about holding), and roll 1, 2, 4, and 6. The roll of 6 results in the destruction of both Skyhawks allocated a 6 Target Lock number. The two Sea Harriers are returned to the Hermes Flown box whilst the surviving two Skyhawks press home their attack.
As the aircraft mount the crest of the hills overlooking San Carlos Water, they see the British Fleet laid out below. Banking sharply right, they begin their run along the Bay. The player makes the first San Carlos Attack Roll, and rolls a 10. The first Skyhawk is heading directly for HMS Alacrity, and the Skyhawk counter is placed in the No.10 San Carlos Box, on top of the endangered Type 21 Destroyer. The second San Carlos Attack Roll results in a 2. As there are no vessels in that box, the Skyhawk attacks the nearest target, in this case HMS Antelope, positioned in Box No.4. As the Skyhawk wheels towards them, the crew of Antelope realise their position at the mouth of the Bay makes them a prime target for the Argentine pilots.
As the planes streak towards their targets, a barrage of small arms fire, and a hastily launched Rapier missile rise up to meet them. As this is the first turn of the Landings, 1d10 is used for San Carlos AA rolls. The results are 3 and 2; the Argentine pilots can see the tracers floating past their canopy, but the fire has no effect.
On Antelope and Alacrity there is just time to fire one Sea Cat missile at their respective attackers. The attack is launched at the shortest possible range -1 mile - and there is no time to secure a radar lock. The die roll is 1d6: Antelope rolls a 2, Alacrity a 3. A roll of 1 was needed to hit. On both warships, the order to “brace, brace, brace!” echoes across the tannoy.
The Target Dice for a Skyhawk attacking in San Carlos Water is 1d6. As the Argentines release their bombs and bank away the player rolls a 4 for Antelope (the bombs splash harmlessly into the water) and a 1 for Alacrity (the Skyhawks have found their target). The destroyer limps towards the mouth of the Bay, smoke pouring from a large gash in her superstructure. She has protected the troop ships, but at a heavy price. The HMS Alacrity counter is removed from the game.
The player now makes the day’s second Scramble Roll, and rolls a 10. Amazingly for the Task Force, the Argentines are unable or unwilling to launch further Raids today, Note: This is simply to save you ploughing through the details of five separate raids. In reality, when the Landings commence, the Argentines will be coming thick and fast!
With the air activity completed for the day, the player now turns to the Landings.
First, he must resolve the two outstanding San Carlos Event Cards. The first is I don’t think that’s a Sea Urchin. As the player has conducted successful reconnaissance, he may attempt to clear the approaches to the landing beaches of the hastily laid Argentine mines. He rolls a 4, a 3, and a 5. The final roll of 5 means that all the mines have been safely neutralised. He then turn his attention to the second card, so who told them we were coming. Again, the card was the subject of successful reconnaissance. Again, he rolls 3d6; this time to see if he is able to divert the Argentine reinforcements who are currently approaching the Landing Area. He rolls a 2, a 4, and another 2. On this occasion the diversionary raid has not had the desired effect. During the upcoming Argentine San Carlos Deployment Phase, three Argentine units will be placed instead of the normal two.
Both San Carlos Cards are now discarded, and the Event Card Deck is placed to one side. Once the Landings are underway, no more Event Card draws will be made.
The Argentine Units now begin to take up their defensive positions around the bay. The player picks three Argentine units at random (again, one additional Unit because of the so who told them we’re coming San Carlos Event Card) and draws the Marine Commando Company, the 3rd Marine Infantry Battalion, and the 10th Headquarters Company. He then rolls 1d10 for each Unit. The first roll is a 9, and the Marine Commando Company is placed on Poker Point. The second roll of 10 places the 3rd Marines overlooking Blue Beach 2. The final roll is a 3, and the Headquarters Company turns up at Wreck Point, overlooking the Bay.
The first British Units now surge ashore. The 40 Commando Unit is removed from the Troop Display and placed in the Look Out Hill box. As the Landing Ship HMS Intrepid is adjacent to the Norland (in San Carlos box 8), the Unit is landed with its full complement of support weapons, and is placed on its full-strength side. Then the Welsh Guards are removed from the Troop Display and placed in the Poker Point box. Similarly, as St. Edmund is adjacent to HMS Fearless, the Unit is also placed on its full-strength side. As this box is currently occupied by the Marine Commando Company, the Guards counter is placed underneath the Argentines. 40 Commando have seized their objective unopposed, but the Welsh Guards have a fight on their hands.
Now that both sides’ Units have been deployed, the player prepares to resolve the battle at Poker Point. First he removes both the British and Argentine Units and places them on the Combat Display. He then places an Opposed Landing Marker in the Poker Point box to indicate where the battle is taking place, and also that the Argentines currently control that Landing box.
Next, he takes the Argentine Dug In Marker, and places it in one of the empty boxes on the Argentine half of the Combat Display. The Argentines currently hold the defensive advantage.
Looking at the Commando Company and Welsh Guards unit counters, he notes that the Argentine Combat Value contains an asterisk, indicating an Elite Unit. He therefore also places the Argentine Elite Unit Marker next to the Dug In Marker on the Combat Display.
He also notes that the CAP Box does not contain any Sea Harriers. He therefore places the Ground Attack Marker next to the other Markers on the Combat Display.
Finally, he reduces the Argentine Supply Level by one, moving the Supply Marker from the 11 May to the 10 May position.
The Welsh Guards have been landed at their designated beach (Poker Point contains the Welsh Guards insignia), so the player does not place a Wrong Landing Zone Marker.
Combat is now resolved. Both units have a Combat Value of 6, so 1d6 will be used for all combat rolls. This combat happens to last nine Rounds, and the rolls for each round are shown below:
52 53
3 Welsh Guards vs. 4 Marine Commandos As the British troops wade up the beach they are immediately pinned down by a burst of accurate machine gun fire. The Welsh Guards counter is rotated 90 degrees counterclockwise.
6 Welsh Guards vs. 4 Marine Commandos The Guards re-group and start to push forward. But as they advance, a lone Pucara ground attack aircraft mounts the crest of the hill, and dives towards the British troops. Again their attack stalls. The Ground Attack Marker is removed from the Argentine half of the Combat Display.
2 Welsh Guards vs. 2 Marine Commandos In the event of a tie on the combat dice, the round is awarded to the defending Unit. As the Argentine troops are well concealed in their defensive positions, the Guards cannot make any headway and are starting to sustain serious losses. Rotate the Welsh Guards counter a further 90 degrees.
6 Welsh Guards vs. 2 Marine Commandos At last, the Welsh Guards begin to move forward, but again, the well constructed Argentine positions make it difficult to locate and accurately target the enemy. The Argentine Dug In Marker is removed.
5 Welsh Guards vs. 4 Marine Commandos As the Guards reach the outer defences of the Argentine positions, the Commandos execute a skillful withdrawal to a new trench line. The British realise they are not fighting conscripts, but a well trained and committed enemy. The Argentine Elite Unit Marker is removed.
2 Welsh Guards vs. 1 Marine Commandos The Guards’ assault is now starting to gain momentum, and the Argentine defenders are beginning to take losses. As there are no further status counters on the Argentine half of the Combat Display the Argentine Unit is rotated 90 degrees.
6 Welsh Guards vs. 4 Marine Commandos The Guards are now forcing the Commandos back, and the battle is hanging in the balance. The Argentine Unit is rotated a further 90 degrees.
3 Welsh Guards vs. 2 Marine Commandos The Argentine defences are now crumbling. The Argentine unit counter take its third hit and is rotated a further 90 degrees.
6 Welsh Guards vs. 5 Marine Commandos The Argentines have finally been routed. The Marine Commando Company Counter is removed from the game. The British have won a hard-fought victory. The ‘Opposed Landing’ Marker is removed from the Poker Point box, and replaced by the Welsh Guards Unit Counter. The player is careful to ensure that the Counter retains the two combat step losses received during the battle.
With the first Units successfully ashore, all that is left is for the player to conduct the End of Turn phase which is detailed in the earlier play example.
The British have returned to the Falkland Islands.
* * *
A word of warning: although I designed this game, I’m useless at it. The best I’ve achieved in play testing is the Historic Victory. By contrast a friend of mine popped over, gamed a couple of hours and had his tanks ashore at Mar del Plata before our second cup of Earl Grey. So you’ve been told. Following my lead is like following the Light Brigade. But here goes.
The first thing you should be aware of is that your greatest enemy is not the Argentine forces. It is time. There’s a real temptation to hold the Task Force back out of range of the worst of the air strikes until the very last minute. Be careful. The weather, the politicians back in London, the diplomats; they can all pop up at the worst moment to scupper your plans. You need to leave yourself enough time to cope with a few contingencies. You don’t want to be in the position of having to scramble the troops ashore, unequipped, because the military clock has run out on you.
Second, International Opinion is important, but Domestic Opinion is the campaign. When the landings commence, the Task Force will be at its most vulnerable and Domestic Opinion will take a knock. The country will back you, but only up to a point. You need to have enough political support prior to the Landings to ensure the politicians hold their nerve.
At a tactical level there are three golden rules: 1) Protect your carriers. 2) Protect your carriers. 3) Protect your carriers. Whatever the temptation, avoid leaving gaps in your outer defence screen. You may get away with it. But if you don’t…
The Argentine Navy is modeled on historical lines. That means, don’t underestimate it! Don’t ignore the importance of the Defence Zone, especially if the Argentine Carrier Group is at sea. Remember, Sea Harriers can assist you in guarding against the surface threat. The Argentine submarines will also present a problem if you allow them beyond their coastal waters.
The tactics for organising your ships on picket duty are pretty obvious. Try to match up an effective radar with an effective weapons system. Give yourself short and long range capability. And remember, you will need to preserve your short range systems for covering the Landings.
The Sea Harriers are clearly vital assets. Keep an eye on the weather when tasking; you cannot afford unnecessary losses. Also, use the Chilean intelligence whilst you have it. You don’t need to keep aircraft on CAP whilst you have this capability.
When it comes to the Landings, have a strategy. The combat mechanism is simple, but you need to give some real thought to what ships will be dropping what troops in what order and with what sort of AA cover. The Argentines are at a disadvantage so long as your units are landed properly equipped. Once you start chucking units ashore without their heavy support, things will start to unravel rapidly.
So what are your chances of success? Well, here’s an insight into my most recent games: I kicked off by having Hermes sunk by the Santa Fe and had to throw in the towel after Turn 10. I subsequently watched my friend Chris achieve an Historic Victory, told him I’d match him, then had to sit there as my meticulously planned Landings were delayed five days by orders from Whitehall (producing a Major Argentine Victory and, much worse, a David Owen Premiership). In the next game I eked out a Narrow Victory with the Task Force a single loss away from being recalled, before embarking on my final campaign, which ended on May 20th when I lost three ships in the space of 24 hours and was ordered home in disgrace.
So, as I said, follow my lead at your peril…
--Dan Hodges
Pla
y T
ips
from
the
De
sig
ne
r

54 55
40 Commando Royal Marines - Lt. Col. Malcolm Hunt40 Commando went ashore in the initial wave at San Carlos, and hoisted the first Union Jack to fly over the Islands since 1 April. Two companies of the battalion were subsequently attached to the Welsh Guards and engaged the Argentines at Sapper Hill on the morning of 14 June, in what proved to be the final skirmish of the war.
42 Commando Royal Marines - Lt. Col. Nick VauxHeld in floating reserve during the initial landings, 42 Commando led the assault on Mt. Harriet on the night of 11/12 June, surprising and overwhelming the Argentine defenders and capturing over 300 prisoners.
45 Commando Royal Marines - Lt. Col. Andrew WhiteheadThis Arbroath-based battalion was tasked with the assault on Two Sisters on the night of 11 April. Despite the twin peaks providing a natural defensive position, the Regiment swiftly overcame the Argentines (who had dug in with a series of six heavy machine gun positions). In the immediate aftermath of the battle, despite being low on ammunition, Whitehead asked for permission to push forward to support the assault on Mt. Tumbledown - a request that was denied.
2nd Battalion Parachute Regiment - Lt. Col. Herbert JonesBased near Colchester, 2 Para led the first wave of the landings. On the morning of 28 May, the battalion engaged the Argentine garrison defending Goose Green airstrip, in what was to prove the fiercest set piece land battle of the war. The assault started at 06.00 (local time) on the morning of 28 May, with the Argentine defenders formally surrendering at 18.50 the following evening. Over 130 Argentine and 50 British troops were killed or seriously wounded - including Lt. Col. Jones, who died whilst storming an Argentine machine gun position (an action which saw him awarded the posthumous Victoria Cross). Command of the battalion fell to Major Chris Keeble. On the night of 11/12 June, 2 Para again confronted the Argentines; this time during the assault on Wireless Ridge. Despite being attacked by Skyhawks and facing stiffer opposition than had been identified during their briefing, the battalion rapidly secured their objective, inflicting heavy losses on the defenders.
3rd Battalion Parachute Regiment - Lt. Col. Hugh Pike After securing Teal Inlet on 29 May, 3 Para advanced on Mt. Longdon, where they launched a major assault on the Argentine positions on the night of 11/12 June. Although the Argentine defence appeared poorly prepared, the Paras were hampered by shortages of ammunition and soon encountered stiff resistance from the 7 Infantry Regiment, dug-in on the slopes of the mountain. Pinned down by accurate sniper and machine gun fire, the attack appeared to be faltering until Sgt. Ian McKay of 4 Platoon lead a concerted charge against the Argentine trenches, opening up the defenders’ southern flank. Just as he and his men were preparing to attack the final enemy position, McKay was killed. He was subsequently awarded the Victoria Cross, the second of two in the Falklands campaign. Despite further resistance and accurate Argentine artillery fire, the Battalion finally secured their objective at 10.30 hours, having sustained some 60 serious casualties.
Special Boat Service - Major Jonathan ThompsonBased in Poole, the SBS carried out a large number of covert operations throughout the conflict. They were involved in Operation Paraquet, the operation to re-take the island of South Georgia, and were amongst the first British Task Force units to reach the Falklands, with two squadrons being landed by helicopter on the evening of 30 April. On the morning of 21 May, 3 Squadron SBS was landed at Fanning Hand (overlooking the entrance to San Carlos Water) and engaged elements of the Argentine 25 Infantry Regiment, forcing them to withdraw before the first wave of the landing force entered the bay.
2nd Battalion Scots Guards - Lt. Col. Mike ScottThe Scots Guards were transported to the South Atlantic aboard the liner QE2, arriving in the Falklands at Bluff Cove on 5 June. On 14 June the Battalion engaged the Argentines on the slopes of Tumbledown Mountain, one of the fiercest battles of the war. Confronted by the 5th Marine Battalion (among the best trained, equipped and motivated Argentine units on the Islands) the Guards’ attack quickly stalled in the face of intense machine gun, mortar and artillery fire. Poor communications and a lack of naval gunfire support further hampered their progress. With the left flank of the attack totally bogged down, the advance was only sustained by a bayonet charge from the right flank company (and the fierce hand-to-hand fighting that ensued) which turned the tide of battle. Over 40 members of the battalion were killed or seriously wounded in the assault.
1st Battalion Welsh Guards - Lt. Col. John Rickett Destined to suffer the worst casualties of any British unit of the campaign. Arriving in the Islands on the 2 June, the battalion was transferred to Bluff Cove via the LSL Sir Galahad six days later. Upon their arrival, poor communication and contradictory orders led to a delay in transferring the Guards to shore. At 17.00 hours, a flight of A4 Skyhawks attacked the Sir Galahad (and her sister ship Sir Tristram), causing massive damage to both vessels and killing 39 Welsh Guardsmen, three other servicemen and seven crew members. The battalion was reinforced by elements of 40 Commando, and held in reserve for the attack on Sapper Hill on the morning of 14 June, but were not deployed to the fighting.
1/7thDukeofEdinburgh’sOwnGurkhaRifles - Lt. Col. David MorganThe Gurkhas landed at San Carlos Water on 1 June. Their deployment had been the subject of debate within the War Cabinet; elements of the Foreign Office were concerned about the diplomatic implications of using Nepalese troops. Ultimately, their objections were overruled by British Defence Secretary John Knott, who had himself served as an officer with the battalion. They were tasked with leading the assault on Mt. William on the night of 13/14 June, and suffered casualties from Argentine artillery fire as they moved into position for the attack. However, Argentine propaganda had portrayed the Battalion as a savage unit who would quite literally take no prisoners. As soon as the advance of the Gurkhas was spotted, the defenders of Mt. William retreated en-masse, allowing the Gurkhas to seize their objective without significant resistance.
Blues & Royals - Lt. Mark CorethB Squadron of the Blues & Royals supplied armoured reconnaissance support for the British land forces with their Scimitar and Scorpion-class light tanks. They supported the assault on Tumbledown (during which one vehicle was lost to an enemy land mine) and engaged the Argentines defending Wireless Ridge on the morning of 13/14 June.
5 Marine Infantry Battalion - Cdr. Carlos H. RobacioThe tough Fifth was part of the 1st Fleet Marine Force, based at Rio Grande. They arrived in the Falklands at the end of April, and were immediately assigned to defensive positions around Mt. Tumbledown. On 13 June they engaged in heavy fighting with elements of the Scots Guards, and mounted a strong resistance. On 14 June they also engaged the Welsh Guards in a violent firefight around Sapper Hill, in what proved to be the final skirmish of the war.
Army Commando Companies 601 & 602 - Majors Mario Castagneto & Aldo Rico601 arrived in the Falklands on 27 April, while 602 was airlifted onto the Islands on 27 May. Both units engaged in a number of actions with British special forces and Royal Marine units, most notably a series of fierce defensive actions at Top Malo House, Mt. Wall and Murrell Bridge.
Marine Commando Company - Lt. Cdr. Sanchez SabarotsThe Marine Commando Company was based in Mare del Plata. They led the initial invasion of the Islands on 1 April, engaging the defending Royal Marines at Government House, and storming Moody Brook Barracks. Lt. Cdr. Pedro Giachino was shot and killed whilst leading the assault on Government House, making him the first fatality of the war.
Army Air Brigade - Lt. Col. Juan C. ScarpaThe Army Air Brigade, based near Buenos Aires, was involved in a wide range of operations during the conflict; including gunship patrols, troop/supply transfer and reconnaissance. Equipped with Augusta, Hirundo, Lima, Puma and Chinook helicopters, the entire force was either destroyed or captured by war’s end.
1 Infantry - Lt. Col. Jorge HalpernThe First Infantry Regiment (“Los Patricios”) was the oldest regiment in the Argentine Army, and a company was airlifted to the Falklands on 13 April - where it was attached to 6 Infantry under Halpern. Based at Stanley, the unit was exposed to heavy air and naval bombardment, with elements being transferred to reinforce Mt. Harriet, where they engaged in fighting with 42 Commando on the night of 9-10 June.
4 Infantry - Lt. Col. Diego A. SoriaThe 4th Infantry Regiment was based in Corrientes (in northern Argentina). Initially dug-in around Mt. Low and Mt. Wall, the regiment was eventually withdrawn to defend the area around Two Sisters Ridge, where they were engaged by 45 Commando on 11 June. Forced to retreat, the surviving elements regrouped and assisted in the defence of Mt. Harriet, where they sustained significant casualties.
Un
it His
toric
al N
ote
s

56 57
8 Infantry - Lt. Col. Ernesto A. RepossiBased in Comodoro Rivadavia, the regiment arrived in the Falklands on 5 April and were deployed to Fox Bay on West Falkland, seeing limited action. However, a platoon was transferred to reinforce Boca House, Goose Green… where on the morning of 28 May they were involved in the most intensive ground fighting of the war. Deployed along a ridgeline to the north of Goose Green airfield, they put up stout resistance in the face of a concerted assault from the British 2 Parachute. They were finally dislodged by Milan anti-tank missile fire, suffering severe casualties.
3 Marine Infantry Battalion - Lt. Col. MaregaCompany H of the Third Marine Battalion was flown to the Falklands on 24 April, and transferred to the airstrip at Pebble Island. On 14 May, Pebble was assaulted by a raiding party of 45 men from D Company SAS, who engaged the Marines and destroyed the eleven ground attack aircraft they were guarding.
2 Marine Infantry Battalion - Cdr. Alfredo WeinstablThe Second Marine Infantry Battalion participated in the initial invasion of the Islands on 1 April. Landed at Yorke Bay in LVTP-7 Amtracks and LARC-5s, the Marines advanced into Stanley before being engaged by elements of the Royal Marine detachment - who attacked with Carl Gustav anti-tank missiles. Despite claims by the British to have disabled one of the vehicles, the Second continued their advance, and linked up with the Commando units besieging Government House. Following the British surrender they occupied defensive positions around Wireless Ridge, before being withdrawn to their base in Puerto Belgrano.
1 Marine Infantry Battalion - Lt. Col. Guillermo LunaBased at Tierra Del Fuego, the First Marine Battalion formed part of Task Force 60.1, assigned to the invasion of South Georgia on 3 April. Transported to the Island by helicopter from the Frigate Guerrico, the Battalion was engaged by 22 Royal Marines dug in around Grytviken Harbour. The outnumbered British mounted a strong defence, though, damaging the frigate with anti-tank missiles and shooting down one of the Puma helicopters carrying 1 Marine into battle. After the British surrendered, 1 Marine was transferred back to Argentina along with their prisoners.
3 Artillery Group - Lt. Col. Martin BalsaBased at Corrientes, the Third Artillery Group arrived on the Islands on 17 April. Equipped with the Italian M56 105mm Howitzer “Obus,” they were stationed on Stanley Common - where they were the subject of regular bombing and Naval Gunfire bombardment. They engaged during the Argentine’s contesting of the Outer Defence Zone (including Two Sisters, Mt. Harriet and Mt. Tumbledown) and were reinforced by a battery of Citefa 155mm Howitzers. The Group continued to provide accurate gunfire support up until the day of the Argentine surrender.
Amphibious Battalion - Lt. Mario D. ForbiceBased at Puerto Belgrano, it was the Amphibious Battalion’s LVTP-7 Amtracks and LARC-5s that brought ashore units like the 2 Marine Infantry Battalion during the invasion of 1 April. Following the British surrender, the unit was dispersed throughout the islands - but found the prevailing conditions exceptionally difficult. They were eventually withdrawn from the Falklands towards the end of April.
Headquarters Company The defence of the Falklands was initially the responsibility of the Ninth Infantry Brigade, commanded by General Americo Daher, who established his command post at the old Royal Marines barracks at Moody Brook. Following the dispatch of the Task Force, they were reinforced by the Tenth, under Oscar Jofre. Command of the Falklands ground forces passed to Jofre on his arrival, and he moved into a new command post located at Stanley Town Hall. The Ninth then took formal responsibility for defence of those areas beyond the immediate vicinity of Port Stanley, and established garrisons at Port Howard, Fox Bay and Goose Green. They were supported by the arrival of Omar Parada’s Third Brigade. Overall command of the joint brigade structure rested with General Mario Menendez, who arrived on the Islands on 3 April, and set up his headquarters at Government house. It was he, then, who signed the surrender order at the Port Stanley Secretariat building, at 20.59 local time on 14 June, 1982.
* * *
Task Group 317.8Ship Pennant No. Date of Arrival Class Plymouth (F126) 1.5.82 RothesayYarmouth (F101) 1.5.82 RothesayCoventry (D118) 1.5.82 Type 42Glasgow (D88) 1.5.82 Type 42Sheffield (D80) 1.5.82 Type 42Arrow (F173) 1.5.82 Type 21Alacrity (F174) 1.5.82 Type 21Brilliant (F90) 1.5.82 Type 22Broadsword (F88) 1.5.82 Type 22Glamorgan (D19) 1.5.82 CountyAntrim (D18) 1.5.82 CountyHermes (R12) 1.5.82 CarrierInvincible (R05) 1.5.82 CarrierSpartan (S105) 1.5.82 SSNSplendid (S106) 1.5.82 SSNConqueror (S48) 1.5.82 SSNContender Bezant 1.5.82 SupportGeestport 1.5.82 SupportSt. Edmund 1.5.82 Troop
ReinforcementsShip Pennant No. Date of Arrival Class Ardent (F184) 13.5.82 Type 21Argonaut (F56) 13.5.82 LeanderFearless (L10) 13.5.82 LandingIntrepid (L11) 13.5.82 LandingCanberra 13.5.82 TroopNorland 13.5.82 TroopEuropic Ferry 13.5.82 SupportElk 13.5.82 SupportAtlantic Conveyor 13.5.82 Support
Lycaon 14.5.82 Support
Valiant (S102) 16.5.82 SSN
Antelope (F170) 18.5.82 Type 21Ambuscade (F172) 18.5.82 Type 21 Exeter (D89) 19.5.82 Type 42
Cardiff (D108) 23.5.82 Type 42Active (F171) 23.5.82 Type 21Avenger (F185) 23.5.82 Type 21Andromeda (F57) 23.5.82 LeanderPenelope (F127) 23.5.82 LeanderMinerva (F45) 23.5.82 LeanderBristol (D23) 23.5.82 Type 82QE2 23.5.82 Troop
Nordic Ferry 25.5.82 TroopBaltic Ferry 25.5.82 TroopAtlantic Causeway 25.5.82 Support
Onyx (S21) 28.5.82 SSN
Tas
k Fo
rce
De
plo
ym
en
t Tab
le

58 59
Where There Is Discord (WTID) is first and foremost a game, rather than a simulation. Many of the concepts within it have been deliberately abstracted in a bid to give the player a genuine “feel” for the overall conflict, rather than a nuts and bolts depiction of the actions of every individual ship, aircraft or missile system. For those looking for a little more detail in their Falklands/Malvinas gaming, I would heartily recommend Ed Kettler’s Harpoon South Atlantic War sourcebook - which as well as being a wonderful simulation is also an invaluable reference work for those interested in the conflict.
In truth, WTID’s game mechanics are relatively simple; yet the five distinct elements (air-to-air, surface-to-air, air-to-surface, surface-to-surface, and ground combat) mean that at first glance the rulebook appears lengthy. After two or three turns, though, they should become intuitive.
At the heart of WTID are some concepts which differ significantly from existing games on this campaign. The first is the requirement the Event Cards place upon you to manage International and Domestic Opinion. In the game, the interrelationship is fundamental to your overall strategy. Neglect the former and your operational effectiveness will rapidly diminish. Ignore the latter, and you will lose the conflict outright.
Another concept is the fluctuating nature of what I call the “player’s perspective.” In most wargames you are given a clearly defined role (perhaps as commander of a war economy, a certain campaign, or an individual squad of troops); but in WTID you will find your role constantly changing. At one moment you will be deciding how to distribute resources throughout the Task Force. Next, you are having to decide when (or if) to fire an individual missile system. A few moments later you might be deciding whether to attack the Argentine mainland, close the Gibraltar border, or call a parliamentary by-election. Go with it. The interplay between the military, diplomatic and political aspects of the Falklands/Malvinas campaign are part of its fascination.
Then, there are the victory conditions. My original intention was to have the landings unopposed, but I realised early on that having a simple ground combat phase would add significantly to the challenges faced by players in planning their landing strategy. So that’s in there and it works; but apologies to any seasoned gamers who were hoping for an even deeper ground combat element. My regrets, also, to players who find the victory conditions placing them in the unenviable position of having to choose between a successful campaign and Karl Rove in the White House. Personally I feel your pain, but... war is hell.
Finally there’s the history itself. There is obviously a balance to be struck between a game that accurately models a conflict while providing the scope to allow for a range of non-historical outcomes. Again the Event Cards seek to provide that balance - and whilst most of the events depicted never actually occurred, almost all of them could have. So yes, the British did nearly shoot down a civilian airliner, and the Argentines did ask NASA if they could borrow one of their satellites. Equally, some historical elements have had to be tweaked in order to improve playability and balance (so for example don’t count on the Argentine Mirages popping up for a couple of days around 1 May and then disappearing to protect the mainland air bases).
I’d also like to make clear that whilst this game has been produced under license, none of the organisations that have assisted me, nor the charities that will benefit from it, have in any way endorsed the details of its content. The politically contentious assumptions behind some of the Events and Victory Conditions are mine alone.
To conclude with some thanks. Viswan Nair, Derrick Walker, Nicola Hunt, Thomas Phillips and Christopher Shea at the Ministry of Defence; they have real wars to fight but kindly took the time to assist me with my cardboard efforts. Group Captains Carlos Castro Madero and Juan Carlos Montoya, along with Colonel Carlos Mariano Saini, of the Argentine Embassy; who were equally gracious with their time. This project commemorates the courage and sacrifice of all those who served in the Malvinas. Ugo Crisponi produced the original art for the aircraft and George Bieda the naval units, and the quality of their work speaks for itself. Finally, a special word for Mark Mahaffey, whose credit as graphic designer is poor tribute for the many months he spent guiding me on how to bring this game to life. As a Tottenham Hotspur fan he has enough of a burden to shoulder, but agreed to share mine with great patience and humour.
-- Dan Hodges
Ad
ditio
na
l Tab
les
De
sig
ne
r’s N
ote
s
60
http://www.fifthcolumngames.co.uk