itservices.risd.edu · xerox workcentre 5945 (follow this link) xerox workcentre 7225 (follow this...
TRANSCRIPT

Scanning Xerox MFD Basic Scanning (modified February, 11, 2016)
This guide covers basic scanning attaching and sending to an email or scanning to a USB Flash Drive.
For further instructions please consult the online manuals. ● Xerox WorkCentre 5945 (follow this link) ● Xerox WorkCentre 7225 (follow this link)
How to Scan and send to an email.
If the Xerox MFD is in Energy Saving Mode (asleep) please touch the “Power” button. ● Load your documents face up in the document feeder input tray. Adjust the guide to just touch the
documents. ○ or...
● Lift up the document feeder. Place the document face down onto the document glass and register it to the arrow at the top left corner. Close the document feeder.
● Press “Services Home” button.
Using the Xerox MFD’s touch screen do the following…. ● Touch “Email” button ● Touch “Enter Recipient” ● Touch "Enter Email address" text box. ● Type in the email address that you wish to send the scan to.
○ note: this can be any valid email address not just RISD email addresses. ● Touch “Add” ● Press the green “Start” button (left of touch screen) to begin scanning.
Note: The recipient will receive an email from the XEROX MFD. (See example below).
_____________________________________________________________________
How to Scan to a USB Flash Drive.
If the Xerox MFD is in Energy Saving Mode (asleep) please touch the “Power” button. ● Load your documents face up in the document feeder input tray. Adjust the guide to just touch the
documents. ○ or...
● Lift up the document feeder. Place the document face down onto the document glass and register it to the arrow at the top left corner. Close the document feeder.
● Press “Services Home” button. ● Insert your USB Flash Drive into the USB port located to the left of the touch screen.
Note: It may take a few seconds for the USB Drive Detected screen to open. ● Select the “Scan to USB” button. ● Select any options required. ● Press the green “Start” button (left of touch screen) to begin scanning. ● Remove the USB Flash Drive from the USB port when you have finished.
_____________________________________________________________________
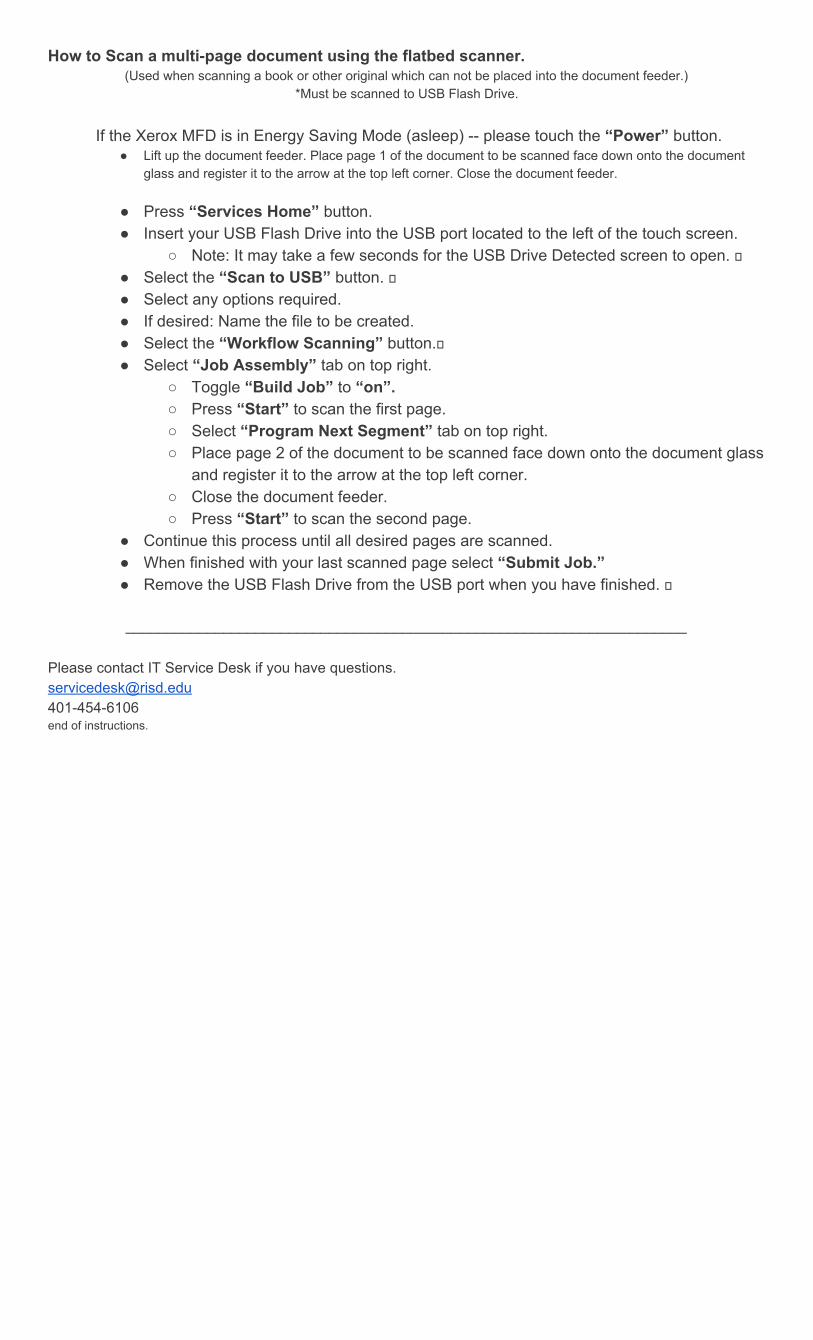
How to Scan a multipage document using the flatbed scanner.
(Used when scanning a book or other original which can not be placed into the document feeder.) *Must be scanned to USB Flash Drive.
If the Xerox MFD is in Energy Saving Mode (asleep) please touch the “Power” button.
● Lift up the document feeder. Place page 1 of the document to be scanned face down onto the document glass and register it to the arrow at the top left corner. Close the document feeder.
● Press “Services Home” button. ● Insert your USB Flash Drive into the USB port located to the left of the touch screen.
○ Note: It may take a few seconds for the USB Drive Detected screen to open. ● Select the “Scan to USB” button. ● Select any options required. ● If desired: Name the file to be created. ● Select the “Workflow Scanning” button. ● Select “Job Assembly” tab on top right.
○ Toggle “Build Job” to “on”. ○ Press “Start” to scan the first page. ○ Select “Program Next Segment” tab on top right. ○ Place page 2 of the document to be scanned face down onto the document glass
and register it to the arrow at the top left corner. ○ Close the document feeder. ○ Press “Start” to scan the second page.
● Continue this process until all desired pages are scanned. ● When finished with your last scanned page select “Submit Job.” ● Remove the USB Flash Drive from the USB port when you have finished.
_____________________________________________________________________
Please contact IT Service Desk if you have questions. [email protected] 4014546106 end of instructions.