zypermx4/mx2 - zeevee
TRANSCRIPT

User ManualFebruary 2021
Firmware Release 2.14
ZyPerMX4/MX2Quad/Dual Video Encoders

ii
Important Safety Instructions. Save These Instructions.WARNING: When using electronic products, basic precautions should always be followed, including:1. Keep these instructions.2. Heed all warnings.3. Follow all instructions.4. Do not use this apparatus near water.5. Clean only with a dry cloth.6. Do not block any ventilation openings. Install in accordance with the manufacturer’s instructions.7. Do not install or place this product near any heat sources such as radiators, heat registers, stoves,
or other apparatus (including amplifiers) that produce heat.8. Do not defeat the safety purpose of the polarized or grounding-type plug. A polarized plug has two
blades with one wider than the other. A grounding type plug has two blades and a third grounding prong. The wide blade or the third prong are provided for your safety. If the provided plug does not fit into your outlet, consult an electrician for replacement of the obsolete outlet.
9. Power cord must be accessible to allow fro the removal of the power from the unit.10. Protect the power cord from being walked on or pinched, particularly at plugs,
convenience receptacles, and the point where they exit from the apparatus.11. Unplug this apparatus during lightning storms or when unused for long periods of time.12. Only use attachments/accessories specified by the manufacturer.13. Refer all servicing to qualified service personnel. Servicing is required when the
apparatus has been damaged in any way, such as power-supply cord or plug is damaged, liquid has been spilled or objects have fallen into the apparatus, the apparatus has been exposed to rain or moisture, does not operate normally, or has been dropped.
14. WARNING: To reduce the risk of fire or electric shock do not place this apparatus in a position where it is exposed to dripping or splashing liquids, rain, moisture, or excessively high humidity. Objects containing liquid shall not be placed in proximity to the unit such that they present a risk of spillage onto the apparatus.
FCC Compliance and Advisory Statement: This hardware device complies with Part 15 of the FCC rules. Operation is subject to the following two conditions: 1) this device may not cause harmful interfer-ence, and 2) this device must accept any interference received including interference that may cause undesired operation. This equipment has been tested and found to comply with the limits for a Class A digital device, pursuant to Part 15 of the FCC Rules. These limits are designed to provide reasonable protection against harmful interference in a commercial installation. This equipment generates, uses, and can radiate radio frequency energy and, if not installed or used in accordance with the instruc-tions, may cause harmful interference to radio communications. However there is no guarantee that interference will not occur in a particular installation. If this equipment does cause harmful interference to radio or television reception, which can be determined by turning the equipment off and on, the user is encouraged to try to correct the interference by one or more of the following measures: 1) reorient or relocate the receiving antenna; 2) increase the separation between the equipment and the receiver; 3) connect the equipment to an outlet on a circuit different from that to which the receiver is connected; 4) consult the dealer or an experienced radio/TV technician for help. Any changes or modifications not ex-pressly approved by the party responsible for compliance could void the user’s authority to operate the equipment. Where shielded interface cables have been provided with the product or specified additional components or accessories elsewhere defined to be used with the installation of the product, they must be used in order to ensure compliance with FCC regulations.
INSTRUCTIONS PERTAINING TO A RISK OF FIRE, ELECTRIC SHOCK, OR INJURY TO PERSONS
Safety Instructions
FCC Statement

Features ● Input: Two or Four standard HDMI 1.4 inputs
○ Resolutions from common Standard Definition, through all resolutions including 1080p60, up to and including1920x1200 @ 60Hz.
● Standards-based H.264/MPEG-4 AVC video compression. ○ High-profile H.264/MPEG-4 AVC compression standard in real-time. ○ Adjustable video bandwidth targets from 1 Mbps through 10 Mbps. ○ Assignable Program Number and Channel Name inserted in encoded stream. ○ Output resolution can track input resolution, or be fixed at a static size.
● Audio input as component of HDMI input. ○ LPCM, AC3, MPEG1 Layer 2.
● Analog audio and/or composite video for Closed Captions. CC requires use of ZeeVee composite cable
● Output: one standard 10/100/1000Base-T Ethernet port. ○ Common communications protocols/methods supported to include TCP/IP, ARP, DHCP,
ICMP (ping), IGMP, HTTP, RTP, UDP, RTMP and HLS. ● Output stream can be set to RTP, UDP, using either unicast or multicast addressing ● Output stream can be set to RTMP, RTSP or HLS unicast. ● HLS supported at up to four simultaneous sessions per video input. ● UDP/RTP video stream can be decoded by any number of Ethernet attached receiving devices.
○ PC / Mac, VLC, IP Set Top Box, IPSTB-enabled television, or custom appliance. ● Audio output in MP2, AC3 or AAC format ● Maestro Web GUI browser management of unit. ● Power-over-Ethernet (PoE) supported allowing for ZyPerMX4 or ZyPerMX2 to be powered by an
appropriately capable switch or power injector. ● Software upgradable through the Maestro web management application.
iii
Features and Package Contents
What’s In The Box
Here’s what you can expect to find when you open the package:
1 x ZyPerMX4 or ZyPerMX21 x Power Adapter
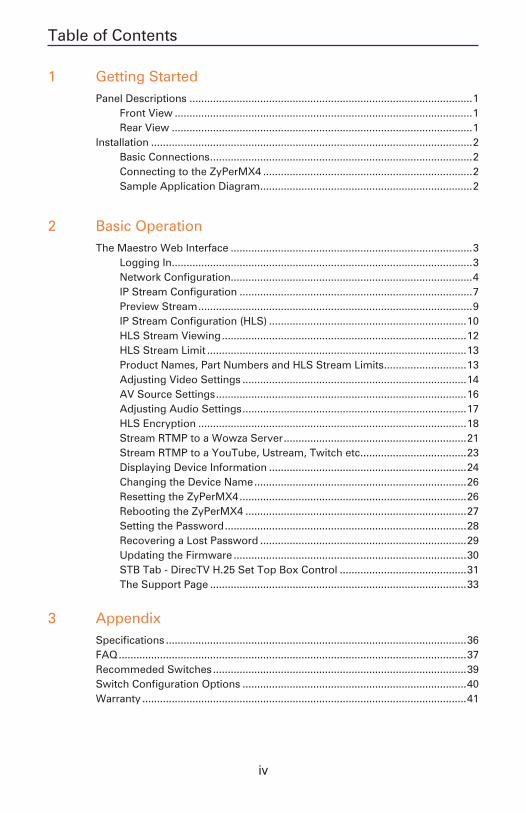
Table of Contents
1 Getting StartedPanel Descriptions ................................................................................................1
Front View .....................................................................................................1Rear View ......................................................................................................1
Installation .............................................................................................................2Basic Connections .........................................................................................2Connecting to the ZyPerMX4 .......................................................................2Sample Application Diagram ........................................................................2
2 Basic OperationThe Maestro Web Interface ..................................................................................3
Logging In ......................................................................................................3Network Configuration..................................................................................4IP Stream Configuration ...............................................................................7Preview Stream .............................................................................................9IP Stream Configuration (HLS) ...................................................................10HLS Stream Viewing ...................................................................................12HLS Stream Limit ........................................................................................13Product Names, Part Numbers and HLS Stream Limits ............................13Adjusting Video Settings ............................................................................14AV Source Settings .....................................................................................16Adjusting Audio Settings ............................................................................17HLS Encryption ...........................................................................................18Stream RTMP to a Wowza Server ..............................................................21Stream RTMP to a YouTube, Ustream, Twitch etc.. ..................................23Displaying Device Information ...................................................................24Changing the Device Name ........................................................................26Resetting the ZyPerMX4 .............................................................................26Rebooting the ZyPerMX4 ...........................................................................27Setting the Password ..................................................................................28Recovering a Lost Password ......................................................................29Updating the Firmware ...............................................................................30STB Tab - DirecTV H.25 Set Top Box Control ...........................................31The Support Page .......................................................................................33
3 AppendixSpecifications ......................................................................................................36FAQ ......................................................................................................................37Recommeded Switches ......................................................................................39Switch Configuration Options ............................................................................40Warranty ..............................................................................................................41
iv

Panel Descriptions
Front View
ID Name Description
1 POWER This LED indicator glows bright blue when the ZyPerMX4 is powered.
2 STATUS The LED glows bright blue when the System Boot Process is complete and the ZyPerMX4/MX2 unit is functioning normally.
3 LED Panel This LED Panel shows IP address for config and management
4 NAV / Control This Button/Wheel is used to select different RESET options.
1
21
1 Getting Started
Rear View (ZyPerMX4)
ID Name Description
1 POWER Connect the included 12V DC power supply to this power receptacle.
2 HDMI In (1-4) Connect an HDMI cable from this port to the HD video source
3 Analog Audio / CC input (1-4)
Connect Analog Audio or Closed Caption “Line 21” source. (Optional with break out cable)
4 TRANSPORT / PoE Connect an Ethernet cable from this port to a smart switch on the Local Area Network.
122 42 23 3 3 3
3 4

Getting Started
2
Installation
Basic Connections
1. Connect an HDMI cable from one of the HDMI In ports on the ZyPerMX4/MX2 to an HD video source.
2. Connect an Ethernet cable from the TRANSPORT connector, on the rear panel of the ZyPerMX4, to a LAN or directly to the PC.
3. Connect the included 12V DC power supply to the POWER connector on the rear panel of the ZyPerMX. (If not using PoE)
Connecting to the ZyPerMX4/MX2
By default, each ZyPerMX4/MX2 encoder uses a DHCP IP address if a DHCP server is found on the network. Otherwise the ZyPerMX4/MX2 will assign itself a Link-Local address. In order to connect to the unit, and depending upon your network setup, it may be necessary to adjust the IP settings of the computer so that it can connect to the ZyPerMX4/MX2. (Note the IP address of the ZyPerMX4/MX2 can be obtained by looking at the LED panel on the unit.)
Once the computer is reconfigured, launch a browser, and enter the IP address of ZyPerMX4/MX2 in the address bar to display the ZyPerMX4/MX2 Maestro web interface.
See Logging In (page 3) for more information on logging in to the Maestro web interface.
See Network Configuration (page 4) for details on setting a static IP address.
Sample Application Diagram

3
2 Basic OperationThe Maestro Web Interface
The ZyPerMX4/MX2 features the Maestro web interface. Maestro allows you to control and manage all features of the ZyPerMX4/MX2. To access Maestro, open a web browser and enter the IP address of the ZyPerMX4/MX2 into the address bar. We recommend using Firefox or Chrome browsers.
Logging In
1. Make sure that the computer used to access Maestro and the ZyPerMX4/MX2 encoder are on the same network. If a network is not being used, the ZyPerMX4/MX2 can be directly connected to the computer. In both cases, the ZyPerMX4/MX2 and the computer must be on the same subnet.
2. Launch the web browser and enter the IP address of the ZyPerMX4/MX2 in the address bar. (IP address can be found on LED display of ZyPerMX4/MX2)
3. The Maestro interface will be displayed with the password dialog.
4. Enter the password. The default password is admin and is case-sensitive.
5. Click the Log In button.

4
Basic Operation
Network Configuration
1. Login to the Maestro web interface. See the previous page for more information.
2. Click the Network tab and then select either AV Port 1 & 2 or AV Port 3 & 4. Note the ZyPerMX2 only uses AV Ports 1 & 2.
3. The current network settings will be displayed.
4. Click the drop-down list, under IP Type, to select the desired network mode. The default setting for IPType is DHCP.
Note that the ZyPerMX4 has 2 independent IP address while the ZyPerMX2 has only one IP address. There is an IP address for AV ports 1 & 2 and a different IP address for AV ports 3 & 4. Both addresses should be set using this procedure.
Once the ZyPerMX4/MX2 is properly configured, click the “lightbulb” icon, at any time, to physically identify the ZyPerMX4/MX2 on the network. This will cause the Status LED indicator on the front panel to flash rapidly for about 10 seconds.

5
Basic Operation
5. Locate the IP Type field:
► If this field is set to DHCP, then all network parameters are assigned automatically, providing there is a DHCP server connected to the network.
► If the IP Type is set to Static, then follow steps 6 - 9.
6. Enter the IP address in the IP Address field. When a value is changed to valid address, the box will highlight in green. Note this is the Primary IP address for the ZyPerMX4.
7. Enter the subnet mask in the Mask field.
8. Enter the gateway address in the Gateway field.
9. Repeat the procedure for AV Port 3 & 4. (ZyPerMX4 only) Click the Apply button to com-mit the changes. To discard recent changes, click the Reset button. Note that a reboot of the unit is required for these changes to take effect.
6
Basic Operation
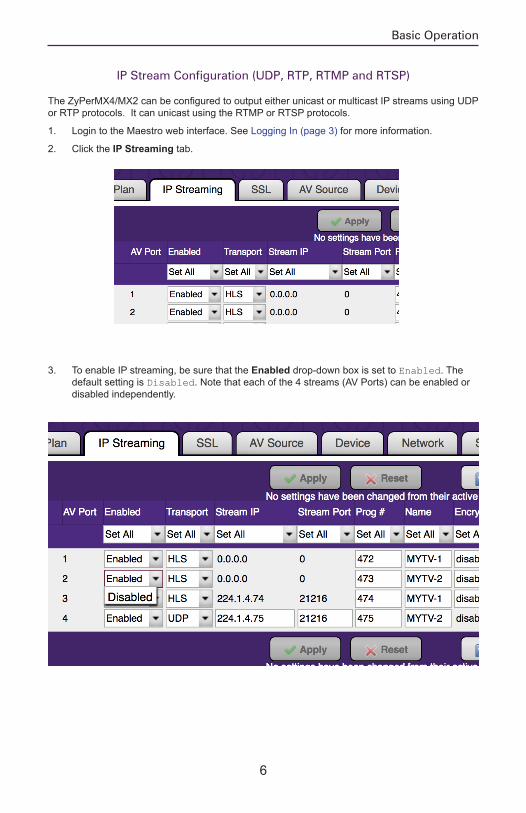
IP Stream Configuration (UDP, RTP, RTMP and RTSP)
The ZyPerMX4/MX2 can be configured to output either unicast or multicast IP streams using UDP or RTP protocols. It can unicast using the RTMP or RTSP protocols.
1. Login to the Maestro web interface. See Logging In (page 3) for more information.
2. Click the IP Streaming tab.
3. To enable IP streaming, be sure that the Enabled drop-down box is set to Enabled. The default setting is Disabled. Note that each of the 4 streams (AV Ports) can be enabled or disabled independently.

7
Basic Operation
4. Select either UDP or RTP or RTMP-WOWZA, RTMP-YOUTUBE or RTSP for the stream type from the Transport drop-down list. Select RTMP-WOWZA for Wowza and select RTMP-YOUTUBE for any other RTMP streaming (ie: YouTube, Ustream, Twitch, etc..)
5. Enter the destination IP address in the Stream IP field. If you enter a valid IP multicast address (range 224.0.0.0 to 239.255.255.255), any endpoint registered with that multicast receives the stream. If you enter a valid IP unicast address, only that specific address receives the IP stream. Important note: The 224.0.0.x range is used for protocol discovery and are flooded to every port. Because they are reserved and may not be constrained by IGMP snooping, we recommend against using them. If unicast, only the specifically ad-dressed endpoint will receive the stream.
6. Enter the port number in the Stream Port field. The supported port range is 1025 to 65534. The destination IP port must not conflict with other IP protocols. If necessary, contact the System Administrator for assistance.
7. Click the Apply button to save the changes or click the Reset button to discard any changes.
TS Type Description
UDP Uses less overhead; lacks packet acknowledgement or error correction. (Multicast) Typical use is delivery to many displays.
RTP Protocol built on top of UDP; delivers real-time multimedia and detects out of sequence packtets. (Multicast) Typical use is delivery to many displays.
HLS HTTP Live Streaming. Typically used to stream to browser such as FireFox or Chrome. (Unicast)
RTSP Protocal popular with local media servers. (Unicast Pull protocol)
RTMP Protocol commonly used by Content Delivery Networks such as Wowza, YouTube, IBM Ustream, Twitch. (Unicast Push protocol)
8
Basic Operation
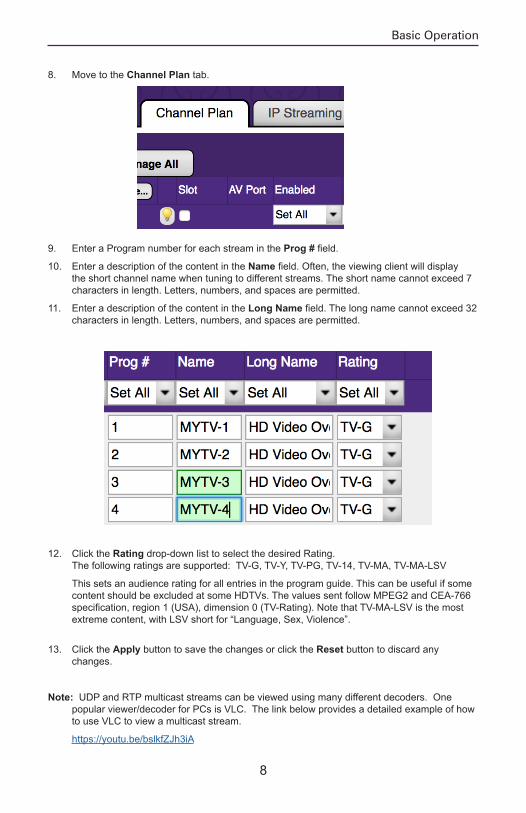
8. Move to the Channel Plan tab.
9. Enter a Program number for each stream in the Prog # field.
10. Enter a description of the content in the Name field. Often, the viewing client will display the short channel name when tuning to different streams. The short name cannot exceed 7 characters in length. Letters, numbers, and spaces are permitted.
11. Enter a description of the content in the Long Name field. The long name cannot exceed 32 characters in length. Letters, numbers, and spaces are permitted.
12. Click the Rating drop-down list to select the desired Rating. The following ratings are supported: TV-G, TV-Y, TV-PG, TV-14, TV-MA, TV-MA-LSV
This sets an audience rating for all entries in the program guide. This can be useful if some content should be excluded at some HDTVs. The values sent follow MPEG2 and CEA-766 specification, region 1 (USA), dimension 0 (TV-Rating). Note that TV-MA-LSV is the most extreme content, with LSV short for “Language, Sex, Violence”.
13. Click the Apply button to save the changes or click the Reset button to discard any changes.
Note: UDP and RTP multicast streams can be viewed using many different decoders. One popular viewer/decoder for PCs is VLC. The link below provides a detailed example of how to use VLC to view a multicast stream.
https://youtu.be/bslkfZJh3iA

9
Basic Operation
Preview Stream (UDP, RTP)
When the ZyPerMX4/MX2 is configured to output UDP or RTP multicast IP streams; it can also simultaneosly send out a Unicast motion JPEG that can be used for other purposes such as a preview stream in a 3rd control appliction.
1. Configure the ZyPerMX2/4 for UDP or RTP streaming as detailed in the prior section.
2. Point a connected web browser such as Chrome to the IP address of the ZyPerMX2/4 with the following port information to view the motion JPEG stream. IP_ADDRESS:8080/port_#.mjpg
IP_ADDRESS = The IP Address of the ZyPerMX2 or ZyPerMX4
Note that the ZyPerMX4 has two IP Addresses. One address for ports 1 & 2 and another address for ports 3 & 4
port_# = This is the phyical port number on the ZyPerMX2 or ZyPerMX4. The ZyPerMX2 has 2 ports and the ZyPerMX4 has 4 ports.
Example: http://192.168.0.26:8080/port_2.mjpg
3. Note that this preview stream is a lower resolution than the primary UDP or RTP stream and the frame rate will be 30fps. This stream is also Unicast. The system can support several simultaneous Unicast streams, but the number is not unlimited. Bandwidth of this stream is approximately 8mb/s.
4. Note, the preview stream is only availble if selecting UDP or RTP streaming. It is not availalbe if selecting “UDP+HLS” or “RTP+HLS”.
10
Basic Operation
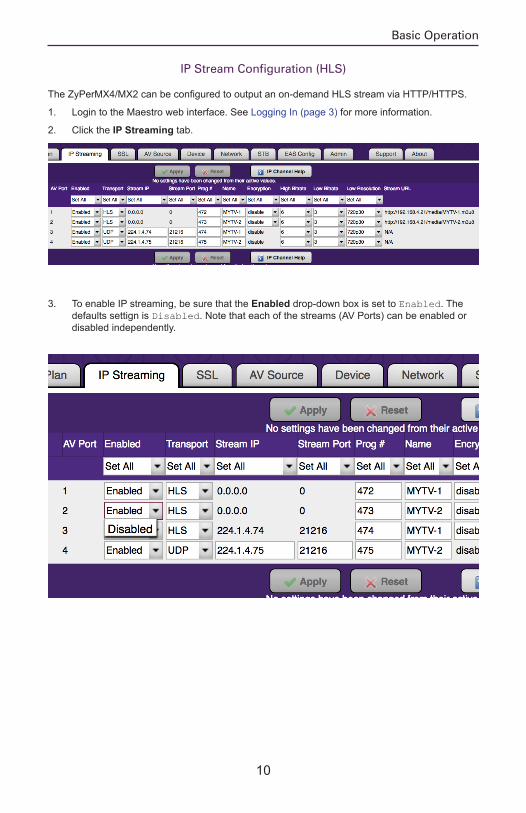
IP Stream Configuration (HLS)
The ZyPerMX4/MX2 can be configured to output an on-demand HLS stream via HTTP/HTTPS.
1. Login to the Maestro web interface. See Logging In (page 3) for more information.
2. Click the IP Streaming tab.
3. To enable IP streaming, be sure that the Enabled drop-down box is set to Enabled. The defaults settign is Disabled. Note that each of the streams (AV Ports) can be enabled or disabled independently.

11
Basic Operation
4. Select HLS for the stream type from the Transport drop-down list.
5. Enter a Program number for each stream in the Prog # field.
6. Enter a description of the content in the Name field.The name field cannot exceed 7 charac-ters. Spaces are not allowed in the The Name field as it is used as part of the Address for HLS streaming. See following section.
7. Click the Apply button to save the changes or click the Reset button to discard any changes.
Note: Any input to the ZyPerMX4 or ZyPerMX2 can be configured to simultaneously output both a multicast and HLS stream. Select either “UDP+HLS” or “RTP+HLS” in step 4 above. Be sure to set the IP Multicast address and Port Number as described on previous pages.

12
Basic Operation
HLS Stream Viewing
To view an HLS stream, point a browser to the following address:
http://<IP_ADDRESS>/media/<name>.m3u8
Example: http://192.168.1.15/media/MYTV-1.m3u8
You can also find the Stream URL in the IP Streaming tab on the far right.
Important NoteThe browser used to view HLS streams must be enabled for Native HLS Playback. This may involve installing a Plug-In to enable this functionality.
For example, Chrome requires a free Plug-In that can be downloaded and installed.
https://chrome.google.com/webstore/detail/native-hls-playback/emnphkkblegpebimobpbekeedfgemhof
Note: Chrome requires audio to be in MP2 format.
Firefox requires a Plug-In that can be downloaded and installed.
https://addons.mozilla.org/en-US/firefox/addon/native_hls_playback/?src=recommended
Note: Firefox requires audio to be in MP2 format
Safari does not require a Plug-In as HLS playback functionality is built in.
Edge does not require a Plug-In as HLS playback functionality is built in.
Note: Edge requires audio to be in AC3 format
HLS Streams can be directly sent to a Wowza server. See the following Wowza link for additional details:
https://www.wowza.com/docs/how-to-publish-and-play-a-live-stream-apple-hls
13
Basic Operation
HLS Stream Limit
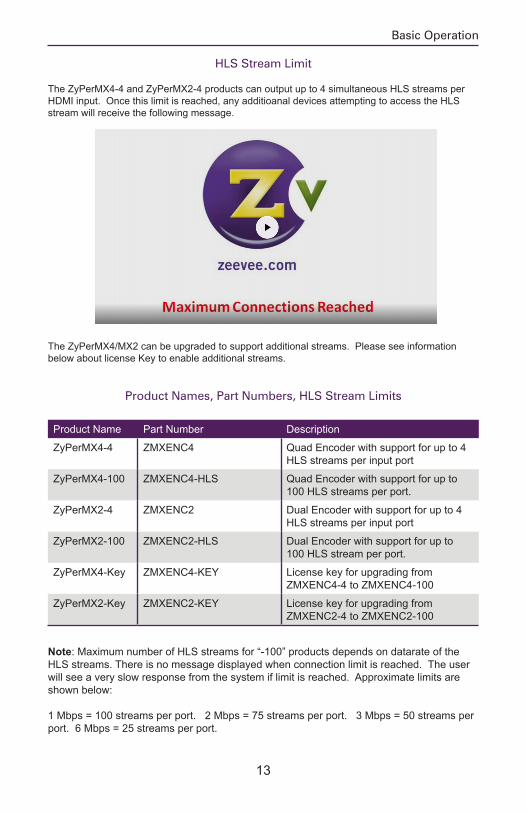
The ZyPerMX4-4 and ZyPerMX2-4 products can output up to 4 simultaneous HLS streams per HDMI input. Once this limit is reached, any additioanal devices attempting to access the HLS stream will receive the following message.
The ZyPerMX4/MX2 can be upgraded to support additional streams. Please see information below about license Key to enable additional streams.
Product Names, Part Numbers, HLS Stream Limits
Note: Maximum number of HLS streams for “-100” products depends on datarate of the HLS streams. There is no message displayed when connection limit is reached. The user will see a very slow response from the system if limit is reached. Approximate limits are shown below:
1 Mbps = 100 streams per port. 2 Mbps = 75 streams per port. 3 Mbps = 50 streams per port. 6 Mbps = 25 streams per port.
Product Name Part Number Description
ZyPerMX4-4 ZMXENC4 Quad Encoder with support for up to 4 HLS streams per input port
ZyPerMX4-100 ZMXENC4-HLS Quad Encoder with support for up to 100 HLS streams per port.
ZyPerMX2-4 ZMXENC2 Dual Encoder with support for up to 4 HLS streams per input port
ZyPerMX2-100 ZMXENC2-HLS Dual Encoder with support for up to 100 HLS stream per port.
ZyPerMX4-Key ZMXENC4-KEY License key for upgrading from ZMXENC4-4 to ZMXENC4-100
ZyPerMX2-Key ZMXENC2-KEY License key for upgrading from ZMXENC2-4 to ZMXENC2-100

14
Basic Operation
Adjusting Video Settings
The ZyPerMX4/MX2 Video Encoder employs Variable Bit Rate (VBR) encoding when transmitting IP streams. Specifying the “High Bitrate” , “Low Bitrate” and “Low Resolution” for video will define the limits of IP stream transmission, without overloading the network bandwidth.
1. Login to the Maestro web interface. See Logging In (page 3) for more information.
2. Click the IP Streaming tab.
3. For UDP and RTP streams the High Bitrate setting is used. Note that the Low Bitrate setting and Low Resolution are disabled in these modes. Click the High Bitrate drop-down list to select a bitrate from 1-10 Mb/sec.

15
When in HLS mode, the ZyPerMX4/MX2 will output both a High Bitrate stream and a Low Bitrate stream simultaneously using the target bitrates specified. The High Bitrate stream will always be output at the same resolution and frame rate as the orignal input. The Low Bitrate stream will put out a reduced resolution stream. The resolution of this stream can be selected using the “Low Resolution” option.
Click the Low Resolution drop-down list and select the desired resolution of the Low Bitrate HLS stream.
Note: To view an HLS stream, point a browser to the following address:
http://<IP_ADDRESS>/media/<name>.m3u8
Example: http://192.168.1.15/media/MYTV-1.m3u8
This will show the best stream that the HLS player can handle. Either the high or low bitrate.
Note that HLS URLs are case sensitive.
You can manually select either the low or high bitrate steam in the following manner.
http://<IP_ADDRESS>/media/<name><High>.m3u8 High Bitrate
http://<IP_ADDRESS>/media/<name><Low>.m3u8 Low Bitrate
Example: http://192.168.1.15/media/MYTV-1High.m3u8
Example: http://192.168.1.15/media/MYTV-1Low.m3u8
Basic Operation

16
Basic Operation
AV Source Settings
The ZyPerMX4/MX2 Video Encoder by default will provide HDCP handshaking to any connected source. This can cause undesired HDCP encrypted video to be sent to the ZyPerMX4/MX2 that will be not be encoded. For example an Apple laptop computer will automacilly output HDCP compatible video if it detects the HDCP handshake.
The ZyPerMX4/MX2 can disable this HDCP handshake so that laptops will not automatically send HDCP encrypted output. To disable HDCP handshaking, the ZyPerMX4/MX2 can be put into Laptop mode.
1. Login to the Maestro web interface. See Logging In (page 3) for more information.
2. Click the AV Source tab.
3. Be sure that the Show advanced controls button is clicked in the lower left corner of the window.
4. Find the HDCP column to the right of the window and set the appropriate inputs to Laptop.
5. Click the Apply button to save the settings.

17
Basic Operation
Adjusting Audio Settings
The ZyPerMX4/MX2 Video Encoder supports either MP2, AC3 or AAC audio formats in the created stream. The default is MP2. You can change the desired audio format manually.
1. Login to the Maestro web interface. See Logging In (page 3) for more information.
2. Click the Device tab.
3. In the lower left area of the screen click on Show advanced controls.
4. To the right of the screen you can now select the Digital Audio format desired. (MP2, AC3 or AAC) Be sure to save any changes and reboot the system. Note: All 4 channels will be set to the same format.

18
Basic Operation
HLS Encryption
When using the HLS functionality for IP streaming, you can enable secure connections for those streams by generating and uploading an SSL certificate via Maestro. This certification will only be used for HLS video streaming. There is a multistep process to use HLS encryption as detailed below.
1. Login to the Maestro web interface. See Logging In (page 3) for more information.
2. Click the IP Streaming tab.
3. Set the Transport method to HLS and enable Encryption. Be sure to Apply any changes. Once that’s applied then you will be running in HLS mode and the actual video data being sent will be encrypted.
However, the HTTP exchanges will still be in the clear (i.e. no encryption via https). That means that the encryption key and initialization vectors will be passed in the clear as well.
To protect against that you have to configure the HTTP server for SSL. To do that you go to the SSL tab and upload a security certificate and key exchange files and enable SSL and define your domain that matches your security certificate (issued by a certificate issuing service – NOT by ZeeVee). These certificates are typically only valid for a period of time and then they expire and the user has to renew them. Failure to do so will result in https no longer working properly.
When requesting a security certificate some data must be entered. This can be done form the “SSL” tab in Maestro:

19
Basic Operation
4. Click the SSL/RTMP tab
5. Generate CSR (Certificate Signing Request). This will provide you with 2 files: The CSR and your Private key. Send your CSR file off to a signing authority and they will return via email a signed certificate file to you along with a certificate chain file. Important Note: Be sure to save the Private Key file, as it will be needed when uploading the certificate. If you do not have the Private Key file, you will need to start the process over, including requesting the certificate from the signing authority again.

20
Basic Operation
6. When you are sent the certificate by the certificate signing authority you want to use; you need to go back to the “SSL” tab and upload it.
7. Once you upload your certificate, private key file, and certificate chain files, select “Upload and Reboot Later” (you still have some work to do). You will be back at the SSL tab and you need to enable SSL and enter the domain that matches your certificate:
Click Apply, then click “Apply and Reboot Now”

21
Basic Operation
Stream RTMP to a Wowza Server
RTMP streams can be sent directly to a Wowza server for more widespread distribution of the AV signal.
1. Login to the Maestro web interface. See Logging In (page 3) for more information.
2. Select the SSL/RTMP tab.
• The right side of the screen will have fields used for streaming to a Wowza server.
• The URL field is the IP Address of the Wowza Server this stream should be sent to. Must include the port number after IP Address. See example above.
• The App. Name field is the Application Name configured on the Wowza Server this stream is connected to.
• The Login ID field is the Login Name configured on the Wowza Server for this stream.
• The Password or Key field is the Password required for this stream to log into the Wowza Server.
22
Basic Operation
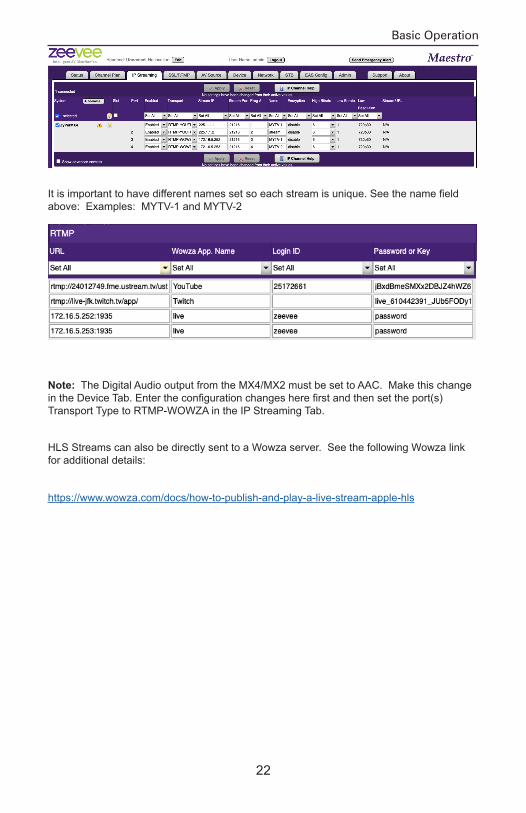
It is important to have different names set so each stream is unique. See the name field above: Examples: MYTV-1 and MYTV-2
Note: The Digital Audio output from the MX4/MX2 must be set to AAC. Make this change in the Device Tab. Enter the configuration changes here first and then set the port(s) Transport Type to RTMP-WOWZA in the IP Streaming Tab.
HLS Streams can also be directly sent to a Wowza server. See the following Wowza link for additional details:
https://www.wowza.com/docs/how-to-publish-and-play-a-live-stream-apple-hls

23
Basic Operation
Stream RTMP to YouTube, Ustream, Twitch etc..
RTMP streams can be sent directly to a various servers such as YouTube, Ustream and Twitch for more widespread distribution of the AV signal.
1. Login to the Maestro web interface. See Logging In (page 3) for more information.
2. Select the SSL/RTMP tab.
• The right side of the screen will have fields used for streaming to a various servers.
• The URL field is the URL of the target server this stream should be sent to. See example above.
• The App. Name field is the Application this stream is being sent to connected to. This may be optional.
• The Login ID field is the Login Name configured on the target Server for this stream. This may be optional.
• The Password or Key field is the Password required for this stream to log into the target Server.
Note: The Digital Audio output from the MX4/MX2 must be set to AAC. Make this change in the Device Tab. Enter the configuration changes here first and then set the port(s) Transport Type to RTMP-YOUTUBE in the IP Streaming Tab.

Displaying Device Information
The Status page is automatically displayed after logging in to Maestro. This page displays video and audio input/output information, firmware version, and status messages.
1. Login to the Maestro web interface. See Logging In (page 3) for more information.
2. The Status tab will be selected automatically.
• The System field displays the name of the ZyPerMX4/MX2. This name can be changed. See the next page for more information.
• Click the “lightbulb” icon to physically identify the ZyPerMX4/MX2 on the network. When this icon is clicked, the Status LED indicator on the front panel will flash rapidly for about 10 seconds.
• The Video field displays the video input and output resolution. In the illustration below, the input is 720p60 and the output is 720p60. Video input and output resolution cannot be changed. To change the video bitrate see Adjusting Audio and Video Settings (page 15).
• The Audio field displays the input audio type and the output audio type.
• The Model field displays the name of the model of the ZyPerMX4/MX2.
• The Firmware field displays the current version of firmware.
• The Uptime field displays the time, in days and hours, since the unit was last re-booted.
• The Temp field displays the ZyPerMX4/MX2 unit internal temperature
• The Enet Average field displays current average output on the Ethernet port
Note: This field can be helpful to determine if HLS streaming level has been reached
• The Messages field receives messages reported by the ZyPerMX4/MX2, during operation.
24
Basic Operation

Changing the Device Name
By default, the ZyPerMX4/MX2 is automatically assigned a name by combining the string “ZyPerMX4” or “ZyPerMX2” and the MAC address of the ZyPerMX4/MX2. This name can easily be changed to something more descriptive using the procedure below.
1. Login to the Maestro web interface. See The Maestro Web Interface (page 3) for more information.
2. Click the Device tab.
3. Enter the desired name in the Device Name field.
4. Click the Apply button to save the changes or click the Reset button to cancel changes and revert to the previous settings.
25
Basic Operation

26
Basic Operation
Resetting the ZyPerMX4
The ZyPerMX4/MX2 can be reset to factory-default settings by clicking the Default button under the Device tab or by pressing the NAV / Control button on the unit. (See next page for details) When the ZyPerMX4 is reset to factory-default settings, the IP address will be reset to will be set to DHCP mode.
► Using Maestro
1. Login to the Maestro web interface. See The Maestro Web Interface (page 3) for more information.
2. Click the Device tab.
3. Click the Default button, under Actions.
4. The following dialog will be displayed, prompting to confirm the reset procedure.
5. Click the Reset button to reset the ZyPerMX4/MX2 to factory-default settings. Click the Cancel button to return to the Device tab.

27
► Using the Reset Button/Wheel (NAV / Control)
1. Locate the NAV / Control button on the front of the unit. This is both a button and wheel.
2. Disconnect power from the ZyPerMX4/MX2. While applying power, rotate dial to the Left to reset the ZyPerMX4/MX2 to factory defaults. Rotate dial to the Right to revert the ZyPerMX4/MX2 to previously installed version of firmware. Be sure to hold the dial either Right or Left until reboot begins.
3. The unit will reboot and after about 60 seconds, the unit will be ready for use.
Rebooting the ZyPerMX4/MX2
The ZyPerMX4/MX2 can be rebooted using Maestro. All configuration settings are saved through
reboots.
1. Login to the Maestro web interface. See Logging In (page 3) for more information.
2. Click the Device tab.
3. Click the Reboot button, under Actions.
4. Confirm the Reboot action to initiate the reboot.
Basic Operation

28
Basic Operation
Setting the Password
The default login password for the Maestro web interface is admin. This password can be changed using the following procedure. To recover a lost or forgotten password, see Recovering a Lost Password (page 29).
1. Login to the Maestro web interface. See Logging In (page 3) for more information.
2. Click the Device tab.
3. Click the Password button, under Actions.
4. Enter the new password in the top field, then retype the password in the bottom field. All passwords must be 4 to 16 characters in length and are restricted to alphanumeric (letters and numbers) characters.
5. Click the Change button to accept the changes. Click the Cancel button to return to the Device tab without any changes.

29
Basic Operation
Recovering a Lost Password
The ZyPerMX4/MX2 does not provide any built-in safeguards for lost or forgotten passwords. The ZyPerMX4/MX2 must be reset to factory-default settings using the NAV / Control button on the front panel. Use the admin password to login and then change the password under the Device tab.
1. Locate the NAV / Control button on the front of the unit. This is both a button and wheel.
2. Disconnect power from the ZyPerMX4/MX2. While applying power, rotate dial to the Left to reset the ZyPerMX4/MX2 to factory defaults. Rotate dial to the Right to revert the ZyPerMX4/MX2 to previously installed version of firmware. Be sure to hold the dial either Right or Left until reboot begins.
3. The unit will reboot and after about 60 seconds, the unit will be ready for use.
4. Follow the steps under Setting the Password (page 28) to complete the process.
Note: All IP streaming customization settings will be lost as a result of a factory reset.
30
Basic Operation
Updating the Firmware
Firmware updates will be available when required. Contact Technical Support for more information.
1. Download the firmware to the desired location on your computer.
2. Login to the Maestro web interface. See Logging In (page 3) for more information.
3. Click the Device tab.
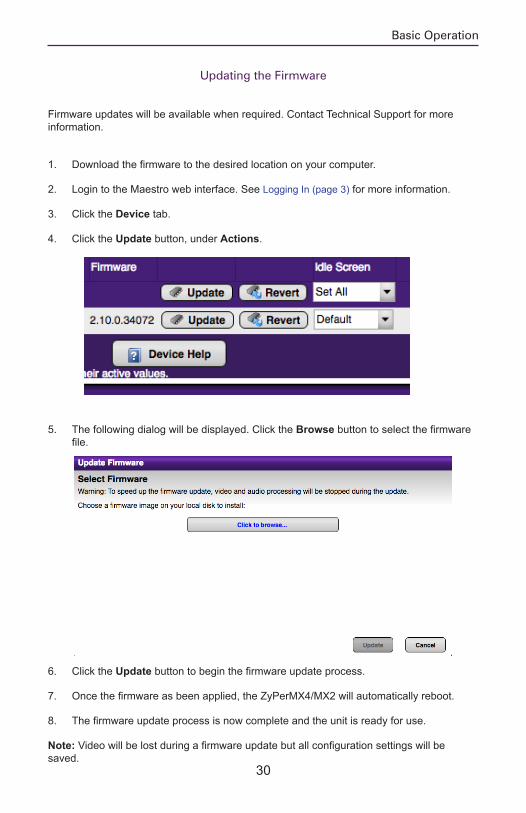
4. Click the Update button, under Actions.
5. The following dialog will be displayed. Click the Browse button to select the firmware file.
6. Click the Update button to begin the firmware update process.
7. Once the firmware as been applied, the ZyPerMX4/MX2 will automatically reboot.
8. The firmware update process is now complete and the unit is ready for use.
Note: Video will be lost during a firmware update but all configuration settings will be saved.
31
Basic Operation
STB TabDirecTV H.25 Set Top Box Control
The ZyPerMX4/MX2 has the ability to remotely control/manage DirecTV H.25 set top boxes. Important: If you do not have a DirecTV H.25 please do not make changes to any fields found in this tab.
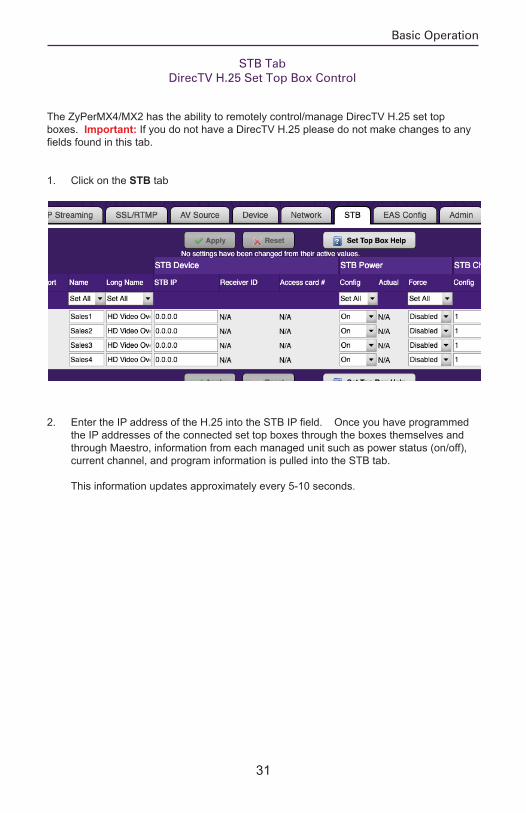
1. Click on the STB tab
2. Enter the IP address of the H.25 into the STB IP field. Once you have programmed the IP addresses of the connected set top boxes through the boxes themselves and through Maestro, information from each managed unit such as power status (on/off), current channel, and program information is pulled into the STB tab. This information updates approximately every 5-10 seconds.

32
Basic Operation

33
Basic Operation
The Support Page
The Support page is similar to the Status page and current information about the ZyPerMX4/MX2.
1. Login to the Maestro web interface. See Logging In (page 3) for more information.
Click the Support tab on the far-right of the screen. System
Shows the unit being managed.
Send Troubleshooting Report
This button allows for generating a troubleshooting report used by technical support to view the configuration and error logs of the unit. By default a ‘light’ version of the report is gener-ated. If the check box for a “full report” is checked the report may take several minutes to generate.
If the unit is connected to the internet and can communicate with the servers at ZeeVee, the reports generated will automatically be sent to the server. If the unit cannot communicate with servers at ZeeVee, an option to download the report will be shown and the report can be emailed to the support team at [email protected].
Serial
Serial number of the unit
Model
Model number of the unit (ZyPerMX4 or ZyPerMX2)

34
Basic Operation
Firmware
Firmware revision unit is currently running
Uptime
Total time since last boot
Boot Count
Total number of reboots the unit has gone through
Temp
The thermometer will show green (ok), orange (warning) or red (critical) and the temp listed is the average internal temperature of the unit
Current time
Time of the unit, always displayed in UTC. Time and Date can be set via an NTP server (Network tab)
Feature Enable Code
This field allows for ZeeVee to enable specially licensed features, such as private test mode(s), on a case by case basis. The code will be provided by ZeeVee technical support after specific approval from ZeeVee management. Enter the code into the field and click apply. A reboot is required for the code to take effect.
Please be sure to save the code information in a safe place. If the unit is reset to factory defaults the code will need to be reapplied.
3 Appendix

Appendix
36
Specifications
Video Input 2 or 4 x HDMI Type A, 19-pin, female
Input Signal 0.5 ~ 1.2 Vp-p
Input DDC Signal 5 Vp-p (TTL)
Video Output 1 x LAN (PoE), 10/100/1000Base-T
Output Type H.264/MPEG-4 AVC, HLS (Low/High datarate)
Video Encoding Bit Rate 1 Mbps ~ 10 Mbps (configurable)
Input / Output Resolutions 60 Hz
720 x 480i/p1280 x 720i/p 1920 x 1080i/p
Note: 480i converts to 480p60Note: 720i converts to 720p60Note: 1080i converts to 1080p60
50 Hz
720 x 576i/p Note: Converts to 1280 x 720p50
1920 x 1080i/p Note: 1080i to 1080p50
30 Hz
1280 x 720p 1920 x 1080p
25 Hz
1920 x 1080p
24 Hz
1920 x 1080p
Audio Input 2 or 4 x HDMI Type A, 19-pin, female, 4 x 3.5mm mini-jack (Analog audio)
Audio Sampling Rate 48 kHz
Audio Compression Format AC3, MP2, AAC
Operating Temperature +32 ºF to +113 ºF (0 ºC to +45 ºC)
Operating Humidity 10% to 90% (non-condensing)
Storage Temperature -4 ºF to +140 ºF (-20 ºC to +70 ºC)
Storage Humidity 10% to 90% (non-condensing)
Power Input 12V DC / 1A
Power Consumption 12W (max)
Dimensions (W x H x D) 7.09 in x 4.41 in x 1.34 in (180 mm x 112 mm x 34 mm)

37
Appendix
FAQ
Network
Question: In a Point to Point environment how should the MX4 or MX2 and STBi3 be configured?
Answer: First, on the networking front be sure that both the MX4/MX2 and STBi3 are set for static IP with addresses on the same subnet. ZeeVee would recommend RTP for P2P installations. RTP has more timing and synchronization information built into the protocol.
Question: In a network environment how best should the MX4/MX2 be configured?
Answer: In a network environment, the ZyPerMX4/MX2 should be configured for UDP/RTP and multicast.
Question: How does channel beaconing work?
Answer: The ZV channel beacon uses the 239.13.1.19 multicast address. The MX4/MX2 uses this address to publish its channels across the network. In a single layer 2 network this should always work. In a routed layer 3 network, this multicast address needs to be added to the router’s forwarding table explicitly. By default, routers will not forward this address. The actual command to do this varies by router.
Question: What is included in the beacon signal?
Answer: The beacon includes the multicast group, port and source IP address.
Question: What other Network protocols are required to support the ZyPerMX4/MX2?
Answer: For an installation of more than a couple of MX4/MX2 sources, the layer 2 Ethernet switch needs to be a smart switch that supports IGMP and multicast traffic management ands vary by vendor.
Question: Should every MX4/MX2 stream in the system be configured with a different multicast address? (UDP and RTP streaming)
Answer: Each MX4/MX2 stream needs to be configured for a different multicast address for proper stream bandwidth management. Network switches filter based on the IP multicast address only. If multiple MX4/MX2 streams are configured with the same multicast address with different ports, all the packets with that multicast address will be forwarded to any STBi3 tuned to any one of those channels. This will overwhelm the Ethernet processing on the STBi3 and cause video artefacts.
Question: What is the range of multicast addresses that can be used by the MX4/MX2?
Answer: The full range of multicast addresses is from 224.0.0.0 to 239.255.255.255

38
Appendix
Question: What is the maximum Router hop limit or TTL of a multicast stream?
Answer: The maximum hop limit is 9. Therefore, the TTL = 10.
Miscellaneous
Question: What is the max length of HDMI cable that can be used on the MX4/MX2 before it starts to not detect the source?
Answer: This will depend on the quality of the HDMI cable. ZeeVee has verified functionality with HDMI cables up to 25 feet in length.
Question: What is the recommended Video Bitrate setting for the ZyPerMX4/MX2 when streaming video to STBi3 devices?
Answer: The recommended Video Bitrate in this case is 6 Mbit/sec. Settings higher than this will cause unacceptable video breakup with the STBi3. Note that higher bitrates can be used when streaming to some other video decoders.
Question: Can the ZyPerMX4/MX2 strip out any HDCP encoding?
Answer: Please contact ZeeVee Support

39
Basic Operation
Recommended Switches
The following 1Gbit switches are recommended for use with the MX4/MX2. Please note this is not an all-inclusive list. There are many other switches available that will function with the MX4/MX2.
Manufacturer Model # Number of
1Gbit Ports
Notes
Netgear M4300-28G 24 Includes four 10Gb ports
Netgear M4300-52G 48 Includes four 10Gb portsNetgear M4300-28G-PoE+ 24 Supports PoE+Netgear M4300-52G-PoE+ 48 Supports PoE+Netgear S3300-28X 24 Includes four 10Gb portsNetgear S3300-52X 48 Includes four 10Gb portsNetgear S3300-28X-PoE+ 24 Supports PoE+Netgear S3300-52X-PoE+ 48 Supports PoE+Netgear GS728TP 24 Supports PoE+Arista 7010T-48 48 Includes four 10Gb portsLuxul XMS-7048P 48 Supports PoE+Luxul XMS-5248P 48 Supports PoE+Luxul XMS-2624P 24 Supports PoE+Luxul AMS-2624P 24 Supports PoE+Luxul AMS-4424P 24 Supports PoE+

40
Basic Operation
Switch Configuration Options
Some Switches will work directly out of the box with zero configuration required. Nearly all switches however will provide the user some ability to customize the configuration. The list below includes various switch configuration options that ZeeVee has encountered. Look for these or similar options when configuring your switch.
1. Enable IGMP Snooping a.Must be enabled 2. Enable IGMP Snooping on VLAN used by ZyPerMX2/4 a.Must be enabled when all ports default to VLAN1 3. Filter/Drop unregistered Multicast traffic a. If not applied, the behavior of the switch will be to broadcast multicast packets if the switch has no known destination for that packet. b. Must be enabled if found 4. Unregistered Multicast Flooding a.Must be disabled if found 5. Filter Unregistered Multicast (different wording than number 4 above) a.Must be enabled if found 6. Disable IGMP Query 7. Disable IGMP Query on VLAN used by ZyPerMX2/4 8. Validate IGMP IP Header a. Must be disabled if found 9. Set IGMP Version to IGMP V2 a. Must be set if found 10. Enable FASTLEAVE on port X a. Should be enabled, if found 11. Enable FASTLEAVE for VLAN used by ZyPerMX2/4 a. Should be enabled if found

41
LIMITED THREE YEAR WARRANTYZeeVee warrants your ZeeVee ZyPerMX4 Series of Equipment (“ZyPerMX4 Equipment”) against defects in materials and workmanship for a period of three (3) years from the date of purchase. ZeeVee’s limited warranty extends only to the original end user purchaser or any person receiving the ZeeVee ZyPerMX4 Equipment as a gift from the original end user purchaser and to no other purchaser or transferee. All warranties implied by law, including any implied warranties of merchantability and fitness for a particular purpose, are expressly limited to the duration of this express limited warranty. Some States do not allow limitations on how long an implied warranty lasts, so the above limitation may not apply to you.
EXCLUSIVE REMEDY FOR ZEEVEE ZyPerMX4 EQUIPMENT At the option of ZeeVee, the ZeeVee ZyPerMX 4Equipment will be repaired or replaced with a new, repaired or refurbished product (whichever ZeeVee deems as necessary) if it becomes defective or inoperative. If ZeeVee cannot reasonably repair or replace the ZeeVee ZyPer-MX4 Equipment then ZeeVee may, at its sole discretion, refund the original purchase price or the current retail price of the ZeeVee ZyPerMX4 Equipment. If ZeeVee chooses to repair or replace the ZeeVee ZyPerMX4 Equipment, or to refund the purchase price, this will be the exclusive remedy. With the exception of any warranties implied by the law of any state of the USA, this express limited warranty is exclusive and in lieu of all other warranties, guarantees, agreements and similar obligations of ZeeVee.
THE ABOVE WARRANTIES ARE SUBJECT TO ALL CONDITIONS LISTED BELOW:• You must have proof of purchase from an authorized ZeeVee dealer to receive warranty
service. A sales receipt or other document showing that you purchased the ZeeVee ZyPer MX Equipment is considered proof of purchase.
• Warranty coverage begins the day the original end user purchaser or any person receiv-ing the ZeeVee ZyPerMX4 Equipment as a gift from the original end user purchaser purchased the ZeeVee ZyPerMX4 Equipment.
• All ZeeVee ZyPerMX4 Equipment, including replacement products are covered only for the original warranty period. When the warranty on the original product expires, the war-ranty on the replacement product also expires.
• If we determine that the problem is not covered under the limited warranty, we will notify you and inform you of service or replacement alternatives that are available to you on a fee basis.
• In the case of a paid repair: at the option of ZeeVee, the ZeeVee ZyPerMX4 Equipment will be repaired or replaced with a new, repaired, refurbished, or comparable product (whichever ZeeVee deems as necessary).
• ZeeVee ZyPerMX4 Equipment must be purchased through an authorized ZeeVee Dis-tribution Partner and Dealer/Reseller. Check www.ZeeVee.com for a list of authorized distributors and a list of any expressly excluded Dealer/Resellers. ZeeVee does not war-rant equipment purchased through grey market resellers or certain internet resellers.
ZyPerMX4/MX2 Series of EquipmentZeeVee, Inc. July, 2018
Appendix
Warranty

42
Appendix
WHAT THESE WARRANTIES EXCLUDEYour warranties do NOT cover: • Labor charges for installation or set-up of the ZeeVee ZyPerMX4 Equipment.
• Shipping, tax or duty charges for return or replacement of unit
• Repairs or replacement due to misuse, accident, lightning damage, unauthorized repair, power surges, or other causes not within the control of ZeeVee.
• Any modifications or other changes to the ZeeVee ZyPerMX4 Equipment, including but not limited to software or hardware modification in any way other than as expressly authorized by ZeeVee, will void these limited warranties. Except in the case of hardware or software provided by ZeeVee, installing modifications, “hacks,” or utilizing service ac-cess or “back doors” will void these limited warranties.
• Reception or transmission problems caused by signal conditions, Internet connection problems, or any other communication systems outside the unit.
• Expendable accessories included in ZeeVee ZyPerMX4 Equipment such as batteries.
• Any ZeeVee ZyPerMX4 Equipment that has been modified or adapted to enable it to operate in any country other than the country for which it was designed, manufactured, approved, and/or authorized.
• Any ZeeVee ZyPerMX4 Equipment that has altered or missing serial numbers.
• Any ZeeVee ZyPerMX4 Equipment that has been opened or otherwise tampered with.
• Problems that are directly caused as a result of using any third party accessories, parts or components.
MAKE SURE YOU KEEP…Please keep your sales receipt and any other documentation showing proof of purchase. Also, keep the original box and packaging material in case you need to return your ZeeVee ZyPerMX4 Equipment.
TO GET WARRANTY SERVICEWarranty service will be provided by ZeeVee. If you believe you need service for your Zee-Vee ZyPerMX4 Equipment, please contact ZeeVee by calling our Customer Care Center at (877)-4ZeeVee; (877)-493-3833. If it is determined that the product needs to be returned for service or exchange, you will receive a Return Material Authorization (“RMA”) number. Our agents will help you through the process through which you can return the product. ZeeVee is not respon-sible for Customer products received without an RMA number and may reject such products.
TO GET OUT-OF-WARRANTY SERVICETo obtain out-of-warranty service for your ZeeVee ZyPerMX4 Equipment, please contact Zee-Vee by calling our Customer Care Center at (877) 4ZEEVEE; (877) 493-3833 for information on the possibility of and any costs for repair or replacement of out-of-warranty products. No agent, company, dealer, distributor, or person is authorized to change, modify, or extend the terms of these warranties in any manner.
LIMITATION OF LIABILITYIn no event will ZeeVee be liable for any amount greater than the retail price of the ZeeVee ZyPerMX4 Equipment. ZeeVee shall not be liable for any incidental or consequential dam-ages (including lost profits) for breach of any express or implied warranty on the ZeeVee ZyPerMX4 Equipment. Some States do not allow the exclusion or limitation of incidental or consequential damages, so the above limitation or exclusion may not apply to you. This warranty gives you specific legal rights and you may also have other rights, which vary from State to State.

BOSTON | DENVER | LONDONwww.zeevee.com
North America: +1 (347) 851-7364 • [email protected]: +1 (347) 851-7364 • [email protected]: +44 1494 956677 • [email protected] Z
yPer
MX
_Man
ual_
Rev
A 2
016-
06