zxtech ip camera how to setup tropox camera
TRANSCRIPT


Questions? Visit our website: domar.com or contact us at [email protected] 2
Contents PHYSICAL CAMERA ............................................................................................................................................. 3
INSTALLING CAMERA SOFTWARE ...................................................................................................................... 4
Search Tool ....................................................................................................................................................... 6
CAMERA CONFIGURATION ................................................................................................................................ 11


Questions? Visit our website: domar.com or contact us at [email protected] 4
INSTALLING CAMERA SOFTWARE
1. First insert the CD that is found with the camera into the computer. Find the “PC Search Tool” and install it.
2. The following window pop up; click next until the installation is complete. You can select
“Browse...” should you wish to change the installation location.

Questions? Visit our website: domar.com or contact us at [email protected] 5
3. From the start menu you can find the tool. You can type in “search tool” if you cannot
find it from the programs list.

Questions? Visit our website: domar.com or contact us at [email protected] 6
Search Tool
1. Click the Search tool software; once opened, click the “Next” button.

Questions? Visit our website: domar.com or contact us at [email protected] 7
2. The following window shall come next. This will display the IP addresses of all the
cameras that are connected on the network. Should the camera not appear, please double check physical connections.
3. Select the camera that you wish to configure first , as seen under A; the “Next” icon shall
then become clickable/selectable (Refer to B.)

Questions? Visit our website: domar.com or contact us at [email protected] 8
4. You can select the “Refresh” button to find any newly connected camera. Refer to C.
5. The following window shall come after you select “Next”. Please make note of the IP
Address. (Refer to D.) Then you will need to click “Next”.

Questions? Visit our website: domar.com or contact us at [email protected] 9
6. Wait for the process to finish.
7. Once the process is complete, the following window will come next; Click “Finish”.
ACCESSING THE CAMERA

Questions? Visit our website: domar.com or contact us at [email protected] 10
For the next steps you will need the IP address. (Refer to step 5.)
1. You can use google chrome for this process.; type the IP address into the
search bar of the web browser. (Refer to A.)
Once you search for the IP address the following window will appear; refer to B.

Questions? Visit our website: domar.com or contact us at [email protected] 11
2. Enter the log in details for the camera, (refer to C). Remember the camera and recorder
have separate log in details. 3. Click the “Sign in” button to proceed.
CAMERA CONFIGURATION
1. Once you have successfully logged into the camera, the following windows shall load.
Please choose the desired language from the top right.
2. Select the first option of the menu “PC view”.

Questions? Visit our website: domar.com or contact us at [email protected] 12

Questions? Visit our website: domar.com or contact us at [email protected] 13
3. The following screen will load, with no image. Click the icon, (refer to A). Once B.
appears, you will want to select “Allow”. This will then bring you the live view of the camera.

Questions? Visit our website: domar.com or contact us at [email protected] 14
4. Once the live view is active; move onto the configuration of the cameras Wi-Fi. Select
settings (C.) > Network (D.) > Wireless (E.). This will then give you access to cameras Wi-Fi settings.

Questions? Visit our website: domar.com or contact us at [email protected] 15
5. The following screen will load. Left click on the “Search”, the camera will then search
for all the nearest Wi-Fi connections.

Questions? Visit our website: domar.com or contact us at [email protected] 16
6. The following window will pop up. The “SSID” will be the name of your network. Make
sure you are familiar with this; in order to select the correct network. The “ RSSI” is the ‘latency’ or signal strength. This should be 70 or above, anything lower can cause your camera to disconnect/lose connection.

Questions? Visit our website: domar.com or contact us at [email protected] 17
7. Select “Join” on your network/SSID.

Questions? Visit our website: domar.com or contact us at [email protected] 18
8. The following window (F.) will then fill out, after you selected “ join” (see step 7.).
The key is the password of your network. This is commonly found on the wireless router, unless it has been changed.

Questions? Visit our website: domar.com or contact us at [email protected] 19
9. You must click “Apply” for the settings/configuration to be saved. There will be NO
indication that it has been saved. However, you can check the connection in the next
step.
Questions? Visit our website: domar.com or contact us at [email protected] 20
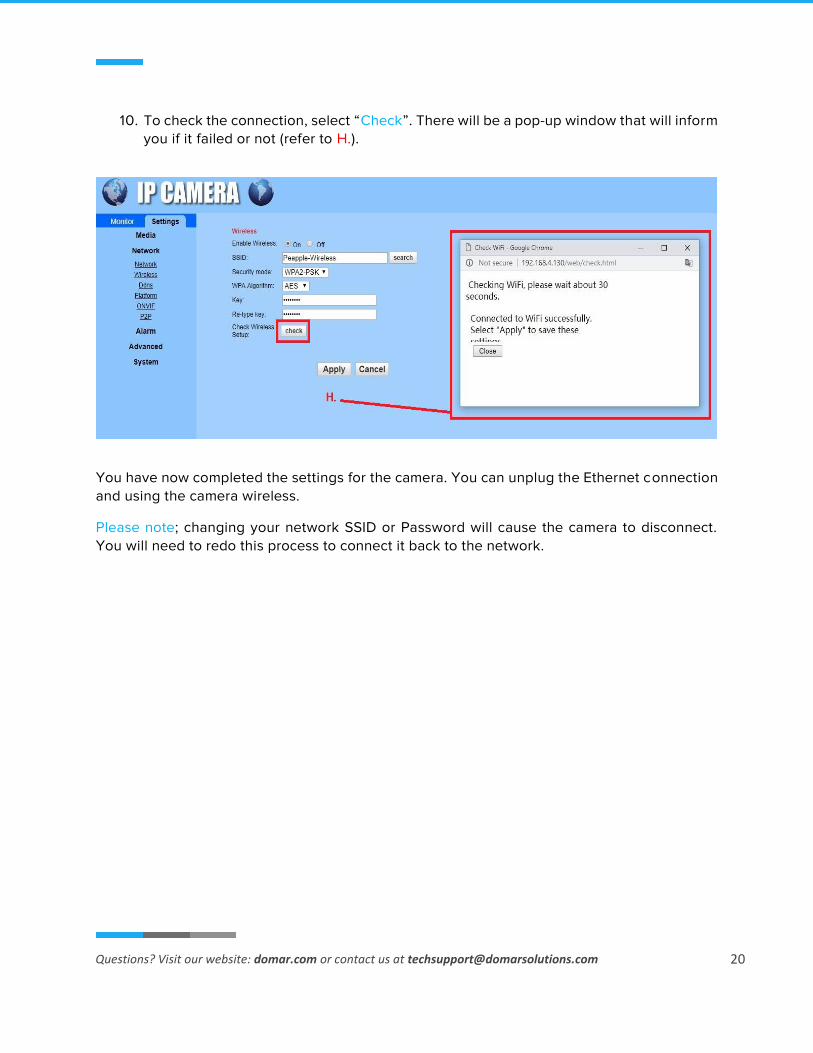
10. To check the connection, select “Check”. There will be a pop-up window that will inform you if it failed or not (refer to H.).
You have now completed the settings for the camera. You can unplug the Ethernet connection and using the camera wireless.
Please note; changing your network SSID or Password will cause the camera to disconnect. You will need to redo this process to connect it back to the network.