your passion. the right place. - campingzoo.it · situazione di rischio sospendere la salita e...
TRANSCRIPT

YOUR PASSION. THE RIGHT PL ACE .

2
CIMA CAPI / MONTE ROCCHETTA
VIA FERRATAGARDA TRENTINO, FEEL THE VERTICAL THRILL
www.gardatrentino.it/outdoor
2

3
5SPORT
ACADEMIES
13HOTELS & CO
6MOUNTAIN HUTS
7FERRATAS
30SHOPS
3
4
Tenno
Riva del GardaLedro
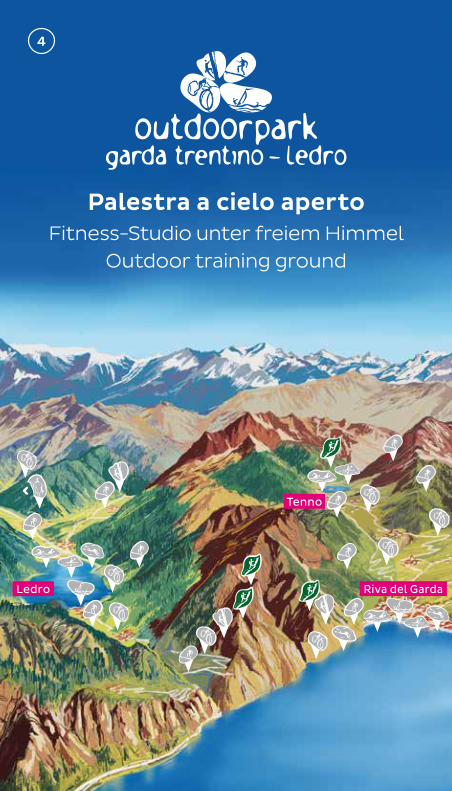
Palestra a cielo apertoFitness-Studio unter freiem Himmel
Outdoor training ground
4

5
Arco
Nago
Dro Drena
Torbole sul Garda
5
BIKE/ROAD BIKE Cycling, Mtb, E-bike,
E-mtb, Gravity
CLIMBING VIA FERRATATREKKING Hiking, Trail Running, Running
WATER SPORTS Canoeing, Canyoning, Diving, Fishing, Kitesurfing, Sailing, Sup, Windsurfing

6
Le vie ferrate del Garda Trentino e della Valle di Ledro Die Klettersteige Vie ferratas
IT Nel Garda Trentino e Valle di Ledro c’è una via ancora più verticale per gli appassionati dell’escursionismo: è il patrimonio delle ferrate che rappresentano una risorsa unica e insostituibile del territorio.
Parliamo di percorsi in parete che richiedono attrezzatura specifica (casco, imbragatura, set di sicurezza) e anche un minimo di conoscenze tecniche e allenamento in rapporto alla difficoltà della via scelta.
Tra tutte forse la più nota è la Ferrata Via dell’Amicizia-Cima Sat, una delle più famose e frequentate dell’intero Trentino. Si snoda sulla parete della Rocchetta, proprio a picco sul Lago. È impegnativa dal punto di vista fisico ma compensa con scorci panoramici assolutamente indimenticabili.
Altrettanto spettacolari la “Fausto Susatti” a Cima Capi, sempre a Riva del Garda, la Colodri ad Arco, il Sentiero attrezzato degli Scaloni a Dro, la difficile e impegnativa “Che Guevara” a Dro, la “Rio Sallagoni” a Drena, suggestiva ferrata family friendly di difficoltà media, che si snoda lungo la forra del Rio Sallagoni.
7
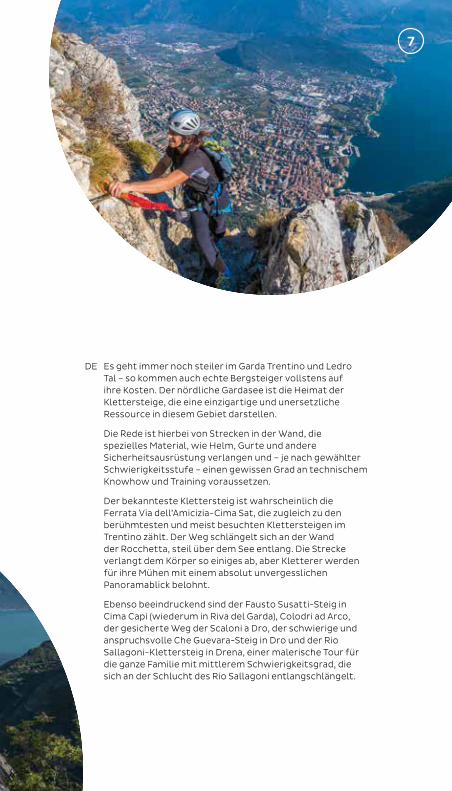
DE Es geht immer noch steiler im Garda Trentino und Ledro Tal – so kommen auch echte Bergsteiger vollstens auf ihre Kosten. Der nördliche Gardasee ist die Heimat der Klettersteige, die eine einzigartige und unersetzliche Ressource in diesem Gebiet darstellen.
Die Rede ist hierbei von Strecken in der Wand, die spezielles Material, wie Helm, Gurte und andere Sicherheitsausrüstung verlangen und – je nach gewählter Schwierigkeitsstufe – einen gewissen Grad an technischem Knowhow und Training voraussetzen.
Der bekannteste Klettersteig ist wahrscheinlich die Ferrata Via dell’Amicizia-Cima Sat, die zugleich zu den berühmtesten und meist besuchten Klettersteigen im Trentino zählt. Der Weg schlängelt sich an der Wand der Rocchetta, steil über dem See entlang. Die Strecke verlangt dem Körper so einiges ab, aber Kletterer werden für ihre Mühen mit einem absolut unvergesslichen Panoramablick belohnt.
Ebenso beeindruckend sind der Fausto Susatti-Steig in Cima Capi (wiederum in Riva del Garda), Colodri ad Arco, der gesicherte Weg der Scaloni a Dro, der schwierige und anspruchsvolle Che Guevara-Steig in Dro und der Rio Sallagoni-Klettersteig in Drena, einer malerische Tour für die ganze Familie mit mittlerem Schwierigkeitsgrad, die sich an der Schlucht des Rio Sallagoni entlangschlängelt.
7

8
EN The via ferratas provide hikers with even steeper trails in Garda Trentino and Valle di Ledro and are a singular resource for the entire area.
What we are dealing with here are trails which go up rock faces and require specific equipment (helmet, harness, ferrata kit) as well as basic technical know-how and fitness levels according to the difficulty of the trail chosen.
Perhaps the best known of them all is the Ferrata Via dell’Amicizia-Cima Sat, one of the most famous and popular in all Trentino, which winds up the side of Rochetta sheer above the lake. Physically it is tough, but the breathtaking views more than make up for the effort.
Equally spectacular ferratas are the Fausto Susatti to Cima Capi which is also in Riva del Garda, the Colodri in Arco, and the bolted Scaloni trail in Dro, the difficult and challenging Che Guevara in Dro, the Rio Sallagoni in Drena, and a panoramic family-friendly ferrata for medium-level hikers through the Rio Sallagoni canyon.
8

9

10
Mountain GuideARCO MOUNTAIN GUIDEArco Cell. +39 330 567285 [email protected] www.arcomountainguide.com pag. 39
bit.ly/ArcoMountainGuide BOOK HERE
CANYON ADVENTURESTorbole sul Garda Tel. +39 0464 505406 Cell. +39 334 8698666 [email protected] www.canyonadv.com pag. 27
bit.ly/CanyonAdventures BOOK HERE
FREE ALP MOUNTAIN GUIDE SERVICEVia Segantini, 86 - Arco Cell. +39 327 6639300 - +39 347 3794259 [email protected] pag. 43
bit.ly/FreeAlp BOOK HERE
LOL GARDA BY LIVE OUTDOOR LIFEViale Rovereto 23/B - Riva del GardaCell. +39 328 [email protected] pag. 35
bit.ly/lolgarda BOOK HERE
MMOVE INTO NATUREVia Legionari Cecoslovacchi, 14 loc. Prabi - 38062 Arco (TN)Cell. +39 334 2193862 Cell. +39 338 [email protected] - www.mmove.net
bit.ly/FriendsofArco BOOK HERE
MOUNTIME OUTDOOR ADVENTURES Via P. Caproni Maini, 26e - Arco Cell. +39 334 7734133 [email protected] www.mountime.com pag. 55
bit.ly/Mountime BOOK HERE
Shop, Rental & Mountain Guide Service
BOOK IT Offers & Activities

11
TRENTINO CLIMBValle di Ledro Cell: +39 347 7847082 [email protected] www.trentinoclimb.com pag. 25
bit.ly/TrentinoClimb BOOK HERE
Shop & RentalCHIOSCO AL CASTELLOVia Roma, 8 - DrenaCell. +39 335 [email protected]/chioscoalcastello.drena
http://bit.ly/chioscoalcastello BOOK HERE
GOBBI SPORTVia Segantini, 49 e 72 - ArcoTel. +39 0464 [email protected] - www.gobbisport.it pag. 31
bit.ly/GobbiSport BOOK HERE

12
Via Ferrata safely
IT REGOLE DI SICUREZZA Intraprendere la salita della via ferrata solo in buone condizioni fisiche e
in ottima salute.
Non intraprendere la salita della via ferrata con condizioni meteorologiche avverse, particolarmente in caso di minaccia di temporale.
Non intraprendere la salita della via ferrata da soli, in caso di incidente nessuno potrà lanciare l’allerta.
Con la presenza di altri escursionisti, vento o pioggia il pericolo di caduta sassi aumenta.
Verificare sempre la percorribilità degli itinerari; in alcuni itinerari nel periodo invernale si possono trovare neve e ghiaccio che rendono pericolosa la progressione.
Utilizzare adeguate attrezzature e tecniche di assicurazione (casco, imbragatura, set di assicurazione con doppio moschettone a bloccaggio automatico e dissipatore di energia); indossare il casco già in prossimità della parete, potrebbero verificarsi cadute di sassi anche prima di raggiungere l’inizio della via ferrata.
Durante la progressione agganciare sempre ambedue i moschettoni al cavo di sicurezza, al passaggio degli ancoraggi mantenere sempre almeno un moschettone agganciato al cavo di sicurezza.
Nel tratto di cavo tra due ancoraggi non deve trovarsi più di un’escursionista.
Indossare abbigliamento adeguato alla quota, alla stagione e alla lunghezza dell’itinerario, scarponcino, guanti da ferrata per proteggere dal contatto con le parti metalliche.
Nei tratti più facili privi di cavo di sicurezza mantenere alta l’attenzione.
Controllare sempre lo stato delle attrezzature in parete che possono venire danneggiate dagli eventi atmosferici. Nel caso si riscontrino o si sospettino problemi che possano comprometterne la tenuta o altra situazione di rischio sospendere la salita e comunicare la situazione al seguente indirizzo e-mail [email protected].
In caso di emergenza chiamare il numero 112.
Queste indicazioni non sostituiscono gli specifici corsi tenuti dalle associazioni alpinistiche o dalle Guide Alpine, in caso di inesperienza farsi accompagnare da una guida alpina.
1
5
10
11
12
13
3
7
2
6
4
9
8
12

13
DE REGELN FÜR IHRE SICHERHEIT Unternehmen Sie den Aufstieg im Klettersteig nur dann, wenn Sie sich in
guter körperlicher Verfassung befinden.
Unternehmen Sie den Aufstieg im Klettersteig NICHT bei ungünstigen Witterungsbedingungen, insbesondere NICHT bei Gewitterrisiko.
Begeben Sie sich NIE allein in den Klettersteig, da im Notfall niemand Alarm schlagen kann.
Andere Bergsteiger, Wind und Regen erhöhen die Gefahr von Steinschlägen.
Prüfen Sie immer die Begehbarkeit der Wege; auf einigen Strecken können in den Wintermonaten Schnee- und Eisfelder das Durchkommen erschweren.
Verwenden Sie angemessene Ausrüstung bzw. Sicherungstechniken (Helm, Klettergurt, Klettersteigset mit Doppelkarabiner mit automatischer Verschlusssicherung und Klettersteigbremse). Tragen Sie bereits auf dem Weg zur Wand einen Helm, da Steinschläge auch vor dem Erreichen des eigentlichen Klettersteigs eine Gefahr darstellen.
Haken Sie beim Übersteigen immer beide Karabiner im Sicherungsseil ein, und lassen Sie beim Passieren des Fixpunktes immer wenigstens einen Karabiner im Sicherheitsseil eingehakt.
Im Seilabschnitt zwischen zwei Fixpunkten darf sich immer nur ein Bergsteiger befinden.
Tragen Sie für die Höhe, Jahreszeit und Routenlänge angemessene Kleidung, Kletterschuhe und Klettersteighandschuhe, um die Hände beim Kontakt mit Metallteilen zu schützen.
Besondere Wachsamkeit gilt auf einfacheren Streckenabschnitten ohne Sicherungsseil.
Kontrollieren Sie den Zustand der Hilfs- bzw. Sicherungsmittel in der Wand, da diese von der Witterung in Mitleidenschaft gezogen werden und so beschädigt sein können. Im Fall von Problemen oder Zweifeln, was den sicheren Halt in der Wand betrifft, oder in jeder anderen Gefahrensituation, brechen Sie den Aufstieg umgehend ab und schildern Sie die Situation per E-Mail an [email protected].
Notruf: 112
Diese Hinweise ersetzen in keiner Weise die speziellen Kurse, die von den Alpenvereinen und Bergführern angeboten werden. Falls Sie nur über geringe Klettererfahrung verfügen, sollten Sie sich immer von einem Bergführer begleiten lassen.
1
5
10
11
12
13
3
7
2
6
4
9
8

14
EN SAFETY REGULATIONS Only do the via ferrata if you are reasonably fit and in excellent health.
Do not do the via ferrata in bad weather, especially if it looks like a storm is coming.
Do not do the via ferrata alone: if you have an accident nobody will be able to call for help.
The risk of rock falls increases if there are others on the via ferrata or with wind or rain.
Always check route conditions; in winter you may find snow and ice on some routes which make progression dangerous.
Use proper safety gear (helmet, harness, ferrata kit with double self-locking carabiners and energy absorbing systems); put on your helmet once you get near to the wall. Rocks might fall before you get to the start of the via ferrata.
During progression always keep both carabiners clipped onto the safety cable and when you pass the anchor points make sure at least one is clipped on to each safety cable.
Only one person may be on any length of cable between two anchor points.
Wear clothing suited to the altitude, the season and the length of the route: hiking boots and ferrata gloves to protect you from contact with the metal parts.
Pay special attention on the easy parts where there are no cables.
Always check the condition of the bolts and cables on the wall as they can suffer damage in bad weather. If you even think you see any problems that might compromise safety, turn back and let us know about the situation at [email protected].
In an emergency call 112.
These instructions are no substitute for the specific courses held by mountaineering associations or professional guides. Unless you have experience doing via ferratas, it is better to go accompanied by a mountain guide.
1
5
10
11
12
13
3
7
2
6
4
9
8

15
Punto di partenza Ausgangsort Departure point
Punto di arrivo Ziel Arrival point
Sentiero Cai-Sat Weg Path
Dislivello Höhenunterschied Ascent
Durata Zeit Duration
Esposizione Richtung Aspect
Periodo Jahreszeit Period
Difficoltà Schwierigkeitsgrad Difficulty
Tratti attrezzati ausgebaute Strecken equipped routes
Tratti non visibili Strecke mit teilweise nicht sichtbarem Verlauf Trail partially not visible
LegendaZeichenerklärung Key to symbols
Le vie ferrate del Garda Trentino sono anche su via-ferrata.de! Informazioni aggiornate, commenti e forum con esperti: tutto sul tema ferrata.
Informationen zu den Klettersteigen der Garda Trentino Region finden Sie auf via-ferrata.de. Hier gibt es aktuelle Infos, Kommentare, ein Expertenforum: Alles rund um das Thema Klettersteig.
The via ferratas of the Garda Trentino region are also on via-ferrata.de! Updated information, comments and a forum with experts: all about via ferratas.
15

16
“Ferrata dell’Amicizia” Cima S.A.T.
Riva del Garda
Cima Sat (1276 mt.)
nr. 404/B
mt. 1200: di cui 650 attrezzati davon 650 ausgebaut 650 m bolted
h. 6/7
Est Osten East
Tutto l’anno ganzjährig all year round
EEA: Ferrata di medio impegno. Esposta. Mittelschwerer Klettersteig. Ausgesetzt. Medium difficulty ferrata. Exposed.
ACCESSO/ZUSTIEG/ACCESS
Da Riva del Garda salire lungo il sentiero SAT 404 e raggiungere Capanna Santa Barbara. Proseguire su SAT 404, prendere poi il sentiero SAT 404B fino all’attacco della ferrata.
Von Riva del Garda aus geht es über den SAT 404 bergan, bis zur Capanna Santa Barbara. Gehen Sie auf dem SAT 404 und dann auf dem SAT 404B weiter bis zum Einstieg des Klettersteigs.
From Riva del Garda head up along the trail SAT 404 which takes you to the mountain hut Capanna Santa Barbara. Continue on SAT 404, then take SAT 404B to the start of the ferrata.

17
RIENTRO/RÜCKWEG/RETURN
Abbiamo due possibilità:
• dalla cima scendere sul versante opposto lungo un tratto attrezzato, fino alla forcella dove si prende a destra il Sentiero dei Crazidei SAT 418 e poi SAT 402 che scende a Riva del Garda
• scendere il tratto attrezzato fino alla forcella, da qui a sinistra per cenge attrezzate con fune metallica SAT 413 , lasciato a destra il sentiero per il Bochet de Concolì, si segue il sentiero SAT 404, si raggiunge il bivio dove si stacca il sentiero SAT 404 A per Bocca d’Enzima. Tenendo a sinistra su SAT 404 si raggiunge, con una breve scala (6) , la chiesetta di Santa Barbara e quindi la Capanna e si ripercorre a ritroso il sentiero di salita.
Es gibt zwei Möglichkeiten:
• Sie steigen vom Gipfel über die entgegengesetzte Seite auf einem gesicherten Weg ab, bis zur Scharte, an der Sie rechts den Sentiero dei Crazidei SAT 418 und dann den SAT 402 hinunter nach Riva del Garda einschlagen.
• Sie steigen den gesicherten Weg bis zur Scharte ab, gehen dann links, den mit Drahtseilen gesicherten Bändern SAT- Weg 413 entlang . Sie gehen vorbei am Weg zum Bochet de Concolì rechterhand und folgen den SAT-Weg 404, erreichen so die Weggabelung, an der, der SAT- Weg 404 A zur Bocca d‘Enzima abzweigt. Wenn man links auf dem SAT 404 bergab geht, erreicht man über eine kurze Leiter (6) zuerst die Kapella Santa Barbara und dann die Capanna. Zurück geht es auf dem Zustiegsweg, in umgekehrter Richtung.
There are two options:
• from the summit head down the other side along a bolted section until the fork in the trail where you take the right hand trail, Sentiero dei Crazidei SAT 418, and then SAT 402 which descends to Riva del Garda
• descend the bolted section as far as the fork and then head left over ledges bolted with metal cables on SAT 413, leaving the trail for Bochet de Concolì on your right, follow the trail SAT 404 and then you come to the junction where the trail SAT 404 A goes towards Bocca d’Enzima. Go down to the left on SAT 404 where a short ladder (6) takes you to the chapel of Santa Barbara and to the mountain hut of the same name and from there you follow the trail back, where you started from.
18
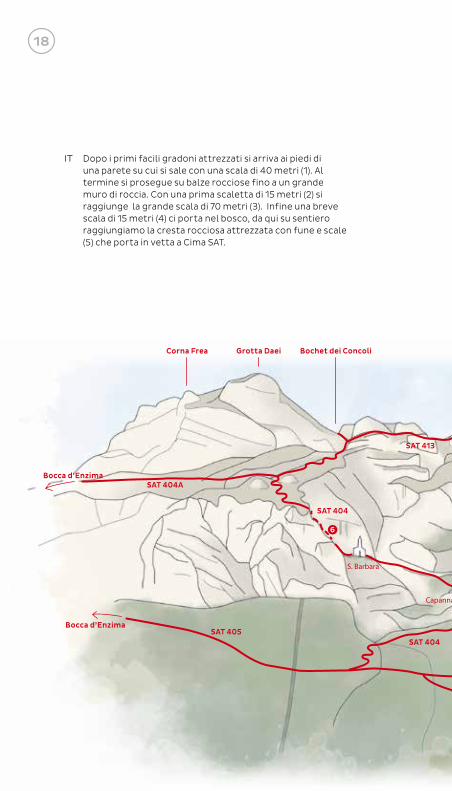
IT Dopo i primi facili gradoni attrezzati si arriva ai piedi di una parete su cui si sale con una scala di 40 metri (1). Al termine si prosegue su balze rocciose fino a un grande muro di roccia. Con una prima scaletta di 15 metri (2) si raggiunge la grande scala di 70 metri (3). Infine una breve scala di 15 metri (4) ci porta nel bosco, da qui su sentiero raggiungiamo la cresta rocciosa attrezzata con fune e scale (5) che porta in vetta a Cima SAT.
Capanna S. Bar
S. Barbara
Corna Frea
Bocca d’Enzima
Bocca d’Enzima
SAT 404A
SAT 405SAT 404
SAT 404
SAT 413
Grotta Daei Bochet dei Concolì
6

19
DE Den Anfang bilden leicht begehbare, große Stufen. Dann führt eine 40 Meter lange Leiter (1) eine Wand hinauf. Es folgen Felsvorsprünge bis zu einer großen Felswand. Dann führen in den Felsen gehauene Trittbügel (2) über 15 Meter hinauf zur großen, 70 Meter langen Leiter (3). Zum Schluss bringt Sie eine kurze Leiter von 15 Metern Länge (4) auf einen Waldweg, über den Sie den felsigen Grat mit Seil und Leitern (5) erreichen, der bis auf den Gipfel Cima SAT führt.
EN After the first easy bolted slabs you come to the foot of a wall which you ascend by means of a 40 metres ladder (1). At the other end, you proceed on rocky outcrops until you come to a big rock wall. A first ladder 15 metres long (2) takes you to the 70 metres ladder (3). Finally a short ladder of just 15 metres (4) takes you into the woods and from there, a trail takes you to the rocky ridge bolted with cables and ladders (5) which takes you to the summit of Cima SAT.
Capanna S. Barbara
SAT 404
SAT 418 - Sentiero dei Crazidei
Sentiero dei Crazidei
Campi Strada della Pinza
SAT 404B FERRATA DELL’AMICIZIA
SAT 402
Riva del Garda
Bastione
Giochello Cima SAT
2
1
4
3
5

20
“Fausto Susatti” a Cima Capi
Val Sperone 3 km da Riva, lungo sentiero del Ponale 3 km von Riva entfernt, entlang des Ponalewegs 3 km from Riva, along the Ponale Path
Da Biacesa in Valle di Ledro (Vedi Cima Capi pag. 29) Von Biacesa im Ledrotal (siehe Cima Capi, S. 29) From Biacesa in Valle di Ledro (see Cima Capi p. 29)
Cima Capi (907 mt.)
nr. 405 o nr. 470 da Biacesa
mt. 900 o mt 500 da Biacesa: di cui 300 attrezzati davon 300 ausgebaut 300 m bolted
h. 5/6
Sud Süd South
Tutto l’anno ganzjährig all year round
EEA:Panoramica e poco esposta Mittelschwerer Klettersteig. Schöne Aussicht und wenig ausgesetzt Panoramic and not particularly exposed
ACCESSO/ZUSTIEG/ACCESS
Da Riva del Garda (v. Cima Capi) salire lungo il sentiero del Ponale, imboccare a destra il sentiero SAT 405 Fausto Susatti fino ad incrociare il sentiero SAT 470 del Bech (1).Da Biacesa in Valle di Ledro (Vedi Cima Capi pag. 29) seguire le indicazioni per sentiero SAT 470. Lasciando a sinistra il sentiero SAT 471 Delle Laste, che sale alla Cima Rocca, seguire le indicazioni per la ferrata Susatti, fino all’incrocio con il sentiero SAT 405 (1).
Von Riva del Garda (siehe Cima Capi) Aufstieg über den Sentiero del Ponale, dann rechts über den SAT-Weg 405 Fausto Susatti bis zur Kreuzung mit dem SAT 470 del Bech (1).Von Biacesa im Ledrotal (siehe Cima Capi, S. 29) Folgen Sie den SAT 470-Wegweisern. Verlassen Sie links den SAT 471 Delle Laste, der bis zur Cima Rocca hinaufführt und folgen Sie den Wegweisern zum Susatti-Klettersteig, bis zur Kreuzung mit dem SAT 405 (1).
From Riva del Garda (see Cima Capi) head up the Ponale trail, turn off to the right onto the trail SAT 405 Fausto Susatti until you come to the junction with the trail SAT 470 del Bech (1).From Biacesa in Valle di Ledro (see Cima Capi p. 29) follow directions for the trail SAT 470. Leave the trail SAT 471 Delle Laste, which leads up to Cima Rocca on your left, follow directions for ferrata Susatti until you come to the junction with the trail SAT 405 (1).

2121

22
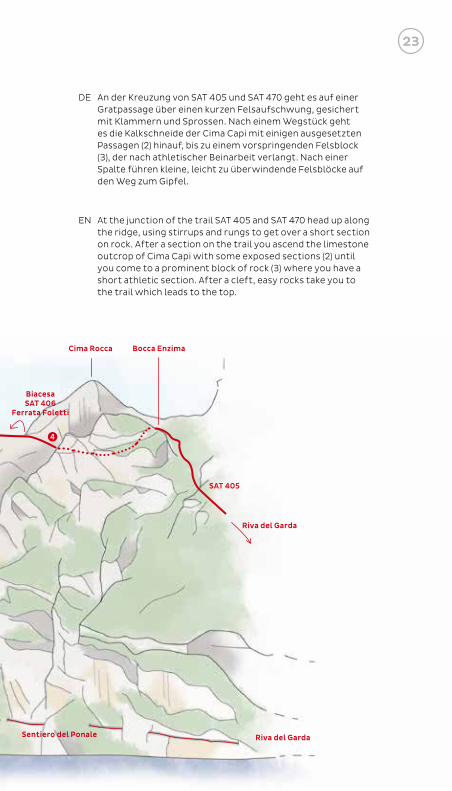
IT All’incrocio tra il sentiero SAT 405 e SAT 470 salire lungo il filo di cresta superando un breve salto roccioso grazie a staffe e pioli. Dopo un tratto di sentiero si risale la lama calcarea della Cima Capi con alcuni tratti esposti (2) , fino a raggiungere un blocco roccioso prominente (3) che obbliga a un breve passo atletico. Dopo una spaccatura, facili roccette portano al sentiero che conduce alla cima.
SAT 405
Cima Capi
BiacesaSAT 470
FERRATA F. SUSATTI
Sentiero del Ponale
2
1
3
23
DE An der Kreuzung von SAT 405 und SAT 470 geht es auf einer Gratpassage über einen kurzen Felsaufschwung, gesichert mit Klammern und Sprossen. Nach einem Wegstück geht es die Kalkschneide der Cima Capi mit einigen ausgesetzten Passagen (2) hinauf, bis zu einem vorspringenden Felsblock (3), der nach athletischer Beinarbeit verlangt. Nach einer Spalte führen kleine, leicht zu überwindende Felsblöcke auf den Weg zum Gipfel.
EN At the junction of the trail SAT 405 and SAT 470 head up along the ridge, using stirrups and rungs to get over a short section on rock. After a section on the trail you ascend the limestone outcrop of Cima Capi with some exposed sections (2) until you come to a prominent block of rock (3) where you have a short athletic section. After a cleft, easy rocks take you to the trail which leads to the top.
SAT 405
Bocca EnzimaCima Rocca
Riva del Garda
BiacesaSAT 406
Ferrata Foletti
Riva del GardaSentiero del Ponale
4

24
RIENTRO/RÜCKWEG/RETURN
Dal punto più alto scendere in direzione nord, facile ma in grande esposizione, fino a raggiungere la forcella tra Cima Capi e Cima Rocca. Da qui è possibile scendere verso Riva del Garda o Biacesa.
• Per Riva del Garda (v. Cima Capi) scendere verso nord attraversando la parete est di Cima Rocca ( 4 ) e la successiva valletta; lasciato a sinistra il sentiero per Bocca Pasumer si raggiunge Bocca Enzima. Scendere sul versante affacciato su Riva del Garda fino alla condotta forzata e al sentiero SAT 405 che porta a Riva del Garda.
• Per Biacesa (v. Cima Capi 2) prendere a sinistra la ferrata Mario Foletti SAT 406 che attraversa la parete meridionale di Cima Rocca e porta al Bivacco Arcioni in circa 40’. Da qui scendere a Biacesa con il ripido sentiero SAT 460, passando dalla chiesetta di San Giovanni.
Vom höchsten Punkt bergab in nördlicher Richtung, leicht gehbar, aber sehr ausgesetzt, bis zur Scharte zwischen Cima Capi und Cima Rocca. Von hier aus können Sie nach Riva del Garda oder Biacesa absteigen.
• Nach Riva del Garda (siehe Cima Capi) Abstieg nach Norden über die Ostwand der Cima Rocca (4) und das nachfolgende Tal; verlassen Sie links den Weg zur Bocca Pasumer, um zur Bocca Enzima zu gelangen. Abstieg auf der Seeseite mit Blick auf Riva del Garda, bis zur Druckleitung und zum SAT 405, der nach Riva del Garda hinabführt.
• Nach Biacesa (siehe Cima Capi 2) Nehmen Sie links den Mario Foletti-Klettersteig SAT 406, der durch die Südwand der Cima Rocca und in rund 40 Minuten bis zum Bivacco Arcioni führt. Von dort aus Abstieg nach Biacesa über den steilen SAT 460, vorbei an der Kapelle San Giovanni.
Head down from the top on the north side, easy but very exposed, until you come to the saddle between Cima Capi and Cima Rocca. From here you can head down towards Riva del Garda or Biacesa.
• For Riva del Garda (see Cima Capi) descend on the north side crossing the east face of Cima Rocca (4) and the valley after it; leave the trail for Bocca Pasumer on your left and you come to Bocca Enzima. Head down the side overlooking Riva del Garda until you come to the penstock and the trail SAT 405 which leads to Riva del Garda.
• For Biacesa (see Cima Capi 2) take the ferrata Mario Foletti SAT 406 on your left which traverse the southern face of Cima Rocca and leads to the shelter Bivacco Arcioni in about 40 minutes. From here head down to Biacesa on the steep trail SAT 460 which takes you past the chapel of San Giovanni.

2525
26
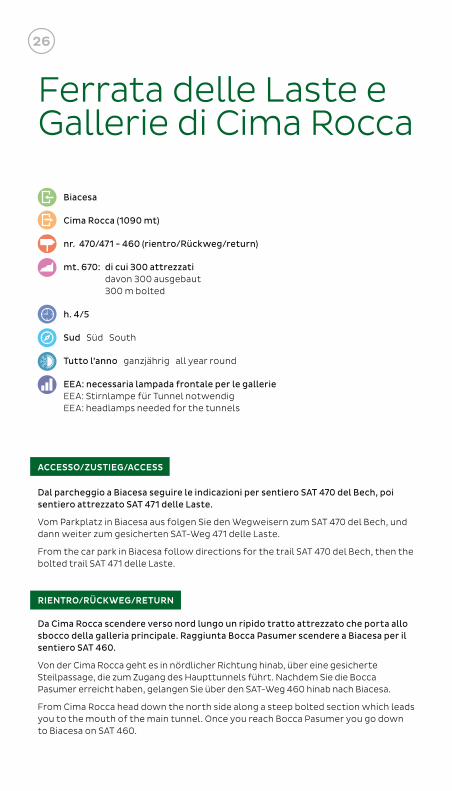
Ferrata delle Laste e Gallerie di Cima Rocca
Biacesa
Cima Rocca (1090 mt)
nr. 470/471 - 460 (rientro/Rückweg/return)
mt. 670: di cui 300 attrezzati davon 300 ausgebaut 300 m bolted
h. 4/5
Sud Süd South
Tutto l’anno ganzjährig all year round
EEA: necessaria lampada frontale per le gallerie EEA: Stirnlampe für Tunnel notwendig EEA: headlamps needed for the tunnels
ACCESSO/ZUSTIEG/ACCESS
Dal parcheggio a Biacesa seguire le indicazioni per sentiero SAT 470 del Bech, poi sentiero attrezzato SAT 471 delle Laste.
Vom Parkplatz in Biacesa aus folgen Sie den Wegweisern zum SAT 470 del Bech, und dann weiter zum gesicherten SAT-Weg 471 delle Laste.
From the car park in Biacesa follow directions for the trail SAT 470 del Bech, then the bolted trail SAT 471 delle Laste.
RIENTRO/RÜCKWEG/RETURN
Da Cima Rocca scendere verso nord lungo un ripido tratto attrezzato che porta allo sbocco della galleria principale. Raggiunta Bocca Pasumer scendere a Biacesa per il sentiero SAT 460.
Von der Cima Rocca geht es in nördlicher Richtung hinab, über eine gesicherte Steilpassage, die zum Zugang des Haupttunnels führt. Nachdem Sie die Bocca Pasumer erreicht haben, gelangen Sie über den SAT-Weg 460 hinab nach Biacesa.
From Cima Rocca head down the north side along a steep bolted section which leads you to the mouth of the main tunnel. Once you reach Bocca Pasumer you go down to Biacesa on SAT 460.

2727

28
IT Dopo alcuni tornanti inizia il tratto attrezzato che risale facili placconate fino a una piccola grotta ( 5) . Superando le ultime balze rocciose si raggiungono il Bivacco Arcioni e la Chiesetta di San Giovanni. Da qui è possibile rientrare a Biacesa per il sentiero SAT 460 lungo la Val Vasotina.
Proseguendo si imbocca tre gallerie con scaletta (munirsi di lampada frontale) ( 6-7-8) scavate nella montagna da parte a parte. Si raggiunge la vetta lungo il sentiero che sale a destra.
FERRATA M. FOLETTI
Sentiero del Ponale
SAT 470Biacesa
S. Giovanni
Cima Rocca
Biacesa
SAT 405Riva del Garda
BiacesaVal Vasotina
Bivacco Arcioni
SAT 471LASTE
SAT 471GALLERIE
5
6
7
8

29
DE Nach einigen Serpentinen beginnt die gesicherte Passage über leicht begehbare Platten bis in eine kleine Grotte (5). Nach den letzten Felsvorsprüngen erreichen Sie das Bivacco Arcioni und die Kapelle San Giovanni. Von dort aus können Sie über den SAT 460 das Vasotinatal entlang nach Biacesa zurückgehen. Wer weiter geht, trifft auf drei Tunnel mit Leitern (Stirnlampe notwendig!) (6-7-8), die einmal quer durch den Berg führen. Sie erreichen den Gipfel über den Weg, der rechts nach oben führt.
EN After a few bends on the road you find yourself at the start of the bolted section which heads up easily slabs as far as a small cave (5) . You get over the final rocky outcrops and come to the shelter Bivacco Arcioni and the Chapel of San Giovanni. From here you can return to Biacesa on SAT 460 along the Val Vasotina valley. Keep going and you come to three tunnels with a ladder (make sure to take a headlamp) (6-7-8) excavated in the rock from one side to the other. You reach the summit along the trail that leads up on your right.
FERRATA F. SUSATTI
SAT 472 Defension Mauer
SAT 470
Cima Capi
SAT 405Riva del Garda
2
1
3

30
Colodri - Colt
Loc. Prabi
Monte dei Colodri ( 400 mt.)
nr. 431/B
mt. 270
h. 2.00
Est Osten East
Tutto l’anno ganzjährig all year round
EEA (facile leicht easy) Facile itinerario che risale la parete est del Monte Colodri fiancheggiando gli strapiombi. Mittelschwerer Klettersteig. Leichte Tour an der Ostwand des Monte Colodri, flankiert von Überhängen. Easy route up the east wall of Monte Colodri alongside the overhangs.
ACCESSO/ZUSTIEG/ACCESS
A Prabi imboccare il sentiero di fronte al parcheggio della piscina comunale, che sale alla base del Monte Colodri, per raggiungere in pochi minuti la partenza della ferrata.
Nehmen Sie in Prabi den Pfad vor dem Parkplatz des Städtischen Schwimmbades, der am Fuße des Monte Colodri nach oben führt, um so in wenigen Minuten zum Einstieg des Klettersteigs zu gelangen.
In Prabi take the trail in front of the car park of the municipal swimming pool which leads you to the foot of Monte Colodri and in a few minutes you are at the start of the ferrata.
RIENTRO/RÜCKWEG/RETURN
Dalla cima seguire il Sentiero dei Lecci e scendere fino a Laghel. Da qui in ca 15 min si raggiunge il centro di Arco.
Vom Gipfel aus folgen Sie dem Sentiero dei Lecci und gehen Sie hinab bis nach Laghel. Von dort aus erreichen Sie in ca. 15 Minuten das Zentrum von Arco.
From the summit follow the Sentiero dei Lecci trail and head down to Laghel. From here it is about 15 minutes to the centre of Arco.

3131

32
IT L’attacco della Via Ferrata si trova sopra i massi calcarei ai piedi della parete est del Monte Colodri. Il primo tratto è caratterizzato da una traccia di sentiero che risale a zig zag la parete rocciosa. Dopo aver superato un breve risalto verticale si prosegue in obliquo a sinistra fino alla base di una placca liscia ben attrezzata con pioli (1). Si sale poi in obliquo a sinistra seguendo una frattura che taglia la parete rocciosa fino all’ultimo risalto. Si supera l’unico tratto verticale (2) attrezzato con pioli e staffe nel breve diedro che porta fuori dalla parete. Una placconata calcarea ricca di fessurazioni e incisioni carsiche porta in pochi minuti alla croce di cima.
DE Der Einstieg des Klettersteigs befindet sich oberhalb der Kalkfelsen am Fuße der Ostwand des Monte Colodri. Der erste Abschnitt führt im Zick-Zack an der Felswand hinauf. Nach einem kurzen Steilstück geht es in der Schräge nach links weiter, bis zu einer Plattenpassage mit Sprossen (1). Dann geht es links weiter schräg hinauf, immer dem Einschnitt nach, der sich bis zum letzten Vorsprung durch die Wand zieht. Über den einzigen vertikalen Abschnitt (2) der Route, der mit Sprossen und Klammern versehen ist, gelangen Sie zum kurzen Dieder, das aus der Wand führt. Über ein beeindruckendes, zerklüftetes Karstplateau erreichen Sie in wenigen Minuten das Gipfelkreuz.
Piscina Comunale - Campeggi
Sentiero dei Lecci
Monte Colodri
Monte ColtSAT 431B
2
1

33
EN The start of the Via Ferrata is above the limestone boulders at the foot of the east face of Monte Colodri. The first stretch is a track which zigzags up side of the rock. After a short vertical section, continue diagonally to the left until you come to the base of a smooth slab fitted out with rungs (1). Head up diagonally to the left following a cleft in the rock which brings you to the final upward stretch. The final vertical section is fitted with rungs and stirrups to take you past the short dihedral which takes you over the top of the wall. A limestone slab of karst formation with plenty of cracks and clefts takes you to the cross at the top in just a few minutes.
VARIANTE DISCESA FERRATA DEL COLODRI PER FERRATA DEL MONTE COLT VARIANTE ABSTIEG KLETTERSTEIG MONTE COLODRI ÜBER DEN KLETTERSTEIG MONTE COLT VARIATIONS OF THE CLIMB COLODRI FOR MOUNT COLT
IT Dalla croce del Monte Colodri dirigersi verso nord – SAT 431 B – fino al bordo della parete. Seguire il sentiero attrezzato che scende sul versante ovest fino al sentiero SAT 431, seguirlo in direzione nord fino al colle antecedente la cima del Monte Colt, nelle vicinanze di un traliccio. 45° 56.511 N - 10° 53.637 E. Si scende sul sentiero lato est del monte Colt, dopo pochi metri si incontra il cordino di sicurezza. Il sentiero attrezzato non è tecnicamente difficile ma esposto e richiede comunque attrezzatura completa per via ferrata. Una scala metallica permette di superare l’ultima balza rocciosa per scendere nella valletta di Malapreda. Rientro a Prabi dal Ponte Romano di Ceniga ad Arco (40 min).
DE Vom Gipfelkreuz des Monte Colodri geht es über den Weg SAT 431 B in nördliche Richtung bis zum Rand der Bergwand. Dem ausgerüsteten Kletterpfad hinunter über die Westseite bis zum Weg SAT 431 folgen. Diesem Weg folgt man in Richtung Norden bis zum Hügel, der vor dem Gipfel des Monte Colt liegt (45° 56.511 N – 10° 53.637 O). Hinab auf dem östlichen Weg des Monte Colt trifft man nach wenigen Metern auf das Sicherheitsseil. Der ausgerüstete Weg ist technisch gesehen nicht schwierig, aber äußerst steil und ausgesetzt und erfordert in jedem Fall eine komplette Ausrüstung für die Benutzung von Kletterwänden. Eine Metallleiter ermöglicht die Überwindung der letzten Felswand, um in das Tal hinab nach Malapreda zu gelangen. Zurück geht es von Prabi über die Römerbrücke von Ceniga nach Arco (40 Min.).
EN From the cross of Mount Colodri go north - SAT 431 B - until you arrive at the cliffs. Continue along the “via ferrata” (there are security wires to hold on too) that goes down westwards until SAT 431, follow the path going north until you reach the hills just before the peak of Mount Colt, remaining near a pylon. 45°56.511 N - 10°53.637 E. You go down the path east of Mount Colt, after a few meters you’ll find a safety wire. This wired path is not technically difficult but it’s exposed and requires climbing equipment ie. boots, harness, helmets. There is a metal ladder to enable you to climb the last rock, then you go down to Malapreda valley. Return to Prabi taking the roman bridge of Ceniga, close to Arco (40mins).

34
Sentiero attrezzato “Degli Scaloni” - “Delle Cavre” - “Dell’Anglone” Gesicherter Weg - Bolted trail
Ceniga/Ponte Romano (Roman Bridge)
Dro
nr. 428 - 428B - 425
mt. 410
h. 4.00
Est/Sud-Est Osten/Süd-Osten East/South-East
Tutto l’anno(evitando i giorni più caldi) ganzjährig (außer an sehr heißen Tagen) all year round (avoid hot days)
EEA (facile leicht easy) Sentiero attrezzato con scale e funi di acciaio. Tour mit Treppen und Stahlseilen. Path fitted with ladders and steel cables.
ACCESSO/ZUSTIEG/ACCESS
Dal Ponte Romano di Ceniga seguire la strada verso Maso Lizzone (NO parcheggio). Imboccare a sinistra il sentiero 428, dopo il maso a destra fino alla base della parete rocciosa dell’Anglone. Qui inizia il percorso attrezzato.
Von der Römischen Brücke in Ceniga folgen Sie der Straße nach Maso Lizzone (KEINE Parkmöglichkeit). Nehmen Sie links den Weg 428, und gehen Sie nach dem Hof rechts, bis zum Fuße der Felswand „dell‘Anglone”. Hier beginnt die gesicherte Passage.
From the Roman Bridge in Ceniga follow the road towards Maso Lizzone (NO car park). Take trail 428 on the left after a farmhouse on your right and follow it to the foot of the Anglone crag. This is where the ferrata starts.
RIENTRO/RÜCKWEG/RETURN
Verso Ceniga seguendo prima la sterrata dei Molinei e poi di Campagnola lungo il Sarca.
In Richtung Ceniga, zunächst über den Schotterweg „dei Molinei” und dann „di Campagnola”, am Sarca entlang.
Towards Ceniga, first along the Molinei track, then following the Campagnola track along the River Sarca.

3535

36
IT Per brevi roccette e sentiero con tratti esposti si raggiunge una sequenza di scaloni (1) sino a un facile camino e quindi a una placca con gradini intagliati. Dopo un tratto di sentiero, una scalinata in pietra porta al sentiero terminale e in breve al Dos Tondo dove si incrocia il sentiero SAT 428B “DELLE CAVRE”: seguendolo verso nord si raggiunge il bivacco del Crozolam. Ancora verso nord lungo il sentiero SAT 425 si incontra il sentiero attrezzato dell’Anglone, che scende prima su una placca rocciosa e poi tra camini e facili roccette fino ai gradoni che portano alla base della parete.
SAT 428B
Maso Lizzone - Ceniga
SAT 428
SENTIERO ATTREZZATO DEGLI SCALONI
1

37
DE Über kleine Felsblöcke und einen Weg mit teils ausgesetzten Stellen erreichen Sie eine Reihe von Leitern (1) bis zu einem einfachen Kamin und zu einer Plattenpassage mit eingearbeiteten Trittstufen. Nach einem kurzen Stück führt eine Steintreppe zum letzten Streckenabschnitt und zum Dos Tondo, wo Sie den SAT 428B „DELLE CAVRE” kreuzen: in Richtung Norden erreichen Sie das Biwak Crozolam. Weiter in nördlicher Richtung, auf dem SAT-Weg 425, treffen Sie auf den gesicherten Weg „Sentiero dell,Anglone”, der zunächst auf eine Felsplatte hinab und dann leicht zwischen Kaminen und Felsblöcken hindurch bis zu den Stufen führt, über die Sie den Wandfuß erreichen.
EN With short stretches over boulders and a trail which is exposed in parts you come to a sequence of broad steps (1) and an easy chimney which lead to a slab with steps carved into the rock. After a section of trail, you come to a series of stone steps and the final trail which leads to Dos Tondo. Here you are at the junction with the trail SAT 428B “DELLE CAVRE”: head north along it to the Crozolam shelter. Further north along trail SAT 425 you come to the Dell’Anglone bolted trail, which first descends onto a rocky slab and then through a series of chimneys and easy rocks leads down to wide steps which take you to the foot of the wall.
SAT 425
Dro - Ceniga Campo Sportivo Oltra
Bivacco Crozolam
SENTIERO ATTREZZATO DELL’ANGLONE

38
Rio Sallagoni
Parcheggio Parkplatz Carpark della Riserva delle Marocche - S.P. 84
Castello di Drena (Burg - Castle)
mt. 190
h. 1.30/2.00
Ovest Westen West
Tutto l’anno ganzjährig all year round
EEA
ACCESSO/ZUSTIEG/ACCESS
Dal parcheggio della Riserva Naturale delle Marocche (sulla sinistra salendo su SP 84 direzione Drena), scendere per un centinaio di metri lungo la strada principale fino alla strada sterrata con segnavia Rio Sallagoni che in pochi minuti porta all’imbocco del canyon.
Vom Parkplatz des Naturschutzgebiets der Marocche (linkerhand bergan auf der SP 84 in Richtung Drena) geht es einige hundert Meter auf der Hauptstraße entlang bis zu einem unbefestigten Weg. Dort folgen Sie dem Wegzeichen Rio Sallagoni. Nach wenigen Minuten erreichen Sie den Eingang der Schlucht.
From the car park of the Marocche Nature Reserve (which is on your left as you come up the SP 84 towards Drena), head down the main road . After a hundred metres you come to a dirt track with a signpost for Rio Sallagoni. Follow this track and in a few minutes it will take you to the entrance of the canyon.
RIENTRO/RÜCKWEG/RETURN
Dal Castello in direzione ovest, verso la Valle del Sarca, scendere per il sentiero che in 20’ porta al parcheggio, passando nei pressi dell’imbocco del canyon.
Von der Burg aus in westlicher Richtung, zum Sarcatal, führt ein Weg vorbei am Eingang der Schlucht in rund 20 Minuten zurück zum Parkplatz.
From the Castle, head west towards the Sarca Valley and down the trail which will take you past the entrance to the canyon and back to the car park in about 20 minutes.
3939

40
IT Si supera con l’ausilio di staffe il primo sbalzo roccioso alzandosi sulla sinistra della cascata, per poi iniziare la lunga attraversata nella forra con qualche tratto faticoso per i più piccoli. Si raggiunge una zona più aperta con fitta vegetazione e cascate. Possiamo rimanere sul sentiero sul lato destro della forra (3) o, guadato il torrente, superare la cascata con un ponte tibetano (4). In pochi minuti lungo un sentiero a gradoni arriviamo a un caratteristico passaggio tra grandi massi (5) e poco oltre superato un secondo ponte tibetano (7) – evitabile sulla destra per sentiero (6) – raggiungiamo un piccolo ponte in legno che supera il torrente. Qui ha termine il percorso attrezzato, su sentiero in breve raggiungiamo in Castello di Drena. La forra prosegue ma al momento non è attrezzata in sicurezza. (8).
DE Den ersten überhängenden Teil der Route, eine felsige Passage links des Wasserfalls, erklimmen Sie mithilfe von Klammern. Dann beginnt die lange Durchquerung der Schlucht, die zumindest für kleine Bergsteiger einige anstrengende Passagen bereithält. Sie erreichen einen offeneren Abschnitt mit dichter Vegetation und Wasserfällen. Sie können nun auf der rechten Schluchtseite (3) bleiben oder aber durch den Bach waten und dann mithilfe einer tibetanischen Brücke (4) den Wasserfall hinter sich lassen. Nach wenigen Minuten erreichen Sie über einen Treppenpfad eine malerische Passage inmitten von großen Felsblöcken (5). Kurz danach gelangen Sie zu einer zweiten tibetanischen Brücke (7) - diese können Sie über den Weg rechts vom Bach (6) auslassen - und dann zu einer kleinen Holzbrücke, die über den Bach führt. Hier endet der gesicherte Abschnitt. Über einen Wanderweg erreichen Sie in Kürze die Burg von Drena. Die Schlucht führt weiter, allerdings gibt es im weiteren Teil zur Zeit keine Sicherungen (8).
EN You get past the first rocky outcrop by heading up to the left of the waterfall with the help of some stirrups, then begin the long traverse in the ravine where there are a few more difficult sections for younger kids. You then come to a more open area with dense vegetation and waterfalls. You can stay on the path to the left side of the ravine (3) or ford the stream and cross the waterfall on a Tibetan hanging bridge (4). In a few minutes along a series of steps you come to a passage between huge boulders (5) and shortly after, crossing a second Tibetan bridge (7) – which you can avoid if you stick to the right and take the trail (6) – you come to a little wooden bridge across the stream. This is the end of the bolted section and in a short time the trail leads to Drena Castle. The ravine continues but for now it has no bolted chains (8).

41
Parking Marocche
Castello di Drena
Parking Marocche
2
3
4
5
6
7
8
1
41

42
Ferrata “Che Guevara” al Monte Casale
Pietramurata
Monte Casale - Rif. Don Zio mt. 1630
nr. 427 (rientro/Rückweg/return)
mt. 1400 - mt. 800 approx via ferrata ca. 800 mt. Klettersteig
h. 7/8 ore
Est Osten East
Primavera e Autunno Frühling und Herbst Spring and Autumn
EEA: difficile, lunga ed impegnativa Schwer, lang und anstrengend Difficult, long and challenging
ACCESSO/ZUSTIEG/ACCESS
All’uscita da Pietramurata, parcheggiare ed imboccare la strada che costeggia a sinistra la cava, alla base della parete del Monte Casale. Per ripido sentiero nel bosco si raggiunge il primo tratto attrezzato.
Parken Sie am Ortsausgang von Pietramurata und nehmen Sie die Straße, die links an der Höhle am Fuße der Monte Casale-Wand vorbeiführt. Über einen steilen Waldweg gelangen Sie zur ersten, gut gesicherten Passage.
Park your car on the far side of Pietramurata and take the road on your left which runs along the quarry at the foot of sheer wall of Monte Casale. A steep trail through the woods leads to the first bolted section.
RIENTRO/RÜCKWEG/RETURN
Dal Rif. Don Zio scendere per il sentiero SAT 427 verso l’abitato di Sarche da cui si raggiunge Pietramurata (circa 3 ore).
Von der Don Zio-Hütte geht es auf dem SAT 427 hinab zur Ortschaft Sarche, von wo aus Sie zurück nach Pietramurata kommen (ca. 3 Stunden).
From the Rifugio Don Zio hut you take the trail SAT 427 towards Sarche and from there continue to Pietramurata (about 3 hours).

43
Evitare le giornate estive a causa dell’esposizione in pieno sole.
An Sommertagen aufgrund ganztägiger Sonneneinstrahlung nicht zu empfehlen.
Avoid in summer because it is in full sun.
43

44
IT La prima parte è caratterizzata da tratti verticali in fessure e diedri seguiti da un traverso a destra, per poi ritornare in obliquo verso sinistra per brevi pareti rocciose e cenge fino alla sommità del Croz del Pin ( 1 ), da qui ci addentriamo nella grande placconata che caratterizza la parete del Monte Casale. Aiutati da pioli e staffe (2) si supera la bastionata fino a quota 1200 mt dove troviamo il libro di via ( 3). Qui hanno termine le difficoltà, ma non la salita, ci aspettano altri 400 mt di dislivello con brevi tratti attrezzati, prima di raggiungere la cima del Monte Casale e poco oltre il Rif. Don Zio.
Cave
Monte CasaleRif. Don Zio
SarcheSAT 427
Via Ferrata del RampinSAT 426
Pietramurata
2
3
1

45
DE Die erste Passage ist durch vertikale Abschnitte in Rissen und Verschneidungen gekennzeichnet, auf die rechts eine Querung folgt, die dann, nach links, erneut in die Schräge übergeht und über kurze Felswände führt, bis hinauf auf den Gipfel des Croz del Plin (1). Von hieraus geht es hinein in das weitläufige plattige Gelände, das die Wand des Monte Casale so besonders macht. Mithilfe von Sprossen und Klammern (2) überwinden Sie die Felsbastion, und erreichen Sie in 1200 m Höhe das Logbuch (3). An dieser Stelle enden zwar die schwierigen Passagen, nicht aber der Aufstieg – es erwarten Sie weitere 400 Höhenmeter mit kurzen gesicherten Passagen, bevor Sie den Gipfel des Monte Casale und kurz darauf die Don Zio-Hütte erreichen.
EN The first section has vertical stretches in clefts and dihedrals followed by a traverse to the right and then a diagonal bend back towards the left across short rock walls and ledges up to the summit of Croz del Pin (1). From here you begin smooth expanse which is the wall of Monte Casale. Rungs and stirrups (2) help you across the ramparts up to an elevation of 1200 metres a.s.l. where you come across the log book ( 3). This marks the end of the difficult section but the ascent continues with another 400 metres of elevation gain with short bolted sections before you reach the summit of Monte Casale and, soon after, the mountain hut Rifugio Don Zio.
Cave
SarcheSAT 427

46
Ferrata “Rino Pisetta” al Dain Piccolo
Sarche
Piccolo Dain (mt. 970)
mt. 710: di cui 400 attrezzati davon 400 ausgebaut 400 m bolted
h. 4/5 + 1,30 discesa/Rückweg/return
Est/Sud-Est Osten/Süd-Osten East/South-East
Primavera, estate, autunno Frühling, Sommer, Herbst Spring, Summer, Autumn
EEA: difficile, lunga ed impegnativa Schwer, lang und anstrengend Difficult, long and challenging
ACCESSO/ZUSTIEG/ACCESS
Da Sarche alla rotonda prendere la strada per Madonna di Campiglio e lasciarla dopo 50 mt, sulla destra stradina che porta al parcheggio ( Cartello Via Ferrata). Seguire le indicazioni lungo il sentiero nel bosco, che attraversa la base della parete del Dain Piccolo. Si incrocia il sentiero di discesa e si guadagna quota sino all’inizio della ferrata segnato da una targa metallica.
Nehmen Sie von Sarche aus am Kreisverkehr die Straße nach Madonna di Campiglio. Biegen Sie nach 50 Metern rechts in das Sträßchen, das zum Parkplatz (Wegweiser zum Klettersteig) führt. Folgen Sie der Beschilderung auf dem Waldweg, der am Fuß der Dain Piccolo-Wand verläuft. Sie kreuzen dabei die Abstiegsroute und legen diverse Höhenmeter bis zum Einstieg in den Klettersteig zurück. Dieser wird von einer Metalltafel markiert.
From the roundabout in Sarche take the road for Madonna di Campiglio for just 50 metres. There is a narrow road on the right which leads to the car park (signposted Via Ferrata). Follow directions along the trail through the woods, across the base of the Dain Piccolo crag. You come to the junction with the path which leads down and gain elevation as far as the start of the ferrata marked by a metal plaque.

47
RIENTRO/RÜCKWEG/RETURN
Dirigersi a nord per ripido sentiero e poi sterrata fino al paese di Ranzo. Al capitello di San Vigilio prendere il sentiero che a sinistra scende sotto la parete sud del Dain Piccolo. Brevi tratti attrezzati con cavo permettono di scendere balze rocciose e raggiungere il ripido sentiero che scende a Sarche. ( 1.5 h dalla cima).
Halten Sie sich nördlich, auf einem steilen und später unbefestigten Weg bis nach Ranzo. Beim Kapitell San Vigilio nehmen Sie den Weg, der links unter die Südwand des Dain Piccolo führt. Über kurze, mit Seil gesicherte Passagen steigen Sie über Felsvorsprünge ab, bis Sie auf den steilen Weg hinunter nach Sarche treffen (1,5 Stunden vom Gipfel).
Head north along a steep trail and then a dirt track until you get to the town of Ranzo. At the column of San Vigilio take the trail on the left which leads down under the south face of Dain Piccolo. Short sections bolted with cables allow you to descend over rocky outcrops and reach the steep trail which leads down to Sarche. ( 1.5 hours from the summit).
La più difficile ferrata della zona, ma da sempre un classico per gli appassionati delle ferrate!
Der schwierigste Klettersteig in der Gardasee Region und schon seit langem ein Klassiker unter den Klettersteigen!
The most difficult track in the area, but always a classic trail for all Via ferrata enthusiasts.
47

48
IT Risalire un primo muro verticale attrezzato, al cui termine è possibile abbandonare lungo un sentiero attrezzato a destra (1). Con un traverso in esposizione (2) si raggiunge un sistema di placche che si superano puntando a un grande pilastro (3) . Si risale il pilastro prima lungo lo spigolo sinistro e poi al centro, fino a raggiungere il libro di via (4) alla sommità del pilastro: oltre questo punto le difficoltà sono più contenute, fino alla vetta.
Ranzo
Piccolo Dain
Sentiero di discesa/ Rückweg/return
Sarche - Lago di Toblino
3
2
4
49
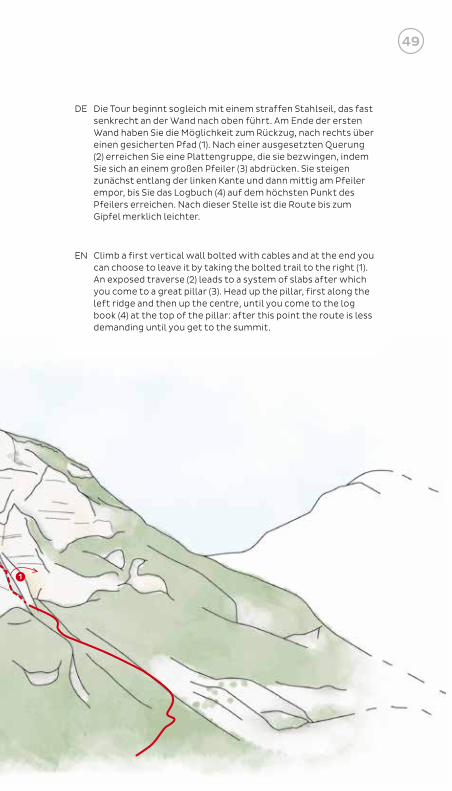
DE Die Tour beginnt sogleich mit einem straffen Stahlseil, das fast senkrecht an der Wand nach oben führt. Am Ende der ersten Wand haben Sie die Möglichkeit zum Rückzug, nach rechts über einen gesicherten Pfad (1). Nach einer ausgesetzten Querung (2) erreichen Sie eine Plattengruppe, die sie bezwingen, indem Sie sich an einem großen Pfeiler (3) abdrücken. Sie steigen zunächst entlang der linken Kante und dann mittig am Pfeiler empor, bis Sie das Logbuch (4) auf dem höchsten Punkt des Pfeilers erreichen. Nach dieser Stelle ist die Route bis zum Gipfel merklich leichter.
EN Climb a first vertical wall bolted with cables and at the end you can choose to leave it by taking the bolted trail to the right (1). An exposed traverse (2) leads to a system of slabs after which you come to a great pillar (3). Head up the pillar, first along the left ridge and then up the centre, until you come to the log book (4) at the top of the pillar: after this point the route is less demanding until you get to the summit.
1

50
Ferrata “O. Marangoni” a Monte Albano
Mori
Monte Albano
nr. 670/675
mt. 200: sviluppo mt. 550 Länge: 550 m 550 m development
h. 2 / 30’ discesa 2 Stunden / Abstieg: 30 Minuten h. 2 / 30’ descent
Sud Süd South
Tutto l’anno Ganzjährig All year round
EEA – D - breve, ma atletica ed esposta Sehr bis extrem schwierig (EEA - D); Sportklettersteig, kurz, aber ausgesetzt EEA – D – (only experienced hikers with ferrata gear) short, but strenuous and exposed
ACCESSO/ZUSTIEG/ACCESS
Dal centro dell’abitato di Mori seguire le indicazioni e salire verso il santuario da dove un breve sentiero porta all’inizio del percorso attrezzato. (Indossare il casco prima di raggiungere il piede della parete rocciosa – area esposta a cadute di sassi smossi da chi sale la ferrata).
Von der Ortschaft Mori aus folgen Sie der Beschilderung zur Kapelle „Santuario di Monte Albano“ hinauf. Von dort aus gelangen Sie über einen kurzen Wanderweg zum Einstieg des Klettersteigs. (Setzen Sie Ihren Helm bereits vor dem Eintreffen am Fuße der Wand auf, da hier die Gefahr von Steinschlägen besteht, ausgelöst durch Kletterer in der Wand über Ihnen).
From the centre of Mori follow directions and head uphill towards the sanctuary from which a short trail takes you to the start of the via ferrata- (Put on your helmet before you approach the rock wall – this is an area where stones may fall dislodged by people above you on the ferrata).

51
RIENTRO/RÜCKWEG/RETURN
Seguire il sentiero di rientro segnalato che segue il margine sinistro della parete e riporta al santuario.
Über den ausgeschilderten Abstiegsklettersteig, der am linken Rand der Wand entlang verläuft. Dieser bringt Sie zurück zur Kapelle.
Follow the signposted path back down which follows the left edge of the wall to take you back tot the sanctuary.
51

52
IT Il primo salto roccioso (1) è volutamente privo di attrezzature, per scoraggiare eventuali persone non preparate. La prima sezione risale una serie di camini (3) , inframezzati da brevi traversi (2), attrezzati con numerose staffe con passaggi atletici. Con una attraversata a sinistra (4) si raggiunge la grande cengia a metà parete. Si attraversa sempre a sinistra fino a salire un nuovo camino (5) e quindi sempre con aerea attraversata si raggiunge il libro di via (6) . Seguendo la sequenza di staffe si superano una sequenza di placche e diedri verticali (7) che portano fuori dalla parete.
DE Der erste Felsaufschwung (1) ist frei von künstlichen Tritthilfen – wer hier bereits Probleme hat, sollte auf jeden Fall den Notausstieg nutzen. Der erste Teil der Route führt an einer Reihe von Kaminen (3) hinauf, mit verschiedenen kurzen Querungen (2) dazwischen. Diese sind mit zahlreichen Tritthilfen versehen und stellen auch für Sportkletterer eine wahre Herausforderung dar. Über eine Querung nach links (4) erreicht man nach der Hälfte der Wand das lange Grasband. Am Ende dieses Bandes geht es links weiter bis zu einem weiteren Kamin (5), bevor man über eine stark ausgesetzte Passage zum Wegbuch (6) kommt. Mithilfe verschiedener Trittbügel gelangen Sie über eine Reihe von Platten und vertikalen Verschneidungen (7) bis zum Ausstieg.
7
6

53
EN The first rocky outcrop (1) is deliberately without any chains in order to discourage the unprepared. The first section climbs up through a series of chimneys (3), punctuated by short traverses (2), fitted with numerous rungs and with some strenuous stretches. A traverse to the left (4) takes you to the great ledge halfway up the wall. Traverse to the left until you are going up another chimney (5) and then with another lofty traverse you reach the libro di via or route book (6). Following the sequence of rungs you can get past a sequence of slabs and vertical dihedrals (7) which lead you off the wall.
Mori
5
4
3
2
1

54
Ferrata “Rio Ruzza”
Ballino
Monte Cogorna
mt. 40
15’ la ferrata – 30’ accesso e rientro 15 Minuten - Zustieg/Abstieg: 30 Minuten 15’ for the ferrata – 30’ access and return
Est Ost East
Aprile/Novembre ( da evitare quando è presente neve sui pendii superiori o ghiaccio che può scaricare lungo la cascata) April-November (bei Schnee auf den oberen Hängen und Eis am Wasserfall nicht zu empfehlen) April/November (avoid when there is snow on the slopes above or ice which can come down from the waterfall)
EEA – PD brevissima ferrata ben attrezzata EEA – PD; sehr kurzer, bestens gesicherter Klettersteig EEA – PD very short ferrata with plenty of rungs and cables
ACCESSO/ZUSTIEG/ACCESS
Dal centro dell’abitato di Ballino seguire le indicazioni per Cascat Sajant, in 20’ si raggiunge la base della cascata e l’attacco della ferrata. ( indossare il casco prima di avvicinarsi ai piedi della parete rocciosa – possibile caduta di sassi).
Vom Ortszentrum Ballino folgen Sie den Wegweisern zum Cascat Sajant. In rund 20 Minuten erreichen Sie den Fuß des Wasserfalls und den Einstieg zum Klettersteig. (Setzen Sie Ihren Helm bereits vor dem Eintreffen am Fuße der Wand auf, da hier die Gefahr von Steinschlägen besteht).
From the centre of Ballino follow directions for Cascat Sajant, and in 20’ you come to the foot of the waterfall and the base of the ferrata. (Put on your helmet before approaching the wall – risk of falling stones).
RIENTRO/RÜCKWEG/RETURN
Si rientra lungo lo stesso tracciato di salita.
Wie Aufstieg.
Go back to the starting point following the same ascent trail.

5555Photo credits:
Foto Archivio Garda Trentino SpA (GP. Calzà), Daniele Lira, Ralf Stute - via-ferrata.de
Illustration credits (Vie Ferrate): Sveva Seneci - [email protected]

56
4
2
1
3

57
IT Brevissima via ferrata ma in ambiente di grande bellezza lungo il salto di un’alta cascata. In progetto il completamento. Con una successione di staffe si supera la parete verticale (1) a destra della cascata, due brevi ( 2-3) ponti tibetani permettono di superare l’alveo della cascata e raggiungere la pozza sospesa (4) ai piedi del salto principale.
DE Sehr kurzer Klettersteig vor traumhafter Kulisse an einem tosenden Wasserfall. Der Klettersteig soll demnächst verlängert werden. Über eine Folge von Trittbügeln überqueren Sie die Steilwand (1) rechts des Wasserfalls, dann überqueren Sie über zwei kurze Seilbrücken (2-3) und gelangen bis zum Wasserfallbett (4) am Fuße des Felsaufschwungs.
EN A very short via ferrata but in a spectacular location running up along the course of a high waterfall. There are plans to extend it all the way up. A sequence of rungs take you up the vertical rock face (1) to the right of the waterfall, two short (2-3) Tibetan bridges take you across the waterfall bed and allow you to get to the suspended pool (4) at the foot of the mainspring.
57

5858

59
Hotels & Co Ospitalità a misura di sportivoTrova la tua sistemazione ideale con proposte e servizi dedicati agli amanti dell’outdoor e verifica la disponibilità con un click...
Gastfreundliche SportunterkünfteFinden Sie Ihre ideale Unterkunft mit vielen Dienstleistungen für Outdoor-Fans und prüfen Sie die Verfügbarkeit mit einem Klick...
Special sporty hospitalityFind your ideal accommodation with services suitable for any outdoor lover and check availability with one click...
www.gardatrentino.it/outdoorfriendly
Si declina ogni responsabilità per eventuali variazioni e inesattezze per cause non dipendenti dalla nostra volontà.
Wir übernehmen keine Gewähr für eventuelle Änderungen, die unabhängig von unserem Willen sind.
We do not accept any responsabilities for changes occured for reasons not dependent on our will.

60
C
M
Y
CM
MY
CY
CMY
K
QuartaPagina_12x21_figlie.pdf 1 19/04/17 12:13