yahoo group review - the battle of the trebbia
DESCRIPTION
TrebiaTRANSCRIPT
The Battle of The Trebbia. Our first encounter with Pulse of Battle
I have been eagerly looking forward to the release of Pulse of Battle - (POB) for a long time. They are available from: http://www.piquetwargames.com/ Just prior to its release I was given eight feet of river suitable for deploying on the edge of a battlefield. I had also been given some Marlburian General Officers as a present, and my wedding present from my wife, Maxine, who is also becoming a wargamer, a beautiful 15mm Numidian army. With the arrival on the doormat of my copy of POB and the beautiful card deck - I usually make my own, and supply to others - I wanted to use my new toys together. Peter Anderson aka Gonsalvo unwittingly provided the solution. Peter’s excellent review and ORBATS can be found here: http://blundersonthedanube.blogspot.co.uk/2014/02/review-pulse-of-battle-1500-bc-500-ad.html I already own a hard copy of ‘Hannibal Ad Portas’ and have been disappointed in my efforts to secure a PDF from Brent. (It would save so much typing and preparation of ORBATS). Peter wrote an account of his first POB game - the Trebbia. Of course! The Romans have just crossed the river to take the fight to the Carthaginians - so I could use my river. The three Marlburian Officers could provide some of the Officers that I would need for the scenario, and some of my wedding present Numidians would aid and assist Hannibal, and some of the Gauls the Romans. Ah yes, I also have some fantastic mountain ranges which were a present from Bob Cordery. They could dress the North end of the table. Sorted! I mentioned this to Last Chance Hooper aka Phil, who was delighted to be able to play the rules so soon after release. To save time I used Peter’s ORBATS, and as has always been our practice when Pk’ing, Phil and I rolled for the unit abilities the first time that each unit came into contact with the enemy by fire, morale etc. I have changed Peter’s ORBATS only in that I have arranged the Command Groups together rather than running through the list as Peter had done. He made several suggestions in his after action report and we followed each of them, as you can see from the ORBATS where they appear appended at the end of each ORBAT. I have played and loved PK since 2001, more of which in the summary.
Carthaginian ORBAT
ID Unit Type Cmd DD CD UI Pila Notes 1 African Javelinmen Peltasts Jav 1 D4 3 N/A 2 Balearic Slingers A Psiloi Sling 1 D8 2 N/A 3 Insubrian Gauls Warband 1 D4 4 N/A 4 Boii Gauls Warband 1 D4 4 N/A 5 Spanish Scutarii A Med Inf Pila 1 D6 4 6 African Elephants A Elephants 1 D4 4 N/A 7 Spanish Javelinmen Peltasts Jav 2 D4 10 3 N/A 8 Balearic Slingers B Psiloi Sling 2 D8 8 2 N/A 9 Libyan Spearmen A Hv Inf long Sp 2 D8 10 4 N/A
10 Libyan Spearmen B Hv Inf long Sp 2 D8 10 4 N/A
1
11 Spanish Scutarii B Med Inf Pila 2 D6 10 4 12 African Elephants B Elephants 2 D4 10 4 N/A 13 Numidian Horse B Lt Cavalry Jav 3 D10 8 3 N/A 14 Spanish Cavalry Med Cavalry 3 D6 12 3 N/A 15 Gallic Cavalry Hvy Cavalry 3 D4 10 3 N/A 16 Numidian Horse A Lt Cavalry Jav 4 D10 10 3 N/A 17 Carthaginian Cavalry Hvy Cavalry 4 D8 10 3 N/A 18 Mago's African Javelins Peltasts Jav 5 D6 8 3 N/A 19 Mago's Numidian Horse Lt Cavalry Jav 5 D10 10 3 N/A
ID Commander Name Command Rating LD Radius
20 Hannibal Barca C-in-C Exceptional 12 24
21 Maharbal 1 Skilled 12+1 24
22 Gisgo 2 Skilled 12 24
23 Mago 5 Skilled 12 24
24 Bomilcar 3 Skilled 10 20
25 Jabnit 4 Skilled 12+1 24
Glen's scenario calls for a "Hypothermia" card (We used the FoB "Thwack!" card) to be added to the Roman Sequence Deck. When it appears, all Romans are Down 1 for Melee for the rest of that turn. The scenario also called for a "Weather Worsens" card to be added to the Roman deck as well. We used the PoB "Special Event" card for this. On its first appearance, it starts to rain and all Missile fire is Down 1. On the second appearance, it starts to sleet; both armies then add another Thwack/ Hypothermia Card to their decks (making 2 for the Romans and one for the Carthaginians total). On a 3rd appearance, it starts to snow; all Cavalry and Elephants are Down 1 in Melee, and all Command Radii are reduced 4". Add a PoB "Warbands Charge" optional card to both Sequence decks; this card effects only the Gallic Warbands in this game. Adapting Glenn's ideas to PoB. I think the Resolve Card should probably be added to both decks for a lot of these battles, maybe after the first Re-shuffle. Hannibal turns a MOVE card, and springs Mago's ambush - a unit each of mediocre Numidian Javelinmen ("Peltasts”) and one of the dreaded Numidian Light Cavalry appear to the flank and rear of the Roman Left flank. No ‘ROUTS’ in POB. Roman interpenetration VERY easy - Special rule.
2

Roman ORBAT
ID Unit Type Cmd DD CD UI Pila Notes 1 Velites, Legion I Peltasts Jav. 1 D4
3 N/A
2 Hastati, Legion I Med. Inf Pila 1 D6 8
4
3 Principes Legion I Heavy Inf Pila 1 D6 10
4
4 Triarii, Legions I & II Hv Inf long Sp 1 D8
4
5 Velites Legion II Peltasts Jav 2 D4 10 3 N/A 6 Hastati, Legion II Med Inf Pila 2 D6 10 4 7 Principes Legion II Hvy Inf Pila 2 D6 8
4
8 Velites Legion III Peltasts Jav 3 D6 8
3 N/A
9 Hastati Legion III Med Inf Pila 3 D6 12 4 10 Principes Legion III Hvy Inf Pila 3 D6 10 4 11 Velites, Legion IV Peltasts Jav 4 D4 8
3 N/A
12 Hastati, Legion IV Med Inf Pila 4 D6 4 13 Principes Legion IV Hvy Inf 4 D6 4 14 Triarii, Legions III &
IV Hv Inf long Sp 4 D8 4
15 Cenomani Gauls Warband 4 D4 10 4 N/A 16 Roman Cavalry Hvy Cavalry C-in-C D4 12+1 3 N/A 17 Allied Cavalry, Leg. Med Cavalry 5 D6 10
3 N/A
18 Allied Cavalry, Leg. Med Cavalry 5 D6 10
3 N/A
ID Commander Name Command Rating LD Radius
19 Sempronius Longus C-in-C Poor 8 16
20 Gaius Atilius 1 Poor 12 24
21 Lucius Manlius 2 Poor 8 16
22 Publius Cornelius Scipio 3 Average 10 20
23 Titus Hostilius 4 Poor 10 20
24 Sextus Rutilius 5 Poor 8 16
Some names are fictitious, and P.C. Scipio was not present in fact, as he was recovering from his wounds suffered in an earlier action. Glen's scenario calls for a "Hypothermia" card (We used the FoB "Thwack!" card) to be added to the Roman Sequence Deck. When it appears, all Romans are Down 1 for Melee for the rest of that turn.
3

The scenario also called for a "Weather Worsens" card to be added to the Roman deck as well. We used the PoB "Special Event" card for this. On its first appearance, it starts to rain and all Missile fire is Down 1. On the second appearance, it starts to sleet; both armies then add another Thwack/ Hypothermia Card to their decks (making 2 for the Romans and one for the Carthaginians total). On a 3rd appearance, it starts to snow; all Cavalry and Elephants are Down 1 in Melee, and all Command Radii are reduced 4". Add a PoB "Warbands Charge" optional card to both Sequence decks; this card effects only the Gallic Warbands in this game. Adapting Glenn's ideas to PoB. I think the Resolve Card should probably be added to both decks for a lot of these battles, maybe after the first Re-shuffle. Hannibal turns a MOVE card, and springs Mago's ambush - a unit each of mediocre Numidian Javelinmen ("Peltasts”) and one of the dreaded Numidian Light Cavalry appear to the flank and rear of the Roman Left flank. No ‘ROUTS’ in POB. Roman interpenetration VERY easy - Special rule. Looking South - from the Alps. Note PK clocks and also Peter Pig countdown markers and both real time and game time clocks at end of table.
4
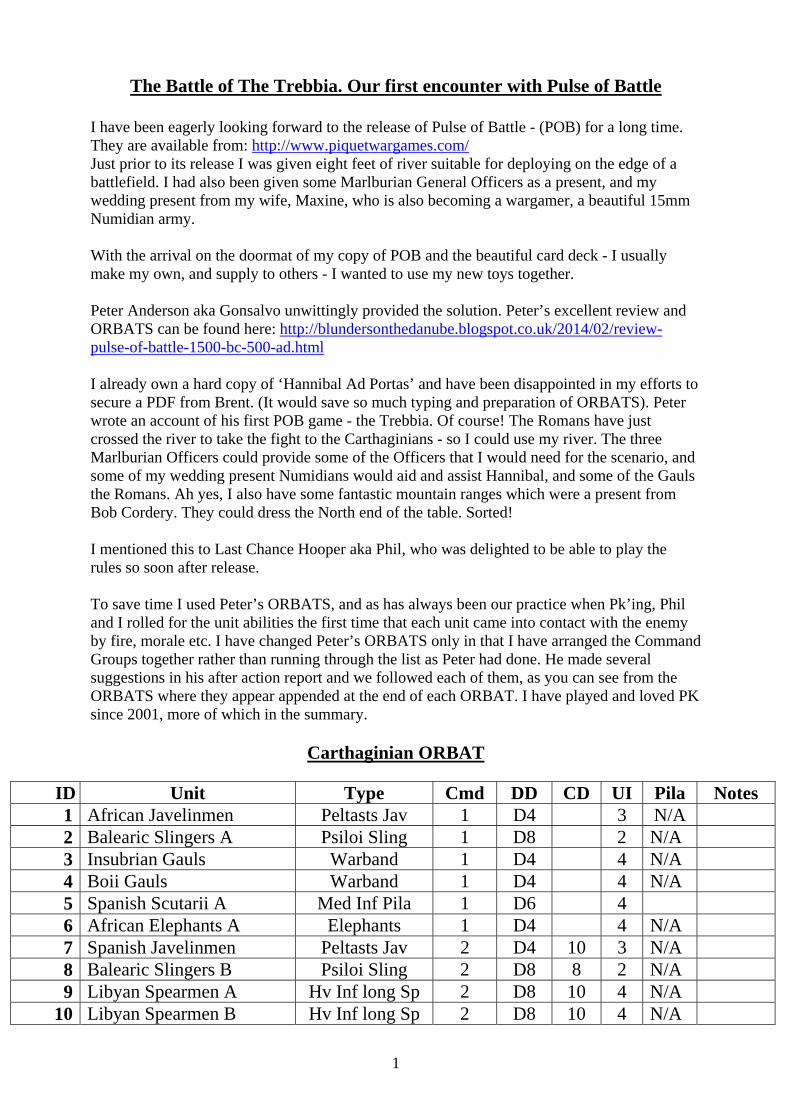
Looking North - towards the Alps
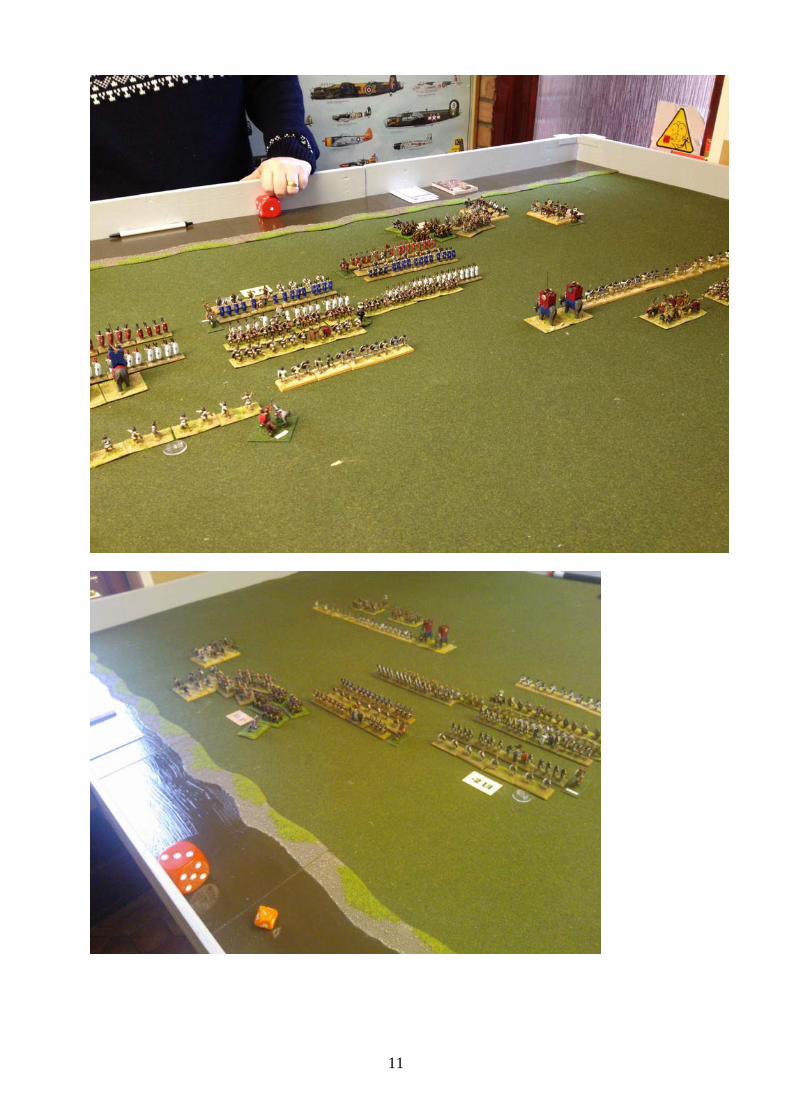
Our initial dispositions were based on my interpretations of the period, and reinforced by Professor Adrian Goldsworthy’s excellent ‘The Punic Wars’. Cavalry on the flank, with infantry in the centre, and the war-winning terror weapons - the Heffalumps - in the front of the Carthaginian lines. The Roman Commands were deployed from left to right with Command 1 on the Roman Right flank. The Carthaginians deployed from their right to left with the Carthaginian Command 1 on their right flank. Mago’s two cavalry units were on the window ledge with their Commander awaiting an opportune ‘Move’ card to summon them to the party. The Initial view for the Romans We use the large D6 to note whether a die roll is odd or even. The yew boxes (one for each side) contain the morale chips, which screen the numbers from the opponent. The blue screen serves two purposes: one being to prevent the toys making unwarranted trips to the floor, and they also provide a great backdrop for low level shots, as per my photos in Henry Hyde’s magazine).
5
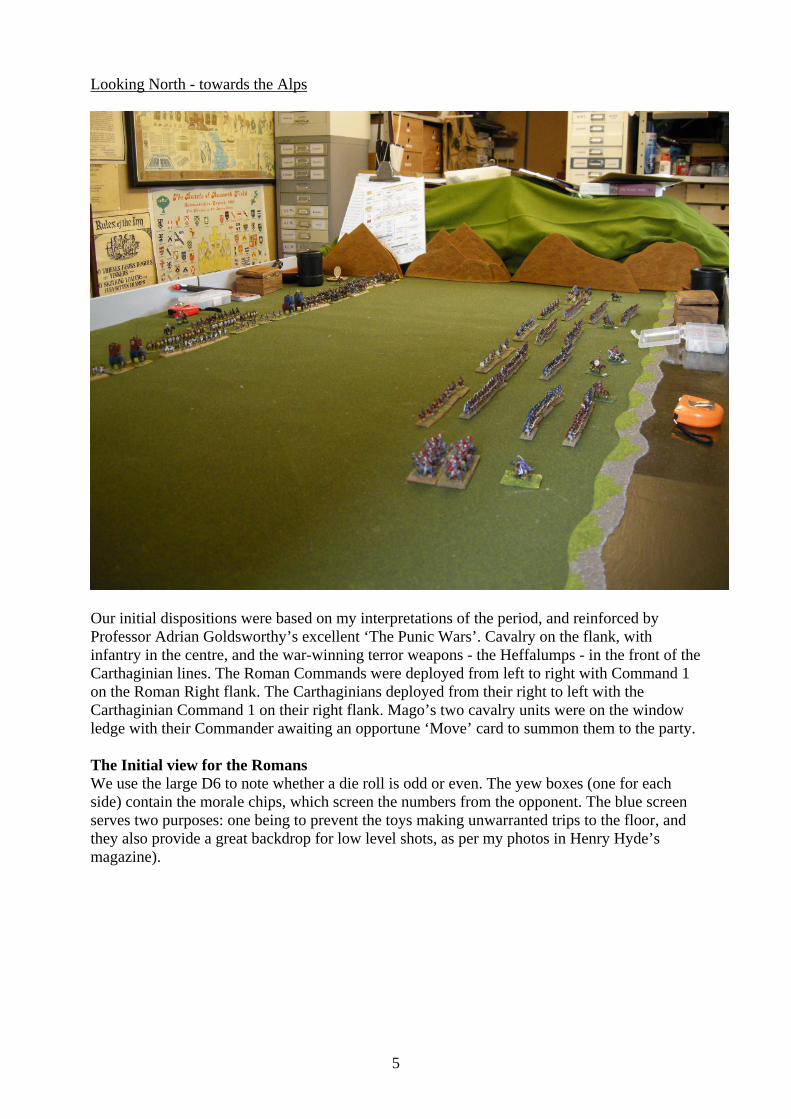
The Romans rolled the higher die to decide the first Initiative and decided to bring the war to the rascally Carthaginians. Their left flank throw resulted in the option of three move segments, which the Romans took. They were eager to close being aware that the Carthaginians liked to utilise stratagems and trickery in a fight. The Carthaginians welcomed such a bold move and much banter ensued as they sought to encourage the Romans ever forward, thereby exposing their left flank to Mago. The Romans advanced their second Command but they rolled a ‘1’ so nothing there. The right flank advanced one segment.
6
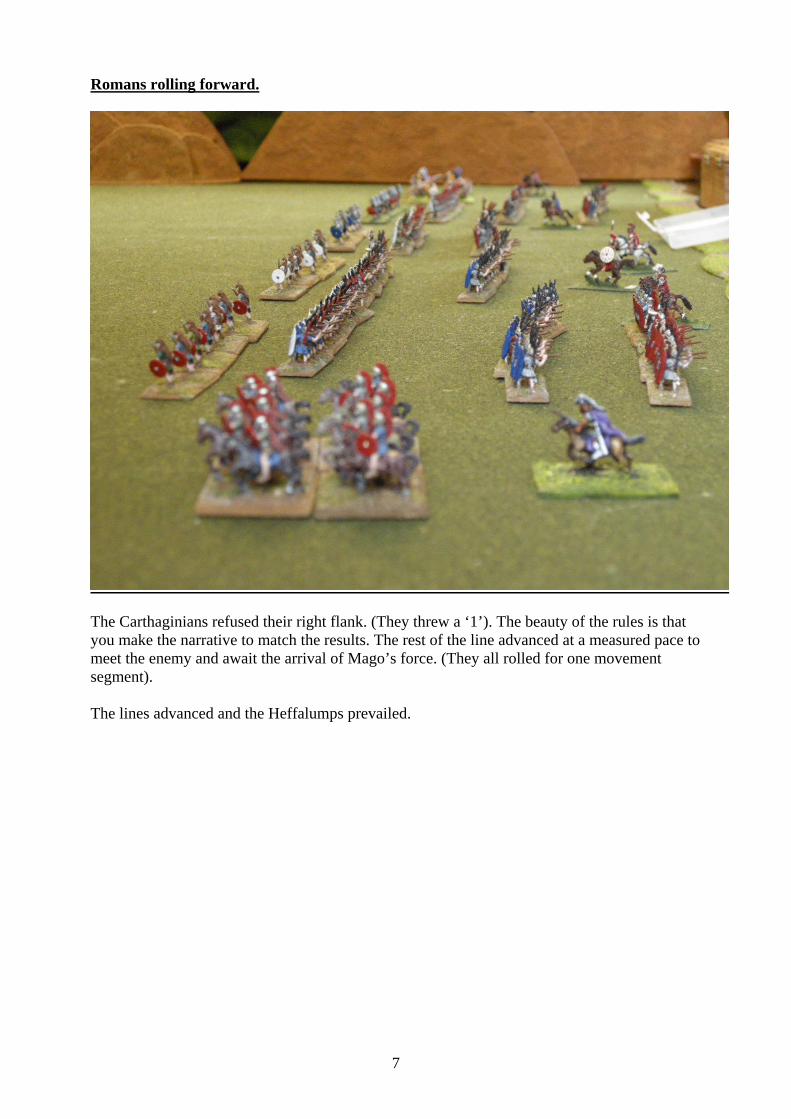
Romans rolling forward.
The Carthaginians refused their right flank. (They threw a ‘1’). The beauty of the rules is that you make the narrative to match the results. The rest of the line advanced at a measured pace to meet the enemy and await the arrival of Mago’s force. (They all rolled for one movement segment). The lines advanced and the Heffalumps prevailed.
7
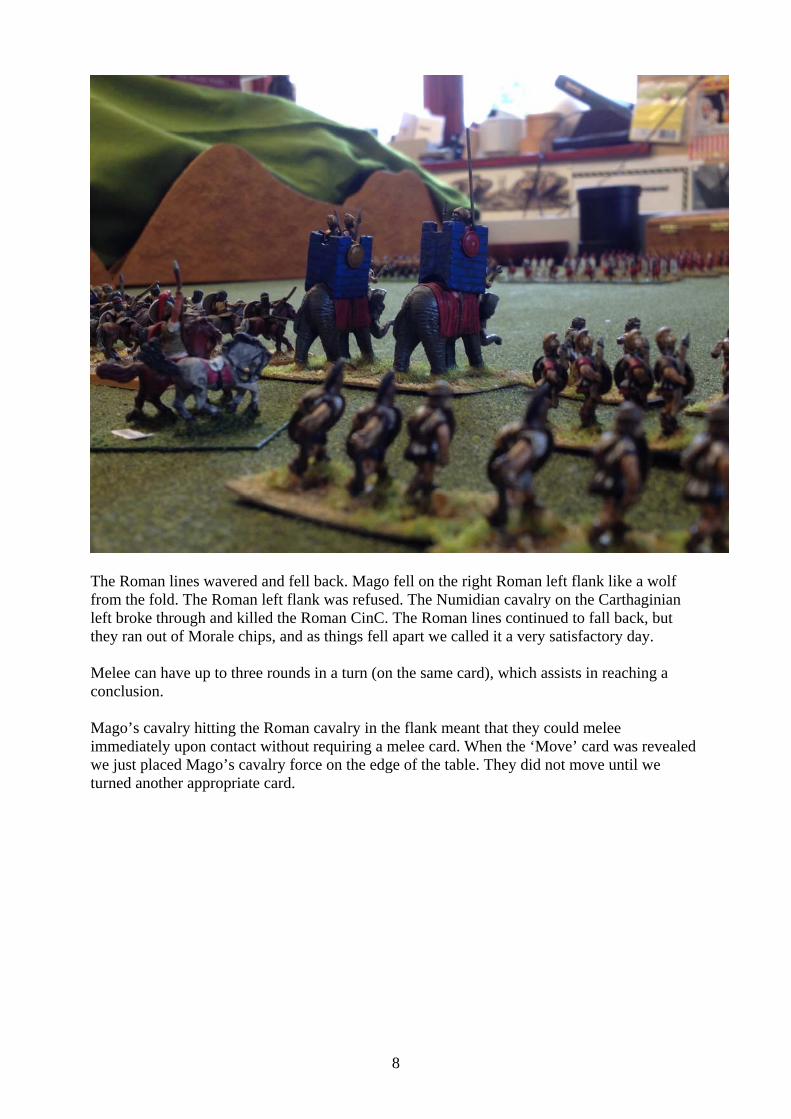
The Roman lines wavered and fell back. Mago fell on the right Roman left flank like a wolf from the fold. The Roman left flank was refused. The Numidian cavalry on the Carthaginian left broke through and killed the Roman CinC. The Roman lines continued to fall back, but they ran out of Morale chips, and as things fell apart we called it a very satisfactory day. Melee can have up to three rounds in a turn (on the same card), which assists in reaching a conclusion. Mago’s cavalry hitting the Roman cavalry in the flank meant that they could melee immediately upon contact without requiring a melee card. When the ‘Move’ card was revealed we just placed Mago’s cavalry force on the edge of the table. They did not move until we turned another appropriate card.
8
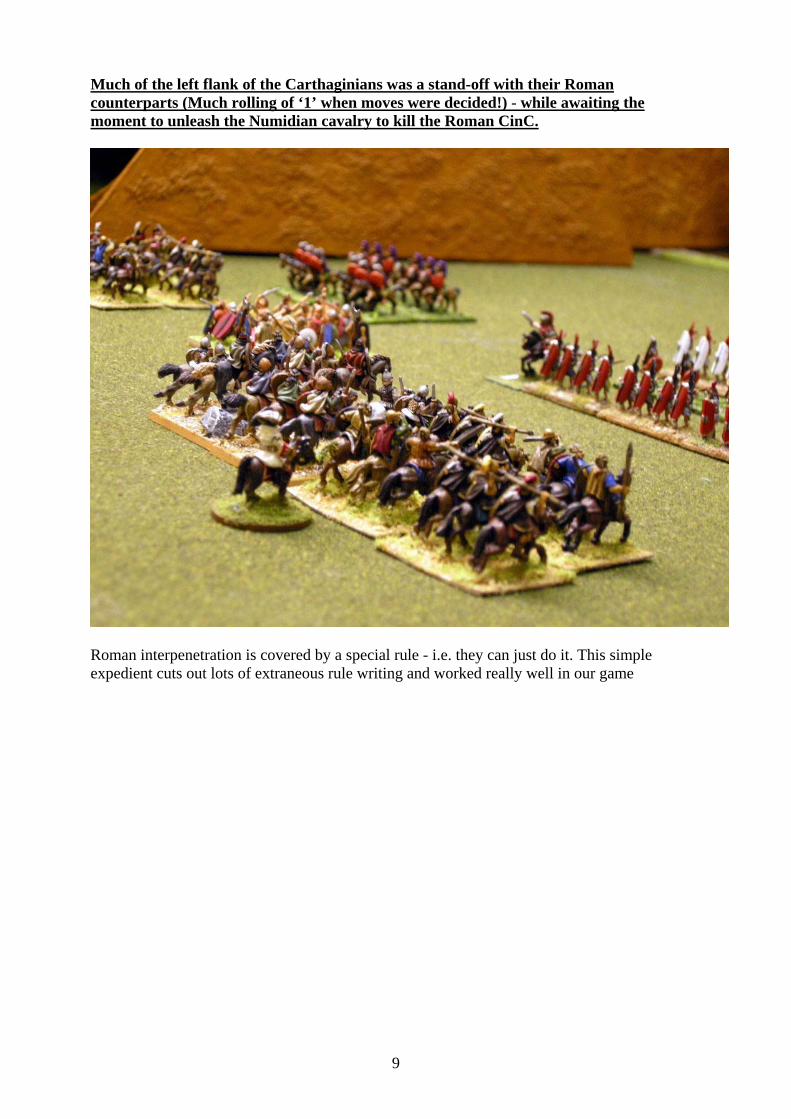
Much of the left flank of the Carthaginians was a stand-off with their Roman counterparts (Much rolling of ‘1’ when moves were decided!) - while awaiting the moment to unleash the Numidian cavalry to kill the Roman CinC.
Roman interpenetration is covered by a special rule - i.e. they can just do it. This simple expedient cuts out lots of extraneous rule writing and worked really well in our game
9
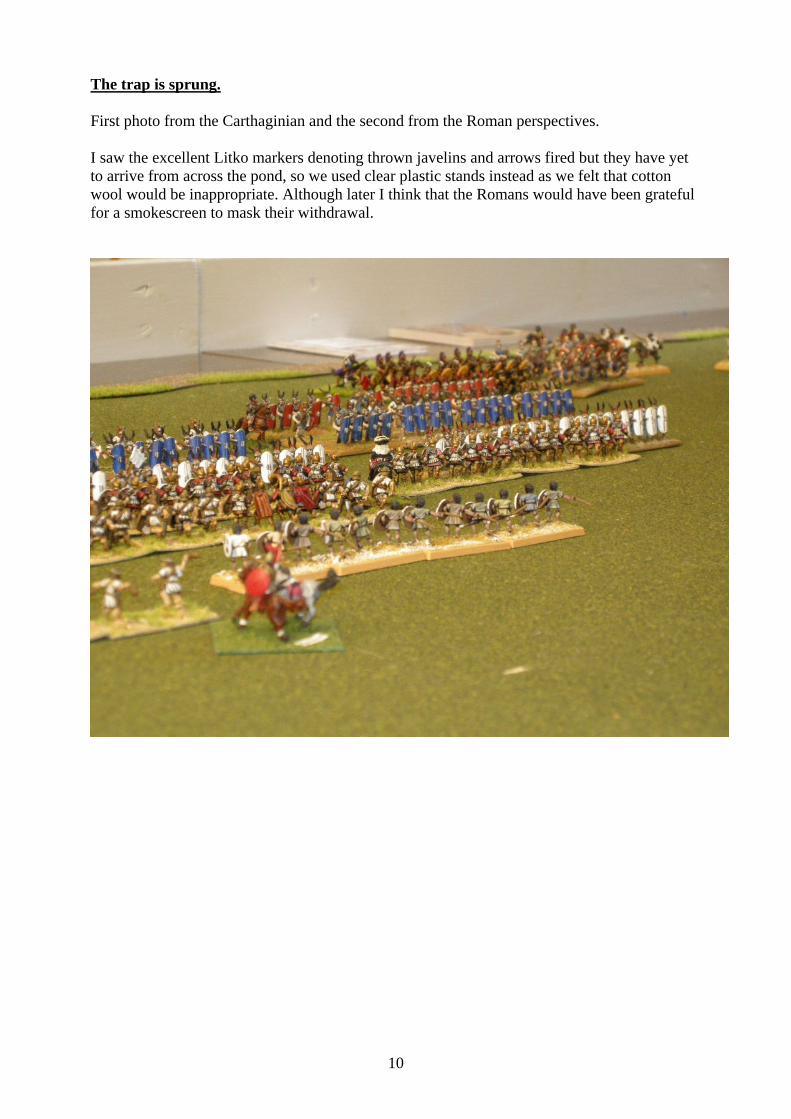
The trap is sprung. First photo from the Carthaginian and the second from the Roman perspectives. I saw the excellent Litko markers denoting thrown javelins and arrows fired but they have yet to arrive from across the pond, so we used clear plastic stands instead as we felt that cotton wool would be inappropriate. Although later I think that the Romans would have been grateful for a smokescreen to mask their withdrawal.
10
11
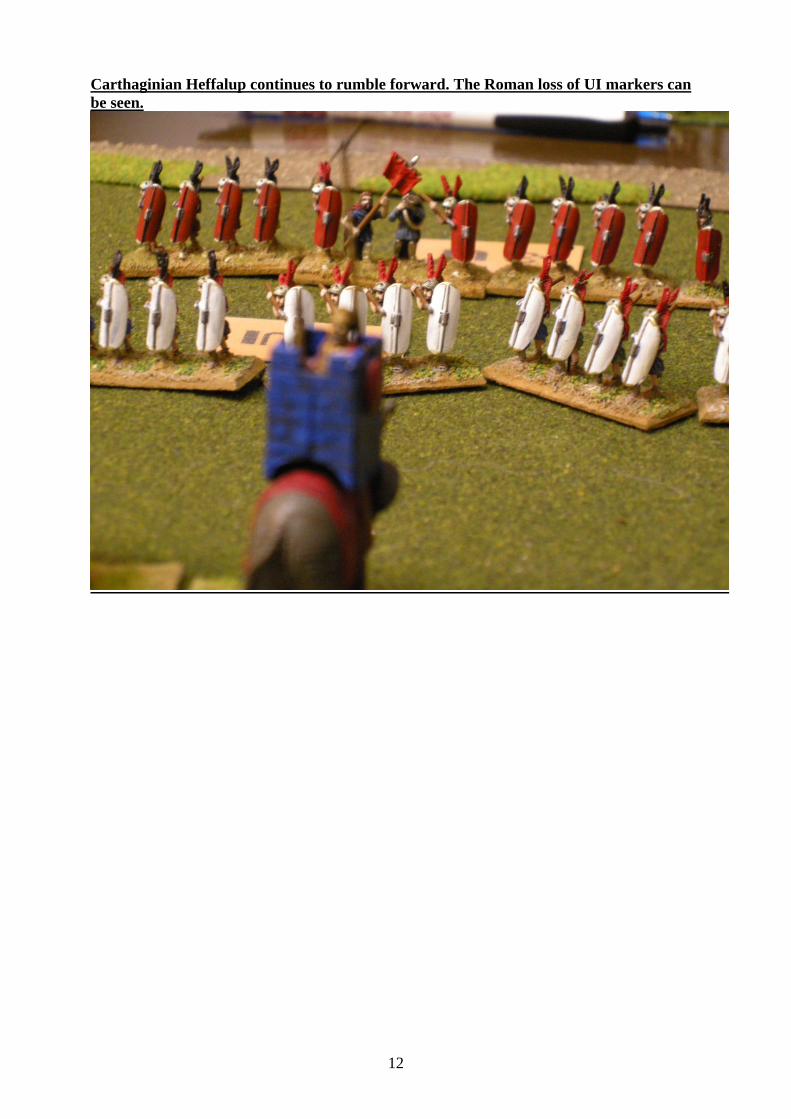
Carthaginian Heffalup continues to rumble forward. The Roman loss of UI markers can be seen.
12

Last Chance diplomatically ignoring Mago’s forces on his left and pointing out the struggle in the centre instaed.
13

The Libyan Spearmen giving a good account of themselves (Aided by Phil’s die rolling ;-) )
14
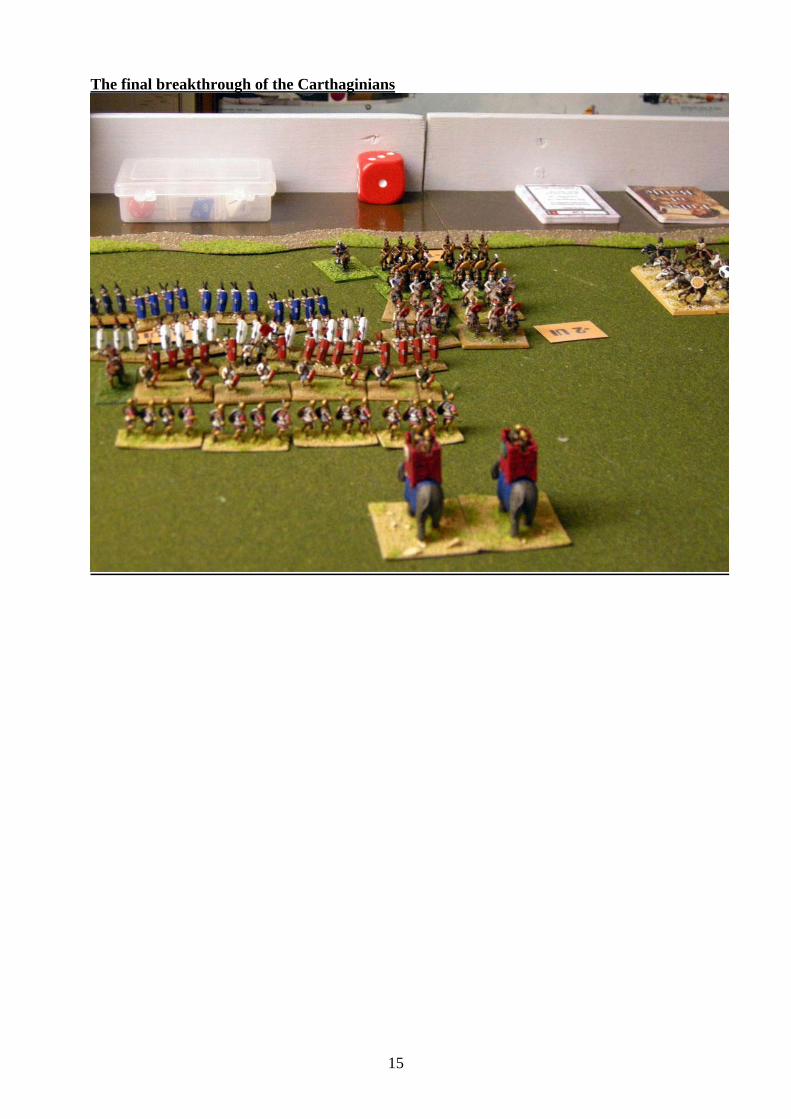
The final breakthrough of the Carthaginians
15
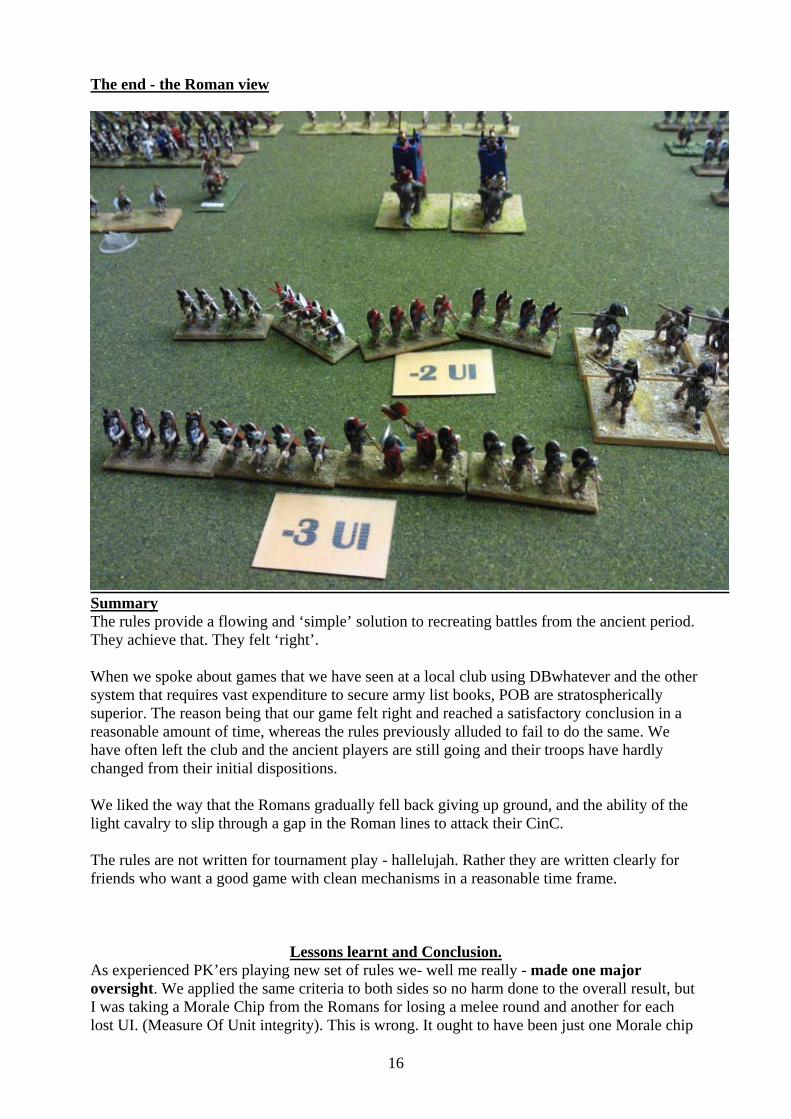
The end - the Roman view
Summary The rules provide a flowing and ‘simple’ solution to recreating battles from the ancient period. They achieve that. They felt ‘right’. When we spoke about games that we have seen at a local club using DBwhatever and the other system that requires vast expenditure to secure army list books, POB are stratospherically superior. The reason being that our game felt right and reached a satisfactory conclusion in a reasonable amount of time, whereas the rules previously alluded to fail to do the same. We have often left the club and the ancient players are still going and their troops have hardly changed from their initial dispositions. We liked the way that the Romans gradually fell back giving up ground, and the ability of the light cavalry to slip through a gap in the Roman lines to attack their CinC. The rules are not written for tournament play - hallelujah. Rather they are written clearly for friends who want a good game with clean mechanisms in a reasonable time frame.
Lessons learnt and Conclusion.
As experienced PK’ers playing new set of rules we- well me really - made one major oversight. We applied the same criteria to both sides so no harm done to the overall result, but I was taking a Morale Chip from the Romans for losing a melee round and another for each lost UI. (Measure Of Unit integrity). This is wrong. It ought to have been just one Morale chip
16

17
per UI lost. It would have been the same for both sides so didn’t effect the game, apart from making the Romans run out of Morale chips somewhat quicker than they otherwise would have done. We also disordered the Roman infantry as the previous line suffered a disordered result and fell back through their supports. This is not how POB is written. Brent said that it could be a house rule. We will play the next game as written on that point and compare. The death of the Roman CinC had major implications. We rolled a D6 while we waited for am card top appoint another Leader. This was incorrect. We ought to have offered the Carthaginians the choice of acting first or second as the Romans had no CinC. As they lost the D6 rolls it had no adverse bearing on the game. Brent promptly supplied the answer and we found the rule. Although no pike blocks were present I really like the sound of how the rules deal with them. I am now basing my pike phalanxes up in anticipation. It also makes me very keen to ply the Italian Wars and Wars of the Roses variants - much awaited and anticipated to be PDFs. If you are interested let Brent know NOW! Now reading the rules again after the game to see what we missed. We didn’t really, and look forward to another game soon. I have a large collection of ‘ancient’ armies and there is much to commend these rules. Buy them and you will play them - not add them to the other ‘dust gatherers’ on the shelves with all the other rules for this period.