y1150 installation manual rev b - catalograck · installation instructions fj rear bumper product...
TRANSCRIPT

Installation Instructions
FJ Rear Bumper Product Number: Y1150
Application: ’07-Current Toyota FJ Cruiser
Page 1 of 19 Y1150-Installation_Manual_REV_B
SAFETY
Your safety and the safety of others is very important.
In order to help you make informed decisions about safety, we have provided installation instructions and other information.
These instructions alert you to potential hazards that could hurt you or others. Please do a job safety analysis (JSA) before each task to identify potential hazards for
your situation and remove/protect against them. You must use your own good judgment, and take your time.
Read and understand all safety precautions and instructions before installing this product. THIS PRODUCT IS FOR OFFROAD USE ONLY. ALL LIABILITY FOR INSTALLATION AND USE RESTS WITH THE OWNER. CARELESS INSTALLATION AND OPERATION CAN RESULT IN SERIOUS INJURY OR EQUIPMENT DAMAGE.
Injury hazard
Failure to observe these instructions could lead to severe injury or death.
Always remove jewelry and wear eye protection. Always use extreme caution when jacking up a vehicle for work. Set emergency
brake and use tire blocks. Locate and use the vehicle manufacturers designated lifting points. Use jack stands.
Always use appropriate and adequate care in lifting components into place. Always insure components will remain secure during installation and operation. Always wear safety glasses when installing this kit. A drilling operation will
cause flying metal chips. Flying chips can cause serious eye injury. Always use extreme caution when drilling on a vehicle. Thoroughly inspect the
area to be drilled (on both sides of material) prior to drilling, and relocate any objects that may be damaged.
Always use extreme caution when cutting and trimming during fitting. Always tighten all nuts and bolts securely per installation instructions. Always route electrical cables carefully. Avoid moving parts, components that
become hot and rough or sharp edges. Always insulate and protect all exposed wiring and electrical terminals. Always perform regular inspections and maintenance on mounts and
related hardware.

Installation Instructions
FJ Rear Bumper Product Number: Y1150
Application: ’07-Current Toyota FJ Cruiser
Page 2 of 19 Y1150-Installation_Manual_REV_B
I. Overview
Congratulations on your new purchase of the industries’ best and most stylish Toyota FJ Rear Bumper! This bumper has been engineered for strength while keeping the weight down.
Your bumper was designed in 3-D from digitized data, CNC laser cut, fabricated, and powder coated… all in the U.S.A. Enjoy the fit and finish of a quality Toyota FJ Cruiser Bumper from Fab Fours Inc.
Installation Instructions
FJ Rear Bumper Product Number: Y1150
Application: ’07-Current Toyota FJ Cruiser
Page 3 of 19 Y1150-Installation_Manual_REV_B
II. Tools Required • Socket Wrench with Extension • ¾” Socket • 10mm, 18mm, & 19mm Sockets • 5/16” Allen Wrench or Socket Drive(Preferred) • Phillips Screwdriver • Wire Cutters • Needle Nose Pliers • 3 Friends to help Guide it into Place!
III. Vehicle Preparation
A. Remove Spare tire from factory spare tire mount located on the rear door.
B. Remove the Factory Spare tire mount and discard. Re-install the two bolts back into the door and the two nuts back onto the upper studs. This mount will not be reused.
C. If an aftermarket ladder for a safari rack has been installed it will need to be removed at this point. It is unfortunate but it cannot be reused due to the tire carrier portion of the Fab Fours bumper.
D. Disconnect factory back-up sensor connectors (if applicable). These will be re-installed into the Fab Fours Bumper.

Installation Instructions
FJ Rear Bumper Product Number: Y1150
Application: ’07-Current Toyota FJ Cruiser
Page 4 of 19 Y1150-Installation_Manual_REV_B
E. Remove (5) 10mm head bolts securing plastic bumper trim to the FJ. These can be accessed with the rear door open. See Image below.
F. Remove dart clip from passenger side of rear door.
Installation Instructions
FJ Rear Bumper Product Number: Y1150
Application: ’07-Current Toyota FJ Cruiser
Page 5 of 19 Y1150-Installation_Manual_REV_B
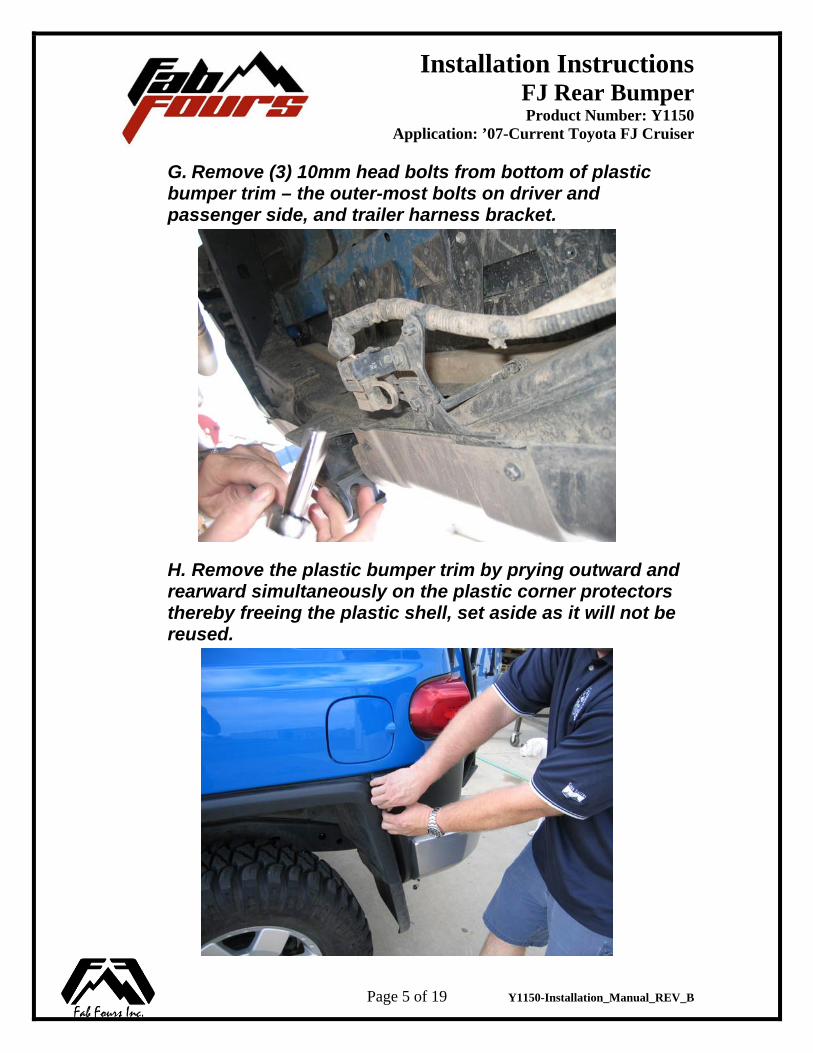
G. Remove (3) 10mm head bolts from bottom of plastic bumper trim – the outer-most bolts on driver and passenger side, and trailer harness bracket.
H. Remove the plastic bumper trim by prying outward and rearward simultaneously on the plastic corner protectors thereby freeing the plastic shell, set aside as it will not be reused.

Installation Instructions
FJ Rear Bumper Product Number: Y1150
Application: ’07-Current Toyota FJ Cruiser
Page 6 of 19 Y1150-Installation_Manual_REV_B
I. Remove the foam bumper from the rear frame crossmember, set aside as it will not be reused.
J. Remove the OEM hitch assembly, set aside as it will not be reused.
K. Remove the rear-most plastic molding (under the corner-protection wings) on both sides of vehicle. Set aside as these will not be reused.
L. Once the above steps have been completed the truck is ready to have the Fab Fours Bumper System installed, and should look like the following image.

Installation Instructions
FJ Rear Bumper Product Number: Y1150
Application: ’07-Current Toyota FJ Cruiser
Page 7 of 19 Y1150-Installation_Manual_REV_B
IV. Bumper Installation NOTE: Your Fab Fours Rear Bumper has come to you assembled for shipment purposes, however it is not ready to bolt on as is. Please do not skip the initial steps of installation which will allow for the adjustment of the bumper for proper fitment. Ignoring these steps will increase your probability of scratching the vehicle during product Installation!
A. Remove the bumper from the shipping carton. Lay bumper out on a blanket to prevent damage to the powder coating.
B. Remove the Center Frame Mount (Intermediate Mount Plate) from the bumper assembly. Do not lose the fasteners. See Below Image with Center Frame Mount Shown in Red.

Installation Instructions
FJ Rear Bumper Product Number: Y1150
Application: ’07-Current Toyota FJ Cruiser
Page 8 of 19 Y1150-Installation_Manual_REV_B
C. Loosen(Do Not Remove) Driver and Passenger side Frame Mounting Brackets at the bumper to allow for adjustment.

Installation Instructions
FJ Rear Bumper Product Number: Y1150
Application: ’07-Current Toyota FJ Cruiser
Page 9 of 19 Y1150-Installation_Manual_REV_B
D. Loosen(Do Not Remove) all fasteners holding the Driver and Passenger Side Corner Protection Plates (wings) to allow for adjustment during fitment. On the Passenger side this includes the fastener on the Tire Carrier Latch Hook Bracket and the red rubber bumper. See Image Below (Typical on Both Sides).
E. Install supplied edge trim on upper edge of the corner protection wings. This will help protect your paint from possible damage during the install. See Image Below.

Installation Instructions
FJ Rear Bumper Product Number: Y1150
Application: ’07-Current Toyota FJ Cruiser
Page 10 of 19 Y1150-Installation_Manual_REV_B
F. Install the Center Frame Mount (Intermediate Mount Plate) to frame crossmember, position the bracket to the middle of its slotting. Verify that the bracket is level to the vehicle and tighten fully. See Image Below.
G. Using two people (One on each Corner Wing), with one more to be free to install bolts, lift the bumper into place. Be extremely cautious as to not scratch the paint with the Corner Wings. The third person can now install the four supplied metric bolts into the bottom of the frame through the Fab Fours Frame Mount Brackets. Do not fully tighten these at this time. See Image Below.

Installation Instructions
FJ Rear Bumper Product Number: Y1150
Application: ’07-Current Toyota FJ Cruiser
Page 11 of 19 Y1150-Installation_Manual_REV_B
H. Level the bumper to the back door using a floor jack, and center from side to side.
I. Install the Center Frame Mount fasteners that were removed earlier back through the bumper threading into the mount. Snug these fasteners, do not fully tighten at this time. See Image Below.
NOTE: If bumper cannot level out in relation to the truck, or is to high or low in relation to the door. Remove the bumper and re-align the Center Frame Mount (Return to Step F above).
J. Tighten the Driver and Passenger Side Frame brackets at the bumper. These were loosened in Step C above before installation.
Installation Instructions
FJ Rear Bumper Product Number: Y1150
Application: ’07-Current Toyota FJ Cruiser
Page 12 of 19 Y1150-Installation_Manual_REV_B
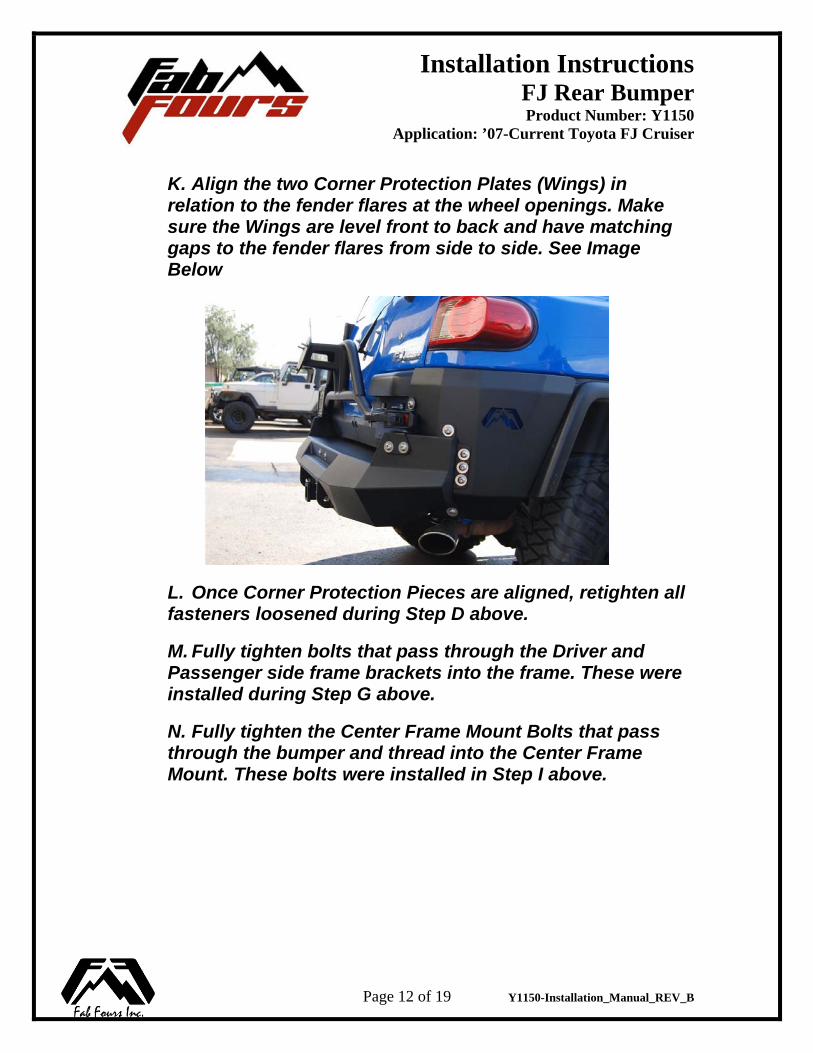
K. Align the two Corner Protection Plates (Wings) in relation to the fender flares at the wheel openings. Make sure the Wings are level front to back and have matching gaps to the fender flares from side to side. See Image Below
L. Once Corner Protection Pieces are aligned, retighten all fasteners loosened during Step D above.
M. Fully tighten bolts that pass through the Driver and Passenger side frame brackets into the frame. These were installed during Step G above.
N. Fully tighten the Center Frame Mount Bolts that pass through the bumper and thread into the Center Frame Mount. These bolts were installed in Step I above.

Installation Instructions
FJ Rear Bumper Product Number: Y1150
Application: ’07-Current Toyota FJ Cruiser
Page 13 of 19 Y1150-Installation_Manual_REV_B
O. Verify the proper operation of the Tire Carrier and rear door. If the level of the Tire Carrier needs to be adjusted at the clasp, loosen the bolts on the Tire Carrier Pivot Bracket (See Image Below), hold Tire Carrier into desired position and re-tighten.
P. Install spare tire to Fab Fours Tire Carrier.
Q. Install backup sensors into Fab Fours Bumper and reattach harness.
R. Your bumper is now installed. Please Continue onto wiring the license plate light.
V. License Plate Relocation and Wiring Instructions. NOTE: Your Fab Fours Rear Bumper has relocated your license plate from the stock position to the License Plate Mount located on the driver side of the Tire Carrier. Supplied with this kit are 2 plastic inserts and bolts for the license plate to be installed in addition to a new license plate light and associated wiring harness.

Installation Instructions
FJ Rear Bumper Product Number: Y1150
Application: ’07-Current Toyota FJ Cruiser
Page 14 of 19 Y1150-Installation_Manual_REV_B
A. With the rear door open remove the two silver screws at the top corners of the inner panel. See Image Below.
B. By hand GENTLY pull the panel away from the rear door. Open the rear door window to release the panel at the top. See Image Below.
Installation Instructions
FJ Rear Bumper Product Number: Y1150
Application: ’07-Current Toyota FJ Cruiser
Page 15 of 19 Y1150-Installation_Manual_REV_B
C. Using a knife or a razor separate the plastic clear liner from the door. Be careful not to scratch the paint!
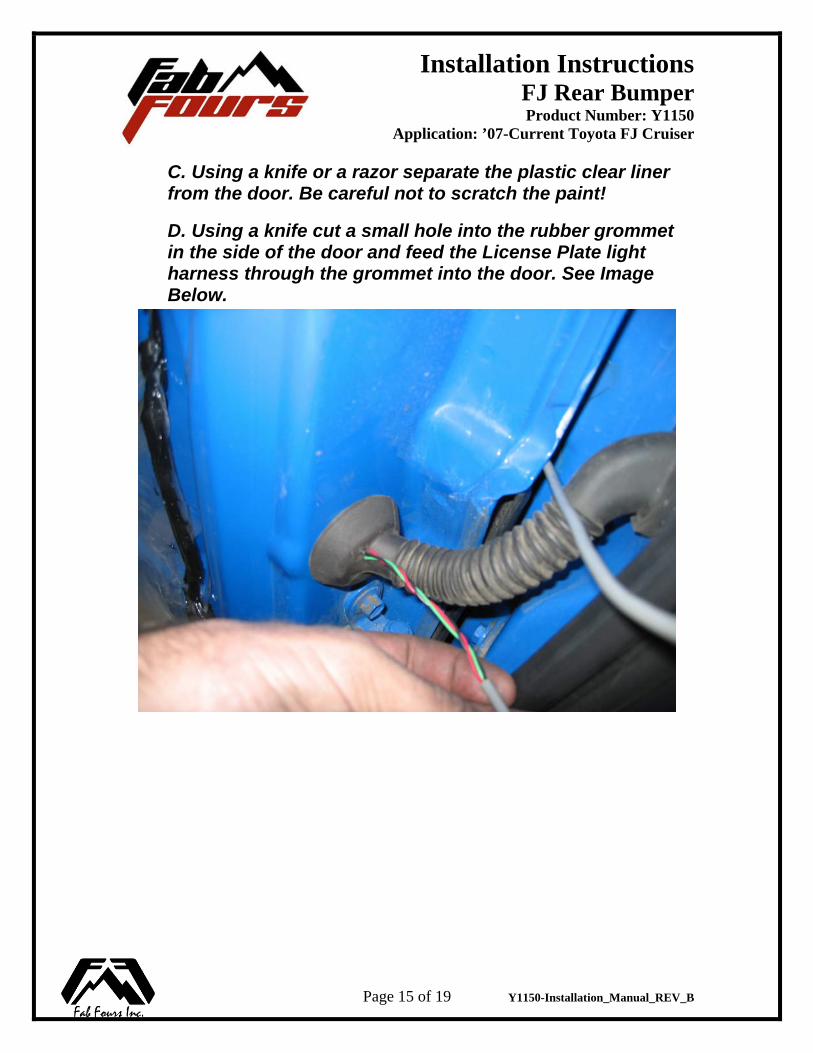
D. Using a knife cut a small hole into the rubber grommet in the side of the door and feed the License Plate light harness through the grommet into the door. See Image Below.

Installation Instructions
FJ Rear Bumper Product Number: Y1150
Application: ’07-Current Toyota FJ Cruiser
Page 16 of 19 Y1150-Installation_Manual_REV_B
E. Pull the Harness to the Passenger side of the door. Using the supplied T-Tap connectors wire the Green Wire from the License Plate harness to the Factory Green wire close to the factory light connector. Also use the supplied T-Tap connectors to wire the Black Wire of the supplied harness to the White w/ Black Strip wire close to the Factory light connector. See Image Below.
OPTIONAL. If you would like to utilize the auxiliary brake light in the supplied license plate light please complete the following steps.
F. Cut back the supplied harness to allow the Red Wire to be bulled back to the Driver Side of the door.

Installation Instructions
FJ Rear Bumper Product Number: Y1150
Application: ’07-Current Toyota FJ Cruiser
Page 17 of 19 Y1150-Installation_Manual_REV_B
G. Use the supplied T-Tap connectors to connect the Red Wire of the supplied harness to the Green w/ Yellow Strip Wire close to the Factory Connector. See Image Below.
H. Zip tie supplied harness into place along the factory harness inside the door.
I. Re-Install Plastic Liner
J. With Rear Window open, re-install the plastic rear door panel.
K. Re-Install the two silver screws at the top of the panel.
L. Press the two License plate inserts into the square holes on the License Plate Mount on the Tire Carrier.

Installation Instructions
FJ Rear Bumper Product Number: Y1150
Application: ’07-Current Toyota FJ Cruiser
Page 18 of 19 Y1150-Installation_Manual_REV_B
M. Install and tighten the License Plate Screws through your license plate into the License Plate Light’s Bracket and into the plastic inserts. See Image Below.
N. Use Zip Ties to secure the harness to the tire carrier and over to the pivot. Be careful to route it in a way that allows the tire carrier and the rear door to operate independently of each other without damaging the harness.

Installation Instructions
FJ Rear Bumper Product Number: Y1150
Application: ’07-Current Toyota FJ Cruiser
Page 19 of 19 Y1150-Installation_Manual_REV_B
VI. Maintenance/Care
If the Tire Carrier Latch becomes loose against the rubber bumper, The rubber bumper can be removed and re-installed with washers between it and the bumper to increase the pre-load.
Periodically check and tighten all fasteners. Periodically lubricate the pivot busing with White Lithium grease to
prevent squeaking. Stripped, fractured, or bent bolts or nuts need to be replaced.
VII. Contact Information Fab Fours Inc. Phone (866)-385-1905 10424 Rodney St. Fax (970)-385-1914 Pineville, NC 28134 Email [email protected]
More than expected… Better than expected