xvl– digital trunk (synway) - xtend technologies … · digital trunk (synway) ... contents 2 1....
TRANSCRIPT

Ver. 3.0
Digital Trunk (Synway)
INSTALLATION GUIDE
Xtend Voice Logger

Contents
2
1.
2.
3.
4.
5.
6.
6.1.
6.2.
6.3.
6.3.1.
7.
8.
9.
Welcome!!! ...................................................................................3
Introduction ..................................................................................4
Unpacking.....................................................................................6
Minimum System Requirements ....................................................6
Interconnection Diagram ...............................................................7
Getting Started .............................................................................8
Connecting the Patch Panel ...................................................9
Synway (Digital) Card – Driver Installation...........................10
Installing Xtend Voice Logger ...............................................24
Device Configuration.................................................31
Installation Checklist...................................................................34
Troubleshooting ..........................................................................35
Contact us ..................................................................................37

Congratulations on becoming an owner of Xtend Voice Logger. You made an excellent choice and we
hope you will enjoy all its capabilities.
Xtend focuses in building accurate, complete and error-free solutions. Our products include Interactive
Voice Response Solution, Voice Loggers and Outbound Dialers developed using RAD toolkit. Our
products allow people to communicate with computers through telephones, there by opening up almost
limitless opportunities for new and enhanced customer service. These products have been used by
prominent Satellite channels, Engineering colleges, Banks, Telecom and other private and public sector
companies for dissemination of information to their customers.
Xtend develops innovative products that offer a rich set of functionality and superb quality at ultra-
affordable price. Xtend Voice Logger is one among these products developed by Xtend to log all the
incoming and outgoing calls in an organisation. With the purchase of this product, now you can have a
perfect monitoring on all the ongoing calls to upgrade the performance of the organisation.
This user guide familiarises you to install the Xtend Voice Logger in the system.
1. Welcome !!!
3
Contents

Congratulations on becoming an owner of Xtend Voice Logger. You made an excellent choice and we
hope you will enjoy all its capabilities.
Xtend specialises in the development and implementation of innovative products and toolkits targeting
the growing telecommunication markets. The series of innovative products developed by Xtend
includes Voice Loggers, Interactive Voice Response System and Outbound Dialers. With the purchase of
Xtend Voice Logger, now you can have a perfect monitoring on all the incoming/outgoing calls to
upgrade the performance of the organisation. This user guide familiarises you to install the Xtend Voice
Logger in the system.
2. Introduction
4
Contents
Major features of Xtend Voice Logger include:
Continuous audio recording
Easy-to-operate and user-friendly
Full-duplex channels
Browser-based user interface
Live monitoring
Multi-login facility
Logged call monitoring through ActiveX control
Advanced call detail search
Generates reports
Archiving capability
Voice compression
Live snooping with reports
Send/receive E-mails
5
Contents

The package for Xtend Voice Logger consists of the following items:
Installation CD
HASP HL Key
Synway Voice Card
Patch Panel (RJ 45 Splitter)
2 Cables
3. Unpacking
4. Minimum System Requirements
Other System Requirements
= Sound card Headphone/Speaker LAN connection= =
6
Contents
Operating System (32/64-bit) : Windows 2008/2012/Vista/7/8/8.1/10
Browser : Internet Explorer 6.0 or above
Processor Speed : Dual Core or higher
Memory : 2 GB or above
Hard Disk Space : 500 MB for software installation
1 GB approx. for 175 hrs of recording
Note: The specification mentioned here is for recording a single port and this shall vary with the increase in number of ports.
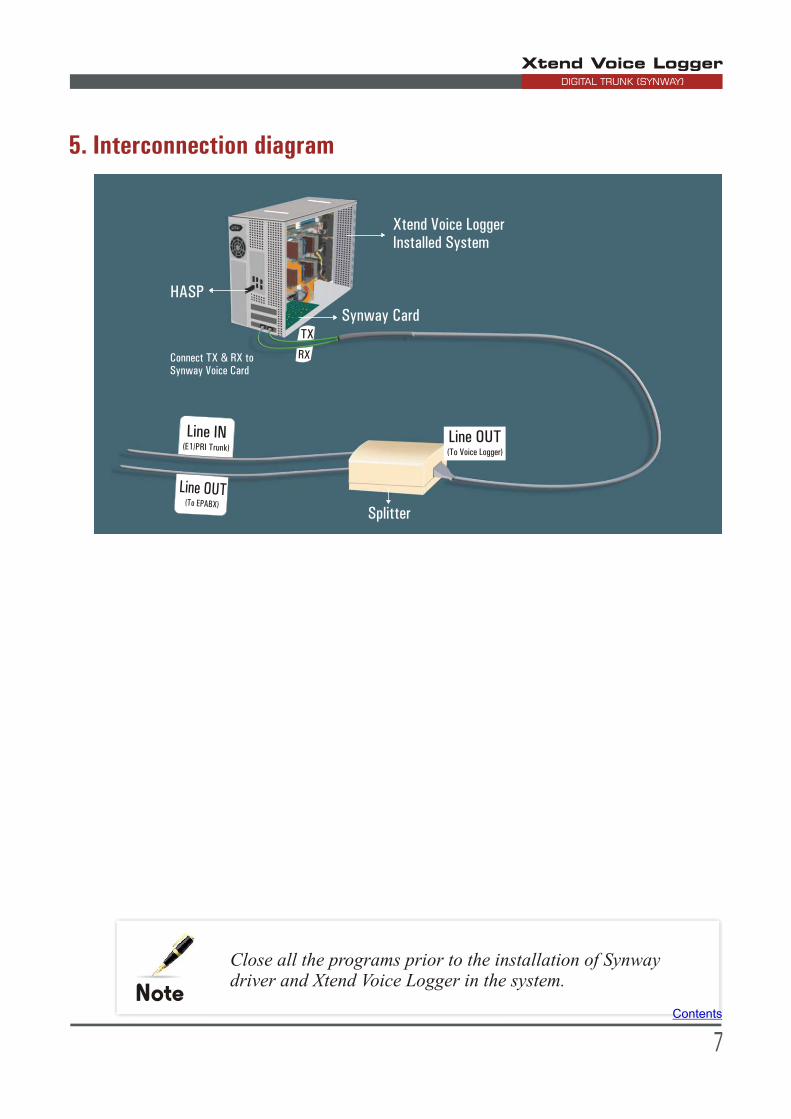
5. Interconnection diagram
Note
Close all the programs prior to the installation of Synway driver and Xtend Voice Logger in the system.
7
Connect TX & RX to Synway Voice Card
HASP
Xtend Voice LoggerInstalled System
TX
Splitter
n Li e IN( 1/ RI TrunkE P )
L ne UTi O o PA(T E BX)
Synway Card
Line OUT (To Voice Logger)
Contents

This manual explains the installation of Xtend Voice Logger in the system. Xtend Voice Logger
functions on the basis of Patch Panel and Synway voice card. A USB cable with a RJ45 connector on
one side connects the Patch Panel, and two RJ45 connectors on the other side connect the Synway
board. The Synway card serves as an interface to connect the Patch Panel to the Xtend Voice Logger
installed in the system. The picture of the HASP HL Key and Synway Voice Card is shown here.
6. Getting Started
HASP HL Key
Synway Voice Card
Installation of Voice Logger is briefly mentioned below:Xtend
Insert the Synway board on the PCI slot of the computer. Insert the two connectors drawn from the
Patch Panel into the socket of the voice card.
Install the Synway driver from the installation CD.
Install the Xtend Voice Logger and insert the HASP HL key into the USB port of the computer.
Go to "C:\ShCti" and copy the two .ini files "ShIndex", "ShConfig" to "C:\XtendLogger\4733\xivr".
Open the file "ShConfig" in the copied location and replace the value of "EventInterfaceType" to 1.
Configure the voice device from the browser interface of Xtend Voice Logger.
Click Live Calls in the browser interface and check that all ongoing calls are logged in the Xtend
Voice Logger.
8
Contents

6.1 Connecting the Patch Panel
Patch Panel consists of three sockets. Connect these lines as given below:
Connect the line from Telecom to Patch Panel
Connect the line from Patch Panel to EPABX
Insert the Synway voice device into the PCI slot of the computer. Now, insert the two connectors
drawn from the Patch Panel into the socket of Synway voice device
9
Contents
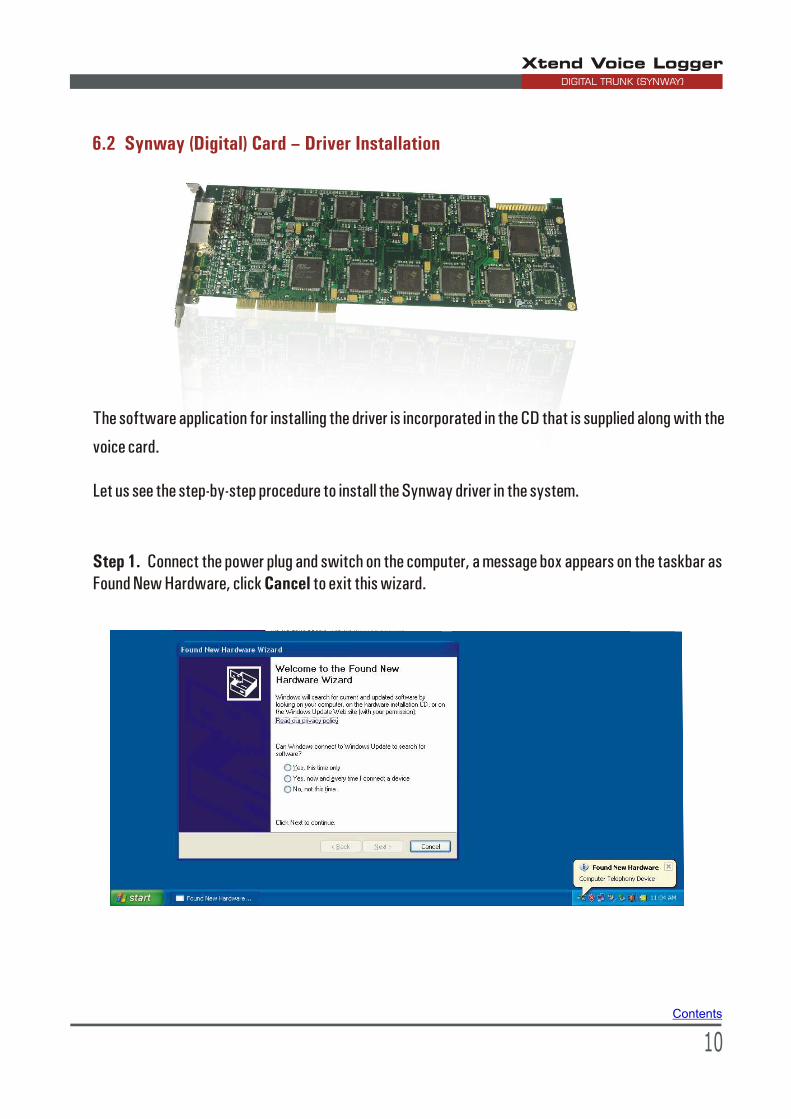
6.2 Synway (Digital) Card – Driver Installation
The software application for installing the driver is incorporated in the CD that is supplied along with the
voice card.
Let us see the step-by-step procedure to install the Synway driver in the system.
Step 1. Found New Hardware, click Cancel to exit this wizard.
Connect the power plug and switch on the computer, a message box appears on the taskbar as
10
Contents

Step 2.
into the CD-ROM drive and run the application file SYNWAY_PCI(USB)_5040_EN from this
location.
Install the Synway device driver ShCti4.7 in the system from the installation CD. Insert the CD
A window named WinRAR self-extracting archive gets opened on the screen as shown. The driver and
the tools are extracted to a destination folder i.e., C:\Program Files\SHCTISETUP.
11
Contents
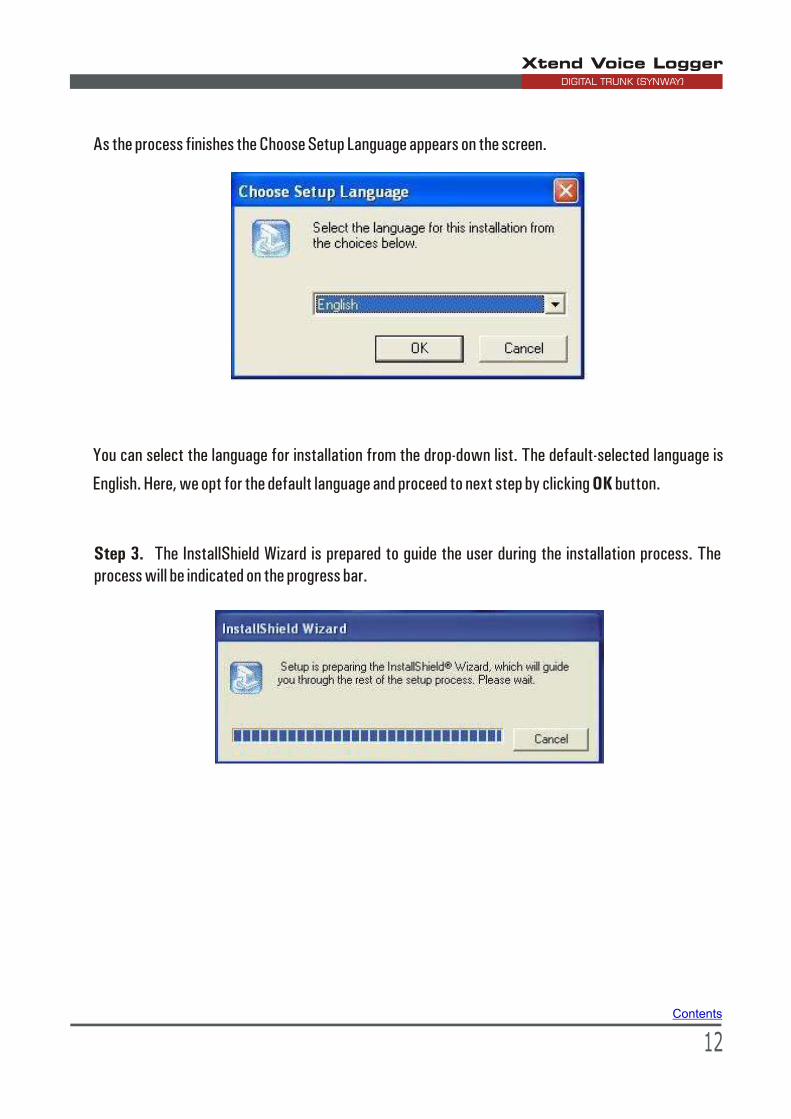
As the process finishes the Choose Setup Language appears on the screen.
You can select the language for installation from the drop-down list. The default-selected language is
English. Here, we opt for the default language and proceed to next step by clicking OK button.
Step 3. process will be indicated on the progress bar.
The InstallShield Wizard is prepared to guide the user during the installation process. The
12
Contents

As the process gets over the InstallShield Wizard pops up on the screen.
The Software License Agreement can be seen on the wizard. Read the instructions listed point-wise
inside the window. Use Page Up/Down key or the Scroll bar to view the whole Agreement.
Click Yes to accept the Agreement and proceed to next window.
13
Contents

Step 4. applications running on the system prior to the Synway driver installation.
The Welcome window appears on the screen that informs the user to close all the active
Click Next to proceed further.
Step 5. existing version of the same driver in the system.
Before installing the new version of Synway driver, the wizard detects the presence of any
14
Contents

Step 6. The Destination Location copies the program files to C:\ShCti, click Next.
As the folder named ShCti does not exist the setup prompts the user to create the folder. Click Yes to
create a new folder.
15
Contents

Step 7. Click Yes to install the include files and the library files with the driver.
Step 8. The installation proceeds as shown in Figure.
16
Contents

A warning window appears on the screen, click Continue Anyway.
Installation of the voice board completes, press OK to confirm.
Again, press OK to continue.
17
Contents

Step 9. Click Finish to conclude the installation.
Step 10. > >configuration.
Go to Start Programs ShCti>ShCtiConfig to proceed with the voice board
18
Contents

The connected voice board model appears within Board Setting, select the board and click Modify
Board.
Connected Synway Voice Board Model
Step 11.
and Advanced Setting. In the Advanced Setting, click PCM.
The window for Modify board[ID:0] appears. There are two sub options Basic Setting
19
Contents

Step 12. The board[ID:0] window appears. Click on the Board, in addition to that click Modify PCM.
Step 13. twisted pair from the dropdown list. Click OK to proceed further.
The modify[PCM:D] window appears. Select the SSX as U-side and Link module as
20
Contents
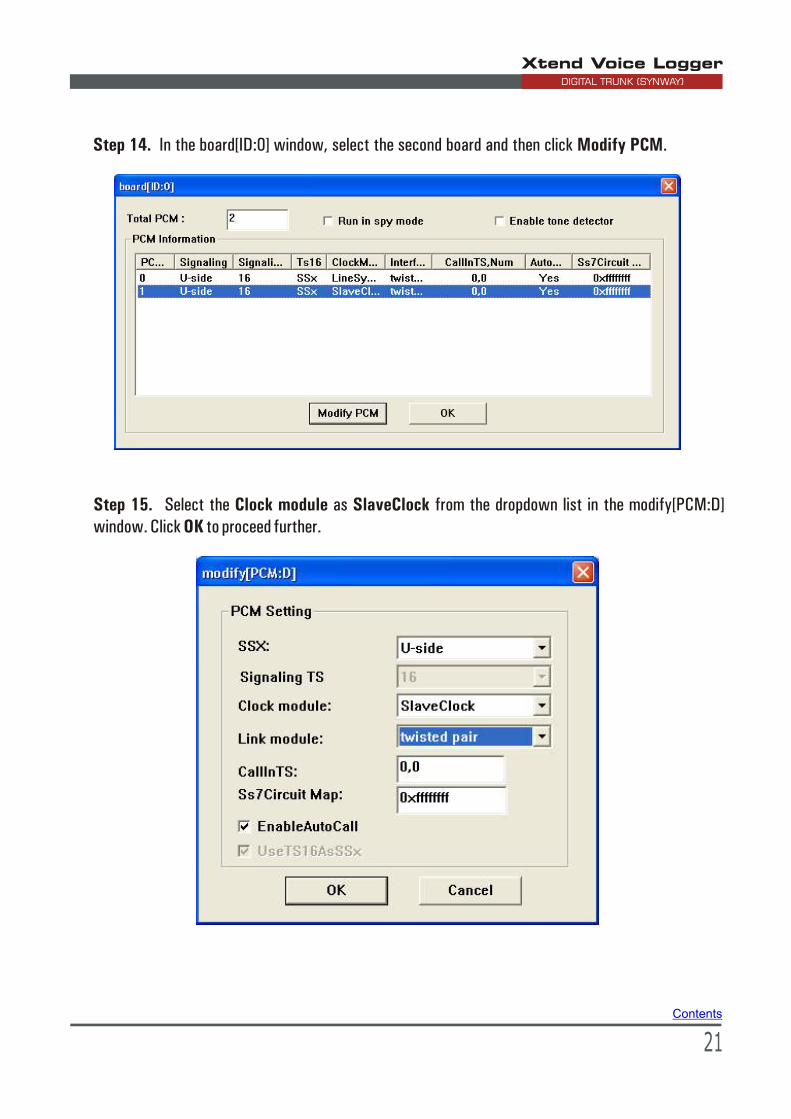
Step 14. In the board[ID:0] window, select the second board and then click Modify PCM.
Step 15. window. Click OK to proceed further.
Select the Clock module as SlaveClock from the dropdown list in the modify[PCM:D]
21
Contents

Step 16. Again click Modify board[ID:0]. Click Apply in the ShCticonfig.exe window.
Step 17. Click OK.
A popup window "ShCtiConfig" displays saying Current Configuration Succeeds!
22
Contents

Step 18. Again click OK on the ShCtiConfig.exe window.
Step 19. appear. Click Close(c) to close the process.
From the task bar, right click on the Synway icon. Two options Show(s) and Close(c) will
23
Contents

6.3 Installing Xtend Voice Logger
This section will help you to install the Xtend Voice Logger in the system.
Software installation is done from the CD provided in the kit. You can follow these steps to install the
voice logging system:-
Step 1. Insert the installation CD into the CD-ROM drive and save the setup to any specified location.
Run the setup from this location.
Step 2. The Welcome window appears on the monitor as the first step in the process of installation,
click Next.
24
Contents

Step 4. Setup installs Xtend Voice Logger in default location C:\XtendLogger, click Next to proceed.
Note that there should be at least 32-MB free disk space available to install the Voice Logger setup.
25
Step 3. Read the License Agreement carefully and select "I accept the agreement". Now, click Next.
Contents

Step 6.
the Start menu. Click Install to proceed.
The user-selected options appear, verify the destination location and the program shortcut in
26
Step 5. continue.
The default shortcut in the Start menu appears as Xtend Voice Logger 3.0, click Next to
Contents

Step 8. Click OK to continue with the installation procedure.
Note: While installing, if Firewall blocks the Xtend Server you can click UNBLOCK button and continue.
27
Step 7. The installation process proceeds by copying all the related files and programs into the
specified location. It will take few seconds for the process to get over, as the time taken will vary from
system to system. An illustration of the installation process is shown below.
Contents
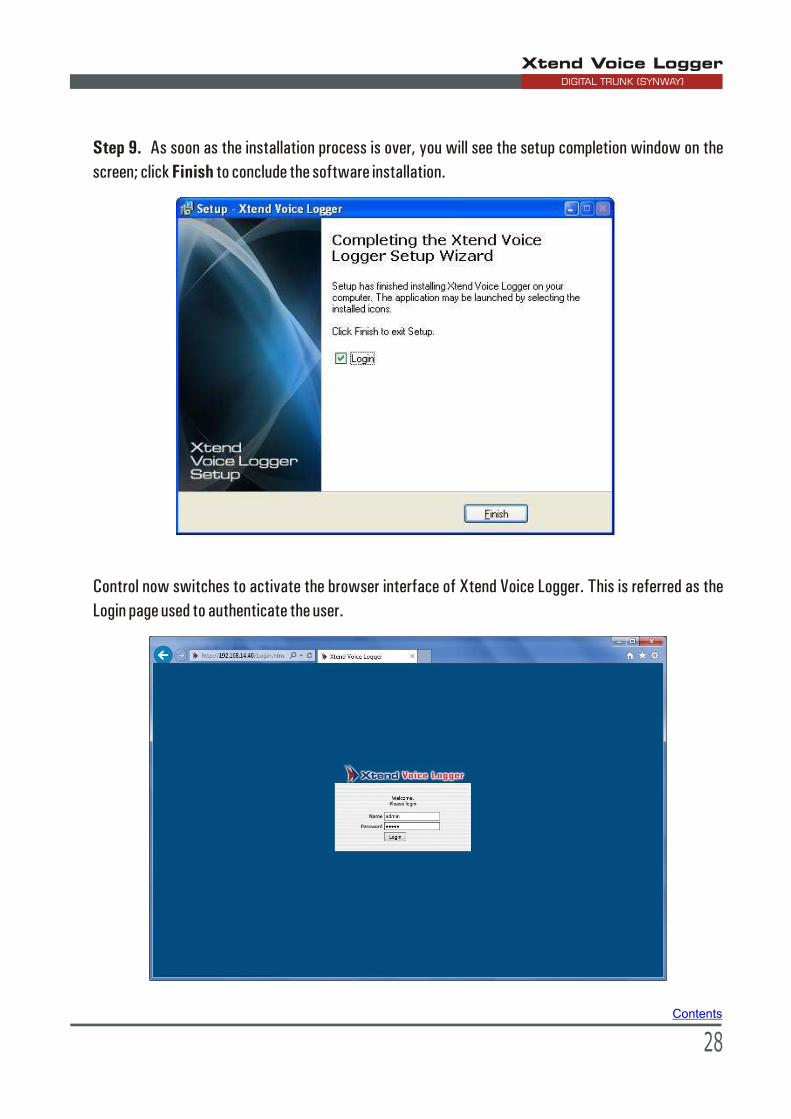
Step 9. As soon as the installation process is over, you will see the setup completion window on the
screen; click Finish to conclude the software installation.
Control now switches to activate the browser interface of Xtend Voice Logger. This is referred as the
Login page used to authenticate the user.
28
Contents

Let the Login page remain opened on the screen. Insert the provided HASP HL Key into the USB port of
the computer. A message appears as “Found New Hardware” on the taskbar.
Wait for few seconds, message appears as “Your new hardware is installed and ready to use”.
29
Contents
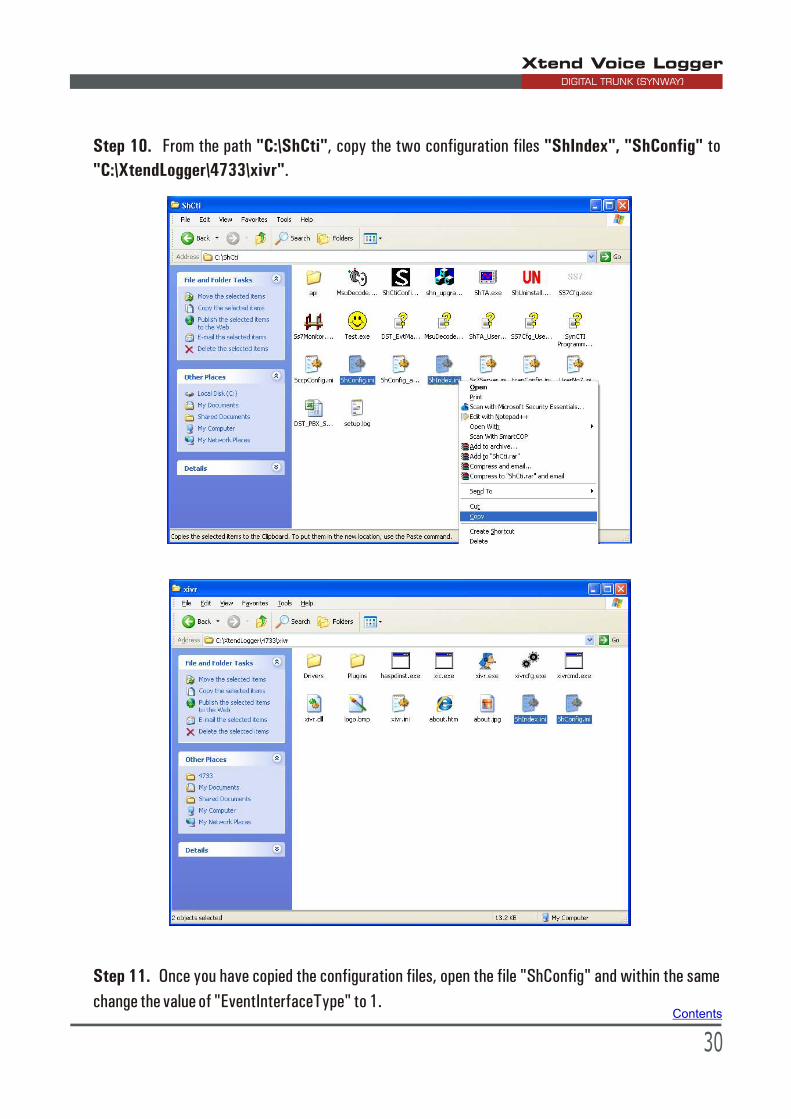
Step 10. From the path "C:\ShCti", copy the two configuration files "ShIndex", "ShConfig" to
"C:\XtendLogger\4733\xivr".
Step 11. Once you have copied the configuration files, open the file "ShConfig" and within the same
change the value of "EventInterfaceType" to 1.
30
Contents

6.3.1. Device Configuration
This section deals with the configuration of the Synway voice device with the Xtend Voice Logger. The device configuration is carried out from the browser interface.
Go to Start Menu>Programs>Xtend Voice Logger 3.0> Login
Default Name and Password is "admin" click Login.
The below window for "Configure Device" will appear, click Ok.
31
Contents

Given below is the description of each option in the configuration window:
1. Displays the number of voice cards detected.
2. Click on the checkbox to enable the trunk.
3. Shows the name of the connected device with serial number of the device.
4. Keep the default Trunk name as it is, or in case if you desire you can give a new trunk name.
5. By default the Trunk Type appears as ISDN PRI.
6. Call Logging begins on the basis of the events specified in the Log Type. By default 'Handset Up to
down' appears as selected in this box.
Call recording begins when handset is lifted, and stops when it is kept down.
Handset Up to Down
Call recording begins when the user hits any specific key (for e.g., press '*' To Start and '#' To Stop etc.)
Agent Trigger
7. The Protocol appears as ISDN PRI.
1 2 3 4 5 6 7
Xtend Voice Logger automatically detects the Synway Voice Device.
32
Contents
Click Start>Programs>Xtend Voice Logger 3.0>Xtend Web Server to start the web server.
Click Start>Programs>Xtend Voice Logger 3.0>Xtend Voice Logger to enable the Voice Logger.
Click Start>Programs>Xtend Voice Logger 3.0>Login to open the browser interface to
monitor the calls.
Instruction
How to enable Xtend Voice Logger?
This concludes the installation of Xtend Voice Logger in the system.
33
Contents

Please read the points mentioned below and verify that all the points are carried out for an error-free
installation of Xtend Voice Logger.
7. Installation Checklist
CHECKS TO BE DONE
Have you inserted the Synway board on the PCI slot of the computer?
Have you made the connection to the socket present in the Patch Panel –
From Telecom line To EPABX To Voice Logger
Have you connected the transmit and receive connectors to the socket of Synway board?
Have you installed the Synway driver from the installation CD?
Have you copied the configuration files to the path "C:\XtendLogger\4733\xivr"?
Have you inserted the HASP HL key into the USB port of the computer?
Have you installed the Xtend Voice Logger from the installation CD?
Is Xtend Web Server enabled?
Have you configured the Synway voice device with the Xtend Voice Logger?
Are you able to view the icon for Xtend Voice Logger on the taskbar?
Click Live Calls in the menu options of browser interface and check that all live calls are recorded in
the Xtend Voice Logger.
34
Contents
Read this section to find potential solutions to problems you may be having.
8. Troubleshooting
Why system is unable to detect the Voice Card?
Solution: This situation arises when the installation is not correctly carried out. Insert the voice device
into the PCI slot. Insert the two connectors into the socket of Synway voice card. Check the
connections of Patch Panel. Install the Synway driver. Copy the .dll file to C:\Windows. Run Setup.exe
to install Xtend Voice Logger. Configure the Synway voice device with the Xtend Voice Logger. Finally,
check that the calls are logged in Live Calls menu.
Why I am unable to hear the play conversation?
Solution: This may happen in O/S Windows 2003. To solve this problem, open Internet Explorer à
Tools à Internet Options à Advanced à Multimedia. Put a tick in the checkbox next to Play
sounds in web pages and click OK.
Why login from the Start Menu is not possible after changing the IP Number of the system?
Solution: After changing the IP Number, when you try to login from the Start Menu the system tries to
login in the old IP Number. In such a case, after changing the IP number you can restart the Xtend Web
Server and then login as http:\\localhost or http:\\127.0.0.1. Once logged, further the problem will be
fixed automatically.
35
Contents

When do you get an error message as “HASP HL Key not found”?
Solution: This error appears when HASP HL Key is not inserted into the USB port of the computer.
When do you get an error message as “HASP HL Key not found”?
Solution: This error happens when the HASP HL Key connected to the USB port of the computer does
not have license to run Xtend Voice Logger.
36
Contents

9. Contact us
Xtend Technologies (P) Ltd.,Blue Hill, Kalathiparambil Cross Road, Ernakulam South, Kochi-682016, Kerala, India,
Phone: +91-484-2378008, +91-9388686080, E-mail: [email protected], Web: www.xtendtech.com
Regional Office for South East Asia:
Xtend Technologies Pte Ltd., 21, Bukit Batok Crescent, #13-76, Wcega Tower, Singapore-658065,
Phone: +65 - 67797972, E-mail: [email protected], Web: www.xtendtech.com.sg
Regional Office for Middle East:
Xtend Technologies LLCP.O. Box No. 83939, Suite #124, Hor Al Anz Plaza, Hor Al Anz, Dubai, UAE,
Phone: +971-4-2545081, E-mail: [email protected], Web: www.xtendtech.ae
Regional Office for South Central Asia:
Contents
3754372-06