xerox device agent user guide...
TRANSCRIPT
Software Version 5.4 October 2016
Xerox® Device AgentUser Guide
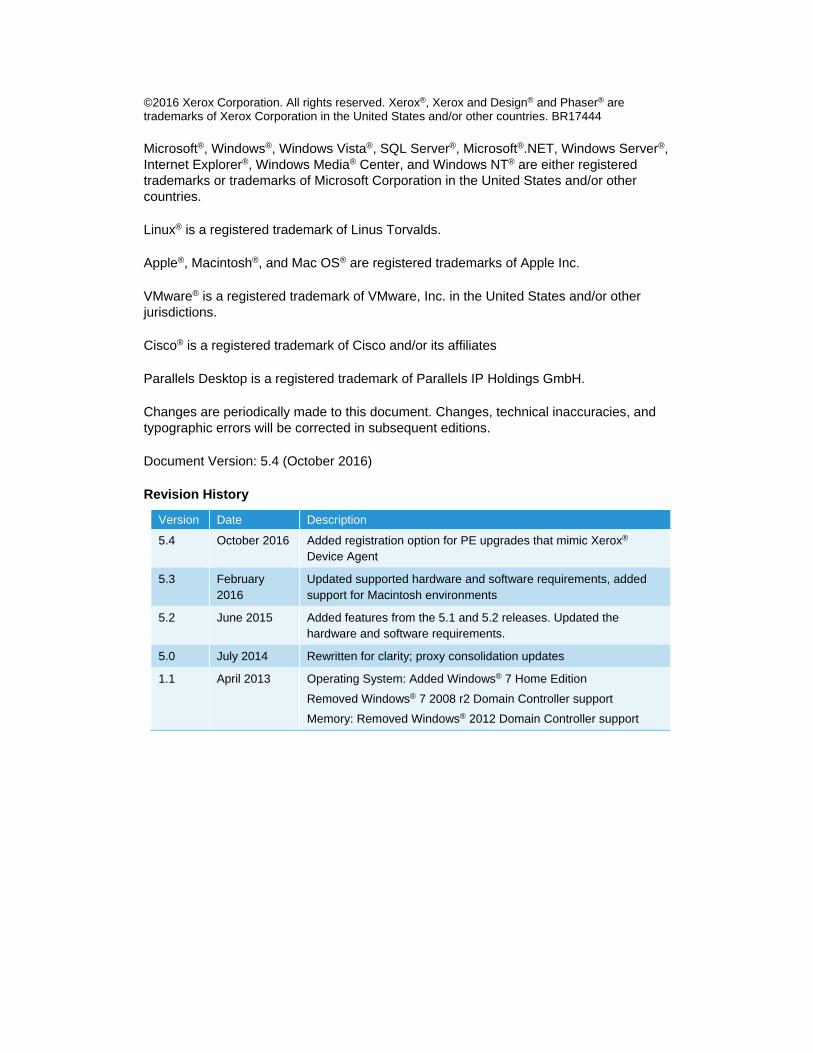
©2016 Xerox Corporation. All rights reserved. Xerox®, Xerox and Design® and Phaser® are trademarks of Xerox Corporation in the United States and/or other countries. BR17444
Microsoft®, Windows®, Windows Vista®, SQL Server®, Microsoft®.NET, Windows Server®, Internet Explorer®, Windows Media® Center, and Windows NT® are either registered trademarks or trademarks of Microsoft Corporation in the United States and/or other countries.
Linux® is a registered trademark of Linus Torvalds.
Apple®, Macintosh®, and Mac OS® are registered trademarks of Apple Inc.
VMware® is a registered trademark of VMware, Inc. in the United States and/or other jurisdictions.
Cisco® is a registered trademark of Cisco and/or its affiliates
Parallels Desktop is a registered trademark of Parallels IP Holdings GmbH.
Changes are periodically made to this document. Changes, technical inaccuracies, and typographic errors will be corrected in subsequent editions.
Document Version: 5.4 (October 2016)
Revision History
Version Date Description
5.4 October 2016 Added registration option for PE upgrades that mimic Xerox® Device Agent
5.3 February 2016
Updated supported hardware and software requirements, added support for Macintosh environments
5.2 June 2015 Added features from the 5.1 and 5.2 releases. Updated the hardware and software requirements.
5.0 July 2014 Rewritten for clarity; proxy consolidation updates
1.1 April 2013 Operating System: Added Windows® 7 Home Edition
Removed Windows® 7 2008 r2 Domain Controller support
Memory: Removed Windows® 2012 Domain Controller support
Xerox® Device Agent User Guide iii
Table of Contents
Introduction ................................................................................ 1 Product Overview ......................................................................................... 1
Data Security ....................................................................................... 1
Using this Guide ........................................................................................... 2
Getting Started ........................................................................... 1 Checking the Requirements ......................................................................... 1
Hardware and Software ....................................................................... 1
Requirements to Run on a Macintosh Operating System ................... 2
Unsupported Configurations ................................................................ 2
Database Configurations ..................................................................... 3
Installing the Software .................................................................................. 3
Uninstalling the Application ................................................................. 7
Automatic Updates .............................................................................. 8
Configuring the System ............................................................. 9
Overview ...................................................................................................... 9
Using the Configuration Wizard .................................................................... 9
Registering the Account ...................................................................... 9
Searching for Printers ........................................................................ 21
Opening the Application ............................................................................. 23
Using the Interface ................................................................... 25
Overview .................................................................................................... 25
Understanding the Screens ........................................................................ 26
Viewing the Printers Screen .............................................................. 26
Viewing the Synchronize Screen ....................................................... 34
Viewing the Settings Screen .............................................................. 35
Using the System Tray ............................................................................... 35
Resizing the Application ............................................................................. 36
Working with Printers ............................................................... 37 Overview .................................................................................................... 37
Adding a Printer .......................................................................................... 37
Adding Printers by IP Address or DNS Name ................................... 37
Adding Multiple Printers ..................................................................... 38
Adding a Direct Printer ............................................................................... 39
Table of Contents
iv Xerox® Device Agent User Guide
Deleting a Printer ........................................................................................ 40
Exporting the Printer List ............................................................................ 40
Viewing Printer Properties .......................................................................... 41
Checking the Status .......................................................................... 42
Checking Consumables ..................................................................... 44
Viewing Printer Information ............................................................... 46
Understanding Printer Features ........................................................ 48
Viewing Transmitted Meters Usage ................................................... 50
Checking the Usage Summary .......................................................... 51
Viewing the Usage Counter Details ................................................... 52
Synchronizing the Data ............................................................ 55 Overview .................................................................................................... 55
Using the Details View ............................................................................... 56
Using the Data View ................................................................................... 56
Configuring the Settings .......................................................... 59
Overview .................................................................................................... 59
Working with the Views .............................................................................. 59
Using the Search View ...................................................................... 60
Viewing the Status Read ................................................................... 64
Viewing the Local Alerts .................................................................... 66
Viewing the Remote Alerts ................................................................ 68
Working with Administrator Settings .................................................. 68
Changing the Language .................................................................... 70
Working with Automatic Updates ....................................................... 71
Gathering Xerox® Print Agent Data ................................................... 73
Viewing the Log ................................................................................. 75
Gathering Information for Support ..................................................... 75
Troubleshooting ....................................................................... 77

Xerox® Device Agent User Guide 1
Introduction
Product Overview The Xerox® Device Agent enables Xerox to monitor and assess output devices on your network, and provides continuing asset management information. Xerox® Device Agent is a Microsoft Windows® device management client that uses Microsoft® SQL Server® CE Edition to provide automated device meter, supplies, and status retrieval and submission to Xerox® Services Manager, and proactive alert monitoring for automatic incident creation and problem resolution. Xerox® Services Manager is a web-based application that provides a single point of management for your enterprise’s output devices, supplies, and service-related incidents to help you manage costs and increase device and user productivity. Xerox® Device Agent features a built-in alert detection system that can warn you when certain conditions exist in monitored devices. It can:
• Discover network-connected printers
• Monitor for status and alert conditions and notify via e-mail when they occur
Data Security
Xerox® Device Agent communicates periodically with Xerox® Services Manager. To ensure maximum security for your data, Xerox® Services Manager is hosted in an ISO 27001-compliant facility. Data sent to your partner is primarily printer-specific billing counters, supply levels and printer alerts. Data is compressed, encrypted and protected by several mechanisms:
• Xerox® Device Agent initiates all contact with Xerox® Services Manager and standard firewall configurations on the site are required to enable communication.
• Xerox® Device Agent requires a valid proxy, if one is required for Internet communication.
• Xerox® Services Manager data server sits behind a secure firewall and is not accessible from the Internet
• Xerox® Services Manager user interface access requires authentication. Xerox® Device Agent information is stored in an account specific to the customer site and the access to that account data in Xerox® Services Manager is restricted to the Xerox® Services Manager account managers.
• All Xerox® Services Manager communication is logged and available for viewing.
Data sent from your partner to your networked devices consists primarily of remote commands that allow an account support administrator to request Xerox® Device Agent command execution.
• Requests principally involve firmware updates, printer reboots, test page printing and current device status refreshes.
Introduction
2 Xerox® Device Agent User Guide
• Xerox® Device Agent periodically polls its Xerox® Services Manager account for command requests.
• Operations results from command requests are sent to the Xerox® Services Manager server, where they are reviewed.
Using this Guide This guide is intended for users installing Xerox® Device Agent.
Xerox® Device Agent User Guide 1
Getting Started
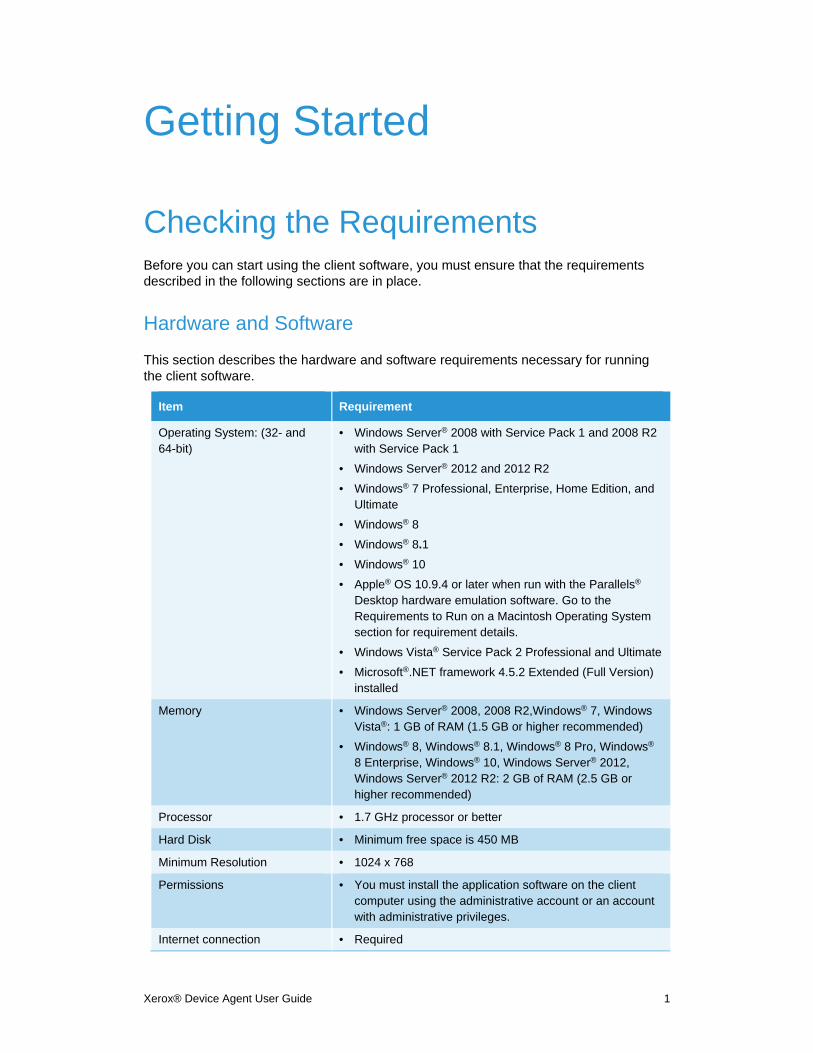
Checking the Requirements Before you can start using the client software, you must ensure that the requirements described in the following sections are in place.
Hardware and Software
This section describes the hardware and software requirements necessary for running the client software.
Item Requirement
Operating System: (32- and 64-bit)
• Windows Server® 2008 with Service Pack 1 and 2008 R2 with Service Pack 1
• Windows Server® 2012 and 2012 R2
• Windows® 7 Professional, Enterprise, Home Edition, and Ultimate
• Windows® 8
• Windows® 8.1
• Windows® 10
• Apple® OS 10.9.4 or later when run with the Parallels®
Desktop hardware emulation software. Go to the Requirements to Run on a Macintosh Operating System section for requirement details.
• Windows Vista® Service Pack 2 Professional and Ultimate
• Microsoft®.NET framework 4.5.2 Extended (Full Version) installed
Memory • Windows Server® 2008, 2008 R2,Windows® 7, Windows Vista®: 1 GB of RAM (1.5 GB or higher recommended)
• Windows® 8, Windows® 8.1, Windows® 8 Pro, Windows® 8 Enterprise, Windows® 10, Windows Server® 2012, Windows Server® 2012 R2: 2 GB of RAM (2.5 GB or higher recommended)
Processor • 1.7 GHz processor or better
Hard Disk • Minimum free space is 450 MB
Minimum Resolution • 1024 x 768
Permissions • You must install the application software on the client computer using the administrative account or an account with administrative privileges.
Internet connection • Required
Getting Started
2 Xerox® Device Agent User Guide
Notes
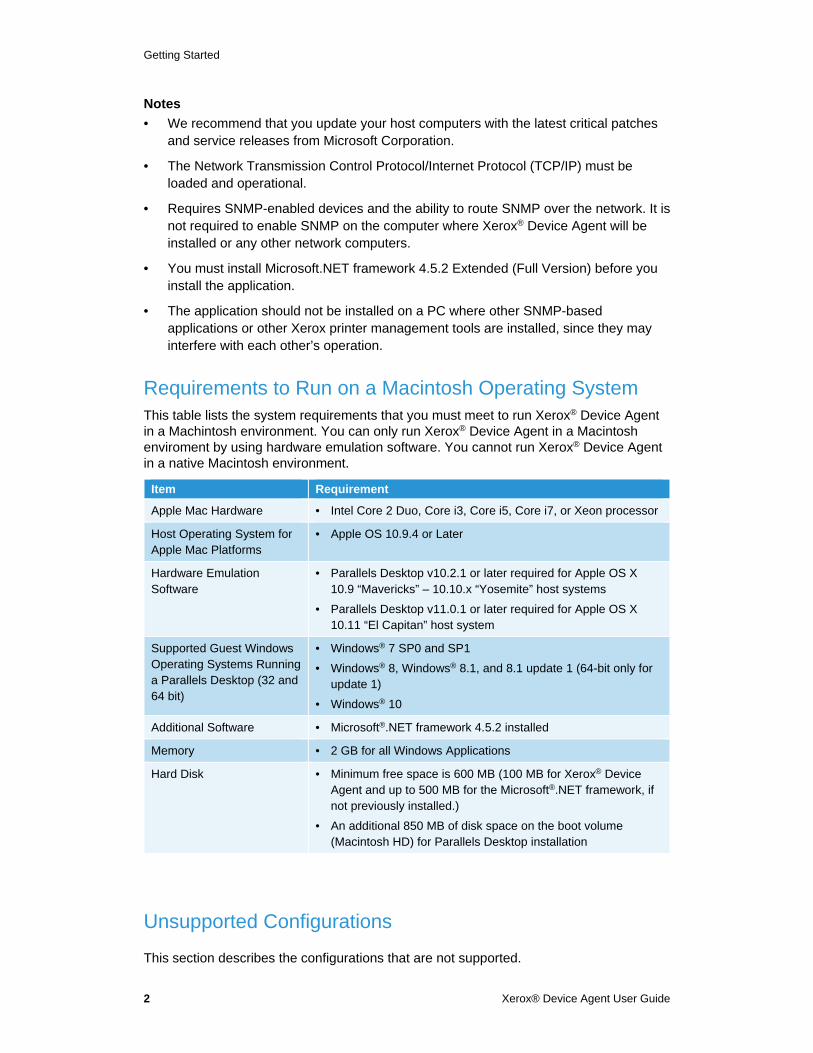
• We recommend that you update your host computers with the latest critical patches and service releases from Microsoft Corporation.
• The Network Transmission Control Protocol/Internet Protocol (TCP/IP) must be loaded and operational.
• Requires SNMP-enabled devices and the ability to route SNMP over the network. It is not required to enable SNMP on the computer where Xerox® Device Agent will be installed or any other network computers.
• You must install Microsoft.NET framework 4.5.2 Extended (Full Version) before you install the application.
• The application should not be installed on a PC where other SNMP-based applications or other Xerox printer management tools are installed, since they may interfere with each other’s operation.
Requirements to Run on a Macintosh Operating System This table lists the system requirements that you must meet to run Xerox® Device Agent in a Machintosh environment. You can only run Xerox® Device Agent in a Macintosh enviroment by using hardware emulation software. You cannot run Xerox® Device Agent in a native Macintosh environment.
Item Requirement
Apple Mac Hardware • Intel Core 2 Duo, Core i3, Core i5, Core i7, or Xeon processor
Host Operating System for Apple Mac Platforms
• Apple OS 10.9.4 or Later
Hardware Emulation Software
• Parallels Desktop v10.2.1 or later required for Apple OS X 10.9 “Mavericks” – 10.10.x “Yosemite” host systems
• Parallels Desktop v11.0.1 or later required for Apple OS X 10.11 “El Capitan” host system
Supported Guest Windows Operating Systems Running a Parallels Desktop (32 and 64 bit)
• Windows® 7 SP0 and SP1
• Windows® 8, Windows® 8.1, and 8.1 update 1 (64-bit only for update 1)
• Windows® 10
Additional Software • Microsoft®.NET framework 4.5.2 installed
Memory • 2 GB for all Windows Applications
Hard Disk • Minimum free space is 600 MB (100 MB for Xerox® Device Agent and up to 500 MB for the Microsoft®.NET framework, if not previously installed.)
• An additional 850 MB of disk space on the boot volume (Macintosh HD) for Parallels Desktop installation
Unsupported Configurations
This section describes the configurations that are not supported.
Getting Started
Xerox® Device Agent User Guide 3
• Installation of the application on a computer with another Xerox device management application, such as Xerox® Device Manager.
• Native Mac OS® operating system software (i.e., Xerox® Device Agent can only run on the Apple Mac Platform when the Parallels Emulation Software is installed.)
• Any version of UNIX® operating systems, Linux® operating systems, Windows® systems running the Novell client, Windows® XP, Windows NT® 4.0, Windows Media® Center, Windows® 2000, Windows® Server 2003, Windows® 8 RT, Operating systems running Terminal Services for applications and Installation on Windows systems running domain controllers.
• Since this application has only been tested on VMware® Lab Manager/workstation environment, other virtual environments are not supported.
Database Configurations
The application installs SQL Server Compact Edition 4.0 (SQL CE) database engine and database files that store printer data and application settings within the installation directory. No database licensing is necessary for the application.
Installing the Software In this section, you will learn how to:
• Install the software
• Change the destination folder location of the application
Note
• Before installation, disable the Sleep and Hibernation modes to allow the application to collect and transmit meter information.
Getting Started
4 Xerox® Device Agent User Guide
To install the software:
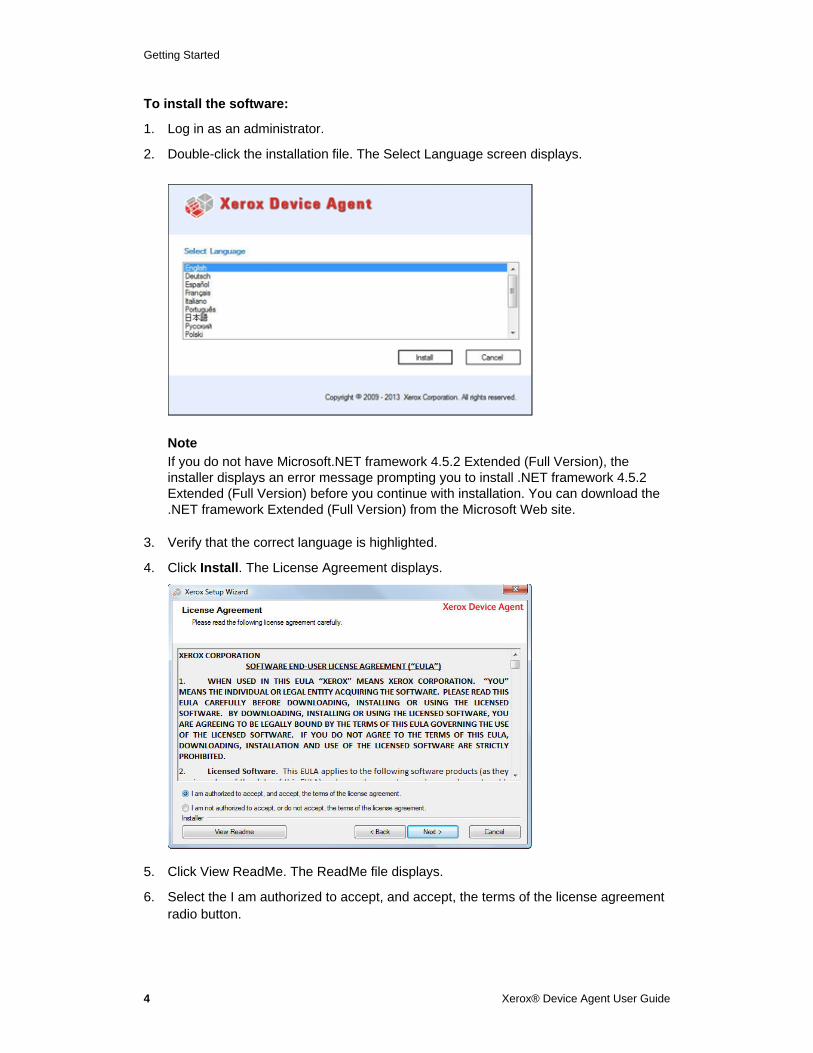
1. Log in as an administrator.
2. Double-click the installation file. The Select Language screen displays.
Note
If you do not have Microsoft.NET framework 4.5.2 Extended (Full Version), the installer displays an error message prompting you to install .NET framework 4.5.2 Extended (Full Version) before you continue with installation. You can download the .NET framework Extended (Full Version) from the Microsoft Web site.
3. Verify that the correct language is highlighted.
4. Click Install. The License Agreement displays.
5. Click View ReadMe. The ReadMe file displays.
6. Select the I am authorized to accept, and accept, the terms of the license agreement radio button.
Getting Started
Xerox® Device Agent User Guide 5
Note
If you are performing a manual update of the application and you have the current version of the application open, you are prompted to accept the EULA. You only see this prompt if the EULA has changed since the last software release.
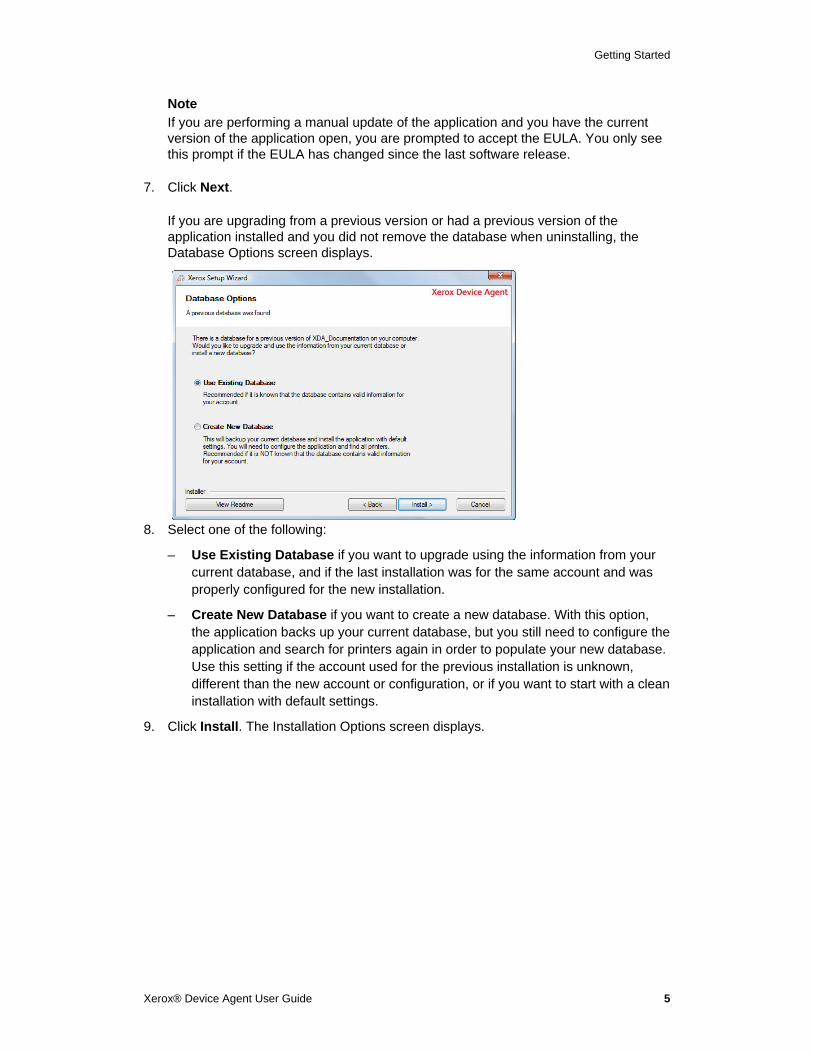
7. Click Next.
If you are upgrading from a previous version or had a previous version of the application installed and you did not remove the database when uninstalling, the Database Options screen displays.
8. Select one of the following:
– Use Existing Database if you want to upgrade using the information from your current database, and if the last installation was for the same account and was properly configured for the new installation.
– Create New Database if you want to create a new database. With this option, the application backs up your current database, but you still need to configure the application and search for printers again in order to populate your new database. Use this setting if the account used for the previous installation is unknown, different than the new account or configuration, or if you want to start with a clean installation with default settings.
9. Click Install. The Installation Options screen displays.
Getting Started
6 Xerox® Device Agent User Guide
Note
If you are installing the application on an operating system in a language other than English where the "Program Files" directory name is localized, the default installation path is displayed in English. The application, however, installs at the correct localized directory for your selected language.
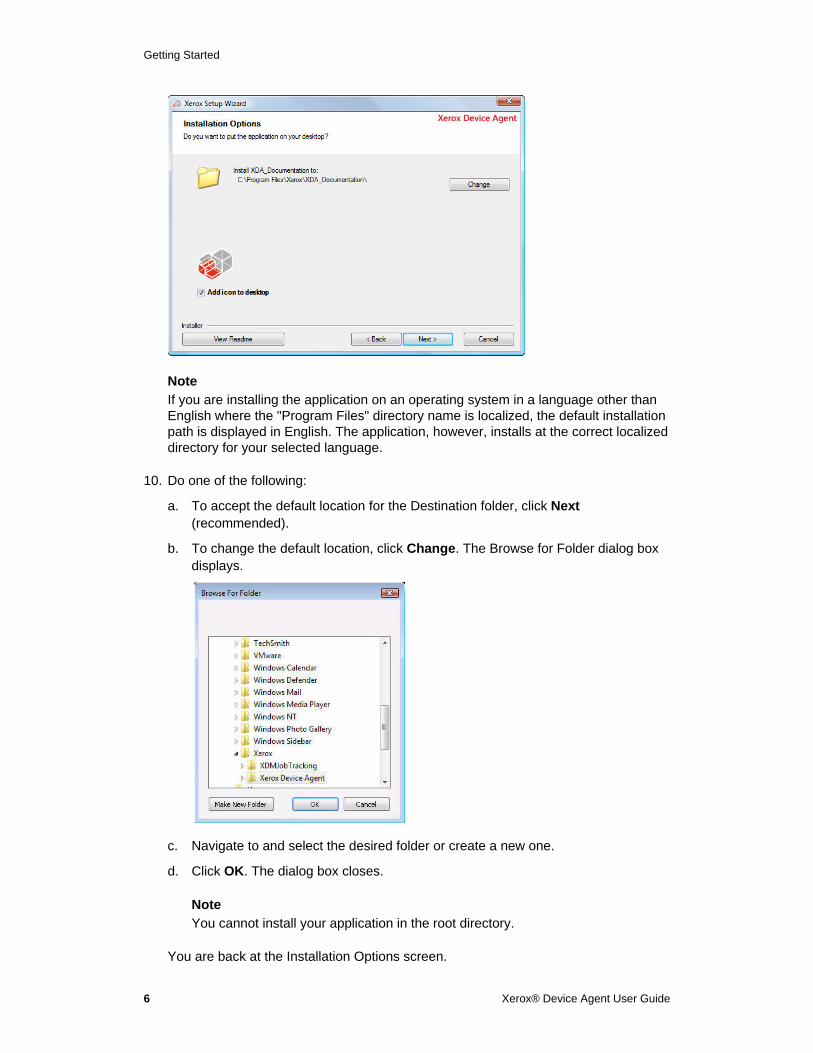
10. Do one of the following:
a. To accept the default location for the Destination folder, click Next (recommended).
b. To change the default location, click Change. The Browse for Folder dialog box displays.
c. Navigate to and select the desired folder or create a new one.
d. Click OK. The dialog box closes.
Note
You cannot install your application in the root directory.
You are back at the Installation Options screen.
Getting Started
Xerox® Device Agent User Guide 7
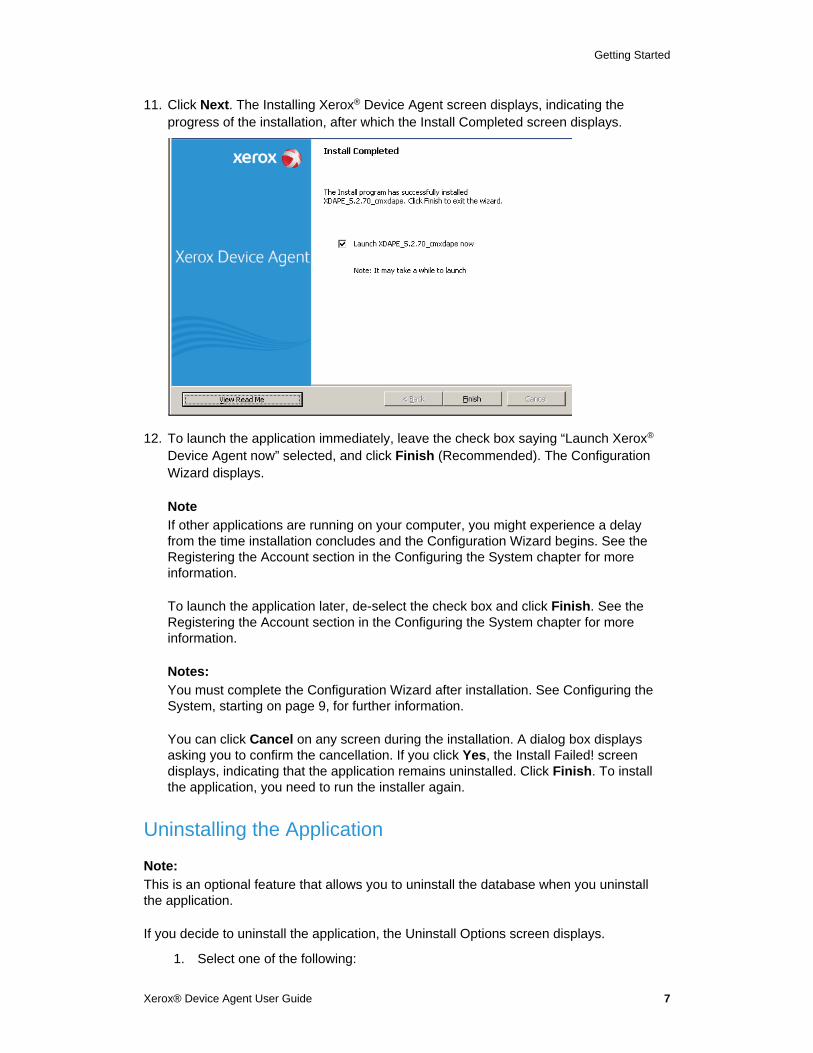
11. Click Next. The Installing Xerox® Device Agent screen displays, indicating the progress of the installation, after which the Install Completed screen displays.
12. To launch the application immediately, leave the check box saying “Launch Xerox® Device Agent now” selected, and click Finish (Recommended). The Configuration Wizard displays.
Note
If other applications are running on your computer, you might experience a delay from the time installation concludes and the Configuration Wizard begins. See the Registering the Account section in the Configuring the System chapter for more information.
To launch the application later, de-select the check box and click Finish. See the Registering the Account section in the Configuring the System chapter for more information.
Notes:
You must complete the Configuration Wizard after installation. See Configuring the System, starting on page 9, for further information.
You can click Cancel on any screen during the installation. A dialog box displays asking you to confirm the cancellation. If you click Yes, the Install Failed! screen displays, indicating that the application remains uninstalled. Click Finish. To install the application, you need to run the installer again.
Uninstalling the Application
Note:
This is an optional feature that allows you to uninstall the database when you uninstall the application.
If you decide to uninstall the application, the Uninstall Options screen displays.
1. Select one of the following:
Getting Started
8 Xerox® Device Agent User Guide
– Do not remove the database if you want to preserve your current database.
– Remove the database if you do not need to preserve your current settings for a future installation. This removes the active database and any future installation creates a new database at the time of installation. If there are any databases backed up during the installation as part of the Database Options, they are not removed.
2. Click Continue.
Automatic Updates
The application supports automatic update. When a newer version of the application is released, it is loaded on the Auto Update server, which the application can connect to.
The application contacts the Auto Update server at:
• Scheduled intervals that you specify in the Updates section of the Settings area
• Application startup, if the schedule is in the past
• Your request, from the Updates section of the Settings area
The server identifies if there is a newer version available for download.
If you set the application to prompt you when updates are available, or if you clicked to check for updates, the application asks you to confirm whether or not you want to update the application.
• If you select No, the Next scheduled upgrade dialog opens. Select the day of the week and time of the day when you would like to receive your next reminder to upgrade.
• If you select Yes, the application proceeds automatically to:
– Download the new installer
– Run the new installer (which closes the application if it is open)
– Uninstall the older version and install the newer version
– Run the new version of the application that was just installed
Notes:
• If you are updating the application, but you decide to cancel the installation process, you must run the installation setup file again to complete the installation.
• Depending on where you cancelled the update in the installation process, you could end up with an unusable application.
Xerox® Device Agent User Guide 9
Configuring the System
Overview You must complete a minimum set of requirements in the Configuration Wizard after installation, according to your site requirements, to use the application.
The Configuration Wizard is divided into two sections:
• Register the Account: Enables communication between the application and Xerox® Services Manager.
• Search for Printers: Allows you to find a printer or printers for the application to manage and monitor.
Using the Configuration Wizard This section describes the features you can construct with the Configuration Wizard.
Registering the Account
In the Register the Account section, you can:
• Enter the administrator name, phone number, and e-mail address
• Enter the application registration information
• Modify the system name, if applicable
• For partner edition installations and upgrades, elect to mimic a Xerox® Device Agent install, which means you are not required to enter chargeback codes. This does not apply to Xerox® Device Agent Lite installs and upgrades.
• Configure proxy server and security settings for Internet connectivity
• Modify synchronization settings, if applicable
Starting the Wizard
If you launch the application immediately after installation, the Install Completed screen closes, and the Configuration Wizard automatically starts. If you did not launch the application immediately after installation, you can access the Configuration Wizard in one of the following ways:
• Double-click the application icon on the desktop:
• Navigate to the program from the Start menu
Configuring the System
10 Xerox® Device Agent User Guide
• Right-click the tray icon in the System Tray and select Open.
To configure the system:
1. Launch the application. The current availability of computer resources might cause a delay, so allow enough time for it to launch successfully. When the Configuration Wizard starts, the Welcome screen displays.
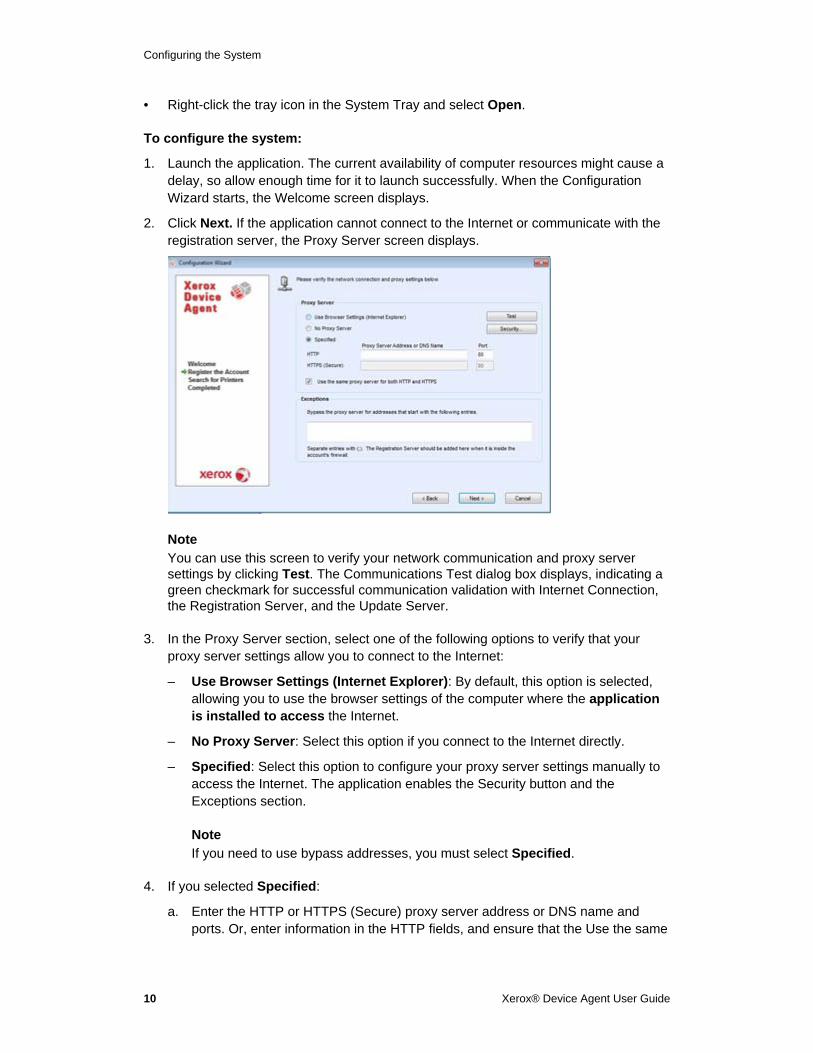
2. Click Next. If the application cannot connect to the Internet or communicate with the registration server, the Proxy Server screen displays.
Note
You can use this screen to verify your network communication and proxy server settings by clicking Test. The Communications Test dialog box displays, indicating a green checkmark for successful communication validation with Internet Connection, the Registration Server, and the Update Server.
3. In the Proxy Server section, select one of the following options to verify that your proxy server settings allow you to connect to the Internet:
– Use Browser Settings (Internet Explorer): By default, this option is selected, allowing you to use the browser settings of the computer where the application is installed to access the Internet.
– No Proxy Server: Select this option if you connect to the Internet directly.
– Specified: Select this option to configure your proxy server settings manually to access the Internet. The application enables the Security button and the Exceptions section.
Note
If you need to use bypass addresses, you must select Specified.
4. If you selected Specified:
a. Enter the HTTP or HTTPS (Secure) proxy server address or DNS name and ports. Or, enter information in the HTTP fields, and ensure that the Use the same
Configuring the System
Xerox® Device Agent User Guide 11
proxy server for both HTTP and HTTPS check box is selected, so that the application populates the HTTPS fields with the same information.
Note
If the addresses, DNS names, or ports are incorrect, the application displays a red exclamation point in the corresponding field. You must correct the information before you can continue to the next step.
b. To identify any addresses that you want the proxy server to bypass, or to ensure that the application bypasses the Xerox® Services Manager registration server when it is inside the firewall, enter the addresses in the Exceptions section, separating each entry with a semicolon.
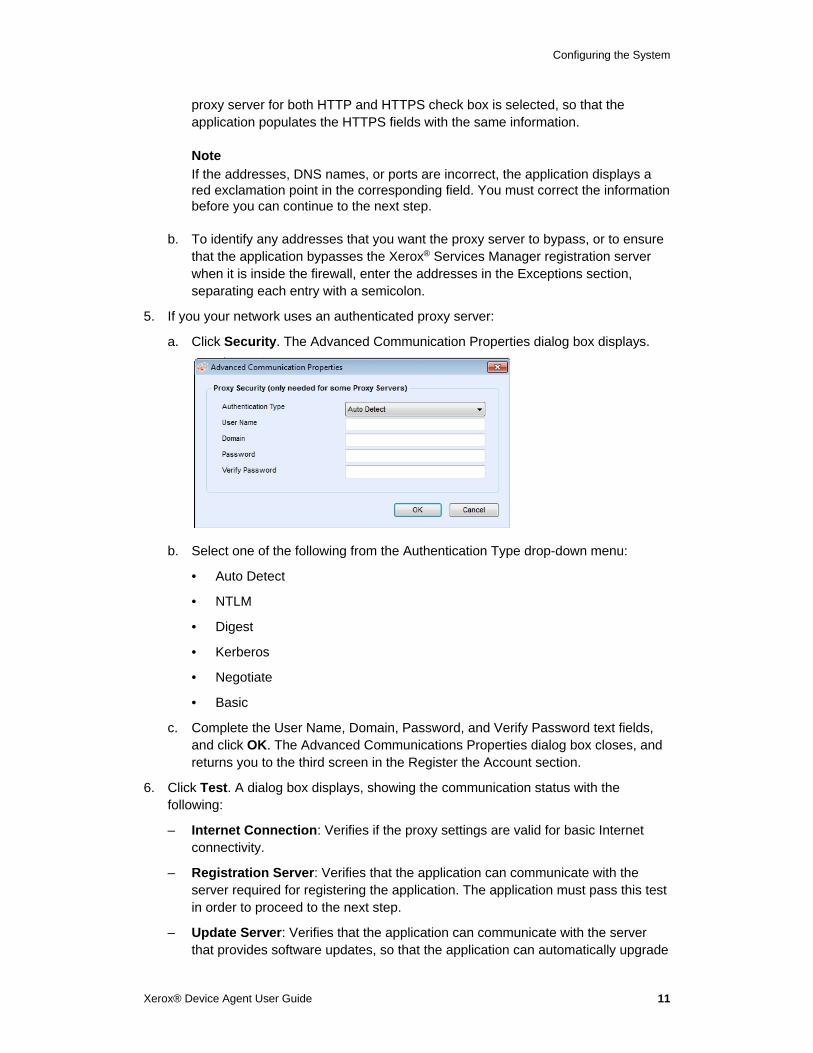
5. If you your network uses an authenticated proxy server:
a. Click Security. The Advanced Communication Properties dialog box displays.
b. Select one of the following from the Authentication Type drop-down menu:
• Auto Detect
• NTLM
• Digest
• Kerberos
• Negotiate
• Basic
c. Complete the User Name, Domain, Password, and Verify Password text fields, and click OK. The Advanced Communications Properties dialog box closes, and returns you to the third screen in the Register the Account section.
6. Click Test. A dialog box displays, showing the communication status with the following:
– Internet Connection: Verifies if the proxy settings are valid for basic Internet connectivity.
– Registration Server: Verifies that the application can communicate with the server required for registering the application. The application must pass this test in order to proceed to the next step.
– Update Server: Verifies that the application can communicate with the server that provides software updates, so that the application can automatically upgrade

Configuring the System
12 Xerox® Device Agent User Guide
to the latest version. If this test fails, you can continue with the registration, but you need to fix the issue in the future.
7. Click OK. The dialog box closes.
8. Continue to test each of the proxy server options until the Registration Server communication status passes.
Note
If the connection test continues to fail and you have verified that the proxy server settings and the Internet is functioning on the computer, contact your Xerox Support Representative.
9. When the Registration Server test passes, click OK. The dialog box closes and you are returned to the third screen in the Register the Account section.
10. Click Next. The next screen in the Register the Account section displays.
11. Enter information in all the fields. Do not change the Registration Server URL unless otherwise instructed.
12. For Partner Edition only, if there is an XDA checkbox and it is checked, you will not be required to enter a chargeback code for billing purposes. In addition, the appropriate product codes will be associated with the new Xerox® Device Agent.
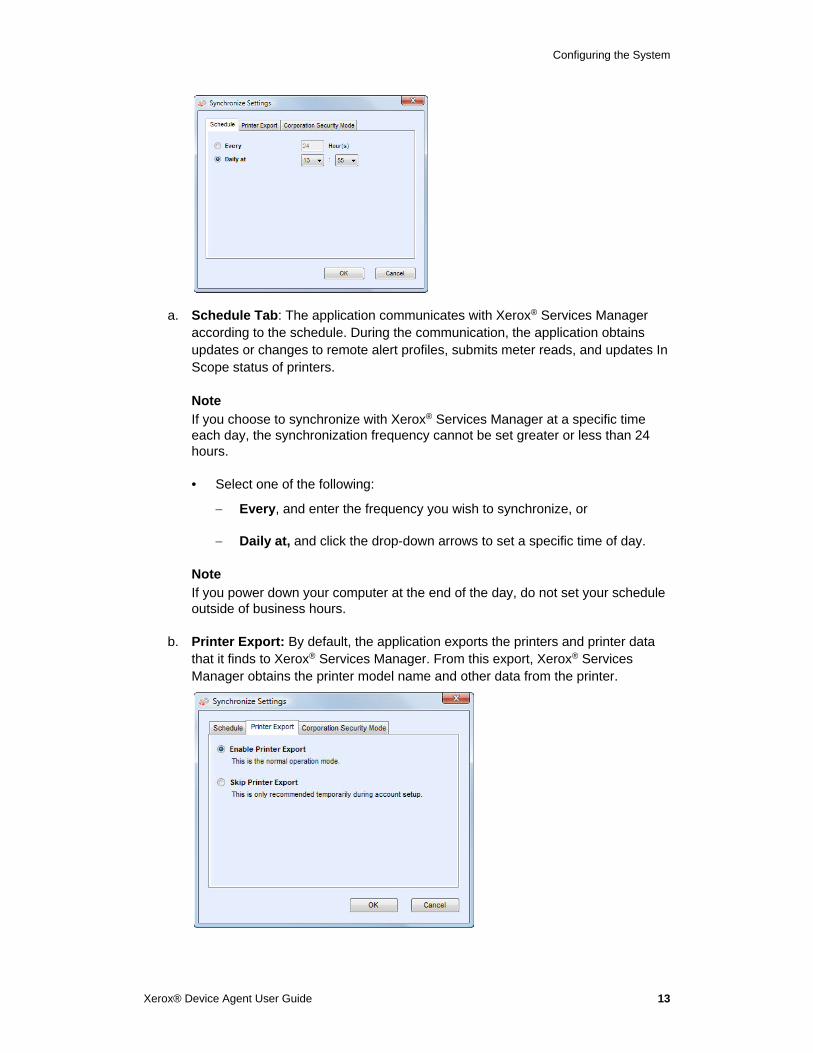
13. If you want to change the default synchronization settings, click Synchronize Settings. The Synchronize Settings dialog box displays.
Configuring the System
Xerox® Device Agent User Guide 13
a. Schedule Tab: The application communicates with Xerox® Services Manager according to the schedule. During the communication, the application obtains updates or changes to remote alert profiles, submits meter reads, and updates In Scope status of printers.
Note
If you choose to synchronize with Xerox® Services Manager at a specific time each day, the synchronization frequency cannot be set greater or less than 24 hours.
• Select one of the following:
Every, and enter the frequency you wish to synchronize, or
Daily at, and click the drop-down arrows to set a specific time of day.
Note
If you power down your computer at the end of the day, do not set your schedule outside of business hours.
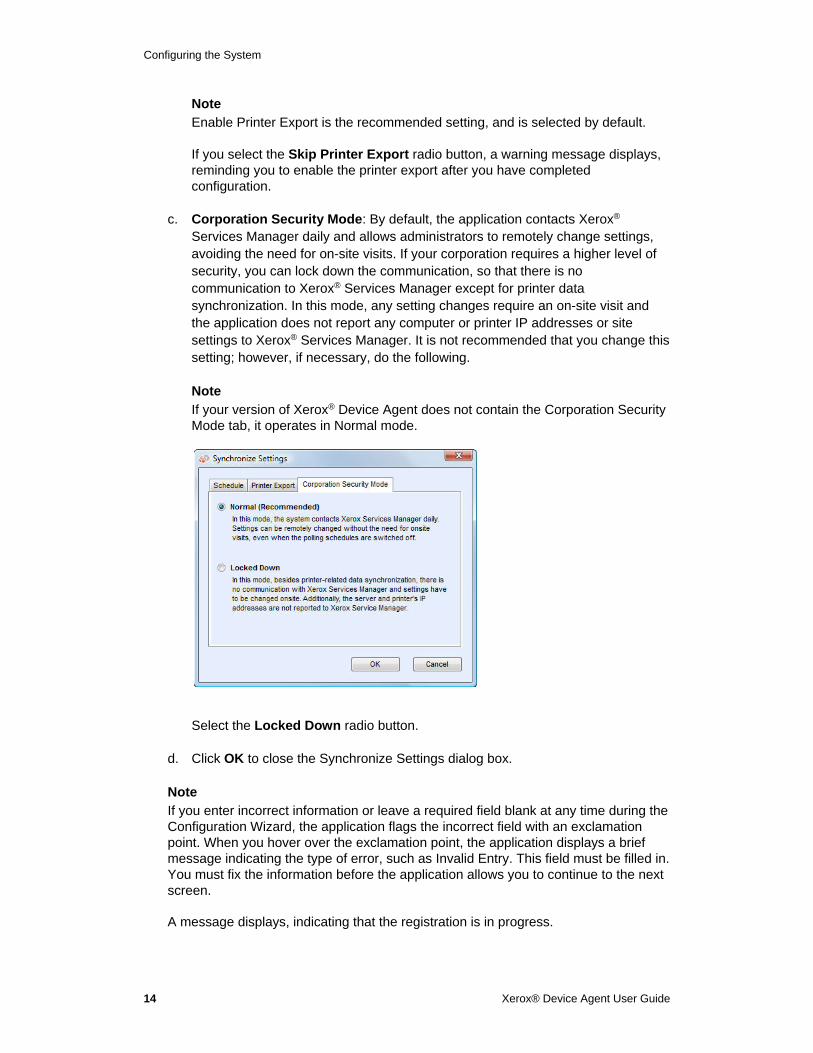
b. Printer Export: By default, the application exports the printers and printer data that it finds to Xerox® Services Manager. From this export, Xerox® Services Manager obtains the printer model name and other data from the printer.
Configuring the System
14 Xerox® Device Agent User Guide
Note
Enable Printer Export is the recommended setting, and is selected by default.
If you select the Skip Printer Export radio button, a warning message displays, reminding you to enable the printer export after you have completed configuration.
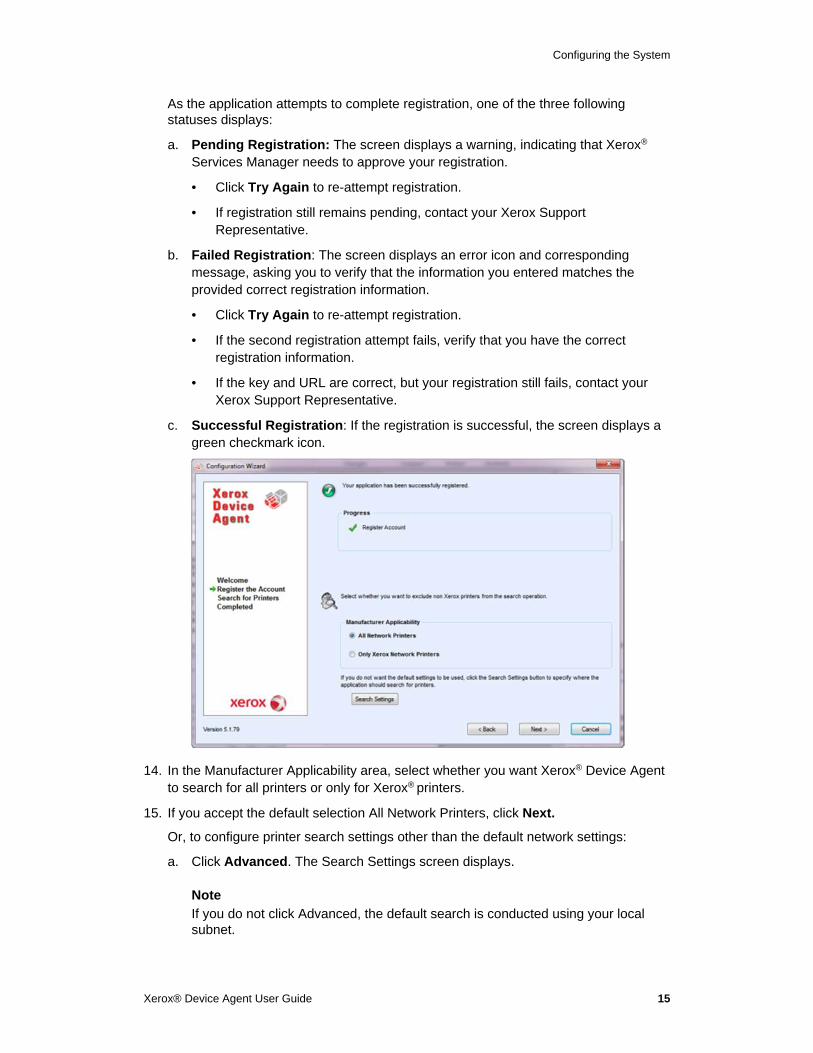
c. Corporation Security Mode: By default, the application contacts Xerox® Services Manager daily and allows administrators to remotely change settings, avoiding the need for on-site visits. If your corporation requires a higher level of security, you can lock down the communication, so that there is no communication to Xerox® Services Manager except for printer data synchronization. In this mode, any setting changes require an on-site visit and the application does not report any computer or printer IP addresses or site settings to Xerox® Services Manager. It is not recommended that you change this setting; however, if necessary, do the following.
Note
If your version of Xerox® Device Agent does not contain the Corporation Security Mode tab, it operates in Normal mode.
Select the Locked Down radio button.
d. Click OK to close the Synchronize Settings dialog box.
Note
If you enter incorrect information or leave a required field blank at any time during the Configuration Wizard, the application flags the incorrect field with an exclamation point. When you hover over the exclamation point, the application displays a brief message indicating the type of error, such as Invalid Entry. This field must be filled in. You must fix the information before the application allows you to continue to the next screen.
A message displays, indicating that the registration is in progress.
Configuring the System
Xerox® Device Agent User Guide 15
As the application attempts to complete registration, one of the three following statuses displays:
a. Pending Registration: The screen displays a warning, indicating that Xerox® Services Manager needs to approve your registration.
• Click Try Again to re-attempt registration.
• If registration still remains pending, contact your Xerox Support Representative.
b. Failed Registration: The screen displays an error icon and corresponding message, asking you to verify that the information you entered matches the provided correct registration information.
• Click Try Again to re-attempt registration.
• If the second registration attempt fails, verify that you have the correct registration information.
• If the key and URL are correct, but your registration still fails, contact your Xerox Support Representative.
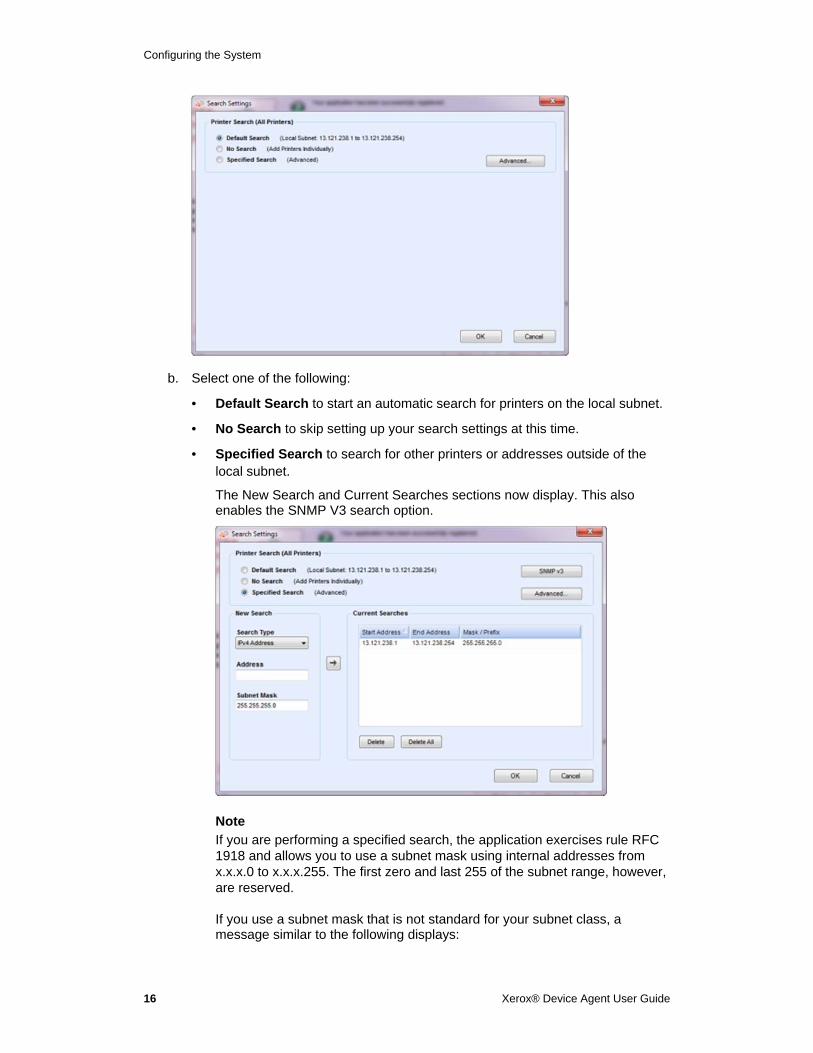
c. Successful Registration: If the registration is successful, the screen displays a green checkmark icon.
14. In the Manufacturer Applicability area, select whether you want Xerox® Device Agent to search for all printers or only for Xerox® printers.
15. If you accept the default selection All Network Printers, click Next.
Or, to configure printer search settings other than the default network settings:
a. Click Advanced. The Search Settings screen displays.
Note
If you do not click Advanced, the default search is conducted using your local subnet.
Configuring the System
16 Xerox® Device Agent User Guide
b. Select one of the following:
• Default Search to start an automatic search for printers on the local subnet.
• No Search to skip setting up your search settings at this time.
• Specified Search to search for other printers or addresses outside of the local subnet.
The New Search and Current Searches sections now display. This also enables the SNMP V3 search option.
Note
If you are performing a specified search, the application exercises rule RFC 1918 and allows you to use a subnet mask using internal addresses from x.x.x.0 to x.x.x.255. The first zero and last 255 of the subnet range, however, are reserved.
If you use a subnet mask that is not standard for your subnet class, a message similar to the following displays:
Configuring the System
Xerox® Device Agent User Guide 17
The range specified includes [X] addresses. The subnet mask entered is not the default Class [X] mask. Are you sure you want to use the range as specified?
– Verify that the range you specified is what you want.
– Click Yes to allow the entry of the range. Click No to return to the screen, without adding the range, so the application can update the values.
– Make a selection from the Search Type drop-down menu.
• If you selected IPv4 Address or IPv6 Address, enter the Address in the Specified field.
• For IPv6, enter the value in the Prefix Length field.
• If you selected DNS Name, enter the name in the DNS Name field.
• If you selected IPv4 Address Range, enter the address ranges in the Start Address and End Address fields; and enter the Subnet Mask in the specified field.
• If you selected IPv4 Subnet, in the Address in Subnet field, enter an IP address within the subnet.
Then, enter the subnet mask in the Subnet Mask field.
• If you selected Import, click Export Template. Complete the CSV file. Click Instructions for details on how to complete the CSV file. When you are ready , click Select File to import the list of printer addresses.
Once you have selected one of the Specified Search options and
entered the information into the appropriate fields, click to add your search information to the Current Searches list.
If you chose SNMP V3 search, the only search type available in Import. The steps are the same as when using the Import option in the Specified Search.
Note
If the IP addresses in your new search overlap any existing IP addresses in the Current Searches list, the application displays the red exclamation point icon, indicating that you cannot add the new IP address. To fix this error, go to the Current Searches lists, click Delete or Delete All and search again for the new addresses.
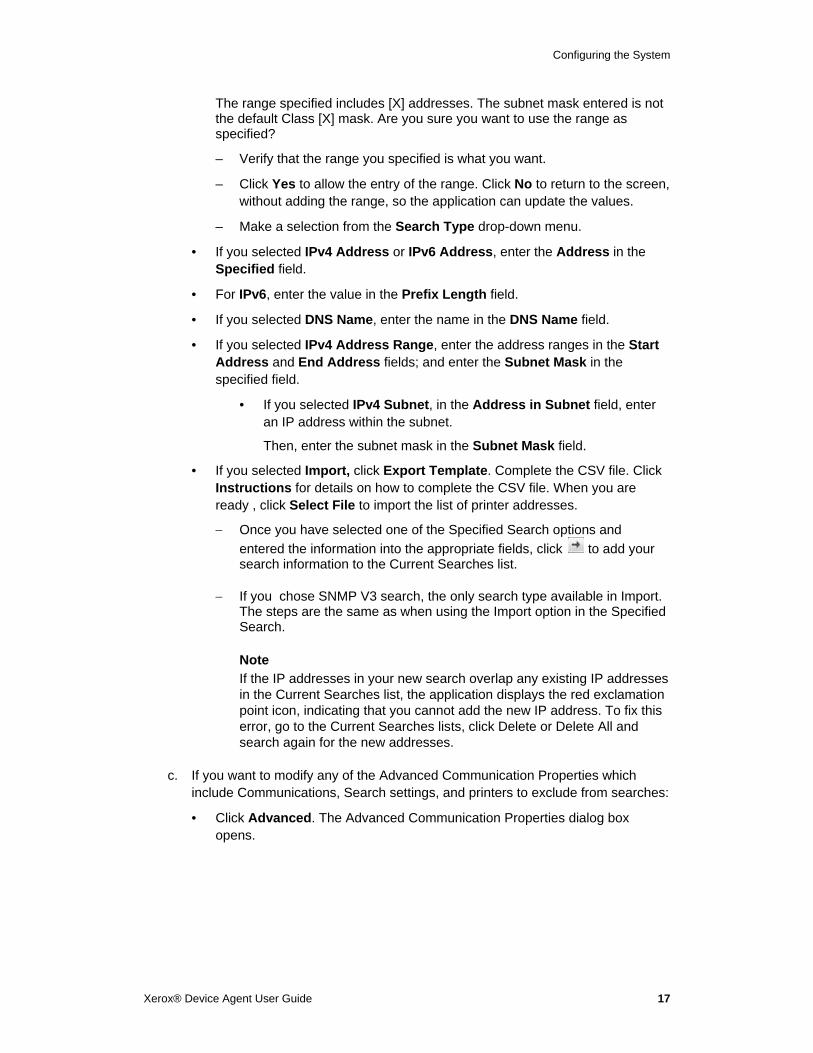
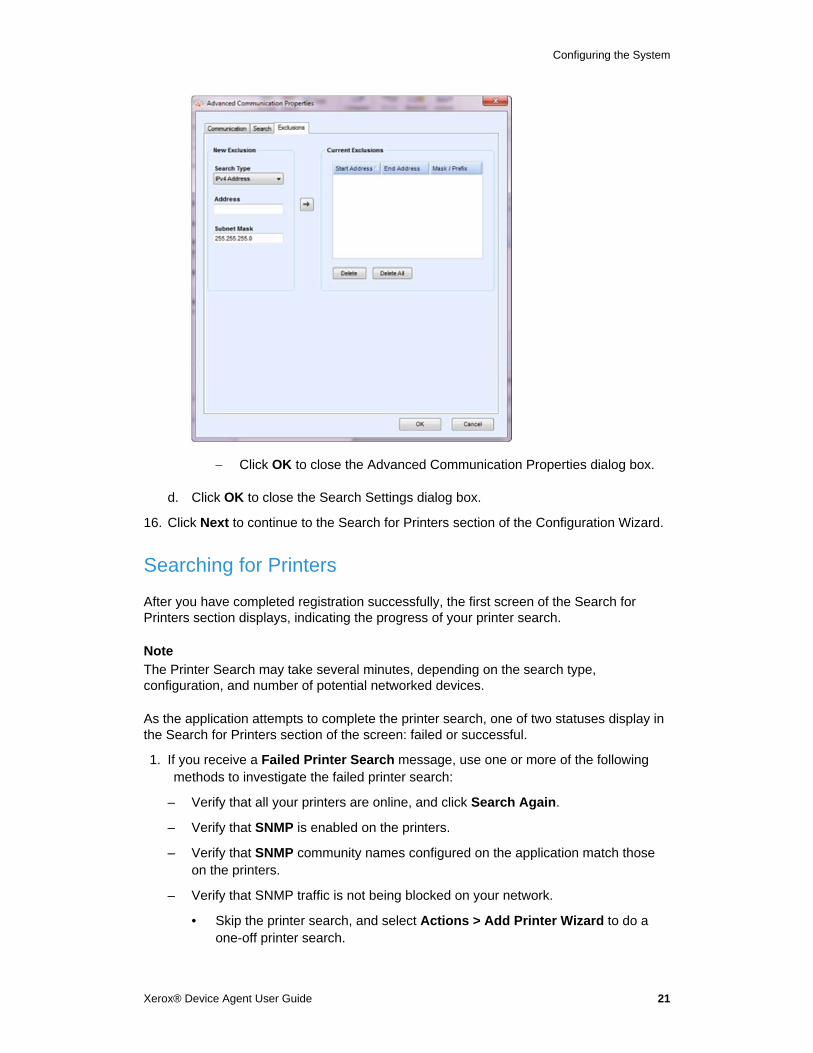
c. If you want to modify any of the Advanced Communication Properties which include Communications, Search settings, and printers to exclude from searches:
• Click Advanced. The Advanced Communication Properties dialog box opens.
Configuring the System
18 Xerox® Device Agent User Guide
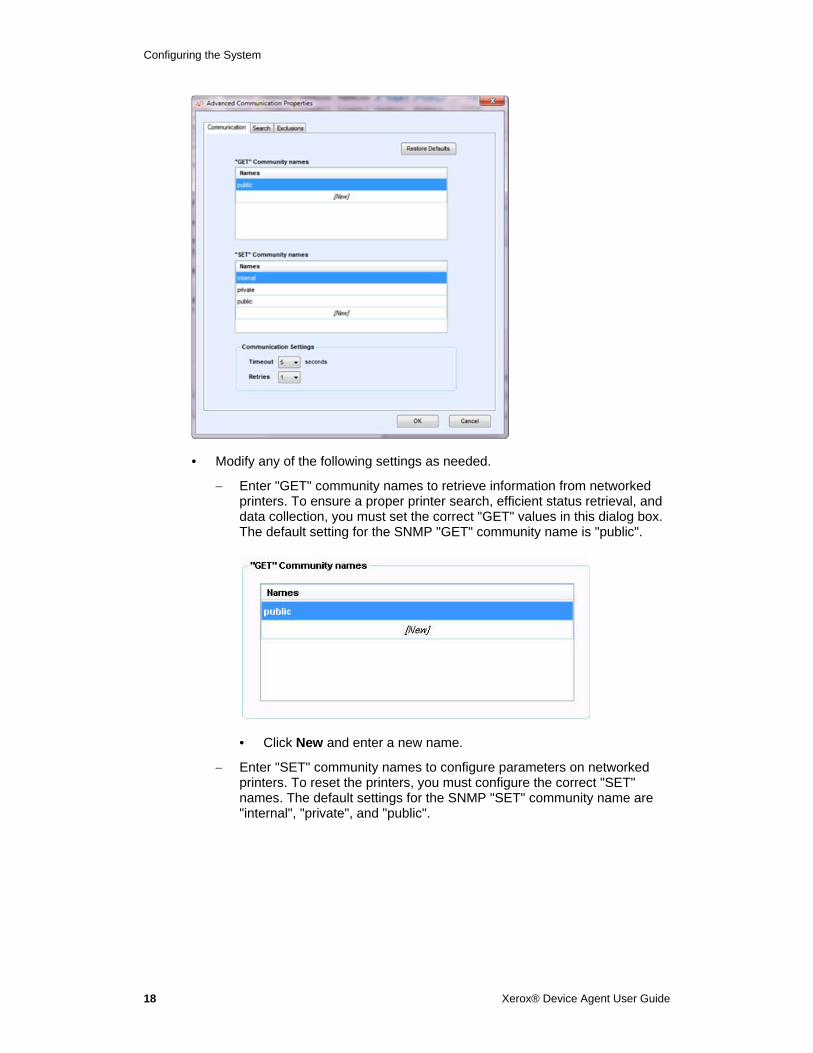
• Modify any of the following settings as needed.
Enter "GET" community names to retrieve information from networked printers. To ensure a proper printer search, efficient status retrieval, and data collection, you must set the correct "GET" values in this dialog box. The default setting for the SNMP "GET" community name is "public".
• Click New and enter a new name.
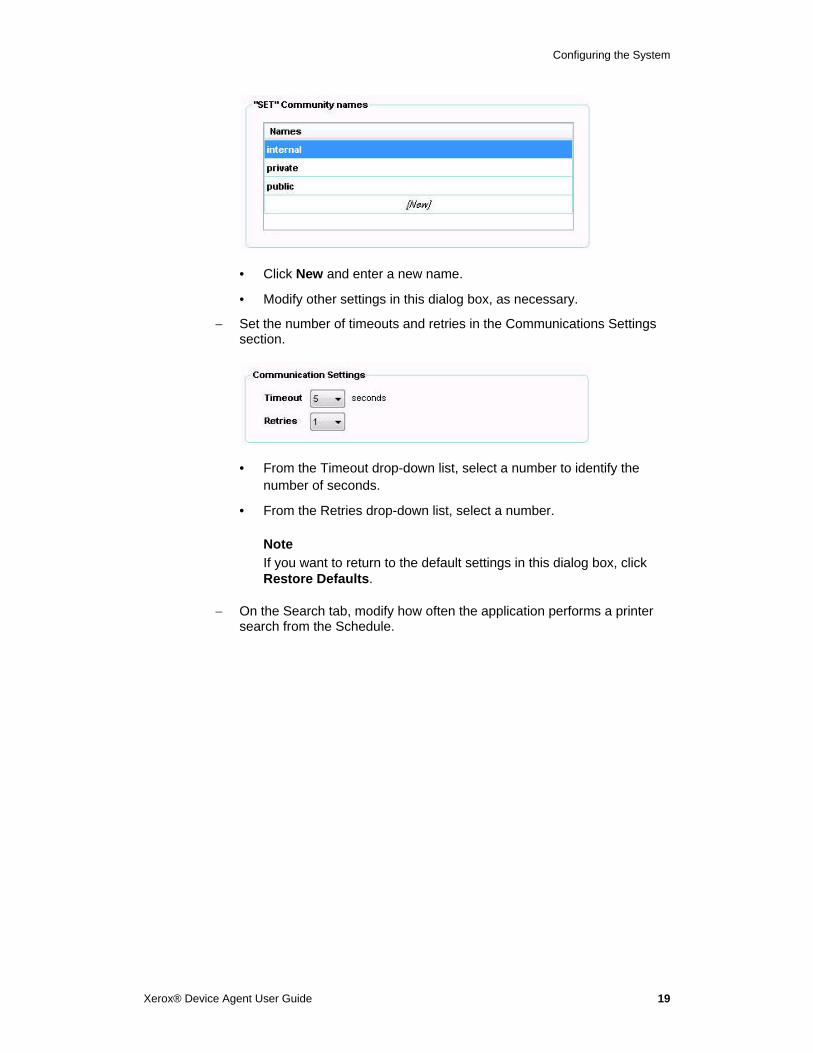
Enter "SET" community names to configure parameters on networked printers. To reset the printers, you must configure the correct "SET" names. The default settings for the SNMP "SET" community name are "internal", "private", and "public".
Configuring the System
Xerox® Device Agent User Guide 19
• Click New and enter a new name.
• Modify other settings in this dialog box, as necessary.
Set the number of timeouts and retries in the Communications Settings section.
• From the Timeout drop-down list, select a number to identify the number of seconds.
• From the Retries drop-down list, select a number.
Note
If you want to return to the default settings in this dialog box, click Restore Defaults.
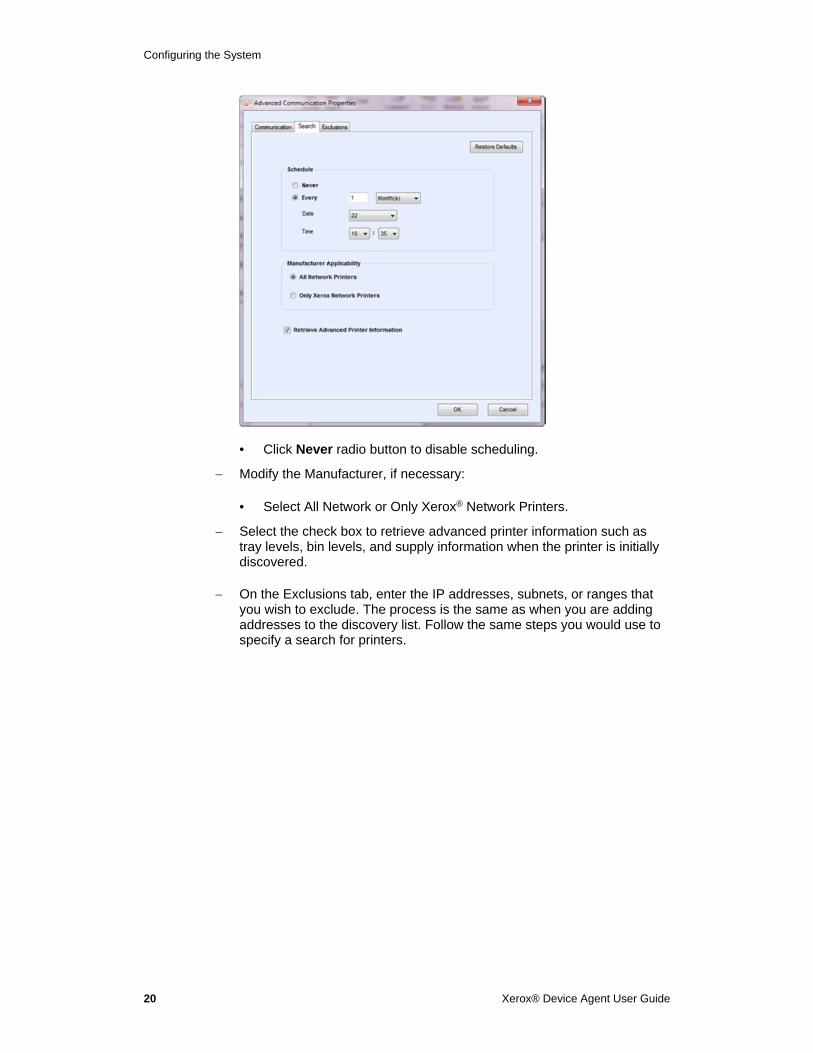
On the Search tab, modify how often the application performs a printer search from the Schedule.
Configuring the System
20 Xerox® Device Agent User Guide
• Click Never radio button to disable scheduling.
Modify the Manufacturer, if necessary:
• Select All Network or Only Xerox® Network Printers.
Select the check box to retrieve advanced printer information such as tray levels, bin levels, and supply information when the printer is initially discovered.
On the Exclusions tab, enter the IP addresses, subnets, or ranges that you wish to exclude. The process is the same as when you are adding addresses to the discovery list. Follow the same steps you would use to specify a search for printers.
Configuring the System
Xerox® Device Agent User Guide 21
Click OK to close the Advanced Communication Properties dialog box.
d. Click OK to close the Search Settings dialog box.
16. Click Next to continue to the Search for Printers section of the Configuration Wizard.
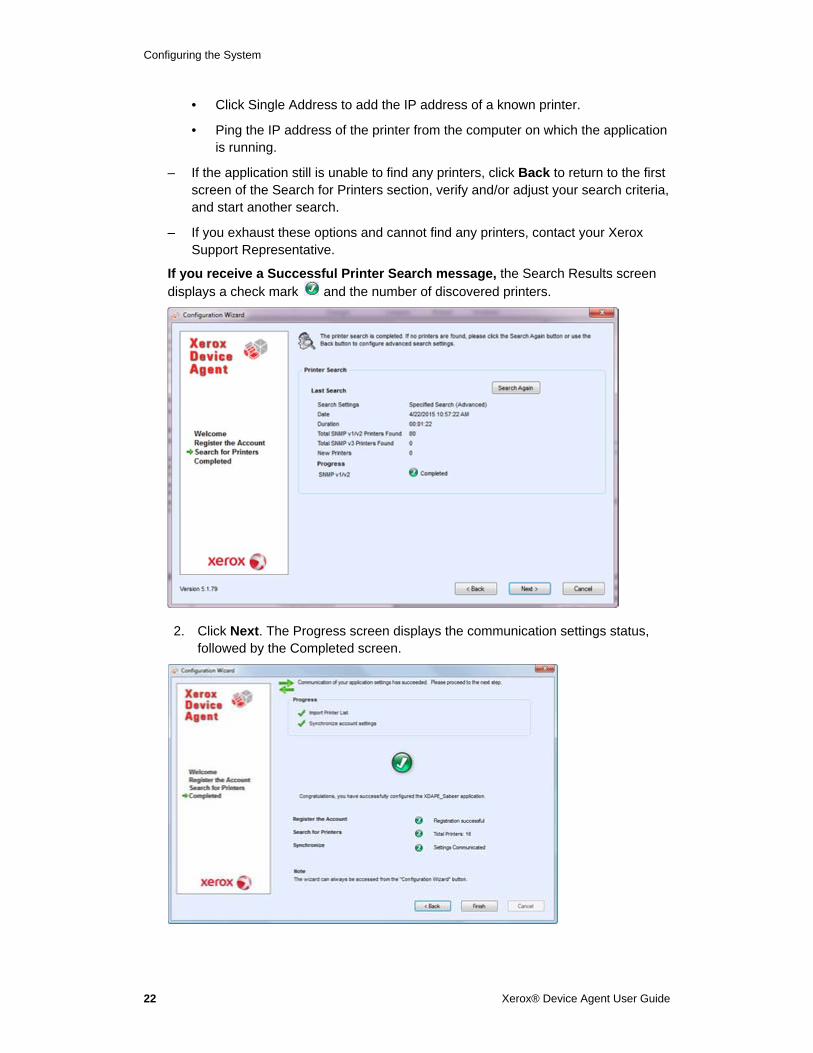
Searching for Printers
After you have completed registration successfully, the first screen of the Search for Printers section displays, indicating the progress of your printer search.
Note
The Printer Search may take several minutes, depending on the search type, configuration, and number of potential networked devices.
As the application attempts to complete the printer search, one of two statuses display in the Search for Printers section of the screen: failed or successful.
1. If you receive a Failed Printer Search message, use one or more of the following methods to investigate the failed printer search:
– Verify that all your printers are online, and click Search Again.
– Verify that SNMP is enabled on the printers.
– Verify that SNMP community names configured on the application match those on the printers.
– Verify that SNMP traffic is not being blocked on your network.
• Skip the printer search, and select Actions > Add Printer Wizard to do a one-off printer search.
Configuring the System
22 Xerox® Device Agent User Guide
• Click Single Address to add the IP address of a known printer.
• Ping the IP address of the printer from the computer on which the application is running.
– If the application still is unable to find any printers, click Back to return to the first screen of the Search for Printers section, verify and/or adjust your search criteria, and start another search.
– If you exhaust these options and cannot find any printers, contact your Xerox Support Representative.
If you receive a Successful Printer Search message, the Search Results screen displays a check mark and the number of discovered printers.
2. Click Next. The Progress screen displays the communication settings status, followed by the Completed screen.

Configuring the System
Xerox® Device Agent User Guide 23
3. Click Finish to close the Configuration Wizard and open the application user interface.
Opening the Application To access the application after installation and configuration, use one of the following methods:
• Double-click the application icon on the desktop.
• Double-click the tray icon in the System Tray, which is where the minimized application runs after installation.
• Navigate to the Start menu programs folder and select the application.
• Right-click the tray icon in the System Tray and select Open.

Xerox® Device Agent User Guide 25
Using the Interface
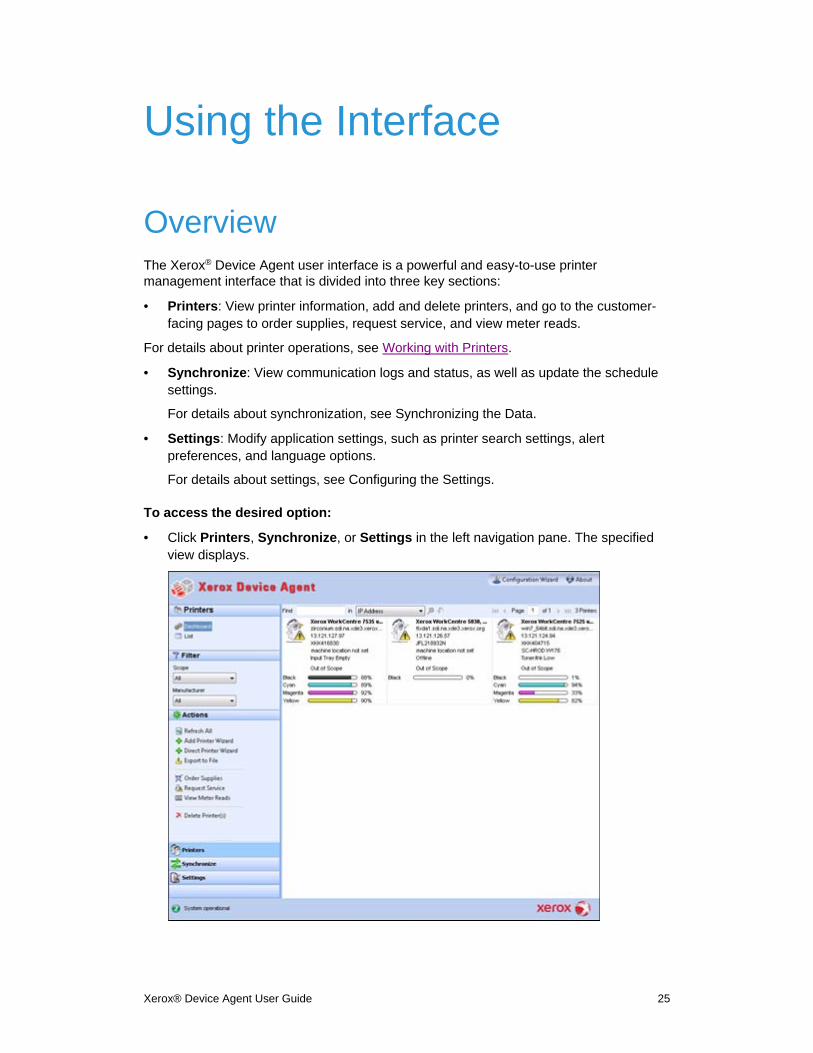
Overview The Xerox® Device Agent user interface is a powerful and easy-to-use printer management interface that is divided into three key sections:
• Printers: View printer information, add and delete printers, and go to the customer-facing pages to order supplies, request service, and view meter reads.
For details about printer operations, see Working with Printers.
• Synchronize: View communication logs and status, as well as update the schedule settings.
For details about synchronization, see Synchronizing the Data.
• Settings: Modify application settings, such as printer search settings, alert preferences, and language options.
For details about settings, see Configuring the Settings.
To access the desired option:
• Click Printers, Synchronize, or Settings in the left navigation pane. The specified view displays.
Using the Interface
26 Xerox® Device Agent User Guide
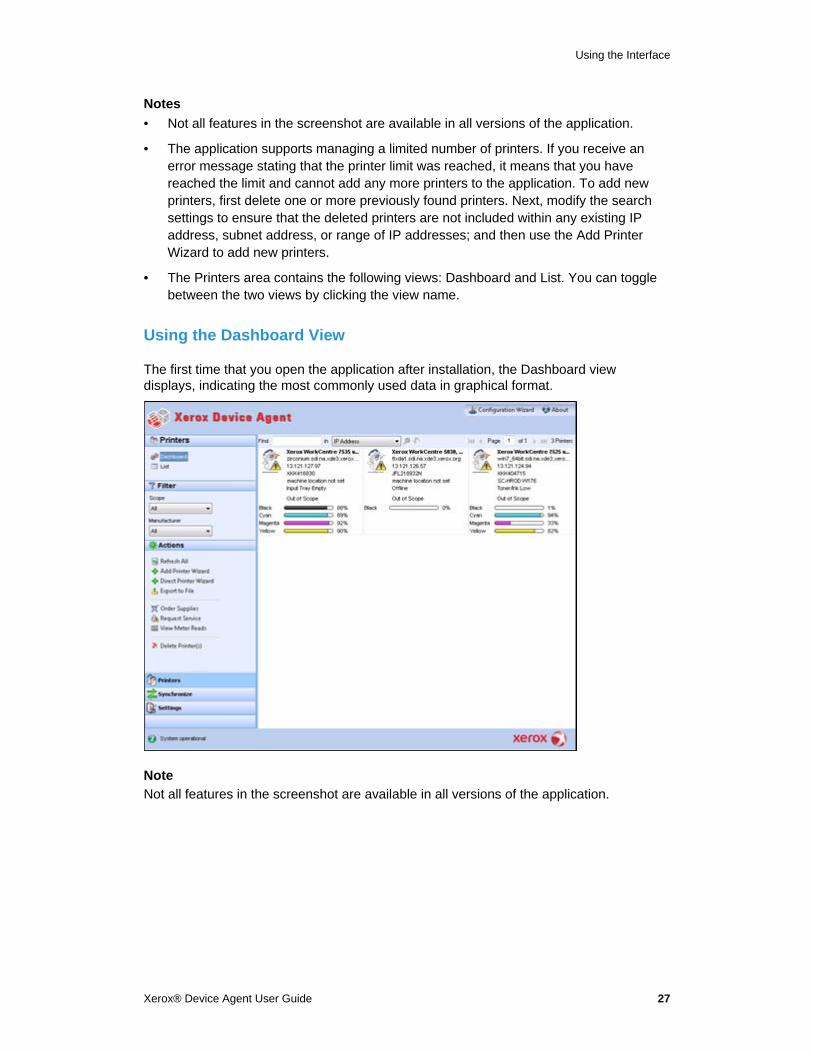
Note
Not all features in the screenshot are available in all versions of the application.
In addition to the three main sections, the application contains:
• Header: Displays the application name and icon, as well as links to the Configuration Wizard and the About dialog box.
• Status bar: Check the status of communication between the application and Xerox® Services Manager, as well as determine if the application is searching for printers or collecting printer status.
Understanding the Screens This section provides further details about the three main screens that you can access from the Xerox® Device Agent interface.
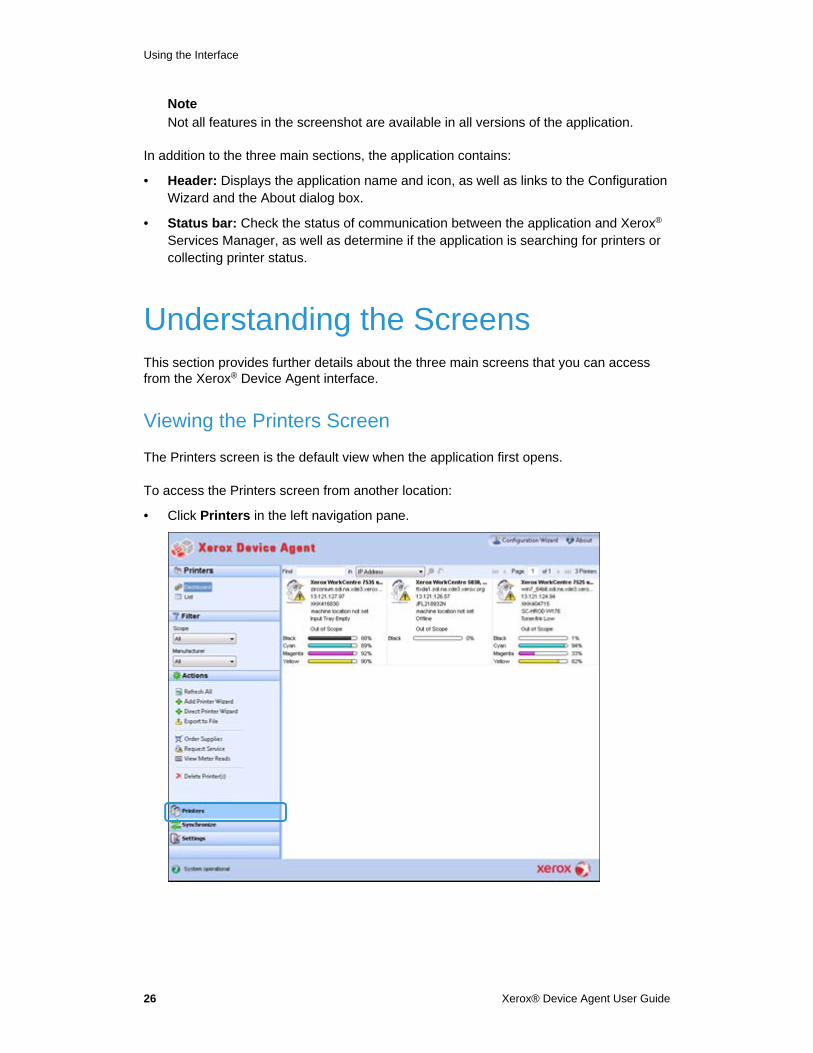
Viewing the Printers Screen
The Printers screen is the default view when the application first opens.
To access the Printers screen from another location:
• Click Printers in the left navigation pane.
Using the Interface
Xerox® Device Agent User Guide 27
Notes
• Not all features in the screenshot are available in all versions of the application.
• The application supports managing a limited number of printers. If you receive an error message stating that the printer limit was reached, it means that you have reached the limit and cannot add any more printers to the application. To add new printers, first delete one or more previously found printers. Next, modify the search settings to ensure that the deleted printers are not included within any existing IP address, subnet address, or range of IP addresses; and then use the Add Printer Wizard to add new printers.
• The Printers area contains the following views: Dashboard and List. You can toggle between the two views by clicking the view name.
Using the Dashboard View
The first time that you open the application after installation, the Dashboard view displays, indicating the most commonly used data in graphical format.
Note
Not all features in the screenshot are available in all versions of the application.

Using the Interface
28 Xerox® Device Agent User Guide
Working with Tiles
In the Dashboard view, each printer is represented in a tile format.
Each tile contains:
• Printer icon: Displays a thumbnail representing the printer type.
• Printer model: Name of the printer.
• Status icons displayed over a printer icon: Describes the printer type.
• DNS name: Translates the domain name into an IP address.
• Printer IP Address: Network address of the printer.
• Serial Number: Serial number found on the physical printer.
• Printer Status: Status of the printer.
• and : For In Scope printers, they take you to the Xerox® Services Manager customer-facing pages, so you can order supplies or request service respectively.
• In Scope/ Out of Scope: Whether or not the printer is included in the Xerox service contract.
Notes
If your version of the application does not distinguish between In Scope and Out of Scope printers, you do not have access to this feature.
All newly-found printers are Marked Out of Scope by default until the Xerox service contract is processed.
• Indicator Bars for Primary Toner or Ink Levels: Toner color and percentage text indicators for toner or ink colors if available: cyan, magenta, yellow, and black. The toner or ink level is indicated as Not Empty for printers that do not support supplies percentage. There are some printers that do not provide any toner or ink level information; therefore, the indicator bars do not display. The hourglass symbol displays when supplies have not been retrieved or are in the process of being retrieved.
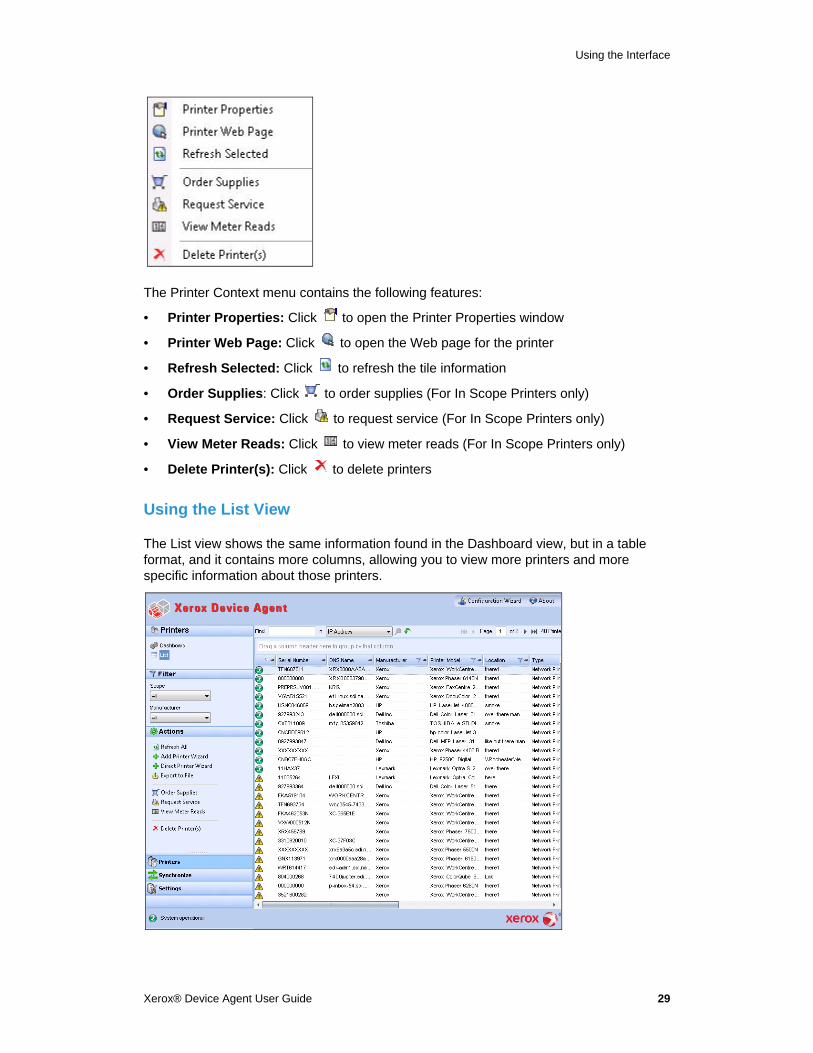
When you right-click a tile, the Printer Context menu opens.
Using the Interface
Xerox® Device Agent User Guide 29
The Printer Context menu contains the following features:
• Printer Properties: Click to open the Printer Properties window
• Printer Web Page: Click to open the Web page for the printer
• Refresh Selected: Click to refresh the tile information
• Order Supplies: Click to order supplies (For In Scope Printers only)
• Request Service: Click to request service (For In Scope Printers only)
• View Meter Reads: Click to view meter reads (For In Scope Printers only)
• Delete Printer(s): Click to delete printers
Using the List View
The List view shows the same information found in the Dashboard view, but in a table format, and it contains more columns, allowing you to view more printers and more specific information about those printers.
Using the Interface
30 Xerox® Device Agent User Guide
Notes
• Xerox® Device Agent supports IPv4 and IPv6 printers. Xerox® Device Agent displays the IPv6 or the IPv4 address in the IP Address column, depending on which protocol was used to search for the printer.
• The list view includes the Type field, which distinguishes networked printers from direct printers.
You can use the following features in List view only:
• Filter using the icon:
• Pin a column
• Group printers
• Use the List view context menu
• Sort printer list
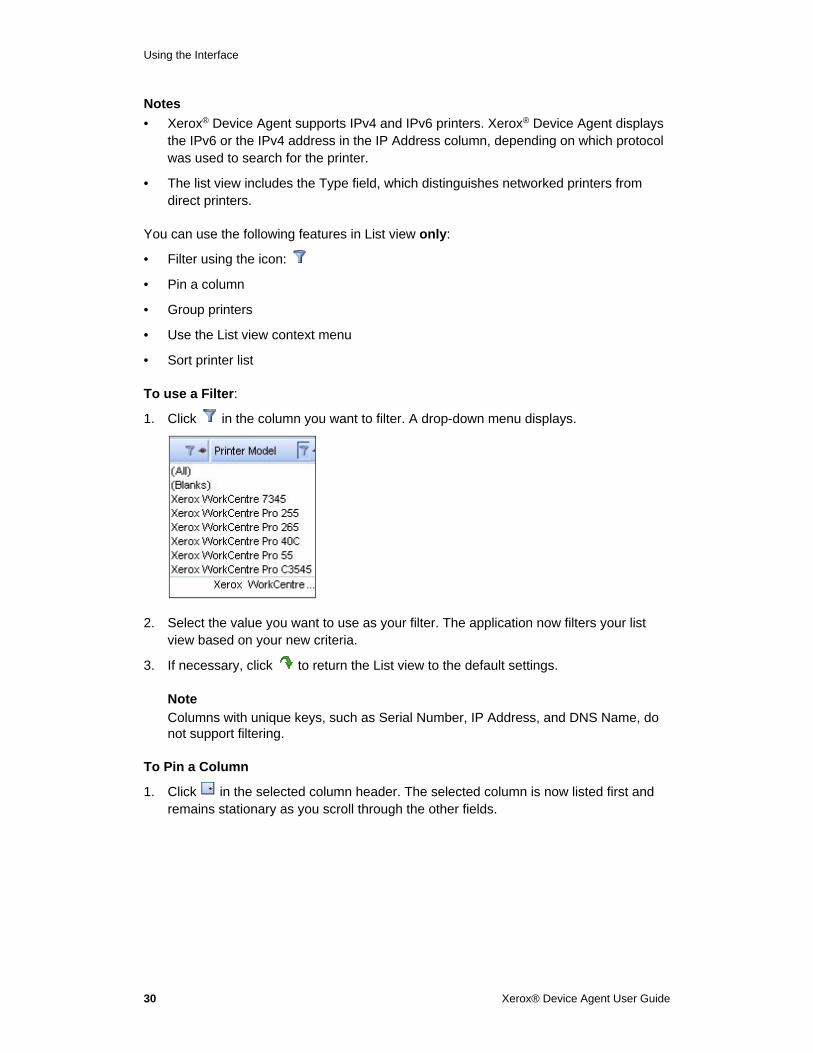
To use a Filter:
1. Click in the column you want to filter. A drop-down menu displays.
2. Select the value you want to use as your filter. The application now filters your list view based on your new criteria.
3. If necessary, click to return the List view to the default settings.
Note
Columns with unique keys, such as Serial Number, IP Address, and DNS Name, do not support filtering.
To Pin a Column
1. Click in the selected column header. The selected column is now listed first and remains stationary as you scroll through the other fields.
Using the Interface
Xerox® Device Agent User Guide 31
2. If necessary, click to return the List view to the default settings.
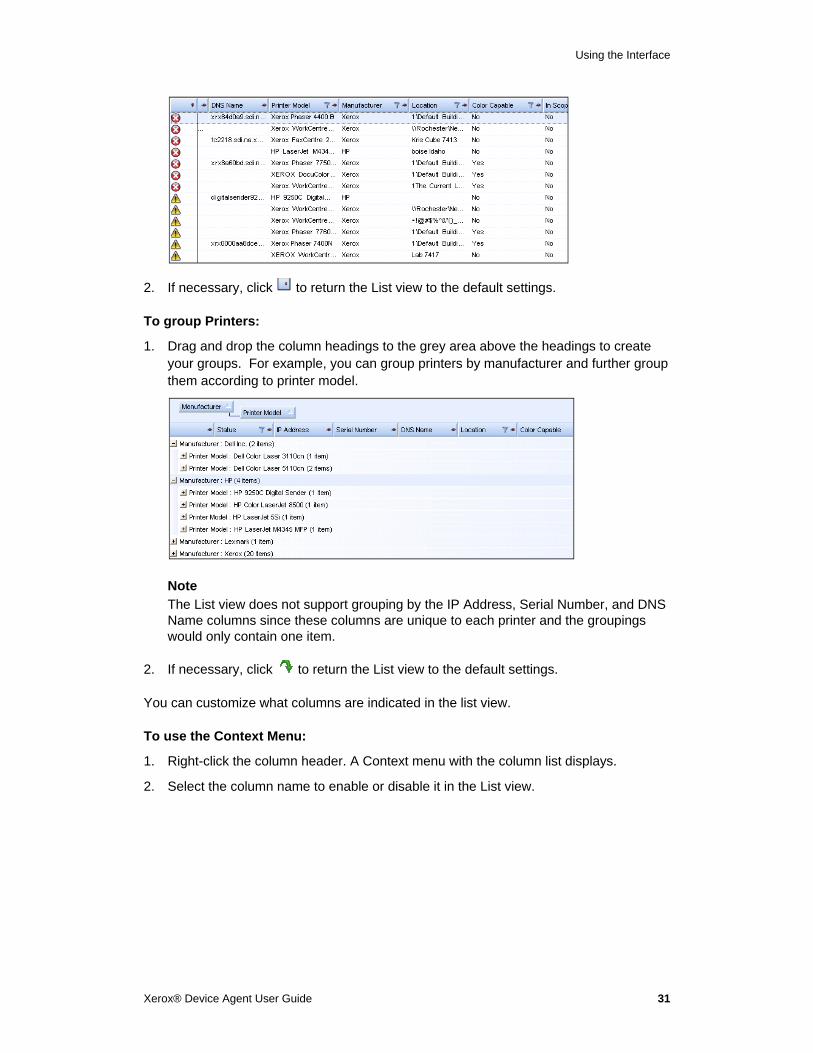
To group Printers:
1. Drag and drop the column headings to the grey area above the headings to create your groups. For example, you can group printers by manufacturer and further group them according to printer model.
Note
The List view does not support grouping by the IP Address, Serial Number, and DNS Name columns since these columns are unique to each printer and the groupings would only contain one item.
2. If necessary, click to return the List view to the default settings.
You can customize what columns are indicated in the list view.
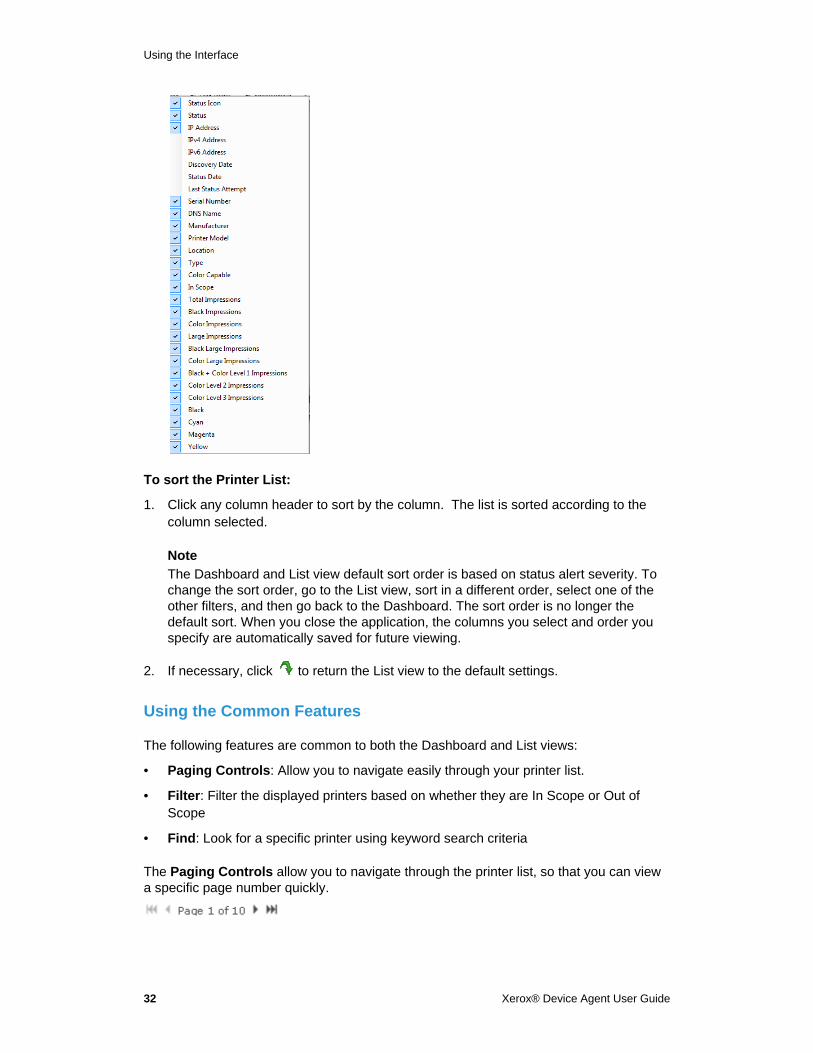
To use the Context Menu:
1. Right-click the column header. A Context menu with the column list displays.
2. Select the column name to enable or disable it in the List view.
Using the Interface
32 Xerox® Device Agent User Guide
To sort the Printer List:
1. Click any column header to sort by the column. The list is sorted according to the column selected.
Note
The Dashboard and List view default sort order is based on status alert severity. To change the sort order, go to the List view, sort in a different order, select one of the other filters, and then go back to the Dashboard. The sort order is no longer the default sort. When you close the application, the columns you select and order you specify are automatically saved for future viewing.
2. If necessary, click to return the List view to the default settings.
Using the Common Features
The following features are common to both the Dashboard and List views:
• Paging Controls: Allow you to navigate easily through your printer list.
• Filter: Filter the displayed printers based on whether they are In Scope or Out of Scope
• Find: Look for a specific printer using keyword search criteria
The Paging Controls allow you to navigate through the printer list, so that you can view a specific page number quickly.
Using the Interface
Xerox® Device Agent User Guide 33
With the paging controls you can:
• Click to jump to the beginning or end of a list
• Move forward or backward through each page in the list
• See the total number of pages in the printer list
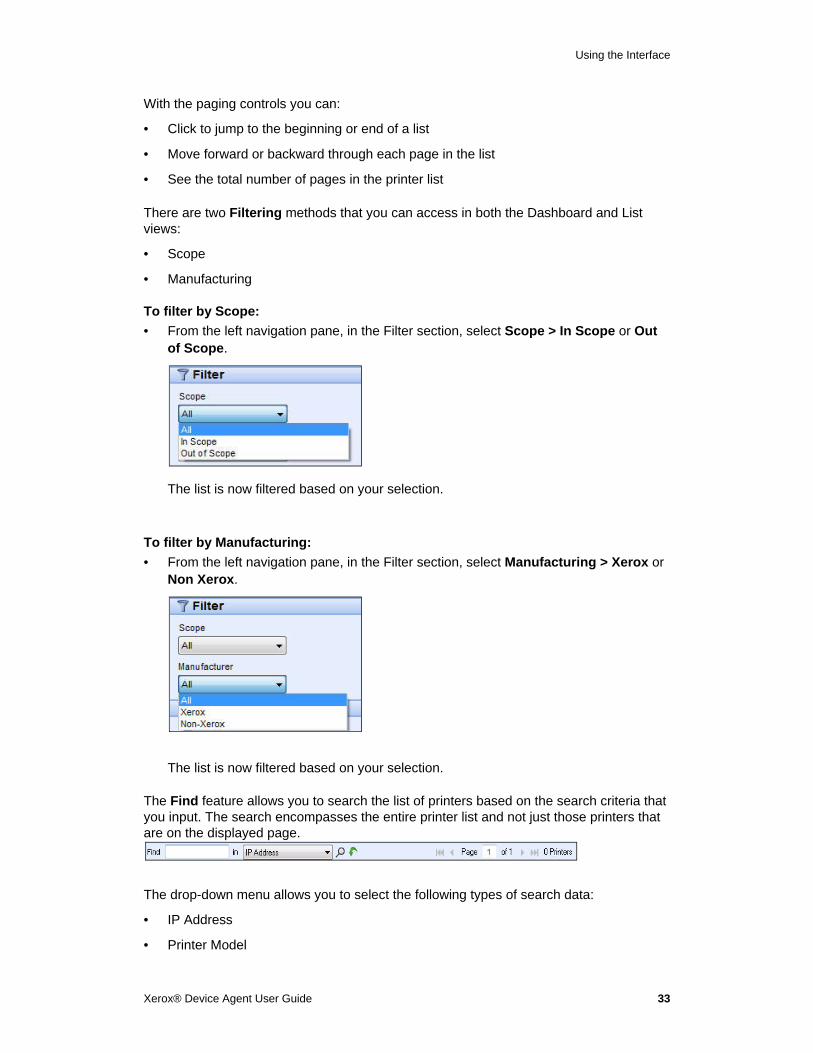
There are two Filtering methods that you can access in both the Dashboard and List views:
• Scope
• Manufacturing
To filter by Scope:
• From the left navigation pane, in the Filter section, select Scope > In Scope or Out of Scope.
The list is now filtered based on your selection.
To filter by Manufacturing:
• From the left navigation pane, in the Filter section, select Manufacturing > Xerox or Non Xerox.
The list is now filtered based on your selection.
The Find feature allows you to search the list of printers based on the search criteria that you input. The search encompasses the entire printer list and not just those printers that are on the displayed page.
The drop-down menu allows you to select the following types of search data:
• IP Address
• Printer Model
Using the Interface
34 Xerox® Device Agent User Guide
• Manufacturer
• DNS Name
• Serial Number
• Status
• Location
• Color Capable
You can enter partial or complete strings to match the values, except for Color Capable, where you click Yes or No to find the devices accordingly.
To use the Find feature:
1. Enter a search word or words in the Find field.
2. Select a find criterion from the drop-down menu.
3. Click the magnifying glass icon. The results display.
4. If necessary, click to return the List view to the default settings.
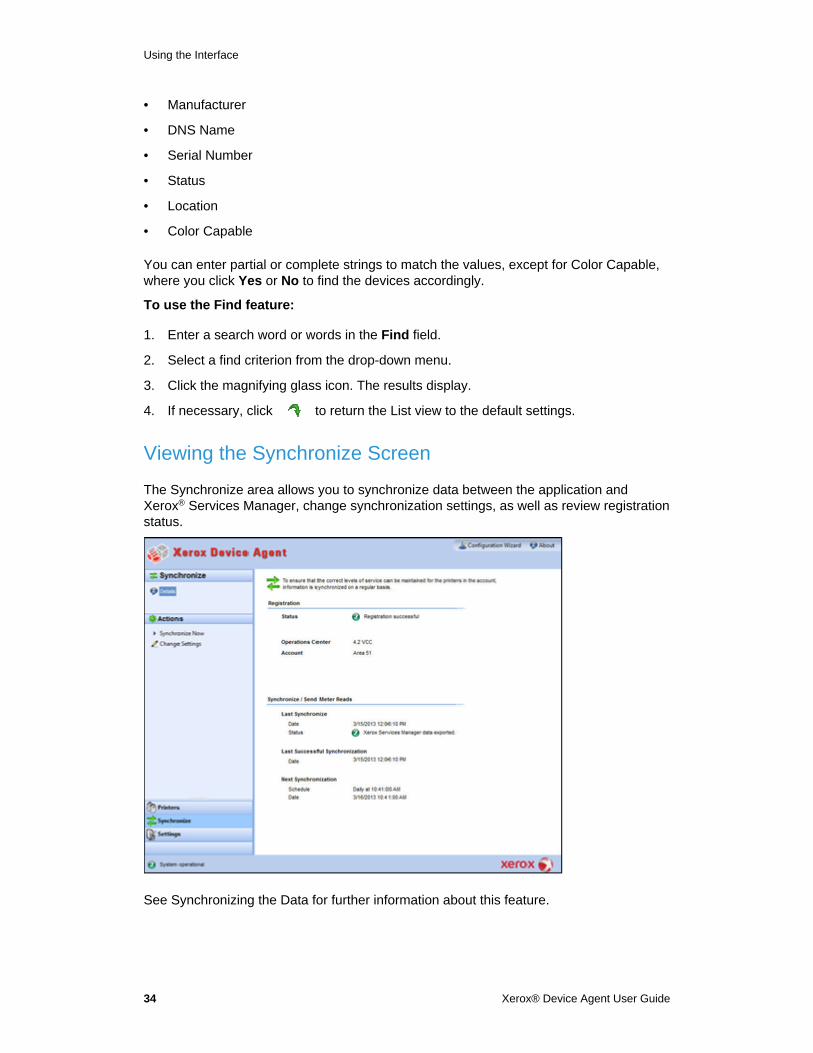
Viewing the Synchronize Screen
The Synchronize area allows you to synchronize data between the application and Xerox® Services Manager, change synchronization settings, as well as review registration status.
See Synchronizing the Data for further information about this feature.
Using the Interface
Xerox® Device Agent User Guide 35
Viewing the Settings Screen
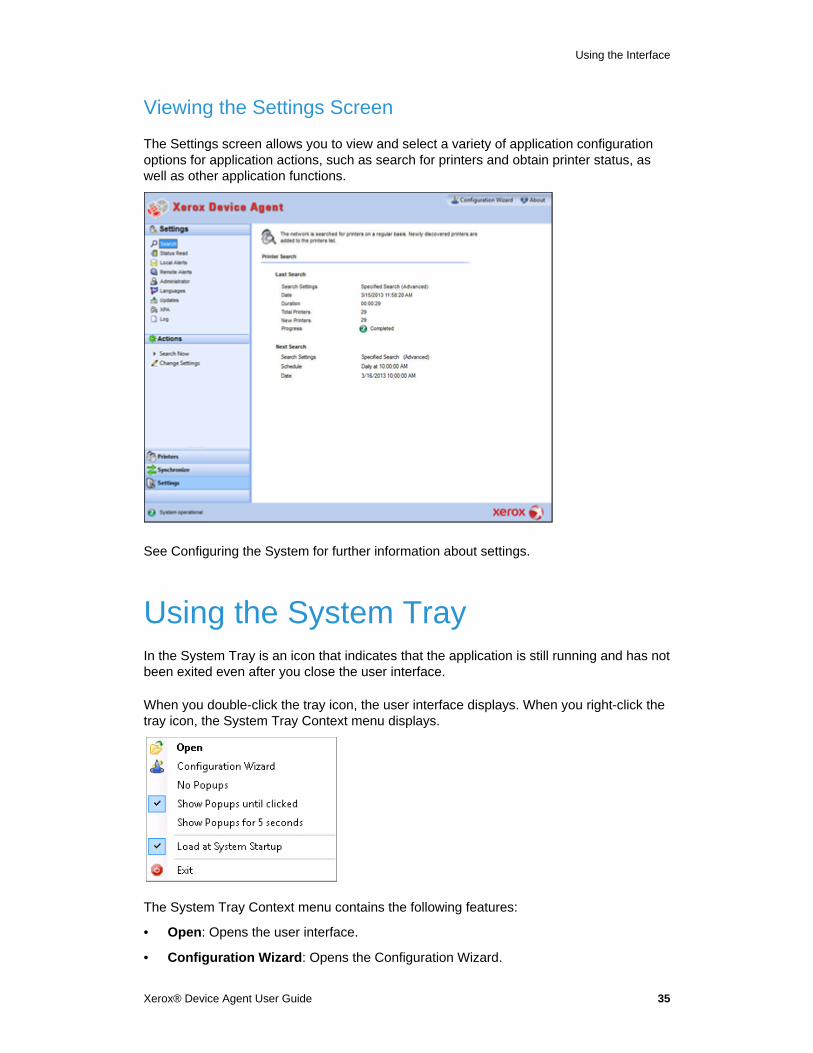
The Settings screen allows you to view and select a variety of application configuration options for application actions, such as search for printers and obtain printer status, as well as other application functions.
See Configuring the System for further information about settings.
Using the System Tray In the System Tray is an icon that indicates that the application is still running and has not been exited even after you close the user interface.
When you double-click the tray icon, the user interface displays. When you right-click the tray icon, the System Tray Context menu displays.
The System Tray Context menu contains the following features:
• Open: Opens the user interface.
• Configuration Wizard: Opens the Configuration Wizard.
Using the Interface
36 Xerox® Device Agent User Guide
• No Popups: Prevents popups in your System Tray.
• Show Popups until clicked: Shows popups until you click the popup message.
• Show Popups for 5 seconds: Shows popup messages for five seconds.
Note
The popup options act as radio buttons, so you can only have one of the three options selected at one time.
• Load at System Startup: Turns on or off the ability to run the user interface part of the application at startup. By default, this option is turned-off. When this option is turned on, Xerox® Device Agent launches automatically when you login. You do not have to select this option for scheduled communications.
• Exit: Exits the application and removes the tray icon from the System Tray.
Note If you are running the Windows Vista®, Windows® 2008, Windows® 2008 R2, or Windows® 7 operating system with User Account Control (UAC) enabled, the application does not auto run when you log into the system. A message displays in your system tray that indicates the operating system has blocked some startup programs, including the application. To run the application, right-click the popup message, and select Run blocked programs; or launch the application from the Start menu.
Resizing the Application After the application is open, you can resize it to fit your screen. Hover your mouse over any area on the application border; your cursor changes to a white double arrow, allowing you to resize the screen.
Notes
• The application does not retain the new size after you exit the application or if you reboot your system.
• Although the installation process places the application on the desktops of all users, only administrators and power users can access the software.
Xerox® Device Agent User Guide 37
Working with Printers
Overview This section describes the multiple ways you can work with printers using the Xerox® Device Manager. You can add or delete a single or multiple printers, export the printer list, and view the various printer properties, such as status, consumables, and usage summary.
Adding a Printer You can add a printer to your system with the Add Printer Wizard, which is accessed through the Actions menu. The Add Printer Wizard can:
• Add a printer to your current list of printers
• Help identify issues with the printer search or SNMP configuration on your network
• Move a printer back into the list if an IP address has changed and is not within the current search settings
You can add a single printer by IP address or DNS name; or you can add multiple printers using the address range selection in the wizard.
Adding Printers by IP Address or DNS Name
Use the following procedure to add a printer to your system using the IP address or DNS name.
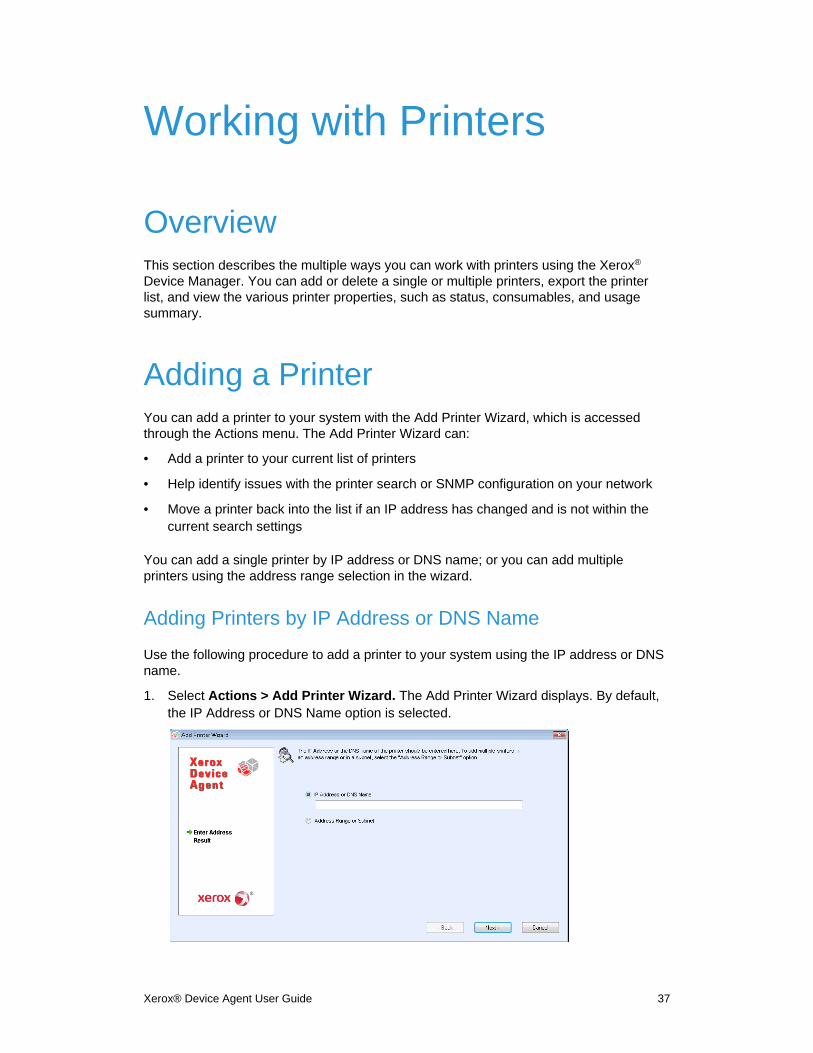
1. Select Actions > Add Printer Wizard. The Add Printer Wizard displays. By default, the IP Address or DNS Name option is selected.
Working with Printers
38 Xerox® Device Agent User Guide
2. Enter the printer’s IP address or DNS Name.
3. Click [Next]. A progress screen displays, indicating the status of the search.
The Results screen displays.
4. Do one of the following:
– Click [Add Another Printer] to search for another printer.
– Click [Finish] to add the new printers to the printer list.
Note
If a printer is not found, the search results describe reason for the failed search. Click Back to verify the entered information or to enter a different address.
Adding Multiple Printers
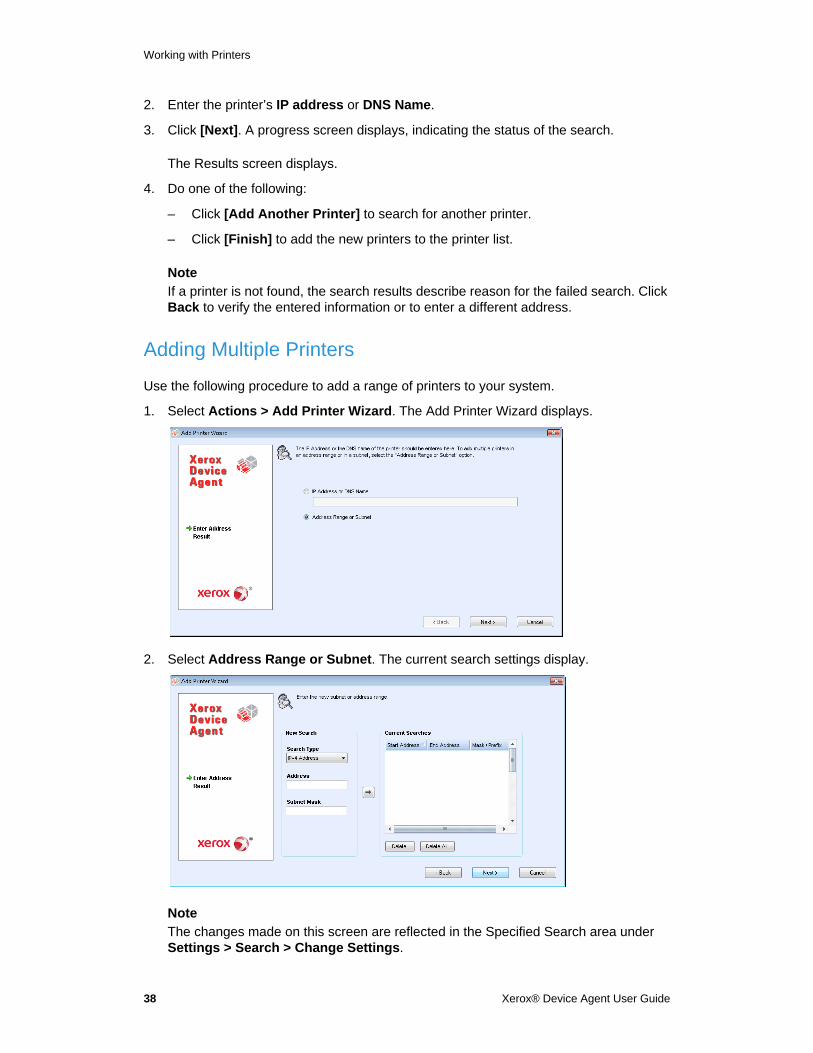
Use the following procedure to add a range of printers to your system.
1. Select Actions > Add Printer Wizard. The Add Printer Wizard displays.
2. Select Address Range or Subnet. The current search settings display.
Note
The changes made on this screen are reflected in the Specified Search area under Settings > Search > Change Settings.
Working with Printers
Xerox® Device Agent User Guide 39
3. Enter or modify your settings.
4. Click [Next]. A progress screen displays, indicating the status of the search.
5. Click [Finish].
Note
If you select Finish and the search is not complete, a prompt displays asking you to stop the search or allow it to continue. If you allow the search to continue, any new printers are found and the current status displays on the left- bottom corner of the screen.
A results screen displays the total number of printers found.
6. Click [Finish]. The new printers are added to the printer list.
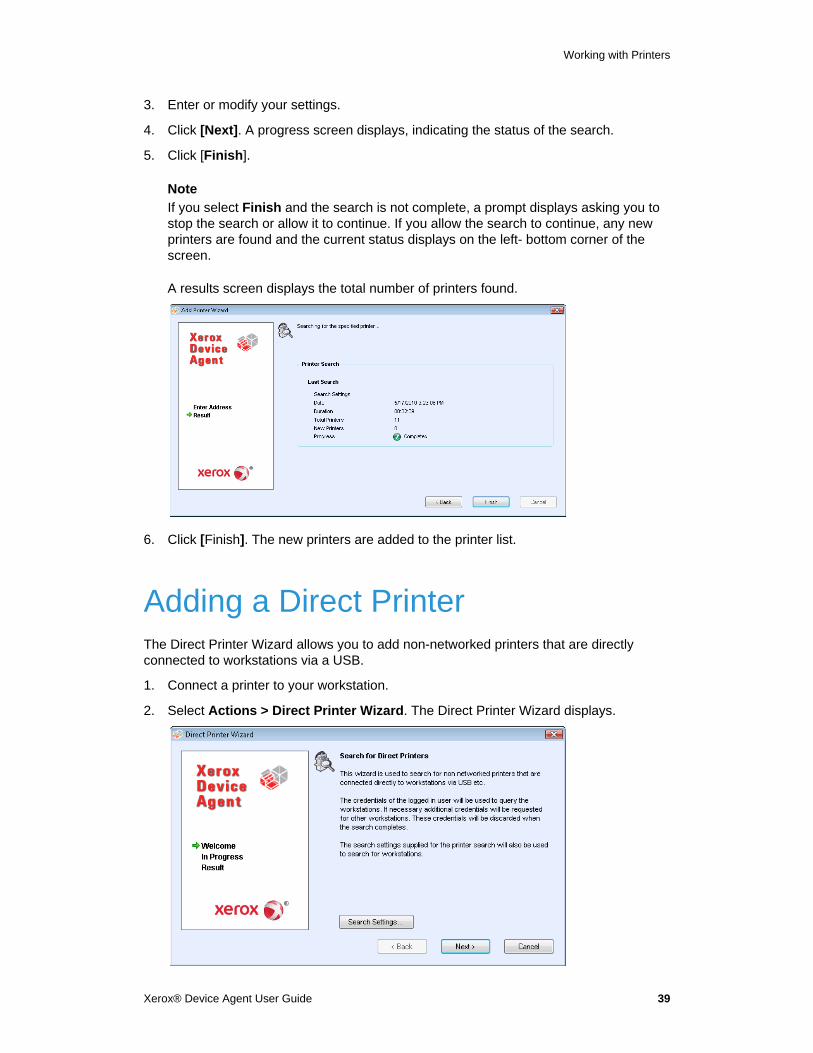
Adding a Direct Printer The Direct Printer Wizard allows you to add non-networked printers that are directly connected to workstations via a USB.
1. Connect a printer to your workstation.
2. Select Actions > Direct Printer Wizard. The Direct Printer Wizard displays.
Working with Printers
40 Xerox® Device Agent User Guide
3. Click [Next]. Xerox® Device Agent searches for printers using your login information. The status of the search displays.
Note
• Xerox® Device Agent uses these credentials for future direct printer wizard searches until you restart the application.
• If Xerox® Device Agent requires additional credentials to access other workstations, Xerox® Device Agent displays another screen prompting you for those credentials.
The Result screen displays the directly-connected printers. Xerox® Device Agent adds the new printer to the printer list.
Deleting a Printer Use the following procedure to delete a printer from the Printer Dashboard or List view.
1. From the Dashboard, select the tile(s) of the printer you want to delete; or from the List, select the row(s) of the printer you want to delete.
2. Select Actions > Delete Printer(s) or Context > Delete Printer(s). The Delete Printer(s) dialog box displays prompting you to verify deletion of the selected printer(s).
3. Click [Yes]. The printers no longer display on the List or Dashboard views.
Note
If a deleted printer is still on the network and the search criteria (IP address range) includes the address of the printer, it is added again at the next scheduled search.
Exporting the Printer List You can export the discovered printer list for import into Xerox® Services Manager via a CSV file. The exported file contains all of the meter data including meters, unit types, and the last transmitted meter to Xerox® Services Manager for each printer.
If you are an advanced users with access to Xerox® Services Manager, do the following:
1. Verify that all the model names map to the same model alias in Xerox® Services Manager.
2. Insert the information into a Xerox® Services Manager template.
3. Import the information into Xerox® Services Manager.
4. If your version of the application has filter options, verify that All is the selected filter.
5. From the Left Navigation pane, select Printers > Dashboard Actions > Export to File; or Printers > List > Actions > Export to File. The Export data dialog box displays.
6. Navigate to the save location for your CSV file.
Working with Printers
Xerox® Device Agent User Guide 41
7. Enter a filename that is easy to identify.
8. Click [Save]. A message displays indicating that your export was successful.
9. Click [OK].
10. In Xerox® Services Manager, create an asset export/import template of required fields for updating or importing a new asset into Xerox® Services Manager.
11. In the exported printer CSV file, edit the model, manufacturer, serial number, etc., as necessary.
12. Copy and paste the data from the CSV file into the Xerox® Services Manager import template in the correct column headers.
13. Import the asset template into Xerox® Services Manager.
Note
Instructions for advanced users on how to import new assets, update existing assets, create an asset export/import template, or re-import the file to Xerox® Services Manager are available in your Xerox® Services Manager documentation.
Viewing Printer Properties On the Printer Properties screen are seven tabs, where you can check the following types of information about the printer.
• Status
• Consumables
• Information
• Features
• Usage Summary
• Usage Details
• Transmitted Meters
To access the printer properties for a selected printer:
Dashboard view
1. Double-click the tile.
2. Select Context > Printer Properties. The Printer Properties screen displays.
List view
1. Double-click the row.
2. Select Context > Printer Properties. The Printer Properties screen displays.
Working with Printers
42 Xerox® Device Agent User Guide
Note
Not all features shown are available in all versions of the application.
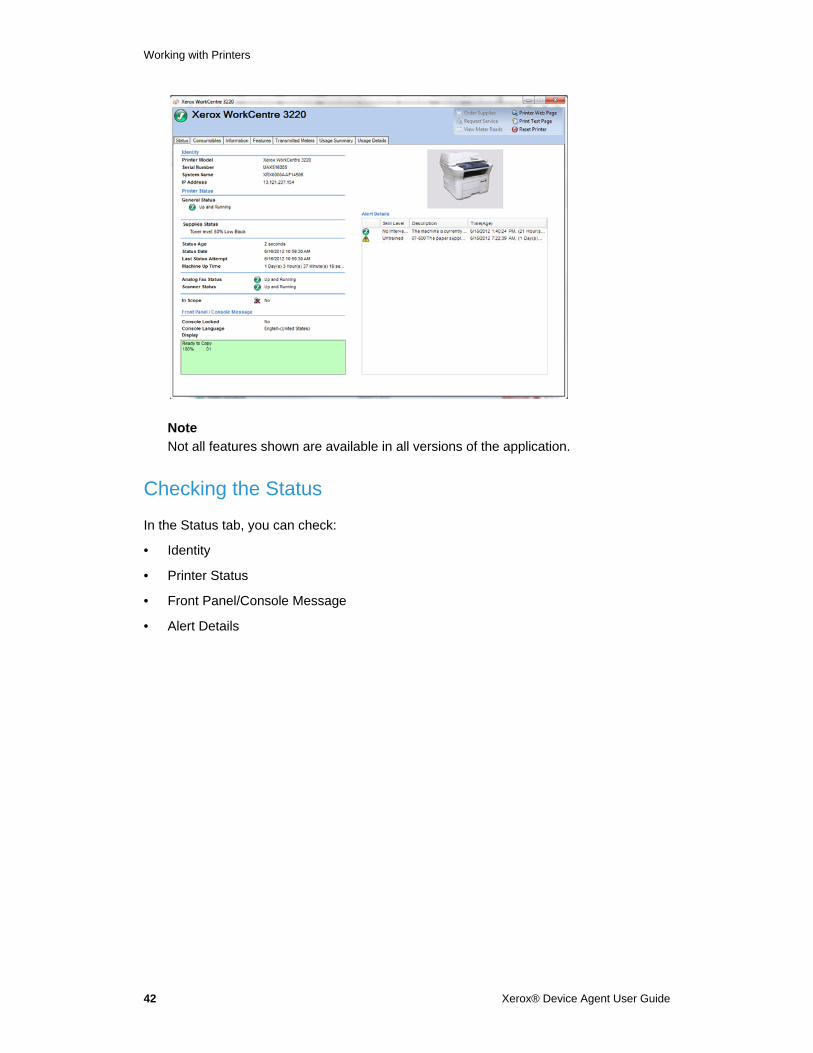
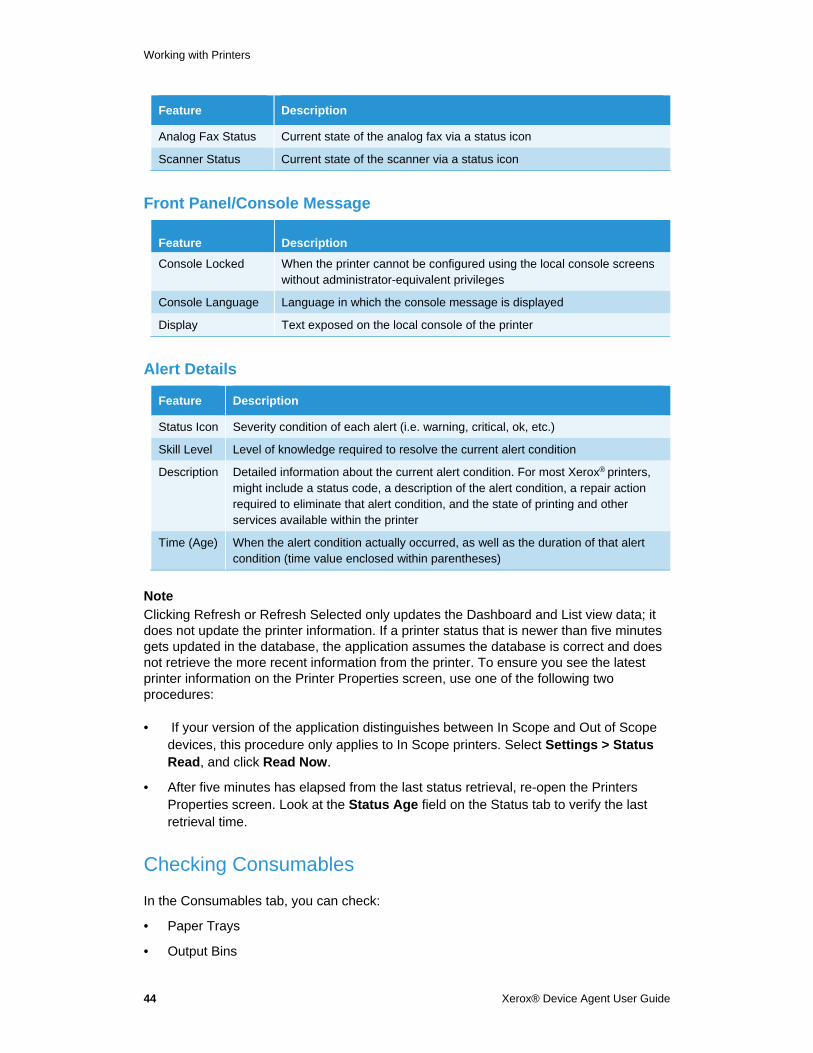
Checking the Status
In the Status tab, you can check:
• Identity
• Printer Status
• Front Panel/Console Message
• Alert Details
Working with Printers
Xerox® Device Agent User Guide 43
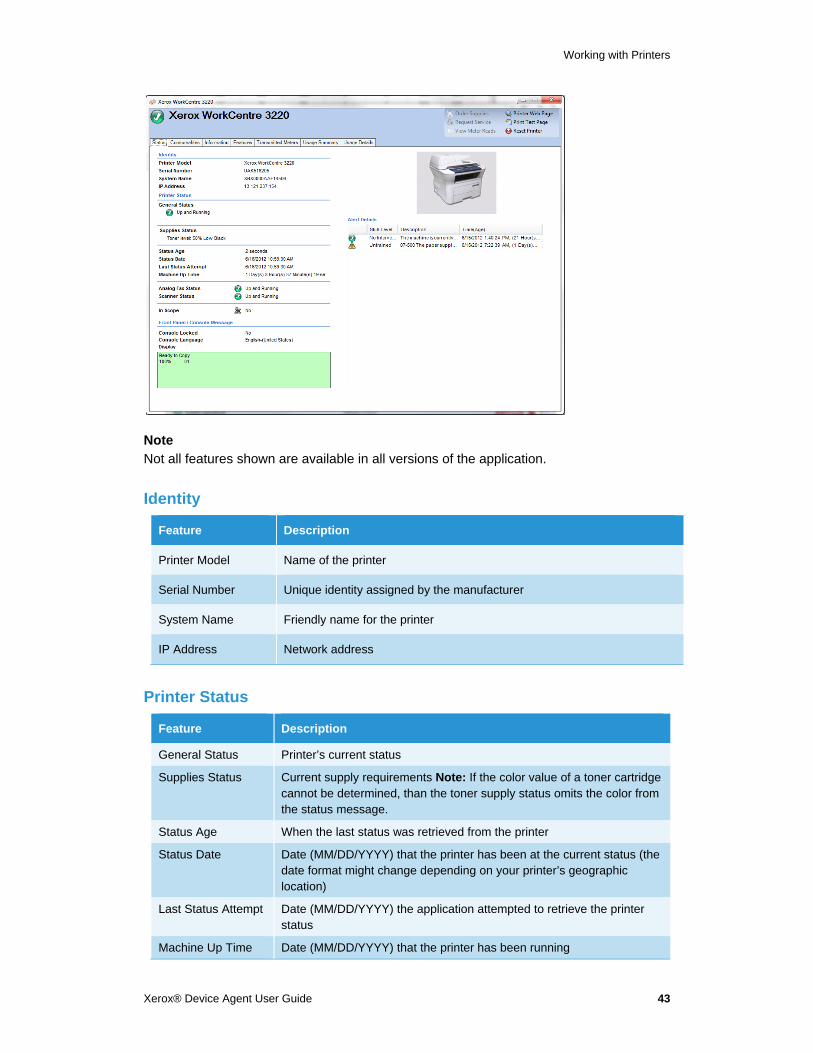
Note
Not all features shown are available in all versions of the application.
Identity
Feature Description
Printer Model Name of the printer
Serial Number Unique identity assigned by the manufacturer
System Name Friendly name for the printer
IP Address Network address
Printer Status
Feature Description
General Status Printer’s current status
Supplies Status Current supply requirements Note: If the color value of a toner cartridge cannot be determined, than the toner supply status omits the color from the status message.
Status Age When the last status was retrieved from the printer
Status Date Date (MM/DD/YYYY) that the printer has been at the current status (the date format might change depending on your printer’s geographic location)
Last Status Attempt Date (MM/DD/YYYY) the application attempted to retrieve the printer status
Machine Up Time Date (MM/DD/YYYY) that the printer has been running
Working with Printers
44 Xerox® Device Agent User Guide
Feature Description
Analog Fax Status Current state of the analog fax via a status icon
Scanner Status Current state of the scanner via a status icon
Front Panel/Console Message
Feature Description
Console Locked When the printer cannot be configured using the local console screens without administrator-equivalent privileges
Console Language Language in which the console message is displayed
Display Text exposed on the local console of the printer
Alert Details
Feature Description
Status Icon Severity condition of each alert (i.e. warning, critical, ok, etc.)
Skill Level Level of knowledge required to resolve the current alert condition
Description Detailed information about the current alert condition. For most Xerox® printers, might include a status code, a description of the alert condition, a repair action required to eliminate that alert condition, and the state of printing and other services available within the printer
Time (Age) When the alert condition actually occurred, as well as the duration of that alert condition (time value enclosed within parentheses)
Note
Clicking Refresh or Refresh Selected only updates the Dashboard and List view data; it does not update the printer information. If a printer status that is newer than five minutes gets updated in the database, the application assumes the database is correct and does not retrieve the more recent information from the printer. To ensure you see the latest printer information on the Printer Properties screen, use one of the following two procedures:
• If your version of the application distinguishes between In Scope and Out of Scope devices, this procedure only applies to In Scope printers. Select Settings > Status Read, and click Read Now.
• After five minutes has elapsed from the last status retrieval, re-open the Printers Properties screen. Look at the Status Age field on the Status tab to verify the last retrieval time.
Checking Consumables
In the Consumables tab, you can check:
• Paper Trays
• Output Bins
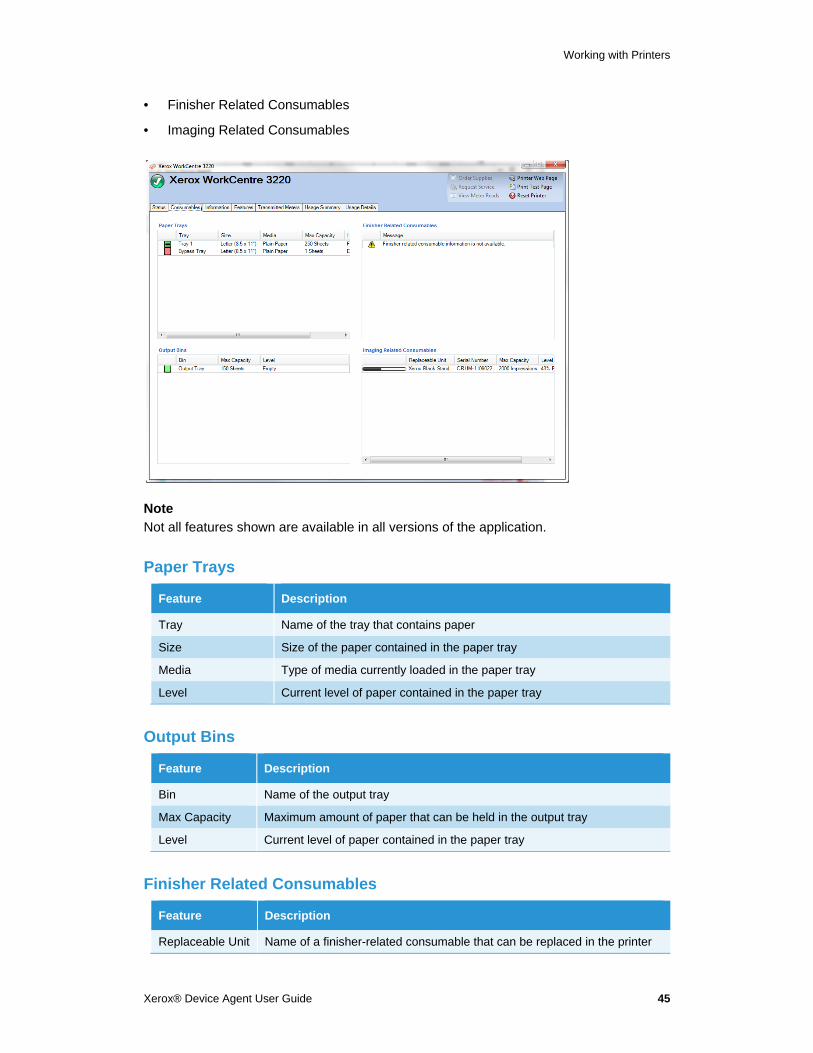
Working with Printers
Xerox® Device Agent User Guide 45
• Finisher Related Consumables
• Imaging Related Consumables
Note
Not all features shown are available in all versions of the application.
Paper Trays
Feature Description
Tray Name of the tray that contains paper
Size Size of the paper contained in the paper tray
Media Type of media currently loaded in the paper tray
Level Current level of paper contained in the paper tray
Output Bins
Feature Description
Bin Name of the output tray
Max Capacity Maximum amount of paper that can be held in the output tray
Level Current level of paper contained in the paper tray
Finisher Related Consumables
Feature Description
Replaceable Unit Name of a finisher-related consumable that can be replaced in the printer
Working with Printers
46 Xerox® Device Agent User Guide
Feature Description
Max Capacity Maximum amount of the consumable that is available
Level Current level of consumable
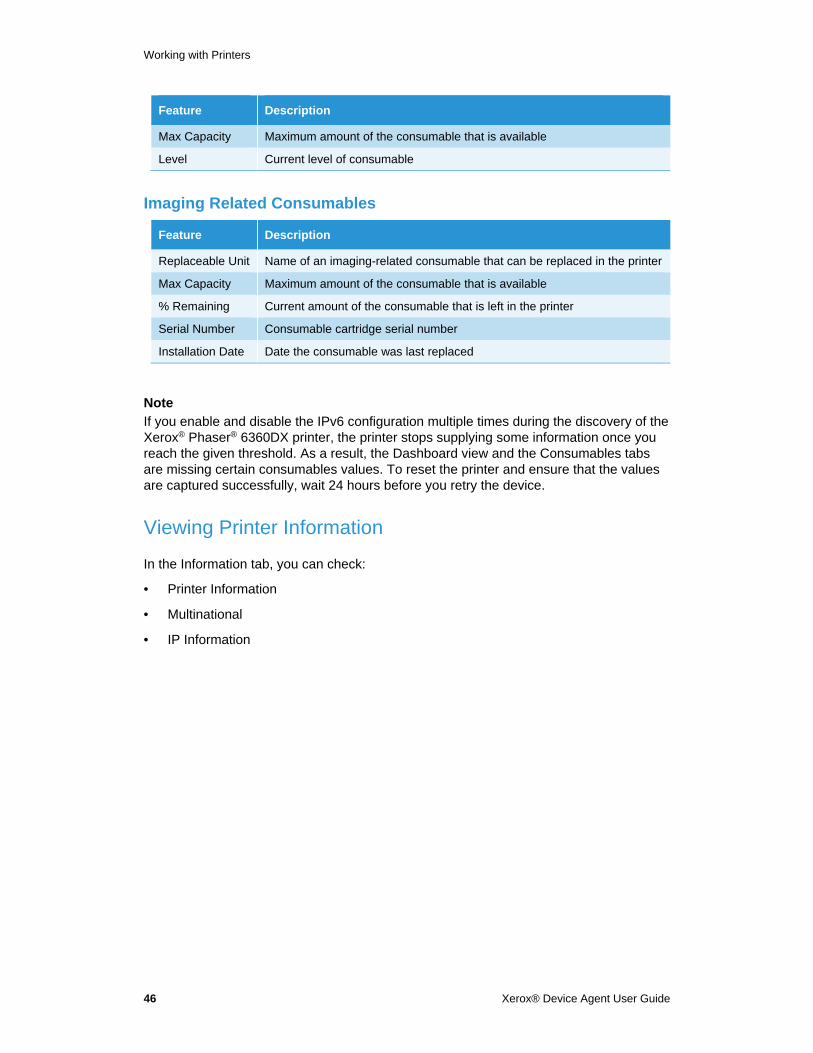
Imaging Related Consumables
Feature Description
Replaceable Unit Name of an imaging-related consumable that can be replaced in the printer
Max Capacity Maximum amount of the consumable that is available
% Remaining Current amount of the consumable that is left in the printer
Serial Number Consumable cartridge serial number
Installation Date Date the consumable was last replaced
Note
If you enable and disable the IPv6 configuration multiple times during the discovery of the Xerox® Phaser® 6360DX printer, the printer stops supplying some information once you reach the given threshold. As a result, the Dashboard view and the Consumables tabs are missing certain consumables values. To reset the printer and ensure that the values are captured successfully, wait 24 hours before you retry the device.
Viewing Printer Information
In the Information tab, you can check:
• Printer Information
• Multinational
• IP Information
Working with Printers
Xerox® Device Agent User Guide 47
Note
Not all features shown are available in all versions of the application.
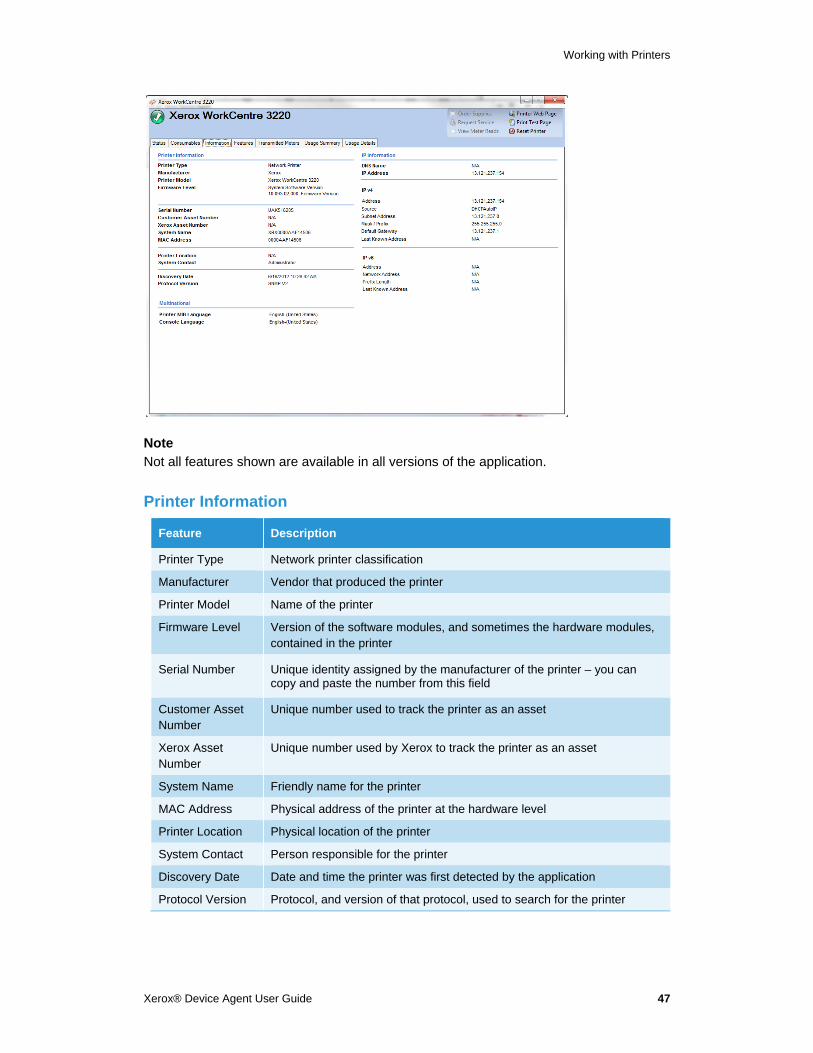
Printer Information
Feature Description
Printer Type Network printer classification
Manufacturer Vendor that produced the printer
Printer Model Name of the printer
Firmware Level Version of the software modules, and sometimes the hardware modules, contained in the printer
Serial Number Unique identity assigned by the manufacturer of the printer – you can copy and paste the number from this field
Customer Asset Number
Unique number used to track the printer as an asset
Xerox Asset Number
Unique number used by Xerox to track the printer as an asset
System Name Friendly name for the printer
MAC Address Physical address of the printer at the hardware level
Printer Location Physical location of the printer
System Contact Person responsible for the printer
Discovery Date Date and time the printer was first detected by the application
Protocol Version Protocol, and version of that protocol, used to search for the printer

Working with Printers
48 Xerox® Device Agent User Guide
Multinational
Feature Description
Printer MIB Language
Language of the text for the printer’s implementation of RFC 3805 - The Printer MIB v2
Console Language
Language of the text on the local console
IP Information
Feature Description
DNS Name Identity of the printer when using the Domain Name Services portion of the TCP/IP protocol suite
IP Address Network address
IP v4 If the printer was found with an IPv4 address, the following fields are populated:
Address – IPv4 address
Source – how the IP address was assigned (i.e. DHCP, static, etc.)
Subnet Address – subnet portion of the IP address
Mask/Prefix – portion of IP address that should be considered as the printer identifier, and portion that should be considered as the subnet address
Default Gateway – network address of the default router connected to the local subnet to which the printer is connected
Last Known Address –last known IP address of the selected printer
IP v6 If the printer was found with an IPv6 address, the following fields are populated:
Address – the IPv6 address
Source – how the IP address was assigned (i.e. DHCP, static, etc.)
Network Address – network address
Prefix Length – numerical length of the prefix
Default Gateway – network address of the default router connected to the local subnet to which the printer is connected
Last Known Address –last known IP address of the selected printer
Understanding Printer Features
In the Features tab, you can check:
• Printer Capabilities
• Services Supported
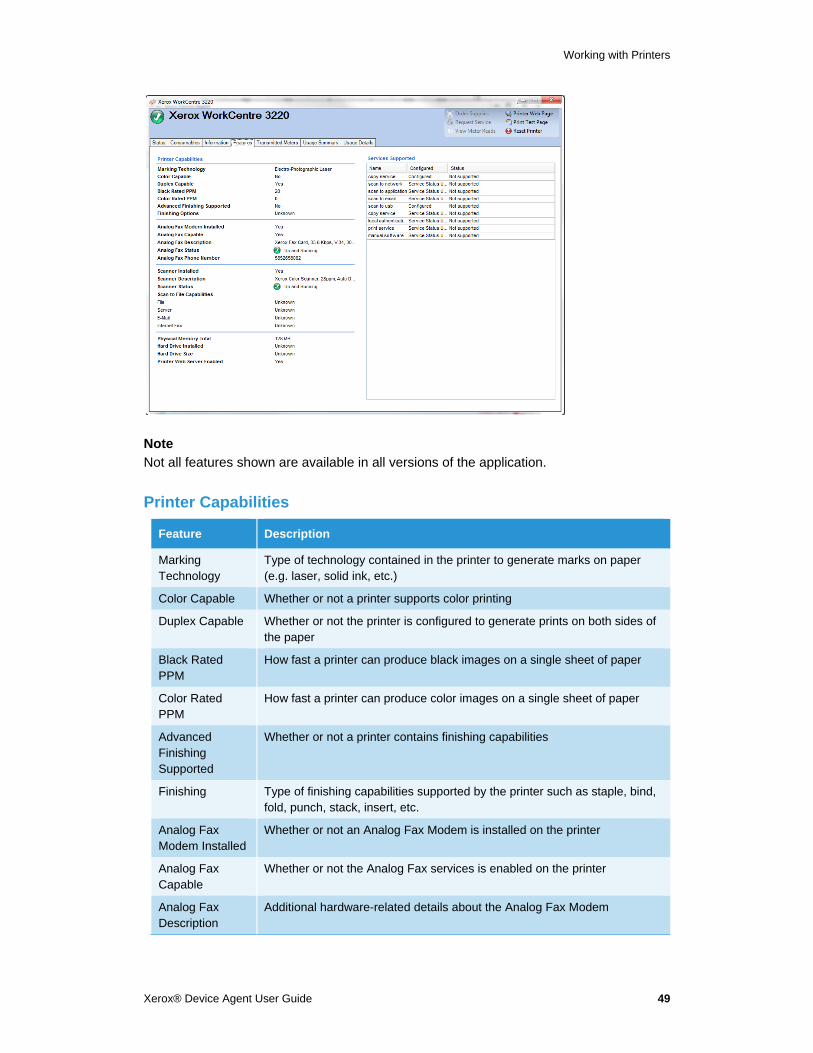
Working with Printers
Xerox® Device Agent User Guide 49
Note
Not all features shown are available in all versions of the application.
Printer Capabilities
Feature Description
Marking Technology
Type of technology contained in the printer to generate marks on paper (e.g. laser, solid ink, etc.)
Color Capable Whether or not a printer supports color printing
Duplex Capable Whether or not the printer is configured to generate prints on both sides of the paper
Black Rated PPM
How fast a printer can produce black images on a single sheet of paper
Color Rated PPM
How fast a printer can produce color images on a single sheet of paper
Advanced Finishing Supported
Whether or not a printer contains finishing capabilities
Finishing Type of finishing capabilities supported by the printer such as staple, bind, fold, punch, stack, insert, etc.
Analog Fax Modem Installed
Whether or not an Analog Fax Modem is installed on the printer
Analog Fax Capable
Whether or not the Analog Fax services is enabled on the printer
Analog Fax Description
Additional hardware-related details about the Analog Fax Modem
Working with Printers
50 Xerox® Device Agent User Guide
Feature Description
Analog Fax Status
Status of the Analog Fax service and related hardware
Analog Fax Phone Number
Phone number used by the Analog Fax Modem
Scanner Installed
Whether or not a Scanner module is installed in the printer
Scanner Description
Additional hardware-related details about the Scanner module
Scanner Status Status of the Scanner module
Scan to File Capable
Whether or not the Scan-to-File service is enabled
Scan to Server Fax Capable
Whether or not the Scan-to-Server Fax service is enabled
Scan to E-mail Capable
Whether or not the Scan-to-E-mail service is enabled
Internet Fax Capable
Whether or not the Scan-to-Internet Fax service is enabled
Physical Memory Total
Amount of physical memory installed on the network controller printer
Hard Drive Installed
Whether or not a hard disk has been installed in the printer
Hard Drive Size Size of the hard disk installed in the printer
Printer Web Server Enabled
Whether or not the embedded Web server feature of the printer is enabled
Supported Services
Feature Description
Name Name of a service supported on the printer
Configured Whether or not a service is configured for use on the printer
Status Current status of a service on the printer; also the impact that alert conditions have on a service
Viewing Transmitted Meters Usage
The Transmitted Meters tab shows the latest usage meter counters that were transmitted to Xerox® Services Manager. This provides the ability to validate, or cross-reference, that the printer meters’ values shipped to Xerox® Services Manager or meters invoiced to a client.
Note
These meter values are read-only.
Working with Printers
Xerox® Device Agent User Guide 51
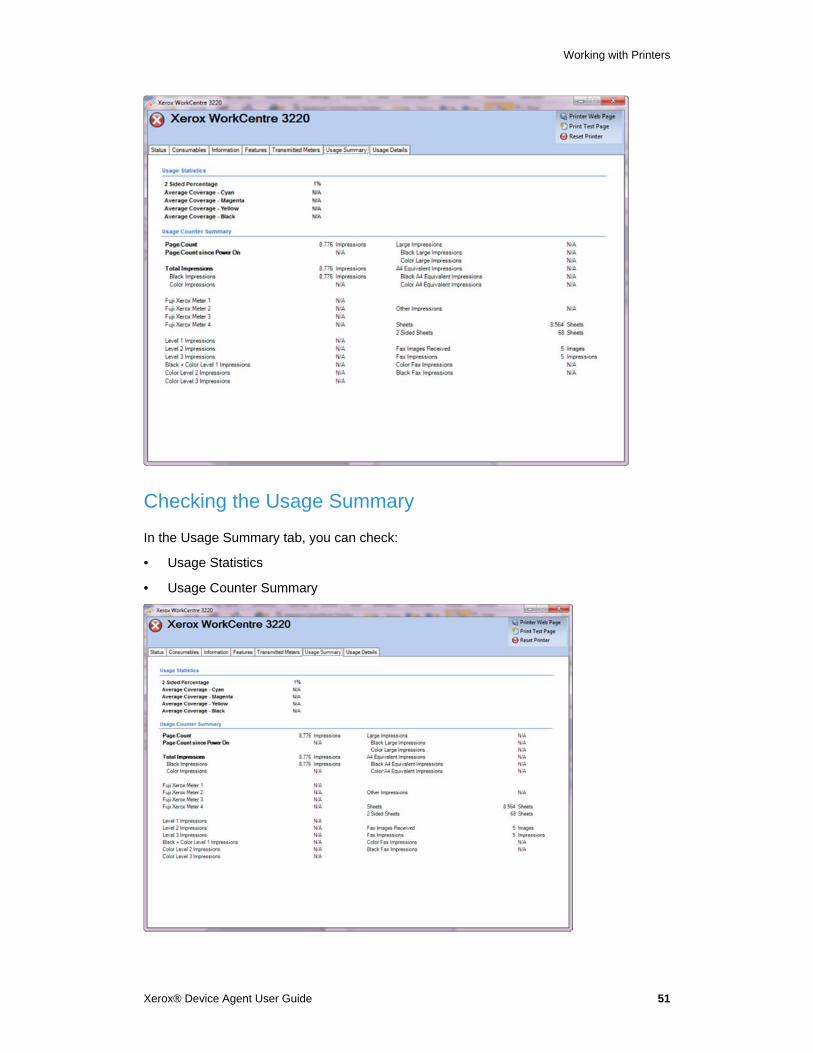
Checking the Usage Summary
In the Usage Summary tab, you can check:
• Usage Statistics
• Usage Counter Summary
Working with Printers
52 Xerox® Device Agent User Guide
Note
Not all features shown are available in all versions of the application.
Usage Statistics
Feature Description
2 Sided Percentage Percentage of pages generated that have been imaged on both sides of a sheet of paper
Average Coverage - Cyan
Percentage of paper that is covered by cyan
Average Coverage - Magenta
Percentage of paper that is covered by magenta
Average Coverage - Yellow
Percentage of paper that is covered by yellow
Average Coverage - Black
Percentage of paper that is covered by black
Usage Counter Summary
Feature Description
Page Count Number of pages that have been produced by the printer
Page Count Since Power On
Number of pages produced by the printer since it was last powered on
Total Impressions
Total volume generated by the printer based upon color and service
Large Impressions
Volume generated by the printer that were bigger than legal-sized pages (> 8.5”x14”)
Sheets Number of pages generated by the printer
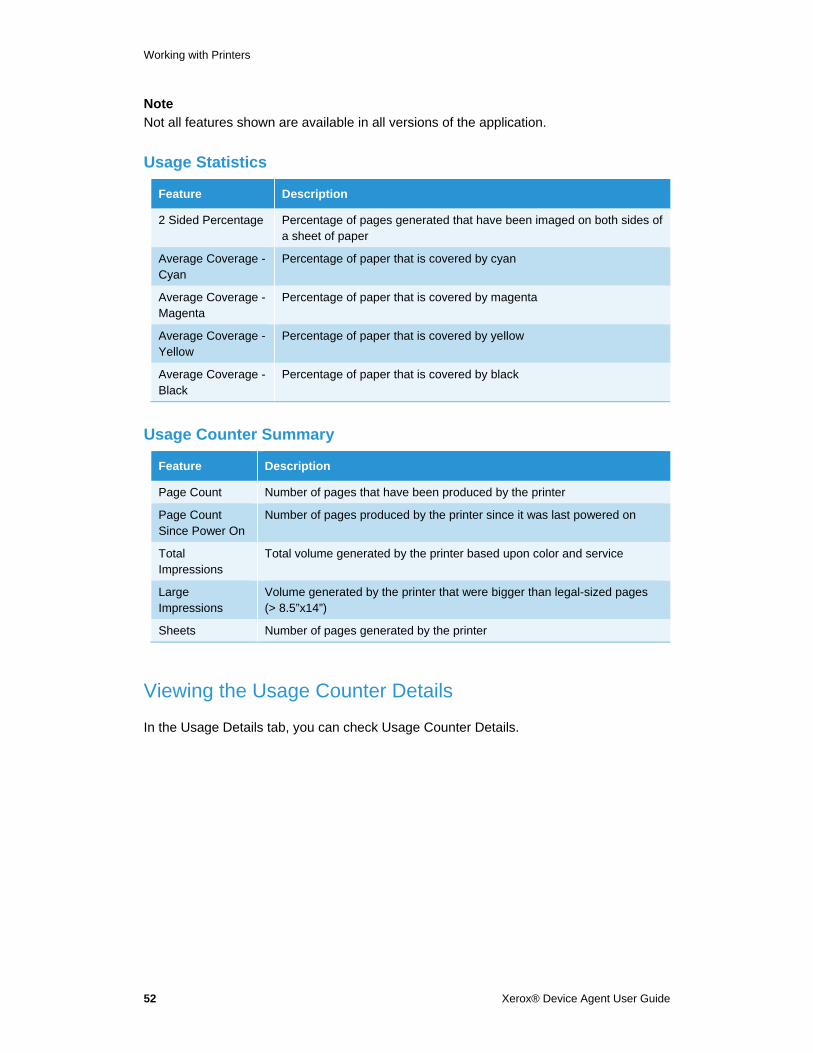
Viewing the Usage Counter Details
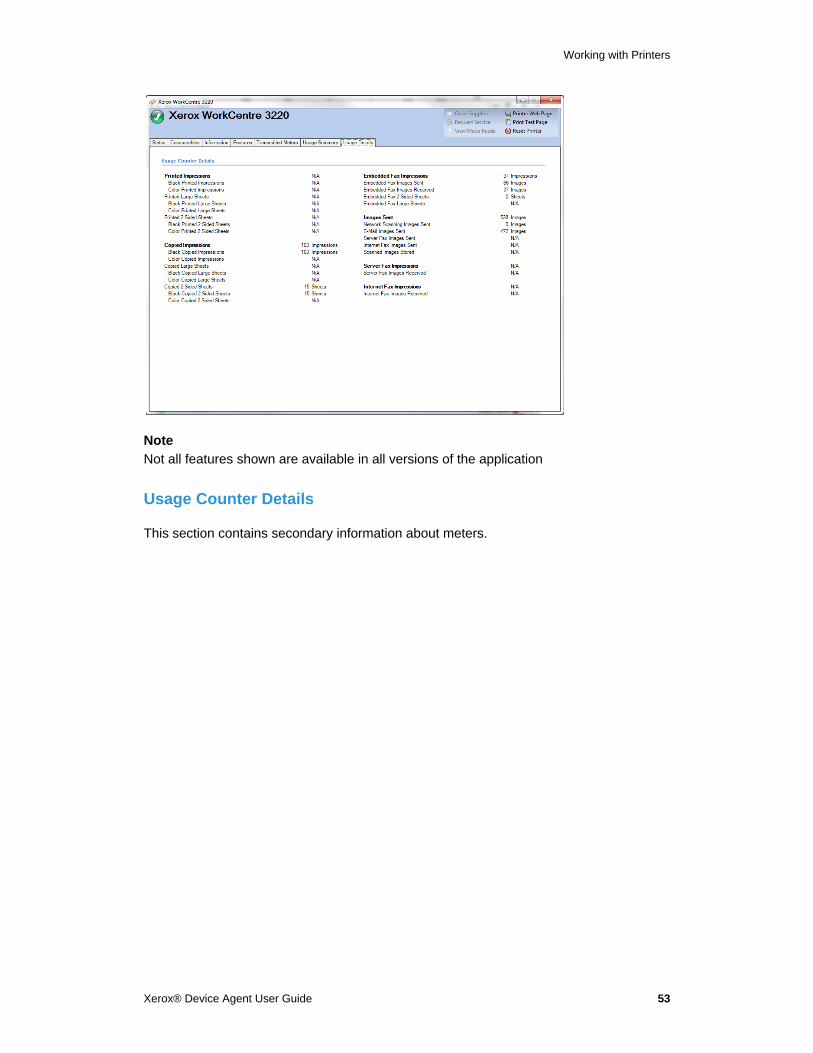
In the Usage Details tab, you can check Usage Counter Details.
Working with Printers
Xerox® Device Agent User Guide 53
Note
Not all features shown are available in all versions of the application
Usage Counter Details
This section contains secondary information about meters.

Xerox® Device Agent User Guide 55
Synchronizing the Data
Overview The Synchronize area allows you to:
• Synchronize data between the application and Xerox® Services Manager
• Change synchronization settings
• Review registration status.
To ensure that printers are maintained at the correct levels of service, you should regularly synchronize information with Xerox® Services Manager.
To review or modify synchronization settings:
• Click Synchronize from the left navigation pane. The Synchronize screen displays.
Note
If you selected the Skip Printer Export radio button during the configuration process, you can use the Configuration Wizard or the Settings dialog box in the Synchronize area to enable the printer export. Before you enable printer export, confirm with your Xerox Support Representative that the models database is ready for connection to the application.
The Synchronization screen displays:
• Last time the application retrieved information from the networked printers
• When it last communicated meter reads to Xerox® Services Manager
• Last successful synchronization
• Next scheduled synchronization
The Synchronization screen has two views:
• Details (the default)
• Data
Synchronizing the Data
56 Xerox® Device Agent User Guide
Using the Details View The Details View of the Synchronization screen contains the following features:
Feature Description
Registration Indicates, with an icon, whether or not registration was successful
Synchronize/Send Meter Reads
Indicates the following:
• Last Synchronize: date, time, and status of the last synchronization attempt
• Last Successful Synchronization: date and time
• Next Synchronization: current schedule, date, and time
Printer Export Message Displays if the printer export is currently in progress
The following actions are available on the Synchronize screen:
• Synchronize Now/Stop Synchronize
• Change Settings
To Synchronizing Now or Stop Synchronizing:
1. From the Left Navigation pane, click to start the synchronization. When the synchronization is in progress, this icon changes to . Under the Synchronize/Send Meter Reads section, a progress bar displays.
2. To stop the synchronization, click .
Note When you change your synchronization, status, or search settings, wait several minutes before you perform a synchronization to give Xerox® Services Manager sufficient time to register the changes.
To change the settings:
1. Click The Synchronization Settings dialog box displays.
2. Modify the information as necessary. See Configuring the System for more information.
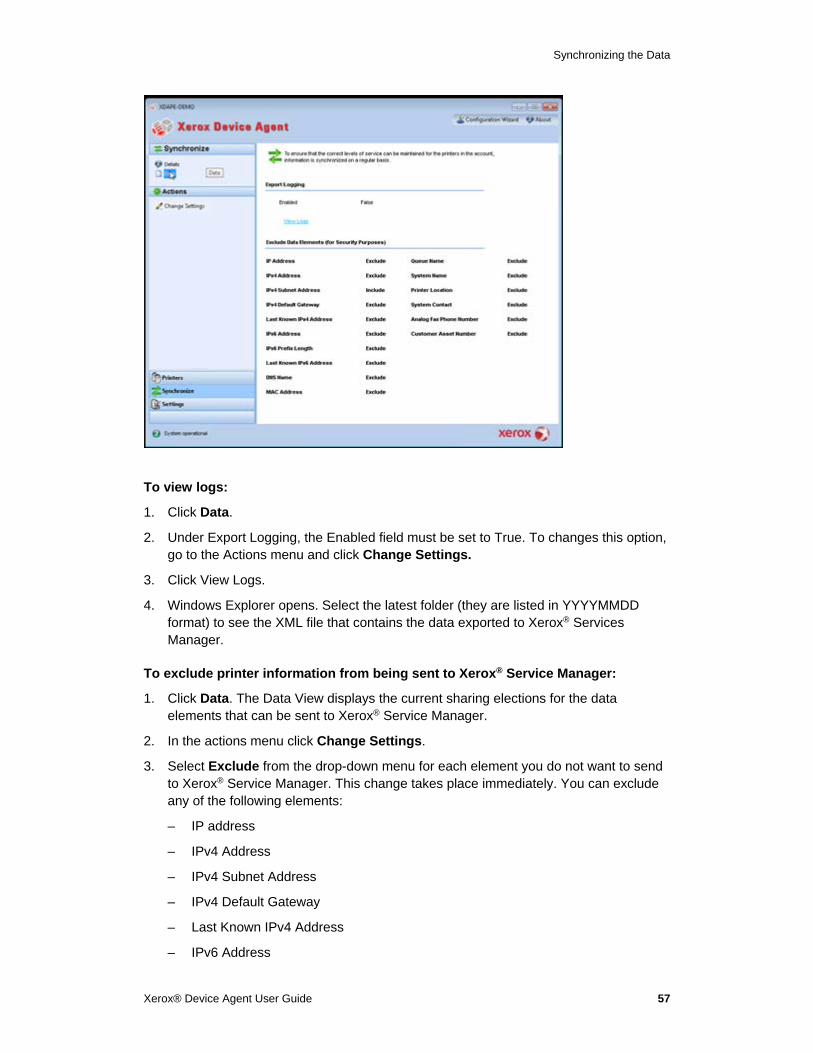
Using the Data View The Data View enables you to view logs and to exclude certain printer information from being sent to Xerox® Service Manager.
Synchronizing the Data
Xerox® Device Agent User Guide 57
To view logs:
1. Click Data.
2. Under Export Logging, the Enabled field must be set to True. To changes this option, go to the Actions menu and click Change Settings.
3. Click View Logs.
4. Windows Explorer opens. Select the latest folder (they are listed in YYYYMMDD format) to see the XML file that contains the data exported to Xerox® Services Manager.
To exclude printer information from being sent to Xerox® Service Manager:
1. Click Data. The Data View displays the current sharing elections for the data elements that can be sent to Xerox® Service Manager.
2. In the actions menu click Change Settings.
3. Select Exclude from the drop-down menu for each element you do not want to send to Xerox® Service Manager. This change takes place immediately. You can exclude any of the following elements:
– IP address
– IPv4 Address
– IPv4 Subnet Address
– IPv4 Default Gateway
– Last Known IPv4 Address
– IPv6 Address
Synchronizing the Data
58 Xerox® Device Agent User Guide
– IPv6 Prefix Length
– Last Known IPv6 Address
– DNS Name
– MAC Address
– Queue Name
– System Name
– IPX External Network Number
– IPX Address
– IPX Printer Server Name
– Printer Location
– System Contact
– Analog Fax Phone Number
– Customer Asset Number
4. Click OK.
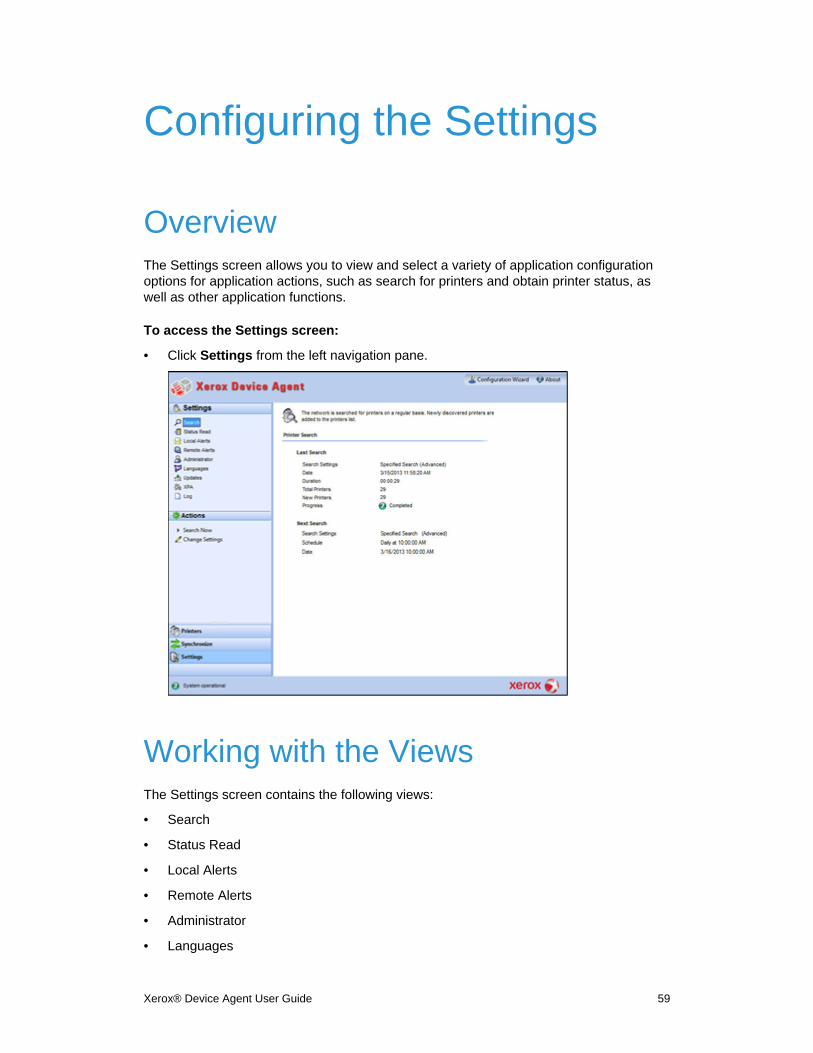
Xerox® Device Agent User Guide 59
Configuring the Settings
Overview The Settings screen allows you to view and select a variety of application configuration options for application actions, such as search for printers and obtain printer status, as well as other application functions.
To access the Settings screen:
• Click Settings from the left navigation pane.
Working with the Views The Settings screen contains the following views:
• Search
• Status Read
• Local Alerts
• Remote Alerts
• Administrator
• Languages
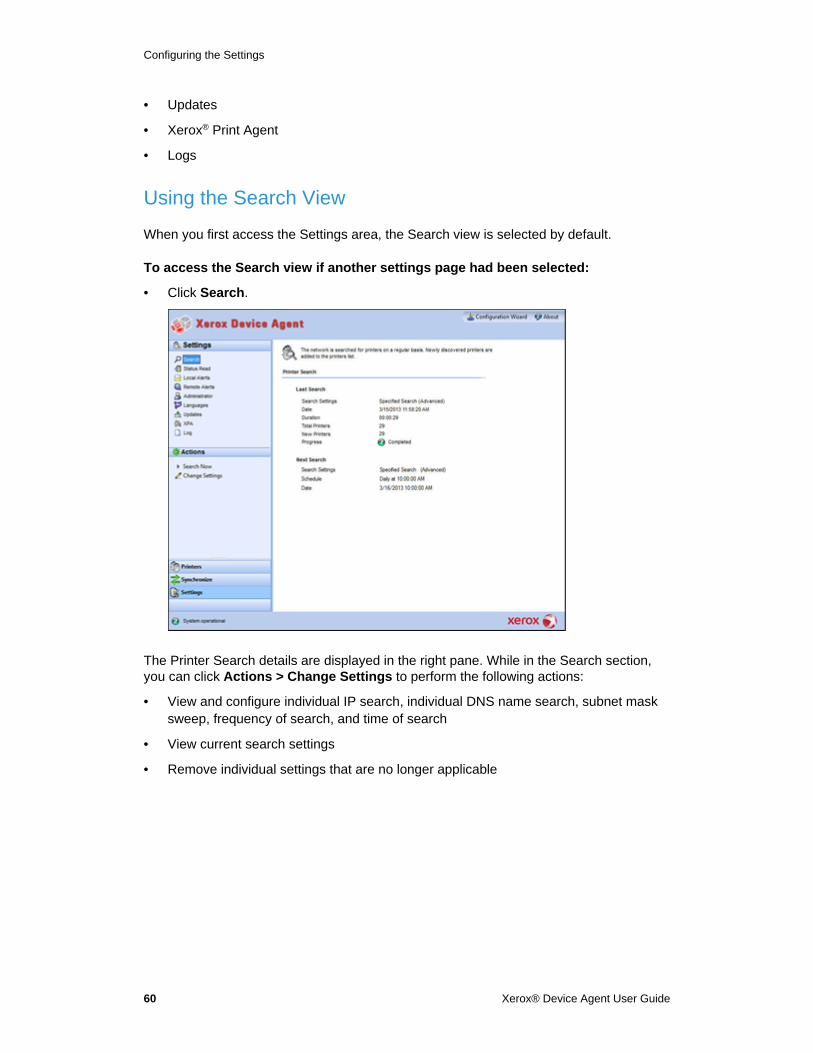
Configuring the Settings
60 Xerox® Device Agent User Guide
• Updates
• Xerox® Print Agent
• Logs
Using the Search View
When you first access the Settings area, the Search view is selected by default.
To access the Search view if another settings page had been selected:
• Click Search.
The Printer Search details are displayed in the right pane. While in the Search section, you can click Actions > Change Settings to perform the following actions:
• View and configure individual IP search, individual DNS name search, subnet mask sweep, frequency of search, and time of search
• View current search settings
• Remove individual settings that are no longer applicable
Configuring the Settings
Xerox® Device Agent User Guide 61
The Printer Search screen includes the following information:
Feature Description
Last Search Indicates the following parameters for the current search:
• Search Settings: Current settings from Default Search, No Search, or Specified Search
• Date: Date of the last search in the date format specified by your operating system
• Duration: How long it took to perform the search
• Total Printers: How many printers have been found during the search
• New Printers Found: Out of all the printers found, how many new ones were found in the most recent search
• Progress: Progress indicator when the search is running or shows the search status with one of the following icons: , , or
Next Search
Indicates the following parameters for the next search:
• Search Settings: Search setting from Default Search, No Search, or Specified Search
• Schedule: Indicates if the search occurs daily or at other intervals at the exact time in the date format specified by your operating system
• Date: Next date that a search is scheduled in the date format specified by your operating system
To search now or stop searching:
• From the Left Navigation pane, click to start the search; when the search is in progress, this icon changes to , allowing you to stop the search.
Note
It can take 10 to 15 seconds to stop the search after you click .
To change the Settings:
1. Click . The Search Settings dialog box displays.
2. Modify the information as necessary.
Importing the Printers
Entering individual printer addresses can be very time consuming. You can import a list of printer addresses to scan during the printer search. This applies to both Xerox® and non Xerox® devices.
To import a list of printer addresses:
1. In the Search Settings dialog box, select Specified Search.
2. Select Search Type > Import.
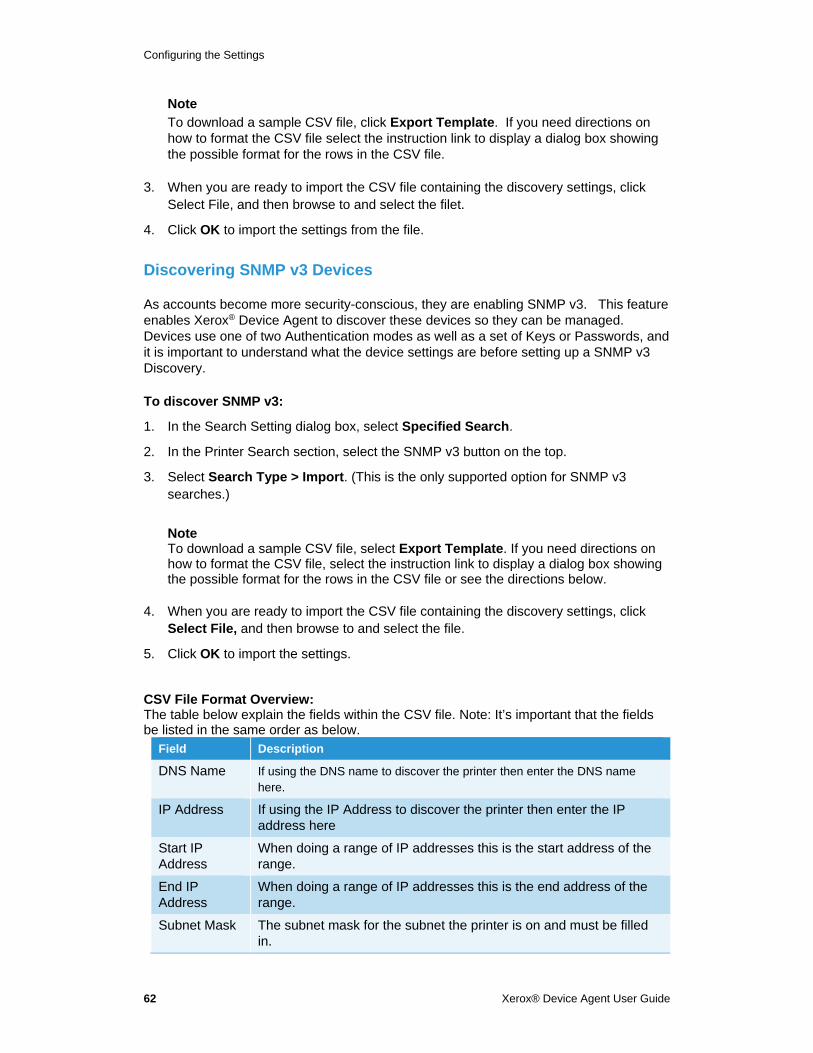
Configuring the Settings
62 Xerox® Device Agent User Guide
Note
To download a sample CSV file, click Export Template. If you need directions on how to format the CSV file select the instruction link to display a dialog box showing the possible format for the rows in the CSV file.
3. When you are ready to import the CSV file containing the discovery settings, click Select File, and then browse to and select the filet.
4. Click OK to import the settings from the file.
Discovering SNMP v3 Devices
As accounts become more security-conscious, they are enabling SNMP v3. This feature enables Xerox® Device Agent to discover these devices so they can be managed. Devices use one of two Authentication modes as well as a set of Keys or Passwords, and it is important to understand what the device settings are before setting up a SNMP v3 Discovery.
To discover SNMP v3:
1. In the Search Setting dialog box, select Specified Search.
2. In the Printer Search section, select the SNMP v3 button on the top.
3. Select Search Type > Import. (This is the only supported option for SNMP v3 searches.)
Note To download a sample CSV file, select Export Template. If you need directions on how to format the CSV file, select the instruction link to display a dialog box showing the possible format for the rows in the CSV file or see the directions below.
4. When you are ready to import the CSV file containing the discovery settings, click
Select File, and then browse to and select the file.
5. Click OK to import the settings.
CSV File Format Overview: The table below explain the fields within the CSV file. Note: It’s important that the fields be listed in the same order as below.
Field Description
DNS Name If using the DNS name to discover the printer then enter the DNS name here.
IP Address If using the IP Address to discover the printer then enter the IP address here
Start IP Address
When doing a range of IP addresses this is the start address of the range.
End IP Address
When doing a range of IP addresses this is the end address of the range.
Subnet Mask The subnet mask for the subnet the printer is on and must be filled in.
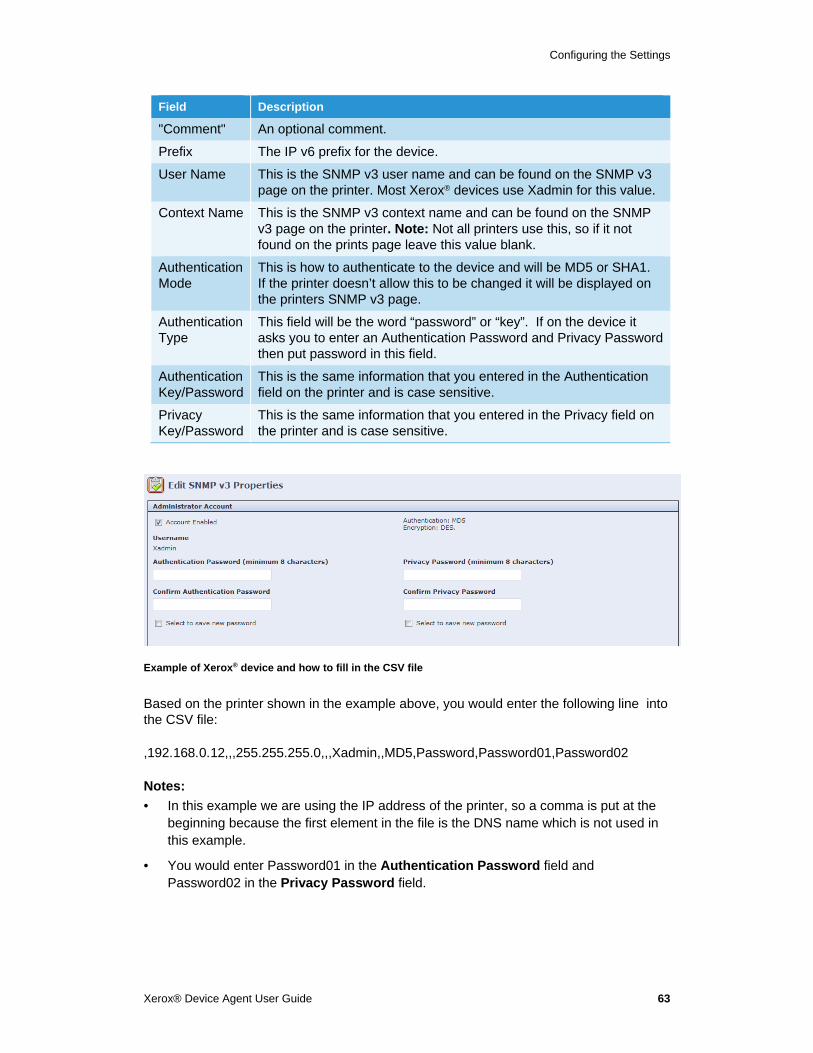
Configuring the Settings
Xerox® Device Agent User Guide 63
Field Description
"Comment" An optional comment.
Prefix The IP v6 prefix for the device.
User Name This is the SNMP v3 user name and can be found on the SNMP v3 page on the printer. Most Xerox® devices use Xadmin for this value.
Context Name This is the SNMP v3 context name and can be found on the SNMP v3 page on the printer. Note: Not all printers use this, so if it not found on the prints page leave this value blank.
Authentication Mode
This is how to authenticate to the device and will be MD5 or SHA1. If the printer doesn’t allow this to be changed it will be displayed on the printers SNMP v3 page.
Authentication Type
This field will be the word “password” or “key”. If on the device it asks you to enter an Authentication Password and Privacy Password then put password in this field.
Authentication Key/Password
This is the same information that you entered in the Authentication field on the printer and is case sensitive.
Privacy Key/Password
This is the same information that you entered in the Privacy field on the printer and is case sensitive.
Example of Xerox® device and how to fill in the CSV file
Based on the printer shown in the example above, you would enter the following line into the CSV file:
,192.168.0.12,,,255.255.255.0,,,Xadmin,,MD5,Password,Password01,Password02
Notes:
• In this example we are using the IP address of the printer, so a comma is put at the beginning because the first element in the file is the DNS name which is not used in this example.
• You would enter Password01 in the Authentication Password field and Password02 in the Privacy Password field.
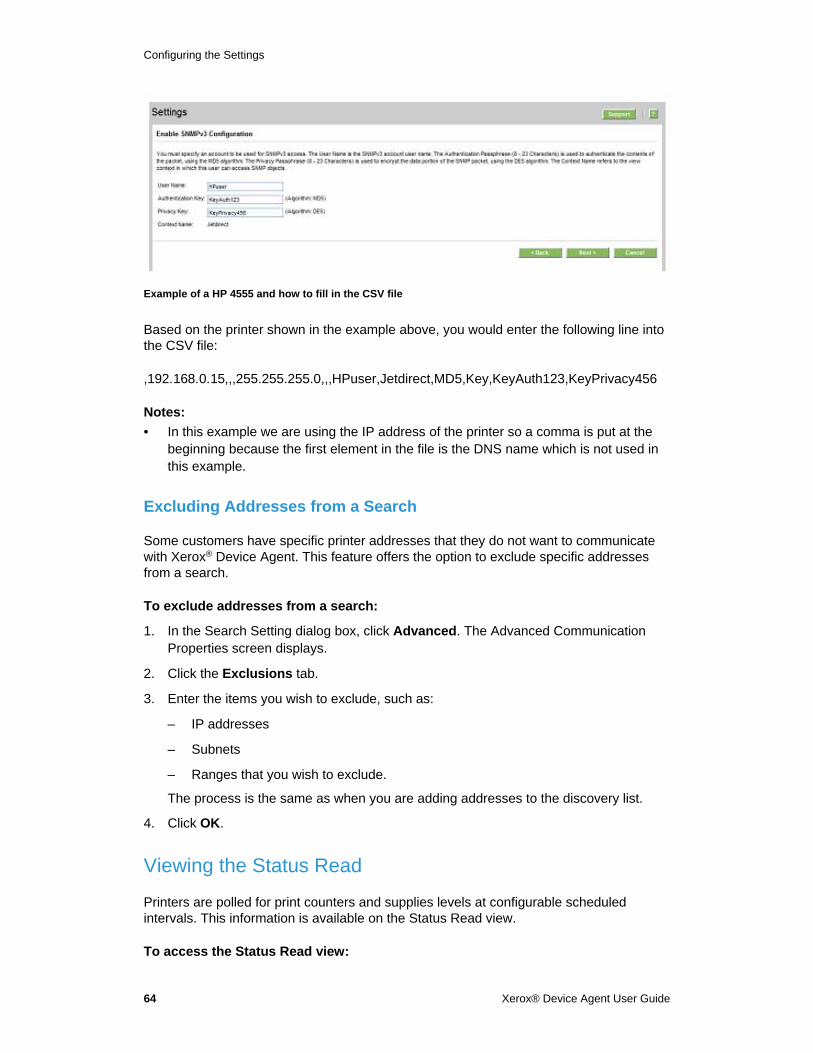
Configuring the Settings
64 Xerox® Device Agent User Guide
Example of a HP 4555 and how to fill in the CSV file
Based on the printer shown in the example above, you would enter the following line into the CSV file:
,192.168.0.15,,,255.255.255.0,,,HPuser,Jetdirect,MD5,Key,KeyAuth123,KeyPrivacy456
Notes:
• In this example we are using the IP address of the printer so a comma is put at the beginning because the first element in the file is the DNS name which is not used in this example.
Excluding Addresses from a Search
Some customers have specific printer addresses that they do not want to communicate with Xerox® Device Agent. This feature offers the option to exclude specific addresses from a search.
To exclude addresses from a search:
1. In the Search Setting dialog box, click Advanced. The Advanced Communication Properties screen displays.
2. Click the Exclusions tab.
3. Enter the items you wish to exclude, such as:
– IP addresses
– Subnets
– Ranges that you wish to exclude.
The process is the same as when you are adding addresses to the discovery list.
4. Click OK.
Viewing the Status Read
Printers are polled for print counters and supplies levels at configurable scheduled intervals. This information is available on the Status Read view.
To access the Status Read view:
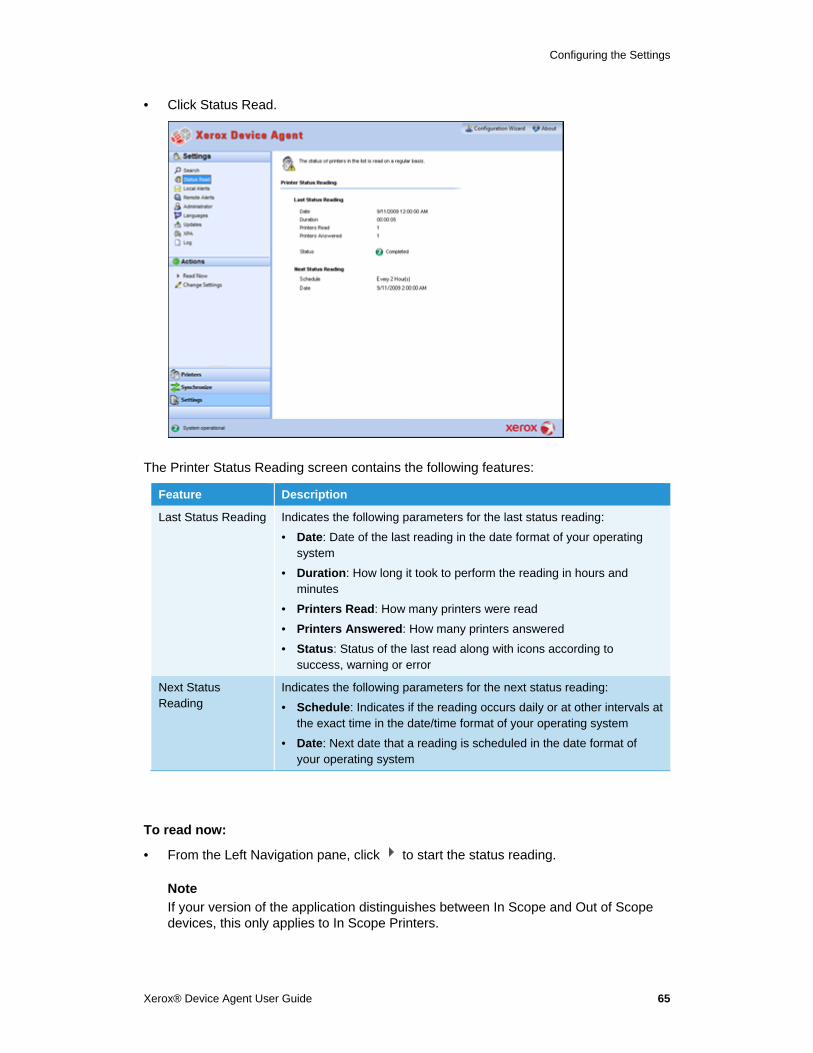
Configuring the Settings
Xerox® Device Agent User Guide 65
• Click Status Read.
The Printer Status Reading screen contains the following features:
Feature Description
Last Status Reading Indicates the following parameters for the last status reading:
• Date: Date of the last reading in the date format of your operating system
• Duration: How long it took to perform the reading in hours and minutes
• Printers Read: How many printers were read
• Printers Answered: How many printers answered
• Status: Status of the last read along with icons according to success, warning or error
Next Status Reading
Indicates the following parameters for the next status reading:
• Schedule: Indicates if the reading occurs daily or at other intervals at the exact time in the date/time format of your operating system
• Date: Next date that a reading is scheduled in the date format of your operating system
To read now:
• From the Left Navigation pane, click to start the status reading.
Note
If your version of the application distinguishes between In Scope and Out of Scope devices, this only applies to In Scope Printers.
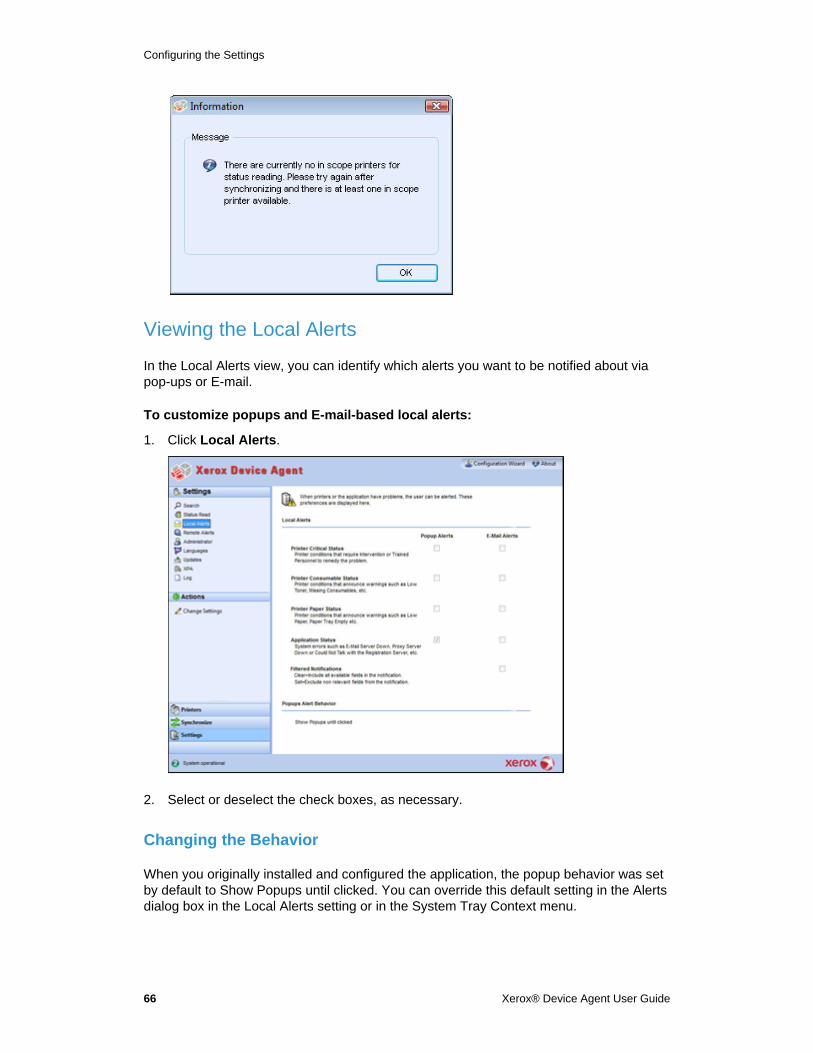
Configuring the Settings
66 Xerox® Device Agent User Guide
Viewing the Local Alerts
In the Local Alerts view, you can identify which alerts you want to be notified about via pop-ups or E-mail.
To customize popups and E-mail-based local alerts:
1. Click Local Alerts.
2. Select or deselect the check boxes, as necessary.
Changing the Behavior
When you originally installed and configured the application, the popup behavior was set by default to Show Popups until clicked. You can override this default setting in the Alerts dialog box in the Local Alerts setting or in the System Tray Context menu.
Configuring the Settings
Xerox® Device Agent User Guide 67
The popup settings you select apply to all popup alert preferences configured for printer critical status, printer consumable status, and application status. Please be sure to select the appropriate behavior for your business.
To change the behavior of Local Alerts:
1. Click Change Settings.. The Local Alerts Settings dialog box opens.
2. Modify the Popups Alert Behavior as necessary.
– Select No Popups to prevent any popup alerts from being displayed even if you selected the popup alerts check box in the Preferences section.
– Select Show Popups for 5 seconds to close the popup alert window after it is displayed for five seconds. The application does not redisplay the popup alert windows once the initial window has disappeared.
– Select Show Popups until clicked to display the popup alert window in the lower right corner of the screen until you manually click the window to close it.
Configuring the Settings
68 Xerox® Device Agent User Guide
Viewing the Remote Alerts
The Remote Alerts view displays all alerts that have been configured in Xerox® Services Manager, including the alert name and the date.
To open the Remote Alerts screen:
• Click Remote Alerts.
Note
The application only updates the Changed field if a modification to a remote alert is made in Xerox® Services Manager.
The Remote Alerts screen contains the following information:
Feature Description
Alert Name
Name of the alert profile created in Xerox® Services Manager , often containing alert type description such as system failure, color low toner, or mono low toner
Changed When the alert profile is updated, in the date format of your operating system
Occurred When the remote alert condition is met and Xerox® Services Manager has been notified of a printer problem in the date format of your operating system
To Synchronize Now or Stop Synchronizing:
• From the Left Navigation pane, click to start the synchronizing; when the synchronization is in progress, this icon changes to , allowing you to stop the synchronization.
Working with Administrator Settings
You can change information about the administrator on the Administrator screen.
To open the Administrator screen:
• Click Administrator.
Configuring the Settings
Xerox® Device Agent User Guide 69
The Administrator screen contains the following information:
Feature Description
Name Name of the administrator
Location Address of the administrator
Phone Phone number of the administrator
E-mail E-mail of the administrator
Website Web site of the administrator
Comment Comments posted by the administrator
To change the Settings:
1. Click , the Administrator/Account Settings dialog box displays.
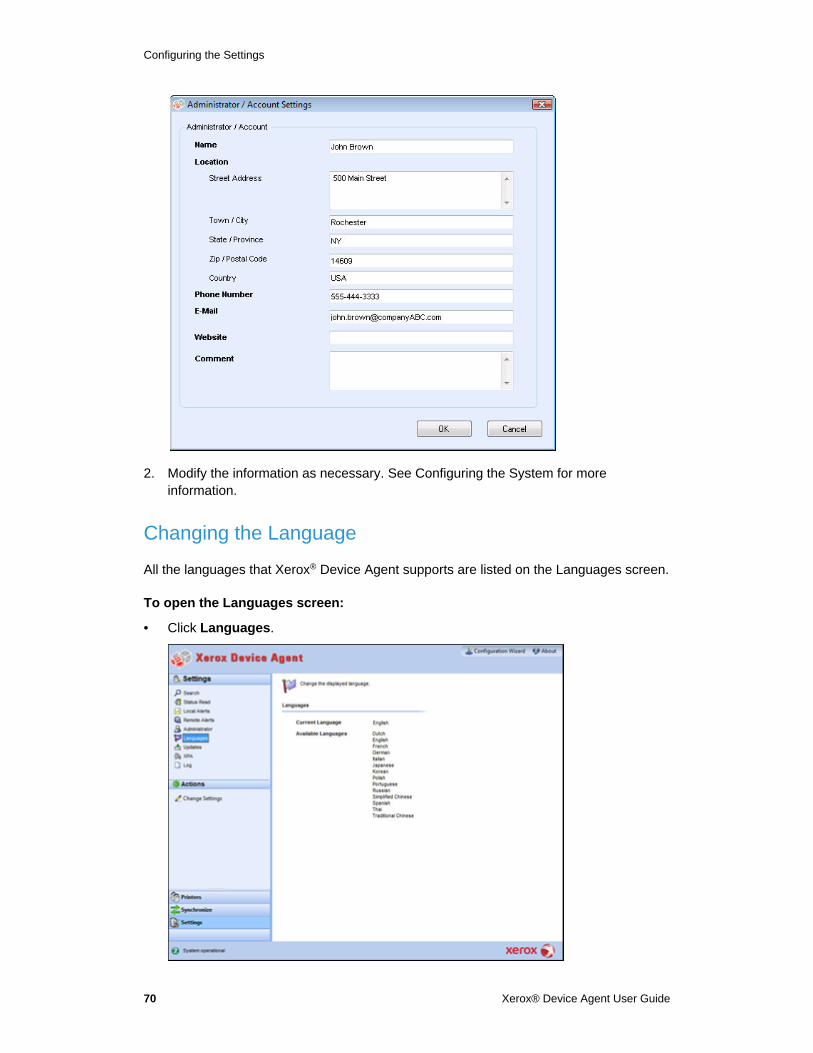
Configuring the Settings
70 Xerox® Device Agent User Guide
2. Modify the information as necessary. See Configuring the System for more information.
Changing the Language
All the languages that Xerox® Device Agent supports are listed on the Languages screen.
To open the Languages screen:
• Click Languages.
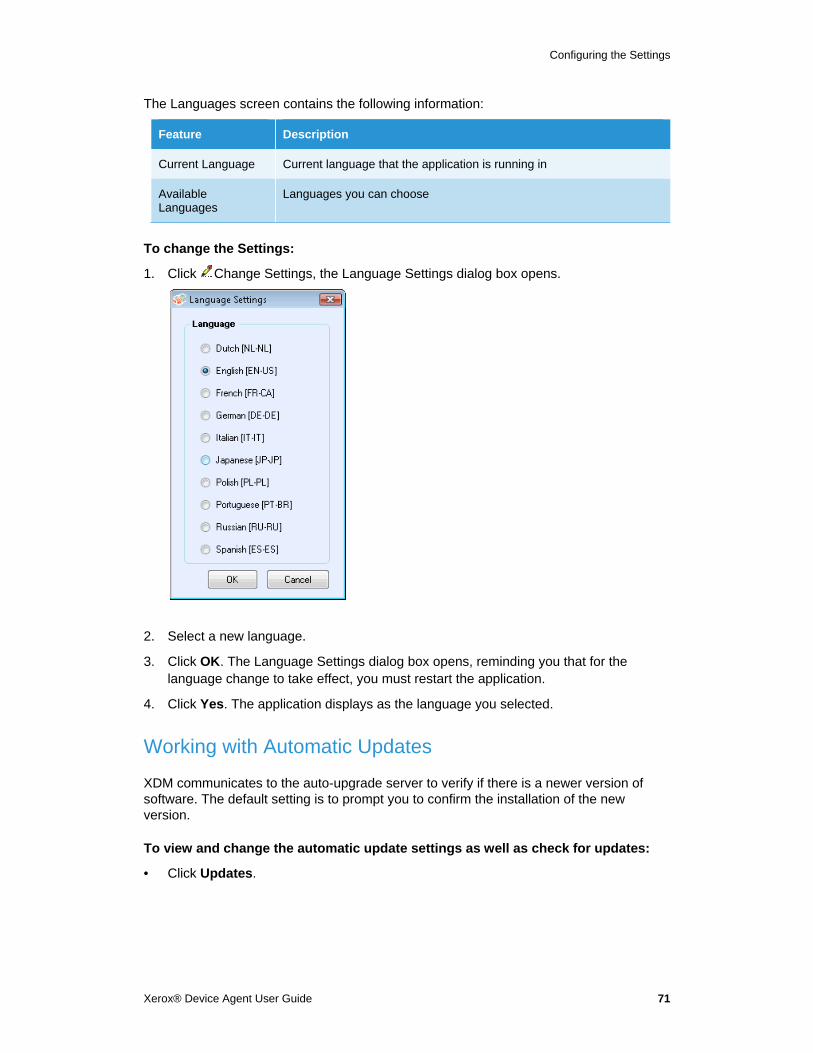
Configuring the Settings
Xerox® Device Agent User Guide 71
The Languages screen contains the following information:
Feature Description
Current Language Current language that the application is running in
Available Languages
Languages you can choose
To change the Settings:
1. Click Change Settings, the Language Settings dialog box opens.
2. Select a new language.
3. Click OK. The Language Settings dialog box opens, reminding you that for the language change to take effect, you must restart the application.
4. Click Yes. The application displays as the language you selected.
Working with Automatic Updates
XDM communicates to the auto-upgrade server to verify if there is a newer version of software. The default setting is to prompt you to confirm the installation of the new version.
To view and change the automatic update settings as well as check for updates:
• Click Updates.
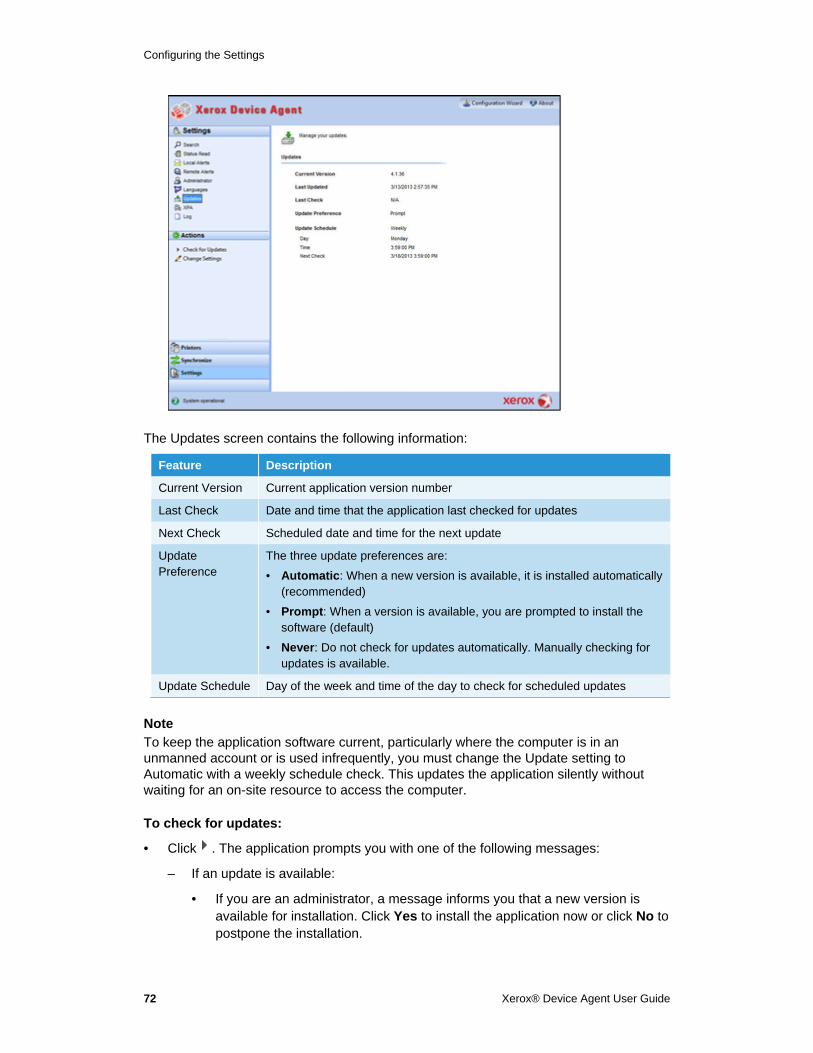
Configuring the Settings
72 Xerox® Device Agent User Guide
The Updates screen contains the following information:
Feature Description
Current Version Current application version number
Last Check Date and time that the application last checked for updates
Next Check Scheduled date and time for the next update
Update Preference
The three update preferences are:
• Automatic: When a new version is available, it is installed automatically (recommended)
• Prompt: When a version is available, you are prompted to install the software (default)
• Never: Do not check for updates automatically. Manually checking for updates is available.
Update Schedule Day of the week and time of the day to check for scheduled updates
Note
To keep the application software current, particularly where the computer is in an unmanned account or is used infrequently, you must change the Update setting to Automatic with a weekly schedule check. This updates the application silently without waiting for an on-site resource to access the computer.
To check for updates:
• Click . The application prompts you with one of the following messages:
– If an update is available:
• If you are an administrator, a message informs you that a new version is available for installation. Click Yes to install the application now or click No to postpone the installation.
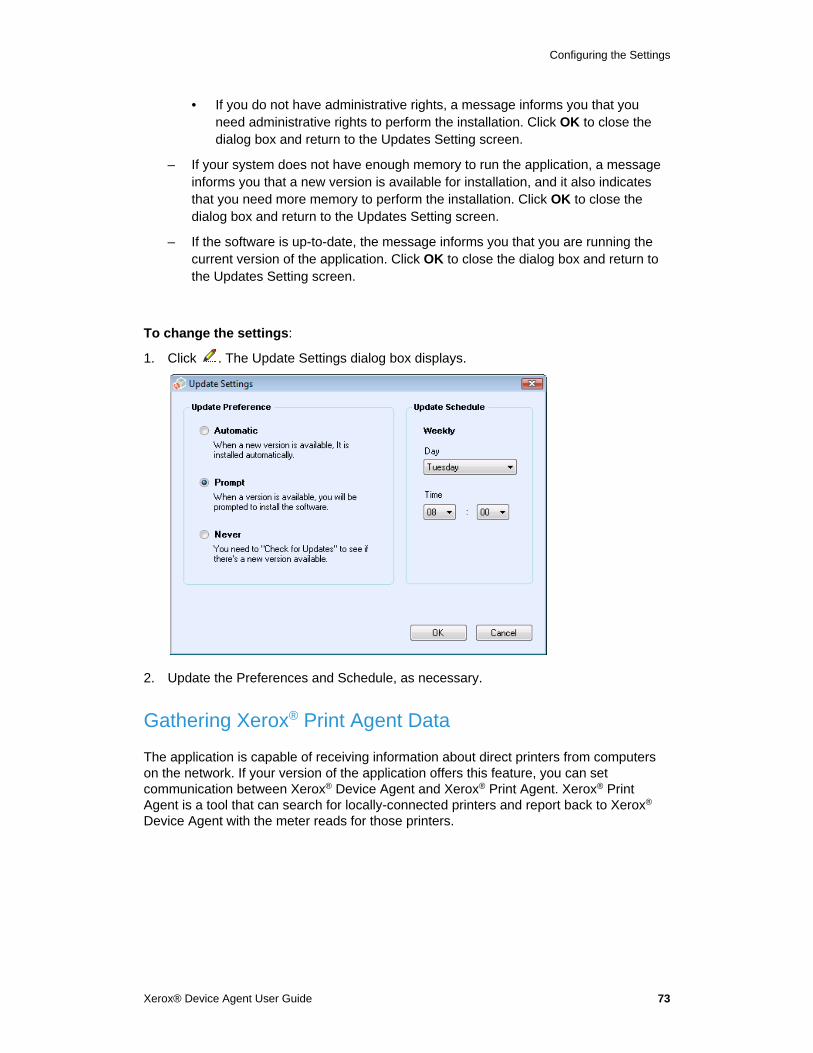
Configuring the Settings
Xerox® Device Agent User Guide 73
• If you do not have administrative rights, a message informs you that you need administrative rights to perform the installation. Click OK to close the dialog box and return to the Updates Setting screen.
– If your system does not have enough memory to run the application, a message informs you that a new version is available for installation, and it also indicates that you need more memory to perform the installation. Click OK to close the dialog box and return to the Updates Setting screen.
– If the software is up-to-date, the message informs you that you are running the current version of the application. Click OK to close the dialog box and return to the Updates Setting screen.
To change the settings:
1. Click . The Update Settings dialog box displays.
2. Update the Preferences and Schedule, as necessary.
Gathering Xerox® Print Agent Data
The application is capable of receiving information about direct printers from computers on the network. If your version of the application offers this feature, you can set communication between Xerox® Device Agent and Xerox® Print Agent. Xerox® Print Agent is a tool that can search for locally-connected printers and report back to Xerox® Device Agent with the meter reads for those printers.
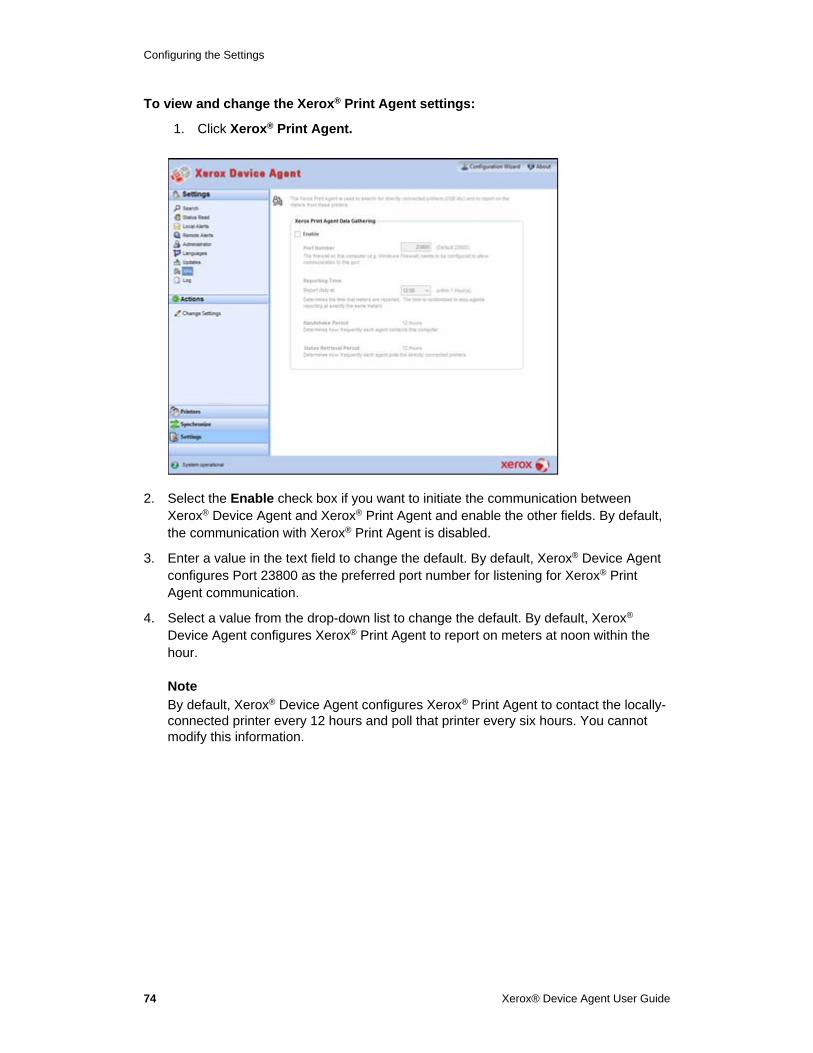
Configuring the Settings
74 Xerox® Device Agent User Guide
To view and change the Xerox® Print Agent settings:
1. Click Xerox® Print Agent.
2. Select the Enable check box if you want to initiate the communication between Xerox® Device Agent and Xerox® Print Agent and enable the other fields. By default, the communication with Xerox® Print Agent is disabled.
3. Enter a value in the text field to change the default. By default, Xerox® Device Agent configures Port 23800 as the preferred port number for listening for Xerox® Print Agent communication.
4. Select a value from the drop-down list to change the default. By default, Xerox® Device Agent configures Xerox® Print Agent to report on meters at noon within the hour.
Note
By default, Xerox® Device Agent configures Xerox® Print Agent to contact the locally-connected printer every 12 hours and poll that printer every six hours. You cannot modify this information.
Configuring the Settings
Xerox® Device Agent User Guide 75
Viewing the Log
The Log view shows the list of events in table format.
To view the Log:
• Click Log.
To clear the Log:
1. Click . The Clear Log dialog box displays.
2. Click Yes to clear the log or click No to cancel the action. The application deletes the log list from the right pane.
To send support information:
1. Click Log.
2. In the Actions list, click Send Support Information.
3. The Send Support Information pop-up opens.
4. Complete the FTP fields and click Send. This sends a zip file of event logs directly to the support team to help resolve issues with the application promptly and with as little customer impact as possible.
Gathering Information for Support
To resolve issues with Xerox® Device Agent in a timely manner, with as little customer impact as possible, Xerox® Device Agent automates gathering the information that the support team needs.
To gather information for support purposes:
1. Select Action > Send Support Information. The Xerox® Device Agent user interface closes and the Send Support Information window displays after a brief (about one minute) delay.
2. Enter the information provided by support and click Send. The window closes and the Xerox® Device Agent user interface displays.


Xerox® Device Agent User Guide 77
Troubleshooting
This section describes known troubleshooting issues for Xerox® Device Agent.
Issue Number Details
1 Stopping the service from the application Service Control Manager does not clear Xerox® Device Agent .exe service from the Windows® Task Manager for approximately 15 seconds because the Windows Task Manager responds by taking XDA.exe CPU usage to '00' while the .exe is still consuming memory.
2 The application does not support fast user switching mode in Windows®, so administrators must configure Windows® to require logging off before another user is able to log back in.
3 When installing the application on a computer that runs Cisco® Security Agent software, the administrator must update the security policy to allow the application processes, Xda.Service.exe and Xda.Shell.exe, to run normally.
4 For all printers, the DNS Name field in the Printer Properties screen is initially blank until the application runs the next import, which populates the field. This issue occurs because the application completes printer search quicker than the DNS resolution.
5 The application skips the Printer Search if you select a date that does not exist for a particular month in the Advanced Communications Properties screen. For example, go to Settings > Search > Settings > Advanced, select Month(s) from the Every drop-down menu, and select 31 from the Date drop-down menu. When configured this way, the application skips the run date for months that do not have 31 days, such as February, but it does run the printer search again for the next month when the date becomes valid, such as March 31.
6 On rare occasions, the application may experience some minor database corruption that requires it to close. If you experience this problem, shut down and restart your computer. Upon startup, the application attempts to repair the database and if the repair is successful, the application operates normally. If the application is still unable to run successfully after you restart, contact your Xerox Support Representative.
7 If you have initiated a single printer search using the Add Printer Wizard, you cannot cancel out of the process if the IP or DNS name corresponds to a valid printer. The only way to remove the printer is to delete it after the search is complete.
8 When the screen saver is active, the application displays the popup alerts in front of the screen saver.
9 When you set the Task bar to auto-hide, the application does not display the popup message next to the bottom edge of the screen.
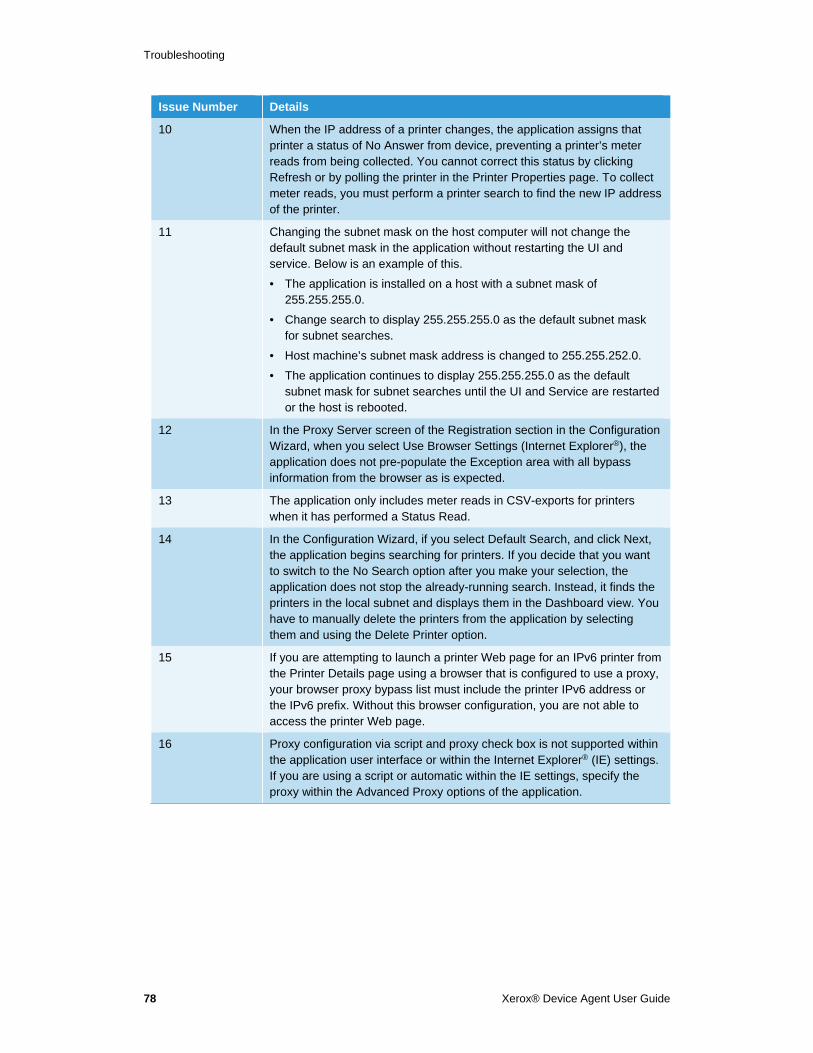
Troubleshooting
78 Xerox® Device Agent User Guide
Issue Number Details
10 When the IP address of a printer changes, the application assigns that printer a status of No Answer from device, preventing a printer’s meter reads from being collected. You cannot correct this status by clicking Refresh or by polling the printer in the Printer Properties page. To collect meter reads, you must perform a printer search to find the new IP address of the printer.
11 Changing the subnet mask on the host computer will not change the default subnet mask in the application without restarting the UI and service. Below is an example of this.
• The application is installed on a host with a subnet mask of 255.255.255.0.
• Change search to display 255.255.255.0 as the default subnet mask for subnet searches.
• Host machine’s subnet mask address is changed to 255.255.252.0.
• The application continues to display 255.255.255.0 as the default subnet mask for subnet searches until the UI and Service are restarted or the host is rebooted.
12 In the Proxy Server screen of the Registration section in the Configuration Wizard, when you select Use Browser Settings (Internet Explorer®), the application does not pre-populate the Exception area with all bypass information from the browser as is expected.
13 The application only includes meter reads in CSV-exports for printers when it has performed a Status Read.
14 In the Configuration Wizard, if you select Default Search, and click Next, the application begins searching for printers. If you decide that you want to switch to the No Search option after you make your selection, the application does not stop the already-running search. Instead, it finds the printers in the local subnet and displays them in the Dashboard view. You have to manually delete the printers from the application by selecting them and using the Delete Printer option.
15 If you are attempting to launch a printer Web page for an IPv6 printer from the Printer Details page using a browser that is configured to use a proxy, your browser proxy bypass list must include the printer IPv6 address or the IPv6 prefix. Without this browser configuration, you are not able to access the printer Web page.
16 Proxy configuration via script and proxy check box is not supported within the application user interface or within the Internet Explorer® (IE) settings. If you are using a script or automatic within the IE settings, specify the proxy within the Advanced Proxy options of the application.
