xerox 4635 laser printing system system generation guide
TRANSCRIPT
XEROX
Xerox 4635 Laser Printing SystemSystem Generation Guide
April 1995721P83030
Xerox Corporation701 S. Aviation BoulevardEl Segundo, CA 90245
© 1994, 1995 by Xerox Corporation. All rights reserved.
Copyright protection claimed includes all forms and matters ofcopyrightable material and information now allowed by statutoryor judicial law or hereinafter granted, including without limitation,material generated from the software programs which aredisplayed on the screen, such as icons, screen displays, looks,etc.
Printed in the United States of America
Publication number: 721P83030
Xerox® and all Xerox products mentioned in this publication aretrademarks of Xerox Corporation. Products and trademarks ofother companies are also acknowledged.
WARNING: This equipment has been tested and found tocomply with the limits for a Class A digital device, pursuant toPart 15 of the FCC Rules.
Changes are periodically made to this document. Changes,technical inaccuracies, and typographic errors will be corrected insubsequent editions.
The typeface for this document is Optima.

Related publications
The Xerox 4635 Laser Printing System – System Generation Guideis part of the ten-manual reference set for your laser printingsystem. The entire reference set is listed in the table below.Several other related documents are also listed for yourconvenience. For a complete list and description of availableXerox documentation, refer to the Xerox Documentation Catalog(Publication number 610P17417) or call the XeroxDocumentation and Software Services (XDSS) at 1-800-445-5554.
Publication Number
Xerox Dynamic Document InterfaceOperator Guide
720P13670
Xerox Dynamic Document InterfaceCommand Summary
720P13680
Xerox 4635 Laser Printing SystemOperator Guide
721P83010
Xerox 4635 Laser Printing SystemOperations Reference
721P83020
Xerox 4635 Laser Printing SystemSysgen Guide
721P83030
Xerox 4635 Laser Printing SystemMessage Guide
721P83040
Xerox 4635 Laser Printing SystemPDL/DJDE Reference
721P83050
Xerox 4635 Laser Printing SystemForms Creation Guide
721P83060
Xerox 4635 Laser Printing SystemProduct Reference
721P83070
Xerox 4635 Laser Printing SystemInstallation Planning Guide
721P83080
Xerox 4635 Laser Printing SystemOperator Command Summary Card
721P83090
Xerox 4635 Laser Printing SystemPC UI Reference
721P83100
Xerox Laser Printing SystemsTape Formats Manual
600P86175
Xerox Laser Printing SystemsStandard Font Library Font User Guide
600P86174
Helpful Facts About Paper 721P82490
XEROX 4635 LASER PRINTING SYSTEM—SYSTEM GENERATION GUIDE iii
Notice
This publication may contain descriptions of concepts andfeatures not currently available for your Xerox Laser PrintingSystem. Consult your Xerox sales representative or youroperating system software program description for additionalinformation.
iv XEROX 4635 LASER PRINTING SYSTEM—SYSTEM GENERATION GUIDE
Table of contents
Related publications iii
Notice iv
Introduction vii
About the reference set viii
4635 Laser Printing System document set viii
Document conventions xi
1. Sysgen overview 1-1
Resource and information checklist 1-2
2. Sysgen commands 2-1
Sysgen Command menu 2-1Command functions 2-2Entering and abbreviating commands 2-3
3. Sample system configurations 3-1
Configuration menu 3-3Additional sysgen parameters 3-7
4. Sysgen and sysgen-related procedures 4-1
Precautions 4-1PC UI software loading procedure summary 4-1Installing or upgrading System UI software 4-2Installing or upgrading System UI dialog 4-3Performing a full sysgen 4-4
Choosing a format command 4-4Full sysgen procedure summary 4-4Steps to perform a full sysgen 4-5
Performing an offline update sysgen 4-12
Choosing a sysgen command 4-12
Offline update sysgen procedure summary 4-12
Steps to perform an offline update sysgen using the AUTO command 4-13
Steps to perform an offline update sysgen using the SYSGEN command 4-17
Performing an online update sysgen 4-22
Online update sysgen procedure summary 4-22
XEROX 4635 LASER PRINTING SYSTEM—SYSTEM GENERATION GUIDE v
TABLE OF CONTENTS
Steps to perform an online update sysgen 4-23
Performing a MINI sysgen 4-30
MINI sysgen procedure summary 4-30
Steps to perform a MINI sysgen 4-31
Formatting a system disk 4-33
Disk formatting summary 4-33
Steps to format a disk 4-33
Erasing a system disk 4-34
Disk erasing summary 4-34
Steps to erase a disk 4-34
Steps for loading incremental patches 4-35
A. Appendix A-1
Glossary GLOSSARY-1
Index INDEX-1
vi XEROX 4635 LASER PRINTING SYSTEM—SYSTEM GENERATION GUIDE
Introduction
The Xerox 4635 Laser Printing System—System Generation Guideis one of several manuals that make up the 4635 Reference Set.The guide is divided into four chapters and one appendix asfollows.
Chapter Content
1. Sysgen overview Types of sysgen available and the resourcesrequired to perform a sysgen.
2. Sysgen commands Sysgen commands and how to use them.
3. System configurationoptions
System configuration options and parameters.
4. Sysgen and sysgen-related procedures
Step-by-step installation and upgradeprocedures for the 4635 PC user interface andprocedures for full, update, and mini sysgens.
A. Sample JCL fortransmission of systemsoftware tapes
Example of a typical host utility for sendingconcatenated files to the printing system.
XEROX 4635 LASER PRINTING SYSTEM—SYSTEM GENERATION GUIDE vii
INTRODUCTION
About the reference set
This document is part of a reference set designed to help youreceive maximum benefit from your 4635 laser printing system.
To help you select the appropriate document for your needs, thefollowing section identifies the documents in the set anddescribes the information contained in each.
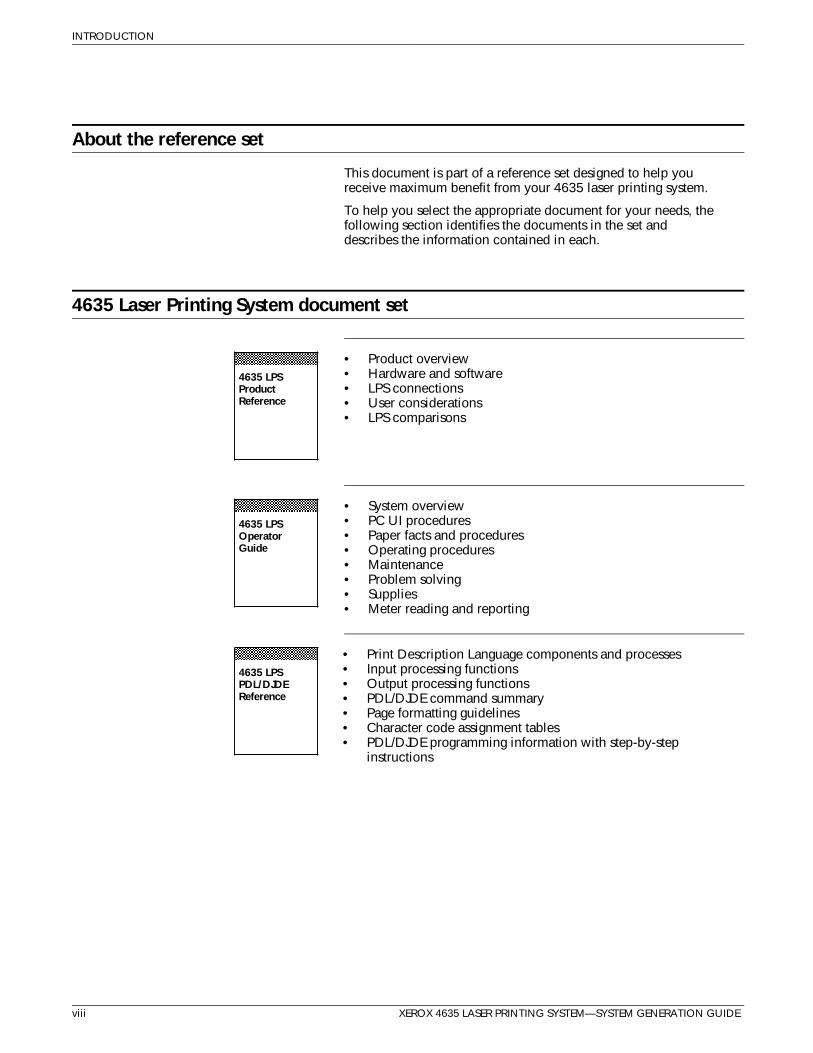
4635 Laser Printing System document set
• Product overview• Hardware and software• LPS connections • User considerations• LPS comparisons
4635 LPSProductReference
a a a a a a a a a a a a a a a a a
a a a a a a a a a a a a a a a a a
a a a a a a a a a a a a a a a a a
• System overview• PC UI procedures• Paper facts and procedures• Operating procedures • Maintenance • Problem solving• Supplies• Meter reading and reporting
4635 LPSOperatorGuide
a a a a a a a a a a a a a a a a a
a a a a a a a a a a a a a a a a a
a a a a a a a a a a a a a a a a a
a a a a a a a a a a a a a a a a a
• Print Description Language components and processes• Input processing functions • Output processing functions • PDL/DJDE command summary• Page formatting guidelines • Character code assignment tables • PDL/DJDE programming information with step-by-step
instructions
4635 LPSPDL/DJDEReference
a a a a a a a a a a a a a a a a a
a a a a a a a a a a a a a a a a a
a a a a a a a a a a a a a a a a a
a a a a a a a a a a a a a a a a a
viii XEROX 4635 LASER PRINTING SYSTEM—SYSTEM GENERATION GUIDE
INTRODUCTION
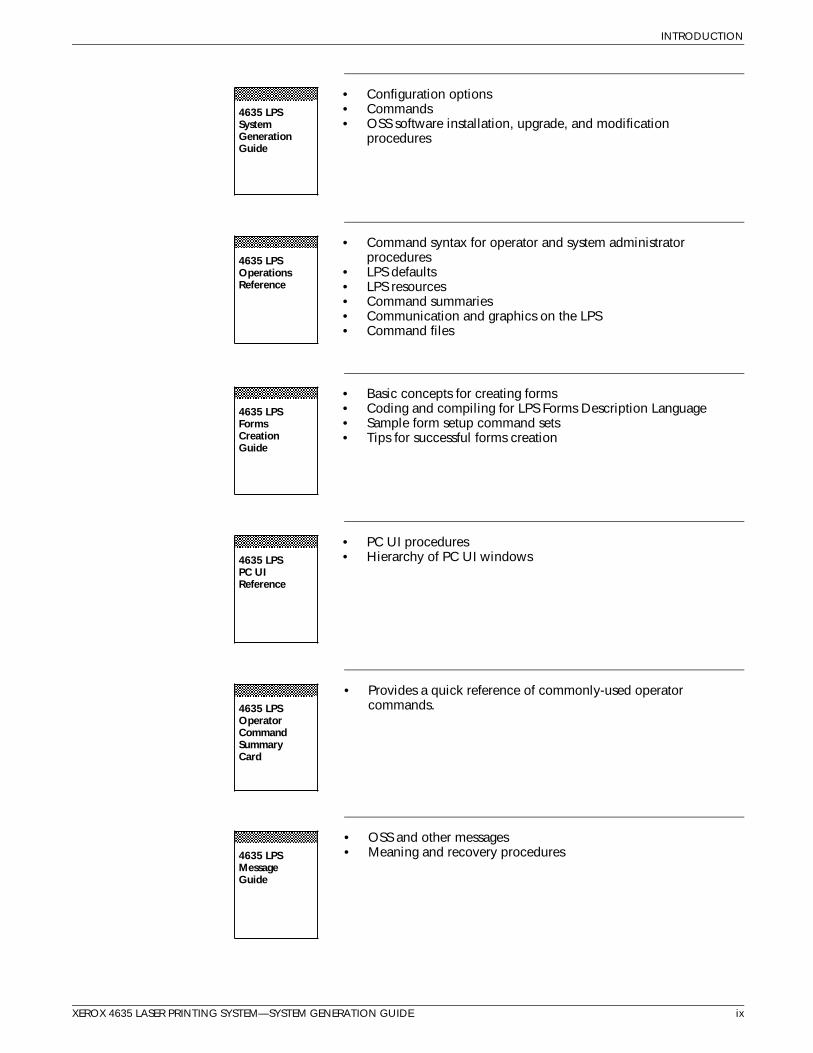
• Configuration options• Commands• OSS software installation, upgrade, and modification
procedures
4635 LPSSystemGenerationGuide
a a a a a a a a a a a a a a a a a
a a a a a a a a a a a a a a a a a
a a a a a a a a a a a a a a a a a
a a a a a a a a a a a a a a a a a
• Command syntax for operator and system administratorprocedures
• LPS defaults• LPS resources• Command summaries• Communication and graphics on the LPS• Command files
4635 LPSOperationsReference
a a a a a a a a a a a a a a a a a
a a a a a a a a a a a a a a a a a
a a a a a a a a a a a a a a a a a
• Basic concepts for creating forms• Coding and compiling for LPS Forms Description Language• Sample form setup command sets• Tips for successful forms creation
4635 LPSFormsCreationGuide
a a a a a a a a a a a a a a a a a
a a a a a a a a a a a a a a a a a
a a a a a a a a a a a a a a a a a
a a a a a a a a a a a a a a a a a
• PC UI procedures• Hierarchy of PC UI windows4635 LPS
PC UIReference
a a a a a a a a a a a a a a a a a
a a a a a a a a a a a a a a a a a
a a a a a a a a a a a a a a a a a
a a a a a a a a a a a a a a a a a
• Provides a quick reference of commonly-used operatorcommands.4635 LPS
OperatorCommandSummaryCard
a a a a a a a a a a a a a a a a a
a a a a a a a a a a a a a a a a a
a a a a a a a a a a a a a a a a a
a a a a a a a a a a a a a a a a a
• OSS and other messages• Meaning and recovery procedures4635 LPS
MessageGuide
a a a a a a a a a a a a a a a a a
a a a a a a a a a a a a a a a a a
a a a a a a a a a a a a a a a a a
XEROX 4635 LASER PRINTING SYSTEM—SYSTEM GENERATION GUIDE ix
INTRODUCTION
• LPS basic components and options• Tasks that must be accomplished before installation• Preinstallation requirements• Installation process• Postinstallation activities
4635 LPSInstallationPlanningGuide
a a a a a a a a a a a a a a a a a
a a a a a a a a a a a a a a a a a
a a a a a a a a a a a a a a a a a
a a a a a a a a a a a a a a a a a
• Characteristics of different formats • File organization• Data formats• Carriage control conventions
Tape FormatsManual
a a a a a a a a a a a a a a a a a
a a a a a a a a a a a a a a a a a
a a a a a a a a a a a a a a a a a
a a a a a a a a a a a a a a a a a
• Font naming conventions• Listing of standard fonts• Data sheets• Glossary of typography terminology
LPS StandardFont LibraryFont UserGuide
a a a a a a a a a a a a a a a a a
a a a a a a a a a a a a a a a a a
a a a a a a a a a a a a a a a a a
a a a a a a a a a a a a a a a a a
• Selection and guidelines• Storage and handling• Specifications for different printers
Helpful FactsAbout Paper
a a a a a a a a a a a a a a a a a
a a a a a a a a a a a a a a a a a
a a a a a a a a a a a a a a a a a
a a a a a a a a a a a a a a a a a
x XEROX 4635 LASER PRINTING SYSTEM—SYSTEM GENERATION GUIDE
INTRODUCTION
Document conventions
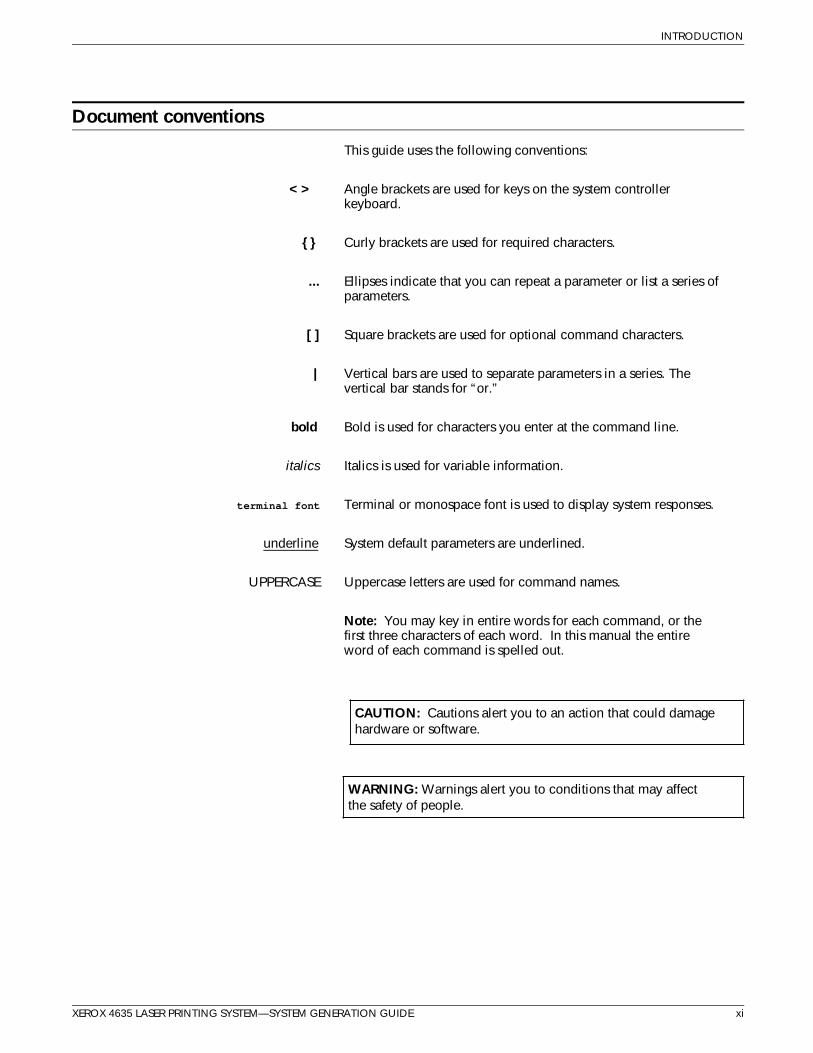
This guide uses the following conventions:
< > Angle brackets are used for keys on the system controllerkeyboard.
{ } Curly brackets are used for required characters.
... Ellipses indicate that you can repeat a parameter or list a series ofparameters.
[ ] Square brackets are used for optional command characters.
| Vertical bars are used to separate parameters in a series. Thevertical bar stands for “or.”
bold Bold is used for characters you enter at the command line.
italics Italics is used for variable information.
terminal font Terminal or monospace font is used to display system responses.
underline System default parameters are underlined.
UPPERCASE Uppercase letters are used for command names.
Note: You may key in entire words for each command, or thefirst three characters of each word. In this manual the entireword of each command is spelled out.
CAUTION: Cautions alert you to an action that could damagehardware or software.
WARNING: Warnings alert you to conditions that may affectthe safety of people.
XEROX 4635 LASER PRINTING SYSTEM—SYSTEM GENERATION GUIDE xi

1. Sysgen overview
Sysgen definition A system generation, or sysgen, is the process you use to install,upgrade, or modify the operating system software (OSS) on aXerox laser printing system (LPS).
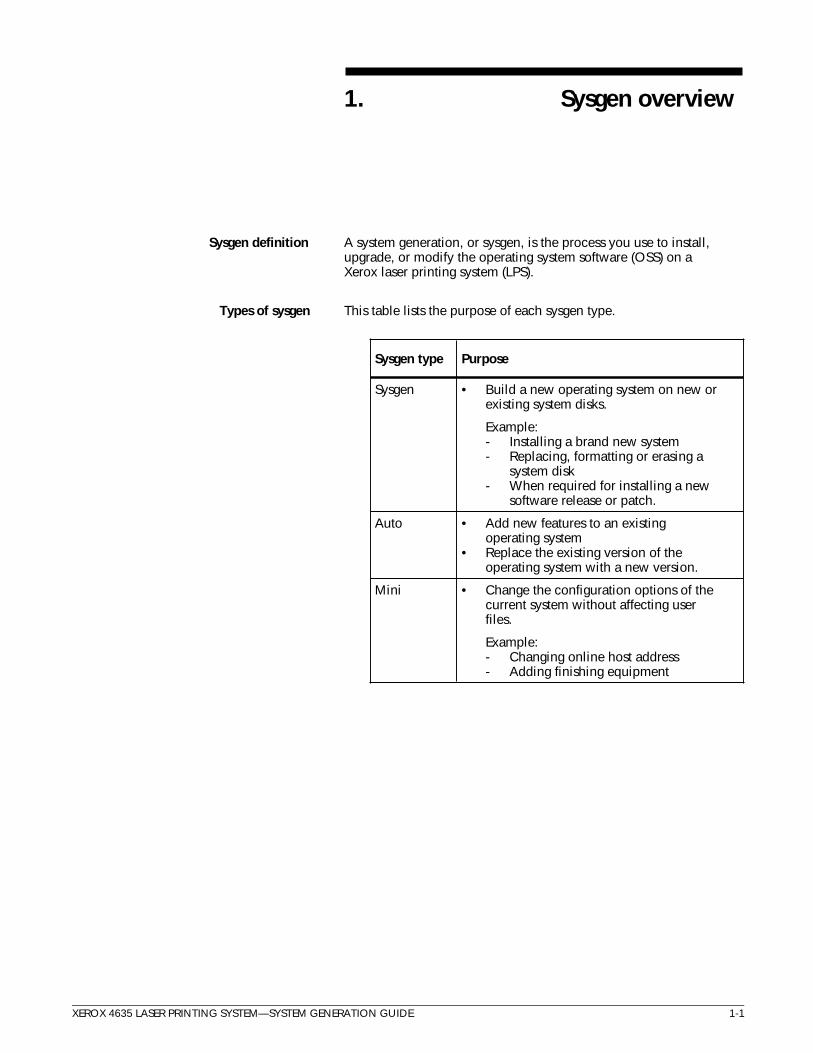
Types of sysgen This table lists the purpose of each sysgen type.
Sysgen type Purpose
Sysgen • Build a new operating system on new orexisting system disks.
Example:- Installing a brand new system- Replacing, formatting or erasing a
system disk- When required for installing a new
software release or patch.
Auto • Add new features to an existingoperating system
• Replace the existing version of theoperating system with a new version.
Mini • Change the configuration options of thecurrent system without affecting userfiles.
Example:- Changing online host address- Adding finishing equipment
XEROX 4635 LASER PRINTING SYSTEM—SYSTEM GENERATION GUIDE 1-1
SYSGEN OVERVIEW
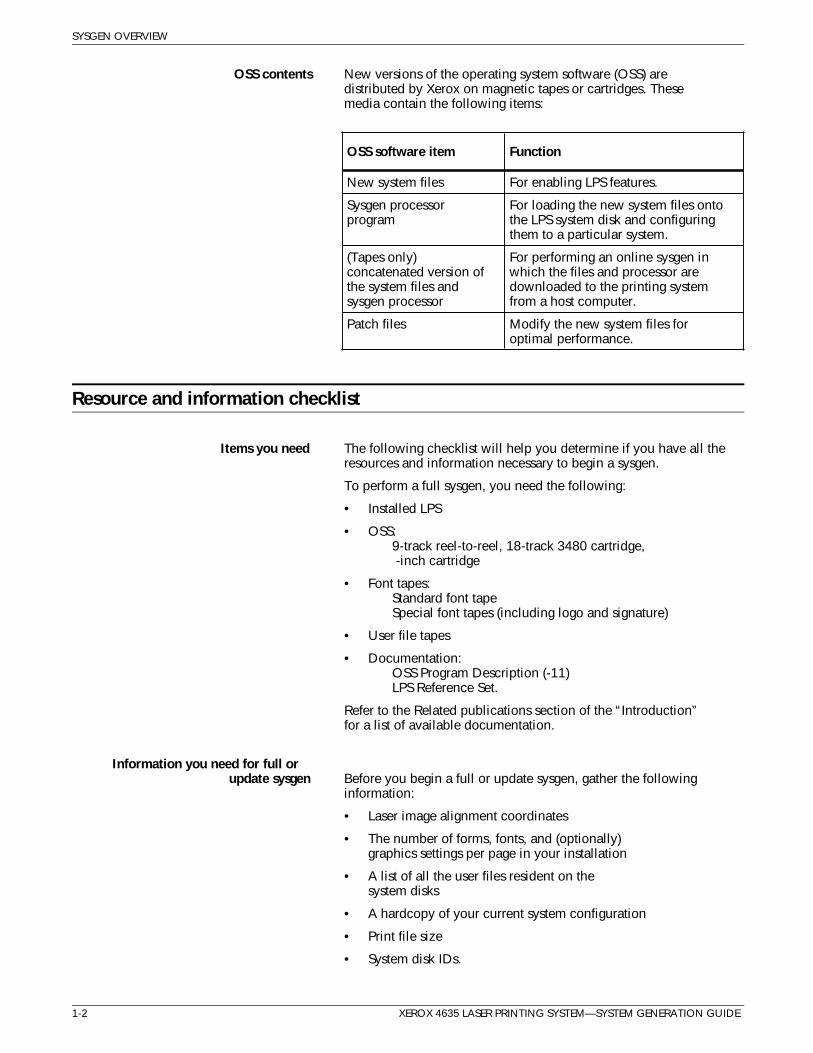
OSS contents New versions of the operating system software (OSS) aredistributed by Xerox on magnetic tapes or cartridges. Thesemedia contain the following items:
OSS software item Function
New system files For enabling LPS features.
Sysgen processorprogram
For loading the new system files ontothe LPS system disk and configuringthem to a particular system.
(Tapes only)concatenated version ofthe system files andsysgen processor
For performing an online sysgen inwhich the files and processor aredownloaded to the printing systemfrom a host computer.
Patch files Modify the new system files foroptimal performance.
Resource and information checklist
Items you need The following checklist will help you determine if you have all theresources and information necessary to begin a sysgen.
To perform a full sysgen, you need the following:
• Installed LPS
• OSS:9-track reel-to-reel, 18-track 3480 cartridge, -inch cartridge
• Font tapes:Standard font tapeSpecial font tapes (including logo and signature)
• User file tapes
• Documentation:OSS Program Description (-11) LPS Reference Set.
Refer to the Related publications section of the “Introduction”for a list of available documentation.
Information you need for full orupdate sysgen Before you begin a full or update sysgen, gather the following
information:
• Laser image alignment coordinates
• The number of forms, fonts, and (optionally)graphics settings per page in your installation
• A list of all the user files resident on thesystem disks
• A hardcopy of your current system configuration
• Print file size
• System disk IDs.
1-2 XEROX 4635 LASER PRINTING SYSTEM—SYSTEM GENERATION GUIDE
SYSGEN OVERVIEW
Questions to answer Before you begin a sysgen, know the answers to the followingquestions:
• Is the account file to be saved or deleted during the sysgen?
• Are the Mergenthaler fonts used by your installation?
• Do you have any site-specific patches to be applied in thepost-sysgen procedure?
• Are any of your .IPM files corrupt or missing?
XEROX 4635 LASER PRINTING SYSTEM—SYSTEM GENERATION GUIDE 1-3

2. Sysgen commands
This chapter explains the commands used for performingsysgens.
Sysgen Command menu
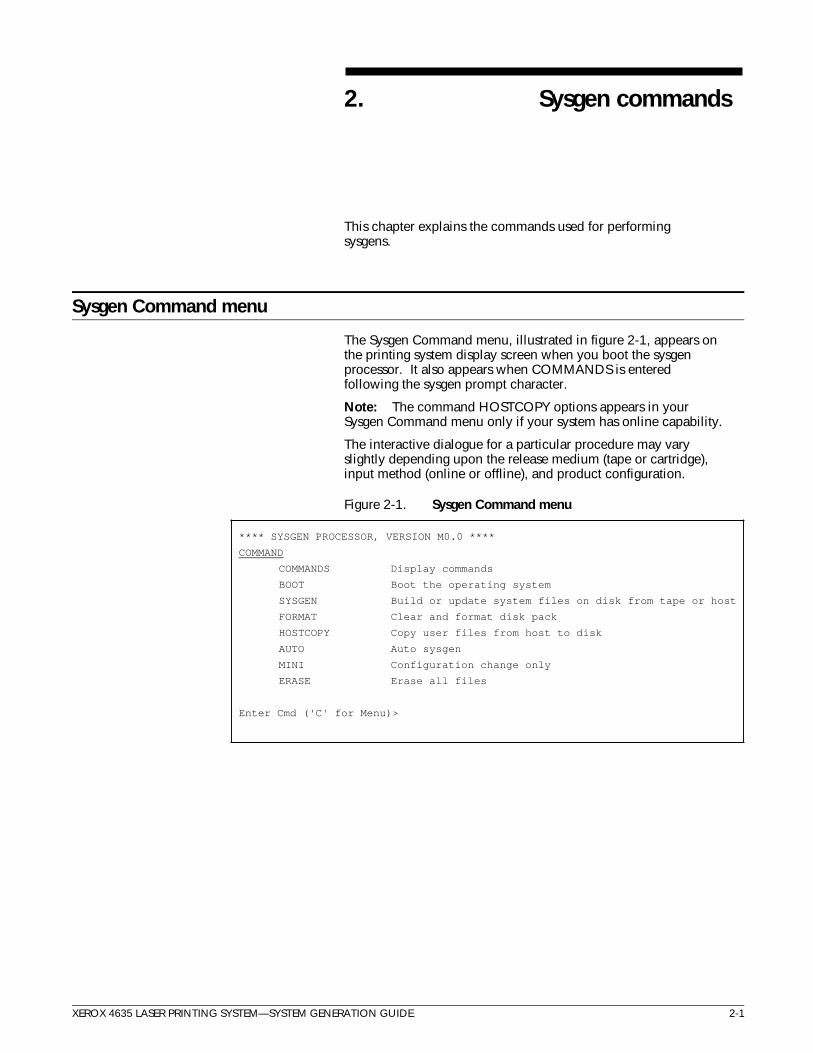
The Sysgen Command menu, illustrated in figure 2-1, appears onthe printing system display screen when you boot the sysgenprocessor. It also appears when COMMANDS is enteredfollowing the sysgen prompt character.
Note: The command HOSTCOPY options appears in yourSysgen Command menu only if your system has online capability.
The interactive dialogue for a particular procedure may varyslightly depending upon the release medium (tape or cartridge),input method (online or offline), and product configuration.
Figure 2-1. Sysgen Command menu
**** SYSGEN PROCESSOR, VERSION M0.0 ****
COMMAND
COMMANDS Display commands
BOOT Boot the operating system
SYSGEN Build or update system files on disk from tape or host
FORMAT Clear and format disk pack
HOSTCOPY Copy user files from host to disk
AUTO Auto sysgen
MINI Configuration change only
ERASE Erase all files
Enter Cmd ('C' for Menu)>
XEROX 4635 LASER PRINTING SYSTEM—SYSTEM GENERATION GUIDE 2-1
SYSGEN COMMANDS
2-2 XEROX 4635 LASER PRINTING SYSTEM—SYSTEM GENERATION GUIDE
Command functions
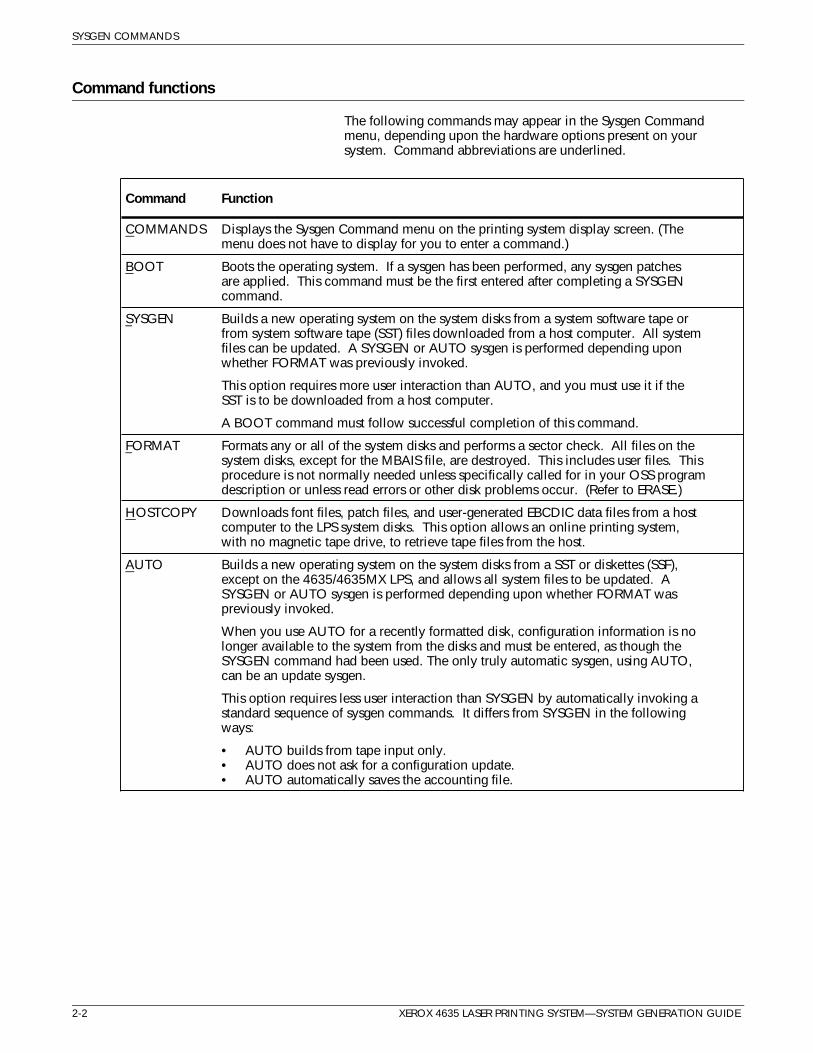
The following commands may appear in the Sysgen Commandmenu, depending upon the hardware options present on yoursystem. Command abbreviations are underlined.
Command Function
COMMANDS Displays the Sysgen Command menu on the printing system display screen. (Themenu does not have to display for you to enter a command.)
BOOT Boots the operating system. If a sysgen has been performed, any sysgen patchesare applied. This command must be the first entered after completing a SYSGENcommand.
SYSGEN Builds a new operating system on the system disks from a system software tape orfrom system software tape (SST) files downloaded from a host computer. All systemfiles can be updated. A SYSGEN or AUTO sysgen is performed depending uponwhether FORMAT was previously invoked.
This option requires more user interaction than AUTO, and you must use it if theSST is to be downloaded from a host computer.
A BOOT command must follow successful completion of this command.
FORMAT Formats any or all of the system disks and performs a sector check. All files on thesystem disks, except for the MBAIS file, are destroyed. This includes user files. Thisprocedure is not normally needed unless specifically called for in your OSS programdescription or unless read errors or other disk problems occur. (Refer to ERASE.)
HOSTCOPY Downloads font files, patch files, and user-generated EBCDIC data files from a hostcomputer to the LPS system disks. This option allows an online printing system,with no magnetic tape drive, to retrieve tape files from the host.
AUTO Builds a new operating system on the system disks from a SST or diskettes (SSF),except on the 4635/4635MX LPS, and allows all system files to be updated. ASYSGEN or AUTO sysgen is performed depending upon whether FORMAT waspreviously invoked.
When you use AUTO for a recently formatted disk, configuration information is nolonger available to the system from the disks and must be entered, as though theSYSGEN command had been used. The only truly automatic sysgen, using AUTO,can be an update sysgen.
This option requires less user interaction than SYSGEN by automatically invoking astandard sequence of sysgen commands. It differs from SYSGEN in the followingways:
• AUTO builds from tape input only.• AUTO does not ask for a configuration update.• AUTO automatically saves the accounting file.
SYSGEN COMMANDS
XEROX 4635 LASER PRINTING SYSTEM—SYSTEM GENERATION GUIDE 2-3
Command Function
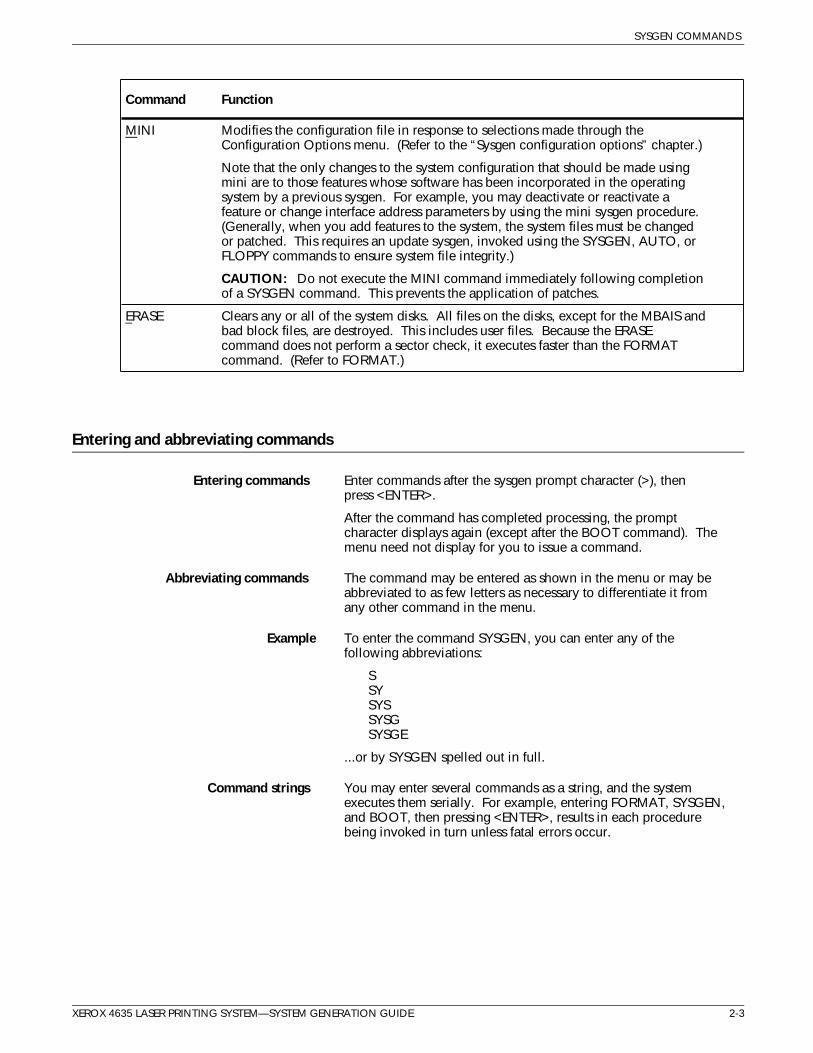
MINI Modifies the configuration file in response to selections made through theConfiguration Options menu. (Refer to the “Sysgen configuration options” chapter.)
Note that the only changes to the system configuration that should be made usingmini are to those features whose software has been incorporated in the operatingsystem by a previous sysgen. For example, you may deactivate or reactivate afeature or change interface address parameters by using the mini sysgen procedure.(Generally, when you add features to the system, the system files must be changedor patched. This requires an update sysgen, invoked using the SYSGEN, AUTO, orFLOPPY commands to ensure system file integrity.)
CAUTION: Do not execute the MINI command immediately following completionof a SYSGEN command. This prevents the application of patches.
ERASE Clears any or all of the system disks. All files on the disks, except for the MBAIS andbad block files, are destroyed. This includes user files. Because the ERASEcommand does not perform a sector check, it executes faster than the FORMATcommand. (Refer to FORMAT.)
Entering and abbreviating commands
Entering commands Enter commands after the sysgen prompt character (>), thenpress <ENTER>.
After the command has completed processing, the promptcharacter displays again (except after the BOOT command). Themenu need not display for you to issue a command.
Abbreviating commands The command may be entered as shown in the menu or may beabbreviated to as few letters as necessary to differentiate it fromany other command in the menu.
Example To enter the command SYSGEN, you can enter any of thefollowing abbreviations:
SSYSYSSYSGSYSGE
...or by SYSGEN spelled out in full.
Command strings You may enter several commands as a string, and the systemexecutes them serially. For example, entering FORMAT, SYSGEN,and BOOT, then pressing <ENTER>, results in each procedurebeing invoked in turn unless fatal errors occur.

3. Sample system configurations
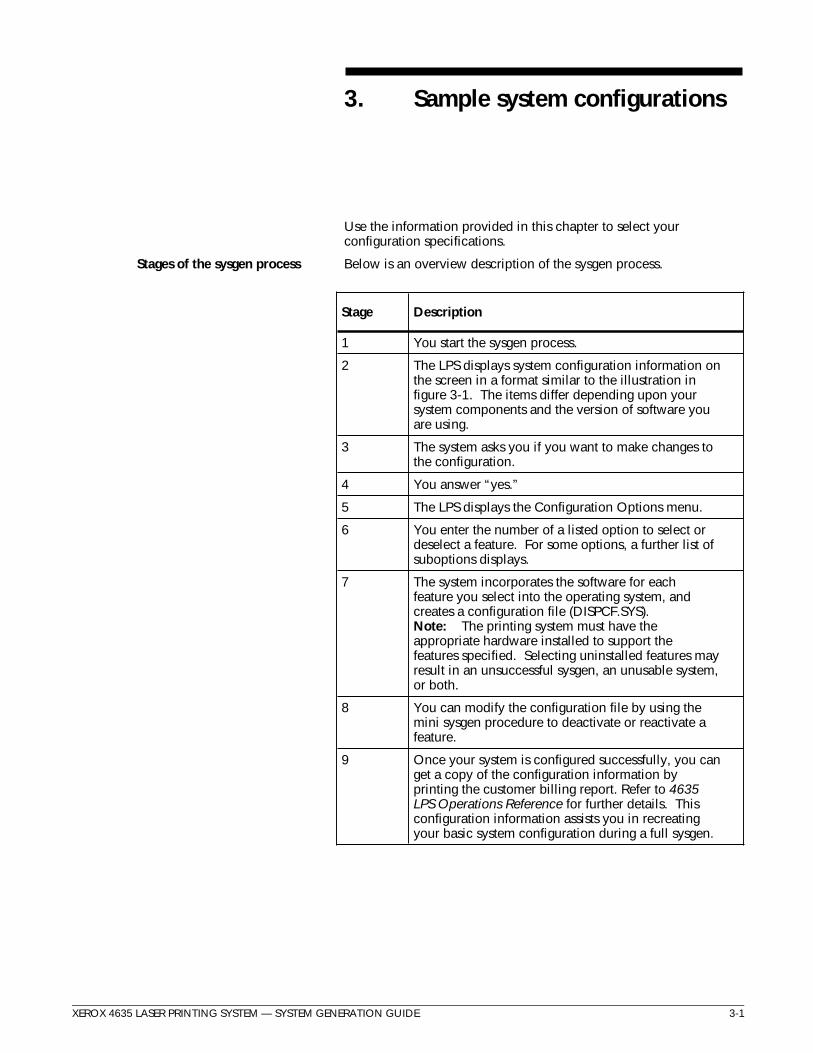
Use the information provided in this chapter to select yourconfiguration specifications.
Stages of the sysgen process Below is an overview description of the sysgen process.
Stage Description
1 You start the sysgen process.
2 The LPS displays system configuration information onthe screen in a format similar to the illustration infigure 3-1. The items differ depending upon yoursystem components and the version of software youare using.
3 The system asks you if you want to make changes tothe configuration.
4 You answer “yes.”
5 The LPS displays the Configuration Options menu.
6 You enter the number of a listed option to select ordeselect a feature. For some options, a further list ofsuboptions displays.
7 The system incorporates the software for eachfeature you select into the operating system, andcreates a configuration file (DISPCF.SYS).Note: The printing system must have theappropriate hardware installed to support thefeatures specified. Selecting uninstalled features mayresult in an unsuccessful sysgen, an unusable system,or both.
8 You can modify the configuration file by using themini sysgen procedure to deactivate or reactivate afeature.
9 Once your system is configured successfully, you canget a copy of the configuration information byprinting the customer billing report. Refer to 4635LPS Operations Reference for further details. Thisconfiguration information assists you in recreatingyour basic system configuration during a full sysgen.
XEROX 4635 LASER PRINTING SYSTEM — SYSTEM GENERATION GUIDE 3-1
SYSGEN CONFIGURATION OPTIONS
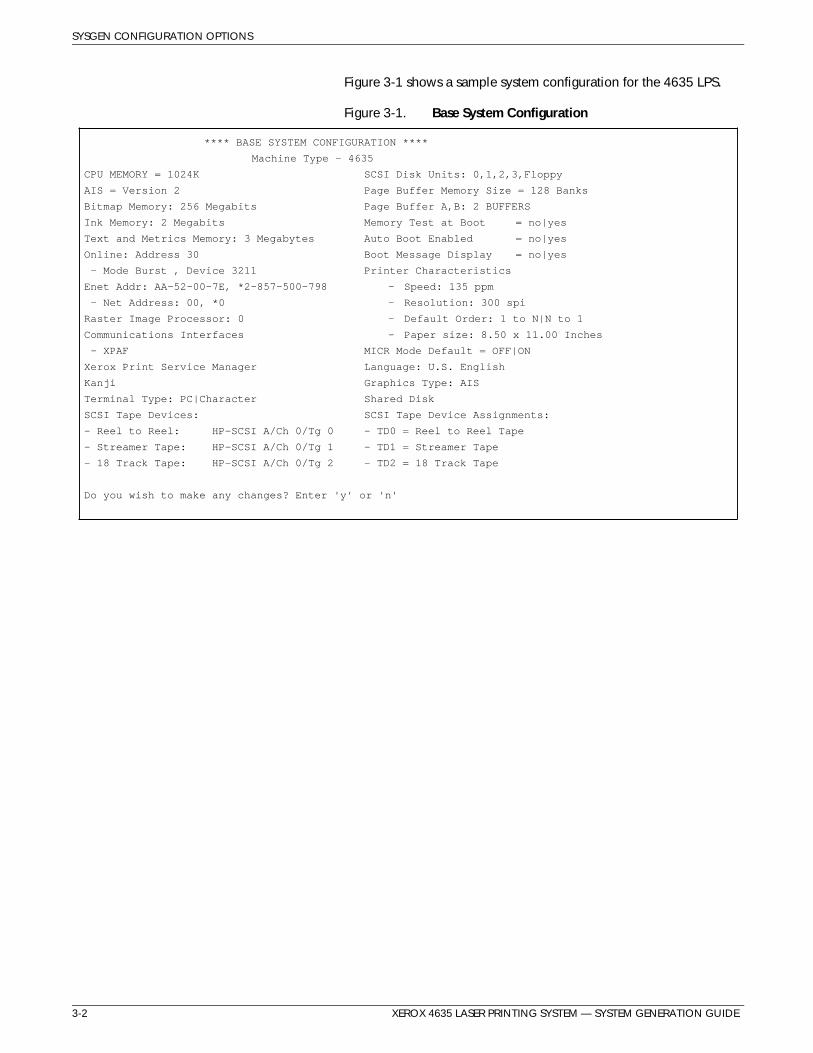
Figure 3-1 shows a sample system configuration for the 4635 LPS.
Figure 3-1. Base System Configuration
**** BASE SYSTEM CONFIGURATION ****
Machine Type - 4635
CPU MEMORY = 1024K SCSI Disk Units: 0,1,2,3,Floppy
AIS = Version 2 Page Buffer Memory Size = 128 Banks
Bitmap Memory: 256 Megabits Page Buffer A,B: 2 BUFFERS
Ink Memory: 2 Megabits Memory Test at Boot = no|yes
Text and Metrics Memory: 3 Megabytes Auto Boot Enabled = no|yes
Online: Address 30 Boot Message Display = no|yes
- Mode Burst , Device 3211 Printer Characteristics
Enet Addr: AA-52-00-7E, *2-857-500-798 - Speed: 135 ppm
- Net Address: 00, *0 - Resolution: 300 spi
Raster Image Processor: 0 - Default Order: 1 to N|N to 1
Communications Interfaces - Paper size: 8.50 x 11.00 Inches
- XPAF MICR Mode Default = OFF|ON
Xerox Print Service Manager Language: U.S. English
Kanji Graphics Type: AIS
Terminal Type: PC|Character Shared Disk
SCSI Tape Devices: SCSI Tape Device Assignments:
- Reel to Reel: HP-SCSI A/Ch 0/Tg 0 - TD0 = Reel to Reel Tape
- Streamer Tape: HP-SCSI A/Ch 0/Tg 1 - TD1 = Streamer Tape
- 18 Track Tape: HP-SCSI A/Ch 0/Tg 2 - TD2 = 18 Track Tape
Do you wish to make any changes? Enter 'y' or 'n'
3-2 XEROX 4635 LASER PRINTING SYSTEM — SYSTEM GENERATION GUIDE
SYSGEN CONFIGURATION OPTIONS
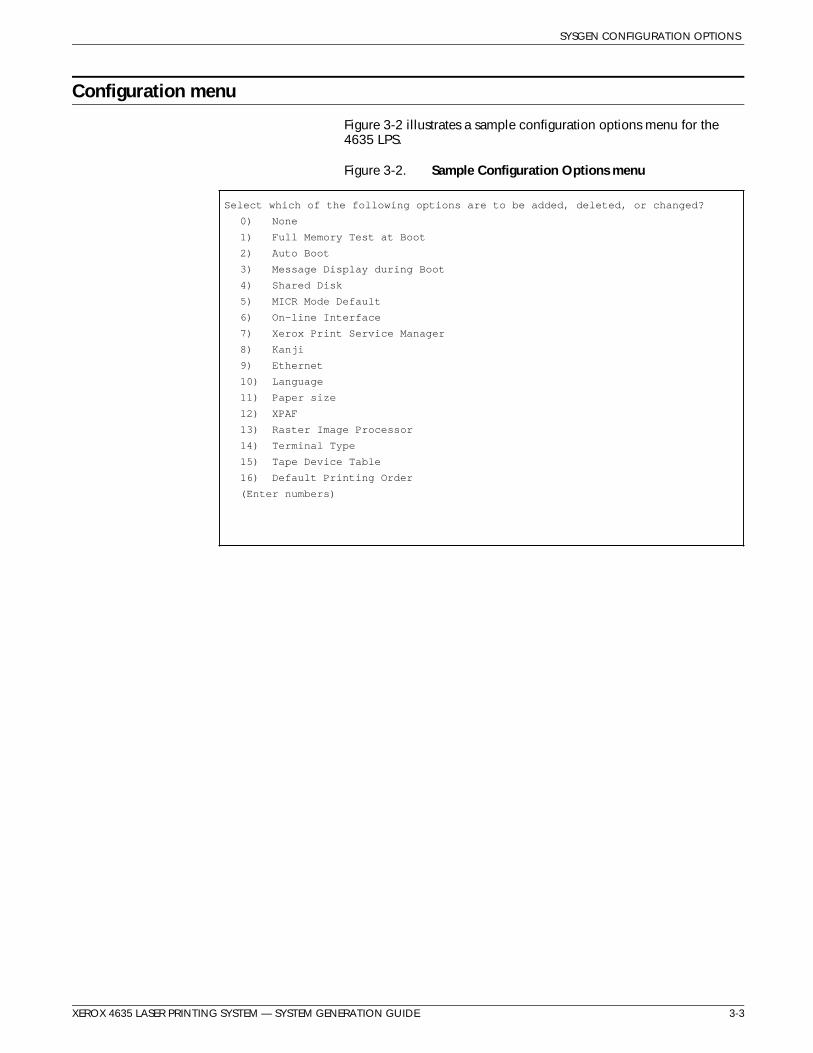
Configuration menu
Figure 3-2 illustrates a sample configuration options menu for the4635 LPS.
Figure 3-2. Sample Configuration Options menu
Select which of the following options are to be added, deleted, or changed?
0) None
1) Full Memory Test at Boot
2) Auto Boot
3) Message Display during Boot
4) Shared Disk
5) MICR Mode Default
6) On-line Interface
7) Xerox Print Service Manager
8) Kanji
9) Ethernet
10) Language
11) Paper size
12) XPAF
13) Raster Image Processor
14) Terminal Type
15) Tape Device Table
16) Default Printing Order
(Enter numbers)
XEROX 4635 LASER PRINTING SYSTEM — SYSTEM GENERATION GUIDE 3-3
SYSGEN CONFIGURATION OPTIONS
3-4 XEROX 4635 LASER PRINTING SYSTEM — SYSTEM GENERATION GUIDE
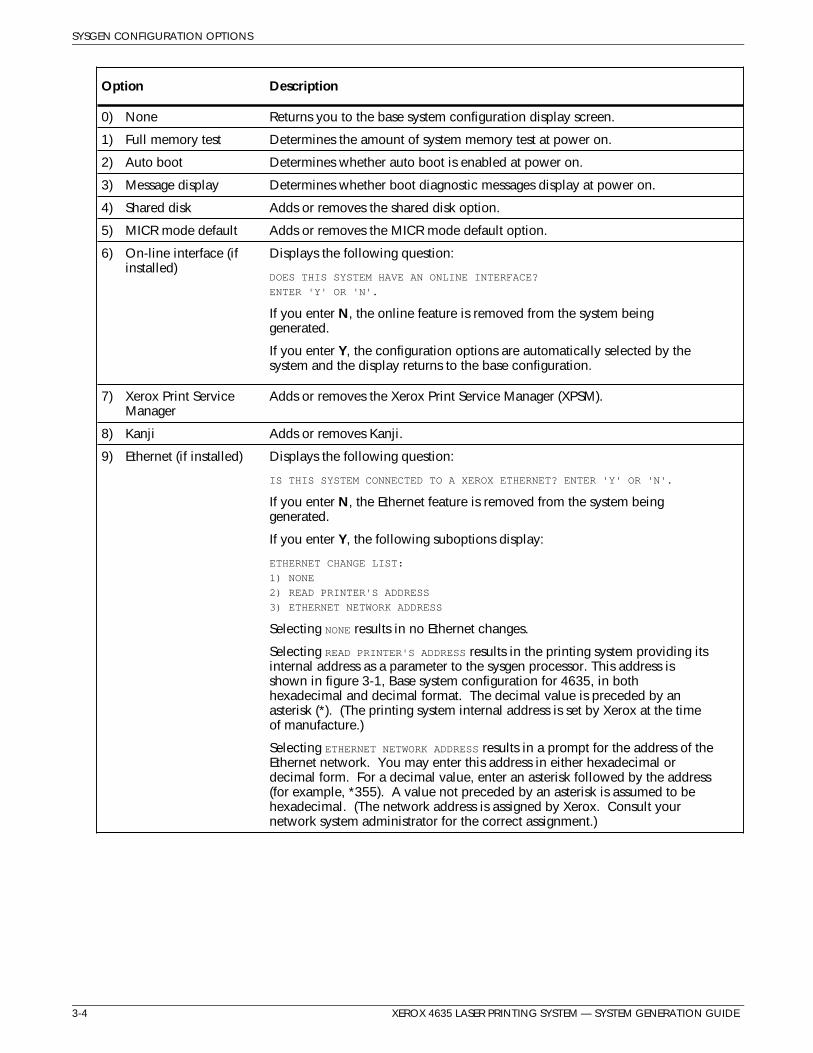
Option Description
0) None Returns you to the base system configuration display screen.
1) Full memory test Determines the amount of system memory test at power on.
2) Auto boot Determines whether auto boot is enabled at power on.
3) Message display Determines whether boot diagnostic messages display at power on.
4) Shared disk Adds or removes the shared disk option.
5) MICR mode default Adds or removes the MICR mode default option.
6) On-line interface (ifinstalled)
Displays the following question:
DOES THIS SYSTEM HAVE AN ONLINE INTERFACE?
ENTER 'Y' OR 'N'.
If you enter N, the online feature is removed from the system beinggenerated.
If you enter Y, the configuration options are automatically selected by thesystem and the display returns to the base configuration.
7) Xerox Print ServiceManager
Adds or removes the Xerox Print Service Manager (XPSM).
8) Kanji Adds or removes Kanji.
9) Ethernet (if installed) Displays the following question:
IS THIS SYSTEM CONNECTED TO A XEROX ETHERNET? ENTER 'Y' OR 'N'.
If you enter N, the Ethernet feature is removed from the system beinggenerated.
If you enter Y, the following suboptions display:
ETHERNET CHANGE LIST:
1) NONE
2) READ PRINTER'S ADDRESS
3) ETHERNET NETWORK ADDRESS
Selecting NONE results in no Ethernet changes.
Selecting READ PRINTER'S ADDRESS results in the printing system providing itsinternal address as a parameter to the sysgen processor. This address isshown in figure 3-1, Base system configuration for 4635, in bothhexadecimal and decimal format. The decimal value is preceded by anasterisk (*). (The printing system internal address is set by Xerox at the timeof manufacture.)
Selecting ETHERNET NETWORK ADDRESS results in a prompt for the address of theEthernet network. You may enter this address in either hexadecimal ordecimal form. For a decimal value, enter an asterisk followed by the address(for example, *355). A value not preceded by an asterisk is assumed to behexadecimal. (The network address is assigned by Xerox. Consult yournetwork system administrator for the correct assignment.)
SYSGEN CONFIGURATION OPTIONS
XEROX 4635 LASER PRINTING SYSTEM — SYSTEM GENERATION GUIDE 3-5
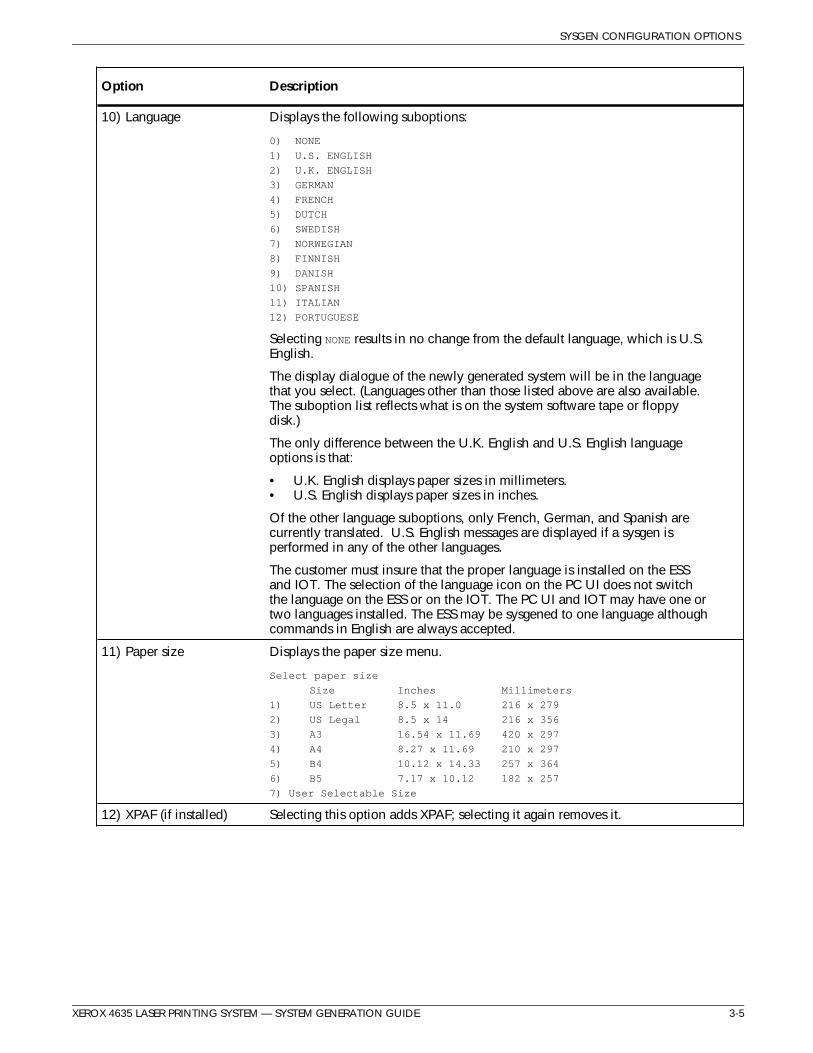
Option Description
10) Language Displays the following suboptions:
0) NONE
1) U.S. ENGLISH
2) U.K. ENGLISH
3) GERMAN
4) FRENCH
5) DUTCH
6) SWEDISH
7) NORWEGIAN
8) FINNISH
9) DANISH
10) SPANISH
11) ITALIAN
12) PORTUGUESE
Selecting NONE results in no change from the default language, which is U.S.English.
The display dialogue of the newly generated system will be in the languagethat you select. (Languages other than those listed above are also available.The suboption list reflects what is on the system software tape or floppydisk.)
The only difference between the U.K. English and U.S. English languageoptions is that:
• U.K. English displays paper sizes in millimeters.• U.S. English displays paper sizes in inches.
Of the other language suboptions, only French, German, and Spanish arecurrently translated. U.S. English messages are displayed if a sysgen isperformed in any of the other languages.
The customer must insure that the proper language is installed on the ESSand IOT. The selection of the language icon on the PC UI does not switchthe language on the ESS or on the IOT. The PC UI and IOT may have one ortwo languages installed. The ESS may be sysgened to one language althoughcommands in English are always accepted.
11) Paper size Displays the paper size menu.
Select paper size
Size Inches Millimeters
1) US Letter 8.5 x 11.0 216 x 279
2) US Legal 8.5 x 14 216 x 356
3) A3 16.54 x 11.69 420 x 297
4) A4 8.27 x 11.69 210 x 297
5) B4 10.12 x 14.33 257 x 364
6) B5 7.17 x 10.12 182 x 257
7) User Selectable Size
12) XPAF (if installed) Selecting this option adds XPAF; selecting it again removes it.
SYSGEN CONFIGURATION OPTIONS
3-6 XEROX 4635 LASER PRINTING SYSTEM — SYSTEM GENERATION GUIDE
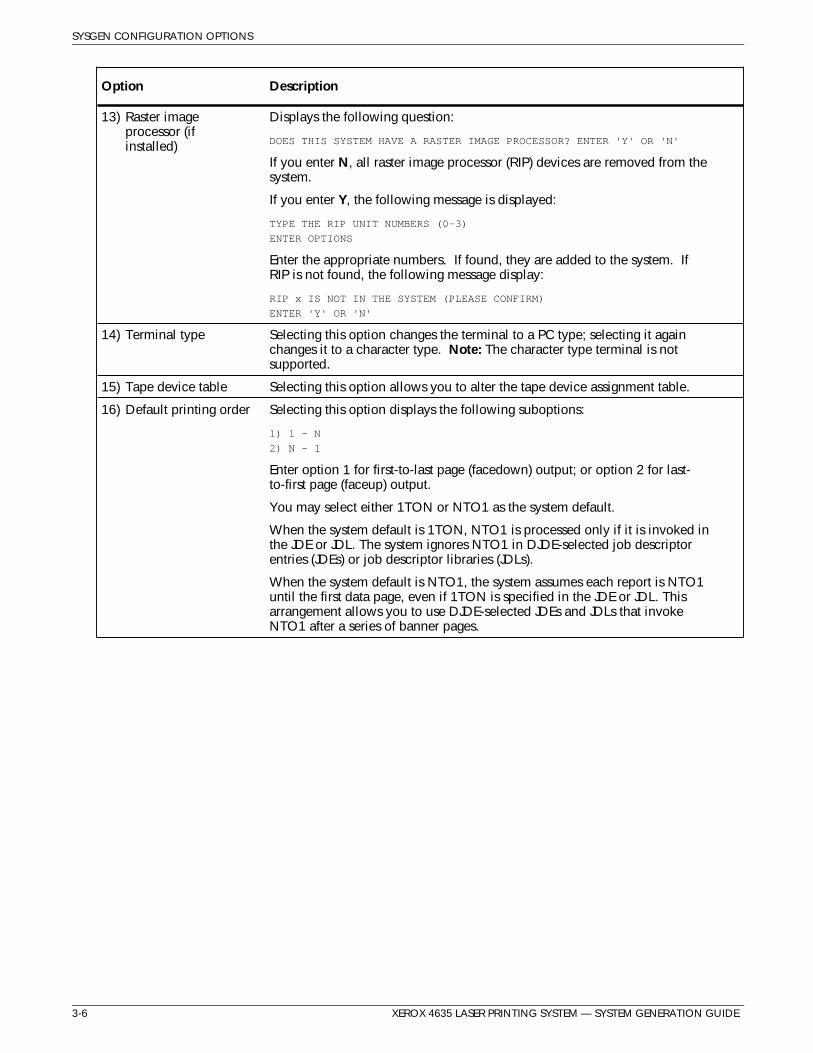
Option Description
13) Raster imageprocessor (ifinstalled)
Displays the following question:
DOES THIS SYSTEM HAVE A RASTER IMAGE PROCESSOR? ENTER 'Y' OR 'N'
If you enter N, all raster image processor (RIP) devices are removed from thesystem.
If you enter Y, the following message is displayed:
TYPE THE RIP UNIT NUMBERS (0-3)
ENTER OPTIONS
Enter the appropriate numbers. If found, they are added to the system. IfRIP is not found, the following message display:
RIP x IS NOT IN THE SYSTEM (PLEASE CONFIRM)
ENTER 'Y' OR 'N'
14) Terminal type Selecting this option changes the terminal to a PC type; selecting it againchanges it to a character type. Note: The character type terminal is notsupported.
15) Tape device table Selecting this option allows you to alter the tape device assignment table.
16) Default printing order Selecting this option displays the following suboptions:
1) 1 - N
2) N - 1
Enter option 1 for first-to-last page (facedown) output; or option 2 for last-to-first page (faceup) output.
You may select either 1TON or NTO1 as the system default.
When the system default is 1TON, NTO1 is processed only if it is invoked inthe JDE or JDL. The system ignores NTO1 in DJDE-selected job descriptorentries (JDEs) or job descriptor libraries (JDLs).
When the system default is NTO1, the system assumes each report is NTO1until the first data page, even if 1TON is specified in the JDE or JDL. Thisarrangement allows you to use DJDE-selected JDEs and JDLs that invokeNTO1 after a series of banner pages.
SYSGEN CONFIGURATION OPTIONS
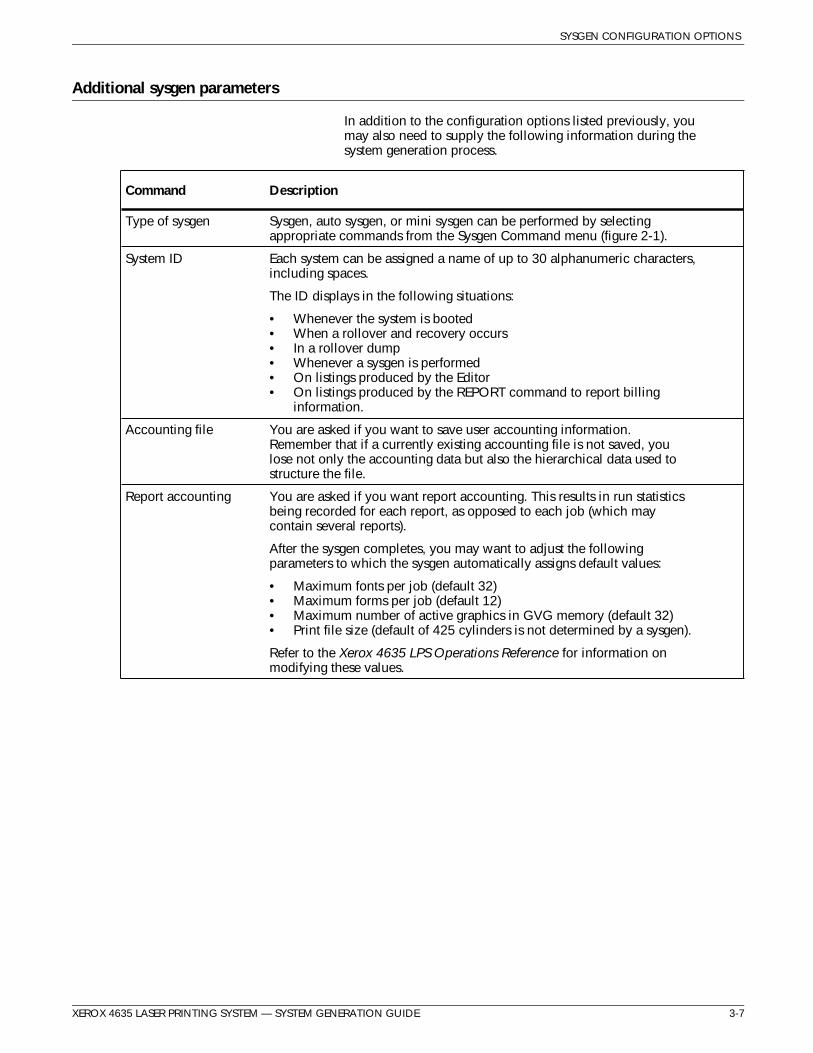
Additional sysgen parameters
In addition to the configuration options listed previously, youmay also need to supply the following information during thesystem generation process.
Command Description
Type of sysgen Sysgen, auto sysgen, or mini sysgen can be performed by selectingappropriate commands from the Sysgen Command menu (figure 2-1).
System ID Each system can be assigned a name of up to 30 alphanumeric characters,including spaces.
The ID displays in the following situations:
• Whenever the system is booted• When a rollover and recovery occurs• In a rollover dump• Whenever a sysgen is performed• On listings produced by the Editor• On listings produced by the REPORT command to report billing
information.
Accounting file You are asked if you want to save user accounting information.Remember that if a currently existing accounting file is not saved, youlose not only the accounting data but also the hierarchical data used tostructure the file.
Report accounting You are asked if you want report accounting. This results in run statisticsbeing recorded for each report, as opposed to each job (which maycontain several reports).
After the sysgen completes, you may want to adjust the followingparameters to which the sysgen automatically assigns default values:
• Maximum fonts per job (default 32)• Maximum forms per job (default 12)• Maximum number of active graphics in GVG memory (default 32)• Print file size (default of 425 cylinders is not determined by a sysgen).
Refer to the Xerox 4635 LPS Operations Reference for information onmodifying these values.
XEROX 4635 LASER PRINTING SYSTEM — SYSTEM GENERATION GUIDE 3-7

4. Sysgen and sysgen-relatedprocedures
This chapter contains information to perform the systemgeneration for the 4635 LPS. It also explains how to install the PCUI system software.
Precautions
Before you begin a sysgen, make sure you comply with thefollowing points:
• Do not overwrite the current version of the system files withsystem files from previous software versions.
• Do not copy the current version system file types to a systemwith an older version of software.
PC UI software loading procedure summary
These are the software components you need for the PC UI.
• System UI software
• UI dialog
MS-DOS 6.2 and Windows 3.1 will be preloaded onto the PC UI.The sections that follow provide step-by-step instructions forloading each of the remaining software programs on your PC UI.
XEROX 4635 LASER PRINTING SYSTEM—SYSTEM GENERATION GUIDE 4-1
SYSGEN AND SYSGEN-RELATED PROCEDURES
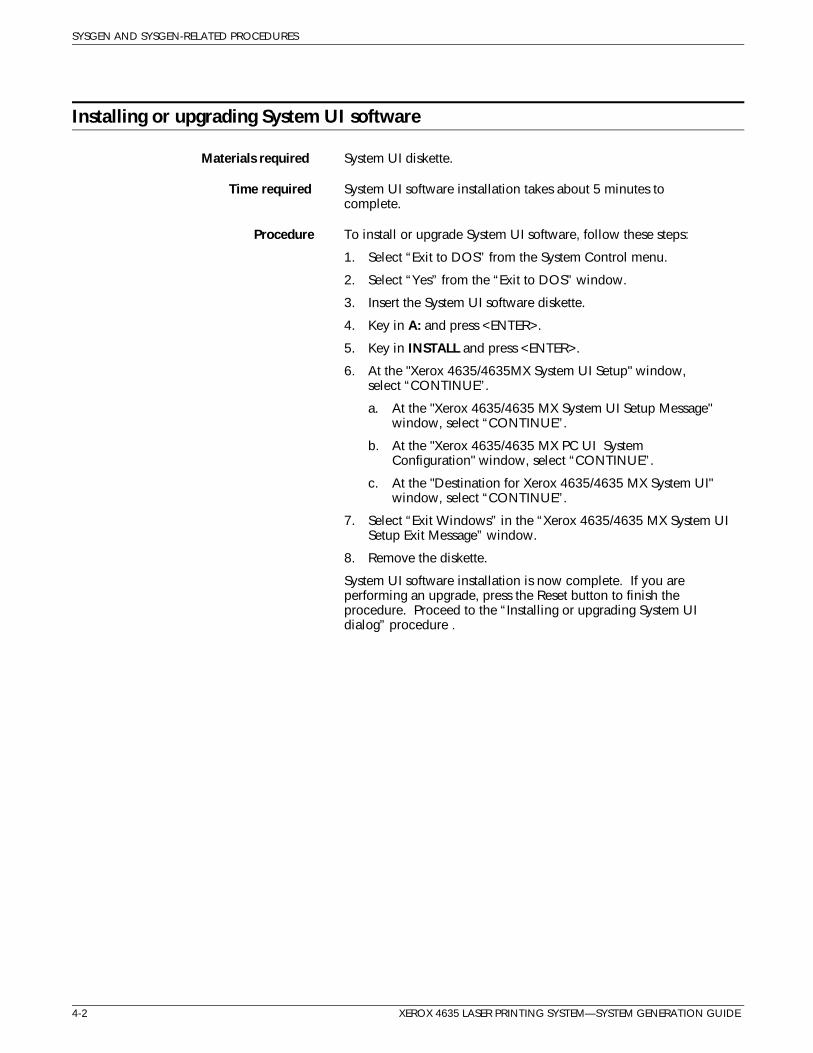
Installing or upgrading System UI software
Materials required System UI diskette.
Time required System UI software installation takes about 5 minutes tocomplete.
Procedure To install or upgrade System UI software, follow these steps:
1. Select “Exit to DOS” from the System Control menu.
2. Select “Yes” from the “Exit to DOS” window.
3. Insert the System UI software diskette.
4. Key in A: and press <ENTER>.
5. Key in INSTALL and press <ENTER>.
6. At the "Xerox 4635/4635MX System UI Setup" window,select “CONTINUE”.
a. At the "Xerox 4635/4635 MX System UI Setup Message"window, select “CONTINUE”.
b. At the "Xerox 4635/4635 MX PC UI SystemConfiguration" window, select “CONTINUE”.
c. At the "Destination for Xerox 4635/4635 MX System UI"window, select “CONTINUE”.
7. Select “Exit Windows” in the “Xerox 4635/4635 MX System UISetup Exit Message” window.
8. Remove the diskette.
System UI software installation is now complete. If you areperforming an upgrade, press the Reset button to finish theprocedure. Proceed to the “Installing or upgrading System UIdialog” procedure .
4-2 XEROX 4635 LASER PRINTING SYSTEM—SYSTEM GENERATION GUIDE
SYSGEN AND SYSGEN-RELATED PROCEDURES
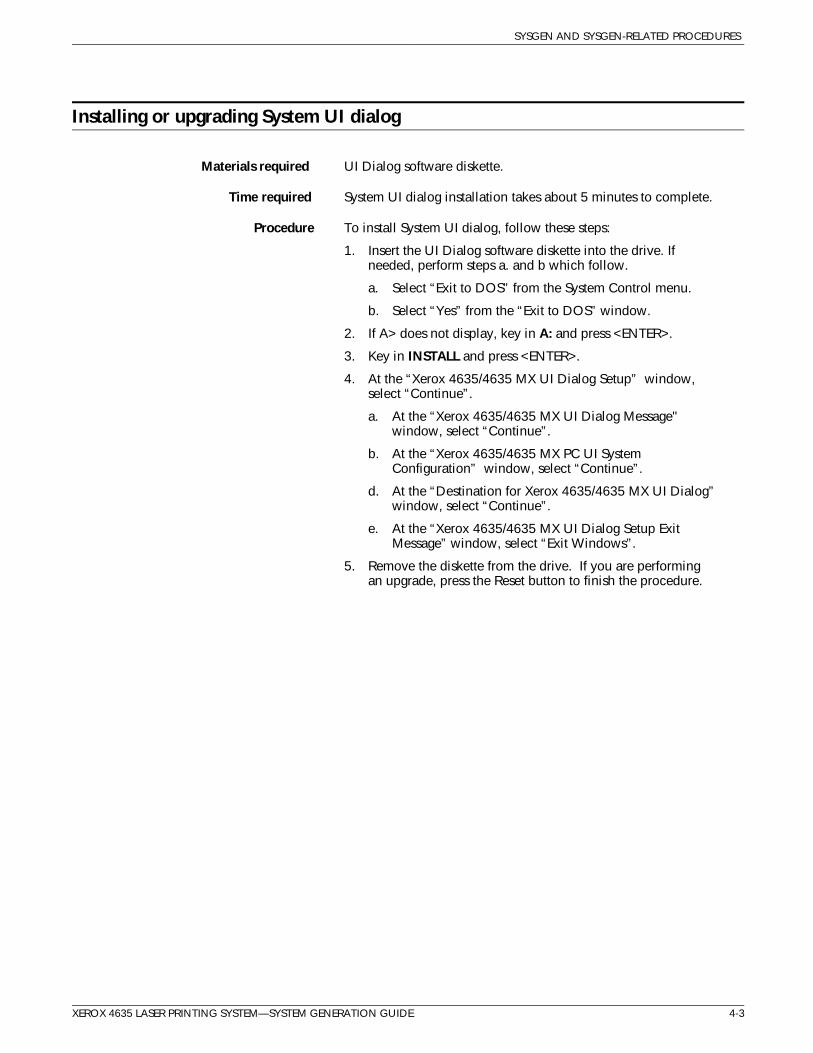
Installing or upgrading System UI dialog
Materials required UI Dialog software diskette.
Time required System UI dialog installation takes about 5 minutes to complete.
Procedure To install System UI dialog, follow these steps:
1. Insert the UI Dialog software diskette into the drive. Ifneeded, perform steps a. and b which follow.
a. Select “Exit to DOS” from the System Control menu.
b. Select “Yes” from the “Exit to DOS” window.
2. If A> does not display, key in A: and press <ENTER>.
3. Key in INSTALL and press <ENTER>.
4. At the “Xerox 4635/4635 MX UI Dialog Setup” window,select “Continue”.
a. At the “Xerox 4635/4635 MX UI Dialog Message"window, select “Continue”.
b. At the “Xerox 4635/4635 MX PC UI SystemConfiguration” window, select “Continue”.
d. At the “Destination for Xerox 4635/4635 MX UI Dialog”window, select “Continue”.
e. At the “Xerox 4635/4635 MX UI Dialog Setup ExitMessage” window, select “Exit Windows”.
5. Remove the diskette from the drive. If you are performingan upgrade, press the Reset button to finish the procedure.
XEROX 4635 LASER PRINTING SYSTEM—SYSTEM GENERATION GUIDE 4-3
SYSGEN AND SYSGEN-RELATED PROCEDURES
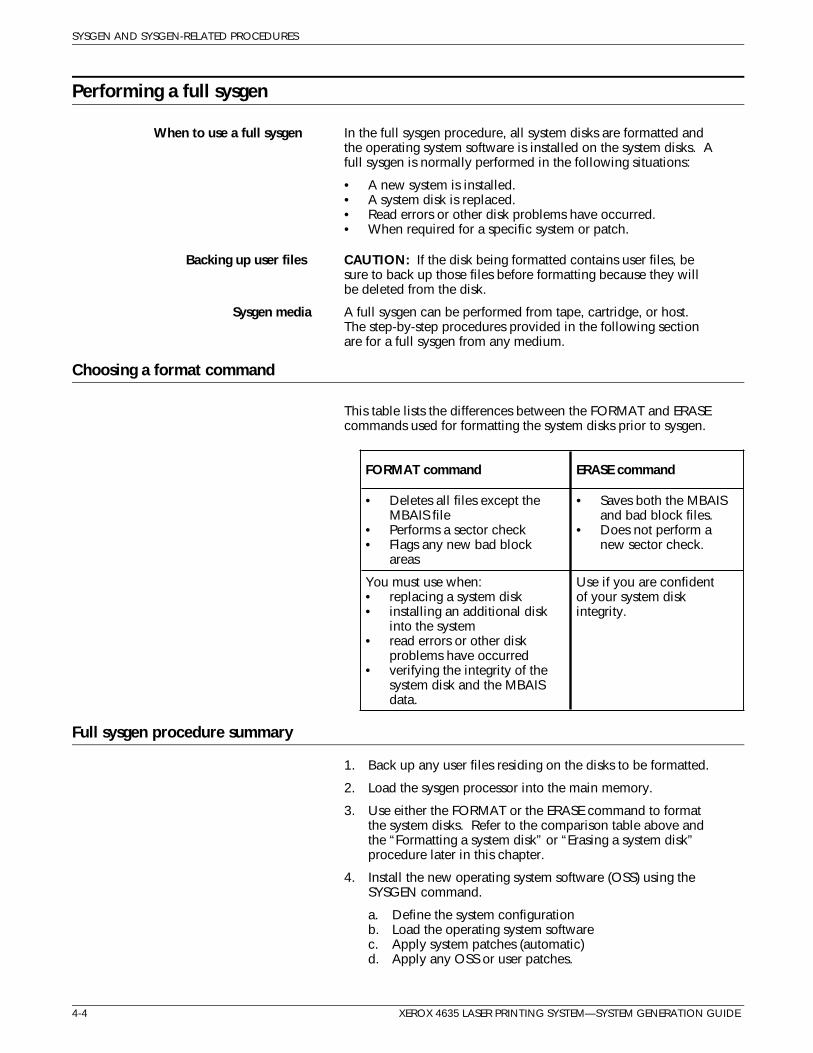
Performing a full sysgen
When to use a full sysgen In the full sysgen procedure, all system disks are formatted andthe operating system software is installed on the system disks. Afull sysgen is normally performed in the following situations:
• A new system is installed.• A system disk is replaced.• Read errors or other disk problems have occurred.• When required for a specific system or patch.
Backing up user files CAUTION: If the disk being formatted contains user files, besure to back up those files before formatting because they willbe deleted from the disk.
Sysgen media A full sysgen can be performed from tape, cartridge, or host.The step-by-step procedures provided in the following sectionare for a full sysgen from any medium.
Choosing a format command
This table lists the differences between the FORMAT and ERASEcommands used for formatting the system disks prior to sysgen.
FORMAT command ERASE command
• Deletes all files except theMBAIS file
• Performs a sector check• Flags any new bad block
areas
• Saves both the MBAISand bad block files.
• Does not perform anew sector check.
You must use when:• replacing a system disk• installing an additional disk
into the system• read errors or other disk
problems have occurred• verifying the integrity of the
system disk and the MBAISdata.
Use if you are confidentof your system diskintegrity.
Full sysgen procedure summary
1. Back up any user files residing on the disks to be formatted.
2. Load the sysgen processor into the main memory.
3. Use either the FORMAT or the ERASE command to formatthe system disks. Refer to the comparison table above andthe “Formatting a system disk” or “Erasing a system disk”procedure later in this chapter.
4. Install the new operating system software (OSS) using theSYSGEN command.
a. Define the system configuration b. Load the operating system softwarec. Apply system patches (automatic)d. Apply any OSS or user patches.
4-4 XEROX 4635 LASER PRINTING SYSTEM—SYSTEM GENERATION GUIDE
SYSGEN AND SYSGEN-RELATED PROCEDURES
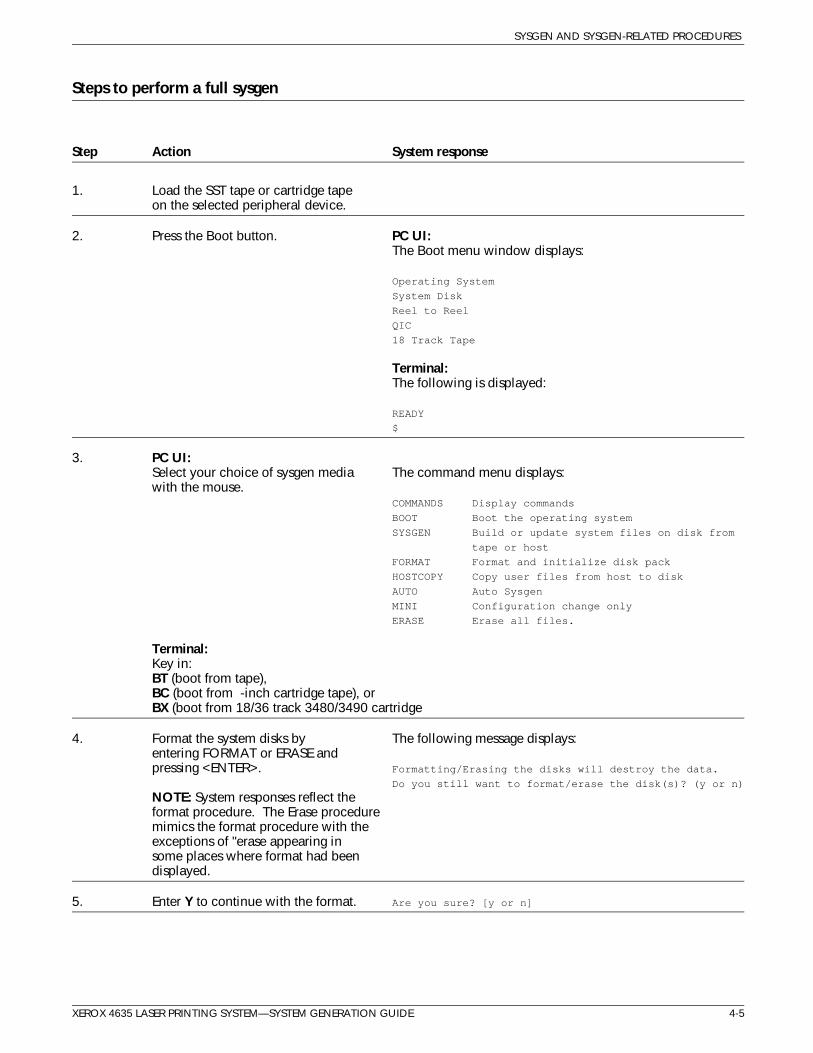
Steps to perform a full sysgen
Step Action System response
1. Load the SST tape or cartridge tapeon the selected peripheral device.
2. Press the Boot button. PC UI:The Boot menu window displays:
Operating System
System Disk
Reel to Reel
QIC
18 Track Tape
Terminal:The following is displayed:
READY
$
3. PC UI:Select your choice of sysgen media The command menu displays:with the mouse.
COMMANDS Display commands
BOOT Boot the operating system
SYSGEN Build or update system files on disk from
tape or host
FORMAT Format and initialize disk pack
HOSTCOPY Copy user files from host to disk
AUTO Auto Sysgen
MINI Configuration change only
ERASE Erase all files.
Terminal:Key in:BT (boot from tape), BC (boot from -inch cartridge tape), orBX (boot from 18/36 track 3480/3490 cartridge
4. Format the system disks by The following message displays:entering FORMAT or ERASE and pressing <ENTER>. Formatting/Erasing the disks will destroy the data.
Do you still want to format/erase the disk(s)? (y or n)
NOTE: System responses reflect theformat procedure. The Erase proceduremimics the format procedure with theexceptions of "erase appearing insome places where format had beendisplayed.
5. Enter Y to continue with the format. Are you sure? [y or n]
XEROX 4635 LASER PRINTING SYSTEM—SYSTEM GENERATION GUIDE 4-5

SYSGEN AND SYSGEN-RELATED PROCEDURES
Steps to perform a full sysgen (continued)
Step Action System response
6. Enter Y to confirm that you want to For Y, the following is displayed:continue the formatting of the disk(s).
**SCSI FORMAT/ERASE VERSION XX RUNNING**
Program operating mode: FORMAT
Located DP0: ...(manufacturer) (disk type)
NOTE: DP1: through DP3: will only Located DP1: ...(manufacturer) (disk type)
be displayed if installed. Located DP2: ...(manufacturer) (disk type)
Located DP3: ...(manufacturer) (disk type)
FORMAT OPTIONS:
1. All disks
2. Selected disk(s)
>
7. Enter the option number and press<ENTER>.
Option 1 selects all disk drivesinstalled on the controller.
Option 2 allows individual drives Enter the disk units to format
to be selected. >
Enter the drive unit number tobe formatted. If more than one driveunit is to be formatted, enter allselected drive unit numbersseparated by commas.
Such as: >0,1,3
Then press <ENTER>. DP0: CONFIRM (Y/N)
The following information is displayed for the disksselected to be formatted:
Disk characteristics (DPx:)
Manufacturer & Type: (manufacturer) (disk type)
Unit Serial Number: nnnnn
Usable capacity: cccc MB
Number of 512-byte sectors: ssssss
Number of heads: h
Number of tracks: ttttt
Spare sectors per cylinder: s
Spare tracks per device: tt
4-6 XEROX 4635 LASER PRINTING SYSTEM—SYSTEM GENERATION GUIDE
SYSGEN AND SYSGEN-RELATED PROCEDURES
Steps to perform a full sysgen (continued)
Step Action System response
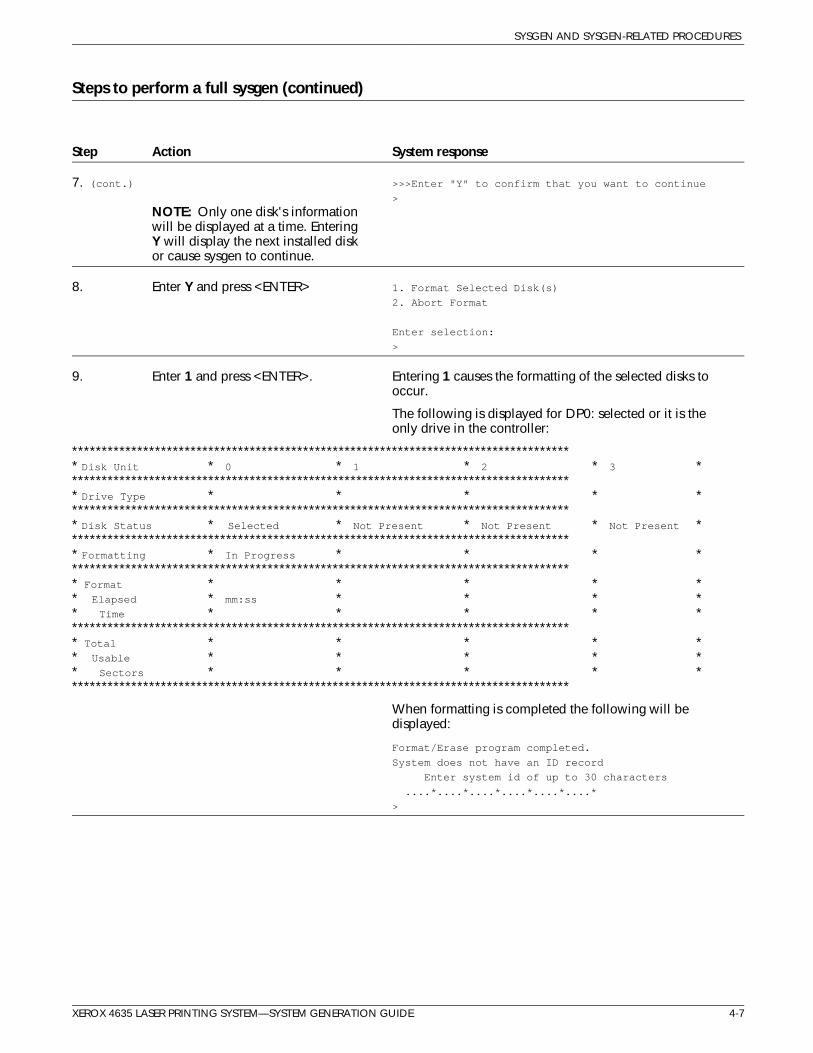
7. (cont.) >>>Enter "Y" to confirm that you want to continue
>
NOTE: Only one disk's informationwill be displayed at a time. EnteringY will display the next installed diskor cause sysgen to continue.
8. Enter Y and press <ENTER> 1. Format Selected Disk(s)
2. Abort Format
Enter selection:
>
9. Enter 1 and press <ENTER>. Entering 1 causes the formatting of the selected disks tooccur.
The following is displayed for DP0: selected or it is theonly drive in the controller:
************************************************************************************* Disk Unit * 0 * 1 * 2 * 3 ************************************************************************************** Drive Type * * * * ************************************************************************************** Disk Status * Selected * Not Present * Not Present * Not Present ************************************************************************************** Formatting * In Progress * * * ************************************************************************************** Format * * * * ** Elapsed * mm:ss * * * ** Time * * * * ************************************************************************************** Total * * * * ** Usable * * * * ** Sectors * * * * *************************************************************************************
When formatting is completed the following will bedisplayed:
Format/Erase program completed.
System does not have an ID record
Enter system id of up to 30 characters
....*....*....*....*....*....*
>
XEROX 4635 LASER PRINTING SYSTEM—SYSTEM GENERATION GUIDE 4-7
SYSGEN AND SYSGEN-RELATED PROCEDURES
Steps to perform a full sysgen (continued)
Step Action System response
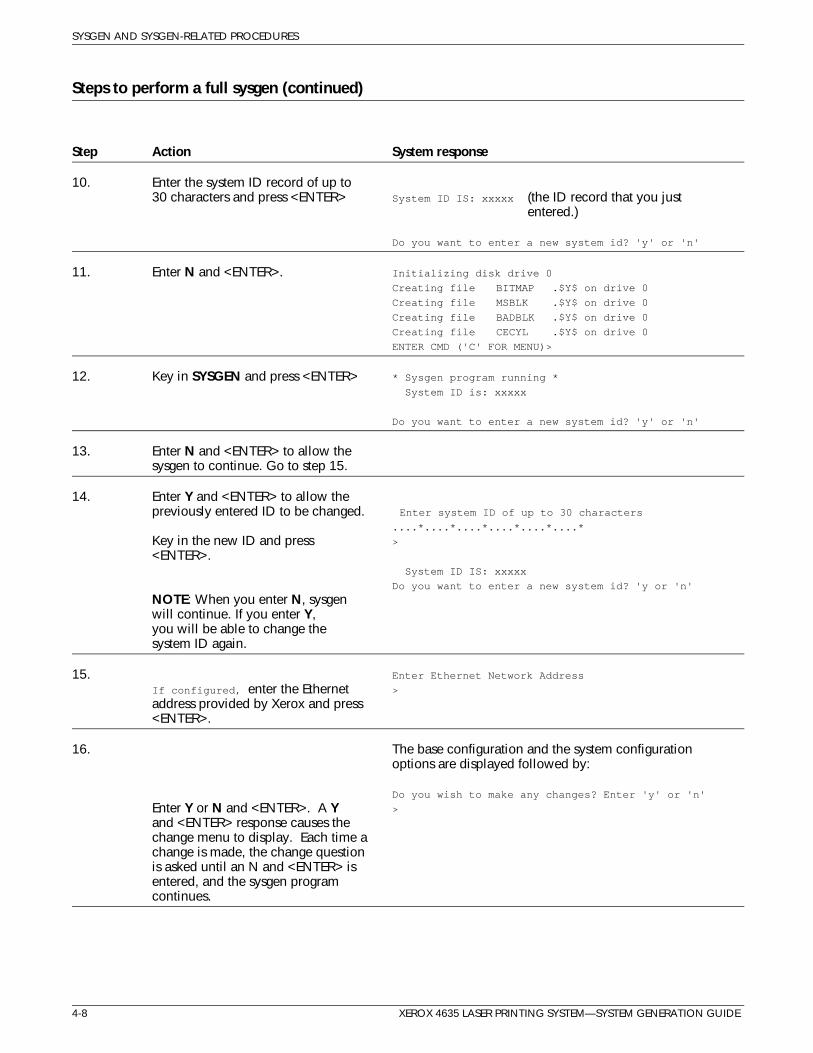
10. Enter the system ID record of up to30 characters and press <ENTER> System ID IS: xxxxx (the ID record that you just
entered.)
Do you want to enter a new system id? 'y' or 'n'
11. Enter N and <ENTER>. Initializing disk drive 0
Creating file BITMAP .$Y$ on drive 0
Creating file MSBLK .$Y$ on drive 0
Creating file BADBLK .$Y$ on drive 0
Creating file CECYL .$Y$ on drive 0
ENTER CMD ('C' FOR MENU)>
12. Key in SYSGEN and press <ENTER> * Sysgen program running *
System ID is: xxxxx
Do you want to enter a new system id? 'y' or 'n'
13. Enter N and <ENTER> to allow thesysgen to continue. Go to step 15.
14. Enter Y and <ENTER> to allow thepreviously entered ID to be changed. Enter system ID of up to 30 characters
....*....*....*....*....*....*
Key in the new ID and press >
<ENTER>. System ID IS: xxxxx
Do you want to enter a new system id? 'y or 'n'
NOTE: When you enter N, sysgenwill continue. If you enter Y,you will be able to change thesystem ID again.
15. Enter Ethernet Network Address
If configured, enter the Ethernet >
address provided by Xerox and press<ENTER>.
16. The base configuration and the system configurationoptions are displayed followed by:
Do you wish to make any changes? Enter 'y' or 'n'
Enter Y or N and <ENTER>. A Y >
and <ENTER> response causes thechange menu to display. Each time achange is made, the change questionis asked until an N and <ENTER> isentered, and the sysgen programcontinues.
4-8 XEROX 4635 LASER PRINTING SYSTEM—SYSTEM GENERATION GUIDE
SYSGEN AND SYSGEN-RELATED PROCEDURES
Steps to perform a full sysgen (continued)
Step Action System response
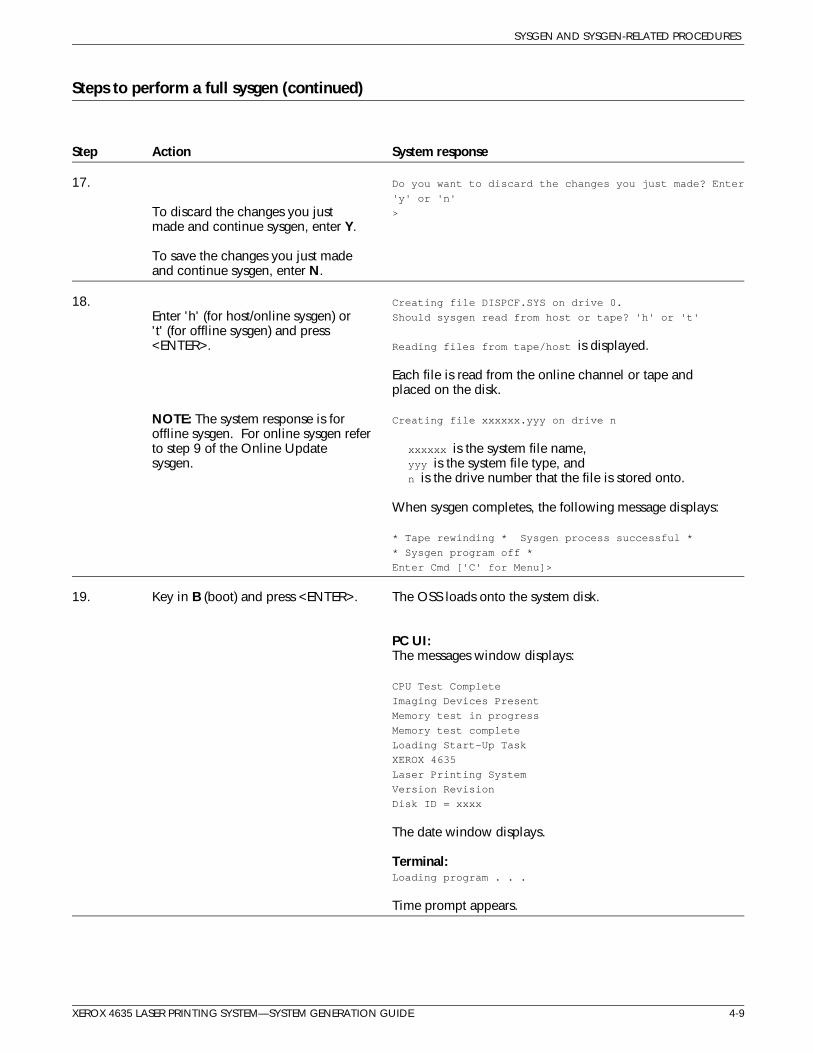
17. Do you want to discard the changes you just made? Enter
'y' or 'n'
To discard the changes you just >
made and continue sysgen, enter Y.
To save the changes you just madeand continue sysgen, enter N.
18. Creating file DISPCF.SYS on drive 0.
Enter 'h' (for host/online sysgen) or Should sysgen read from host or tape? 'h' or 't'
't' (for offline sysgen) and press<ENTER>. Reading files from tape/host is displayed.
Each file is read from the online channel or tape andplaced on the disk.
NOTE: The system response is for Creating file xxxxxx.yyy on drive n
offline sysgen. For online sysgen referto step 9 of the Online Update xxxxxx is the system file name,sysgen. yyy is the system file type, and
n is the drive number that the file is stored onto.
When sysgen completes, the following message displays:
* Tape rewinding * Sysgen process successful *
* Sysgen program off *
Enter Cmd ['C' for Menu]>
19. Key in B (boot) and press <ENTER>. The OSS loads onto the system disk.
PC UI:The messages window displays:
CPU Test Complete
Imaging Devices Present
Memory test in progress
Memory test complete
Loading Start-Up Task
XEROX 4635
Laser Printing System
Version Revision
Disk ID = xxxx
The date window displays.
Terminal:Loading program . . .
Time prompt appears.
XEROX 4635 LASER PRINTING SYSTEM—SYSTEM GENERATION GUIDE 4-9
SYSGEN AND SYSGEN-RELATED PROCEDURES
Steps to perform a full sysgen (continued)
Step Action System response
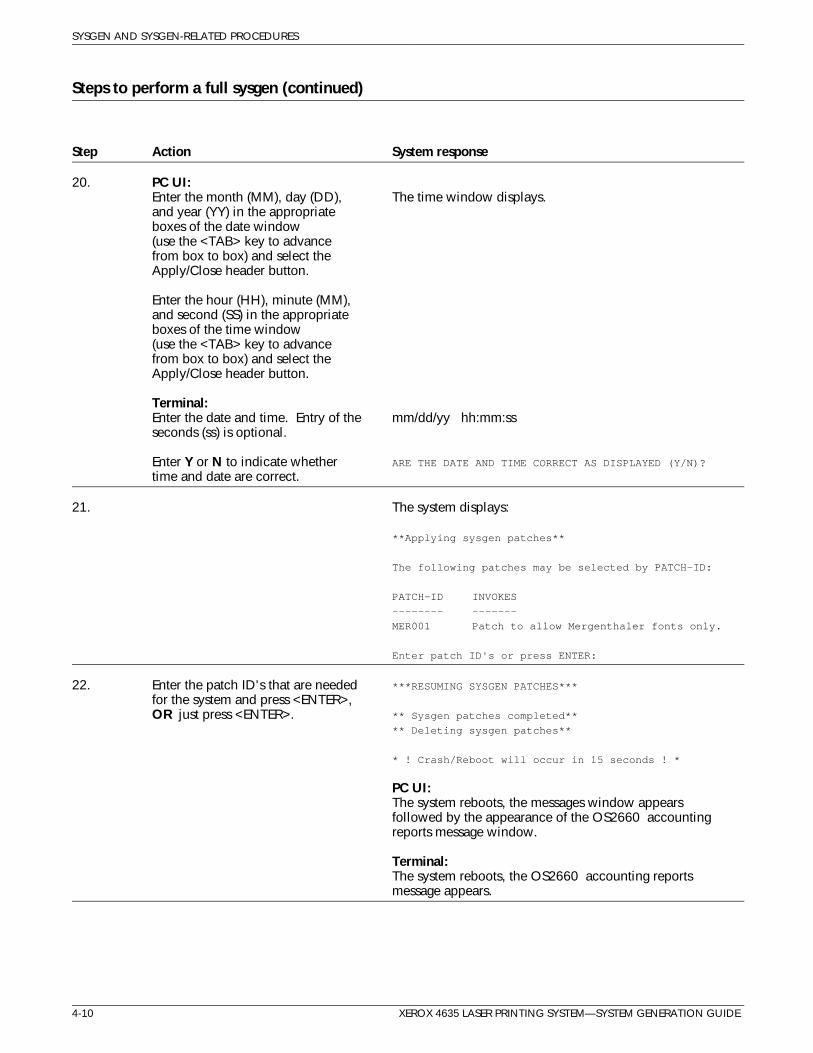
20. PC UI:Enter the month (MM), day (DD), The time window displays.and year (YY) in the appropriateboxes of the date window(use the <TAB> key to advancefrom box to box) and select theApply/Close header button.
Enter the hour (HH), minute (MM),and second (SS) in the appropriateboxes of the time window(use the <TAB> key to advancefrom box to box) and select theApply/Close header button.
Terminal:Enter the date and time. Entry of the mm/dd/yy hh:mm:ssseconds (ss) is optional.
Enter Y or N to indicate whether ARE THE DATE AND TIME CORRECT AS DISPLAYED (Y/N)?
time and date are correct.
21. The system displays:
**Applying sysgen patches**
The following patches may be selected by PATCH-ID:
PATCH-ID INVOKES
-------- -------
MER001 Patch to allow Mergenthaler fonts only.
Enter patch ID's or press ENTER:
22. Enter the patch ID's that are needed ***RESUMING SYSGEN PATCHES***
for the system and press <ENTER>,OR just press <ENTER>. ** Sysgen patches completed**
** Deleting sysgen patches**
* ! Crash/Reboot will occur in 15 seconds ! *
PC UI:The system reboots, the messages window appearsfollowed by the appearance of the OS2660 accountingreports message window.
Terminal:The system reboots, the OS2660 accounting reportsmessage appears.
4-10 XEROX 4635 LASER PRINTING SYSTEM—SYSTEM GENERATION GUIDE

SYSGEN AND SYSGEN-RELATED PROCEDURES
Steps to perform a full sysgen (continued)
Step Action System response
23. Select Yes for 2000 reports or No for100 reports. Upon your selection of Yes or No, the system begins and
completes the loading and testing process.
When complete the following displays:
; WOULD YOU LIKE TO COMPILE THE .IPM FILES AT THIS
TIME? (Y/N)
24. Enter Y and press <ENTER>. IFU IPFNTS IPFNTS
NOTE: Do not do anything with the Lists all font families as they are compiled in the followingkeyboard or mouse during this format.operation.
IF1100 Font family "(specific font family)"
Upon completion of compilation, the systemautomatically goes to logon class 1 and displays:
Class 1 selected
OS1000 Ready For Commands hh:mm:ss
25. Apply any incremental patches. Refer to the “Steps for loading incremental patches” section atthe end of this chapter.
This completes a full sysgen.
XEROX 4635 LASER PRINTING SYSTEM—SYSTEM GENERATION GUIDE 4-11
SYSGEN AND SYSGEN-RELATED PROCEDURES
Performing an offline update sysgen
When to use An offline update sysgen is normally performed for the followingpurposes:
• To add major new features to the existing operating system
• To replace the existing version of the operating system with anew version.
No disk format required System disks are not formatted prior to an update sysgen, souser files need not be backed up as long as there is sufficientroom on the disks to generate the new system.
Choosing a sysgen command
• The SYSGEN command updates system files from a systemsoftware tape (SST) or cartridge, and gives you the option ofmaking configuration changes, deleting the accounting file,and recompiling the font files.
• The AUTO command updates system files from either a SSTor a SSC. It enables you to recompile the font files. There isno configuration update, and the account file is savedautomatically.
Note: If you invoke any one of these commands after aFORMAT command, a full sysgen is performed.
Offline update sysgen procedure summary
1. Load the sysgen processor into main memory. If you areinstalling a new version of the operating system, make sureto load the new sysgen processor.
2. Install the new OSS using either the SYSGEN or AUTOcommand.
3. Apply patches.
Note: An update sysgen resets the patch history file.
4-12 XEROX 4635 LASER PRINTING SYSTEM—SYSTEM GENERATION GUIDE
SYSGEN AND SYSGEN-RELATED PROCEDURES
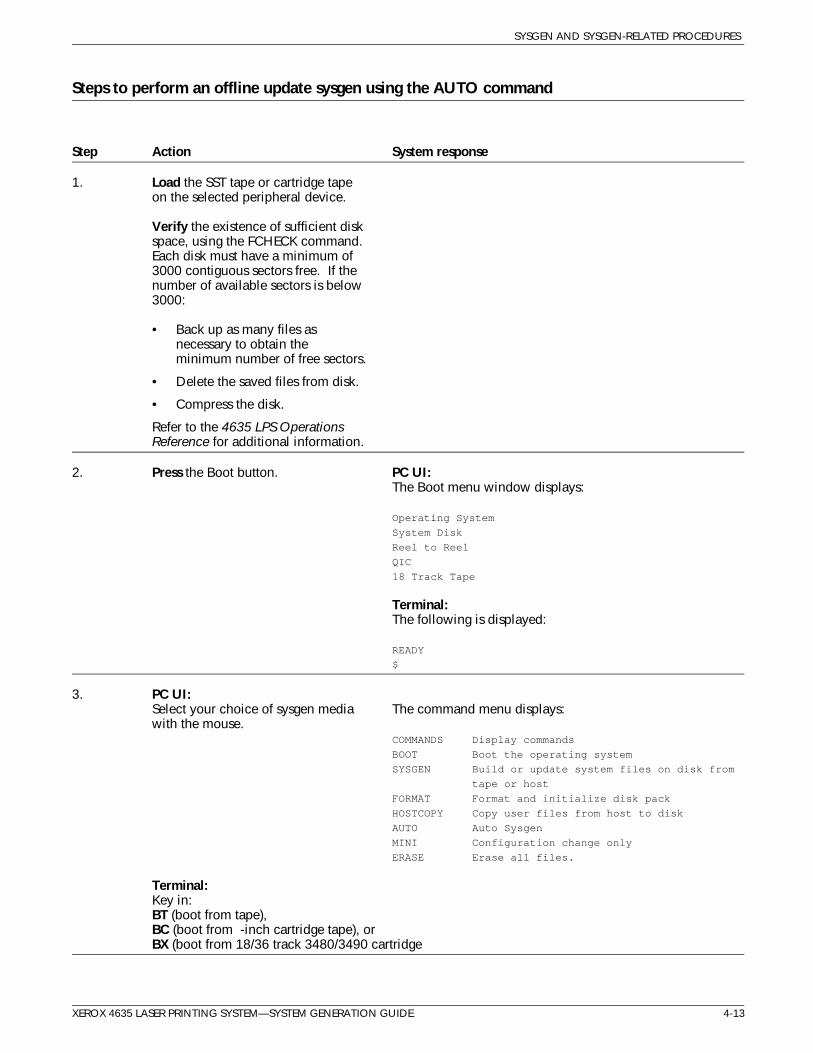
Steps to perform an offline update sysgen using the AUTO command
Step Action System response
1. Load the SST tape or cartridge tapeon the selected peripheral device.
Verify the existence of sufficient diskspace, using the FCHECK command.Each disk must have a minimum of3000 contiguous sectors free. If thenumber of available sectors is below3000:
• Back up as many files asnecessary to obtain theminimum number of free sectors.
• Delete the saved files from disk.
• Compress the disk.
Refer to the 4635 LPS Operations Reference for additional information.
2. Press the Boot button. PC UI:The Boot menu window displays:
Operating System
System Disk
Reel to Reel
QIC
18 Track Tape
Terminal:The following is displayed:
READY
$
3. PC UI:Select your choice of sysgen media The command menu displays:with the mouse.
COMMANDS Display commands
BOOT Boot the operating system
SYSGEN Build or update system files on disk from
tape or host
FORMAT Format and initialize disk pack
HOSTCOPY Copy user files from host to disk
AUTO Auto Sysgen
MINI Configuration change only
ERASE Erase all files.
Terminal:Key in:BT (boot from tape), BC (boot from -inch cartridge tape), orBX (boot from 18/36 track 3480/3490 cartridge
XEROX 4635 LASER PRINTING SYSTEM—SYSTEM GENERATION GUIDE 4-13
SYSGEN AND SYSGEN-RELATED PROCEDURES
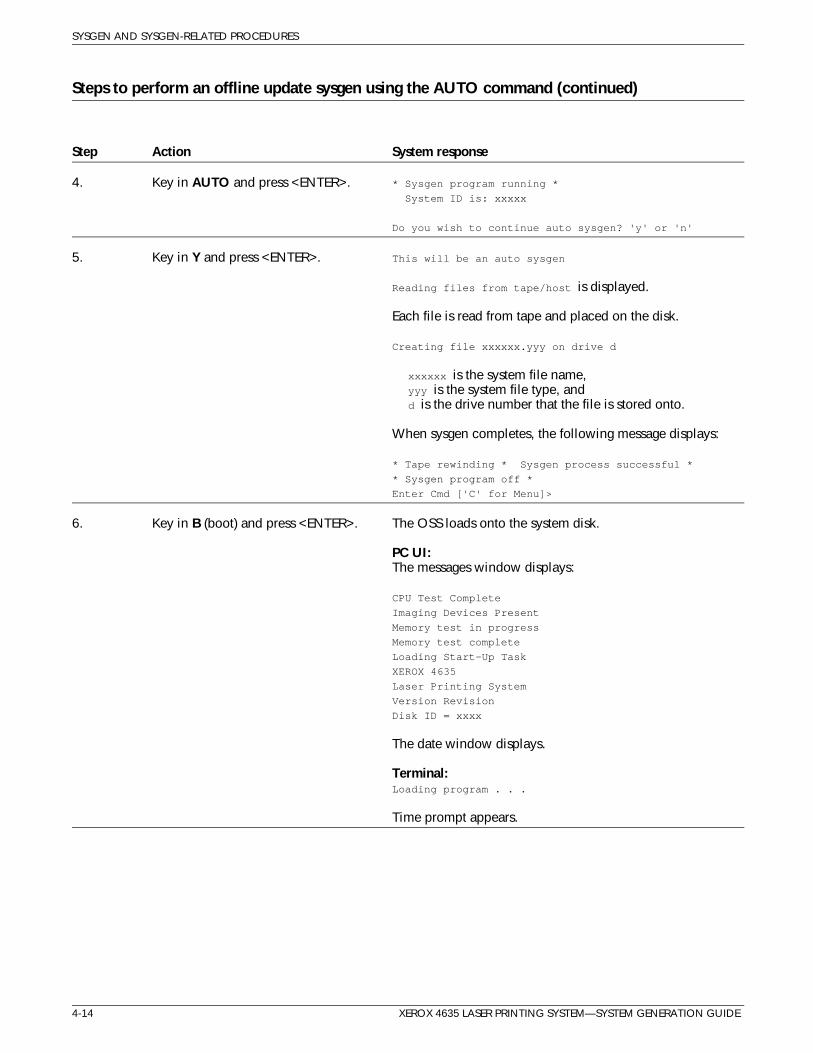
Steps to perform an offline update sysgen using the AUTO command (continued)
Step Action System response
4. Key in AUTO and press <ENTER>. * Sysgen program running *
System ID is: xxxxx
Do you wish to continue auto sysgen? 'y' or 'n'
5. Key in Y and press <ENTER>. This will be an auto sysgen
Reading files from tape/host is displayed.
Each file is read from tape and placed on the disk.
Creating file xxxxxx.yyy on drive d
xxxxxx is the system file name,yyy is the system file type, andd is the drive number that the file is stored onto.
When sysgen completes, the following message displays:
* Tape rewinding * Sysgen process successful *
* Sysgen program off *
Enter Cmd ['C' for Menu]>
6. Key in B (boot) and press <ENTER>. The OSS loads onto the system disk.
PC UI:The messages window displays:
CPU Test Complete
Imaging Devices Present
Memory test in progress
Memory test complete
Loading Start-Up Task
XEROX 4635
Laser Printing System
Version Revision
Disk ID = xxxx
The date window displays.
Terminal:Loading program . . .
Time prompt appears.
4-14 XEROX 4635 LASER PRINTING SYSTEM—SYSTEM GENERATION GUIDE
SYSGEN AND SYSGEN-RELATED PROCEDURES
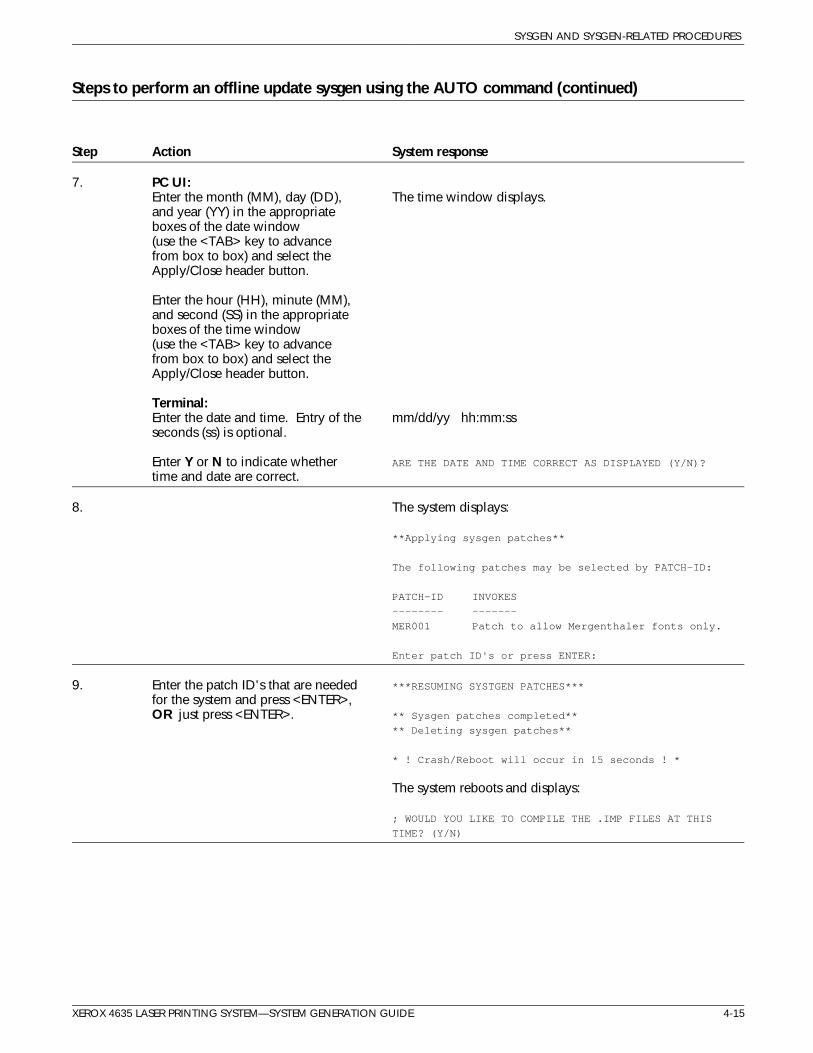
Steps to perform an offline update sysgen using the AUTO command (continued)
Step Action System response
7. PC UI:Enter the month (MM), day (DD), The time window displays.and year (YY) in the appropriateboxes of the date window(use the <TAB> key to advancefrom box to box) and select theApply/Close header button.
Enter the hour (HH), minute (MM),and second (SS) in the appropriateboxes of the time window(use the <TAB> key to advancefrom box to box) and select theApply/Close header button.
Terminal:Enter the date and time. Entry of the mm/dd/yy hh:mm:ssseconds (ss) is optional.
Enter Y or N to indicate whether ARE THE DATE AND TIME CORRECT AS DISPLAYED (Y/N)?
time and date are correct.
8. The system displays:
**Applying sysgen patches**
The following patches may be selected by PATCH-ID:
PATCH-ID INVOKES
-------- -------
MER001 Patch to allow Mergenthaler fonts only.
Enter patch ID's or press ENTER:
9. Enter the patch ID's that are needed ***RESUMING SYSTGEN PATCHES***
for the system and press <ENTER>,OR just press <ENTER>. ** Sysgen patches completed**
** Deleting sysgen patches**
* ! Crash/Reboot will occur in 15 seconds ! *
The system reboots and displays:
; WOULD YOU LIKE TO COMPILE THE .IMP FILES AT THIS
TIME? (Y/N)
XEROX 4635 LASER PRINTING SYSTEM—SYSTEM GENERATION GUIDE 4-15
SYSGEN AND SYSGEN-RELATED PROCEDURES
Steps to perform an offline update sysgen using the AUTO command (continued)
Step Action System response
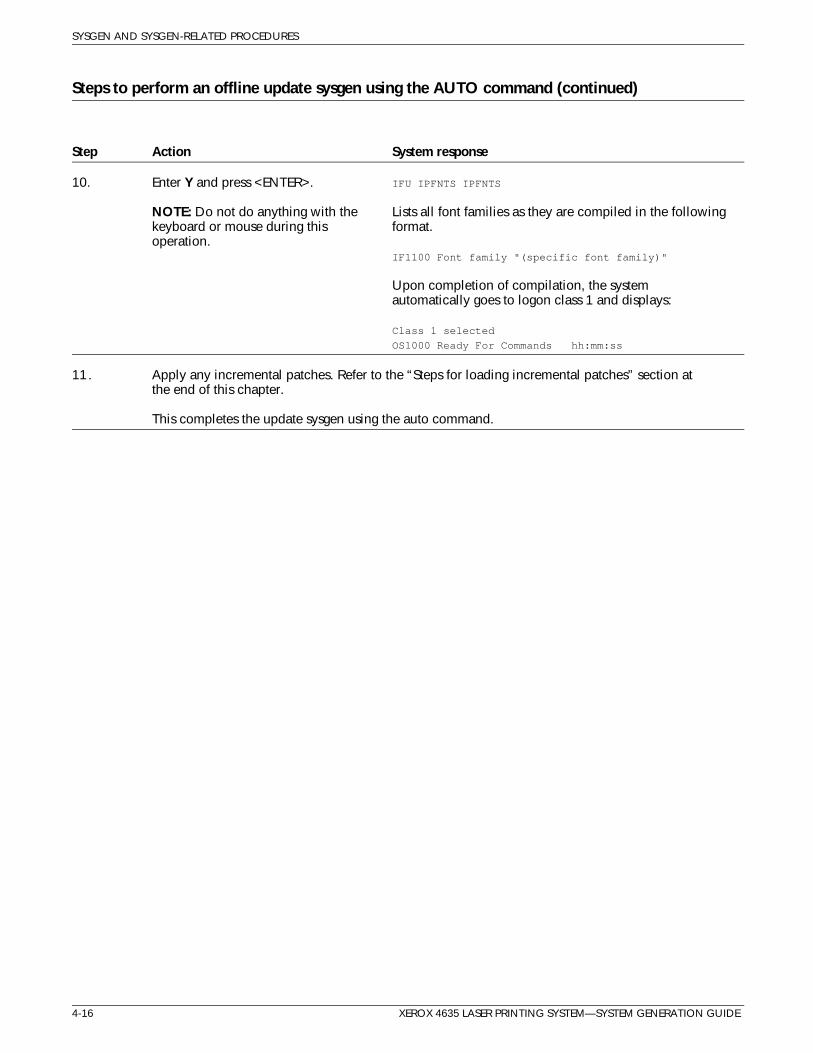
10. Enter Y and press <ENTER>. IFU IPFNTS IPFNTS
NOTE: Do not do anything with the Lists all font families as they are compiled in the followingkeyboard or mouse during this format.operation.
IF1100 Font family "(specific font family)"
Upon completion of compilation, the systemautomatically goes to logon class 1 and displays:
Class 1 selected
OS1000 Ready For Commands hh:mm:ss
11. Apply any incremental patches. Refer to the “Steps for loading incremental patches” section atthe end of this chapter.
This completes the update sysgen using the auto command.
4-16 XEROX 4635 LASER PRINTING SYSTEM—SYSTEM GENERATION GUIDE

SYSGEN AND SYSGEN-RELATED PROCEDURES
Steps to perform an offline update sysgen using the SYSGEN command
Step Action System response
1. Load the SST tape or cartridge tapeon the selected peripheral device.
Verify the existence of sufficient diskspace, using the FCHECK command.Each disk must have a minimum of3000 contiguous sectors free. If thenumber of available sectors is below3000:
• Back up as many files asnecessary to obtain theminimum number of free sectors.
• Delete the saved files from disk.
• Compress the disk.
Refer to the 4635 LPS Operations Reference for additional information.
2. Press the Boot button. PC UI:The Boot menu window displays:
Operating System
System Disk
Reel to Reel
QIC
18 Track Tape
Terminal:The following is displayed:
READY
$
3. PC UI:Select your choice of sysgen media The command menu displays:with the mouse.
COMMANDS Display commands
BOOT Boot the operating system
SYSGEN Build or update system files on disk from
tape or host
FORMAT Format and initialize disk pack
HOSTCOPY Copy user files from host to disk
AUTO Auto Sysgen
MINI Configuration change only
ERASE Erase all files.
Terminal:Key in:BT (boot from tape), BC (boot from -inch cartridge tape), orBX (boot from 18/36 track 3480/3490 cartridge
XEROX 4635 LASER PRINTING SYSTEM—SYSTEM GENERATION GUIDE 4-17

SYSGEN AND SYSGEN-RELATED PROCEDURES
Steps to perform an offline update sysgen using the SYSGEN command (continued)
Step Action System response
4. Key in SYSGEN and press <ENTER> * Sysgen program running *
System ID is: xxxxx
Do you want to enter a new system id? 'y' or 'n'
5. Enter N and <ENTER> to allow thesysgen to continue. Go to step 7.
6. Enter Y and <ENTER> to allow thepreviously entered ID to be changed. Enter system ID of up to 30 characters
....*....*....*....*....*....*
Key in the new ID and press >
<ENTER>. System ID IS: xxxxx
Do you want to enter a new system id? 'y or 'n'
NOTE: When you enter no, sysgenwill continue. If you enter yes,you will be able to change thesystem ID again.
7. Do you want to save the accounting file? enter 'y' or
'n'
Enter Y or N and press <ENTER>.
8. The base configuration and the system configurationoptions are displayed followed by:
Do you wish to make any changes? Enter 'y' or 'n'
Enter Y or N and <ENTER>. A Y >
and <ENTER> response causes thechange menu to display. Each time achange is made, the change questionis asked until an N and <ENTER> isentered, and the sysgen programcontinues.
9. Do you want to discard the changes you just made? Enter
'y' or 'n''
To discard the changes you just >
made and continue sysgen, enter Y.
To save the changes you just madeand continue sysgen, enter N. Is continuation of sysgen required? (y or n)
Enter Y and <ENTER>. Should sysgen read from host or tape? 'h' or 't'
4-18 XEROX 4635 LASER PRINTING SYSTEM—SYSTEM GENERATION GUIDE
SYSGEN AND SYSGEN-RELATED PROCEDURES
Steps to perform an offline update sysgen using the SYSGEN command (continued)
Step Action System response
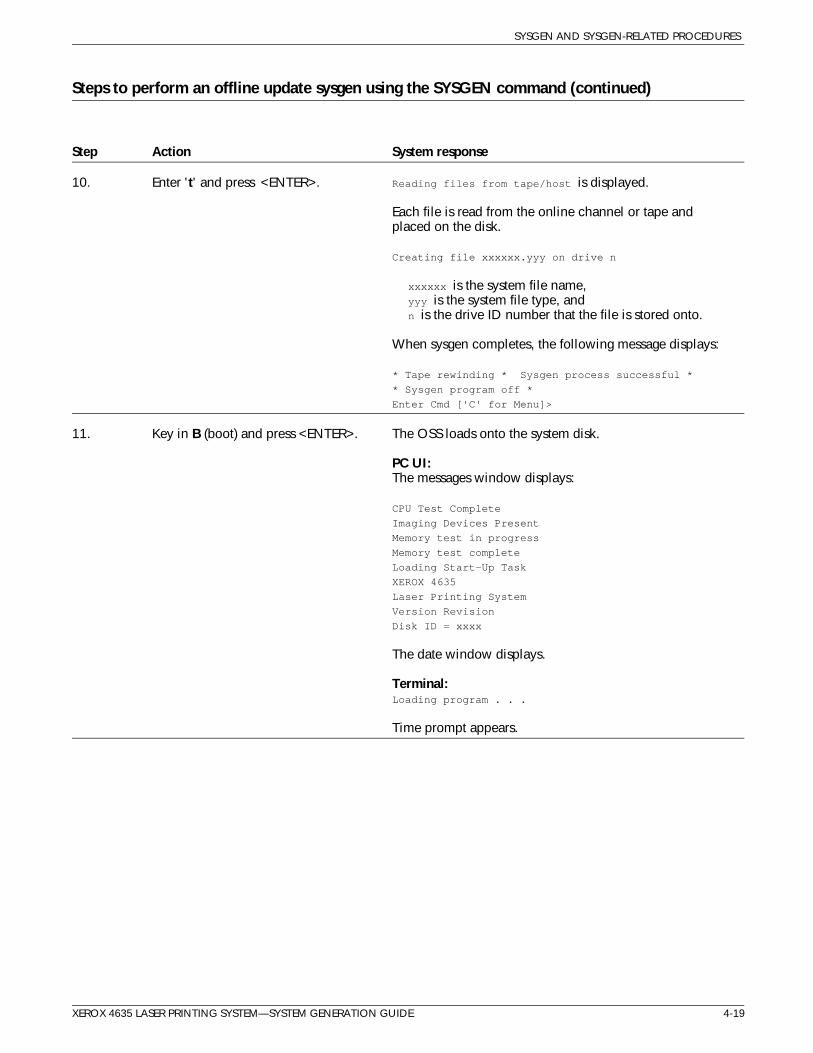
10. Enter 't' and press <ENTER>. Reading files from tape/host is displayed.
Each file is read from the online channel or tape andplaced on the disk.
Creating file xxxxxx.yyy on drive n
xxxxxx is the system file name,yyy is the system file type, andn is the drive ID number that the file is stored onto.
When sysgen completes, the following message displays:
* Tape rewinding * Sysgen process successful *
* Sysgen program off *
Enter Cmd ['C' for Menu]>
11. Key in B (boot) and press <ENTER>. The OSS loads onto the system disk.
PC UI:The messages window displays:
CPU Test Complete
Imaging Devices Present
Memory test in progress
Memory test complete
Loading Start-Up Task
XEROX 4635
Laser Printing System
Version Revision
Disk ID = xxxx
The date window displays.
Terminal:Loading program . . .
Time prompt appears.
XEROX 4635 LASER PRINTING SYSTEM—SYSTEM GENERATION GUIDE 4-19
SYSGEN AND SYSGEN-RELATED PROCEDURES
Steps to perform an offline update sysgen using the SYSGEN command (continued)
Step Action System response
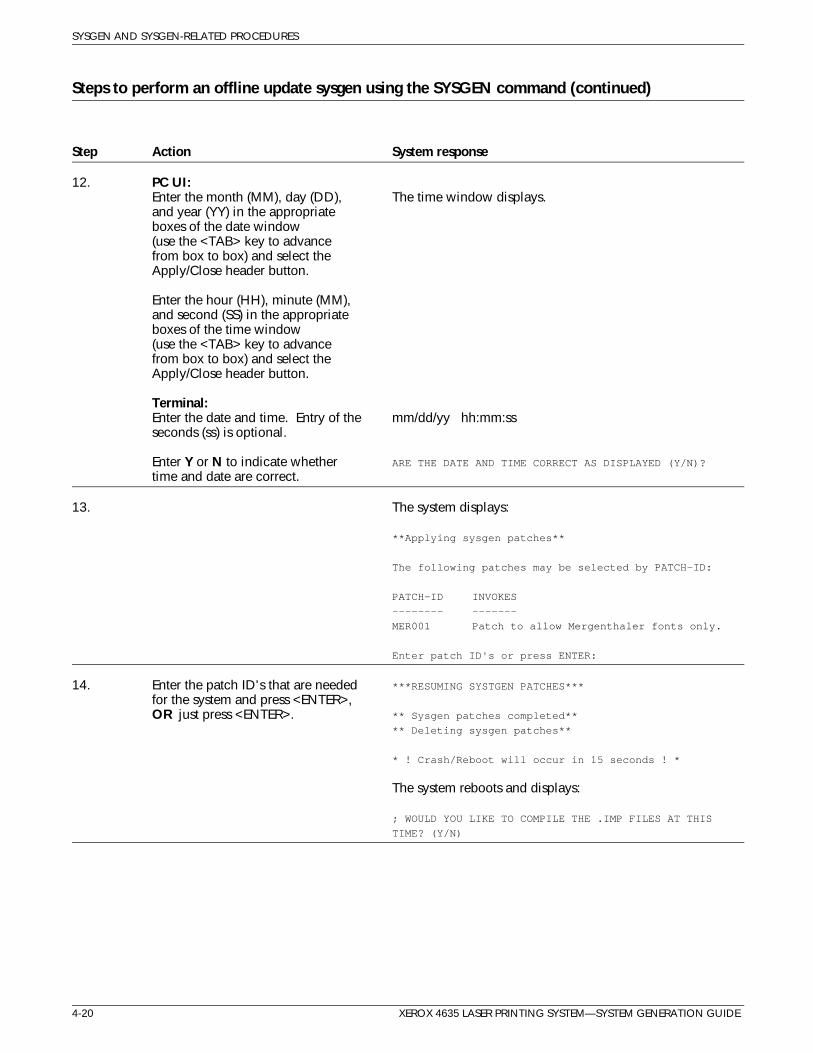
12. PC UI:Enter the month (MM), day (DD), The time window displays.and year (YY) in the appropriateboxes of the date window(use the <TAB> key to advancefrom box to box) and select theApply/Close header button.
Enter the hour (HH), minute (MM),and second (SS) in the appropriateboxes of the time window(use the <TAB> key to advancefrom box to box) and select theApply/Close header button.
Terminal:Enter the date and time. Entry of the mm/dd/yy hh:mm:ssseconds (ss) is optional.
Enter Y or N to indicate whether ARE THE DATE AND TIME CORRECT AS DISPLAYED (Y/N)?
time and date are correct.
13. The system displays:
**Applying sysgen patches**
The following patches may be selected by PATCH-ID:
PATCH-ID INVOKES
-------- -------
MER001 Patch to allow Mergenthaler fonts only.
Enter patch ID's or press ENTER:
14. Enter the patch ID's that are needed ***RESUMING SYSTGEN PATCHES***
for the system and press <ENTER>,OR just press <ENTER>. ** Sysgen patches completed**
** Deleting sysgen patches**
* ! Crash/Reboot will occur in 15 seconds ! *
The system reboots and displays:
; WOULD YOU LIKE TO COMPILE THE .IMP FILES AT THIS
TIME? (Y/N)
4-20 XEROX 4635 LASER PRINTING SYSTEM—SYSTEM GENERATION GUIDE

SYSGEN AND SYSGEN-RELATED PROCEDURES
Steps to perform an offline update sysgen using the SYSGEN command (continued)
Step Action System response
15. Enter Y and press <ENTER>. IFU IPFNTS IPFNTS
NOTE: Do not do anything with the Lists all font families as they are compiled in the followingkeyboard or mouse during this format.operation.
IF1100 Font family "(specific font family)"
Upon completion of compilation, the systemautomatically goes to logon class 1 and displays:
Class 1 selected
OS1000 Ready For Commands hh:mm:ss
16. Apply any incremental patches. Refer to the “Steps for loading incremental patches” section atthe end of this chapter.
This completes update sysgen using the sysgen command.
XEROX 4635 LASER PRINTING SYSTEM—SYSTEM GENERATION GUIDE 4-21
SYSGEN AND SYSGEN-RELATED PROCEDURES
Performing an online update sysgen
When to use You can use the SYSGEN command to download SST files from ahost computer to an online-only or an online/offline switchableprinting system to generate a new system. This type of sysgen isnormally performed for the following purposes:
• To add major new features to the existing operating system
• To replace the existing version of the operating system with anew version.
No disk format required System disks are not formatted prior to an update sysgen. Youdo not need to back up your files as long as there is sufficient room on the disks to generate the new system.
Online update sysgen procedure summary
1. Load the current sysgen processor into main memory.
2. Use a SYSGEN command to download the new sysgenprocessor into main memory.
3. Use another SYSGEN command to download system files thatare then used by the processor to build the new operatingsystem.
4. Apply patches.
Note: An update sysgen resets the patch history file.
4-22 XEROX 4635 LASER PRINTING SYSTEM—SYSTEM GENERATION GUIDE
SYSGEN AND SYSGEN-RELATED PROCEDURES
Steps to perform an online update sysgen
Step Action System response
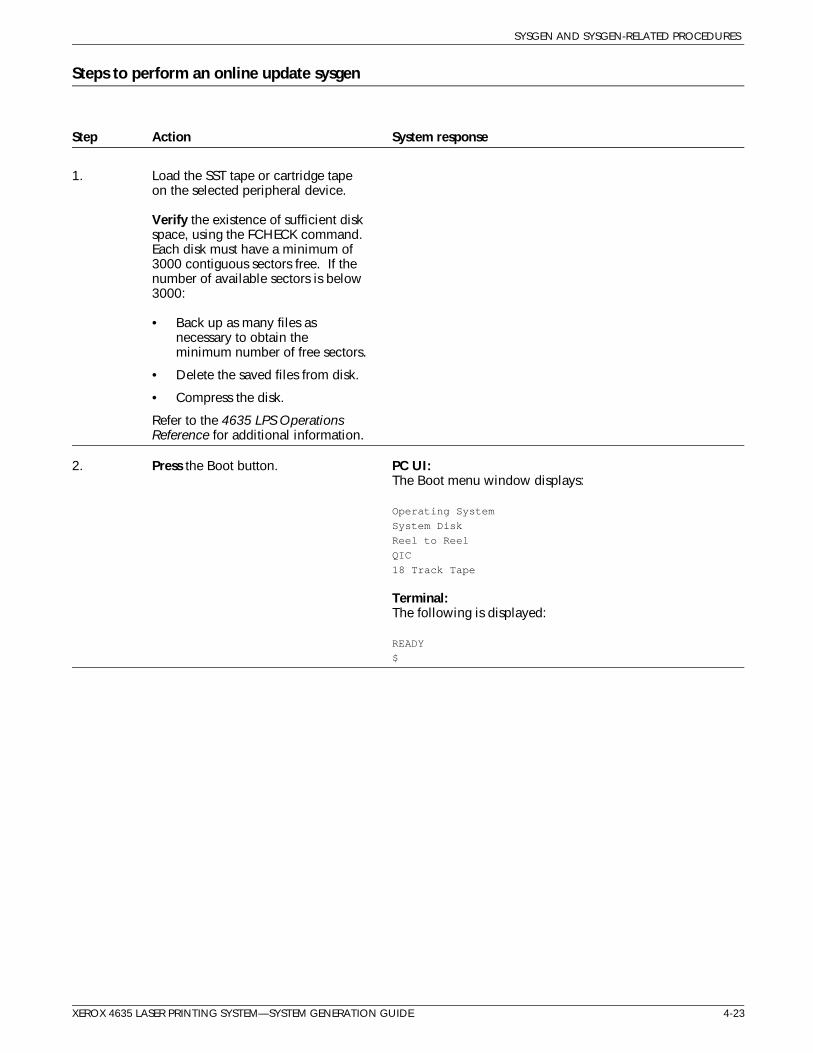
1. Load the SST tape or cartridge tapeon the selected peripheral device.
Verify the existence of sufficient diskspace, using the FCHECK command.Each disk must have a minimum of3000 contiguous sectors free. If thenumber of available sectors is below3000:
• Back up as many files asnecessary to obtain theminimum number of free sectors.
• Delete the saved files from disk.
• Compress the disk.
Refer to the 4635 LPS Operations Reference for additional information.
2. Press the Boot button. PC UI:The Boot menu window displays:
Operating System
System Disk
Reel to Reel
QIC
18 Track Tape
Terminal:The following is displayed:
READY
$
XEROX 4635 LASER PRINTING SYSTEM—SYSTEM GENERATION GUIDE 4-23
SYSGEN AND SYSGEN-RELATED PROCEDURES
Steps to perform an online update sysgen (continued)
Step Action System response
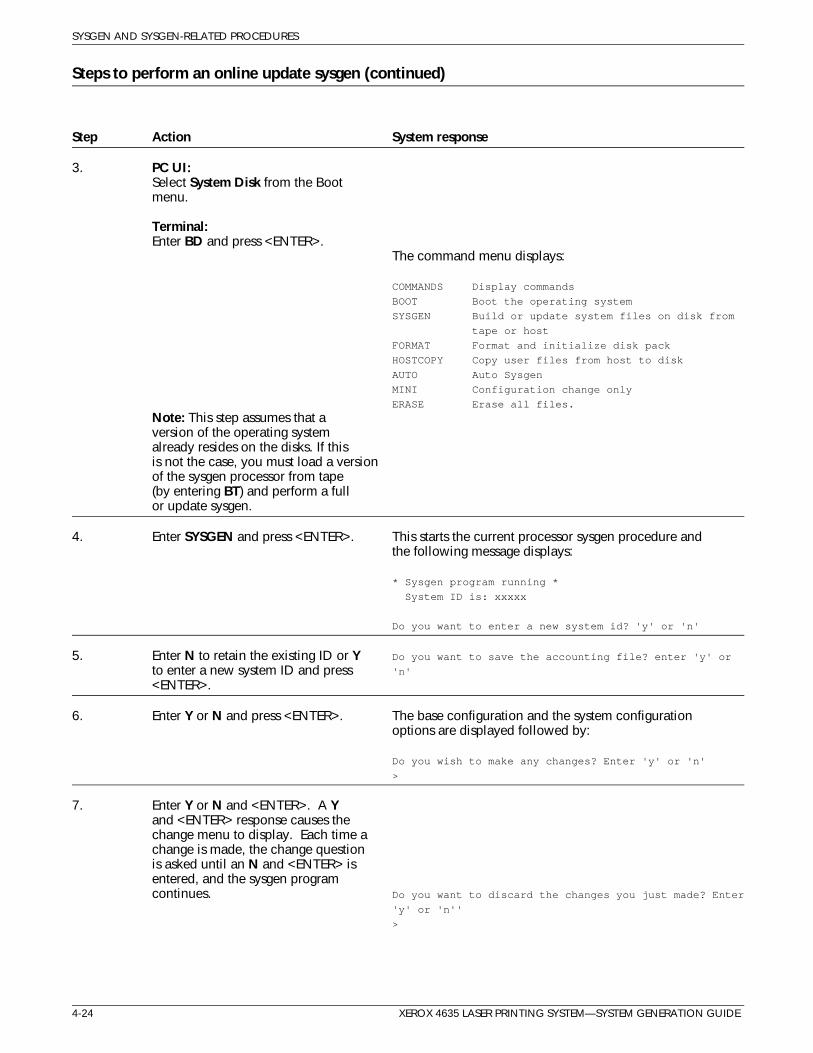
3. PC UI:Select System Disk from the Bootmenu.
Terminal:Enter BD and press <ENTER>.
The command menu displays:
COMMANDS Display commands
BOOT Boot the operating system
SYSGEN Build or update system files on disk from
tape or host
FORMAT Format and initialize disk pack
HOSTCOPY Copy user files from host to disk
AUTO Auto Sysgen
MINI Configuration change only
ERASE Erase all files.
Note: This step assumes that aversion of the operating systemalready resides on the disks. If thisis not the case, you must load a versionof the sysgen processor from tape(by entering BT) and perform a fullor update sysgen.
4. Enter SYSGEN and press <ENTER>. This starts the current processor sysgen procedure andthe following message displays:
* Sysgen program running *
System ID is: xxxxx
Do you want to enter a new system id? 'y' or 'n'
5. Enter N to retain the existing ID or Y Do you want to save the accounting file? enter 'y' or
to enter a new system ID and press 'n'
<ENTER>.
6. Enter Y or N and press <ENTER>. The base configuration and the system configurationoptions are displayed followed by:
Do you wish to make any changes? Enter 'y' or 'n'
>
7. Enter Y or N and <ENTER>. A Yand <ENTER> response causes thechange menu to display. Each time achange is made, the change questionis asked until an N and <ENTER> isentered, and the sysgen programcontinues. Do you want to discard the changes you just made? Enter
'y' or 'n''
>
4-24 XEROX 4635 LASER PRINTING SYSTEM—SYSTEM GENERATION GUIDE
SYSGEN AND SYSGEN-RELATED PROCEDURES
Steps to perform an online update sysgen (continued)
Step Action System response
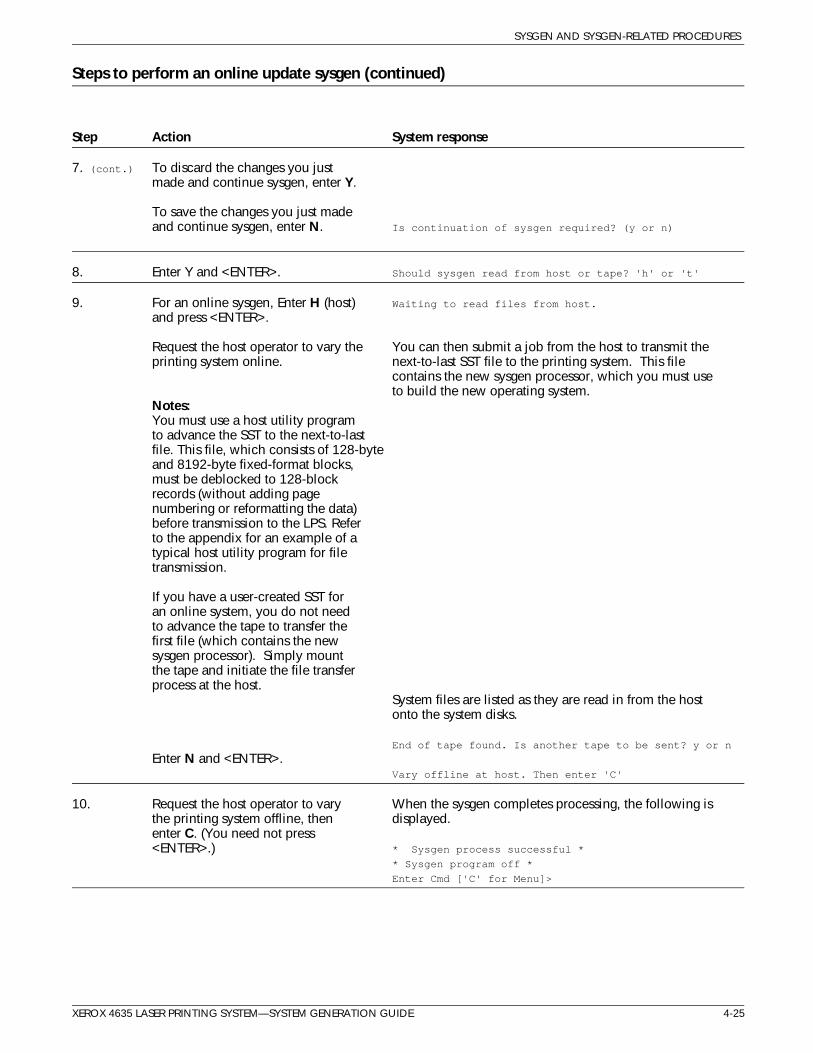
7. (cont.) To discard the changes you justmade and continue sysgen, enter Y.
To save the changes you just madeand continue sysgen, enter N. Is continuation of sysgen required? (y or n)
8. Enter Y and <ENTER>. Should sysgen read from host or tape? 'h' or 't'
9. For an online sysgen, Enter H (host) Waiting to read files from host.
and press <ENTER>.
Request the host operator to vary the You can then submit a job from the host to transmit the printing system online. next-to-last SST file to the printing system. This file
contains the new sysgen processor, which you must useto build the new operating system.
Notes:You must use a host utility programto advance the SST to the next-to-lastfile. This file, which consists of 128-byteand 8192-byte fixed-format blocks,must be deblocked to 128-blockrecords (without adding pagenumbering or reformatting the data)before transmission to the LPS. Referto the appendix for an example of atypical host utility program for filetransmission.
If you have a user-created SST foran online system, you do not needto advance the tape to transfer thefirst file (which contains the newsysgen processor). Simply mountthe tape and initiate the file transferprocess at the host.
System files are listed as they are read in from the hostonto the system disks.
End of tape found. Is another tape to be sent? y or n
Enter N and <ENTER>.Vary offline at host. Then enter 'C'
10. Request the host operator to vary When the sysgen completes processing, the following is the printing system offline, then displayed.enter C. (You need not press<ENTER>.) * Sysgen process successful *
* Sysgen program off *
Enter Cmd ['C' for Menu]>
XEROX 4635 LASER PRINTING SYSTEM—SYSTEM GENERATION GUIDE 4-25

SYSGEN AND SYSGEN-RELATED PROCEDURES
Steps to perform an online update sysgen (continued)
Step Action System response
11. Press the Boot button. PC UI:The Boot menu window displays:
Operating System
System Disk
Reel to Reel
QIC
18 Track Tape
Terminal:The following is displayed:
READY
$
12. PC UI: This loads the new sysgen processor, that you just Select System Disk from the Boot retrieved from the host, into main memory from the menu. system disks.
Terminal:Enter BD and press <ENTER>. The command menu displays:
COMMANDS Display commands
BOOT Boot the operating system
SYSGEN Build or update system files on disk from
tape or host
FORMAT Format and initialize disk pack
HOSTCOPY Copy user files from host to disk
AUTO Auto Sysgen
MINI Configuration change only
ERASE Erase all files.
13. Enter SYSGEN and press <ENTER>. This starts the sysgen procedure from the new sysgenprocessor.
* Sysgen program running *
System ID is: xxxxx
Do you want to enter a new system id? 'y' or 'n'
14. Enter N to retain the existing ID or Y Do you want to save the accounting file? enter 'y' or
to enter a new system ID and press 'n'
<ENTER>.
15. Enter Y or N and press <ENTER>. The base configuration and the system configurationoptions are displayed followed by:
Do you wish to make any changes? Enter 'y' or 'n'
>
4-26 XEROX 4635 LASER PRINTING SYSTEM—SYSTEM GENERATION GUIDE
SYSGEN AND SYSGEN-RELATED PROCEDURES
Steps to perform an online update sysgen (continued)
Step Action System response
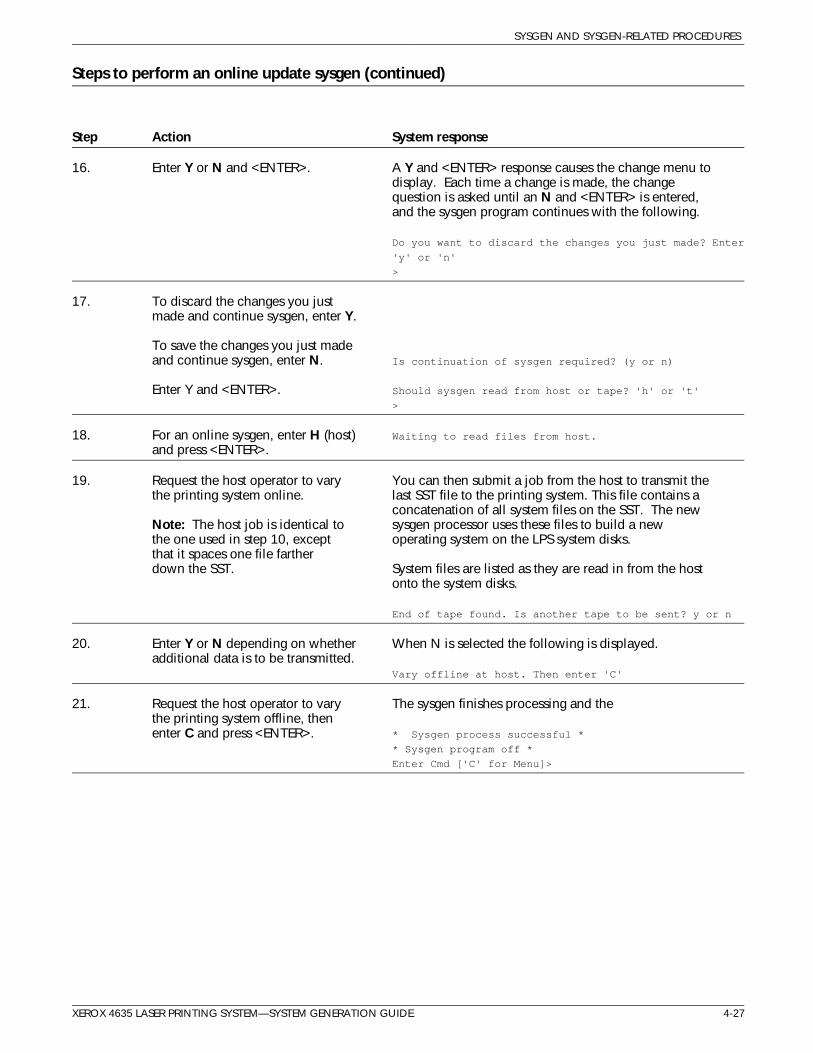
16. Enter Y or N and <ENTER>. A Y and <ENTER> response causes the change menu todisplay. Each time a change is made, the changequestion is asked until an N and <ENTER> is entered,and the sysgen program continues with the following.
Do you want to discard the changes you just made? Enter
'y' or 'n'
>
17. To discard the changes you justmade and continue sysgen, enter Y.
To save the changes you just madeand continue sysgen, enter N. Is continuation of sysgen required? (y or n)
Enter Y and <ENTER>. Should sysgen read from host or tape? 'h' or 't'
>
18. For an online sysgen, enter H (host) Waiting to read files from host.
and press <ENTER>.
19. Request the host operator to vary You can then submit a job from the host to transmit the the printing system online. last SST file to the printing system. This file contains a
concatenation of all system files on the SST. The new Note: The host job is identical to sysgen processor uses these files to build a new the one used in step 10, except operating system on the LPS system disks.that it spaces one file fartherdown the SST. System files are listed as they are read in from the host
onto the system disks.
End of tape found. Is another tape to be sent? y or n
20. Enter Y or N depending on whether When N is selected the following is displayed.additional data is to be transmitted.
Vary offline at host. Then enter 'C'
21. Request the host operator to vary The sysgen finishes processing and the the printing system offline, thenenter C and press <ENTER>. * Sysgen process successful *
* Sysgen program off *
Enter Cmd ['C' for Menu]>
XEROX 4635 LASER PRINTING SYSTEM—SYSTEM GENERATION GUIDE 4-27
SYSGEN AND SYSGEN-RELATED PROCEDURES
Steps to perform an online update sysgen (continued)
Step Action System response
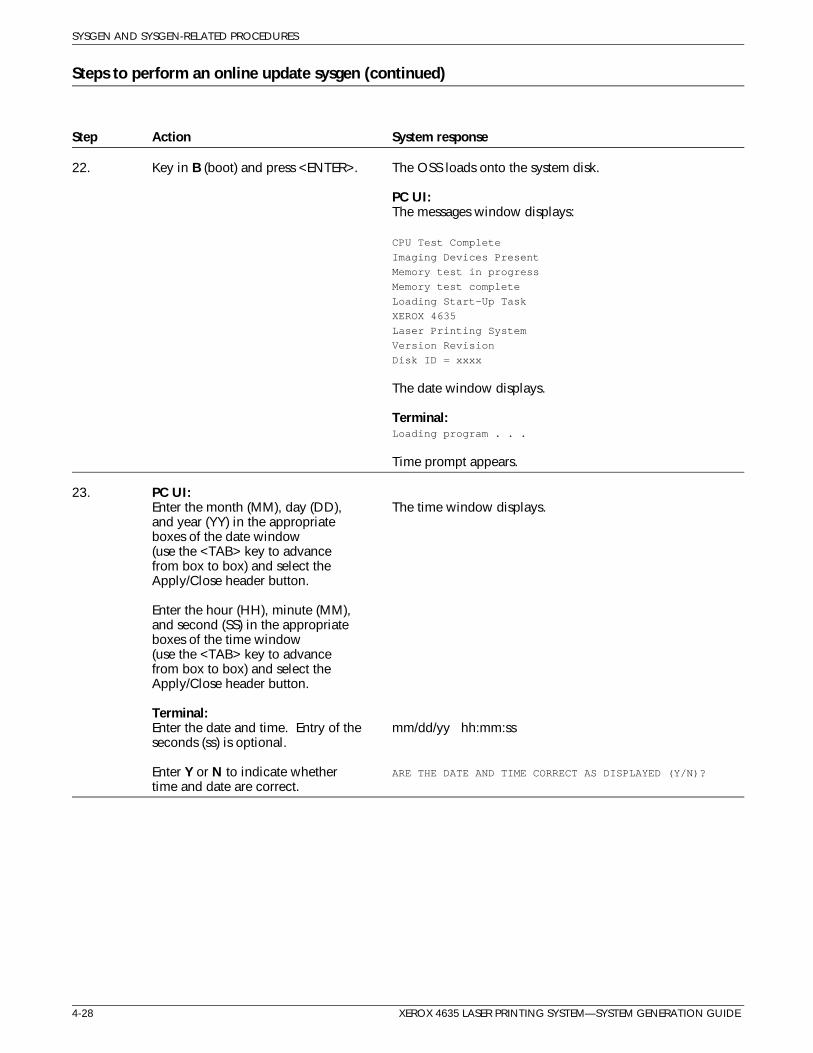
22. Key in B (boot) and press <ENTER>. The OSS loads onto the system disk.
PC UI:The messages window displays:
CPU Test Complete
Imaging Devices Present
Memory test in progress
Memory test complete
Loading Start-Up Task
XEROX 4635
Laser Printing System
Version Revision
Disk ID = xxxx
The date window displays.
Terminal:Loading program . . .
Time prompt appears.
23. PC UI:Enter the month (MM), day (DD), The time window displays.and year (YY) in the appropriateboxes of the date window(use the <TAB> key to advancefrom box to box) and select theApply/Close header button.
Enter the hour (HH), minute (MM),and second (SS) in the appropriateboxes of the time window(use the <TAB> key to advancefrom box to box) and select theApply/Close header button.
Terminal:Enter the date and time. Entry of the mm/dd/yy hh:mm:ssseconds (ss) is optional.
Enter Y or N to indicate whether ARE THE DATE AND TIME CORRECT AS DISPLAYED (Y/N)?
time and date are correct.
4-28 XEROX 4635 LASER PRINTING SYSTEM—SYSTEM GENERATION GUIDE
SYSGEN AND SYSGEN-RELATED PROCEDURES
Steps to perform an online update sysgen (continued)
Step Action System response
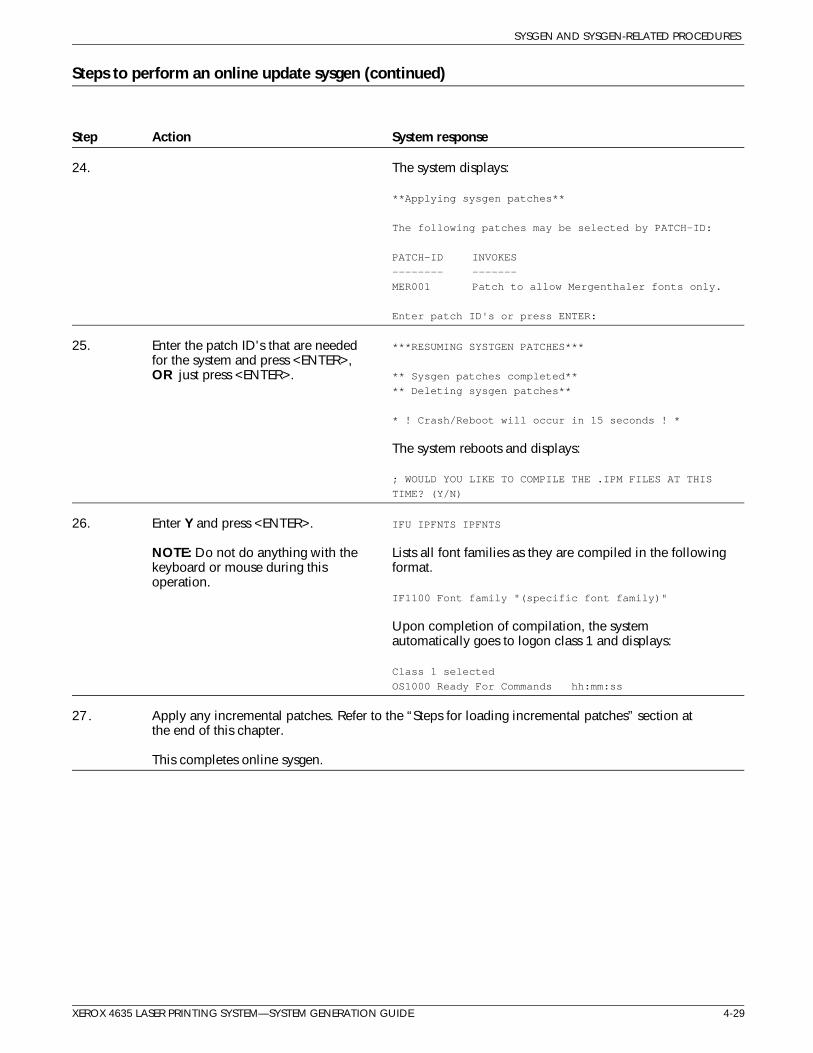
24. The system displays:
**Applying sysgen patches**
The following patches may be selected by PATCH-ID:
PATCH-ID INVOKES
-------- -------
MER001 Patch to allow Mergenthaler fonts only.
Enter patch ID's or press ENTER:
25. Enter the patch ID's that are needed ***RESUMING SYSTGEN PATCHES***
for the system and press <ENTER>,OR just press <ENTER>. ** Sysgen patches completed**
** Deleting sysgen patches**
* ! Crash/Reboot will occur in 15 seconds ! *
The system reboots and displays:
; WOULD YOU LIKE TO COMPILE THE .IPM FILES AT THIS
TIME? (Y/N)
26. Enter Y and press <ENTER>. IFU IPFNTS IPFNTS
NOTE: Do not do anything with the Lists all font families as they are compiled in the followingkeyboard or mouse during this format.operation.
IF1100 Font family "(specific font family)"
Upon completion of compilation, the systemautomatically goes to logon class 1 and displays:
Class 1 selected
OS1000 Ready For Commands hh:mm:ss
27. Apply any incremental patches. Refer to the “Steps for loading incremental patches” section atthe end of this chapter.
This completes online sysgen.
XEROX 4635 LASER PRINTING SYSTEM—SYSTEM GENERATION GUIDE 4-29
SYSGEN AND SYSGEN-RELATED PROCEDURES
Performing a mini sysgen
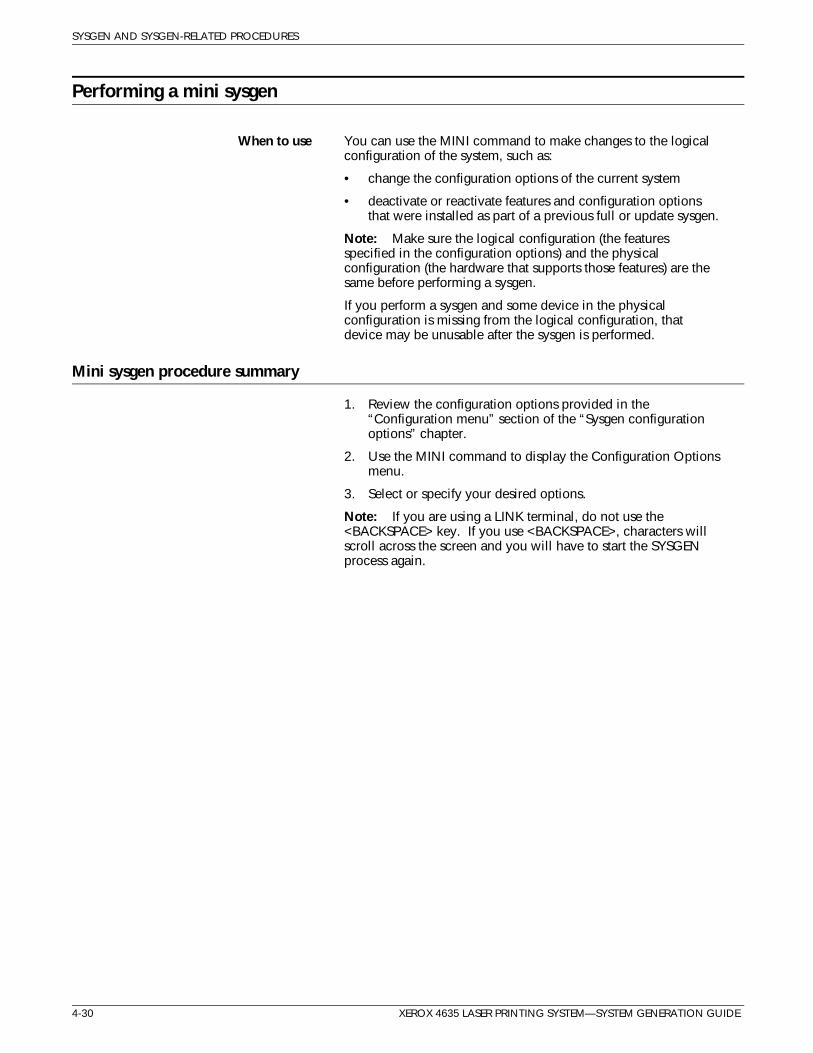
When to use You can use the MINI command to make changes to the logicalconfiguration of the system, such as:
• change the configuration options of the current system
• deactivate or reactivate features and configuration optionsthat were installed as part of a previous full or update sysgen.
Note: Make sure the logical configuration (the featuresspecified in the configuration options) and the physicalconfiguration (the hardware that supports those features) are thesame before performing a sysgen.
If you perform a sysgen and some device in the physicalconfiguration is missing from the logical configuration, thatdevice may be unusable after the sysgen is performed.
Mini sysgen procedure summary
1. Review the configuration options provided in the“Configuration menu” section of the “Sysgen configurationoptions” chapter.
2. Use the MINI command to display the Configuration Optionsmenu.
3. Select or specify your desired options.
Note: If you are using a LINK terminal, do not use the<BACKSPACE> key. If you use <BACKSPACE>, characters willscroll across the screen and you will have to start the SYSGENprocess again.
4-30 XEROX 4635 LASER PRINTING SYSTEM—SYSTEM GENERATION GUIDE
SYSGEN AND SYSGEN-RELATED PROCEDURES
Steps to perform a mini sysgen
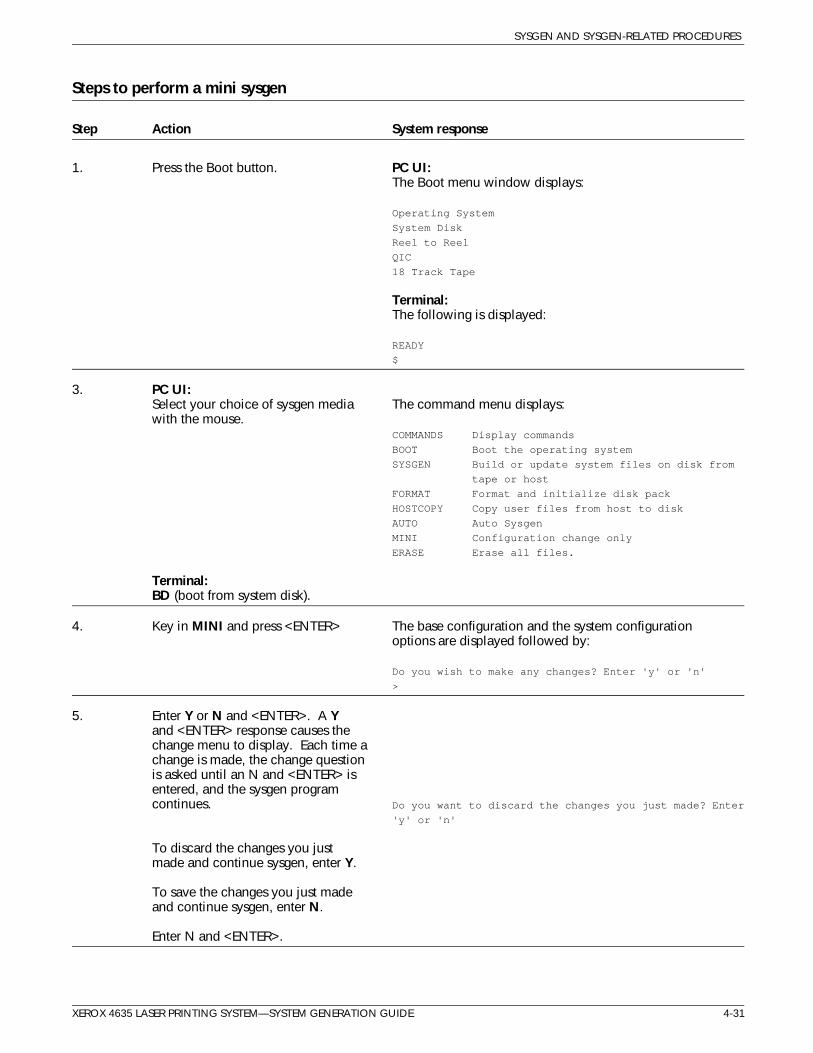
Step Action System response
1. Press the Boot button. PC UI:The Boot menu window displays:
Operating System
System Disk
Reel to Reel
QIC
18 Track Tape
Terminal:The following is displayed:
READY
$
3. PC UI:Select your choice of sysgen media The command menu displays:with the mouse.
COMMANDS Display commands
BOOT Boot the operating system
SYSGEN Build or update system files on disk from
tape or host
FORMAT Format and initialize disk pack
HOSTCOPY Copy user files from host to disk
AUTO Auto Sysgen
MINI Configuration change only
ERASE Erase all files.
Terminal:BD (boot from system disk).
4. Key in MINI and press <ENTER> The base configuration and the system configurationoptions are displayed followed by:
Do you wish to make any changes? Enter 'y' or 'n'
>
5. Enter Y or N and <ENTER>. A Yand <ENTER> response causes thechange menu to display. Each time achange is made, the change questionis asked until an N and <ENTER> isentered, and the sysgen programcontinues. Do you want to discard the changes you just made? Enter
'y' or 'n'
To discard the changes you justmade and continue sysgen, enter Y.
To save the changes you just madeand continue sysgen, enter N.
Enter N and <ENTER>.
XEROX 4635 LASER PRINTING SYSTEM—SYSTEM GENERATION GUIDE 4-31
SYSGEN AND SYSGEN-RELATED PROCEDURES
Steps to perform a mini sysgen (continued)
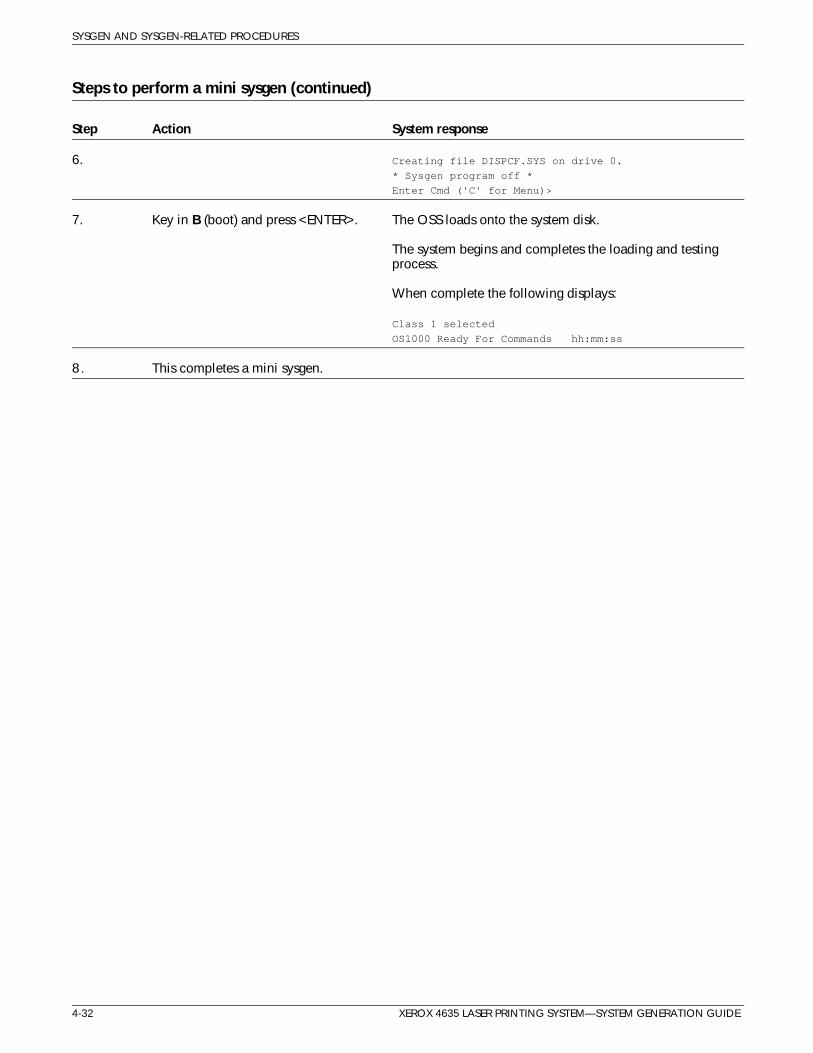
Step Action System response
6. Creating file DISPCF.SYS on drive 0.
* Sysgen program off *
Enter Cmd ('C' for Menu)>
7. Key in B (boot) and press <ENTER>. The OSS loads onto the system disk.
The system begins and completes the loading and testingprocess.
When complete the following displays:
Class 1 selected
OS1000 Ready For Commands hh:mm:ss
8. This completes a mini sysgen.
4-32 XEROX 4635 LASER PRINTING SYSTEM—SYSTEM GENERATION GUIDE
SYSGEN AND SYSGEN-RELATED PROCEDURES
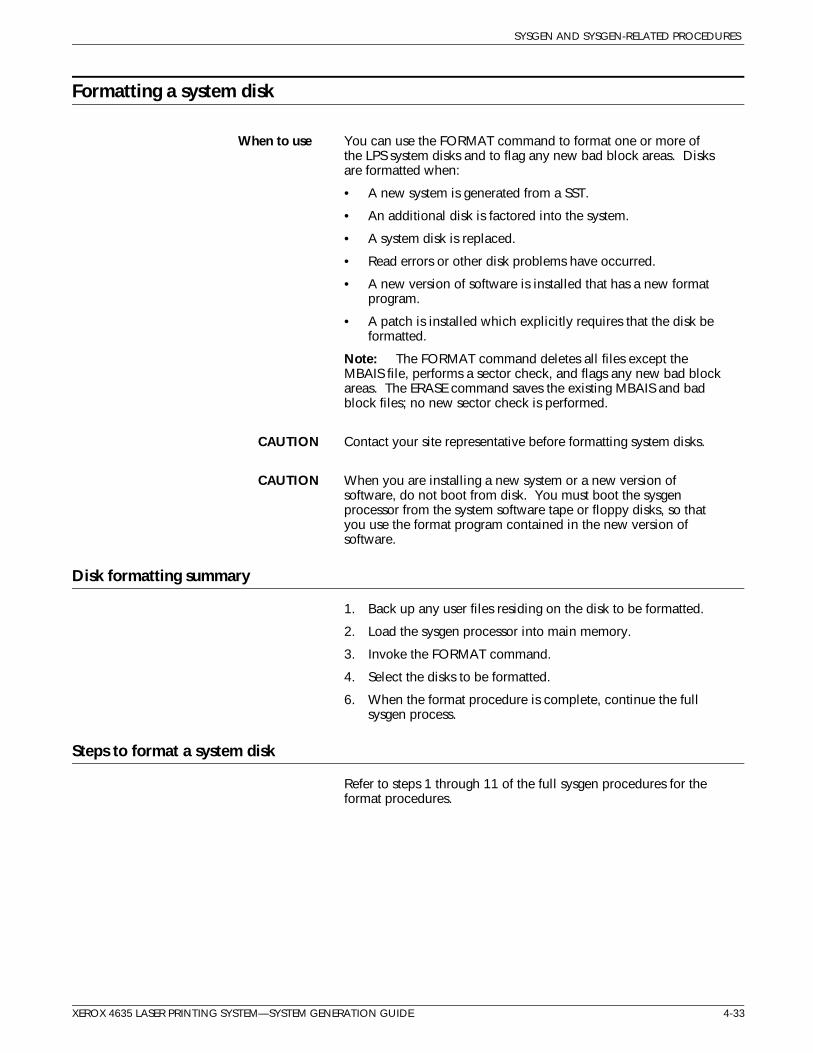
Formatting a system disk
When to use You can use the FORMAT command to format one or more ofthe LPS system disks and to flag any new bad block areas. Disksare formatted when:
• A new system is generated from a SST.
• An additional disk is factored into the system.
• A system disk is replaced.
• Read errors or other disk problems have occurred.
• A new version of software is installed that has a new formatprogram.
• A patch is installed which explicitly requires that the disk beformatted.
Note: The FORMAT command deletes all files except theMBAIS file, performs a sector check, and flags any new bad blockareas. The ERASE command saves the existing MBAIS and badblock files; no new sector check is performed.
CAUTION Contact your site representative before formatting system disks.
CAUTION When you are installing a new system or a new version ofsoftware, do not boot from disk. You must boot the sysgenprocessor from the system software tape or floppy disks, so thatyou use the format program contained in the new version ofsoftware.
Disk formatting summary
1. Back up any user files residing on the disk to be formatted.
2. Load the sysgen processor into main memory.
3. Invoke the FORMAT command.
4. Select the disks to be formatted.
6. When the format procedure is complete, continue the fullsysgen process.
Steps to format a system disk
Refer to steps 1 through 11 of the full sysgen procedures for theformat procedures.
XEROX 4635 LASER PRINTING SYSTEM—SYSTEM GENERATION GUIDE 4-33
SYSGEN AND SYSGEN-RELATED PROCEDURES
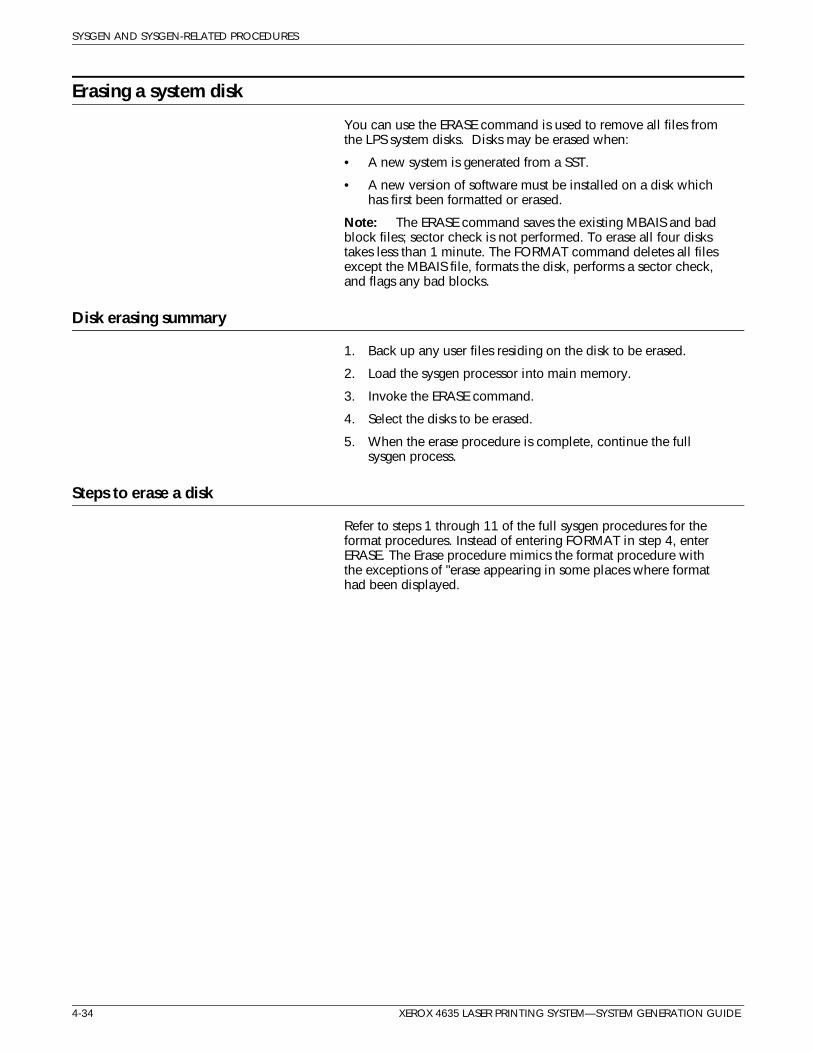
Erasing a system disk
You can use the ERASE command is used to remove all files fromthe LPS system disks. Disks may be erased when:
• A new system is generated from a SST.
• A new version of software must be installed on a disk whichhas first been formatted or erased.
Note: The ERASE command saves the existing MBAIS and bad block files; sector check is not performed. To erase all four diskstakes less than 1 minute. The FORMAT command deletes all filesexcept the MBAIS file, formats the disk, performs a sector check,and flags any bad blocks.
Disk erasing summary
1. Back up any user files residing on the disk to be erased.
2. Load the sysgen processor into main memory.
3. Invoke the ERASE command.
4. Select the disks to be erased.
5. When the erase procedure is complete, continue the fullsysgen process.
Steps to erase a disk
Refer to steps 1 through 11 of the full sysgen procedures for theformat procedures. Instead of entering FORMAT in step 4, enterERASE. The Erase procedure mimics the format procedure withthe exceptions of "erase appearing in some places where formathad been displayed.
4-34 XEROX 4635 LASER PRINTING SYSTEM—SYSTEM GENERATION GUIDE
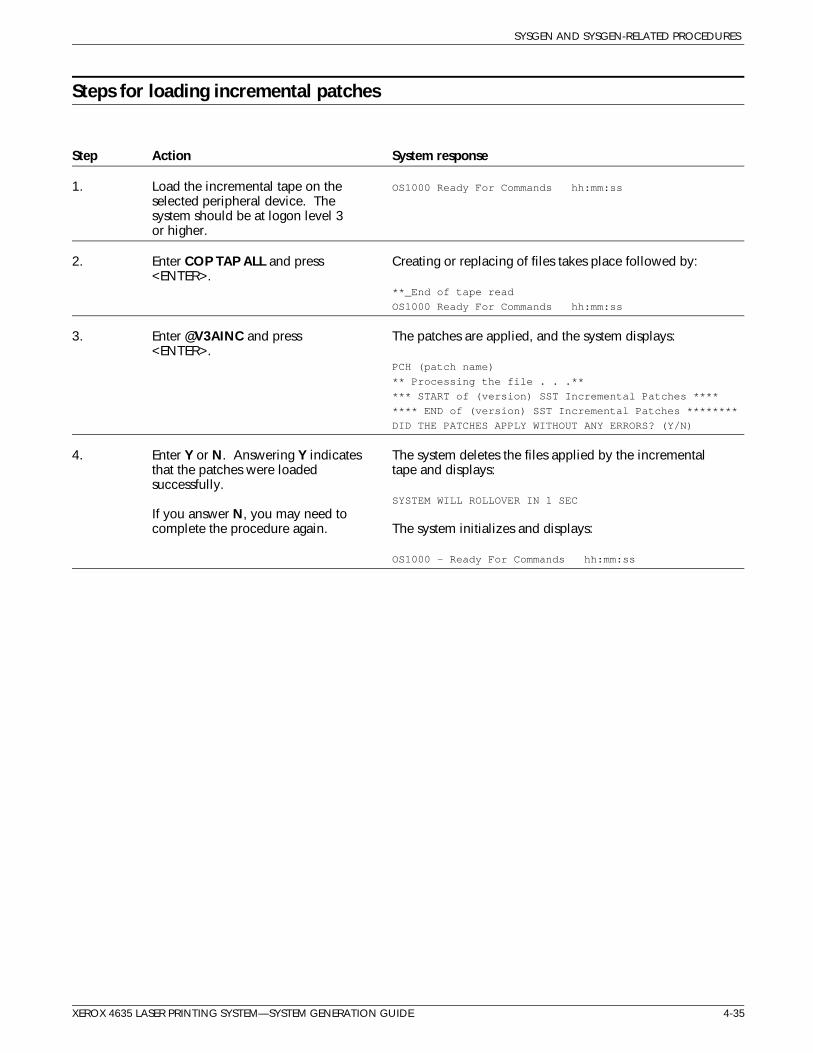
SYSGEN AND SYSGEN-RELATED PROCEDURES
Steps for loading incremental patches
Step Action System response
1. Load the incremental tape on the OS1000 Ready For Commands hh:mm:ss
selected peripheral device. Thesystem should be at logon level 3or higher.
2. Enter COP TAP ALL and press Creating or replacing of files takes place followed by:<ENTER>.
**_End of tape read
OS1000 Ready For Commands hh:mm:ss
3. Enter @V3AINC and press The patches are applied, and the system displays:<ENTER>.
PCH (patch name)
** Processing the file . . .**
*** START of (version) SST Incremental Patches ****
**** END of (version) SST Incremental Patches ********
DID THE PATCHES APPLY WITHOUT ANY ERRORS? (Y/N)
4. Enter Y or N. Answering Y indicates The system deletes the files applied by the incremental that the patches were loaded tape and displays:successfully.
SYSTEM WILL ROLLOVER IN 1 SEC
If you answer N, you may need tocomplete the procedure again. The system initializes and displays:
OS1000 - Ready For Commands hh:mm:ss
XEROX 4635 LASER PRINTING SYSTEM—SYSTEM GENERATION GUIDE 4-35

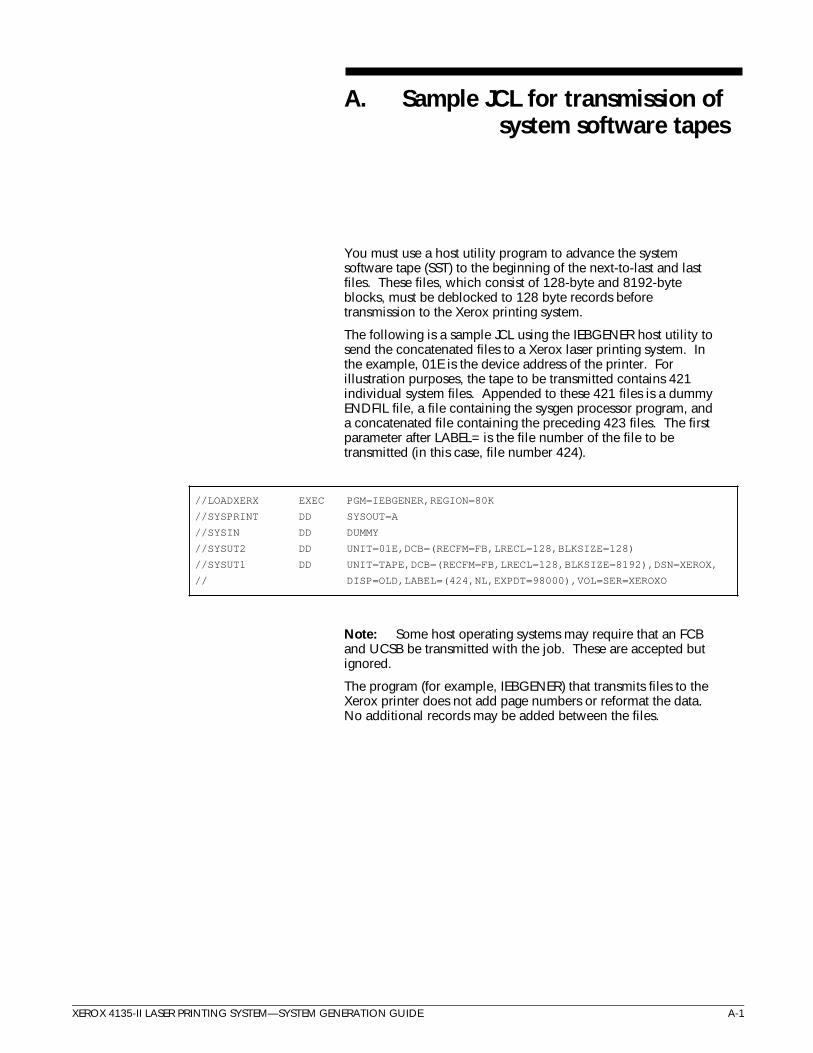
A. Sample JCL for transmission ofsystem software tapes
You must use a host utility program to advance the systemsoftware tape (SST) to the beginning of the next-to-last and lastfiles. These files, which consist of 128-byte and 8192-byteblocks, must be deblocked to 128 byte records beforetransmission to the Xerox printing system.
The following is a sample JCL using the IEBGENER host utility tosend the concatenated files to a Xerox laser printing system. Inthe example, 01E is the device address of the printer. Forillustration purposes, the tape to be transmitted contains 421individual system files. Appended to these 421 files is a dummyENDFIL file, a file containing the sysgen processor program, anda concatenated file containing the preceding 423 files. The firstparameter after LABEL= is the file number of the file to betransmitted (in this case, file number 424).
//LOADXERX EXEC PGM=IEBGENER,REGION=80K
//SYSPRINT DD SYSOUT=A
//SYSIN DD DUMMY
//SYSUT2 DD UNIT=01E,DCB=(RECFM=FB,LRECL=128,BLKSIZE=128)
//SYSUT1 DD UNIT=TAPE,DCB=(RECFM=FB,LRECL=128,BLKSIZE=8192),DSN=XEROX,
// DISP=OLD,LABEL=(424,NL,EXPDT=98000),VOL=SER=XEROXO
Note: Some host operating systems may require that an FCBand UCSB be transmitted with the job. These are accepted butignored.
The program (for example, IEBGENER) that transmits files to theXerox printer does not add page numbers or reformat the data.No additional records may be added between the files.
XEROX 4135-II LASER PRINTING SYSTEM—SYSTEM GENERATION GUIDE A-1

Glossary
A3 A paper size measuring 297 by 420 mm.
A4 A paper size measuring 210 by 297 mm.
abort To terminate the printing of a job or execution of a programbefore it completes.
application Use to which a computer program or system is put, for example,sorting employee records.
asynchronous Transmission in data communications controlled by start and stopelements at the beginning and end of each character; thus, timeintervals between transmitted characters may be unequal inlength.
auxiliary menu A menu that contains options not displayed in a window. Thesymbol for an auxiliary menu is a box containing three horizontallines.
B4 A paper size measuring 250 by 353 mm.
carriage return Control character that (unless set to be interpreted as a line end)causes the printing system to start printing at the left margin ofthe current line.
character Single printable letter (A-Z), numeral (0-9), symbol (& % #), orpunctuation mark (, . ! ?) used to represent data. Characters canalso be nonprinting, such as space, tab, or carriage return.
character code Code representing alphanumeric information, for example, ASCII.
character set Number of different characters used by a particular device,including alphabetic, numeric, and special characters such assymbols.
cluster A group of paper feeder trays, usually containing the same sizeand type of paper (stock). Each cluster has a name, consisting ofone to six alphanumeric characters.
collate To arrange or assemble into ordered sets.
XEROX 4135-II LASER PRINTING SYSTEM—SYSTEM GENERATION GUIDE GLOSSARY-1
GLOSSARY
column Vertical arrangement of characters.
command User instruction to a computer, via the system controllerkeyboard or the PC UI. Commands are words, mnemonics, orcharacters that cause a computer to perform predefinedoperations. Coded instruction to a computer or computer-basedsystem.
compatibility Characteristic of computer equipment permitting one device touse the same information or programs as another device withoutconversion or code modification.
configuration One or a group of computers and related devices (terminals,printers, etc.) interconnected and programmed to operate as asystem (sharing resources, communicating data, accepting input,etc.).
console Functional unit containing devices used by an operator tocommunicate with an operating system. It may consist of adisplay, keyboard, and certain switches or other controls.
continuous printing Refers to Interpress job integrity under any of the followingconditions: excessive graphics, forms, or font use problems.
cpi characters per inch. Designates the number of characters perinch for a particular typeface. See also pitch.
CPU Central processing unit. Interprets and executes instructions,performs all operations and calculations, and controls input andoutput units and auxiliary attachments.
data 1. In general, facts, numbers, letters, symbols, etc., which can beprocessed or produced by a computer. 2. In data processing,the source data or raw data entered for processing (as opposedto the results obtained by processing).
data file Collection of related data records organized in a specific mannerso that each record is similarly structured, for example a payrollfile set up with one record for each employee, last name first,indicating the rate of pay and all deductions.
data rate In data communications, the rate at which a channel carries data,measured in bps (bits per second).
data storage Preservation of data on various media (for example tape, disks,magnetic bubble memory, etc.).
desktop The basic display screen of the PC UI.
device Any piece of hardware other than the CPU (Central ProcessingUnit).
GLOSSARY-2 XEROX 4135-II LASER PRINTING SYSTEM—SYSTEM GENERATION GUIDE
GLOSSARY
disk drive Device that can read or write magnetic media.
display Viewing device (monitor) that visually communicates systemwarnings, status, and error messages and reflects operatorinteraction with the system on a display.
document 1. Data medium and the data recorded on it, usually permanent,which can be read by you or a computer. 2. Collection ofinformation pertaining to a specific subject or related subjects.
dot Unit of measurement representing a fraction of an inch, forexample, 300 dots per inch (dpi). May also be referred to as apicture element (pixel) or spot.
duplex Ability to send and receive information simultaneously. See alsosimplex printing.
duplex printing Printing on both sides (front and back) of a page.
EBCDIC Extended Binary Coded Decimal Interchange Code. Codedcharacter set consisting of 8-bit coded characters. It canaccommodate 256 characters.
Ethernet Xerox local area network (LAN) that allows data to be transmittedby cable from one device to another, enabling it to share thenetwork.
field 1. Part of a record that serves a similar function in all records ofthat group (such as name and address field). 2. Area or settingof practical activity or application.
file Set of records or text that can be stored and retrieved.Organized, named collection of records treated as a unit. Foroffline, it is the data between the two tape marks. For online, it isthe data between banner pages.
FIS Font Interchange Standard. A standard that defines the digitalrepresentation of fonts and character metrics for the generationof an entire series of Interpress fonts.
fixed pitch Font set in which every character cell has the same width. Inreference to character sets, this term describes typefaces inwhich all character cells are of equal width. Monospaced asopposed to proportional spaced.
fixed spacing Arrangement of characters on a line so that all characters occupythe same amount of horizontal space.
format 1. Layout of a document, including margins, page length, linespacing, typeface, etc. 2. In data storage, the way the surface ofa disk is organized to store data. 3. To prepare the surface of adisk for acceptance of data.
XEROX 4135-II LASER PRINTING SYSTEM—SYSTEM GENERATION GUIDE GLOSSARY-3
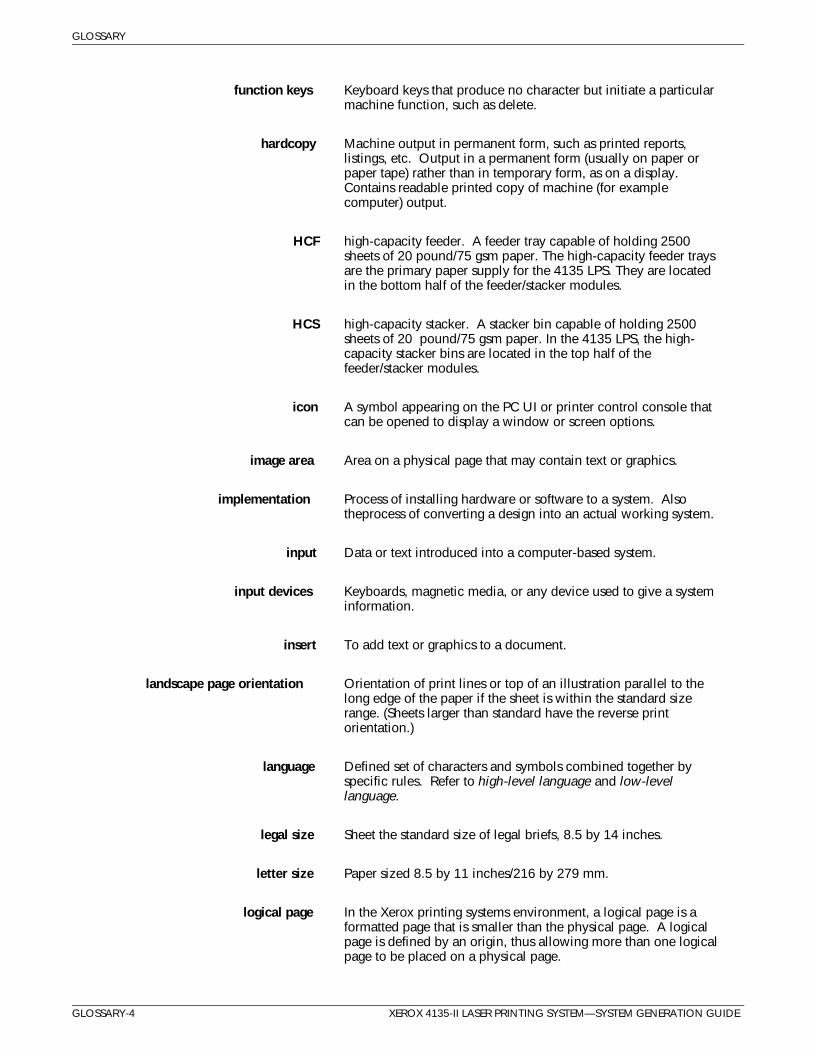
GLOSSARY
function keys Keyboard keys that produce no character but initiate a particularmachine function, such as delete.
hardcopy Machine output in permanent form, such as printed reports,listings, etc. Output in a permanent form (usually on paper orpaper tape) rather than in temporary form, as on a display.Contains readable printed copy of machine (for examplecomputer) output.
HCF high-capacity feeder. A feeder tray capable of holding 2500sheets of 20 pound/75 gsm paper. The high-capacity feeder traysare the primary paper supply for the 4135 LPS. They are locatedin the bottom half of the feeder/stacker modules.
HCS high-capacity stacker. A stacker bin capable of holding 2500sheets of 20 pound/75 gsm paper. In the 4135 LPS, the high-capacity stacker bins are located in the top half of thefeeder/stacker modules.
icon A symbol appearing on the PC UI or printer control console thatcan be opened to display a window or screen options.
image area Area on a physical page that may contain text or graphics.
implementation Process of installing hardware or software to a system. Alsotheprocess of converting a design into an actual working system.
input Data or text introduced into a computer-based system.
input devices Keyboards, magnetic media, or any device used to give a systeminformation.
insert To add text or graphics to a document.
landscape page orientation Orientation of print lines or top of an illustration parallel to thelong edge of the paper if the sheet is within the standard sizerange. (Sheets larger than standard have the reverse printorientation.)
language Defined set of characters and symbols combined together byspecific rules. Refer to high-level language and low-levellanguage.
legal size Sheet the standard size of legal briefs, 8.5 by 14 inches.
letter size Paper sized 8.5 by 11 inches/216 by 279 mm.
logical page In the Xerox printing systems environment, a logical page is aformatted page that is smaller than the physical page. A logicalpage is defined by an origin, thus allowing more than one logicalpage to be placed on a physical page.
GLOSSARY-4 XEROX 4135-II LASER PRINTING SYSTEM—SYSTEM GENERATION GUIDE
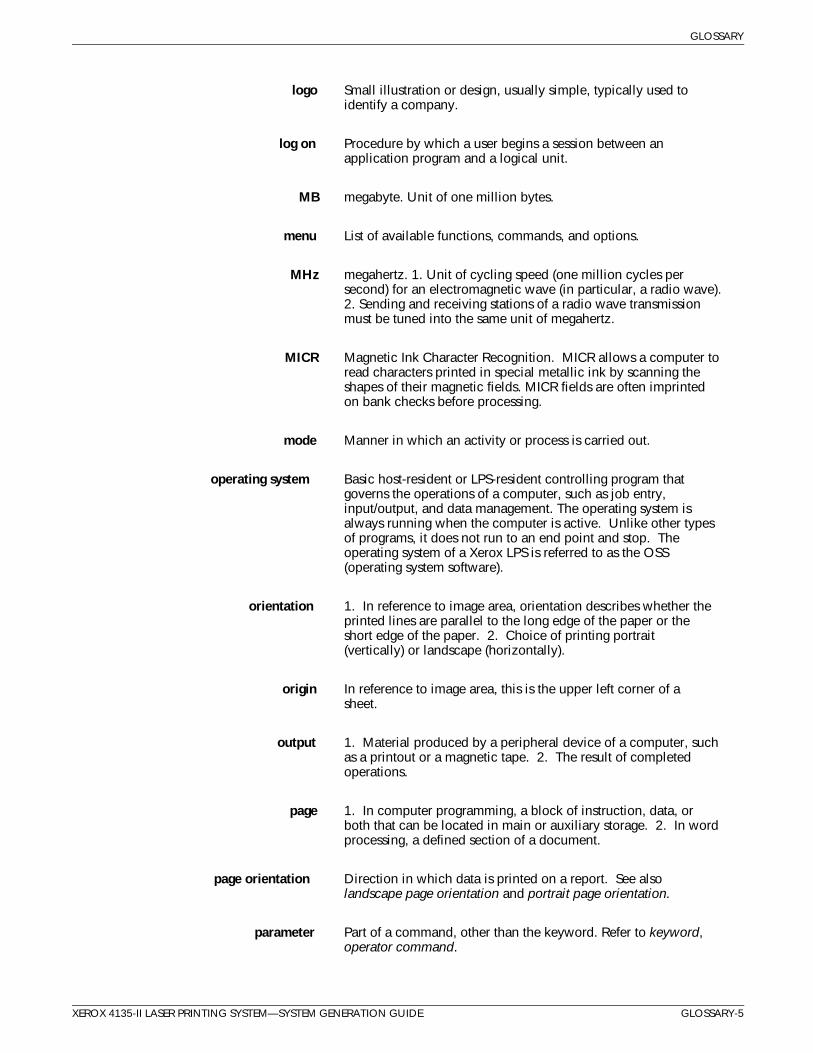
GLOSSARY
logo Small illustration or design, usually simple, typically used toidentify a company.
log on Procedure by which a user begins a session between anapplication program and a logical unit.
MB megabyte. Unit of one million bytes.
menu List of available functions, commands, and options.
MHz megahertz. 1. Unit of cycling speed (one million cycles persecond) for an electromagnetic wave (in particular, a radio wave).2. Sending and receiving stations of a radio wave transmissionmust be tuned into the same unit of megahertz.
MICR Magnetic Ink Character Recognition. MICR allows a computer toread characters printed in special metallic ink by scanning theshapes of their magnetic fields. MICR fields are often imprintedon bank checks before processing.
mode Manner in which an activity or process is carried out.
operating system Basic host-resident or LPS-resident controlling program thatgoverns the operations of a computer, such as job entry,input/output, and data management. The operating system isalways running when the computer is active. Unlike other typesof programs, it does not run to an end point and stop. Theoperating system of a Xerox LPS is referred to as the OSS(operating system software).
orientation 1. In reference to image area, orientation describes whether theprinted lines are parallel to the long edge of the paper or theshort edge of the paper. 2. Choice of printing portrait(vertically) or landscape (horizontally).
origin In reference to image area, this is the upper left corner of asheet.
output 1. Material produced by a peripheral device of a computer, suchas a printout or a magnetic tape. 2. The result of completedoperations.
page 1. In computer programming, a block of instruction, data, orboth that can be located in main or auxiliary storage. 2. In wordprocessing, a defined section of a document.
page orientation Direction in which data is printed on a report. See alsolandscape page orientation and portrait page orientation.
parameter Part of a command, other than the keyword. Refer to keyword,operator command.
XEROX 4135-II LASER PRINTING SYSTEM—SYSTEM GENERATION GUIDE GLOSSARY-5
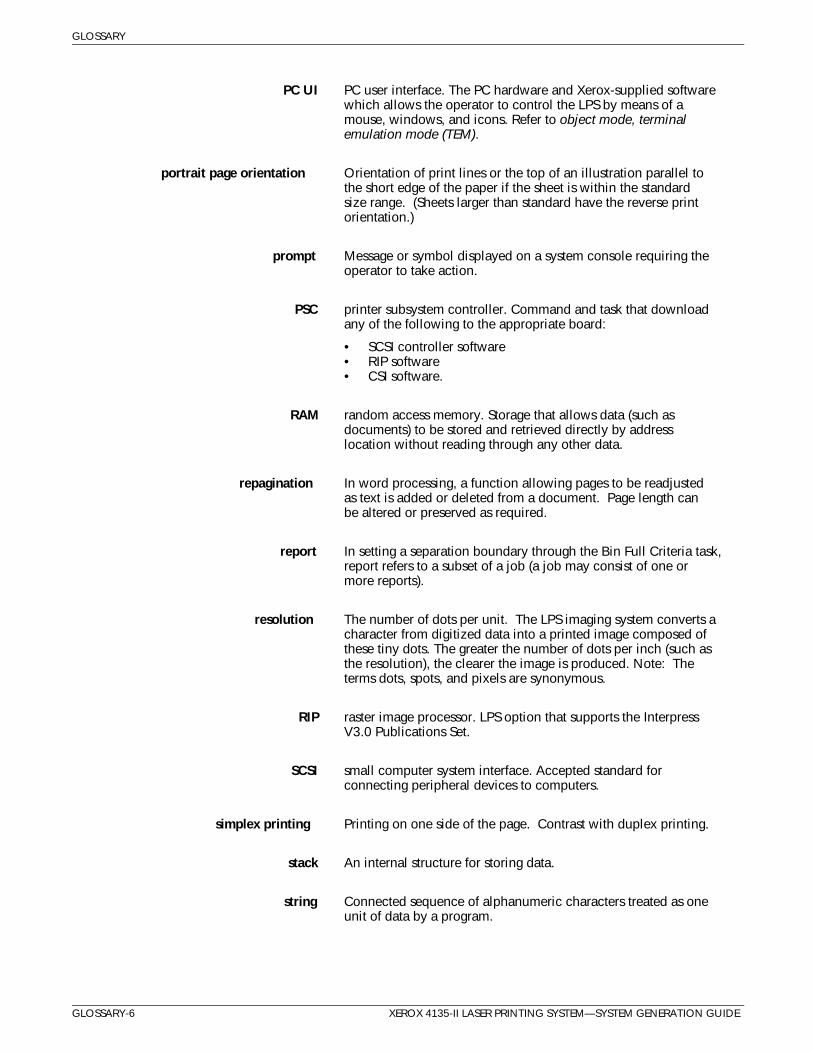
GLOSSARY
PC UI PC user interface. The PC hardware and Xerox-supplied softwarewhich allows the operator to control the LPS by means of amouse, windows, and icons. Refer to object mode, terminalemulation mode (TEM).
portrait page orientation Orientation of print lines or the top of an illustration parallel tothe short edge of the paper if the sheet is within the standardsize range. (Sheets larger than standard have the reverse printorientation.)
prompt Message or symbol displayed on a system console requiring theoperator to take action.
PSC printer subsystem controller. Command and task that downloadany of the following to the appropriate board:
• SCSI controller software• RIP software• CSI software.
RAM random access memory. Storage that allows data (such asdocuments) to be stored and retrieved directly by addresslocation without reading through any other data.
repagination In word processing, a function allowing pages to be readjustedas text is added or deleted from a document. Page length canbe altered or preserved as required.
report In setting a separation boundary through the Bin Full Criteria task,report refers to a subset of a job (a job may consist of one ormore reports).
resolution The number of dots per unit. The LPS imaging system converts acharacter from digitized data into a printed image composed ofthese tiny dots. The greater the number of dots per inch (such asthe resolution), the clearer the image is produced. Note: Theterms dots, spots, and pixels are synonymous.
RIP raster image processor. LPS option that supports the InterpressV3.0 Publications Set.
SCSI small computer system interface. Accepted standard forconnecting peripheral devices to computers.
simplex printing Printing on one side of the page. Contrast with duplex printing.
stack An internal structure for storing data.
string Connected sequence of alphanumeric characters treated as oneunit of data by a program.
GLOSSARY-6 XEROX 4135-II LASER PRINTING SYSTEM—SYSTEM GENERATION GUIDE
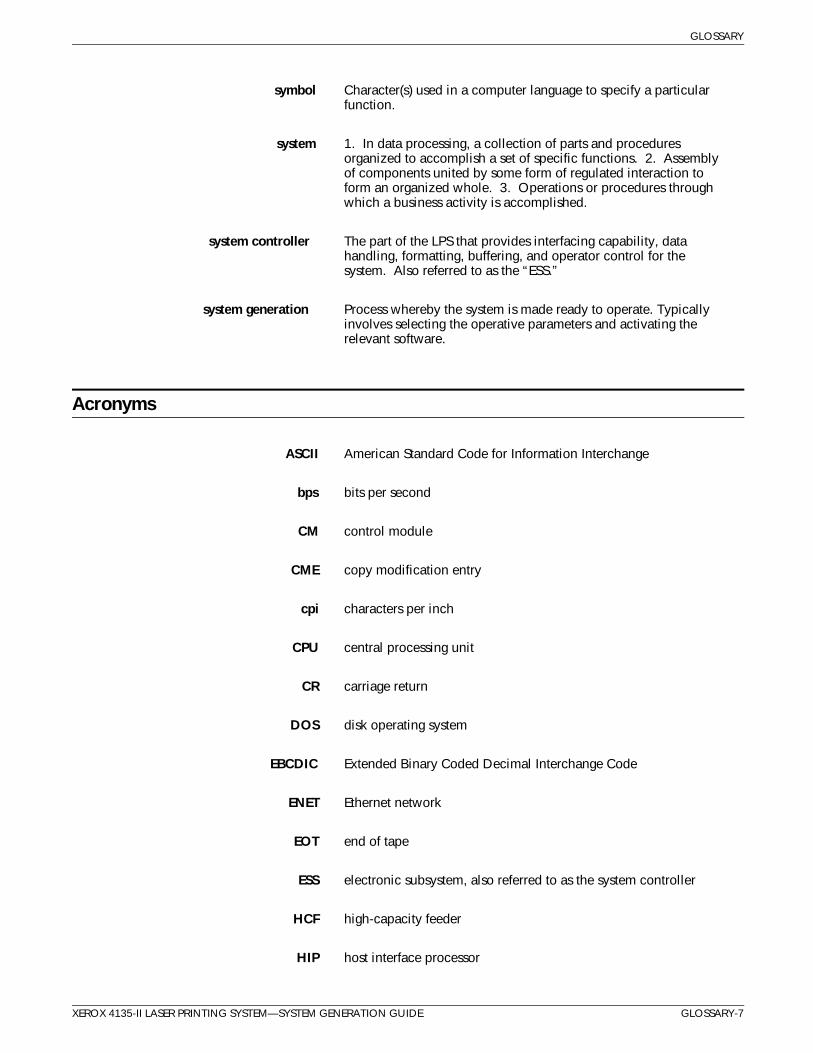
GLOSSARY
symbol Character(s) used in a computer language to specify a particularfunction.
system 1. In data processing, a collection of parts and proceduresorganized to accomplish a set of specific functions. 2. Assemblyof components united by some form of regulated interaction toform an organized whole. 3. Operations or procedures throughwhich a business activity is accomplished.
system controller The part of the LPS that provides interfacing capability, datahandling, formatting, buffering, and operator control for thesystem. Also referred to as the “ESS.”
system generation Process whereby the system is made ready to operate. Typicallyinvolves selecting the operative parameters and activating therelevant software.
Acronyms
ASCII American Standard Code for Information Interchange
bps bits per second
CM control module
CME copy modification entry
cpi characters per inch
CPU central processing unit
CR carriage return
DOS disk operating system
EBCDIC Extended Binary Coded Decimal Interchange Code
ENET Ethernet network
EOT end of tape
ESS electronic subsystem, also referred to as the system controller
HCF high-capacity feeder
HIP host interface processor
XEROX 4135-II LASER PRINTING SYSTEM—SYSTEM GENERATION GUIDE GLOSSARY-7

GLOSSARY
IO input/output
ips inches per second
JCL job control language
LPS laser printing system
OLI online interface
OS operating system
OSS operating system software
PC personal computer
PC UI personal computer user interface
PDL print description language
ppm pages per minute
PQA print quality adjustment
PSC printer subsystem controller
pt point
QIC 1/4 inch cartridge
RAM random access memory
RIP raster image processor
ROS raster output scanner
SCSI small computer system interface
spi spots per inch
SST system software tape
sysgen system generation
tpi tracks per inch
GLOSSARY-8 XEROX 4135-II LASER PRINTING SYSTEM—SYSTEM GENERATION GUIDE
GLOSSARY
UI user interface
XCSC Xerox Customer Support Center
XDSS Xerox Documentation and Software Services
XMP xerographic mode persistence
XMS xerographic mode switching
XPAF, XPF Xerox Printer Access Facility
XEROX 4135-II LASER PRINTING SYSTEM—SYSTEM GENERATION GUIDE GLOSSARY-9

Index
Aabbreviating commands, 2-3accounting file, sysgen parameter, 3-7auto
boot option, 3-4sysgen, description, 1-1
AUTO command, 2-2
Bbacking up, user files, 4-4BOOT command, 2-2
Ccommands
abbreviating, 2-3AUTO, 2-2BOOT, 2-2COMMANDS, 2-2entering 2-3ERASE, 2-3, 4-4FORMAT, 2-2, 4-4HOSTCOPY, 2-1 TO 2-2MINI, 2-3SYSGEN, 2-2
COMMANDS command, 2-2concatenated files, A-1Configuration menu, sample, 3-3 to 3-6
Ddefault printing order option, 3-6documentation, other, iii
Eentering commands, 2-3ERASE command
choosing, 4-4function, 2-3
erasing, system disk, 4-34Ethernet option, 3-4
FFCB, A-1font tapes, 1-2FORMAT command
choosing, 4-4function, 2-2
formatting, system disk, 4-33full
memory test option, 3-4sysgen, 4-4 to 4-11
HHOSTCOPY command
function, 2-2online capability, 2-1
IIEBGENER host utility, A-1incremental patches, loading, 4-35
JJCL, SST transmission, A-1
KKanji option, 3-4
LLanguage option, 3-5laser image alignment coordinates, 1-2LPS Reference Set, 1-2
Mmenu
Configuration, sample, 3-3 to 3-6Sysgen Command, 2-1
Mergenthaler fonts, 1-3message display option, 3-4MICR option, 3-4MINI command, 2-3mini sysgen
description, 1-1performing, 4-30 to 4-32
NNone option, 3-4
Ooffline update sysgen
using AUTO, 4-12 to 4-16using SYSGEN, 4-17 to 4-21
on-line interface option, 3-4online update sysgen, 4-22 to 4-29operating system software, see OSSOSS
contents, new version, 1-2Program Description, 1-2
Ppaper size option, 3-5PC UI software, see UI softwareprecautions, 4-1
XEROX 4635 LASER PRINTING SYSTEM—SYSTEM GENERATION GUIDE INDEX-1

INDEX
print file size, 1-2procedures
full sysgen, performing, 4-4 to 4-11incremental patches, loading, 4-35mini sysgen, performing, 4-30 to 4-32offline update sysgen, performing
using AUTO command, 4-12 to 4-16using SYSGEN command, 4-12, 4-17 to 4-21
online update sysgen, 4-22 to 4-29system disk
erasing, 4-34formatting, 4-33
UI dialog installing or upgrading, 4-3software, installing or upgrading, 4-2
publications, related, see documentation, other
Rraster image processor option, 3-6report accounting, sysgen parameter, 3-7requirements
sysgen, beginning, 1-2UI software, loading, 4-1
Sshared disk option, 3-4site-specific patches, 1-3SST, transmitting, A-1stages, sysgen process, 3-1sysgen
definition, 1-1full, performing, 4-4 to 4-11mini, performing, 4-30 to 4-32offline update, performing
using AUTO, 4-12 to 4-16using SYSGEN, 4-12, 4-17 to 4-21
online update, performing, 4-22 to 4-29
parameters, additional, 3-7precautions, 4-1stages, 3-1types, 1-1
SYSGEN command, 2-2Sysgen Command menu, 2-1system
configurationcurrent, 1-2sample, 3-2
disks erasing, 4-34formatting, 4-33IDs, 1-2
ID, sysgen parameter, 3-7UI software, see UI software
system software tapes, see SST, transmitting
Ttape device table option, 3-6terminal type option, 3-6type, sysgen parameter, 3-7
UUCSB, A-1UI
dialog, installing or upgrading, 4-3software
installing or upgrading, 4-2loading requirements, 4-1
user files, backing up, 4-4tapes, 1-2
XXerox Print Service Manager option, 3-4XPAF option, 3-5
INDEX-2 XEROX 4635 LASER PRINTING SYSTEM—SYSTEM GENERATION GUIDE