xerox secure access unified id system 5.3 administration...
TRANSCRIPT

Xerox Secure Access Unified ID System® 5.3Administration Guide
Software Version 5.3August 2014702P03154

©2014 Xerox Corporation. All rights reserved. XEROX® and XEROX and Design®, and Xerox Secure Access
Unified ID System® are trademarks of Xerox Corporation in the United States and/or other countries.
Equitrac® and Follow-You Printing® are registered trademarks of Nuance Communications.
ProxCard® is a registered trademark of HID Corporation.
Document Version: 1.0 (August 2014)

Administration Guide iii
Table of Contents
1 Introduction . . . . . . . . . . . . . . . . . . . . . . . . . . . . . . . . . . . . . . . . . . . 1-1What is Xerox Secure Access? . . . . . . . . . . . . . . . . . . . . . . . . . . . . . . . . . . . . . . . . . . . . . . 1-2Core Server Components. . . . . . . . . . . . . . . . . . . . . . . . . . . . . . . . . . . . . . . . . . . . . . . . . . . 1-3
Core Accounting Server . . . . . . . . . . . . . . . . . . . . . . . . . . . . . . . . . . . . . . . . . . . . . . . . 1-4Document Routing Engine . . . . . . . . . . . . . . . . . . . . . . . . . . . . . . . . . . . . . . . . . . . . . 1-5Device Control Engine . . . . . . . . . . . . . . . . . . . . . . . . . . . . . . . . . . . . . . . . . . . . . . . . . 1-6
Administering Xerox Secure Access . . . . . . . . . . . . . . . . . . . . . . . . . . . . . . . . . . . . . . . . . 1-7System Manager . . . . . . . . . . . . . . . . . . . . . . . . . . . . . . . . . . . . . . . . . . . . . . . . . . . . . . 1-8
Licensing . . . . . . . . . . . . . . . . . . . . . . . . . . . . . . . . . . . . . . . . . . . . . . . . . . . . . . . . . . . . . . . . . . 1-9Xerox Secure Access Licensing Workflow . . . . . . . . . . . . . . . . . . . . . . . . . . . . . . . 1-9Component License Structure . . . . . . . . . . . . . . . . . . . . . . . . . . . . . . . . . . . . . . . . . . 1-9Changing the License View . . . . . . . . . . . . . . . . . . . . . . . . . . . . . . . . . . . . . . . . . . . 1-10Assigning Licenses to Devices . . . . . . . . . . . . . . . . . . . . . . . . . . . . . . . . . . . . . . . . . 1-11
Additional Documentation . . . . . . . . . . . . . . . . . . . . . . . . . . . . . . . . . . . . . . . . . . . . . . . . 1-122 Managing Devices . . . . . . . . . . . . . . . . . . . . . . . . . . . . . . . . . . . . . 2-1
Devices Overview . . . . . . . . . . . . . . . . . . . . . . . . . . . . . . . . . . . . . . . . . . . . . . . . . . . . . . . . . . 2-2Device Types . . . . . . . . . . . . . . . . . . . . . . . . . . . . . . . . . . . . . . . . . . . . . . . . . . . . . . . . . . 2-2Managing Secure Printing Settings . . . . . . . . . . . . . . . . . . . . . . . . . . . . . . . . . . . . . 2-3
Physical Devices . . . . . . . . . . . . . . . . . . . . . . . . . . . . . . . . . . . . . . . . . . . . . . . . . . . . . . . . . . . 2-4Physical Device Configuration Workflow . . . . . . . . . . . . . . . . . . . . . . . . . . . . . . . 2-4Manually Adding and Configuring a Physical Device . . . . . . . . . . . . . . . . . . . . 2-5Creating Equitrac® Printer Ports . . . . . . . . . . . . . . . . . . . . . . . . . . . . . . . . . . . . . . . 2-7Configuring Physical Devices with the Printer Configuration Wizard . . . . 2-10Configuring a Printer Port . . . . . . . . . . . . . . . . . . . . . . . . . . . . . . . . . . . . . . . . . . . . . 2-11Configuring Print Queues . . . . . . . . . . . . . . . . . . . . . . . . . . . . . . . . . . . . . . . . . . . . . 2-13Editing and Removing Devices . . . . . . . . . . . . . . . . . . . . . . . . . . . . . . . . . . . . . . . . 2-14
Control Terminals. . . . . . . . . . . . . . . . . . . . . . . . . . . . . . . . . . . . . . . . . . . . . . . . . . . . . . . . . 2-15Supported Devices . . . . . . . . . . . . . . . . . . . . . . . . . . . . . . . . . . . . . . . . . . . . . . . . . . . 2-15Adding and Configuring a Control Terminal . . . . . . . . . . . . . . . . . . . . . . . . . . . 2-15Associating a Control Terminal With a Physical Device . . . . . . . . . . . . . . . . . 2-17
3 Creating & Managing Accounts . . . . . . . . . . . . . . . . . . . . . . . . . 3-1Accounts Overview. . . . . . . . . . . . . . . . . . . . . . . . . . . . . . . . . . . . . . . . . . . . . . . . . . . . . . . . . 3-2
Why Use Accounts? . . . . . . . . . . . . . . . . . . . . . . . . . . . . . . . . . . . . . . . . . . . . . . . . . . . 3-2User Account . . . . . . . . . . . . . . . . . . . . . . . . . . . . . . . . . . . . . . . . . . . . . . . . . . . . . . . . . 3-3
Working with User Accounts. . . . . . . . . . . . . . . . . . . . . . . . . . . . . . . . . . . . . . . . . . . . . . . . 3-4Creating User Accounts . . . . . . . . . . . . . . . . . . . . . . . . . . . . . . . . . . . . . . . . . . . . . . . . 3-4Adding and Editing Users Individually . . . . . . . . . . . . . . . . . . . . . . . . . . . . . . . . . . 3-5Importing Users with Active Directory Services . . . . . . . . . . . . . . . . . . . . . . . . . 3-6Configuring Active Directory Synchronization . . . . . . . . . . . . . . . . . . . . . . . . . . 3-6Active Directory LDS Support . . . . . . . . . . . . . . . . . . . . . . . . . . . . . . . . . . . . . . . . . . 3-9Configuring LDAP Synchronization . . . . . . . . . . . . . . . . . . . . . . . . . . . . . . . . . . . . 3-10LDAP Field Mapping to CAS . . . . . . . . . . . . . . . . . . . . . . . . . . . . . . . . . . . . . . . . . . . 3-12Qualifying Accounts by Domain . . . . . . . . . . . . . . . . . . . . . . . . . . . . . . . . . . . . . . 3-12Adding Users from a Flat File Import . . . . . . . . . . . . . . . . . . . . . . . . . . . . . . . . . . 3-13

Table of Contents Xerox Secure Access Unified ID System® 5.3
iv Administration Guide
Importing LDAP User Accounts . . . . . . . . . . . . . . . . . . . . . . . . . . . . . . . . . . . . . . . 3-14Managing User Accounts . . . . . . . . . . . . . . . . . . . . . . . . . . . . . . . . . . . . . . . . . . . . . . . . . 3-16
Locking Accounts . . . . . . . . . . . . . . . . . . . . . . . . . . . . . . . . . . . . . . . . . . . . . . . . . . . . 3-16Removing Accounts . . . . . . . . . . . . . . . . . . . . . . . . . . . . . . . . . . . . . . . . . . . . . . . . . . 3-16
Managing Search Filters . . . . . . . . . . . . . . . . . . . . . . . . . . . . . . . . . . . . . . . . . . . . . . . . . . 3-18Managing the Filter List . . . . . . . . . . . . . . . . . . . . . . . . . . . . . . . . . . . . . . . . . . . . . . 3-20
Accounts System Configuration . . . . . . . . . . . . . . . . . . . . . . . . . . . . . . . . . . . . . . . . . . . 3-21User Authentication . . . . . . . . . . . . . . . . . . . . . . . . . . . . . . . . . . . . . . . . . . . . . . . . . . 3-21External User Authentication . . . . . . . . . . . . . . . . . . . . . . . . . . . . . . . . . . . . . . . . . 3-24Deleting Objects in Synchronized Directories . . . . . . . . . . . . . . . . . . . . . . . . . . 3-27Associating Swipe Cards with Secure Access Accounts . . . . . . . . . . . . . . . . . 3-27
4 Advanced Printing Configuration . . . . . . . . . . . . . . . . . . . . . . . .4-1Enabling Secure Printing . . . . . . . . . . . . . . . . . . . . . . . . . . . . . . . . . . . . . . . . . . . . . . . . . . . 4-2
Secure Printing Configuration Workflow . . . . . . . . . . . . . . . . . . . . . . . . . . . . . . . . 4-2Administering the Secure Print Queue . . . . . . . . . . . . . . . . . . . . . . . . . . . . . . . . . . 4-3
Managing Device Pull Groups . . . . . . . . . . . . . . . . . . . . . . . . . . . . . . . . . . . . . . . . . . . . . . 4-4Choosing Devices to Group . . . . . . . . . . . . . . . . . . . . . . . . . . . . . . . . . . . . . . . . . . . . 4-4Printer Pull Group Workflow . . . . . . . . . . . . . . . . . . . . . . . . . . . . . . . . . . . . . . . . . . . . 4-5
Setting Up Follow-You Printing® . . . . . . . . . . . . . . . . . . . . . . . . . . . . . . . . . . . . . . . . . . . 4-6Follow-You Printing Configuration Workflow . . . . . . . . . . . . . . . . . . . . . . . . . . . 4-6Identifying the Home Server for each User . . . . . . . . . . . . . . . . . . . . . . . . . . . . . 4-6Configuring Follow-You Printing® . . . . . . . . . . . . . . . . . . . . . . . . . . . . . . . . . . . . . 4-7
5 Configuring HID Cards . . . . . . . . . . . . . . . . . . . . . . . . . . . . . . . . . .5-1HID Encoding . . . . . . . . . . . . . . . . . . . . . . . . . . . . . . . . . . . . . . . . . . . . . . . . . . . . . . . . . . . . . 5-2
Supported HID Card Types . . . . . . . . . . . . . . . . . . . . . . . . . . . . . . . . . . . . . . . . . . . . 5-2Determining HID Card Encoding . . . . . . . . . . . . . . . . . . . . . . . . . . . . . . . . . . . . . . . 5-6Disabling and Enabling HID Decoding on the Control Terminal . . . . . . . . 5-13
HID Decoding . . . . . . . . . . . . . . . . . . . . . . . . . . . . . . . . . . . . . . . . . . . . . . . . . . . . . . . . . . . . 5-146 Using Xerox Secure Access Utilities . . . . . . . . . . . . . . . . . . . . . . .6-1
Enabling SSL Communication . . . . . . . . . . . . . . . . . . . . . . . . . . . . . . . . . . . . . . . . . . . . . . 6-2Directory Synchronization Access Permissions. . . . . . . . . . . . . . . . . . . . . . . . . . . . . . . 6-3Purge Database Transactions . . . . . . . . . . . . . . . . . . . . . . . . . . . . . . . . . . . . . . . . . . . . . . 6-4Modifying User Accounts from a Flat File . . . . . . . . . . . . . . . . . . . . . . . . . . . . . . . . . . . 6-5
EQCmd Actions . . . . . . . . . . . . . . . . . . . . . . . . . . . . . . . . . . . . . . . . . . . . . . . . . . . . . . . 6-6EQCmd Batch File Process . . . . . . . . . . . . . . . . . . . . . . . . . . . . . . . . . . . . . . . . . . . . . 6-8
Refining the User Group View . . . . . . . . . . . . . . . . . . . . . . . . . . . . . . . . . . . . . . . . . . . . . . 6-9Print Queue Viewer . . . . . . . . . . . . . . . . . . . . . . . . . . . . . . . . . . . . . . . . . . . . . . . . . . . . . . . 6-10

Administration Guide 1-1
1Introduction
After you successfully install Xerox Secure Access Unified ID System® and perform initial configuration tasks outlined in the Xerox Secure Access Unified ID System® Installation Guide, you can further customize your deployment. Use this guide to perform advanced configuration tasks for all components and features of Xerox Secure Access.
This chapter provides information about:
• key features of Xerox Secure Access used in business environments
• administrative applications that enable system configuration and ongoing management
• limiting access to the Administrative Applications to prevent unauthorized users from making changes to system components or printing accounts
• purchasing licenses to enable core and optional functionality
Topics
What is Xerox Secure Access?
Core Server Components
Administering Xerox Secure Access
Licensing
Additional Documentation

Introduction Xerox Secure Access Unified ID System® 5.3
1-2 Administration Guide
What is Xerox Secure Access?Xerox Secure Access is a software-based print tracking and document accounting solution that reduces print expenses, eliminates wasteful printing, deploys equipment for maximum efficiency, and even contributes to a better environment. Xerox Secure Access allows you to track, analyze and, if necessary, allocate expenses for every document that any employee sends to any networked printer, copier or multi-function device.
Xerox Secure Access is an ideal solution for businesses because it provides the following features:
• Authentication happens when the user approaches a device and authenticates themselves with valid user credentials. Desktop Printing is not considered authentication.
• Secure Printing holds documents sent to print in a proprietary queue until a user releases the job via an MFP embedded device. This prevents situations where proprietary documents sit at the printer for all users to see until the user picks up the job.
• Follow-You Printing® holds print jobs in a secure print queue and allows the user to release the print jobs to a compatible device, even across print servers. A user can select a particular printer when they submit a print request, then use any MFP embedded device and redirect the job to a different compatible printer.

Xerox Secure Access Unified ID System® 5.3 Introduction
Administration Guide 1-3
Core Server Components• Xerox Secure Access is comprised of the following main core server components:
• Core Accounting Server (CAS)
• Document Routing Engine (DRE)
• Device Control Engine (DCE)
There are three main core components, every Xerox Secure Access installation requires at least the Core Accounting Server (CAS) and either a Document Routing Engine (DRE) or a Device Control Engine (DCE).
The components can be installed on a single server, or you can distribute the components across multiple servers to distribute the print load tracking or device management activities.
The core server components communicate on designated ports. Each component "listens" on a specific port for information or requests from the other components. Refer to the Xerox Secure Access Unified ID System® Installation Guide for a complete list of port assignments per component.
Making Changes to Server Components
If you make configuration changes within System Manager to any of the core Xerox Secure Access server components (CAS, DRE, DCE), such as changing printer languages, you must wait a minimum of thirty seconds before these changes take effect.
The delay in updating server components is a function of the CAS polling feature. This means that the delay may be longer in the event that CAS is unavailable for some reason during that polling period after the server changes. CAS sends the change data to the relevant components once the connection is restored.

Introduction Xerox Secure Access Unified ID System® 5.3
1-4 Administration Guide
Core Accounting Server
The Core Accounting Server (CAS) verifies users, calculates transaction charges, and assigns those charges to an appropriate user or group account. CAS calculates charges using page count and job attribute information received from the Port Monitor, along with printer costs defined by the administrator.
Every Xerox Secure Access installation requires a pre-installed database. CAS uses the database instance to create an accounts database that contains all printer, user, transaction, and balance information. The database can reside on the same machine as CAS, or on a separate server if needed. See System Requirements in the Xerox Secure Access Unified ID System® Installation Guide for information about supported databases.
For installations that support a large user base, or where you support remote office locations, you may need to deploy multiple accounting servers.
• user verification• print charge calculations• output tracking• account balance management

Xerox Secure Access Unified ID System® 5.3 Introduction
Administration Guide 1-5
Document Routing Engine
The Document Routing Engine (DRE) is the print server. Its primary function is to enable document flow from user workstations to output devices such as printers, plotters, or MFPs and capture the document characteristics of all output. Each time a user releases a print job, DRE communicates the job characteristics to CAS.
The Equitrac Port Monitor is installed with each DRE. The Port Monitor integrates with the Windows® printing subsystem and functions as part of the spooler service, allowing the Port Monitor to receive and route print jobs to parallel network-connected printers.
If there are many printers within your deployment that generate frequent throughput, you may need to deploy multiple DREs. You can designate specific printers to each DRE, balancing the overall load to streamline the data flow.
The diagram below shows a typical DRE workflow. First, a user generates a print request. The DRE Port Monitor intercepts the request before it gets to the printer and "holds" the print job while it waits for a response from CAS. CAS then checks its database and either validates the user, or denies the request. The response is sent back to DRE, and the print job is forwarded to the printer if the user was validated. If denied, the user receives a notification message on their desktop (if configured). After the job has printed, the page count and job attributes are forwarded to the CAS database for printing.
For installations that require secure document printing, you can configure DRE to hold documents in a print queue until the user releases them from an embedded device. See Enabling Secure Printing on page 2 for details.
Although DRE is a core component, it is not required in all deployments. DRE manages communications with physical printing devices. If you are only tracking copy transaction on devices with embedded devices (rather than tracking print jobs), you do not need to install the DRE component.
DRE functionality can be configured in System Manager.
Print Request
CASDREUpdate Job Attributes
Basic DRE workflow used to measure print usage
DB
Validate Print Request
Job is Printed
1
2
4
3
PortMonitor

Introduction Xerox Secure Access Unified ID System® 5.3
1-6 Administration Guide
Device Control Engine
The Device Control Engine (DCE) provides communication with copy and fax devices and with multifunction devices that provide fax and scan features. You must install specific embedded devices or terminals to enable communication with these devices. See Control Terminals on page 15 for details.
DCE communicates with CAS to verify user credentials, and forwards the copy and fax information generated by these devices for tracking in the accounting database.
The diagram below shows a basic DCE workflow. First, a user requests access to a multi-function device via a terminal keypad. The request is handled by DCE, which then forwards a user validation request to CAS. CAS then checks its database and either validates the request, or denies it. After the user completes their copy, fax, or scan, the job attributes are forwarded to CAS for tracking.
Although DCE is a core component, it is not required in all deployments. If you intend to track printing from workstations only, and do not need to track copy, scan, or fax jobs, you do not need to install the DCE component. Instead, you need the DRE component only.
CASDCE
Update Job Attributes
Basic DCE workflow used to measure multifunction device usage
DB
Validate Login Request
Login Requested
2
3
1

Xerox Secure Access Unified ID System® 5.3 Introduction
Administration Guide 1-7
Administering Xerox Secure AccessThe majority of Xerox Secure Access Server administration takes places in the Administrative Applications. These applications are typically installed on the Core Accounting Server (CAS), but can also be installed on any server or workstation within the deployment for ease of administration.
NoteWhen you install System Manager on a workstation other than the CAS, you must have administrator rights on the CAS to run it.
By default, the installer places the Administrative Applications on the Start menu. (Start > All Programs > Xerox Secure Access). Before you can access the Administrative Applications, you must select the accounting server that you want to work with. The accounting server collects information from, and writes to, a single accounts database, so you can connect to only one accounting server at a time.
If you deployed multiple CAS servers, the Select accounting server dialog box displays each time you open an Administrative Application, and you need to select the appropriate CAS before proceeding. If you only have one CAS, you can disable this feature by unchecking the Display at startup option. However, if you disabled the Display at startup option, and later need to access a different CAS, select Tools > Options within any of the Administrative Applications, and check the Display server selection dialog on startup option. The next time you launch an Administrative Application, the Select accounting server dialog box opens.
If you deployed multiple CAS servers, each CAS is listed in this window.
Introduction Xerox Secure Access Unified ID System® 5.3
1-8 Administration Guide
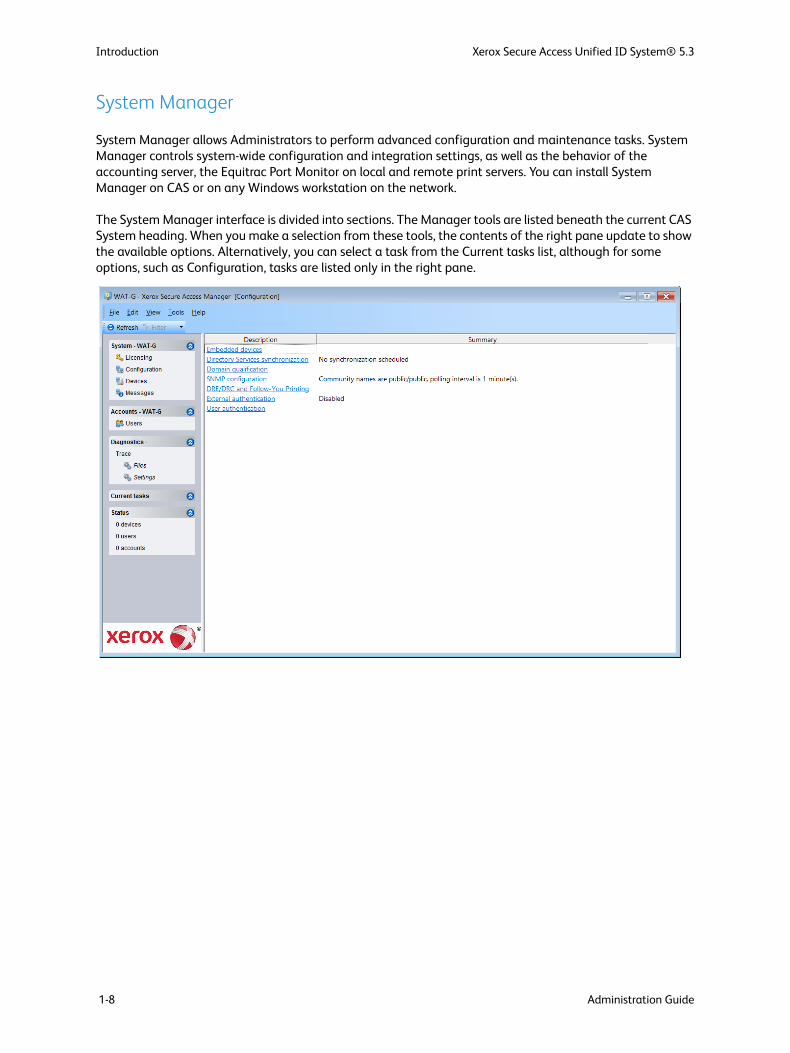
System Manager
System Manager allows Administrators to perform advanced configuration and maintenance tasks. System Manager controls system-wide configuration and integration settings, as well as the behavior of the accounting server, the Equitrac Port Monitor on local and remote print servers. You can install System Manager on CAS or on any Windows workstation on the network.
The System Manager interface is divided into sections. The Manager tools are listed beneath the current CAS System heading. When you make a selection from these tools, the contents of the right pane update to show the available options. Alternatively, you can select a task from the Current tasks list, although for some options, such as Configuration, tasks are listed only in the right pane.
Xerox Secure Access Unified ID System® 5.3 Introduction
Administration Guide 1-9
LicensingThe Xerox Secure Access software comes with a unique serial number. When you supply this product serial number and the machine name on which you are installing the software, you are provided with an activation code that is proof of registration.
For more information on obtaining activation codes and registering licenses in System Manager after the initial installation, refer to the Xerox Secure Access Unified ID System® Installation Guide.
When Xerox Secure Access is installed for the first time on a specified machine, a limited default license is generated and applied during installation. The auto-generated default license allows full operation of System Manager’s features for 45 days, however, there is a limit of only one of each licensable item.
After installation, obtain and register the Base and Feature component licenses in the System Manager Administrative Application before the 45 day default license expires. A new default license cannot be generated by reinstalling Xerox Secure Access on the same machine. When applying the full licenses, the default license is automatically overwritten.
For more information on obtaining activation codes and registering licenses in System Manager after the initial installation, refer to the Xerox Secure Access Unified ID System® Installation Guide.
Xerox Secure Access Licensing Workflow
The Xerox Secure Access solution requires a combination of a Base license (with a system expiry date) and the desired feature licenses. Xerox MPS licensing needs to be applied in the following order:
1. Obtain and install a Base license.
2. Obtain and install any feature licenses as required.
NoteSome feature licenses may require that another feature license is installed as on the system as a prerequisite. For example, the Follow-You Printing license requires an Authentication license already installed on the system.
3. Once the desired licenses are installed, they need to be assigned to devices in the License Assignment View in System Manager.
Component License Structure
The Xerox Secure Access system utilizes a licensing structure which allows licenses to be assigned on a per device basis.
Authentication – Any time the user approaches a device and authenticates themselves, they are using an Authentication license. Desktop Printing is not considered authentication.
• Licenses are assigned per device where authentication is required.
• Does not require a prerequisite.
Follow-You Printing – Allows the user the ability to release a job from a device with this license assigned to it.
• License are assigned per device where Follow-You Printing is required.
• Requires an Authentication license as a prerequisite.

Introduction Xerox Secure Access Unified ID System® 5.3
1-10 Administration Guide
Changing the License View
You can change the view in System Manager’s right pane if you need to see specific information:
• License View lists all currently licensed components.
• Assignment View lists all assigned component licenses, the date on which Xerox Secure Access last assigned the license to a component connecting to CAS, and the number of licenses assigned.

Xerox Secure Access Unified ID System® 5.3 Introduction
Administration Guide 1-11
Assigning Licenses to Devices
Licenses must be assigned to each printer that will use that particular feature.
To assign a license, do the following:
1. Open System Manager, and select Licensing in the left pane.
2. Select the Assignment View tab to open the list of all assigned licenses.
3. Expand or right-click the desired license option, and select Add to open the Assign license dialog box.
4. On the Assign license dialog box, select the checkbox for the device(s) to assign the license to.
At the bottom of the dialog box is a counter displaying the number of available licenses and available devices. These numbers decrease with every license assigned.
5. Click OK after the licenses have been assigned to the desired devices.
The devices assigned to the license now display under the selected license option.
To remove an assigned license from a device, right-click the device and select Remove assignment. The number of used licenses will be adjusted accordingly.
Introduction Xerox Secure Access Unified ID System® 5.3
1-12 Administration Guide
Additional DocumentationTo learn more about the advanced features and functionality of the Xerox Secure Access Suite(s), refer to the table below to determine the Guide you need.
For a complete list of product specification and system requirements, contact your Equitrac representative.
Guide When to refer to this guide
Planning Guide Prior to installing Xerox Secure Access, read this guide to understand how to deploy Xerox Secure Access on your network.
Installation Guide Use this guide to perform an initial installation or upgrade.
Cluster Deployment Guide If you are deploying Xerox Secure Access in a cluster environment, use this guide to plan the installation.
Embedded Guides Use these specific guides for Xerox embedded devices.
Print Server Module Guides:
UNIXLinux SUSE
If your deployment utilizes a UNIX print server, use this guide to configure the print server after the installation is completed.
If you plan to deploy Xerox Secure Access components across a cluster, use the Cluster Deployment Guide for planning and implementation.

Administration Guide 2-1
2Managing Devices
Xerox Secure Access can track transaction data from many different device types. From physical printers to virtual queues, to control terminals, Xerox Secure Access can be configured to meet the needs of any size organization. All devices you want to track must be registered in the Xerox Secure Access database.
Instructions to install all device types are provided in the Xerox Secure Access Unified ID System® Installation Guide. This chapter provides information to help you make changes to existing device configuration, and to manage devices over time.
This chapter provides information about:
• the various device types and capabilities that Xerox Secure Access supports• setting up each device in System Manager• configuring device capabilities and options
Topics
Devices Overview
Physical Devices
Control Terminals
Xerox Secure Access Unified ID System® 5.3 Managing Devices
Administration Guide 2-2
Devices OverviewXerox Secure Access can track and control printing to many different types of devices. Each device must be registered in the Xerox Secure Access database. When a user accesses a registered device, Xerox Secure Access tracks and sends the transaction data to CAS.
There are two different ways that device registration can occur:
• Configure each device to use the Equitrac® Port Monitor
Each device on a DRE print server that you want Xerox Secure Access to track must communicate with the Equitrac Port Monitor. For a new device, set the port to an Equitrac Port. If you print a test page when configuring the port, the queue is created automatically and appears within System Manager. For existing devices, convert the port to an Equitrac Port. See Creating Equitrac® Printer Ports on page 7.
• A print request is sent to a device for the first time
DRE registers a print queue and port for a physical device the first time a print request is sent to the unknown device. The device is displayed within System Manager.
Device Types
Xerox Secure Access can control printing to multiple device types. When a user accesses a registered device, Xerox Secure Access tracks and stores the data to CAS.
• Physical Devices – The actual piece of hardware that prints or copies. Physical devices include select devices that also copy, scan or fax. Xerox Secure Access adds physical devices to the database automatically when you use Windows to add a print queue, or when you add and configure printers for a UNIX print server.
• Embedded Devices – Embedded devices are the connections to physical devices that track transactions.
When working with devices, you can change the view in System Manager to make it easier to find and manage devices. The different views available are: Standard view, Server view, Type view, Custom group view, Routing group view, and Workstation view.
To sort devices in any view, click a column title to sort that column alphabetically. Click the column title again to sort in reverse-alphabetical order. Click and drag the column widths individually to enhance the current view, or to hide a column that you do not want to display. Additionally, you can right-click the column title bar and select Secure printing from the list. The Secure printing column can be made visible in all views except the Workstation view. By default, this column is not visible, and must be selected from the title bar options.
When the Secure printing column is visible, the secure printing setting of the physical devices and print queues are displayed. See Managing Secure Printing Settings on page 3 for more details on configuring and managing the secure printing settings.

Xerox Secure Access Unified ID System® 5.3 Managing Devices
Administration Guide 2-3
Managing Secure Printing Settings
When working with devices in System Manager > Devices, you can add an optional Secure printing column to make it easier and manage device secure printing settings. The Secure printing column is available in the Standard view, Server view, Type view, Custom group view, and Routing group view. This column is not available in the Workstation view. By default, this column is not visible, and must be added to the desired view(s).
To add the Secure printing column to any of these views, right-click the column title bar and select Secure printing from the list. When the Secure printing column is visible, the secure printing setting of the physical devices and print queues are displayed. Physical devices display the Secure printing default setting of the physical device configuration in this column. Print queues display the existing Secure printing setting of its configuration, and displays the actual secure printing state for that queue—either Enabled or Disabled.
The Secure printing options for physical devices are:
• New queue: use system default – secure document release is set to Enabled or Disabled as the global Secure printing default for Follow-You Printing as configured in System Manager > Configuration > DRE/DRC and Follow-You Printing.
If the Secure printing default is configured as Enabled (or Disabled), and the physical device displays New queue: use default, the newly created print queue will be set to Enabled (or Disabled) accordingly.
• New queue: enabled – secure document release is enabled on the newly created print queue.
If the physical device displays New queue: enabled in the Secure printing column, then the newly created print queue will be set to Enabled.
• New queue: disabled – secure document release is disabled on the newly created print queue.
If the physical device displays New queue: disabled in the Secure printing column, then the newly created print queue will be set to Disabled.
The terminology ‘New queue’ denotes that the setting applies to newly created print queues that are defined automatically.
You can change the secure printing settings of physical devices or print queues, and apply these changes to more than one device at a time. For example, you can select multiple devices and set the secure printing value to New queue:enabled, which in turn will set any newly created print queues for the specified devices to Enabled.
Xerox Secure Access Unified ID System® 5.3 Managing Devices
Administration Guide 2-4
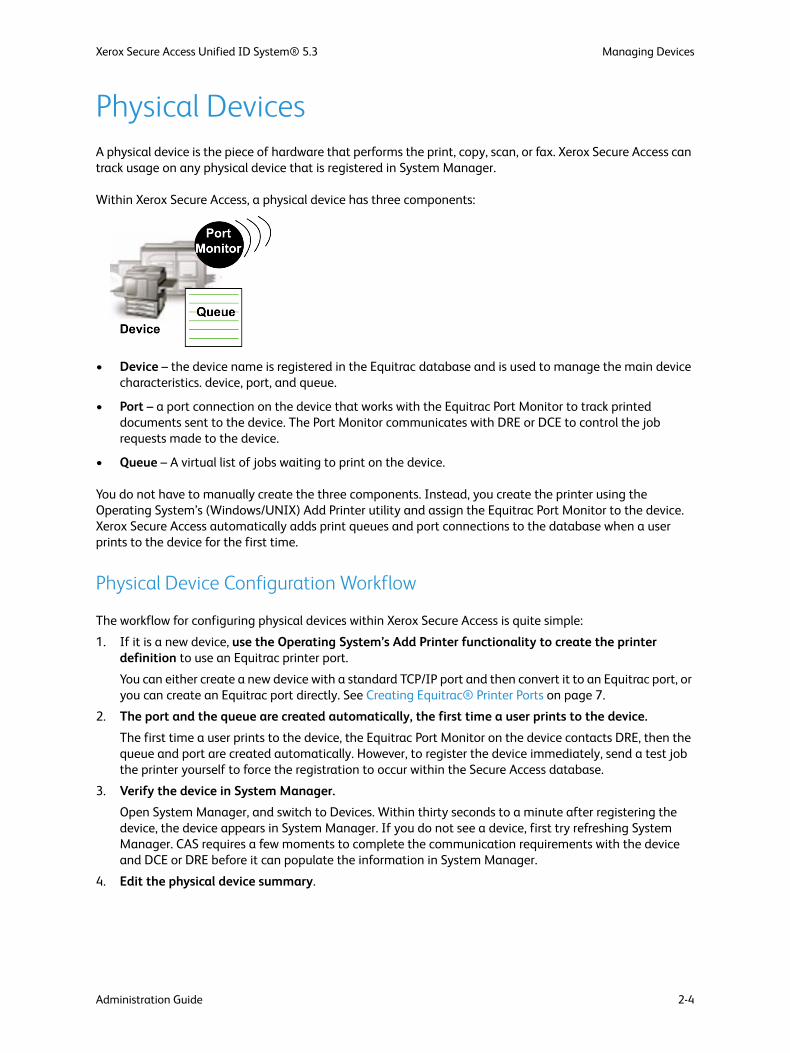
Physical DevicesA physical device is the piece of hardware that performs the print, copy, scan, or fax. Xerox Secure Access can track usage on any physical device that is registered in System Manager.
Within Xerox Secure Access, a physical device has three components:
• Device – the device name is registered in the Equitrac database and is used to manage the main device characteristics. device, port, and queue.
• Port – a port connection on the device that works with the Equitrac Port Monitor to track printed documents sent to the device. The Port Monitor communicates with DRE or DCE to control the job requests made to the device.
• Queue – A virtual list of jobs waiting to print on the device.
You do not have to manually create the three components. Instead, you create the printer using the Operating System’s (Windows/UNIX) Add Printer utility and assign the Equitrac Port Monitor to the device. Xerox Secure Access automatically adds print queues and port connections to the database when a user prints to the device for the first time.
Physical Device Configuration Workflow
The workflow for configuring physical devices within Xerox Secure Access is quite simple:
1. If it is a new device, use the Operating System’s Add Printer functionality to create the printer definition to use an Equitrac printer port.
You can either create a new device with a standard TCP/IP port and then convert it to an Equitrac port, or you can create an Equitrac port directly. See Creating Equitrac® Printer Ports on page 7.
2. The port and the queue are created automatically, the first time a user prints to the device.
The first time a user prints to the device, the Equitrac Port Monitor on the device contacts DRE, then the queue and port are created automatically. However, to register the device immediately, send a test job the printer yourself to force the registration to occur within the Secure Access database.
3. Verify the device in System Manager.
Open System Manager, and switch to Devices. Within thirty seconds to a minute after registering the device, the device appears in System Manager. If you do not see a device, first try refreshing System Manager. CAS requires a few moments to complete the communication requirements with the device and DCE or DRE before it can populate the information in System Manager.
4. Edit the physical device summary.
Xerox Secure Access Unified ID System® 5.3 Managing Devices
Administration Guide 2-5
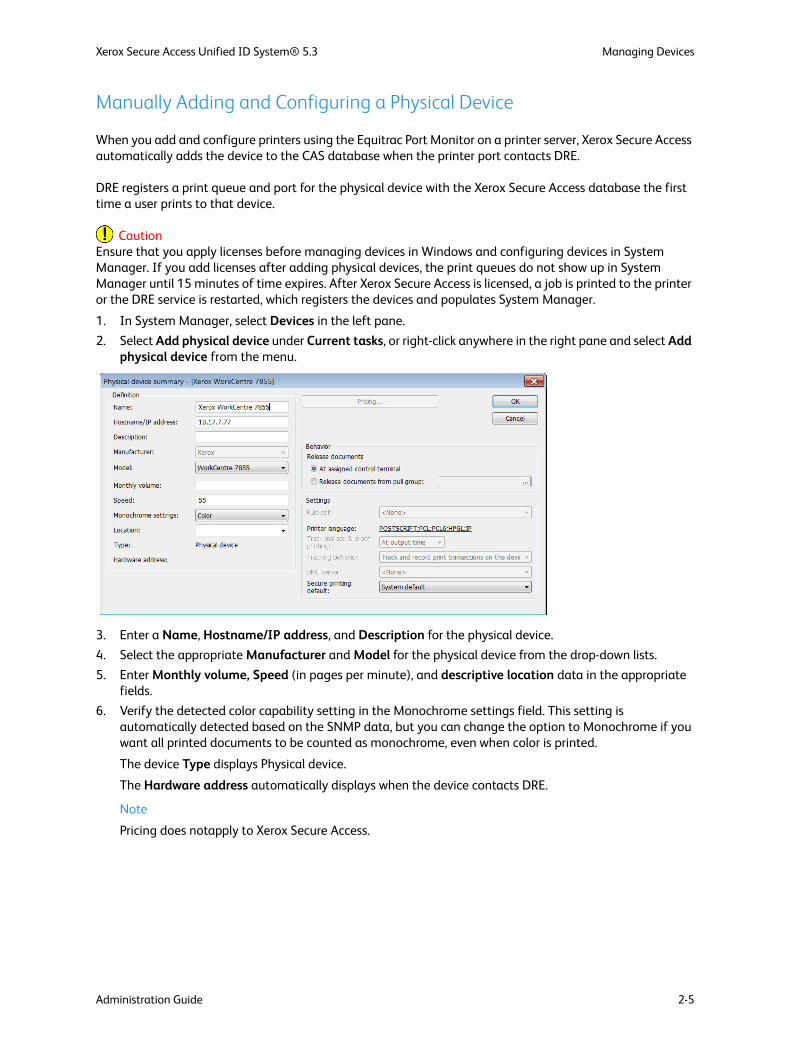
Manually Adding and Configuring a Physical Device
When you add and configure printers using the Equitrac Port Monitor on a printer server, Xerox Secure Access automatically adds the device to the CAS database when the printer port contacts DRE.
DRE registers a print queue and port for the physical device with the Xerox Secure Access database the first time a user prints to that device.
CautionEnsure that you apply licenses before managing devices in Windows and configuring devices in System Manager. If you add licenses after adding physical devices, the print queues do not show up in System Manager until 15 minutes of time expires. After Xerox Secure Access is licensed, a job is printed to the printer or the DRE service is restarted, which registers the devices and populates System Manager.
1. In System Manager, select Devices in the left pane.
2. Select Add physical device under Current tasks, or right-click anywhere in the right pane and select Add physical device from the menu.
3. Enter a Name, Hostname/IP address, and Description for the physical device.
4. Select the appropriate Manufacturer and Model for the physical device from the drop-down lists.
5. Enter Monthly volume, Speed (in pages per minute), and descriptive location data in the appropriate fields.
6. Verify the detected color capability setting in the Monochrome settings field. This setting is automatically detected based on the SNMP data, but you can change the option to Monochrome if you want all printed documents to be counted as monochrome, even when color is printed.
The device Type displays Physical device.
The Hardware address automatically displays when the device contacts DRE.
Note
Pricing does notapply to Xerox Secure Access.

Xerox Secure Access Unified ID System® 5.3 Managing Devices
Administration Guide 2-6
7. Set the Release behavior options. Leave the default setting unless you are setting up Print pull groups. See Managing Device Pull Groups on page 4 for details.
8. Change the settings, as required:
9. Click OK to save the physical device configuration settings.
Physical Device Settings Description
Rule set Rule Sets do not apply to Xerox Secure Access
Print language Change the default printer language settings that are used by this device.
Track mailbox & proof printing
Select At output time when printing is being tracked by an Equitrac port.Select At send time when printing is being tracked locally by polling the device for print activity.
DME server DME servers do not apply to Xerox Secure Access
Secure printing default Select System default to use the global secure printing default for new devices and existing physical devices on upgrade.Select Enabled or Disabled to override the system default setting for individual or grouped physical devices.

Xerox Secure Access Unified ID System® 5.3 Managing Devices
Administration Guide 2-7
Creating Equitrac® Printer Ports
Xerox Secure Access uses specialized ports to track print devices. Each monitored device must use an Equitrac port. Depending on your printing hardware, you may need more than one port using the Equitrac Port Monitor on a print server. You can configure a new printer definition that uses the Equitrac Port Monitor.
You can create Equitrac printer ports directly for new devices, or convert existing devices from standard TCP/IP ports into Equitrac ports. For new devices, see Add a Printer on an Equitrac Printer Port (below). Alternatively, new devices can be created using standard TCP/IP ports and then converted it to an Equitrac ports. For existing devices, Convert an Existing TCP/IP Port to Equitrac Port on page 8. Converting from TCP/IP to Equitrac ports allows them to be quickly converted back to TCP/IP ports to determine if reported errors within the print environment are due to the Equitrac server or the normal print environment.
NoteIf you are working in a cluster environment, these instructions do not apply. See the Cluster Deployment Guide to set up Equitrac Ports for clusters.
Add a Printer on an Equitrac Printer Port
To create Equitrac printer ports for new devices, do the following:
1. Using the standard Windows interface, open the Add Printer wizard.
2. Follow the prompts to add a local printer and create a new port.
3. Select Equitrac Port as the type of port you want to create and click Next.
4. The Add Equitrac Printer Port wizard displays and you are prompted to ensure that the printer device is turned on, connected to the network, and properly configured. Click Next to continue.
5. Click Next and select Physical printer as your Device Type from the drop-down list.
6. Specify a Printer name or IP Address. The wizard supplies a Port name prefaced with "EQ_" based on the printer name or IP address. If another naming convention is preferred, rename the port accordingly.
7. Click Next to continue with the port configuration options. The Port Configuration screen displays. The Detected device information displays automatically if the wizard is able to collect this data Convert an Existing TCP/IP Port to Equitrac Port on page 8 from the printer.
8. Select the Use custom settings option:
• If you select Raw port communication, identify the TCP Port number, and specify if the port monitor should hold the connection open.
• If you select LPR, specify the name of the print Queue on the physical device (e.g. PORT1).• If you select Specific device, select the appropriate Manufacturer and Model from the drop-down
lists. The device uses the relevant default communications parameters based on these selections.
9. Click Next and specify the Physical device name. This is the name of the device that is displayed within System Manager.
10. Review the details for this new port and device registration, and click Finish to close the Add Equitrac Printer Port wizard, or Back to change any of the settings.
11. Specify the Manufacture and model to install the printer driver, and click Next.
Note
If the device is part of a pull group, it must use the same drivers as all other devices in the pull group. You must select the model of the pull group driver, not the model of the device. If DRE is a 64-bit server you must remember to also load the 32-bit driver to the server.

Xerox Secure Access Unified ID System® 5.3 Managing Devices
Administration Guide 2-8
12. Specify the version of the print driver to use, and click Next.
13. Enter the Printer name, and click Next. This is the name of the device that is displayed in System Manager.
14. Select to share or not to share the printer with others, and click Next. If sharing the printer, enter a Share name, and optionally provide a printer location and any comments.
15. Click the Print a test page button, and click Finish to close the Add Printer wizard.
16. Confirm that the test page printed successfully.
17. Verify that the physical device and its printer port and print queue appear in System Manager > Devices.
Convert an Existing TCP/IP Port to Equitrac Port
Use the Printer Configuration Wizard to convert from a TCP/IP port to Equitrac ports. Converting from TCP/IP to Equitrac ports allows them to be quickly converted back to TCP/IP ports if desired.
To convert from TCP/IP printer ports to Equitrac ports, do the following:
1. Select Start > All Programs > Xerox Secure Access > Printer Configuration Wizard.
2. Click Next on the Welcome screen to continue with the conversion.
3. Select Convert printers to use Equitrac Ports, and click Next. Optional – Uncheck Auto-discover model if the printers are off-line or have SNMP disabled. If selected, the wizard sends an SNMP request to each device, and then times-out on each failed connection attempt, greatly increasing the time to run the conversion.
4. Select the desired print server(s) from the list, and click Next. Optionally, enter the name of other print servers in the Add field, and click the Add button to place them in the PrintServer list. Print servers can only be added one at a time

Xerox Secure Access Unified ID System® 5.3 Managing Devices
Administration Guide 2-9
5. Select the printer(s) to be converted, and click Next. If a printer exists on more than one print server, it displays multiple times in the Printer list along with the name of its associated server in the PrintServer list.
6. Set the Printer Name and Port Name as they will display in the System Manager Devices view. You can use the default naming templates for the printer "<ip>_<printer>" and port "EQ_<ip>", or change the names as desired.
Typing over the <ip> value, automatically replaces the printer IP address. Typing over the <printer> value, automatically replaces the print queue name. For example, you can change the printer default "<ip>_<printer>" to "2nd floor <printer>" to associate the selected printer(s) with the 2nd floor in your environment, or you can remove "<printer>" from the name to only display the printer’s IP address in System Manager

Xerox Secure Access Unified ID System® 5.3 Managing Devices
Administration Guide 2-10
NoteThe printer and port names can be changed individually or as a group. If multiple printers are selected, the naming convention affects the entire selection.
7. On the Properties page, select the properties you want to assign to the printers from the SDR and Pull Group drop-down lists, and then click Next. The properties can be applied to single or grouped printers. Rule Sets do not apply to Xerox Secure Access.
8. On the Price Lists page, click Next to skip this page. Price Lists do not apply to Xerox Secure Access.
9. Click Finish to complete the conversion process. Alternatively, you can select the Return to Start checkbox and click Next to return to the Wizard’s main page without completing the conversion.
10. Open the Printers and Faxes window, and print a test page for EACH converted printer.
11. Confirm that the test page printed successfully.
12. Verify that the physical device and its printer port and print queue display in System Manager > Devices.
Configuring Physical Devices with the Printer Configuration Wizard
Use the Printer Configuration Wizard to reconfigure existing Equitrac printers. The wizard allows for properties such as pull groups and SDR to be set across multiple devices simultaneously.
To configure existing Equitrac printers, do the following:
1. Select Start > All Programs > Xerox Secure Access > Printer Configuration Wizard.
2. Click Next on the Welcome screen to continue with the conversion.
3. Select Configure Equitrac Printers, and click Next. Optional – Uncheck Auto-discover model if the printers are off-line or have SNMP disabled. If selected, the wizard sends an SNMP request to each device, and then times-out on each failed connection attempt, greatly increasing the time to run the configuration.

Xerox Secure Access Unified ID System® 5.3 Managing Devices
Administration Guide 2-11
4. On the Properties page, select the properties you want to assign to the printers from the SDR and Pull Group drop-down lists. Rule Sets do not apply to Xerox Secure Access. The properties can be applied single or grouped printers. Multiple Pull groups can be assigned by entering a semi-colon separated list of groups in the Pull Group field.
5. On the Price Lists page, click Next to skip this page. Price Lists do not apply to Xerox Secure Access.
6. Click Finish to complete the configuration process. Alternatively, you can select the Return to Start checkbox and click Next to return to the Wizard’s main page without completing the configuration.
Configuring a Printer Port
To view the port in System Manager, switch to Devices, then select Standard View. Expand the device that you want to modify, then click to view the port summary.
Option Description
Name The name for the port. By default, the port is assigned the device IP Address.
Description A text description of the port that appears in System Manager. The description should reflect the device name that the port belongs to, or the location where the device is located.
Server Displays the local print server. This field is provided for information only.
Type Indicates that you are viewing information about a port.
Xerox Secure Access Unified ID System® 5.3 Managing Devices
Administration Guide 2-12
Port number Displays the currently configured TCP/IP port number for this port.
Queue print server Displays the name of the DRE print server that manages this port.
Proxy IP address Use this field to identify the print queue name of the printers using a Passthrough port. In order to retrieve SNMP data from the DME console, the Hostname/IP address field in the Physical device summary dialog box should contain the IP address of the physical printer.
Pricing Pricing does not apply to Xerox Secure Access.
Rule set Rule sets do not apply to Xerox Secure Access.
Connectivity You can edit this field only when the port communication type is set to RAW. This option does not apply to LPR and Passthrough ports. Choose Hold port Open to ensure that users can only print to the device through the print server, preventing users from bypassing the accounting server and establishing an exclusive connection to the network printer. Choose Close port on completion to share the printer connection with other non-Equitrac printer definitions.
Notification page Determines if users are notified when print errors occur on this port.
Uses printer job language (PJL)
Enable this option for Print Job Language (PJL) compatible devices. If the user cancels printing mid-job, Xerox Secure Access combines the information from the Datastream Interpreter (DSI) and the PJL page count to determine an accurate page count and document details. When disabled, Xerox Secure Access uses only the DSI page counting method configured at the physical device level. Enabling PJL support may reduce the throughput speed of the device.
Uses SNMP counting If the user cancels printing mid-job, or there is a printer error, Xerox Secure Access combines the information from the DSI and the SNMP page count to determine how many pages were printed. In order for SNMP page counting to work, only one port can talk to the MFP.
Idle timeout When SNMP counting is selected, you can set the idle timeout value in seconds for the amount of time that the device has been in idle state since the job was canceled. Once this time is reached, Xerox Secure Access assumes the printing is complete and polls the device again to determine how many pages were printed.
Option Description
Xerox Secure Access Unified ID System® 5.3 Managing Devices
Administration Guide 2-13
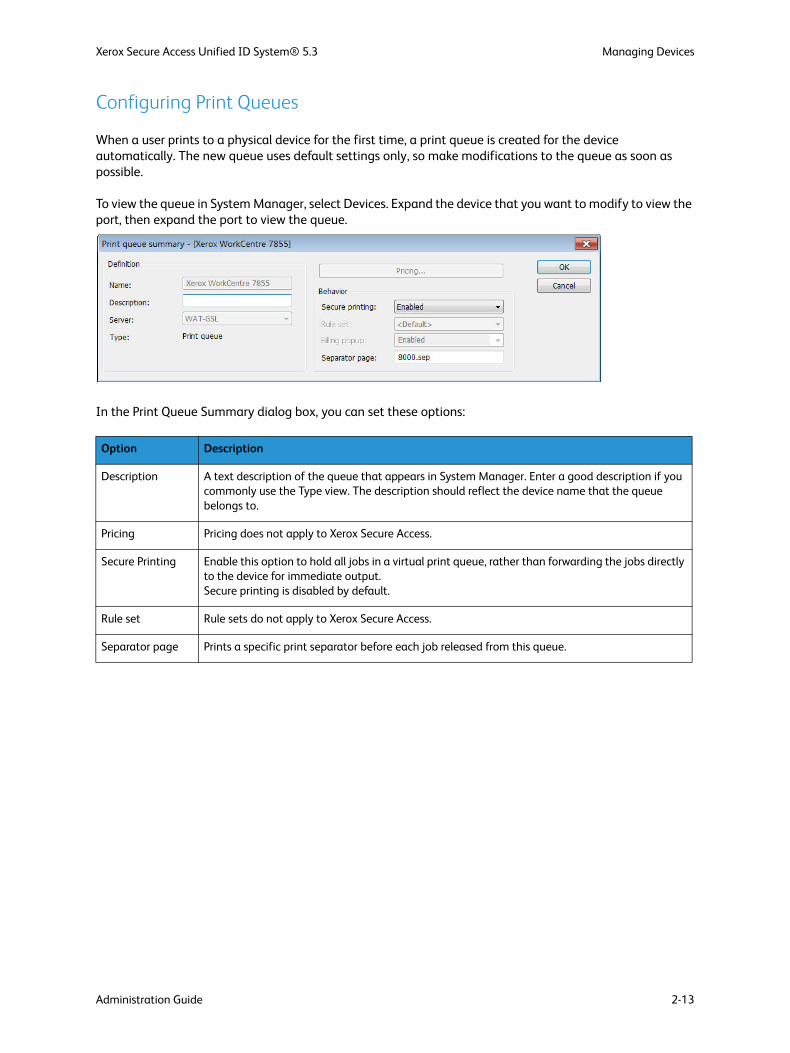
Configuring Print Queues
When a user prints to a physical device for the first time, a print queue is created for the device automatically. The new queue uses default settings only, so make modifications to the queue as soon as possible.
To view the queue in System Manager, select Devices. Expand the device that you want to modify to view the port, then expand the port to view the queue.
In the Print Queue Summary dialog box, you can set these options:
Option Description
Description A text description of the queue that appears in System Manager. Enter a good description if you commonly use the Type view. The description should reflect the device name that the queue belongs to.
Pricing Pricing does not apply to Xerox Secure Access.
Secure Printing Enable this option to hold all jobs in a virtual print queue, rather than forwarding the jobs directly to the device for immediate output. Secure printing is disabled by default.
Rule set Rule sets do not apply to Xerox Secure Access.
Separator page Prints a specific print separator before each job released from this queue.

Xerox Secure Access Unified ID System® 5.3 Managing Devices
Administration Guide 2-14
Editing and Removing Devices
You can edit the properties of a physical device, print queue, port, embedded device or control terminal at any time. Changes can be made to more than one device at a time. For example, if you want to set secure printing on all queues, select the queues, then set secure printing on all devices at once.
When multiple devices are selected, the summary dialog box opens and disables any properties that are not shared among the devices. For example, the Name and Hostname/IP address fields are blank in the dialog box and are not editable. If the settings on the devices do not match, Xerox Secure Access displays the lists and options as empty fields. You can edit these fields, which in turn changes the field on every selected device, or leave the option “empty” to keep the existing settings.
A device can be deleted at any time. In System Manager, right-click the device, and select Delete from the list. If the device was tracked using DME, it no longer appears in the DME console.
Deleted devices cannot be re-added to the database as the same device. The database assigns a unique identifier to each device, and a record of the device is kept in the database even after the device is deleted from System Manager. If you delete a device and need to re-add it, you must choose a unique device name.

Xerox Secure Access Unified ID System® 5.3 Managing Devices
Administration Guide 2-15
Control TerminalsControl terminals are small network devices that are installed on or near printers, copiers, or multi-function devices. Control terminals enable users to release print jobs securely at the printer. Control terminals can also track copy transactions through a copy control cable connected to the copier.
Supported Devices
Xerox Secure Access supports the PageCounter Mini. This device can only be configured for Release all or Release all and enable copier and does not support full use of Follow-You Printing across print servers.
Adding and Configuring a Control Terminal
Control terminals can be added to System Manager automatically or manually. When a control terminal is powered-up and connected to the network, DCE registers the control terminal and automatically adds it in System Manager > Devices under the Unassigned control terminals group. Once the control terminal has been added to the list of Devices, it can be assigned to a specific physical device. See Associating a Control Terminal With a Physical Device on page 17.
To manually add and configure a PageCounter Mini control terminal, do the following:
1. In System Manager > Devices, right-click a physical device and select Add control terminal from the menu.
2. In the Device interface summary dialog box, enter a unique Name and a Description for the control terminal.
The Server value defaults to the current DCE host. Change the server, if necessary, by selecting another server from the drop-down list.
The Type automatically displays Control terminal.
The Hardware address automatically displays when the control terminal contacts DCE.
3. If needed, override the copier type associated with your MFP device model to define a more appropriate copier type for your hardware. The Xerox Secure Access device database that maps MFP devices to copier types may not contain every available model.
Select <unconfigured> to use the physical device copier type, select <Default> to override the physical device copier type with the default copier type, or, select a copier type from the drop-down list.

Xerox Secure Access Unified ID System® 5.3 Managing Devices
Administration Guide 2-16
4. Enter the IP address, Gateway IP, and Subnet mask for the control terminal.
Xerox Secure Access returns this information to the device if you configure the device to use the modified BOOTP protocol for initialization instead of a static IP address. See your control terminal documentation for details on device configuration.
The Terminal type is automatically detected and displayed when the control terminal contacts DCE.
5. If you have enabled secure printing, configure the following control terminal functionality:
NoteRule sets do not apply to Xerox Secure Access.
a. Select a Control to specify the device’s default functionality, as described in the following table:
b. When configuring control terminals for print transactions only, select the Release Behavior to determine the device’s default release behavior:
6. Select a Card Reader HID decoding from the drop-down list. See HID Decoding on page 14 for setup details.
7. Click OK to save these settings, or Cancel to close the dialog box without saving any changes.
Control Option Description Control Terminal Prompt
Copy and release Provide copy and print release control for documents sent to the associated physical device.
Select use:Print Copy End
Copy only Provide copy control only. N/A
Copy then release Enable the copier immediately upon authentication.If the user presses Print, the print functionality is available and control terminal prompts are displayed according to the Release Behavior that is configured.
Copying...Print End
Release only Provide print release control only. N/A
Release then copy Release all documents immediately after the user authenticates, and enables copying.
N/A
Release Behavior Description Control Terminal Prompt
First is released The device releases only the first queued document automatically after user login.
N/A
Prompt The device prompts the user to release all or select documents for that user.
1 documents foundon local serversAll Select End
Release all at login The device releases all queued documents for the current user automatically after successful login.
N/A
Select to release User can select one or more documents to release or delete. Document1.txtPrint Del End

Xerox Secure Access Unified ID System® 5.3 Managing Devices
Administration Guide 2-17
Associating a Control Terminal With a Physical Device
When a control terminal is powered-up and connected to the network, DCE registers the control terminal in System Manager > Devices under the Unassigned control terminals group.
To associate any unassigned control terminal with a physical device, do the following:
1. In System Manager > Devices, switch to Standard view. The list of unassigned control terminals is displayed.
2. Right-click on a control terminal in the right pane and select Assign control terminal from the menu.
3. In the Assign Control Terminal to device dialog box, select a physical device from the list and click OK.
The right pane updates to display the new control terminal association.
Alternatively, you can select the control terminal in the right pane, and drag it to a physical device.

Xerox Secure Access Unified ID System® 5.3 Managing Devices
Administration Guide 2-18
Administration Guide 3-1
3‘
Creating & Managing Accounts
Printing Accounts are required to track copy, fax, scan, and print usage. Each time a user submits a job, the Core Accounting Server (CAS) validates the job request, then logs the transaction details to the database.
Printing Accounts are created and managed within System Manage. Access to this manager is restricted to selected domain groups. You must be a member of the Domain controller assigned to the Accounts permission to open and use System Manage.
This chapter provides information to:
• determine the account types required for your deployment
• create the three different account types
• manage accounts on an on-going basis
• set system configuration options that affect all accounts
Topics
Accounts Overview
Working with User Accounts
Managing User Accounts
Managing Search Filters
Accounts System Configuration

Creating & Managing Accounts Xerox Secure Access Unified ID System® 5.3
3-2 Administration Guide
Accounts Overview
Why Use Accounts?
If you want Xerox Secure Access to track printing per Users, you need to create printing accounts. You can use accounts to set limits on the amount of printing each account can perform, and on the number of color pages each account can produce.
Each account is logged in the database. Print, scan, fax, and copy job transaction details are logged to the account. User Account properties can also include name, email address, and account balance.
Each time a user submits a print request, the Port Monitor on the target device contacts the Core Accounting Server (CAS) to verify the users credentials. CAS checks the database entry for the account, and either verifies or denies the print request. If verified, the print job is released to the print queue. After the job has printed, the Port Monitor forwards the transaction details to CAS, which updates the account information and transaction details for that account.

Xerox Secure Access Unified ID System® 5.3 Creating & Managing Accounts
Administration Guide 3-3
User Account
User accounts allow valid users to print to monitored devices, and enables print tracking. Each user who prints to one or more monitored devices, or who login to a control terminal to use copy, scan, or fax functions, must have an Xerox Secure Access printing account.
Users can be assigned to act as a delegate to release another user’s print jobs. For example, an assistant needs to release a manager's print jobs from a device, therefore the assistant is assigned to the manager’s account as a delegate. The manager (delegator) sends a job for printing, and the assistant (delegate user) logs in to the device with their user credentials to release the job via Follow-You Printing®. The delegate is presented with a list of their documents, followed by a list of the delegator’s documents. A delegator may have multiple delegates, and a delegate may be assigned to multiple delegators. See Click OK to save the changes. on page 6.
Grouping Accounts
If you are managing a large organization, you may have more than 1000 users. Rather than presenting an enormous list of users, System Manage can be configured to group users alphabetically or numerically.
To enable the User group view, do the following:
1. Click Tools > Options.
2. In the Options dialog box, select the Enable grouping checkbox.
3. Set the Alphabetical ranges to either Predefined or Optimized size.
4. If Optimized size is selected, enter a Maximum group size to display in System Manage. The group size range must be within 100 - 10,000.
5. Click OK to save the settings.
A User group view tab is placed on the System Manage toolbar.
Click the User group view tab to select a user group to view and access in the right pane. The System Manage title bar displays the selected group.
If you want to further refine the views in System Manage, use the EQAccountRegroup tool to divide the groups into smaller subgroups for easier viewing. See Refining the User Group View on page 9.

Creating & Managing Accounts Xerox Secure Access Unified ID System® 5.3
3-4 Administration Guide
Working with User AccountsWhen you first implement Xerox Secure Access, you can choose from three methods to create user accounts: create accounts with Xerox Secure Access one at a time, allow the system to create users automatically, or import users from Synchronized Directories (e.g. Active Directory and LDAP). Instructions for each method are provided within this chapter.
Creating User Accounts
Xerox Secure Access provides several different methods to create user accounts. Use the table below to determine the best method for your needs. Instructions are provided within this section for each method.
Method Purpose
Add users individually Use System Manage within Xerox Secure Access to add users one at a time.
Allow Xerox Secure Access to create users automatically
Configure Xerox Secure Access to create a new account automatically when a print request is received from a user not known to the Accounting Server.
Import Users with Active Directory Synchronization
Use Active Directory Services to batch import user data, then synchronize updates as they occur.Minimizes administration because updates occur automatically via communication with the Active Directory Services.Offers PIN code and home server synchronization to single or multiple Active Directory servers.
LDAP Synchronization Has all the same features as Active Directory Synchronization. The LDAP server must support persistent search (e.g. Novell eDirectory).
Flat-File Import Use the EQCmd.exe utility to import a file containing user account data.
Xerox Secure Access Unified ID System® 5.3 Creating & Managing Accounts
Administration Guide 3-5
Adding and Editing Users Individually
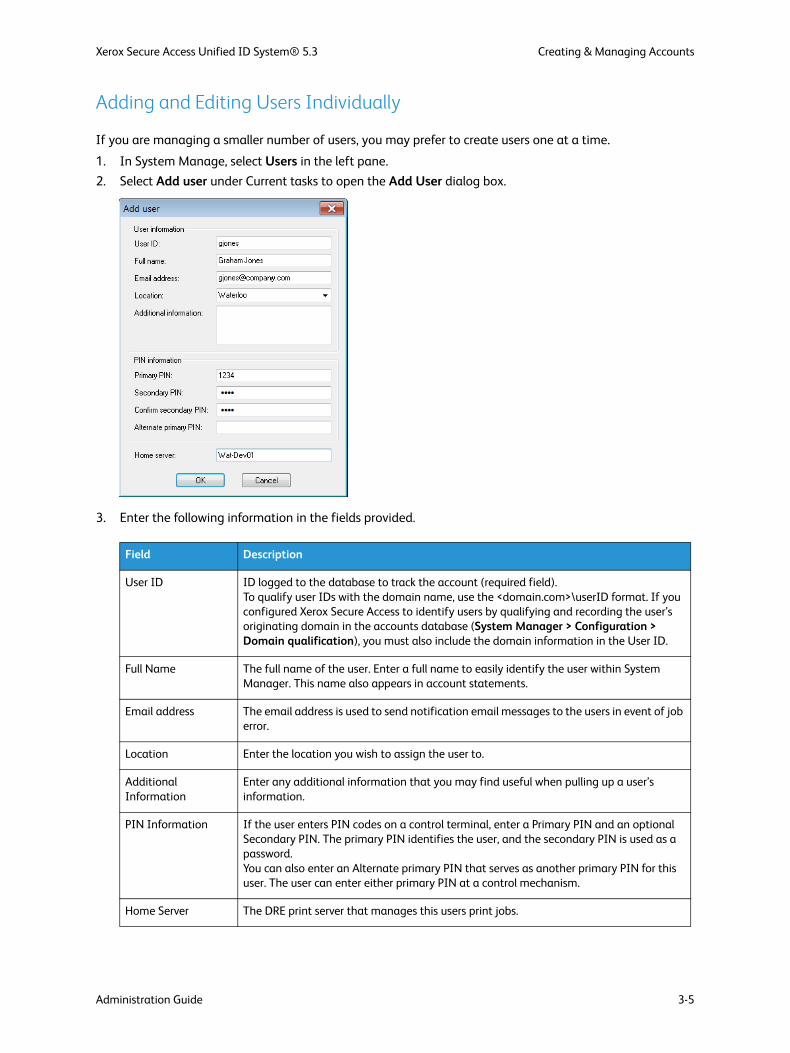
If you are managing a smaller number of users, you may prefer to create users one at a time.
1. In System Manage, select Users in the left pane.
2. Select Add user under Current tasks to open the Add User dialog box.
3. Enter the following information in the fields provided.
Field Description
User ID ID logged to the database to track the account (required field). To qualify user IDs with the domain name, use the <domain.com>\userID format. If you configured Xerox Secure Access to identify users by qualifying and recording the user’s originating domain in the accounts database (System Manager > Configuration > Domain qualification), you must also include the domain information in the User ID.
Full Name The full name of the user. Enter a full name to easily identify the user within System Manager. This name also appears in account statements.
Email address The email address is used to send notification email messages to the users in event of job error.
Location Enter the location you wish to assign the user to.
Additional Information
Enter any additional information that you may find useful when pulling up a user’s information.
PIN Information If the user enters PIN codes on a control terminal, enter a Primary PIN and an optional Secondary PIN. The primary PIN identifies the user, and the secondary PIN is used as a password. You can also enter an Alternate primary PIN that serves as another primary PIN for this user. The user can enter either primary PIN at a control mechanism.
Home Server The DRE print server that manages this users print jobs.

Creating & Managing Accounts Xerox Secure Access Unified ID System® 5.3
3-6 Administration Guide
Xerox Secure Access adds the User to the accounts database and lists the User name in the right pane.
To edit an existing User, do the following:
1. In System Manage, select Users in the left pane.
2. Right-click a User in the right pane, and select Properties from the menu to open its Properties window and modify any of the editable fields.
3. Click OK to save the changes.
Importing Users with Active Directory Services
System Manager provides a utility to import uses via Active Directory Services (ADS). If you want to minimize administration overhead, and you are managing a large number of User Accounts, you should use ADS to synchronize user accounts.
WarningThe Equitrac® services must be started by a Domain account with access to the contact Active Directory. If services are started under the local administrative account, the Active Directory synchronization fails.
CautionIf you plan to use Active Directory Services to generate user accounts, you must decide before performing the first synchronization whether or not to use Domain Qualification. See Qualifying Accounts by Domain on page 12 for instructions.
Configuring Active Directory Synchronization
It is important to select options in the correct order in the Directory Services synchronization dialog box. Performing these steps causes a task to run in the background. You can see the result of the task in the System Manage—the list of users populates automatically when the task is complete.
An Active Directory server consists of containers that contain records (users, computers, printers, etc.) organized by type, geographical location or similar. Synchronization, settings and any related operations available in this window can be applied to servers or individual containers, depending on your selection.
Xerox Secure Access Unified ID System® 5.3 Creating & Managing Accounts
Administration Guide 3-7
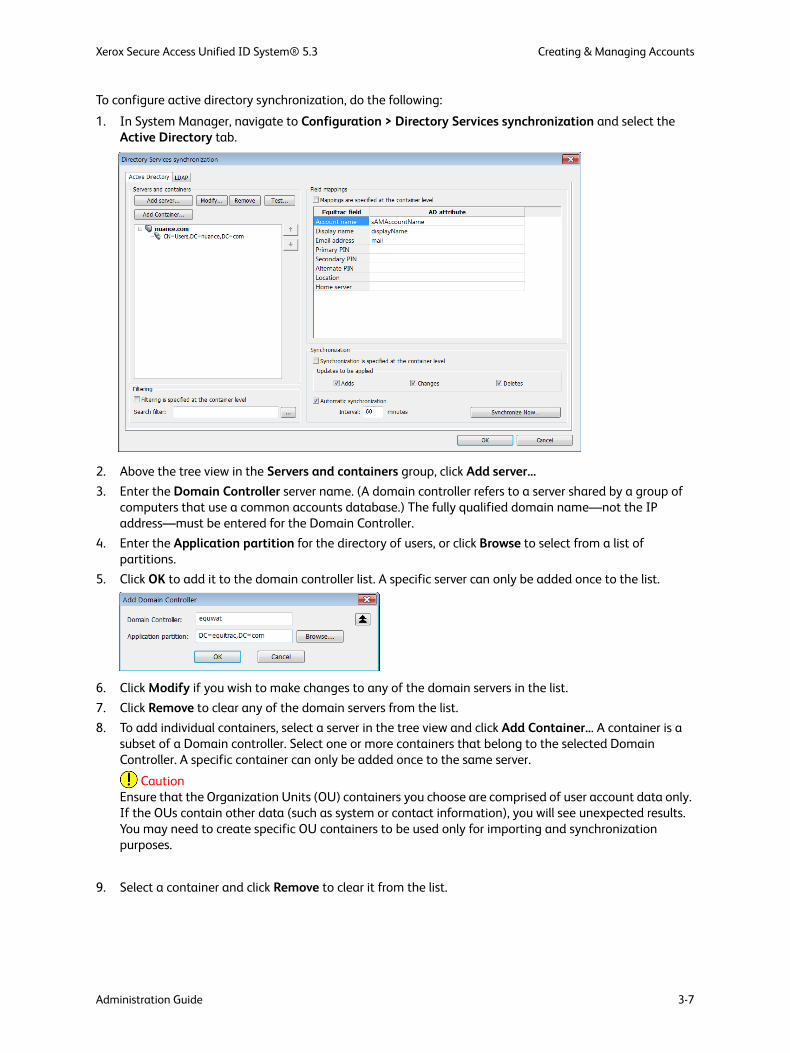
To configure active directory synchronization, do the following:
1. In System Manager, navigate to Configuration > Directory Services synchronization and select the Active Directory tab.
2. Above the tree view in the Servers and containers group, click Add server...
3. Enter the Domain Controller server name. (A domain controller refers to a server shared by a group of computers that use a common accounts database.) The fully qualified domain name—not the IP address—must be entered for the Domain Controller.
4. Enter the Application partition for the directory of users, or click Browse to select from a list of partitions.
5. Click OK to add it to the domain controller list. A specific server can only be added once to the list.
6. Click Modify if you wish to make changes to any of the domain servers in the list.
7. Click Remove to clear any of the domain servers from the list.
8. To add individual containers, select a server in the tree view and click Add Container... A container is a subset of a Domain controller. Select one or more containers that belong to the selected Domain Controller. A specific container can only be added once to the same server.
CautionEnsure that the Organization Units (OU) containers you choose are comprised of user account data only. If the OUs contain other data (such as system or contact information), you will see unexpected results. You may need to create specific OU containers to be used only for importing and synchronization purposes.
9. Select a container and click Remove to clear it from the list.

Creating & Managing Accounts Xerox Secure Access Unified ID System® 5.3
3-8 Administration Guide
10. Click Test to open an Active Directory lookup dialog box. Enter a user account name. When the domain controller is contacted, the dialog box shows the ADS properties for that account. You can test servers as well as containers, depending on your list selection. Lookups may get resource intensive operations: ensure that you use this functionality on an entire server only if your task specifically requires it.
11. Optionally, you can move servers and containers up or down the tree view. Select the item to move and use the Move Up or Move Down buttons next to the view.
NoteControls in this group are also accessible from the item context menu.
12. Under Filtering, you can specify a search filter for synchronization. Click the (...) button if you wish to assemble a filter using a graphical interface. A standard filter dialog box opens. Use this to specify conditions. To specify an unlisted field use the Search filter textbox. Only user accounts that meet these conditions are included in the synchronization.
Click the checkbox Filtering is specified at the container level if you are working with containers instead of servers.
NoteIf filters are applied after the initial user import, updates to users who do not match the filter specifications are ignored.
13. In the Field mappings section, you can link Xerox Secure Access user fields to ADS attributes. You should enter the AD attribute name, not the field label. Synchronization uses the specified mappings.
Click the Mappings are specified at the container level checkbox to set field mappings for containers instead of servers.
Check the options you want to associate with the user accounts in the selected containers:
• Account name – contains the user login ID. This is mapped to the User ID property in Xerox Secure Access.
• Display name – contains a description of the user, such as the full user name. This is mapped into the Full name property for the user within Xerox Secure Access.
• Email address – contains the user’s email address.• Primary PIN and Secondary PIN – map the numeric PIN values found on the ADS to the
PrimaryPIN and SecondaryPIN fields in Xerox Secure Access. • Alternate PIN – maps the alternative primary PIN.• Location – maps the user’s physical location.• Home Server – maps the name of a particular print server to the Home Server field in the Xerox
Secure Access database. If you are enabling Follow-You Printing, ensure that you select the Home Server attribute for these users.
NoteDepartment, Color quota, Home folder and Delegates do not apply to Xerox Secure Access.
14. Use the controls in the Synchronization group (under Field mappings) to specify synchronization settings.
15. Click the checkbox Synchronization is specified at the container level if you want to synchronize containers rather than servers. Ensure that you only use this option with a container selected.
Xerox Secure Access Unified ID System® 5.3 Creating & Managing Accounts
Administration Guide 3-9
16. Select or clear AD update options—Adds, Deletes, or Changes—to specify which AD accounts Xerox Secure Access receives and applies to the accounts database during subsequent synchronizations.
You must have at least one option selected to perform synchronization or save your changes.
You can import added or changed users, or remove inactive accounts from the Secure Access accounts database. Leave these settings at the default to ensure the accounts are updated and kept in sync with the ADS server.
Note
The Deletes option only works if the "isDeleted" AD attribute is set to true. In case the entire user record is removed from AD, Xerox Secure Access cannot detect this deletion due to an AD limitation, and the corresponding user is not deleted automatically from Secure Access database.
17. Click the Automatic synchronization checkbox to enable adjustments to the Synchronization interval. Use this to change how often Xerox Secure Access synchronizes its accounts database with the specified AD. The synchronization interval value must be at least 15 minutes. The maximum value 10080 minutes (one week).
18. After specifying the synchronization settings, click Synchronize Now… to schedule a single synchronization process (as opposed to automatic synchronization, which is performed periodically). Click OK to have this single synchronization performed in the background.
19. Click OK to exit the dialog box. The task continues to run even though the dialog box is closed. Server settings apply to all containers of the server.
20. After a few minutes, refresh System Manage, then check the list of Users to ensure successful import of the accounts. Open the user account properties and ensure that the settings are correct.
Active Directory LDS Support
Xerox Secure Access supports Active Directory Lightweight Directory Services (AD LDS) to synchronize a subset of the Active Directory tree to a local LDS server.
Like Active Directory, AD LDS provides a hierarchical data store for storage of directory data, a Directory Service with an LDAP directory service interface. Unlike Active Directory, however, multiple AD LDS instances can be run on the same server. AD LDS shares the code base with Active Directory and provides the same functionality as Active Directory, including an identical API, but does not require the creation of domains or domain controllers.
AD LDS operates independently of Active Directory and independently of Active Directory domains or forests. It operates either as a standalone data store, or it operates with replication. Its independence enables local control and autonomy of directory services for specific applications. It also facilitates independent, flexible schemas, and naming contexts.
AD LDS is ideal for applications that require directory services, but do not require the complete infrastructure features of Active Directory.

Creating & Managing Accounts Xerox Secure Access Unified ID System® 5.3
3-10 Administration Guide
Configuring LDAP Synchronization
LDAP synchronization requires that the LDAP server supports search functionality. LDAP import will not work if the Base DN or user names contain spaces.
To configure LDAP synchronization, do the following:
1. In System Manager, navigate to Configuration > Directory Services synchronization and select the LDAP tab.
2. Above the tree view in the Servers group, click Add... to open the New LDAP server dialog box.
a. Enter the LDAP server name.
b. Enter the Port number. The default value depends on whether you have the Use SSL checkbox marked or clear (see below).
c. In the Base DN field, enter the location within the directory to start the search. For example, if the entire directory is to be searched under an organization of “Nuance”, this would be “O=nuance”. Ensure the Base DN name does not contain spaces, or the import will fail.
d. Enter a Login ID. The login ID is the fully qualified user ID (e.g. CN=admin, O=nuance).
e. Enter a Login password.
f. Select an LDAP version from the drop-down list.
g. Select Use SSL if you want use Secure Socket Layer encryption.
h. Click OK to add the new server.

Xerox Secure Access Unified ID System® 5.3 Creating & Managing Accounts
Administration Guide 3-11
3. Click Modify if you wish to make changes to any of the LDAP servers in the list.
4. Click Remove if you wish to remove any of the LDAP servers from the list.
5. Click Test to confirm that Persistent Search is enabled. An LDAP lookup dialog box opens. Enter a user account name. If Persistent Search is enabled, the dialog box shows the LDAP properties for that account. If a search filter (see below) is specified, the lookup only returns users matching the selected filter.
6. Optionally, you can move servers and containers up or down the tree view. Select the item to move and use the Move Up or Move Down buttons next to the view.
NoteControls in this group are also accessible from the item context menu.
7. To specify import search criteria, enter it in the Search filter field under Filtering. "(objectClass=person)" is the default search filter, and can be modified as needed. Use standard LDAP filter syntax to define the search criteria. he search filter criteria also affects the information returned in the LDAP lookup Test tool.
If desired, you can enter additional search criteria along with the Object class. For example, if the search filter entered is "(&(objectClass=person)(l=Waterloo)", this would search for objects that have the Object class = person AND also have a location set to Waterloo.
NoteWhen using LDAP email search, the Search filter field is not active. LDAP email search looks for entries in the displayName attribute, not the email address. The displayName attribute must match what is entered in the LDAP server.
8. In the Field mappings section, you can link Xerox Secure Access user fields to LDAP attributes. The LDAP lookup must resolve to a unique user identifier.
The specified field mappings are used by synchronization. Check the options you want to associate with the user accounts in the selected containers:
• Account name – contains the user login ID. This is mapped to the User ID property in Xerox Secure Access.
• Display name – contains a description of the user, such as the full user name. This is mapped into the Full name property for the user within Xerox Secure Access.
• Email address – contains the user’s email address.• Primary PIN and Secondary PIN – map the numeric PIN values found on LDAP to the PrimaryPIN
and SecondaryPIN fields in Xerox Secure Access. • Alternate PIN – maps the alternative primary PIN.• Location – maps the user’s physical location.• Home Server – maps the name of a print server to the Home Server field in the Xerox Secure Access
database. If you are enabling Follow-You Printing, ensure that you select the Home Server attribute for these users.
NoteDepartment, Color quota, Home folder and Delegates do not apply to Xerox Secure Access.
9. Use the controls in the Synchronization group (under Field mappings) to specify synchronization settings.
10. Select or clear update options; Adds, Deletes, or Changes, to specify which accounts Xerox Secure Access receives and applies to the accounts database during subsequent synchronizations. At least one option selected to perform synchronization or save the changes.

Creating & Managing Accounts Xerox Secure Access Unified ID System® 5.3
3-12 Administration Guide
11. Click the Automatic synchronization checkbox to enable adjustments to the Synchronization interval. Use this to change how often Xerox Secure Access synchronizes its accounts database with the specified LDAP server. The synchronization interval value must be at least 15 minutes. The maximum value 10080 minutes (one week).
12. After specifying the synchronization settings, click Synchronize Now… to schedule a single synchronization process (as opposed to automatic synchronization, which is performed periodically). Click OK to have this single synchronization performed in the background.
13. Click OK to exit the dialog box. The task continues to run even though the dialog box is closed.
After a few minutes, refresh System Manage, then check the list of Users to ensure successful import of the accounts. Open the user account properties and ensure that the settings are correct.
LDAP Field Mapping to CAS
Mapping the LDAP attributes to CAS fields provides a way to cross-reference the attributes received from the LDAP server with the corresponding fields for the user account in the CAS database. When a user logs in and is authenticated based on the LDAP configuration, CAS looks up the LDAP attributes mapping and imports the correct fields into the user’s account. CAS updates the fields with every authentication if the field has changed.
An LDAP server does not need to be added to the LDAP synchronization dialog box for field mapping.
Qualifying Accounts by Domain
If you plan to use Active Directory Synchronization to generate user accounts, you must decide before performing the first synchronization whether or not to use Domain Qualification.
Performing an initial synchronization creates user accounts based on Windows credentials without specifying a domain for the imported users. If you enable Domain Qualification after the initial synchronization, however, the process creates a second account for every Windows user. Also check the configuration of your control system; to maintain consistency in user data, both the control system and Xerox Secure Access should be similarly configured to use or not use domain data.
Therefore, to prevent slowing down system resources by doubling the number of user accounts unnecessarily, decide whether or not to enable Domain Qualification before you perform a synchronization. If you enable domain qualification and want to subsequently create users manually, ensure that you include the domain qualification in the user ID you create, using the following format: user’s_domain\userID.
To set the domain qualification option, do the following:
1. In System Manager, navigate to Configuration > Domain qualification.
2. Select or clear the Qualify all user IDs with NT domain information option as necessary, depending on whether or not you want to use domain-qualified user IDs.
3. If necessary, provide a default domain name for unqualified users attempting to print, and click OK.

Xerox Secure Access Unified ID System® 5.3 Creating & Managing Accounts
Administration Guide 3-13
Adding Users from a Flat File Import
Use the EQCmd.exe utility to add, delete, modify and query user accounts from a flat file. You can also assign delegates to users. This method is a one-time import and does not synchronize data beyond the import.
Xerox Secure Access installs this utility on the accounting server in the Program Files\Xerox\Xerox Secure Access\Tools folder.
The command line utility accepts commands in the following format:
EQCmd -s<Server> <Action> <Obj_type> <Obj_ID>|All [<Options>]
Execute the command with a batch file:
EQCmd -s<Server> -f<BatchFile> [-o<OutputFile>]
The OutputFile parameter is an optional parameter which specifies where to output a trace file. If not specified, then EQCmd will attempt to write the output file to the same folder where the batch file exists, using the same name as the batch file, but adding the .log extension. If the trace file cannot be opened, the utility will log a warning to the console screen and proceed with the batch file, writing all messages to the console.
Xerox Secure Access accepts CSV files as batch files. Batch operation allows all the command actions except for query command. Use the following table to fill in the parameters.
Parameters enclosed in parentheses < > are mandatory; parameters within square brackets [ ] are optional.
Parameter Variables
Server Specify the name or IP address of CAS.
Action Specify the action to take on the account. Use one of: • add - Add a user.• assign - Assign a delegate to a user. • delete - Delete a user. It does not use <details> parameter.• remove - Remove the association between delegate and user.• query - Query database. Output differs based on <Obj_type>.• modify - Modify an object attribute.• adjust - Adjust the user account balance; set a new balance to an object type or set a balance no
less than a certain amount.• lock/unlock - Lock or unlock a user.
Obj_type Use one of: • ur - user
Obj_ID Applies <action> only to the specified object ID. Use double quotes around object IDs that have a space, for example human resources. Use All To apply <Action> to all accounts of <Obj_type>.
NoteYou can use “All” for “Assign”, “Remove”, “Query”, “Adjust” actions. You cannot use it for “Add”, “Delete”, “Modify”, “Lock” and “Unlock” actions.

Creating & Managing Accounts Xerox Secure Access Unified ID System® 5.3
3-14 Administration Guide
For a complete list of Action parameters, see Modifying User Accounts from a Flat File on page 5.
Importing LDAP User Accounts
You can use the EQCmd.exe utility to import a class containing specific LDAP users into the CAS database. Xerox Secure Access installs the EQCmd.exe utility and the EQLDAPImport.ini on the accounting server in the Program Files\Xerox\Xerox Secure Access\Tools folder.
After you create the LDAP class, call the class from the command line using the following format:
EQCmd.exe -s<CASServer> import ur <LDAPServer> <SearchRoot>
You can run the command line with the EQLDAPImport.ini file using the following format:
EQCmd.exe -s<CASServer> import ur <LDAPServer> <SearchRoot> <ini file>
CautionDo not edit the original EQLDAPImport.ini file directly. Create a copy and modify it as needed, and then provide the EQLDAPImport copy file to EQCmd
Command line parameters enclosed in parentheses < > are mandatory; parameters within square brackets [ ] are optional.
The following table list the fields in EQLDAPImport.ini required to configure LDAP import.
Options for Action Command
Specify additional values. Use double quotes around detail values that have spaces or for empty values. Specify amounts with a period for the decimal separator. For the modify action, place “!” for required fields that you don't wish to change.
• <desc>: Description• <user_ID>: User ID • <user_name>: User name• <email>: User email
Parameter Variables
Parameter Definition
CASServer The name or IP address of CAS that you want to add a user accounts to.
LDAPServer The name or IP address of the LDAP server to import an account from.
SearchRoot The LDAP search root used to begin the import. For example "ou=Accounting, dc=metrics,dc=com".
Parameter Definition
[AccountSettings] This section specifies some initial settings for created accounts.
[ConnectionSettings] This section specifies how to connect and login to the LDAP server.
LoginID The LoginID for binding to the LDAP server.
Password The Password for the LoginID for binding to the LDAP server.

Xerox Secure Access Unified ID System® 5.3 Creating & Managing Accounts
Administration Guide 3-15
BindMethod The authentication binding method. Supported values are "simple", "ntlm" and "negotiate".
UseSSL Select whether or not to use SSL. "0=no, 1=yes".
Version What version of LDAP to use.
DataEncoding Encoding of LDAP data to expect. Supported values are "unicode16" or "utf8" or "ascii".
[Attributes] This section specifies the attributes to import and map.
AccountName The attribute for lookup of the account name. If left blank, the default behavior is to look for the following attributes (in order): "sAMAccountName", "uid".
Email The attribute for lookup of the email address. If left blank, the default behavior is to look for the attribute "mail".
FullName The attribute for lookup of the full name. If left blank, the default behavior is to look for the following attributes (in order): "displayName", "cn".
HomeServer The attribute to look up the home server. If left blank, home servers are not imported.
PrimaryPIN The attribute to look up the primary PIN. If left blank, primary PINs are not imported.
SecondaryPIN The attribute to look up the secondary PIN. If left blank, secondary PINs are not imported.
AlternatePIN The attribute to look up the alternate primary PIN. If left blank, alternate PINs are not imported.
Locked=logindisabled The attribute to look up to find if the account is locked.
Location The attribute to look up the location. If left blank, location is not imported.
[General Settings] This section specifies the general settings to import.
SearchFilter=(objectClass=person)
The attribute to look up the class type to import.
Parameter Definition

Creating & Managing Accounts Xerox Secure Access Unified ID System® 5.3
3-16 Administration Guide
Managing User AccountsAfter you create the required User accounts, you can perform account management tasks such as locking or removing accounts, and performing account transactions.
Locking Accounts
When you lock an account, Xerox Secure Access cannot charge print jobs to it. The account is maintained in the database but it is inactive.
Locking an account can have different consequences for network users, depending on the account type that is locked and the types of accounts that you are using at your organization.
To lock an account:
1. In System Manage, click Users to view the list of accounts.
2. Click a user account from the list. The Account Properties dialog box opens.
3. In the Account Information section, select the Account Locked checkbox and click OK.
The account is locked. Users must charge print jobs to another account. If users do not have access to another account, they are unable to print.
To unlock or enable the account, clear the Account locked checkbox and click Save.
Removing Accounts
Each Xerox Secure Access account has a unique identifier in the database. While you can remove and delete an account and add a new account with the same name, the transactions for the deleted account are not associated with the new account. The audit trail for any account ends the moment you delete it, however, the accounts database retains all transaction records,
If you want to disable an account temporarily, but do not want to delete it permanently, you can lock the account so the system cannot charge print jobs to it.
When you delete an account, that account is permanently closed. Since each account has a unique identifier, once you delete an account, you cannot recreate it, even if you assign a new account with the same name. Deleting Single or Multiple Accounts
1. In System Manage, click Users to view the list of accounts.
2. Click a user account from the list.
Use SHIFT-click or CTRL-click to select multiple accounts.
3. Right-click on the account(s) you wish to delete and select Delete from the menu.

Xerox Secure Access Unified ID System® 5.3 Creating & Managing Accounts
Administration Guide 3-17
4. Click one of the options on the Delete dialog box.
• Yes – deletes the selected account. When deleting multiple accounts, you can click Yes to step through and delete the selected accounts one at a time.
• Yes to All – deletes all of the selected accounts at once.• No – prevents an account from being deleted. If you click No when multiple accounts are being
deleted, the next account in the selection appears in the Delete dialog box.• Cancel – closes the Delete dialog box and stops the delete process.
CautionIf you click Yes when deleting multiple accounts, and then you click Cancel before deleting the remaining selected accounts, any deleted accounts are permanently removed from the database, regardless when you click Cancel. Cancel only affects the selected accounts that you did not yet delete
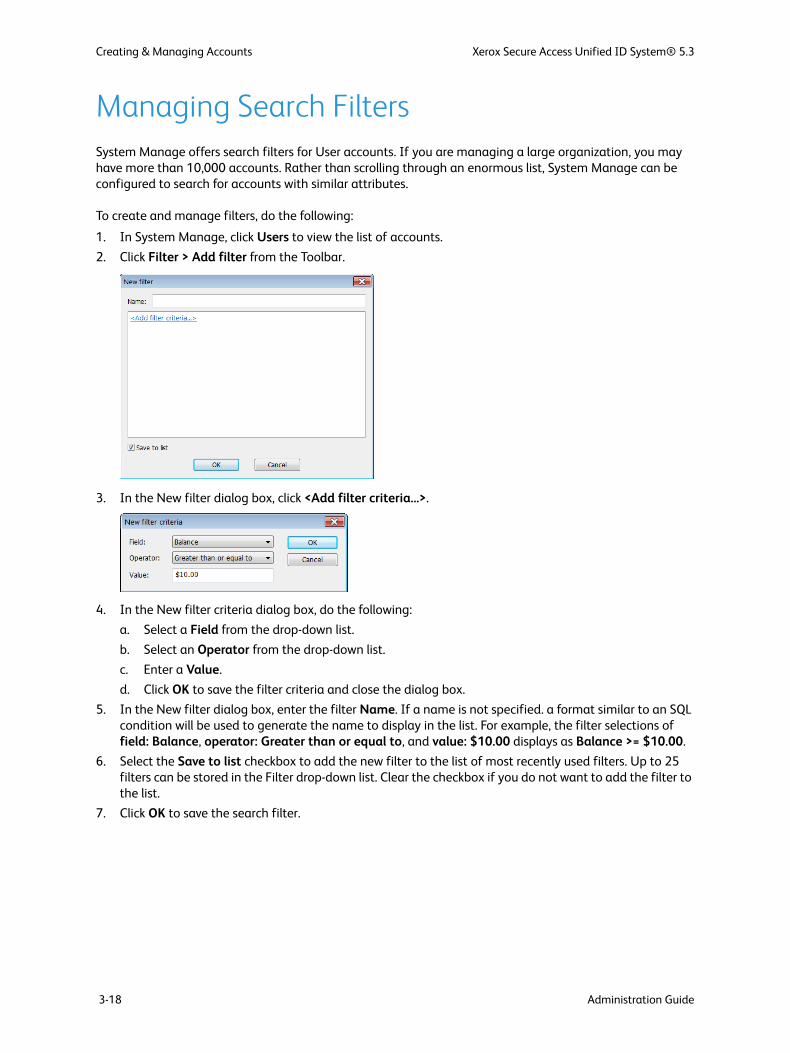
Creating & Managing Accounts Xerox Secure Access Unified ID System® 5.3
3-18 Administration Guide
Managing Search FiltersSystem Manage offers search filters for User accounts. If you are managing a large organization, you may have more than 10,000 accounts. Rather than scrolling through an enormous list, System Manage can be configured to search for accounts with similar attributes.
To create and manage filters, do the following:
1. In System Manage, click Users to view the list of accounts.
2. Click Filter > Add filter from the Toolbar.
3. In the New filter dialog box, click <Add filter criteria...>.
4. In the New filter criteria dialog box, do the following:
a. Select a Field from the drop-down list.
b. Select an Operator from the drop-down list.
c. Enter a Value.
d. Click OK to save the filter criteria and close the dialog box.
5. In the New filter dialog box, enter the filter Name. If a name is not specified. a format similar to an SQL condition will be used to generate the name to display in the list. For example, the filter selections of field: Balance, operator: Greater than or equal to, and value: $10.00 displays as Balance >= $10.00.
6. Select the Save to list checkbox to add the new filter to the list of most recently used filters. Up to 25 filters can be stored in the Filter drop-down list. Clear the checkbox if you do not want to add the filter to the list.
7. Click OK to save the search filter.
Xerox Secure Access Unified ID System® 5.3 Creating & Managing Accounts
Administration Guide 3-19
Filter Attributes
The following table lists the search filter attributes for User accounts.
Note
The operators are dependent upon the definition attribute, and are not all available for all definitions.
NoteAt least one location must be defined for any user in order for the Location search filter to be available.
Account Type Definition Operators
Users • Additional information• Balance• Email address• Full name• Home server• Locked• Minimum Balance• Primary PIN• Quota usage• User ID
The following operators are available for all account types:
• Contains• LIKE• Not contains• NOT LIKE• Equal to• Greater than• Greater than or equal to• Less than• Less than or equal to• Not equal to
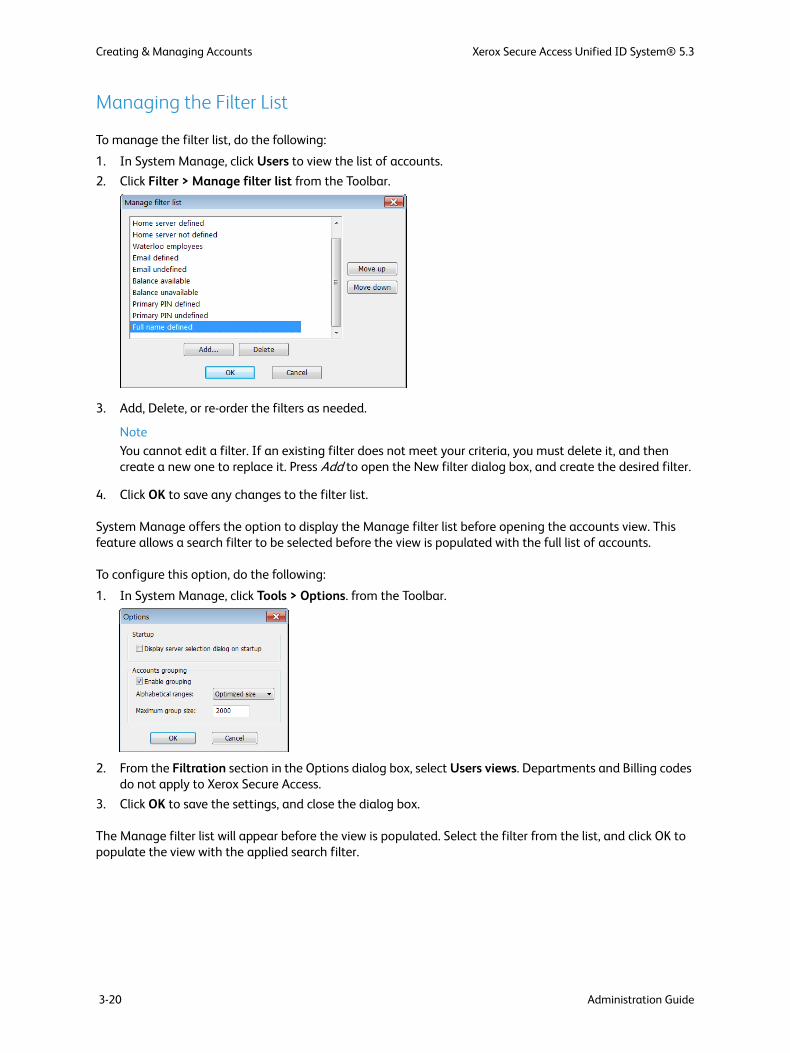
Creating & Managing Accounts Xerox Secure Access Unified ID System® 5.3
3-20 Administration Guide
Managing the Filter List
To manage the filter list, do the following:
1. In System Manage, click Users to view the list of accounts.
2. Click Filter > Manage filter list from the Toolbar.
3. Add, Delete, or re-order the filters as needed.
Note
You cannot edit a filter. If an existing filter does not meet your criteria, you must delete it, and then create a new one to replace it. Press Add to open the New filter dialog box, and create the desired filter.
4. Click OK to save any changes to the filter list.
System Manage offers the option to display the Manage filter list before opening the accounts view. This feature allows a search filter to be selected before the view is populated with the full list of accounts.
To configure this option, do the following:
1. In System Manage, click Tools > Options. from the Toolbar.
2. From the Filtration section in the Options dialog box, select Users views. Departments and Billing codes do not apply to Xerox Secure Access.
3. Click OK to save the settings, and close the dialog box.
The Manage filter list will appear before the view is populated. Select the filter from the list, and click OK to populate the view with the applied search filter.

Xerox Secure Access Unified ID System® 5.3 Creating & Managing Accounts
Administration Guide 3-21
Accounts System ConfigurationSystem configuration options determine how the Accounting Server validates accounts, provides error notifications, assigns charges, and handles unknown print requests or unidentified documents.
User Authentication
If your Xerox Secure Access deployment uses control terminals or embedded devices, you can configure CAS to validate user accounts against primary and secondary accounts PINs. PIN information connects an Xerox Secure Access printing account with user logon information when a user logs onto a control terminal or releases a print job.
The primary PIN is the alpha-numeric sequence that uniquely identifies the user, and can be data encoded on a magnetic swipe card or entered via a terminal keypad. The secondary PIN acts as a device password, and is entered via a terminal keypad.
To configure user authentication settings, perform the following procedure:
1. In System Manager, navigate to Configuration > User authentication.
2. Select one or more Authentication mechanisms:
• Xerox Secure Access PINs – Leave selected only if you want to connect an Xerox Secure Access printing account with logon information.
• External user ID and password – Select to verify all user information outside of Xerox Secure Access.
• Xerox Secure Access PIN with external password – Enable if users swipe their cards for identification, and must also enter their domain user account password.

Creating & Managing Accounts Xerox Secure Access Unified ID System® 5.3
3-22 Administration Guide
Xerox Secure Access cross-checks the database for the corresponding Secure Access account name, then verifies the credentials against the selected external authority for network logon. See External User Authentication on page 24 for details.
3. Select the Store secondary PIN encrypted checkbox if you want the secondary PIN to be encrypted.
4. Select the CAS offline behavior for the Login caching from the DCE servers drop-down list.
• Disabled – Prevents user login when CAS is offline.• Enabled – Allows only previously CAS-validated users to login when CAS is offline.
DCE login caching determines whether a user login is accepted or denied when CAS is offline. If DCE caching is disabled when CAS is offline, then users cannot login. If DCE caching is enabled when CAS is offline, then DCE allows users to login only if they had previously logged in when CAS was online.
For example, if DCE caching is enabled, and User1 authenticated while CAS was online, but User2 did not, then if CAS goes offline, User1 can still login, but User2 cannot login until CAS comes online again. Once CAS is back online, then User2 can login, and continue to login even if CAS goes offline again.
5. Select your Authentication options:
a. Select the Input type to determine how users are authenticated.
• Card swipe only – Users authenticate with a swipe card.
• Card swipe or keypad entry – Users authenticate with a swipe card or at the MFP front panel.
• Keypad only – Users authenticate at the MFP front panel.
b. Select the Secondary prompt to determine when users are prompted for a secondary PIN.
• Always – User must enter a secondary PIN.
• If PIN2 available – User must enter a secondary PIN if they have a PIN 2 value associated with their user account. Users with a PIN 2 value will be prompted to enter it. This applies for both keyboard and card swipe logins. This option only applies to select embedded devices.
• If PIN2 available or keyboard login – User must enter a secondary PIN if they have a PIN 2 value associated with their user account, or if they entered their primary PIN or network ID via the keyboard (rather than with a swipe card). Users with a PIN 2 value will be prompted to enter it, while users who login via the keyboard and do not have a PIN 2 will be prompted to enter a network password. This option only applies to select embedded devices.
• Never – Secondary PIN is not required.
• Only with keyboard login – User must enter a secondary PIN if they entered their primary PIN via the keyboard (rather than with a swipe card). This option prevents users from typing in someone else’s primary PIN while still allowing valid users to login without a card.
NoteUse either If PIN2 available or keyboard login or Only with keyboard login when two-level authentication is required to register new cards. In order to register the card, the user is required to manually enter the primary and secondary login credentials. Regardless which of the above options is selected, if a user has a PIN 2 value associated with their Xerox Secure Access user account, they must enter it in order to successfully login. If any users have a PIN 2 value, select If PIN2 available or keyboard login. Do not select Only with keyboard login.
c. If using a control terminal, determine the Card setup. For details on entering the decoding parameters, see HID Decoding on page 14.

Xerox Secure Access Unified ID System® 5.3 Creating & Managing Accounts
Administration Guide 3-23
d. Select Auto-register primary PINs to enable users to register an unrecognized swipe card for future use. To complete the card registration, the user is required to login with a valid user ID and password. Optionally, you can select Register as alternate PIN to record the PIN as the Alternate PIN instead of the Primary PIN.
NoteIf the Auto-register primary PINs option is not selected, then the user cannot register their card, and must login manually.
6. Click OK to save the settings.

Creating & Managing Accounts Xerox Secure Access Unified ID System® 5.3
3-24 Administration Guide
External User Authentication
If the user authentication method is set to a Windows or LDAP external authority, the authentication settings must be configured in System Manager.
To configure the external authority for user authentication, do the following:
1. In System Manager, navigate to Configuration > External authentication.
NoteOne or more external authority can be used for user authentication.
2. Select Windows to validate user accounts against a Windows domain. If using Windows authentication, enter the Domain name.
3. Select LDAP to validate user accounts against an LDAP server. If using LDAP authentication, do the following:
a. Enter the host LDAP Server name. The fully qualified domain name of the LDAP server may be required for certificates imported for SSL. Ensure that the LDAP server’s fully qualified domain name is resolvable.
b. Enter the Port number used by the LDAP server.

Xerox Secure Access Unified ID System® 5.3 Creating & Managing Accounts
Administration Guide 3-25
c. Select an LDAP lookup Type from the drop-down list. Use AD-style when connecting to a Windows domain controller, and use Simple bind when connecting to a Linux/Unix server.
• First try AD-style, then try simple – If selected, only Direct bind is used as the Authentication method.
• Try AD-style – If selected, either Direct bind or Lookup then bind can be used as the Authentication method. SSL is not available with the Try AD-style lookup option.
• Try simple – If selected, either Direct bind or Lookup then bind can be used as the Authentication method.
d. Select Force SSL to use SSL (Secure Socket Layer) encryption.
e. Select Use LDAP version 3 to use LDAP 3.
f. In the Authentication method section, select either Direct bind or Lookup then bind.If Direct bind is selected, do the following.
• Enter the LDAP DN Prefix (e.g. CN=admin) and DN Suffix (e.g. ,O=nuance) to be placed, respectively, before and after the supplied user ID for simple authentication against LDAP.
• Select your User ID modification method. If the user ID has the format of an email address, this setting allows the email domain to be removed.
If Lookup then bind is selected, do the following:
• In the Search filter field, enter the import search criteria using standard LDAP filter syntax. For example, the search filter (&(objectClass=person)(uid=%value%)) would search for the person entry AND the specific user ID. Or, the search filter (|(uid=%value%)(mail=%value%)) would authenticate a user by email address. The %value% is replaced with the value entered by the user at login.
Note'uid’ can be used to connect to a Linux server, whereas 'sAMAccountName' should be used to connect to a Windows domain controller.
• Select the search Scope from the pull-down menu.
Base – searches the base entry.
One level – searches all entries in the first level below the base entry.
Subtree – searches the base entry and all entries in the tree below the base entry. This is the default setting.
• In the Base DN field, enter the location within the directory to start the search. For example, if the entire directory is to be searched under an organization of “Nuance”, this would be “O=nuance”. Ensure the Base DN name does not contain spaces, or the import will fail.
• User ID field to match – enter the LDAP attribute used to match the Secure Access user ID field in CAS.
• Select the Anonymous login/As service login checkbox to allow the admin to specify that the LDAP server supports anonymous login (for simple LDAP type), or to login as the user the service is running as (for AD type).
• Enter the LDAP server Login ID and Login Password. Cannot enter credentials if the Anonymous login/As service login option is selected.

Creating & Managing Accounts Xerox Secure Access Unified ID System® 5.3
3-26 Administration Guide
NoteFor AD, the supplied Login ID would be either in NT4 format (domain\user) or UPN format (user@domain).
Note
For simple bind, the options are to bind anonymously or with the supplied credentials. The Login ID has to be in distinguished name format (e.g. uid=admin,dc=example,dc=com).
g. Select the Synchronize user attributes on login checkbox to enable LDAP synchronization of user attributes on LDAP authentication.
This feature allows user account details to be imported into the Xerox Secure Access software when the user logs into an endpoint. A traditional LDAP import/synchronization using persistent search, imports all users initially and then updates account details in the LDAP database as changes occur (see Configuring LDAP Synchronization on page 10).
If you do not want to keep a persistent connection open to a database server, the Synchronize user attributes on login feature imports user account details as needed. The new synchronization can be configured to import the same user account details as the standard LDAP sync (e.g. Primary PIN and email address).
NoteEnsure that Lookup then bind is selected when using the synchronize user attributes feature. Direct bind does not enable this feature.
4. Click Test to open an LDAP lookup dialog box. Enter an account User name and Password, and then click Lookup. If Persistent Search is enabled, the dialog box shows the LDAP properties for that account.
5. Click OK to save the settings.
NoteThe LDAP lookup must resolve to a unique user identifier.

Xerox Secure Access Unified ID System® 5.3 Creating & Managing Accounts
Administration Guide 3-27
Deleting Objects in Synchronized Directories
When you delete an object, such as a user, from a Windows Active Directory, the deleted object goes into a deleted object container for a period of time. When you use the Xerox Secure Access Scheduling feature to synchronize Active Directory accounts, the Scheduler looks at this container for deleted user accounts. If you have selected the Deletes ADS update option, Scheduler also flags any corresponding user accounts in Xerox Secure Access as deleted.
In order to access the contents of the deleted object container, you must use the EQModifyDeletedContainerSecurity command line tool to give Xerox Secure Access permission to view and manage the container’s contents. This utility assigns container access permissions to the user ID that starts the Scheduler service. See Directory Synchronization Access Permissions on page 3 for more information on using this utility.
NoteTo run this utility, you must have Active Directory administrator privileges in addition to having Xerox Secure Access System Manager rights.
Associating Swipe Cards with Secure Access Accounts
If your users swipe magnetic cards to identify themselves at the printer or copier through an external XCP device or control terminal, use the Card Swipe wizard to add the swipe card account associations to the Secure Access database.
This wizard enables you to swipe a magnetic swipe card on an XCP device, or on a simple wedge card reader with keyboard interface. The wedge card reader option is mandatory if you are using card readers that do not interface with a PC. Contact Equitrac Technical Support for a list of compatible wedge card readers.
CautionFor XCP devices only, disconnect the network cable from the card reader when using the Card Swipe wizard. The only cable you can attach to the card reader during this procedure is the nine-pin serial cable. If both the serial and network cables are connected for the wizard, you risk registering unusable characters from the XCP device in the PIN information.
To add account identifications for magnetic cards:
1. Before you start the Card Swipe Wizard, you must shut down the Device Control Engine.
2. Select Start > Control Panel > Administrative Tools > Services. Right-click the EQ DCE Service in the right pane and select Stop
3. For XCP devices only, ensure that you have configured the COM port for the card reader correctly in the operating system BIOS and Control Panel. For all other devices, proceed to the next step.
4. Use a nine-pin cable to connect the card reader to the serial port.
5. On an administrative workstation, browse to Programs Files\Xerox\Xerox Secure Access\Tools. Select the Card Swipe Wizard.
6. In the wizard’s first dialog box, select a Card swipe unit. If you select XCP, specify the serial port to which the card reader is connected.
7. Enter the Windows network name of the computer that hosts the accounting server. Click Next.
8. Swipe the magnetic card.

Creating & Managing Accounts Xerox Secure Access Unified ID System® 5.3
3-28 Administration Guide
9. In the following dialog box, verify that the card reader has successfully retrieved the primary PIN data from the card. Optionally, you can specify a secondary PIN for the card. Click Next.
NoteThe card reader reads the primary PIN from the card based on the card swipe position you configure in System Manager > Devices > Control Terminals; see Control Terminals on page 15 for details. The secondary PIN is like a password for the user. If you use the secondary PIN, you must also configure Xerox Secure Access to prompt for it; see User Authentication on page 21 for details.
10. In the following dialog box, select the type of account that Xerox Secure Access associates with this card. In the accompanying text box, specify the name of the account and click Verify. The wizard verifies that the specified account exists in the Xerox Secure Access database and displays the account description.
11. To continue using the wizard to configure more cards with Xerox Secure Access accounts, click Another card.
12. To exit the wizard, click Finish.
13. Open Start > Control Panel > Administrative Tools > Services. Right-click the EQ DCE Service in the right pane and select Start.
The account identifications appear in System Manage.

Administration Guide 4-1
4Advanced Printing Configuration
Beyond the basic configuration, Xerox Secure Access offers several different advanced printing options. This chapter provides reference information and complete instructions to configure each of these advanced features:
• Secure printing sets up virtual print queues that hold jobs until they are released at an MFP embedded device by a valid user.
• Device Pull Groups provide a method of organizing compatible printers to allow users to release print jobs from the secure queue to any device within the pull group on the same print server. Pull Groups extend secure printing functionality, and are required for Follow-You Printing®.
• Follow-You Printing extends the Secure Printing functionality to allow users to pull their print jobs from one secure print queue to another, even across Print Servers.
Topics
Enabling Secure Printing
Managing Device Pull Groups
Setting Up Follow-You Pinting®
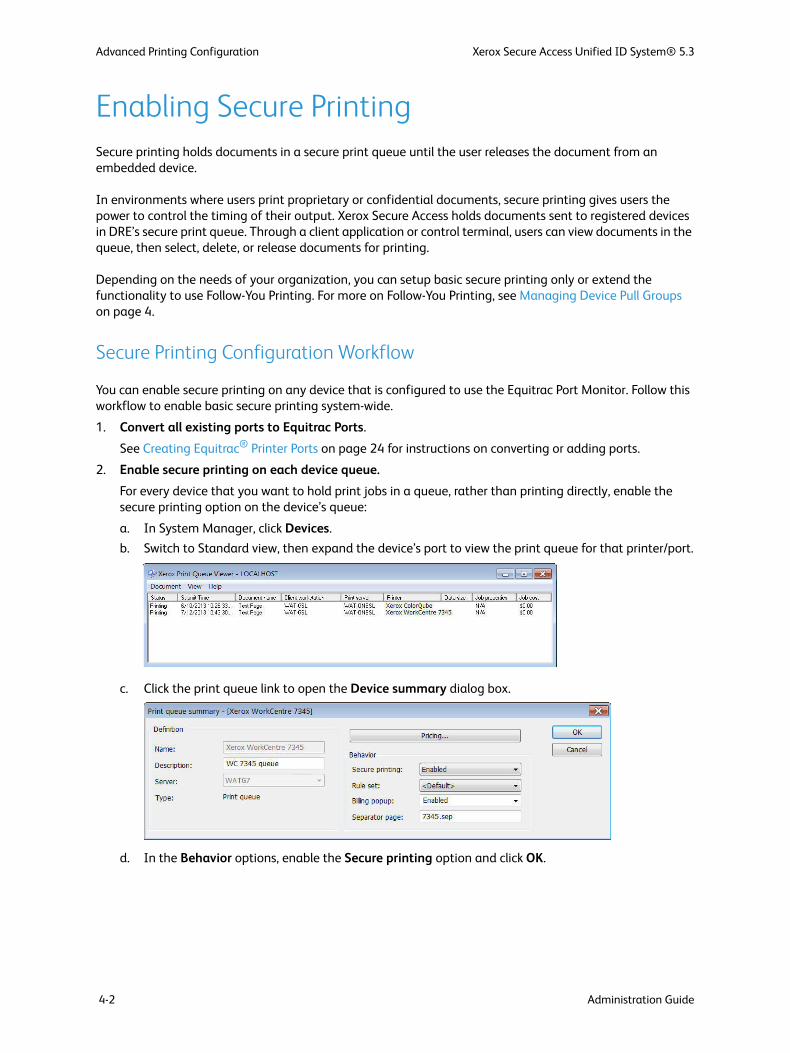
Advanced Printing Configuration Xerox Secure Access Unified ID System® 5.3
4-2 Administration Guide
Enabling Secure PrintingSecure printing holds documents in a secure print queue until the user releases the document from an embedded device.
In environments where users print proprietary or confidential documents, secure printing gives users the power to control the timing of their output. Xerox Secure Access holds documents sent to registered devices in DRE’s secure print queue. Through a client application or control terminal, users can view documents in the queue, then select, delete, or release documents for printing.
Depending on the needs of your organization, you can setup basic secure printing only or extend the functionality to use Follow-You Printing. For more on Follow-You Printing, see Managing Device Pull Groups on page 4.
Secure Printing Configuration Workflow
You can enable secure printing on any device that is configured to use the Equitrac Port Monitor. Follow this workflow to enable basic secure printing system-wide.
1. Convert all existing ports to Equitrac Ports.
See Creating Equitrac® Printer Ports on page 24 for instructions on converting or adding ports.
2. Enable secure printing on each device queue.
For every device that you want to hold print jobs in a queue, rather than printing directly, enable the secure printing option on the device’s queue:
a. In System Manager, click Devices.
b. Switch to Standard view, then expand the device’s port to view the print queue for that printer/port.
c. Click the print queue link to open the Device summary dialog box.
d. In the Behavior options, enable the Secure printing option and click OK.

Xerox Secure Access Unified ID System® 5.3 Advanced Printing Configuration
Administration Guide 4-3
Administering the Secure Print Queue
The Print Queue Viewer provides a tool for Administrators to view and delete documents within the secure print queue. Each DRE has its own print queue, and therefore its own Viewer. If you deployed multiple DREs you can run multiple Viewers at the same time. You must specify the print server (DRE) you want to connect to when you launch the Viewer.
1. On your Windows desktop, navigate to Start > All Programs > Xerox Secure Access > Print Queue Viewer. This creates the Viewer icon in the Windows system tray.
2. Double-click the icon to open the Print Queue Viewer.
3. Click any document in the list to select it. Hold down SHIFT or CTRL to select multiple documents in the queue.
You can sort documents in the list by clicking any of the column headings visible in the Viewer.
4. To delete selected documents from the queue, press the Delete key or choose Delete from the Document menu.
Select View > Simple view or View > Full view to change the default view depending on how many document details you want to display.
NoteStart the Print Queue Viewer with the -s option to customize Viewer’s visible columns. Select View > Custom view, and then select View > Select columns to select or clear columns as desired.
Select View > Hide to close the Viewer without shutting down the service. The Viewer icon remains visible in the Windows system tray. Use the Refresh option to update the Viewer document list while the Viewer is open; the list does not refresh automatically.
To shut down the service, right-click the icon in the system tray and select Exit. You can also select Show/Hide to open or close the Print Queue Viewer window.

Advanced Printing Configuration Xerox Secure Access Unified ID System® 5.3
4-4 Administration Guide
Managing Device Pull GroupsAs you configure devices in System Manager, you can create and manage printer pull groups that group similar devices together. With secure printing enabled, users can release jobs from the pull group queue to any compatible device within the pull group. Pull groups are required to support Follow-You Printing.
The groups you create should reflect the needs of your organization. For example, you can group compatible devices by physical location or by manufacturer.
You can create pull groups that include a selection of devices from a single print server only OR across multiple print servers.
Choosing Devices to Group
The key to creating pull groups is to ensure that all device drivers within the group are technologically compatible. If you want a print job generated for one printer to output successfully on another printer, you must ensure that the other printer can understand all of the print commands included in the datastream from the driver.
If the user specifies staples for the print job, but the target device does not support staples, Xerox Secure Access charges for the staples if the associated price list specifies a finishing cost. Similarly, if the user specifies the print job as full color, but releases the job on a machine that supports black and white only, the output is black and white, but Xerox Secure Access charges for color, depending on the price list on the release machine, and color attributes that are recorded in the database.
You can also add the same device to multiple pull groups. For example, if you want to enable users to retrieve all print jobs (both color and monochrome) at a color device, but only monochrome print jobs at a monochrome device, you can add the same device to two different pull groups: one groups color devices, the other groups monochrome devices.
Two pull groups are created from across printer servers
Two pull groups are created from a single printer server

Xerox Secure Access Unified ID System® 5.3 Advanced Printing Configuration
Administration Guide 4-5
Printer Pull Group Workflow
To create a pull group, follow this workflow:
1. Enable secure printing on all physical devices that you want to add to the pull group.
See Secure Printing Configuration Workflow on page 2 for instructions.
2. Associate a control terminal with each physical device that is part of a control group.
See Control Terminals on page 15 for instructions.
3. Assign two or more devices to one or more pull groups.
a. In System Manager, select Devices, then click on one or more physical devices. Use CTRL-click or SHIFT-click to select more than one device.
b. In the Physical Device Summary dialog box, select Release documents from pull group. Type in the name of the Pull group (e.g. PullGroupA), then click OK to apply the change. You only have to type in the name of the Pull group the first time you use it. Afterward, it appears in the list automatically.
c. Repeat steps a and b for each physical device that should be part of a Pull group.
d. To add the device to multiple pull groups, enter the name of the pull groups into the Release documents from pull group field, separated by a semi-colon. For example, PullGroupA; PullGroupB; PullGroupC.

Advanced Printing Configuration Xerox Secure Access Unified ID System® 5.3
4-6 Administration Guide
Setting Up Follow-You Printing®
Follow-You Printing extends the basic functionality of secure printing by allowing a user to release a print job to other compatible devices in the organization. Even if you deployed multiple DRE print servers, each of which manages a separate set of devices, you can configure Xerox Secure Access to allow printing across print servers.
For example, a user who works in two different buildings can submit their print job from their computer in Building A, and while enroute to a meeting in Building B, the user can walk up to an embedded device and pull the job to a compatible printer nearest them.
When a user submits a print request, they select a destination printer, but the job is actually held in DREs secure print queue. The user can walk up to an embedded device, and release the job to any compatible printer in the Pull group. Users may also retrieve Follow-You Printing jobs on a device connected to a different CAS and DCE/DRE server. For more information, see Follow-You Printing Across Multiple Accounts Servers on page 8.
Pull groups are simply groups of compatible printers, manually grouped by the Administrator. Devices assigned to a Pull group can be managed by any DRE print server, allowing the user to print across Print Servers and “pull” their print job where it is needed. For full details on Pull groups, see Printer Pull Group Workflow on page 5.
Follow-You Printing Configuration Workflow
To set up Follow-You Printing, complete the following workflow.
1. Enable secure printing on each device.
Configure the devices to use secure printing. See Enabling Secure Printing on page 2 for instructions.
2. Create Pull groups, and add physical devices to each Pull group.
Identifying the Home Server for each User
When Follow-You Printing is enabled, and you have deployed many DRE Print Servers, you can set the Home Server attribute to help users locate their print jobs a little more quickly. This is an optional setting, and is used only to assist users locate their print jobs when releasing.
The Home Server is the DRE that hosts the devices that the user typically prints to. If the user wants to release jobs to devices on a different Print Server, they can use the Search functionality provided.
To establish the Home Server per user, switch to System Manage, and select Users. Click on any user account to open the Properties dialog box. In the Home server field enter the DRE print server that serves as the users main server.
CautionIf you are using ADS to synchronize User Accounts, ensure that you assign a Home Server value in the Active directory synchronization dialog box. See Importing Users with Active Directory Services on page 6 for instructions.
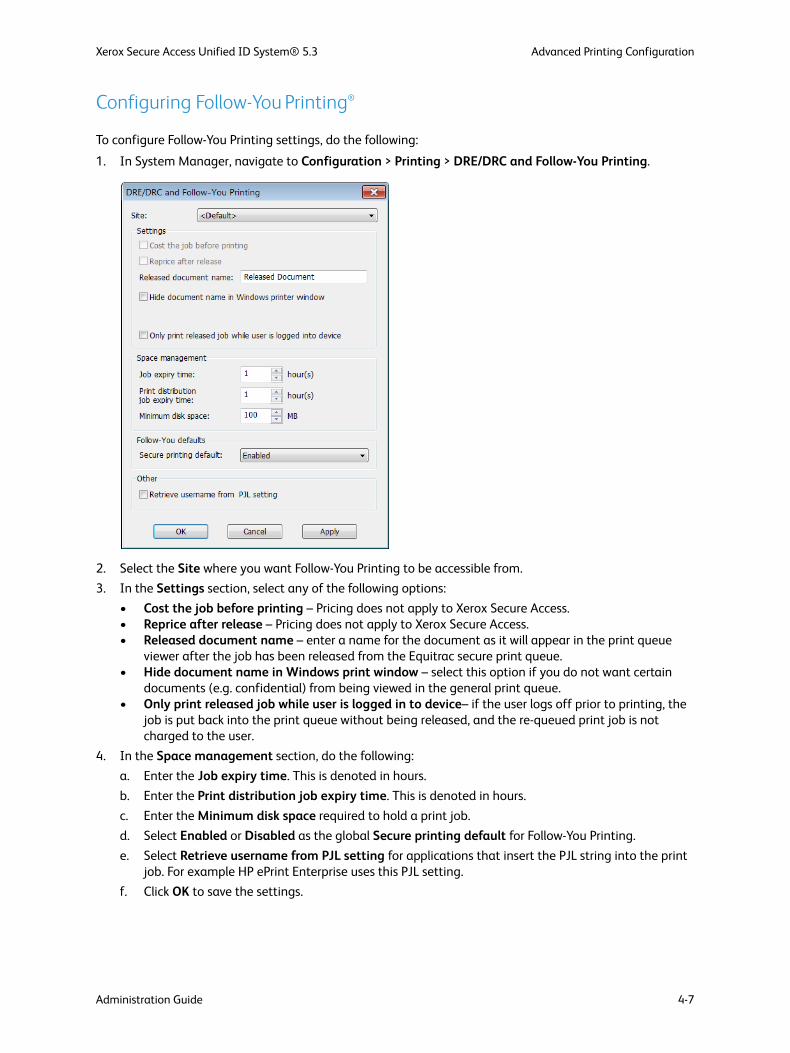
Xerox Secure Access Unified ID System® 5.3 Advanced Printing Configuration
Administration Guide 4-7
Configuring Follow-You Printing®
To configure Follow-You Printing settings, do the following:
1. In System Manager, navigate to Configuration > Printing > DRE/DRC and Follow-You Printing.
2. Select the Site where you want Follow-You Printing to be accessible from.
3. In the Settings section, select any of the following options:
• Cost the job before printing – Pricing does not apply to Xerox Secure Access.• Reprice after release – Pricing does not apply to Xerox Secure Access. • Released document name – enter a name for the document as it will appear in the print queue
viewer after the job has been released from the Equitrac secure print queue.• Hide document name in Windows print window – select this option if you do not want certain
documents (e.g. confidential) from being viewed in the general print queue.• Only print released job while user is logged in to device– if the user logs off prior to printing, the
job is put back into the print queue without being released, and the re-queued print job is not charged to the user.
4. In the Space management section, do the following:
a. Enter the Job expiry time. This is denoted in hours.
b. Enter the Print distribution job expiry time. This is denoted in hours.
c. Enter the Minimum disk space required to hold a print job.
d. Select Enabled or Disabled as the global Secure printing default for Follow-You Printing.
e. Select Retrieve username from PJL setting for applications that insert the PJL string into the print job. For example HP ePrint Enterprise uses this PJL setting.
f. Click OK to save the settings.

Advanced Printing Configuration Xerox Secure Access Unified ID System® 5.3
4-8 Administration Guide
Follow-You Printing Across Multiple Accounts Servers
Users are able to retrieve Follow-You Printing jobs on MFPs connected to several CASs. Follow this workflow to configure multi-server Follow-You Printing:
1. User must be registered in the database on all relevant CASs with the home server value correctly set. See Working with User Accounts on page 4. Users must always print on their home server.
2. The pull group name must be the same on every CAS. See Managing Device Pull Groups on page 4.
3. Both DCE/DRE servers need to be running under the same security credentials. See your operating system’s documentation for more information on this.

Administration Guide 5-1
5Configuring HID Cards
HID cards can be configured to allow users to identify themselves at control terminals in the same way as when using a magnetic stripe or proximity card.
Topics
HID Encoding
HID Decoding
Configuring HID Cards Xerox Secure Access Unified ID System® 5.3
5-2 Administration Guide
HID EncodingHID cards can be used to allow users to identify themselves at the control terminal just as though they were using a magnetic stripe or other supported proximity card. To configure HID cards to function with the control terminal, you must identify how your HID cards are encoded with your facility and ID codes and how that information relates to the user PIN data in Xerox Secure Access. You can then configure the Secure Access server to interpret the data it receives and use it to identify your users.
To configure the control terminal to accurately read HID cards, you require the following:
1. Ensure Xerox Secure Access is running.
2. Ensure you are still running the correct control terminal firmware version. Firmware versions prior to 1.1.47 do not support the HID decoding described in this document.
3. Ensure that the type of HID proximity card you are using is supported. See Supported HID Card Types on page 2 for details.
4. Write down the following HID card encoding information:
• Facility Start – the position in the raw bitstream (0 based, left to right, inclusive) where the Facility code begins.
• Facility End – the position in the raw bitstream (0 based, left to right, inclusive) where the facility code ends.
• Facility Width – the number of expected decimal digits representing the facility code from among the string of numbers returned by the control terminal.
• ID Start – the position in the raw bitstream (0 based, left to right, inclusive) where the ID code begins.
• ID End – the position in the raw bitstream (0 based, left to right, inclusive) where the ID code ends. • ID Width – the number of expected decimal digits representing the ID from among the string of
numbers returned by the control terminal.
NoteThe terminal returns a single value comprising of both the facility code (if used) and ID (facility + ID).
If you do not know the encoding used on your HID proximity cards, this document provides a reasonable method to ascertain your card encoding. See Determining HID Card Encoding on page 6. However, if you do not succeed in discovering your card encoding using the method provided, contact your HID vendor for assistance.
Supported HID Card Types
The following is a list of supported HID card formats. The illustrations shown for each card is from HID’s product data sheets. However, refer to the HID Web site in case of discrepancy.
RFID Carrier frequency
The RF signal used to exchange information between the powered card reader and the passive card can operate at many different frequencies and ranges (125 KHz carrier frequency, or Mifare and Legic standard using a 13.56 MHz carrier frequency).
HID offers a variety of products using different carrier frequencies and standards (HID IClass cards, HID Corporate 1000, HID Mifare, and others). However, since the control terminals have HID readers using a 125KHz carrier frequency, only certain card formats can be read by the control terminal.
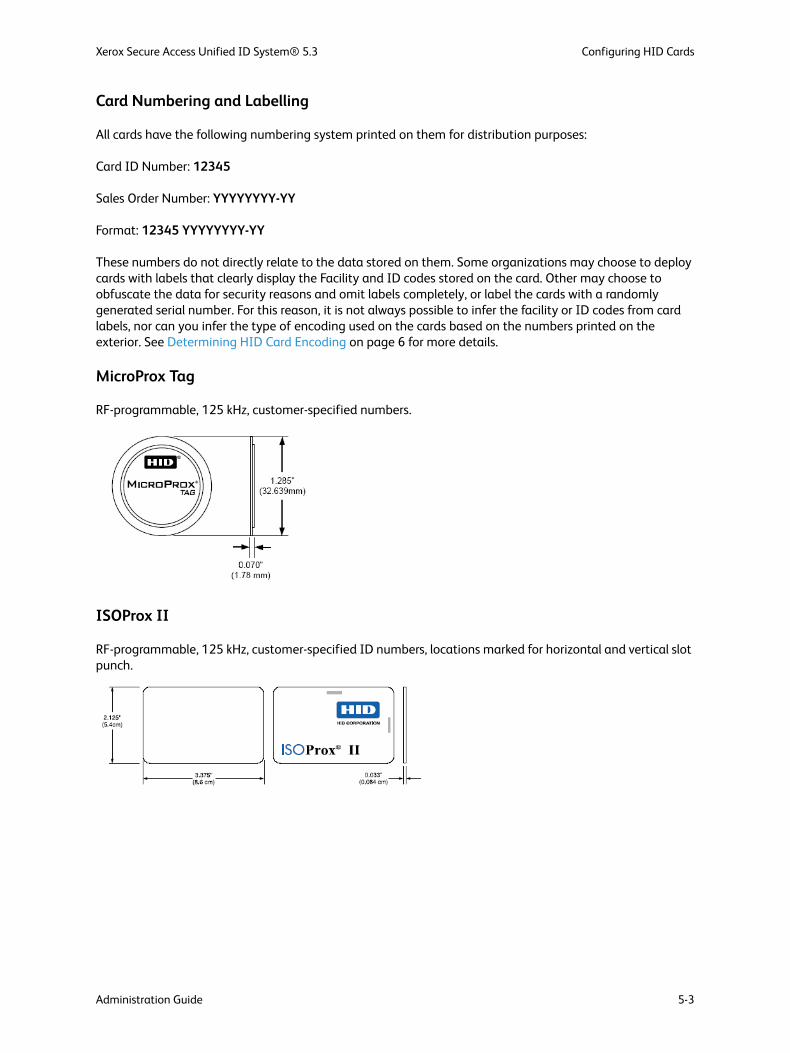
Xerox Secure Access Unified ID System® 5.3 Configuring HID Cards
Administration Guide 5-3
Card Numbering and Labelling
All cards have the following numbering system printed on them for distribution purposes:
Card ID Number: 12345
Sales Order Number: YYYYYYYY-YY
Format: 12345 YYYYYYYY-YY
These numbers do not directly relate to the data stored on them. Some organizations may choose to deploy cards with labels that clearly display the Facility and ID codes stored on the card. Other may choose to obfuscate the data for security reasons and omit labels completely, or label the cards with a randomly generated serial number. For this reason, it is not always possible to infer the facility or ID codes from card labels, nor can you infer the type of encoding used on the cards based on the numbers printed on the exterior. See Determining HID Card Encoding on page 6 for more details.
MicroProx Tag
RF-programmable, 125 kHz, customer-specified numbers.
ISOProx II
RF-programmable, 125 kHz, customer-specified ID numbers, locations marked for horizontal and vertical slot punch.
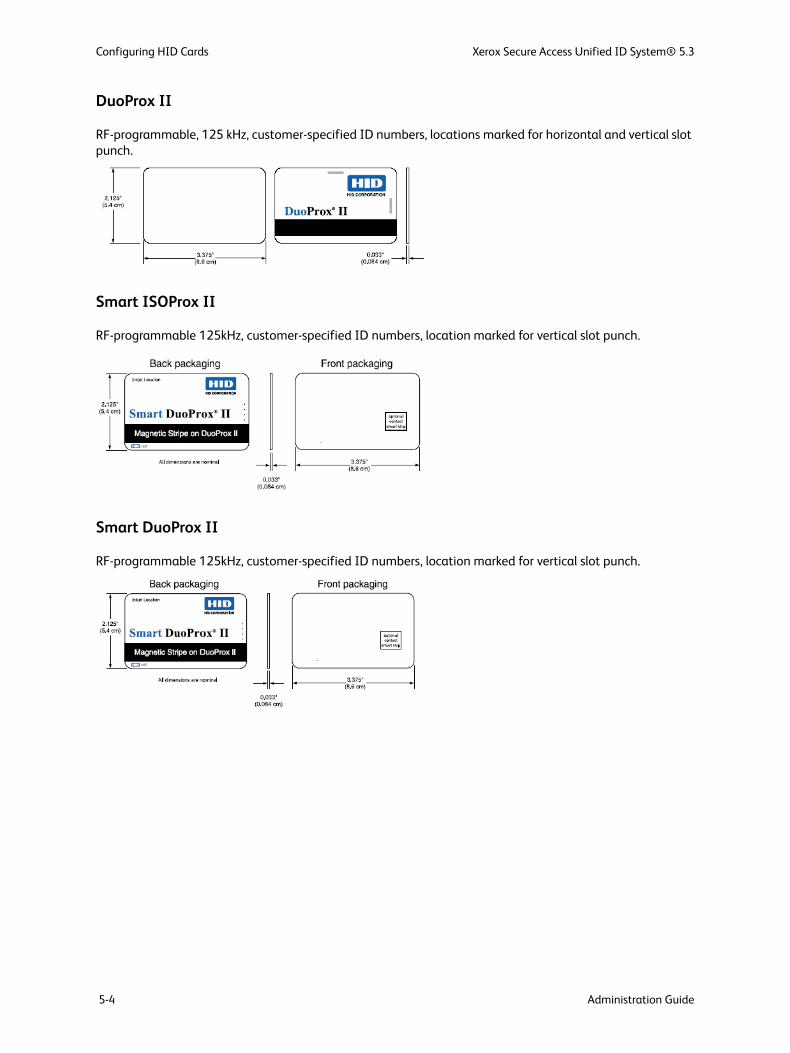
Configuring HID Cards Xerox Secure Access Unified ID System® 5.3
5-4 Administration Guide
DuoProx II
RF-programmable, 125 kHz, customer-specified ID numbers, locations marked for horizontal and vertical slot punch.
Smart ISOProx II
RF-programmable 125kHz, customer-specified ID numbers, location marked for vertical slot punch.
Smart DuoProx II
RF-programmable 125kHz, customer-specified ID numbers, location marked for vertical slot punch.
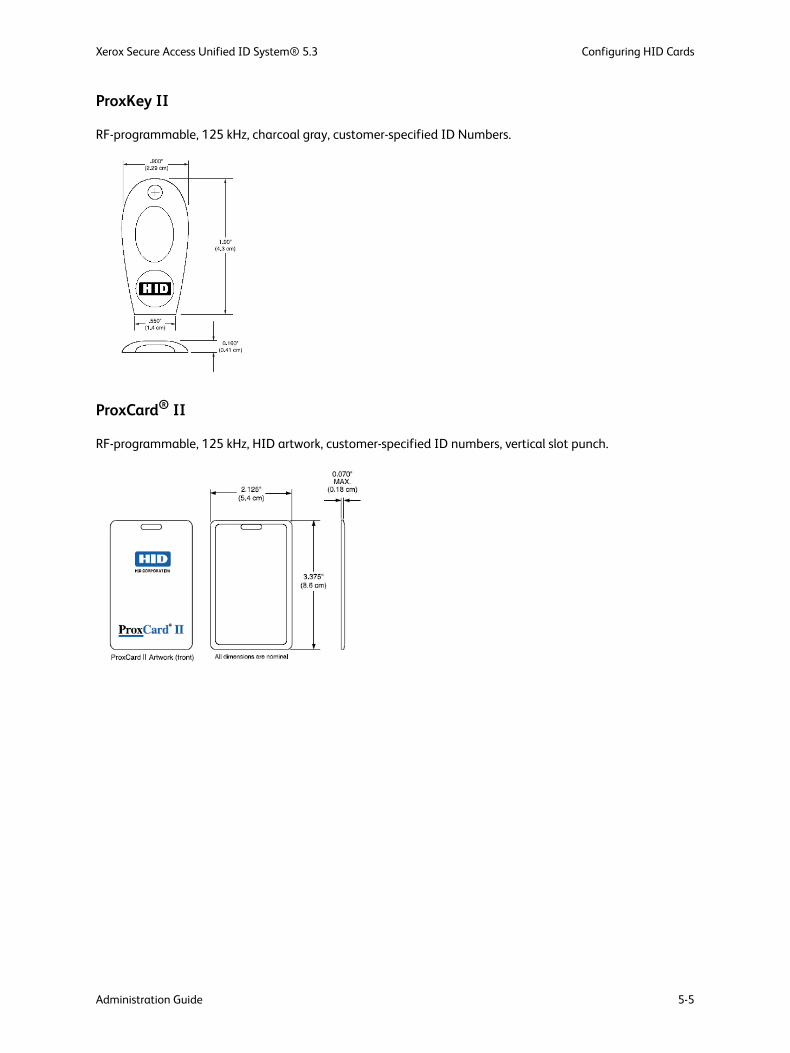
Xerox Secure Access Unified ID System® 5.3 Configuring HID Cards
Administration Guide 5-5
ProxKey II
RF-programmable, 125 kHz, charcoal gray, customer-specified ID Numbers.
ProxCard® II
RF-programmable, 125 kHz, HID artwork, customer-specified ID numbers, vertical slot punch.

Configuring HID Cards Xerox Secure Access Unified ID System® 5.3
5-6 Administration Guide
Determining HID Card Encoding
HID uses a proprietary encoding format to encode data (ID or facility code and ID) on proximity cards. Generally, the encoding types used are either 26 or 37-bits, or in the case of some corporate cards, 35-bits.
Encoding Types
The encoding is comprised of a beginning and end parity bit. Between these parity bits is a string of binary digits. The first part—on the left—can be the facility code if your site uses one. The second part (possibly the entire string if there is no facility code) of the binary string—on the right—is the encoded ID code.
26-bit encoding
37-bit encoding with Facility code and ID code
37-bit encoding with ID code only
Although it is possible to decipher the type of encoding used via the Card Swipe Wizard, it is best to contact your HID vendor to determine the encoding type used on your proximity cards.
The embedded HID card reader always returns 16 octal digits, which when converted to binary equals 48 digits. The HID card reader zero-pads the string returned from the card to equal 48 binary digits, regardless of the proprietary encoding used on the card. Therefore, knowing the type of encoding used on your card helps, since the actual digits returned from the card always appear at the end of the data string. The trick then is to decipher where the facility code (if used) and ID code begin and end within the binary data string.

Xerox Secure Access Unified ID System® 5.3 Configuring HID Cards
Administration Guide 5-7
To determine card encoding, you require the following:
• The ability to convert between different numeric notations (octal, binary, and decimal). You can use the calculator application available in most versions of Windows for this. However, you need to change the view to Scientific. See the help file within the calculator application for detailed instructions.
• An embedded device with an HID proximity card reader.
• One or more sample HID Proximity cards (see Supported HID Card Types on page 2 for supported card formats).
• The codes expected to be returned by the sample proximity cards. Contact your security system administrator or HID vendor for assistance.
Determining Code Start and Stop Positions – Known Codes
If you have a sample card and you know the codes you expect to see returned from it, you can follow the procedure below to determine where the codes begin and end in the binary data string returned from the HID card reader.
1. To see the full value of the data string returned by the HID card reader, you must change the card swipe PIN settings:
a. Open System Manager and click on the Configuration > User authentication link to open the User authentication dialog box.
b. Change the from and to positions in the Card setup area to read: Use data from position 1 to 32 as the primary PIN.
2. Configure your HID embedded device to use a static IP. Change the server IP address setting to point to the IP address of the system on which you run the Card Swipe Wizard.
3. Temporarily disable HID decoding on the device to examine the raw data only (see Disabling and Enabling HID Decoding on the Control Terminal on page 13).
4. If you plan to run the Card Swipe Wizard on the server running DCE, stop the EQ DCE Service on the server:

Configuring HID Cards Xerox Secure Access Unified ID System® 5.3
5-8 Administration Guide
5. On an administrative workstation, browse to the Tools folder within the directory where Xerox Secure Access is installed (for example, C:\Programs Files\Xerox\Xerox Secure Access\Tools) and run the CardSwipeWizard.exe file to launch the Card Swipe Wizard.
6. Select PageCounter device as the Card swipe unit.
7. Enter the Windows network name of the computer that hosts the accounting server and click Next.
8. Power on the control terminal configured in step 2 and wait for it to connect to the system running the Card Swipe Wizard.
9. Take your sample card (for example, with the number 87343 11082200-1 printed on the card) and swipe it at the terminal. The Card Swipe Wizard displays the extracted data string from the sample card in the Primary PIN field.
The following table shows the number printed on the card as well as the expected values that you know should be returned by the HID card reader.
CautionThe number printed on the card may not be the facility code or ID code.
Since HID decoding is disabled on the terminal, the HID card reader in the control terminal return the entire data string from the card in octal format.
10. Convert the extracted octal string to its binary value using the Microsoft Windows Calculator:
Number Printed on the Card
Expected Facility Code to be returned (in decimal)
Expected ID Code to be returned (in decimal)
87343 11082200-1 109 86343
Number Printed on the Card Value returned (octal)
87343 11082200-1 0000201550521216
Value returned (octal) Value returned (binary)
0000201550521216 000000000000010000001101101000101010001010001110
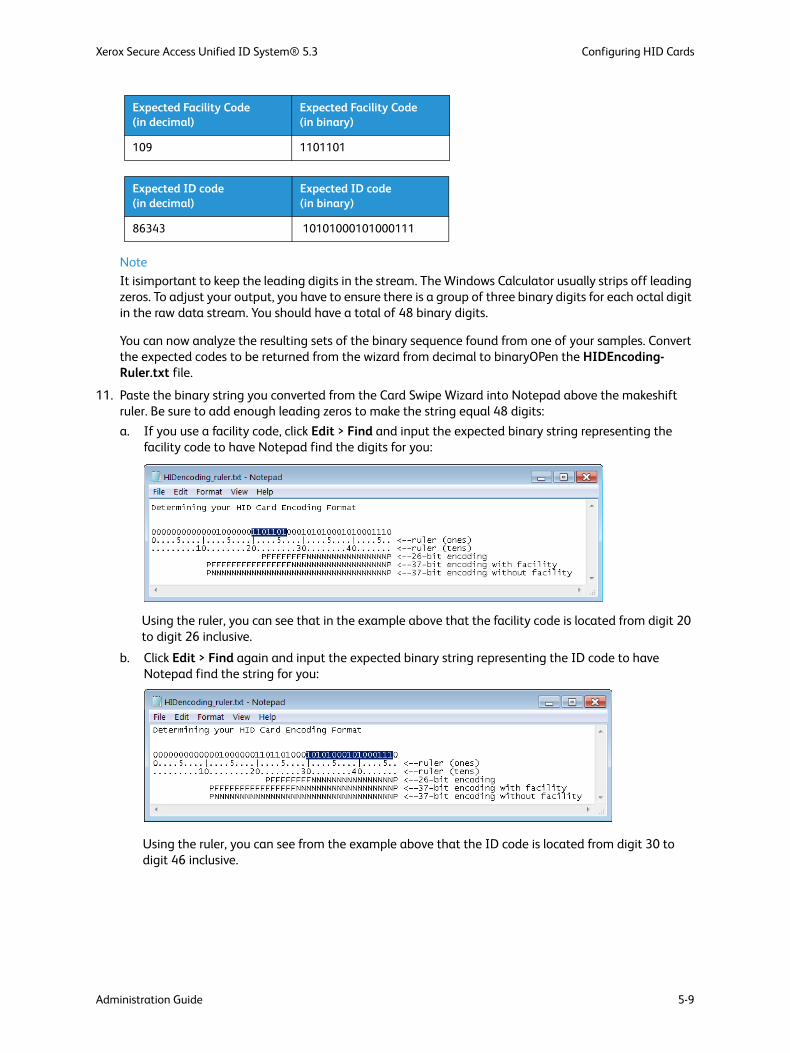
Xerox Secure Access Unified ID System® 5.3 Configuring HID Cards
Administration Guide 5-9
Note
It isimportant to keep the leading digits in the stream. The Windows Calculator usually strips off leading zeros. To adjust your output, you have to ensure there is a group of three binary digits for each octal digit in the raw data stream. You should have a total of 48 binary digits.
You can now analyze the resulting sets of the binary sequence found from one of your samples. Convert the expected codes to be returned from the wizard from decimal to binaryOPen the HIDEncoding-Ruler.txt file.
11. Paste the binary string you converted from the Card Swipe Wizard into Notepad above the makeshift ruler. Be sure to add enough leading zeros to make the string equal 48 digits:
a. If you use a facility code, click Edit > Find and input the expected binary string representing the facility code to have Notepad find the digits for you:
Using the ruler, you can see that in the example above that the facility code is located from digit 20 to digit 26 inclusive.
b. Click Edit > Find again and input the expected binary string representing the ID code to have Notepad find the string for you:
Using the ruler, you can see from the example above that the ID code is located from digit 30 to digit 46 inclusive.
Expected Facility Code(in decimal)
Expected Facility Code (in binary)
109 1101101
Expected ID code (in decimal)
Expected ID code (in binary)
86343 10101000101000111

Configuring HID Cards Xerox Secure Access Unified ID System® 5.3
5-10 Administration Guide
NoteIt is possible that the starting bit might actually begin one or more digits earlier if there are leading zeros. Therefore it is a good idea to test the card after this procedure to ensure that you have recorded the correct start and end positions. See HID Decoding on page 14.
12. Record the start and end locations for the facility code (if used) and ID code to use when setting up Xerox Secure Access.
13. Close the Card Swipe Wizard.
14. If required, restart EQ DCE Service on the DCE server.
15. Enable HID decoding on the control terminal.
Note
If you need to use the Card Swipe Wizard to read HID cards and setup Xerox Secure Access PINs, you need to temporarily enable local caching on the control terminals, then ensure the control terminal that you are using the Card Swipe Wizard on connects to DCE. Finally, disable the local caching setting on the control terminals. The control terminal can be used with HID cards.
Determining Code Start and Stop Positions – Unknown Codes
If you have sample cards but do not know the codes you expect to see returned from them, you can follow the procedure below to determine the codes and where they begin and end in the binary data string returned from the HID card reader.
1. To see the full value of the data string returned by the HID card reader, you must change the card swipe PIN settings:
a. In Xerox Secure Access, open System Manager and click on the Configuration > User authentication link to open the User authentication dialog box.
b. Change the from and to positions in the Card setup area to read: Use data from position 1 to 32 as the primary PIN.
2. Configure your HID embedded control terminal control terminal to use a static IP. Change the server IP address setting to point to the IP address of the system on which you run the Card Swipe Wizard.
3. Disable HID decoding on the control terminal (see Disabling and Enabling HID Decoding on the Control Terminal on page 13).
If you plan to run the Card Swipe Wizard on the server running DCE, stop the EQ DCE Service on the server:
WarningThe Card Swipe Wizard can only talk to one control terminal at a time. If there are multiple terminals pointing to the system running the Card Swipe Wizard, you need to unplug all but the one you configured in step 2.

Xerox Secure Access Unified ID System® 5.3 Configuring HID Cards
Administration Guide 5-11
4. On an administrative workstation, browse to the Tools folder within the directory where Xerox Secure Access was installed (the default installation folder location is C:\Programs Files\xerox\Xerox Secure Access\Tools) and run the CardSwipeWizard.exe file to launch the Card Swipe Wizard.
5. In the wizard’s first dialog box, select PageCounter device as the Card swipe unit.
6. Enter the Windows network name of the computer that hosts the accounting server and click Next.
7. Power on the control terminal configured in step 2 and wait for it to connect to the system running the Card Swipe Wizard.
8. Take a sample of five or more cards (for example, with the format 87343 11082200-1 printed on the cards) and swipe them at the terminal. The Card Swipe Wizard displays the extracted data strings in the Primary PIN fields.
NoteFor a more precise determination, it is best to use a large number of cards. However, five to seven cards should suffice for this procedure.
Since HID decoding is disabled on the terminal, the HID card reader in the control terminal returns the entire data string from the card in octal format.
9. Convert each octal number to its binary value:
Note
It is important to keep the leading digits in the stream. The MS Calculator usually strips off leading zeros. To adjust your output, you have to ensure there is a group of three binary digits for each octal digit in the raw data stream. You should have a 48 digit binary string for each card.
Number printed on Card Value returned from Card Swipe Wizard (octal)
87343 11082200-1 0000201550521216
87344 11082200-1 0000201550521220
87345 11082200-1 0000201550521223
87346 11082200-1 0000201550521225
87347 11082200-1 0000201550521226
Value returned (octal) Value returned (binary)
0000201550521216 000000000000010000001101101000101010001010001110
0000201550521220 000000000000010000001101101000101010001010010000
0000201550521223 000000000000010000001101101000101010001010010011
0000201550521225 000000000000010000001101101000101010001010010101
0000201550521226 000000000000010000001101101000101010001010010110

Configuring HID Cards Xerox Secure Access Unified ID System® 5.3
5-12 Administration Guide
You can now analyze the resulting sets of the binary sequence found from your samples.
10. Open the HIDEncoding-Ruler.txt file.
11. Now paste each of the binary strings you converted from the Card Swipe Wizard into Notepad above the makeshift ruler. Be sure to add enough leading zeros to make each string equal 48 digits and then look for patterns:
Try to match the returned binary strings against the card encoding type formats to see if your cards seem to match any of them. If they do, use the format to determine the start and end positions of the facility (if used) and ID codes. If they do not, as in the case above, you need to make some assumptions as follows:
• We know that if there is a facility code, it appears first (on the left) and that the ID code appears on the right.
• The facility code should be the same for all cards. Therefore if there is a set of digits on the left that are identical in all strings, then you can assume that it is the facility code. In the example given above, the pattern appears from digit 20 to 26.
• You can assume that the last binary digit in the string is a parity digit and disregard it. This assumption is based on what we know to be true about HID encoding types.
• If you contacted your HID vendor, hopefully they gave you the card encoding type and the card ID range. If you know the card ID range, you can use the information to help determine where the ID code starts and ends. For example, if you know that the cards deployed at your site are between 75,000 and 200,000 you can determine that the largest card ID (200,000) in binary would require 18 digits (110000110101000000), therefore you would be able to assume the ID portion of the string is from digits 29 to 46 inclusive.
NoteThe ID portion could actually be from digit 27 to 46 inclusive, or the facility code could be from digit 20 to 29. Therefore, you may need to analyze these patterns several times to determine exactly where the codes start and end.
12. Record the start and end locations for the facility code (if used) and ID code for use in setting up Xerox Secure Access.
13. Close the Card Swipe Wizard.
14. If required, restart EQ DCE Service on the DCE server.
Note
It is best to test the assumptions you made during this procedure by reading an HID card with the control terminal and verifying that the card can log in. The card points to the correct account if the HID decoding parameters are set correctly.
15. Enable HID decoding on the control terminal.
Xerox Secure Access Unified ID System® 5.3 Configuring HID Cards
Administration Guide 5-13
Disabling and Enabling HID Decoding on the Control Terminal
The HID card reader within the control terminal returns the data from the cards in octal format. However, when HID decoding is enabled, the control terminal converts the data returned by the HID card reader into a decimal string as configured by your HID parameters. Therefore you need to Disable HID decoding prior to using the Card Swipe Wizard to extract the encoded octal data value.
NoteBy default, control terminals with internal HID proximity readers have HID decoding turned on. You only need to disable HID decoding on one control terminal to determine your HID decoding format.
To disable HID decoding on a control terminal, complete the following:
1. Enter Manager Mode on the control terminal, see your Equitrac® PageCounter Administration Guide for details regarding Manager Mode.
2. Press 4 for Devices.
3. Press 1 for HID Card Settings
4. Enable or disable HID decoding by completing one of the following:
• Press 1 to enable HID decoding• Press 2 to disable HID decoding
Disabling decoding for the duration of a test ensures that the terminal returns the raw data (represented in octal format) read from the card.
5. Press F3 (Back) until you exit Manager Mode.
The control terminal automatically reboots.
WarningIf you manually reboot the terminal before exiting Manager Mode, your changes are not saved.
You must re-enable HID decoding once you have finished determining your HID parameter values using the Card Swipe Wizard. Turning HID decoding on again enables the control terminal to return the proper PINs from your HID proximity cards.

Configuring HID Cards Xerox Secure Access Unified ID System® 5.3
5-14 Administration Guide
HID DecodingDue to the variation in encoding formats allowed by HID, the USB card reader or control terminals must be configured to return card information in a standard format. You configure the card decoding parameters on the accounting server and these settings are relayed to your USB card reader or control terminals. For details on how HID card values are encoded. See Determining HID Card Encoding on page 6 for details.
Xerox Secure Access can support a mixed HID card environment (e.g. different card configurations with different facility codes read by the same USB card reader), and a mixed device and card reader environment (e.g. Equitrac and non-Equitrac card readers decoding the same ID value from the card). In order to accomplish this, you can create different HID profiles (referred to as "Decoding groups") to determine how a specific card reader decodes the HID card data.
To configure how the USB card reader or control terminal decodes the ID and Facility codes, do the following:
1. Ensure that your card type and encoding format are supported, and that you know the details of how your HID cards are encoded with your facility and ID information. See Determining HID Card Encoding on page 6 for details.
2. Open System Manager, and click Configuration > User authentication.
3. Click <None> located beside HID decoding within the Card setup section.
4. In the HID decodings dialog box, click Add from the Decoding groups section.

Xerox Secure Access Unified ID System® 5.3 Configuring HID Cards
Administration Guide 5-15
5. Enter an HID decoding group name, and click OK.
6. Select the group from the list, and then click Add from the Decoding groups settings section.
7. In the HID decoding dialog box, enter the following:
In the case where you do not need to extract facility code information, check ID codes only. If you need to extract both Facility code and ID code, check both options.
a. In the Facility code Start field, enter the position in the raw bitstream (0 based, left to right, inclusive) where the Facility code begins. – In the Facility code End field, enter the position in the raw bitstream (0 based, left to right,
inclusive) where the facility code ends.
b. In the Facility code Width field, enter the number of decimal digits for the facility portion of the value that the USB card reader or control terminal outputs. Numbers are zero-padded on the left as needed.
c. In the ID code Start field, enter the position in the raw bitstream (0 based, left to right, inclusive) where the ID code begins.
d. In the ID code End field, enter the position in the raw bitstream (0 based, left to right, inclusive) where the ID code ends.
e. In the ID code Width field, enter the number of decimal digits for the ID code portion of the value that the USB card reader or control terminal outputs. Numbers are zero-padded on the left as needed. The USB card reader or control terminal returns a single value for each card swipe that is the decoded facility code followed by the decoded ID.
f. Enter a Matching facility code if you want the card reader to locate the same facility code on different HID formatted cards.
g. Select the Include facility code in PIN option if the facility code is part of the user PIN.
h. Click OK.
8. Repeat this procedure for any additional decoding groups you want to define for you environment.
9. If more than one group is defined, the first group in the list will be used as the default decoding by the embedded device. If you want to change the default, select a group from the list and click Make default.
10. Click OK to save the decoding groups.

Configuring HID Cards Xerox Secure Access Unified ID System® 5.3
5-16 Administration Guide

Administration Guide 6-1
6Using Xerox Secure Access Utilities
Xerox Secure Access provides several different utilities that can help you speed up the time spent on configuration tasks. This chapter contains instructions to run some of these utilities. Instructions to use other utilities are located throughout this guide in the appropriate location. Use the table below to locate instructions for running all Secure Access utilities.
Topics
Enabling SSL Communication
Directory Synchronization Access Permissions
Purge Database Transactions
Modifying User Accounts from a Flat File
Refining the User Group View
Print Queue Viewer
Utility Description See Page
CardSwipeWizard.exe Determines the encoding and data positions on magnetic or prax cards.
Determining Code Start and Stop Positions – Known Codes on page 7
EQAccountRegroup.exe Filters the User Group view when managing a large account base.
Refining the User Group View on page 9
EQCmd.exe Adds, deletes, modifies or query user, accounts from a flat file.
Modifying User Accounts from a Flat File on page 5
EQEnableSSL.exe Enables/disable SSL communication between Equitrac services and clients.
Enabling SSL Communication on page 2
EQModifyDeletedContainerSecurity.exe
Changes the administrative access permissions on the deleted objects container in a Windows Active Directory.
Directory Synchronization Access Permissions on page 3
EQPrinterConversionWizard.exe
Converts existing printer ports to an Equitrac port, allowing Equitrac to monitor the device.
Creating Equitrac® Printer Ports on page 7

Using Xerox Secure Access Utilities Xerox Secure Access Unified ID System® 5.3
6-2 Administration Guide
Enabling SSL CommunicationCommunication between Secure Access components running in a Windows environment can utilize SSL (Secure Socket Layer) if required. To enable this feature, run the EQEnableSSL.exe utility located in the Program Files\Xerox\Xerox Secure Access\Tools folder.
Note
EQEnableSSL.exe must be run on every system running Xerox Secure Access software that uses an SSL connection. (e.g. CAS, DRE, DCE). Shutdown all Equitrac services and utilities (e.g. System Manager) before running this command.
The command-line utility accepts the following command:
EQEnableSSL.exe [-e -d –h]
The following table lists the values for each letter.
NoteFor compatibility reasons, management communications are not currently encrypted even if this feature is enabled. Non-Windows DREs do not support encrypted connections.
EQTransactionPurge.exe Purges transactions from the database. Purge Database Transactions on page 4
Value Description
-e enables SSL communication from this system.
-d disables SSL communication from this system.
-h displays this help screen.No parameters display the current settings.
Utility Description See Page

Xerox Secure Access Unified ID System® 5.3 Using Xerox Secure Access Utilities
Administration Guide 6-3
Directory Synchronization Access PermissionsEQModifyDeletedContainerSecurity.exe changes the administrative access permissions on the deleted objects container in a Windows Active Directory, so that Xerox Secure Access can access the objects during directory synchronizations.
By default, only Active Directory administrators have access permission. The Windows account running the Xerox Secure Access services need this access if you wish to synchronize deleted accounts between Active Directory and Xerox Secure Access.
The account running the EQModifyDeletedContainerSecurity.exe command must be an administrator in the Active Directory domain.
See Importing Users with Active Directory Services on page 6 for more information on configuring Active Directory Synchronization options.
Xerox Secure Access installs this utility on the accounting server in the Program Files\Xerox\Xerox Secure Access\Tools folder.
The command line utility accepts commands in the following format:
EQModifyDeletedContainerSecurity.exe <-s server> [-p | {-r} -a accountname]
Parameters enclosed in parentheses < > are mandatory; parameters within square brackets [ ] are optional.
Parameter Description
-s server Server name of the Active Directory domain controller.
-p Display current permissions on the container.
-r Remove access permissions for the specified accountname.
- a accountname Account to be granted access to the container. Access permission is removed if specified with the -r option.

Using Xerox Secure Access Utilities Xerox Secure Access Unified ID System® 5.3
6-4 Administration Guide
Purge Database TransactionsThe EQTransactionPurge.exe utility purges transactions from the database.
Xerox Secure Access installs this utility on the accounting server in the Program Files\Xerox\Xerox Secure Access\Tools folder.
The command line utility accepts commands in the following format:
EQTransactionPurge.exe [-f] [-u] <-o n | -d yyyy-mm-dd | -i NNNNN> [-t]
Parameters enclosed in parentheses < > are mandatory; parameters within square brackets [ ] are optional.
Parameter Description
-f Force transaction purge.
-u Purge from uplink tables.
-o Purge transactions more than n days old.
-d Purge transactions on given date or older.
-i Purge a single transaction where NNNNN is a 32 digit transaction ID.
-t Enable trace logging.

Xerox Secure Access Unified ID System® 5.3 Using Xerox Secure Access Utilities
Administration Guide 6-5
Modifying User Accounts from a Flat FileUse the EQCmd.exe utility to add, delete, modify and query user accounts from a flat file. You can also assign delegates to users. This method is a one-time import and does not synchronize data beyond the import.
Xerox Secure Access installs this utility on the accounting server in the Program Files\Xerox\Xerox Secure Access\Tools folder.
The command line utility accepts commands in the following format:
EQCmd -s<Server> <Action> <Obj_type> <Obj_ID>|All [<Options>]
Execute the command with a batch file:
EQCmd -s<Server> -f<BatchFile>
Command-line parameters enclosed in parentheses < > are mandatory and require a specified value. Parameters within square brackets [ ] are optional entries and do not need to have a specified value if they will not be included in the command. Optional parameters that will be in the command, do require a specified value.
Xerox Secure Access accepts CSV files as batch files. Batch operation allows all the command actions except for query command. Use the table below to fill in the parameters.
Parameter Variables
Server Specify the name or IP address of CAS.
Action Specify the action to take on the account. Use one of:
• add - Add users.
• assign - Assign a delegate to a user.
• delete - Delete users. It does not use <details> parameter.
• remove - Remove the association between a delegate and a user.
• query - Query database. Output differs based on <Obj_type>.
• modify - Modify an object attribute.
• adjust - Adjust the user account balance; set a new balance to a object type or set a balance no less than a certain amount.
• lock/unlock - Lock or unlock a user.
Obj_type Use one of:
• ur - user
Obj_ID Applies <action> only to the specified object ID. Use double quotes around object IDs that have a space, for example human resources. To apply <Action> to all accounts of <Obj_type>, use All.
NoteYou can use “All” for “Assign”, “Remove”, “Query”, “Adjust” actions. You cannot use it for “Add”, “Delete”, “Modify”, “Lock” and “Unlock” actions.

Using Xerox Secure Access Utilities Xerox Secure Access Unified ID System® 5.3
6-6 Administration Guide
EQCmd Actions
Add
Parameters within the square brackets [ ] must contain values up to and including the final field needed. For example, if the final field is <primaryPIN>, all fields to the left must have a specified value—those to the right can be excluded from the command. If you want to leave a field blank (i.e. skip a field), enter "0" (zero) to indicate an empty value. Use double quotes around detail values that have spaces. Specify monetary amounts with a period for the decimal separator. The parameters must be entered in the specified order.
NoteThere is one parameter in the EQCmd utility that does not apply to Xerox Secure Access but must be part of the utility. Input "0" (zero) where indicated in the following Add actions.
Add User:
add ur <user_id> [<init_bal> <user_name> 0 <email> <primaryPIN> <secondaryPIN>
<alternatePIN> <home_server> <locked> <location> 0 <additional_info> <home_folder>]
Example: EQCmd -sMyServer add ur JohnD 35.50 “John Doe” 0 [email protected] 123 456 321 WATSRV lock Waterloo 0 UserX_folder
Assign:
Assign a delegate to a user:
assign dlg <user_id> <delegate_id>
Delete
Delete a user:
delete ur <user_id>
Options for Action Command
Specify additional values.
• <init_bal> - Does not apply to Xerox Secure Access
• <desc> - Description
• <user_id> - User ID
• <user_name> - Full user name
• <email> - User email
• <amount> - Amount of balance value. The value can be both positive (+) and negative (-).
• <primaryPIN> - User Primary PIN
• <secondaryPIN> - User Secondary PIN and Confirm Secondary PIN
• <alternatePIN> - Alternate to user Primary PIN
• <home_server> - DRE print server
• <locked> - User account is locked
• <location> - Location of the user
• <delegate_id> - Does not apply to Xerox Secure Access
• <additional_info> - Additional information about the user
• <home_folder> - Does not apply to Xerox Secure Access
Parameter Variables

Xerox Secure Access Unified ID System® 5.3 Using Xerox Secure Access Utilities
Administration Guide 6-7
Remove
Remove an association between a user and a delegate or all available delegates:
remove dlg <user_id> <delegate_id> | All
Query
Displays results from query database. Query is only allowed from the command prompt, not in CSV file batch operation.
Query a user:
query ur <user_id>|All
It displays:
user_ID Full_name Email Balance Limit Status
Modify
Modifies the database settings for a user.
Modifying requires values up to and including the final modified field. For example, if the final field is <email>, all fields to the left must have a specified value—those to the right can be excluded from the command. Insert an “!” for the fields to the left that you do not want to change. Any unmodified field after <email> can be left blank.
NoteThere is one parameter in the EQCmd utility that does not apply to Xerox Secure Access but must be part of the utility. Input "!" where indicated in the following Modify actions.
Modify a user:
modify ur <user_id> [<user_name> ! <email> <primaryPIN> <secondaryPIN>
<alternatePIN> <home_server> <locked> <location> <additional_info> <home_folder>]
Example: Update email address of user johnd and keep the rest of the information:
EQCmd -sMyServer modify ur johnd! ! [email protected] !
To lock a user, set the <locked> value to "1". To unlock a user, use the unlock ur <user_id> command. See Lock and Unlock on page 8 for details.
Adjust
Allows the administrator to adjust the balance for a certain object type. Adjust has three formats:
...adjust <Obj_type> <Obj_ID>|All <amount>
...adjust <Obj_type> <Obj_ID>|All set <amount>
...adjust <Obj_type> <Obj_ID>|All atleast <amount>
adjust … <amount>
Allows the administrator to adjust a balance to an object type. When adjusting the user balance, there is also a description field to state what the adjustment was regarding. Use double quotes around the description, with a maximum string length of 225 characters.

Using Xerox Secure Access Utilities Xerox Secure Access Unified ID System® 5.3
6-8 Administration Guide
Adjust a user balance:
adjust ur <user_id>|All <amount> <description>
Example: adjust user balance by $50.00 with a description of the adjustment
EQCmd -sMyServer adjust ur johnd 50 ”deposit funds”
adjust … set <amount>
Allows the administrator to set a new balance to an object type. When adjusting the user balance, there is also a description field to state what the adjustment was regarding. Use double quotes around the description, with a maximum string length of 225 characters.
Set a new balance to a user:
adjust ur <user_id>|All set <amount> <description>
adjust … atleast <amount>
Allows the administrator to set the object balance value no less than a certain amount. For example: if a user current balance is $10, if the administrator set atleast amount $5.00, the user's new balance is still $10; if the administrator set the atleast amount $15, then the user's new balance is changed to $15.00.
Atleast a user account:
adjust ur <user_id>|All atleast <amount> <description>
Lock and Unlock
Allow the administrator to lock/unlock a user.
Lock a user:
lock ur <user_id>
Unlock a user:
unlock ur <user_id>
EQCmd Batch File Process
EQCmd has a batch mode. It accepts a CSV file as an batch file, one file per server.
[Xerox Secure Access\Tools file path]\EQCmd –s<Server> –fBatchFileName.csv
Note
Copy the .csv file to the Xerox Secure Access > Tools folder.
CSV File Format<Action>, <Obj_type>, <Obj_ID>|All, [<Details>]

Xerox Secure Access Unified ID System® 5.3 Using Xerox Secure Access Utilities
Administration Guide 6-9
Refining the User Group ViewFor large installations, you may have a large-enough account base that the User Group view does not provide a sufficiently refined view of the user accounts. Xerox Secure Access includes a command line utility to divide the group listing into smaller sections or sub-sections for easier viewing.
On CAS, open the command prompt, and navigate to the Program Files\Xerox\Xerox Secure Access\Tools, then type the following command and replace the variables with appropriate values:
EQAccountRegroup [-sCASName] [-f filename] [-q] -t accounttype [-g groupmaxsize] [-l refinedgroupminimum]
-s identifies the core accounting server hosting the accounts you wish to view.
The following example illustrates the overall usage of the command.
Argument Result
-t required argument that identifies the type of account listing you want to view:
• use -t ur for user accounts
-s Optional argument that identifies the core accounting server hosting the accounts
If you run the command on CAS, you do not need to enter this argument.
-f Identifies the output path for the command log file
Example: diagnostics.txt
-q Hides error details from the console
-g Specifies the limit when the subgroups appears in System Manage.
Example: -g 2000 shows the users in the normal view until the number of users reaches 2000.
-l Specifies the number of users within the subgroups.
Example: -l 100 list at most 100 users in each subgroup
EQAccountRegroup -sBora -f diagnostics.txt -t ur -g 2000 -l 100
CAS Output Path User Accounts
Subgroup after 2000 accounts
100 usersin each subgroup

Using Xerox Secure Access Utilities Xerox Secure Access Unified ID System® 5.3
6-10 Administration Guide
The command is invoked on CAS called Bora, with the command log saved to a file called diagnostics.txt. The user accounts are grouped, and if there are more than 2000 user accounts, the tool splits them into viewable groups of 100.
When you open the User group view dialog box, Xerox Secure Access sorts the list alphabetically. Using this example, if there are less than 2000 users, only views based on first character (0-9, A-Z) are available. When there are 2000 or more users then the refined groupings are available. The refined groups in this example list a maximum of 100 accounts, though not necessarily 100 accounts in each group.
The refinements are based on first character groups that have over 100 accounts. If a first character group has 100 accounts or less, it is not further refined. For example if there are 99 users with names starting with B, then the tool does not refine the view of the B accounts. If there are 200 accounts starting with B, then there are two sub-groups of Bs available in the refined view.
Print Queue ViewerThe Print Queue Viewer provides a tool for Administrators to view and delete documents within the secure print queue. Each DRE has its own print queue, and therefore its own Viewer. If you deployed multiple DREs you can run multiple Viewers at the same time. You must specify the print server (DRE) you want to connect to when you launch the Viewer.
The Print Queue Viewer utility is installed as part of the management tools when Xerox Secure Access is installed on your system. The EQPrintQueueViewer.exe file is placed in the Program Files\Xerox\Xerox Secure Access\Tools folder, and a shortcut is created in the Xerox Secure Access group under the Windows Start menu.
To open the Print Queue Viewer, do the following:
1. On your Windows desktop, navigate to Start > All Programs > Xerox Secure Access > Print Queue Viewer. This creates the Viewer icon in the Windows system tray.
2. Double-click the icon to open the Print Queue Viewer.
3. Click any document in the list to select it. Hold down SHIFT or CTRL to select multiple documents in the queue.
You can sort documents in the list by clicking any of the column headings visible in the Viewer.
4. To delete selected documents from the queue, press the Delete key or choose Delete from the Document menu.
Select View > Simple view or View > Full view to change the default view depending on how many document details you want to display.

Xerox Secure Access Unified ID System® 5.3 Using Xerox Secure Access Utilities
Administration Guide 6-11
NoteStart the Print Queue Viewer with the -s option to customize Viewer’s visible columns. Select View > Custom view, and then select View > Select columns to select or clear columns as desired.
Select View > Hide to close the Viewer without shutting down the service. The Viewer icon remains visible in the Windows system tray. Use the Refresh option to update the Viewer document list while the Viewer is open; the list does not refresh automatically.
To shut down the service, right-click the icon in the system tray and select Exit. You can also select Show/Hide to open or close the Print Queue Viewer window.
Running Print Queue Viewer on a Workstation
To run the Print Queue Viewer application on a workstation, choose one of the following options:
• Use the Xerox Secure AccessInstaller with one of the management tools, such as System Manager.
The EQPrintQueueViewer.exe file is placed in the Program Files\Xerox\Xerox Secure Access\Tools folder, and a shortcut is automatically created in the Xerox Secure Access group under the Windows Start menu.
OR
• Copy the EQPrintQueueViewer.exe file to the workstation.
When manually copying EQPrintQueueViewer.exe you need to run it with the -s<DRE_server> option if you want to customize the Print Queue Viewer columns, and to view other user’s print jobs.
If the -s<DRE_server> option is not used, then the Print Queue Viewer only shows print jobs for the current user.
After running EQPrintQueueViewer.exe, a shortcut is created in the Xerox Secure Access group under the Windows Start menu.

Using Xerox Secure Access Utilities Xerox Secure Access Unified ID System® 5.3
6-12 Administration Guide

