wse evaporator manualwhere the sap is denser and then to the densest c compartment , the “syrup”...
TRANSCRIPT

LeaderEvaporatorCo.,Inc.
49JonerginDrive
Swanton,VT05488
Tel:802‐868‐5444
www.leaderevaporator.com
WSE Evaporator Manual

SetupInstructionsforLEADER2X6Evaporator 2016 Page:1
TABLE OF CONTENTS
INTRODUCTION:THEORYOFOPERATION.................................................................................................................................................2
FORMINGTHEGRADIENT........................................................................................................................................................................................................2Firing....................................................................................................................................................................................................................................................2Defoamer.............................................................................................................................................................................................................................................3MinimizeReversalEffects............................................................................................................................................................................................................3
EQUIPMENTDESCRIPTION...............................................................................................................................................................................4
DIAGRAMOFTHEWSEEVAPORATOR..........................................................................................................................................................7
SETUPOFTHEWSEEVAPORATOR................................................................................................................................................................8
SUGGESTEDTOOLS:.....................................................................................................................................................................................................................8RECEIVINGYOUREVAPORATOR:..........................................................................................................................................................................................8SUGARHOUSESETUP:................................................................................................................................................................................................................9FOUNDATIONFORTHEARCH..............................................................................................................................................................................................11SETTINGTHEARCHONTHEFOUNDATION:.................................................................................................................................................................11INSULATINGTHEARCH:.........................................................................................................................................................................................................12CementingofInsulationBoardandBricks.......................................................................................................................................................................13InsulationBoard...........................................................................................................................................................................................................................14InstallTheGrates.........................................................................................................................................................................................................................15Bricks.................................................................................................................................................................................................................................................17
SETTINGUPTHEPANS:..........................................................................................................................................................................................................23INSTALLTAPERANDSTACK................................................................................................................................................................................................28THEFIRSTBOIL..........................................................................................................................................................................................................................31
OPERATINGTHEWSEEVAPORATOR.........................................................................................................................................................32
SYRUPPANREVERSAL............................................................................................................................................................................................................32MAKINGSYRUP...........................................................................................................................................................................................................................34DAILYSHUTDOWN....................................................................................................................................................................................................................35MAINTENANCE...........................................................................................................................................................................................................................36DAILY.................................................................................................................................................................................................................................................36PERIODIC.........................................................................................................................................................................................................................................36ENDOFSEASON...........................................................................................................................................................................................................................36BEGINNINGOFSEASONSTARTUP......................................................................................................................................................................................37
FEEDBACK.....................................................................................................................................................................................................................................37NOTES.............................................................................................................................................................................................................................................37
ATTACHMENT#1:HYDROMETERUSAGE.................................................................................................................................................38
HYDROMETERFUNCTION.....................................................................................................................................................................................................38USEOFAHYDROMETER.........................................................................................................................................................................................................38PreparingANewHydrometerForUse:..............................................................................................................................................................................38UsingTheHydrometer...............................................................................................................................................................................................................38
ATTACHMENT#2:INSTALLATIONANDUSAGEOFTHEWSEUPGRADEBUTTERFLY................................................................40
INSTALLATION...........................................................................................................................................................................................................................40USAGE..............................................................................................................................................................................................................................................42

SetupInstructionsforLEADER2X6Evaporator 2016 Page:2
INTRODUCTION: THEORY OF OPERATION A maple syrup evaporator works under the principal of a gradient. As the sap boils, it concentrates. As it concentrates, the volume is reduced and the solids (sugar concentration) increase. As the volume is reduced the liquid works to maintain the levels across the evaporator so less concentrated sap flows into areas where there is more concentrated sap. During the evaporation process the percent of sugar will change from the incoming (approximately 2%) to the draw off (approximately 66%).
FORMING THE GRADIENT When the evaporator is first filled, the concentration of the sap is the same throughout. The gradient is formed as the water is evaporated from the sap in the syrup pan and the flue pan, and as the new sap enters the flue pan.
As the sap boils it loses moisture and becomes denser / more concentrated. As it is becoming concentrated it loses volume. As it loses volume additional sap will try to keep the levels constant and at the same concentration. This is occurring in both the flue pan and the syrup pan.
In the flue pan less concentrated sap enters through the float box into the first flue pan compartment and begins to concentrate. As it concentrates it moves toward the second compartment of the flue pan. Early in the boil the second compartment will become denser as the “fresh” sap entering the first compartment from the float box keeps pushing the denser sap around.
As the syrup pan boils, the sap becomes denser. The flue pan sap is pushed into the syrup pan making sap in the first syrup pan compartment less dense. The sap from the first syrup pan compartment is pushed to the next compartment where the sap is denser and then to the densest c compartment , the “syrup” compartment. The syrup is drawn off the evaporator from this compartment and more sap flows across all the compartment s of the evaporator to replace the volume of syrup drawn off.
With a good gradient in place there will be a measureable difference in the liquid levels between one side of the syrup pan and the other. You may note a difference of ½”.
PROPER OPERATIONS TO MAINTAIN GRADIENT: Firing
Defoamer
Minimize Reversal Effects
During operations you will be working to maintain a consistent gradient. This is done through firing level, control of foaming, and minimizing the effects of reversal.
Firing During firing you are seeking to maintain the same boil all the time. By doing so the liquid “push” in the pans will remain consistent. If the boil reduces, the syrup pan flow will reverse and flow to the flue pan. In order to maintain the boil the following should be of concern:
1. Wood to use a. Mix of hardwood (longer lasting, more BTUs) and softwood (quicker, intense heat). b. Avoid slabs as they do not allow heat to evenly reach the pan c. Split wood 2” to 3” in diameter and approximately 24” in length
2. Loading wood into the arch a. Wood should stay on the grates and 2” to 5” inside from the door so wood fire does not heat the arch
face b. Criss‐cross the wood as best possible so oxygen can reach all wood efficiently c. Do not hit the flues when loading wood

SetupInstructionsforLEADER2X6Evaporator 2016 Page:3
3. When a. Keep stack temperature in range of 650oF to 800oF b. Maintain the arch ½ to ⅔ full c. Fire consistently with small amounts of wood to maintain level of heat d. Use timer to stay on schedule with firings e. Adjust firing intervals as needed to maintain an even boil
Defoamer The purpose of defoamer is to prevent foam build up in the pans. Foam build up will prevent proper evaporation of the water from the sap. It will give a false liquid level to the float not allowing the incoming sap to flow in a consistent manner. Inconsistent defoamer usage will create large volume adds of sap into the pans as the foam is reduced (when you do add defoamer) and the float seeks to replace the level with incoming sap. The following items should be of concern in the use of defoamer:
1. Use defoamer on a regular basis. It is suggested you add defoamer to the flue pan each time you fire the evaporator.
2. Add defoamer primarily to the flue pan. Modify this only under certain conditions.
3. The estimated usage for a 2 foot wide WSE is 3 drops. The usage may need to be changed as the sap characteristics change. NOTE: This is based on the use of ATMOS 300 Defoamer
4. NEVER add defoamer to the center compartments of the syrup pan. Use one drop at a time in the syrup (draw‐off) compartment.
Minimize Reversal Effects Reversal occurs when the boil in the flue pan is reduced (when firing is inconsistent, end of day, change pan flow direction). As the flue pan boil reduces, the level is reduced so more fresh sap is added and sap will flow back from the syrup pan. This causes the “sweet” in the syrup pan to mix back across the syrup pan and increases the volume of sap in the flue pan. To minimize this effect:
1. Maintain a consistent boil
2. After the last syrup draw of the day, draw 1 to 1 ½ gallons of “sweet” from the syrup pan into a clean container. This will be added to the boiling syrup pan at the beginning of the next boil and aid in setting up the gradient.

SetupInstructionsforLEADER2X6Evaporator 2016 Page:4
EQUIPMENT DESCRIPTION A standard wood fired arch from Leader Evaporator is designed to have a deeper and wider firebox to increase firing capacity. There is a large draft door to maximize airflow. The flue pan and the syrup pan are tig welded of 20 gauge bright annealed stainless steel which is the same as the larger evaporators.
NOTE: Pictures, sketches and drawings presented in this document are not to scale. In general the information in this document is based on a standard WSE arch. A standard WSE arch has galvanized sides, base taper and stack. A stainless steel option is available with which the arch sides, base taper and stack will be stainless steel. A left draw evaporator is defined, as the draw off assembly will be on the left front of the syrup pan when standing facing the firing door. A right draw evaporator is defined, as the draw off assembly will be on the right front of the syrup pan when standing facing the firing door. The Leader WSE Evaporator consists are the following parts:
INCLUDED PARTS
ITEM LEADER ORDER # DESCRIPTION / PHOTO
ITEM LEADER ORDER #
DESCRIPTION / PHOTO
Arch 302406LN
2X6
3 Sided SS Splash Guard
58974
Flue Pan 372404LW
2X4
Syrup Pan (2X2)
372402LWL (for Left)
372402LWR (for Right)
Float Box
Regulator Arm (Included – part of float box)Regulator Bridge (Included – part of box)
Special Order
59048
59061
Regulator Packing (included with regulator arm)
59065
Float with Collar (10 ½” X 5 ½” X 2”)
59024
float
SS “U” Connection
Special Order
1–½” SS Clamps (qty: 4)
72245
1–½” Teflon Gasket (qty: 4)
65621
¼” SS Thumb Screws (qty: 2)
72422
Draft Door Latch
Wire tied to draft door of arch
75169

SetupInstructionsforLEADER2X6Evaporator 2016 Page:5
ITEM LEADER ORDER # DESCRIPTION / PHOTO
ITEM LEADER ORDER #
DESCRIPTION / PHOTO
1‐½” #24 SS Band Clamps (qty: 2)
60046
1‐½” X 2” Hose Connection
Special Order
WSE ¾” SS Draw Off Valve
390000
4” X 24” Ceramic Pan Gasket
65158
Base Taper 24” X 3’ X 10”
502410L (Galvanized)
542410L (Stainless Steel)
Stack 10” X 3’ (qty: 3)
5210 (Galvanized)
5210S (stainless Steel)
25” Full Leader Grate (qty: 4)
75021
Pipe legs (Qty: 2)
Wire tied to inside rear of arch
77021
Flue Brush Rod (8’ )
60069 (6’)
60071 (8’)
Rod end is threaded to allow
mounting of flue brush
Flue Brush 60058
OPTIONAL SETUP MATERIAL, ADDITIONAL SPARE PARTS AND OPERATIONAL SUPPLIES
ITEM LEADER ORDER # DESCRIPTION / PHOTO
ITEM LEADER ORDER #
DESCRIPTION / PHOTO
Fire Door 24”
75241
Draft Door 30” 75111
Front Only 24” No Doors
75240
10” Stack Cover 5410
10” Leader Style Roof Jack
Peak Style
OR
Side of Roof Style
Insulation Board 1” X 1’X3’ (3 sq.
ft) qty. 14 65000

SetupInstructionsforLEADER2X6Evaporator 2016 Page:6
ITEM LEADER ORDER # DESCRIPTION / PHOTO
ITEM LEADER ORDER #
DESCRIPTION / PHOTO
3000o Full Brick qty: 14
65003
3000
o Half Brick qty: 98
65006
Refractory Cement qty: 2
65001
Jaco Firestop Plus (10.5 oz
tube) 65196
Rail Gasket
65154 (1/2” X 2” X
25’)
Thermometer 3” or 5” face, 6”
stem
61022 3” Face/6”
Stem
61028 5” Face/6”
Stem
Two are recommended – one for each side of the syrup pan
Stainless Steel Smoke Stack 3’ x 10”
5210S
Stainless Steel Base Stack
542410L
Upgrade Butterfly 1 ½” WSE
390002 Valve allows for isolating the flue pan from the syrup pan so the flue pan does not need to be drained
when you change sides of the syrup pan.
Stack Thermometer
61052
Install at shoulder to eye level in the
smoke stack
Timer, Firing
Firing Gloves 63123
Green Gloves
63125
Short Syrup Hydrometer
61040
Short Test Cup 2” Diameter
59007
4 oz Defoamer
63015

SetupInstructionsforLEADER2X6Evaporator 2016 Page:7
DIAGRAM OF THE WSE EVAPORATOR

SetupInstructionsforLEADER2X6Evaporator 2016 Page:8
SETUP OF THE WSE EVAPORATOR NOTE: The following information pertaining to setup of an evaporator is to be considered one suggested method. Installations should meet all applicable governmental regulations and standards. SUGGESTED TOOLS:
7/16” box/open‐end wrench
Phillips screwdriver
Utility knife
Plumb bob
Drill
Drill bits
Bricking trowel
Measuring tape
Marker (mark roof material)
Level 4’
Brick saw RECEIVING YOUR EVAPORATOR:
Upon receipt of the evaporator, it is recommended the following tasks be performed:
1. Protect all incoming materials from damage and the environment. If possible place the evaporator at the location where it will be setup (See section titled SUGAR HOUSE SETUP).
2. Unpack all materials and check the received materials against the Equipment Description list provided above.
3. Immediately notify Leader Evaporator or your local dealer if there are questions on the received equipment.

SetupInstructionsforLEADER2X6Evaporator 2016 Page:9
SUGAR HOUSE SETUP: Prior to setup of the sugar house, it is suggested future needs be considered. The requirements for the setup of the WSE evaporator may not be adequate if in the future additional or larger equipment will be needed. If assistance is needed in determining possible future requirements please contact Leader Evaporator Sales or your local dealer. The following are the dimensions of the evaporator: 2 X 6 WSE
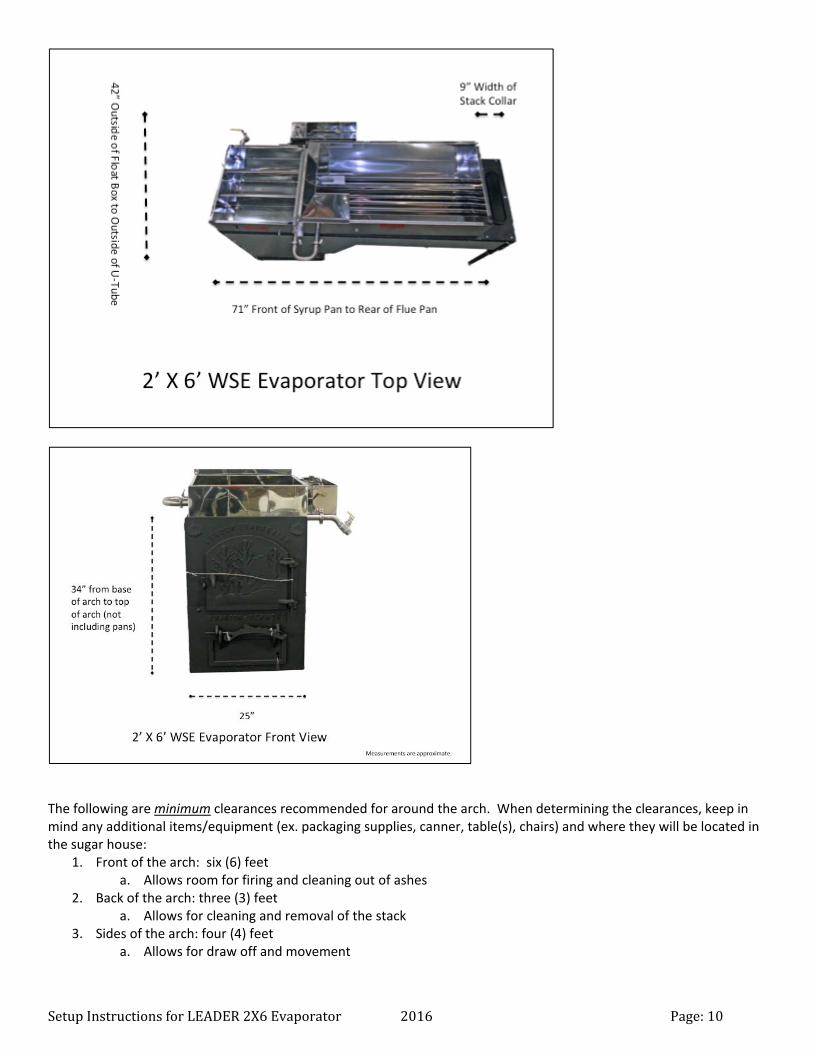
SetupInstructionsforLEADER2X6Evaporator 2016 Page:10
The following are minimum clearances recommended for around the arch. When determining the clearances, keep in mind any additional items/equipment (ex. packaging supplies, canner, table(s), chairs) and where they will be located in the sugar house:
1. Front of the arch: six (6) feet a. Allows room for firing and cleaning out of ashes
2. Back of the arch: three (3) feet a. Allows for cleaning and removal of the stack
3. Sides of the arch: four (4) feet a. Allows for draw off and movement
SetupInstructionsforLEADER2X6Evaporator 2016 Page:11
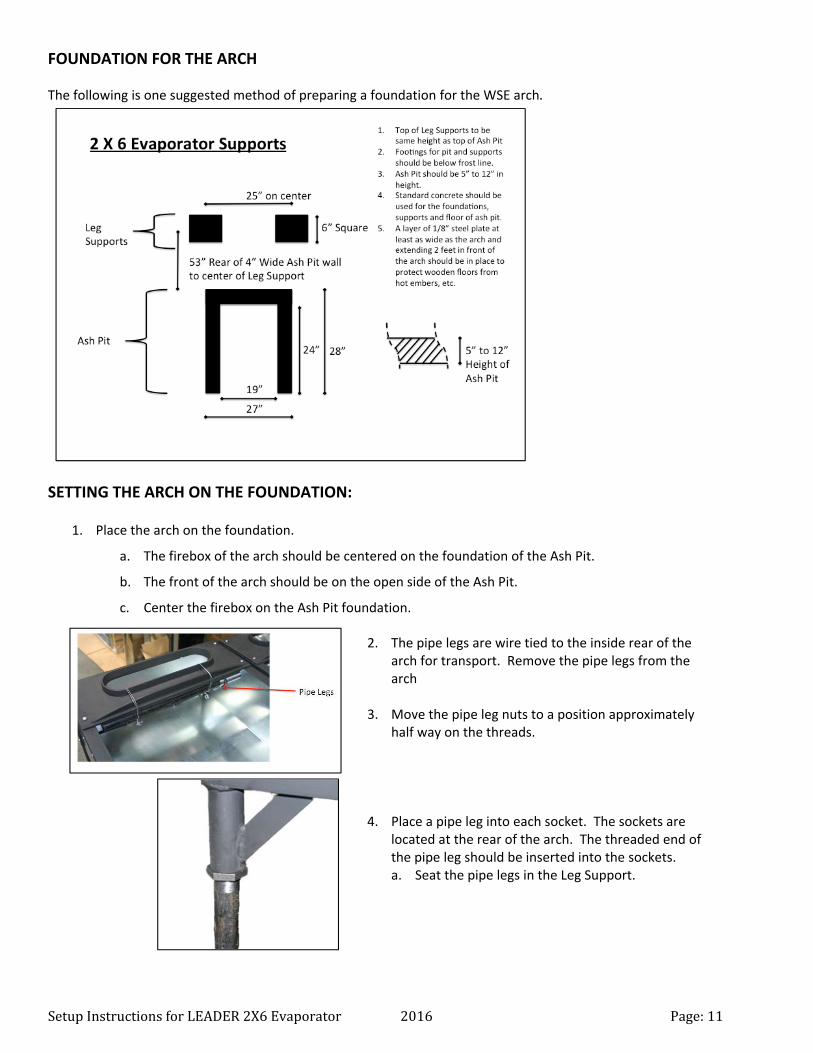
FOUNDATION FOR THE ARCH The following is one suggested method of preparing a foundation for the WSE arch.
SETTING THE ARCH ON THE FOUNDATION:
1. Place the arch on the foundation.
a. The firebox of the arch should be centered on the foundation of the Ash Pit.
b. The front of the arch should be on the open side of the Ash Pit.
c. Center the firebox on the Ash Pit foundation.
2. The pipe legs are wire tied to the inside rear of the arch for transport. Remove the pipe legs from the arch
3. Move the pipe leg nuts to a position approximately half way on the threads.
4. Place a pipe leg into each socket. The sockets are located at the rear of the arch. The threaded end of the pipe leg should be inserted into the sockets. a. Seat the pipe legs in the Leg Support.

SetupInstructionsforLEADER2X6Evaporator 2016 Page:12
INSULATING THE ARCH:
3. Beginbyfittingtheinsulationboardandbricksinthearch“dry”(nocement).Thiswillallowyoutocutandfitalltheinsulationboardandbricksintothearchsothecementingcanbedoneinonecontinuousapplication.
NOTE:Theuseofawetsawormasonrybladeinacircularsawisrecommendedtocutthebrickswhererequired.
NOTE:Theuseofaminihacksawissuggestedforcuttingtheinsulationboard.
Thefollowingsectionsaretheoutlineforthepreparingandsequencingofthefittingoftheinsulationboardandbrickintothearch.Adjustmentstoshownsizeswillberequiredastheinstallationproceeds.Theruleof“Measuretwiceandcutonce”willreducewasteinfittingthepieces.Asyougothrougheachofthefollowingpages,cut,“dryfit”thencementthepartsintoplace.Theorderisasfollows:
1. LeftSideInsulation2. RightSideInsulation3. BackInsulation4. Insertthegrates5. FrontInsulation6. TopViewInsulationstartingwithundertheGrateShelfthentheInclinethentheRearFloor
5. Level the arch on the foundation. a. Place a 4‐foot level on the rail of the arch front
to back. (The rail is the part where the pans are rested).
b. Adjust the level of the arch by raising or lowering the pipe leg nuts. The use of two pipe wrenches is suggested. Metal shims may be needed on the front of the arch..
c. Place the level on the rail of the arch side‐to‐side.
d. Adjust the level of the arch by raising or lowering the pipe leg nuts.
1. Priortoinsulating thearchitisrecommendedhightemperaturecaulking(ex.JACOFirestopPlus)beusedtosealalljoints,rivetsandbolts.Thisistopreventsparksandsmokefromexitingthearch.
2. Obtaintherightnumberof3000ofirebricks,refractorycementcontainersandinsulationboard: 14fullbricks 98halfbricks 2‐30lb.bucketsofrefractorycement 14sheetsof1’X3’insulationboard

SetupInstructionsforLEADER2X6Evaporator 2016 Page:13
7. LeftSideBrick8. RightSideBrick9. FrontBrick10. BackBrick11. TopViewBrickstartingundertheGrateShelfthentheGrateShelfthentheInclinethentheRearFloor
Whenfittingpiecesinthearchtherewillbeboltsandrivetswherethepiecesarebeingfit.Inordertoproperlyfitfortheboltsandrivetseither:
Measurethelocationsonthesheetandcutoutthenecessaryareaforclearanceoftherivets/bolts
OR
Placethesheetinpositionandpressitagainsttherivets/boltsinordertomarktherearofthesheetthencutoutthemarkedareatoallowforclearanceoftherivets/bolts.
NOTE:Alldrawingsfortheinsulatingboardareillustratedastheboard“white”faceup.
NOTE:Insulatingsheetsatthetopofthearcharecuttoleavea¾”gapbetweenthesheettopandthebottomofthearchrail.
Cementing of Insulation Board and Bricks
1. Placeatemporarysupportatthebottomofthearchtoholdthebrickinplaceasyouarebricking.
2. Skimcoatalayerofrefractorycementtotheinsidearchwallcoveringtheapproximateareaofthepieceofarchboardtobemounted.Placetheboardagainstthecement.
3. Thecementdoesnotneedtodrypriortoinstallingthebricks.
4. Toinstallbrick,skimcoattherearofthebrickandapplyaheaviercoattothesidesofthebrick.Placeitintoposition.Asmorebricksareaddedthecementwillbeforcedfromthejoints.Scrapeandsmoothofftheexcesscement.Makesureallopeningsbetweenthebricksarefilledwithcement..
5. Allowthecementtodryfor36hoursatroomtemperature(65°Forhigher).DECIMAL FRACTION
0.125 1/8
0.250 1/4
0.375 3/8
0.500 1/2
0.625 5/8
0.750 3/4
0.875 7/8

WSEOperationsManual Year:2015 PAGE: 14
Insulation Board
Thefollowingaredimensionsforthepartslabeledabove.Always“dryfit”thepartspriortocementingtoensureproperfit.
Print ID Length Width Notes
L1 36" 9.25"
L2 12" 9.5"
L3 31.5" 9.75"
L4 Top: 36" Bottom: 29.5" 12" Down 2" from Top then cut on angle to 29.5"
L5 25" 9.5" Top cutout 1.5" L, 0.5" W / Bottom cutout 1" L, 0.5" W
Thefollowingaredimensionsforthepartslabeledabove.Always“dryfit”thepartspriortocementingtoensureproperfit.
Print ID Length Width Notes
R1 36" 9.25"
R2 12" 9.5"
R3 31.5" 9.75"
R4 Top: 36" Bottom: 29.5" 12" Down 2" from Top then cut on angle to 29.5"
R5 25" 9.5" Top cutout 1.5" L, 0.5" W / Bottom cutout 1" L, 0.5" W

WSEOperationsManual Year:2015 PAGE: 15
Thefollowingaredimensionsforthepartslabeledabove.Always“dryfit”thepartspriortocementingtoensureproperfit.
Print ID Length Width Notes
B1 13.375" 8.5"
B2 8.75" 8.5"
Install The Grates
Placethreeofthearchgratesevenlyspacedintothearchwiththegratestouchingthefrontofthearch.Placethegratessooneisoneachsideofthearchandtheotherisapproximatelyinthemiddle.Obtainapieceof“Cflute”cardboard(mostcommontypeofcardboard)approximately20”x18”.Folditintothirdsalongthelengthandtapewithanon‐plastictape(ex.maskingtape).Placeitbehindthegratestowardtherearofthearch.Thecardboardwillprovidethespacingneededtoremovethegratesafterthebrickshavebeenfitinplace.
PROPERORIENTATIONOFGRATES
Gratesshouldbeinstalledsothe“V”grooveisup.Inotherwordstheopeningofthe“V”willbeinapositiontocatchandfillwithashes.

WSEOperationsManual Year:2015 PAGE: 16
Thefollowingaredimensionsforthepartsaslabelled.Always“dryfit”thepartspriortocementingtoensureproperfit.
NOTE:Theinsulationboardwillfitabovethegrates.
.
Thefollowingaredimensionsforthepartslabeledabove.Always“dryfit”thepartspriortocementingtoensureproperfit.
Print ID Length Width Notes
TV1 22.25" 9.25" Not Shown ‐ under the grate support shelf
TV2 10.5" 4.5"
TV3 12" 4.5"
TV4 10.5" 14.5"
TV5 12" 14.5"
TV6 22.5" 5"
TV7 36" 10.25"
TV8 36" 12"
Print ID Length Width Notes
F1 4.5" 9.0"
F2 24" Arc cutout 16" W 6" Cutouts top corners 2.5" L 0.5" W
F3 4.5" 9.0"

WSEOperationsManual Year:2015 PAGE: 17
Bricks
Thefollowingaredimensionsforthebrickslabeledabove.Always“dryfit”thepartspriortocementingtoensureproperfit
Brick ID Brick Type Length Width Thickness
Quantity Needed NOTES
FB Full 9.000" 4.500" 2.500" 4
HB Half 9.000" 4.500" 1.250" 22
HHB Half 4.500" 4.500" 1.250" 3
BL1 Half 6.625" 4.500" 1.250" 1
BL2 Half 9.000" 4.500" 1.250" 1Cutout 1" L 0.625" W
BL3 Half
top ‐ 6.125" bottom ‐ 4.25" 2.750" 1.250" 1
BL4 Half
top ‐ 6.5" bottom ‐ 3.75" 4.500" 1.250" 1
BL5 Half 4.25" 4.500" 1.250" 1
BL6 Half
top ‐ 2.5" bottom ‐ 5.25" 4.500" 1.250" 1
Use part of brick left from BL5
BL7 Half 3.000" 4.500" 1.250" 1
BL8 Half 6.375" 4.500" 1.250" 1

WSEOperationsManual Year:2015 PAGE: 18
Thefollowingaredimensionsforthebrickslabeledabove.Always“dryfit”thepartspriortocementingtoensureproperfit
Brick ID Brick Type Length Width Thickness
Quantity Needed NOTES
FB Full 9.000" 4.500" 2.500" 4
HB Half 9.000" 4.500" 1.250" 22
HHB Half 4.500" 4.500" 1.250" 3
BR1 Half 6.625" 4.500" 1.250" 1
BR2 Half 9.000" 4.500" 1.250" 1Cutout 1" L 0.625" W
BR3 Half
top ‐ 6.125" bottom ‐ 4.25" 2.750" 1.250" 1
BR4 Half
top ‐ 6.5" bottom ‐ 3.75" 4.500" 1.250" 1
BR5 Half 4.25" 4.500" 1.250" 1
BR6 Half
top ‐ 2.5" bottom ‐ 5.25" 4.500" 1.250" 1
Use part of brick left from BR5
BR7 Half 3.000" 4.500" 1.250" 1
BR8 Half 6.375" 4.500" 1.250" 1
WSEOperationsManual Year:2015 PAGE: 19
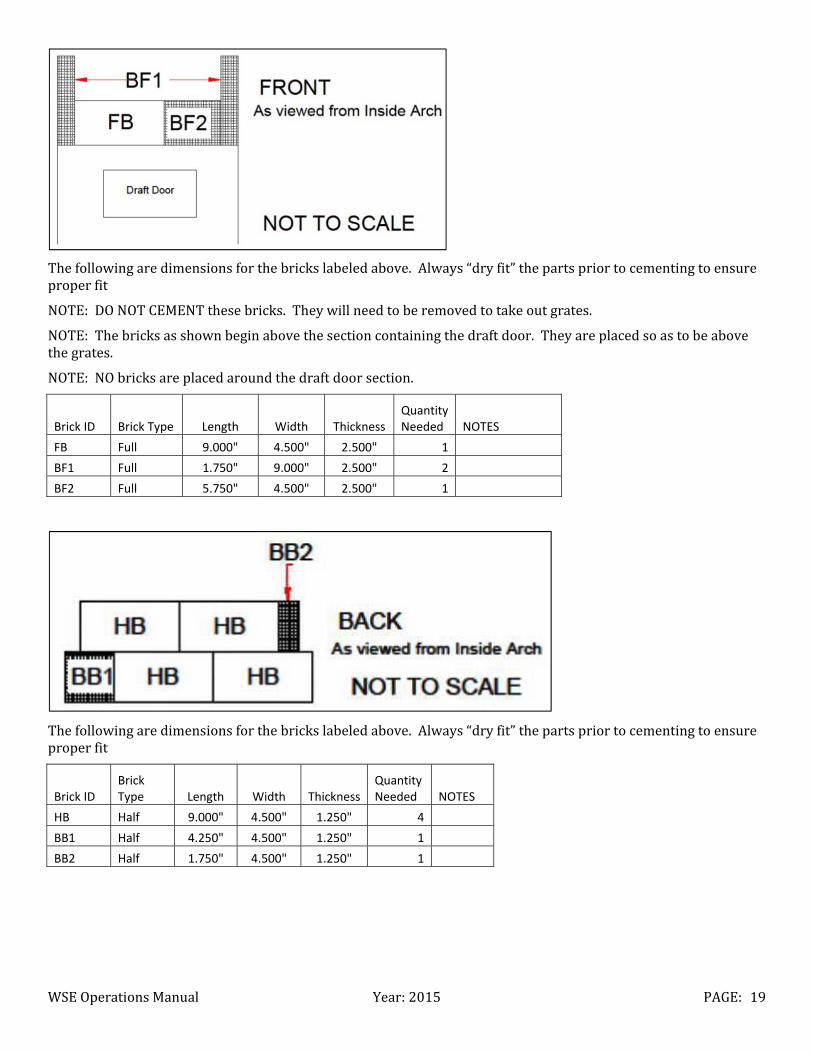
Thefollowingaredimensionsforthebrickslabeledabove.Always“dryfit”thepartspriortocementingtoensureproperfit
NOTE:DONOTCEMENTthesebricks.Theywillneedtoberemovedtotakeoutgrates.
NOTE:Thebricksasshownbeginabovethesectioncontainingthedraftdoor.Theyareplacedsoastobeabovethegrates.
NOTE:NObricksareplacedaroundthedraftdoorsection.
Brick ID Brick Type Length Width Thickness Quantity Needed NOTES
FB Full 9.000" 4.500" 2.500" 1
BF1 Full 1.750" 9.000" 2.500" 2
BF2 Full 5.750" 4.500" 2.500" 1
Thefollowingaredimensionsforthebrickslabeledabove.Always“dryfit”thepartspriortocementingtoensureproperfit
Brick ID Brick Type Length Width Thickness
Quantity Needed NOTES
HB Half 9.000" 4.500" 1.250" 4
BB1 Half 4.250" 4.500" 1.250" 1
BB2 Half 1.750" 4.500" 1.250" 1

WSEOperationsManual Year:2015 PAGE: 20
TheTOPVIEWwillbedividedintosectionsforeasierillustration.Thearchlocationoftheofthesectionsisasfollows
Thefollowingaredimensionsforthebrickslabeledabove.Always“dryfit”thepartspriortocementingtoensureproperfit
Brick ID Brick Type Length Width Thickness
Quantity Needed NOTES
HB Half 9.000" 4.500" 1.250" 4
BU1 Half 4.375" 9.000" 1.250" 1

WSEOperationsManual Year:2015 PAGE: 21
Thefollowingaredimensionsforthebrickslabeledabove.Always“dryfit”thepartspriortocementingtoensureproperfit
Brick ID Brick Type Length Width Thickness
Quantity Needed NOTES
FB Full 9.000" 4.500" 2.500" 1
BG1 Full 5.375" 4.500" 2.500" 2
Thefollowingaredimensionsforthebrickslabeledabove.Always“dryfit”thepartspriortocementingtoensureproperfit
Brick ID Brick Type Length Width Thickness
Quantity Needed NOTES
HB Half 9.000" 4.500" 1.250" 1
HHB Half 4.500" 4.500" 1.250" 2
BI1 Half 5.500" 4.500" 1.250" 4
BI2 Half 4.500" 4.000" 1.250" 2
BI3 Half 5.500" 4.000" 1.250" 2

WSEOperationsManual Year:2015 PAGE: 22
Thefollowingaredimensionsforthebrickslabeledabove.Always“dryfit”thepartspriortocementingtoensureproperfit.
NOTE:ThefirstrowofbrickswilloverlapthebricksontheIncline.Usecementtofillopeningsbetweenthebricks.
Brick ID Brick Type Length Width Thickness
Quantity Needed NOTES
HB Half 9.000" 4.500" 1.250" 9
BFL1 Half 8.375” 4.500” 1.250” 5
BFL2 Half 4.125" 4.500" 1.250" 8
BFL3 Half 4.125" 3.875" 1.250" 1

WSEOperationsManual Year:2015 PAGE: 23
SETTING UP THE PANS:
NOTE:Allarchsidedirectionsareasifyouwerefacingthefiredoorofthearch.
NOTE:ThepicturesusedinthissectionarefromaRightDrawEvaporator.
Inthissectionyouwillbeusingferrules,Teflongasketsandclampstomakeconnections.Theferrulesareweldedinplacetotheitemsbeingconnected.TheTeflongasketsandclampsareusedasfollowstocompletetheconnections:
SettingthePans
1. MatchthegrooveintheferruletotheprojectionontheTeflongasket.
2. PlacetheclampgrooveovertheassembledferrulesandTeflongasket.Ensurethegasketisproperlyseatedintheferrulepriortoplacingtheclamp.
3. Aligntheclampsothewingnutisaccessibleforturningandwillbeturnedawayfromanyworkarea.
NOTE:Theclampdoesnotrotateeasilyonceplacedovertheferrules.Itisrecommendedyoupositionitinitiallysothewingnutwillbeeasytoaccess.
4. Closetheboltoftheclampandtightenthewingnut
1. Priortoplacingthepansonthearch,linetherailswith½”ceramicrailgasket(notincluded).Useautilityknifetocutthegaskettomakeasquarefitwithnogaps.

WSEOperationsManual Year:2015 PAGE: 24
2. Therearofthefluepanistheendwherethesidesdonothaveferruleswelded.Placethefluepanonthearchsotherearofthepanisontherailgasketandagainstthestackcollarprojection.
3. Looselythreadathumbscrewintothemountingbracketonthesideofthefluepan.Usethebracketonthesamesideasthedrawoffistobeinstalled(leftdraw‐bracketonleft,rightdraw‐bracketonright).
4. Slidethefloatboxbraceintothebracketwherethethumbscrewisinstalled.Ensurethefloatboxferruleisfacingthefluepanferrule.
5. Placea1½”Teflongasketbetweentheflueboxandfloatboxferrules.Ensurethegasketalignswiththegroovesintheferrules
.
6. Loosenthewingnutona1½”clampandopenuptheclamp.Placetheclampovertheferrulesandgasket.Aligntheclampsothewingnutfacesdown.Closetheclampwiththewingnutandtightenenoughtosecurelyholdthefloatbox.
7. Tightenthethumbscrewinthebracket.

WSEOperationsManual Year:2015 PAGE: 25
12. Iftapewasusedtoholdthepangasket,removeitnow.
8. Placethe4”X24”pangasketbetweenthepans.Itshouldbecenteredsotheendsoverlaptherails.Ifnecessary,useasmallpieceoftapetoholdthegasketinplace.
9. Placethesyruppanonthearchsooneweldedferruleisintherearonthesideoppositethefloatbox.Aleftdrawpanhastherearferruleontheright.Arightdrawpanhastheferruleontheleft.
10. Movethesyruppantowardthefluepan:
a. Slidethefloatboxbraceintothebracketonthesideofthesyruppan.
b. Compressthepangaskettoholditinplace.
c. Placethethumbscrewintothesyruppanbracketandtightenthethumbscrewofthesyrupandfluepans.
11. InstalltheU‐tube
a. Placea1½”TeflongasketontotheferruleofthefluepantobeconnectedtotheU‐tube(samesideastherearferruleonthesyruppan).
b. PlacetheU‐tubeoverthegasket.Aligntheclampsotheboltisinsidetheu‐tubeandthewingnutfacesdown.Ensurethegasketalignswiththegroovesintheferrules.
c. Loosenthewingnutona1½”clampandopenuptheclamp.Placetheclampovertheferrulesandgasket.Closetheclampwiththewingnutandpartiallytighten.
d. Placea1½”TeflongasketontotherearferruleofthesyruppantobeconnectedtotheU‐Tube.PlacetheU‐tubeoverthegasket.
e. Loosenthewingnutona1½”clampandopenuptheclamp.Placetheclampovertheferrulesandgasket.Aligntheclampsotheboltisinsidetheu‐tubeandthewingnutfacesdown.Closetheclampwiththewingnutandpartiallytighten.
f. EnsuretheU‐tubeandpansarealignedthenfullytightenbothclamps.

WSEOperationsManual Year:2015 PAGE: 26
13. Installthedrawoffvalveassembly.Thedrawoffassemblyshouldbeasverticalaspossiblewiththeopenendpointeddown.
a. Placea1½”Teflongasketbetweentheferruleonthefrontofthesyruppanandthedrawoffvalveassembly.Arightdrawoffevaporatorwillhavethedrawofflocatedontherightfrontofthesyruppan.Theleftdrawoffevaporatorwillhavethedrawofflocatedontheleftsideofthesyruppan.
b. Loosenthewingnutona1½”clampandopenuptheclamp.Placetheclampovertheferrulesandgasket.Positiontheclampsotheboltisonthefluesideoftheevaporatorandthewingnutfacesdown.Alignthedrawoffvalveassemblysoitisdirectedfullydown.Closetheclampwiththewingnutandfullytighten.
14. Installthefloat
a. Loosenthethumbscrewonthefloatcollarandadjustthefloatcollartoapproximately½”fromthetopofthefloat.Retightenthethumbscrew.
b. Alignthelongsideofthefloatwiththelongsideofthefloatbox.
c. Raisetheregulatorarm.
d. Tiltthefloatunderthearmandlowerintothefloatboxuntilitisseatedonthebottomofthefloatbox.Thefloatcollarshouldbepositionedundertheforkoftheregulatorarmandthethumbscrewofthecollarshouldbeattheopenendofthefork.

WSEOperationsManual Year:2015 PAGE: 27
15. InstallHoseConnector
a. Locatethebridgeofthefloatbox.
b. Ensurethereispackingontheregulatorarm.Youcancheckthisbylookingdownthebridgetube.Therewillbeeitheratanorblackcoloredappearance.
c. Slidethehoseconnectorontothefloatboxbridgeandplacea#24bandclampoverthelowerendofthehosewhereitoverlapsthebridgetube.Tightentheclamp.
d. Slidea#24bandclampontotheotherendofthehoseconnector.Placeyoursapsourcelineintotheconnectorandtightenthebandclamptoholdyourline.NOTE:Itisrecommendedavalvebeinstalledbetweenthesapsourceandtheregulatorbox.
16. Installthedraftdooradjustablelatch
a. Thelatchiswiretiedtothefrontofthedraftdoor.Removethewirestofreethelatch.Removethewiresecuringthedraftdoor.
b. Removethedraftdooradjusterbolt.Thedraftdooradjusterboltislocatedontherearofthedraftdooracrossthelatchslot.

WSEOperationsManual Year:2015 PAGE: 28
INSTALL TAPER AND STACK
Aroofjackshouldbeinstalledpriortosettingupyourtaperandstack.LeaderEvaporatorofferstwostylesofroofjack–aLeaderstylethatismountedonthepeakoftheroofandaLeaderstylethatismountedonthesideoftheroof.
Inordertodetermineyourrequirementsyouwillneedtoknowwhereyouwillpenetratetheroofwiththestackandthepitchofyourroof.
Roofpenetration:
c. Slidethelatchintotheslotuntilthemountingholeinthelatchisinlinewiththeboltholesindraftdoor.Ensurethe“teeth”ofthelatcharepointeddown.Inserttheboltthroughtheboltholesandthelatchandtightenthenut.
17. InstallSplashGuard
a. Thesplashguardisapproximatelyshapedasa“U”.Theopenendofthe“U”willbeplacedfacingtherearofthearch.
b. Bringthesplashguardtothefrontofthefluepanwiththewidepartoftheguardtowardthefluepan.
c. Raisetherearofthesplashguardtoallowforthesplashguardliptoslideunderthefrontedgeofthefluepan.
d. Lowerthesplashguardontothesidesofthefluepanwiththesplashguardchannelsoverlappingthesidesofthefluepan.Ensurethesplashguardlipisforwardunderthefrontedgeofthefluepan.
RoofPenetrationandtheTypeofRoofJack:
1. Obtainaplumbbobwithsufficientlinetoreachfromtherooftothestackcollarofthearch.
2. Runtheplumbbobfromthecenterofthestackcollartotheroof,movingtheroofpointuntiltheplumbbobisproperlypositioned.Ensuretherearenobendsinthelinecausedbyotheritems.
3. Iftheplumbboblineendisatthepeakoftheroof‐orderaLeaderpeakstyleroofjack.Iftheplumbboblineendisatthesideoftheroof–orderasideofroofLeaderstyleroofjack.
4. Priortotakingdowntheplumbbob,marktheinsideoftheroof,asthiswillbeusedwhenmakingtheroofpenetrationforthestackorinstallationoftheroofjack.

WSEOperationsManual Year:2015 PAGE: 29
InstalltheTaperandStack
NOTE:Itisrecommendedyouinstallallsuppliedexhauststack,asaminimum.Additionalstackmayberequiredtoensureproperdraft.
Draftiscorrectwhen: Theboilisthesameinthesyruppanfront‐to‐backandside‐to‐side Thefiredoorisopentheflame,sparks,etc.aredrawntowardtherearofthearch.
NOTE:Whenworkingwithstacksections,recognizethatthecrimpedendofthestacksectionistheupper/topsection.
1. WheninstallingaroofjackrefertotheLEADERCUSTOMIZEDROOFJACKdocument.
2. Ifnotusingaroofjack,makeaholeatthepointmarkedontheinsideoftheroofinthepreviousstep.Theholeshouldbelargeenoughtoallowthestacktobeslidintopositionandassmallaspossibletoallowforsealingtopreventrain,moistureanddebrisfromenteringthehole.
NOTE:Ifsealingisdonedirectlyaroundthestack,ensureallgovernmentalregulationsaremetforthistypeofinstallation.
1. Placethebasetaperonthearchstackcollar.Ifyouhavedifficultyplacingthebasetaperontothecollar,squeezethebasetaperbypressingonthelongsidesatthebase.

WSEOperationsManual Year:2015 PAGE: 30
3. Installthestacksectionsstartingfromthebasetaper.Ensureyouplacethecrimpedendupwhenconnectingthestacksections.
4. Whenyouputthelastindoorsectioninplace,lowerthestacksectionfromtheroofjack(ifused)approximately2½”downontothetoppieceofstack,orlowerastacksectionthroughthepenetrationintheroof.
a. Ifaroofjackisused,placearemainingsectionofstackontotheroofjackbyinsertingintothetopoftheroofjackandaligningwiththeinteriorstack.
5. Continueinstallingstackuntilallpieceshavebeeninstalled.Ensureyouhaveagoodoverlapforeachstackjoint.Overlapwillbe2to2½”.Itisrecommendedyouscrewallsectionstogetherusingselftappingstainlesssteelscrews.
6. Stackabovetheroofshouldbeguidewiredinatleastthreedirections(tripodconfiguration)tominimizetheeffectsofwind.
a. Itisrecommendedyouinstallastackcoveronthelast/topsectionofstack.Aclosedstackcoverwillminimizetherainandmoistureenteringthestackandarch.WheninstallingastackcoverrefertotheLEADERSTACKCOVERdocument.
2. Ifaroofjackisused,
a. Insertonepieceofstackintotheroofjackuntilitisalightlywedged.TheLeaderstyleroofjackistaperedfromlargertosmaller.Theendtobeinsertedintotheroofjackisthecrimpedend.NOTE:Youwillbemovingthepieceofstackbackdownbyapproximately2½”whenyouconnecttothenextstacksectionsoensureitwillbeabletomove.
b. Measurefromthetopofthetapertothebeadatthebottomofthestacksectionintheroofjack.
c. Determinethenumberoflengthsofstackrequiredbydividingthemeasurementtakenininchesby34”.i. Forexampleifthemeasurementwas68”,then68”÷34”=
2so2lengthsofstackarerequired.ii. Forexampleifthemeasurementwas60”,then60”÷34”=
1.76lengthsofstackarerequired.Thiswouldmeanonefulllengthandalengthmeasuring26”wouldberequired.Toobtainthe26”lengthyoucaneither
iii. Specialorderapieceofstackthelengthrequirediv. Cutastandardlengthofstacktofit.Ifyoucutalengthof
stacktofit,measurethelengthfromthecrimponthebeadendofthestack.

WSEOperationsManual Year:2015 PAGE: 31
THE FIRST BOIL Thefirstboilisdonetoremoveanyresidualmaterialsfromthepansandto“season”thebrickingandinsulation.
1. Fillthefluepanandsyruppanwithabakingsoda:watermix(1pound:200gallons)toalevelof2to3inches.
2. Toseasonthebricking,startbybuildingasmallfireinthefireboxandverygraduallybuildtoanormalfire.
3. Boilthesolutionforapproximately30minutes.Watchtheboilcarefullyandreplenishthesolutionasneededtoensurethesolutioninthepansremainsatthe2to3inchlevel.
4. Checkallequipment:a. Noleaksatfittingsb. Pansareboilingevenlyc. Valvesworkproperlyd. Draftiscorrect
Draftiscorrectwhen: Theboilisthesameinthesyruppanfront‐to‐backandside‐to‐side Thefiredoorisopentheflame,sparks,etc.aredrawntowardtherearofthearch.
5. Drainthesolutionaftertheevaporatorhascooled.CAUTION–ensuretheequipmentiscoolenoughtobesafelyhandledfordraining.
6. Checktheinteriorofthearchtoensureinsulationandbrickingareinplace.
7. Refillthepanstothe2to3inchlevelwithcleanwater.
8. Boilfor30minutesthendrainthepans–aftertheevaporatorhascooled.CAUTION–ensuretheequipmentiscoolenoughtobesafelyhandledfordraining.

WSEOperationsManual Year:2015 PAGE: 32
OPERATING THE WSE EVAPORATOR NOTE:Whenoperatingtheevaporatorbecautiousofhazardssuchashotsurfaces,hotliquids,sparks,andexposedflames.
NOTE:Youmustbeawareatalltimesofthelevelofsapinallcompartmentsofthepans.Iftheleveldropstoolowyoucanandwilldamageyourpans.Ifthereistoomuchfoamyouriskdamagingyourpans.
NOTE:Ifyouhavepurchasedascooporskimmer,doNOTusethemtopushsapthroughtheevaporator.Doingsowillchangethegradientintheevaporator.
1. Checktheevaporator
a. Makesureallsapsourcesareflowingfreelyi.e.notfrozen.b. Ensuredefoamerisusable.c. Ensureallfittingsaretight.d. Makesureallvalvesareworkingproperlyandthefloatisproperlypositioned.e. Cleantheflueswiththefluebrushevery8to12hoursofboiling.NOTE:Therodsuppliedwiththe
archhasathreadedend.Thefluebrushcanbescrewedontotherodtocleantheflues.f. Ensuretheopenareainthegratesiscleanandfreeofmaterial.g. Removetheashesfrombelowthegrates.h. Ifpresent,opencupola,thimblesandhoodcondensatedrains.
2. Ifthisstartupisforanewevaporatororforthefirsttimeoftheseason,gototheSectiontitledMAKINGSYRUP.
Itisrecommendedinordertominimizethesugarsandandniter,theflowinthesyruppanbereverseddailyorwhenitisnotedthebubblesfromboilingaredrawnbackdownintothecompartmentastheybreak(appearlikeboilingmud).ThefollowingaretheinstructionsforreversingthesyruppanontheWSE:
SYRUP PAN REVERSAL DISASSEMBLE
e. Ifyouhaveinstalledasingledialthermometer,removeitfromitspositionnearthedrawoffvalveandinstallitinthe¼”threadedfittingontheoppositesideofthepan.Plugtheemptythermometerfittingwitha¼”plug.
1. Attheendoftheday,whilestillhot,drawoff1to1½gallonsof“sweet”fromthesyruppanandsetaside.
a. Allowtheevaporatortocool.
b. Openthedrawoffvalveonthesyruppananddrainthesapfromthefluepanandthesyruppanintocontainers;approximately11gallonsfor2X4WSEandapproximately16gallonsfora2X6.
c. Wipeoutanyloosematerialusingcleancloths.d. Removethethumbscrewsecuringthefloatbox
bracketfromthesyruppanmountandthreadintothemountontheoppositesideofthesyruppan.

WSEOperationsManual Year:2015 PAGE: 33
f. LoosenandremovetheclampfromthedrawoffassemblyonthesyruppanthenremovetheTeflongasketanddrawoffassembly.Asyoutakeofftheclamp,thedrawoffassemblyandTeflongasketwillneedtobeheldsoasnottodropthem.
g. Loosenandremovetheclamponthesyruppansideoftheu‐tube.RemovetheTeflongasket.Loosenbutdonotremovetheclamponthefluepansideoftheu‐tube.
h. Turnthepan180osothedrawoffferruleisnowthesyruppanu‐tubeconnectionferrule.
RE‐ASSEMBLE
NOTE:LEADEREVAPORATORoffersanupgradetotheWSE(LEADEREVAPORATORpartnumber390002),whichreplacestheu‐tubewithaconnectorincludingabutterflyvalve.Ifthisupgradeisinstalled,thebutterflyvalvecanbeclosedandthefluepandoesnotneedtobedrained.Thislessenstheeffectstothegradientintheevaporator.SeeATTACHMENT#2forinstallationandusageinstructions.
i. Slidethefloatboxsupportintothesyrupboxbracket
j. Reconnecttheu‐tubebysecuringwithaTeflongasketandclamp.
k. ReconnectthedrawoffassemblywithaTeflongasketandclamp.
l. Refilltheevaporatorwiththesapdrainedoffatthestartoftheprocedure.
m. Tightenthethumbscrew(atstepi).

WSEOperationsManual Year:2015 PAGE: 34
MAKING SYRUP
1. Setthefloatsothelevelofsapoverthefluesis1”indepth.Tosetthedepthusingthefloat,loosenthethumbscrewonthesideofthefloatshaftcollar.Raisethecollartolowerthelevelofthesap.Lowerthecollartoraisethelevelofthesap.Tightenthethumbscrewwhentheproperlevelisset.
2. Loadthearchforfiring.Itissuggestedyoustartwithasmallloadofwood(approximately1/3offull)untilthishasbeguntoburnthenfinishloadingthearch.
CAUTION:Usecarewhenloadingwoodintothearch.Donothittheflueswiththewood.
5. Asthefluepanstartstoboil,addthree(3)dropsofdefoamer(basedonATMOS300)tothefluepanonthefloatboxside.Defoamershouldbeaddedclosetotheinletfromthefloatbox.Openthesapfeedvalveonyoursapsourceline.
6. Asthesyruppanisboiling,watchforfoamhigherthanthecompartmentdividerofthepan.Ifthefoamishigherthanthedivider,add1dropofdefoamertothesyruppansyrupcompartmentdirectlyinfrontofthedrawoffvalve.Iftheproblemrepeatsincreasetheamountofdefoamerusedinthefluepan.Itwilltake15to20minutesbeforeanychangeisnoted.REMEMBERyouaretryingtostopthefoamingnottheboiling.
7. Thesapinthesyrupcompartmentofthesyruppanmustbeboileduntilitreaches7.0°Fto7.5°Fabovetheboilingpointofwater(thedrawofftemperature).Theboilingpointofwaterisnotaconsistentpoint.Thereforethefollowingistherecommendedmethodfordeterminingthedrawofftemperature.
3. Fullyopenthedraftdoorandlightthefire.
4. Whenthewoodhasbeguntoburnloadthewoodintothearchuntil½to⅔ full.Adjustthedraftdoorsotheairenteringthearchallowsforaconsistentburnofthewoodandaconsistentboil.

WSEOperationsManual Year:2015 PAGE: 35
8. Drawoffthesyrupintoacontainer.Youshouldopenthevalveandallowapencilsizestreamofsyruptoflow,maintainingthetemperatureatthe“7”markaslongaspossible.Whenthetemperaturestartstodropbelowthe“7”mark,closethedrawoffvalve.
9. Checkyourincomingsap,atthefloatbox,toensureitisflowingproperly.
10. Ifyouhavenotdeterminedthefiringinterval,monitoryourboil.Checkthestackthermometertomaintainthetemperaturebetween650oFand800oFDeterminehowlongittakesbetweenfiringstokeepthetemperatureintherightrangethenusethattimeasyourfiringinterval.Theuseofatimingdevicewithanaudiblealarmtonotifyyouwhentofiretheevaporatorisrecommended.Adjustyourintervalasnecessarytomaintainasteadyboil.Thefiringintervalshouldbebetween5and10minutesdependingonthewoodbeingused.
DAILY SHUTDOWN 1. Therearetwofactorsinfluencingtheshutdownoftheevaporator;timeandsapvolume.
a. Itwillrequireapproximately1hourfromthelastfiringtobringthefiredowntoembers(coalsonthegrates).
b. Itwillrequireavolumeofsapfromthelastfiringtoembersandtofloodthearchsoensurethereisadequatevolumeleftpriortothelastfiring.
i. 2X4WSEwillrequire20gallonsofsapafterthelastfiringii. 2X6WSEwillrequire25gallonsofsapafterthelastfiring
2. Afterthelastfiringandthelastsyrupdraw(theremaybe1to2drawsafterthelastfiring)drawoff1to1–½gallonsof“sweet”fromtheevaporatorintoacleancontainer.Setthecontainerasideandcoverit.
3. Continuetomonitorthearchasdonefornormaloperationsbutdonotaddanyadditionalwood.Ifyouwanttohastentheshutdown,raketheburningmaterialinthefireboxtoaidtheflowofoxygen.
4. Whenthereisnomoreboilineitherpanandthefireisdowntocoalsonthegrates,addsapuntilthepansareatadepthof2”.Thisisdonebyholdingthefloatdownorbylooseningthefloatcollarandloweringit.Ifthesapremainingdoesnotcoverthepanstothe2”depththenaddclean,non‐chlorinated,potablewateruntilthedepthisreached.
NOTE:Theextrasapdepthisrequiredastheinsulationofthearch(ex.bricks)willholdheatandcontinuetheevaporationprocessuntiltheheathasbeendissipated.
a. Priortousingtheevaporator,installathermometerinthesyruppan.Thepreferredmodelismountedinthe¼”threadedfittingnearthedrawoff.Rotatethe“7”soitisstraightdownforeasierviewingstandingnexttotheevaporator.
b. Asthesapbeginsboilinginthesyruppan,monitorthethermometer.Thethermometerneedlewillneedtogoaroundcompletelyonceandcomebacktothe“7”markonthethermometer.
c. Whenthe“7”markisreached,useahydrometertotestthedensityofthesyrup.SeeATTACHMENT#1ontheuseofahydrometer.
d. Adjustthethermometerto“7”whenthehydrometerindicatesthesapinthepanhasturnedtosyrupi.e.isatthe“HOTTEST”mark.Toadjustthethermometer,placetheAllenwrench,providedwiththethermometer,intothescrewandturnuntilthe“7”alignswiththeneedle.

WSEOperationsManual Year:2015 PAGE: 36
MAINTENANCE DAILY –priortoperformingmaintenancemakesurethesurfaceshavebeencooled.
1. Removespillsandsplashesfromthepanbywipingwithhotwater.2. FollowthestepslistedintheabovesectiontitledSYRUPPANREVERSAL3. CleanouttheashchamberandtheslotsinthegratesNOTthe“V”groovesofthegrates.4. Checkallfittingsforleakage.Repair/replaceasnecessary.
PERIODIC 1. Usingthesuppliedbrushandrod,brushtheundersideofthefluepantoremoveaccumulatedmaterial.
Cleaningwillallowtheheattobetterreachthesapinthepan.2. Inspecttherailgasketandpangasketforareaswhereheatandsmokemaybeescaping.Replaceif
necessary.3. Ifexcessiveniterandsugarsandiscoatingthesurfacesofthepanswithscale,cleanthepanswithapan
cleanersuchasLEADEROrder#63006(1quartsize).Thedirectionsareasfollows:a. Addwatertothepansuntilthecoatingtoberemovediscoveredwithwater.b. Add1quartofconcentratedpancleanerforeach40gallonsofwaterinthepans.c. Heatthesolutiontosimmeringandkeepatthatlevelforonehourandthescaleisnotedtodissolve.d. Wearingprotectivegloves,brushtheloosescale.e. Ifscaleisremovedflushthepanswithwater.Ifthescaleisthickyoumayneedtocontinue
simmeringthesolutioninthepan.f. Whenthescalehasbeenremoved,drainoffthesolution,fillthepanswithcleanwater.Add2
poundsofbakingsodato200gallonsofcleanwater.Heattoalightboil,brushthepans,andemptythewaterfromthepans.
g. Ensureallsolutionisrinsedfromthepans.
END OF SEASON NOTES:
Donotallowsaporacidsolutionstosoakinthepansformorethan24hours. UseONLYcleanersstatedtobeformaplesyrupequipment. Neverstoreortransportthefluepanupsidedown.
1. CleanthepanswithapancleanersuchasLEADEROrder#63006(1quartsize).Thedirectionsareasfollows:
a. Addwatertothepansuntilthecoatingtoberemovediscoveredwithwater.b. Add1quartofconcentratedpancleanerforeach40gallonsofwaterinthepans.c. Heatthesolutiontosimmeringandkeepatthatlevelforonehourandthescaleisnotedtodissolve.d. Wearingprotectivegloves,brushtheloosescale.e. Ifscaleisremovedflushthepanswithwater.Ifthescaleisthickyoumayneedtocontinue
simmeringthesolutioninthepan.f. Whenthescalehasbeenremoved,drainoffthesolution,fillthepanswithcleanwater.Add2
poundsofbakingsodato200gallonsofcleanwater.Heattoalightboil,brushthepans,andemptythewaterfromthepans.
g. Ensureallsolutionisrinsedfromthepans.2. Disassemblepanconnections.Inspectallsealsandgaskets.3. Discardtherailgasketandpangasket.4. Inspectthebrickandcement.Replacemissingordamagedbricksorloosecement.5. Cleanthegrates.6. Raisethefluepanoutofthearchandfinishdraining.7. Thoroughlybrushthesootfromthefluesofthefluepan.

WSEOperationsManual Year:2015 PAGE: 37
8. Set2X4sacrosstherailofthearchwherethefluepanisusuallyplacedthensetthefluepanrightsideuponthe2X4s.
9. Set2X4sacrosstherailofthearchwherethesyruppanisusuallyplacedthensetthesyruppanrightsideuponthe2X4s.
10. Coverthepansandarchwithplasticoratarp.
BEGINNING OF SEASON STARTUP 1. Removethecoverandtakethepansand2X4sofffromthearch.2. Installanewrailgasket.3. Placethepansonthearchandinstallanewpangasketbetweenthepans.4. Assemblethepanconnections(ex.Draw‐off,u‐tube)andfloatbox.5. Wipeand/orrinseoutthepans.6. Whenfillingthepansforthefirsttimecheckallfittingsforleakageandrepairifnecessary.
FEEDBACK Pleaseusethefollowinge‐mailaddress([email protected])tosuggestimprovementsorentercommentsonthisdocument.Referencethedocumenttitleinyournote.YoumayalsocontactLEADERCustomerService.NOTES

WSEOperationsManual Year:2015 PAGE: 38
ATTACHMENT #1: HYDROMETER USAGE HYDROMETER FUNCTION Ahydrometerworksbasedonthedensityofthemaplesyrup.Therearetwoscalesonthehydrometer;BrixandBaume.TheBrixscaleindicatesthepercentageofsugarinthemaplesyrup.TheBaumescaleisameasureofhowdensethemaplesyrupisrelatedtothedensityofwater.Thecorrectdensityformaplesyrupisaminimumof66%sugar(66°Brix/35.6°Baume).Youwillneedtoverifyyourstate’srulesandadjustyourreadingsasnecessary.ThehydrometerssuppliedbyLEADEREVAPORATORhavebeencalibratedattwotemperatures;60°FColdTest(66.9°Brix/36°Baume)and211°FHotTest(59.1°Brix/32.1°Baume).Themaplesyrupisexpectedtobeattheuppertemperaturewhenitismeasuredimmediatelyafterbeingdrawnofftheevaporator.
NOTE:HydrometersfromLeaderEvaporatorbylawarecalibratedbytheStateofVermont..TheHOTandCOLDtestlinesshouldbeconsideredguidelines.HydrometersshouldonlybeusedbyreadingtemperatureandBrix/Baumereadings.
USE OF A HYDROMETER NOTE:Hydrometersareveryfragile.Twomostsusceptiblepointsofdamageduringusearethebottomandwherethestemmeetsthebody.Takeextremecarewhenhandlingahydrometer.
Ashydrometersaresusceptibletodamageitisrecommendedthesugarhousehaveaspare.
Preparing A New Hydrometer For Use: 1. Unpackthehydrometerfromitstubeorbox.
2. Carefullyinspectthehydrometerforanybreakage.Ifyoususpectanycracks,fillyourtestcupwithhotwaterandimmersethehydrometer.Ifitleaksthenitisdamagedandcan’tbeused.
3. Placethehydrometerinitsoriginalcontainerseatedinthepackagingandmarkthecontainerwherethebottomofthehydrometeraligns.
4. MarkthecontaineratthesamelinesastheHOTandCOLDtestlinesinthehydrometer.Whenusingthehydrometerinthefuturetheselinesareachecktoensurethescaleinsidethehydrometerhasnotmoved.
Using The Hydrometer 1. Priortousingthehydrometerfortheday,placeitintoitsoriginalcontainerandcheckthehydrometerlines
againstthelinesyoumarkedonthecontainer.Iftheydonotmatchthenreplacethehydrometer.
2. Ensurethehydrometeriscleanpriortoeveryuse.Accumulatedmaterialonthehydrometerwillcausethehydrometerreadingstobeincorrectasitwillhaveextraweightandnotfloataseasily.
3. Holdthetestcupupright.Fillthetestcupupto½”to¾”fromthetopwiththesyruptobetestedorfromthesyrupcompartmentofthesyruppan.DONOTHAVETHEHYDROMETERINTHECUP.
4. Donotallowthesyruptocool.Placethecuponalevelsurface.Immerseathermometerintothetestcup.Slowlyimmersethehydrometerintothesyrupinthetestcupuntilitreachesthe“HOT”testmarkthencarefullyreleaseit.NEVERDROPTHEHYDROMETERINTOTHETESTCUP.
5. Readthetemperaturefromthethermometer.

WSEOperationsManual Year:2015 PAGE: 39
6. ReadtheBrixorBaumenumberfromthehydrometer.
NOTE:TocorrectlydeterminetheBrix/Baume,youneedtoreadfromthelineofthesyrup.
LEADEREVAPORATORHydrometers:HydrometersfromLEADEREVAPORATORarecalibratedbytheStateofVermontattwotemperatures;60°FColdTest(66.9°Brix/36°Baume)and211°FHotTest(59.1°Brix/32.1°Baume).Afternumerousmeasurementsitwasdetermined211°Fistheaveragetemperatureofsyrupwhenmeasuredimmediatelyafterdraw‐offfromtheevaporator.Whencheckingsyrupat211°F,thesyrupisattheproperconcentrationwhenthereadinglineisattheHotTestline.IftheHotTestLineisbelowthereadinglineoftheliquid,continuetoboilasthesyrupis“light”.IftheHotTestLineisabovethereadinglineoftheliquid,thesyrupis“heavy”andwillneedtobedilutedwithsap.
7. Refertothecharttodetermineifyoursyrupis“light”or“heavy”.Ifthereadingishigherthanthenumberonthetableyoursyrupis“heavy”andwillneedtobediluted.Ifthenumberislowerthanthenumberinthetable,thesyrupis“light”andwillneedtobeboiledmore.
8. Afterreadingthehydrometer,removeitfromthetestcupandrinseitwitheitherhotwaterorhotsapto
ensureitisclean.Dumpthecontentsofthetestcupintothesyrupcompartmentofthesyruppanorbackintoit’sstoragecontainer.Rinsethetestcupwithhotsaporhotwater.
9. Duringtheboilingperiod,storethehydrometerinacontainerofcleanhotwaterorhotsap.
TEMPERATURE °F
Degrees Baume
Degrees Brix
209 32.0 59.0
202 32.25 59.6
193 32.5 60.0
185 32.75 60.4
176 33.0 60.9
167 33.25 61.4
158 33.5 61.8
149 33.75 62.3
140 34.0 62.8
130 34.25 63.3
120 34.5 63.8
110 34.75 64.3
100 35.0 64.8
90 35.25 65.4
80 35.5 65.9
70 35.75 66.4
60 36.0 66.9
50 36.25 67.4

WSEOperationsManual Year:2015 PAGE: 40
ATTACHMENT #2: INSTALLATION AND USAGE OF THE WSE UPGRADE BUTTERFLY TheWSEbutterflyupgradeprovidesavalvetoclosetheconnectionbetweenthefluepanandthesyruppan.Thiseliminatestheneedtodrainthefluepanwhenreversingorcleaningthesyruppan.Closingthevalveadditionallyhelpsmaintainthegradientascloseditminimizesthereverseflowofsaptothefluepan.
INSTALLATION NOTE:DoNOTinstallthisvalveontothepanswithoutfirstdisassembling.Ifnotfullydisassembledtherubbersectioncannotbealignedproperlyandwillbedamaged.
1. Removetheu‐tubebylooseningandremovingtheclamps.Holdtheu‐tubewhenremovingtheclampssothetubeandtheTeflongasketsarenotdropped.
2. Disassemblethebutterflyvalveasfollows:
a. Usingthesupplied3MMhexwrenchloosenandremovethehandle.
b. Loosen/removethewingnutsand
removethebolts.
c. Removethetopandbottomsections
ofthevalve.
d. Removetherubbersectioncontaining
theflapper.

WSEOperationsManual Year:2015 PAGE: 41
Flapperinclosedposition
3. AttachtheupgradetubetothesyruppanusingoneoftheclampsandTeflonwashersfromtheu‐tubethatwasremoved.Theendtobeconnectedtothesyruppanislongeraftertheelbow.Donotfullytightentheclamp.
4. AligntheupgradetubewiththeFLUEpanferrule.
Inserttherubbersectionbetweentheupgradetubeandthefluepanferrule,ensuringthetopoftheshaft(topissquare)isuprightandtheshaftinsertisinplace.Makenoteofthepositionoftheflapperintherubberassemblyi.e.isitacrossor90ototheassembly.Awayofdoingthisistouseamarkerandmarkthetopsideoftheshaftandthesamesideastheflapper.Inordertomakethecompletionoftheassemblyeasier,itissuggestedyousetandmaintainthevalveflapperintheclosedposition(flapperandrubberareparallel).
5. Placethetopsectionofthevalveassemblyovertheshaft.Ensurethegroovesinthesectionarelinedupwiththeferrulesofthefluepanandtheconnectortube.
6. Placethebottomsectionovertheshaft.Ensurethebottomsectiongroovesarelinedupwiththeferruleofthefluepanandtheconnectortube.Paycarefulattentiontoensuretheinsertispresentinthesectionandtheshaftisinsertedintoit.Holdthesectioninplace.
BottomClamp–notethegroovesandtheshaftinsert

WSEOperationsManual Year:2015 PAGE: 42
USAGE Thefollowingisamodificationofthesyruppanreversalproceduredetailedearlierinthedocument.
STEP1:DISASSEMBLE
a. Attheendoftheday,whilestillhot,drawoff1to1½gallonsof“sweet”fromthesyruppanandsetaside.
b. Allowtheevaporatortocool.Closetheupgradevalveonthefluepan,openthedrawoffvalveonthesyruppananddrainthesapfromthesyruppanintocontainers;approximately5gallons.
c. Ifthepaniscoolyoucanwipeoutanyloosematerialusingcleancloths.
7. Insertthetwoboltswiththeboltheadontop.Threadthewingnutsontotheboltsthentighten
8. Placethehandleontotheshaftpointinginthesame
directionastheflappervalve.Ifyouhavemaintainedtheflapperparalleltotherubberassemblythenthehandleshouldbemountedatrightanglestothevalve.Tightenthehandlewitha3mmhexwrench.Makesurethehandleopensawayfromthepan.
d. Removethethumbscrewsecuringthefloatboxbracketfromthesyruppanmountandthreadintothemountontheoppositesideofthesyruppan.
e. Ifyouhaveinstalledasingledialthermometer,removeitfromit’spositionnearthedrawoffvalveandinstallitinthe¼”threadedfittingontheoppositesideofthepan.Plugtheemptythermometerfittingwitha¼”plug.
f. LoosenandremovetheclampfromthedrawoffassemblyonthesyruppanthenremovetheTeflongasketanddrawoffassembly.Asyoutakeofftheclamp,thedrawoffassemblyandTeflongasketwillneedtobeheldsoasnottodropthem.

WSEOperationsManual Year:2015 PAGE: 43
g. Loosenandremovetheclamponthesyruppansideoftheupgradeassembly.RemovetheTeflongasket.Donotremovetheupgradeassemblyonthefluepanside.
h. Turnthepan180osothedrawoffferruleisnowthesyruppanupgradeassemblyconnectionferrule.
STEP2:RE‐ASSEMBLE
i. Slidethefloatboxsupportintothesyrupboxbracket.
j. ReconnecttheupgradeassemblybysecuringwithaTeflongasketandclamp.
k. ReconnectthedrawoffassemblywithaTeflongasketandclamp.
l. Closethedrawoffvalveandrefillthesyruppanwiththesapdrainedoffatthestartoftheprocedure.
m. Tightenthethumbscrew.
n. Opentheupgradevalvetothefluepanandaddsapasnecessarytobringtheevaporatoruptotheoperatinglevel.
NOTE:Ifusingonlyasinglethermometerandyouhavenotreversethepositioning,refertostepe.