writing the visual kinesthetic and auditory alphabet free sample
TRANSCRIPT

8/12/2019 Writing the Visual Kinesthetic and Auditory Alphabet FREE SAMPLE
http://slidepdf.com/reader/full/writing-the-visual-kinesthetic-and-auditory-alphabet-free-sample 1/9
By Sarah K Major
Writing
the
Visual, Kinesthetic, and Auditory
Alphabet
chris russ (order #3205345)

8/12/2019 Writing the Visual Kinesthetic and Auditory Alphabet FREE SAMPLE
http://slidepdf.com/reader/full/writing-the-visual-kinesthetic-and-auditory-alphabet-free-sample 2/9
Writing the
Visual, Kinesthetic, and Auditory
Alphabet
By Sarah K Major
www.child-1st.com
Tips for teaching the alphabet using visual and kinesthetic cues.
For teaching resources for visual and other right brained learners, visit www.child-1st.com.
chris russ (order #3205345)

8/12/2019 Writing the Visual Kinesthetic and Auditory Alphabet FREE SAMPLE
http://slidepdf.com/reader/full/writing-the-visual-kinesthetic-and-auditory-alphabet-free-sample 3/9
Writing the Visual, Kinesthetic, and Auditory Alphabet
Ages 4 and up.
© 2006 Sarah K MajorPrinted in the United States of America
ISBN: 978-0-9829873-2-2
Design, lessons, illustrations: Sarah K Major
Published by Child1st Publications, LLC
3302 South New Hope RoadSuite 300B
Gastonia, NC 28056
www.child-1st.com
All rights reserved. The reproduction of this book for any reason is strictly
prohibited. No form of this work may be reproduced, transmitted or recorded
without written permission from the publisher.
Other titles by this author:Kid-Friendly Computation series: Addition & Subtraction, Place Value, and
Multiplication & Division. The Illustrated Book of Sounds & Their Spelling
Patterns, Alphabet Tales, and the Easy-for-Me™ Books series.
Other educational work: Child1st stylized sight words and alphabet.
chris russ (order #3205345)

8/12/2019 Writing the Visual Kinesthetic and Auditory Alphabet FREE SAMPLE
http://slidepdf.com/reader/full/writing-the-visual-kinesthetic-and-auditory-alphabet-free-sample 4/9
3
WHY INCLUDE VISUAL & KINESTHETIC ELEMENTS?
Young children learn most easily when material is presented in a way that is
closely tied to movement and visual objects with which they are familiar. If we
incorporate purposeful movement and visuals into our teaching, we will go a
long way toward preventing learning problems.
Traditionally, teachers have asked their students to just remember how certain
symbols are formed, whether letters or numbers. This approach works for some
but falls short of what others need in order to learn.
To ensure success with all learners, we have chosen to approach writing the
alphabet by using motions that are familiar to young children and by using
wording that allows the child to imagine actually doing what they hear you say. A
very important note: These motions are not the only way to teach the alphabet.
In fact, learning will be far better if you make a practice of asking your children
how they can move to look like the letter you are studying.
What follows is a sample of handwriting that illustrates the need to give young
children the kinds of helps we share in this book. The writing sample is from my
daughter, Melissa.
Melissa
Morgan
Malburg
Age 3;
circa 1985.
Following are some helps included in this book that would have provided
Melissa with memory cues on how to form the problem letters: M is like
mountains that start on the ground. E has 3 tables that come out from the top
of the head, at the belly button and at the feet. S is two stacked caves, facing
different directions. Even very young children know their heads, belly buttons
and feet; they know about climbing mountains or hills; they know about sliding
down. Because these things are a part of their world, they become simple
helps that make all the difference!
chris russ (order #3205345)

8/12/2019 Writing the Visual Kinesthetic and Auditory Alphabet FREE SAMPLE
http://slidepdf.com/reader/full/writing-the-visual-kinesthetic-and-auditory-alphabet-free-sample 5/9
4
TEACHING BY SOUND, NOT LETTER NAME
When I rst teach the alphabet to young children, I do not teach letter names.
I instead use only the sound of the letter. For instance, the letter A does not
say “Ay” but rather is an individual sound that is heard at the beginning ofwords like “ant” or “Abigail.” Young children learning to read don’t need to know
the names of the letters. A word is made up of sounds that are put together
meaningfully to form a word, not made up of collections of letter names.
Some children become hopelessly lost in the process when they are asked to
learn the letter names rst, then learn the name of an object that represents
each letter, and THEN learn the sounds. They don’t know how to manage all
that information that, to them, seems unrelated and without purpose. If we
simplify the process for them and let them understand that words are made
of sounds, and those sounds are represented by symbols called letters, they
have far less to manage. I have found that they somehow learn the letter
names along the way. I’ve never met a child yet who learned the sounds but
could not call the name of the letter.
TO MEMORIZE OR NOT TO MEMORIZE THE ALPHABET
After several years of working with young children in learning the alphabet,another practice I abandoned was the emphasis on learning the alphabet
in sequence rst of all. Although I had an ABC displayed on the wall of the
classroom, I did not feel it was best practice to insist that all children learn to
recite the alphabet by heart before starting to teach them to read.
Children can successfully start right out putting sounds together and making
small words, and in doing so, understand WHY we learn letters and sounds!
The relevance is there that jump-starts them in their process of learning
to read. My practice is to be very simple, very clear, and very purposefulin what I teach young children and in what I ask them to learn. The Easy-
for-Me™ Teaching Manual is the product of experiencing real success with
this simplied process of teaching reading to early learners. This simplied
approach helped them avoid the difculties many children face that often result
in failure and discouragement.
chris russ (order #3205345)
8/12/2019 Writing the Visual Kinesthetic and Auditory Alphabet FREE SAMPLE
http://slidepdf.com/reader/full/writing-the-visual-kinesthetic-and-auditory-alphabet-free-sample 6/9
5
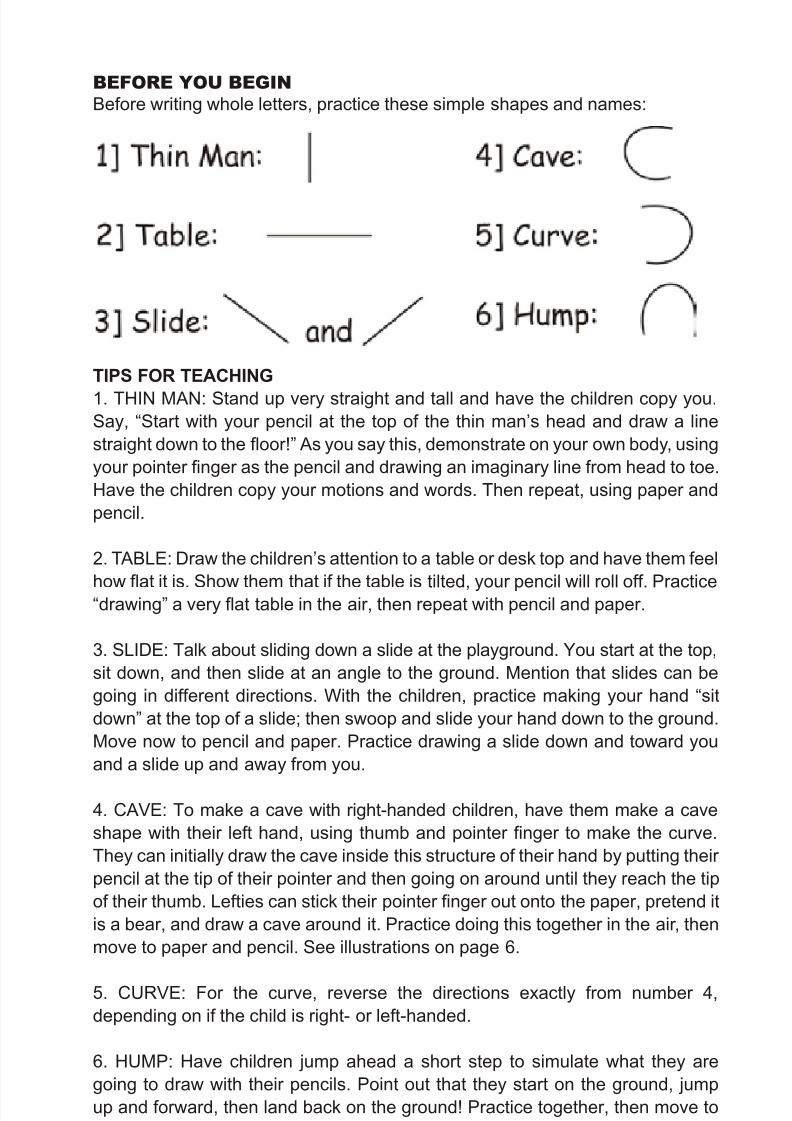
BEFORE YOU BEGIN
Before writing whole letters, practice these simple shapes and names:
TIPS FOR TEACHING
1. THIN MAN: Stand up very straight and tall and have the children copy you.
Say, “Start with your pencil at the top of the thin man’s head and draw a line
straight down to the oor!” As you say this, demonstrate on your own body, using
your pointer nger as the pencil and drawing an imaginary line from head to toe.
Have the children copy your motions and words. Then repeat, using paper and
pencil.
2. TABLE: Draw the children’s attention to a table or desk top and have them feel
how at it is. Show them that if the table is tilted, your pencil will roll off. Practice“drawing” a very at table in the air, then repeat with pencil and paper.
3. SLIDE: Talk about sliding down a slide at the playground. You start at the top,
sit down, and then slide at an angle to the ground. Mention that slides can be
going in different directions. With the children, practice making your hand “sit
down” at the top of a slide; then swoop and slide your hand down to the ground.
Move now to pencil and paper. Practice drawing a slide down and toward you
and a slide up and away from you.
4. CAVE: To make a cave with right-handed children, have them make a cave
shape with their left hand, using thumb and pointer nger to make the curve.
They can initially draw the cave inside this structure of their hand by putting their
pencil at the tip of their pointer and then going on around until they reach the tip
of their thumb. Lefties can stick their pointer nger out onto the paper, pretend it
is a bear, and draw a cave around it. Practice doing this together in the air, then
move to paper and pencil. See illustrations on page 6.
5. CURVE: For the curve, reverse the directions exactly from number 4,
depending on if the child is right- or left-handed.
6. HUMP: Have children jump ahead a short step to simulate what they are
going to draw with their pencils. Point out that they start on the ground, jump
up and forward, then land back on the ground! Practice together, then move to
doing it with paper and pencil.
chris russ (order #3205345)

8/12/2019 Writing the Visual Kinesthetic and Auditory Alphabet FREE SAMPLE
http://slidepdf.com/reader/full/writing-the-visual-kinesthetic-and-auditory-alphabet-free-sample 7/9
6
CATEGORIES OF LETTERS
The alphabet may be grouped into categories based on how each letter is
formed. What follows is one way of grouping the letters. It might be a good idea
to work on the letters in one group before moving on to the next group.
Cave Letters: a, c, d, e, g, o, q, sChildren will make a cave like this:
Bear or Peanut Letters: p, b
The letters for “peanut butter” are made this way.
Slide Letters: k, M, N, v, w, x, y, z
Thin Man Letters: F, H, i, j, l, THump Letters: u, (h, n, m, r)
Combo Letter: R
Left-handed children can make a bear with their right
pointer nger and draw the cave around the bear!
Left-handed children can make a cave with their right
hand and draw the letters inside the cave!
chris russ (order #3205345)

8/12/2019 Writing the Visual Kinesthetic and Auditory Alphabet FREE SAMPLE
http://slidepdf.com/reader/full/writing-the-visual-kinesthetic-and-auditory-alphabet-free-sample 8/9
7
HAND MOTIONS:
WRITING:
Uppercase: “Start on the ground and climb to the top of the hill
(make a slide going up and away from you), then sit down and
slide down to the ground (make a long slide going down away
from you). Next, make a table straight through the middle”. Or“Climb up, slide down, then make a table through the middle.”
Lowercase: “Start by making a cave, but instead of leaving the
door open, make your pencil go all the way back up to the top to
close the opening. Then without lifting your pencil, come straight
back down to the ground (make a thin man).”
FOLLOW-UP ACTIVITY:
Give the children a sheet of paper and crayons. Let them draw
large capital A’s and make believe they are anthills. They can
draw ants crawling up and down the sides. If you want a more
involved project, let the children draw a large A and then brush
glue right over the two sides with a Q-tip. They can then sprinkle
sand over the glue and allow to dry before drawing their ants!
Aa
chris russ (order #3205345)

8/12/2019 Writing the Visual Kinesthetic and Auditory Alphabet FREE SAMPLE
http://slidepdf.com/reader/full/writing-the-visual-kinesthetic-and-auditory-alphabet-free-sample 9/9
ABC-W www.child-1st.com
Writing the Visual, Kinesthetic, and Auditory Alphabet is a multisensoryresource designed for those teaching children to form their letters.
Includes:
• teaching tips for forming letters
• hand motions for each letter to help hands-on learners remember
• activities for each letter to deepen learning
• tips for preventing backwards letters
Writing the Visual, Kinesthetic, and Auditory Alphabet is best used with
other SnapLetters™ alphabet materials, including Alphabet Tales and
SnapLetters™ Teaching Cards, since all the materials rely on similar visuals
and body motions for teaching the alphabet.
“I highly recommend this book! I use this as part of our preschool and
Kindergarten curriculum and my kids love it. Clear, concise illustrations and
instructions are given for each letter and forming them with your hands is
simple. I’m so glad I found this for my visual learners. Watching them write
with plain old paper and pencil is pretty awesome. It seems like they are
almost teaching themselves how to write!” Amy C.