working with wood & tools working plans · working with wood & tools working plans you can...
TRANSCRIPT
Working with Wood & Tools
Working PlansYou can make any of the following items, or
some of your own. Change the drawings or use other materials if you like. Your project leader will have some ideas, too.
There are several ways to make each article. Use the skills you have learned to experiment a little, or ask your project leader for advice on how to proceed. The most important thing is that you have fun, and do your woodworking safely!
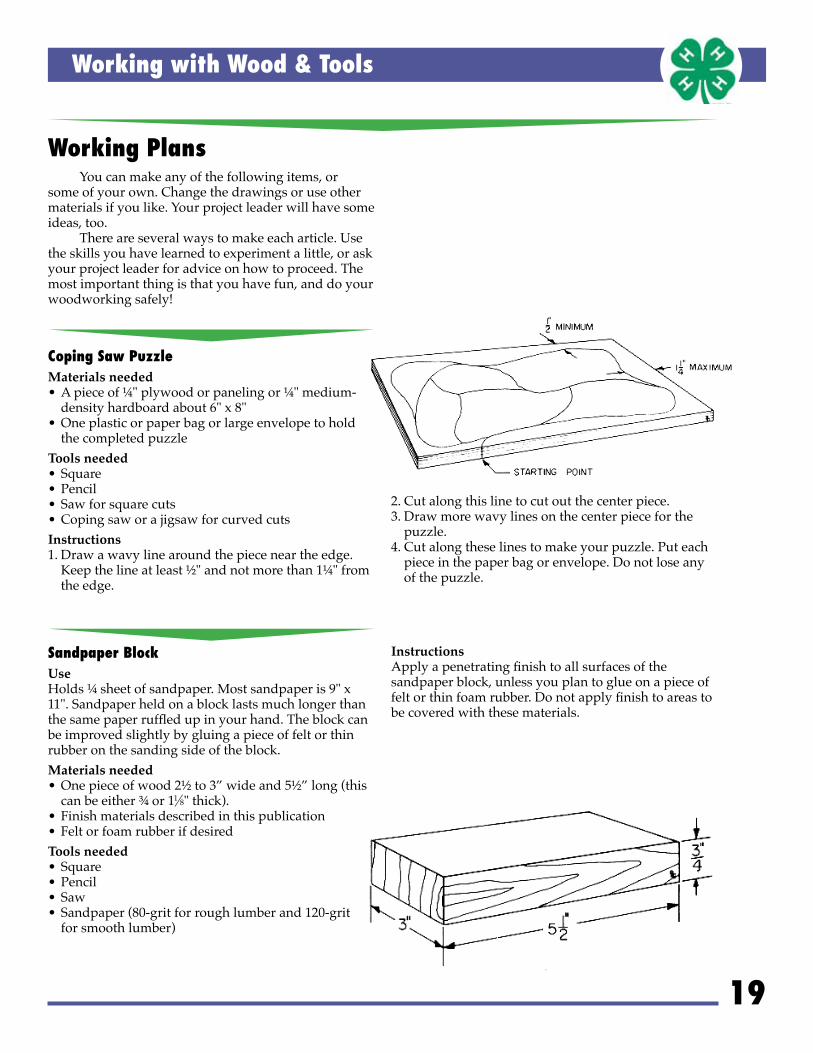
Coping Saw PuzzleMaterials needed• A piece of ¼" plywood or paneling or ¼" medium-
density hardboard about 6" x 8"• One plastic or paper bag or large envelope to hold
the completed puzzleTools needed• Square• Pencil• Saw for square cuts• Coping saw or a jigsaw for curved cutsInstructions1. Draw a wavy line around the piece near the edge.
Keep the line at least ½" and not more than 1¼" from the edge.
19
2. Cut along this line to cut out the center piece.3. Draw more wavy lines on the center piece for the
puzzle.4. Cut along these lines to make your puzzle. Put each
piece in the paper bag or envelope. Do not lose any of the puzzle.
Sandpaper BlockUseHolds ¼ sheet of sandpaper. Most sandpaper is 9" x 11". Sandpaper held on a block lasts much longer than the same paper ruffled up in your hand. The block can be improved slightly by gluing a piece of felt or thin rubber on the sanding side of the block.Materials needed• One piece of wood 2½ to 3” wide and 5½” long (this
can be either ¾ or 11⁄8" thick).• Finish materials described in this publication• Felt or foam rubber if desiredTools needed• Square• Pencil• Saw• Sandpaper (80-grit for rough lumber and 120-grit
for smooth lumber)
InstructionsApply a penetrating finish to all surfaces of the sandpaper block, unless you plan to glue on a piece of felt or thin foam rubber. Do not apply finish to areas to be covered with these materials.

Working with Wood & Tools
20
Nail Point DesignUseMade from ¾" or thinner lumber, the design can be used as a hot-pad or wall plaque. Made from a piece of material 1½" thick, or thicker, it can be used as a paperweight or a decorative object for a shelf.Materials needed:• A piece of lumber about ¾" x 5½" x 5½" • Smoothing or sanding materialsTools needed• Saw• Square• Pencil• Hammer• Plane, wood-forming tool, wood rasp, or coarse
sandpaper if you plan to slope or bevel the edges• 1" wire nails to form a fine line of nail point holes• Six-penny nails to form a medium line of nail point
holes• Ten-penny nails to form a heavy line of nail point
holes• Sandpaper (80-grit for rough wood and 120-grit for
smooth wood)Instructions1. Use your hammer and nails to make lines of nail
point holes to replace your pencil lines.2. Use the sandpaper to sand off the pencil lines. Brush
the dust out of the nail point holes.
Letter Holder Materials needed• One piece of 1 x 2 (actual dimension approximately
¾" x 1½") 6" long• Enough plywood or paneling to cut two pieces each
4" x 6"• Eight 1-inch wire brads• Glue• Smoothing or sanding materials described in this
manualTools needed• Square• Pencil• A saw for square-cuts• A coping saw or jigsaw for curve cuts• Pencil compass• Hammer• Nail set• Sandpaper (80-grit for rough wood and 120-grit for
smooth wood)Instructions1. Cut the center piece to measure 6" long.
2. Mark the cutout lines for the side pieces. Remember, most plywood and paneling has one side better than the other side. Arrange your pieces so the best side of the plywood will be the outside of both the front and back piece. You may want to nail both pieces together and cut them at the same time.
Other ideas• Add designs or decals to the side pieces.• Use different material and change the shape.• Make it larger so it can serve as a napkin holder.

Working with Wood & Tools
21
Wire WiggleyUseYour wire wiggley can have many uses. It can be a table decoration or a paperweight. It can be a decorative ornament to place on a shelf. You also can make it a pencil holder.Materials needed• A piece of wood about ¾" thick and 2½" x 2½" for
base• About 2 feet or so of 19-gauge bright or annealed
iron wire• Sanding and smoothing materials described in this
publicationTools needed• Square• Saw• Pencil• A wire brad, or a wire nail of the same wire gauge as
the wire used, to punch a hole in the block to insert the end of the wire.
• Hammer• Sandpaper (80-grit for rough wood and 120-grit for
smooth wood)Instructions1. Bend your wire to the desired shape.2. Decide where you want one or both ends of the
wire to stick into the wooden base. Make a hole for the wire about 3⁄8" deep into the wood using your hammer and wire nail. Be careful not to mar the wood when you pull out the nail.
Consider making changes in this plan1. Use two or more pieces of wood of different sizes for
the base.2. Slope or gauge out different areas of the end of the
base.3. Use fine aluminum or brass welding rod as a wire.
You may have to use a pair of pliers to bend the rod.

Working with Wood & Tools
22
StiltsMaterials needed• A 1 x 6 at least 10" long• Two pieces of 1 x 2s (pine, fir, or other wood) around
5' long• Six 2-inch nails• Paint or varnish (optional)Tools needed• Square and pencil • Cutting saw • HammerInstructions1. Saw two pieces from a 1" x 6" board as shown in the
diagram. Your final pieces should each measure 3½" and 2" across, and 10" long on the side that touches the pole.
2. Nail these parts to the 5' poles with 6-penny finish nails 2" long. Place each nail 4" apart, the first and last nail being 1" from the edge of the wood. Drive the nails up tight and flush with the surface.
3. A finish is not necessary, but paint or varnish will protect the wood and improve appearance.
4. The length of stilts and height of steps may be changed to suit your size.

Working with Wood & Tools
23
Rabbit PuzzleUseMakes a great present for your brother or sister!Materials needed• A piece of 5/4 or 2 x 4 wood about 3½" long (the 5/4
material is about 11⁄16" thick and the 2 x 4 is about 1½" thick)
• Carbon paper• Whatever finish materials you selectTools needed• Pencil• Coping saw with coarse teeth, or jigsaw with narrow
blade• Sandpaper (80-grit for rough surfaces and 120-grit
for smooth surfaces)Instructions:1. Copy the drawing onto your section of wood, using
the pencil and carbon paper.2. Use your special saw to cut out the pattern from the
wood.3. Rub over the edges with various grades of
sandpaper.4. If you care to decorate your rabbit puzzle, make a
design with your wood burning kit or use a wood finish.

Working with Wood & Tools
24
4. Glue the clothespin to the end of the ¾" x 2" x 2" piece.
5. When the glue dries, screw the pin down.6. Glue the ¾" x 2" x 2" piece to the ¾" x 3" x 3½" piece.
The assembly should be on center and flush with the back.
7. Apply a coat of finish.
Picture FramesMaterials needed• ½" x ¾" stock—size will depend on size of picture• Heavy cardboard—size will depend on size of
picture• Glue• 1" bradsTools needed• Square and pencil• Utility knife• Saw• Hammer• Sandpaper• Stain and varnishInstructions1. Cut the cardboard 1½" longer and 1½" wider
than the picture to be framed.2. Cut two pieces of stock the same length as
the cardboard. Cut two more pieces the width of the picture.
3. Glue and nail the frame together.4. Sand and finish.5. Glue the picture to the cardboard, leaving a ¾"
margin all around.6. Glue the frame to the cardboard. NOTE: A piece of string may be glued or fastened on
small tacks in back of picture to hang on wall. (Tacks should be put into frame.)
Note HolderMaterials needed• One piece of wood ¾" x 2" x 2" (actual dimensions)• One piece of wood ¾" x 3" x 3½"• One clothespin• Two 1½" nails• One ½" woodscrew• Glue• ShellacTools needed• Square and pencil• Saw• Drill• Sandpaper• Brush• Hammer• ScrewdriverInstructions:1. Cut the pieces to size.2. Sand the pieces smooth.3. Drill a hole in one side piece of the clothespin, about
½" from the open end.

Working with Wood & Tools
25
Nest Shelf for RobinsNOTE: Mount the nest shelf on the side of a building in the shelter of the eaves. Allow 6 or 7 inches between the shelf and the overhang. The shelf also may be mounted on the trunk or main branches of a tree, 10 to 12 feet above the ground.Materials needed• One piece 1" x 6" x 18"• One piece 1" x 2" x 10"• Eight 6d nails (preferably galvanized)• Exterior finishing materials Tools needed • Square and pencil• Saw • Hammer • Brush Instructions:1. Cut pieces to size as indicated.2. Nail the 15⁄8" x 9" front piece and the two 4¼" by 5½"
base pieces together. The base pieces should slant upward from the center. No part of either base piece should extend above, below, or beyond the front piece. The gap between the base pieces will serve as a drain.
3. Nail the back piece to the assembled unit. Have the upper corners of the base pieces 2½ inches from the top of the back
4. Apply finish.
Horseshoe Tie RackMaterials needed• One piece of lumber or plywood 6" x 6" about ¾"
thick• One piece of wood 1⁄8" x 3⁄8" x 4"• Seven 2" horseshoe or cut iron nails• One small screw eye• ½" wire brads• Interior finish materialsTools needed• Pencil• Saw• Drill• Sandpaper• Hammer• BrushInstructions1. Cut out the horseshoe and cleats.2. Attach the cleats with glue and wire brads.3. Drill pilot holes for the horseshoe or cut iron nails.4. Sandpaper smooth.5. Apply finish.6. Drive in nails to equal height.