wiser home controller user's manual - looking for … · wiser home controller 2 user's...
TRANSCRIPT
C-BusWiser Home Controller 2
WHC2_5918
User's Manual

© Copyright Schneider Electric (Australia) Pty Ltd, 2015. All rights reserved. This material is copyright under Australian and international laws. Exceptas permitted under the relevant law, no part of this work may be reproduced by any processwithout prior written permission of and acknowledgement to Schneider Electric (Australia)Pty Ltd.
Clipsal and C-Bus are registered trademarks of Schneider Electric (Australia) Pty Ltd.
The information in this manual is provided in good faith. Schneider Electric (Australia) Pty Ltdhas endeavoured to ensure the relevance and accuracy of the information, but it assumes noresponsibility for any loss incurred as a result of its use. Schneider Electric (Australia) doesnot warrant that the information is fit for any particular purpose, nor does it endorse its use inapplications that are critical to the health or life of any human being. Schneider Electric(Australia) reserves the right to update the information at any time without notice.
Version 1.0
Release date: February 2015.
3
Wiser Home Controller 2 User's Manual
Contents
1.0 Introduction 6
1.1 About this Document 6
1.2 Version 6
1.3 Notes 6
2.0 Hardware Overview 8
2.1 Home Controller Components 8
2.2 Connectors and Indicators 8
3.0 Using the User Interface 11
3.1 Graphical User Interface 11
3.2 Concepts 11
3.3 Basic Guidelines and Use 12
3.3.1 Opening the User Interface 12
3.3.2 Sequence of Operations 13
3.3.3 Navigation 14
3.4 Status Information 14
3.4.1 Connection 14
3.4.2 Warnings 15
3.5 Settings 15
3.5.1 Remote Access 16
3.5.2 C-Bus Date and Time 17
3.5.3 Setup 18
3.5.4 Profiles 18
3.5.5 Edit Scenes 18
3.5.6 Edit Schedules 18
4.0 Using the Mobile Phone Application 21
4.1 General 21
4.2 Requirements 21
4.3 Getting the Application 21
4.4 Installing the Application 21
4.5 Running the Application 21
4.6 Navigation 25
4
Wiser Home Controller 2 User's Manual
4.7 Widgets 26
4.8 Menu 26
5.0 Widgets 28
5.1 Press/click 28
5.2 Icons 28
5.3 C-Bus Widgets 28
5.3.1 General Lighting Relay 28
5.3.2 General Lighting Dimmer 28
5.3.3 Bellpress 29
5.3.4 Curtain Control 29
5.3.5 Two-State Lighting Relay 30
5.3.6 Shutter Relay 30
5.3.7 Lighting Preset 31
5.3.8 Lighting Status 31
5.3.9 General Lighting Timer 32
5.3.10 Enable Preset 32
5.3.11 Two-State Enable 33
5.3.12 Fan Controller 33
5.3.13 Scene Trigger 33
5.3.14 Local Scene Controller 33
5.3.15 Multi Room Audio Zone 34
5.3.16 Media Transport 35
5.3.17 MRA V3 Zone Widget 35
5.3.18 Homesafe Panel 39
5.3.19 MinderPro Panel 41
5.3.20 Climate Control 42
5.3.21 Power Meter 43
5.3.22 Power Meter Totals 48
5.4 Logic Widgets 51
5.4.1 User System IO Integer 51
5.4.2 User System IO Real 52
5.4.3 User System IO String 52
5.4.4 User System IO Boolean 52
5.4.5 User System IO Date 53
5
Wiser Home Controller 2 User's Manual
5.4.6 User System IO Time 53
5.5 Other Widgets 53
5.5.1 Web Camera 53
5.6 ZigBee Widgets 54
5.6.1 ZigBee Lighting Endpoints 55
5.6.2 ZigBee Lighting Groups 56
5.6.3 ZigBee Lighting Scenes 57
5.7 Favourites 57
6.0 Terms 59
Index
6
Wiser Home Controller 2 User's Manual
1.0 Introduction
1.1 About this Document
The Wiser 2 Home Controller allows you to access your C-Bus using a graphical user interface,sometimes referred to as the Wiser 2 UI. The Wiser 2 Home Controller arrives with a sample projectloaded and the user interface accessible from your local home network. With certain options set,you can also access the Wiser 2 UI from anywhere using the Internet.
Using the Wiser 2 Home Controller you can:
control equipment such as IP cameras, C-Bus devices and non C-Bus wired and wirelessequipment on the home LAN.schedule events in the home.create and store scenes on-board.customise a C-Bus system using the on-board Logic Engine.monitor the home environment including C-Bus and security systems.control ZigBee products such as Ulti-ZigBee Dimmer, Relay, Groups and Curtains.connect to Flash, Android HDMI, Android Mobile and iOS clients to access the user interface.remotely connect to your Wiser 2 using Flash, Android Mobile and iOS clients to access the userinterface.
Examples of equipment you might access with Wiser 2 Home Controller include lighting, HVAC,curtains, cameras, sprinkler systems, power monitoring, Ulti-ZigBee, multi-room audio and securitycontrols.
Purpose
The Wiser 2 User's Manual is provided to familiarise you with some of the features of the interfaceand to help you to use it more effectively. Some of the illustrations in this document might not lookexactly like what you see on your screen as with different clients the look can be slightly differentdue to limitations of the client. For the most part, the look will be consistent across all clients. Thisis because there are several different 'skin' designs and there are many different devices available foraccessing your Wiser 2 Home Controller.
If you are using PICED software, you can access the skin help or manual using the Help drop downmenu.
1.2 Version
Version 1.0.
The current versions of the Wiser 2 Help file and the Wiser 2 Home Controller User's Manual areincluded with the PICED software.
Copyright © 2015 Schneider Electric (Australia) Pty Ltd
1.3 Notes
Each Wiser 2 Home Controller project is unique. The examples in this document are provided todemonstrate the general concepts. The usage and appearance of your Wiser 2 Home Controller userinterface may be different to that shown here.

7
Wiser Home Controller 2 User's Manual
This document generally assumes that a web browser and a mouse are being used to access theWiser 2 Home Controller and hence the term "click" is used, referring to a mouse click. If you areusing a device with a touch screen, the term "click" will mean touching the screen.
8
Wiser Home Controller 2 User's Manual
2.0 Hardware Overview
2.1 Home Controller Components
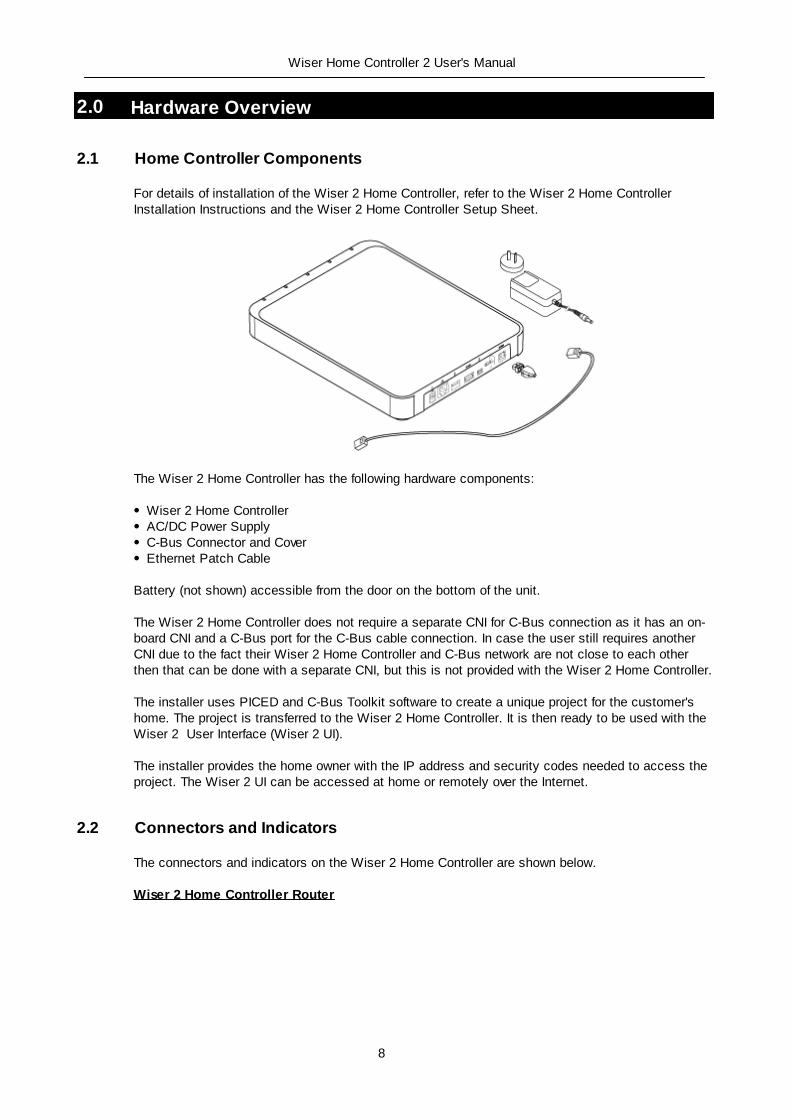
For details of installation of the Wiser 2 Home Controller, refer to the Wiser 2 Home ControllerInstallation Instructions and the Wiser 2 Home Controller Setup Sheet.
The Wiser 2 Home Controller has the following hardware components:
Wiser 2 Home ControllerAC/DC Power SupplyC-Bus Connector and CoverEthernet Patch Cable
Battery (not shown) accessible from the door on the bottom of the unit.
The Wiser 2 Home Controller does not require a separate CNI for C-Bus connection as it has an on-board CNI and a C-Bus port for the C-Bus cable connection. In case the user still requires anotherCNI due to the fact their Wiser 2 Home Controller and C-Bus network are not close to each otherthen that can be done with a separate CNI, but this is not provided with the Wiser 2 Home Controller.
The installer uses PICED and C-Bus Toolkit software to create a unique project for the customer'shome. The project is transferred to the Wiser 2 Home Controller. It is then ready to be used with theWiser 2 User Interface (Wiser 2 UI).
The installer provides the home owner with the IP address and security codes needed to access theproject. The Wiser 2 UI can be accessed at home or remotely over the Internet.
2.2 Connectors and Indicators
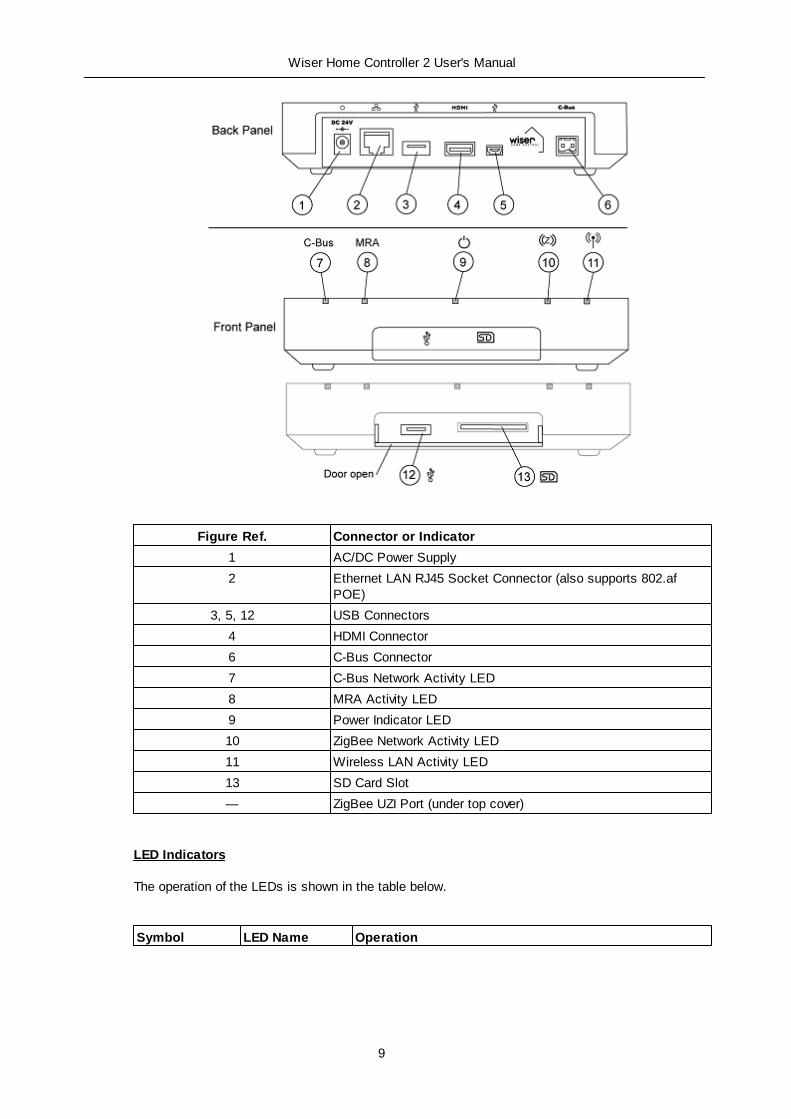
The connectors and indicators on the Wiser 2 Home Controller are shown below.
Wiser 2 Home Controller Router
9
Wiser Home Controller 2 User's Manual
Figure Ref. Connector or Indicator
1 AC/DC Power Supply
2 Ethernet LAN RJ45 Socket Connector (also supports 802.afPOE)
3, 5, 12 USB Connectors
4 HDMI Connector
6 C-Bus Connector
7 C-Bus Network Activity LED
8 MRA Activity LED
9 Power Indicator LED
10 ZigBee Network Activity LED
11 Wireless LAN Activity LED
13 SD Card Slot
— ZigBee UZI Port (under top cover)
LED Indicators
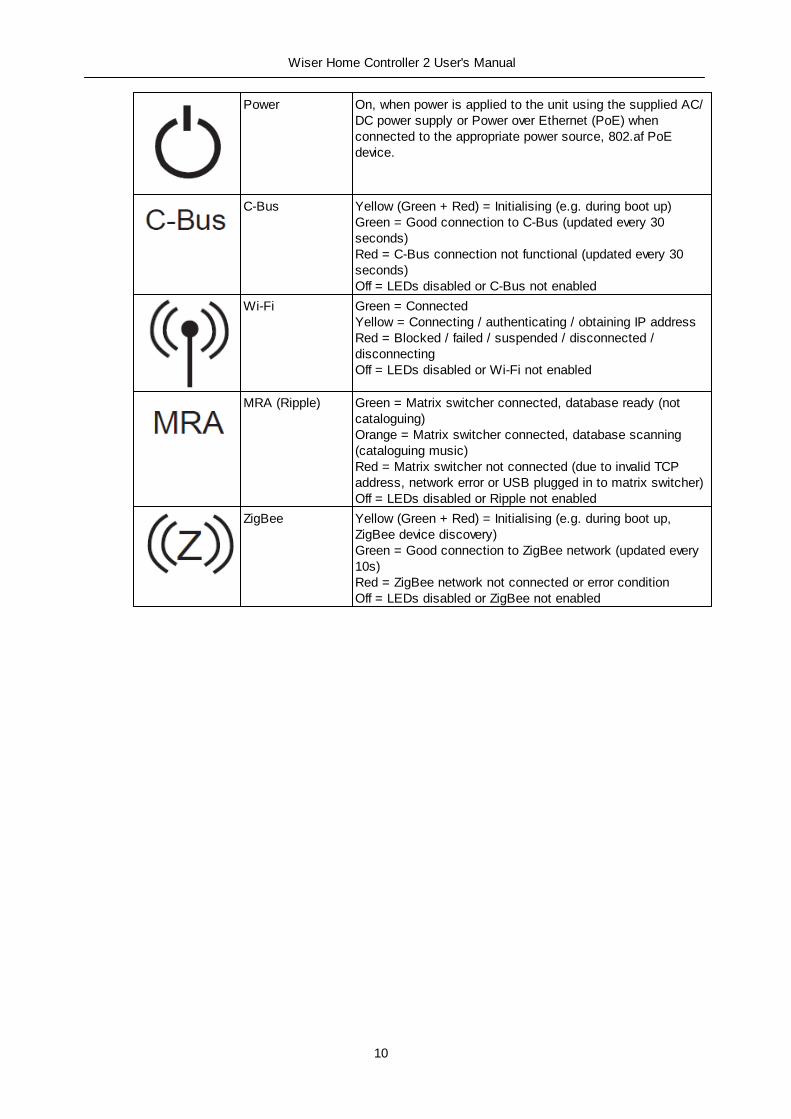
The operation of the LEDs is shown in the table below.
Symbol LED Name Operation
10
Wiser Home Controller 2 User's Manual
Power On, when power is applied to the unit using the supplied AC/DC power supply or Power over Ethernet (PoE) whenconnected to the appropriate power source, 802.af PoEdevice.
C-Bus Yellow (Green + Red) = Initialising (e.g. during boot up)Green = Good connection to C-Bus (updated every 30seconds)Red = C-Bus connection not functional (updated every 30seconds)Off = LEDs disabled or C-Bus not enabled
Wi-Fi Green = ConnectedYellow = Connecting / authenticating / obtaining IP addressRed = Blocked / failed / suspended / disconnected /disconnectingOff = LEDs disabled or Wi-Fi not enabled
MRA (Ripple) Green = Matrix switcher connected, database ready (notcataloguing)Orange = Matrix switcher connected, database scanning(cataloguing music)Red = Matrix switcher not connected (due to invalid TCPaddress, network error or USB plugged in to matrix switcher)Off = LEDs disabled or Ripple not enabled
ZigBee Yellow (Green + Red) = Initialising (e.g. during boot up,ZigBee device discovery)Green = Good connection to ZigBee network (updated every10s)Red = ZigBee network not connected or error conditionOff = LEDs disabled or ZigBee not enabled
11
Wiser Home Controller 2 User's Manual
3.0 Using the User Interface
3.1 Graphical User Interface
The Wiser 2 Home Controller's GUI is an easy-to-use interface for accessing, monitoring andcontrolling your residential or office environment locally, or remotely over the Internet. You canaccess the GUI of the new Wiser 2 Home Controller (Wiser 2) with a range of personal computingdevices, including hand-held phones and tablets. The Wiser 2 installation can include wirelessdevices in your home or business.
The control interface is set up by the installer/integrator. The user selects:
1. a location, such as a bedroom or lounge room,
2. an application, such as lighting, heating or window shades and
3. a device or function such as a lamp or curtain relay.
When you change the state of a device, the screen widget shows the change. The installer sets up aprofile for the user that allows access to certain functions and devices.
3.2 Concepts
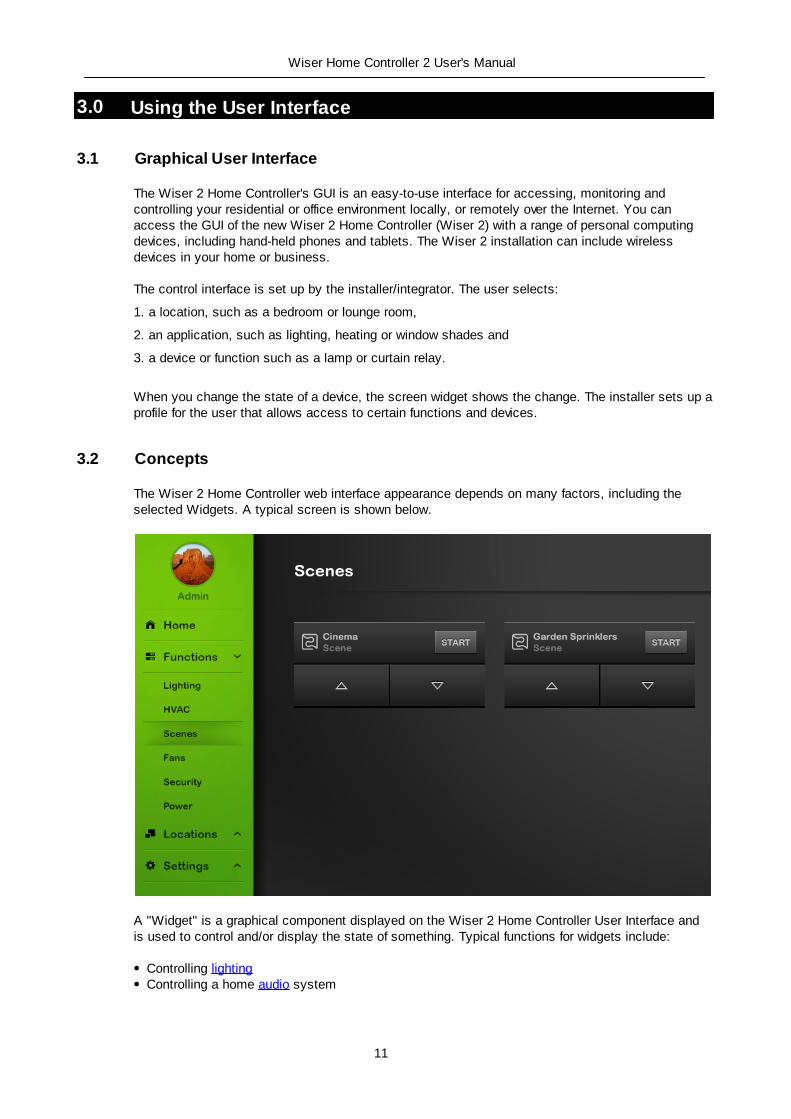
The Wiser 2 Home Controller web interface appearance depends on many factors, including theselected Widgets. A typical screen is shown below.
A "Widget" is a graphical component displayed on the Wiser 2 Home Controller User Interface andis used to control and/or display the state of something. Typical functions for widgets include:
Controlling lightingControlling a home audio system
12
Wiser Home Controller 2 User's Manual
Controlling and monitoring a security systemDisplaying a web camera
TheWiser 2 Home Controller automatically arranges the widgets onto pages according to their"Location" and/or "Function Group". If there are too many widgets to fit on a single page, it ispossible to scroll them left and right using the Scroll Pad.
Locations are used to arrange widgets according to their physical location in a site. A project canhave between 1 and 20 locations. Typical Locations in a home might include:
LoungeDiningBedroomsOutside
Function Groups are used to arrange widgets according to their usage. A project can have noFunction Groups, or up to 20. Typical Function Groups in a home might include:
LightingSecurityClimate ControlMedia (Audio/Video)
At the bottom of the Locations list is the option for Settings which provides the ability to edit createdProfiles, Edit Scenes, Edit Schedules, Edit/View the Network Settings and Edit Date/Time. Thementioned options are available in Flash and Android HDMI Client but in the Android and iOS Mobile/Tablet application only a subset of these options will be available.
A projector is a software application which can display the Wiser 2 Home Controller User Interfaceand allow the user to view and interact with the Wiser 2 Home Controller. It can run like a desktopapplication on your PC.
3.3 Basic Guidelines and Use3.3.1 Opening the User Interface
Control of the Wiser 2 Home Controller is done via a web based user interface, usually a webbrowser. This could be a web browser connected to the Local Area Network (LAN), or connectedremotely via the Internet.
It is also possible to control the Wiser 2 Home Controller via the Wiser 2 application running onAndroid or iOS mobiles and tablets. The user interface can also be controlled using a HDMI client,such as a TV, by connecting the HDMI cable between the TV and Wiser 2 Home Controller (portprovided at the back of the unit).
To display the Wiser 2 Home Controller user interface on a web browser which is connected to theLAN, enter the following URL in the web browser:
http://192.168.2.1/ (or the address as configured during installation)
Note: You will need to use the actual IP Address of the Wiser 2 Home Controller in the above URL.This will be provided by your installer. It may be a good idea to write it below.
Wiser 2 Home Controller IP Address:
13
Wiser Home Controller 2 User's Manual
When you first use the Wiser 2 Home Controller, you will be prompted for a user name andpassword. The default values are:
User name : adminPassword : admin
The user name can not be changed. It is recommended that the password be changed for security. Ifyou change the password, it may be a good idea to write it below.
Password:
To change the password:1. Click on the Project menu in PICED2. Click on the Edit Profiles option3. Edit the Admin profile4. Enter the new password5. Click OK to save the changes
There is a concept of Profiles in Wiser 2 Home Controller which was not present in the earlierversion of Wiser Home Controller. Profiles allow users to have different user names and passwordseach with respective rights such as administrative rights (All rights), Edit Widgets, Edit Schedules,Edit Scenes etc. This enables the Administrator to create profiles allowing users to view and editonly a few things.
To add/edit profiles:
1. Click on the Project menu in PICED2. Click on the Edit Profiles option3. Press the Add button to add a profile4. In the window that appears, enter Profile Name, Username and Password5. Assign the rights you want the user to have, remember administrator rights means the user has
all rights6. Click OK to save the changes
Similarly, created profiles can be edited using the same Edit Profiles option.
3.3.2 Sequence of Operations
Power On and Initialisation
Switch on the Wiser 2 Home Controller before accessing the Wiser 2 user interface. Allow time forthe controller to establish connection with the C-Bus network and to poll the states of the C-Busdevices through the C-Bus Network Interface (CNI). This is important to give a true picture of thestatus of the equipment. In case ZigBee network is connected or Ripple is enabled, please allowtime for the connection to fully establish which will be indicated by the Green LED on Wiser 2 HomeController. Try to avoid disconnecting power from the Wiser 2 Home Controller equipment. It is betterto let it remained powered on than to remove power on a random basis.
You can get a good indication of the status of the system from the indicator LEDs on the Wiser 2Home Controller depending on what is connected to the controller. Some activity between thecontroller and C-Bus network is normal at any time, even when not being controlled or monitored by
14
Wiser Home Controller 2 User's Manual
you using the Wiser 2 UI.
During maintenance events such as using C-Bus ToolKit via a remote CNI, transferring a project tothe Wiser 2 unit using PICED, or when the controller is rebooting or performing power on self tests,the Wiser 2 User Interface will not respond to input or display changes.
3.3.3 Navigation
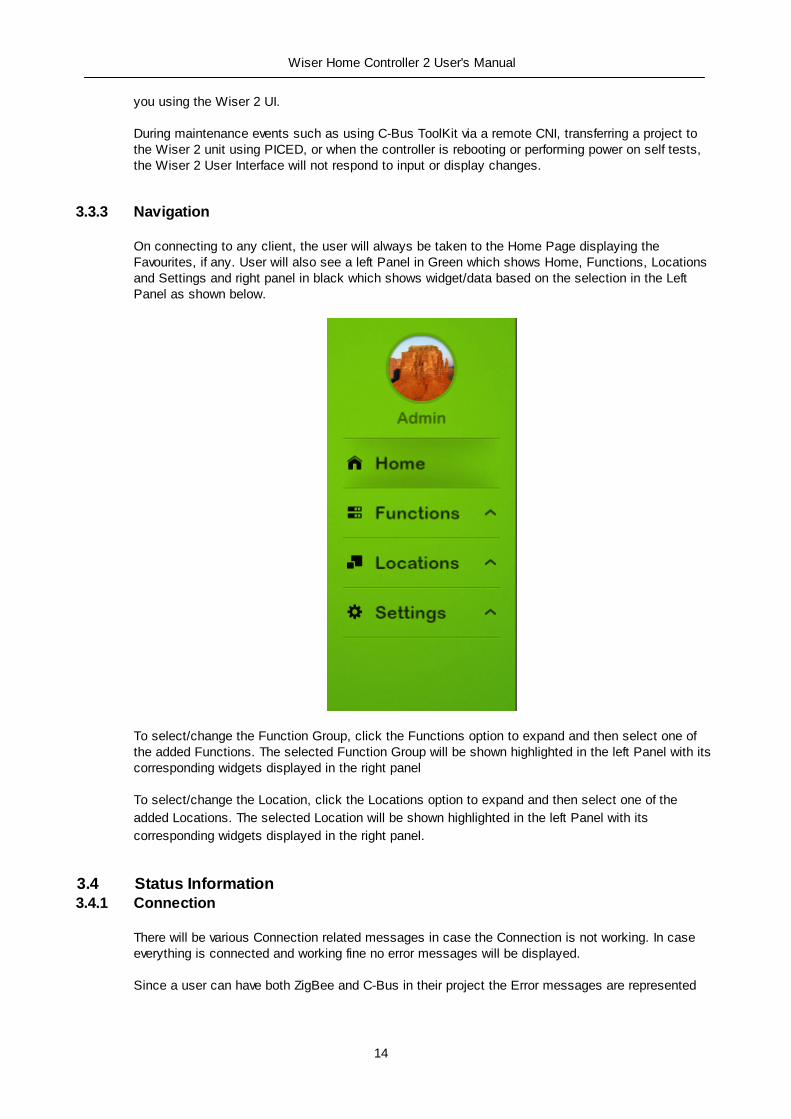
On connecting to any client, the user will always be taken to the Home Page displaying theFavourites, if any. User will also see a left Panel in Green which shows Home, Functions, Locationsand Settings and right panel in black which shows widget/data based on the selection in the LeftPanel as shown below.
To select/change the Function Group, click the Functions option to expand and then select one ofthe added Functions. The selected Function Group will be shown highlighted in the left Panel with itscorresponding widgets displayed in the right panel
To select/change the Location, click the Locations option to expand and then select one of the
added Locations. The selected Location will be shown highlighted in the left Panel with its
corresponding widgets displayed in the right panel.
3.4 Status Information3.4.1 Connection
There will be various Connection related messages in case the Connection is not working. In caseeverything is connected and working fine no error messages will be displayed.
Since a user can have both ZigBee and C-Bus in their project the Error messages are represented
15
Wiser Home Controller 2 User's Manual
such that user can still access the UI and work with features/functions which are accessible. Theonly time the UI will not be accessible is when connection to the Wiser 2 Home Controller would belost, i.e. either the controller is powered off or there is no Ethernet/WiFi connection present.
Error Messages will be displayed when the following conditions occur:
General
No connection to the Wiser 2 Home Controller.
C-Bus
No connection to C-Bus.
ZigBee
ZigBee interface not found.ZigBee initialising.Not connected to ZigBee network.Connected to the wrong ZigBee network.
3.4.2 Warnings
C-Bus
When the C-Bus ToolKit is connected to the Wiser 2 Home Controller, where the controller is usinga remote CNI connection instead of a direct CNI connection, the following warning message wouldbe displayed:
C-Bus Connection in Transparent Mode. User interface actions will not be processed.
In the above case you will be unable to use theWiser 2 Home Controller to control C-Bus during thistime.
ZigBee
ZigBee Interface Updating FirmwarePerforming ZigBee Device Discovery
3.5 Settings
The Settings section allows the user to control the profiles, network settings, ethernet settings, C-Bus date/time, etc. This section is accessible only if the user has rights to it. All the options underSettings are not available in all Clients, they are available in Flash and Android HDMI but only asubset of them are available in Android and iOS mobile and tablet applications.
The following sections come under Settings:
Profiles
This option displays all the Profiles part of the Project. User can change the Username, Password
and Profile permissions for all profiles depending on their rights except for the ‘Administrator’ Profile.
For the ‘Administrator’ profile which is the default profile only Password can be changed.
16
Wiser Home Controller 2 User's Manual
Scene Edit
The user can edit all the unlocked scenes from this option. The option gives the user the ability tomodify the parameters of the scene and save them to the Wiser 2 Home Controller. The feature doesnot allow users to add groups or add scenes through this Section. In order to add more scenes orgroups to a scene, the project needs to be modified in PICED and transferred to the Wiser 2 HomeController.
Schedule Edit
The user can edit all the unlocked schedules from this option. The option gives the user the ability tomodify the parameters of the schedule and save them to the Wiser 2 Home Controller. The featuredoes not allow users to add events or schedules through this section. In order to modify the eventsof a schedule or add a new schedule, the project needs to be modified in PICED and transferred tothe Wiser 2 Home Controller.
Setup
This option allows the user to select the language they want to see the UI in, allows the user to editthe network settings by enabling/disabling DHCP, enabling/disabling WiFi, NTP Settings, etc. Theuser can also enable/disable SAMBA share through this option.
System Utilities
Remote Access: select the options for using the Wiser from a remote locationC-Bus Date & Time: set the Wiser Date and Time (this will be sent to C-Bus)
3.5.1 Remote Access
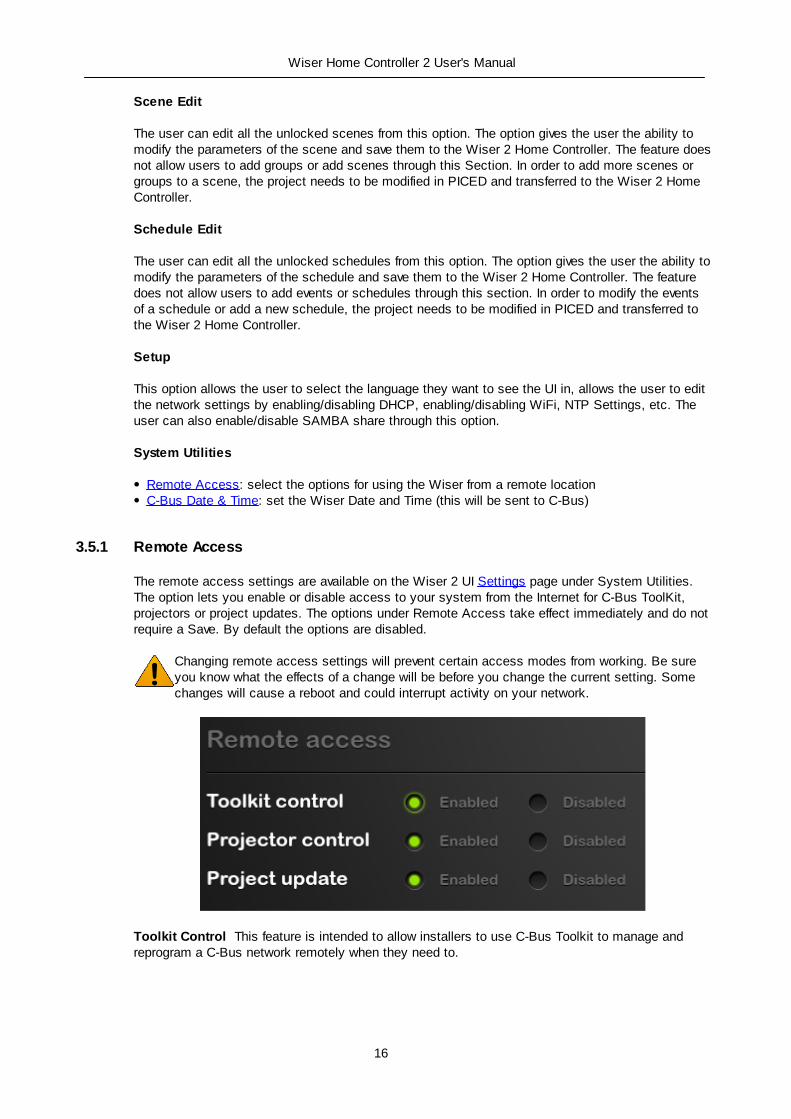
The remote access settings are available on the Wiser 2 UI Settings page under System Utilities.The option lets you enable or disable access to your system from the Internet for C-Bus ToolKit,projectors or project updates. The options under Remote Access take effect immediately and do notrequire a Save. By default the options are disabled.
Changing remote access settings will prevent certain access modes from working. Be sureyou know what the effects of a change will be before you change the current setting. Somechanges will cause a reboot and could interrupt activity on your network.
Toolkit Control This feature is intended to allow installers to use C-Bus Toolkit to manage andreprogram a C-Bus network remotely when they need to.
17
Wiser Home Controller 2 User's Manual
It is important to make sure to disable toolkit control after use. leaving it open allows anyoneto manipulate your C-Bus network.
Projector Control allows the web user interface to be accessed via a web browser and/or aprojector running on a device like a laptop or other mobile device. This feature is intended to allow auser or installer to interact with their C-Bus network when outside of their home (by using theInternet). This option can safely be left enabled because there is authentication of the web browseror projector connecting to the Wiser 2 unit. Project Update allows a PICED project to be uploaded to theWiser 2 Home Controller over theInternet. This means that anyone on the Internet, if they knew the Internet address of your device,can connect to the device and transfer a project to the unit and/or retrieve a project from the unit.
It is important to make sure to disable Project Update after usage as leaving it open willallow anyone to modify your Wiser 2 Home Controller.
3.5.2 C-Bus Date and Time
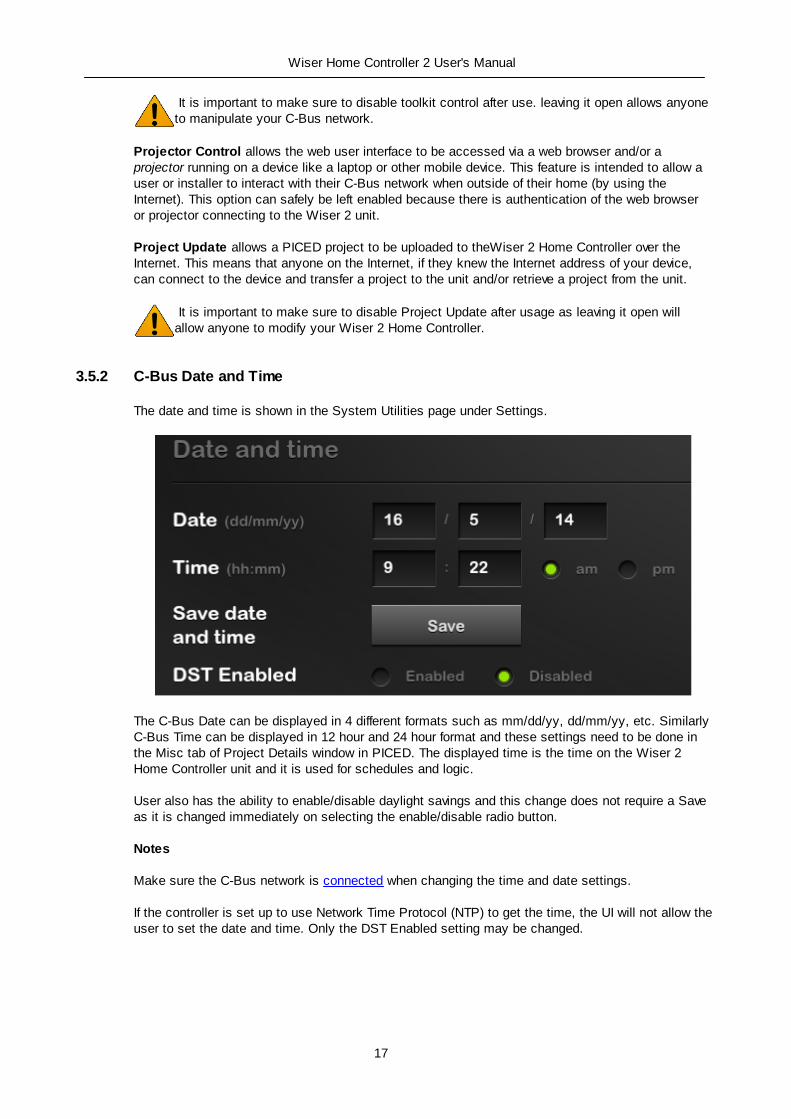
The date and time is shown in the System Utilities page under Settings.
The C-Bus Date can be displayed in 4 different formats such as mm/dd/yy, dd/mm/yy, etc. SimilarlyC-Bus Time can be displayed in 12 hour and 24 hour format and these settings need to be done inthe Misc tab of Project Details window in PICED. The displayed time is the time on the Wiser 2Home Controller unit and it is used for schedules and logic.
User also has the ability to enable/disable daylight savings and this change does not require a Saveas it is changed immediately on selecting the enable/disable radio button.
Notes
Make sure the C-Bus network is connected when changing the time and date settings.
If the controller is set up to use Network Time Protocol (NTP) to get the time, the UI will not allow theuser to set the date and time. Only the DST Enabled setting may be changed.
18
Wiser Home Controller 2 User's Manual
3.5.3 Setup
This option allows the user to set up the following:
LanguageDHCP Server SettingsWireless Network SettingsNTPSAMBADDNSManual Web Upgrade
Changing settings on the Wiser 2 Home Controller can cause unexpected results. Unlessyou are absolutely certain, do not attempt to modify these settings.
Most of the setting screen fields require text/number entries. After making a change, it will need tobe saved and this will cause the Wiser 2 Home Controller to re-boot. Changes will not take effect ifthe Wiser 2 Home Controller is not re-booted after the save.
3.5.4 Profiles
This option displays all the Profiles part of the project. Depending on the given rights, the user canchange the Username, Password and Permissions for each profile. For the default Admin profile,the Username and Permission values may not be edited, but the user may change the Password.
Note: Any change made on this page requires a Save which will result in an automatic Wiser 2Home Controller re-boot after confirmation from the user. Any changes made will not take effect untilthe Wiser 2 Home Controller is re-booted.
3.5.5 Edit Scenes
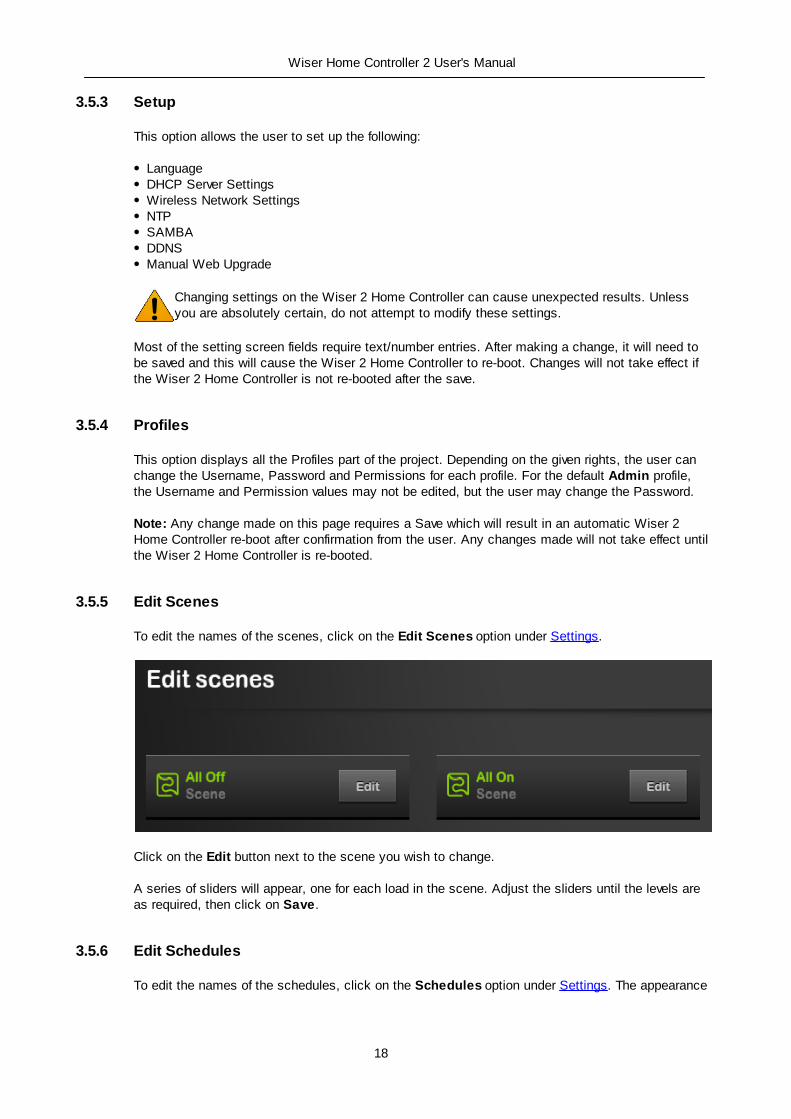
To edit the names of the scenes, click on the Edit Scenes option under Settings.
Click on the Edit button next to the scene you wish to change.
A series of sliders will appear, one for each load in the scene. Adjust the sliders until the levels areas required, then click on Save.
3.5.6 Edit Schedules
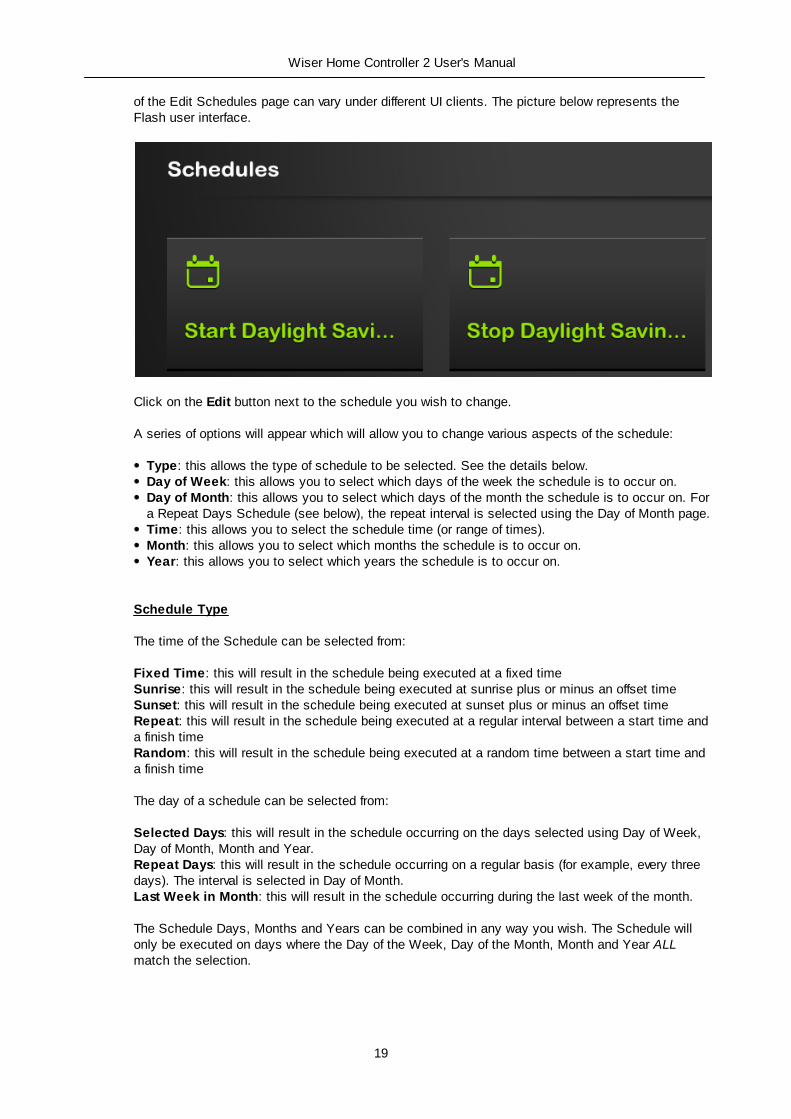
To edit the names of the schedules, click on the Schedules option under Settings. The appearance
19
Wiser Home Controller 2 User's Manual
of the Edit Schedules page can vary under different UI clients. The picture below represents theFlash user interface.
Click on the Edit button next to the schedule you wish to change.
A series of options will appear which will allow you to change various aspects of the schedule:
Type: this allows the type of schedule to be selected. See the details below.Day of Week: this allows you to select which days of the week the schedule is to occur on.Day of Month: this allows you to select which days of the month the schedule is to occur on. Fora Repeat Days Schedule (see below), the repeat interval is selected using the Day of Month page.Time: this allows you to select the schedule time (or range of times).Month: this allows you to select which months the schedule is to occur on.Year: this allows you to select which years the schedule is to occur on.
Schedule Type
The time of the Schedule can be selected from:
Fixed Time: this will result in the schedule being executed at a fixed timeSunrise: this will result in the schedule being executed at sunrise plus or minus an offset time Sunset: this will result in the schedule being executed at sunset plus or minus an offset timeRepeat: this will result in the schedule being executed at a regular interval between a start time anda finish timeRandom: this will result in the schedule being executed at a random time between a start time anda finish time
The day of a schedule can be selected from:
Selected Days: this will result in the schedule occurring on the days selected using Day of Week,Day of Month, Month and Year.Repeat Days: this will result in the schedule occurring on a regular basis (for example, every threedays). The interval is selected in Day of Month.Last Week in Month: this will result in the schedule occurring during the last week of the month.
The Schedule Days, Months and Years can be combined in any way you wish. The Schedule willonly be executed on days where the Day of the Week, Day of the Month, Month and Year ALLmatch the selection.

20
Wiser Home Controller 2 User's Manual
Click on the Save button when you have finished making changes.

21
Wiser Home Controller 2 User's Manual
4.0 Using the Mobile Phone Application
4.1 General
The Wiser 2 Mobile Phone Application is an application which allows many devices in a home to becontrolled from a mobile phone, Android or iOS.
It requires a compatible mobile phone and a Wiser 2 Home Controller unit which is connected to aC-Bus/ZigBee system.
All phones are different, so it is not possible to include instructions for details which vary betweenphones. The user interface across all clients has been made as consistent as possible, but therecould still be some differences.Mobile phone applications do not have all the options under Settings,thus to access those options either a Flash or Android HDMI client would be required.
4.2 Requirements
To run the Mobile Phone Application, users will need and iOS 7 or Android 4.1 (and above) smartphone or tablet.
4.3 Getting the Application
Using an iOS Phone/Tablet
The process for getting the Mobile Phone Application using your iOS phone/tablet is:
1. Search for the Wiser 2 application from Schneider Electric in the App Store.2. Download and install the application on your mobile/tablet.
Using an Android Phone/Tablet
The process for getting the Mobile Phone Application using your Android phone/tablet is:
1. Search for the Wiser 2 application from Schneider Electric in the Google Play Store.2. Download and install the application on your mobile/tablet.
4.4 Installing the Application
If you downloaded the Application using a mobile phone or tablet, you will automatically be promptedto install it.
4.5 Running the Application
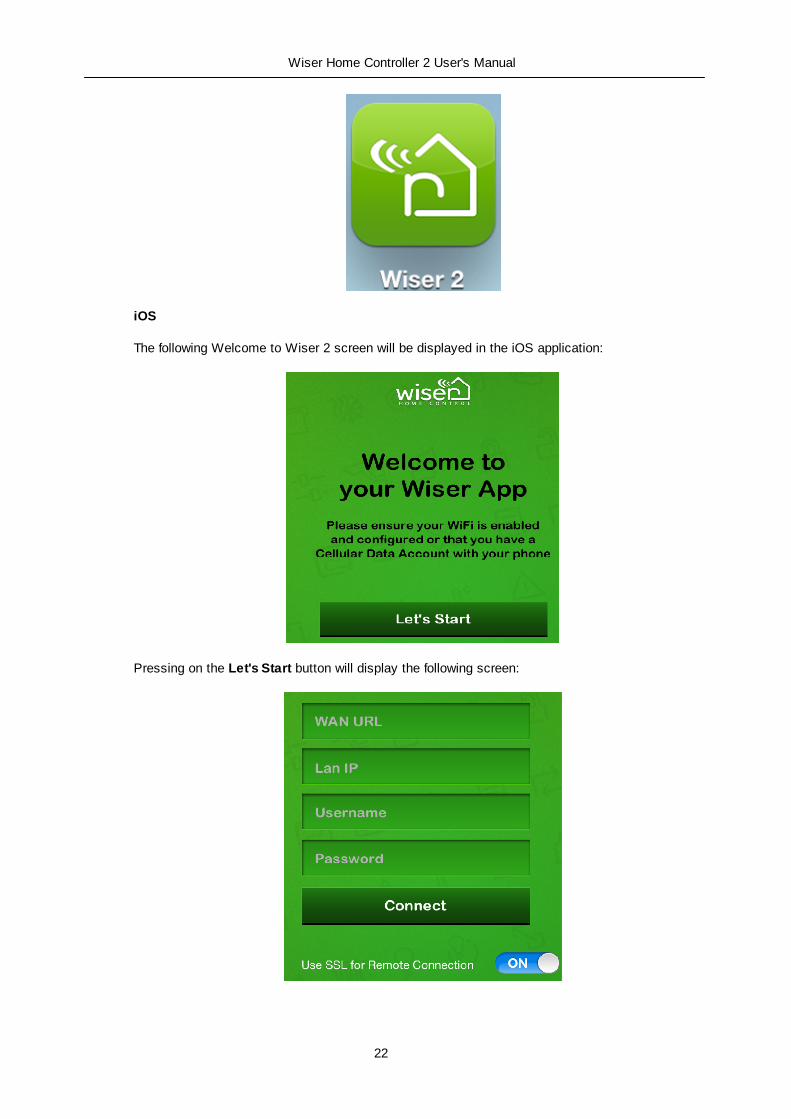
To run the Wiser 2 application click on the Wiser 2 icon in both iOS and Android:
22
Wiser Home Controller 2 User's Manual
iOS
The following Welcome to Wiser 2 screen will be displayed in the iOS application:
Pressing on the Let's Start button will display the following screen:
23
Wiser Home Controller 2 User's Manual
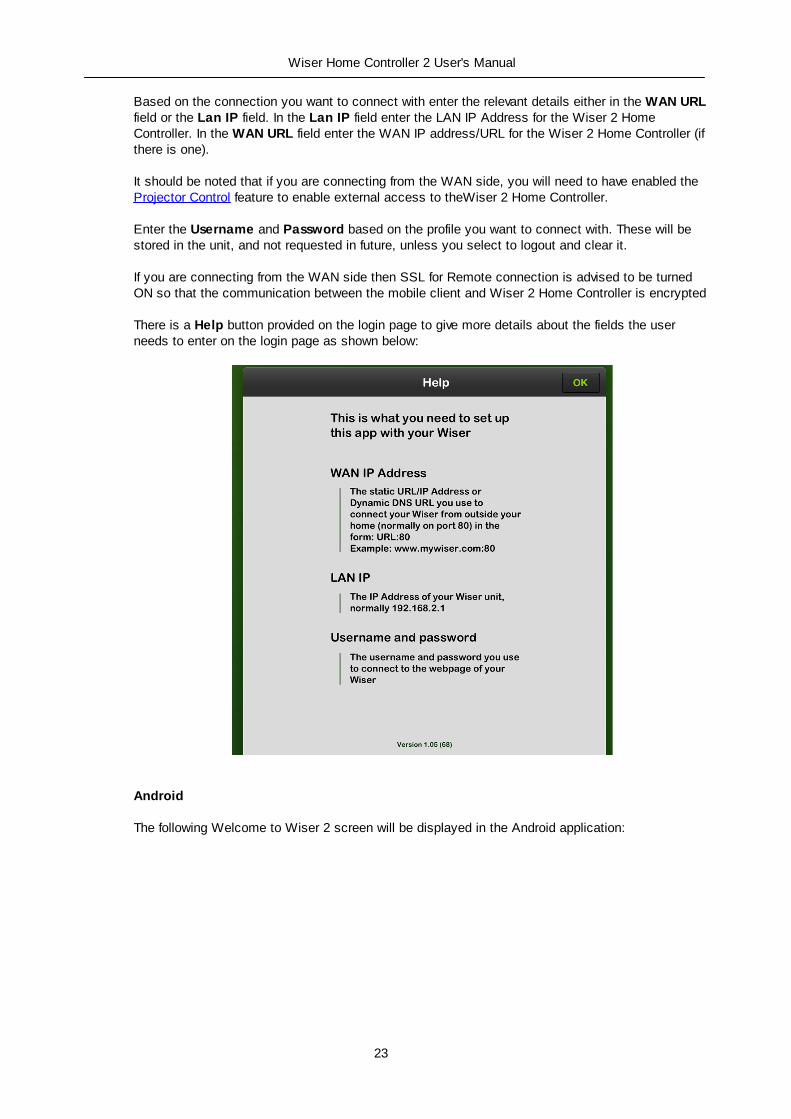
Based on the connection you want to connect with enter the relevant details either in the WAN URLfield or the Lan IP field. In the Lan IP field enter the LAN IP Address for the Wiser 2 HomeController. In the WAN URL field enter the WAN IP address/URL for the Wiser 2 Home Controller (ifthere is one).
It should be noted that if you are connecting from the WAN side, you will need to have enabled the Projector Control feature to enable external access to theWiser 2 Home Controller.
Enter the Username and Password based on the profile you want to connect with. These will bestored in the unit, and not requested in future, unless you select to logout and clear it.
If you are connecting from the WAN side then SSL for Remote connection is advised to be turnedON so that the communication between the mobile client and Wiser 2 Home Controller is encrypted
There is a Help button provided on the login page to give more details about the fields the userneeds to enter on the login page as shown below:
Android
The following Welcome to Wiser 2 screen will be displayed in the Android application:

24
Wiser Home Controller 2 User's Manual
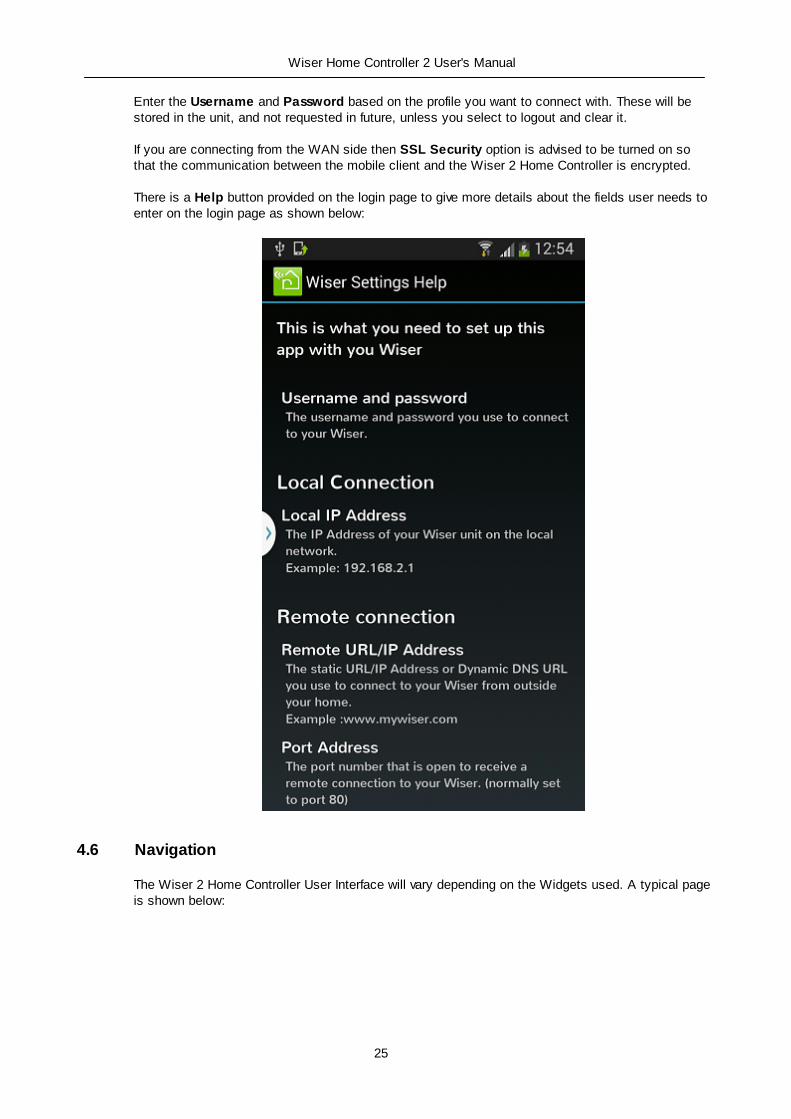
Pressing on the Settings button will display the following screen:
Based on the connection you want to connect with enter the relevant details either in the RemoteConnection section or the Local Connection section. In the Local Connection section, enter theIP Address for the Wiser 2 Home Controller. In the Remote Connection section enter the WAN IPAddress/URL for the Wiser 2 Home Controller (if there is one).
It should be noted that if you are connecting from the WAN side, you will need to have enabled the Projector Control feature to enable external access to the Wiser 2 Home Controller.
25
Wiser Home Controller 2 User's Manual
Enter the Username and Password based on the profile you want to connect with. These will bestored in the unit, and not requested in future, unless you select to logout and clear it.
If you are connecting from the WAN side then SSL Security option is advised to be turned on sothat the communication between the mobile client and the Wiser 2 Home Controller is encrypted.
There is a Help button provided on the login page to give more details about the fields user needs toenter on the login page as shown below:
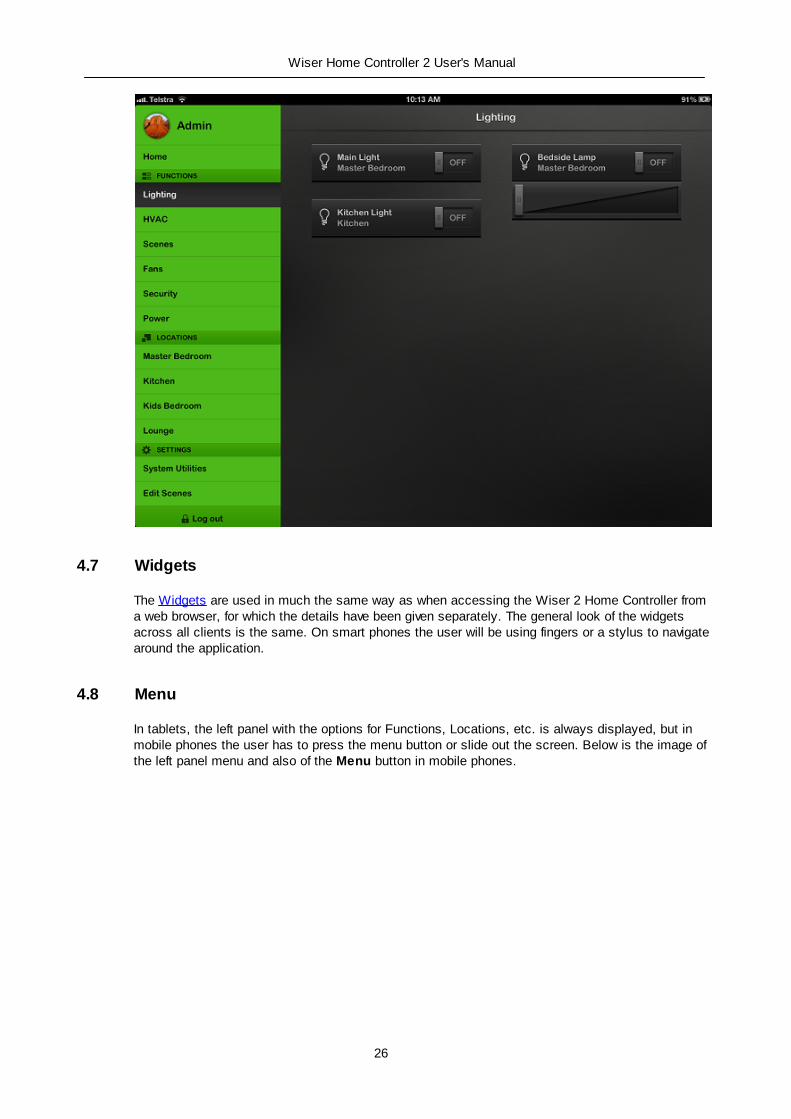
4.6 Navigation
The Wiser 2 Home Controller User Interface will vary depending on the Widgets used. A typical pageis shown below:
26
Wiser Home Controller 2 User's Manual
4.7 Widgets
The Widgets are used in much the same way as when accessing the Wiser 2 Home Controller froma web browser, for which the details have been given separately. The general look of the widgetsacross all clients is the same. On smart phones the user will be using fingers or a stylus to navigatearound the application.
4.8 Menu
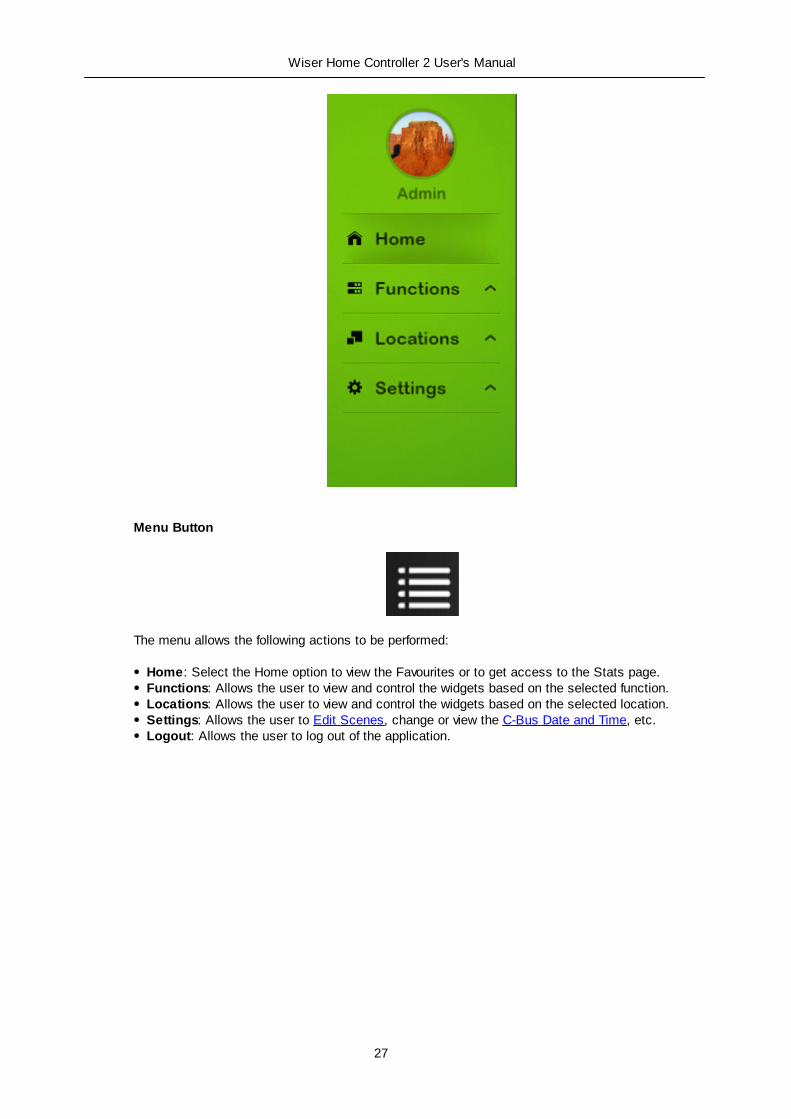
In tablets, the left panel with the options for Functions, Locations, etc. is always displayed, but inmobile phones the user has to press the menu button or slide out the screen. Below is the image ofthe left panel menu and also of the Menu button in mobile phones.
27
Wiser Home Controller 2 User's Manual
Menu Button
The menu allows the following actions to be performed:
Home: Select the Home option to view the Favourites or to get access to the Stats page.Functions: Allows the user to view and control the widgets based on the selected function.Locations: Allows the user to view and control the widgets based on the selected location.Settings: Allows the user to Edit Scenes, change or view the C-Bus Date and Time, etc.Logout: Allows the user to log out of the application.

28
Wiser Home Controller 2 User's Manual
5.0 Widgets
5.1 Press/clickShort Press
The term short press is used to describe clicking the mouse button and then releasing within about1/2 second. If you are using a touch screen device, you will be pressing the screen with your finger,rather than using a mouse. In this document, it is assumed you are using a mouse.
Long Press
The term long press is used to describe clicking the mouse button and then holding for more than1/2 second before releasing.
5.2 Icons
There are many icons available for use with the user interface and can be selected for use with thewidgets. Some of the icons available are shown below.
Light Bulb Bell Press Security
5.3 C-Bus Widgets
C-Bus Widgets are used to monitor and control C-Bus devices, including relays, dimmers, sensors,security panels, media devices and air conditioning systems.
5.3.1 General Lighting Relay
The General Lighting Relay widget is used for on/off control of a load.
The appearance will depend on the icon selected. The icon will show whether the load is on,indicated by the colour green.
The ON/OFF button will toggle the state between on and off.
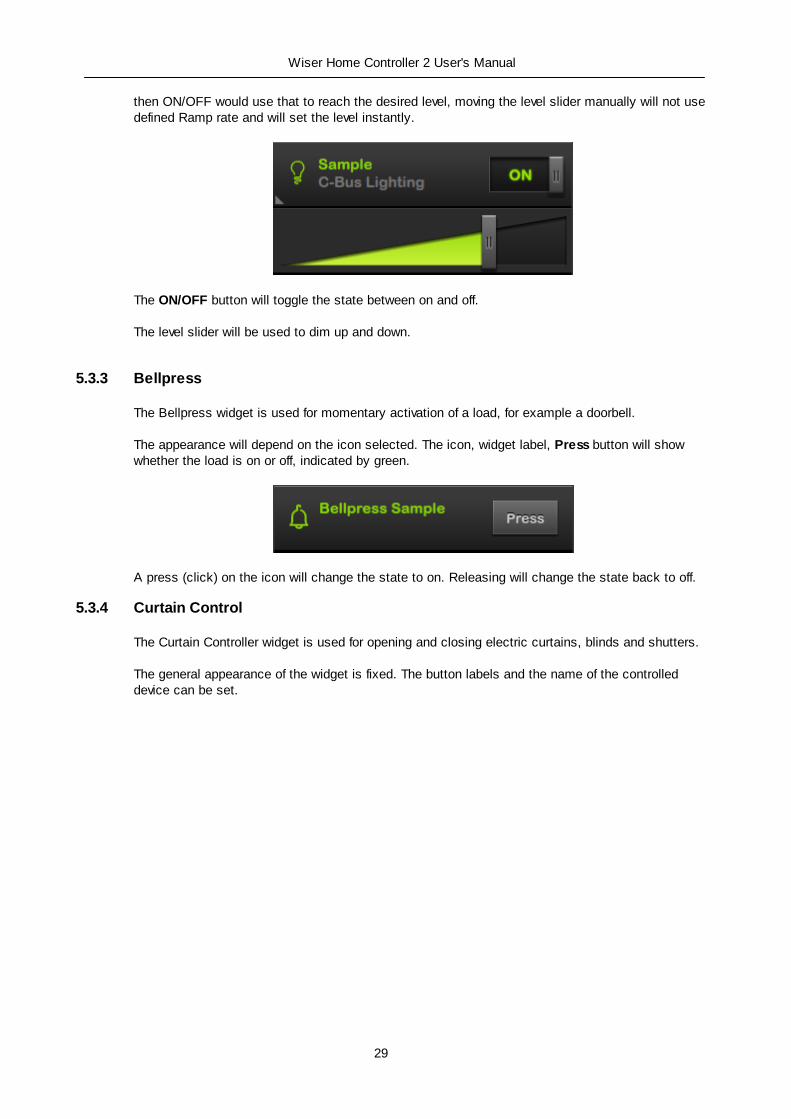
5.3.2 General Lighting Dimmer
The General Lighting Dimmer widget is used for level control of a load (from 0% to 100%).
The appearance will depend on the icon selected. The icon and widget label will show whether theload is ON, indicated by the color green. The Level slider can be used to increase/decrease thecurrent set level. Ramp Rate is associated with the ON/OFF button thus, if Ramp rate is applied
29
Wiser Home Controller 2 User's Manual
then ON/OFF would use that to reach the desired level, moving the level slider manually will not usedefined Ramp rate and will set the level instantly.
The ON/OFF button will toggle the state between on and off.
The level slider will be used to dim up and down.
5.3.3 Bellpress
The Bellpress widget is used for momentary activation of a load, for example a doorbell.
The appearance will depend on the icon selected. The icon, widget label, Press button will showwhether the load is on or off, indicated by green.
A press (click) on the icon will change the state to on. Releasing will change the state back to off.
5.3.4 Curtain Control
The Curtain Controller widget is used for opening and closing electric curtains, blinds and shutters.
The general appearance of the widget is fixed. The button labels and the name of the controlleddevice can be set.
30
Wiser Home Controller 2 User's Manual
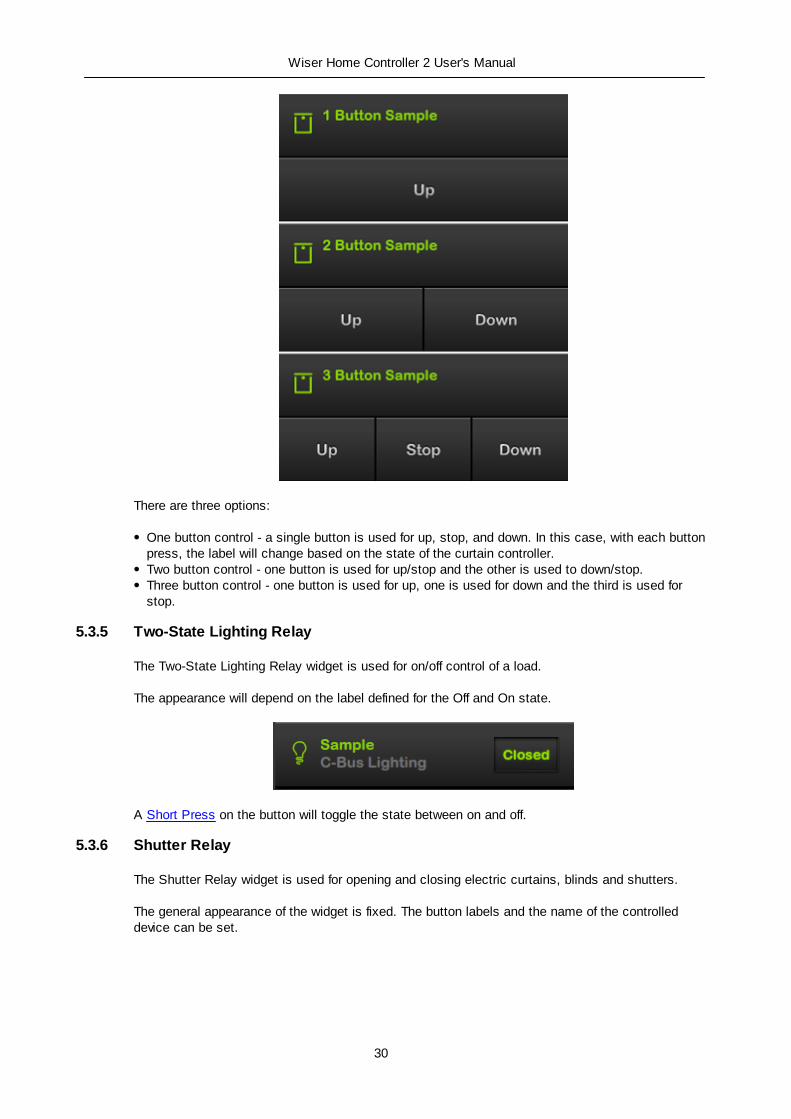
There are three options:
One button control - a single button is used for up, stop, and down. In this case, with each buttonpress, the label will change based on the state of the curtain controller.Two button control - one button is used for up/stop and the other is used to down/stop.Three button control - one button is used for up, one is used for down and the third is used forstop.
5.3.5 Two-State Lighting Relay
The Two-State Lighting Relay widget is used for on/off control of a load.
The appearance will depend on the label defined for the Off and On state.
A Short Press on the button will toggle the state between on and off.
5.3.6 Shutter Relay
The Shutter Relay widget is used for opening and closing electric curtains, blinds and shutters.
The general appearance of the widget is fixed. The button labels and the name of the controlleddevice can be set.

31
Wiser Home Controller 2 User's Manual
There are three options:
One button control - a single button is used for open, stop and closeTwo button control - one button is used for open/stop and the other is used for close/stopThree button control - one button is used to open, one is used to down and the third is to stop
5.3.7 Lighting Preset
The Lighting Preset widget is used for setting a load to a preset level (from 0% to 100%).
The appearance will depend on the icon selected. The icon, widget label and Preset Level will showwhether the load is at the Preset level, indicated by the color green.
A Short Press on the Preset Level panel will set the load to the preset level.
5.3.8 Lighting Status
The Lighting Status widget shows when a load is on. It is not used for controlling the load. Thestatus will be shown by displaying the level (0-100%).
32
Wiser Home Controller 2 User's Manual
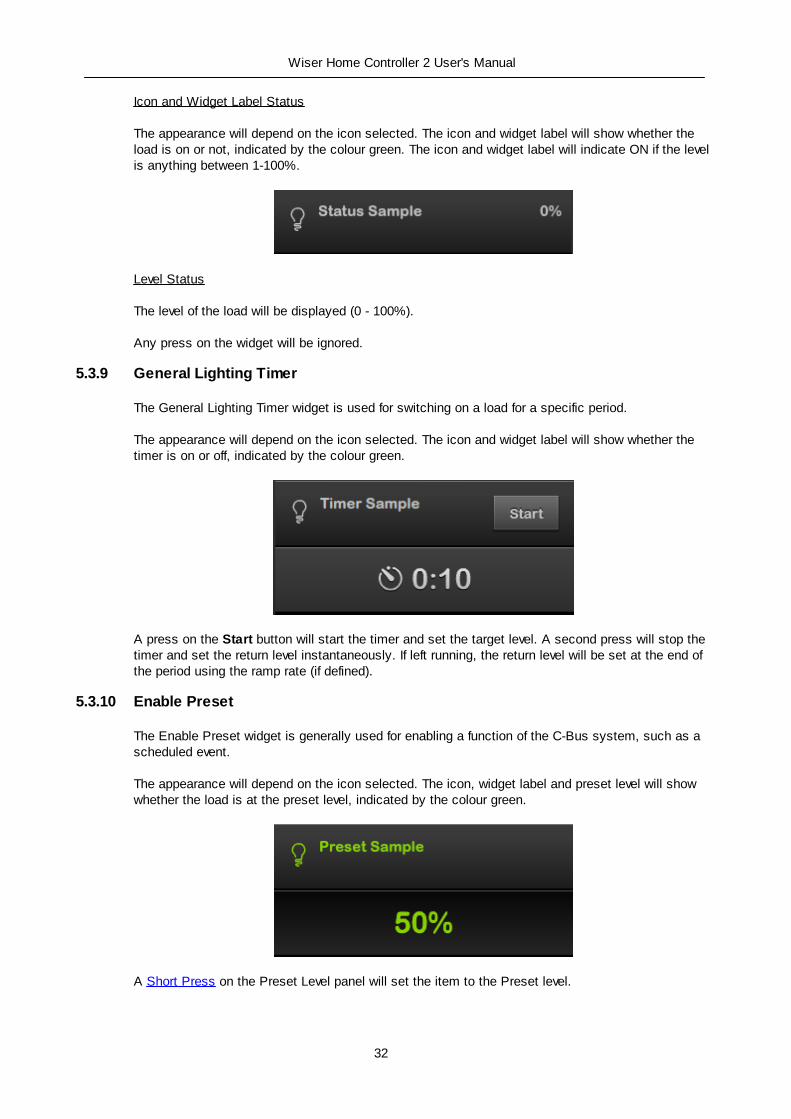
Icon and Widget Label Status
The appearance will depend on the icon selected. The icon and widget label will show whether theload is on or not, indicated by the colour green. The icon and widget label will indicate ON if the levelis anything between 1-100%.
Level Status
The level of the load will be displayed (0 - 100%).
Any press on the widget will be ignored.
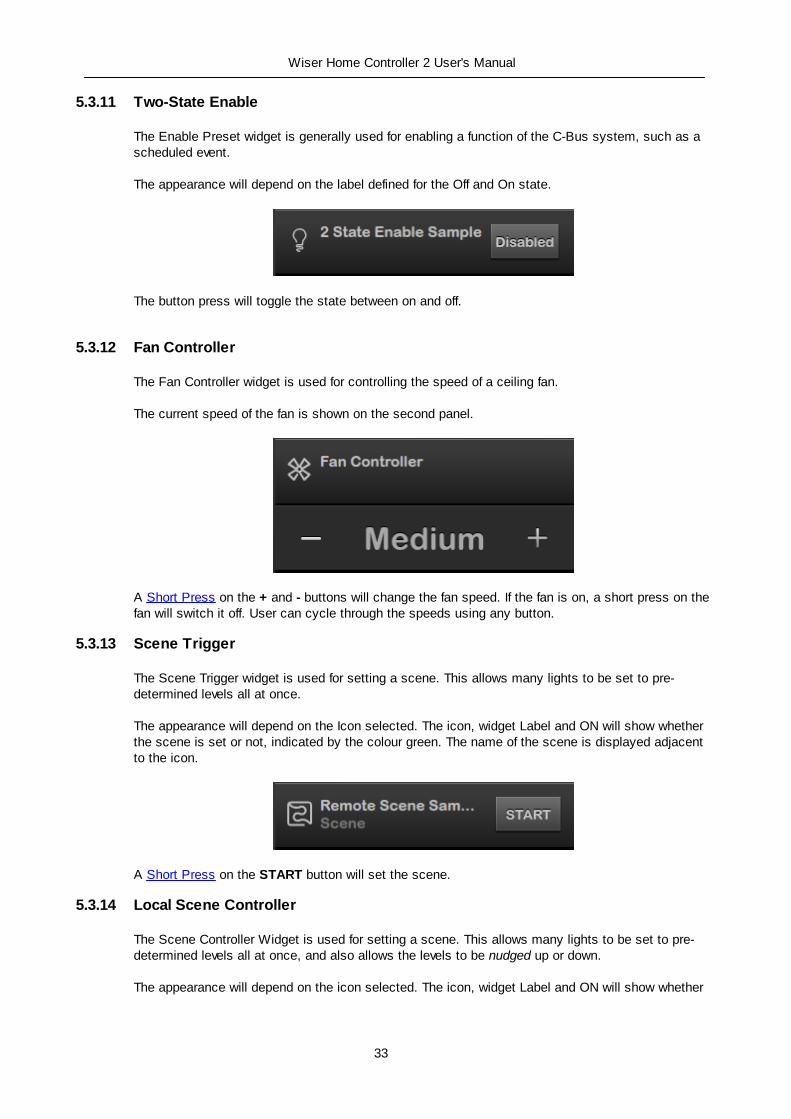
5.3.9 General Lighting Timer
The General Lighting Timer widget is used for switching on a load for a specific period.
The appearance will depend on the icon selected. The icon and widget label will show whether thetimer is on or off, indicated by the colour green.
A press on the Start button will start the timer and set the target level. A second press will stop thetimer and set the return level instantaneously. If left running, the return level will be set at the end ofthe period using the ramp rate (if defined).
5.3.10 Enable Preset
The Enable Preset widget is generally used for enabling a function of the C-Bus system, such as ascheduled event.
The appearance will depend on the icon selected. The icon, widget label and preset level will showwhether the load is at the preset level, indicated by the colour green.
A Short Press on the Preset Level panel will set the item to the Preset level.
33
Wiser Home Controller 2 User's Manual
5.3.11 Two-State Enable
The Enable Preset widget is generally used for enabling a function of the C-Bus system, such as ascheduled event.
The appearance will depend on the label defined for the Off and On state.
The button press will toggle the state between on and off.
5.3.12 Fan Controller
The Fan Controller widget is used for controlling the speed of a ceiling fan.
The current speed of the fan is shown on the second panel.
A Short Press on the + and - buttons will change the fan speed. If the fan is on, a short press on thefan will switch it off. User can cycle through the speeds using any button.
5.3.13 Scene Trigger
The Scene Trigger widget is used for setting a scene. This allows many lights to be set to pre-determined levels all at once.
The appearance will depend on the Icon selected. The icon, widget Label and ON will show whetherthe scene is set or not, indicated by the colour green. The name of the scene is displayed adjacentto the icon.
A Short Press on the START button will set the scene.
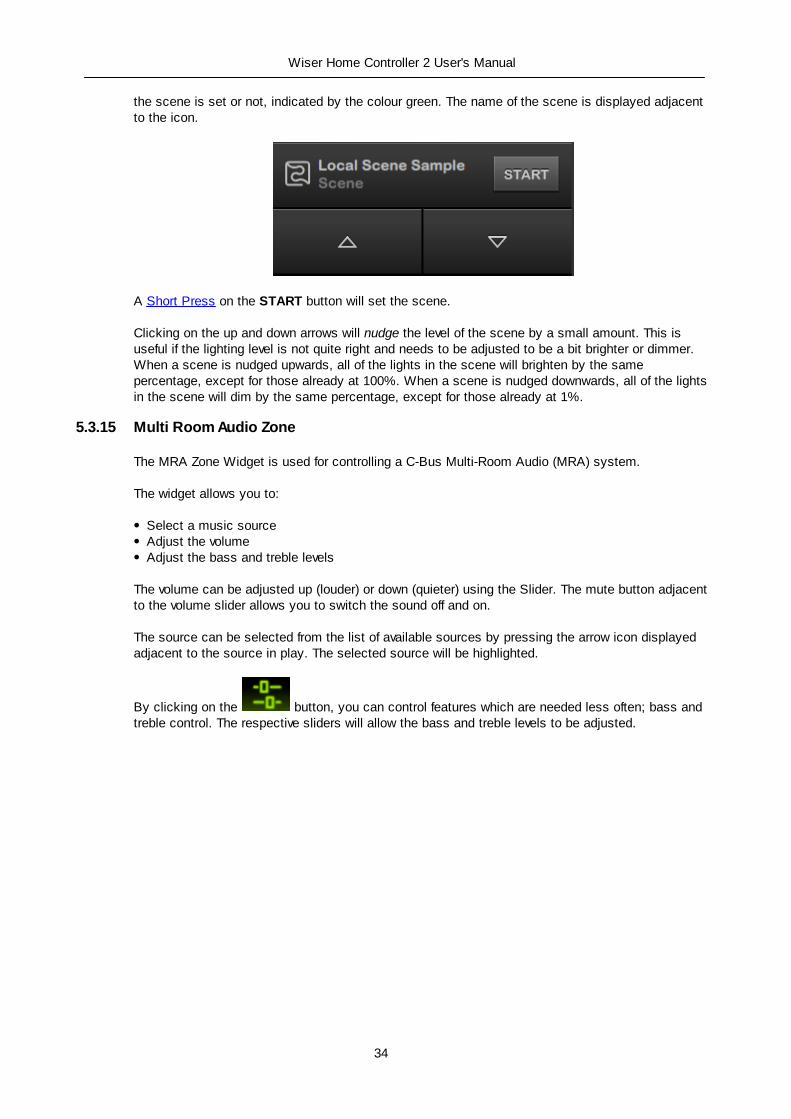
5.3.14 Local Scene Controller
The Scene Controller Widget is used for setting a scene. This allows many lights to be set to pre-determined levels all at once, and also allows the levels to be nudged up or down.
The appearance will depend on the icon selected. The icon, widget Label and ON will show whether
34
Wiser Home Controller 2 User's Manual
the scene is set or not, indicated by the colour green. The name of the scene is displayed adjacentto the icon.
A Short Press on the START button will set the scene.
Clicking on the up and down arrows will nudge the level of the scene by a small amount. This isuseful if the lighting level is not quite right and needs to be adjusted to be a bit brighter or dimmer.When a scene is nudged upwards, all of the lights in the scene will brighten by the samepercentage, except for those already at 100%. When a scene is nudged downwards, all of the lightsin the scene will dim by the same percentage, except for those already at 1%.
5.3.15 Multi Room Audio Zone
The MRA Zone Widget is used for controlling a C-Bus Multi-Room Audio (MRA) system.
The widget allows you to:
Select a music sourceAdjust the volumeAdjust the bass and treble levels
The volume can be adjusted up (louder) or down (quieter) using the Slider. The mute button adjacentto the volume slider allows you to switch the sound off and on.
The source can be selected from the list of available sources by pressing the arrow icon displayedadjacent to the source in play. The selected source will be highlighted.
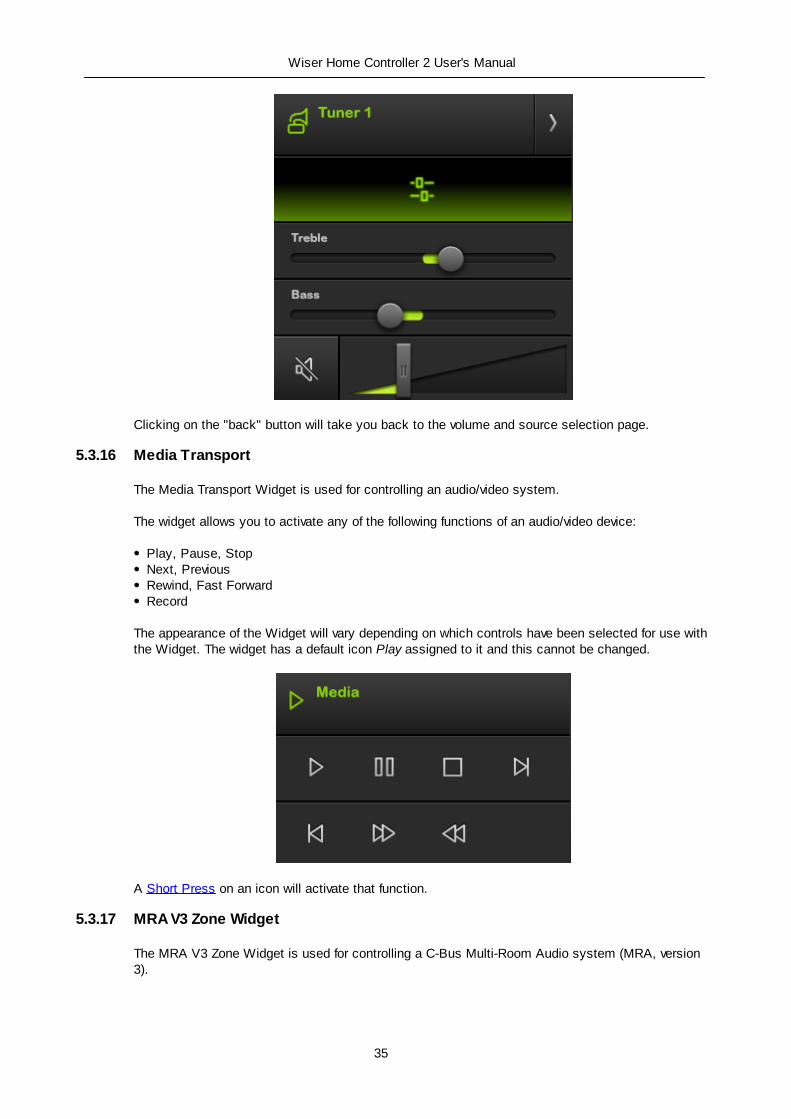
By clicking on the button, you can control features which are needed less often; bass andtreble control. The respective sliders will allow the bass and treble levels to be adjusted.
35
Wiser Home Controller 2 User's Manual
Clicking on the "back" button will take you back to the volume and source selection page.
5.3.16 Media Transport
The Media Transport Widget is used for controlling an audio/video system.
The widget allows you to activate any of the following functions of an audio/video device:
Play, Pause, StopNext, PreviousRewind, Fast ForwardRecord
The appearance of the Widget will vary depending on which controls have been selected for use withthe Widget. The widget has a default icon Play assigned to it and this cannot be changed.
A Short Press on an icon will activate that function.
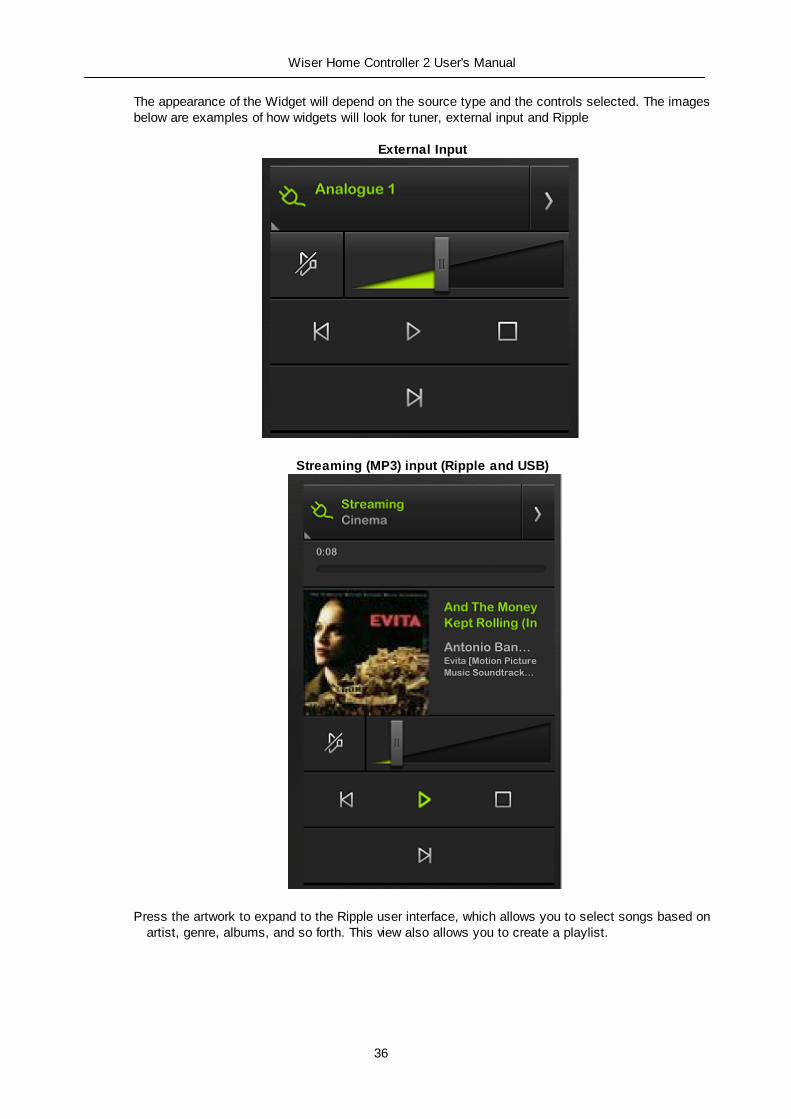
5.3.17 MRA V3 Zone Widget
The MRA V3 Zone Widget is used for controlling a C-Bus Multi-Room Audio system (MRA, version3).
36
Wiser Home Controller 2 User's Manual
The appearance of the Widget will depend on the source type and the controls selected. The imagesbelow are examples of how widgets will look for tuner, external input and Ripple
External Input
Streaming (MP3) input (Ripple and USB)
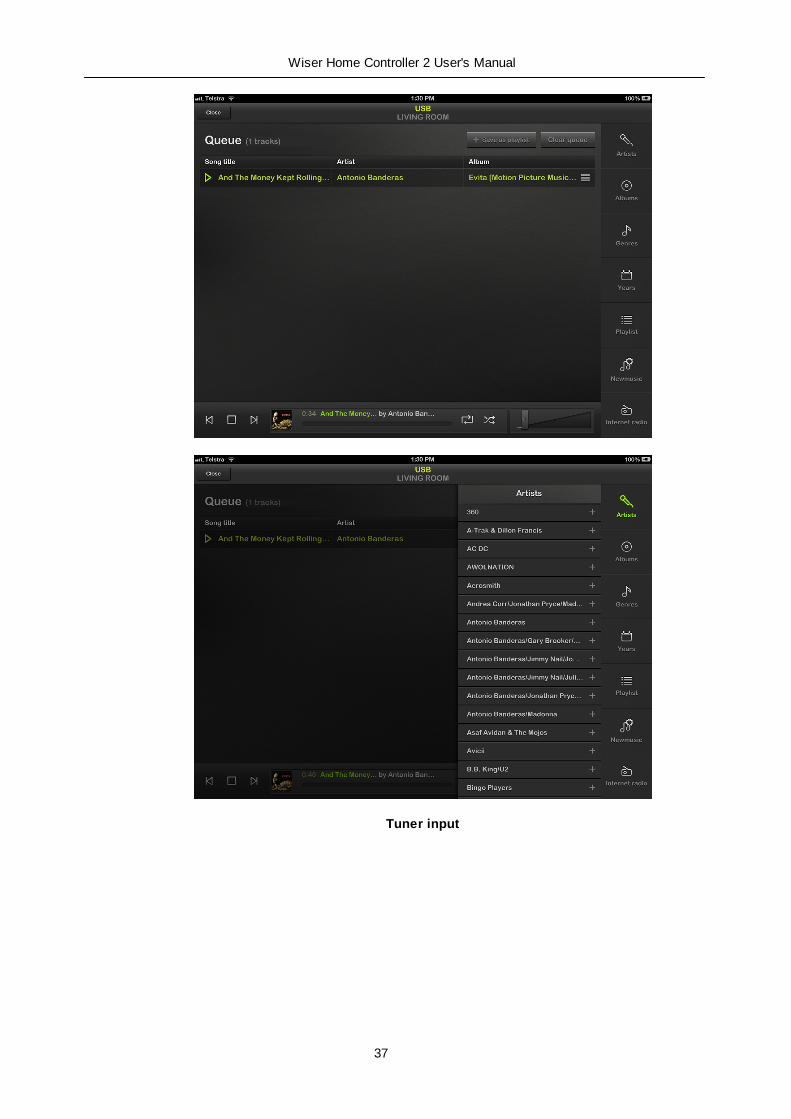
Press the artwork to expand to the Ripple user interface, which allows you to select songs based onartist, genre, albums, and so forth. This view also allows you to create a playlist.
37
Wiser Home Controller 2 User's Manual
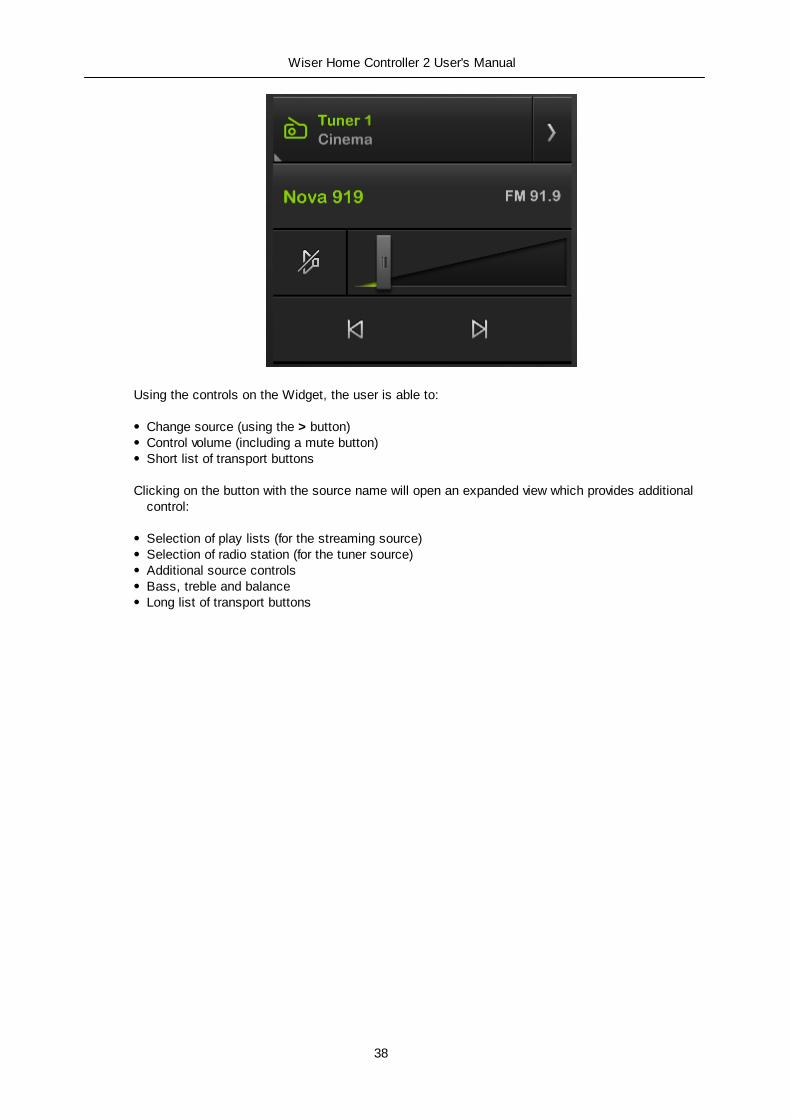
Tuner input
38
Wiser Home Controller 2 User's Manual
Using the controls on the Widget, the user is able to:
Change source (using the > button)Control volume (including a mute button)Short list of transport buttons
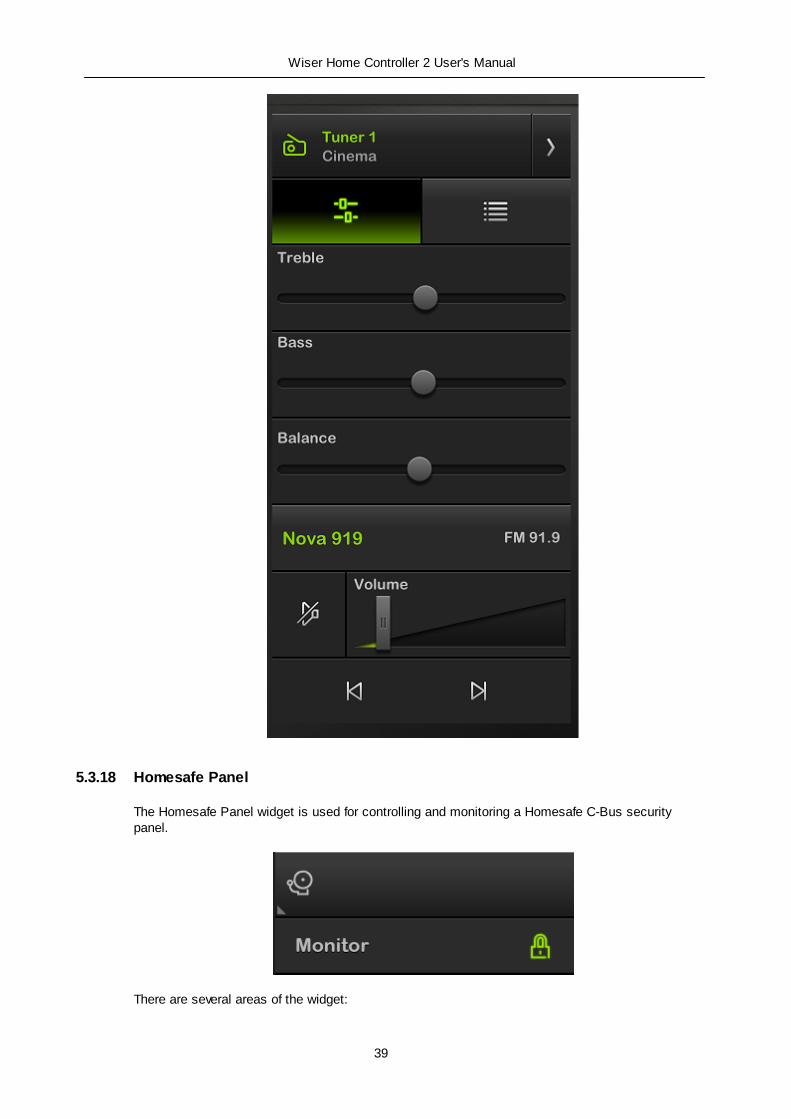
Clicking on the button with the source name will open an expanded view which provides additionalcontrol:
Selection of play lists (for the streaming source)Selection of radio station (for the tuner source)Additional source controlsBass, treble and balanceLong list of transport buttons
39
Wiser Home Controller 2 User's Manual
5.3.18 Homesafe Panel
The Homesafe Panel widget is used for controlling and monitoring a Homesafe C-Bus securitypanel.
There are several areas of the widget:

40
Wiser Home Controller 2 User's Manual
Panel status - this shows whether the security panel is armed, disarmed, or has alarmsKeypad - this is used in the same was as a regular security panel keypadAlarm status - this shows if any alarms have been raised and, if yes, which onesZone status - these show whether the zones are secure or not
41
Wiser Home Controller 2 User's Manual
5.3.19 MinderPro Panel
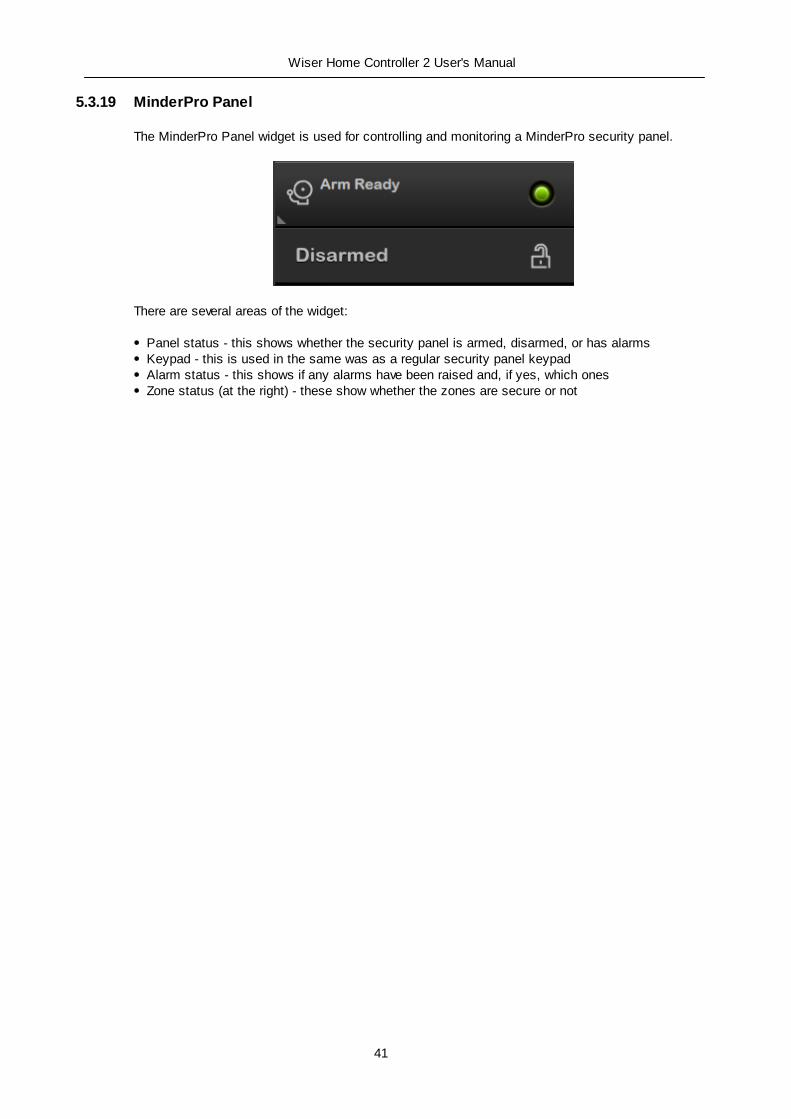
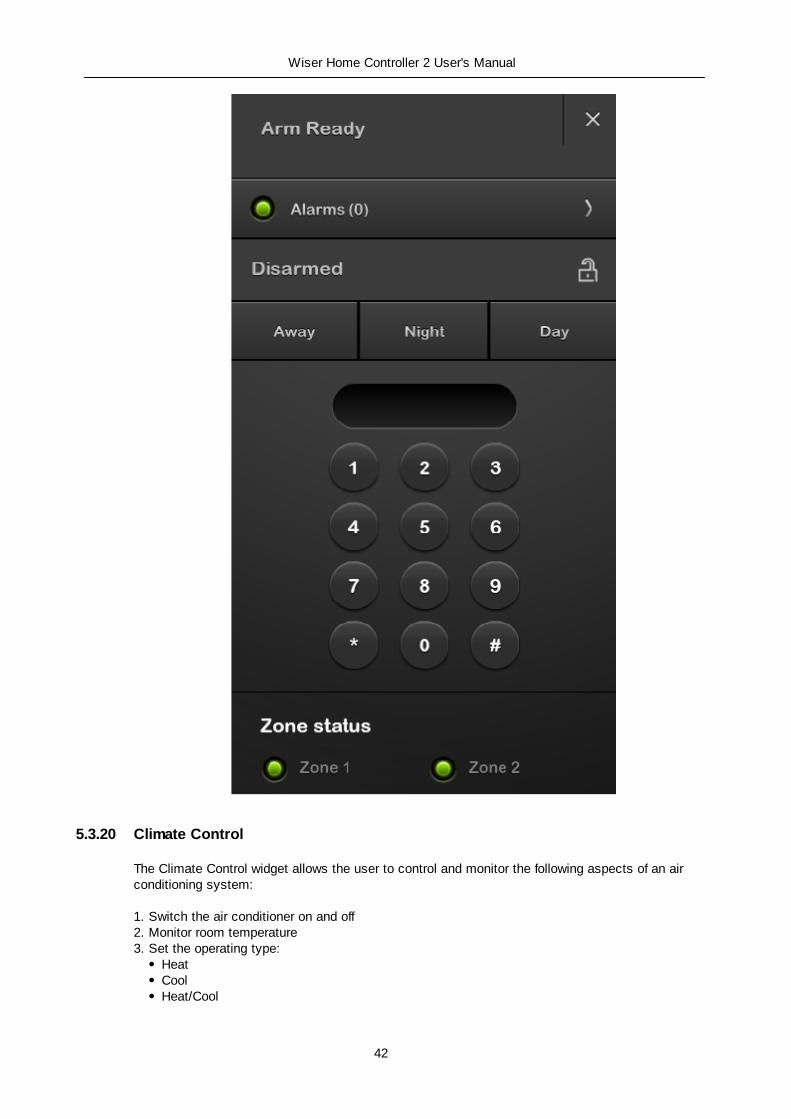
The MinderPro Panel widget is used for controlling and monitoring a MinderPro security panel.
There are several areas of the widget:
Panel status - this shows whether the security panel is armed, disarmed, or has alarmsKeypad - this is used in the same was as a regular security panel keypadAlarm status - this shows if any alarms have been raised and, if yes, which onesZone status (at the right) - these show whether the zones are secure or not
42
Wiser Home Controller 2 User's Manual
5.3.20 Climate Control
The Climate Control widget allows the user to control and monitor the following aspects of an airconditioning system:
1. Switch the air conditioner on and off2. Monitor room temperature3. Set the operating type:
HeatCoolHeat/Cool
43
Wiser Home Controller 2 User's Manual
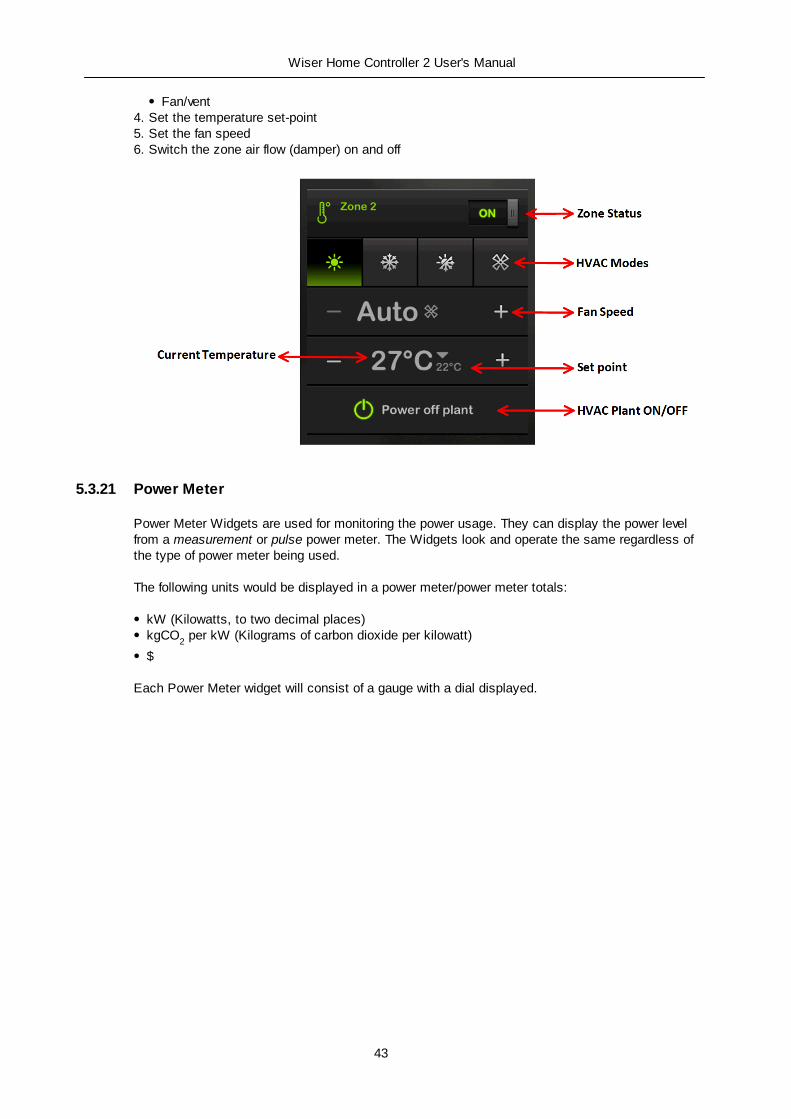
Fan/vent4. Set the temperature set-point5. Set the fan speed6. Switch the zone air flow (damper) on and off
5.3.21 Power Meter
Power Meter Widgets are used for monitoring the power usage. They can display the power levelfrom a measurement or pulse power meter. The Widgets look and operate the same regardless ofthe type of power meter being used.
The following units would be displayed in a power meter/power meter totals:
kW (Kilowatts, to two decimal places)kgCO
2 per kW (Kilograms of carbon dioxide per kilowatt)
$
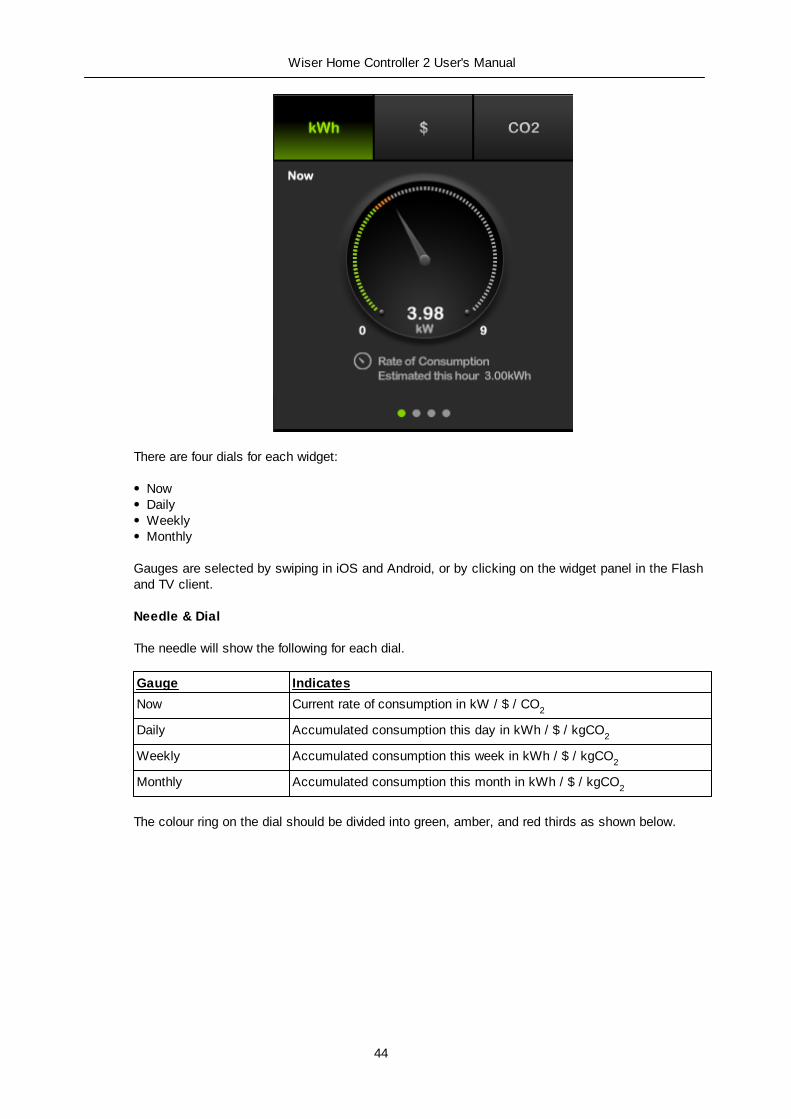
Each Power Meter widget will consist of a gauge with a dial displayed.
44
Wiser Home Controller 2 User's Manual
There are four dials for each widget:
NowDailyWeeklyMonthly
Gauges are selected by swiping in iOS and Android, or by clicking on the widget panel in the Flashand TV client.
Needle & Dial
The needle will show the following for each dial.
Gauge Indicates
Now Current rate of consumption in kW / $ / CO2
Daily Accumulated consumption this day in kWh / $ / kgCO2
Weekly Accumulated consumption this week in kWh / $ / kgCO2
Monthly Accumulated consumption this month in kWh / $ / kgCO2
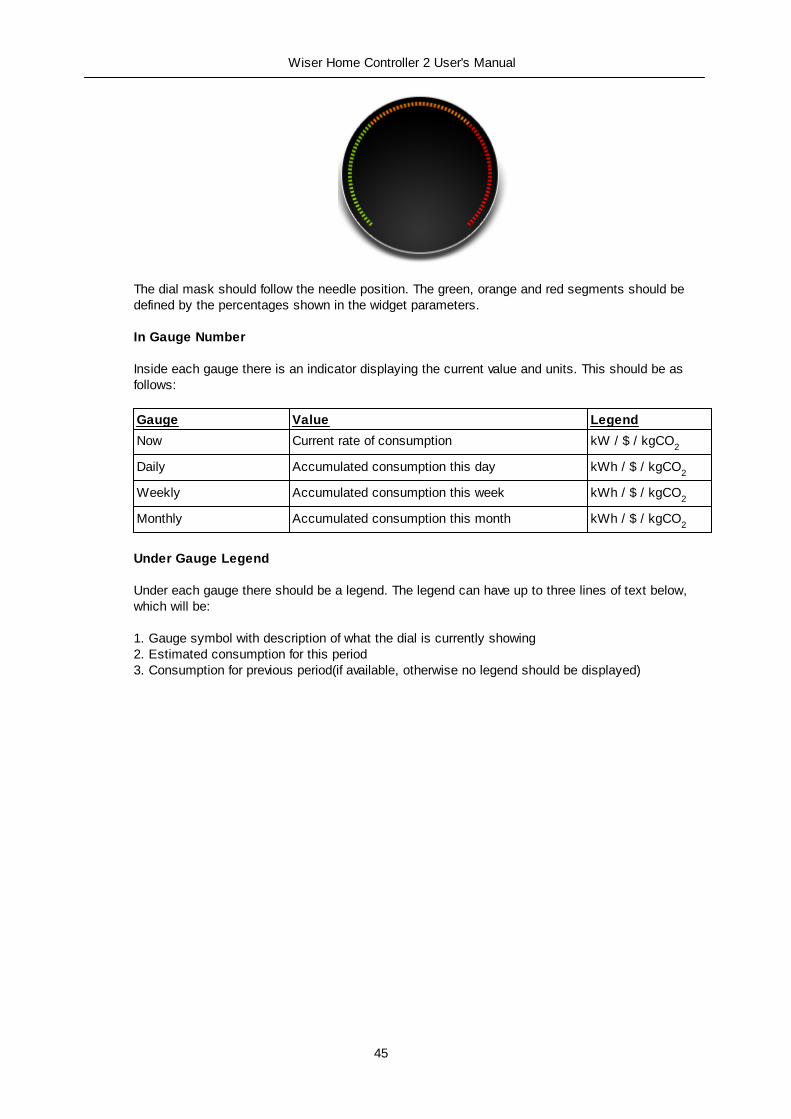
The colour ring on the dial should be divided into green, amber, and red thirds as shown below.
45
Wiser Home Controller 2 User's Manual
The dial mask should follow the needle position. The green, orange and red segments should bedefined by the percentages shown in the widget parameters.
In Gauge Number
Inside each gauge there is an indicator displaying the current value and units. This should be asfollows:
Gauge Value Legend
Now Current rate of consumption kW / $ / kgCO2
Daily Accumulated consumption this day kWh / $ / kgCO2
Weekly Accumulated consumption this week kWh / $ / kgCO2
Monthly Accumulated consumption this month kWh / $ / kgCO2
Under Gauge Legend
Under each gauge there should be a legend. The legend can have up to three lines of text below,which will be:
1. Gauge symbol with description of what the dial is currently showing2. Estimated consumption for this period3. Consumption for previous period(if available, otherwise no legend should be displayed)

46
Wiser Home Controller 2 User's Manual
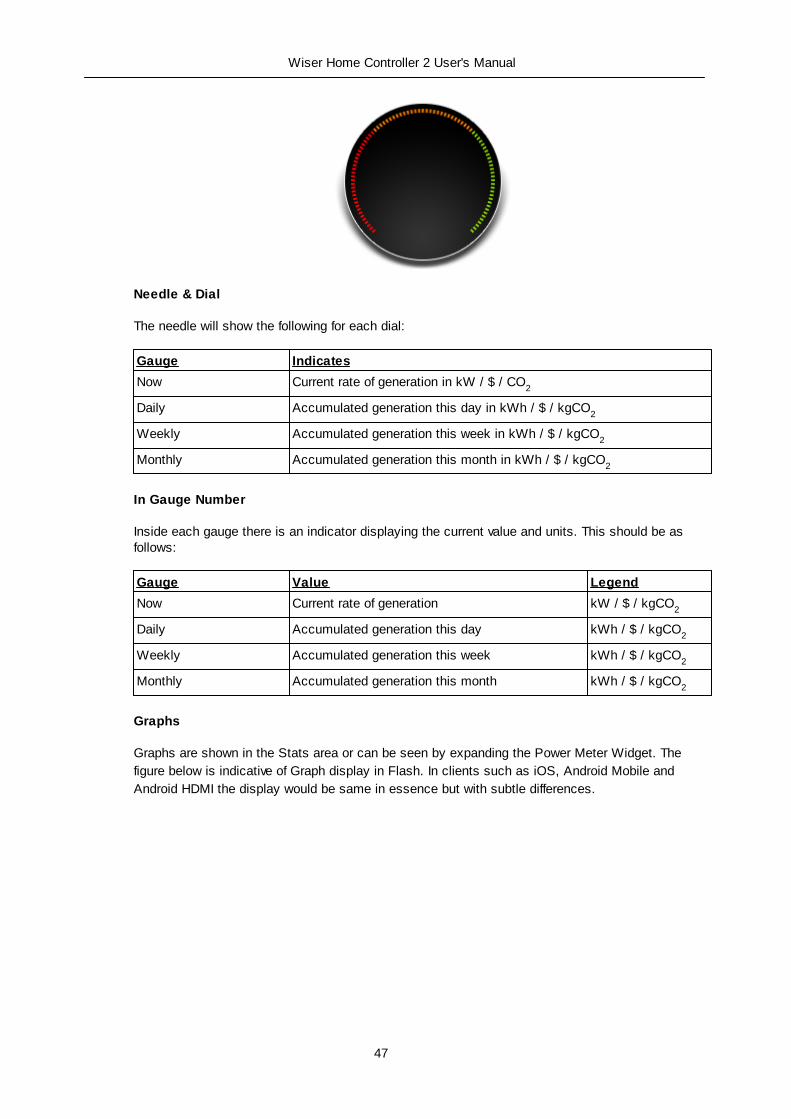
Generators
Each power meter can be a consumer or a generator. If a meter is a generator, the dial and legendsare displayed differently.
47
Wiser Home Controller 2 User's Manual
Needle & Dial
The needle will show the following for each dial:
Gauge Indicates
Now Current rate of generation in kW / $ / CO2
Daily Accumulated generation this day in kWh / $ / kgCO2
Weekly Accumulated generation this week in kWh / $ / kgCO2
Monthly Accumulated generation this month in kWh / $ / kgCO2
In Gauge Number
Inside each gauge there is an indicator displaying the current value and units. This should be asfollows:
Gauge Value Legend
Now Current rate of generation kW / $ / kgCO2
Daily Accumulated generation this day kWh / $ / kgCO2
Weekly Accumulated generation this week kWh / $ / kgCO2
Monthly Accumulated generation this month kWh / $ / kgCO2
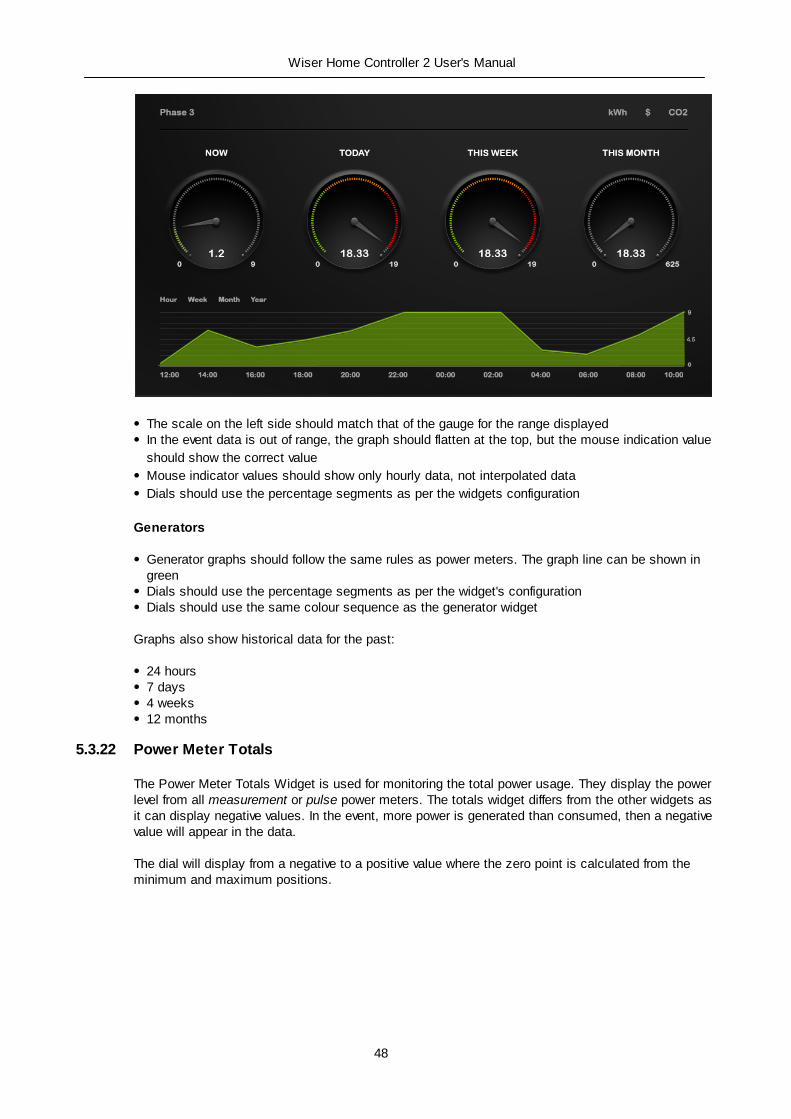
Graphs
Graphs are shown in the Stats area or can be seen by expanding the Power Meter Widget. The
figure below is indicative of Graph display in Flash. In clients such as iOS, Android Mobile and
Android HDMI the display would be same in essence but with subtle differences.
48
Wiser Home Controller 2 User's Manual
The scale on the left side should match that of the gauge for the range displayedIn the event data is out of range, the graph should flatten at the top, but the mouse indication value
should show the correct value
Mouse indicator values should show only hourly data, not interpolated data
Dials should use the percentage segments as per the widgets configuration
Generators
Generator graphs should follow the same rules as power meters. The graph line can be shown ingreenDials should use the percentage segments as per the widget's configurationDials should use the same colour sequence as the generator widget
Graphs also show historical data for the past:
24 hours7 days4 weeks12 months
5.3.22 Power Meter Totals
The Power Meter Totals Widget is used for monitoring the total power usage. They display the powerlevel from all measurement or pulse power meters. The totals widget differs from the other widgets asit can display negative values. In the event, more power is generated than consumed, then a negativevalue will appear in the data.
The dial will display from a negative to a positive value where the zero point is calculated from theminimum and maximum positions.
49
Wiser Home Controller 2 User's Manual
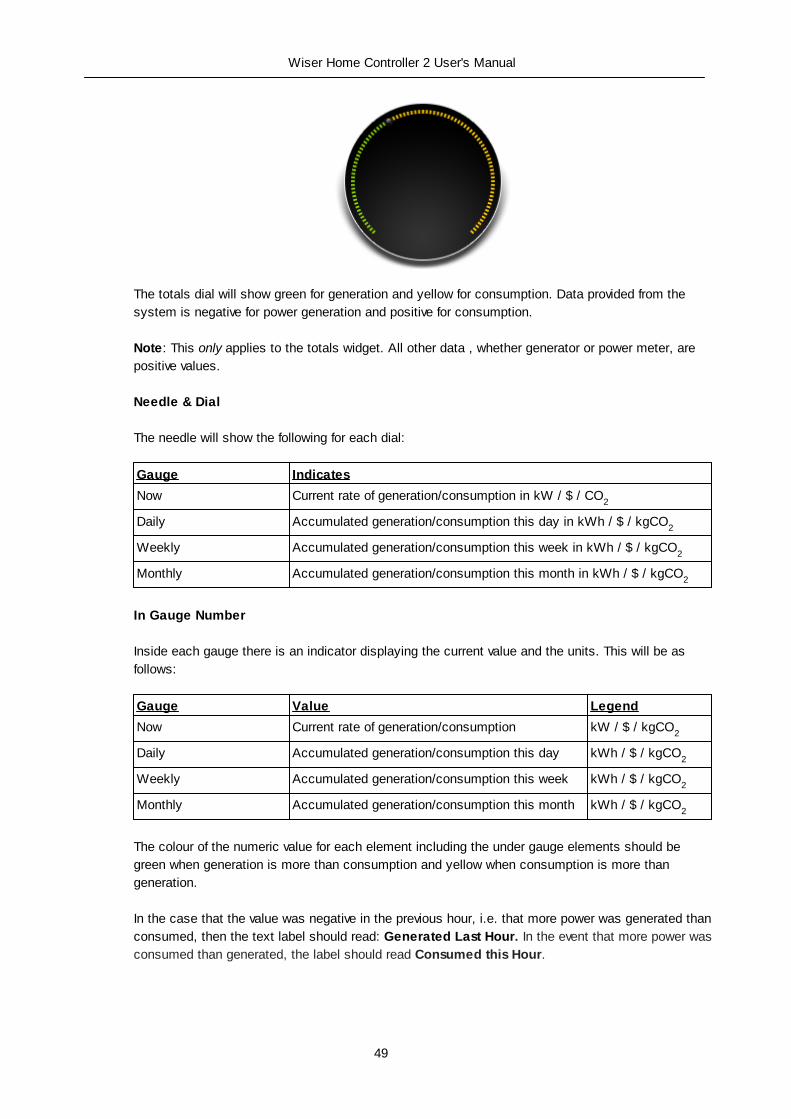
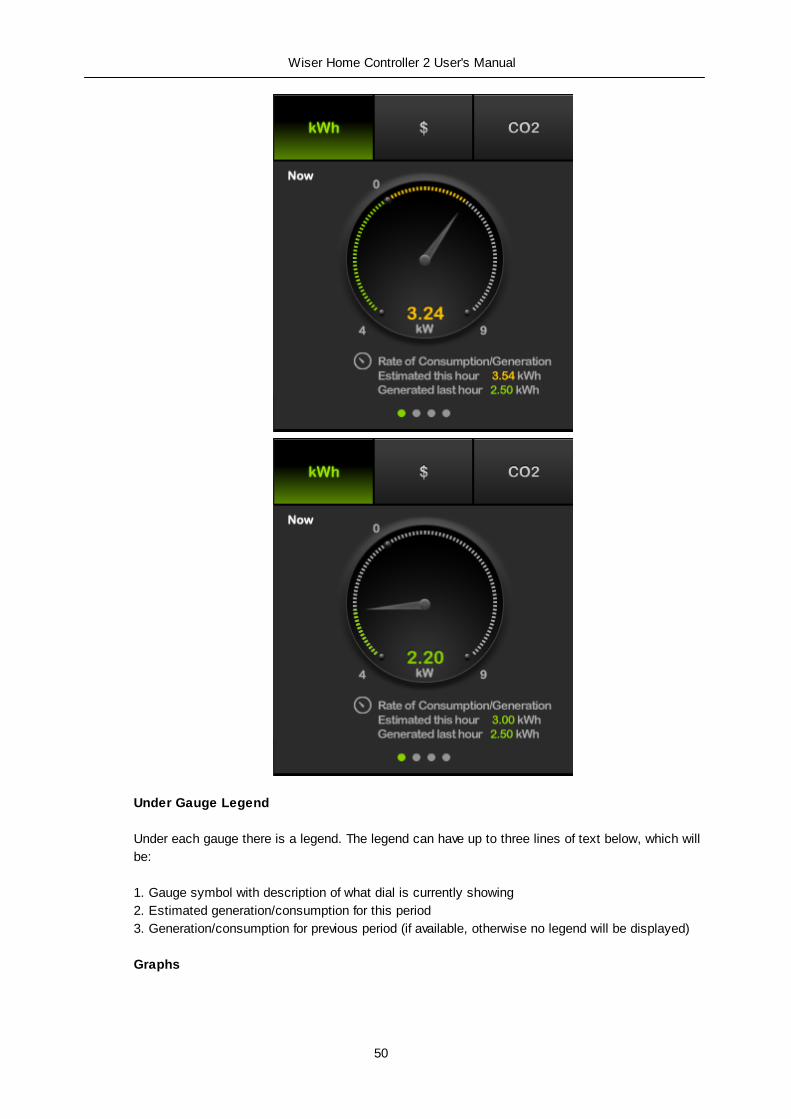
The totals dial will show green for generation and yellow for consumption. Data provided from the
system is negative for power generation and positive for consumption.
Note: This only applies to the totals widget. All other data , whether generator or power meter, are
positive values.
Needle & Dial
The needle will show the following for each dial:
Gauge Indicates
Now Current rate of generation/consumption in kW / $ / CO2
Daily Accumulated generation/consumption this day in kWh / $ / kgCO2
Weekly Accumulated generation/consumption this week in kWh / $ / kgCO2
Monthly Accumulated generation/consumption this month in kWh / $ / kgCO2
In Gauge Number
Inside each gauge there is an indicator displaying the current value and the units. This will be as
follows:
Gauge Value Legend
Now Current rate of generation/consumption kW / $ / kgCO2
Daily Accumulated generation/consumption this day kWh / $ / kgCO2
Weekly Accumulated generation/consumption this week kWh / $ / kgCO2
Monthly Accumulated generation/consumption this month kWh / $ / kgCO2
The colour of the numeric value for each element including the under gauge elements should be
green when generation is more than consumption and yellow when consumption is more than
generation.
In the case that the value was negative in the previous hour, i.e. that more power was generated than
consumed, then the text label should read: Generated Last Hour. In the event that more power was
consumed than generated, the label should read Consumed this Hour.
50
Wiser Home Controller 2 User's Manual
Under Gauge Legend
Under each gauge there is a legend. The legend can have up to three lines of text below, which will
be:
1. Gauge symbol with description of what dial is currently showing
2. Estimated generation/consumption for this period
3. Generation/consumption for previous period (if available, otherwise no legend will be displayed)
Graphs
51
Wiser Home Controller 2 User's Manual
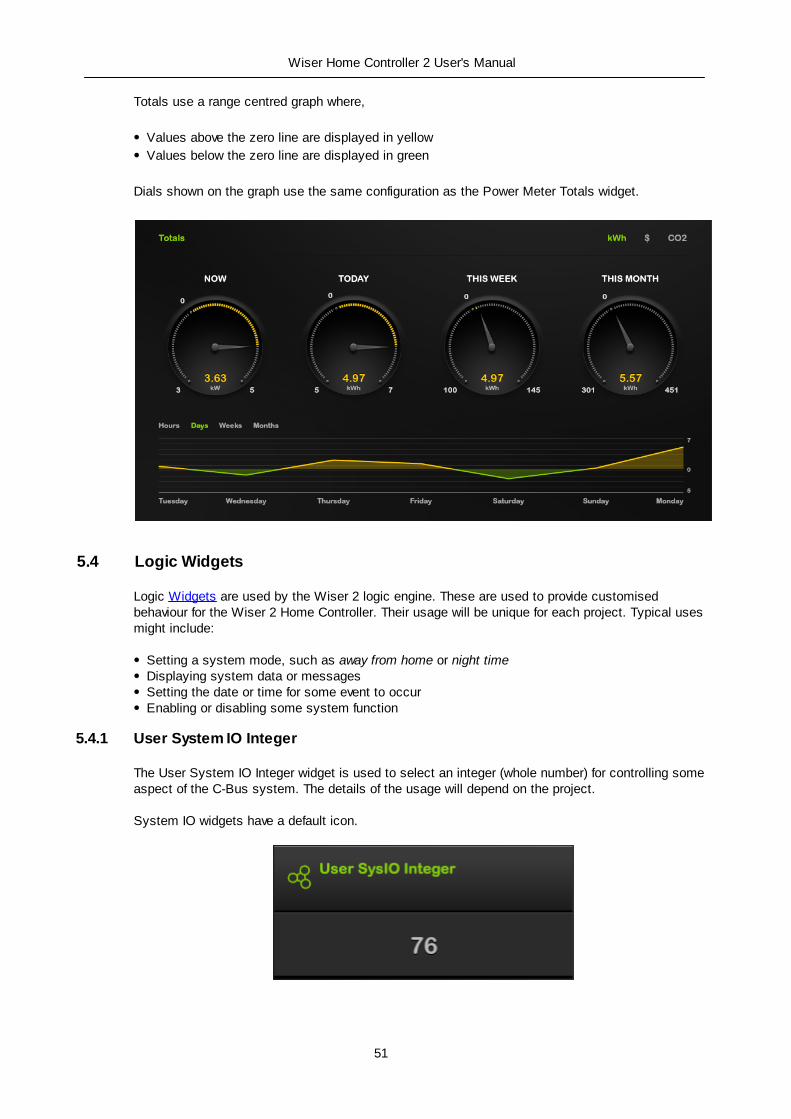
Totals use a range centred graph where,
Values above the zero line are displayed in yellow
Values below the zero line are displayed in green
Dials shown on the graph use the same configuration as the Power Meter Totals widget.
5.4 Logic Widgets
Logic Widgets are used by the Wiser 2 logic engine. These are used to provide customisedbehaviour for the Wiser 2 Home Controller. Their usage will be unique for each project. Typical usesmight include:
Setting a system mode, such as away from home or night timeDisplaying system data or messagesSetting the date or time for some event to occurEnabling or disabling some system function
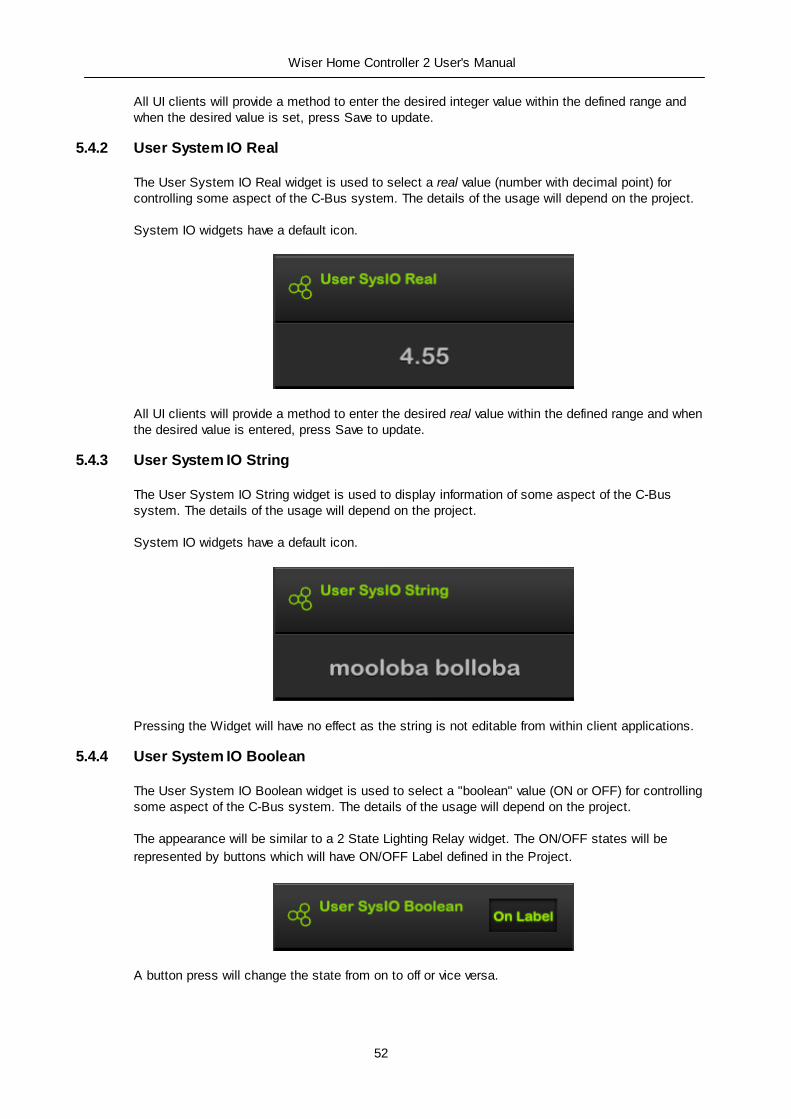
5.4.1 User System IO Integer
The User System IO Integer widget is used to select an integer (whole number) for controlling someaspect of the C-Bus system. The details of the usage will depend on the project.
System IO widgets have a default icon.
52
Wiser Home Controller 2 User's Manual
All UI clients will provide a method to enter the desired integer value within the defined range andwhen the desired value is set, press Save to update.
5.4.2 User System IO Real
The User System IO Real widget is used to select a real value (number with decimal point) forcontrolling some aspect of the C-Bus system. The details of the usage will depend on the project.
System IO widgets have a default icon.
All UI clients will provide a method to enter the desired real value within the defined range and whenthe desired value is entered, press Save to update.
5.4.3 User System IO String
The User System IO String widget is used to display information of some aspect of the C-Bussystem. The details of the usage will depend on the project.
System IO widgets have a default icon.
Pressing the Widget will have no effect as the string is not editable from within client applications.
5.4.4 User System IO Boolean
The User System IO Boolean widget is used to select a "boolean" value (ON or OFF) for controllingsome aspect of the C-Bus system. The details of the usage will depend on the project.
The appearance will be similar to a 2 State Lighting Relay widget. The ON/OFF states will be
represented by buttons which will have ON/OFF Label defined in the Project.
A button press will change the state from on to off or vice versa.
53
Wiser Home Controller 2 User's Manual
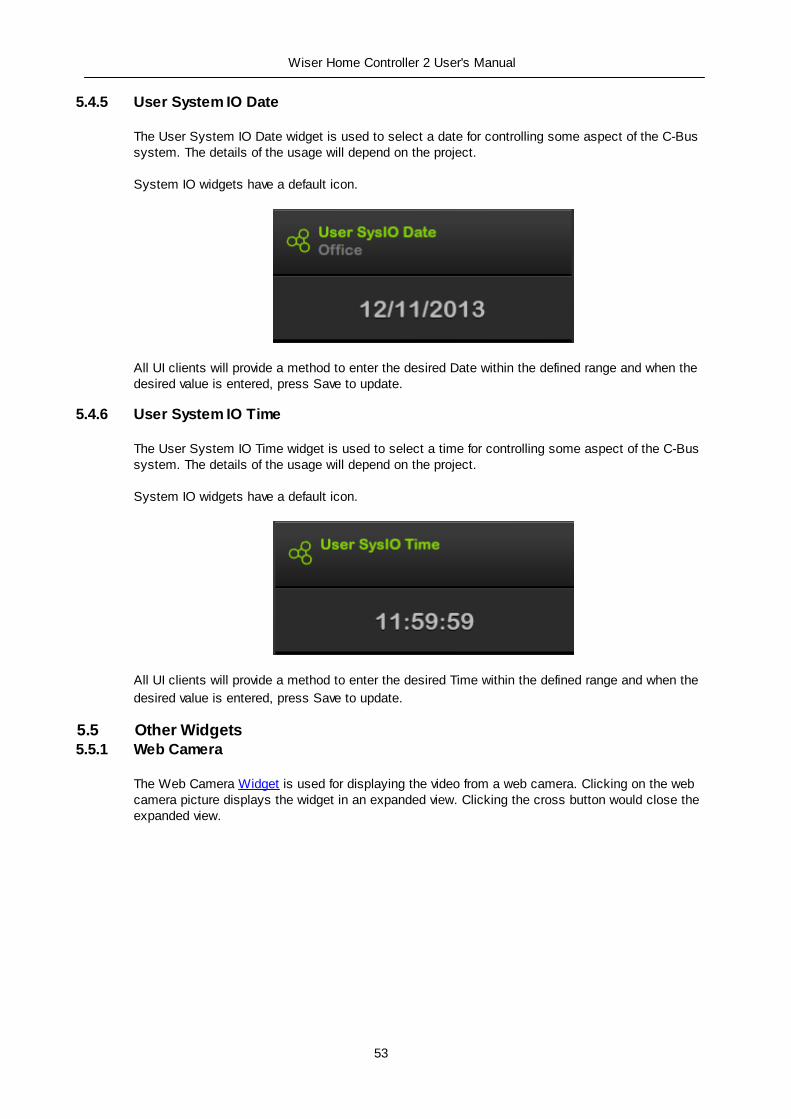
5.4.5 User System IO Date
The User System IO Date widget is used to select a date for controlling some aspect of the C-Bussystem. The details of the usage will depend on the project.
System IO widgets have a default icon.
All UI clients will provide a method to enter the desired Date within the defined range and when thedesired value is entered, press Save to update.
5.4.6 User System IO Time
The User System IO Time widget is used to select a time for controlling some aspect of the C-Bussystem. The details of the usage will depend on the project.
System IO widgets have a default icon.
All UI clients will provide a method to enter the desired Time within the defined range and when the
desired value is entered, press Save to update.
5.5 Other Widgets5.5.1 Web Camera
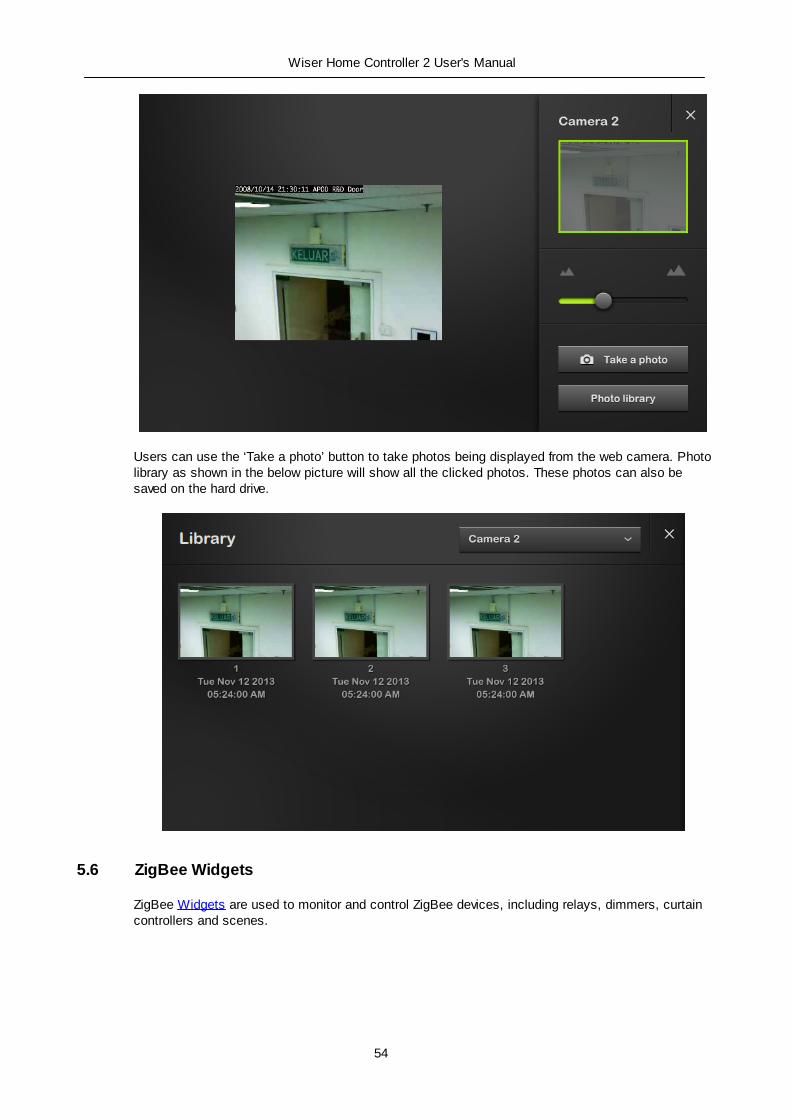
The Web Camera Widget is used for displaying the video from a web camera. Clicking on the webcamera picture displays the widget in an expanded view. Clicking the cross button would close theexpanded view.
54
Wiser Home Controller 2 User's Manual
Users can use the ‘Take a photo’ button to take photos being displayed from the web camera. Photolibrary as shown in the below picture will show all the clicked photos. These photos can also besaved on the hard drive.
5.6 ZigBee Widgets
ZigBee Widgets are used to monitor and control ZigBee devices, including relays, dimmers, curtaincontrollers and scenes.
55
Wiser Home Controller 2 User's Manual
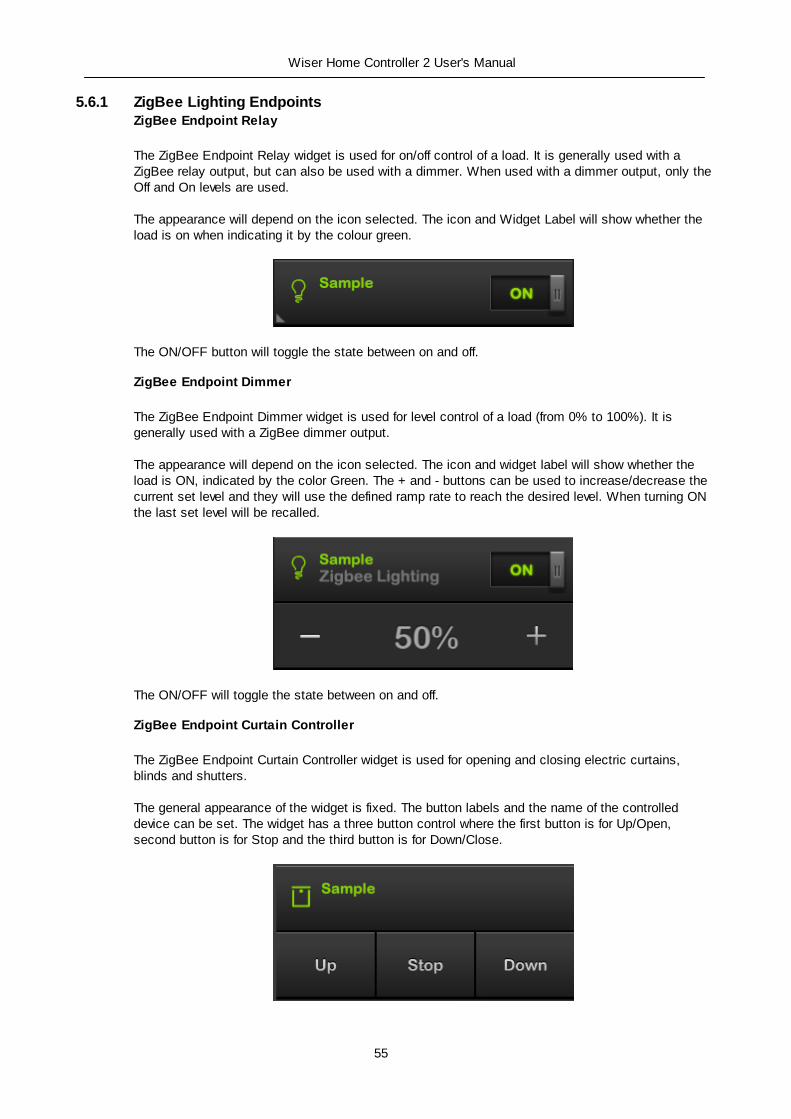
5.6.1 ZigBee Lighting EndpointsZigBee Endpoint Relay
The ZigBee Endpoint Relay widget is used for on/off control of a load. It is generally used with aZigBee relay output, but can also be used with a dimmer. When used with a dimmer output, only theOff and On levels are used.
The appearance will depend on the icon selected. The icon and Widget Label will show whether theload is on when indicating it by the colour green.
The ON/OFF button will toggle the state between on and off.
ZigBee Endpoint Dimmer
The ZigBee Endpoint Dimmer widget is used for level control of a load (from 0% to 100%). It isgenerally used with a ZigBee dimmer output.
The appearance will depend on the icon selected. The icon and widget label will show whether theload is ON, indicated by the color Green. The + and - buttons can be used to increase/decrease thecurrent set level and they will use the defined ramp rate to reach the desired level. When turning ONthe last set level will be recalled.
The ON/OFF will toggle the state between on and off.
ZigBee Endpoint Curtain Controller
The ZigBee Endpoint Curtain Controller widget is used for opening and closing electric curtains,blinds and shutters.
The general appearance of the widget is fixed. The button labels and the name of the controlleddevice can be set. The widget has a three button control where the first button is for Up/Open,second button is for Stop and the third button is for Down/Close.
56
Wiser Home Controller 2 User's Manual
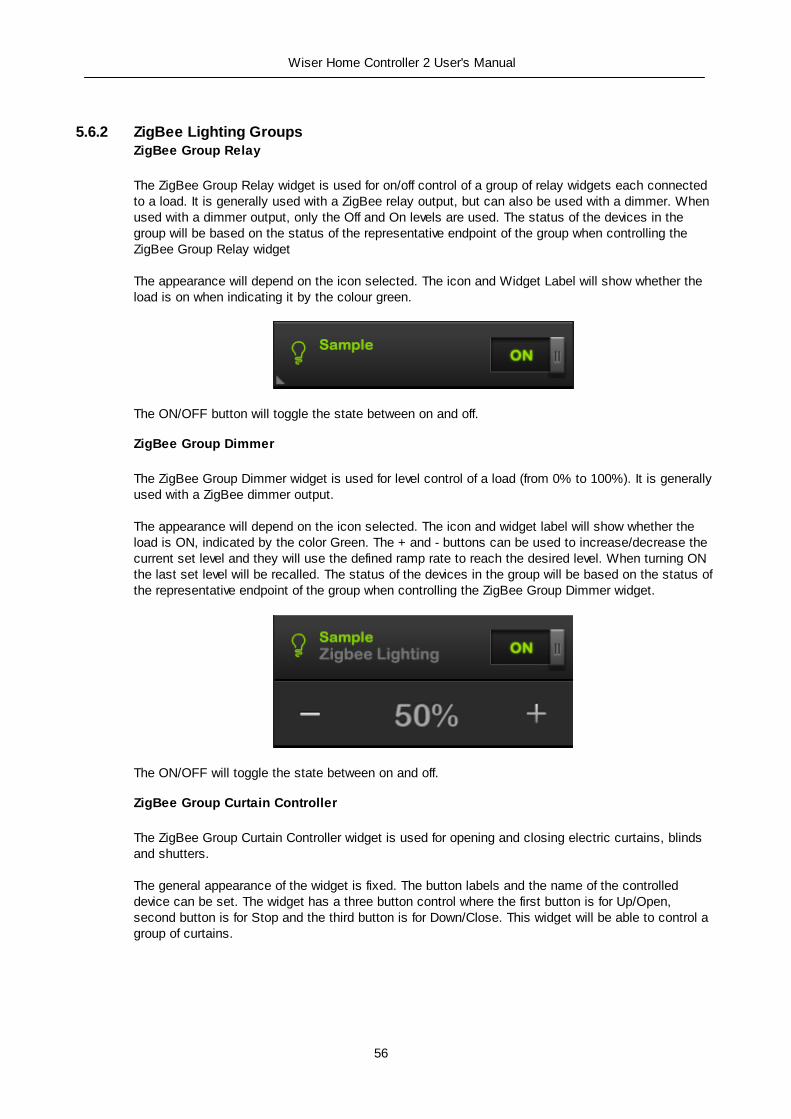
5.6.2 ZigBee Lighting GroupsZigBee Group Relay
The ZigBee Group Relay widget is used for on/off control of a group of relay widgets each connectedto a load. It is generally used with a ZigBee relay output, but can also be used with a dimmer. Whenused with a dimmer output, only the Off and On levels are used. The status of the devices in thegroup will be based on the status of the representative endpoint of the group when controlling theZigBee Group Relay widget
The appearance will depend on the icon selected. The icon and Widget Label will show whether theload is on when indicating it by the colour green.
The ON/OFF button will toggle the state between on and off.
ZigBee Group Dimmer
The ZigBee Group Dimmer widget is used for level control of a load (from 0% to 100%). It is generallyused with a ZigBee dimmer output.
The appearance will depend on the icon selected. The icon and widget label will show whether theload is ON, indicated by the color Green. The + and - buttons can be used to increase/decrease thecurrent set level and they will use the defined ramp rate to reach the desired level. When turning ONthe last set level will be recalled. The status of the devices in the group will be based on the status ofthe representative endpoint of the group when controlling the ZigBee Group Dimmer widget.
The ON/OFF will toggle the state between on and off.
ZigBee Group Curtain Controller
The ZigBee Group Curtain Controller widget is used for opening and closing electric curtains, blindsand shutters.
The general appearance of the widget is fixed. The button labels and the name of the controlleddevice can be set. The widget has a three button control where the first button is for Up/Open,second button is for Stop and the third button is for Down/Close. This widget will be able to control agroup of curtains.
57
Wiser Home Controller 2 User's Manual
5.6.3 ZigBee Lighting ScenesZigBee Group Scene
The ZigBee Group Scene Widget is used for setting a scene. This allows many lights and/ curtainsto be set to pre-determined levels all at once.
The appearance will depend on the icon selected. The icon, widget Label and ON will show whetherthe scene is set or not, indicated by the colour green. The name of the scene is displayed adjacentto the icon.
A Short Press on the START button will set the scene.
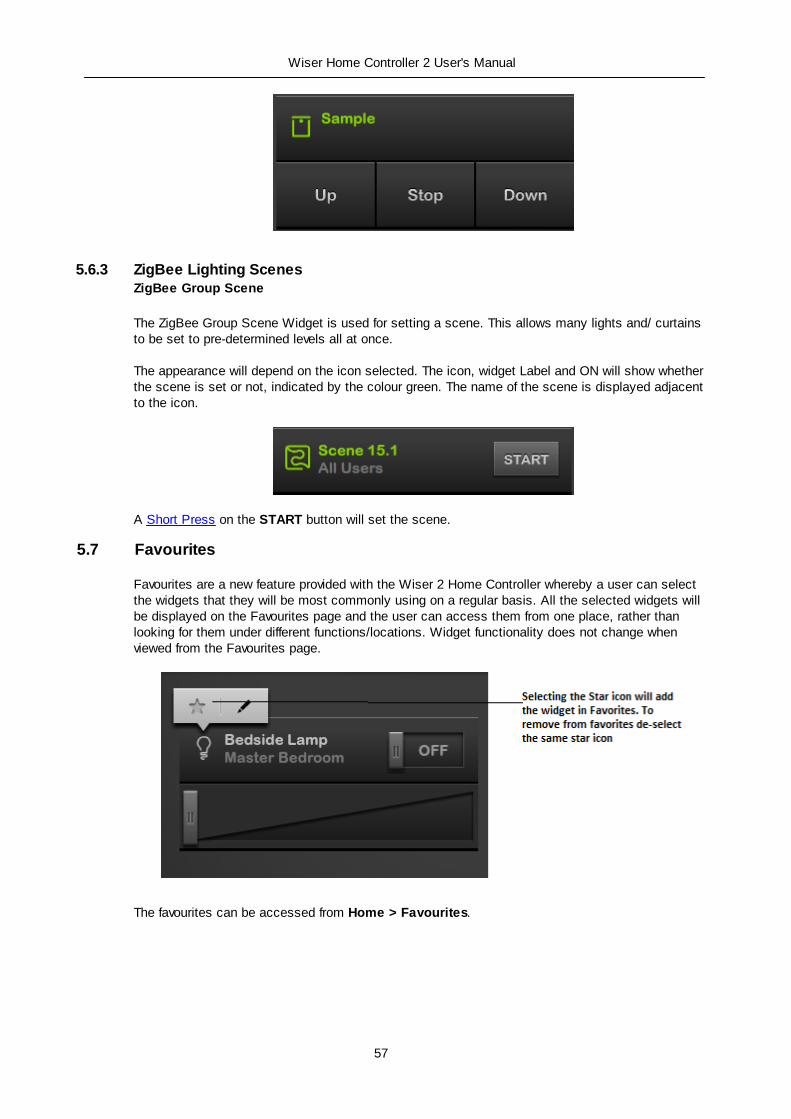
5.7 Favourites
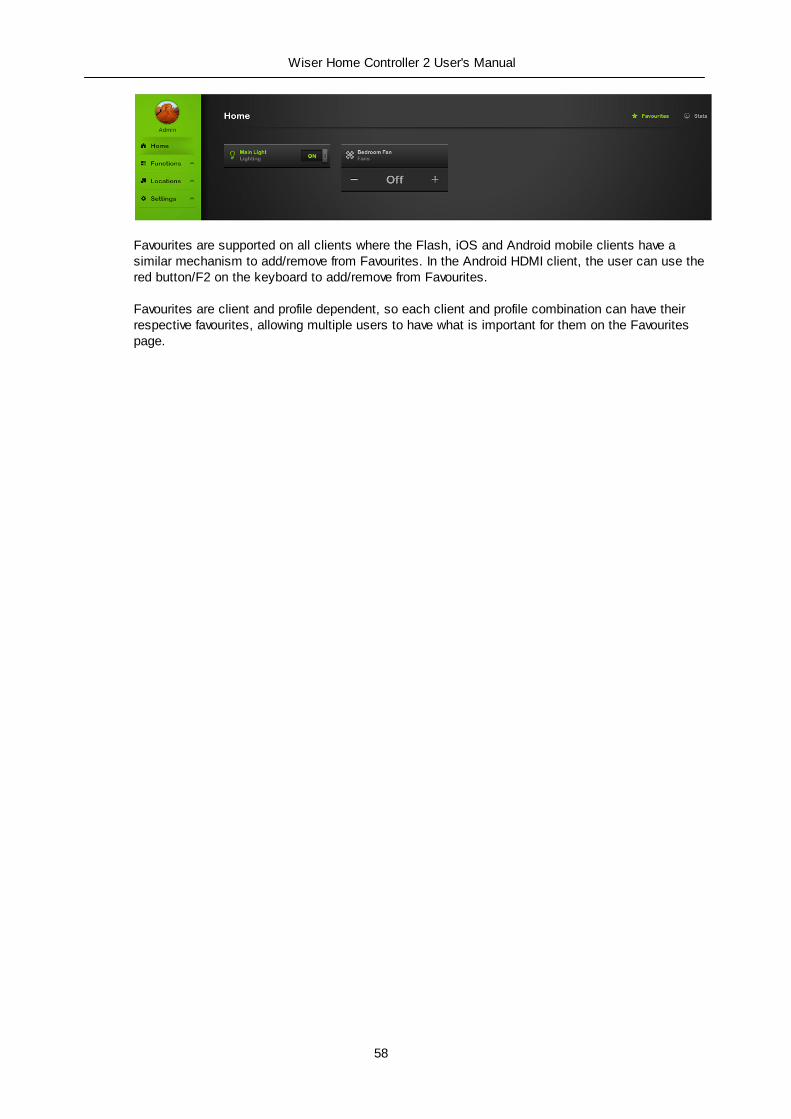
Favourites are a new feature provided with the Wiser 2 Home Controller whereby a user can selectthe widgets that they will be most commonly using on a regular basis. All the selected widgets willbe displayed on the Favourites page and the user can access them from one place, rather thanlooking for them under different functions/locations. Widget functionality does not change whenviewed from the Favourites page.
The favourites can be accessed from Home > Favourites.
58
Wiser Home Controller 2 User's Manual
Favourites are supported on all clients where the Flash, iOS and Android mobile clients have asimilar mechanism to add/remove from Favourites. In the Android HDMI client, the user can use thered button/F2 on the keyboard to add/remove from Favourites.
Favourites are client and profile dependent, so each client and profile combination can have theirrespective favourites, allowing multiple users to have what is important for them on the Favouritespage.
59
Wiser Home Controller 2 User's Manual
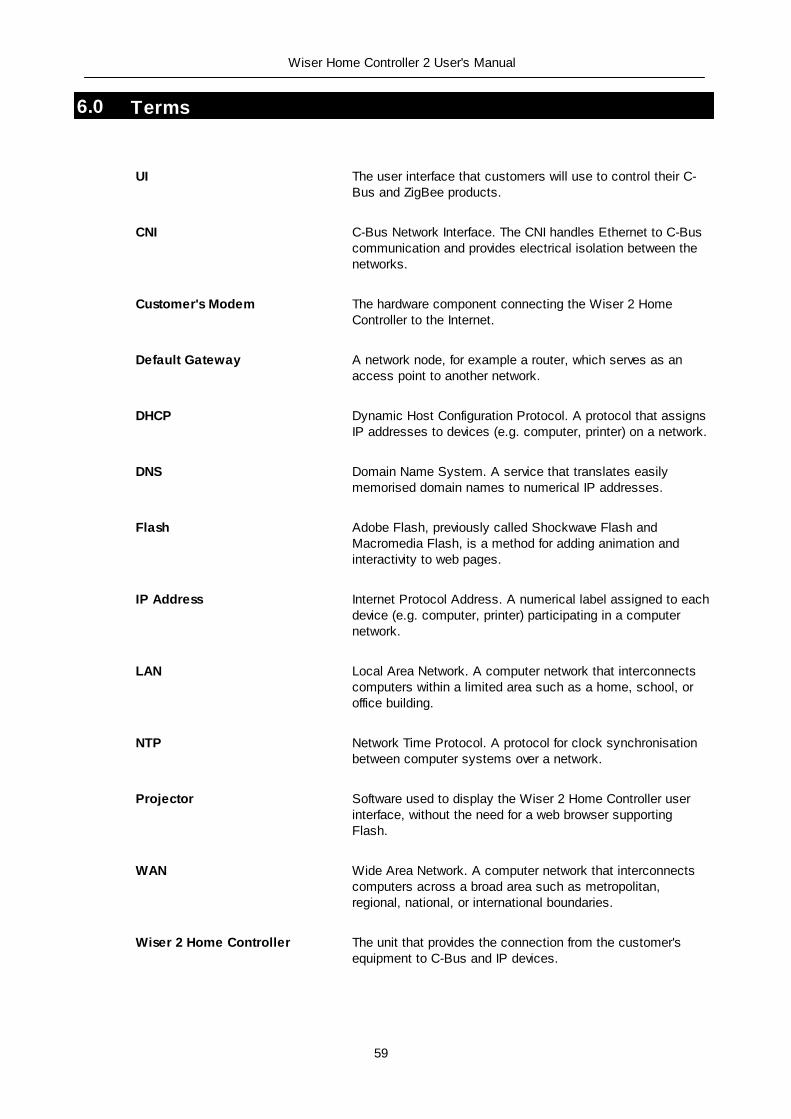
6.0 Terms
UI The user interface that customers will use to control their C-Bus and ZigBee products.
CNI C-Bus Network Interface. The CNI handles Ethernet to C-Buscommunication and provides electrical isolation between thenetworks.
Customer's Modem The hardware component connecting the Wiser 2 HomeController to the Internet.
Default Gateway A network node, for example a router, which serves as anaccess point to another network.
DHCP Dynamic Host Configuration Protocol. A protocol that assignsIP addresses to devices (e.g. computer, printer) on a network.
DNS Domain Name System. A service that translates easilymemorised domain names to numerical IP addresses.
Flash Adobe Flash, previously called Shockwave Flash andMacromedia Flash, is a method for adding animation andinteractivity to web pages.
IP Address Internet Protocol Address. A numerical label assigned to eachdevice (e.g. computer, printer) participating in a computernetwork.
LAN Local Area Network. A computer network that interconnectscomputers within a limited area such as a home, school, oroffice building.
NTP Network Time Protocol. A protocol for clock synchronisationbetween computer systems over a network.
Projector Software used to display the Wiser 2 Home Controller userinterface, without the need for a web browser supportingFlash.
WAN Wide Area Network. A computer network that interconnectscomputers across a broad area such as metropolitan,regional, national, or international boundaries.
Wiser 2 Home Controller The unit that provides the connection from the customer'sequipment to C-Bus and IP devices.
Wiser Home Controller 2 User's Manual
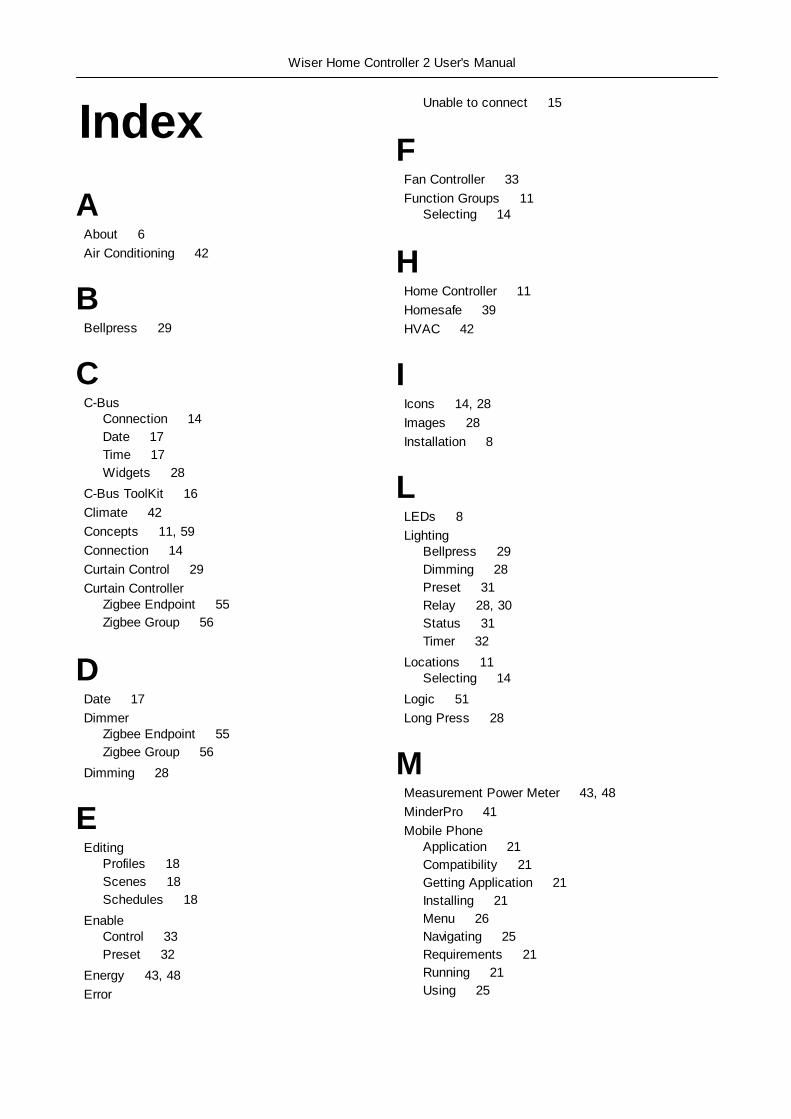
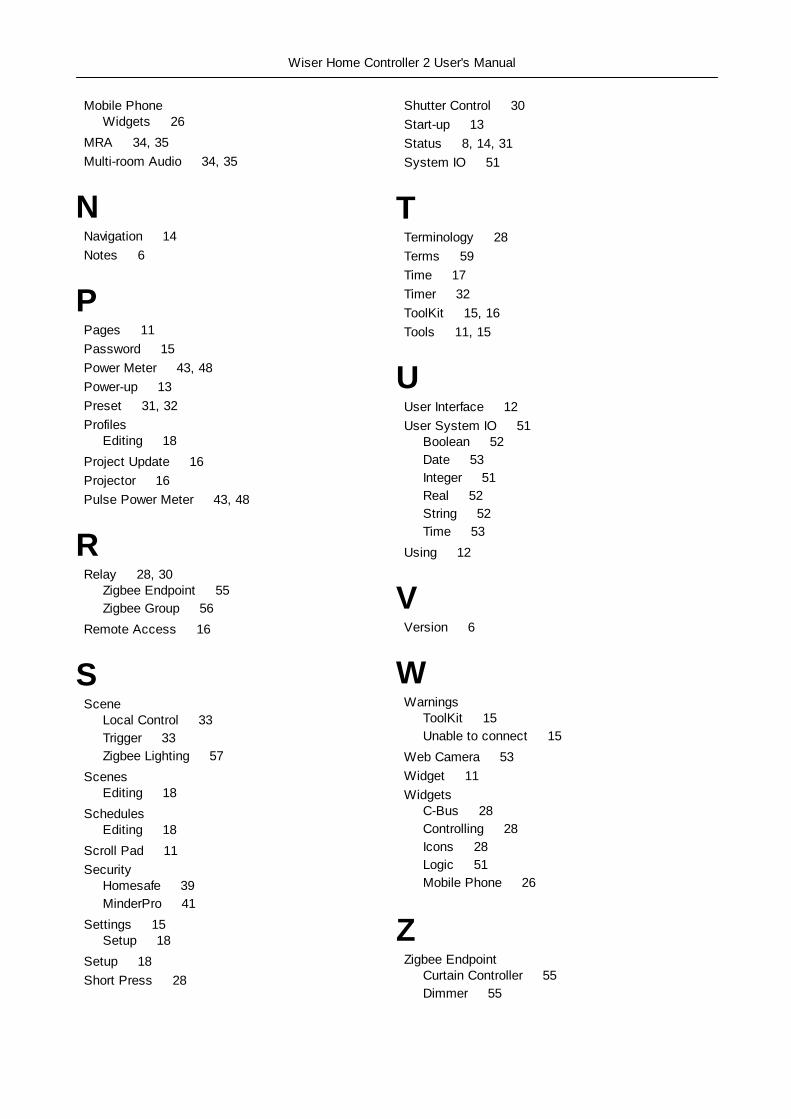
Index
AAbout 6
Air Conditioning 42
BBellpress 29
CC-Bus
Connection 14
Date 17
Time 17
Widgets 28
C-Bus ToolKit 16
Climate 42
Concepts 11, 59
Connection 14
Curtain Control 29
Curtain Controller Zigbee Endpoint 55
Zigbee Group 56
DDate 17
Dimmer Zigbee Endpoint 55
Zigbee Group 56
Dimming 28
EEditing
Profiles 18
Scenes 18
Schedules 18
Enable Control 33
Preset 32
Energy 43, 48
Error
Unable to connect 15
FFan Controller 33
Function Groups 11Selecting 14
HHome Controller 11
Homesafe 39
HVAC 42
IIcons 14, 28
Images 28
Installation 8
LLEDs 8
Lighting Bellpress 29
Dimming 28
Preset 31
Relay 28, 30
Status 31
Timer 32
Locations 11Selecting 14
Logic 51
Long Press 28
MMeasurement Power Meter 43, 48
MinderPro 41
Mobile Phone Application 21
Compatibility 21
Getting Application 21
Installing 21
Menu 26
Navigating 25
Requirements 21
Running 21
Using 25
Wiser Home Controller 2 User's Manual
Mobile Phone Widgets 26
MRA 34, 35
Multi-room Audio 34, 35
NNavigation 14
Notes 6
PPages 11
Password 15
Power Meter 43, 48
Power-up 13
Preset 31, 32
Profiles Editing 18
Project Update 16
Projector 16
Pulse Power Meter 43, 48
RRelay 28, 30
Zigbee Endpoint 55
Zigbee Group 56
Remote Access 16
SScene
Local Control 33
Trigger 33
Zigbee Lighting 57
Scenes Editing 18
Schedules Editing 18
Scroll Pad 11
Security Homesafe 39
MinderPro 41
Settings 15Setup 18
Setup 18
Short Press 28
Shutter Control 30
Start-up 13
Status 8, 14, 31
System IO 51
TTerminology 28
Terms 59
Time 17
Timer 32
ToolKit 15, 16
Tools 11, 15
UUser Interface 12
User System IO 51Boolean 52
Date 53
Integer 51
Real 52
String 52
Time 53
Using 12
VVersion 6
WWarnings
ToolKit 15
Unable to connect 15
Web Camera 53
Widget 11
Widgets C-Bus 28
Controlling 28
Icons 28
Logic 51
Mobile Phone 26
ZZigbee Endpoint
Curtain Controller 55
Dimmer 55

Wiser Home Controller 2 User's Manual
Zigbee Endpoint Relay 55
Zigbee Group Curtain Controller 56
Dimmer 56
Relay 56
Zigbee Lighting Scene 57

Product of Schneider Electric (Australia) Pty Ltd
Technical Support Hotline: 1300 722 247 (Australia)
Technical Support email: [email protected]
Contact us: clipsal.com/feedback clipsal.com
National Customer Service Enquiries
Tel 1 300 202 525
Fax 1 300 202 556
Schneider Electric (Australia) Pty Ltd reservesthe right to change specifications, modifydesigns and discontinue items without incurringobligation and whilst every effort is made toensure that descriptions, specifications andother information in this document are correct,no warranty is given in respect thereof and thecompany shall not be liable for any error therein.
© Schneider Electric (Australia) Pty Ltd. 2015
F2164/1 February 2015 30415751