wire transfers in cu*base · wire transfers in cu*base 5 configuration settings configuring wire...
TRANSCRIPT
Revision date: January 22, 2018
For an updated copy of this booklet, check out the Reference Materials page of our website: http://www.cuanswers.com/resources/doc/cubase-reference
CU*BASE® is a registered trademark of CU*Answers, Inc.
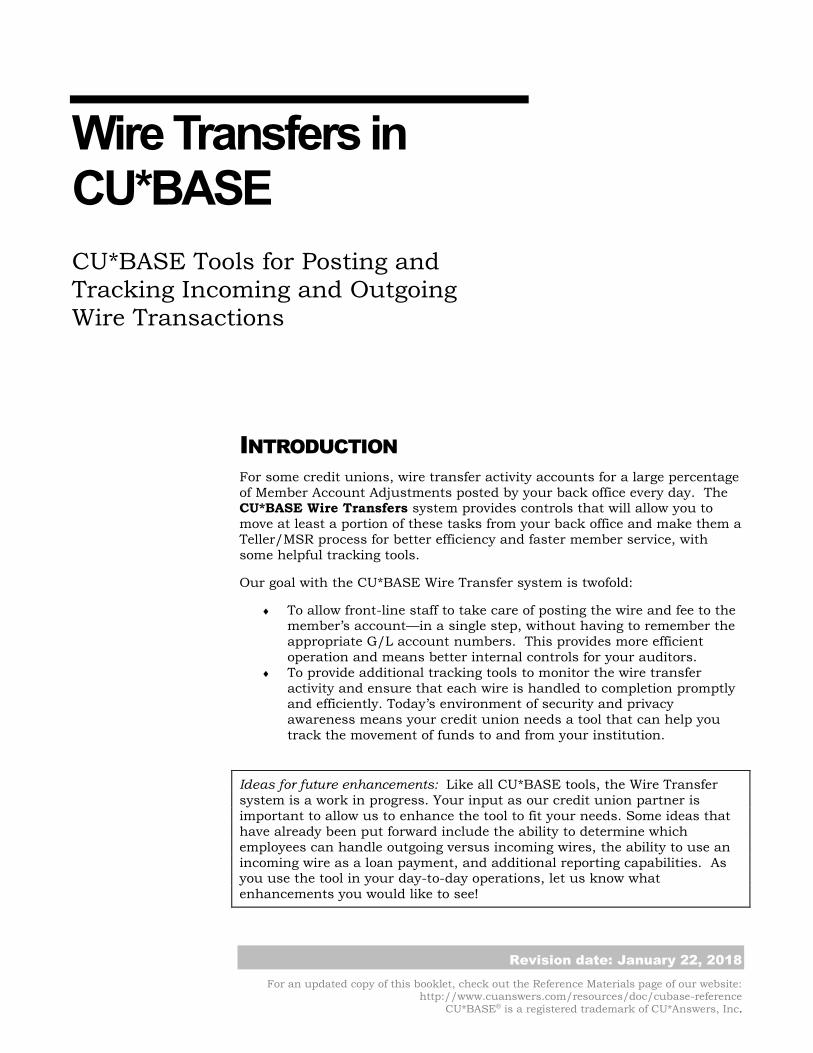
Wire Transfers in CU*BASE
CU*BASE Tools for Posting and Tracking Incoming and Outgoing Wire Transactions
INTRODUCTION
For some credit unions, wire transfer activity accounts for a large percentage
of Member Account Adjustments posted by your back office every day. The CU*BASE Wire Transfers system provides controls that will allow you to
move at least a portion of these tasks from your back office and make them a
Teller/MSR process for better efficiency and faster member service, with
some helpful tracking tools.
Our goal with the CU*BASE Wire Transfer system is twofold:
To allow front-line staff to take care of posting the wire and fee to the member’s account—in a single step, without having to remember the
appropriate G/L account numbers. This provides more efficient
operation and means better internal controls for your auditors.
To provide additional tracking tools to monitor the wire transfer
activity and ensure that each wire is handled to completion promptly and efficiently. Today’s environment of security and privacy
awareness means your credit union needs a tool that can help you
track the movement of funds to and from your institution.
Ideas for future enhancements: Like all CU*BASE tools, the Wire Transfer
system is a work in progress. Your input as our credit union partner is
important to allow us to enhance the tool to fit your needs. Some ideas that
have already been put forward include the ability to determine which
employees can handle outgoing versus incoming wires, the ability to use an
incoming wire as a loan payment, and additional reporting capabilities. As you use the tool in your day-to-day operations, let us know what
enhancements you would like to see!
2 Wire Transfers in CU*BASE
CONTENTS
WHY USE CU*BASE WIRE TRACKING? 3
ACCOUNT ADJUSTMENTS VS. WIRE TRANSFERS 3 WIRE TRANSFERS: STEP BY STEP 4
CONFIGURATION SETTINGS 5
CONFIGURING WIRE TRANSFER CODES 5 CONFIGURING RED FLAG CONTROLS 8
POSTING A WIRE TRANSFER AND FEE TO A MEMBER ACCOUNT 10
COMPLETING THE WIRE USING THE TRACKING SYSTEM 15
MARKING A WIRE “COMPLETED” 17
WIRE ACTIVITY REPORT 19
Wire Transfers in CU*BASE 3
WHY USE CU*BASE WIRE
TRACKING?
No doubt your credit union has procedures already in place to handle wire
transfers, and the volume of wires you do will play a big part in how you
choose to handle this activity. Some credit unions hold wires very close to
the back office and have specific people assigned to handle every part of the transaction. Some want tellers to be able to post outgoing wires to take
money out of the member’s account, but have a specific procedure and paper
trail to handle the actual wire itself.
Whatever your procedure, CU*BASE tools are flexible enough to be used any
way your credit union wishes, whether to supplement or even to replace your
existing procedures and paperwork.
Use the Wire Posting feature instead of account adjustments just to post
the wire and fee transaction, then proceed with your existing procedures. This allows member service and front-line staff to assist the member
quickly, efficiently, and consistently. (Using the full Wire Tracking feature is not required in order to post wire deposits/withdrawals and fees to member accounts.)
Use Wire Posting to post the wire deposit or withdrawal, while still filling
out your normal paperwork. When the wire is complete, use the
Tracking system simply as checklist to mark items as completed. This allows management to see at least the volume of wire activity your staff is
processing.
Use both the full Wire Posting and Wire Tracking tools to replace your
existing paper trail, allowing for greater efficiency and a complete online
record of wire activity and recipient information.
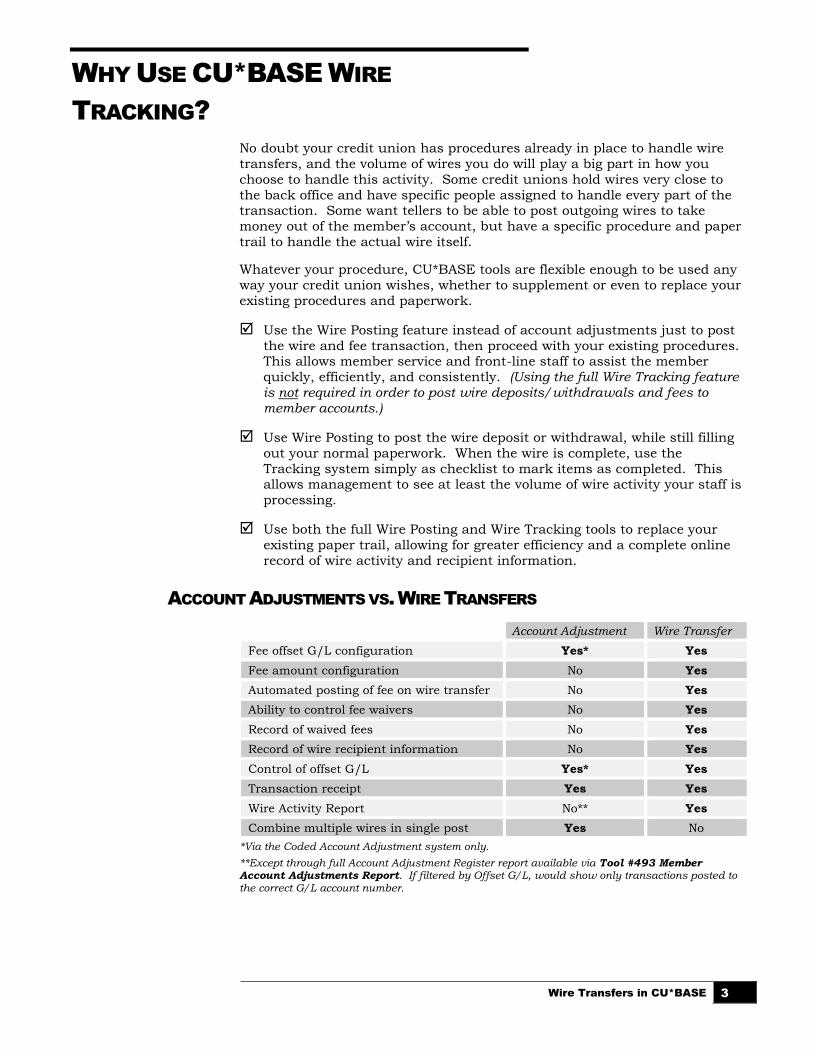
ACCOUNT ADJUSTMENTS VS. WIRE TRANSFERS
Account Adjustment Wire Transfer
Fee offset G/L configuration Yes* Yes
Fee amount configuration No Yes
Automated posting of fee on wire transfer No Yes
Ability to control fee waivers No Yes
Record of waived fees No Yes
Record of wire recipient information No Yes
Control of offset G/L Yes* Yes
Transaction receipt Yes Yes
Wire Activity Report No** Yes
Combine multiple wires in single post Yes No
*Via the Coded Account Adjustment system only.
**Except through full Account Adjustment Register report available via Tool #493 Member Account Adjustments Report. If filtered by Offset G/L, would show only transactions posted to the correct G/L account number.
4 Wire Transfers in CU*BASE
WIRE TRANSFERS: STEP BY STEP
Your credit union will start by configuring special codes that contain all of
the accounting information needed to post the wire withdrawal/deposit and
fee (see Page 5 for details).
Step 1: Post the Wire to Member
When a member requests a wire transfer, the teller or MSR uses the Post
Wire Transfer feature (via Phone Operator, Tool #73 Post Wire Transfer to Member Account, or shortcut WIREP) to post the withdrawal or deposit and
the fee. As part of the process, the teller will also enter the institution and
routing information needed to process the wire.
The request is automatically queued up on the Wire Transfer
Tracking system, stamped with the date and time of the request.
Step 2: Process the Wire / Mark Completed
A designated employee will use the wire tracking system (Tool #981 Wire Transfer Tracking, or shortcut WIRET) to view outstanding wire requests
and post the wire (using the Fedline terminal, etc.) according to normal
procedures. After processing the wire, the employee marks the request as
“complete” in the tracking system.
The wire details remain stored in CU*BASE for later reference and to
allow credit union leaders to analyze wire volumes and activity.
Wire Transfers in CU*BASE 5
CONFIGURATION SETTINGS
CONFIGURING WIRE TRANSFER CODES
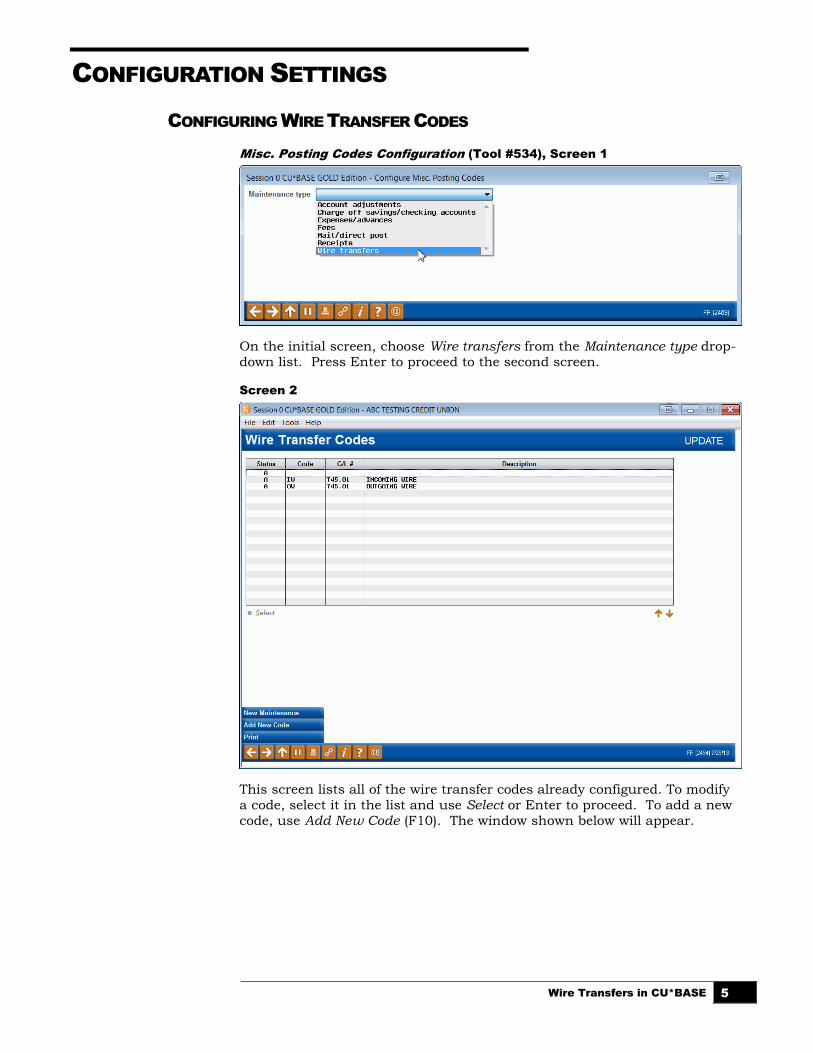
Misc. Posting Codes Configuration (Tool #534), Screen 1
On the initial screen, choose Wire transfers from the Maintenance type drop-
down list. Press Enter to proceed to the second screen.
Screen 2
This screen lists all of the wire transfer codes already configured. To modify
a code, select it in the list and use Select or Enter to proceed. To add a new
code, use Add New Code (F10). The window shown below will appear.
6 Wire Transfers in CU*BASE
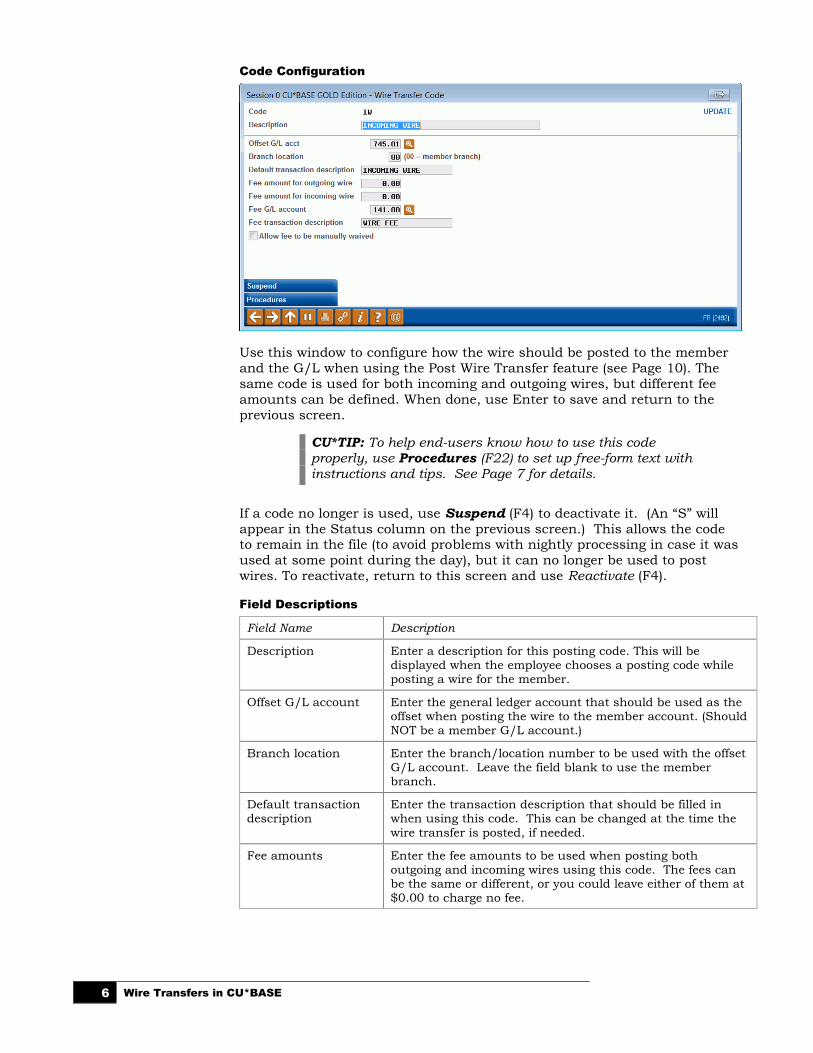
Code Configuration
Use this window to configure how the wire should be posted to the member
and the G/L when using the Post Wire Transfer feature (see Page 10). The
same code is used for both incoming and outgoing wires, but different fee
amounts can be defined. When done, use Enter to save and return to the
previous screen.
CU*TIP: To help end-users know how to use this code properly, use Procedures (F22) to set up free-form text with instructions and tips. See Page 7 for details.
If a code no longer is used, use Suspend (F4) to deactivate it. (An “S” will
appear in the Status column on the previous screen.) This allows the code to remain in the file (to avoid problems with nightly processing in case it was
used at some point during the day), but it can no longer be used to post
wires. To reactivate, return to this screen and use Reactivate (F4).
Field Descriptions
Field Name Description
Description Enter a description for this posting code. This will be displayed when the employee chooses a posting code while posting a wire for the member.
Offset G/L account Enter the general ledger account that should be used as the offset when posting the wire to the member account. (Should NOT be a member G/L account.)
Branch location Enter the branch/location number to be used with the offset G/L account. Leave the field blank to use the member branch.
Default transaction description
Enter the transaction description that should be filled in when using this code. This can be changed at the time the
wire transfer is posted, if needed.
Fee amounts Enter the fee amounts to be used when posting both outgoing and incoming wires using this code. The fees can be the same or different, or you could leave either of them at $0.00 to charge no fee.
Wire Transfers in CU*BASE 7
Field Name Description
Fee G/L account Use this field to enter the G/L account to which fee income should be posted. (This field is required even if no fee
amount is entered.)
Fee transaction description
If fee amount(s) have been entered, use this to define the transaction description to be used when the fee is posted to the member’s account. This cannot be changed when the wire transfer transaction is posted. (This field is required even if no fee amount is entered.)
Allow fee to be manually waived
If checked, the final Wire Transfer Posting screen will allow the fee amount to be changed or even deleted at the time the wire transfer is being posted. Leave this unchecked to force a fee to be posted every time.
Remember that fees that are manually modified or waived will appear on the Fee Waiver Information
Report (available via Tool #371 Fee Waiver Information Report), so you may choose to allow manual waivers, and then keep a close eye on them
through the report and improve employee education as needed.
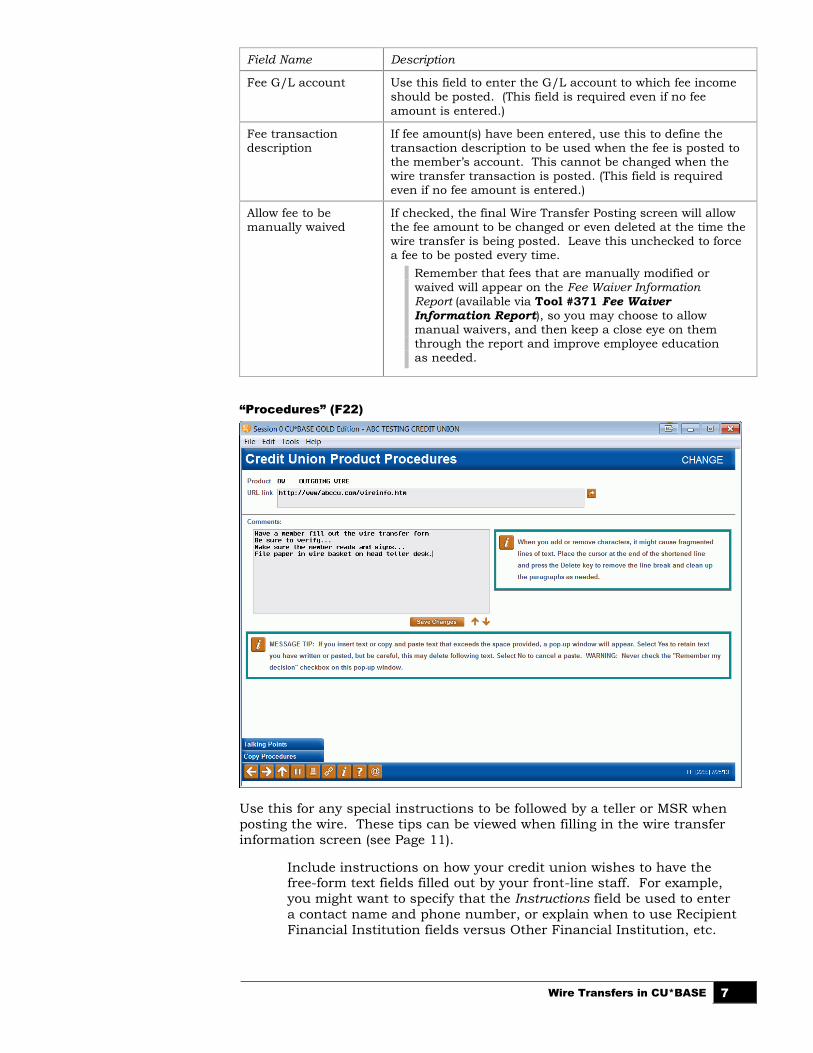
“Procedures” (F22)
Use this for any special instructions to be followed by a teller or MSR when
posting the wire. These tips can be viewed when filling in the wire transfer
information screen (see Page 11).
Include instructions on how your credit union wishes to have the free-form text fields filled out by your front-line staff. For example,
you might want to specify that the Instructions field be used to enter
a contact name and phone number, or explain when to use Recipient
Financial Institution fields versus Other Financial Institution, etc.
8 Wire Transfers in CU*BASE
The URL link lets you link to a intranet or web page that has more
information or instructions about wire transfers. You can use both a URL
and text as you wish. When done, use Save Changes, then the backup
arrow to return to the code configuration window.
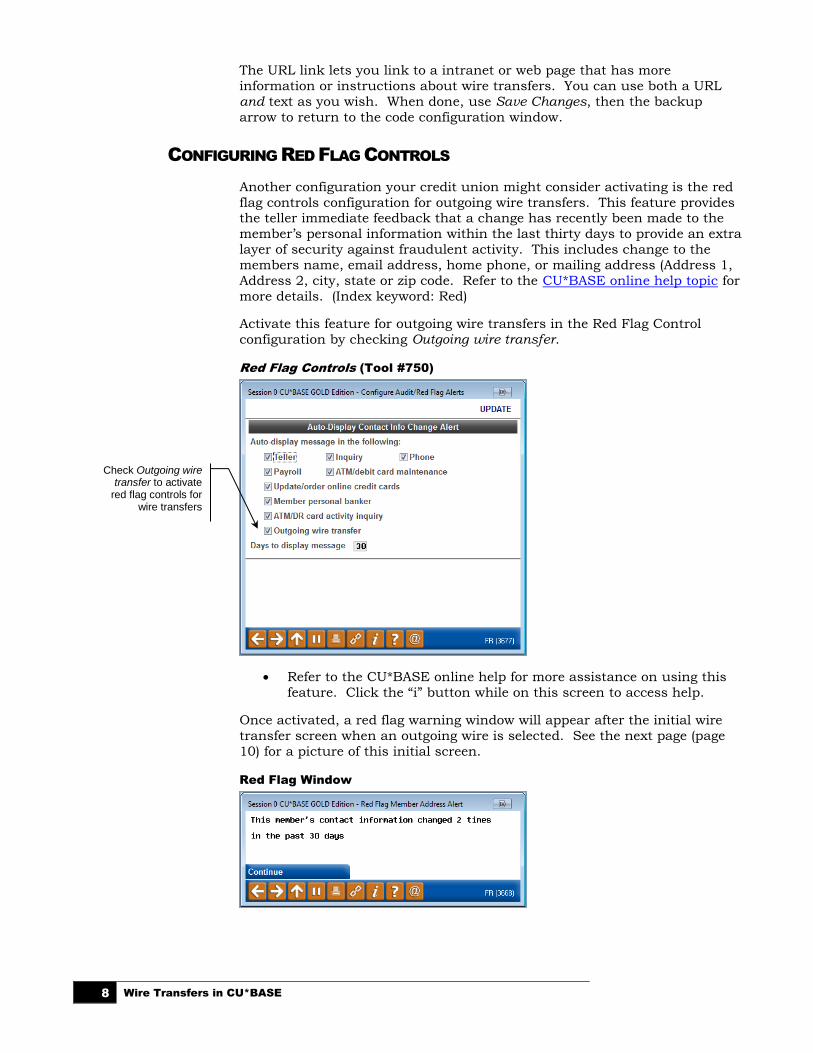
CONFIGURING RED FLAG CONTROLS
Another configuration your credit union might consider activating is the red
flag controls configuration for outgoing wire transfers. This feature provides the teller immediate feedback that a change has recently been made to the
member’s personal information within the last thirty days to provide an extra
layer of security against fraudulent activity. This includes change to the
members name, email address, home phone, or mailing address (Address 1,
Address 2, city, state or zip code. Refer to the CU*BASE online help topic for
more details. (Index keyword: Red)
Activate this feature for outgoing wire transfers in the Red Flag Control
configuration by checking Outgoing wire transfer.
Red Flag Controls (Tool #750)
• Refer to the CU*BASE online help for more assistance on using this
feature. Click the “i” button while on this screen to access help.
Once activated, a red flag warning window will appear after the initial wire
transfer screen when an outgoing wire is selected. See the next page (page
10) for a picture of this initial screen.
Red Flag Window
Check Outgoing wire transfer to activate
red flag controls for wire transfers
Wire Transfers in CU*BASE 9
At this point follow your credit union policies. Pressing Enter will advance
you to the OFAC scan (if activated) and then the second wire transfer screen.
See page 11 for a picture of the second wire transfer screen.

10 Wire Transfers in CU*BASE
POSTING A WIRE TRANSFER AND FEE
TO A MEMBER ACCOUNT
The wire posting system is designed to take care of posting both the wire
withdrawal or deposit as well as any associated fee transaction, in a single
step. Because your configured wire posting codes are used, there is no need
for the member service staff to have to enter general ledger numbers or
remember to post a separate fee transaction.
Special Note Regarding Wires To/From Loan
Accounts: It is not possible to wire money directly out of a loan account. In this case, disburse the money to a savings account and wire the money out of this account. The wire posting system is also not set up to process loan payments. If a member receives an incoming wire intended to make a
loan payment, post the wire to a savings account, and then use the normal journal transfer system to post the loan payment from the savings account.
The Wire posting feature can be accessed several ways:
Via the “Wire” action code in Phone Operator Via Tool #73 Post Wire Transfer to Member Account Via shortcut WIREP
Screen 1
This is the first of three screens used to post a wire deposit/withdrawal and
wire fee to a member account. Enter the account number and name ID (if
coming from the Phone software, these fields already will be completed for
you). You may use the last ten account look up to find your account if your
access point is not Phone Operator.
Then enter the wire amount, choose incoming (deposit) or outgoing
(withdrawal), and enter the appropriate posting code. Click the lookup
button to see a list of your credit union’s configured codes:
Wire Transfers in CU*BASE 11
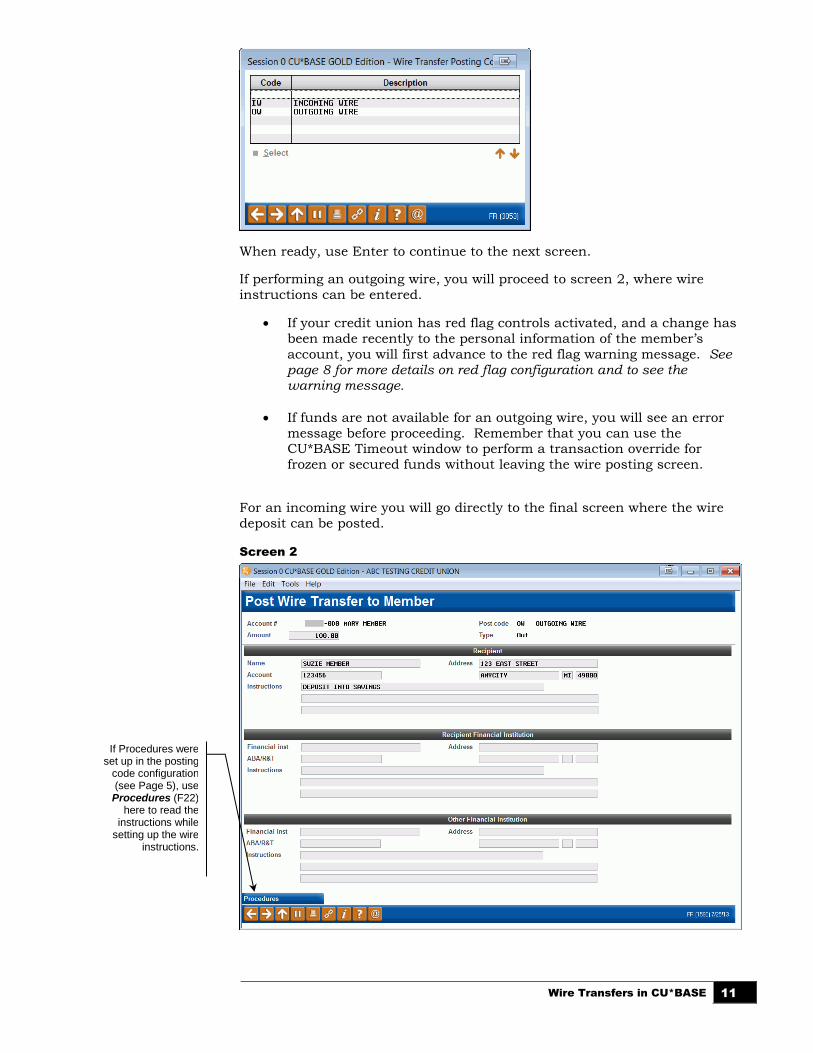
When ready, use Enter to continue to the next screen.
If performing an outgoing wire, you will proceed to screen 2, where wire
instructions can be entered.
• If your credit union has red flag controls activated, and a change has
been made recently to the personal information of the member’s
account, you will first advance to the red flag warning message. See page 8 for more details on red flag configuration and to see the warning message.
• If funds are not available for an outgoing wire, you will see an error
message before proceeding. Remember that you can use the CU*BASE Timeout window to perform a transaction override for
frozen or secured funds without leaving the wire posting screen.
For an incoming wire you will go directly to the final screen where the wire
deposit can be posted.
Screen 2
If Procedures were set up in the posting
code configuration (see Page 5), use Procedures (F22)
here to read the instructions while
setting up the wire instructions.

12 Wire Transfers in CU*BASE
Use this screen to enter instructions that will be stored and used to perform
the actual wire. All of these fields are optional and can be filled in any way you wish according to credit union procedures. Use Enter to proceed to the
final screen.
Wire Transfers in CU*BASE 13
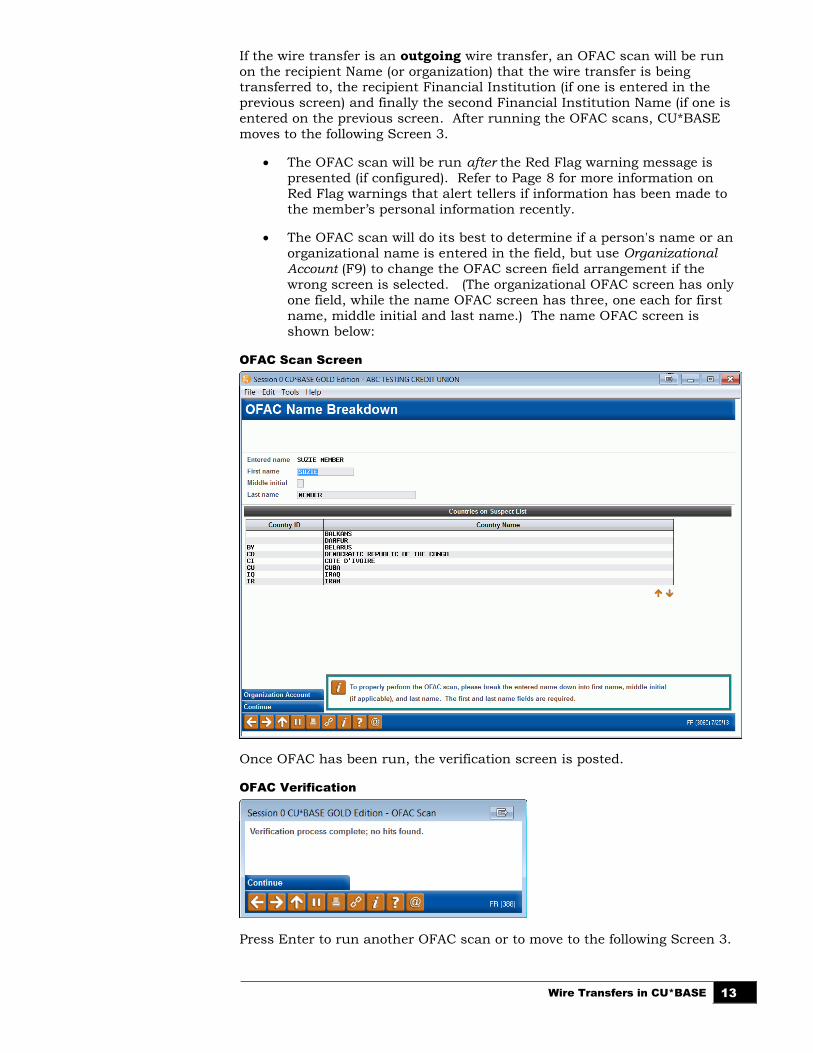
If the wire transfer is an outgoing wire transfer, an OFAC scan will be run
on the recipient Name (or organization) that the wire transfer is being transferred to, the recipient Financial Institution (if one is entered in the
previous screen) and finally the second Financial Institution Name (if one is
entered on the previous screen. After running the OFAC scans, CU*BASE
moves to the following Screen 3.
• The OFAC scan will be run after the Red Flag warning message is
presented (if configured). Refer to Page 8 for more information on
Red Flag warnings that alert tellers if information has been made to
the member’s personal information recently.
• The OFAC scan will do its best to determine if a person's name or an
organizational name is entered in the field, but use Organizational Account (F9) to change the OFAC screen field arrangement if the
wrong screen is selected. (The organizational OFAC screen has only
one field, while the name OFAC screen has three, one each for first
name, middle initial and last name.) The name OFAC screen is
shown below:
OFAC Scan Screen
Once OFAC has been run, the verification screen is posted.
OFAC Verification
Press Enter to run another OFAC scan or to move to the following Screen 3.
14 Wire Transfers in CU*BASE
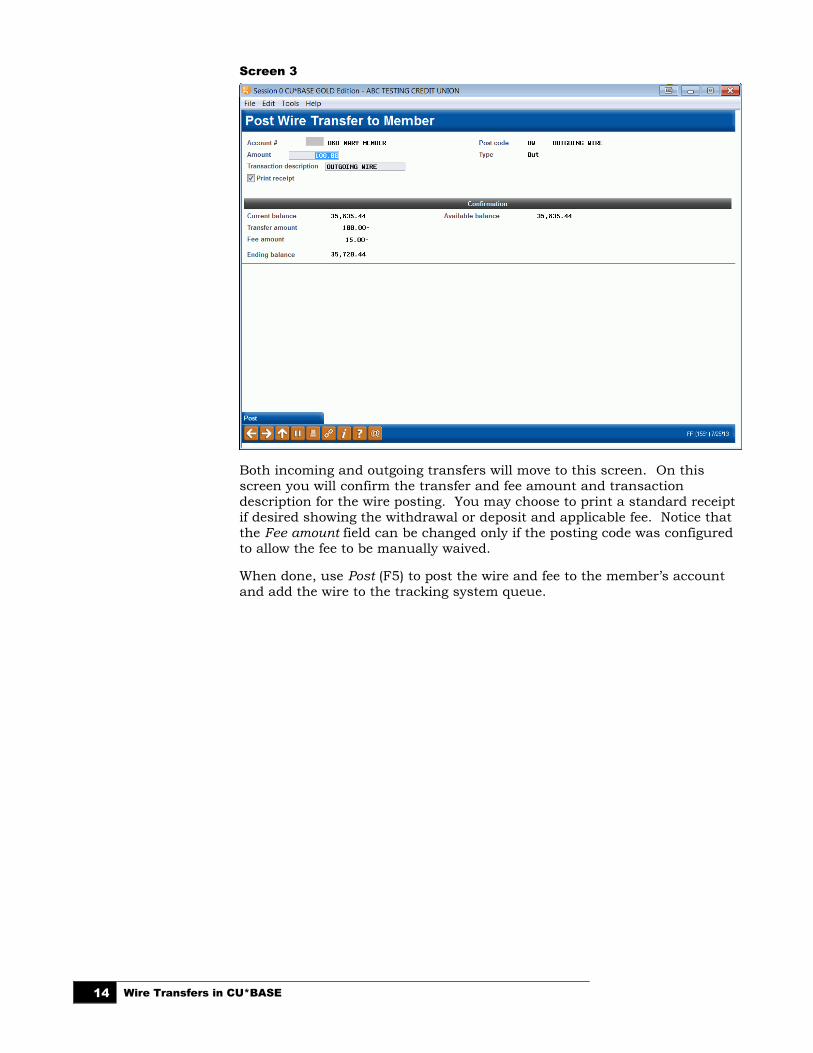
Screen 3
Both incoming and outgoing transfers will move to this screen. On this
screen you will confirm the transfer and fee amount and transaction
description for the wire posting. You may choose to print a standard receipt
if desired showing the withdrawal or deposit and applicable fee. Notice that
the Fee amount field can be changed only if the posting code was configured
to allow the fee to be manually waived.
When done, use Post (F5) to post the wire and fee to the member’s account
and add the wire to the tracking system queue.
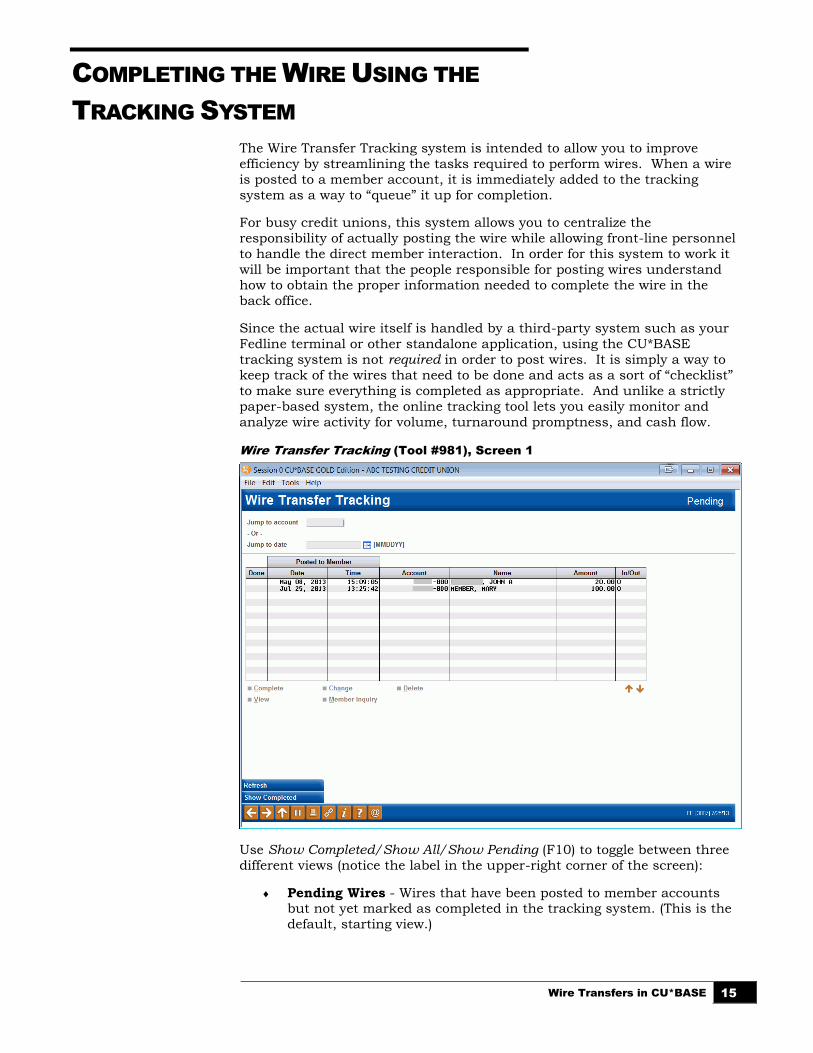
Wire Transfers in CU*BASE 15
COMPLETING THE WIRE USING THE
TRACKING SYSTEM
The Wire Transfer Tracking system is intended to allow you to improve
efficiency by streamlining the tasks required to perform wires. When a wire
is posted to a member account, it is immediately added to the tracking
system as a way to “queue” it up for completion.
For busy credit unions, this system allows you to centralize the
responsibility of actually posting the wire while allowing front-line personnel
to handle the direct member interaction. In order for this system to work it
will be important that the people responsible for posting wires understand
how to obtain the proper information needed to complete the wire in the
back office.
Since the actual wire itself is handled by a third-party system such as your
Fedline terminal or other standalone application, using the CU*BASE
tracking system is not required in order to post wires. It is simply a way to
keep track of the wires that need to be done and acts as a sort of “checklist”
to make sure everything is completed as appropriate. And unlike a strictly
paper-based system, the online tracking tool lets you easily monitor and
analyze wire activity for volume, turnaround promptness, and cash flow.
Wire Transfer Tracking (Tool #981), Screen 1
Use Show Completed/Show All/Show Pending (F10) to toggle between three
different views (notice the label in the upper-right corner of the screen):
Pending Wires - Wires that have been posted to member accounts but not yet marked as completed in the tracking system. (This is the
default, starting view.)
16 Wire Transfers in CU*BASE
Completed Wires - Wires that have been marked as completed in the
tracking system.
All Wire Transfers - All wire transfers, whether marked as completed
or not.
Use the Jump to account or Jump to date fields at the top of the screen to scroll
quickly to a particular wire, either by account number or by date. Note that
if you enter an account number, the list will change to be sorted by account
number. Enter a date to sort the list by date (ascending order).
To work with a wire, select it in the list and choose one of the following
options:
Options
Option Description
Completed Use this to mark a wire as completed. The screens shown
below will appear.
Change On a pending wire, use this option to edit the recipient name, address, and financial institution details.
On a wire that has been marked as completed, this option will also allow you to edit the completion information (Employee ID, date/time, and comments).
Delete Use this to delete a wire item from the tracking list. This will NOT affect the member’s account or G/L in any way. A confirmation window will appear.
View Use this to view wire details without changing anything. Screens similar to those used to mark the wire as completed will appear.
Member Inquiry Use this to view this member’s account information in Member Inquiry.
Wire Transfers in CU*BASE 17
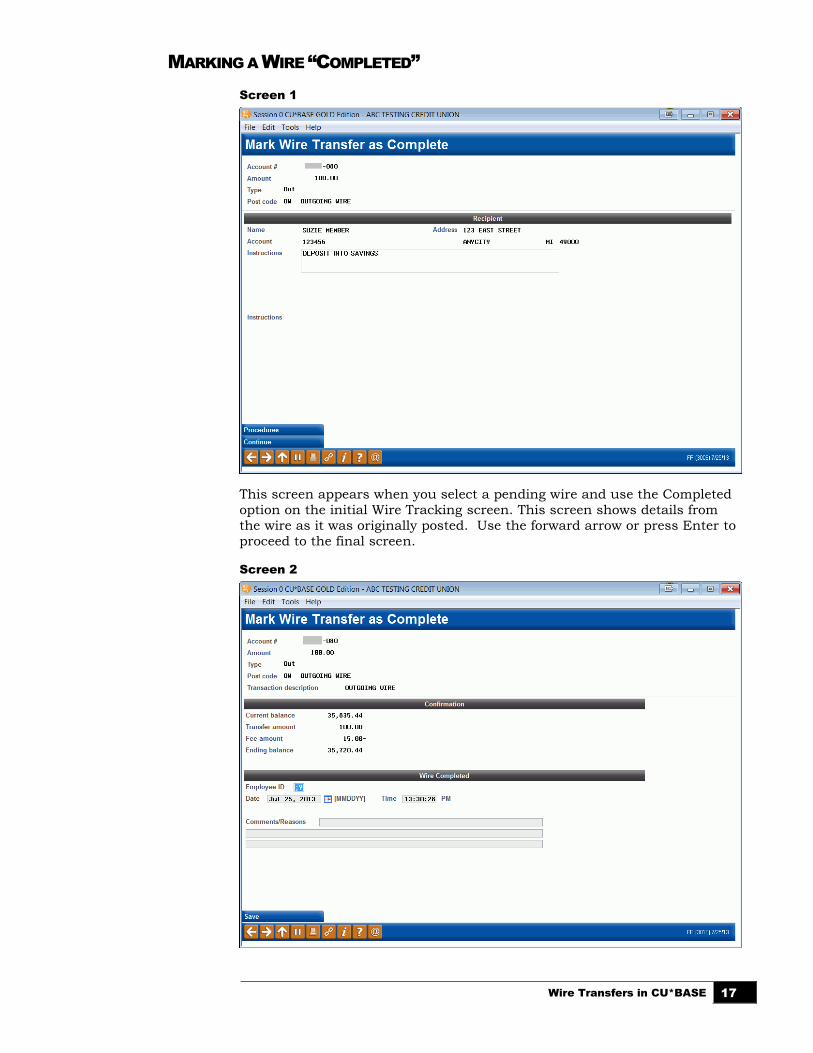
MARKING A WIRE “COMPLETED”
Screen 1
This screen appears when you select a pending wire and use the Completed
option on the initial Wire Tracking screen. This screen shows details from
the wire as it was originally posted. Use the forward arrow or press Enter to
proceed to the final screen.
Screen 2
18 Wire Transfers in CU*BASE
Use the fields at the bottom of this screen to record the employee ID, date,
and time to show that the wire has been completed. Use the Comments field for any additional information you wish to save with the wire record. When
done, use Save (F5) to save changes and return to the initial tracking screen.
Notice a 1 in the Done column showing that the wire has been marked as
complete.
Wire Transfers in CU*BASE 19
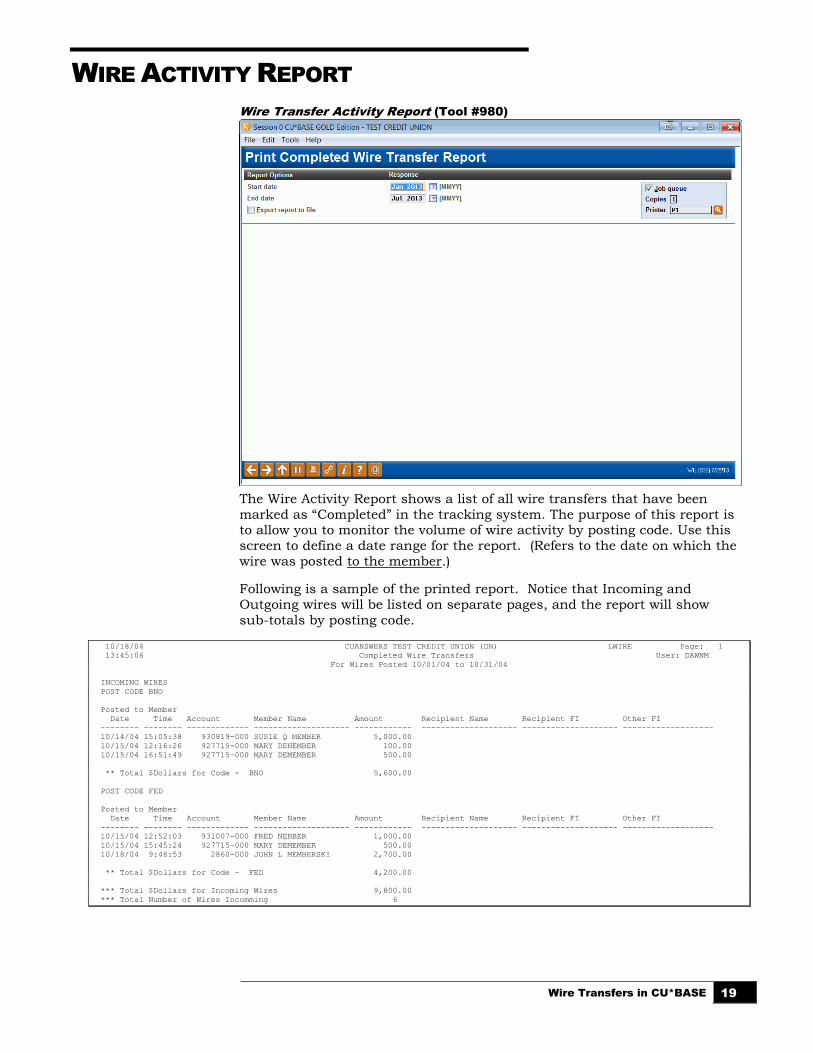
WIRE ACTIVITY REPORT
Wire Transfer Activity Report (Tool #980)
The Wire Activity Report shows a list of all wire transfers that have been
marked as “Completed” in the tracking system. The purpose of this report is to allow you to monitor the volume of wire activity by posting code. Use this
screen to define a date range for the report. (Refers to the date on which the
wire was posted to the member.)
Following is a sample of the printed report. Notice that Incoming and
Outgoing wires will be listed on separate pages, and the report will show
sub-totals by posting code.
10/18/04 CUANSWERS TEST CREDIT UNION (DN) LWIRE Page: 1
13:45:06 Completed Wire Transfers User: DAWNM
For Wires Posted 10/01/04 to 10/31/04
INCOMING WIRES
POST CODE BNO
Posted to Member
Date Time Account Member Name Amount Recipient Name Recipient FI Other FI
-------- -------- ------------- -------------------- ------------ -------------------- -------------------- -------------------
10/14/04 15:05:38 930819-000 SUSIE Q MEMBER 5,000.00
10/15/04 12:16:26 927715-000 MARY DENEMBER 100.00
10/15/04 16:51:49 927715-000 MARY DEMEMBER 500.00
** Total $Dollars for Code - BNO 5,600.00
POST CODE FED
Posted to Member
Date Time Account Member Name Amount Recipient Name Recipient FI Other FI
-------- -------- ------------- -------------------- ------------ -------------------- -------------------- -------------------
10/15/04 12:52:03 931007-000 FRED NENBER 1,000.00
10/15/04 15:45:24 927715-000 MARY DEMEMBER 500.00
10/18/04 9:48:53 2860-000 JOHN L MEMBERSKI 2,700.00
** Total $Dollars for Code - FED 4,200.00
*** Total $Dollars for Incoming Wires 9,800.00
*** Total Number of Wires Incomming 6
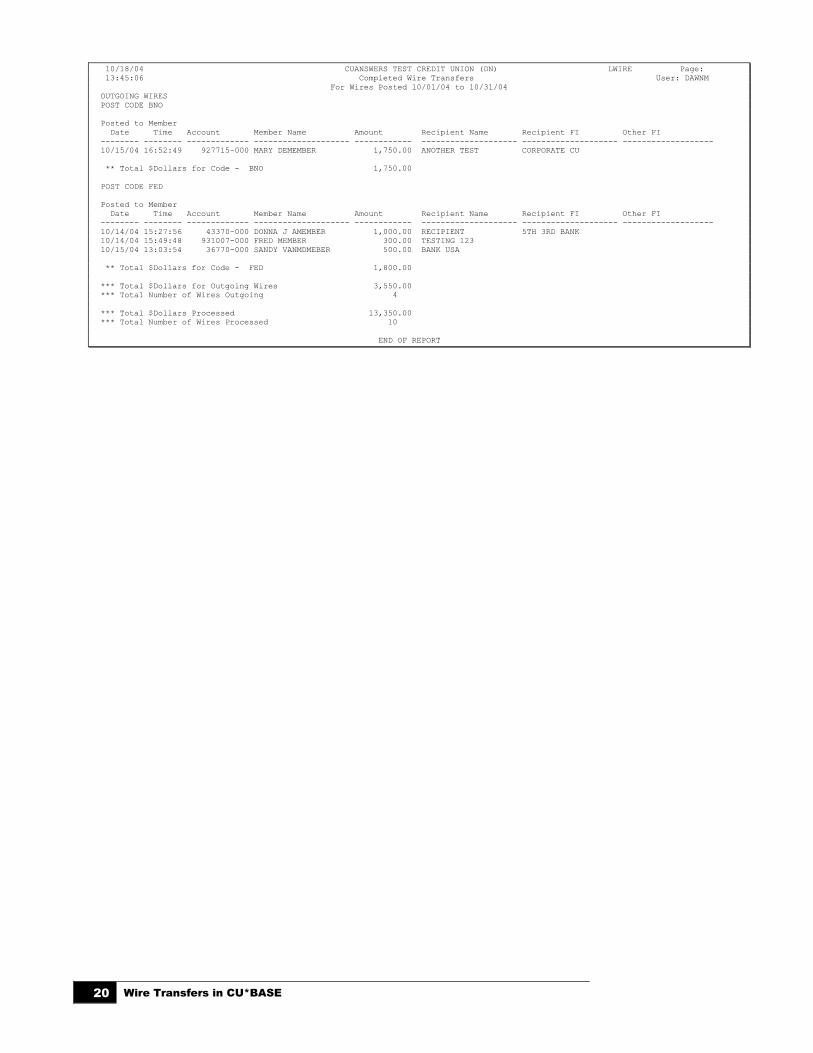
20 Wire Transfers in CU*BASE
10/18/04 CUANSWERS TEST CREDIT UNION (DN) LWIRE Page:
13:45:06 Completed Wire Transfers User: DAWNM
For Wires Posted 10/01/04 to 10/31/04
OUTGOING WIRES
POST CODE BNO
Posted to Member
Date Time Account Member Name Amount Recipient Name Recipient FI Other FI
-------- -------- ------------- -------------------- ------------ -------------------- -------------------- -------------------
10/15/04 16:52:49 927715-000 MARY DEMEMBER 1,750.00 ANOTHER TEST CORPORATE CU
** Total $Dollars for Code - BNO 1,750.00
POST CODE FED
Posted to Member
Date Time Account Member Name Amount Recipient Name Recipient FI Other FI
-------- -------- ------------- -------------------- ------------ -------------------- -------------------- -------------------
10/14/04 15:27:56 43370-000 DONNA J AMEMBER 1,000.00 RECIPIENT 5TH 3RD BANK
10/14/04 15:49:48 931007-000 FRED MEMBER 300.00 TESTING 123
10/15/04 13:03:54 36770-000 SANDY VANMDMEBER 500.00 BANK USA
** Total $Dollars for Code - FED 1,800.00
*** Total $Dollars for Outgoing Wires 3,550.00
*** Total Number of Wires Outgoing 4
*** Total $Dollars Processed 13,350.00
*** Total Number of Wires Processed 10
END OF REPORT