wifi module - libelium · -6- v5.1 topologies nodes may also connect to a standard wifi router with...
TRANSCRIPT

WiFi ModuleNetworking Guide
-2- v5.1
Index
Document version: v5.1 - 03/2016 © Libelium Comunicaciones Distribuidas S.L.
INDEX
1. Introduction ......................................................................................................................................... 4
2. Topologies ............................................................................................................................................ 52.1. Access Point ...................................................................................................................................................................................52.2. Ad-hoc mode with iPhone/Android ......................................................................................................................................8
3. Hardware .............................................................................................................................................. 93.1. Specifications ................................................................................................................................................................................93.2. Power consumption ....................................................................................................................................................................93.3. Bandwidth ...................................................................................................................................................................................103.4. Distance ranges .........................................................................................................................................................................103.5. Connection times ......................................................................................................................................................................10
4. General considerations ..................................................................................................................... 114.1. Waspmote library ......................................................................................................................................................................11
4.1.1. Waspmote WiFi files ...................................................................................................................................................114.1.2. Constructor ...................................................................................................................................................................11
4.2. API functions ...............................................................................................................................................................................124.3. Waspmote reboots ...................................................................................................................................................................164.4. Constants predefined ..............................................................................................................................................................164.5. Class Variables ............................................................................................................................................................................18
5. Initialization ....................................................................................................................................... 195.1. Expansion Radio Board ...........................................................................................................................................................195.2. Setting ON ...................................................................................................................................................................................205.3. Setting OFF ..................................................................................................................................................................................20
6. Access Point Configuration ............................................................................................................... 216.1. Manual Mode .............................................................................................................................................................................216.2. Automatic Mode........................................................................................................................................................................216.3. Examples ......................................................................................................................................................................................22
7. Network Configuration ..................................................................................................................... 237.1. DHCP protocol ...........................................................................................................................................................................237.2. IP manual .....................................................................................................................................................................................23
8. Connection Creation ......................................................................................................................... 248.1. TCP ..................................................................................................................................................................................................24
8.1.1. TCP Client ......................................................................................................................................................................248.1.2. TCP Server .....................................................................................................................................................................25
-3- v5.1
8.2. UDP ................................................................................................................................................................................................258.2.1. UDP Client .....................................................................................................................................................................258.2.2. UDP Server ....................................................................................................................................................................25
8.3. HTTP ..............................................................................................................................................................................................258.3.1. GET method .................................................................................................................................................................268.3.2. Server response ..........................................................................................................................................................268.3.3. Sending HTTP queries ..............................................................................................................................................278.3.4. Sending a frame to Meshlium ...............................................................................................................................28
8.4. FTP ..................................................................................................................................................................................................298.5. Broadcast-UDP ...........................................................................................................................................................................308.6. Sending standard Libelium Frames ....................................................................................................................................30
9. Device Options ................................................................................................................................... 319.1. Default settings .........................................................................................................................................................................319.2. Improving performance .........................................................................................................................................................329.3. Sleeping the radio WiFi ...........................................................................................................................................................32
10. Status Information .......................................................................................................................... 33
11. Connecting to Meshlium ................................................................................................................. 3411.1. Setting Meshlium as AP........................................................................................................................................................3511.2. Capturing and storing packets ..........................................................................................................................................37
11.2.1. Using the Sensor Parser .........................................................................................................................................3711.2.2. Developing your own capturer...........................................................................................................................37
12. Connecting to a Smartphone directly ........................................................................................... 4212.1. Connecting to an iPhone .....................................................................................................................................................42
12.1.1. Installation ..................................................................................................................................................................4212.1.2. iPhone App tutorial .................................................................................................................................................44
12.2. Connecting to an Android ...................................................................................................................................................4712.2.1. Installation ..................................................................................................................................................................4712.2.2. Android App tutorial ..............................................................................................................................................48
13. Code examples and extended information ................................................................................... 51
14. API Changelog ................................................................................................................................. 53
15. Documentation changelog ............................................................................................................. 54
Index

-4- v5.1
Introduction
1. IntroductionThis guide describes all features of the WiFi module for the Waspmote sensor platform, which has been designed to make a connection between a Waspmote and any other device with a WiFi radio (smart-phones, computers, routers...) or to make a connection directly to an Internet server.
The Waspmote WiFi module is able to make connections and communicate by using different ways. Connections can be done by Ad-hoc (point to point) or infrastructure mode (connecting to an available Access Point - AP). In the Infrastructure mode we can connect to the AP’s by using secure connections such as WEP-128, WPA-PSK (TKIP) and WPA2-PSK (AES).
Furthermore, the WiFi module can manage high level networking applications such as:
• DHCP client • DNS client • ARP • ICMP pings • FTP • TELNET • HTTP • TCP • UDP or UDP Broadcast • OTA feature can be performed now by Waspmote. Refer to over the air programming guide for more information.
www.libelium.com/development/waspmote/documentation/over-the-air-programming-guide-otap/
This guide will try to describe main parts of the WiFi module, its characteristics like consumption and ranges (between them and between a WiFi module and a device like a Meshlium or a smart-phone), and how to carry out many types of inquiries, explaining the API and providing code examples for each case. It also describes the software made to test and connect WiFi module, like PC software and mobile applications.
Figure: Image of WiFi module connected to Waspmote
-5- v5.1
Topologies
2. Topologies
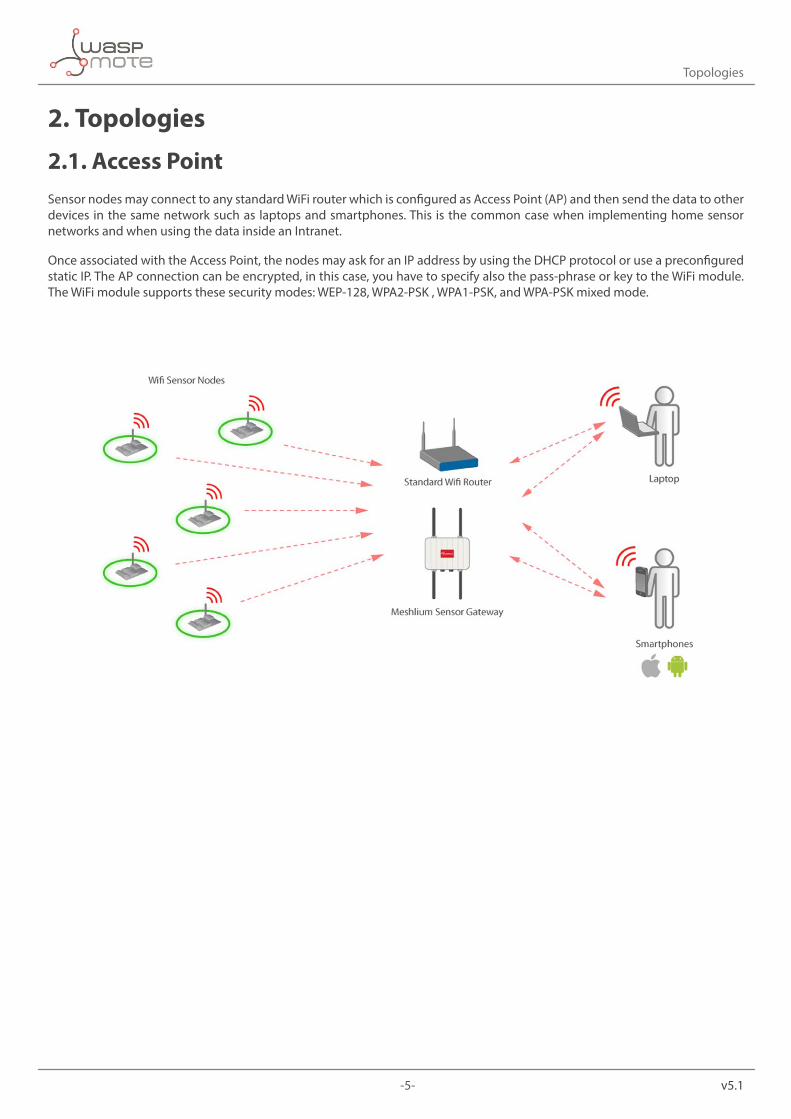
2.1. Access PointSensor nodes may connect to any standard WiFi router which is configured as Access Point (AP) and then send the data to other devices in the same network such as laptops and smartphones. This is the common case when implementing home sensor networks and when using the data inside an Intranet.
Once associated with the Access Point, the nodes may ask for an IP address by using the DHCP protocol or use a preconfigured static IP. The AP connection can be encrypted, in this case, you have to specify also the pass-phrase or key to the WiFi module. The WiFi module supports these security modes: WEP-128, WPA2-PSK , WPA1-PSK, and WPA-PSK mixed mode.

-6- v5.1
Topologies
Nodes may also connect to a standard WiFi router with DSL or cable connectivity and send the data to a web server located on the Internet. Then users are able to get this data from the Cloud. This is the typical scenario for companies which want to give data accessibility services.
As pointed before the WiFi module can join any standard WiFi router, however the connection may also be performed using Meshlium instead of a standard WiFi router. Meshlium is the multiprotocol router designed by Libelium which is specially recommended for outdoor applications as it is designed to resist the hardest conditions in real field deployments.

-7- v5.1
Topologies
When is recommended to use Meshlium instead a standard WiFi router?
As pointed before the new WiFi module for Waspmote can connect to any standard WiFi router (“home oriented”) in the market. However when deploying sensor networks outdoors you need a robust machine capable of resist the hardest conditions of rain, wind, dust, etc. Meshlium is specially designed for real deployments of wireless sensor networks as it is waterproof (IP-65) and counts with a robust metallic enclosure ready to resist the hardest atmospheric conditions.
Meshlium is also ready to deal with hundreds of nodes at the same time, receiving sensor data from all of them and storing it in its internal database or sending it to an Internet server. As well as this, Meshlium may work as a WiFi to 3G/GPRS gateway, giving access to the internet to all the nodes in the network using the mobile phones infrastructure.
It is also important to mention that the transmission power of the WiFi interface integrated in Meshlium is many times higher than the ones available in “home oriented” WiFi routers so the distance we can get increases dramatically from a few meters to dozens or even hundreds depending on the location of the nodes.
Using Meshlium as WiFi Access Point allows to control and to store the messages received from the WiFi module, or allows to combine WiFi technology with other protocols such as ZigBee. Meshlium may work as:
• a ZigBee to Ethernet router for Waspmote nodes • a ZigBee to 3G/GPRS router for Waspmote nodes • a WiFi Access Point • a WiFi Mesh node (dual band 2.4GHz-5GHz) • a WiFi to 3G/GPRS router • a Bluetooth scanner and analyzer • a GPS-GPRS real time tracker
For more information about Meshlium go to: http://www.libelium.com/meshlium

-8- v5.1
Topologies
2.2. Ad-hoc mode with iPhone/AndroidThe following diagram shows how Android and iPhone devices can communicate directly with the WiFi integrated in Waspmote through an Adhoc WiFi network without any extra router or gateway.
More information about this topology in section “Connecting to a Smartphone directly”.

-9- v5.1
Hardware
3. Hardware
3.1. SpecificationsMain Features:
• TX Power: 0dBm - 12dBm * (variable power controlled by software)
• RX Sensitivity: -83dBm • Antenna: 2dBi/5dBi antenna options • Antenna connector: SMA standard connector for any
kind of antenna • AP topology • DHCP enabled • TCP/IP - UDP/IP connections • HTTP connection • FTP connection • FCC / CE/ IC certified 2.4GHz IEEE 802.11b/g
3.2. Power consumptionNext table shows average power consumption in different states of the module.
Estate Power Consumption
OFF 0 uA
SLEEP 4 uA
ON 33 mA
Receiving Data 38 mA
Transmitting Data 38 mA
Scanning Access Points 34 mA
Figure: WiFi module with 2dBi and 5dBi antennas

-10- v5.1
Hardware
3.3. Bandwidth
Baud-rates Transmission Reception
9600142 ms
5,63 kbps
8 ms
100 kbps
1920087 ms
9,19 kbps
8 ms
100 kbps
5760051 ms
15,68 kbps
8 ms
100 kbps
3.4. Distance rangesDistance ranges depend on the gain of the antenna and the TX power selected. The different tests have been done using 2dBi and 5dBi antennas and TX in maximum power (12dBm).
The distance ranges changes in communication between Waspmote with WiFi module and connecting it to an Access Point like Meshlium. They also are different for a perfect transmission (100 % UDP packets received) and for the visibility of the AP (longer distance range).
Next table shows the distance ranges of the module depending of the antenna.
Waspmote + 2dBi antenna 50m - 100m
Waspmote + 5dBi antenna 300m - 500m
The final distance varies on parameters such as if the Fresnel Zone is respected or the humidity in the ambient.
3.5. Connection timesIt has been measured the connection and join times in some typical cases. This is quite useful for configuring sleep and wake timers. These cases are:
• Join AP times with different type of encryption
Encryption Time (seconds)
Open 3,997 s
WEP 4,077 s
WPA 4,176 s
WPA2 4,293 s

-11- v5.1
General considerations
4. General considerationsThis section will describe the API for the WiFi module. The functions that manage the WiFi module belong to the class WaspWIFI, and the object used to use them is defined as WIFI. All of them are described below including some examples of use.
4.1. Waspmote library
4.1.1. Waspmote WiFi files
WaspWIFI.h is the header file of the class, and WaspWIFI.cpp is the class where the functions and variables are implemented. Next diagram shows the organization of the class.
It is mandatory to include the WiFi library when using this module. The following line must be introduced at the beginning of the code:
#include <WaspWIFI.h>
4.1.2. Constructor
To start using Waspmote WiFi library, an object from class ‘WaspWIFI’ must be created. This object, called ‘WIFI’, is created inside Waspmote WiFi library and it is public to all libraries. It is used through this guide to show how Waspmote WiFi library works.
When creating this constructor, all the variables are defined with an initial value by default.

-12- v5.1
General considerations
4.2. API functionsPrivate functions:
commandMode(); Switches the module to command Mode.
contains(text, word); Checks if 'word' is contained in 'text'.
readData(length); Reads data over the UART.
sendCommand(command); Sends a command over the UART.
parseBroadcast(); Reads a broadcast message and parses it.
saveReboot(); Saves current configuration and reboots the device in order to new configuration takes effect.
open(); Opens TCP connection, and checks that everything are going good.
openHTTP(); Opens HTTP connection, and checks that everything are going good.
Public functions:
Basic functions
WaspWIFI(); Class constructor.
ON(SOCKET); Powers on the module in the desired socket (SOCKET0 or SOCKET1) and enters in command mode.
OFF(); Closes the UART and powers off the module.
Access Point Configuration functions
join(SSID); Joins the chosen SSID.
joinAPnum(value); Joins a network AP from the scan list.
leave(); If connected, leaves the connected network.
setChannel(value); Sets the network channel.
setESSID(SSID); Sets the ESSID of the network.
setAuthKey(mode, pass); Sets the security mode and the Key or the pass-phrase of the network.
setAutojoinAuth(value); Sets the authentication mode.
setJoinMode(value); Sets the policy for automatically or manual joining/associating with network access points.

-13- v5.1
General considerations
setAPretries(value); Sets the link monitor timeout threshold.
setTXRate(value); Sets the Transmission Rate.
setTXPower(value); Sets the Transmission Power.
setIPWindow(value); Sets the IP Window value.
setJoinTime(value);Join timer is the time in milliseconds the join function will wait for an access point to complete the association process. This timer is also the timeout for the WPA handshaking process.
setScanOptions(time, mask, mode); Sets the Scan options (the time scanning, the channel mask, and if it is passive or active scan), does not launch the scan.
scan(); Launches the scan.
Network Configuration functions
sendPing(IP); Sends a ping to a remote specified host.
resolve(name); Performs a DNS query on the supplied host-name.
setTimeFromServer(IP, port, interval);
Synchronizes the time from a server. And if interval > 0, the module will synchronize every interval seconds.
setDebugMode(value); Controls debug print messages.
setGW(IP); Sets the Gateway address.
setNetmask(net mask); Sets the net-mask.
setRemoteHost(IP, port); Sets the Remote Host.
setLocalPort(port); Sets the Local Port.
setIp(IP); Sets the IP address.
setDHCPoptions(value); Sets the DHCP options.
setIPoptions(value); Sets optional TCP/IP functions/flags.
setConnectionOptions(value); Sets the connection protocol type.
setTCPpassw(password); Sets the TCP connection password.
setDNS(type, IP, name); Sets the IP address, host and backup host of the DNS main or auxiliary server.
-14- v5.1
General considerations
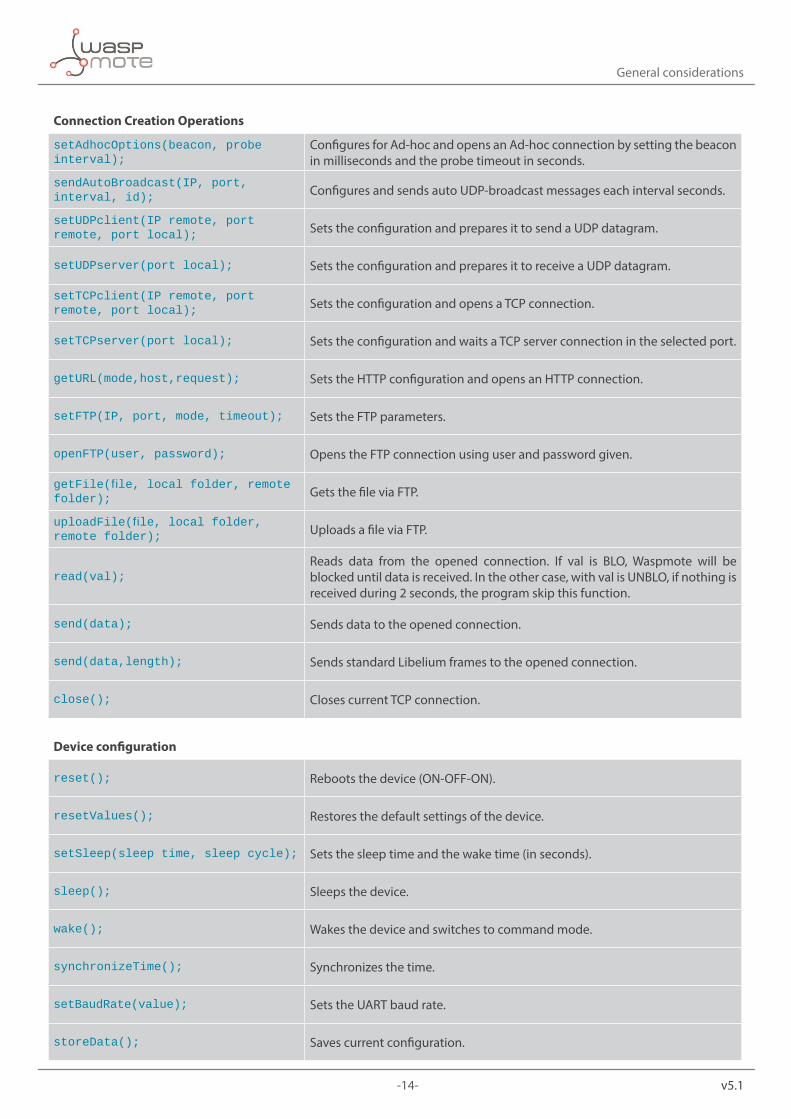
Connection Creation Operations
setAdhocOptions(beacon, probe interval);
Configures for Ad-hoc and opens an Ad-hoc connection by setting the beacon in milliseconds and the probe timeout in seconds.
sendAutoBroadcast(IP, port, interval, id); Configures and sends auto UDP-broadcast messages each interval seconds.
setUDPclient(IP remote, port remote, port local); Sets the configuration and prepares it to send a UDP datagram.
setUDPserver(port local); Sets the configuration and prepares it to receive a UDP datagram.
setTCPclient(IP remote, port remote, port local); Sets the configuration and opens a TCP connection.
setTCPserver(port local); Sets the configuration and waits a TCP server connection in the selected port.
getURL(mode,host,request); Sets the HTTP configuration and opens an HTTP connection.
setFTP(IP, port, mode, timeout); Sets the FTP parameters.
openFTP(user, password); Opens the FTP connection using user and password given.
getFile(file, local folder, remote folder); Gets the file via FTP.
uploadFile(file, local folder, remote folder); Uploads a file via FTP.
read(val);Reads data from the opened connection. If val is BLO, Waspmote will be blocked until data is received. In the other case, with val is UNBLO, if nothing is received during 2 seconds, the program skip this function.
send(data); Sends data to the opened connection.
send(data,length); Sends standard Libelium frames to the opened connection.
close(); Closes current TCP connection.
Device configuration
reset(); Reboots the device (ON-OFF-ON).
resetValues(); Restores the default settings of the device.
setSleep(sleep time, sleep cycle); Sets the sleep time and the wake time (in seconds).
sleep(); Sleeps the device.
wake(); Wakes the device and switches to command mode.
synchronizeTime(); Synchronizes the time.
setBaudRate(value); Sets the UART baud rate.
storeData(); Saves current configuration.

-15- v5.1
General considerations
Status Information
isConnected(); Checks if the module is correctly connected to the Access Point.
getConnectionInfo(); Displays connection status.
getAPstatus(); Displays current network status, association, authentication, etc.
getRSSI(); Displays current last received signal strength.
getStats(); Displays current statistics, packet Rx/TX counters, etc.
getUpTime(); Displays number of seconds since last power up or reboot.
getAdhocSettings(); Displays all ad-hoc settings.
getBroadcastSettings(); Displays the broadcast settings.
getComSettings(); Displays communication settings.
getDNSsettings(); Displays DNS settings.
getFTPsettings(); Displays FTP settings.
getIP(); Displays IP address and port number settings.
getMAC(); Displays the device MAC address.
getOptionSettings(); Displays the option settings like device ID.
getSystemSettings(); Displays system settings, sleep, wake timers.
getTime(); Displays the time-server UDP address and time-server port number.
getWLANsettings(); Displays the SSID, channel and other WLAN settings.
getUARTsettings(); Displays the UART settings.
getVersion(); Returns the software release version of the WiFi module.
-16- v5.1
General considerations
4.3. Waspmote rebootsWhen Waspmote is rebooted or it wakes up from a hibernate state (battery is disconnected) the application code will start again, creating all the variables and objects from the beginning, by the way, the user can save some internal configuration by default in the WiFi module calling storeData().
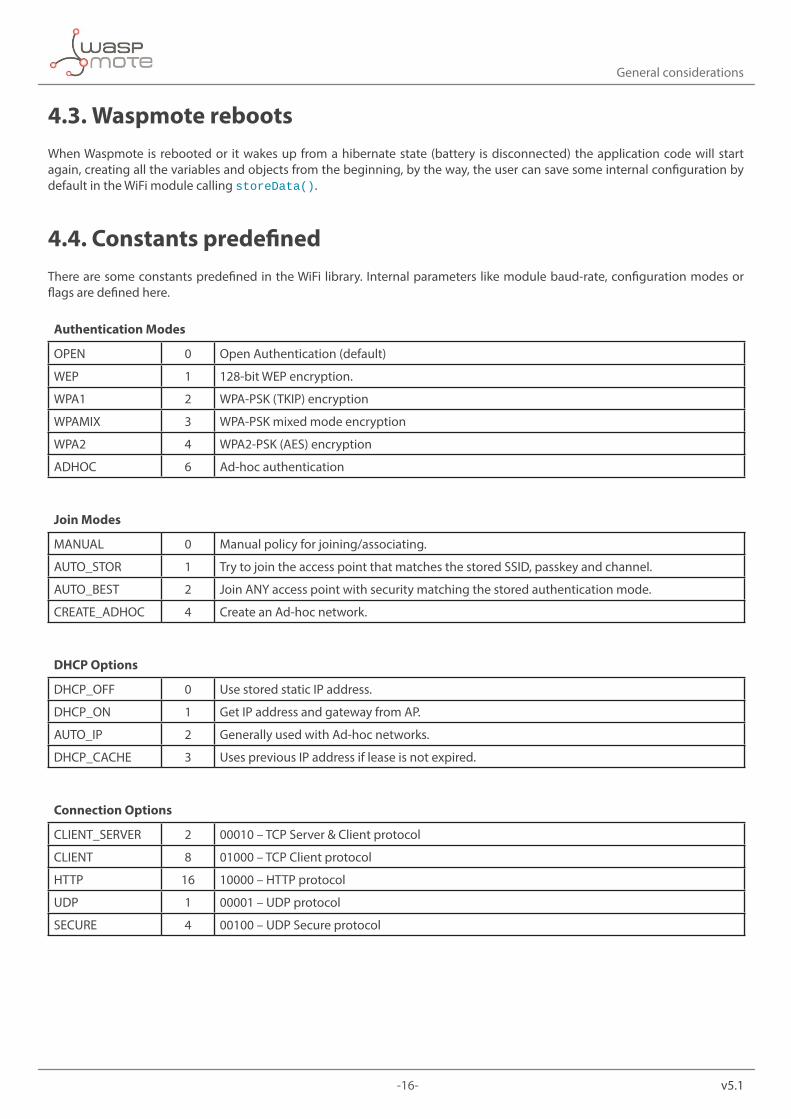
4.4. Constants predefinedThere are some constants predefined in the WiFi library. Internal parameters like module baud-rate, configuration modes or flags are defined here.
Authentication Modes
OPEN 0 Open Authentication (default)
WEP 1 128-bit WEP encryption.
WPA1 2 WPA-PSK (TKIP) encryption
WPAMIX 3 WPA-PSK mixed mode encryption
WPA2 4 WPA2-PSK (AES) encryption
ADHOC 6 Ad-hoc authentication
Join Modes
MANUAL 0 Manual policy for joining/associating.
AUTO_STOR 1 Try to join the access point that matches the stored SSID, passkey and channel.
AUTO_BEST 2 Join ANY access point with security matching the stored authentication mode.
CREATE_ADHOC 4 Create an Ad-hoc network.
DHCP Options
DHCP_OFF 0 Use stored static IP address.
DHCP_ON 1 Get IP address and gateway from AP.
AUTO_IP 2 Generally used with Ad-hoc networks.
DHCP_CACHE 3 Uses previous IP address if lease is not expired.
Connection Options
CLIENT_SERVER 2 00010 – TCP Server & Client protocol
CLIENT 8 01000 – TCP Client protocol
HTTP 16 10000 – HTTP protocol
UDP 1 00001 – UDP protocol
SECURE 4 00100 – UDP Secure protocol

-17- v5.1
General considerations
Flags Options
TCP_STATUS 1 00000001 – TCP connections are kept open when the connection to the access point is lost.
TCP_NODELAY 2 00000010 – Nagle's algorithm, it is a means of improving the efficiency of TCP/IP networks by reducing the number of packets that need to be sent over the network.
TCP_RETRY 4 00000100 – Enables the TCP retry.
UDP_RETRY 8 00001000 – Retry if no ACK from UDP.
DNS_CACHE 16 00010000 – Enables DNS Cache.
ARP_CACHE 32 00100000 – Enables ARP Table Cache.
UDP_AUTO_PA 64 01000000 – UDP auto pairing enabled.
BYTE_STAMP 128 10000000 - 8 byte time-stamp to UDP or TCP packets.
DNS Options
MAIN 0 Sets the IP address or name of the DNS server.
AUX 1 Sets the IP address or name of the backup DNS server.
HTTP Options
IP 1 HTTP connection is specified by an IP address.
DNS 2 HTTP connection is specified by a DNS address.
READ Options
BLO 0 Blocking read.
NOBLO 1 Read with a timeout of 2 seconds.
FTP Options
FTP_PASIVE 0 FTP Passive mode (default).
FTP_ACTIVE 1 FTP Active mode.
FTP_TIMEOUT 30 000 Period of time (in ms) until the process is called off without a response.
Debug Mode
DEBUG_WIFI When defined, it enables the Debug mode.
QUIET 0 No messages printed when wakes up or powers up.
ALL 1 All status messages.
CRITICAL 2 Only critical network AP connection level status is output.
IP_STATUS 4 DHCP and IP address status information.
OTA Options
#define CHECK_VERSION // when defined it enables the version checking.
OTA_ver_file “UPGRADE.TXT” // Server’s file.
#define NO_OTA “NO_FILE” // No file in server pattern indicator.

-18- v5.1
General considerations
4.5. Class VariablesWaspWIFI class has a public variable called answer that allows the user to check the last message that WiFi module received last time user called read(). Besides, there is another variable called ‘length’ which indicates the length of the last answer.
char answer[513];
int length;
It is a vector of 512 char bytes, so if the user is going to receive less or more data, can adjust this vector on the library, in order to save memory.

-19- v5.1
Initialization
5. InitializationBefore starting to use a module, it needs to be initialized. During this process, configuration parameters are sent to the module. USB UART connection is enabled to check Debug messages and to display information, and SD card is used to store or upload files when using FTP connections.
5.1. Expansion Radio BoardThe Expansion Board allows to connect two communication modules at the same time in the Waspmote sensor platform. This means a lot of different combinations are possible using any of the wireless radios available for Waspmote: 802.15.4, ZigBee, DigiMesh, 868 MHz, 900 MHz, LoRaWAN, LoRa, Sigfox, Bluetooth Pro, Bluetooth Low Energy, RFID/NFC, WiFi, GPRS Pro, GPRS+GPS and 3G/GPRS. Besides, the following Industrial Protocols modules are available: RS-485/Modbus, RS-232 Serial/Modbus and CAN Bus.
Some of the possible combinations are:
• LoRaWAN - GPRS • 802.15.4 - Sigfox • 868 MHz - RS-485 • RS-232 - WiFi • DigiMesh - 3G/GPRS • RS-232 - RFID/NFC • WiFi - 3G/GPRS • CAN bus - Bluetooth • etc.
Remark: GPRS Pro, GPRS+GPS and 3G/GPRS modules do not need the Expansion Board to be connected to Waspmote. They can be plugged directly in the socket1.
In the next photo you can see the sockets available along with the UART assigned. On one hand, SOCKET0 allows to plug any kind of radio module through the UART0. On the other hand, SOCKET1 permits to connect a radio module through the UART1.
Figure: Use of Expansion Board

-20- v5.1
Initialization
The API provides a function called ON() in order to switch the WiFi module on. This function supports a parameter which permits to select the SOCKET. It is possible to choose between SOCKET0 and SOCKET1.
Selecting SOCKET0:
WIFI.ON(SOCKET0);
Selecting SOCKET1:
WIFI.ON(SOCKET1);
The rest of functions are used the same way as they are used with older API versions. In order to understand them we recommend to read this guide.
WARNING:
• Avoid to use DIGITAL7 pin when working with Expansion Board. This pin is used for setting the XBee into sleep. • Avoid to use DIGITAL6 pin when working with Expansion Board. This pin is used as power supply for the Expansion Board. • Incompatibility with Sensor Boards:
- Gases Board: Incompatible with SOCKET4 and NO2/O3 sensor. - Agriculture Board: Incompatible with Sensirion and the atmospheric pressure sensor. - Smart Metering Board: Incompatible with SOCKET11 and SOCKET13. - Smart Cities Board: Incompatible with microphone and the CLK of the interruption shift register.
- Events Board: Incompatible with interruption shift register.
5.2. Setting ONIt opens the UART and switches the WiFi ON. The baud rate used to open the UART is defined on the library (9600bps is the factory baudrate; 115200bps is the API baudrate). This function also initializes the USB and SD card connections. USB is used for displaying the data received from the connections (more information on section 8) or for showing debug messages (more on section 10). Finally, it enters in command mode and sets some default configuration.
Example of use:
{ WIFI.ON(SOCKET0); // Opens the UART and switches the WiFi module on}
5.3. Setting OFFWiFi API function OFF() closes the UART and switches the module off.
Example of use:
{ WIFI.OFF(); // Closes the UART and powers off the module.}

-21- v5.1
Access Point Configuration
6. Access Point ConfigurationThis section will describe how an Access Point can be configured in order to make the desired connections. The configurations are saved in the memory of WiFi module, and when the module creates the Access Point, takes those configurations from memory.
It has to be remarked that this information is deleted every time Waspmote reboots unless the configuration is saved as default in WiFi module using function storeData() for using automatic associations for example.
Next codes are examples of WiFi Access Point configuration/creation for each type of connection.
6.1. Manual ModeIn Manual Mode the user has to specify the name and the security (if exits) of the Access Point.
{ // 1. Configure how to connect the AP. WIFI.setJoinMode(MANUAL);
// 2. If it is manual, call join giving the name of the AP. if (WIFI.join(“Libelium_AP”)) { ... }}
• Connect to Access Point in Manual mode example: www.libelium.com/development/waspmote/examples/wifi-06-connect-ap-manual
6.2. Automatic ModeIn Auto-Store mode, the module tries to join the access point that matches the stored SSID, passkey and channel. Channel can be set to 0 for scanning.
{ // 1.1 Configure the authentication mode of the auto-join WIFI.setAutojoinAuth(OPEN); // 1.2 Sets the name of the AP we want to join WIFI.setESSID(“libelium_AP”); // 2. Configure the joining mode WIFI.setJoinMode(AUTO_STOR);
// 3. Save Data to module’s memory WIFI.storeData();
// 4. When re-starting, the module joins the known AP // Switch on the WiFi module WIFI.ON(socket); // 5. Check connectivity for several seconds if( WIFI.isConnected(5000) == true ) { ... }}
• Connect to Access Point in Auto-Store mode example: www.libelium.com/development/waspmote/examples/wifi-08-connect-ap-auto_store/

-22- v5.1
Access Point Configuration
6.3. Examples • Connect to Access Point in Manual mode:
www.libelium.com/development/waspmote/examples/wifi-06-connect-ap-manual
• Connect to Access Point in Auto-Store mode: www.libelium.com/development/waspmote/examples/wifi-08-connect-ap-auto_store/
• Connect to a not encrypted Access Point: www.libelium.com/development/waspmote/examples/wifi-10-ap-not-encrypted
• Connect to a WEP encrypted Access Point: www.libelium.com/development/waspmote/examples/wifi-11-ap-wep-encrypted
• Connect to a WPA encrypted Access Point: www.libelium.com/development/waspmote/examples/wifi-12-ap-wpa-encrypted
• Connect to a WPAMIX encrypted Access Point: www.libelium.com/development/waspmote/examples/wifi-13-ap-wpamix-encrypted
• Connect to a WPA2 encrypted Access Point: www.libelium.com/development/waspmote/examples/wifi-14-ap-wpa2-encrypted

-23- v5.1
Network Configuration
7. Network ConfigurationThis section describes how to configure the network, the WiFi module has to be prepared to join to an access point.
The most important thing here is to configure the WiFi module address, needed for making connections on the Internet. The WiFi module can set the IP address by calling WIFI.setDHCPoptions(type) and the types can be:
• DHCP_OFF
• DHCP_ON
• AUTO_IP
• DHCP_CACHE
7.1. DHCP protocolThe Dynamic Host Configuration Protocol (DHCP) is a network configuration protocol for hosts on Internet Protocol (IP) networks. Calling this protocol, the WiFi module receives a valid IP address from the access point automatically.
To use this protocol, the module needs to call WIFI.setDHCPoptions(DHCP_ON) and then try to join the access point.
• Configure DHCP example: www.libelium.com/development/waspmote/examples/wifi-15-dhcp
Another way to solve IP automatically, is calling WIFI.setDHCPoptions(DHCP_CACHE), in this case the WiFi module uses previous IP address if lease is not expired (lease survives reboot).
• Configure auto-cache IP example: www.libelium.com/development/waspmote/examples/wifi-18-auto-cache-ip
7.2. IP manualIP address can also be set manually calling WIFI.setDHCPoptions(DHCP_OFF). In this case you can set as well the gateway address, the net-mask, the DNS address and the local port.
There are functions to configure each address. Next code shows an example of manual network configuration.
{ ////////MANUAL NETWORK CONFIGURATION /////////////// // 1. Configure DHCP off. WIFI.setDHCP(DHCP_OFF); // 2. Configure the Gateway address WIFI.setGW(“192.168.4.1”); // 3. Configure the Net-mask address WIFI.setNetmask(“255.255.255.0”); // 4. Configure the local port WIFI.setLocalPort(55555); // 5. Configure the IP address WIFI.setIP(“192.168.1.50”);}
• Configure static IP: www.libelium.com/development/waspmote/examples/wifi-16-static-ip
Note: the WiFi module supports IPv4, but not IPv6.

-24- v5.1
Connection Creation
8. Connection CreationThis section will describe how to create/open a connection. There are functions to open or prepare connections for each protocol. Possible connections are:
• Broadcast-UDP • UDP client-only • UDP server • TCP client • TCP server • FTP • HTTP
8.1. TCPTCP is a connection-oriented protocol; the user has to open and close the connection when he finishes to work with it. This protocol is the most reliable, and the user can even configure a password for the connection.
First, the WiFi module configures the protocol with WIFI.setConnectionOptions(type). The types in TCP can be:
• CLIENT_SERVER: for TCP server & client • CLIENT: for TCP client only.
And then the user can set the remote parameters in the creation function or with the function: WIFI.setRemoteHost(IP,PORT).
{ // Configure the transport protocol as TCP server & client WIFI.setConnectionOptions(CLIENT_SERVER); // Configure the Remote parameters. WIFI.setRemoteHost(“192.168.1.45”, 2000);}
To create the connection, the WiFi module can act as a client, or as a server /client. As a client, the WiFi module specifies the remote address and port and makes the connection. And as a server, the WiFi module specifies the port and waits for a connection on that port.
8.1.1. TCP Client
Next example show how to create a TCP client connection with the function setTCPclient(). It is necessary to indicate the remote IP address, the remote port and the local port.
• TCP client example: http://www.libelium.com/development/waspmote/examples/wifi-20a-tcp-client
• TCP client using Waspmote Frame Class to send information: http://www.libelium.com/development/waspmote/examples/wifi-20b-tcp-client-frame

-25- v5.1
Connection Creation
8.1.2. TCP Server
Next example shows how to create a TCP server connection with the function setTCPserver(). It is necessary to indicate the local port to be used.
• TCP server example: http://www.libelium.com/development/waspmote/examples/wifi-21-tcp-server
Note: It is not recommended to use this mode in Waspmote as the best implementation is to set Waspmote as client so as to send Data Frames to a specific server.
8.2. UDPUDP is a connectionless protocol, for this reason there is not a close method to close the connection. However, with the function close() the user enters in command mode only and can continue doing other things with the radio WiFi.
There is no initial handshake between the hosts to set up the UDP connection. This makes UDP an unreliable protocol, as there is no guarantee that the data will be correctly delivered. However, UDP is suited for applications that cannot tolerate too much latency but can tolerate some errors in data. Transmission of video and audio would be a good example of UDP application.
8.2.1. UDP Client
Next code shows how to create a UDP client connection with the function setUDPclient(). It is necessary to indicate the remote IP address, the remote port and the local port.
• UDP client example: www.libelium.com/development/waspmote/examples/wifi-22-udp-client
8.2.2. UDP Server
Next code shows how to create a UDP server connection with the function setUDPserver(). It is necessary to indicate the local port to be used.
• UDP server example: www.libelium.com/development/waspmote/examples/wifi-23-udp-server
Note: It is not recommended to use this mode in Waspmote as the best implementation is to set Waspmote as client so as to send Data Frames to a specific server.
8.3. HTTP HTTP is a great protocol because it is a standard, simple and light way to send information to web servers.
Libelium has created a little web service in order to allow GPRS, WiFi or 3G modules users to test the HTTP mode. This web service is a little code, written in PHP, which is continuously listening to the HTTP port (port number 80) of our test server “pruebas.libelium.com”. This is a kind of RESTful service. GPRS, WiFi or 3G modules can send HTTP instances to our web service.
WiFi module HTTP instances should have the following structure so that our web service can understand.
-26- v5.1
Connection Creation
8.3.1. GET method
In GET method data is sent to the server append to the main URL with the ‘?’ character. The base sentence to perform GET method is shown below:
pruebas.libelium.com/getpost_frame_parser.php?<variable1=value1>&<variable2=value2>&<...>&view=html
Where:
• getpost_frame_parser.php? : It is the main URL, where the web service is running.
• <variable1=value1> : It is a couple with the variable name and value which we want the web service to parse.
• view=html : It is an optional argument. It shows a “pretty” response (HTML-formated)
All arguments must be separated by “&”. The variable name and value must be separated by “=”.
Some examples:
pruebas.libelium.com/getpost_frame_parser.php?var1=3.1415
pruebas.libelium.com/getpost_frame_parser.php?var1=3.1415&view=html
pruebas.libelium.com/getpost_frame_parser.php?var1=3.1415&var2=123456&var3=hello&view=html
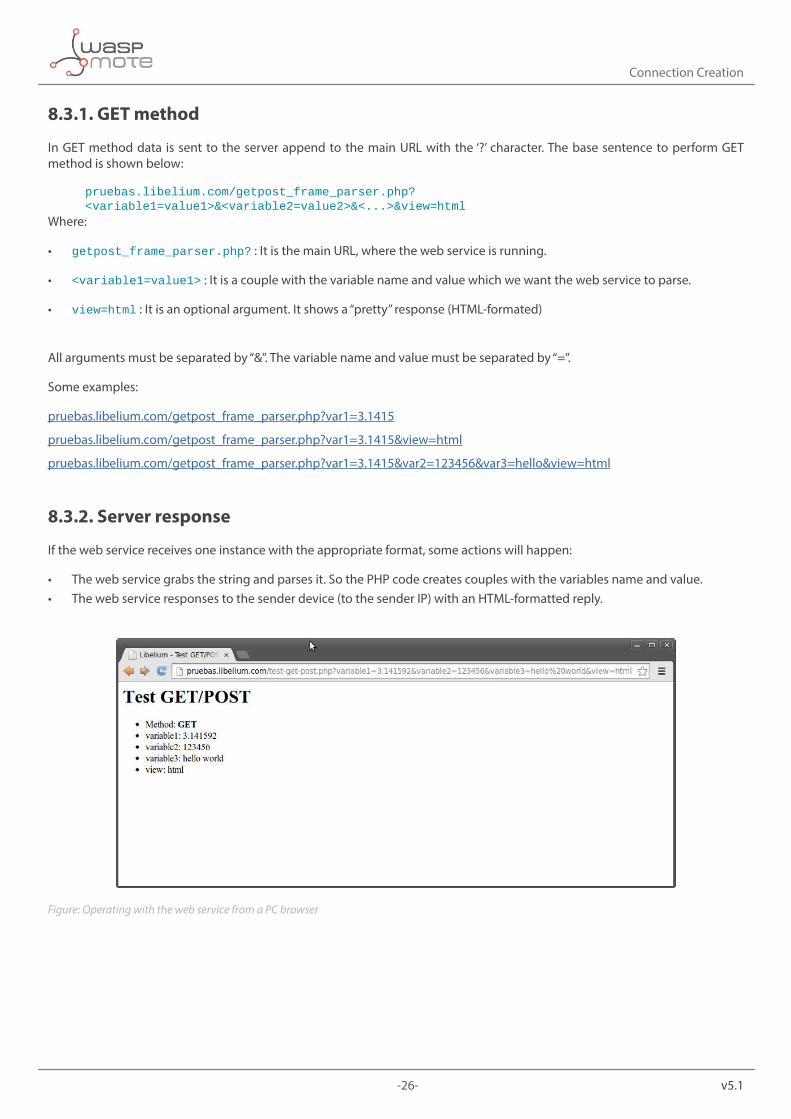
8.3.2. Server response
If the web service receives one instance with the appropriate format, some actions will happen:
• The web service grabs the string and parses it. So the PHP code creates couples with the variables name and value. • The web service responses to the sender device (to the sender IP) with an HTML-formatted reply.
Figure: Operating with the web service from a PC browser
-27- v5.1
Connection Creation
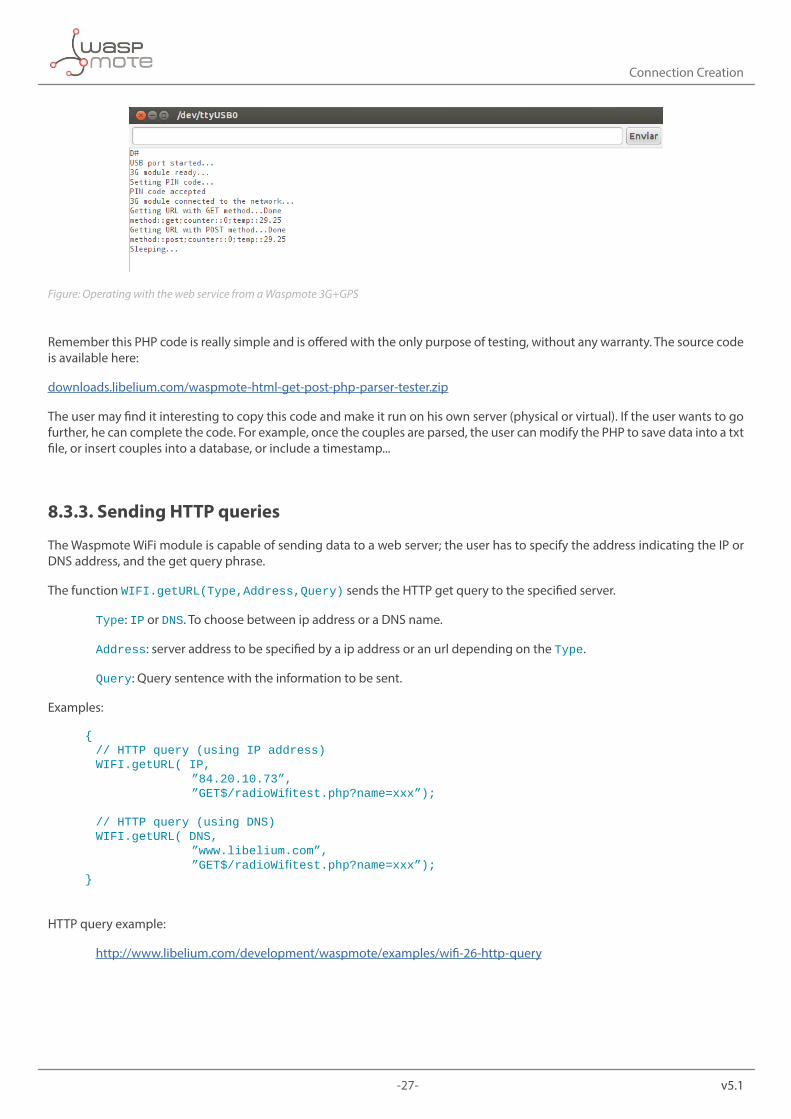
Figure: Operating with the web service from a Waspmote 3G+GPS
Remember this PHP code is really simple and is offered with the only purpose of testing, without any warranty. The source code is available here:
downloads.libelium.com/waspmote-html-get-post-php-parser-tester.zip
The user may find it interesting to copy this code and make it run on his own server (physical or virtual). If the user wants to go further, he can complete the code. For example, once the couples are parsed, the user can modify the PHP to save data into a txt file, or insert couples into a database, or include a timestamp...
8.3.3. Sending HTTP queries
The Waspmote WiFi module is capable of sending data to a web server; the user has to specify the address indicating the IP or DNS address, and the get query phrase.
The function WIFI.getURL(Type,Address,Query) sends the HTTP get query to the specified server.
Type: IP or DNS. To choose between ip address or a DNS name.
Address: server address to be specified by a ip address or an url depending on the Type.
Query: Query sentence with the information to be sent.
Examples:
{ // HTTP query (using IP address) WIFI.getURL( IP, ”84.20.10.73”, ”GET$/radioWifitest.php?name=xxx”);
// HTTP query (using DNS) WIFI.getURL( DNS, ”www.libelium.com”, ”GET$/radioWifitest.php?name=xxx”);}
HTTP query example:
http://www.libelium.com/development/waspmote/examples/wifi-26-http-query

-28- v5.1
Connection Creation
Using Waspmote Frame
In the case the user wants to use the Waspmote Frame instead of plain strings another function prototype is defined as shown below.
The function WIFI.getURL(Type,Address,Query,frame,length) sends the HTTP get query to the specified server.
Type: IP or DNS. To choose between ip address or a DNS name.
Address: server address to be specified by a ip address or an url depending on the Type.
Query: Query sentence with the information to be sent.
frame: Pointer to the frame buffer
length: Length of the frame to be sent
Examples:
{ // HTTP query (using IP address) WIFI.getURL( IP, ”10.10.10.1”, ”GET$/getpost_frame_parser.php?frame=”, frame.buffer, frame.length);
// HTTP query (using DNS) WIFI.getURL( DNS, ”pruebas.libelium.com”, ”GET$/getpost_frame_parser.php?frame=”, frame.buffer, frame.length);}
• HTTP query example with Waspmote Frame: http://www.libelium.com/development/waspmote/examples/wifi-26b-http-get-using-frame/
8.3.4. Sending a frame to Meshlium
Since June 2014, it is possible to send HTTP queries from Waspmote to Meshlium. All data sent using the Waspmote Frame to Meshlium is stored in the Meshlium’s database using the Frame Parser. Thus, it is possible to access to this data or synchronize it to external systems.
For this purpose, we need to use a different function. The function sendHTTPframe() sends the HTTP get query to the specified server.
The function prototype is WIFI.sendHTTPframe(Type, Address, remote_port, frame, length) where:
Type: IP or DNS. To choose between ip address or a DNS name.
Address: server address to be specified by a ip address o an url depending on the Type.
remote_port: The remote port used by the server.
Frame: Pointer to the frame buffer
Length: Length of the frame to be sent
-29- v5.1
Connection Creation
Examples:
{ // HTTP query to Meshlium WIFI.sendHTTPframe( IP, “10.10.10.1”, 80, frame.buffer, frame.length);}
• HTTP query example with Waspmote Frame: http://www.libelium.com/development/waspmote/examples/wifi-26c-sending-frames-to-meshlium/
8.4. FTPIn the FTP protocol, connections are created when uploading or downloading a file from a connection previously configured, and then closed.
FTP connection can be made in 3 easy steps:
First the WiFi module has to specify the IP address, the port, the mode of the FTP server, and the timeout of the connection with the function WIFI.setFTP(ip_address, port, passive/active, timeout). Timeout input specifies that once you finish writing to the file, a timer begins counting down and the file is closed when the timer gets to zero.
• Second, the WiFi module has to specify the user name and password of the FTP server with the function WIFI.openFTP(USER,PASSWORD).
• And then, the WiFi module can save a file from the server to the SD card, or upload a file to the server with the functions WIFI.getFile(filename, folder_sd, folder_ftp) and WIFI.uploadFile(filename,folder_sd, folder_ftp).
An example of using FTP protocol is showed below.
{ // 1. Configure the Remote parameters (Sets the FTP address, port, etc) WIFI.setFTP(“62.75.203.94”, 21, FTP_PASIVE, 20);
// 2 Prepares the ftp account with the user name and password WIFI.openFTP(“USERNAME”, ”PASSWORD”);
// 3. Now it is able to upload or get a file from the SD card or to a FTP server WIFI.uploadFile(“FILE”, ”FOLDER SD CARD”, ”FOLDER FTP SERVER”); WIFI.getFile(“FILE”, ”FOLDER SD CARD”, ”FOLDER FTP SERVER”); }
• FTP download example: www.libelium.com/development/waspmote/examples/wifi-24-ftp-download
• FTP upload example: www.libelium.com/development/waspmote/examples/wifi-25-ftp-upload
Note: Libelium can not secure 100% of file integrity when uploading/downloading using FTP protocol.

-30- v5.1
Connection Creation
8.5. Broadcast-UDPThe WiFi module can be setup to automatically generate UDP broadcast packets at certain intervals. This feature can work in parallel with any other protocol before explained. Those packets are sent using UDP protocol.
It is useful for a number of reasons:
• Some AP will disconnect devices that have joined don’t send any packets after a time. • Application programs to auto-discover and auto-connect the WiFi module can use this feature.
The format of the Broadcast-UDP packet is 110 Bytes of data organized as next table shows.
AP MAC ADDR. CHAN. RSSI TCP PORT REAL TIME
CLOCKTIME OF
DAY DATE CODE USER DEVICE ID BOOT TIME
Number of Bytes
0-5 6 7 8-9 10-13 18-31 32-59 60-91 92-93
Next code is an example of Broadcast-UDP connection creation; in the function the user need to specify the broadcast address, the port, the seconds and the User device ID.
• Configure broadcast-UDP messages example: www.libelium.com/development/waspmote/examples/wifi-19-broadcast-udp
8.6. Sending standard Libelium FramesThis version of WiFi library has the method WIFI.send(buffer, length) to send standard Libelium frames in an easy way.
An example is presented next:
{// Create new frame (ASCII)frame.createFrame(ASCII,”Waspmote_Pro”); // set frame fields (String - char*)frame.addSensor(SENSOR_STR, (char*) “WiFi frame”);
// Sends to the TCP connection WIFI.send(frame.buffer,frame.length); }

-31- v5.1
Device Options
9. Device OptionsThere are some device options when using WiFi module. These options are made to improve speed or to save energy.
9.1. Default settingsIn terms of settings, the user can restart the module with the default settings with the function resetValues(), restart the module with the last saved settings with reset, or save current settings with storeData().
Next table shows default configuration of the WiFi module to be used with the provided API.
Ad-hoc Beacon 100 milliseconds
Ad-hoc probe 5 seconds
IP Broadcast 255.255.255.255
Port Broadcast 55555
Interval Broadcast 7 seconds
DHCP ON
IP address 0.0.0.0
Net mask 255.255.255.0
Local port 2000
Remote port 2000
Protocol TCP server and client
Device ID WiFly-GSX
Join timer 1000 milliseconds
UART Baud rate9600 (Factory Default)115200 (Waspmote API Default)
SSID roving1
Channel 0 (automatic)
Join mode AUTO_STOR
Rate 12 (24 Mbit)
TX Power 0 (12 dBm)
Pass phrase rubygirl
Key 000000000000

-32- v5.1
Device Options
9.2. Improving performanceTo improve the features or performance of WiFi module it has been created some functions to set the speed of WiFi radio communication with the Waspmote, the transmission rate and transmission power.
{ // Sets the baud rate between the radio WiFi and Waspmote WIFI.setBaudRate(115200); // Sets the transmission rate with the network WIFI.setTXRate(15);
// Sets the power of transmission WIFI.setTXPower(0);
// Sets the timeout in milliseconds of joining to a network WIFI.setJoinTime(100);}
9.3. Sleeping the radio WiFiThe Radio WiFi uses the Real Time Clock (RTC) to generate timers. The RTC is active even when radio WiFi is asleep. This makes it possible to set the module to sleep and wake up from sleep based on timer intervals. During the sleep time, any sent to radio WiFi over the UART will not be processed.
That feature may be done automatically with setSleep( sTime, sCycle) function. When radio WiFi reboots, this configuration will remain the radio WiFi awake during sCycle seconds and then it will sleep the radio during sTime seconds. The user can configure default connections when waking up.
The next example shows how the module works when sTime=90 and sCycle=30.
• Sleep and Wake up the module automatically: www.libelium.com/development/waspmote/examples/wifi-04-sleep-auto
Note: It is not recommended to use this mode. It is better to switch on and off the module in order to save battery as it is not possible to know when the module is awake or not.

-33- v5.1
Status Information
10. Status InformationFinally, the last group of functions are the ways for watching the current status and the current configuration of WiFi module. This information is displayed through the USB connection and stored in the WIFI.answer variable.
These options are: connection, network, signal quality, statistics, delays, ad-hoc, broadcast, communication, DNS, FTP, IP, MAC, device ID, timers, UDP and UART settings.
• Display module status example: www.libelium.com/development/waspmote/examples/wifi-03-status

-34- v5.1
Connecting to Meshlium
11. Connecting to MeshliumMeshlium is a Linux router which works as the Gateway of the Waspmote Sensor Networks. It can contain 5 different radio interfaces: WiFi 2.4GHz, WiFi 5GHz, 3G/GPRS, Bluetooth and ZigBee. As well as this, Meshlium can also integrate a GPS module for mobile and vehicular applications and be solar and battery powered. These features a long with an aluminium waterproof (IP-65) enclosure allows Meshlium to be placed anywhere outdoor. Meshlium comes with the Manager System, a web application which allows to control quickly and easily the WiFi, ZigBee, Bluetooth and 3G/GPRS configurations a long with the storage options of the sensor data received.
More info: http://www.libelium.com/meshlium
Focusing in WiFi technologies, there are two main ways of using Meshlium and Waspmote with the WiFi module. First is using Meshlium to create an Access Point and give the WiFi module access to the Internet. And the other is configuring Meshlium for receiving, capturing and sending messages from and to Waspmote with WiFi module.

-35- v5.1
Connecting to Meshlium
11.1. Setting Meshlium as APMeshlium comes with all the radios ready to be used. Just “plug & mesh!”. All the Meshlium nodes come with the WiFi AP ready so that users can connect using their WiFi devices. Connect the Ethernet cable to your network hub, restart Meshlium and it will automatically get an IP from your network using DHCP *.
Then access Meshlium through the WiFi connection. First of all search the available access points and connect to “Meshlium”.
No password is needed as the network is public (you can change it later in the WiFi AP Interface options). When you select it, Meshlium will give an IP from the range 10.10.10.10 - 10.10.10.250.
Now you can open your browser and access to the Meshlium Manager System:
• URL: http://10.10.10.1/ManagerSystem • user: root • password: libelium
-36- v5.1
Connecting to Meshlium
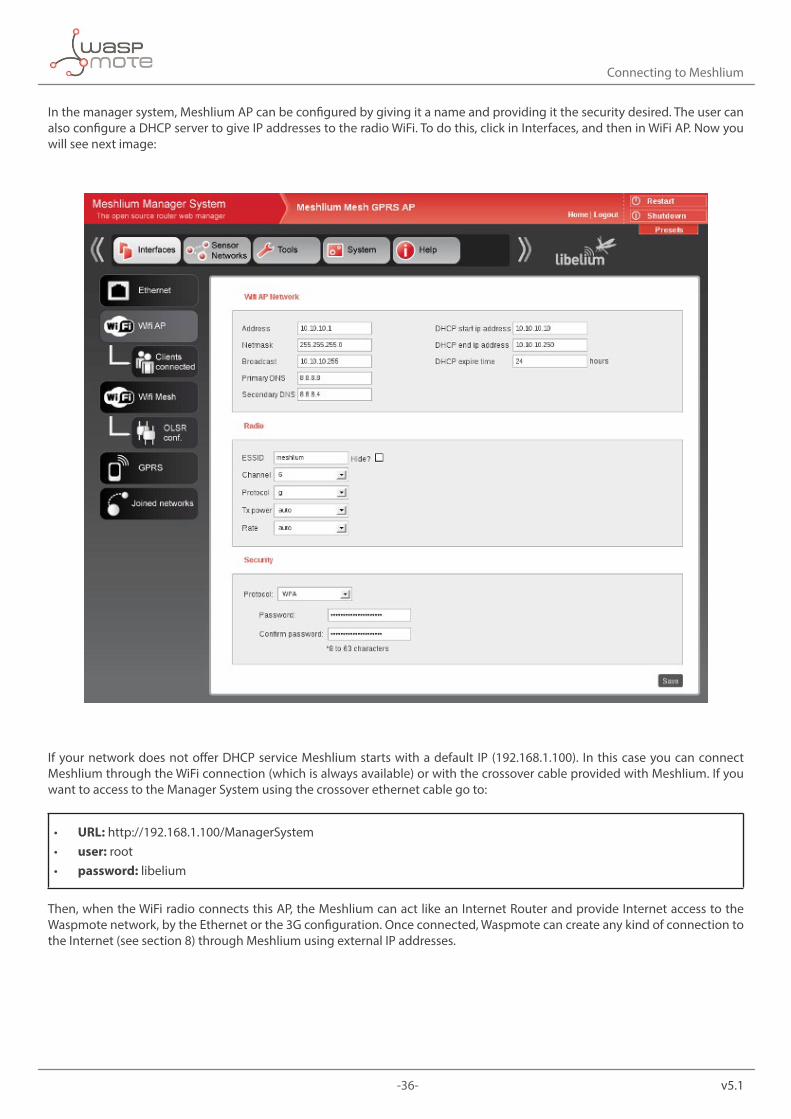
In the manager system, Meshlium AP can be configured by giving it a name and providing it the security desired. The user can also configure a DHCP server to give IP addresses to the radio WiFi. To do this, click in Interfaces, and then in WiFi AP. Now you will see next image:
If your network does not offer DHCP service Meshlium starts with a default IP (192.168.1.100). In this case you can connect Meshlium through the WiFi connection (which is always available) or with the crossover cable provided with Meshlium. If you want to access to the Manager System using the crossover ethernet cable go to:
• URL: http://192.168.1.100/ManagerSystem • user: root • password: libelium
Then, when the WiFi radio connects this AP, the Meshlium can act like an Internet Router and provide Internet access to the Waspmote network, by the Ethernet or the 3G configuration. Once connected, Waspmote can create any kind of connection to the Internet (see section 8) through Meshlium using external IP addresses.

-37- v5.1
Connecting to Meshlium
11.2. Capturing and storing packets
11.2.1. Using the Sensor Parser
With the new Manager System version launched on June 2014, now the Sensor Parser can not only grab data from the XBee interface, but also from WiFi, GPRS and 3G. In November 2014, LoRa support was added to the Manager System too.
Now Meshlium’s Manager System can receive HTTP instances sent from Waspmote WiFi module. Packets must be constructed respecting the Libelium’s Frame library. Please see section “Sending a frame to Meshlium” in this guide for more details. Those packets will be received, parsed and stored in the MySQL database automatically, just like XBee frames. Then the user can configure Meshlium to send data to the Cloud.
Figure: Meshlium Sensor Parser receives data frames from WiFi modules and sends to the Cloud
11.2.2. Developing your own capturer
Meshlium is a complete Linux system. This means you can prepare it to execute any kind of application including PHP, Python, Perl, Ajax, Ruby, C, C++, Java, etc and services: http, ftp(not installed by default), mysql, postgre, etc.
As Meshlium is based on a Debian system you can use tools such as aptitude in order to download and install new libraries, services, data bases and applications. See next chapter “Installing new packages and libraries” to see how to add them.
Meshlium counts with a file system up to 32GB which can be used by developers to store the data generated in their own applications and with the sensor data coming from the ZigBee, Bluetooth and GPS capturer tools. You can access through SSH using the same user and password of the Manager System.
• Command: ssh [email protected] • user: root • password: libelium

-38- v5.1
Connecting to Meshlium
The user partition is located in /mnt/user and it is read and write enabled by default so you don’t need to remount it. However, if you want to add your own applications in the system path you must remount the system in read and write mode. To do so execute as root: “remountrw”.
#remountrw
You can use “scp” (available by default in most linux distributions) in order to copy your own files to Meshlium.
#scp myFile [email protected]:/mnt/user/.
Alternatively you can use a sftp client program, like Filezilla, (available for windows and mac) and use it from you pc to upload files to Meshlium using the following data:
• Host: 10.10.10.1 • Server Type: SFTP • Port: 22 • User: root • Passw: libelium

-39- v5.1
Connecting to Meshlium
Last you must remount the system in read only mode. To do so execute as root: “remountro”.
#remountro
Important: Installing new software is a delicate task which has to be done for experts. If you are not sure about adding new files to the system path do not perform any action including remounting the system as read and write. If you have any doubt ask to our Development team at: http://www.libelium.com/forum
All the information coming from all the interfaces (ZigBee, Bluetooth, 3G/GPRS, WiFi and from the GPS module) can be stored in the Local Data Base as explained in the “Storage Options” section or even exported to an external Data Base connected to the internet.

-40- v5.1
Connecting to Meshlium
We have created a template code files in order to help developers to create their own capture and storage applications.
main() { /* file descriptors */ int fd; int i; struct sockaddr_in server; struct sockaddr_in client; int sin_size; int numbytes; char buf[MAXDATASIZE]; /* create a socket() */ if ((fd=socket(AF_INET, SOCK_DGRAM, 0)) == -1 ) { printf(“socket error\n”); exit(-1); } /* create the struct sockaddr_in with the addresses/settings */ sin_size = sizeof(client); server.sin_family = AF_INET; server.sin_port = htons(PORT); server.sin_addr.s_addr = INADDR_ANY; bzero(&(server.sin_zero), 8); /* bind() the socket to a port */ if (bind(fd, (structsockaddr*)&server, sizeof(structsockaddr)) == -1) { printf(“bind error \n”); exit(-1); } //HERE WHATEVER YOU WANT TO DO: STORE, RECEIVE, ANSWER… /* receive data from the socket */ recvfrom(fd, buf, MAXDATASIZE, 0, (structsockaddr*)&client, &sin_size); /* send data to the socket */ sendto(fd, …); /* closes the socket */ close(fd); }
This example is for UDP connection, if the user wants to make a TCP connection, there are some changes in the code, for example, function socket changes and the functions listen() and accept() are needed.
/* creates TCP socket */ fd = socket(AF_INET, SOCK_STREAM, 0)) ; /* bind() the socket to a port */ bind(fd, (structsockaddr*)&server, sizeof(structsockaddr)); /* listen for connections */ listen(fd, BACKLOG) == -1); /* accept and stablish a TCP connection */ fd2 = accept(fd, (structsockaddr *)&client, &sin_size)); /* receive data from the socket */ recv(fd2, buf, MAXDATASIZE,0)); /* send data to the socket*/ send(fd2, ”whatever.”);
The real files (wifi_UDP.c, wifi_TCP.c) can be downloaded from the Meshlium Development section: http://www.libelium.com/development/meshlium
You can download these files and change them in order to make it compatible for your specific configuration.

-41- v5.1
Connecting to Meshlium
The compilation can be done in the same Meshlium. Just copy these files in a folder accessing by SSH and execute:
#gcc wifi_UDP.c –o wifiUDP #gcc wifi_TCP.c –o wifiTCP
You will find support in the Libelium Forum at: http://www.libelium.com/forum
Finally, execute one of these programs.
#./wifiUDP #./wifiTCP
And next image shows what you should see:
-42- v5.1
Connecting to a Smartphone directly
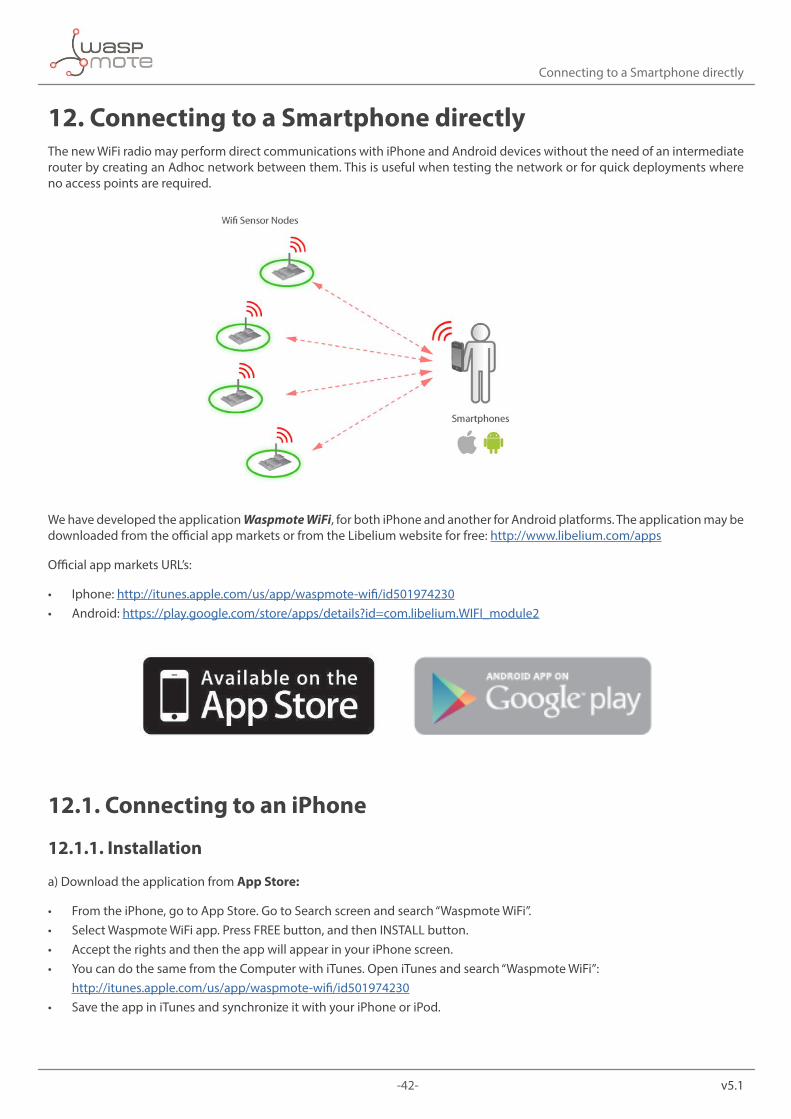
12. Connecting to a Smartphone directlyThe new WiFi radio may perform direct communications with iPhone and Android devices without the need of an intermediate router by creating an Adhoc network between them. This is useful when testing the network or for quick deployments where no access points are required.
We have developed the application Waspmote WiFi, for both iPhone and another for Android platforms. The application may be downloaded from the official app markets or from the Libelium website for free: http://www.libelium.com/apps
Official app markets URL’s:
• Iphone: http://itunes.apple.com/us/app/waspmote-wifi/id501974230 • Android: https://play.google.com/store/apps/details?id=com.libelium.WIFI_module2
12.1. Connecting to an iPhone
12.1.1. Installation
a) Download the application from App Store:
• From the iPhone, go to App Store. Go to Search screen and search “Waspmote WiFi”. • Select Waspmote WiFi app. Press FREE button, and then INSTALL button. • Accept the rights and then the app will appear in your iPhone screen. • You can do the same from the Computer with iTunes. Open iTunes and search “Waspmote WiFi”:
http://itunes.apple.com/us/app/waspmote-wifi/id501974230 • Save the app in iTunes and synchronize it with your iPhone or iPod.

-43- v5.1
Connecting to a Smartphone directly
b) Download the application (WaspmoteWifi.ipa) from the Libelium website: http://www.libelium.com/apps
• Then double click on the icon, or right click and open with iTunes.
• Inside iTunes, on the left panel, click on DEVICES → Your Device. • Select on the top “Apps”, and select Sync Apps. Drag into the desired screen Waspmote WiFi app.
Once installed, the app appears in your iPhone/iPod screen:
-44- v5.1
Connecting to a Smartphone directly
12.1.2. iPhone App tutorial
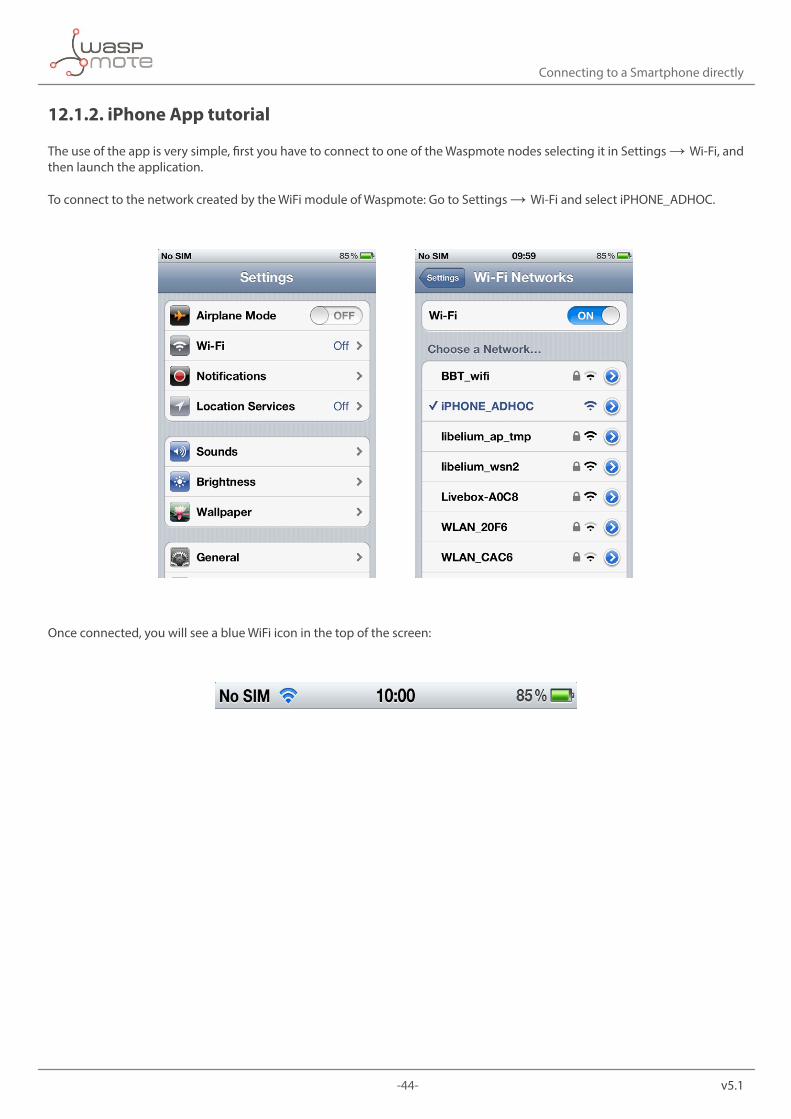
The use of the app is very simple, first you have to connect to one of the Waspmote nodes selecting it in Settings → Wi-Fi, and then launch the application.
To connect to the network created by the WiFi module of Waspmote: Go to Settings → Wi-Fi and select iPHONE_ADHOC.
Once connected, you will see a blue WiFi icon in the top of the screen:
-45- v5.1
Connecting to a Smartphone directly
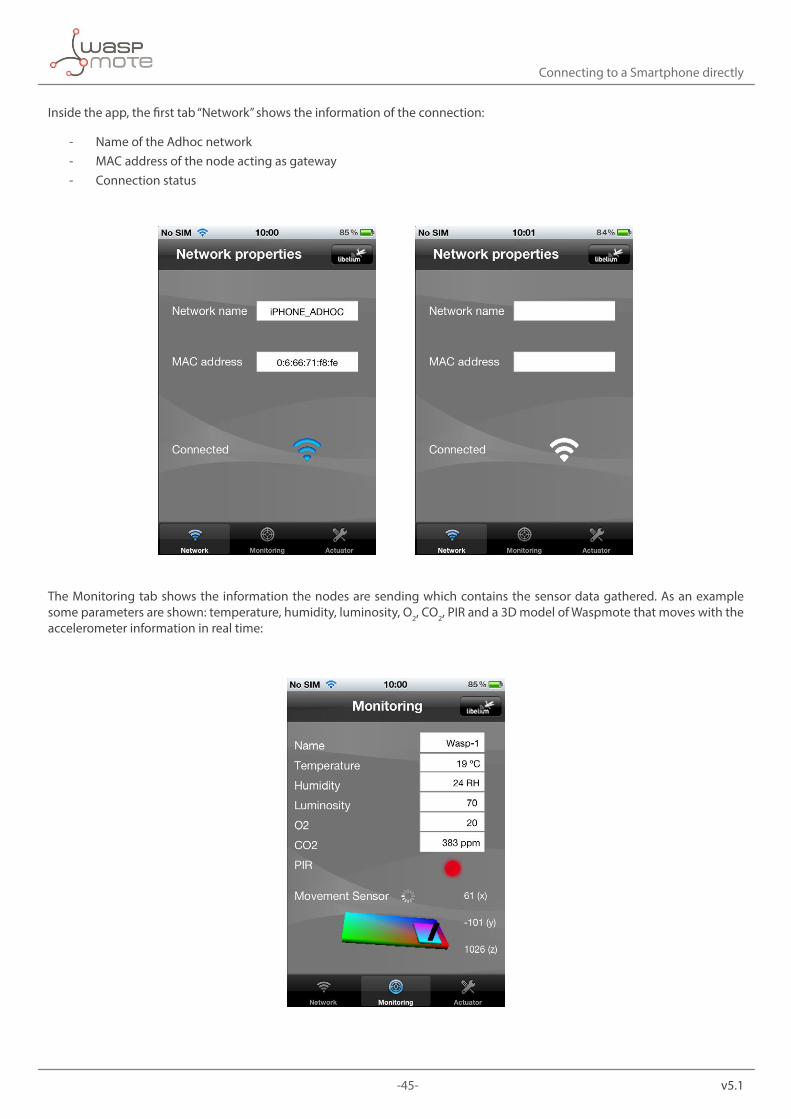
Inside the app, the first tab “Network” shows the information of the connection:
- Name of the Adhoc network - MAC address of the node acting as gateway - Connection status
The Monitoring tab shows the information the nodes are sending which contains the sensor data gathered. As an example some parameters are shown: temperature, humidity, luminosity, O2, CO2, PIR and a 3D model of Waspmote that moves with the accelerometer information in real time:
-46- v5.1
Connecting to a Smartphone directly
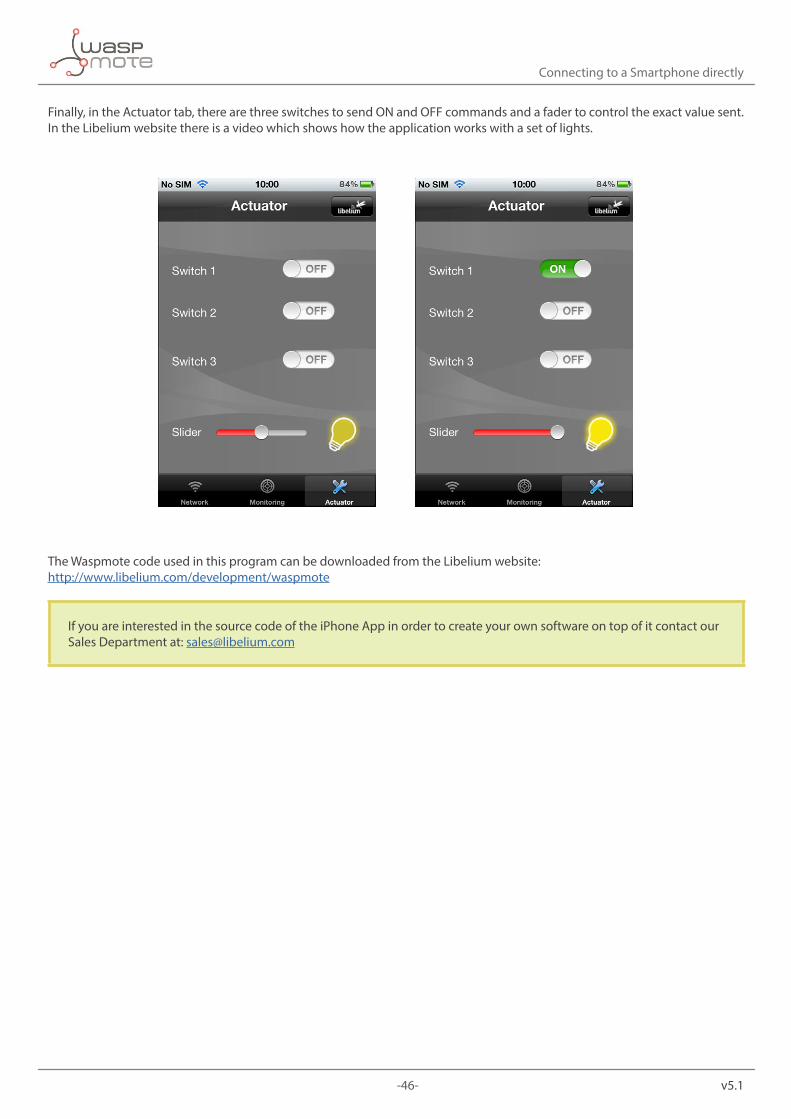
Finally, in the Actuator tab, there are three switches to send ON and OFF commands and a fader to control the exact value sent. In the Libelium website there is a video which shows how the application works with a set of lights.
The Waspmote code used in this program can be downloaded from the Libelium website: http://www.libelium.com/development/waspmote
If you are interested in the source code of the iPhone App in order to create your own software on top of it contact our Sales Department at: [email protected]

-47- v5.1
Connecting to a Smartphone directly
12.2. Connecting to an AndroidThere is a feature since the version Android 2.2 or higher that allows us to create an Adhoc network and allows Waspmote to connect to it.
12.2.1. Installation
a) Download the application from Google Play:
• From the Android device, go to Google Play. • Search “Libelium” or “Waspmote WiFi” and press enter.
b) Download the application (WaspmoteWifi.apk) from Libelium website:
http://www.libelium.com/apps
• Insert it to the SD card of your Android device. • Then explore the SD card in your Android device and install the application. You can explore the SD card with “Astro”, “ES
Explora”, or “File Explorer” applications.

-48- v5.1
Connecting to a Smartphone directly
12.2.2. Android App tutorial
The use of the app is very simple, first you have to create an AP from your Android device and then set Waspmote to connect to it.
To create the AP from the Android device:
Go to Settings → Tethering & Portable Hotspot or Settings → WiFi → My WiFi Zone (depending of the version of mobile)
Then configure the WLAN hotspot (name= ANDROID, Security= Open). This settings you can change if you change as well the Waspmote code.

-49- v5.1
Connecting to a Smartphone directly
Finally, enable Portable WLAN hotspot (or My WiFi Zone), and Waspmote will connect to the Android device. Once connected, you can launch the Waspmote WiFi Demo app.
Inside the app, the first tab “Network” shows the information of the connection:
- Name of the Adhoc network - MAC address of the node acting as gateway - Connection status
The Monitoring tab shows the information the nodes are sending which contains the sensor data gathered. As an example some parameters are shown: temperature, humidity, luminosity, O2, CO2, PIR and a 3D model of Waspmote that moves with the accelerometer information in real time.

-50- v5.1
Connecting to a Smartphone directly
Finally, in the Actuator tab, there are three switches to send ON and OFF commands and a fader to control the exact value sent. In the Libelium website there is a video which shows how the application works with a set of lights.
The Waspmote code used in this program can be downloaded from the Libelium website: http://www.libelium.com/development/waspmote
If you are interested in the source code of the Android App in order to create your own software on top of it contact our Sales Department at: [email protected]
Figure: Examples
• iPhone App example: www.libelium.com/development/waspmote/examples/wifi-29a-iphone
• Android App example: www.libelium.com/development/waspmote/examples/wifi-29b-android

-51- v5.1
Code examples and extended information
13. Code examples and extended information • For more information about the Waspmote hardware platform go to:
http://www.libelium.com/waspmote
http://www.libelium.com/development/waspmote
• In the Waspmote Development section you can find complete examples: http://www.libelium.com/development/waspmote/examples
Example:
#include <WaspWIFI.h> // Include WiFi library #include <WaspFrame.h> // Include Frame library
// choose socket (SELECT USER’S SOCKET)uint8_t socket=SOCKET0;
// TCP server settings#define IP_ADDRESS “???.???.???.???”#define REMOTE_PORT 55557#define LOCAL_PORT 2000
// WiFi AP settings (CHANGE TO USER’S AP)#define ESSID “libelium_AP”#define AUTHKEY “password”
void setup(){ // Switch ON the WiFi module on the desired socket WIFI.ON(socket);
// 1. Configure the transport protocol (UDP, TCP, FTP, HTTP...) WIFI.setConnectionOptions(CLIENT);
// 2. Configure the way the modules will resolve the IP address. WIFI.setDHCPoptions(DHCP_ON);
// 3. Configure how to join the AP WIFI.setJoinMode(MANUAL);
// 4. Set Authentication key WIFI.setAuthKey(WPA1,AUTHKEY);
// 5. Store values WIFI.storeData();
}
void loop(){ // 1. Switch WiFi ON WIFI.ON(socket);
// 2. Join AP if (WIFI.join(ESSID)) { USB.println(“Connected to AP”); // 3. Call the function to create a TCP connection if (WIFI.setTCPclient(IP_ADDRESS, REMOTE_PORT, LOCAL_PORT))

-52- v5.1
Code examples and extended information
{ // Connection is open, get values USB.println(F(“TCP client set”)); RTC.ON(); RTC.getTime(); // Create new frame (ASCII) frame.createFrame(ASCII,”Waspmote_Pro”); // set frame fields frame.addSensor(SENSOR_BAT, PWR.getBatteryLevel() ); frame.addSensor(SENSOR_TIME, RTC.hour, RTC.minute, RTC.second );
// Sends to the TCP connection WIFI.send(frame.buffer,frame.length); // Closes the TCP connection. USB.println(F(“Close TCP socket”)); WIFI.close(); } else { USB.println(F(“TCP client NOT set”)); } } else { USB.println(F(“NOT Connected to AP”)); }
// Switch off the module WIFI.OFF(); USB.println(F(“-------------------------”)); delay(3000); }

-53- v5.1
API Changelog
14. API Changelog
Keep track of the software changes on this link:
www.libelium.com/development/waspmote/documentation/changelog/#WiFi

-54- v5.1
Documentation changelog
15. Documentation changelog
From v5.0 to v5.1 • Deleted references to HTTPS and FTPS
From v4.9 to v5.0 • References to the new LoRaWAN module
From v4.8 to v4.9 • References to the new Sigfox module
From v4.7 to v4.8 • Deleted references to auto-best mode
From v4.6 to v4.7 • Deleted references to Waspmote WiFi PC App
From v4.5 to v4.6 • References to the new LoRa module • Link to the new online API changelog
From v4.4 to v4.5 • API changelog updated to API v011 • Expansion Radio Board section updated • Added method for receiving data in Meshlium: Sensor Parser
From v4.3 to v4.4: • API changelog updated to API v010 • Added info about sending HTTP queries to Meshlium
From v4.2 to v4.3: • API changelog updated to API v007 • Added section to explain Libelium’s HTTP web service
From v4.1 to v4.2: • Added reference to OTA with WiFi module via FTP server
From v4.0 to v4.1: • Added references to 3G/GPRS Board in section: Expansion Radio Board