wic only merchants pos procedures manual
TRANSCRIPT
WIC Only Merchants POS Procedures Manual For the Verifone Vx520 Revised Date: September 2020 Website www.ebtedge.com Merchant Help Desk Number: ______________ WIC Location ID: ___________________ WIC Terminal ID: ________________

WIC Only Merchants POS Procedures Manual
Copyright © 2015, 2018-2020 FIS™ and/or its subsidiaries. All Rights Reserved. ebtEDGE is a registered trademark of FIS. FIS confidential and proprietary information.
1
Table of Contents 1 POS Equipment ............................................................................................................................. 1
Equipment Location Considerations ........................................................................................... 1
Equipment Components ............................................................................................................... 2
Requirements and Installation ..................................................................................................... 2
Dial-up Connection – Connect the Phone Line ......................................................................... 2
Broadband Connection – Connect the Ethernet (LAN) Cable ................................................... 3
Connect the Scanner ............................................................................................................... 3
Connect the Power Pack Cable ............................................................................................... 3
Optional Equipment - Connect the Handheld External PIN Pad ............................................... 4
Paper Replacement ................................................................................................................. 4
POS Terminal Function Keys ....................................................................................................... 6
F1 – F4 Keys ........................................................................................................................... 6
Terminal Overlay and Function Keys ....................................................................................... 6
Alpha Key ........................................................................................................................ 7
Numbered Function Keys (1-0) ........................................................................................ 7
Color-Coded Keys ........................................................................................................... 7
POS Terminal Overview................................................................................................................ 8
WIC Card ................................................................................................................................. 8
How to Swipe the WIC Card .................................................................................................... 9
Receipts ................................................................................................................................. 10
Messages .................................................................................................................................... 12
Printed on Receipts ................................................................................................................ 12
Demo Mode ................................................................................................................... 12
Declined Codes ............................................................................................................. 12
Duplicate ........................................................................................................................ 13
Displayed on Terminal Screen ............................................................................................... 13
2 Processing WIC Transactions.................................................................................................... 14
Sign On Procedure ..................................................................................................................... 14
Sign Off Procedure ..................................................................................................................... 14
WIC Balance Inquiry ................................................................................................................... 15

WIC Only Merchants POS Procedures Manual
Copyright © 2015, 2018-2020 FIS™ and/or its subsidiaries. All Rights Reserved. ebtEDGE is a registered trademark of FIS. FIS confidential and proprietary information.
2
WIC Purchase .............................................................................................................................. 16
WIC Purchase with CVB Split Tender ........................................................................................ 19
WIC Purchase – Cancel .............................................................................................................. 20
WIC Purchase – Item Delete ....................................................................................................... 21
WIC Purchase – Reduce Quantity .............................................................................................. 21
WIC Purchase – Print Scanned Items ........................................................................................ 21
WIC Purchase – Reprint Receipt ................................................................................................ 22
WIC Purchase – Void Last .......................................................................................................... 24
3 Supervisor Transactions ............................................................................................................ 25
Add a Clerk or Supervisor ID ..................................................................................................... 25
Add or Change a Password ....................................................................................................... 26
Delete a Clerk or Supervisor ID .................................................................................................. 27
UPC Price Maintenance .............................................................................................................. 28
Manual Card Entry ...................................................................................................................... 29
Demo Mode ................................................................................................................................. 29
To Exit Demo Mode ............................................................................................................... 32
4 Totals Reporting ......................................................................................................................... 33
Vendor Totals .............................................................................................................................. 33
Terminal Totals ........................................................................................................................... 34
Clerk Totals ................................................................................................................................. 35
5 POS Download ............................................................................................................................ 36
Dial-Up Download Procedures ................................................................................................... 36
Broadband Download Procedures ............................................................................................ 37
EMA Partial Download ................................................................................................................ 38
6 POS Equipment Troubleshooting .............................................................................................. 40
Terminal ....................................................................................................................................... 40
External PIN Pad ................................................................................................................... 41
Telephone Line ...................................................................................................................... 41
Broadband Internet Connection ............................................................................................. 41
Printer .................................................................................................................................... 42
Handheld Scanner ................................................................................................................. 42
WIC Only Merchants POS Procedures Manual
Copyright © 2015, 2018-2020 FIS™ and/or its subsidiaries. All Rights Reserved. ebtEDGE is a registered trademark of FIS. FIS confidential and proprietary information.
3
Vx520 WIC Broadband Connectivity.......................................................................................... 43
Check Hardware Connections ................................................................................................ 43
Check Broadband Connection ............................................................................................... 43
Restart a Network Connection ............................................................................................... 44
7 Maintenance ................................................................................................................................ 45
Contact Information .................................................................................................................... 45
Daily Preparation ........................................................................................................................ 45
Terminal ....................................................................................................................................... 45
PIN Pad ........................................................................................................................................ 46
Handheld Scanner ...................................................................................................................... 46
Cleaning the Device ............................................................................................................... 46
Replacing the Interface Cable ................................................................................................ 46
8 Scanner Troubleshooting ........................................................................................................... 48
9 Error Messages ........................................................................................................................... 49
Error Messages Displayed on Terminal Screen........................................................................ 51
10 Glossary ............................................................................................................................... 52
Glossary of WIC Terms .............................................................................................................. 52
WIC Only Merchants POS Procedures Manual
Copyright © 2015, 2018-2020 FIS™ and/or its subsidiaries. All Rights Reserved. ebtEDGE is a registered trademark of FIS. FIS confidential and proprietary information.
1
1 POS Equipment This manual familiarizes you with the point-of-sale (POS) equipment and the application that allows merchants to serve customers eligible for WIC benefits. While using this application, merchants can assist customers with WIC benefit purchases at their stores.
Equipment Location Considerations It is important to consider the following guidelines when selecting a location for the POS terminal:
• Place the equipment in a location that is convenient for both the cashier and the cardholder. The equipment should be placed so the cardholder can easily enter their 4-digit personal identification number (PIN) in such a manner that the PIN cannot be compromised.
• Place the terminal in a location where it can lie flat, near an analog telephone line (for dial-up only) or Ethernet connection (for broadband only) and power outlet.
• Moving the equipment creates a high risk for damage.
Note
The telephone line and jack must be installed prior to POS equipment installation. This POS equipment supports the transaction processing over a broadband internet connection. If a vendor chooses to process transactions over broadband connection, connectivity should be readily available.
• Avoid using power outlets that are currently used for other devices as this can cause voltage fluctuations or electrical noise.
• Avoid placing the POS terminal in areas: o With excessive noise, heat sources (direct sunlight or on a computer tower), oil, moisture,
and dust. o Near devices that can cause voltage fluctuations or electrical noise, such as air
conditioners, electric motors, fans, neon signs, or high frequency security equipment. o Where electrical outlets are not grounded. (Do not use adaptor plugs or outdoor outlets.)

WIC Only Merchants POS Procedures Manual
Copyright © 2015, 2018-2020 FIS™ and/or its subsidiaries. All Rights Reserved. ebtEDGE is a registered trademark of FIS. FIS confidential and proprietary information.
2
Equipment Components Two main pieces of equipment are provided: the terminal with an integrated printer and the scanner. Make sure the components arrive with all of their parts. The following items should be included in the package:
• Terminal • Alternating Current (AC)
power cord • Scanner
• Power pack • Handheld PIN pad
(optional equipment) • Paper roll
• Telephone cord • PIN pad
Note The Vx520 POS terminal comes equipped with an internal PIN pad. As a setup option, merchants can request a handheld PIN pad when they complete their contract agreement with FIS.
Requirements and Installation Terminal equipment installation requires one power outlet and either a telephone line with a modular telephone company jack (for dial-up connections) or an Ethernet (LAN) cable and port/wall jack (for broadband connections). No special wiring is needed. The power pack cables are approximately six (6) feet long, and the telephone cable runs up to seven (7) feet.
Dial-up Connection – Connect the Phone Line 1. Insert the telephone cord into the
telephone port () on the terminal. 2. Insert the other end of the telephone
cord into the wall jack dedicated to the terminal.
Note
Your terminal may have a different configuration than the examples shown in this manual. However, the port symbols remain the same.

WIC Only Merchants POS Procedures Manual
Copyright © 2015, 2018-2020 FIS™ and/or its subsidiaries. All Rights Reserved. ebtEDGE is a registered trademark of FIS. FIS confidential and proprietary information.
3
Broadband Connection – Connect the Ethernet (LAN) Cable Insert one end of the Ethernet (LAN) cable
into the ETH port on the terminal and the other end into the Ethernet (LAN) connection in the store (Ethernet port/wall jack).
Note Each merchant must supply their own Ethernet cables.
2. LAN connectivity may vary by location. Please talk to your internet provider for any configuration questions or issues.
Connect the Scanner 1. Simply insert the USB cord end of the
scanner into the USB port on the right side of the terminal.
Connect the Power Pack Cable 1. Insert the barrel-shaped connector into
the power port ( ) on the terminal.
The power port location on the Vx520 is on the bottom of the terminal. Turn the connector to the locking position.
2. If available, route the cable through the cable retainer to secure the position of the power cord.
3. Insert the AC power cord into the power pack.
4. Plug the AC power cord into an indoor electrical outlet.

WIC Only Merchants POS Procedures Manual
Copyright © 2015, 2018-2020 FIS™ and/or its subsidiaries. All Rights Reserved. ebtEDGE is a registered trademark of FIS. FIS confidential and proprietary information.
4
Your POS terminal is now ready for operation. When the terminal has power, the LCD screen lights up and the VeriFone logo blue LED indicator remains lit. The following screen is displayed.
Optional Equipment - Connect the Handheld External PIN Pad Before connecting the PIN pad, make sure the green indicator LED is not lit. The terminal should not have power until after the PIN pad is connected.
1. If it is not already connected, insert the PIN pad cable grommet into the PIN pad device.
2. Insert the connector into the PIN pad port on the terminal.
Paper Replacement This section describes how to replace the paper roll in the Vx520 terminal. Each merchant should supply their own paper. The paper roll required is single-ply, thermal sensitive, 2.25 inches (58 millimeters) wide, by 82 feet.
Important When the terminal is on, the green indicator light blinks to indicate the printer needs paper. A pink line will also appear on the receipt paper to indicate the need for replacement. Make sure the shiny side of the paper is on the outside of the roll once it is installed.
Note
The Vx520 POS terminal comes equipped with an internal PIN pad, allowing the cardholder to enter their PIN using the terminal. An optional handheld PIN pad may also be used. If the handheld PIN pad is connected, the cardholder must enter the PIN using that device.

WIC Only Merchants POS Procedures Manual
Copyright © 2015, 2018-2020 FIS™ and/or its subsidiaries. All Rights Reserved. ebtEDGE is a registered trademark of FIS. FIS confidential and proprietary information.
5
To install a paper roll in the terminal:
Hook your finger under the latch and lift up to swing the paper roll cover open.
Opening the Printer Cover
Remove any partial roll of paper in the printer tray by lifting it up.
Loosen the glued leading edge of the new paper roll or remove the protective strip. Unwind the paper roll past any glue residue.
Hold the roll so the paper feeds from the bottom of the roll.
Drop the paper roll into the printer tray.
Loading the Paper Roll
Pull paper up past the glue residue.
Close the paper roll cover by gently pressing directly on the cover until it clicks shut, allowing a small amount of paper past the glue residue to extend outside the printer door.
Closing the Paper Roll Cover
Tear the paper off against the serrated metal strip in the printer.
Note To prevent the paper roll cover from damaging the print roller, always gently press down on the printer dust cover to close it.
WIC Only Merchants POS Procedures Manual
Copyright © 2015, 2018-2020 FIS™ and/or its subsidiaries. All Rights Reserved. ebtEDGE is a registered trademark of FIS. FIS confidential and proprietary information.
6
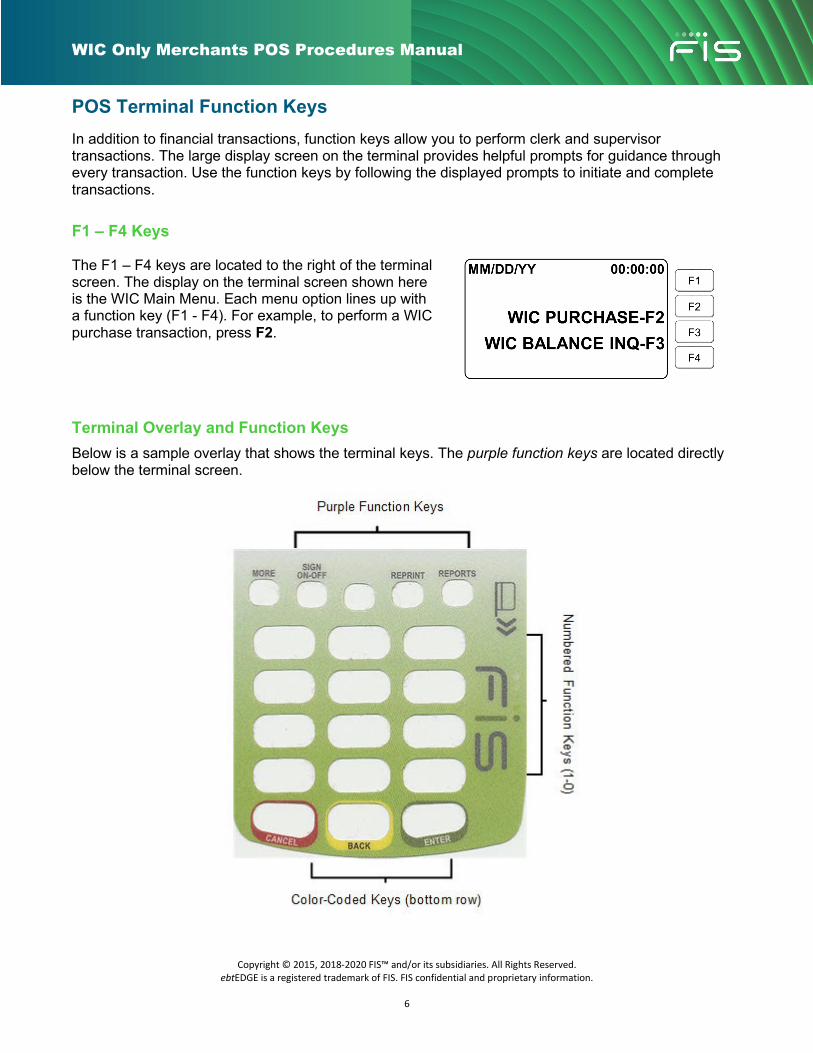
POS Terminal Function Keys In addition to financial transactions, function keys allow you to perform clerk and supervisor transactions. The large display screen on the terminal provides helpful prompts for guidance through every transaction. Use the function keys by following the displayed prompts to initiate and complete transactions.
F1 – F4 Keys
The F1 – F4 keys are located to the right of the terminal screen. The display on the terminal screen shown here is the WIC Main Menu. Each menu option lines up with a function key (F1 - F4). For example, to perform a WIC purchase transaction, press F2.
Terminal Overlay and Function Keys Below is a sample overlay that shows the terminal keys. The purple function keys are located directly below the terminal screen.
WIC Only Merchants POS Procedures Manual
Copyright © 2015, 2018-2020 FIS™ and/or its subsidiaries. All Rights Reserved. ebtEDGE is a registered trademark of FIS. FIS confidential and proprietary information.
7
Purple Function Key Purpose Purple Function Key Purpose MORE
Press the MORE function key to access additional functions.
SIGN ON-OFF
Press the SIGN ON-OFF function key to display the SIGN ON-OFF options.
REPRINT
Press the REPRINT function key to reprint the previous receipt.
REPORTS
Press REPORTS to display the reports options.
Alpha Key The ALPHA key is in the top, center between the purple function keys. It is used to change a number that has been entered into one of the corresponding alphabetic characters found on that numbered key. It also is used for troubleshooting situations. If needed, a Merchant Help Desk representative is available to walk you through the procedure.
Numbered Function Keys (1-0) The keys numbered 1 through 0 are located below the purple function keys. They are used to enter the dollar amount and/or quantity for a transaction.
Color-Coded Keys The keys on the bottom of the keypad are used as follows:
Key Description Cancel (Red) Clears the display, and returns the user to the WIC Main Menu from any point in a transaction. Back (Yellow) Deletes the previously-keyed character. Enter (Green) Enters the information.

WIC Only Merchants POS Procedures Manual
Copyright © 2015, 2018-2020 FIS™ and/or its subsidiaries. All Rights Reserved. ebtEDGE is a registered trademark of FIS. FIS confidential and proprietary information.
8
POS Terminal Overview The terminal (as shown below) is used for swiping a customer’s WIC card and performing clerk and supervisor transactions.
Terminal Key Identification
WIC Card The WIC card is issued to a customer so the customer can use their benefit authorizations to make WIC benefit purchases.
Sample Front of Card

WIC Only Merchants POS Procedures Manual
Copyright © 2015, 2018-2020 FIS™ and/or its subsidiaries. All Rights Reserved. ebtEDGE is a registered trademark of FIS. FIS confidential and proprietary information.
9
A magnetic stripe is located on the back of the card (as shown below).
Sample Back of Card
How to Swipe the WIC Card 1. Insert the card in the card reader. To ensure
a proper read of the card, insert the card from the top of the unit, as shown here. Make sure the magnetic stripe faces down and toward the terminal keypad.
2. Swipe the card through the card reader slot using a quick, smooth motion.
WIC Only Merchants POS Procedures Manual
Copyright © 2015, 2018-2020 FIS™ and/or its subsidiaries. All Rights Reserved. ebtEDGE is a registered trademark of FIS. FIS confidential and proprietary information.
10
Receipts A Customer Receipt prints first. The receipt shows the amount and type of transaction requested and a message indicating whether the transaction is approved or denied. Tear off and give this receipt to the client.
Sample of Customer Receipt

WIC Only Merchants POS Procedures Manual
Copyright © 2015, 2018-2020 FIS™ and/or its subsidiaries. All Rights Reserved. ebtEDGE is a registered trademark of FIS. FIS confidential and proprietary information.
11
The Merchant Receipt is similar to the Customer Receipt. MERCHANT COPY is printed at the bottom instead of CARDHOLDER COPY. The Merchant Receipt is kept at the store.
Sample of Merchant Receipt

WIC Only Merchants POS Procedures Manual
Copyright © 2015, 2018-2020 FIS™ and/or its subsidiaries. All Rights Reserved. ebtEDGE is a registered trademark of FIS. FIS confidential and proprietary information.
12
Messages
Printed on Receipts Bolded items, such as: ****DEMO MODE****, ****DECLINED****, and ****DUPLICATE RECEIPT**** are important to look for on a receipt when performing transactions.
Demo Mode DEMO MODE is printed on the receipt when transactions are performed in demo mode. For more information on this topic, refer to Demo Mode.
Declined Codes When a transaction is denied, DECLINED displays on the terminal screen, the terminal beeps, and a message prints on the receipt. The most common denial codes and solutions are:
Code Description Solution AF Invalid card prefix Try entering the customer’s WIC card number again. If the same message prints, call
the Merchant Help Desk. CA Acceptor/Store ID not
defined Call the Merchant Help Desk.
CB PIN not selected Have the customer call the Cardholder Customer Service number on the back of his or her WIC card.
CC Card not active Have the customer call the Cardholder Customer Service number on the back of his or her WIC card.
CD Return exceeds prior authorization
Have the customer call the Cardholder Customer Service number on the back of his or her WIC card.
I Invalid PIN Have the customer enter his or her PIN again. If the same message prints, have the customer call the Cardholder Customer Service number on the back of his or her WIC card.
N Host unavailable/Cannot process
Try the transaction again. If it still does not work, call the Merchant Help Desk.
ND Lost/stolen card Have the customer call the Cardholder Customer Service number on the back of his or her WIC card.
NH Expired card Have the customer call the Cardholder Customer Service number on the back of his or her WIC card.
NR PIN tries exceeded Have the customer call the Cardholder Customer Service number on the back of his or her WIC card.
P Client not on file Try the transaction again. If the same message prints, have the customer call the Cardholder Customer Service number on the back of his or her WIC card.
PW Invalid password Enter your password again. If the same message prints, call the Merchant Help Desk. PX Invalid ID Enter your ID again. If the same message prints, call the Merchant Help Desk. PZ System problems Call the Merchant Help Desk.

WIC Only Merchants POS Procedures Manual
Copyright © 2015, 2018-2020 FIS™ and/or its subsidiaries. All Rights Reserved. ebtEDGE is a registered trademark of FIS. FIS confidential and proprietary information.
13
Code Description Solution QI General denial Call the Merchant Help Desk. RK System malfunction Call the Merchant Help Desk. S No funds available Customer should check the balance on his or her receipt. If the customer has
questions, have him or her call the Cardholder Customer Service number on the back of his or her WIC card.
U Insufficient funds Customer should perform a stand-alone Balance Inquiry to confirm which purchase items are available to the customer. If the customer has questions, have him or her call the Cardholder Customer Service number on the back of his or her WIC card.
Note For all other declined messages or error codes printed on the receipt, call the Merchant Help Desk.
Duplicate When this message is printed on the receipt, it means the clerk or supervisor reprinted a receipt for the last transaction performed at a particular POS terminal. (See WIC Purchase – Reprint Receipt) For more explanation, call the Merchant Help Desk.
Displayed on Terminal Screen The following messages may display on the terminal screen during a transaction.
Displayed Explanation APPROVED Transaction is accepted. CLOSED Terminal is closed. No user is signed on. CONNECTED Host answered. DECLINED Transaction is denied. DEMO MODE Terminal is in training mode. DIALING PRIMARY Terminal is dialing telephone number. LINE CHECK Terminal is checking for dial tone. PLEASE WAIT Terminal is processing. RECEIVING Terminal is receiving transaction data from host. TRANSMITTING Terminal is sending transaction data to host.

WIC Only Merchants POS Procedures Manual
Copyright © 2015, 2018-2020 FIS™ and/or its subsidiaries. All Rights Reserved. ebtEDGE is a registered trademark of FIS. FIS confidential and proprietary information.
14
2 Processing WIC Transactions The following section describes how to process WIC transactions on the WIC POS equipment. To sign on to the terminal, user must have their ID already added to the terminal by the store supervisor. Only a supervisor is able to set up a new clerk ID or supervisor ID, delete an ID, and change a password. Refer to Supervisor Transactions for more details.
Sign On Procedure You only need to sign in when the terminal displays CLOSED.
Note
If your store has more than one terminal, you must sign on using a unique ID at each terminal. Whenever you move from one terminal to another, sign off from the current terminal and sign on to the next terminal.
You will be signed off automatically if you attempt to use two or more terminals with the same ID at the same time. Avoid this disruption by using a unique ID at each terminal.
To sign on to the POS terminal:
1. Press SIGN ON-OFF (2nd purple key at bottom of display).
2. Enter your 3-digit ID number, and press ENTER.
3. Enter your 4-digit password, and press ENTER.
The terminal displays SIGN-ON PENDING SUCCESSFUL TRANSACTION.
The host will verify your user credentials when you complete your first transaction.
Sign Off Procedure You must sign off the terminal if you leave it for any reason. The sign off procedure closes the terminal and prevents anyone else from performing transactions on it.
Warning The terminal does not time out. If you leave at the end of your shift without signing off, the next clerk to use that station will not be able to sign on.
To sign off of the POS terminal:
1. Press SIGN ON-OFF (2nd purple key at bottom of display).
2. Press F1 (Yes) to complete the process or press F2 (No) to cancel and return to the WIC Main Menu.
3. A receipt prints with a sign off message and your clerk totals.
WIC Only Merchants POS Procedures Manual
Copyright © 2015, 2018-2020 FIS™ and/or its subsidiaries. All Rights Reserved. ebtEDGE is a registered trademark of FIS. FIS confidential and proprietary information.
15
The terminal displays CLOSED when your sign off is complete.
Sign Off Receipt
WIC Balance Inquiry The balance inquiry transaction can be performed by a cardholder or a clerk.
Press F3 (WIC Balance Inq).
Slide the card through the card reader slot, or enter the card number manually and press ENTER.
Have the customer enter his or her PIN.
Note
The Vx520 POS terminal comes equipped with an internal PIN pad, allowing the cardholder to enter their PIN using the terminal. If the optional, handheld PIN pad is connected, the cardholder must enter the PIN using that device.
In either situation, the customer enters their PIN using the keys (1-0), and then presses the green ENTER key.
The transaction message APPROVED or DECLINED displays on the screen. If approved, the WIC Main Menu displays after processing is complete. If denied, an error message displays indicating the denial reason (e.g., Error Invalid PIN).
Note The customer’s balance is not displayed on the terminal screen.
WIC Only Merchants POS Procedures Manual
Copyright © 2015, 2018-2020 FIS™ and/or its subsidiaries. All Rights Reserved. ebtEDGE is a registered trademark of FIS. FIS confidential and proprietary information.
16
4. The Customer Receipt (as shown below) prints, and shows whether the transaction is approved or denied. Tear it off and give this receipt to the customer.
Balance Inquiry Receipt
WIC Purchase A WIC Purchase transaction is performed when the cardholder is ready to check out. This transaction accepts WIC benefits from customers as payment for WIC eligible items.
Press F2 (WIC Purchase). Slide the card through the card reader slot, or manually enter the card number using the gray
number keys (1-0) on the terminal and press ENTER.
Note If the card number is entered manually, a supervisor ID and password must be entered to continue the transaction.
Have the customer enter his or her PIN into the terminal or handheld PIN pad, and press ENTER. 4. Various transaction processing displays appear and the WIC balance information is downloaded to
the terminal.
5. Scan the UPC bar code using the scanner, or manually enter the UPC code and press ENTER. 6. Enter the price of the item, and press ENTER.
WIC Only Merchants POS Procedures Manual
Copyright © 2015, 2018-2020 FIS™ and/or its subsidiaries. All Rights Reserved. ebtEDGE is a registered trademark of FIS. FIS confidential and proprietary information.
17
7. After all items have been scanned or manually entered, press F1 (Total). a. If there are CVB (fruit/vegetable) items, press F1 (Yes). If there are no CVB items, press F2
(No). b. Enter the CVB amount and press ENTER after each CVB item.
c. After all the CVB items have been entered, press F1 (Total). 8. If the cardholder has coupons, press F1 (Yes). If the cardholder does not have coupons, press F2
(No). 9. Enter the coupon amount and press ENTER after each coupon is entered. 10. After all the coupon amounts have been entered, press F1 (Total). 11. Press F1 (Yes) to complete the transaction. 12. The Customer Receipt prints, showing whether the transaction is approved or denied. Tear it off
and give this receipt to the customer. 13. If there is a balance due, collect payment from the customer.
14. Press F1 (Yes) to print the Vendor Receipt.

WIC Only Merchants POS Procedures Manual
Copyright © 2015, 2018-2020 FIS™ and/or its subsidiaries. All Rights Reserved. ebtEDGE is a registered trademark of FIS. FIS confidential and proprietary information.
18
WIC Purchase Receipts
Note Clerks must review the merchant copy of the receipt to ensure NTE amounts are reasonable. Merchants should contact the WIC Agency to report issues or to clarify approved prices for items.

WIC Only Merchants POS Procedures Manual
Copyright © 2015, 2018-2020 FIS™ and/or its subsidiaries. All Rights Reserved. ebtEDGE is a registered trademark of FIS. FIS confidential and proprietary information.
19
WIC Purchase with CVB Split Tender The FIS WIC POS solution allows the merchant to allow split tender functionality for CVB items. In this situation, the clerk need not remove the CVB items from the check-out lane if the purchase quantity is more than cardholder’s balance. The clerk will be prompted in this situation and will be asked whether they wish to continue the transaction. If the transaction is continued, the WIC host authorizes the CVB items for available balance only and allows the clerk to collect the remaining balance in another form of tender.
Press F2 (WIC Purchase).
Slide the card through the card reader slot, or manually enter the card number using the gray number keys (1-0) on the terminal and press ENTER.
Note If the card number is entered manually, a supervisor ID and password must be entered to continue the transaction.
Have the customer enter his or her PIN, and press ENTER.
Note If a handheld PIN pad is connected to the POS terminal, the customer must enter his or her PIN on it.
4. Various transaction processing displays appear and the WIC balance information is downloaded to the terminal.
5. Scan the UPC bar code using the scanner, or manually enter the UPC code using the number keys and press ENTER.
6. Enter the price of the item using the number keys, and press ENTER.
7. After all items have been scanned or manually entered, press F1 (Total).
8. If there are CVB items, press F1 (Yes). If there are no CVB items, press F2 (No).
9. Enter the CVB amount using the number keys and press ENTER after each CVB item is entered.
10. If the total CVB purchase amount exceeds the cardholder’s CVB balance, the following message will be displayed: “Insufficient Balance Continue?”
11. Press F1 (Yes) to continue.
12. If the cardholder has coupons, press F1 (Yes). If the cardholder does not have coupons, press F2 (No).
13. Enter the coupon amount using the number keys and press ENTER after each coupon is entered.
14. After all the coupon amounts have been entered, press F1 (Total). 15. Press F1 (Yes) to complete the transaction. 16. The Customer Receipt prints, showing whether the transaction is approved or denied.
17. If there is a balance due, collect payment from the customer.
18. Press F1 (Yes) to print the Vendor Receipt.

WIC Only Merchants POS Procedures Manual
Copyright © 2015, 2018-2020 FIS™ and/or its subsidiaries. All Rights Reserved. ebtEDGE is a registered trademark of FIS. FIS confidential and proprietary information.
20
WIC Purchase Receipts with CVB Split Tender
WIC Purchase – Cancel This action allows you to cancel a transaction.
At any time during the transaction, press CANCEL to cancel the transaction.
Press F1 (Yes) to confirm cancellation and return to the WIC Main Menu. Press F2 (No) to resume the transaction.

WIC Only Merchants POS Procedures Manual
Copyright © 2015, 2018-2020 FIS™ and/or its subsidiaries. All Rights Reserved. ebtEDGE is a registered trademark of FIS. FIS confidential and proprietary information.
21
WIC Purchase – Item Delete This function can be used to delete individual items from this purchase, but not the entire transaction.
1. At any point during the scanning process, press F2 (List) to see the list of scanned items.
2. Press F1 (Prev) and F2 (Next) to navigate through the list.
3. When you locate the desired item, press F3 (Qty) to view the quantity of the item.
4. Change the quantity to 0 by pressing BACK on the terminal to highlight the amount, and then press the 0 key on the terminal. When finished, press ENTER.
The item will be removed from the shopping list, but not from the individual’s WIC benefit balance.
WIC Purchase – Reduce Quantity This function can be used to reduce the individual item quantity.
1. At any point during the scanning process, press F2 (List) to view the list of scanned items.
2. Press F1 (Prev) and F2 (Next) to navigate through the list.
3. When you locate the desired item, press F3 (Qty) to view the quantity of the item.
4. Change the quantity to the desired amount by pressing BACK on the terminal to highlight the amount, enter the new amount , and press ENTER.
The item quantity will be modified in the shopping list, but not in the individual’s WIC benefit balance.
5. Press ENTER to finish the transaction.
WIC Purchase – Print Scanned Items This function can be used to print the scanned items before sending the transaction to the host.
1. At any point during the scanning process, press F2 (List) to view the list of scanned items.
2. Press F4 (Prnt) to print the list of items that have been scanned.
Scanned Items Print Receipt

WIC Only Merchants POS Procedures Manual
Copyright © 2015, 2018-2020 FIS™ and/or its subsidiaries. All Rights Reserved. ebtEDGE is a registered trademark of FIS. FIS confidential and proprietary information.
22
WIC Purchase – Reprint Receipt This function is used to reprint a receipt within 24 hours of the transaction. It will print both the cardholder and merchant receipts.
Press REPRINT (3rd purple function key).
By default, the last transaction will be displayed.
To print the last receipt, press F3 (Prnt).
To find a different transaction receipt to print, press F1 (Prev).
Navigate through the list by pressing F1 (Prev) or F2 (Next), and press F3 (Prnt) when the desired item is located.

WIC Only Merchants POS Procedures Manual
Copyright © 2015, 2018-2020 FIS™ and/or its subsidiaries. All Rights Reserved. ebtEDGE is a registered trademark of FIS. FIS confidential and proprietary information.
23
WIC Purchase – Reprint Receipts

WIC Only Merchants POS Procedures Manual
Copyright © 2015, 2018-2020 FIS™ and/or its subsidiaries. All Rights Reserved. ebtEDGE is a registered trademark of FIS. FIS confidential and proprietary information.
24
WIC Purchase – Void Last The Void Last transaction is performed to void the previous transaction completely. Only the last transaction can be voided, and it must be done on the same terminal as the original transaction.
1. Press MORE (1st purple function key).
2. Press F2 (Void Last).
3. Press F1 (Yes) to void the transaction, or press F2 (No) to cancel the void.
WIC Purchase – Void Last Receipt

WIC Only Merchants POS Procedures Manual
Copyright © 2015, 2018-2020 FIS™ and/or its subsidiaries. All Rights Reserved. ebtEDGE is a registered trademark of FIS. FIS confidential and proprietary information.
25
3 Supervisor Transactions The following section describes the functions managers can perform from any WIC POS terminal. Only a supervisor is able to set up a new clerk or supervisor’s ID, delete an ID, and add or change a password. Follow these guidelines:
• Add your own ID, using a Supervisor ID number 900-998.
• Assign a separate ID to each clerk or supervisor using the POS terminal by logging on with your Supervisor ID.
• Make sure each ID is three digits; 900-998 for a supervisor and 001 to 899 for a clerk.
• Assign each password using four digits, but not four zeros (0000).
Add a Clerk or Supervisor ID Use any FIS supplied POS terminal in the store to add an ID for a clerk or supervisor.
Note If a location has more than one terminal, the supervisor should only sign on to one terminal at a time. If the supervisor must move to another lane, he or she must first sign off of their current terminal before signing on to a different terminal.
To begin this transaction:
1. Press MORE (1st purple function key).
2. Press F4 (Clerk Setup).
3. Press F2 (Add Clerk).
4. Enter your supervisor ID, and press ENTER.
5. Enter your supervisor password, and press ENTER.
6. Enter the 3-digit ID for the new clerk or supervisor, and press ENTER.
7. Enter the 4-digit password for the new clerk or supervisor, and press ENTER.
8. Verify the password by re-entering the 4-digits previously entered, and press ENTER.
A message will display on the terminal to confirm the clerk or supervisor ID is added to the database.
If the ID is successfully added to the system, a confirmation receipt prints. If the ID is not successfully added, a message prints on the receipt to indicate the problem.

WIC Only Merchants POS Procedures Manual
Copyright © 2015, 2018-2020 FIS™ and/or its subsidiaries. All Rights Reserved. ebtEDGE is a registered trademark of FIS. FIS confidential and proprietary information.
26
Add an ID Receipt – Confirmation
Add or Change a Password Use any FIS supplied POS terminal in the store to add or change a password for a clerk or supervisor. To begin this transaction:
Press MORE (1st purple function key).
Press F4 (Clerk Setup).
Press F3 (Change Password).
Enter your supervisor ID, and press ENTER.
Enter your supervisor password, and press ENTER.
Enter the 3-digit ID for the clerk or supervisor whose password is being changed, and press ENTER.
Enter the new 4-digit password for the clerk or supervisor, and press ENTER.
Enter the new 4-digit password again to confirm, and press ENTER.
A message will display on the terminal to confirm the password is changed in the database.
If the password is successfully changed in the system, a receipt prints to confirm the password has been changed. If the password is not successfully changed, a message prints on the receipt to indicate the problem.

WIC Only Merchants POS Procedures Manual
Copyright © 2015, 2018-2020 FIS™ and/or its subsidiaries. All Rights Reserved. ebtEDGE is a registered trademark of FIS. FIS confidential and proprietary information.
27
Change Password Receipt – Confirmation
Delete a Clerk or Supervisor ID Use any FIS supplied POS terminal in the store to delete an ID. The clerk or supervisor must be signed off before you can delete his or her ID from the system. To begin this transaction:
1. Press MORE (1st purple function key).
2. Press F4 (Clerk Setup).
3. Press F4 (Delete Clerk).
4. Enter your supervisor ID, and press ENTER.
5. Enter your supervisor password, and press ENTER.
6. Enter the 3-digit ID for the clerk or supervisor being deleted, and press ENTER.
7. Press F2 (Yes) to complete the transaction.
A message will display on the terminal to confirm the clerk or supervisor ID is deleted from the database.
If the ID is successfully deleted from the system, a confirmation receipt prints. If the ID is not successfully deleted, a message prints on the receipt to indicate the problem.

WIC Only Merchants POS Procedures Manual
Copyright © 2015, 2018-2020 FIS™ and/or its subsidiaries. All Rights Reserved. ebtEDGE is a registered trademark of FIS. FIS confidential and proprietary information.
28
Delete an ID Receipt – Confirmation
UPC Price Maintenance This function is used to maintain the shelf-price for all the WIC items in the store. You can scan each UPC and save the shelf-price so that during a purchase transaction the price entry will be handled by the terminal. You can also update prices that you have previously saved and press F4 (Prnt) to print the complete list of shelf-prices stored in the terminal.
Press MORE (1st purple function key).
Press F3 (Edit UPC List).
To add a new item:
a. Scan the item‘s UPC code. If it is WIC eligible, the description displays.
b. Press F3 (Edit) to enter the price.
To change the price for an existing item:
a. Scan the item‘s UPC code or press F1 (Prev) and F2 (Next) to navigate through the list to locate the desired item.
b. Press F3 (Edit) to edit the price.
Repeat steps 3 and 4 for remaining items.
Press CANCEL when you have finished adding items or updating prices.
Press F1 (Yes) to save the changes.
The screen confirms the changes have been saved before the WIC Main Menu displays.

WIC Only Merchants POS Procedures Manual
Copyright © 2015, 2018-2020 FIS™ and/or its subsidiaries. All Rights Reserved. ebtEDGE is a registered trademark of FIS. FIS confidential and proprietary information.
29
Store Shelf Prices Print Out
Manual Card Entry Note Customers must have their WIC cards with them to perform a Manual Card Entry.
The manual card entry transaction is performed when the customer’s card does not slide through the card reader slot or when the terminal cannot read the magnetic stripe.
Follow the instructions below to manually enter the customer’s card number when Swipe Card or Enter Card Number displays on the terminal screen. (The card number is found on the front of the WIC card.)
Enter the customer’s card number, and press ENTER.
Instruct the customer to enter their PIN to continue with the transaction.
Demo Mode
Caution Demo Mode is for training only. Stores are not paid for transactions performed in Demo Mode.
Demo Mode allows a user to practice performing a transaction. To sign on in Demo Mode:
1. Press ENTER for the Function screen.
WIC Only Merchants POS Procedures Manual
Copyright © 2015, 2018-2020 FIS™ and/or its subsidiaries. All Rights Reserved. ebtEDGE is a registered trademark of FIS. FIS confidential and proprietary information.
30
2. Press 9 using the number keys on the terminal.
3. Enter the demo mode password, 0723, and press ENTER.
4. DEMO MODE displays at the top or the main menu screen.
5. Practice transactions in demo mode.
Display in Demo Mode
6. After a transaction has been practiced while in Demo Mode, a Customer Receipt prints, specifying the transaction was performed in Demo Mode. Tear off receipt and discard. Press any key to print the Merchant Receipt.
WIC Only Merchants POS Procedures Manual
Copyright © 2015, 2018-2020 FIS™ and/or its subsidiaries. All Rights Reserved. ebtEDGE is a registered trademark of FIS. FIS confidential and proprietary information.
31
Demo Mode Receipt
When a transaction is practiced in Demo Mode, DEMO MODE prints at the top of the receipt.
WIC Only Merchants POS Procedures Manual
Copyright © 2015, 2018-2020 FIS™ and/or its subsidiaries. All Rights Reserved. ebtEDGE is a registered trademark of FIS. FIS confidential and proprietary information.
32
To Exit Demo Mode 1. Press ENTER for the Function screen.
2. Press 9 using the number keys on the terminal.
IN LIVE MODE displays on the screen for a few seconds. 3. When the WIC Main Menu displays, you may begin an actual transaction or sign off of the
terminal.
WIC Main Menu Display
Caution Always exit Demo Mode before letting a user start an actual transaction. Transactions performed in Demo Mode are not added to the store’s WIC purchase totals, so the store will not be paid for the transaction.

WIC Only Merchants POS Procedures Manual
Copyright © 2015, 2018-2020 FIS™ and/or its subsidiaries. All Rights Reserved. ebtEDGE is a registered trademark of FIS. FIS confidential and proprietary information.
33
4 Totals Reporting The procedures that follow explain how to generate each of the reports.
Vendor Totals This report is recommended for single-lane stores and is a summary of all the store’s transactions (automatically cut off at your store’s pre-determined time) for the reporting day.
To initiate a Store Totals Report:
1. Press REPORTS (last purple function key).
2. Press F2 (Vendor Totals).
3. Enter the Supervisor ID, and press ENTER.
4. Enter the Supervisor password, and press ENTER.
5. Enter the reporting date <MM/DD/YY>, and press ENTER.
a. The terminal screen displays messages while the transaction is processed.
b. The Store Totals Report prints.
Store Totals Report
WIC Only Merchants POS Procedures Manual
Copyright © 2015, 2018-2020 FIS™ and/or its subsidiaries. All Rights Reserved. ebtEDGE is a registered trademark of FIS. FIS confidential and proprietary information.
34
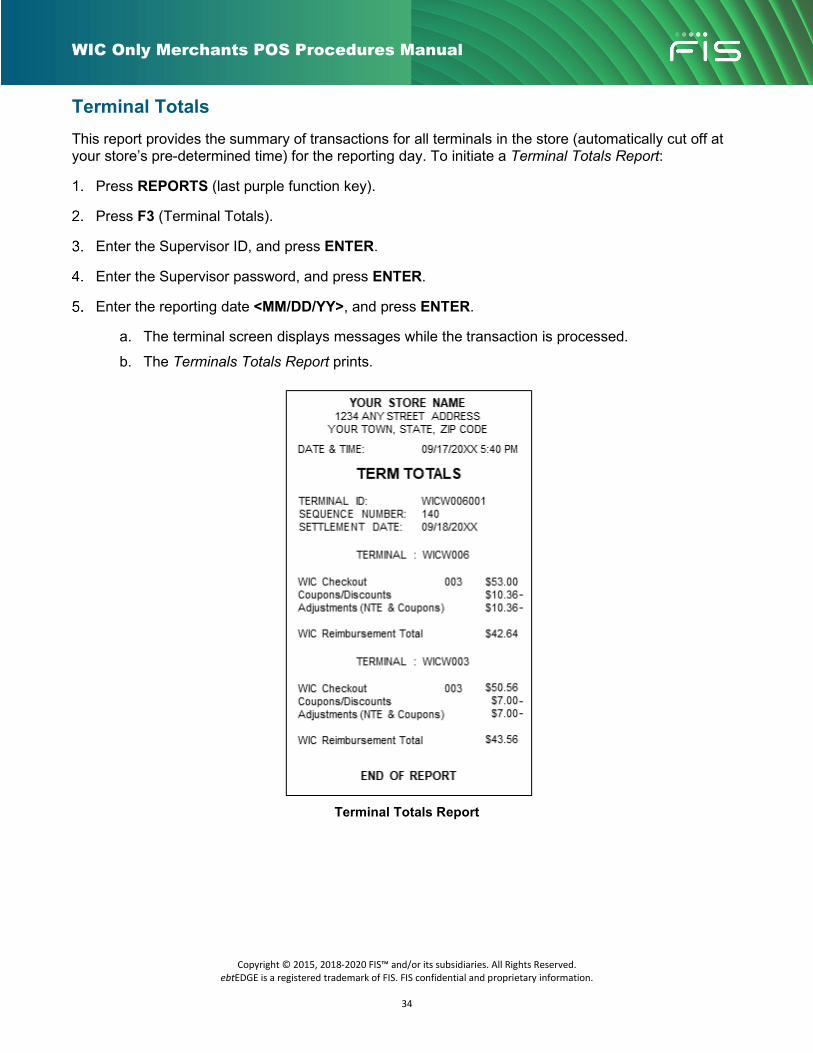
Terminal Totals This report provides the summary of transactions for all terminals in the store (automatically cut off at your store’s pre-determined time) for the reporting day. To initiate a Terminal Totals Report:
Press REPORTS (last purple function key).
Press F3 (Terminal Totals).
Enter the Supervisor ID, and press ENTER.
Enter the Supervisor password, and press ENTER.
Enter the reporting date <MM/DD/YY>, and press ENTER.
a. The terminal screen displays messages while the transaction is processed.
b. The Terminals Totals Report prints.
Terminal Totals Report
WIC Only Merchants POS Procedures Manual
Copyright © 2015, 2018-2020 FIS™ and/or its subsidiaries. All Rights Reserved. ebtEDGE is a registered trademark of FIS. FIS confidential and proprietary information.
35
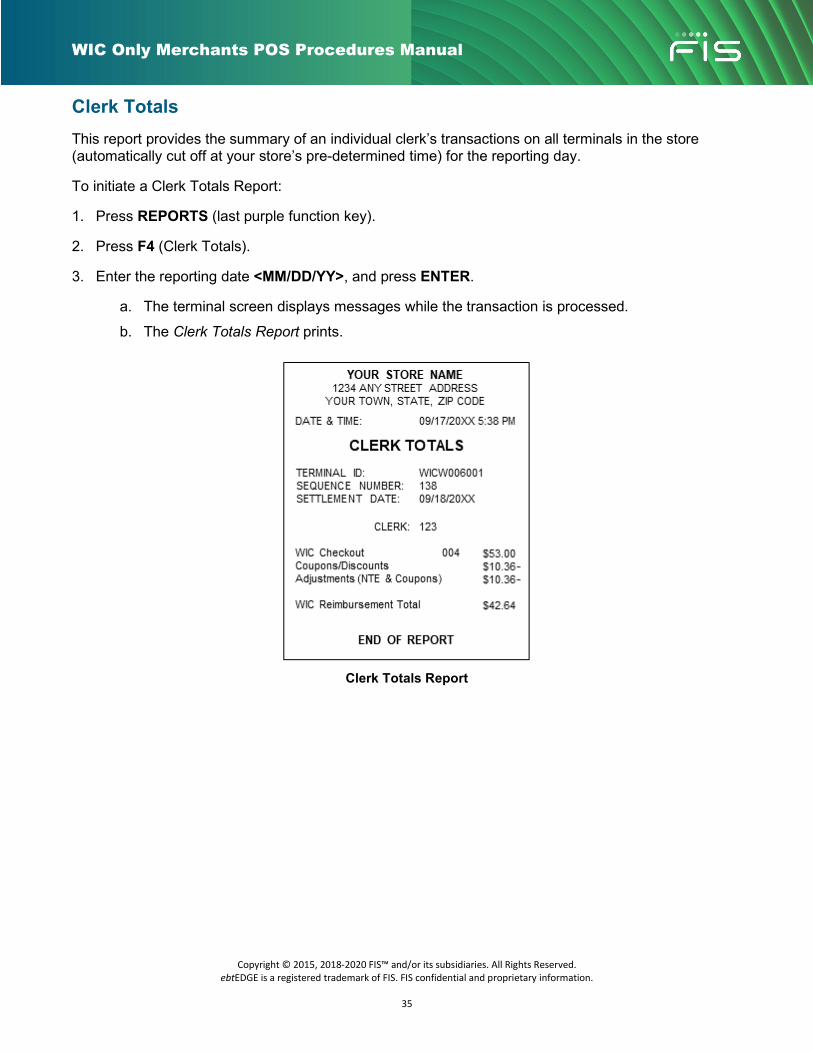
Clerk Totals This report provides the summary of an individual clerk’s transactions on all terminals in the store (automatically cut off at your store’s pre-determined time) for the reporting day.
To initiate a Clerk Totals Report:
1. Press REPORTS (last purple function key).
2. Press F4 (Clerk Totals).
3. Enter the reporting date <MM/DD/YY>, and press ENTER.
a. The terminal screen displays messages while the transaction is processed.
b. The Clerk Totals Report prints.
Clerk Totals Report

WIC Only Merchants POS Procedures Manual
Copyright © 2015, 2018-2020 FIS™ and/or its subsidiaries. All Rights Reserved. ebtEDGE is a registered trademark of FIS. FIS confidential and proprietary information.
36
5 POS Download The following section describes how to perform analog and broadband download procedures, as well as an Estate Management Agent (EMA) application partial download. POS downloads contain a variety of software updates, including APL files.
Dial-Up Download Procedures 1. Press F3 (FIS WIC) on the WIC Main Menu.
2. Press ENTER.
Note You can cancel the download anytime during steps 3 through 9. Press CANCEL to cancel the download and return to the WIC Main Menu.
3. Press 3 using the gray number keys (1-0) on the terminal.
4. If the store does not require a dial prefix, press ENTER and 3.
5. If the store requires a dial prefix (9) and it is not listed in the download number proceed
6. with the following steps:
a. Press the yellow BACK key eleven times (there should not be a telephone number listed).
b. Press 9.
c. Press ALPHA one time.
d. Enter the download number, 18772296831.
e. Press ENTER and 3.
7. Press ENTER, again.
8. Press ENTER.
9. Press F4 (FAST).
10. Press F3 (FULL).
11. To continue the download, press F1 (YES).
The device is being updated. Please wait until the download is complete and the WIC Main Menu is displayed before using the device.
WIC Only Merchants POS Procedures Manual
Copyright © 2015, 2018-2020 FIS™ and/or its subsidiaries. All Rights Reserved. ebtEDGE is a registered trademark of FIS. FIS confidential and proprietary information.
37
12. Press F3 (FIS WIC) on the WIC Main Menu.
The user is now able to SIGN ON to the terminal using their Clerk ID and password.
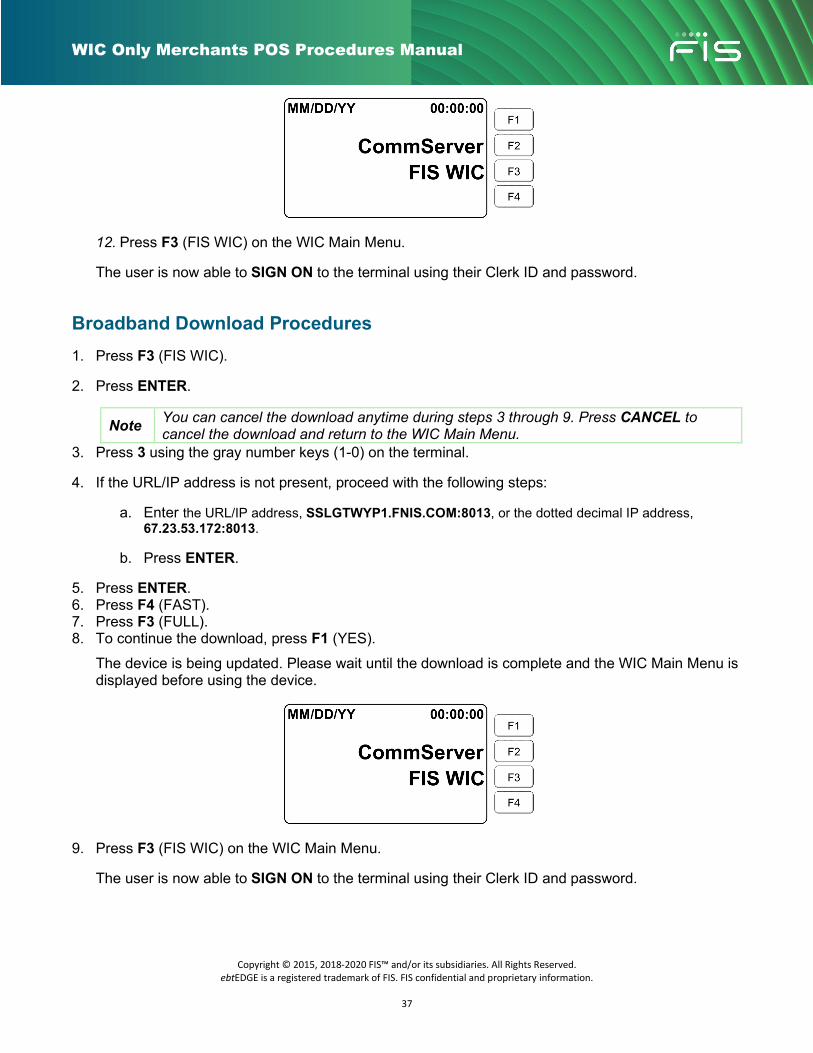
Broadband Download Procedures 1. Press F3 (FIS WIC).
2. Press ENTER.
Note You can cancel the download anytime during steps 3 through 9. Press CANCEL to cancel the download and return to the WIC Main Menu.
3. Press 3 using the gray number keys (1-0) on the terminal.
4. If the URL/IP address is not present, proceed with the following steps:
a. Enter the URL/IP address, SSLGTWYP1.FNIS.COM:8013, or the dotted decimal IP address, 67.23.53.172:8013.
b. Press ENTER.
5. Press ENTER. 6. Press F4 (FAST). 7. Press F3 (FULL). 8. To continue the download, press F1 (YES).
The device is being updated. Please wait until the download is complete and the WIC Main Menu is displayed before using the device.
9. Press F3 (FIS WIC) on the WIC Main Menu.
The user is now able to SIGN ON to the terminal using their Clerk ID and password.
WIC Only Merchants POS Procedures Manual
Copyright © 2015, 2018-2020 FIS™ and/or its subsidiaries. All Rights Reserved. ebtEDGE is a registered trademark of FIS. FIS confidential and proprietary information.
38
EMA Partial Download Estate Management Agent (EMA) application can be used to get the latest version of the application from the host (Vericentre). While the terminal is powered on and the WIC Main Menu is displayed, vendors do not need to check for an update. The terminal will dial in to the FIS terminal management system to check for updates to the APL. If there is an update, the terminal will automatically start the process to receive the latest APL. However, at the vendor’s discretion, EMA can be used in two ways to initiate forced updates:
• Manual or forced update check and update.
• Auto or scheduled update check and update. 1. From the WIC Main Menu, press 9 using the gray number keys (1-0) on the terminal.
2. The EMA Options Menu is displayed.
3. Press F2 (Update Check).
4. Enter the provided password, and press ENTER.
Note FIS will provide the necessary password needed to perform the download.
WIC Only Merchants POS Procedures Manual
Copyright © 2015, 2018-2020 FIS™ and/or its subsidiaries. All Rights Reserved. ebtEDGE is a registered trademark of FIS. FIS confidential and proprietary information.
39
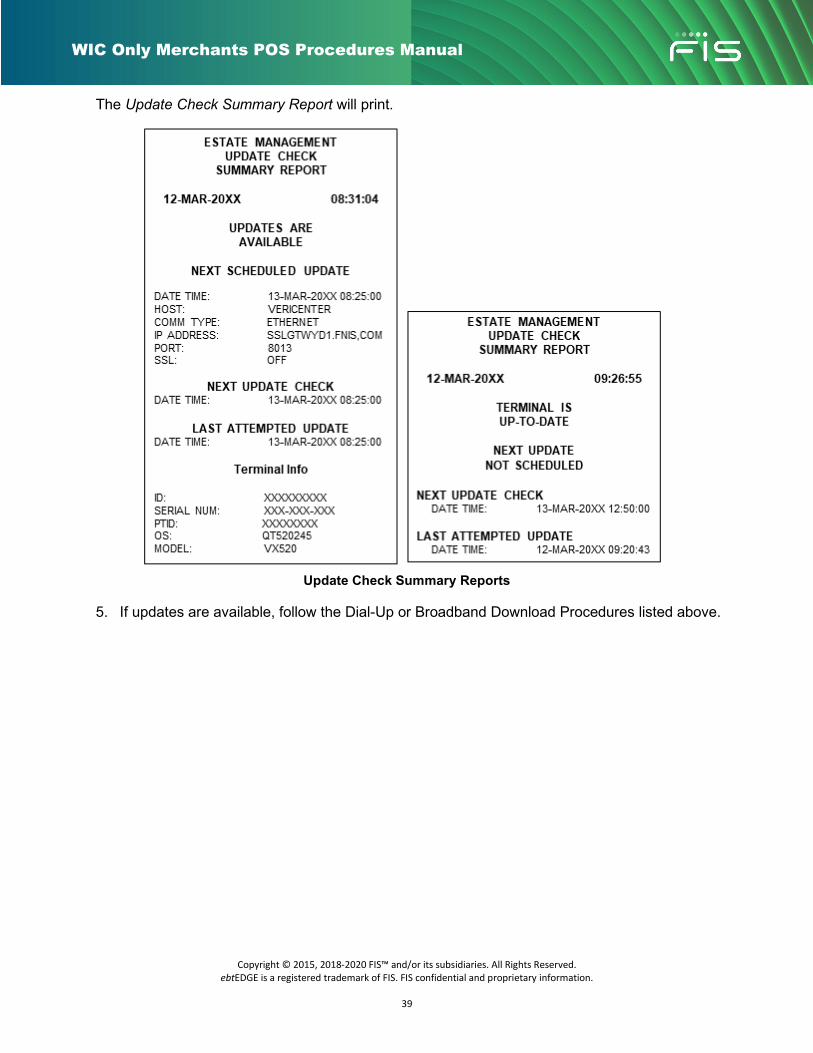
The Update Check Summary Report will print.
Update Check Summary Reports
5. If updates are available, follow the Dial-Up or Broadband Download Procedures listed above.

WIC Only Merchants POS Procedures Manual
Copyright © 2015, 2018-2020 FIS™ and/or its subsidiaries. All Rights Reserved. ebtEDGE is a registered trademark of FIS. FIS confidential and proprietary information.
40
6 POS Equipment Troubleshooting The following are basic troubleshooting guidelines for each piece of POS equipment. If a message or a problem is not discussed in this section, call the Merchant Help Desk for assistance.
Terminal
Problem Possible Solution Incorrect screen display • Check all cable connections, and make sure the telephone cable is
properly connected. • Make sure the terminal is plugged in. • Make sure the correct steps for the transaction were followed.
Keypad does not work • If the terminal does not beep when the keys are pressed, call the Merchant Help Desk.
Unable to perform a transaction • Make sure there are two cables plugged into the back of the terminal (power cable and phone line/LAN cable).
• Make sure the WIC card is properly swiped through the card reader slot.
• Perform a manual transaction. If it does not work, call the Merchant Help Desk.
Blank screen • Make sure both cables are plugged into the back of the terminal. • Make sure the power pack is plugged in. • Plug an adding machine or small appliance into the power outlet to
test it. • Try another outlet. • Make sure the terminal is plugged in and the green light is on.
Card does not swipe • Check the card and card reader condition. • Make sure the card reader slot is clear. If not, swipe a piece of
paper through it. Terminal freezes • Check all cable connections, and make sure the Ethernet (LAN) cable
is properly connected. Message displays: Invalid Supervisor or Clerk ID
• Check the ID and re-enter it. • See Add a Clerk or Supervisor ID if an ID is missing.

WIC Only Merchants POS Procedures Manual
Copyright © 2015, 2018-2020 FIS™ and/or its subsidiaries. All Rights Reserved. ebtEDGE is a registered trademark of FIS. FIS confidential and proprietary information.
41
External PIN Pad
Problem Possible Solution PIN pad does not work • Check the cable connections.
• Check the terminal power pack cable. Number is stuck or the display does not change on the PIN pad
• Press ENTER, and then press CANCEL on the POS terminal. • Call the Merchant Help Desk.
Blank screen • Make sure the PIN pad cable grommet is plugged into the PIN pad device.
• Make sure the connector is inserted into the PIN pad port on the terminal.
• Unplug the power pack cable from behind the terminal, and plug it back in.
Message displays: Invalid "M" key • Call the Merchant Help Desk. Message displays: Packet error 2 or 3 • The terminal is unable to communicate with the PIN pad. Press
any key, and retry the transaction (from the beginning).
Telephone Line
Problem Possible Solution Telephone line does not work • Check phone lines by using another standard telephone line to test. If
the test line works, have the defective line replaced. • If the telephone line on the terminal is working, call the Merchant Help
Desk to verify the system is operating.
Broadband Internet Connection
Problem Possible Solution Broadband internet connection does not work (Also see Vx520 WIC Broadband Connectivity.)
• Ensure the LAN/Ethernet cable is securely connected to the router and terminal. If necessary, unplug the cable and plug it in again ensuring the cable "clicks" into place.
• Make sure the internet connection in the store is working for other devices, such as a personal computer.
• If you are using a Static IP address for the terminal, contact your network administrator or your internet provider.
• If you have performed the steps above and the broadband connection is working but the issue is still persisting, call the Merchant Help Desk to verify the system is operating.
WIC Only Merchants POS Procedures Manual
Copyright © 2015, 2018-2020 FIS™ and/or its subsidiaries. All Rights Reserved. ebtEDGE is a registered trademark of FIS. FIS confidential and proprietary information.
42
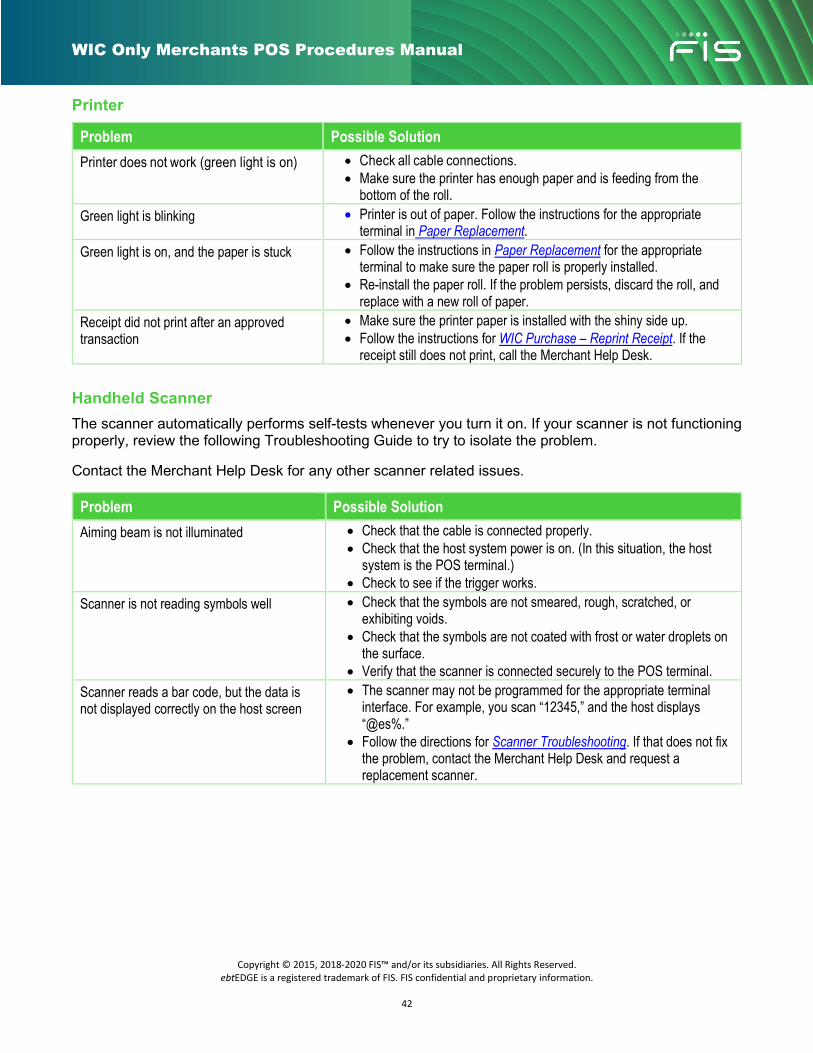
Printer
Problem Possible Solution Printer does not work (green light is on) • Check all cable connections.
• Make sure the printer has enough paper and is feeding from the bottom of the roll.
Green light is blinking • Printer is out of paper. Follow the instructions for the appropriate terminal in Paper Replacement.
Green light is on, and the paper is stuck • Follow the instructions in Paper Replacement for the appropriate terminal to make sure the paper roll is properly installed.
• Re-install the paper roll. If the problem persists, discard the roll, and replace with a new roll of paper.
Receipt did not print after an approved transaction
• Make sure the printer paper is installed with the shiny side up. • Follow the instructions for WIC Purchase – Reprint Receipt. If the
receipt still does not print, call the Merchant Help Desk.
Handheld Scanner The scanner automatically performs self-tests whenever you turn it on. If your scanner is not functioning properly, review the following Troubleshooting Guide to try to isolate the problem.
Contact the Merchant Help Desk for any other scanner related issues.
Problem Possible Solution Aiming beam is not illuminated • Check that the cable is connected properly.
• Check that the host system power is on. (In this situation, the host system is the POS terminal.)
• Check to see if the trigger works. Scanner is not reading symbols well • Check that the symbols are not smeared, rough, scratched, or
exhibiting voids. • Check that the symbols are not coated with frost or water droplets on
the surface. • Verify that the scanner is connected securely to the POS terminal.
Scanner reads a bar code, but the data is not displayed correctly on the host screen
• The scanner may not be programmed for the appropriate terminal interface. For example, you scan “12345,” and the host displays “@es%.”
• Follow the directions for Scanner Troubleshooting. If that does not fix the problem, contact the Merchant Help Desk and request a replacement scanner.
WIC Only Merchants POS Procedures Manual
Copyright © 2015, 2018-2020 FIS™ and/or its subsidiaries. All Rights Reserved. ebtEDGE is a registered trademark of FIS. FIS confidential and proprietary information.
43
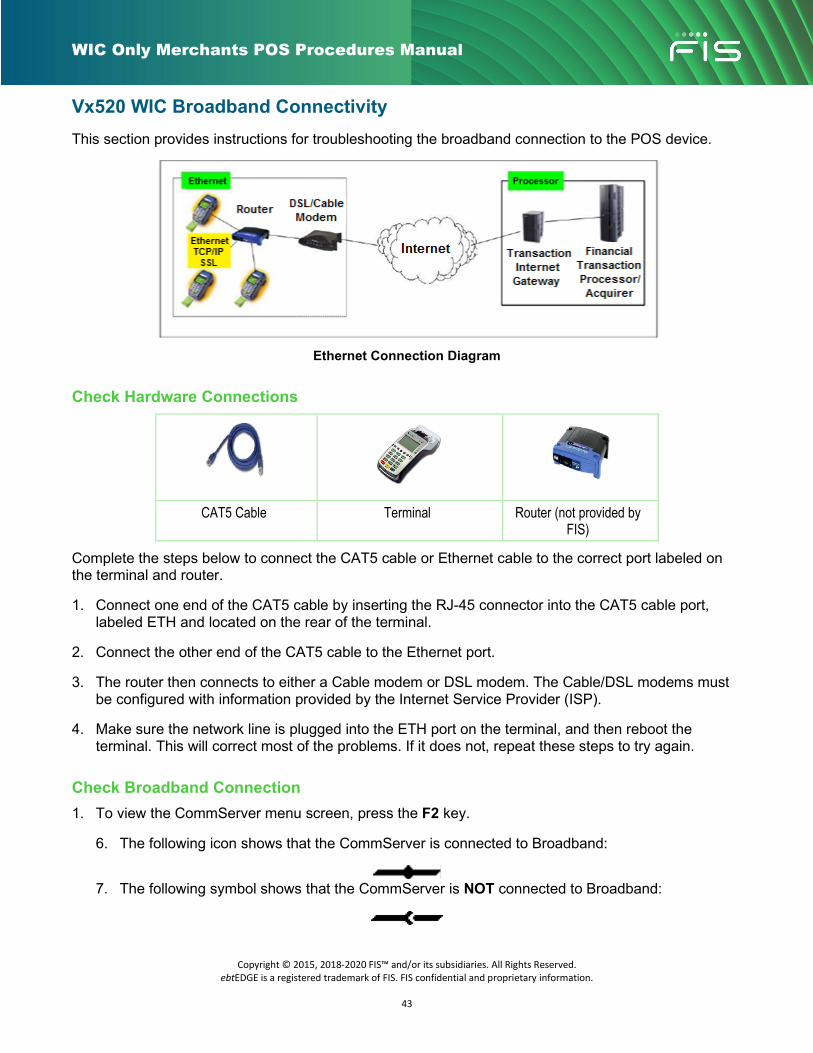
Vx520 WIC Broadband Connectivity This section provides instructions for troubleshooting the broadband connection to the POS device.
Ethernet Connection Diagram
Check Hardware Connections
CAT5 Cable Terminal Router (not provided by FIS)
Complete the steps below to connect the CAT5 cable or Ethernet cable to the correct port labeled on the terminal and router.
1. Connect one end of the CAT5 cable by inserting the RJ-45 connector into the CAT5 cable port, labeled ETH and located on the rear of the terminal.
2. Connect the other end of the CAT5 cable to the Ethernet port.
3. The router then connects to either a Cable modem or DSL modem. The Cable/DSL modems must be configured with information provided by the Internet Service Provider (ISP).
4. Make sure the network line is plugged into the ETH port on the terminal, and then reboot the terminal. This will correct most of the problems. If it does not, repeat these steps to try again.
Check Broadband Connection 1. To view the CommServer menu screen, press the F2 key.
6. The following icon shows that the CommServer is connected to Broadband:
7. The following symbol shows that the CommServer is NOT connected to Broadband:
WIC Only Merchants POS Procedures Manual
Copyright © 2015, 2018-2020 FIS™ and/or its subsidiaries. All Rights Reserved. ebtEDGE is a registered trademark of FIS. FIS confidential and proprietary information.
44
Restart a Network Connection 1. Press F2 (CommServer).
2. Press the third purple key from the left, under the following symbol:
3. Press F4 (Repair).
4. The Repairing Connection Operation message appears. The process may take up to 60 seconds to complete.
5. The Connection Repair Successful message appears once the connection is restored.
6. Press any key to continue.
WIC Only Merchants POS Procedures Manual
Copyright © 2015, 2018-2020 FIS™ and/or its subsidiaries. All Rights Reserved. ebtEDGE is a registered trademark of FIS. FIS confidential and proprietary information.
45
7 Maintenance This section provides instructions for contacting the Merchant Help Desk and daily preparation before beginning transactions for each terminal. Guidelines when problems arise while using the POS terminal and responses to customers’ frequently asked questions are also provided.
Contact Information The Merchant Help Desk, which is available 24 hours a day, 7 days a week, provides the merchant with customer service. The toll-free number is located on the front cover of this manual.
Have this information ready before calling:
• Merchant Name
• WIC Vendor ID Number
• Location ID Number
• Terminal ID Number
• Problem or Error When you call the Merchant Help Desk, enter your Location ID using the telephone keypad and follow the IVR prompts.
Daily Preparation Each day, check the POS terminal and printer to make sure they are ready when the store opens.
To get the POS terminal and printer ready:
• Make sure the terminal, power pack cables, and telephone lines are connected properly.
• Make sure the terminal is plugged into the power outlet.
• Verify the terminal screen displays CLOSED or the WIC Main Menu screen.
• Check the printer’s paper supply, and replace the paper if low by performing the instructions found in Paper Replacement.
Terminal • Do not spill liquids on the terminal.
• Use a head cleaner at least once a week (or more if the terminal usage is heavy). Dirty card readers are the biggest cause of machine downtime. (Note: Head cleaners are commercially-available cards used to clean card readers.)
• Use a clean damp cloth with water and mild soap to remove dirt. Do not use liquid or aerosol cleaners on your equipment.
WIC Only Merchants POS Procedures Manual
Copyright © 2015, 2018-2020 FIS™ and/or its subsidiaries. All Rights Reserved. ebtEDGE is a registered trademark of FIS. FIS confidential and proprietary information.
46
• Never use paint thinner or other solvents to clean the equipment, because they may cause damage to plastic parts.
PIN Pad • Do not spill liquids on the PIN pad.
• Use a clean damp cloth with water and mild soap to remove dirt.
• Do not use liquid or aerosol cleaners on your equipment.
Handheld Scanner The scanner provides reliable and efficient operation with minimum care. Although specific maintenance is not required, the following periodic checks ensure dependable scanner operation.
Cleaning the Device Reading performance may degrade if the scanner’s window is not clean. If the window is visibly dirty, or if the scanner is not operating well, clean the window with a soft cloth or lens tissue dampened with water (or a mild soapy water solution). If a soapy water solution is used, rinse with a clean lens tissue dampened with water only.
Caution
Do not submerge the imager in water. Do not use abrasive wipes or tissues on the imager’s window – abrasive wipes may scratch the window.
Never use solvents (e.g., acetone, benzene, ether, or phenol-based agents) on the housing or window – solvents may damage the finish or the window.
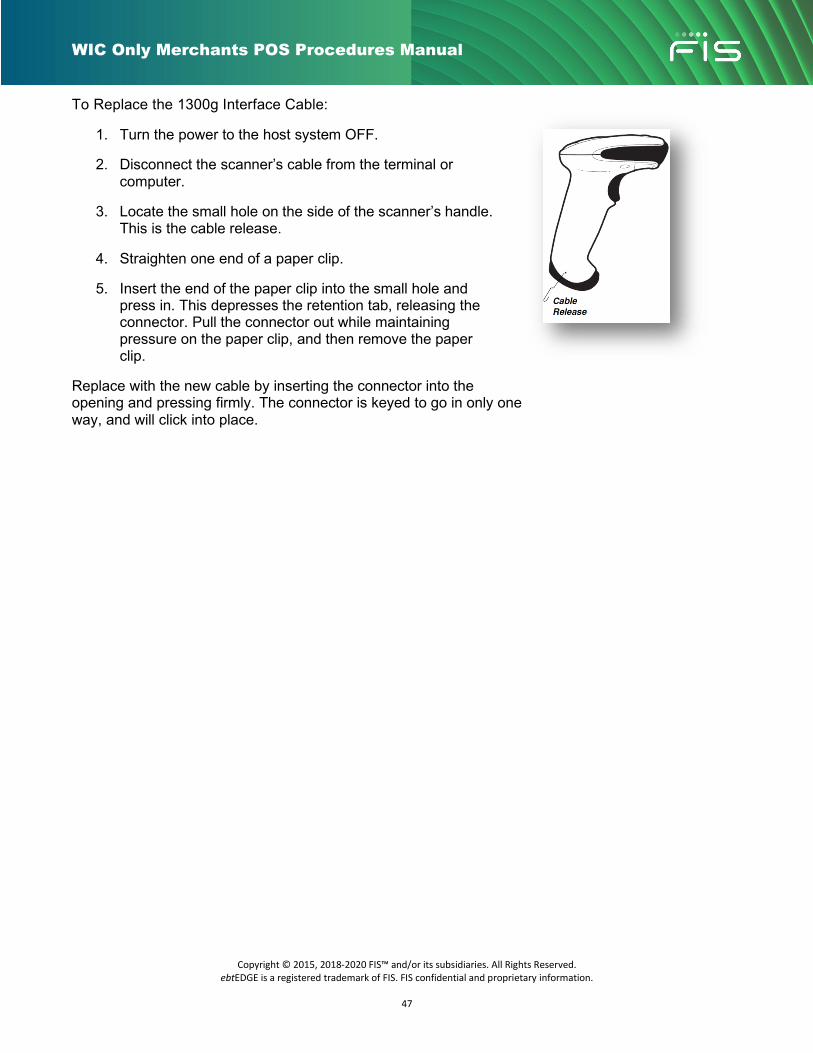
Replacing the Interface Cable Inspect the scanner’s interface cable and connector for wear or other signs of damage. A badly worn cable or damaged connector may interfere with scanner operation. The standard interface cable is attached to the scanner with a 10-pin modular connector. When properly seated, the connector is held in the 1300g scanner’s handle by a flexible retention tab. The interface cable is designed to be field replaceable.
WIC Only Merchants POS Procedures Manual
Copyright © 2015, 2018-2020 FIS™ and/or its subsidiaries. All Rights Reserved. ebtEDGE is a registered trademark of FIS. FIS confidential and proprietary information.
47
To Replace the 1300g Interface Cable:
1. Turn the power to the host system OFF.
2. Disconnect the scanner’s cable from the terminal or computer.
3. Locate the small hole on the side of the scanner’s handle. This is the cable release.
4. Straighten one end of a paper clip.
5. Insert the end of the paper clip into the small hole and press in. This depresses the retention tab, releasing the connector. Pull the connector out while maintaining pressure on the paper clip, and then remove the paper clip.
Replace with the new cable by inserting the connector into the opening and pressing firmly. The connector is keyed to go in only one way, and will click into place.
WIC Only Merchants POS Procedures Manual
Copyright © 2015, 2018-2020 FIS™ and/or its subsidiaries. All Rights Reserved. ebtEDGE is a registered trademark of FIS. FIS confidential and proprietary information.
48
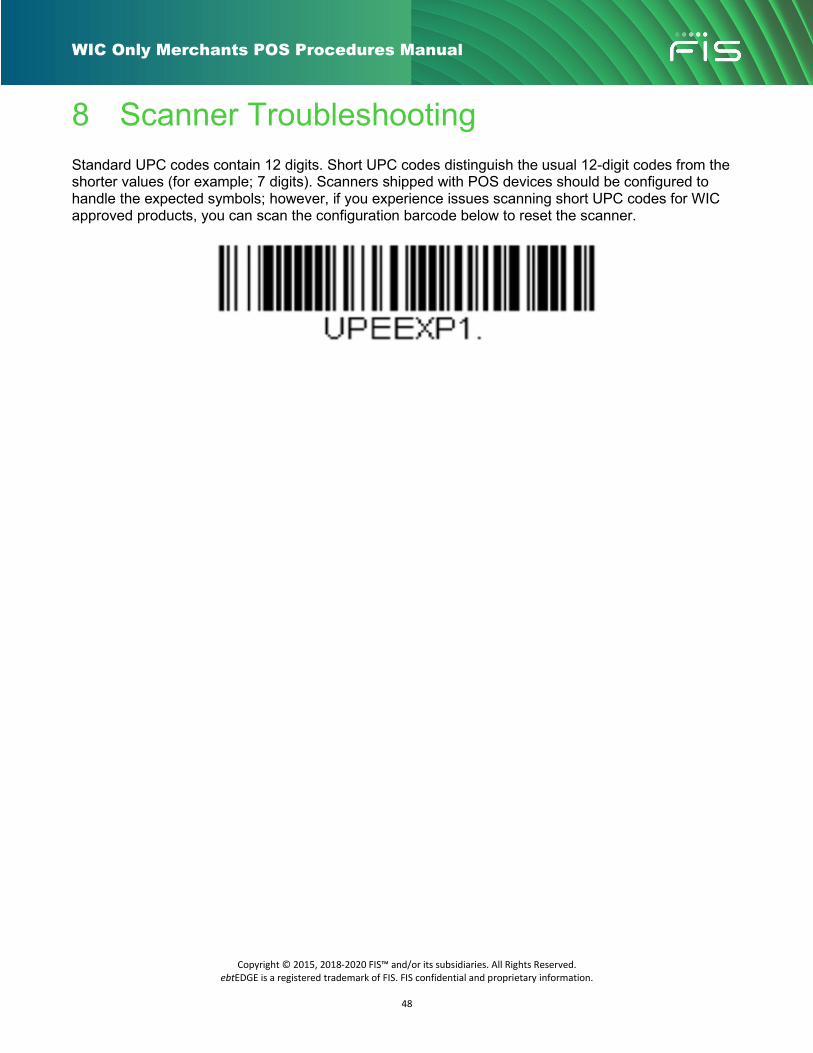
8 Scanner Troubleshooting Standard UPC codes contain 12 digits. Short UPC codes distinguish the usual 12-digit codes from the shorter values (for example; 7 digits). Scanners shipped with POS devices should be configured to handle the expected symbols; however, if you experience issues scanning short UPC codes for WIC approved products, you can scan the configuration barcode below to reset the scanner.
WIC Only Merchants POS Procedures Manual
Copyright © 2015, 2018-2020 FIS™ and/or its subsidiaries. All Rights Reserved. ebtEDGE is a registered trademark of FIS. FIS confidential and proprietary information.
49
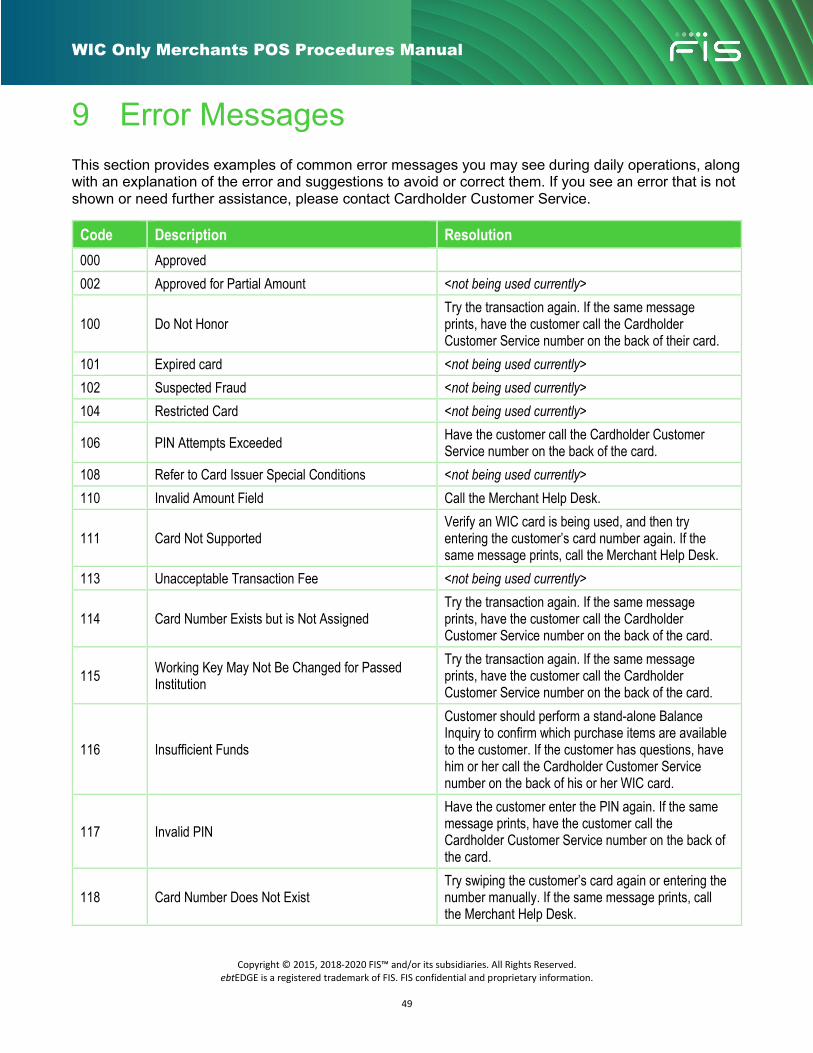
9 Error Messages This section provides examples of common error messages you may see during daily operations, along with an explanation of the error and suggestions to avoid or correct them. If you see an error that is not shown or need further assistance, please contact Cardholder Customer Service.
Code Description Resolution 000 Approved 002 Approved for Partial Amount <not being used currently>
100 Do Not Honor Try the transaction again. If the same message prints, have the customer call the Cardholder Customer Service number on the back of their card.
101 Expired card <not being used currently> 102 Suspected Fraud <not being used currently> 104 Restricted Card <not being used currently>
106 PIN Attempts Exceeded Have the customer call the Cardholder Customer Service number on the back of the card.
108 Refer to Card Issuer Special Conditions <not being used currently> 110 Invalid Amount Field Call the Merchant Help Desk.
111 Card Not Supported Verify an WIC card is being used, and then try entering the customer’s card number again. If the same message prints, call the Merchant Help Desk.
113 Unacceptable Transaction Fee <not being used currently>
114 Card Number Exists but is Not Assigned Try the transaction again. If the same message prints, have the customer call the Cardholder Customer Service number on the back of the card.
115 Working Key May Not Be Changed for Passed Institution
Try the transaction again. If the same message prints, have the customer call the Cardholder Customer Service number on the back of the card.
116 Insufficient Funds
Customer should perform a stand-alone Balance Inquiry to confirm which purchase items are available to the customer. If the customer has questions, have him or her call the Cardholder Customer Service number on the back of his or her WIC card.
117 Invalid PIN Have the customer enter the PIN again. If the same message prints, have the customer call the Cardholder Customer Service number on the back of the card.
118 Card Number Does Not Exist Try swiping the customer’s card again or entering the number manually. If the same message prints, call the Merchant Help Desk.
WIC Only Merchants POS Procedures Manual
Copyright © 2015, 2018-2020 FIS™ and/or its subsidiaries. All Rights Reserved. ebtEDGE is a registered trademark of FIS. FIS confidential and proprietary information.
50
Code Description Resolution
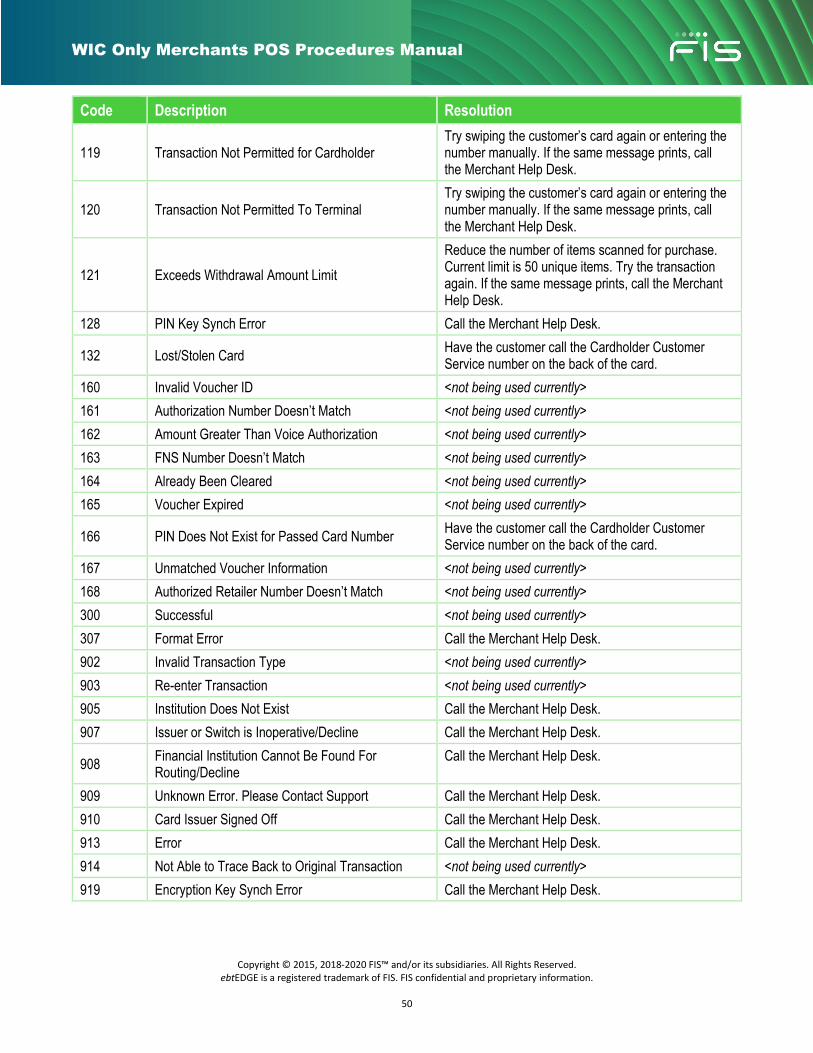
119 Transaction Not Permitted for Cardholder Try swiping the customer’s card again or entering the number manually. If the same message prints, call the Merchant Help Desk.
120 Transaction Not Permitted To Terminal Try swiping the customer’s card again or entering the number manually. If the same message prints, call the Merchant Help Desk.
121 Exceeds Withdrawal Amount Limit Reduce the number of items scanned for purchase. Current limit is 50 unique items. Try the transaction again. If the same message prints, call the Merchant Help Desk.
128 PIN Key Synch Error Call the Merchant Help Desk.
132 Lost/Stolen Card Have the customer call the Cardholder Customer Service number on the back of the card.
160 Invalid Voucher ID <not being used currently> 161 Authorization Number Doesn’t Match <not being used currently> 162 Amount Greater Than Voice Authorization <not being used currently> 163 FNS Number Doesn’t Match <not being used currently> 164 Already Been Cleared <not being used currently> 165 Voucher Expired <not being used currently>
166 PIN Does Not Exist for Passed Card Number Have the customer call the Cardholder Customer Service number on the back of the card.
167 Unmatched Voucher Information <not being used currently> 168 Authorized Retailer Number Doesn’t Match <not being used currently> 300 Successful <not being used currently> 307 Format Error Call the Merchant Help Desk. 902 Invalid Transaction Type <not being used currently> 903 Re-enter Transaction <not being used currently> 905 Institution Does Not Exist Call the Merchant Help Desk. 907 Issuer or Switch is Inoperative/Decline Call the Merchant Help Desk.
908 Financial Institution Cannot Be Found For Routing/Decline
Call the Merchant Help Desk.
909 Unknown Error. Please Contact Support Call the Merchant Help Desk. 910 Card Issuer Signed Off Call the Merchant Help Desk. 913 Error Call the Merchant Help Desk. 914 Not Able to Trace Back to Original Transaction <not being used currently> 919 Encryption Key Synch Error Call the Merchant Help Desk.
WIC Only Merchants POS Procedures Manual
Copyright © 2015, 2018-2020 FIS™ and/or its subsidiaries. All Rights Reserved. ebtEDGE is a registered trademark of FIS. FIS confidential and proprietary information.
51
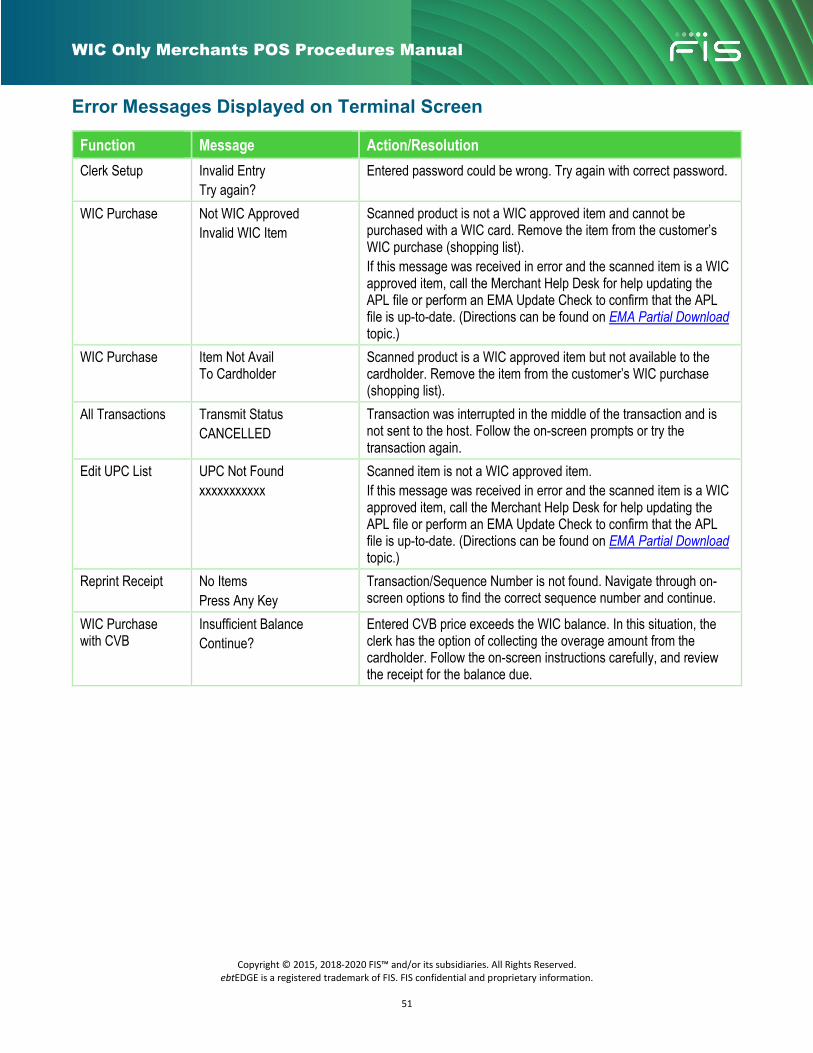
Error Messages Displayed on Terminal Screen
Function Message Action/Resolution Clerk Setup Invalid Entry
Try again? Entered password could be wrong. Try again with correct password.
WIC Purchase Not WIC Approved Invalid WIC Item
Scanned product is not a WIC approved item and cannot be purchased with a WIC card. Remove the item from the customer’s WIC purchase (shopping list). If this message was received in error and the scanned item is a WIC approved item, call the Merchant Help Desk for help updating the APL file or perform an EMA Update Check to confirm that the APL file is up-to-date. (Directions can be found on EMA Partial Download topic.)
WIC Purchase Item Not Avail To Cardholder
Scanned product is a WIC approved item but not available to the cardholder. Remove the item from the customer’s WIC purchase (shopping list).
All Transactions Transmit Status CANCELLED
Transaction was interrupted in the middle of the transaction and is not sent to the host. Follow the on-screen prompts or try the transaction again.
Edit UPC List UPC Not Found xxxxxxxxxxx
Scanned item is not a WIC approved item. If this message was received in error and the scanned item is a WIC approved item, call the Merchant Help Desk for help updating the APL file or perform an EMA Update Check to confirm that the APL file is up-to-date. (Directions can be found on EMA Partial Download topic.)
Reprint Receipt No Items Press Any Key
Transaction/Sequence Number is not found. Navigate through on-screen options to find the correct sequence number and continue.
WIC Purchase with CVB
Insufficient Balance Continue?
Entered CVB price exceeds the WIC balance. In this situation, the clerk has the option of collecting the overage amount from the cardholder. Follow the on-screen instructions carefully, and review the receipt for the balance due.
WIC Only Merchants POS Procedures Manual
Copyright © 2015, 2018-2020 FIS™ and/or its subsidiaries. All Rights Reserved. ebtEDGE is a registered trademark of FIS. FIS confidential and proprietary information.
52
10 Glossary
Glossary of WIC Terms The following pages provide descriptions of WIC terms:
Item Description Authorization Number The number returned from the host computer to approve an WIC transaction. Automated Clearing House (ACH) ACH is a facility that processes electronic debits and credits between financial
institutions. The ACH process will be used to reimburse vendors for benefits extended to customers who have purchased WIC items using WIC cards.
Balance Inquiry A non-financial transaction that allows the WIC cardholder to obtain the current balance in their WIC benefit account.
Card Reader Located on the front right side of the terminal, it reads the card number off the magnetic stripe on the back of the WIC card when the card slides through the slot on the POS terminal.
Cashier ID Also known as “Clerk ID,” it is the sign on ID used by the clerk at the POS device. Cash Value Benefit (CVB) A cash benefit used to purchase fruits and vegetables at a WIC authorized
retailer. CVB is also referred to as a Cash Value Voucher (CVV). Communications Transmission of information between a POS terminal and the transaction
processor that operates the terminal, also known as the terminal driving vendor. Communication takes place over telephone lines.
Coupon A certificate accompanying a product that is exchanged for a reduction in purchase price.
Display Visible presentation of data on the POS terminal. Ethernet Network protocol.
The Ethernet (LAN) connection refers to the port on the POS terminal and the merchant’s network. The Ethernet (LAN) cable connects the POS terminal to the merchant’s network port. See LAN.
FIS Fidelity National Information Services. Fruit and Vegetable Benefit (FVB) A cash benefit used to purchase fruits and vegetables at a WIC authorized
retailer. FVB is also referred to as a Fruit and Vegetable Voucher (FVV). Handheld Scanner The electronic scanner that is used to read UPC/barcodes from items. Hardware The WIC equipment (WIC POS terminal/printer, scanner, external PIN pad—if
used) installed at vendor locations that is used to process WIC transactions. Host Computer The FIS mainframe computer that records all activity from the WIC equipment
installed at vendor locations. The host computer transmits the approvals and/or denial messages back to the WIC equipment.
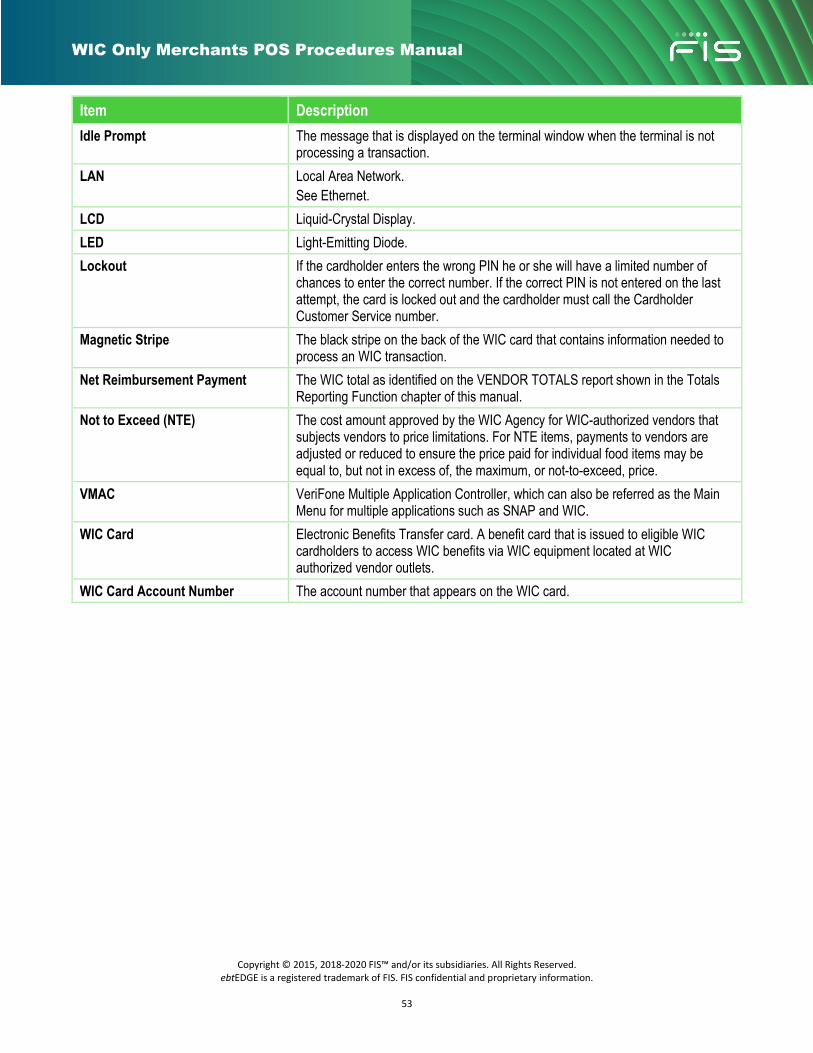
WIC Only Merchants POS Procedures Manual
Copyright © 2015, 2018-2020 FIS™ and/or its subsidiaries. All Rights Reserved. ebtEDGE is a registered trademark of FIS. FIS confidential and proprietary information.
53
Item Description Idle Prompt The message that is displayed on the terminal window when the terminal is not
processing a transaction. LAN Local Area Network.
See Ethernet. LCD Liquid-Crystal Display. LED Light-Emitting Diode. Lockout If the cardholder enters the wrong PIN he or she will have a limited number of
chances to enter the correct number. If the correct PIN is not entered on the last attempt, the card is locked out and the cardholder must call the Cardholder Customer Service number.
Magnetic Stripe The black stripe on the back of the WIC card that contains information needed to process an WIC transaction.
Net Reimbursement Payment The WIC total as identified on the VENDOR TOTALS report shown in the Totals Reporting Function chapter of this manual.
Not to Exceed (NTE) The cost amount approved by the WIC Agency for WIC-authorized vendors that subjects vendors to price limitations. For NTE items, payments to vendors are adjusted or reduced to ensure the price paid for individual food items may be equal to, but not in excess of, the maximum, or not-to-exceed, price.
VMAC VeriFone Multiple Application Controller, which can also be referred as the Main Menu for multiple applications such as SNAP and WIC.
WIC Card Electronic Benefits Transfer card. A benefit card that is issued to eligible WIC cardholders to access WIC benefits via WIC equipment located at WIC authorized vendor outlets.
WIC Card Account Number The account number that appears on the WIC card.