what’s new in pro tools | first - avid...
TRANSCRIPT
What’s New in Pro Tools® | First
version 2018.1
Legal Notices
© 2018 Avid Technology, Inc., (“Avid”), all rights reserved. This guide may not be duplicated in whole or in part without the written consent of Avid.
003, 192 Digital I/O, 192 I/O, 96 I/O, 96i I/O, Adrenaline, AirSpeed, ALEX, Alienbrain, AME, AniMatte, Archive, Archive II, Assistant Station, Audiotabs, AudioStation,AutoLoop, AutoSync, Avid, Avid Active, Avid Advanced Response, Avid DNA, Avid DNxcel, Avid DNxHD, Avid DS Assist Station, Avid Ignite, Avid Liquid, Avid MediaEngine, Avid Media Processor, Avid MEDIArray, Avid Mojo, Avid Remote Response, Avid Unity, Avid Unity ISIS, Avid VideoRAID, AvidRAID, AvidShare, AVIDstripe,AVX, Beat Detective, Beauty Without The Bandwidth, Beyond Reality, BF Essentials, Bomb Factory, Bruno, C|24, CaptureManager, ChromaCurve, ChromaWheel,Cineractive Engine, Cineractive Player, Cineractive Viewer, Color Conductor, Command|8, Control|24, Cosmonaut Voice, CountDown, d2, d3, DAE, D-Command,D-Control, Deko, DekoCast, D-Fi, D-fx, Digi 002, Digi 003, DigiBase, Digidesign, Digidesign Audio Engine, Digidesign Development Partners, Digidesign IntelligentNoise Reduction, Digidesign TDM Bus, DigiLink, DigiMeter, DigiPanner, DigiProNet, DigiRack, DigiSerial, DigiSnake, DigiSystem, Digital Choreography,Digital Nonlinear Accelerator, DigiTest, DigiTranslator, DigiWear, DINR, DNxchange, Do More, DPP-1, D-Show, DSP Manager, DS-StorageCalc, DV Toolkit,DVD Complete, D-Verb, Eleven, EM, Euphonix, EUCON, EveryPhase, Expander, ExpertRender, Fairchild, FastBreak, Fast Track, Film Cutter, FilmScribe,FlexEvent, FluidMotion, Frame Chase, FXDeko, HD Core, HD Process, HDpack, Home-to-Hollywood, HyperSPACE, HyperSPACE HDCAM, iKnowledge, Impact,Improv, iNEWS, iNEWS Assign, iNEWS ControlAir, InGame, Instantwrite, Instinct, Intelligent Content Management, Intelligent Digital Actor Technology,IntelliRender, Intelli-Sat, Intelli-Sat Broadcasting Recording Manager, InterFX, Interplay, inTONE, Intraframe, iS Expander, iS9, iS18, iS23, iS36, ISIS, IsoSync,LaunchPad, LeaderPlus, LFX, Lightning, Link & Sync, ListSync, LKT-200, Lo-Fi, MachineControl, Magic Mask, Make Anything Hollywood,make manage move|media, Marquee, MassivePack, MassivePack Pro, Maxim, Mbox, Media Composer, MediaFlow, MediaLog, MediaMix, Media Reader,Media Recorder, MEDIArray, MediaServer, MediaShare, MetaFuze, MetaSync, MIDI I/O, Mix Rack, Moviestar, MultiShell, NaturalMatch, NewsCutter, NewsView,NewsVision, Nitris, NL3D, NLP, NSDOS, NSWIN, OMF, OMF Interchange, OMM, OnDVD, Open Media Framework, Open Media Management, Painterly Effects,Palladium, Personal Q, PET, Podcast Factory, PowerSwap, PRE, ProControl, ProEncode, Profiler, Pro Tools, Pro Tools|HD, Pro Tools LE, Pro Tools M-Powered,Pro Transfer, QuickPunch, QuietDrive, Realtime Motion Synthesis, Recti-Fi, Reel Tape Delay, Reel Tape Flanger, Reel Tape Saturation, Reprise,Res Rocket Surfer, Reso, RetroLoop, Reverb One, ReVibe, Revolution, rS9, rS18, RTAS, Salesview, Sci-Fi, Scorch, ScriptSync, SecureProductionEnvironment,Shape-to-Shape, ShuttleCase, Sibelius, SimulPlay, SimulRecord, Slightly Rude Compressor, Smack!, Soft SampleCell, Soft-Clip Limiter, SoundReplacer, SPACE,SPACEShift, SpectraGraph, SpectraMatte, SteadyGlide, Streamfactory, Streamgenie, StreamRAID, SubCap, Sundance, Sundance Digital, SurroundScope,Symphony, SYNC HD, SYNC I/O, Synchronic, SynchroScope, Syntax, TDM FlexCable, TechFlix, Tel-Ray, Thunder, TimeLiner, Titansync, Titan, TL Aggro,TL AutoPan, TL Drum Rehab, TL Everyphase, TL Fauxlder, TL In Tune, TL MasterMeter, TL Metro, TL Space, TL Utilities, tools for storytellers, Transit,TransJammer, Trillium Lane Labs, TruTouch, UnityRAID, Vari-Fi, Video the Web Way, VideoRAID, VideoSPACE, VTEM, Work-N-Play, Xdeck, X-Form, and XMONare either registered trademarks or trademarks of Avid Technology, Inc. in the United States and/or other countries.
Bonjour, the Bonjour logo, and the Bonjour symbol are trademarks of Apple Computer, Inc.
Thunderbolt and the Thunderbolt logo are trademarks of Intel Corporation in the U.S. and/or other countries.
JetPLL, JET and Jitter Elimination Technology are trademarks of TC Applied Technologies, a division of TC Group Americas Inc. The JetPLL technology is usedunder sublicense from TC Applied Technologies, and is the intellectual property of Sonopsis Ltd. The JetPLL technology is protected by one or more U.S. andnon-U.S. patents, the details of which can be found at www.tctechnologies.tc/patents.
This product may be protected by one or more U.S. and non-U.S. patents. Details are available at www.avid.com/patents.
Product features, specifications, system requirements, and availability are subject to change without notice.
Guide Part Number 9329-65912-00 REV A 01/18

What’s New in Pro Tools | First 2018.1 . . . . . . . . . . . . . . . . . . . . . . . . . . . . . . . . . . . . . . . . . . . . . . . . . . . . . . . . . . . . . . 1
New Version Numbering Convention . . . . . . . . . . . . . . . . . . . . . . . . . . . . . . . . . . . . . . . . . . . . . . . . . . . . . . . . . . . . 1
New Features and Enhancements . . . . . . . . . . . . . . . . . . . . . . . . . . . . . . . . . . . . . . . . . . . . . . . . . . . . . . . . . . . . . . . 1
System Requirements and Compatibility Information . . . . . . . . . . . . . . . . . . . . . . . . . . . . . . . . . . . . . . . . . . . . . . . 2
Conventions Used in This Guide . . . . . . . . . . . . . . . . . . . . . . . . . . . . . . . . . . . . . . . . . . . . . . . . . . . . . . . . . . . . . . . . 2
Resources. . . . . . . . . . . . . . . . . . . . . . . . . . . . . . . . . . . . . . . . . . . . . . . . . . . . . . . . . . . . . . . . . . . . . . . . . . . . . . . . . . 3
Track Presets. . . . . . . . . . . . . . . . . . . . . . . . . . . . . . . . . . . . . . . . . . . . . . . . . . . . . . . . . . . . . . . . . . . . . . . . . . . . . . . . . . . . . 4
Creating and Saving Track Presets . . . . . . . . . . . . . . . . . . . . . . . . . . . . . . . . . . . . . . . . . . . . . . . . . . . . . . . . . . . . . . 4
Creating New Tracks from Track Presets . . . . . . . . . . . . . . . . . . . . . . . . . . . . . . . . . . . . . . . . . . . . . . . . . . . . . . . . . 9
Recalling Inserts from Track Presets . . . . . . . . . . . . . . . . . . . . . . . . . . . . . . . . . . . . . . . . . . . . . . . . . . . . . . . . . . . 11
Recalling Track Presets to Sends . . . . . . . . . . . . . . . . . . . . . . . . . . . . . . . . . . . . . . . . . . . . . . . . . . . . . . . . . . . . . . 12
Track Presets in Soundbase . . . . . . . . . . . . . . . . . . . . . . . . . . . . . . . . . . . . . . . . . . . . . . . . . . . . . . . . . . . . . . . . . . 12
New MIDI Features . . . . . . . . . . . . . . . . . . . . . . . . . . . . . . . . . . . . . . . . . . . . . . . . . . . . . . . . . . . . . . . . . . . . . . . . . . . . . . . 15
Arrow Key MIDI Editing Enhancements . . . . . . . . . . . . . . . . . . . . . . . . . . . . . . . . . . . . . . . . . . . . . . . . . . . . . . . . . 16
Retrospective Record for MIDI. . . . . . . . . . . . . . . . . . . . . . . . . . . . . . . . . . . . . . . . . . . . . . . . . . . . . . . . . . . . . . . . . 17
Mixing Enhancements. . . . . . . . . . . . . . . . . . . . . . . . . . . . . . . . . . . . . . . . . . . . . . . . . . . . . . . . . . . . . . . . . . . . . . . . . . . . 19
EQ Curve View in the Mix Window . . . . . . . . . . . . . . . . . . . . . . . . . . . . . . . . . . . . . . . . . . . . . . . . . . . . . . . . . . . . . 19
Pre/Post–Fader Indicator for Sends . . . . . . . . . . . . . . . . . . . . . . . . . . . . . . . . . . . . . . . . . . . . . . . . . . . . . . . . . . . . 19
Track View and Automation Lane Selectors Display Orange to Indicate Automation . . . . . . . . . . . . . . . . . . . . . 20
Collaboration Improvements. . . . . . . . . . . . . . . . . . . . . . . . . . . . . . . . . . . . . . . . . . . . . . . . . . . . . . . . . . . . . . . . . . . . . . 21
Start Collaboration . . . . . . . . . . . . . . . . . . . . . . . . . . . . . . . . . . . . . . . . . . . . . . . . . . . . . . . . . . . . . . . . . . . . . . . . . . 21
Contents
What’s New in Pro Tools | First 2018.1 iii

What’s New in Pro Tools | First 2018.1
New Version Numbering ConventionAs of January 2018, Avid has adopted a new versioning scheme across all its product lines based on the date of release. For exam-
ple, Pro Tools® | First version 2018.1 is released in January 2018. With a regular, subscription-based release schedule, the new
scheme lets you readily know if you are running the latest version of Pro Tools | First. Note that subsequent releases within the same
month will have an additional suffix, for example version 2018.1.1.
New Features and EnhancementsPro Tools® | First software version 2018.1 provides the following new features and enhancements:
Track PresetsTrack Presets lets you save and recall one or more tracks (of any type, format, plug-ins and sends configurations, and so on)
pre-configured to match the most common track configurations you use when building your Pro Tools | First projects. In addition
to creating new tracks from Track Presets, you can recall Inserts or Sends configurations from Track Presets to tracks that are al-
ready in your project.
New MIDI Features
Arrow Key MIDI Editing Enhancements
Use Arrow keys, with and without additional key modifiers, to transpose, trim, and modify the velocity of MIDI notes on MIDI and
Instrument tracks in Notes view or in MIDI Editor windows.
Retrospective Record for MIDI
Use the Retrospective Record command to recover your last MIDI performance in Pro Tools when you didn’t record it.
Mixing Enhancements
EQ Curve View in the Mix Window
EQ Curve view in the Mix window displays the EQ curve of supported EQ plug-ins inserted on tracks.
Pre/Post–Fader Indicator for Sends
The Pre/Post-Fader Indicator for Sends lets you quickly see which sends are set to pre-fader and which to post-fader simply by
glancing at the Sends view of tracks in the Mix or Edit window.
Track View and Automation Lane Selectors Display Orange to Indicate Automation
Automation Track view and Automation lane selectors indicate which automation playlists contain automation.
When two different products are released with identical software numbers—for example Pro Tools | First 2018.1and Sibelius | First 2018.1—this does not necessarily imply unique compatibility.
What’s New in Pro Tools | First 2018.1 1

Start Collaboration Command
Start Collaboration Command
The Start Collaboration command (File > Start Collaboration) lets you start a collaboration with a new project or with an existing proj-
ect.
System Requirements and Compatibility InformationAvid can only assure compatibility and provide support for hardware and software it has tested and approved.
For complete system requirements and a list of qualified computers, operating systems, hard drives, and third-party devices, visit:
www.avid.com/compatibility
Conventions Used in This GuidePro Tools documentation uses the following conventions to indicate menu choices, keyboard commands,
and mouse commands::
The names of Commands, Options, and Settings that appear on-screen are in a different font.
The following symbols are used to highlight important information:
Convention Action
File > Save Choose Save from the File menu
Control+N Hold down the Control key and press the N key
Control-click Hold down the Control key and click the mouse but-
ton
Right-click Click with the right mouse button
User Tips are helpful hints for getting the most from your Pro Tools system.
Important Notices include information that could affect your Pro Tools project data or the performance of yourPro Tools system.
Shortcuts show you useful keyboard or mouse shortcuts.
Cross References point to related sections in this guide and other Avid documentation.
What’s New in Pro Tools | First 2018.1
2

How to Use this PDF GuideThis PDF provides the following useful features:
• The Bookmarks on the left serve as a continuously visible table of contents. Click on a subject heading to jump to that page.
• Click a + symbol to expand that heading to show subheadings. Click the – symbol to collapse a subheading.
• The Table of Contents provides active links to their pages. Select the hand cursor, allow it to hover over the heading until it turns
into a finger. Then click to locate to that subject and page.
• All cross references in blue are active links. Click to follow the reference.
• Select Find from the Edit menu to search for a subject.
• When viewing this PDF on an iPad, it is recommended that you open the file using iBooks to take advantage of active links within
the document. When viewing the PDF in Safari, touch the screen, then touch Open in “iBooks”.
ResourcesThe Avid website (www.avid.com) is your best online source for information to help you get the most out of Pro Tools.
Account Activation and Product RegistrationActivate your product to access downloads in your Avid account (or quickly create an account if you do not have one). Register your
purchase online, download software, updates, documentation, and other resources.
www.avid.com/account
Support and DownloadsContact Avid Customer Success (technical support), download software updates and the latest online manuals, browse the Compatibil-
ity documents for system requirements, search the online Knowledge Base or join the worldwide Avid user community on the User Con-
ference.
www.avid.com/support
Training and EducationStudy on your own using courses available online, find out how you can learn in a classroom setting at an Avid-certified training center,
or view video tutorials and webinars.
www.avid.com/education
Products and DevelopersLearn about Avid products, download demo software, or learn about our Development Partners and their plug-ins, applications, and
hardware.
www.avid.com/products
What’s New in Pro Tools | First 2018.1
3

Track Presets
Pro Tools | First lets you create, save, overwrite, and recall Track Presets. A Track Preset captures the current configuration of the
selected track or tracks, and can include the track type, format, level, panning, plug-in and send configurations, and more. You can
recall Track Presets to create new pre-configured tracks in your project. You can also recall Inserts or Sends configurations from
Track Presets to tracks that are already in your project.
Track Presets are available for recall in the Track Type selector in the New Tracks dialog. Track Presets can also be recalled from
Soundbase to create new tracks. You can use Soundbase to organize, manage, and search your collection of Track Presets, so you
always have easy access to the perfect Track Presets for any project.
Creating and Saving Track PresetsYou can save any selected track or tracks in your project as a Track Preset. A Track Preset captures the current configuration of the
selected track or tracks.
To create and save a new Track Preset:
1 Create and configure one or more tracks for any of your common workflow scenarios (such as “lead vocal input chain,” or
“drums parallel compression bus,” and so on).
2 Do one of the following:
• Select the track or tracks and choose Track > Save Track Preset.
• Right-click the track name and choose Save Track Preset.
• Select the track or tracks and press Option+Shift+P (Mac) or Alt+Shift+P (Windows).
3 Configure the Save Track Preset dialog as desired (see Save Track Preset Dialog Settings).
4 Click OK.
Save Track Preset Dialog SettingsThe Save Track Preset dialog lets you name the preset, assign it to a category, and include audio and MIDI clips (all clips or only
clips within the current Edit selection). Add metadata tags to your Track Presets to make searching for the perfect Track Preset in
Soundbase even easier. You can rename and re-categorize Track Presets later in Soundbase.
Save Track Preset dialog
Track Presets 4

Category
From the Category selector, assign the Track Preset to an appropriate category. If the appropriate category for the preset doesn’t yet ex-
ist, create a new one.
To create a new Track Preset Category:
1 In the Save Track Preset dialog, choose Add Category from the Category selector.
2 In the resulting dialog, type the name for the New Category.
3 If desired, select the directory in which you want your new category to be created.
4 Click OK.
The new category is added to the available Track Preset Categories.
Name
The Name field is pre-populated with the track name. You can continue using the track name for the preset, type a new name, or select
the name of an existing preset to overwrite it.
Adding a Track Preset Category
Naming a new Track Preset Category
Selecting the directory in which to create a new Track Preset Category
Press Command+Left/Right Arrow keys (Mac) or Control+Left/Right Arrow keys (Windows) to cycle through the availableCategories.
Press Command+Up/Down Arrow keys (Mac) or Control+Up/Down Arrow keys (Windows) to cycle through the Name menu.
Track Presets
5

Include Audio and MIDI Clips
Enable Include Audio and MIDI Clips to include any audio or MIDI clips on the track with the Track Preset. This can be useful if you of-
ten work with loops, for example.
Clips in Edit Selection Only
Enable Clips in Edit Selection Only to include only whole audio and MIDI clips, and any associated automation data that is within the
current Edit selection. Use this option in conjunction with Track Offset Options set in the Track Data To Recall dialog to place included
media at any desired Timeline location in any other project (see Track Data to Recall).
Tags
Add metadata tags to Track Presets to narrow searches for Track Presets in Soundbase.
Auto-populate tags from Track Data
Enable Auto-populate tags from Track Data to automatically create tags based on the following Track Data: Plug-in Manufacturers,
Plug-in Names, Plug-in Categories, Plug-in Preset (if unmodified), Track Types, Track Names, and Track Width.
Tags Field
Type descriptive tags for the Track Preset in the Tags field.
To add a tag to a Track Preset:
1 Click in the Tags filed and type the tag you want (for example, “Strings,” “Synth,” or “Pad”).
2 Press Return (Mac) or Enter (Windows) to assign each new tag that you type.
To remove a tag from a Track Preset:
Click the X on the right-edge of the tag.
Press Command+I (Mac) or Control+I (Windows) to enable or disable the Include Audio and Media Clips option.
The beginning of the Edit selection is defined as the first sample of the saved Track Preset.
Press Command+N (Mac) or Control+N (Windows) to enable or disable the Clips in Edit Selection Only option.
Press Command+T (Mac) or Control+T (Windows) to enable or disable the Auto-populate Tags from Track Data option.
Entering tags in the Tags field
Use the Left and Right Arrow keys to navigate tags. Press Delete to remove a selected tag.
Track Presets
6

Track Data to RecallPro Tools | First lets you specify what Track and Session data to recall with the Track Preset. These settings can be modified in Sound-
base for any selected Track Preset (see Track Presets in Soundbase).
Track Data to Recall Presets
Pro Tools | First lets you store and recall different configurations of the Track Data to Recall dialog as presets. The Presets controls for
the Track Data to Recall dialog work much like the Presets controls for Batch Renaming, Fades, and Clip Effects.
Presets Buttons
The Track Data to Recall dialog provides five Presets buttons that let you store and recall your most commonly used Track Data to Re-
call configurations. You can also save and recall Track Data to Recall settings using the Librarian menu.
Track Data to Recall dialog
Press Command+R (Mac) or Control+R (Windows) to open the Track Data To Recall dialog from the Save Track Preset dialog.
When recalling a Track Preset by any means, press Control (Mac) or Start (Windows) to open and edit the Track Data to Im-port dialog. You can then specify what Track Data you want to recall.
Clips and media will only be stored with a Track Preset if the Clips and Media option is enabled.
Track Presets
7

To store a Track Data to Recall preset:
1 Configure the Track Data to Recall dialog as you like.
2 Command-click (Mac) or Control-click (Windows) the Presets button where you want to store the current Track Data to Recall set-
tings.
To recall a Track Data to Recall preset:
Click the Presets button that contains the settings you want to recall.
Librarian Menu
Use the Librarian menu to save and recall presets files (.ptpreset). These are usually saved to and recalled from the Track Data to Recall
folder (/Documents/Pro Tools/Pro Tools Presets/Track Data to Recall/). However, you can save to and recall from any directory loca-
tion on your system. Preset files can be shared and used on any other Pro Tools system as well.
The Librarian menu commands include:
<factory default> Restores the default settings for the Track Data to Recall dialog.
Save Settings Saves the current settings. This command overwrites any previous version of the preset.
Save Settings As Saves the current settings as a new preset. You can name the preset and save it to any location on your system.
Import Settings Opens the Choose a Settings File dialog focused on the default Track Data to Recall folder. Track Data to Recall Set-
tings files stored in this location are listed by name under <factory default> in the Librarian menu. In the Choose a Settings File dialog,
you can navigate to any location on your system to select and import the Track Data to Recall Settings preset file you want.
Delete Current Settings File Permanently deletes the current settings file from disk.
Lock (Unlock) Settings File Locks (or unlocks) the selected Settings file so that it cannot (or can) be edited.
Track Data
Pro Tools lets you include (or exclude) Track Data with Track Presets. For a complete list of Track Data options with descriptions, refer
to the Pro Tools | First Help (Help > Pro Tools | First Help).
Session Data
Pro Tools lets you include (or exclude) the following Session Data with Track Presets: For a complete list of Session Data options with
descriptions, refer to the Pro Tools | First Help (Help > Pro Tools | First Help).
Track Offset Options
Pro Tools | First lets you specify a Track Offset in addition to any offset incurred with the Timecode Mapping Options. Any imported
audio is offset in the current project Timeline by the specified amount.
Select one of the following options:
No Offset No Track Offset is applied.
Offset To Lets you specify the Track Offset to a Timeline location in Bars|Beats, Min:Sec, Timecode, Feet+Frames, or Samples.
Offset to Song Start Marker Locates the Track Offset to the Session Song Start Marker.
Offset to Timeline Selection Locates the Track Offset to the start of the current Timeline Selection.
Other Options
Pro Tools | First lets you set et the current Track Preset to Recall settings to be Tick-based or as a Sample-based track.
Force to Timebase
Enable the Force to Timebase option to ensure that the Track Preset is always imported in the selected Timebase:
Press Command+Shift+S (Mac) or Control+Shift+S (Windows) to save the current settings.
Track Presets
8

Ticks Ensures that the Track Preset imports as Tick-based.
Samples Ensures that the Track Preset imports as Sample-based.
Track Presets FilesAll Track Presets are stored as and recalled from Track Presets files (.ptxp). By default, Pro Tools | First installs and looks for Track Pre-
sets files in the following locations:
Mac Macintosh HD/Users/<username>/Documents/Pro Tools/Track Presets
Windows C:\Users\<username>\Documents\Pro Tools\Track Presets
Creating New Tracks from Track PresetsYou can create new tracks from Tracks Presets using the New Tracks dialog or the Track Right-click menu, or by drag and drop from
Soundbase (see Track Presets in Soundbase).
Track Presets in the New Tracks Dialog
To create a new track from a Track Preset:
1 Choose Tracks > New Track.
2 From the Track Type selector, choose Track Presets and select the Track Preset Category (such as “Avid”).
3 Select the Track Preset.
4 Click Create.
Track Presets can be stored in sub-folders within the designated directories so you can organize your Track Presets bysub-categories. Pro Tools | First displays these as sub-menus when selecting Track Presets in the application.
Selecting the Track Preset Category
Selecting a Track Preset
Track Presets
9

The Track Preset is recalled into the project as a new track (or as new tracks) according to the current Track Data to Recall settings.
Track Presets in the New Tracks Dialog from Track Output and Sends Selectors
To create a new track from a Track Preset using the Track Output Selector:
1 Click the Output selector of a track and choose New Track.
2 From the Track Type selector, choose Track Presets and select the Track Preset Category (such as “Avid”).
3 Select the Track Preset.
4 Click Create.
The Track Preset is recalled into the project as a new track (or as new tracks) according to the current Track Data to Recall settings.
Creating a New Track from a Track Output selector
Selecting the Track Preset Category
Creating a new track from a Track Preset
Track Presets
10

Track Presets in the Tracks Right-Click Menu
To configure a track from a Track Preset using the Track Right-click menu:
1 Right-click any Track Name in the Tracks List, or in the Edit or Mix windows.
2 From the Right-click menu, choose Recall Track Preset and select the Track Preset you want to recall.
Recalling Inserts from Track PresetsPro Tools lets you recall Inserts saved in a Track Preset. This lets you quickly configure any track with common effects chains saved
in Track Presets.
To recall inserts from a Track Preset, do one of the following:
Drag and drop a Track Preset from Soundbase to the Inserts view of an existing track.
Choose a Track Preset from the Recall Inserts submenu in the Inserts selector of an existing track.
Selecting a Track Preset from the Track Right-click menu
Plug-ins recalled from Track Presets adapt to the format of the current track when possible. For example, if a Track Presetwas saved as stereo, but you are recalling Inserts from it to a 5.1 track, any plug-ins stored with that Track Preset that support5.1 are recalled as 5.1 inserts. However, if a plug-in does not support the track format (for example, in this case, if there isno 5.1 version of a plug-in saved with the Track Preset), it is not recalled.
Recalling inserts from a Track Preset
Track Presets
11
Recalling Track Presets to SendsPro Tools lets you recall Sends configurations saved in a Track Preset. This lets you quickly configure any track with common send con-
figurations saved in Track Presets.
To recall sends from a Track Preset, do one of the following:
Drag and drop a Track Preset from Soundbase to the Sends view of an existing track.
Choose a Track Preset from the Recall Sends submenu in the Sends selector of an existing track.
Track Presets in SoundbaseSoundbase provides easy access to all of your Track Presets from the Track Presets alias in the Locations pane. Subdirectories of the
Track Presets location let you organize Track Presets by Category—each subdirectory appears as a Track Preset Category in the New
Tracks dialog. Search for Track Presets by name, category, or by matching metadata tags.
Recalling sends from a Track Preset
Track Preset selected in Soundbase showing Track Data to Recall
Track Presets
12

To recall Track Presets from Soundbase into a project and create new tracks, do one of the following:
Drag and drop a Track Preset to the Tracks List or to blank space in the Mix or Edit windows.
Double-click a Track Preset.
Right-click a Track Preset and choose Recall Track Preset.
Tagging Track PresetsPro Tools | First lets you add metadata tags to Track Presets. For more information about working with tags, see the Pro Tools | FirstHelp (Help > Pro Tools | First Help).
Searching Track PresetsPro Tools | First lets you search for track presets using basic or advanced search criteria, or by searching on metadata tags. For more in-
formation about searching in Soundbase, see the Pro Tools | First Help (Help > Pro Tools | First Help).
Filtering Track Data when Recalling Track Presets from SoundbaseWhen a Track Preset is selected in the search pane of Soundbase, the Track Data to Recall settings for the selected Track Preset appears
in its own pane on the right side of Soundbase. These settings are the same as those in the Track Data to Recall dialog. You can edit the
Track Data to Recall settings for the selected Track Preset in Soundbase. The Track Preset is updated with any changes you make. These
settings are applied when you recall the Track Preset from Soundbase or when you create a new track (Track > New) from the Track Pre-
set.
Searching Track Presets with Tags in Soundbase
For detailed information about the Track Data to Recall settings, see Track Data to Recall.
Track Presets
13
Dragging Track Presets from SoundbaseYou can recall Track Presets by dragging and dropping them from Soundbase to your project.
Dragging to the Track List, or Edit or Mix Windows
Drag and drop a Track Preset from Soundbase to the Track List, or to the Edit or Mix window to create new tracks from the Track Preset.
See also Creating New Tracks from Track Presets.
Dragging to Inserts
Drag and drop a Track Preset from Soundbase to a track’s Inserts view in the Edit or Mix window to recall Inserts from the Track Preset.
See also Recalling Inserts from Track Presets.
Dragging to Sends
Drag and drop a Track Preset from Soundbase to a track’s Sends view in the Edit or Mix window to recall Sends configurations from
the Track Preset. See also Recalling Track Presets to Sends.
Dragging to a Track Name
Drag and drop a Track Preset from Soundbase to a Track Name in the Edit or Mix window to configure that track based on the Track
Preset. If the Track Preset contains more than one track, on the first track stored with the Track Preset is recalled.
Importing Multiple Presets from Soundbase Simultaneously Pro Tools | First lets you import an entire folder of Track Presets from Soundbase with a single command. Similarly, you can import a
selection of multiple Track Presets at once.
To import all of the Track Presets in a folder:
1 Locate the folder of Track Presets you want to recall in Soundbase.
2 Right-click the folder and choose Import Track Preset.
All Track Presets are recalled to create new tracks in your project.
To recall a selection of Track Presets:
1 Locate the Track Presets you want to recall in Soundbase.
2 Command-click (Mac) or Control-click (Windows) the Track Presets you want to import.
3 Right-click one of the selected Track Presets and choose Import Track Preset.
All selected Track Presets are imported to create new tracks in your project.
Press Option+Shift (Mac) or Alt+Shift (Windows) when dragging and dropping to configure all tracks based on the Track Preset.
Track Presets
14
New MIDI Features
Arrow Key MIDI Editing EnhancementsUse the Arrow Keys with key modifiers to transpose, copy and transpose, trim, and change velocities of selected MIDI notes.
Transposing MIDI Notes with the Arrow KeysUse the Up and Down Arrow keys, with or without additional key modifiers, to transpose selected MIDI notes up and down on
MIDI and Instrument tracks in Notes view or in MIDI Editor windows.
To transpose selected notes up or down by semitones:
Press the Up Arrow to transpose up or the Down Arrow to transpose down a semitone.
To transpose selected notes up or down by an octave:
Press Shift+Up Arrow to transpose up or Shift+Down Arrow to transpose down by an octave.
To transpose notes in key according to Key markers in the Key ruler:
Press Control+Up/Down Arrows (Mac) or Start+Up/Down Arrows (Windows).
To duplicate and transpose selected notes up or down by semitone:
Press Option+Up/Down Arrows (Mac) or Alt+Up/Down Arrows (Windows).
To duplicate and transpose selected notes up or down by an octave:
Press Option+Shift+Up/Down Arrows (Mac) or Alt+Shift+Up/Down Arrows (Windows).
To duplicate notes when transposing in key (to create chords):
1 Press Control+Option+Up/Down Arrows (Mac) or Start+Alt+Up/Down Arrows (Windows) to duplicate the notes in key.
2 Then Press Control+Up/Down Arrows (Mac) or Start+Up/Down Arrows (Windows) to transpose the duplicate notes to the de-
sired chord tone in the key.
3 Repeat steps 1 and 2 to add more notes to the chord.
Trimming MIDI Notes with the Arrow KeysUse the Up and Down Arrow keys with key modifiers to trim selected MIDI notes on MIDI and Instrument tracks in Notes view
or in MIDI Editor windows.
To trim the note off value of selected notes incrementally by the current grid value, do one of the following:
Press Option+Left Arrow (Mac) or Alt+Left Arrow (Windows) to shorten selected notes.
Press Option+Right Arrow (Mac) or Alt+Right Arrow (Windows) to lengthen selected notes.
To trim the note off value of selected notes incrementally by the next larger grid value of the current grid value, do one of the
following:
Press Option+Shift+Left Arrow (Mac) or Alt+Shift+Left Arrow (Windows) to shorten selected notes.
Press Option+Shift+Right Arrow (Mac) or Alt+Shift+Right Arrow (Windows) to lengthen selected notes.
New MIDI Features 15

To trim the note on value of selected notes incrementally by the current grid value, do one of the following:
Press Option+Control+Left Arrow (Mac) or Alt+Start+Left Arrow (Windows) to lengthen selected notes.
Press Option+Control+Right Arrow (Mac) or Alt+Start+Right Arrow (Windows) to shorten selected notes.
To trim the note off value of selected notes incrementally by the next larger grid value of the current grid value, do one of the following:
Press Option+Control+Shift+Left Arrow (Mac) or Alt+Start+Shift+Left Arrow (Windows) to shorten selected notes.
Press Option+Control+Shift+Right Arrow (Mac) or Alt+Start+Shift+Right Arrow (Windows) to lengthen selected notes.
Editing MIDI Note Velocities with the Arrow KeysUse the Up and Down Arrow keys with key modifiers to change the velocities of selected MIDI notes on MIDI and Instrument tracks
in Notes view or in MIDI Editor windows.
To increase or decrease the velocities of selected notes in increments of 5:
Press Command+Up/Down Arrow (Mac) or Control+Up/Down Arrow (Windows).
To increase or decrease the velocities of selected notes in increments of 15:
Press Command+Shift+Up/Down Arrow (Mac) or Control+Shift+Up/Down Arrow (Windows).
Tabbing To Transients in MIDI Notes View EnhancementWhen Tab to Transients is enabled, Tabbing in notes view now tabs to note off events as well as note on events.
Retrospective Record for MIDIWhen you play a MIDI controller (such as a USB MIDI keyboard or trigger pad) along with the playback of your Pro Tools | First proj-
ect, your MIDI performance is stored in a buffer by Pro Tools | First behind the scenes. As long as any MIDI or Instrument is record-en-
abled, Pro Tools captures any MIDI performance during playback whether you are recording or not. For example, if were playing along
with your project, but did not actually record your performance, Pro Tools captures it for you. You can then place it on a MIDI or In-
strument track spotted to the exact time of your original performance on the Timeline. Using Retrospective Record, you won't lose that
perfect take or that great musical idea just because you were only playing along with the project but not actually recording.
To recover a MIDI performance that was played, but not recorded:
1 Start playback of your project.
2 Play your MIDI controller along with project playback. You will hear your performance either from the Default Thru Instrument or
from the instrument (virtual or hardware) assigned to the MIDI output of the record-enabled MIDI or Instrument track to which your
controller is assigned.
Retrospective Record takes into account the MIDI Import Filter settings. For example, if Pitch Bend is filtered, but the Mod-ulation Wheel (MIDI CC 1) is not, when you perform using both any Pitch Bend activity is excluded while Modulation Wheelactivity is included.
New MIDI Features
16

3 Choose Events > Retrospective Record.
Instrument track record-enabled, Transport not record-enabled, MIDI performance sounds during playback
Press Shift+C to write your MIDI performance to the record-enabled MIDI or Instrument track.
New MIDI Features
17

Pro Tools | First places your MIDI performance in the record-enabled track matching the time of the original performance on the Time-
line.
Additional Behaviors with Retrospective Record for MIDI Pro Tools | First lets you apply Retrospective Record during playback.
Since Pro Tools | First lets you toggle MIDI record enable status during playback, you can change tracks during playback and
Pro Tools | First continues to capture your performance. In this case, if you restore your performance using Retrospective Record,
Pro Tools | First places your entire performance on a single track. If multiple tracks are selected, the performance is placed on the last
selected track.
Pro Tools | First lets you play over a MIDI or Instrument track that already contains MIDI data. When using Retrospective Record
on a track that already contains MIDI data, your performance is written to and merged with the existing MIDI data on that track.
MIDI performance written to record enabled track using Retrospective Record command
New MIDI Features
18
Mixing Enhancements
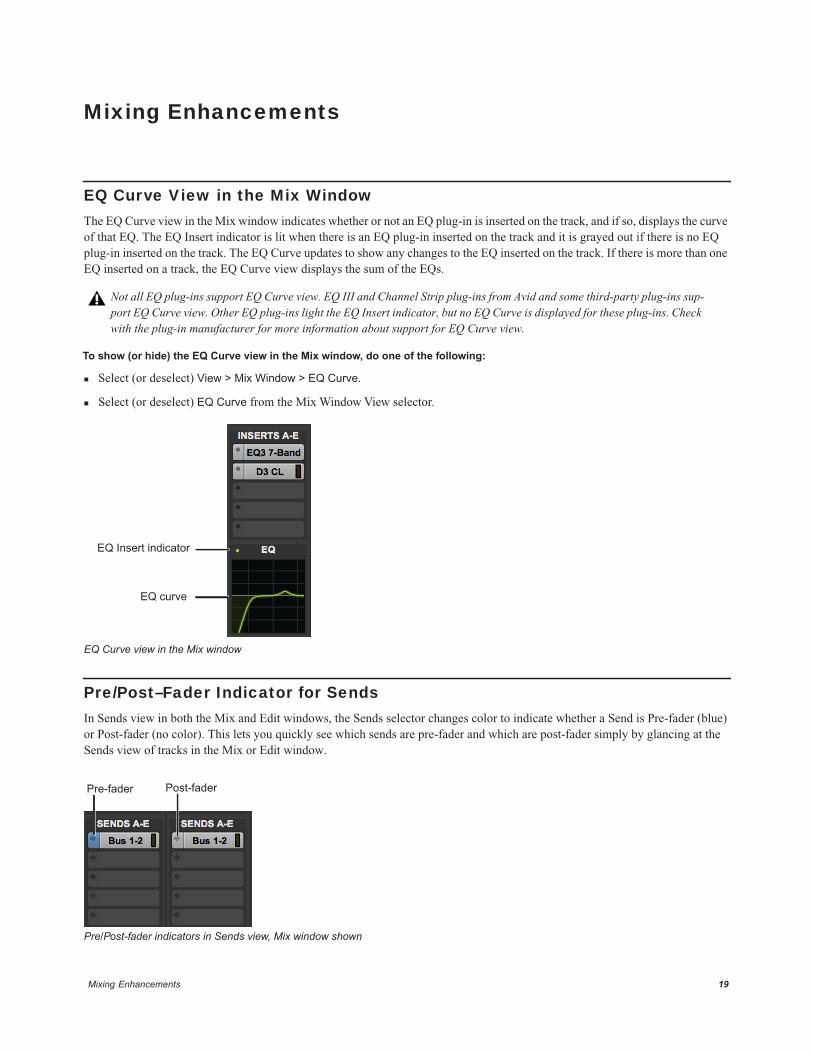
EQ Curve View in the Mix WindowThe EQ Curve view in the Mix window indicates whether or not an EQ plug-in is inserted on the track, and if so, displays the curve
of that EQ. The EQ Insert indicator is lit when there is an EQ plug-in inserted on the track and it is grayed out if there is no EQ
plug-in inserted on the track. The EQ Curve updates to show any changes to the EQ inserted on the track. If there is more than one
EQ inserted on a track, the EQ Curve view displays the sum of the EQs.
To show (or hide) the EQ Curve view in the Mix window, do one of the following:
Select (or deselect) View > Mix Window > EQ Curve.
Select (or deselect) EQ Curve from the Mix Window View selector.
Pre/Post–Fader Indicator for SendsIn Sends view in both the Mix and Edit windows, the Sends selector changes color to indicate whether a Send is Pre-fader (blue)
or Post-fader (no color). This lets you quickly see which sends are pre-fader and which are post-fader simply by glancing at the
Sends view of tracks in the Mix or Edit window.
Not all EQ plug-ins support EQ Curve view. EQ III and Channel Strip plug-ins from Avid and some third-party plug-ins sup-port EQ Curve view. Other EQ plug-ins light the EQ Insert indicator, but no EQ Curve is displayed for these plug-ins. Checkwith the plug-in manufacturer for more information about support for EQ Curve view.
EQ Curve view in the Mix window
Pre/Post-fader indicators in Sends view, Mix window shown
EQ Insert indicator
EQ curve
Post-faderPre-fader
Mixing Enhancements 19
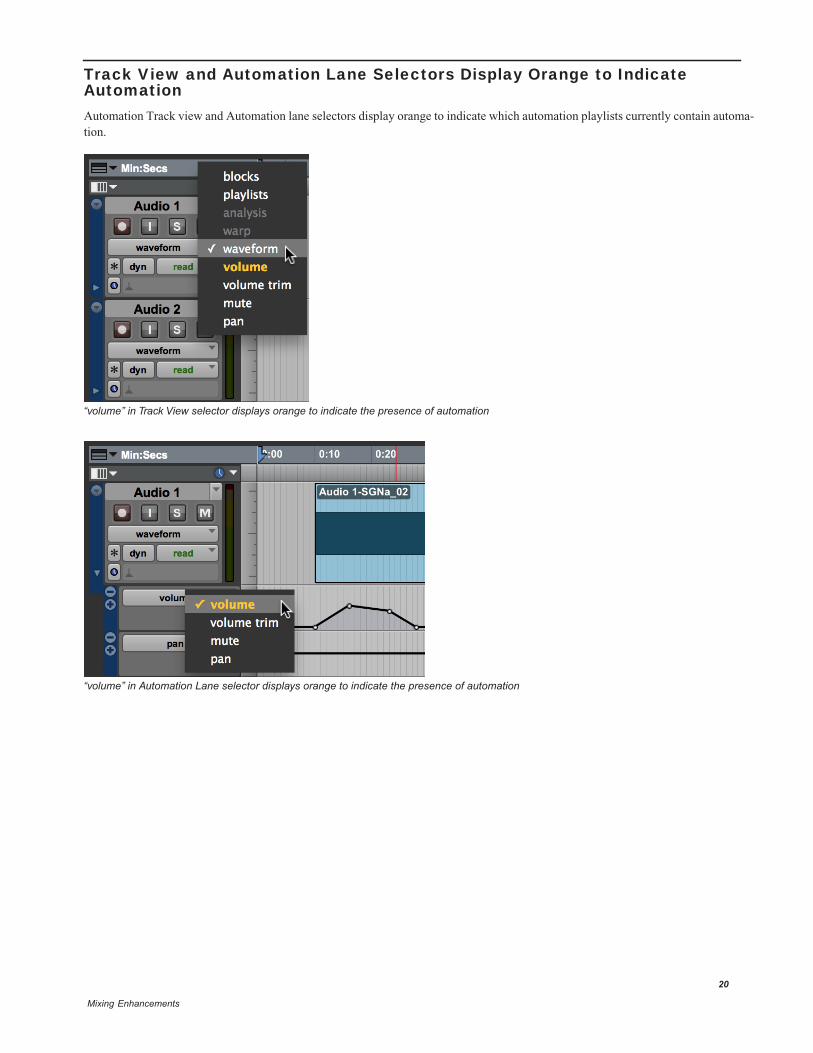
Track View and Automation Lane Selectors Display Orange to Indicate AutomationAutomation Track view and Automation lane selectors display orange to indicate which automation playlists currently contain automa-
tion.
“volume” in Track View selector displays orange to indicate the presence of automation
“volume” in Automation Lane selector displays orange to indicate the presence of automation
Mixing Enhancements
20
Collaboration Improvements
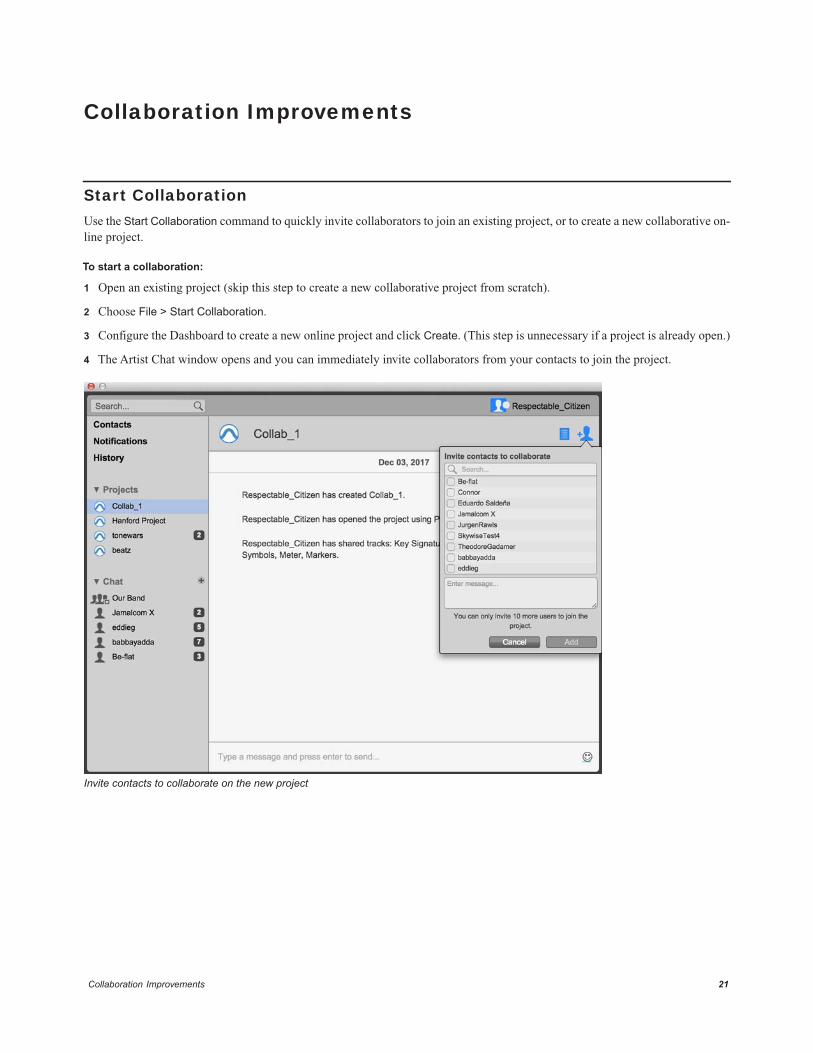
Start CollaborationUse the Start Collaboration command to quickly invite collaborators to join an existing project, or to create a new collaborative on-
line project.
To start a collaboration:
1 Open an existing project (skip this step to create a new collaborative project from scratch).
2 Choose File > Start Collaboration.
3 Configure the Dashboard to create a new online project and click Create. (This step is unnecessary if a project is already open.)
4 The Artist Chat window opens and you can immediately invite collaborators from your contacts to join the project.
Invite contacts to collaborate on the new project
Collaboration Improvements 21

Avid280 N Bernardo Avenue
Mountain View, CA 94043 USA
Technical Support (USA)Visit the Online Support Center
at www.avid.com/support
Product InformationFor company and product information,
visit us on the web at www.avid.com