what is this about?lookout-spiele.de/wp-content/uploads/kolonisten...mayfair games, inc. 8060 st....
TRANSCRIPT
1
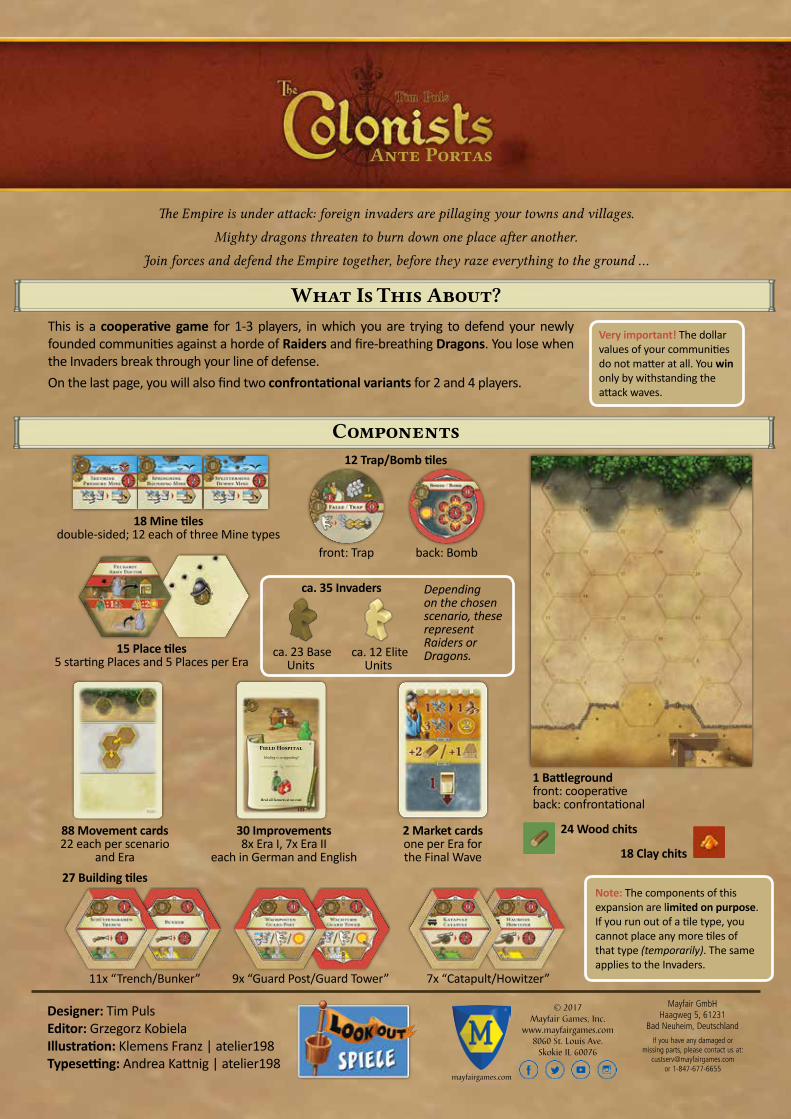
Note: The components of this expansion are limited on purpose. If you run out of a tile type, you cannot place any more tiles of that type (temporarily). The same applies to the Invaders.
Depending on the chosen scenario, these represent Raiders or Dragons.
Designer: Tim PulsEditor: Grzegorz KobielaIllustration: Klemens Franz | atelier198Typesetting: Andrea Kattnig | atelier198
121*
Field HospitalHealing is so appealing!
Heal all farmers at no cost
1 Battleground front: cooperativeback: confrontational
ca. 12 Elite Units
88 Movement cards 22 each per scenario
and Era
30 Improvements 8x Era I, 7x Era II
each in German and English
2 Market cards one per Era for the Final Wave
24 Wood chits
15 Place tiles5 starting Places and 5 Places per Era
18 Mine tiles double-sided; 12 each of three Mine types
12 Trap/Bomb tiles
11x “Trench/Bunker” 9x “Guard Post/Guard Tower” 7x “Catapult/Howitzer”
front: Trap back: Bomb
ca. 35 Invaders
ca. 23 Base Units
27 Building tiles
Ante Portas
The Empire is under attack: foreign invaders are pillaging your towns and villages.
Mighty dragons threaten to burn down one place after another.
Join forces and defend the Empire together, before they raze everything to the ground …
What Is This About?This is a cooperative game for 1-3 players, in which you are trying to defend your newly founded communities against a horde of Raiders and fire-breathing Dragons. You lose when the Invaders break through your line of defense.On the last page, you will also find two confrontational variants for 2 and 4 players.
Components
Very important! The dollar values of your communities do not matter at all. You win only by withstanding the attack waves.
18 Clay chits
If you have any damaged or missing parts, please contact us at:
[email protected] 1-847-677-6655
© 2017Mayfair Games, Inc.
www.mayfairgames.com8060 St. Louis Ave.
Skokie IL 60076
mayfairgames.com
Mayfair GmbHHaagweg 5, 61231
Bad Neuheim, Deutschland

2
Setup 1. Place the Battleground on the table. For the cooperative game, use the side showing numbered hexes. Use the other
side for the confrontational variants.2. Place the (base game) small Market next to the Battleground, and then place the 5 starting Places in this expansion
randomly around the Market (leaving one space empty). This set of tiles is called the Command Center.3. Shuffle the 5 Era I Places that are part of this expansion and place them in a face-down stack near the Command
Center. (You cannot start this expansion in Era II.)4. Choose a scenario (Raiders or Dragons—Dragons are more challenging) and shuffle the corresponding Era I
Movement cards. Place them face down next to the Battleground.5. Set up the Mainland from all base game Places up to and including Era I (according to the base game rules, using two
Markets) , using the "Day Laborer" in place of the "Diplomat".Important! Always keep the Mainland and Command Center separated!
6. Colonies are not used (the ambassadors fled the country).7. The new Improvements replace the base game Improvements with the same number.8. Do not add the new Market cards to the others. They are only used at the end of the game, during the Final Wave
(see page 11).9. You start the game with 3 Farms each (instead of 2), placing two Farmers on your Farms and the third Farmer—as a
Soldier—on your Spawn Point (hex #2).Solo game: You also start with a Forester’s House.
10. Lay out the Goods and Buildings. You start with the usual Goods.
BattlegroundThe Battleground is comprised of 28 numbered hexes (in the cooperative game).
Invaders’ Spawn AreaThis is where the Invaders will spawn according to the top part of the Movement cards.
Defensive WorksAside from your Farmers and Citizens, there are six different Buildings, three types of Mines, as well as Traps and Bombs that you can use to defend yourselves against the Invaders. Buildings allow your Soldiers to carry out special actions.
Spawn PointThis is where your Farmers and Citizens can go to war as Soldiers.
BattleWhenever a troop (i.e., one or more Invaders) runs into your Units (i.e., your Soldiers and Defensive Works), there is a Battle. Compare the total Strength of both sides and take damage accordingly. A Unit’s Strength also represents its amount of health.
SickbaySoldiers wounded in Battle end up in the Sickbay, from where you can send them home and then back onto the Battleground.
Movement CardsThe bottom part of the Movement cards shows how the Invaders will move across the Battleground. Some Movement cards endow the Invaders with Special Powers.
New Invaders
Movement
Special Powers
Strength

3
Changes to Course of Play Unless stated otherwise, the base game rules apply.
Start of a Half-Year At the start of each Half-Year—except during the 1st Winter of an Era—new Invaders will spawn. Turn over two Movement cards from the pile and place the Units shown at the top of the card on the indicated hexes within the Spawn Area (hexes #24-28).
Solo game: Only draw one Movement card. Skip this step during the 1st and 2nd Winter of each Era.
At the start of the 1st Summer of each Era, draw one new Place from the pile and place it in the empty spot at the small Market. At the start of the 2nd and 3rd Summer, add two new Places each to the Command Center, according to the normal placement rules. Decide together where to place the Places, after you spawn new Invaders.
During a Half-YearOnly in a 3-player game: Each player takes only two (not three) turns per Half-Year.
FactoriesIn this expansion, Factories also apply to Money Buildings (i.e., Pubs and Theaters).
FeeIn the cooperative game, you do not pay the Fee when you enter an occupied Place.
ImprovementsWhenever you play an Improvement, you can immediately and irrevocably give the Improvement you play to another player. Only that player carries out its effects. The costs are paid by the active (giving) player.
SlideWhenever you move (or jump) your Steward onto a Market, you can immediately and without taking a Market action “slide” the Steward to an adjacent Place and take that action.Exception: You may not slide to the Place you just left.
TradingAs long as two or more Stewards are at the same Place, their owners may freely trade Goods with each other. Which types (including Dollars and Tools) and quantities (including 0) they trade are up to them. It does not matter where the Goods are coming from (Storage, Warehouse, Buffers). You must place the Goods you receive from another player into your Storage or Warehouse.
Note: At the end of each Year, all players may freely trade with one another (see below).
End of a Half-YearAt the end of each Half-Year, there is a Battle Phase (see next page). In Winter, the Battle Phase happens before the End-of-the-Year items (i.e., before the Starting Player changes).
Skip the "Adding New Places" step, as all Mainland Places have been placed during setup. Consequently, lay out all the Era II Mainland Places at the start of that Era.
During the Sustenance and Production Phase, all players may freely trade Goods with one another (regardless of where your Stewards are). You may sustain your Citizens together (i.e., it does not matter who pays for them). Citizens on the Battleground must be sustained, even if they do not man a Building (otherwise, move them to the Sickbay).
At the end of the game, after one or two Eras, there is a Final Wave (see page 11). The game only ends after you get rid of all Invaders.
Important! You lose the game immediately if an Invader manages to leave the Battleground from any of the bottom five hexes (#1-5).
Example: This card would spawn one Base Unit each on hexes #26 and #27.
Command Center
Market

4
Battle Phase There is a Battle Phase at the end of every Half-Year, in which you draw a Movement card for each hex with Invader troops. Start with the occupied hex with the smallest number and go through the hexes in numerical order.
Moving Troops
The Invaders are moved according to the arrows in the bottom part of the Movement card drawn for them. Some Movement cards will endow the Invaders with Special Powers (see page 9). If an arrow points left or right while the troop is at the far left or right of the Battleground, respectively, the troop simply moves down.
Merging Troops
When a troop ends its Movement on a hex with another troop, both troops merge and will move as one in the future. Otherwise the troop moves through the occupied hex.
Battle
A Battle takes place immediately when the Invaders move onto a hex containing your Units (except on hexes only containing a Trap or Bomb but no Soldiers). Any surviving Invaders will continue Movement according to the remaining arrows on the Movement card. See the next page on how to resolve Battle.
Soldier Actions
At any time during the game, even during Movement or Battle, Soldiers in your Buildings on the Battleground can take certain actions to react to the Invaders. Soldiers can take at most one action each. After taking their action, lay them down to show that they are exhausted. (The available Soldier actions are explained on page 8).
End of Battle Phase
The Battle Phase ends when you have drawn one Movement card for each hex occupied by Invaders. Any exhausted Soldiers are automatically set upright at no cost (and are again available for Solider actions).
Defeat
If at least one Invader moves past the bottom hexes of the Battleground, you all lose the game immediately.
Example: First, the Raider on hex #26 moves to hex #24. Then the two Raiders on hex #27 move through hex #24 to hex #19. If the two Raiders had ended their movement on hex #24, they would have merged with the other Raider.
Example: The Raider on hex #28 is supposed to move right, which it cannot do. So it moves down.
Example: This Movement card has been drawn for the two Dragons on hex #19. At first, they fly onto hex #17 on the right. Then they breathe fire on hex #12, wounding the Farmer on it, before they enter that hex unopposed. Finally, they fly onto hex #9. (See page 10 for details on Dragons.)

5
Resolving BattleFirst, determine the total Strength of your Units and the invading Units. Each Unit has a Strength value which is also the number of health points that Unit has. Basic Units and Farmers have a Strength of 1 each; Elite Units and Citizens have a Strength of 3 each. (Exhausted Soldiers do engage in Battle on their hex.) The Strength values of your Defensive Works are printed on the tiles . A Unit will fall if it takes damage equal to its Strength value. Consider any Special Powers of the Invaders and your Defensive Works (e.g. Traps)!
Note: You can use nearby Catapults, Howitzers, Trenches, and Bunkers to increase your total Strength (see “Soldier Actions” on page 8).
If your total Strength is equal to or greater than the Invaders, all invading Units are removed from the hex and returned to the general supply. Your Units must take damage equal to the total Strength of the fallen Invaders.
If available, a Mine will detonate first, unless you want your Soldiers to take the damage instead (e.g., in order to not waste a Dummy Mine on a Basic Unit).
Then you must wound as many Soldiers as possible (see first example).
Citizens do not take any damage of 2 or lower (absorbing the damage). If there are Farmers or Mines on the hex, they must take damage first before the Citizen will absorb the remaining damage (see second example).
Buildings do not take damage until all Soldiers are removed from the hex. Bunkers withstand the attack if the remaining damage is 2 or lower (absorbing the damage).
Traps and Bombs do not take damage. They can only be removed via certain Special Powers (see page 9).
If your total Strength is lower, remove all of your Units—except Traps, and Bombs that you did not fire—from the hex (including Buildings and Mines). The Invaders take damage equal to your total Strength. Elite Units are like Citizens in this regard: they absorb any damage lower than 3.
Removed Soldiers are wounded and placed in the Sickbay; removed Buildings and Mines are returned to the general supply. If possible, you may replace a removed Mine via a Soldier action (see page 8).
Example: Up to 5 Basic Units move from hex #12 onto hex #7. Your total Strength is 4 (=3+1+0).
1 Basic Unit—the Farmer gets wounded.
2 Basic Units—the Farmer gets wounded; the Citizen absorbs the remaining damage.
3 Basic Units—the Citizen gets wounded; the Farmer does not.
4 Basic Units—both Soldiers get wounded; the Guard Post prevails.
5 Basic Units— the Soldies get wounded and the Guard Post gets destroyed. Four Basic Units are removed from the hex; the remaining one can move on.
Example: Up to 5 Basic Units move from hex #12 onto hex #7. Your total Strength is 5 (=3+2).
1 or 2 Basic Units—the Mine explodes.
3 Basic Units—choose one: either the Mine explodes and the Citizen absorbs the remaining damage, or the Citizen is wounded and the Mine prevails.
4 Basic Units—the Mine explodes; the Citizen absorbs the remaining damage.
5 Basic Units—the Mine explodes and the Citizen gets wounded.
1-5
1-5
=
=

6
New Places and Actions
Recruiting OfficerAt the Recruiting Officer, you must choose one of two actions:
Enlist
Move any number of unemployed Farmers and Citizens from Residences on your Community board to the Spawn Point (hex #2). Newly enlisted Citizens must be sustained immediately by the active player. You may not enlist other players’ Colonists.
Note: If your Spawn Point is occupied by Invaders, enlisting new Soldiers will immediately result in Battle.
Discharge
Move any number of Soldiers from hexes anywhere on the Battleground into free Residences on your Community board. It does not matter whether or not the Colonists you discharge have originally been yours. You may not discharge Soldiers into other players’ Residences.
Important! You cannot have more Colonists on your Community board than you can support with your Residences. (Colonists working in your Community require a free space “at home”!)
CommanderAt the Commander, you must choose one of two actions:
Deploy
Move any number of Mobile Units (Soldiers, Catapults, and Howitzers) on the Battleground one hex each. You have access to all Mobile Units, regardless of who provided them originally. You may move single Units or groups of Units. (You do not have to move all Units.) Each Unit can be moved at most once per action. Exhausted Soldiers cannot be moved. If you move one or more Units onto a hex with Invaders, this will immediately result in Battle.
Note: No hex may contain more than one Defensive Work. Therefore, you may not move Catapults and Howitzers on hexes that are already occupied by a Defensive Work. However, using the Supreme Commander (see below), you may move them through hexes with Defensive Works.
Rotate
Rotate any number of Buildings on the Battleground by 60° clockwise or counter-clockwise (i.e., one position to the left or right). This will change the direction their arrows are facing.
Supreme CommanderThe Supreme Commander works much like the Commander, allowing you to either move each Unit up to two hexes or rotate each Building by up to 120° (i.e., two positions left or right). If moving Units results in Battle, your total Strength will be increased by 1 for that Battle. The surviving Units may move on if they have not moved two hexes yet.
Army DoctorAt the Army Doctor, you must choose one of two actions:
Heal
Heal any number of Soldiers in the Sickbay, returning them to any free Residences (not necessarily your own). No player may receive more Colonists from this than they can support with their Residences (see also “Discharge”). Healing a Farmer costs 1 Food; healing a Citizen costs 2 Dollars. The cost must be paid by the active (healing) player.
Set Upright
Set any number of exhausted Soldiers upright so they can take Soldier actions again (see page 8). Setting a Farmer upright costs 1 Food; setting a Citizen upright costs 2 Dollars. Note that exhausted Soldiers are set upright at no cost at the end of every Battle Phase. This action can help you the most during the Final Wave (see page 11).
7
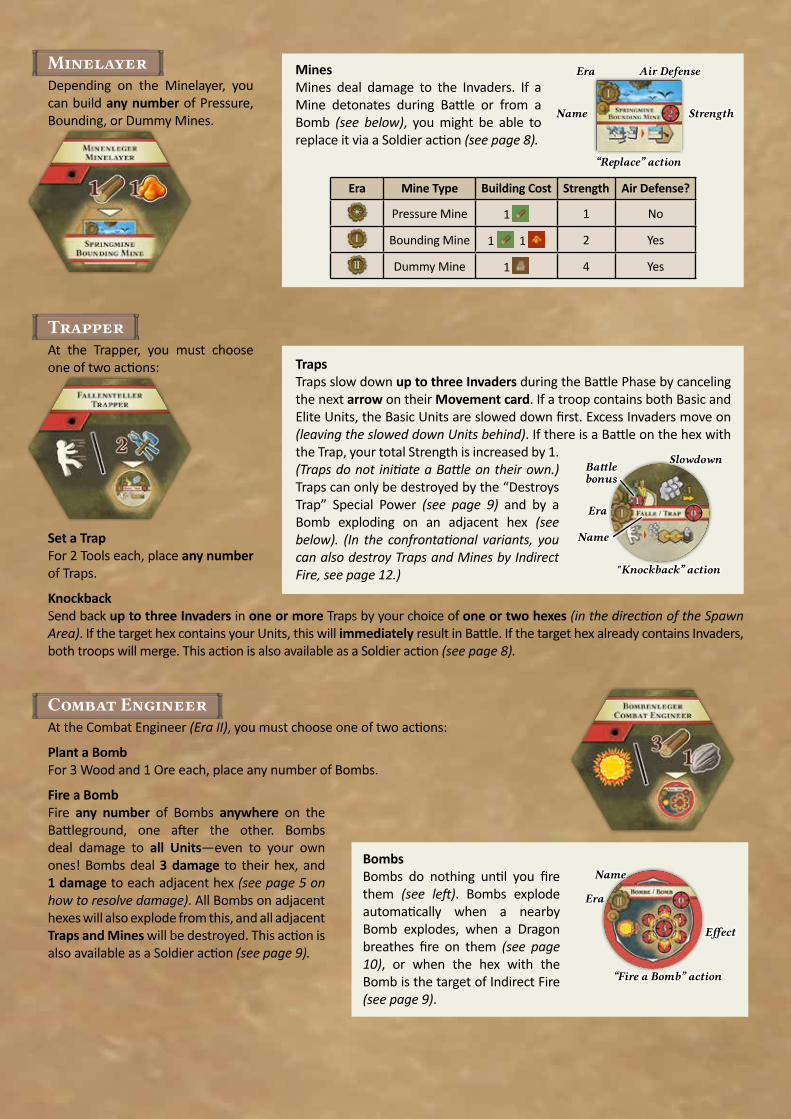
MinelayerDepending on the Minelayer, you can build any number of Pressure, Bounding, or Dummy Mines.
TrapperAt the Trapper, you must choose one of two actions:
Set a TrapFor 2 Tools each, place any number of Traps.
KnockbackSend back up to three Invaders in one or more Traps by your choice of one or two hexes (in the direction of the Spawn Area). If the target hex contains your Units, this will immediately result in Battle. If the target hex already contains Invaders, both troops will merge. This action is also available as a Soldier action (see page 8).
Combat EngineerAt the Combat Engineer (Era II), you must choose one of two actions:
Plant a BombFor 3 Wood and 1 Ore each, place any number of Bombs.
Fire a BombFire any number of Bombs anywhere on the Battleground, one after the other. Bombs deal damage to all Units—even to your own ones! Bombs deal 3 damage to their hex, and 1 damage to each adjacent hex (see page 5 on how to resolve damage). All Bombs on adjacent hexes will also explode from this, and all adjacent Traps and Mines will be destroyed. This action is also available as a Soldier action (see page 9).
TrapsTraps slow down up to three Invaders during the Battle Phase by canceling the next arrow on their Movement card. If a troop contains both Basic and Elite Units, the Basic Units are slowed down first. Excess Invaders move on (leaving the slowed down Units behind). If there is a Battle on the hex with the Trap, your total Strength is increased by 1. (Traps do not initiate a Battle on their own.) Traps can only be destroyed by the “Destroys Trap” Special Power (see page 9) and by a Bomb exploding on an adjacent hex (see below). (In the confrontational variants, you can also destroy Traps and Mines by Indirect Fire, see page 12.)
MinesMines deal damage to the Invaders. If a Mine detonates during Battle or from a Bomb (see below), you might be able to replace it via a Soldier action (see page 8).
Era Mine Type Building Cost Strength Air Defense?
Pressure Mine 1 1 No
Bounding Mine 1 1 2 Yes
Dummy Mine 1 4 Yes
StrengthName
“Replace” action
Air DefenseEra
Battle bonus
Name
Slowdown
"Knockback” action
Era
BombsBombs do nothing until you fire them (see left). Bombs explode automatically when a nearby Bomb explodes, when a Dragon breathes fire on them (see page 10), or when the hex with the Bomb is the target of Indirect Fire (see page 9).
Effect
Name
“Fire a Bomb” action
Era
8
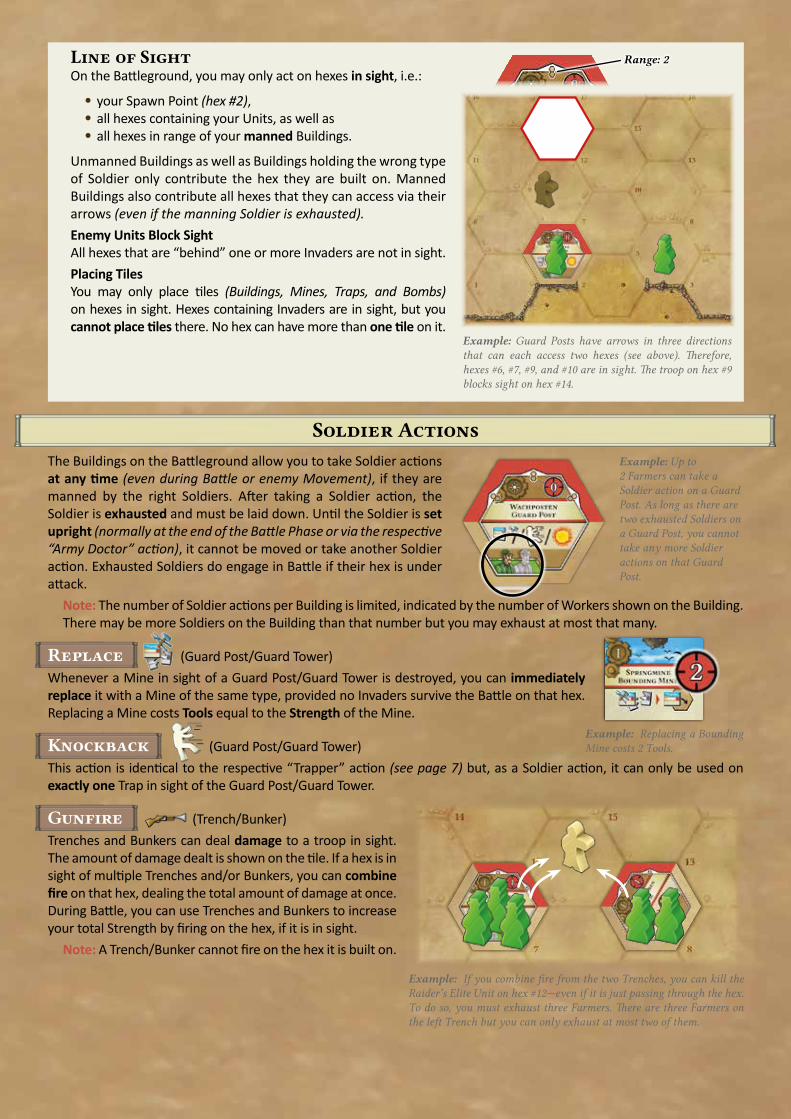
Line of SightOn the Battleground, you may only act on hexes in sight, i.e.:
your Spawn Point (hex #2), all hexes containing your Units, as well as all hexes in range of your manned Buildings.
Unmanned Buildings as well as Buildings holding the wrong type of Soldier only contribute the hex they are built on. Manned Buildings also contribute all hexes that they can access via their arrows (even if the manning Soldier is exhausted).Enemy Units Block SightAll hexes that are “behind” one or more Invaders are not in sight.Placing TilesYou may only place tiles (Buildings, Mines, Traps, and Bombs) on hexes in sight. Hexes containing Invaders are in sight, but you cannot place tiles there. No hex can have more than one tile on it.
Soldier Actions The Buildings on the Battleground allow you to take Soldier actions at any time (even during Battle or enemy Movement), if they are manned by the right Soldiers. After taking a Soldier action, the Soldier is exhausted and must be laid down. Until the Soldier is set upright (normally at the end of the Battle Phase or via the respective “Army Doctor” action), it cannot be moved or take another Soldier action. Exhausted Soldiers do engage in Battle if their hex is under attack.
Note: The number of Soldier actions per Building is limited, indicated by the number of Workers shown on the Building. There may be more Soldiers on the Building than that number but you may exhaust at most that many.
Replace (Guard Post/Guard Tower)Whenever a Mine in sight of a Guard Post/Guard Tower is destroyed, you can immediately replace it with a Mine of the same type, provided no Invaders survive the Battle on that hex. Replacing a Mine costs Tools equal to the Strength of the Mine.
Knockback (Guard Post/Guard Tower)This action is identical to the respective “Trapper” action (see page 7) but, as a Soldier action, it can only be used on exactly one Trap in sight of the Guard Post/Guard Tower.
Gunfire (Trench/Bunker)Trenches and Bunkers can deal damage to a troop in sight. The amount of damage dealt is shown on the tile. If a hex is in sight of multiple Trenches and/or Bunkers, you can combine fire on that hex, dealing the total amount of damage at once. During Battle, you can use Trenches and Bunkers to increase your total Strength by firing on the hex, if it is in sight.
Note: A Trench/Bunker cannot fire on the hex it is built on.
Example: Replacing a Bounding Mine costs 2 Tools.
Example: If you combine fire from the two Trenches, you can kill the Raider’s Elite Unit on hex #12—even if it is just passing through the hex. To do so, you must exhaust three Farmers. There are three Farmers on the left Trench but you can only exhaust at most two of them.
Example: Up to 2 Farmers can take a Soldier action on a Guard Post. As long as there are two exhausted Soldiers on a Guard Post, you cannot take any more Soldier actions on that Guard Post.
Range: 2
Example: Guard Posts have arrows in three directions that can each access two hexes (see above). Therefore, hexes #6, #7, #9, and #10 are in sight. The troop on hex #9 blocks sight on hex #14.

9
Indirect Fire (Catapult/Howitzer)Indirect Fire is like Gunfire. Additionally, Catapults and Howitzers can attack hexes blocked from sight that are accessible via their arrows (firing over the Invaders’ heads). If Indirect Fire hits a hex containing a Bomb, the Bomb will explode (see page 7).
Fire a Bomb (Guard Post/Guard Tower)This action is identical to the respective “Combat Engineer” action (see page 7) but, as a Soldier action, it can only be used on exactly one Bomb in sight of the Guard Post/Guard Tower (which can and will explode adjacent Bombs).
Important! When a Bomb blows up, it deals damage to both enemy and friendly Units! Use Bombs with caution.
Example: You may use the Catapult on hex #6 against hex #11 or #16.
Special Powers If a Special Power or part of it is not applicable, simply ignore it or that part, respectively.
Raiders
Press Ahead
R116, R216The troop moves 4/3/2/1/0 hexes if it contains 1/2/3/4/5+ Units.
Shoot
R107, R207Before the troop moves, it deals 1 damage* to the target hexes.*Note! If you cannot apply this damage
immediately, it will be applied during Battle (increasing the troop’s total Strength by 1).
Killed by Citizens
R122, R222If the troop moves onto a hex with a Citizen, it is immediately removed without Battle.
Regroup
R202, R209Exchange the indicated Units in the troop (from the general supply; only once per Movement card).
Increase Troop Size
R109, R113, R213Add the indicated Units to the troop (from the general supply).
Merge Troops
R106, R206Move the troop to the smallest-numbered hex containing another troop (the troop can and will retreat, if need be).
Remove Citizens
R121, R222Before Battle, move all Citizens from the hex to the Sickbay.
Weaker
R116, R216During Battle, the total Strength of the troop will be decreased by the indicated value.
Stronger
R117, R217, R221During Battle, the total Strength of the troop will be increased by the indicated value.
Destroy Trap
R111, R211The troop immediately destroys any Trap it moves to or starts from.
Decrease in Trap
R120, R220If the troop moves onto a hex with a Trap, immediately remove 1 Basic Unit from it.
10
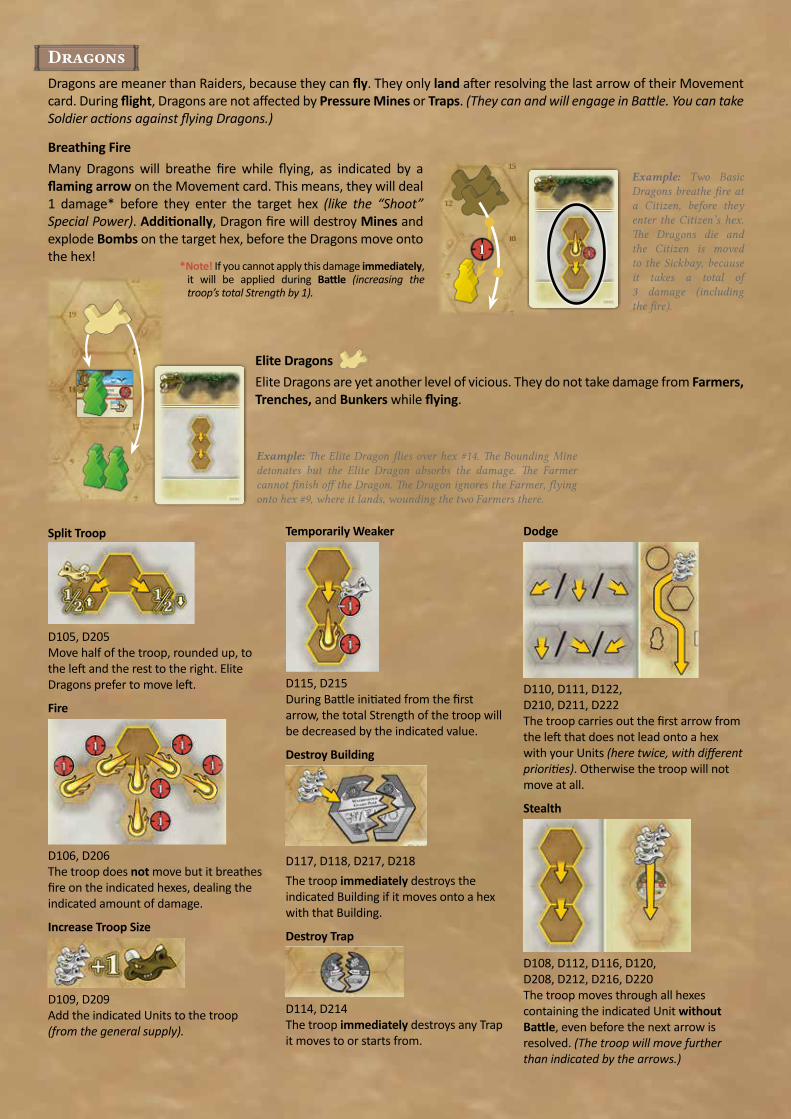
DragonsDragons are meaner than Raiders, because they can fly. They only land after resolving the last arrow of their Movement card. During flight, Dragons are not affected by Pressure Mines or Traps. (They can and will engage in Battle. You can take Soldier actions against flying Dragons.)
Breathing Fire Many Dragons will breathe fire while flying, as indicated by a flaming arrow on the Movement card. This means, they will deal 1 damage* before they enter the target hex (like the “Shoot” Special Power). Additionally, Dragon fire will destroy Mines and explode Bombs on the target hex, before the Dragons move onto the hex!
Elite Dragons Elite Dragons are yet another level of vicious. They do not take damage from Farmers, Trenches, and Bunkers while flying.
Example: The Elite Dragon flies over hex #14. The Bounding Mine detonates but the Elite Dragon absorbs the damage. The Farmer cannot finish off the Dragon. The Dragon ignores the Farmer, flying onto hex #9, where it lands, wounding the two Farmers there.
*Note! If you cannot apply this damage immediately, it will be applied during Battle (increasing the troop’s total Strength by 1).
Example: Two Basic Dragons breathe fire at a Citizen, before they enter the Citizen’s hex. The Dragons die and the Citizen is moved to the Sickbay, because it takes a total of 3 damage (including the fire).
Dodge
D110, D111, D122,D210, D211, D222The troop carries out the first arrow from the left that does not lead onto a hex with your Units (here twice, with different priorities). Otherwise the troop will not move at all.
Stealth
D108, D112, D116, D120,D208, D212, D216, D220The troop moves through all hexes containing the indicated Unit without Battle, even before the next arrow is resolved. (The troop will move further than indicated by the arrows.)
Temporarily Weaker
D115, D215During Battle initiated from the first arrow, the total Strength of the troop will be decreased by the indicated value.
Destroy Building
D117, D118, D217, D218The troop immediately destroys the indicated Building if it moves onto a hex with that Building.
Destroy Trap
D114, D214The troop immediately destroys any Trap it moves to or starts from.
Split Troop
D105, D205Move half of the troop, rounded up, to the left and the rest to the right. Elite Dragons prefer to move left.
Fire
D106, D206The troop does not move but it breathes fire on the indicated hexes, dealing the indicated amount of damage.
Increase Troop Size
D109, D209Add the indicated Units to the troop (from the general supply).

11
Final Wave The game ends after one or two Eras (i.e., after the final Production Phase) with a special Battle Phase, the so-called Final Wave. The Final Wave goes over several Battle Rounds and ends in one of two ways—either you defeat all Invaders or you lose.
Important! The Final Wave only happens at the very end of the game and not after every Era.
PreparationsMove your Stewards from the Mainland to the Market in the Command Center. During the Final Wave, you may only visit the Command Center Places. (You can remove the Mainland.)Place the appropriate new Market card on the table (depending on the number of Eras you played), for the entire duration of the Final Wave.
Battle RoundsThe Final Wave goes over several Battle Rounds, comprised of the following steps:
1. Spawn Invaders: At the start of the first few Battle Rounds, new Invaders will spawn—the same as at the start of a Half-Year. (Draw one Movement card in the solo game; otherwise draw two.) The following table shows for how many Battle Rounds new Invaders will spawn:
2. Move Invaders: Carry out the steps of a regular Battle Phase—the same as at the end of a Half-Year. (Draw one Movement card per troop and carry it out, including Battle.)
Note: The entire Final Wave is one big Battle Phase. Exhausted Soldiers will not be set upright at no cost after this step! To set them upright, during step 3, you should take the respective Army Doctor action. (Having spare Food and Dollars is crucial for the Final Wave, and not just to heal wounded Soldiers.)
3. Take an Action: After all troops have moved, it is your turn to react to the Invaders. Decide together which Steward will take exactly one turn.
Note: During this step, you take exactly one turn total—not one turn per player!Then proceed with the next Battle Round. (During the Final Wave, you do not have to sustain Citizens.) Once you defeat all Invaders on the Battleground, when no more would spawn, you win.
VariantsTo increase the challenge, you may try out one of the following two Final Wave variants:
All Dead: In this variant, during the Final Wave, remove any defeated Invaders from the game. Carry out step 1 in every Battle Round (and not just in the first 2-4 Battle Rounds) until you run out of Basic or Elite Units. Once you defeat all Invaders on the Battleground, when no more would spawn, you win.
Crescendo: In this variant, increase the number of Movement cards drawn during step 1 by one from one Battle Round to the next, starting with one Movement card (regardless of the number of players) in step 1 of the first Battle Round (then two cards in Round 2, three cards in Round 3, etc.). Try to survive the increasing waves as long as possible. Once all Basic Units are on the Battleground, skip step 1 of all subsequent Battle Rounds. You win when you defeat all Invaders once all Basic Units are on the Battleground.
Twice as Strong To increase the challenge with two or three players, you can try the following variant:
Always draw just one Movement card at the start of each Half-Year (except the 1st Winter of an Era). In return, every Basic Unit will have a Strength of 2; every Elite Unit will have a Strength of 6. (Consequently, only half as many Units will spawn but each Unit will be twice as strong.)
In a 3-player game, you can go one step further: Draw two Movement cards to spawn new Invaders as normal. The Invaders will still be twice as strong (Basic Unit 2, Elite Unit 6). In return, every player may take the usual three turns per Half-Year. (You will take 50% more actions, but the Invaders will be twice as strong.)
# of Players 1 2 3
# of Battle Rounds with new Invaders
2 3 4
=
=

12
Confrontational VariantsYou can also use the components from this expansion to play against each other with two or four players (in teams of two). Decide before the game which goal shall determine the winning team:Capture the FlagYour team wins when you manage to move a Unit over the opposite edge of the Battleground (as in the cooperative game). If the game ends before any team accomplishes this goal, the team whose Mobile Units have advanced the furthest wins (compare the Units row by row).Area ControlThe team controlling the most hexes at game end wins. You control every hex in sight that is not in sight of the other team. In case of a tie, no team wins.
Preparations Turn the Battleground to the side showing unnumbered hexes and place it between the two teams.
In a 4-player game: The teams should sit opposite of each other. Play alternates between the two teams and, within a team, between the two players of that team. In Capture the Flag, your Spawn Point is on the edge. In Area Control, your Spawn Points are closer together.
One team uses the Farmers and Citizens from the base game as usual; instead, the second team uses the Basic and Elite Units from this expansion (in place of Farmers and Citizens, respectively). Limit the first team to the same number of Farmers and Citizens as there are Basic and Elite Units.
Each player starts with an additional Hunting Lodge and the usual three (!) Farms.
General RulesApply all rules of the cooperative game as completely as possible. There is no Battle Phase or Final Wave. Leave the Movement and new Market cards in the game box.
Building limit: The number of base game Buildings is limited. Defensive Works: Build your Defensive Works such that their name tags face you. If you rotate a Building, you must simply remember it was your Building (usually you will have it manned anyway).
Exhausted Soldiers: At the start of your first turn in a Half-Year, set your team’s exhausted Soldiers upright at no cost. (This applies to each player individually.)
Fee: You must pay the other team’s Stewards. Improvements: You may give a newly played Improvement to your teammate. Indirect Fire: Your Catapults and Howitzers will destroy enemy Traps and Mines (regardless of Strength) when firing at a hex containing them.
Maximum troop size: No player may have more than 6 Soldiers on any given hex. Mobile Units: When you move a Mobile Unit, you may move the manning Soldier with it, even if the Soldier is exhausted. If the Soldier is not exhausted, he will not be exhausted from this.
Moving is exhausting: Whenever you move Soldiers on the Battleground, you must exhaust them when the movement is complete. Consequently, each Soldier may only move once per player, unless you pay at the Army Doctor to set him upright.
New Places: The new Places are added by the current Starting Player. Slowdown: In enemy Traps, the active team decides which of their Units get slowed down. Spawn Points: You may move Units onto the other team’s Spawn Point to initiate Battle. However, if you do not leave the other team’s Spawn Point until the end of your three turns, your Units will be moved to the Sickbay. In other words, your Spawn Points will always be free of enemies at the start of your turns.
Trading: The cooperative trading rules apply to the members of a team. Wounding Soldiers: The team defeated in Battle decides which Soldiers of the winning team will be wounded.
Keep in mind: You can take Soldier actions at any time, even on another player’s turn (even during Movement or Battle).
=
=