webdt device manager - dt research™ · webdt device manager (wdm) ... configure tftp first and...
TRANSCRIPT

WebDT Device ManagerVersion 2.1
User Manual
WebDT Device Manager2
ContentsChapter 1 Getting Started .....................................................................................6
1.1 Overview .......................................................................................................61.2 Features ........................................................................................................61.3 Network Connection Overview ...................................................................71.4 System Requirements .................................................................................8
1.4.1 Hardware Requirements ..................................................................... 81.4.2 Software Requirements ...................................................................... 8
1.5 Install WebDT Device Manager ...................................................................81.5.1 Installation Considerations ................................................................ 81.5.2 Install Application ............................................................................... 91.5.3 Upgrade from WDM2.0 to WDM2.1 .................................................... 131.5.4 Configuration Tool .............................................................................. 161.5.5 Install WDM Edge Server .................................................................... 161.5.6 Register WDM Edge Server ................................................................ 201.5.7 Register WebDT Client Agent ............................................................ 21
1.6 Launch the WebDT Device Manager ..........................................................23Login .............................................................................................................. 23Change Password ......................................................................................... 24
1.7 The WDM Interface .......................................................................................251.7.1 Main Menu ........................................................................................... 25
Devices Menu ..................................................................................... 25Entities Menu ...................................................................................... 26Tasks Menu ......................................................................................... 26System Menu ...................................................................................... 26
1.7.2 Toolbar ................................................................................................. 271.7.3 List Window ......................................................................................... 271.7.4 Display Window .................................................................................. 27
Chapter 2 Working with Devices ..........................................................................282.1 Group Management .....................................................................................28
2.1.1 Manage Groups ................................................................................... 28Create New Groups ............................................................................ 28Modify Group Information ................................................................. 29Delete Groups .................................................................................... 29Apply Profile to a Group .................................................................... 29
2.1.2 Manage Clients .................................................................................... 29Assign Devices to Groups ................................................................ 30Move Devices to Other Groups ....................................................... 30Extract Setting from Client ................................................................ 31Apply Setting from Client .................................................................. 31
WebDT Device Manager 3
Apply Setting from Profile ................................................................. 32Bind PXE/IPXE OS ............................................................................. 33Set Power On/Off Schedule .............................................................. 33Remotely Control Devices and View Info ........................................ 34Reboot / Power Off / Power On Devices .......................................... 37Remove Devices ............................................................................... 37
2.1.3 Set Privilege ........................................................................................ 382.2 Network Hierarchy .......................................................................................39
2.2.1 Manage Client Agents ......................................................................... 39Set Server Preference ........................................................................ 41
2.3 Search for Devices .......................................................................................422.3.1 Simple Search ..................................................................................... 422.3.2 Advanced Search ................................................................................ 42
Chapter 3 Files .......................................................................................................443.1 File Management ..........................................................................................44
3.1.1 Manage Folders ................................................................................... 45Create New Folders ........................................................................... 45Modify Folder Information ................................................................. 45Delete Folders .................................................................................... 45Move Folders ...................................................................................... 45
3.1.2 Manage Files ....................................................................................... 46Add Files to Folders .......................................................................... 46Copy Files ........................................................................................... 47Download Files ................................................................................... 48Modify Files ........................................................................................ 49Delete Files ......................................................................................... 49Move Files ........................................................................................... 49
3.2 Profile Management ......................................................................................503.2.1 Manage Profile .................................................................................... 50
Connection of Profile setting ............................................................ 50Connection from Microsoft RDP ...................................................... 51Connection from Citrix ICA ............................................................... 51Connection from VMWare VDI .......................................................... 52Network ............................................................................................... 53Wired network .................................................................................... 53Wireless network ............................................................................... 53Proxy Network .................................................................................... 54Homepage ........................................................................................... 54Display ................................................................................................ 55Sound .................................................................................................. 55Region/Time ....................................................................................... 55
WebDT Device Manager4
3.2.2 Delete the Profile .................................................................................. 561. On the main menu, click Profile Management. ............................. 56
3.3 PXE OS Management ....................................................................................57New PXE OS ...................................................................................... 57Download PXE OS ............................................................................. 57Modify PXE OS ................................................................................... 57Delete PXE OS .................................................................................... 57Move PXE OS ..................................................................................... 58
4.1 Task Management ........................................................................................59Chapter 4 Managing Tasks ...................................................................................59
4.1.1 Manage Folders ................................................................................... 60Create New Folders ........................................................................... 60Modify Folder Information ................................................................. 60Delete Folders .................................................................................... 60Move Folders ...................................................................................... 60
4.1.2 Manage Tasks ...................................................................................... 614.1.2.1 Create New Tasks .................................................................. 61Set Task Schedule ............................................................................. 61Set Task Commands .......................................................................... 63Arrange Command Sequence ........................................................... 71Delete Commands .............................................................................. 72Modify Commands ............................................................................. 72Assign Tasks to Devices ................................................................... 724.1.2.2 Modify Tasks ......................................................................... 734.1.2.3 Delete Tasks .......................................................................... 734.1.2.4 Refresh Tasks ........................................................................ 744.1.2.5 Move Tasks ............................................................................ 74
4.2 Task Monitor .................................................................................................754.2.1 Monitor By Clients .............................................................................. 754.2.2 Monitor By Tasks ................................................................................ 76
5.1 Account Management ..................................................................................775.1.1 Create New Accounts ......................................................................... 77
Chapter 5 Other Settings ......................................................................................775.1.2 Change Account Password ................................................................ 785.1.3 Modify Accounts ................................................................................. 795.1.4 Delete Accounts .................................................................................. 795.1.5 Refresh Accounts ............................................................................... 79
5.2 Role Management ........................................................................................805.2.1 WDM Role Management ..................................................................... 80
5.2.1.1 Create Roles .......................................................................... 805.2.1.2 Delete Roles .......................................................................... 81
WebDT Device Manager 5
5.2.1.3 Refresh Roles ........................................................................ 815.2.1.4 Assign Account to WDM Role .............................................. 81
5.2.2 Action Directory (AD) Role Management .......................................... 825.2.2.1 Import Roles .......................................................................... 825.2.2.2 Synchronize Roles ................................................................ 835.2.2.3 Delete Roles .......................................................................... 835.2.2.4 Refresh Roles ........................................................................ 835.2.2.5 See AD Role Account ........................................................... 83
5.3 System Setting .............................................................................................845.3.1 Convert Accounts to AD System ....................................................... 845.3.2 Detach Accounts from AD System .................................................... 84
6.1 Open WDM Configuration Tool ...................................................................85Chapter 6 Configuration Tool ...............................................................................85
6.2 WDM HTTP Server .......................................................................................866.2.1 General Page ....................................................................................... 866.2.2 SSL Page ............................................................................................. 876.2.3 Connection Page ................................................................................. 886.2.4 Others Page ......................................................................................... 89
6.3 Database .......................................................................................................896.3.1 Connection Page ................................................................................. 906.3.2 Parameters Page ................................................................................. 916.3.3 Reinitialize Page .................................................................................. 926.3.4 PostgreSQL Settings Page ................................................................ 92
6.4 VNC Repeater ...............................................................................................93

WebDT Device Manager6
1 Chapter 1 Getting Started
1.1 OverviewWebDT Device Manager (WDM) allows you to completely manage, control, and update all your client devices at remote sites via network. With its efficient network management capabilities, you can remotely control and manage individual devices or groups of devices. Its web-based browser interface is intuitive and easy to use.
WDM provides comprehensive user account and system administration. You can set up access rights and assign privileges to user.
WDM supports flexible scheduling management. You can group appliances and schedule tasks or programs for deployment to a particular appliance or group. You can also customize commands to suit different applications.
1.2 Features• Automatically detects edge servers and devices in the same LAN• Includes powerful components like Java, Tomcat Web Server, PostgreSQL
database, and VNC• Built-in config tool compatible with other database like, Oracle, MS SQL, and
MySQL• Scales up to multiple web servers• Supports multiple web browsers like Internet Explorer, Firefox, Chrome, and Safari• Updates OS/BIOS from Device Manager, FTP, HTTP server, USB, or network drive• Downloads/Uploads files between devices and server/FTP• Power on/off devices by Real Time Clock and Wake On LAN• Collects device software and hardware information• Groups multiple commands into tasks• Task monitoring
WebDT Device Manager 7
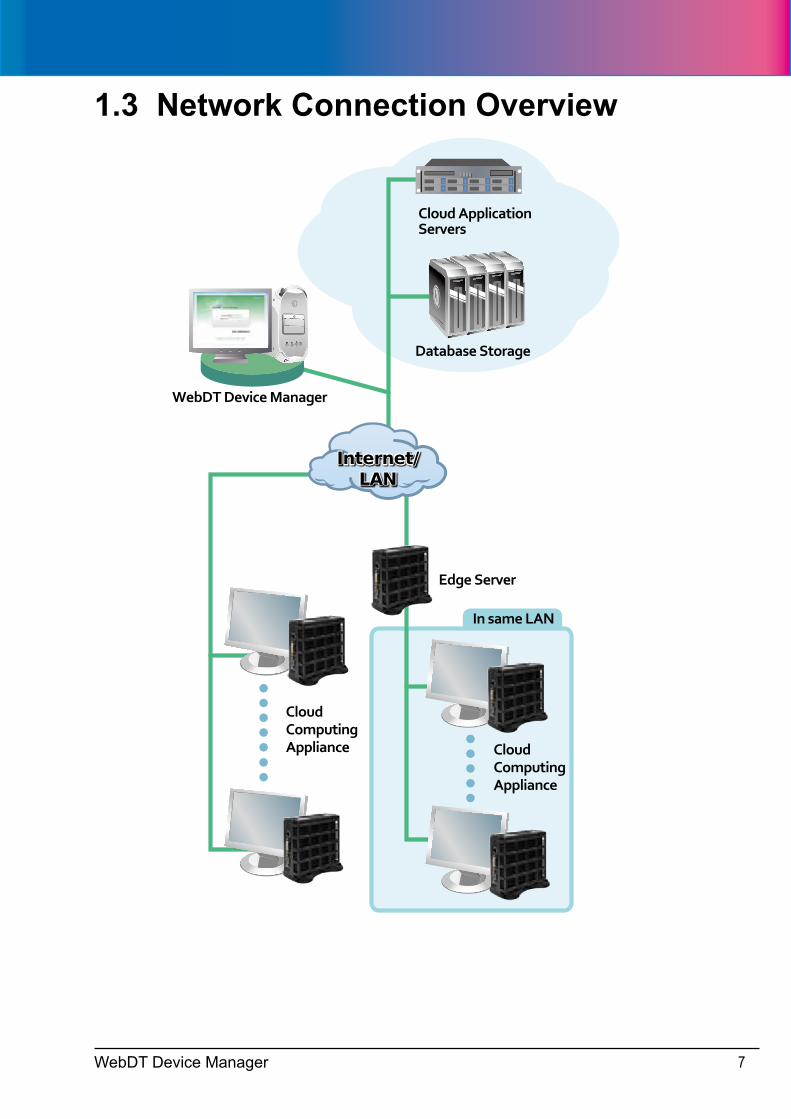
1.3 Network Connection Overview
Internet/LAN
WebDT Device Manager8
1.4 System RequirementsBefore you install and run WebDT Device Manager (WDM Server and Edge Server), make sure your computer meets the system requirements.
1.4.1 Hardware Requirements → 4GB DDR3 DRAM or above
→ Intel Core i3 or above
→ 100Mbit or above Ethernet Adapter or above
→ At least 512GB free hard drive space
1.4.2 Software RequirementsYour computer must have either of the following operating systems and all the listed applications installed.
→ Windows Server 2008 Standard/Enterprise Edition, Windows 7 Ultimate
→ NTFS server file system
→ Windows Java Development Kit (JDK) 1.6 or later (download from http://www.java.com/en/download/index.jsp)
→ One of these browsers: Internet Explorer 8.0/ 9.0, Firefox 5.0/6.0, Chrome 12, and Safari 5.0
Note: The WDM Server system cannot be installed on an AD server.
1.5 Install WebDT Device Manager1.5.1 Installation ConsiderationsBefore installing WebDT Device Manager (WDM), make sure you have the following:
→ Make sure your computer meets the hardware and software requirements.
→ Login in with an administrator account on your local server on which you want to install WDM.
→ Disable the computer anti-virus application. Re-enable it again after installation
→ If installing WDM on a computer with a database server, you may be prompted to enter your service account ID and password.
WebDT Device Manager 9
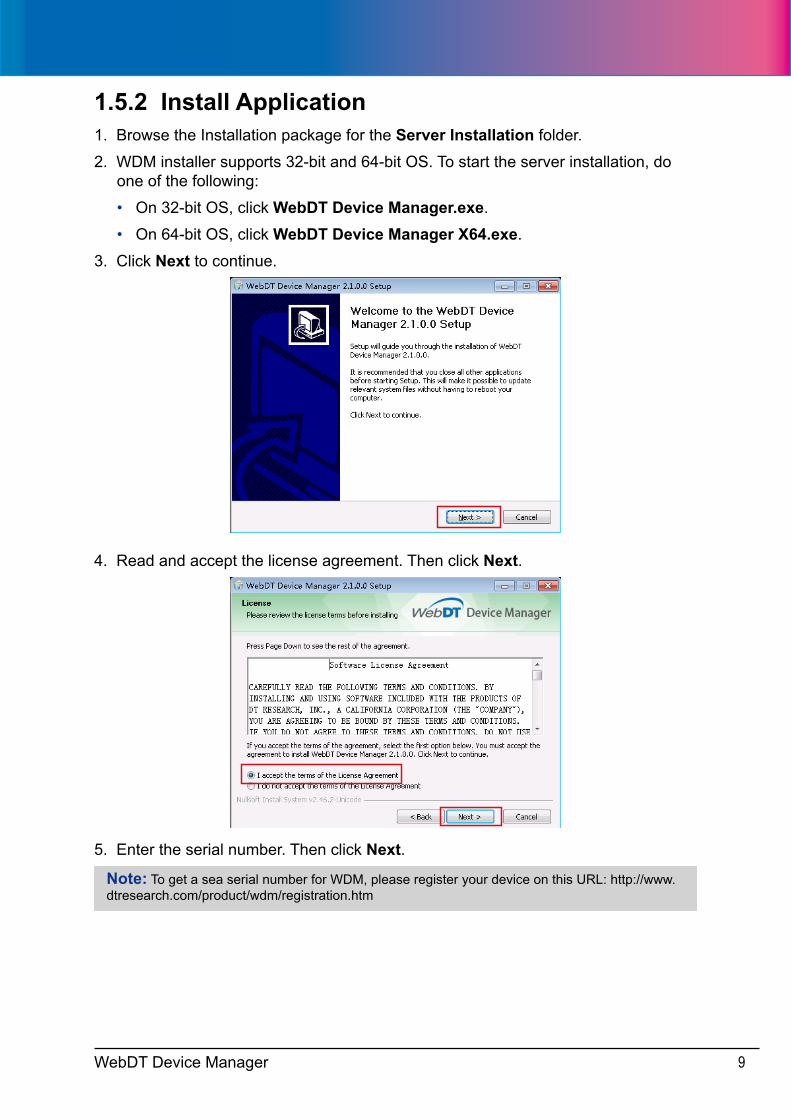
1.5.2 Install Application1. Browse the Installation package for the Server Installation folder.
2. WDM installer supports 32-bit and 64-bit OS. To start the server installation, do one of the following:
• On 32-bit OS, click WebDT Device Manager.exe.
• On 64-bit OS, click WebDT Device Manager X64.exe.
3. Click Next to continue.
4. Read and accept the license agreement. Then click Next.
5. Enter the serial number. Then click Next.
Note: To get a sea serial number for WDM, please register your device on this URL: http://www.dtresearch.com/product/wdm/registration.htm
WebDT Device Manager10
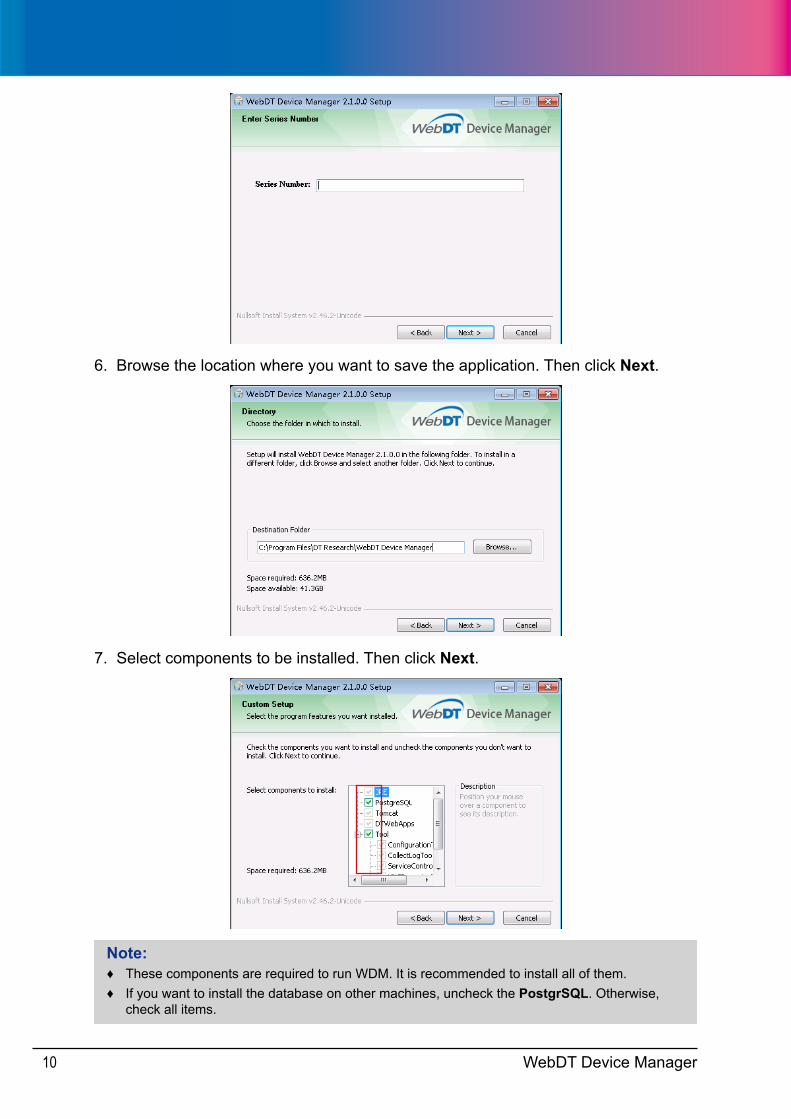
6. Browse the location where you want to save the application. Then click Next.
7. Select components to be installed. Then click Next.
Note: ♦ These components are required to run WDM. It is recommended to install all of them. ♦ If you want to install the database on other machines, uncheck the PostgrSQL. Otherwise,
check all items.

WebDT Device Manager 11
8. If tftp component under Tool is checked, configure tftp first and click Next.
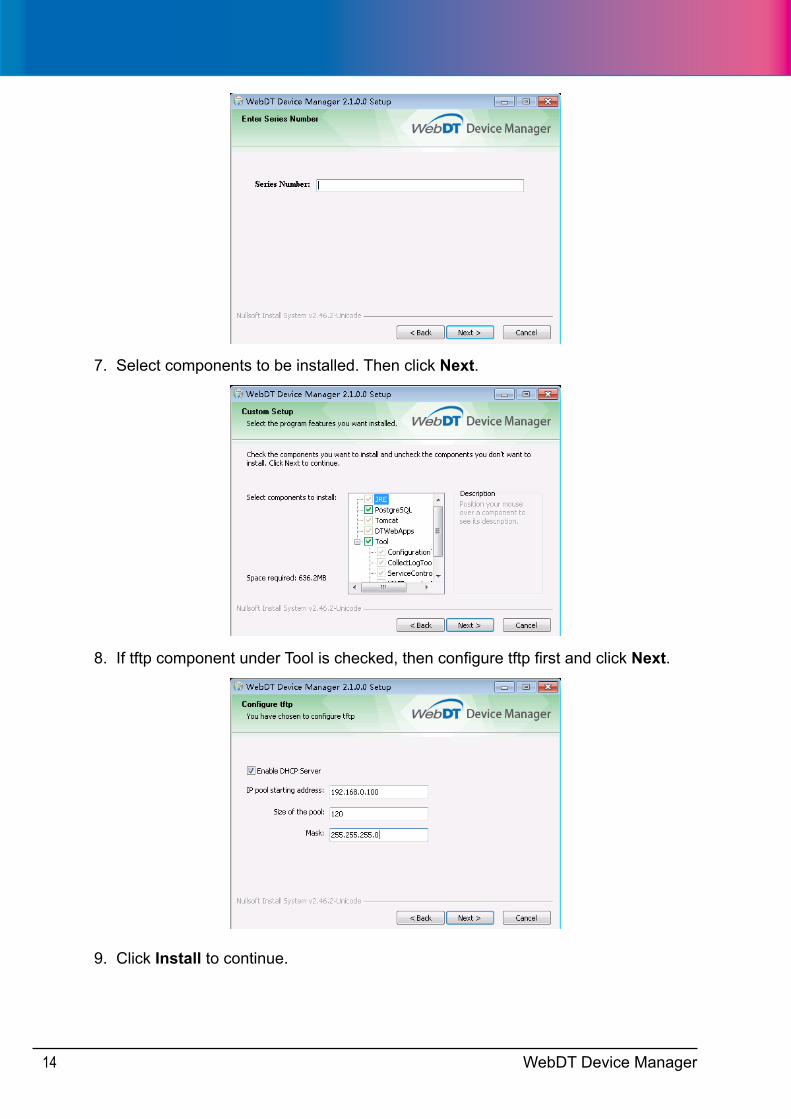
Note: ♦ If Enable DHCP Server is checked, TFTP server will be installed with DHCP. ♦ If you have installed another DHCP Server, please unchec this option. ♦ IP Pool starting Address is the first address to be distributed. ♦ Size of pool is the number of hosts allowed to config by Tftpd32. ♦ Mask is the network mask to be assigned to the DHCP clients.
9. Click Install to start installation.
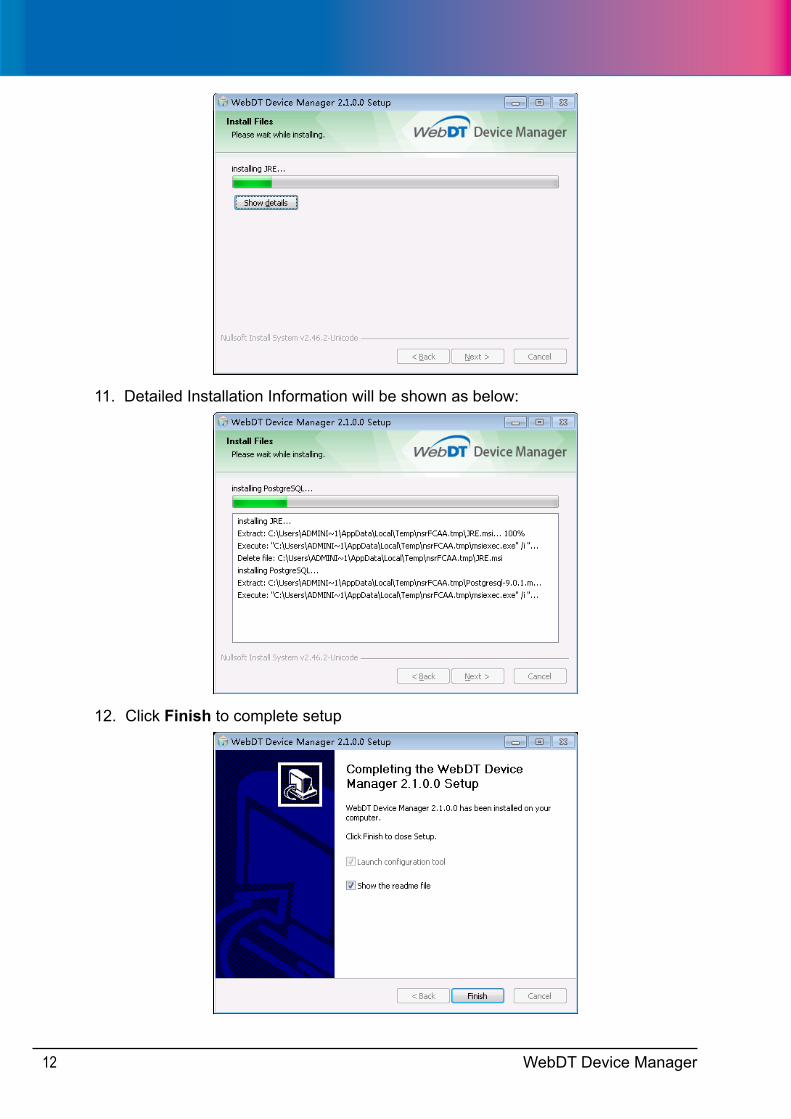
10. Click Show details to see the detail information if necessary.
WebDT Device Manager12
11. Detailed Installation Information will be shown as below:
12. Click Finish to complete setup
WebDT Device Manager 13
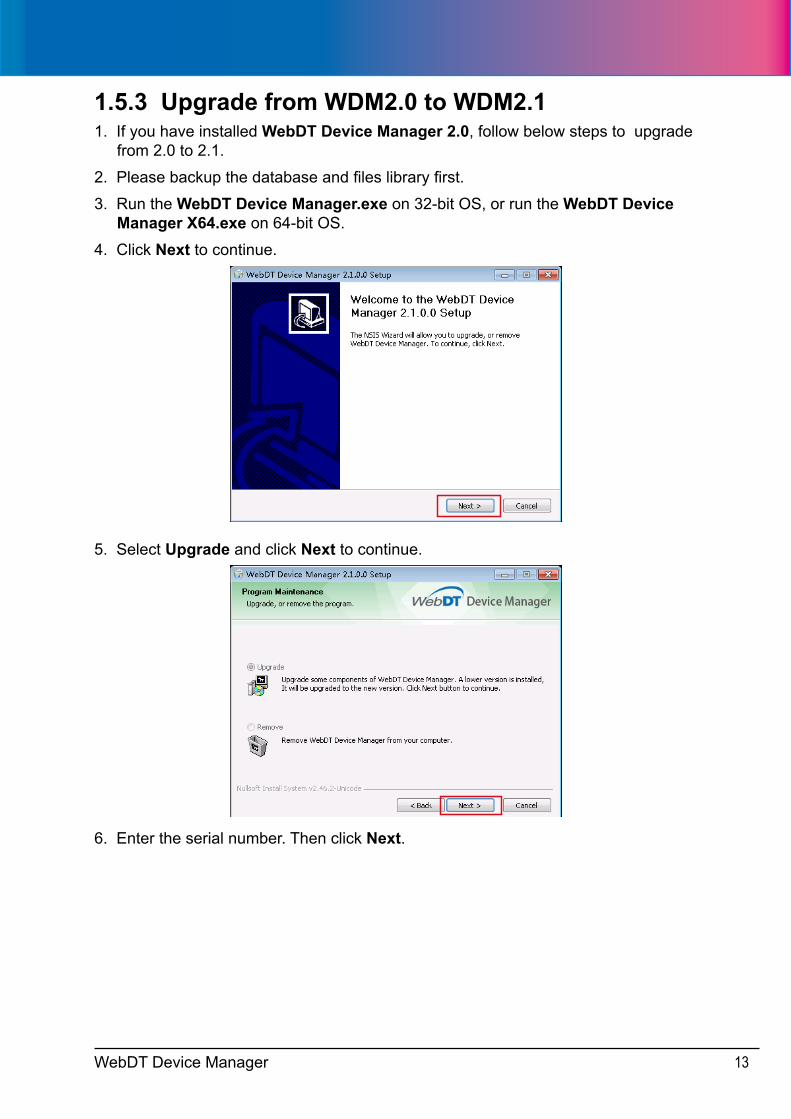
1.5.3 Upgrade from WDM2.0 to WDM2.11. If you have installed WebDT Device Manager 2.0, follow below steps to upgrade
from 2.0 to 2.1.
2. Please backup the database and files library first.
3. Run the WebDT Device Manager.exe on 32-bit OS, or run the WebDT Device Manager X64.exe on 64-bit OS.
4. Click Next to continue.
5. Select Upgrade and click Next to continue.
6. Enter the serial number. Then click Next.
WebDT Device Manager14
7. Select components to be installed. Then click Next.
8. If tftp component under Tool is checked, then configure tftp first and click Next.
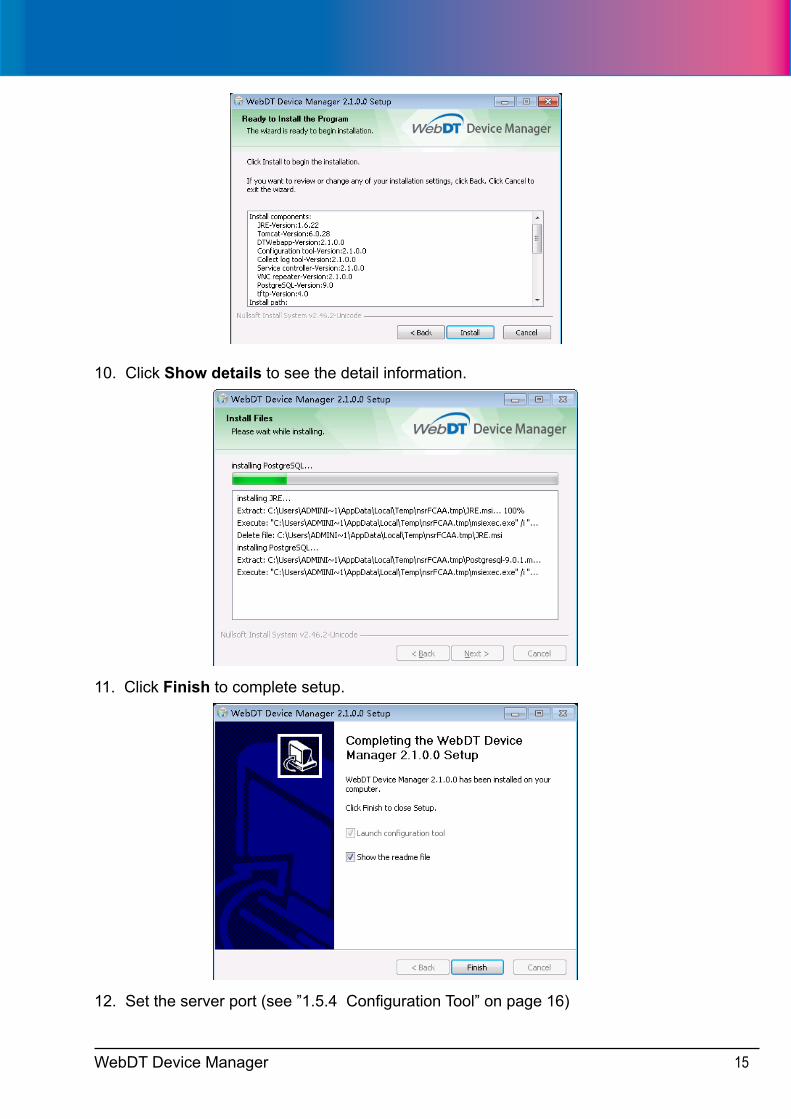
9. Click Install to continue.
WebDT Device Manager 15
10. Click Show details to see the detail information.
11. Click Finish to complete setup.
12. Set the server port (see ”1.5.4 Configuration Tool” on page 16)
WebDT Device Manager16
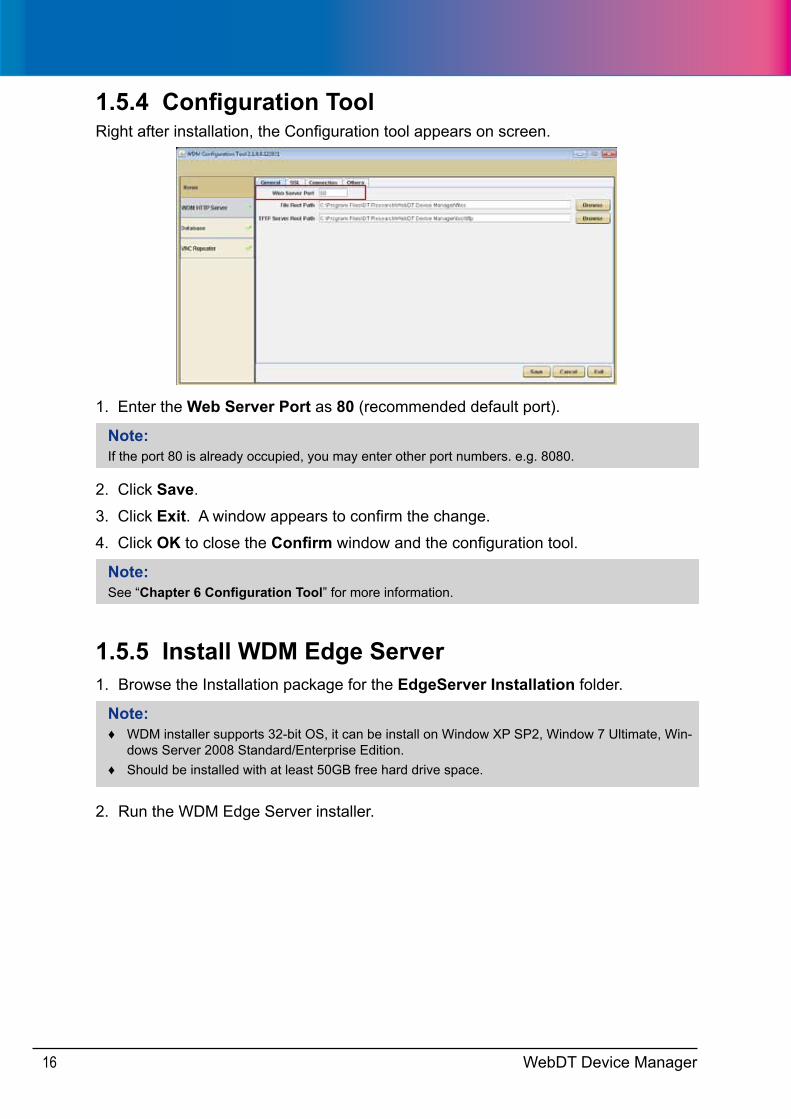
1.5.4 Configuration ToolRight after installation, the Configuration tool appears on screen.
1. Enter the Web Server Port as 80 (recommended default port).
Note:If the port 80 is already occupied, you may enter other port numbers. e.g. 8080.
2. Click Save.
3. Click Exit. A window appears to confirm the change.
4. Click OK to close the Confirm window and the configuration tool.
Note:See “Chapter 6 Configuration Tool” for more information.
1.5.5 Install WDM Edge Server1. Browse the Installation package for the EdgeServer Installation folder.
Note: ♦ WDM installer supports 32-bit OS, it can be install on Window XP SP2, Window 7 Ultimate, Win-
dows Server 2008 Standard/Enterprise Edition. ♦ Should be installed with at least 50GB free hard drive space.
2. Run the WDM Edge Server installer.
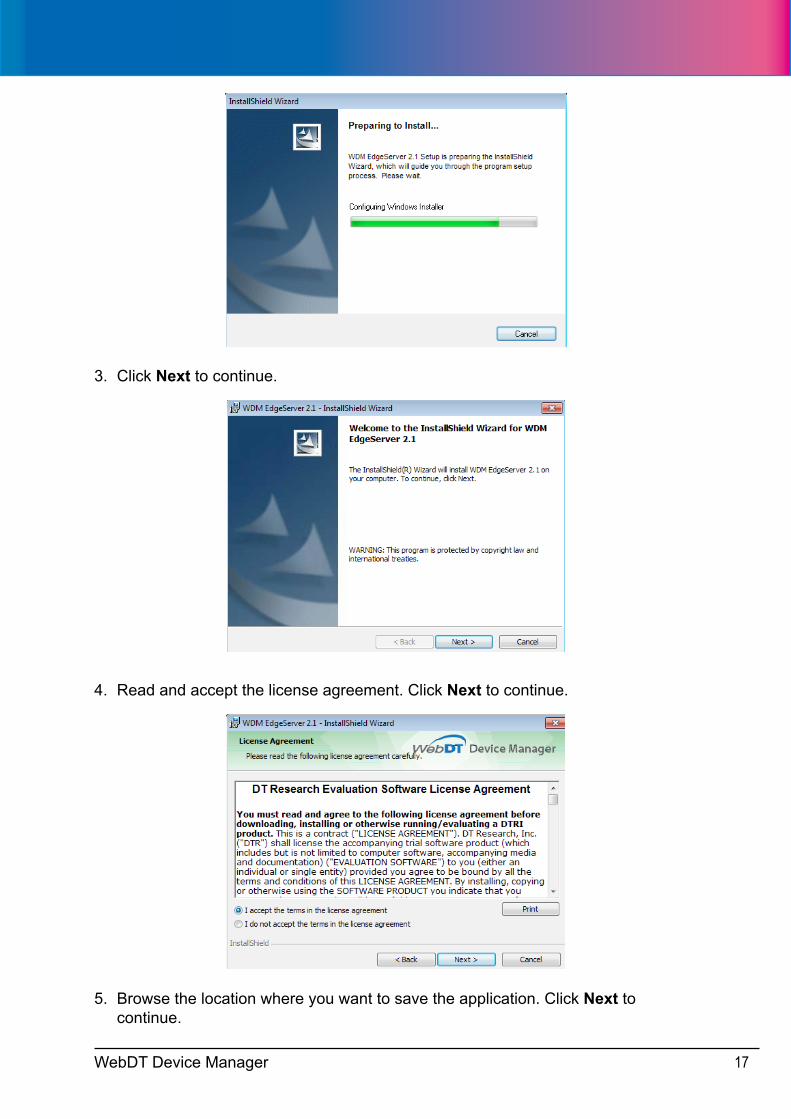
WebDT Device Manager 17
3. Click Next to continue.
4. Read and accept the license agreement. Click Next to continue.
5. Browse the location where you want to save the application. Click Next to continue.
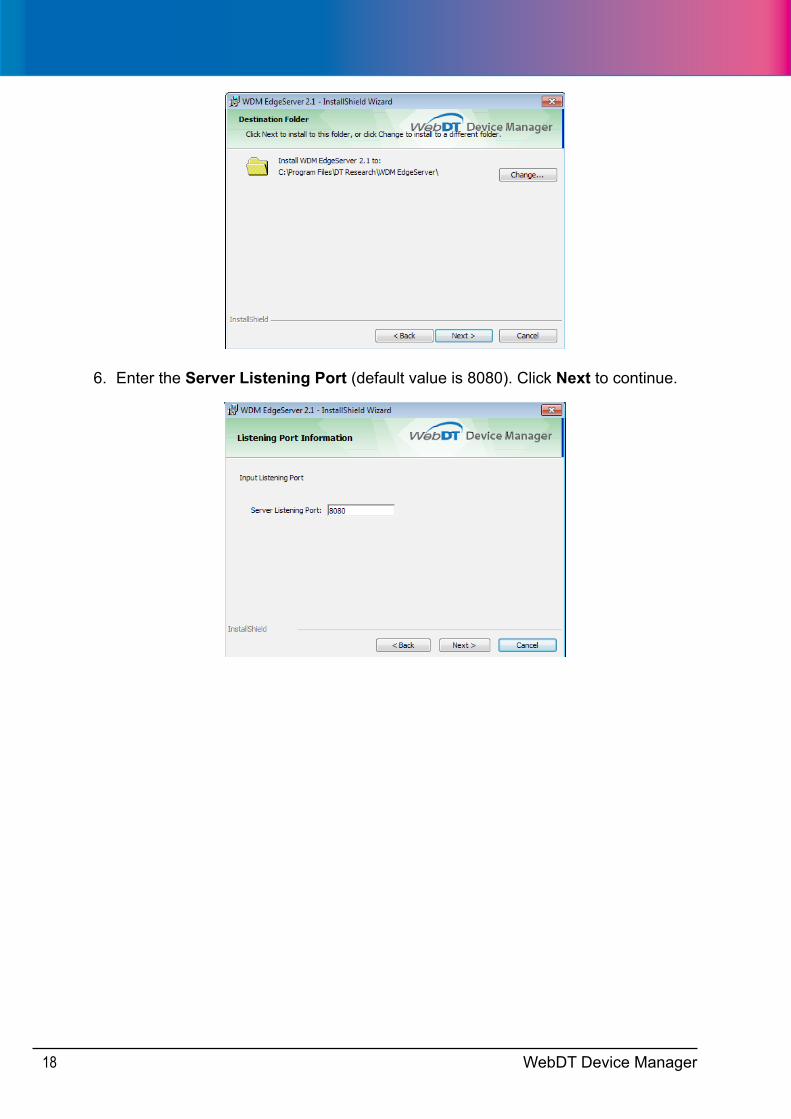
WebDT Device Manager18
6. Enter the Server Listening Port (default value is 8080). Click Next to continue.
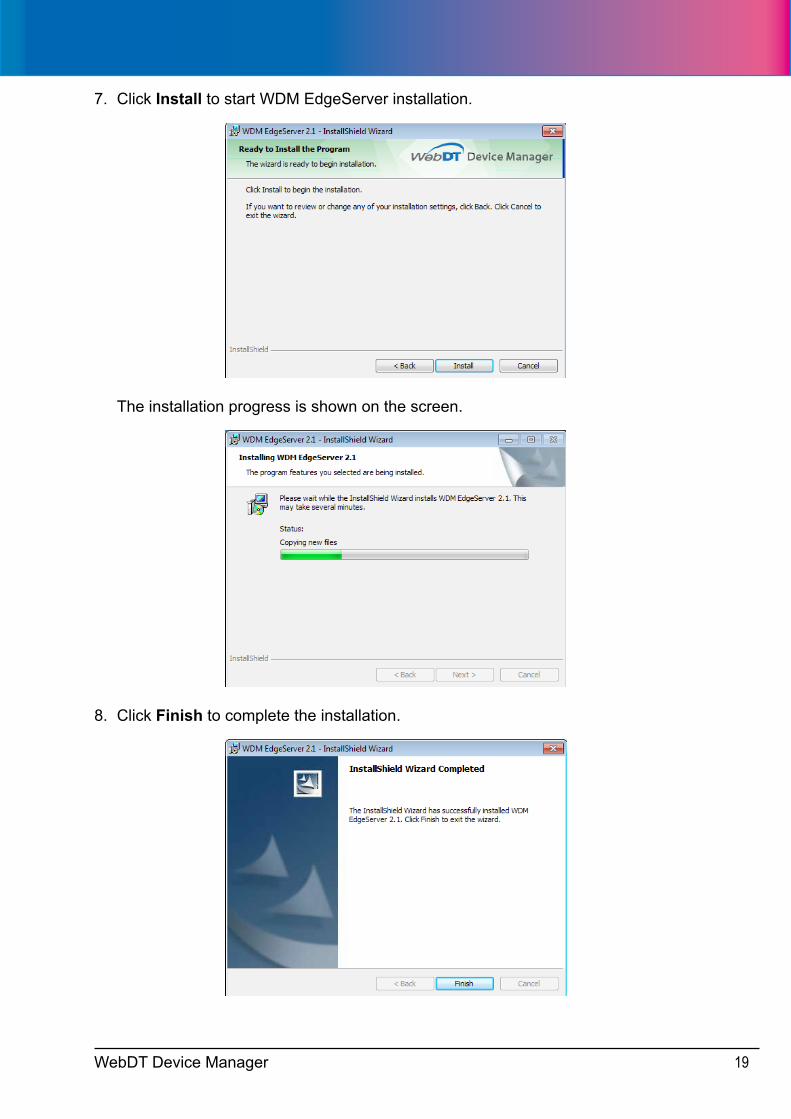
WebDT Device Manager 19
7. Click Install to start WDM EdgeServer installation.
The installation progress is shown on the screen.
8. Click Finish to complete the installation.
WebDT Device Manager20
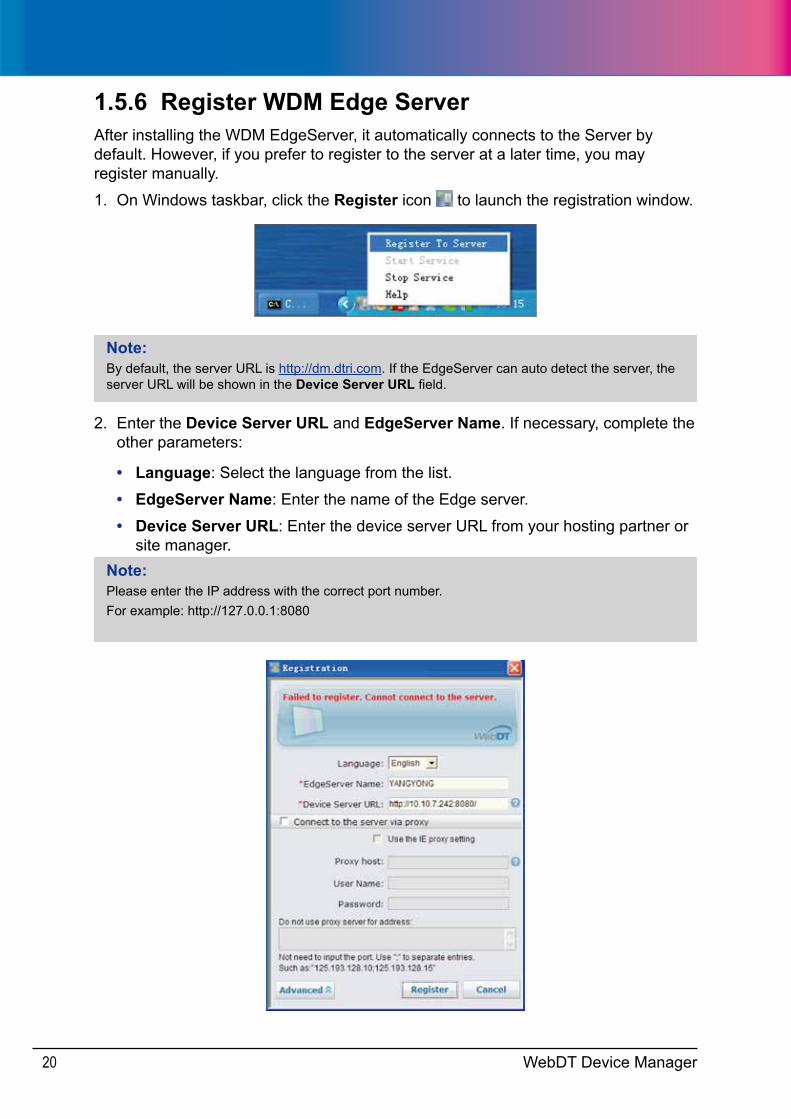
1.5.6 Register WDM Edge ServerAfter installing the WDM EdgeServer, it automatically connects to the Server by default. However, if you prefer to register to the server at a later time, you may register manually.
1. On Windows taskbar, click the Register icon to launch the registration window.
Note:By default, the server URL is http://dm.dtri.com. If the EdgeServer can auto detect the server, the server URL will be shown in the Device Server URL field.
2. Enter the Device Server URL and EdgeServer Name. If necessary, complete the other parameters:
• Language: Select the language from the list.
• EdgeServer Name: Enter the name of the Edge server.
• Device Server URL: Enter the device server URL from your hosting partner or site manager.
Note:Please enter the IP address with the correct port number.For example: http://127.0.0.1:8080
WebDT Device Manager 21
Click the Advanced button to display the following:
• Connect to the server via proxy: Check the box to register WebDT player by proxy.
• Use the IE proxy setting: After setting the proxy in IE, check this box. The Client Agent will use the proxy in IE.
• Proxy host: Enter the host name and port number of the proxy server from your hosting partner, for example: http://w.x.y.w:80/ (80 is the port number).
• User name and Password: Enter the user name and password from your hosting partner.
• Do not use proxy server for address: You can use this setting to bypass using the proxy server to register to the WebDT server if it is located in the same subnet as the proxy server.
1.5.7 Register WebDT Client AgentAfter installing the WDM Server and launching the configuration tool settings, you can register your WebDT Client Agent. Follow the operation guide to register the Client Agent.
The Client Agent must be Internet/network enabled via Ethernet or wireless connection. For Ethernet connection, please make sure it is connected to a network or Internet. For wireless connection, please configure your wireless network before registration.
When you turn on the DT Research device for the first time, the Client Agent automatically connects to the Server by default. However, if you prefer to register to the server at a later time, you may register manually.
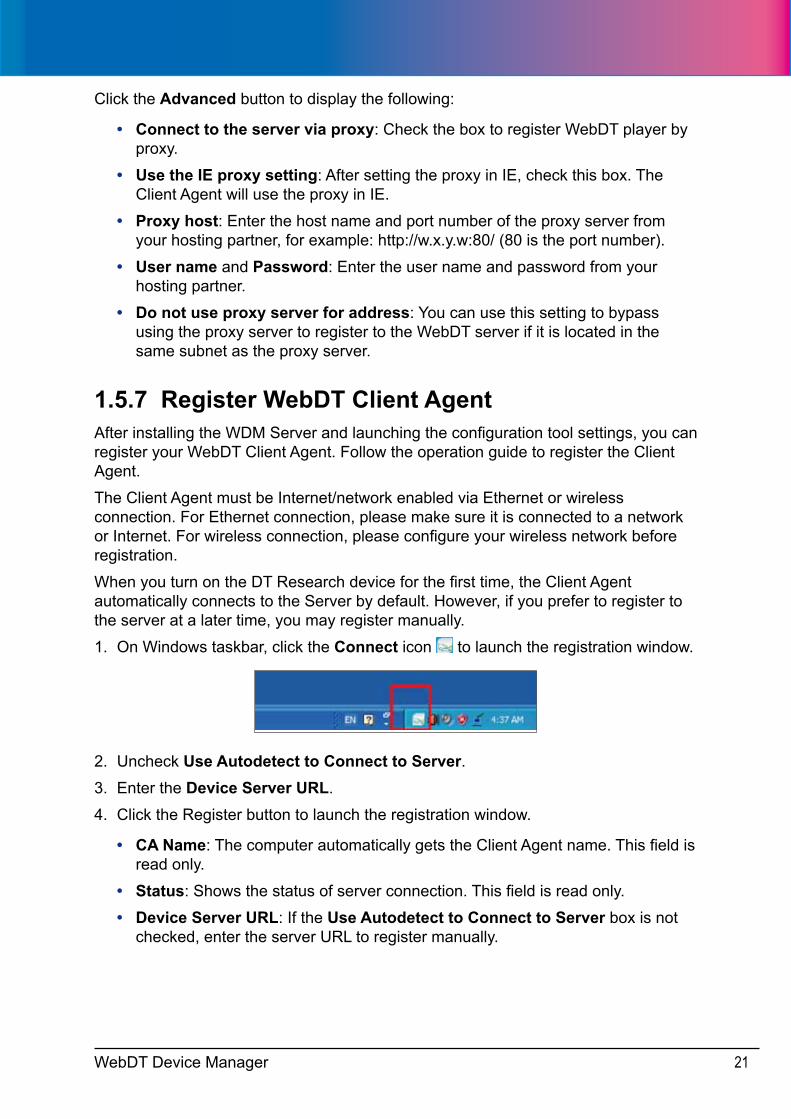
1. On Windows taskbar, click the Connect icon to launch the registration window.
2. Uncheck Use Autodetect to Connect to Server.3. Enter the Device Server URL.
4. Click the Register button to launch the registration window.
• CA Name: The computer automatically gets the Client Agent name. This field is read only.
• Status: Shows the status of server connection. This field is read only.
• Device Server URL: If the Use Autodetect to Connect to Server box is not checked, enter the server URL to register manually.

WebDT Device Manager22
Click the Advance button to display the following:
Proxy Setting
• Connect to the server via proxy: Check the box to register WebDT player by proxy.
• Use the IE proxy setting: After setting the proxy in IE, check this box. The Client Agent will use the proxy in IE.
• Proxy host: Enter the host name and port number of the proxy server from your hosting partner, for example: http://w.x.y.w:80/ (80 is the port number).
• User name and Password: Enter the user name and password from your hosting partner.
• Do not use proxy server for address: You can use this setting to bypass using the proxy server to register to the WebDT server if it is located in the same subnet as the proxy server.

WebDT Device Manager 23
1.6 Launch the WebDT Device ManagerThe WebDT Device Manager (WDM) login page allows you to:
• Login to WDM
• Change your account password
Login1. Launch your web browser.
2. On the address bar, enter the IP address with port number to open the login page. For example:
http://192.168.254.145:8080
IP Address : Port Number
3. On the Language field, select a language from the drop-down menu. (Only English is supported in current version)
4. On the Account and Password fields, enter your account ID and password.
Note:The administrator’s default account ID is “admin” and the password is “123456”. To change these settings, see “Change Password” on page 24.
5. Click Login.
WebDT Device Manager24
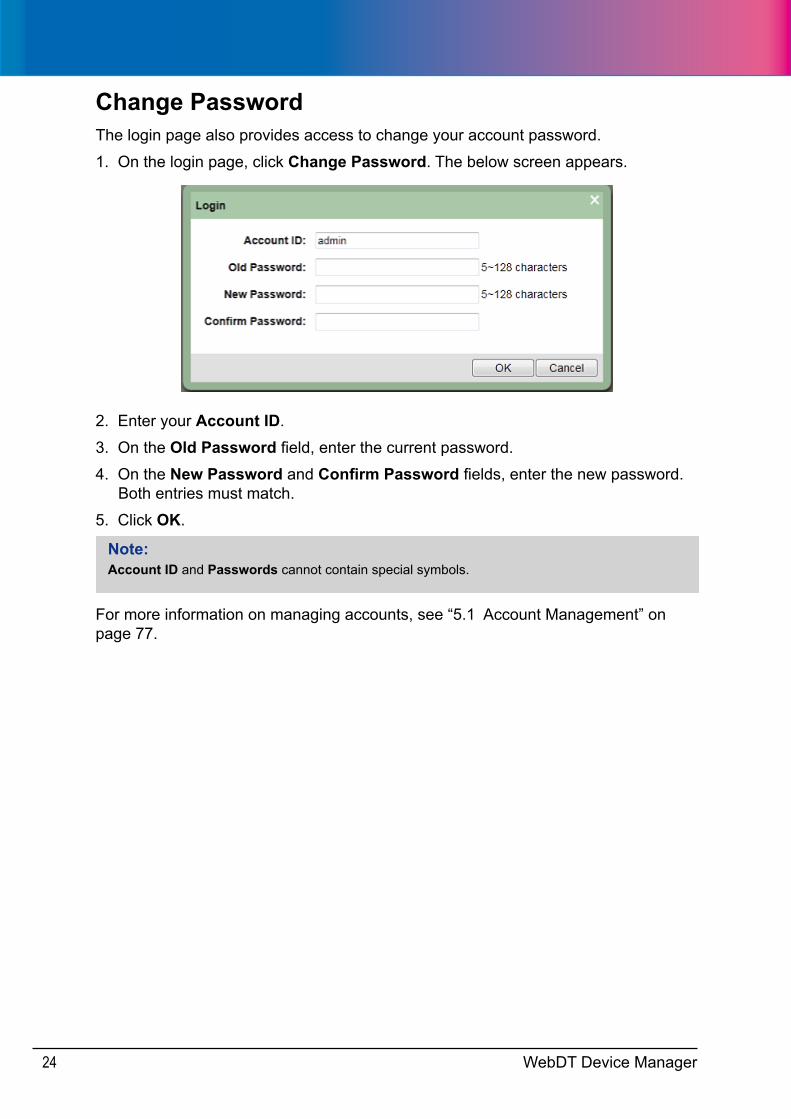
Change PasswordThe login page also provides access to change your account password.
1. On the login page, click Change Password. The below screen appears.
2. Enter your Account ID.
3. On the Old Password field, enter the current password.
4. On the New Password and Confirm Password fields, enter the new password. Both entries must match.
5. Click OK.
Note:Account ID and Passwords cannot contain special symbols.
For more information on managing accounts, see “5.1 Account Management” on page 77.
WebDT Device Manager 25
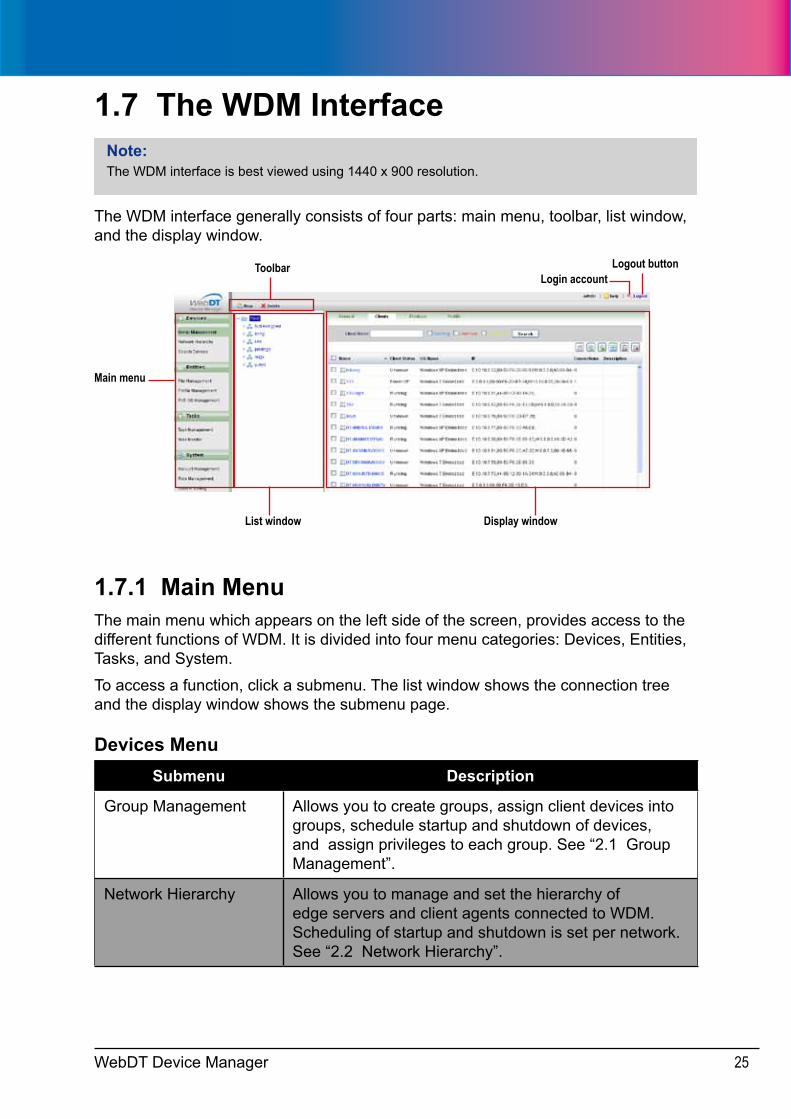
1.7 The WDM InterfaceNote:The WDM interface is best viewed using 1440 x 900 resolution.
The WDM interface generally consists of four parts: main menu, toolbar, list window, and the display window.
Main menu
Toolbar
Display windowList window
Logout buttonLogin account
1.7.1 Main MenuThe main menu which appears on the left side of the screen, provides access to the different functions of WDM. It is divided into four menu categories: Devices, Entities, Tasks, and System.
To access a function, click a submenu. The list window shows the connection tree and the display window shows the submenu page.
Devices MenuSubmenu Description
Group Management Allows you to create groups, assign client devices into groups, schedule startup and shutdown of devices, and assign privileges to each group. See “2.1 Group Management”.
Network Hierarchy Allows you to manage and set the hierarchy of edge servers and client agents connected to WDM. Scheduling of startup and shutdown is set per network. See “2.2 Network Hierarchy”.
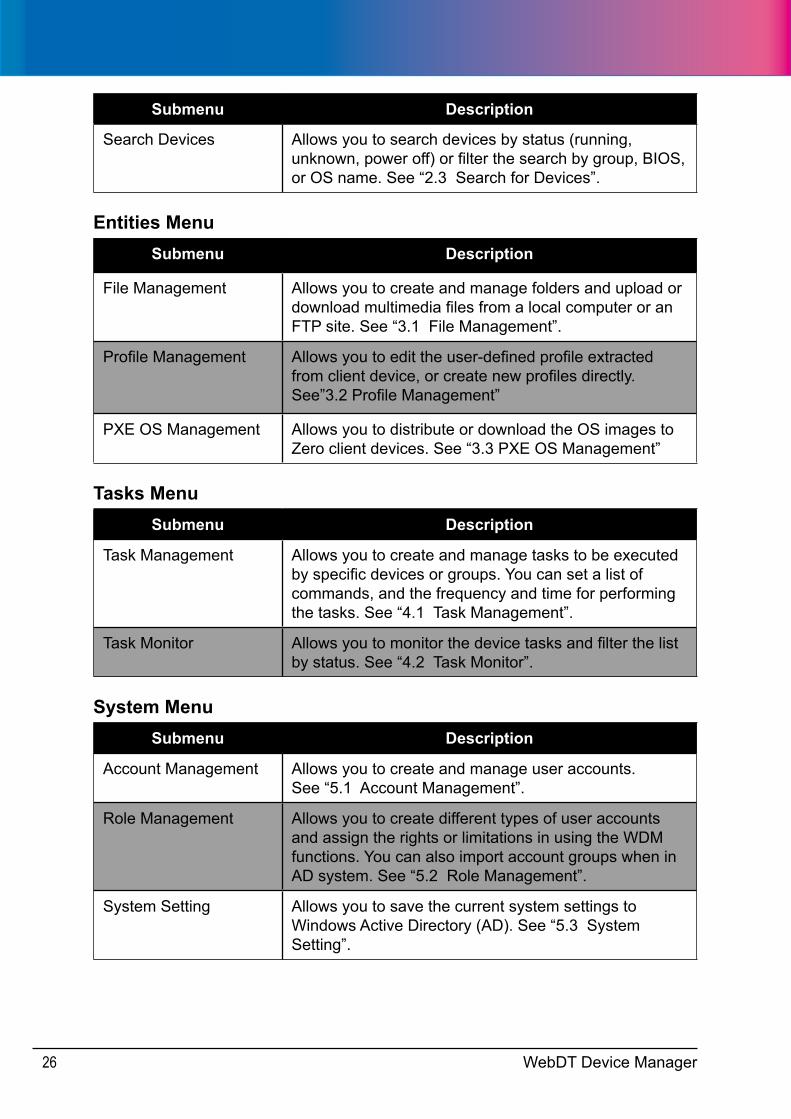
WebDT Device Manager26
Submenu Description
Search Devices Allows you to search devices by status (running, unknown, power off) or filter the search by group, BIOS, or OS name. See “2.3 Search for Devices”.
Entities MenuSubmenu Description
File Management Allows you to create and manage folders and upload or download multimedia files from a local computer or an FTP site. See “3.1 File Management”.
Profile Management Allows you to edit the user-defined profile extracted from client device, or create new profiles directly. See”3.2 Profile Management”
PXE OS Management Allows you to distribute or download the OS images to Zero client devices. See “3.3 PXE OS Management”
Tasks MenuSubmenu Description
Task Management Allows you to create and manage tasks to be executed by specific devices or groups. You can set a list of commands, and the frequency and time for performing the tasks. See “4.1 Task Management”.
Task Monitor Allows you to monitor the device tasks and filter the list by status. See “4.2 Task Monitor”.
System MenuSubmenu Description
Account Management Allows you to create and manage user accounts. See “5.1 Account Management”.
Role Management Allows you to create different types of user accounts and assign the rights or limitations in using the WDM functions. You can also import account groups when in AD system. See “5.2 Role Management”.
System Setting Allows you to save the current system settings to Windows Active Directory (AD). See “5.3 System Setting”.
WebDT Device Manager 27
1.7.2 ToolbarClick an icon button on the toolbar to process the action. Note that the toolbar may not appear in some submenu pages.
1.7.3 List WindowThe list window shows a tree that indicates the connection or relationship of the items in the tree. The items may be networks, groups, and devices, folders and files, or command lists. In some submenu pages, a tabular list is displayed instead of trees.
Click an item on the tree to select it.
1.7.4 Display WindowThe display window is the main screen where you view and manage information on WDM. The information on the screen varies depending on the selected function.
WebDT Device Manager28
2 Chapter 2 Working with Devices
This chapter covers the following topics:
• Search for devices in the network
• Create and manage groups
• Assign devices to groups
• Schedule startup, shutdown, reboot and other operations per group
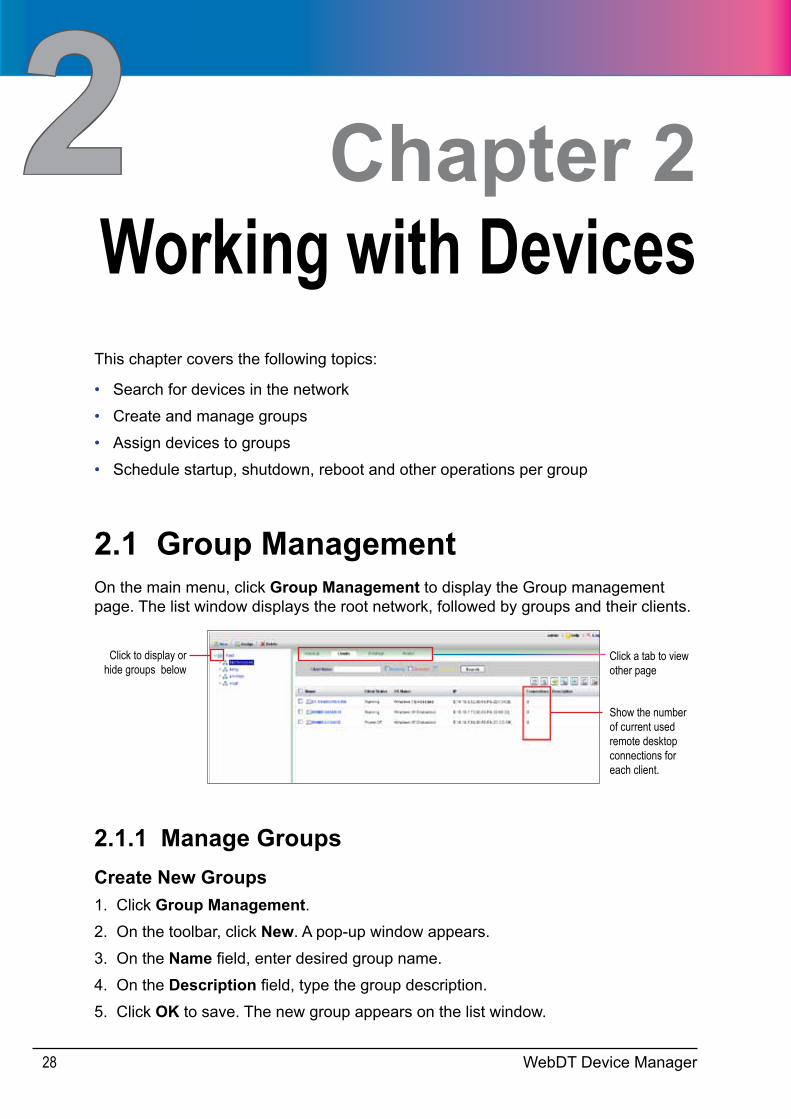
2.1 Group ManagementOn the main menu, click Group Management to display the Group management page. The list window displays the root network, followed by groups and their clients.
Click to display or hide groups below
Click a tab to view other page
Show the number of current used remote desktop connections for each client.
2.1.1 Manage GroupsCreate New Groups1. Click Group Management.2. On the toolbar, click New. A pop-up window appears.
3. On the Name field, enter desired group name.
4. On the Description field, type the group description.
5. Click OK to save. The new group appears on the list window.
WebDT Device Manager 29
Note:Name can be any letters or numbers, but it cannot contain the following special characters: “$’*/:<>?@\_|%.
Modify Group InformationTo edit the group name or description, do the following:
1. On the list window, select the group.
2. On the General page Name and Description field, type the desired text. (The built-in group names cannot be changed)
3. Click Save General Information.
Delete Groups1. On the list window, select the group.
2. On the General page toolbar, click Delete.
3. Click OK to confirm. The devices in the deleted group are automatically assigned to the Not Assigned group.
Apply Profile to a Group1. Click Group Management2. On the list window, select a group
3. Select the Profile tab
4. Click to display the profile setting window. (See “Apply Setting from Profile” on page 32)
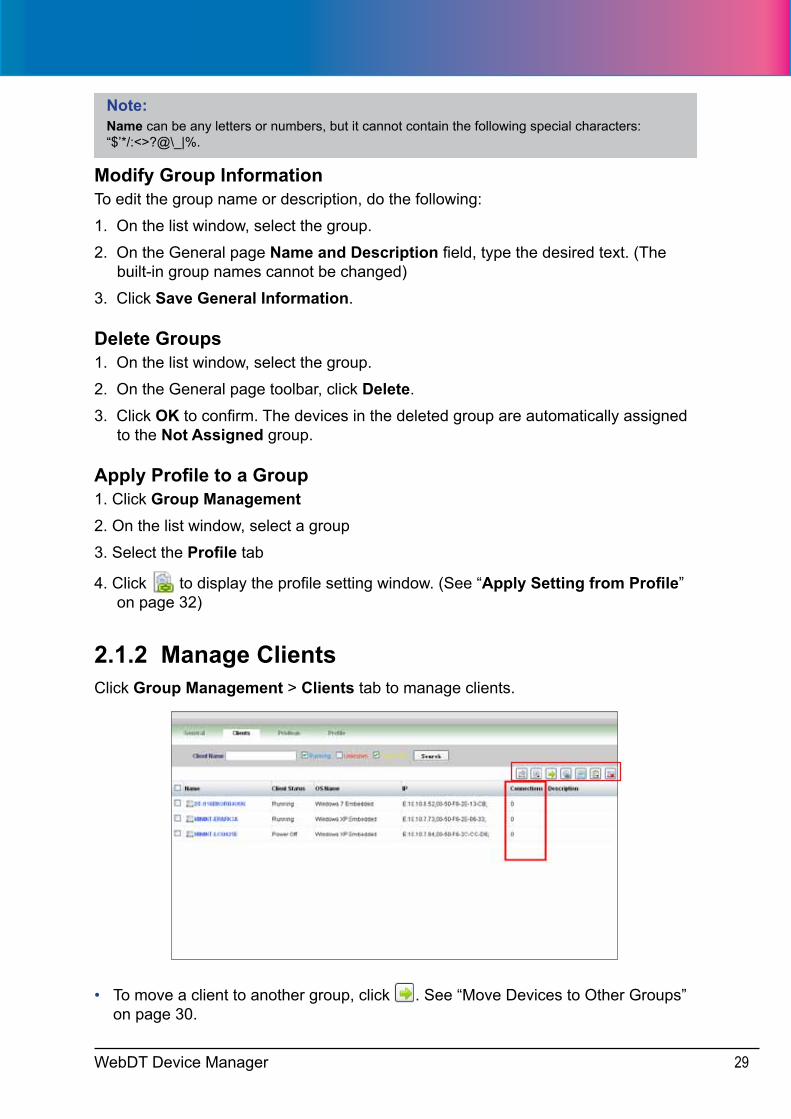
2.1.2 Manage ClientsClick Group Management > Clients tab to manage clients.
• To move a client to another group, click . See “Move Devices to Other Groups” on page 30.
WebDT Device Manager30
• To apply the setting from client, click . See “Apply Setting from Client” on page 31.
• To set PXE/IPXE OS to client, click . See “Bind PXE/IPXE OS” on page 33.
• To set the power scheme of a client, click . See “Set Power On/Off Schedule” on page 33.
• To create “report info/reboot/power off/power on/other” task, click . See “Reboot / Power Off / Power On Devices” on page 37.
• To remove a client from the group, click . See “Remove Devices” on page 37. To view the device information or activate the remote control, click the device name link.
• To check the number of current used remote desktop connection for each client from the Connections column.
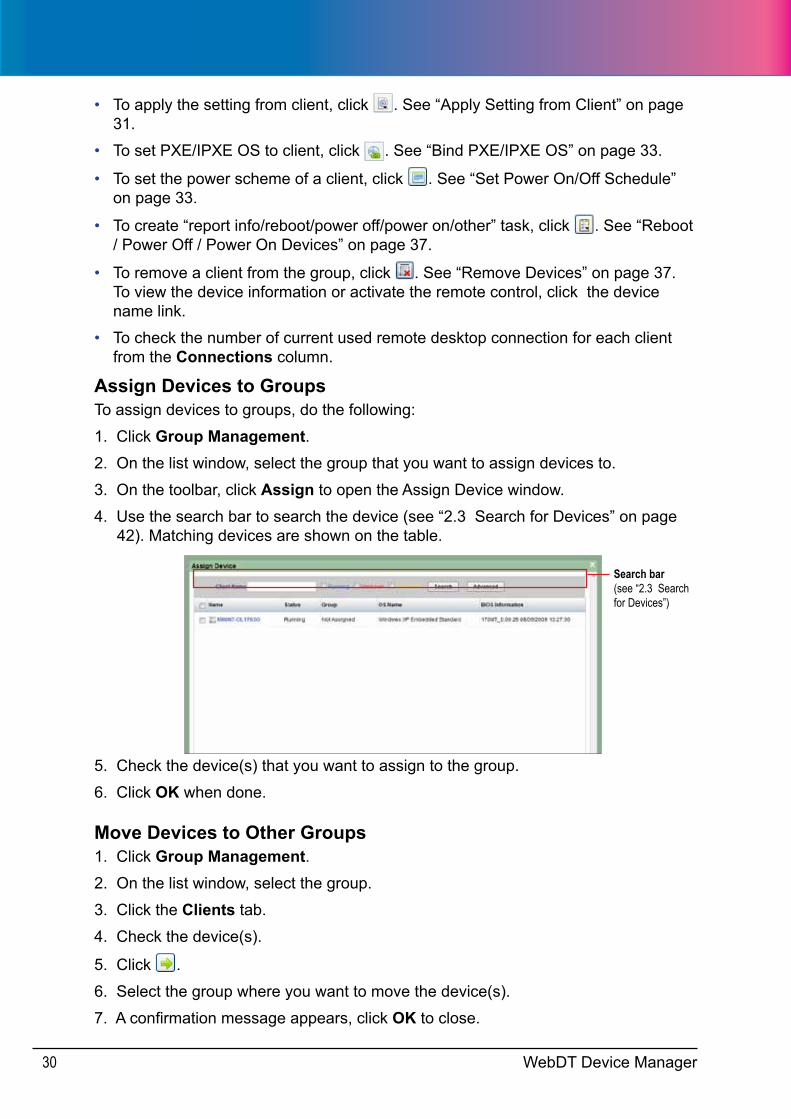
Assign Devices to GroupsTo assign devices to groups, do the following:
1. Click Group Management.2. On the list window, select the group that you want to assign devices to.
3. On the toolbar, click Assign to open the Assign Device window.
4. Use the search bar to search the device (see “2.3 Search for Devices” on page 42). Matching devices are shown on the table.
Search bar (see “2.3 Search for Devices”)
5. Check the device(s) that you want to assign to the group.
6. Click OK when done.
Move Devices to Other Groups 1. Click Group Management.2. On the list window, select the group.
3. Click the Clients tab.
4. Check the device(s).
5. Click .
6. Select the group where you want to move the device(s).
7. A confirmation message appears, click OK to close.

WebDT Device Manager 31
Extract Setting from ClientYou can schedule a time for a particular device to start up or shut down.
1. Click Group Management.2. On the list window, select the group.
3. Click the Clients tab.
4. Check the device you want to extract from.
5. Click the to open the Extract setting window for confirmation the setting.
6. Check all the profile setting (See “3.2.1 Manage Profile” on page 50).
7. Press Next.8. Rename the Profile and press Save to close.
Note:Only one client can be selected for the extract setting.
Apply Setting from Client1. Click Group Management.2. On the list window, select the group.
3. Click the Clients tab.
4. Check the device you want to apply to.
5. Click .

WebDT Device Manager32
6. Select Apply the setting from client to display the setting window.
7. Select the client from the list window to display the detail setting information of client (See “3.2.1 Manage Profile” on page 50).
8. Press Apply to apply the setting.
Note:• The information of each setting can be read only.• If the clients are under abnormal operation, the applying operation will be failed for these clients.
User needs to do it again when the clients is recovered.
Apply Setting from Profile1. Click Group Management.2. On the list window, select the group.
3. Click the Clients tab.
4. Check the device you want to extract from.
5. Click .
6. Select Apply the setting from profile.
7. Select the profile from the list window to display the profile setting (See “3.2.1 Manage Profile” on page 50).
WebDT Device Manager 33
8. Press Apply to apply the setting.
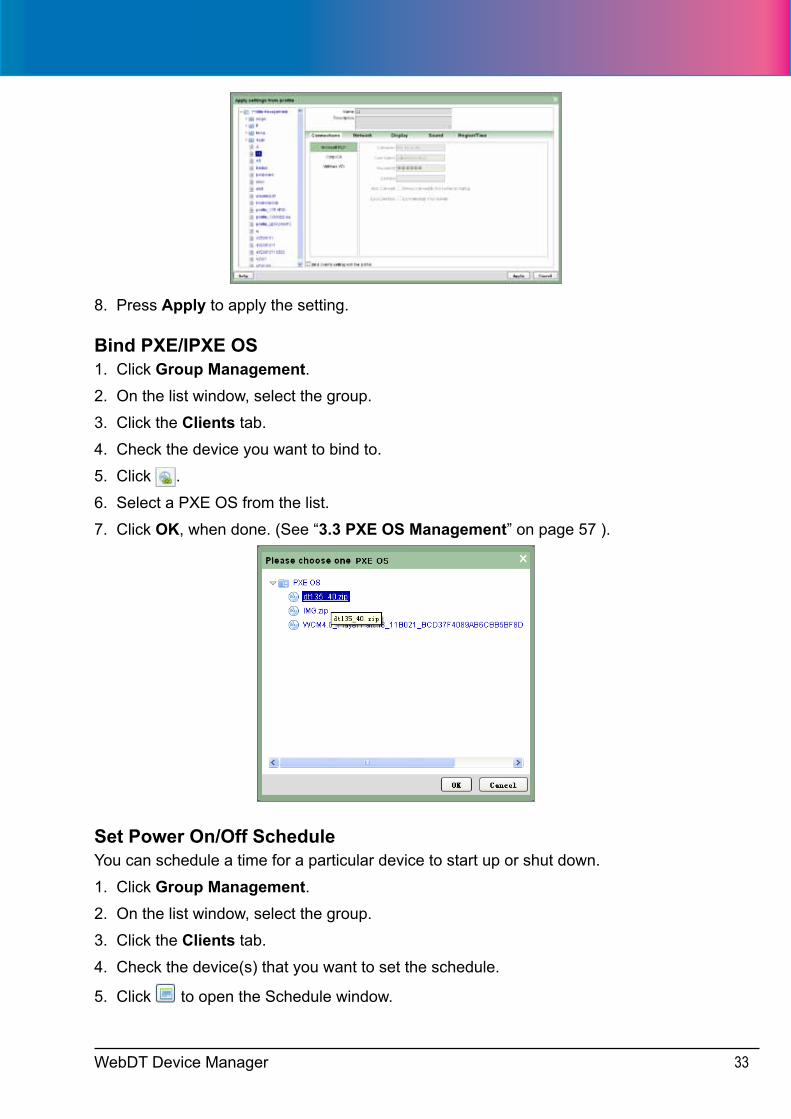
Bind PXE/IPXE OS1. Click Group Management.2. On the list window, select the group.
3. Click the Clients tab.
4. Check the device you want to bind to.
5. Click .
6. Select a PXE OS from the list.
7. Click OK, when done. (See “3.3 PXE OS Management” on page 57 ).
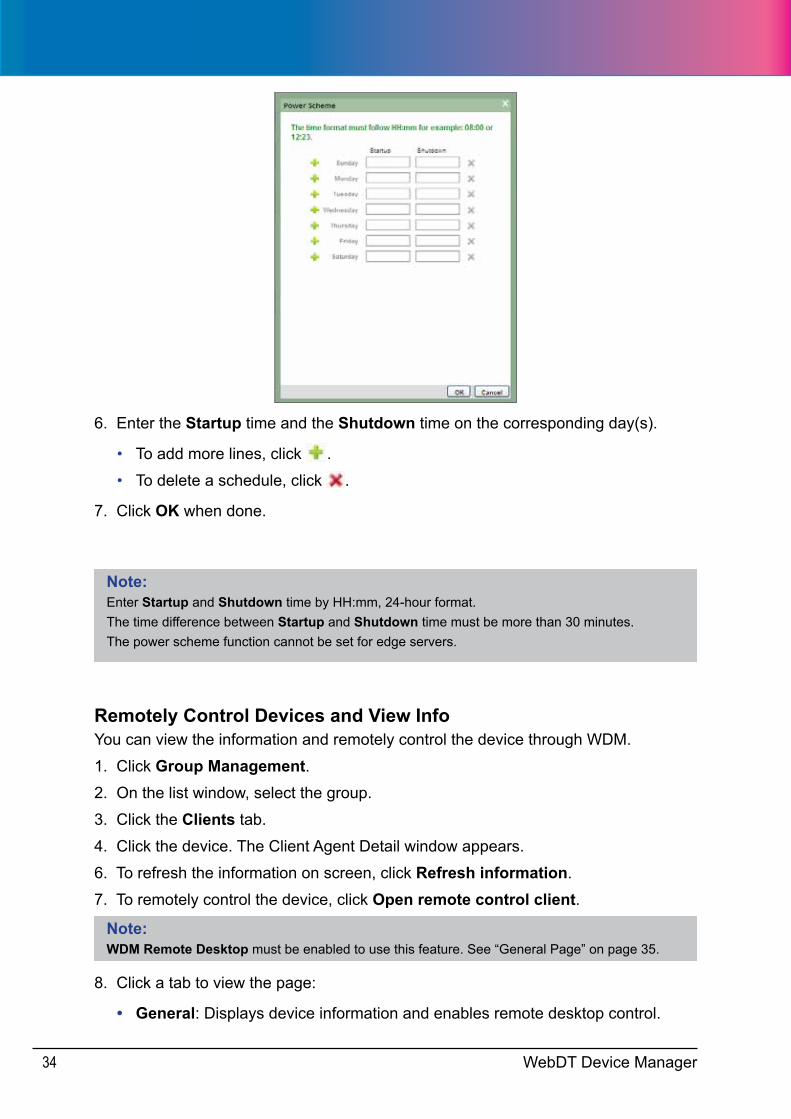
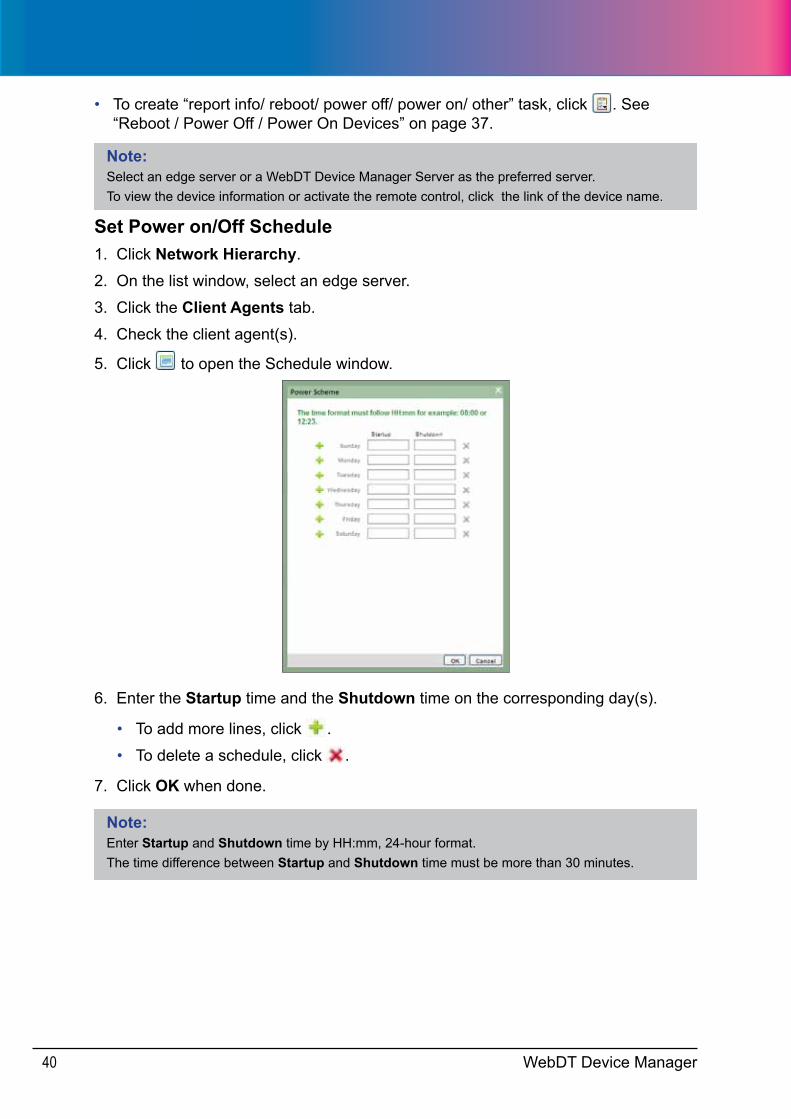
Set Power On/Off ScheduleYou can schedule a time for a particular device to start up or shut down.
1. Click Group Management.2. On the list window, select the group.
3. Click the Clients tab.
4. Check the device(s) that you want to set the schedule.
5. Click to open the Schedule window.
WebDT Device Manager34
6. Enter the Startup time and the Shutdown time on the corresponding day(s).
• To add more lines, click .
• To delete a schedule, click .
7. Click OK when done.
Note:Enter Startup and Shutdown time by HH:mm, 24-hour format.The time difference between Startup and Shutdown time must be more than 30 minutes.The power scheme function cannot be set for edge servers.
Remotely Control Devices and View InfoYou can view the information and remotely control the device through WDM.
1. Click Group Management.2. On the list window, select the group.
3. Click the Clients tab.
4. Click the device. The Client Agent Detail window appears.
6. To refresh the information on screen, click Refresh information.
7. To remotely control the device, click Open remote control client.
Note:WDM Remote Desktop must be enabled to use this feature. See “General Page” on page 35.
8. Click a tab to view the page:
• General: Displays device information and enables remote desktop control.
WebDT Device Manager 35
• Tasks: Displays queued tasks for the device.
• Power: Sets the device start up and shut down time.
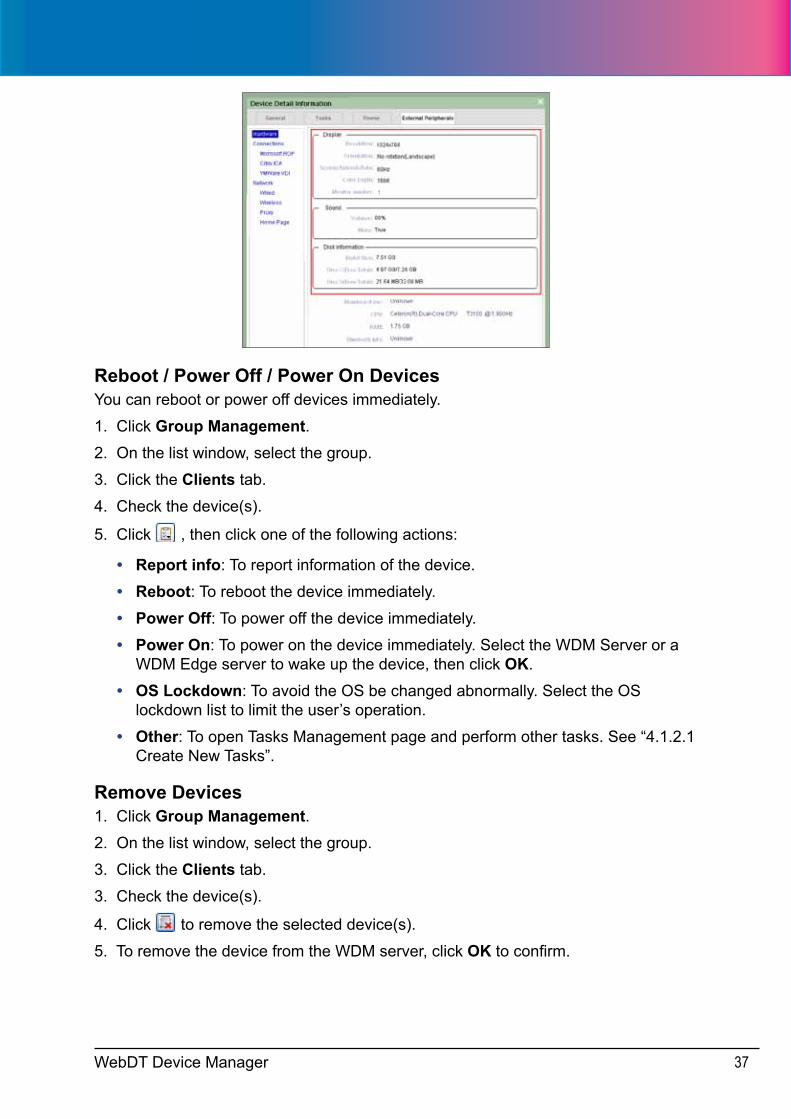
• External Peripherals: Displays the hardware specifications and external peripherals connected to the device.
Note:If the device is an Edge server, the Power tab and External Peripherals tab won’t be displayed.
See below for more details about each page.
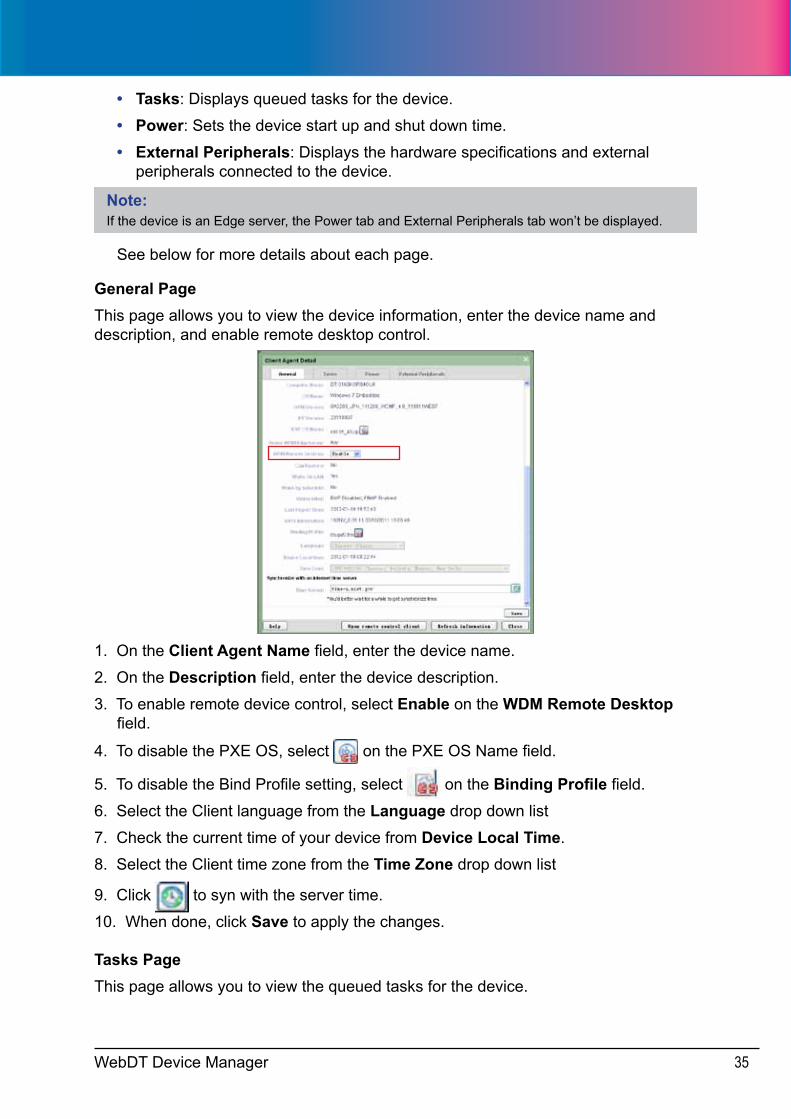
General PageThis page allows you to view the device information, enter the device name and description, and enable remote desktop control.
1. On the Client Agent Name field, enter the device name.
2. On the Description field, enter the device description.
3. To enable remote device control, select Enable on the WDM Remote Desktop field.
4. To disable the PXE OS, select on the PXE OS Name field.
5. To disable the Bind Profile setting, select on the Binding Profile field.
6. Select the Client language from the Language drop down list
7. Check the current time of your device from Device Local Time.
8. Select the Client time zone from the Time Zone drop down list
9. Click to syn with the server time.
10. When done, click Save to apply the changes.
Tasks PageThis page allows you to view the queued tasks for the device.
WebDT Device Manager36
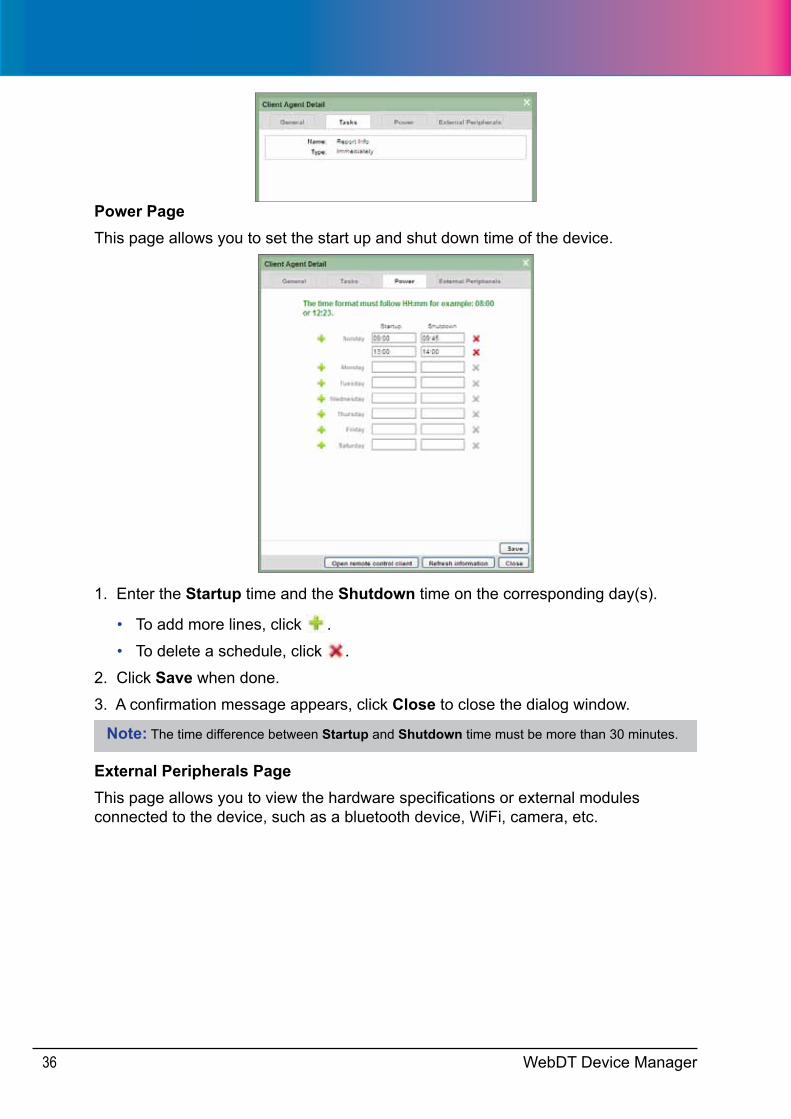
Power PageThis page allows you to set the start up and shut down time of the device.
1. Enter the Startup time and the Shutdown time on the corresponding day(s).
• To add more lines, click .
• To delete a schedule, click .
2. Click Save when done.
3. A confirmation message appears, click Close to close the dialog window.
Note: The time difference between Startup and Shutdown time must be more than 30 minutes.
External Peripherals PageThis page allows you to view the hardware specifications or external modules connected to the device, such as a bluetooth device, WiFi, camera, etc.
WebDT Device Manager 37
Reboot / Power Off / Power On DevicesYou can reboot or power off devices immediately.
1. Click Group Management.2. On the list window, select the group.
3. Click the Clients tab.
4. Check the device(s).
5. Click , then click one of the following actions:
• Report info: To report information of the device.
• Reboot: To reboot the device immediately.
• Power Off: To power off the device immediately.
• Power On: To power on the device immediately. Select the WDM Server or a WDM Edge server to wake up the device, then click OK.
• OS Lockdown: To avoid the OS be changed abnormally. Select the OS lockdown list to limit the user’s operation.
• Other: To open Tasks Management page and perform other tasks. See “4.1.2.1 Create New Tasks”.
Remove Devices 1. Click Group Management.2. On the list window, select the group.
3. Click the Clients tab.
3. Check the device(s).
4. Click to remove the selected device(s).
5. To remove the device from the WDM server, click OK to confirm.
WebDT Device Manager38
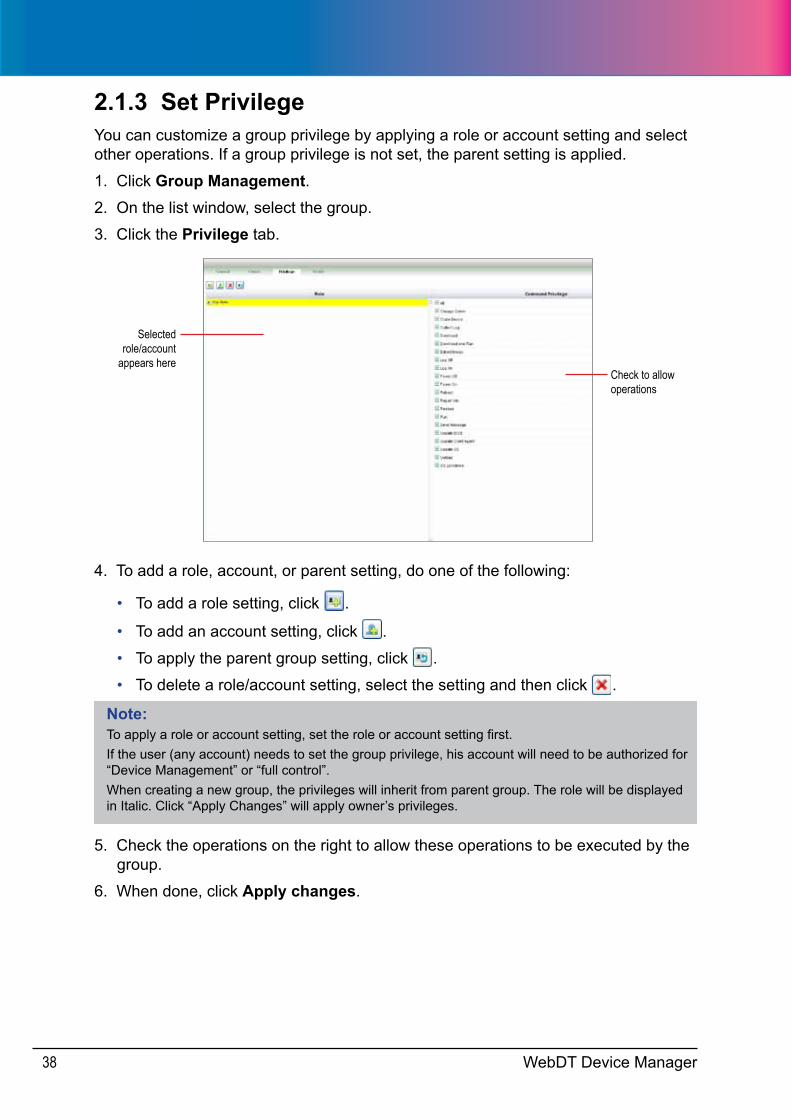
2.1.3 Set PrivilegeYou can customize a group privilege by applying a role or account setting and select other operations. If a group privilege is not set, the parent setting is applied.
1. Click Group Management.2. On the list window, select the group.
3. Click the Privilege tab.
Check to allow operations
Selected role/account
appears here
4. To add a role, account, or parent setting, do one of the following:
• To add a role setting, click .
• To add an account setting, click .
• To apply the parent group setting, click .
• To delete a role/account setting, select the setting and then click .
Note:To apply a role or account setting, set the role or account setting first.If the user (any account) needs to set the group privilege, his account will need to be authorized for “Device Management” or “full control”.When creating a new group, the privileges will inherit from parent group. The role will be displayed in Italic. Click “Apply Changes” will apply owner’s privileges.
5. Check the operations on the right to allow these operations to be executed by the group.
6. When done, click Apply changes.
WebDT Device Manager 39
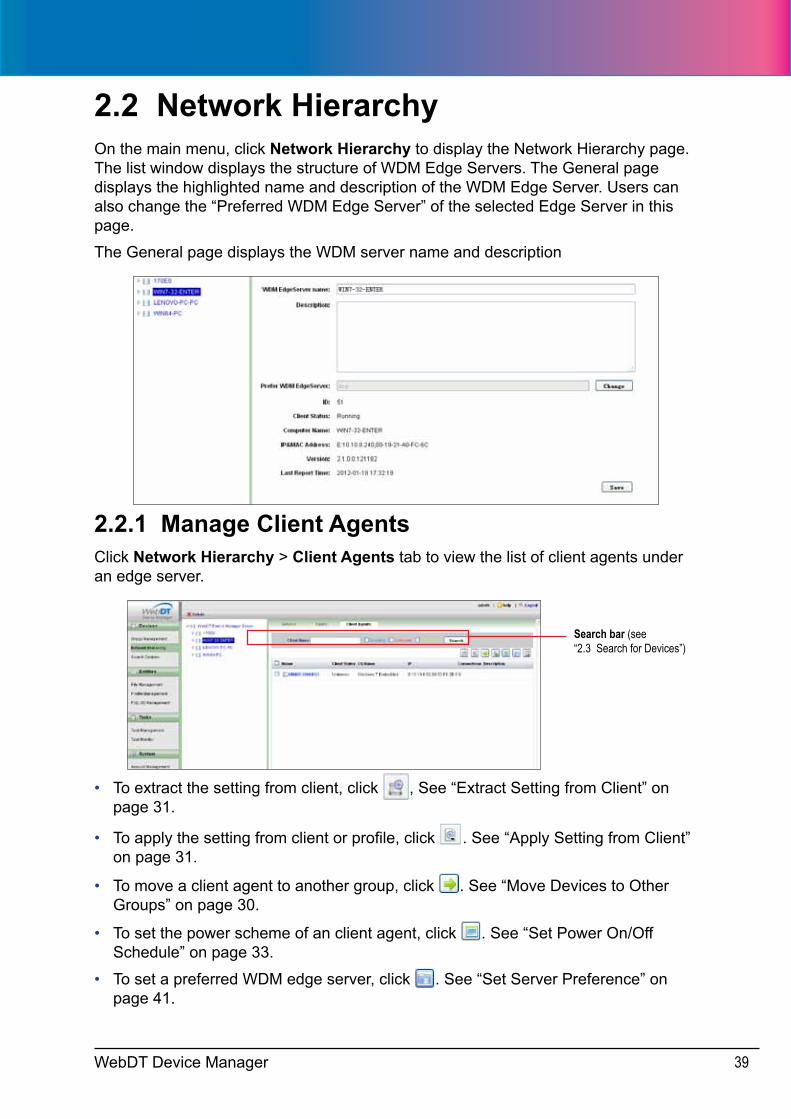
2.2 Network HierarchyOn the main menu, click Network Hierarchy to display the Network Hierarchy page. The list window displays the structure of WDM Edge Servers. The General page displays the highlighted name and description of the WDM Edge Server. Users can also change the “Preferred WDM Edge Server” of the selected Edge Server in this page.
The General page displays the WDM server name and description
2.2.1 Manage Client AgentsClick Network Hierarchy > Client Agents tab to view the list of client agents under an edge server.
Search bar (see “2.3 Search for Devices”)
• To extract the setting from client, click , See “Extract Setting from Client” on page 31.
• To apply the setting from client or profile, click . See “Apply Setting from Client” on page 31.
• To move a client agent to another group, click . See “Move Devices to Other Groups” on page 30.
• To set the power scheme of an client agent, click . See “Set Power On/Off Schedule” on page 33.
• To set a preferred WDM edge server, click . See “Set Server Preference” on page 41.
WebDT Device Manager40
• To create “report info/ reboot/ power off/ power on/ other” task, click . See “Reboot / Power Off / Power On Devices” on page 37.
Note:Select an edge server or a WebDT Device Manager Server as the preferred server.To view the device information or activate the remote control, click the link of the device name.
Set Power on/Off Schedule1. Click Network Hierarchy.
2. On the list window, select an edge server.
3. Click the Client Agents tab.
4. Check the client agent(s).
5. Click to open the Schedule window.
6. Enter the Startup time and the Shutdown time on the corresponding day(s).
• To add more lines, click .
• To delete a schedule, click .
7. Click OK when done.
Note:Enter Startup and Shutdown time by HH:mm, 24-hour format.The time difference between Startup and Shutdown time must be more than 30 minutes.
WebDT Device Manager 41
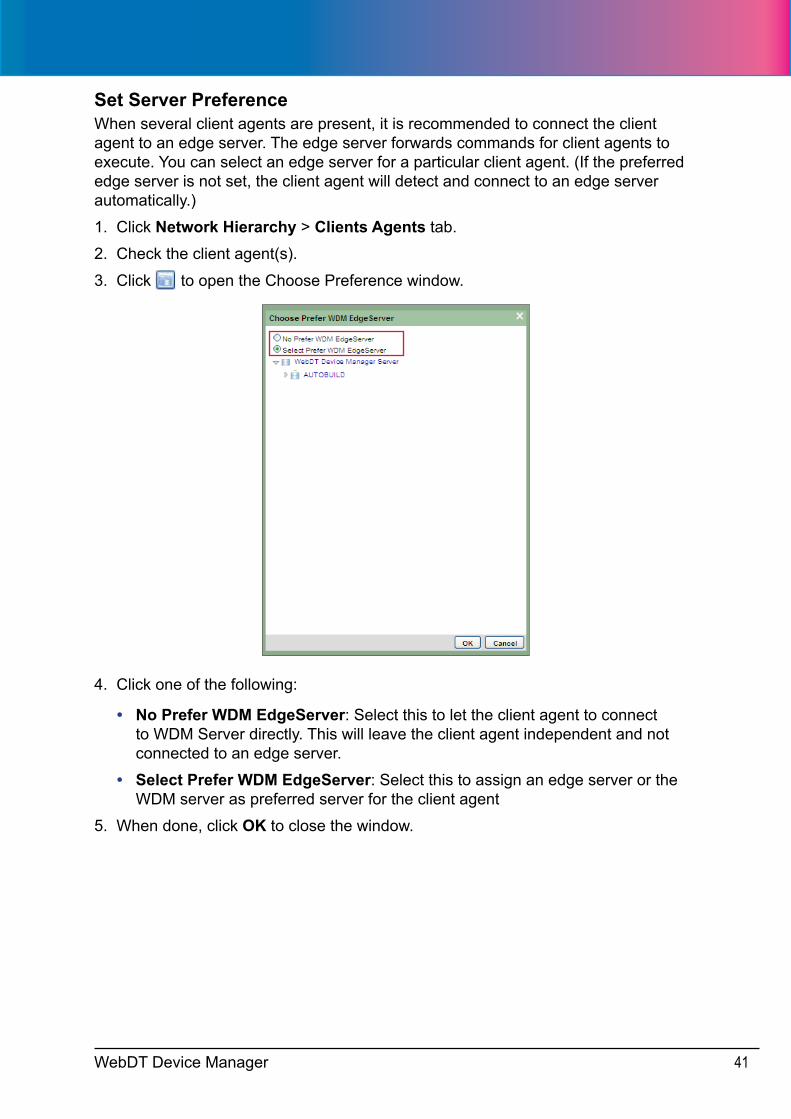
Set Server PreferenceWhen several client agents are present, it is recommended to connect the client agent to an edge server. The edge server forwards commands for client agents to execute. You can select an edge server for a particular client agent. (If the preferred edge server is not set, the client agent will detect and connect to an edge server automatically.)
1. Click Network Hierarchy > Clients Agents tab.
2. Check the client agent(s).
3. Click to open the Choose Preference window.
4. Click one of the following:
• No Prefer WDM EdgeServer: Select this to let the client agent to connect to WDM Server directly. This will leave the client agent independent and not connected to an edge server.
• Select Prefer WDM EdgeServer: Select this to assign an edge server or the WDM server as preferred server for the client agent
5. When done, click OK to close the window.
WebDT Device Manager42
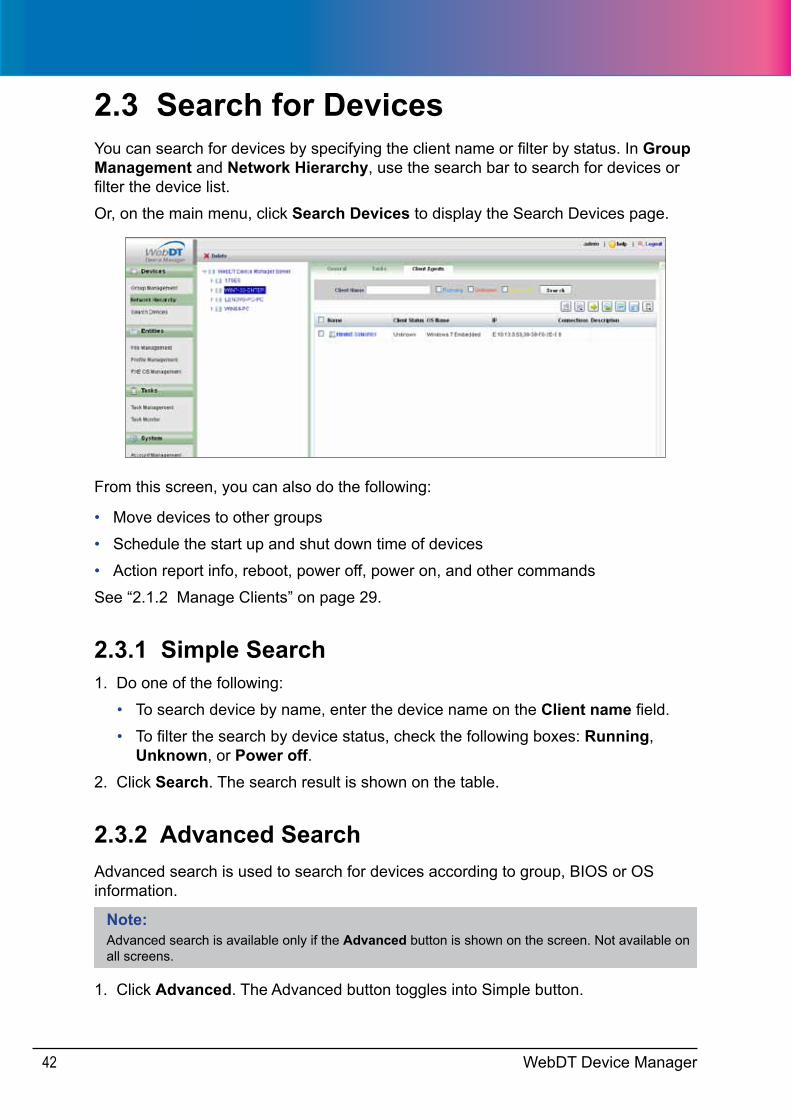
2.3 Search for DevicesYou can search for devices by specifying the client name or filter by status. In Group Management and Network Hierarchy, use the search bar to search for devices or filter the device list.
Or, on the main menu, click Search Devices to display the Search Devices page.
From this screen, you can also do the following:
• Move devices to other groups
• Schedule the start up and shut down time of devices
• Action report info, reboot, power off, power on, and other commands
See “2.1.2 Manage Clients” on page 29.
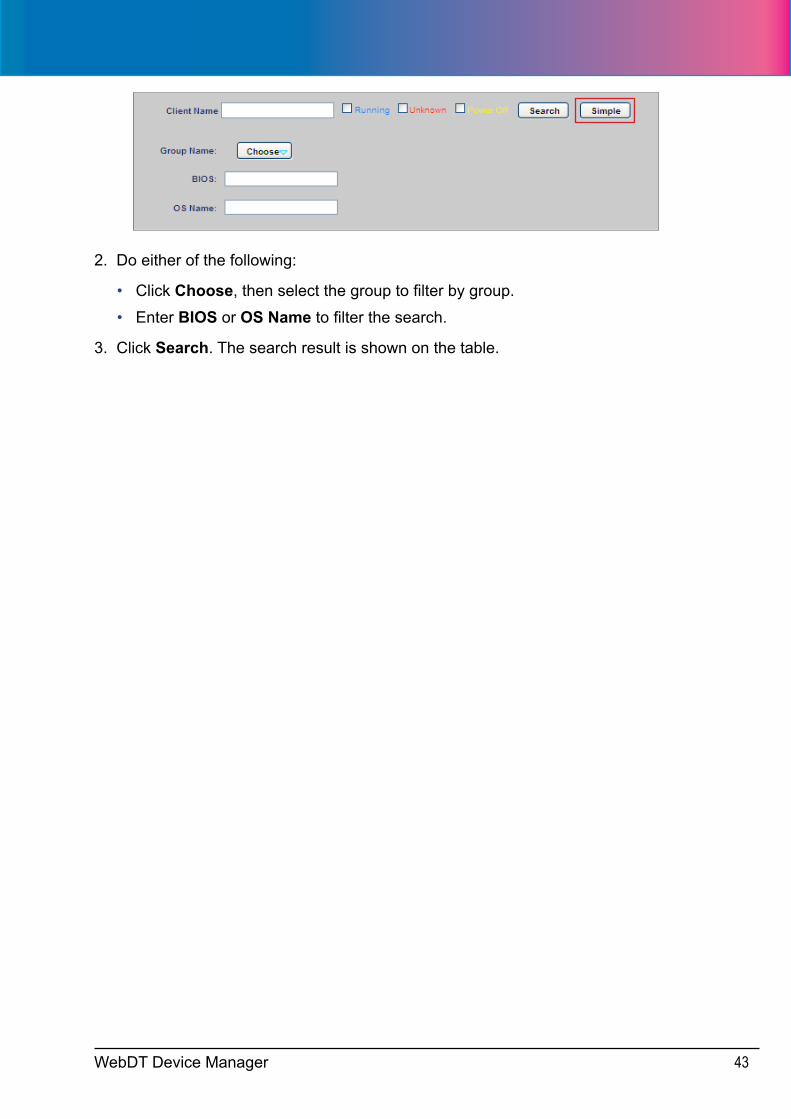
2.3.1 Simple Search1. Do one of the following:
• To search device by name, enter the device name on the Client name field.
• To filter the search by device status, check the following boxes: Running, Unknown, or Power off.
2. Click Search. The search result is shown on the table.
2.3.2 Advanced SearchAdvanced search is used to search for devices according to group, BIOS or OS information.
Note:Advanced search is available only if the Advanced button is shown on the screen. Not available on all screens.
1. Click Advanced. The Advanced button toggles into Simple button.
WebDT Device Manager 43
2. Do either of the following:
• Click Choose, then select the group to filter by group.
• Enter BIOS or OS Name to filter the search.
3. Click Search. The search result is shown on the table.
WebDT Device Manager44
3 Chapter 3 Files
This chapter covers the following topics:
• Create and manage folders and files
• Create and manage profiles
• Create and manage PXE OS
The files and commands defined on this chapter will be used to compose tasks to be executed by the client agents. See “Chapter 4 Managing Tasks”.
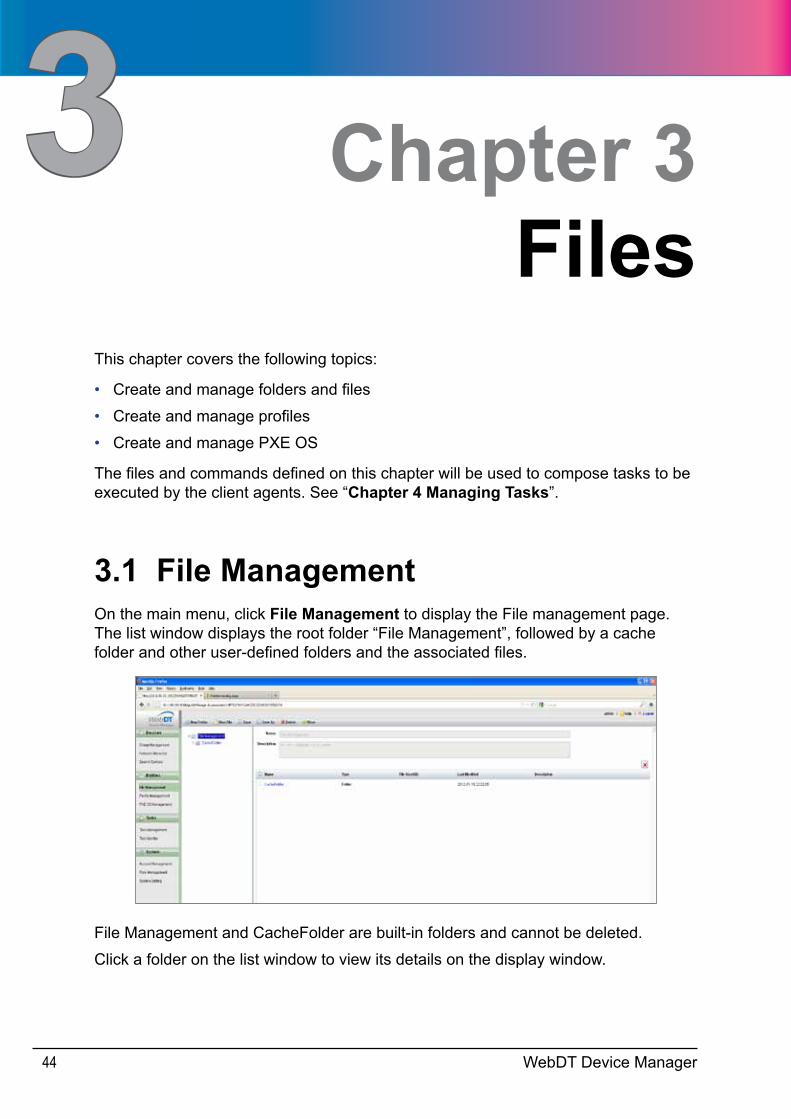
3.1 File ManagementOn the main menu, click File Management to display the File management page. The list window displays the root folder “File Management”, followed by a cache folder and other user-defined folders and the associated files.
File Management and CacheFolder are built-in folders and cannot be deleted.
Click a folder on the list window to view its details on the display window.
WebDT Device Manager 45
3.1.1 Manage FoldersCreate New Folders1. On the main menu, click File Management.2. On the list window, select the root or another folder where you want to create the
new folder.
3. On the toolbar, click New Folder.4. On the Name field, enter the desired folder name. This field cannot contain the
following special characters: “$’*/:<>?@\_|%.
5. On the Description field, type the folder description.
6. Click Save. The new folder appears on the list window.
Modify Folder InformationTo edit the folder name and description, do the following:
1. On the main menu, click File Management.2. Select the folder on the list window.
3. Modify the folder name or description.
4. Click Save.
Delete Folders1. On the main menu, click File Management.2. Select the folder on the list window.
3. On the toolbar, click Delete.
4. Click OK to confirm.
Move FoldersA folder can be moved under another folder.
1. On the main menu, click File Management.2. Select the folder on the list window.
3. On the toolbar, click Move. A window appears.
4. Select the destination folder.
5. Click OK.
WebDT Device Manager46
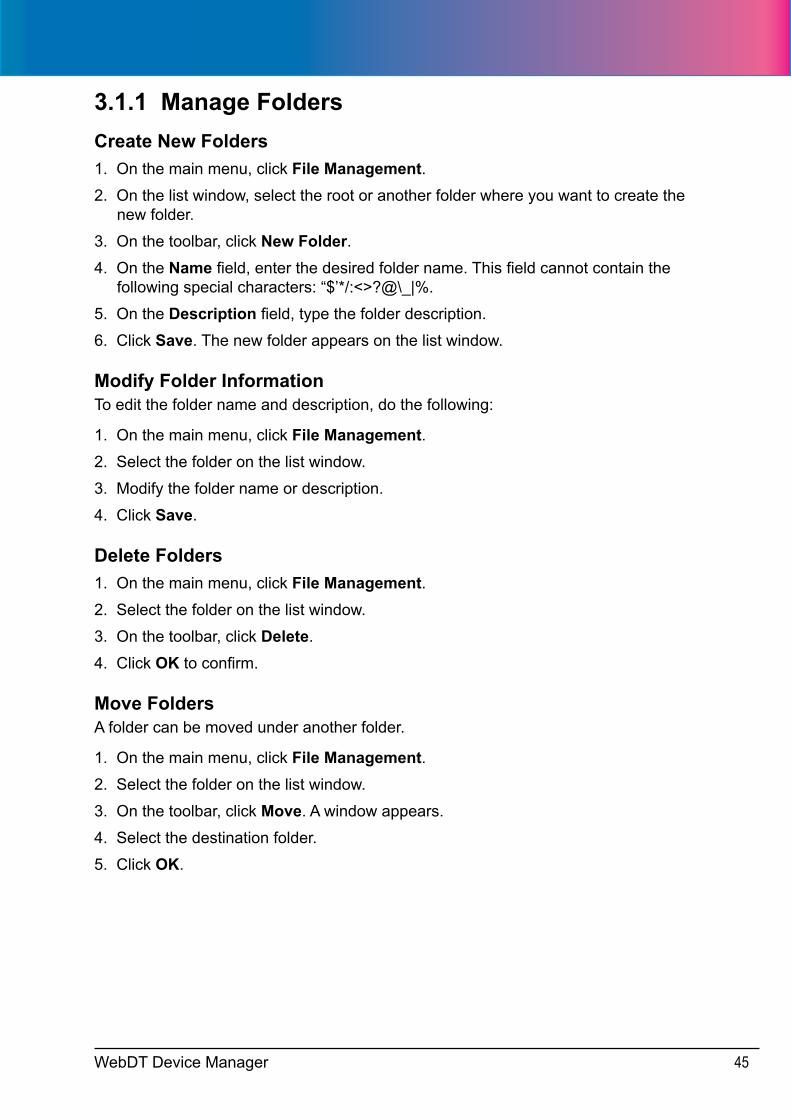
3.1.2 Manage Files
Add Files to Folders1. On the main menu, click File Management.2. Select the folder where you want to add the file.
3. On the toolbar, click New File.
4. If necessary, enter a description on the Description field.
5. To add files from the local computer, see “Add Files From Local Computer” on page 46 below. To add files from an FTP server, see “Add Files From FTP Server” on page 47.
Add Files From Local Computer1. Select Local File.
2. Click Browse and browse for the desired file.
3. Click Open to select the file and close the window.
4. On the toolbar, click Save. The new file is automatically named after the original filename and shown on the list window.

WebDT Device Manager 47
Add Files From FTP Server1. Select FTP URL, then enter the URL on the field. Example format: ftp://xxx.
xxx:Port/xxx.zip”.
2. On the Account field, enter the authorized user account that is allowed to access the FTP.
3. On the Password field, enter the account password.
4. Click Browse. The available files and folders appear on a pop-up window.
5. Select a file or folder to add.
6. Click OK to close the window.
7. On the toolbar, click Save. The new file/folder is automatically named and shown on the list window.
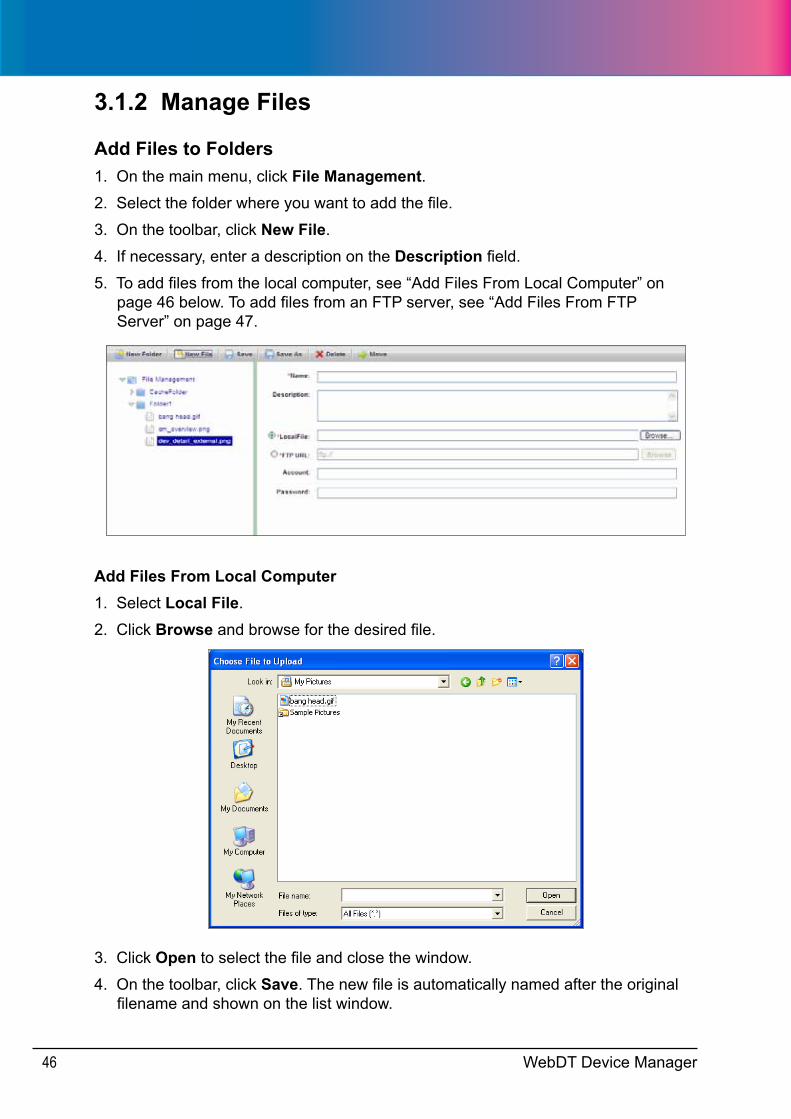
Copy FilesTo have more than one copy of the same file, you have to save the file with a different filename.
1. On the main menu, click File Management.2. Select the file that you want to copy.
WebDT Device Manager48
3. On the toolbar, click Save As. A window appears.
4. On the Name field, enter the filename to save the new file.
5. Click OK.
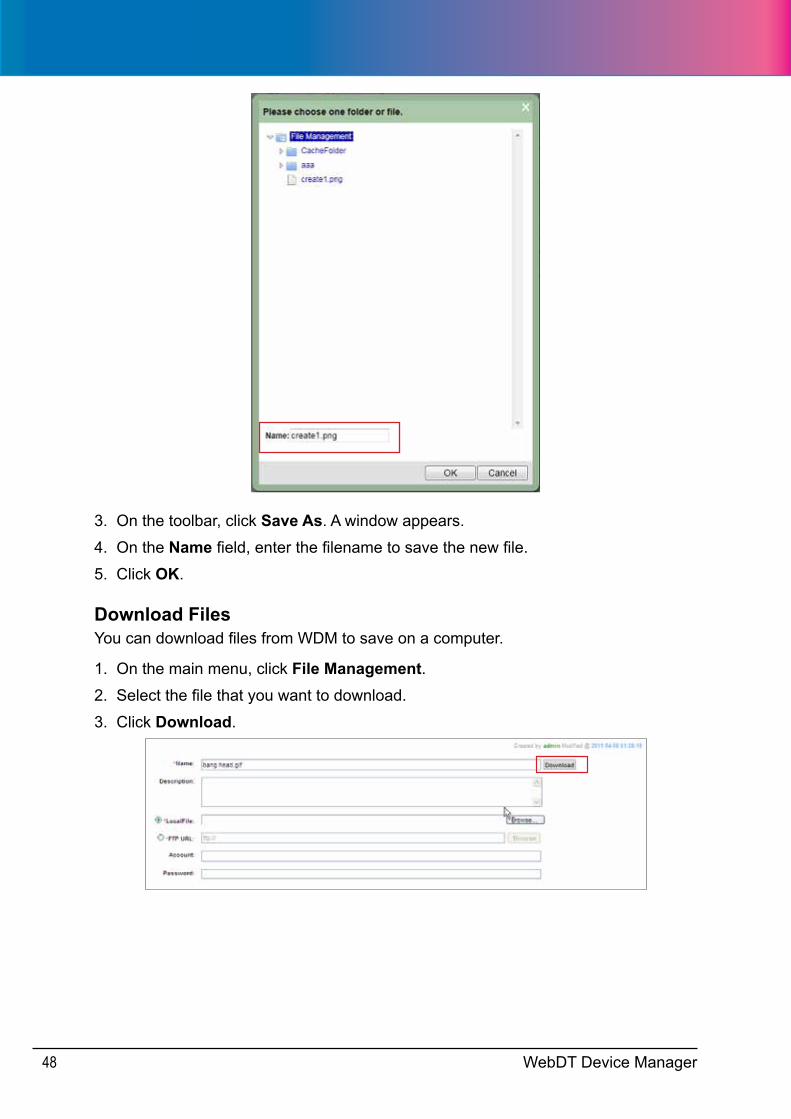
Download FilesYou can download files from WDM to save on a computer.
1. On the main menu, click File Management.2. Select the file that you want to download.
3. Click Download.
WebDT Device Manager 49
Modify Files1. On the main menu, click File Management.2. Select the file that you want to modify.
3. Modify the description or browse for a different file to change it.
4. When done, click Save.
Delete Files1. On the main menu, click File Management.2. To delete a single file, select the file then click Delete on the toolbar (skip to step 5).
To delete more than one file, select the folder where the files are saved.
3. On the display window, check the files that you want to delete.
4. Click .
5. A pop-up window appears. Click OK to delete the file(s).
Move Files1. On the main menu, click File Management.2. Select the file that you want to move.
3. On the toolbar, click Move. A window appears.
4. Select the destination folder.
5. Click OK.
WebDT Device Manager50
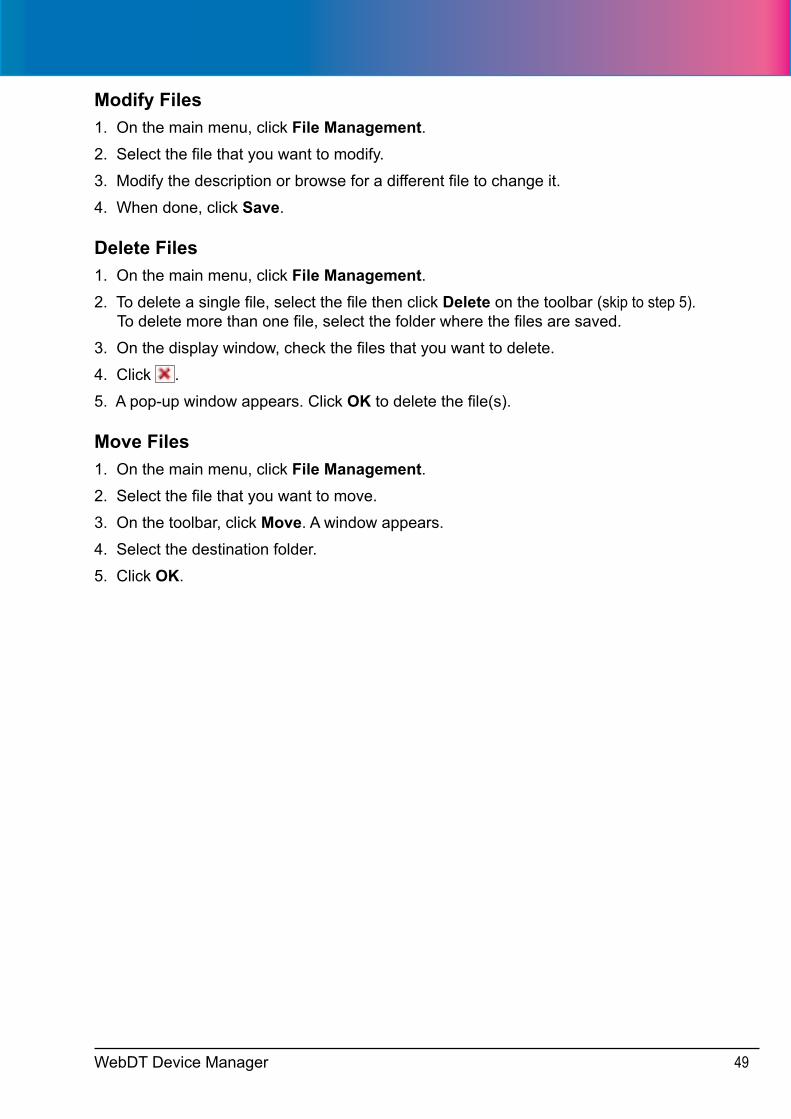
3.2 Profile ManagementOn the main menu, click Profile Management to display the window. The list window displays the root folder, followed by user-defined profiles.
3.2.1 Manage Profile
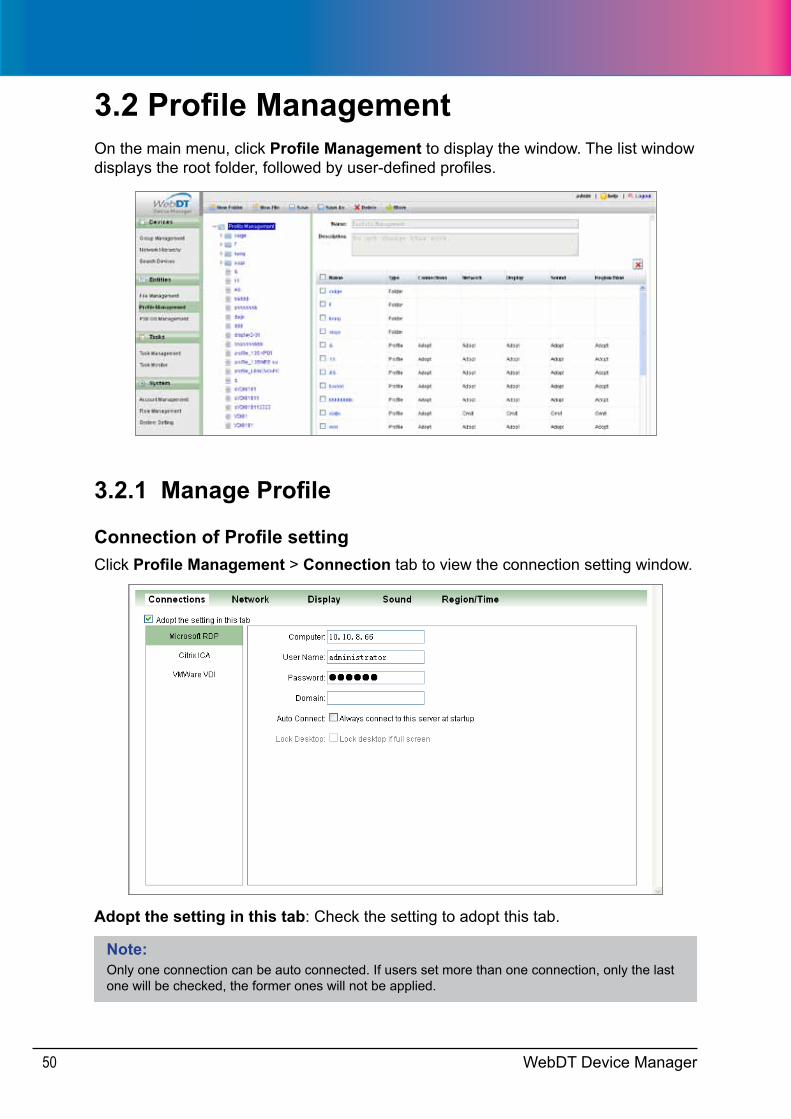
Connection of Profile settingClick Profile Management > Connection tab to view the connection setting window.
Adopt the setting in this tab: Check the setting to adopt this tab.
Note:Only one connection can be auto connected. If users set more than one connection, only the last one will be checked, the former ones will not be applied.
WebDT Device Manager 51
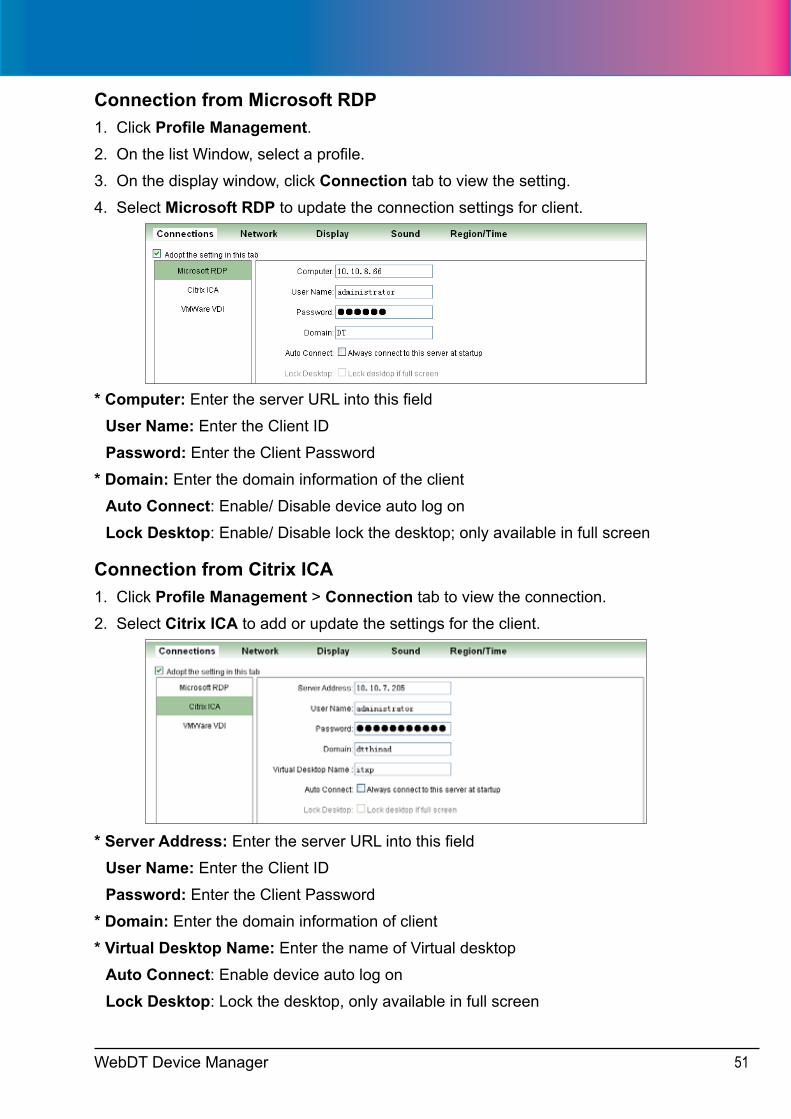
Connection from Microsoft RDP1. Click Profile Management.2. On the list Window, select a profile.
3. On the display window, click Connection tab to view the setting.
4. Select Microsoft RDP to update the connection settings for client.
* Computer: Enter the server URL into this field
User Name: Enter the Client ID
Password: Enter the Client Password
* Domain: Enter the domain information of the client
Auto Connect: Enable/ Disable device auto log on
Lock Desktop: Enable/ Disable lock the desktop; only available in full screen
Connection from Citrix ICA1. Click Profile Management > Connection tab to view the connection.
2. Select Citrix ICA to add or update the settings for the client.
* Server Address: Enter the server URL into this field
User Name: Enter the Client ID
Password: Enter the Client Password
* Domain: Enter the domain information of client
* Virtual Desktop Name: Enter the name of Virtual desktop
Auto Connect: Enable device auto log on
Lock Desktop: Lock the desktop, only available in full screen
WebDT Device Manager52
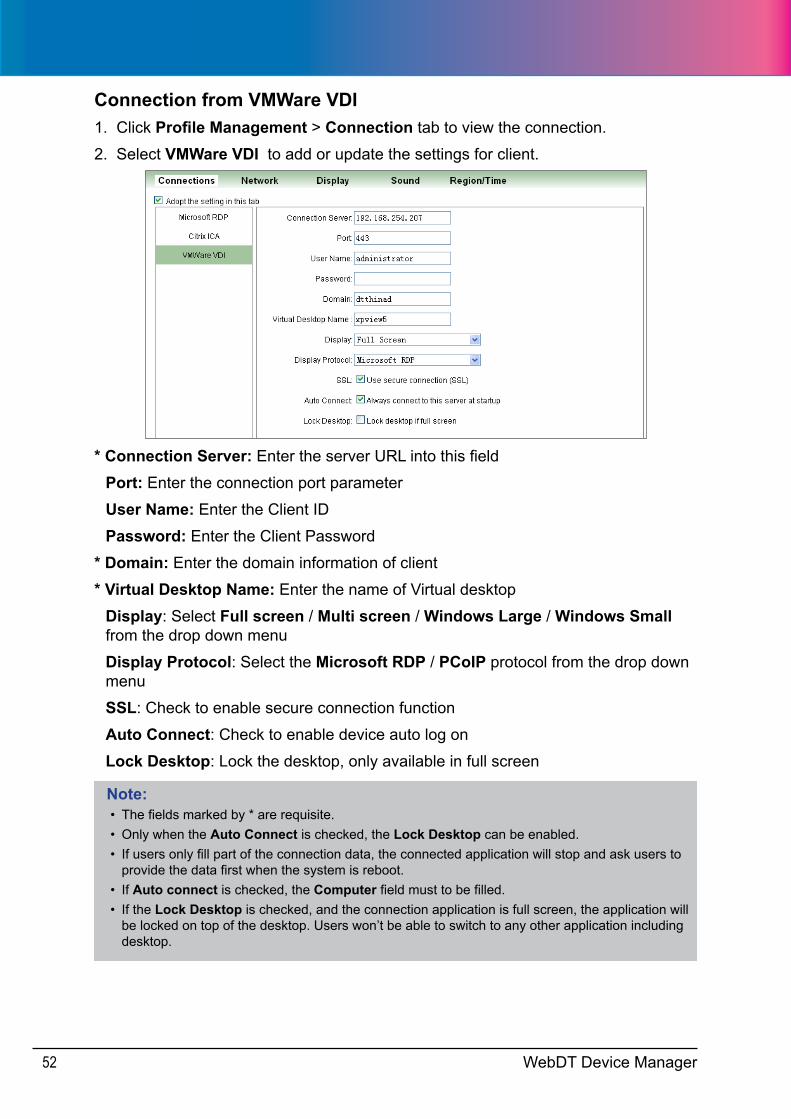
Connection from VMWare VDI1. Click Profile Management > Connection tab to view the connection.
2. Select VMWare VDI to add or update the settings for client.
* Connection Server: Enter the server URL into this field
Port: Enter the connection port parameter
User Name: Enter the Client ID
Password: Enter the Client Password
* Domain: Enter the domain information of client
* Virtual Desktop Name: Enter the name of Virtual desktop
Display: Select Full screen / Multi screen / Windows Large / Windows Small from the drop down menu
Display Protocol: Select the Microsoft RDP / PCoIP protocol from the drop down menu
SSL: Check to enable secure connection function
Auto Connect: Check to enable device auto log on
Lock Desktop: Lock the desktop, only available in full screen
Note:• The fields marked by * are requisite.• Only when the Auto Connect is checked, the Lock Desktop can be enabled. • If users only fill part of the connection data, the connected application will stop and ask users to
provide the data first when the system is reboot.• If Auto connect is checked, the Computer field must to be filled.• If the Lock Desktop is checked, and the connection application is full screen, the application will
be locked on top of the desktop. Users won’t be able to switch to any other application including desktop.
WebDT Device Manager 53
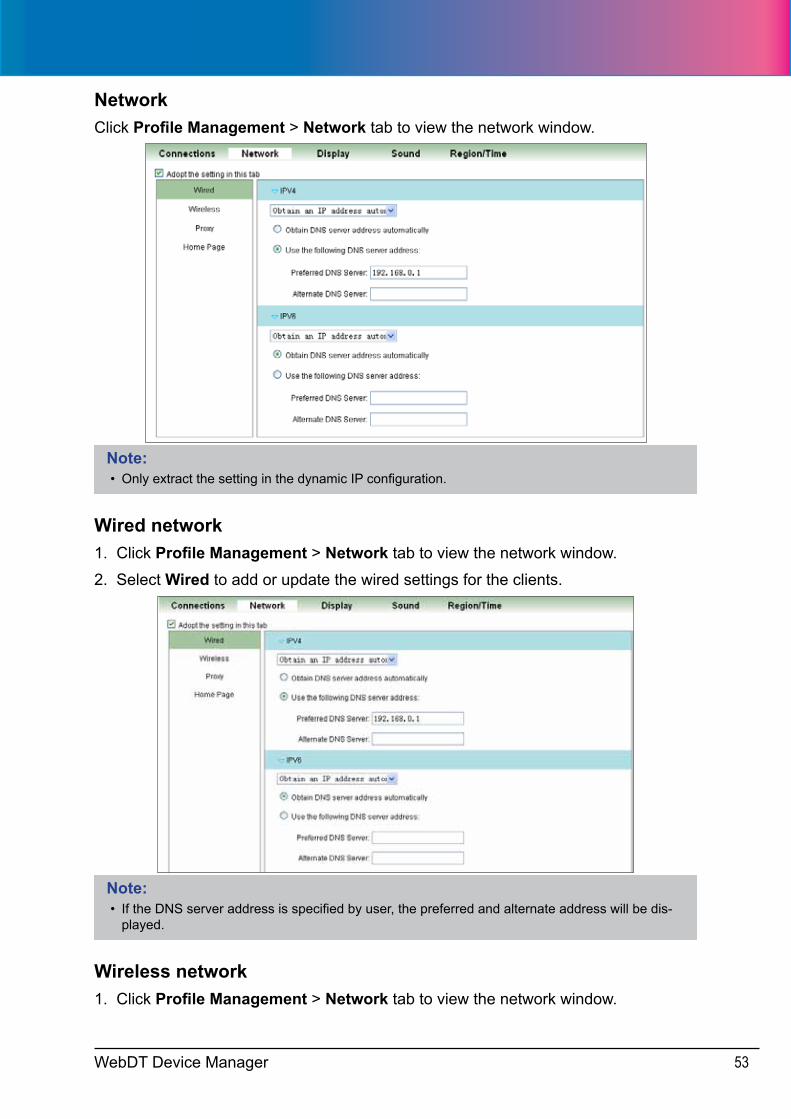
NetworkClick Profile Management > Network tab to view the network window.
Note:• Only extract the setting in the dynamic IP configuration.
Wired network1. Click Profile Management > Network tab to view the network window.
2. Select Wired to add or update the wired settings for the clients.
Note:• If the DNS server address is specified by user, the preferred and alternate address will be dis-
played.
Wireless network1. Click Profile Management > Network tab to view the network window.
WebDT Device Manager54
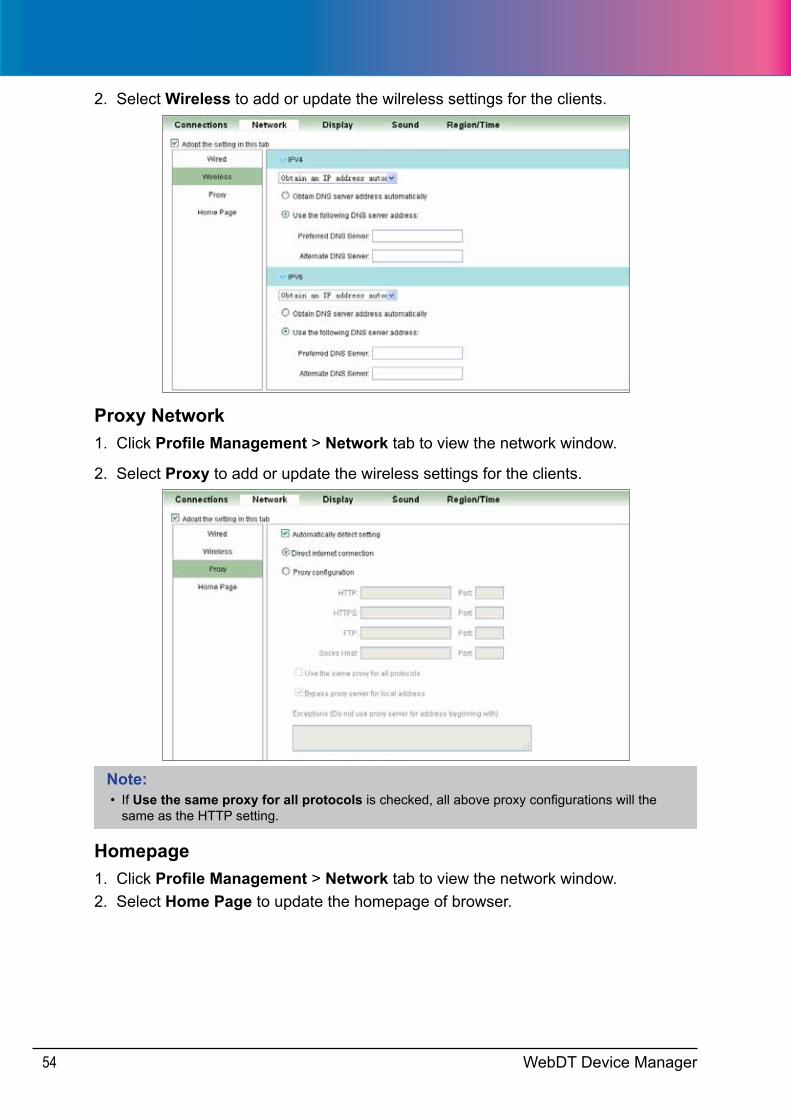
2. Select Wireless to add or update the wilreless settings for the clients.
Proxy Network1. Click Profile Management > Network tab to view the network window.
2. Select Proxy to add or update the wireless settings for the clients.
Note:• If Use the same proxy for all protocols is checked, all above proxy configurations will the
same as the HTTP setting.
Homepage1. Click Profile Management > Network tab to view the network window.2. Select Home Page to update the homepage of browser.
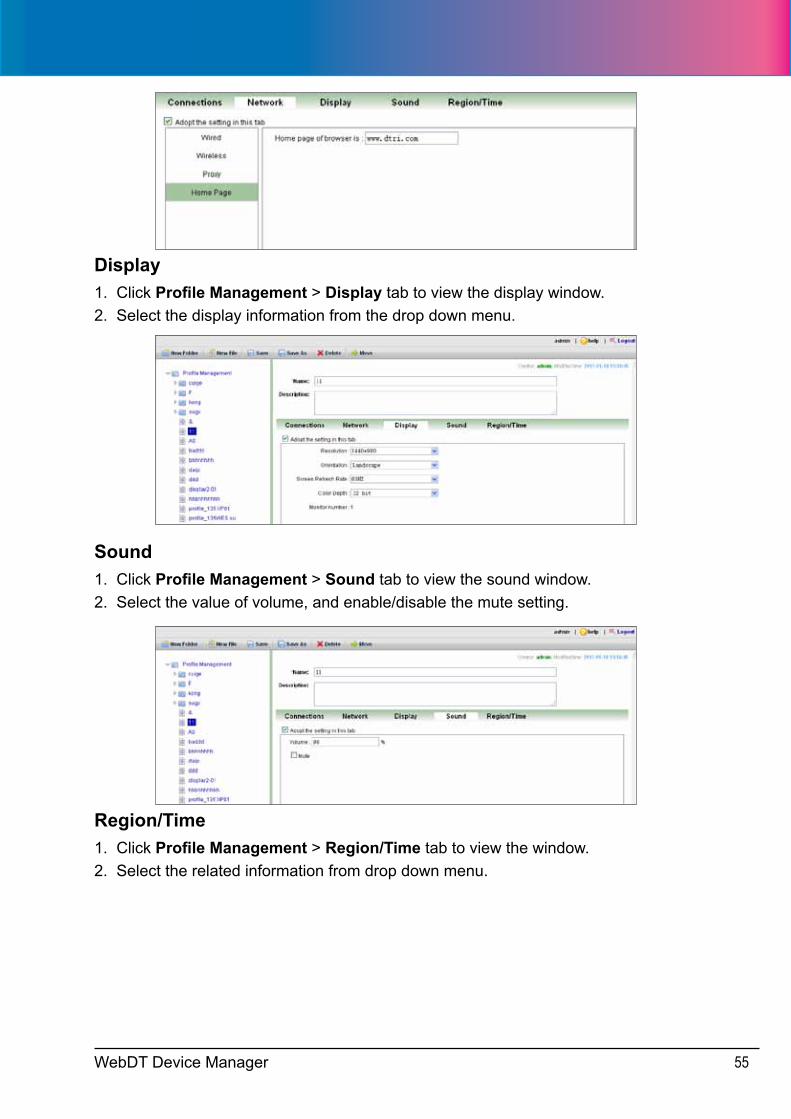
WebDT Device Manager 55
Display1. Click Profile Management > Display tab to view the display window.2. Select the display information from the drop down menu.
Sound1. Click Profile Management > Sound tab to view the sound window.2. Select the value of volume, and enable/disable the mute setting.
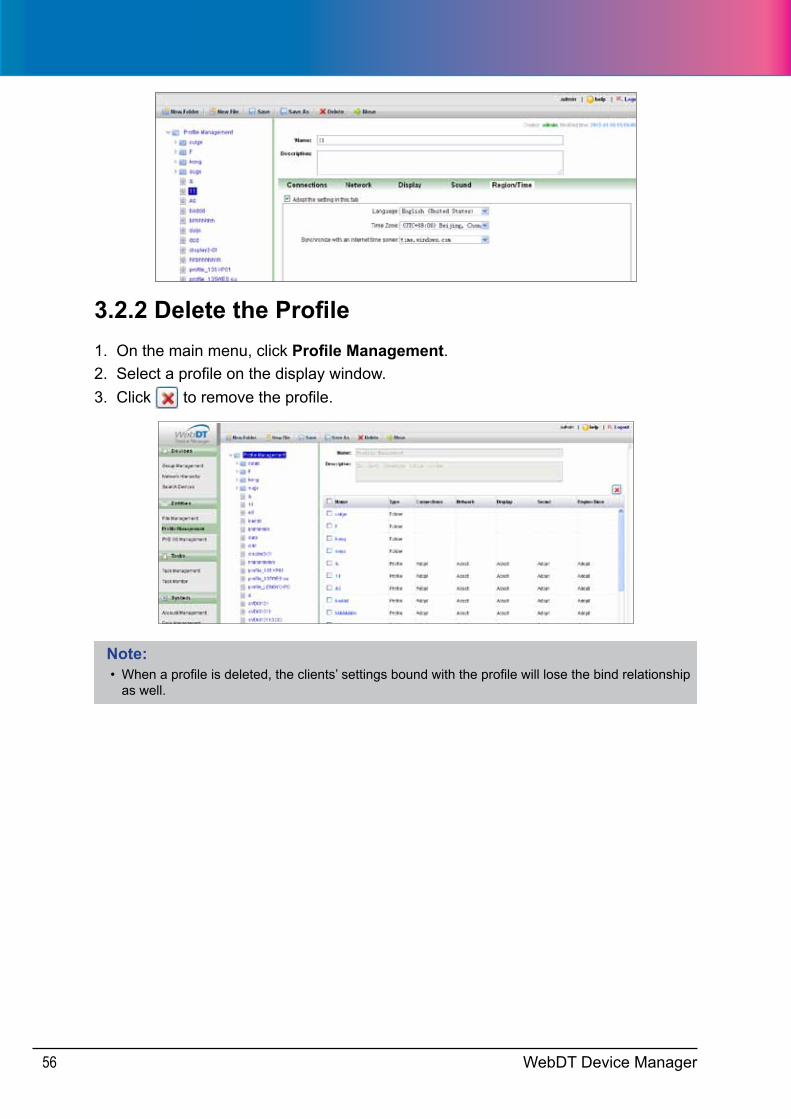
Region/Time1. Click Profile Management > Region/Time tab to view the window.2. Select the related information from drop down menu.
WebDT Device Manager56
3.2.2 Delete the Profile1. On the main menu, click Profile Management.2. Select a profile on the display window.3. Click to remove the profile.
Note:• When a profile is deleted, the clients’ settings bound with the profile will lose the bind relationship
as well.

WebDT Device Manager 57
3.3 PXE OS ManagementOn the main menu, click PXE OS Management to display the window. The list window displays the root PXE OS folder, followed by user-defined OS files.
3.3.1 Create PXE OSNew PXE OS 1. Click PXE OS Management.2. On the toolbar, select New File.
3. On the Name field, enter the desired name.
4. On the Description field, type the OS file description.
5. On the Local File field, Click Browse to select the destination OS from local device.
6. Click Save.
Download PXE OS1. Click PXE OS Management.2. On the List Window, select a PXE OS file.
3. On the Name field, click Download to start the OS download.
Modify PXE OS1. Click PXE OS Management.2. On the list window, select a PXE OS file to update.
3. Modify the name, description or browse for a different file to change it.
4. Click Save.
Delete PXE OS1. Click PXE OS Management.2. On the list window, select the PXE OS file to delete.
WebDT Device Manager58
3. Click Delete.4. A pop-up window appears. Click OK to delete the file.
Move PXE OS1. Click PXE OS Management.2. On the list window, select a PXE OS file to move.
3. Click Move. A window appears.
4. Select the destination file.
5. Click OK to move the file.
WebDT Device Manager 59
4Chapter 4 Managing TasksThis chapter covers the following topics:
• Create and manage tasks
• Monitor tasks
4.1 Task ManagementOn the main menu, click Task Management to display the Task management page. The list window displays the task tree, a tree of created tasks with their names. Click a task name on the task tree to view the task detail on the display window.
Task Table Task Detail
WebDT Device Manager60
4.1.1 Manage Folders
Create New Folders1. On the main menu, click Task Management.
2. On the list window, select the root or another folder where you want to create the new folder.
3. On the toolbar, click New Folder.
4. On the Name field, enter the desired folder name.
5. On the Description field, type the folder description.
6. Click Save. The new folder appears on the list window.
Modify Folder InformationTo edit the folder name and description, do the following:
1. On the main menu, click Task Management.
2. Select the folder on the list window.
3. Modify the folder name or description.
4. Click Save.
Delete Folders1. On the main menu, click Task Management.
2. Select the folder on the list window.
3. On the toolbar, click Delete.
4. Click OK to confirm. When a folder is deleted, all relevant tasks/ commands under the folder will be cancelled in the assigned devices.
Move FoldersA folder can be moved under another folder:
1. On the main menu, click Task Management.
2. Select the folder on the list window.
3. On the toolbar, click Move. A window appears.
4. Select the destination folder.
5. Click OK.
WebDT Device Manager 61
4.1.2 Manage Tasks
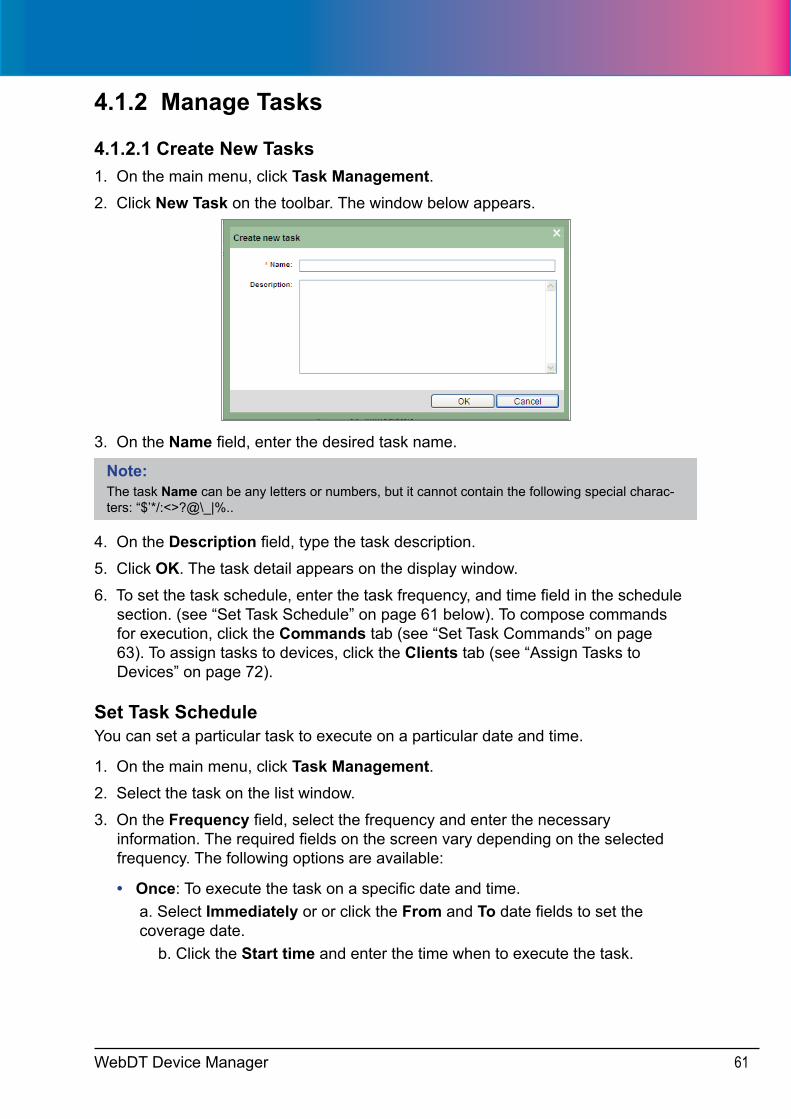
4.1.2.1 Create New Tasks1. On the main menu, click Task Management.2. Click New Task on the toolbar. The window below appears.
3. On the Name field, enter the desired task name.
Note:The task Name can be any letters or numbers, but it cannot contain the following special charac-ters: “$’*/:<>?@\_|%..
4. On the Description field, type the task description.
5. Click OK. The task detail appears on the display window.
6. To set the task schedule, enter the task frequency, and time field in the schedule section. (see “Set Task Schedule” on page 61 below). To compose commands for execution, click the Commands tab (see “Set Task Commands” on page 63). To assign tasks to devices, click the Clients tab (see “Assign Tasks to Devices” on page 72).
Set Task ScheduleYou can set a particular task to execute on a particular date and time.
1. On the main menu, click Task Management.2. Select the task on the list window.
3. On the Frequency field, select the frequency and enter the necessary information. The required fields on the screen vary depending on the selected frequency. The following options are available:
• Once: To execute the task on a specific date and time.a. Select Immediately or or click the From and To date fields to set the coverage date.
b. Click the Start time and enter the time when to execute the task.

WebDT Device Manager62
• Daily: To execute the task on a daily basis.a. Click the From and To date fields to set the coverage date.b. Set the Start time, click the fields to select the value.
• Weekly: To execute the task on a weekly basis.a. Click the From and To date fields to set the coverage date.b. Set the Start time, click the fields to select the value.c. Click the day buttons to select the days. Selected days are highlighted.
WebDT Device Manager 63
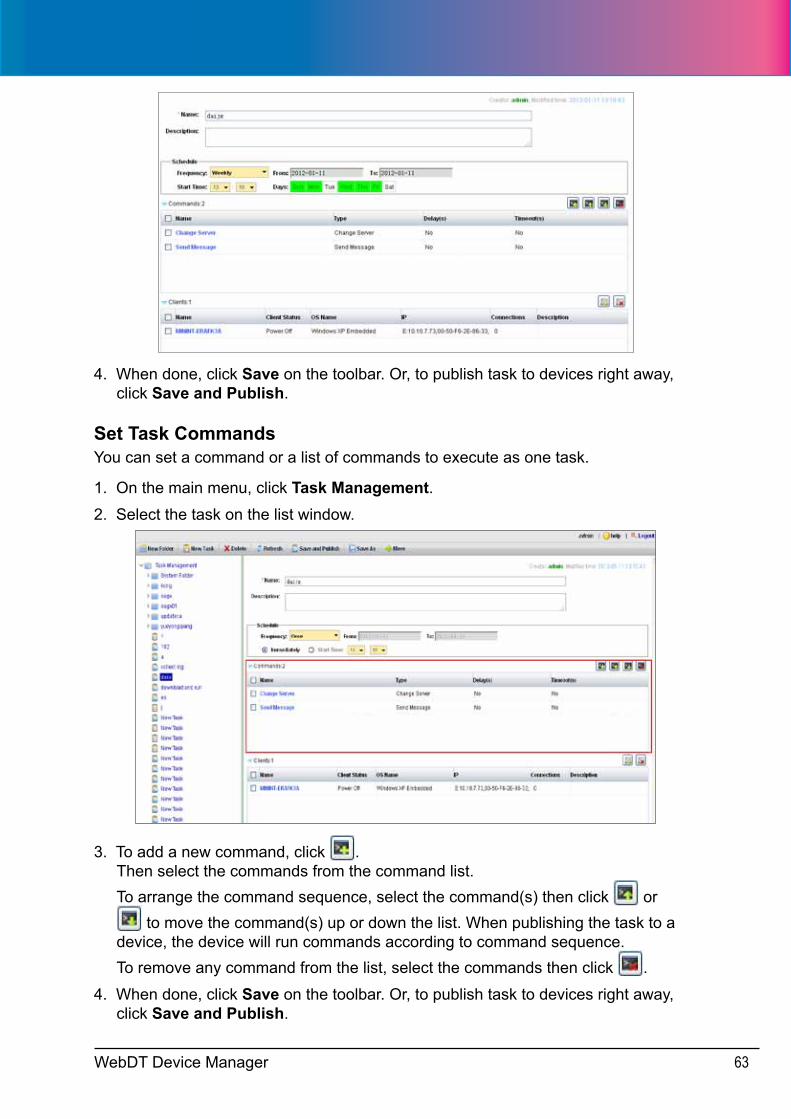
4. When done, click Save on the toolbar. Or, to publish task to devices right away, click Save and Publish.
Set Task CommandsYou can set a command or a list of commands to execute as one task.
1. On the main menu, click Task Management.2. Select the task on the list window.
3. To add a new command, click . Then select the commands from the command list. To arrange the command sequence, select the command(s) then click or
to move the command(s) up or down the list. When publishing the task to a device, the device will run commands according to command sequence. To remove any command from the list, select the commands then click .
4. When done, click Save on the toolbar. Or, to publish task to devices right away, click Save and Publish.
WebDT Device Manager64
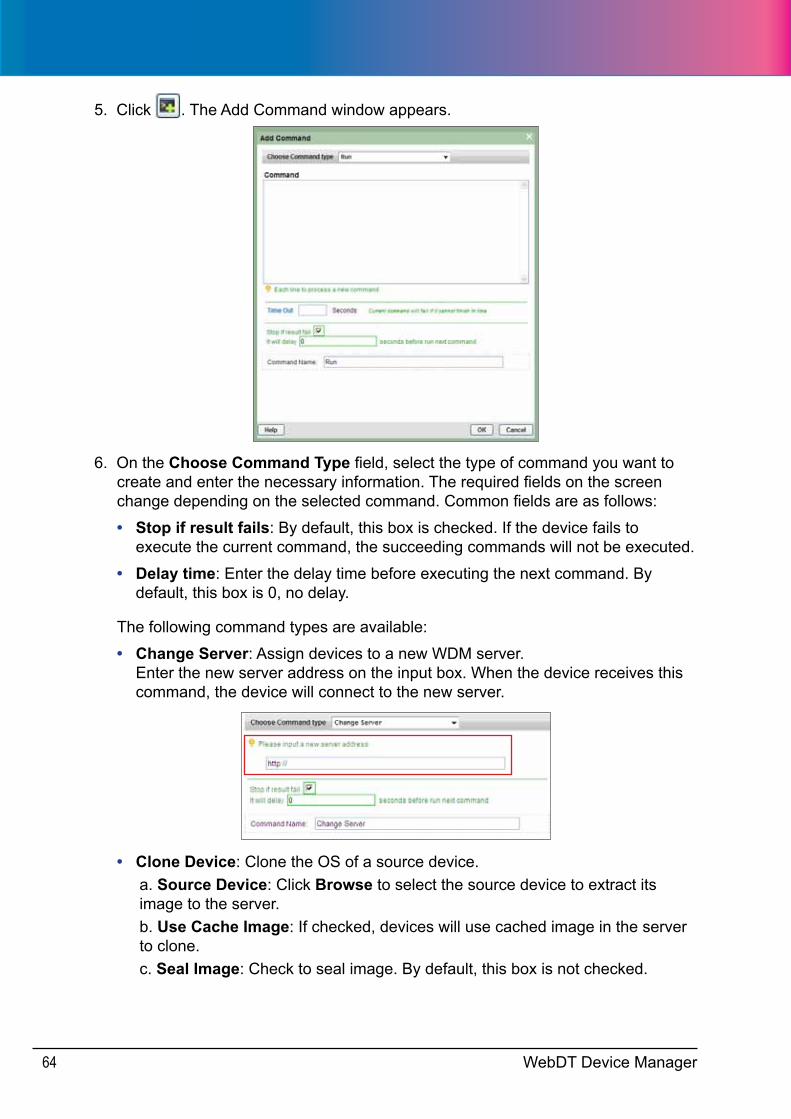
5. Click . The Add Command window appears.
6. On the Choose Command Type field, select the type of command you want to create and enter the necessary information. The required fields on the screen change depending on the selected command. Common fields are as follows:
• Stop if result fails: By default, this box is checked. If the device fails to execute the current command, the succeeding commands will not be executed.
• Delay time: Enter the delay time before executing the next command. By default, this box is 0, no delay.
The following command types are available:
• Change Server: Assign devices to a new WDM server.Enter the new server address on the input box. When the device receives this command, the device will connect to the new server.
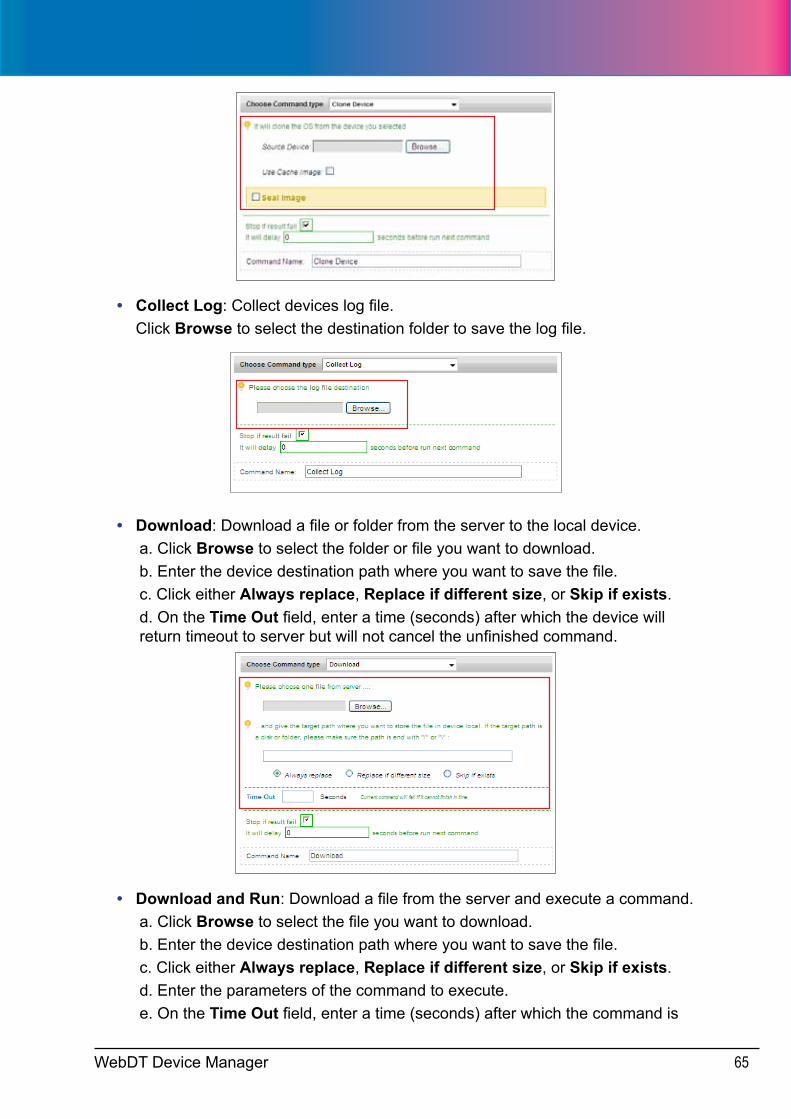
• Clone Device: Clone the OS of a source device.a. Source Device: Click Browse to select the source device to extract its image to the server. b. Use Cache Image: If checked, devices will use cached image in the server to clone.c. Seal Image: Check to seal image. By default, this box is not checked.
WebDT Device Manager 65
• Collect Log: Collect devices log file.Click Browse to select the destination folder to save the log file.
• Download: Download a file or folder from the server to the local device.a. Click Browse to select the folder or file you want to download.b. Enter the device destination path where you want to save the file.c. Click either Always replace, Replace if different size, or Skip if exists.d. On the Time Out field, enter a time (seconds) after which the device will return timeout to server but will not cancel the unfinished command.
• Download and Run: Download a file from the server and execute a command.a. Click Browse to select the file you want to download.b. Enter the device destination path where you want to save the file.c. Click either Always replace, Replace if different size, or Skip if exists.d. Enter the parameters of the command to execute.e. On the Time Out field, enter a time (seconds) after which the command is
WebDT Device Manager66
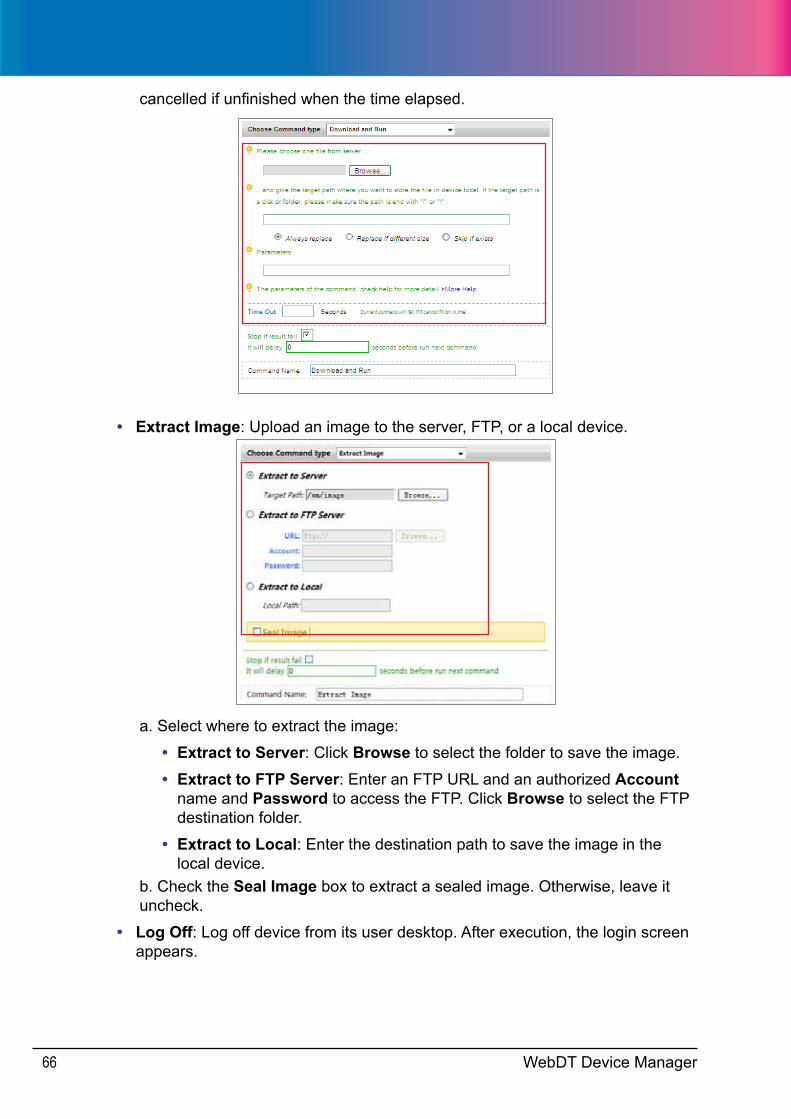
cancelled if unfinished when the time elapsed.
• Extract Image: Upload an image to the server, FTP, or a local device.
a. Select where to extract the image:
• Extract to Server: Click Browse to select the folder to save the image.
• Extract to FTP Server: Enter an FTP URL and an authorized Account name and Password to access the FTP. Click Browse to select the FTP destination folder.
• Extract to Local: Enter the destination path to save the image in the local device.
b. Check the Seal Image box to extract a sealed image. Otherwise, leave it uncheck.
• Log Off: Log off device from its user desktop. After execution, the login screen appears.
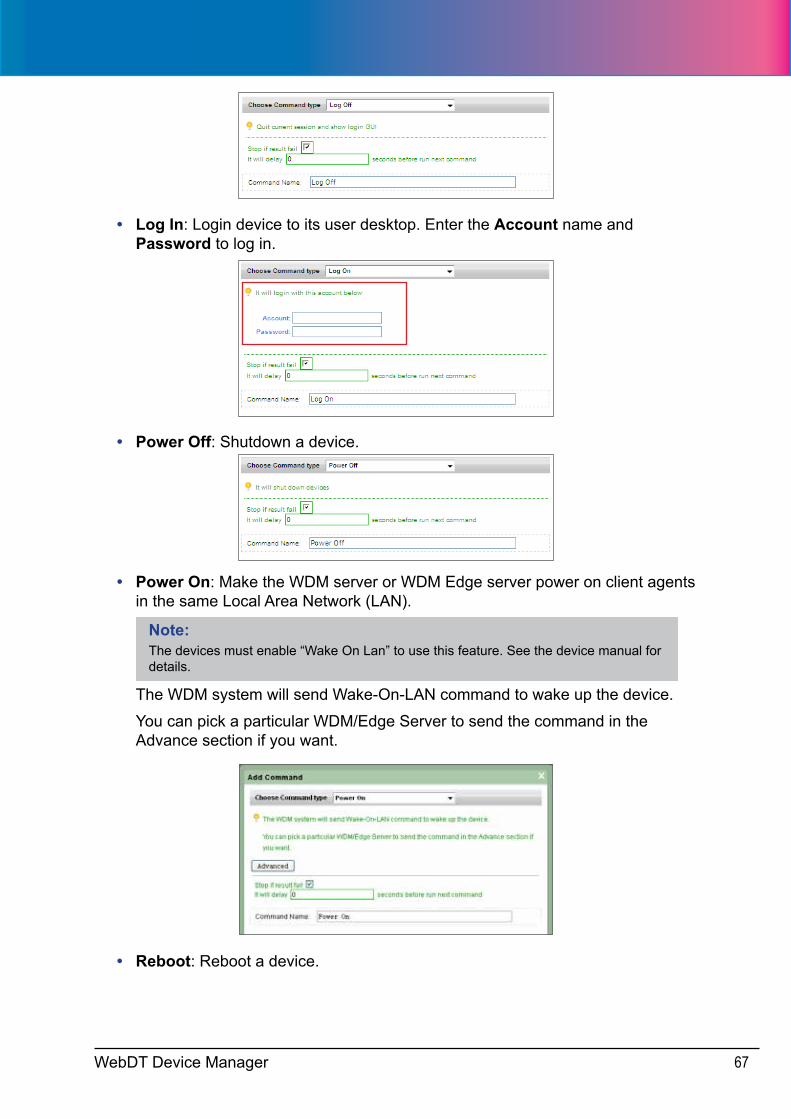
WebDT Device Manager 67
• Log In: Login device to its user desktop. Enter the Account name and Password to log in.
• Power Off: Shutdown a device.
• Power On: Make the WDM server or WDM Edge server power on client agents in the same Local Area Network (LAN).
Note:The devices must enable “Wake On Lan” to use this feature. See the device manual for details.
The WDM system will send Wake-On-LAN command to wake up the device.
You can pick a particular WDM/Edge Server to send the command in the Advance section if you want.
• Reboot: Reboot a device.
WebDT Device Manager68
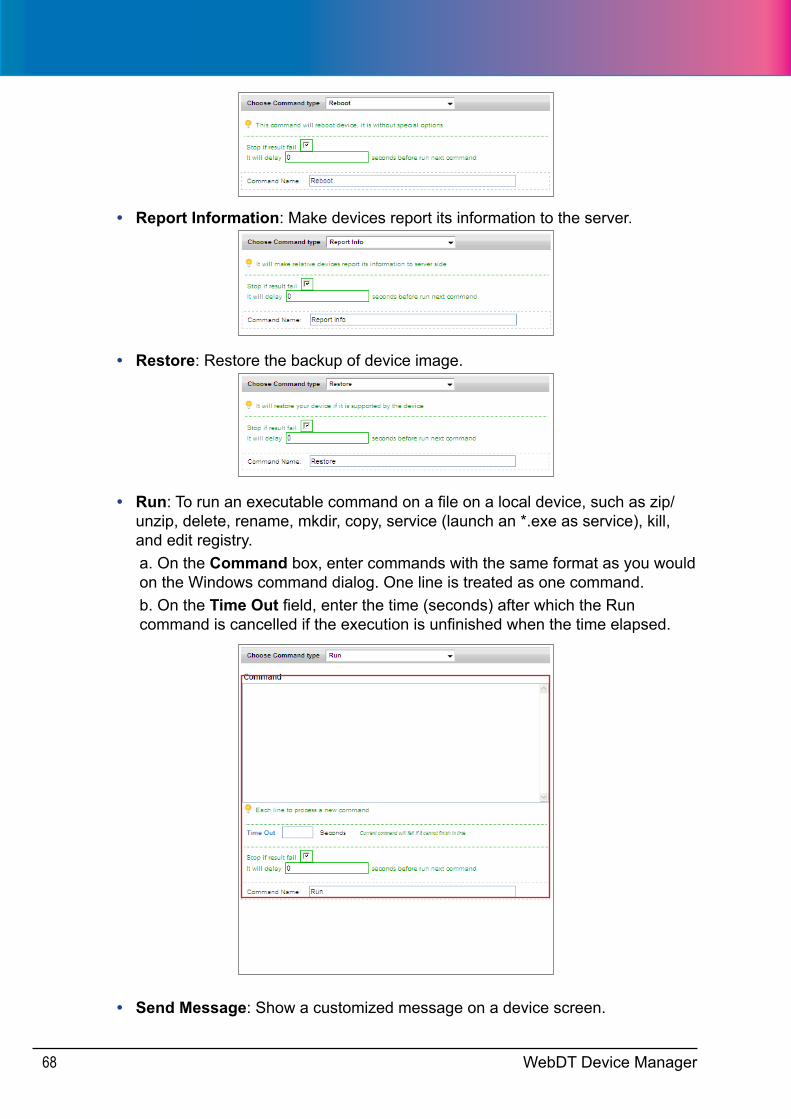
• Report Information: Make devices report its information to the server.
• Restore: Restore the backup of device image.
• Run: To run an executable command on a file on a local device, such as zip/unzip, delete, rename, mkdir, copy, service (launch an *.exe as service), kill, and edit registry.a. On the Command box, enter commands with the same format as you would on the Windows command dialog. One line is treated as one command.b. On the Time Out field, enter the time (seconds) after which the Run command is cancelled if the execution is unfinished when the time elapsed.
• Send Message: Show a customized message on a device screen.
WebDT Device Manager 69
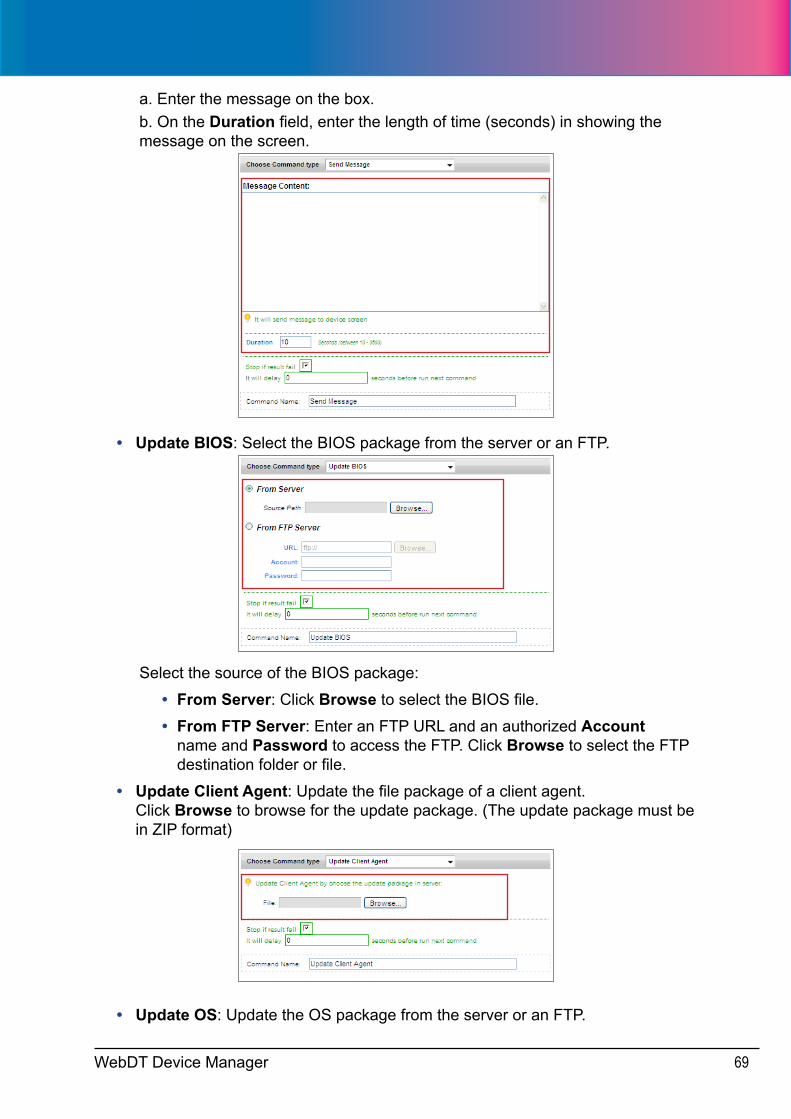
a. Enter the message on the box.b. On the Duration field, enter the length of time (seconds) in showing the message on the screen.
• Update BIOS: Select the BIOS package from the server or an FTP.
Select the source of the BIOS package:
• From Server: Click Browse to select the BIOS file.
• From FTP Server: Enter an FTP URL and an authorized Account name and Password to access the FTP. Click Browse to select the FTP destination folder or file.
• Update Client Agent: Update the file package of a client agent. Click Browse to browse for the update package. (The update package must be in ZIP format)
• Update OS: Update the OS package from the server or an FTP.
WebDT Device Manager70
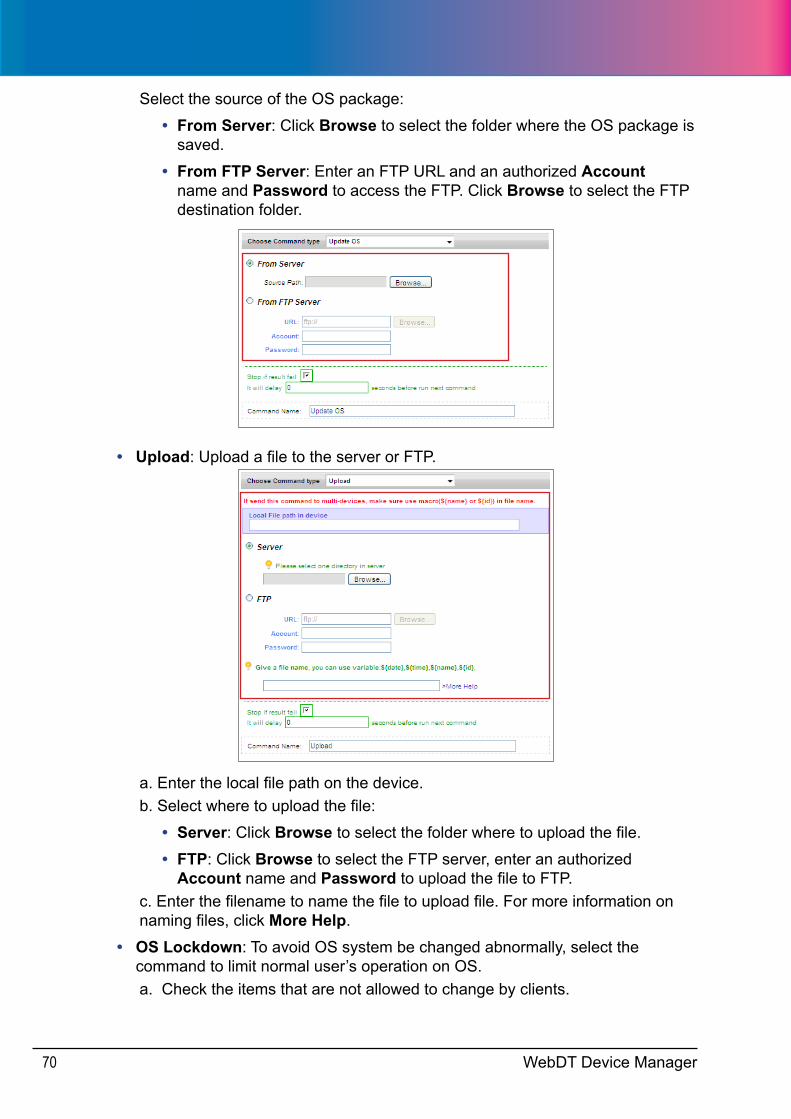
Select the source of the OS package:
• From Server: Click Browse to select the folder where the OS package is saved.
• From FTP Server: Enter an FTP URL and an authorized Account name and Password to access the FTP. Click Browse to select the FTP destination folder.
• Upload: Upload a file to the server or FTP.
a. Enter the local file path on the device.b. Select where to upload the file:
• Server: Click Browse to select the folder where to upload the file.
• FTP: Click Browse to select the FTP server, enter an authorized Account name and Password to upload the file to FTP.
c. Enter the filename to name the file to upload file. For more information on naming files, click More Help.
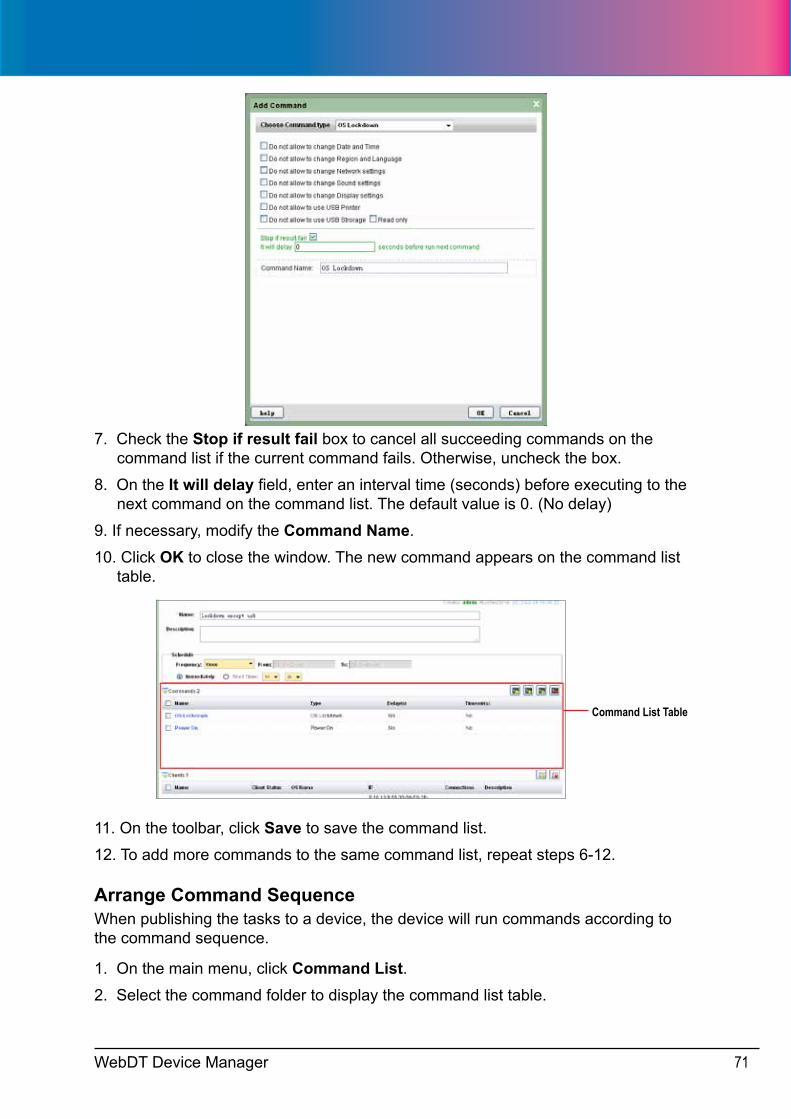
• OS Lockdown: To avoid OS system be changed abnormally, select the command to limit normal user’s operation on OS.a. Check the items that are not allowed to change by clients.
WebDT Device Manager 71
7. Check the Stop if result fail box to cancel all succeeding commands on the command list if the current command fails. Otherwise, uncheck the box.
8. On the It will delay field, enter an interval time (seconds) before executing to the next command on the command list. The default value is 0. (No delay)
9. If necessary, modify the Command Name.
10. Click OK to close the window. The new command appears on the command list table.
Command List Table
11. On the toolbar, click Save to save the command list.
12. To add more commands to the same command list, repeat steps 6-12.
Arrange Command SequenceWhen publishing the tasks to a device, the device will run commands according to the command sequence.
1. On the main menu, click Command List.2. Select the command folder to display the command list table.
WebDT Device Manager72
3. Click a command list to display the command table.
4. Select the command(s), then click to move up or to move down the command(s) on the list.
5. On the toolbar, click Save when done.
Delete Commands1. On the main menu, click Command List.2. Select the command folder to display the command list table.
3. Click a command list to display the command table.
4. Select the command(s) that you want to delete from the command list.
5. Click . The command will be removed from the command list.
6. On the toolbar, click Save to apply the changes.
Modify Commands1. On the main menu, click Command List.2. Select the command folder to display the command list table.
3. Click a command list to display the command table.
4. Click the command that you want to modify from the command list table.
5. The command window appears. Modify the necessary information, then click OK.
6. On the toolbar, click Save to apply the changes.
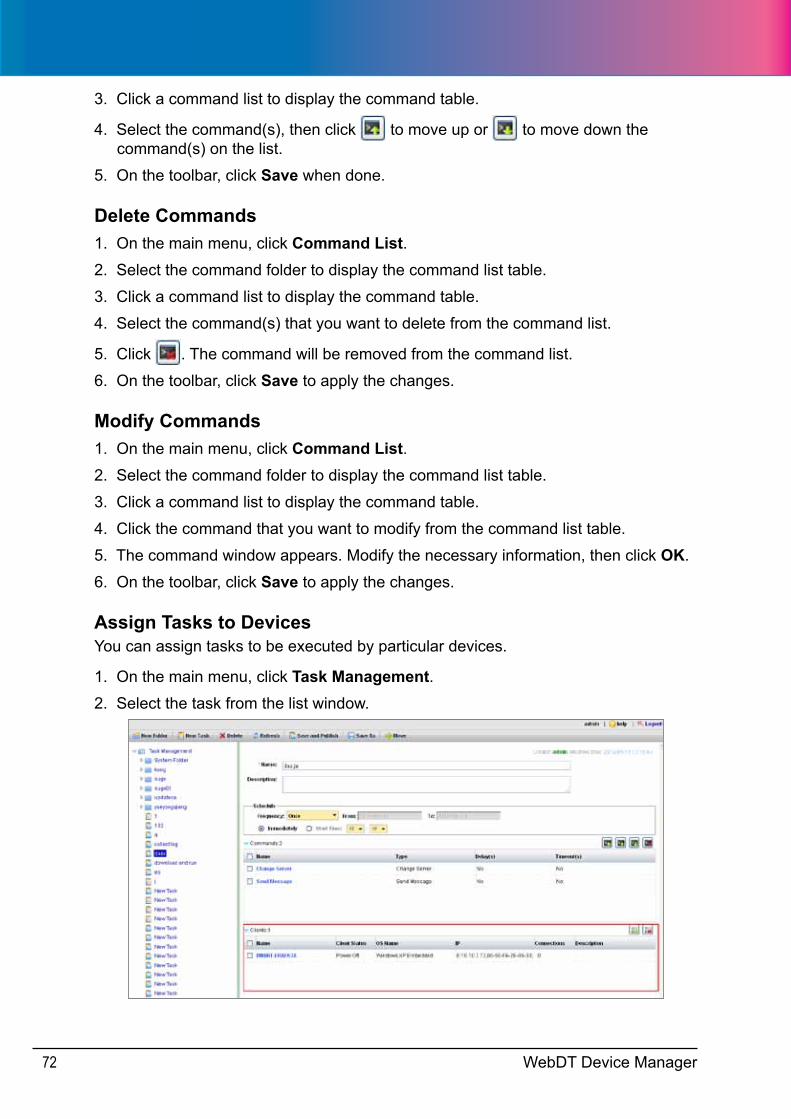
Assign Tasks to DevicesYou can assign tasks to be executed by particular devices.
1. On the main menu, click Task Management.2. Select the task from the list window.
WebDT Device Manager 73
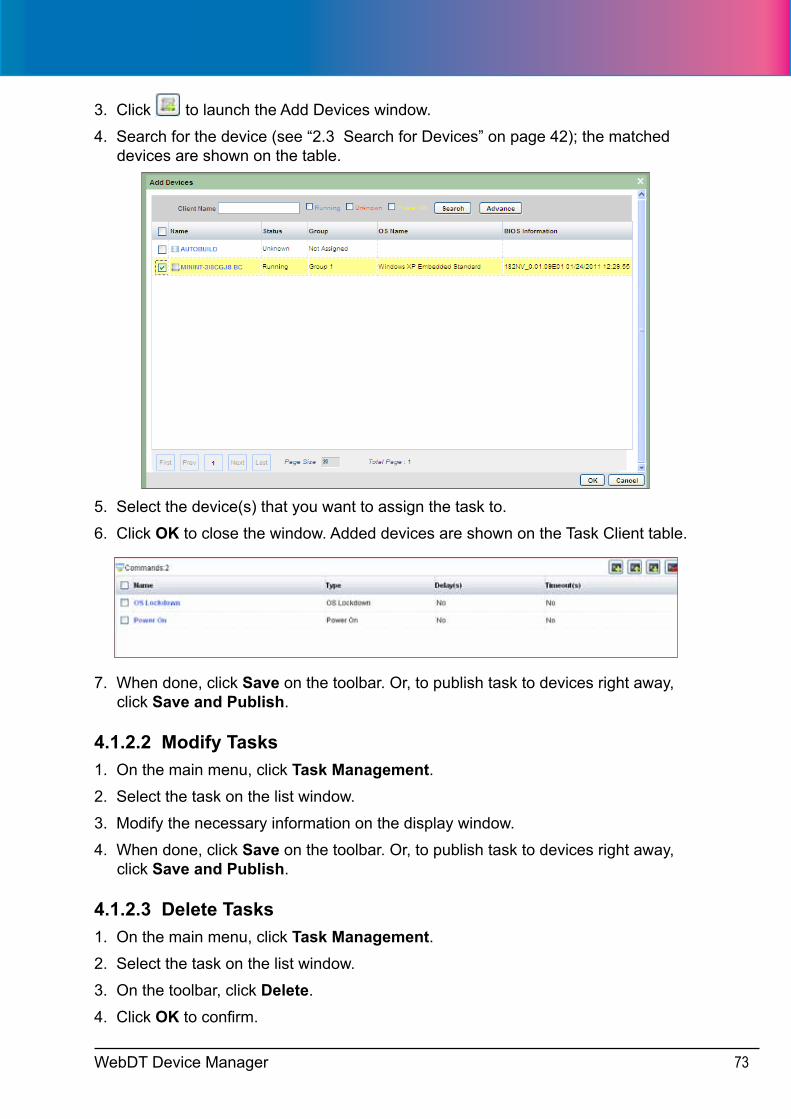
3. Click to launch the Add Devices window.
4. Search for the device (see “2.3 Search for Devices” on page 42); the matched devices are shown on the table.
5. Select the device(s) that you want to assign the task to.
6. Click OK to close the window. Added devices are shown on the Task Client table.
7. When done, click Save on the toolbar. Or, to publish task to devices right away, click Save and Publish.
4.1.2.2 Modify Tasks1. On the main menu, click Task Management.2. Select the task on the list window.
3. Modify the necessary information on the display window.
4. When done, click Save on the toolbar. Or, to publish task to devices right away, click Save and Publish.
4.1.2.3 Delete Tasks1. On the main menu, click Task Management.2. Select the task on the list window.
3. On the toolbar, click Delete.
4. Click OK to confirm.
WebDT Device Manager74
Note:When a task is deleted, all relevant tasks/commands in the assigned devices are cancelled.
4.1.2.4 Refresh Tasks1. On the main menu, click Task Management.2. Select the task on the list window.
3. On the toolbar, click Refresh.
4.1.2.5 Move Tasks1. On the main menu, click Task Management.2. Select the task that you want to move.
3. On the toolbar, click Move. Awindow appears.
4. Select the destination folder.
5. Click OK.
WebDT Device Manager 75
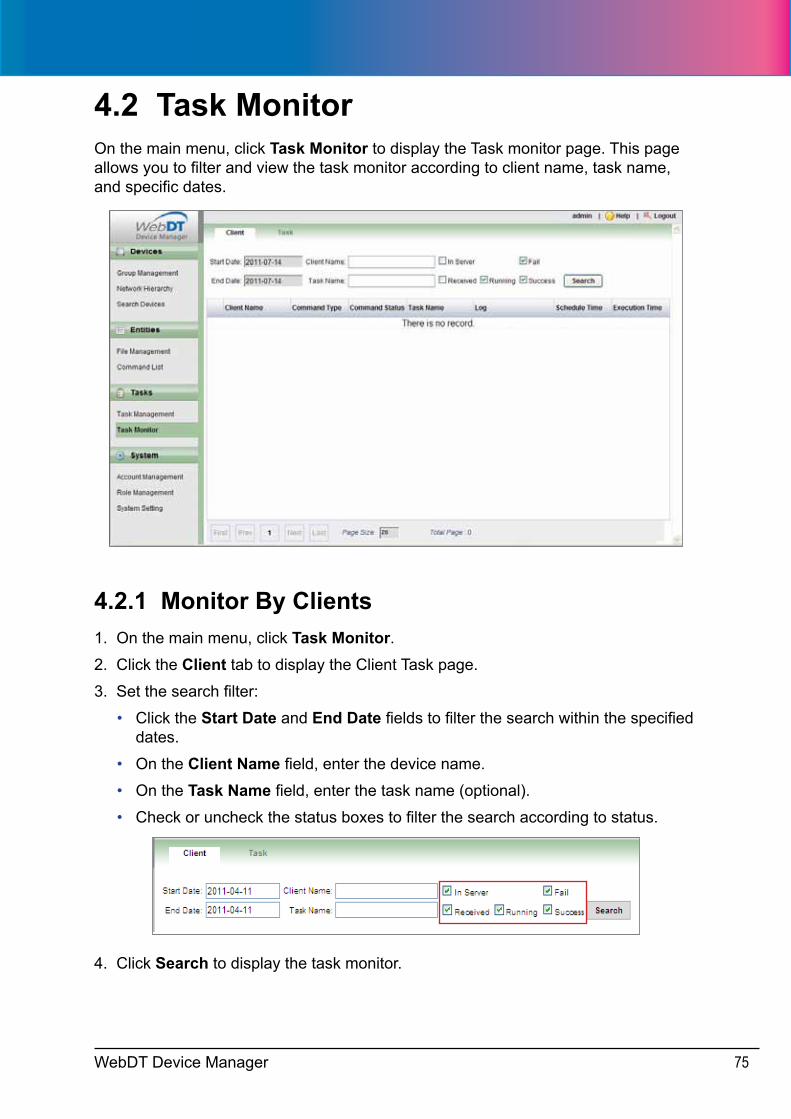
4.2 Task MonitorOn the main menu, click Task Monitor to display the Task monitor page. This page allows you to filter and view the task monitor according to client name, task name, and specific dates.
4.2.1 Monitor By Clients1. On the main menu, click Task Monitor.2. Click the Client tab to display the Client Task page.
3. Set the search filter:
• Click the Start Date and End Date fields to filter the search within the specified dates.
• On the Client Name field, enter the device name.
• On the Task Name field, enter the task name (optional).
• Check or uncheck the status boxes to filter the search according to status.
4. Click Search to display the task monitor.
WebDT Device Manager76
Note:Running / Fail / Success are checked by default.Start date and End date are set to today’s date by default. The date interval should not exceed 7 days.When the Search button is clicked, the client will show the latest execution command in the inter-val. Click Left to expand the Client history commands in the interval.If the search filter is set and you click the last search filter, the next time Task Monitor is opened, auto search will search by the last search filter.
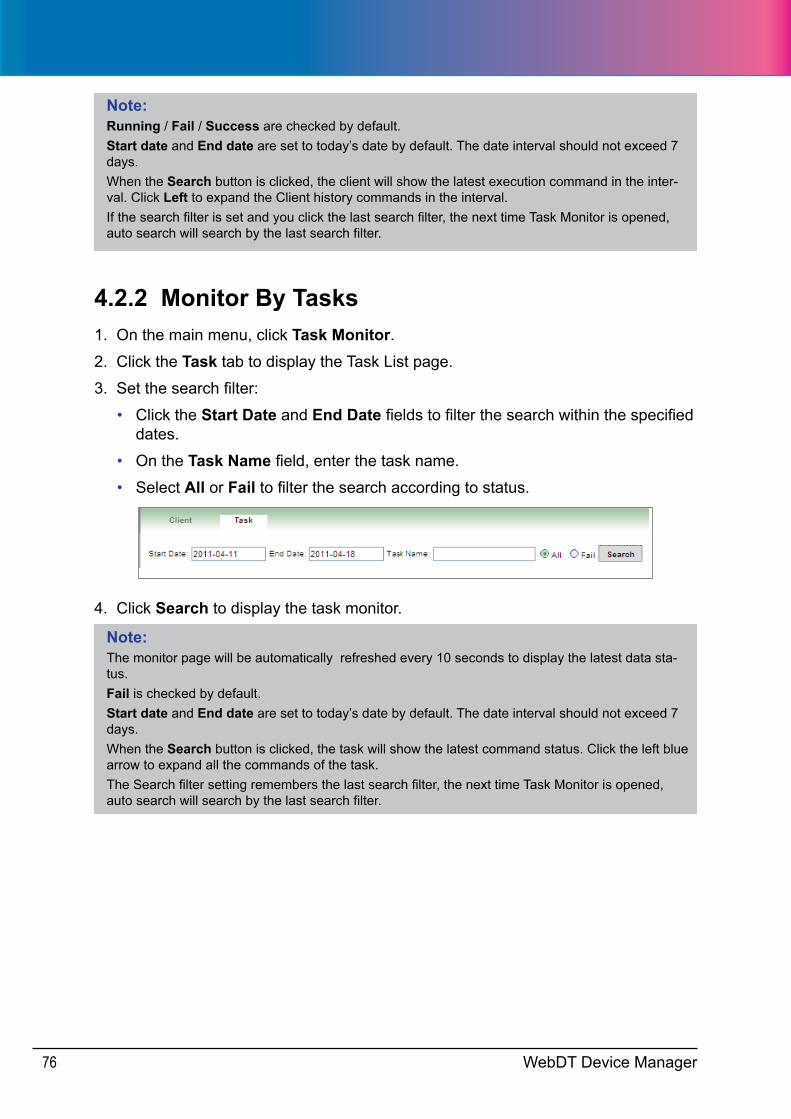
4.2.2 Monitor By Tasks1. On the main menu, click Task Monitor.2. Click the Task tab to display the Task List page.
3. Set the search filter:
• Click the Start Date and End Date fields to filter the search within the specified dates.
• On the Task Name field, enter the task name.
• Select All or Fail to filter the search according to status.
4. Click Search to display the task monitor.
Note:The monitor page will be automatically refreshed every 10 seconds to display the latest data sta-tus.Fail is checked by default.Start date and End date are set to today’s date by default. The date interval should not exceed 7 days.When the Search button is clicked, the task will show the latest command status. Click the left blue arrow to expand all the commands of the task.The Search filter setting remembers the last search filter, the next time Task Monitor is opened, auto search will search by the last search filter.
WebDT Device Manager 77
5Chapter 5 Other SettingsThis chapter covers the following topics:
• Create and manage user accounts
• Manage and implement roles to user accounts
• Set other system settings
5.1 Account ManagementOn the main menu, click Account Management to display the Account management page. The list window displays the user accounts. Click an account name to view the details on the display window.
5.1.1 Create New AccountsThe “admin” account, with password “123456”, is the default account in WDM. This account is not shown on the list window.
1. On the main menu, click Account Management.2. On the toolbar, click New.
WebDT Device Manager78
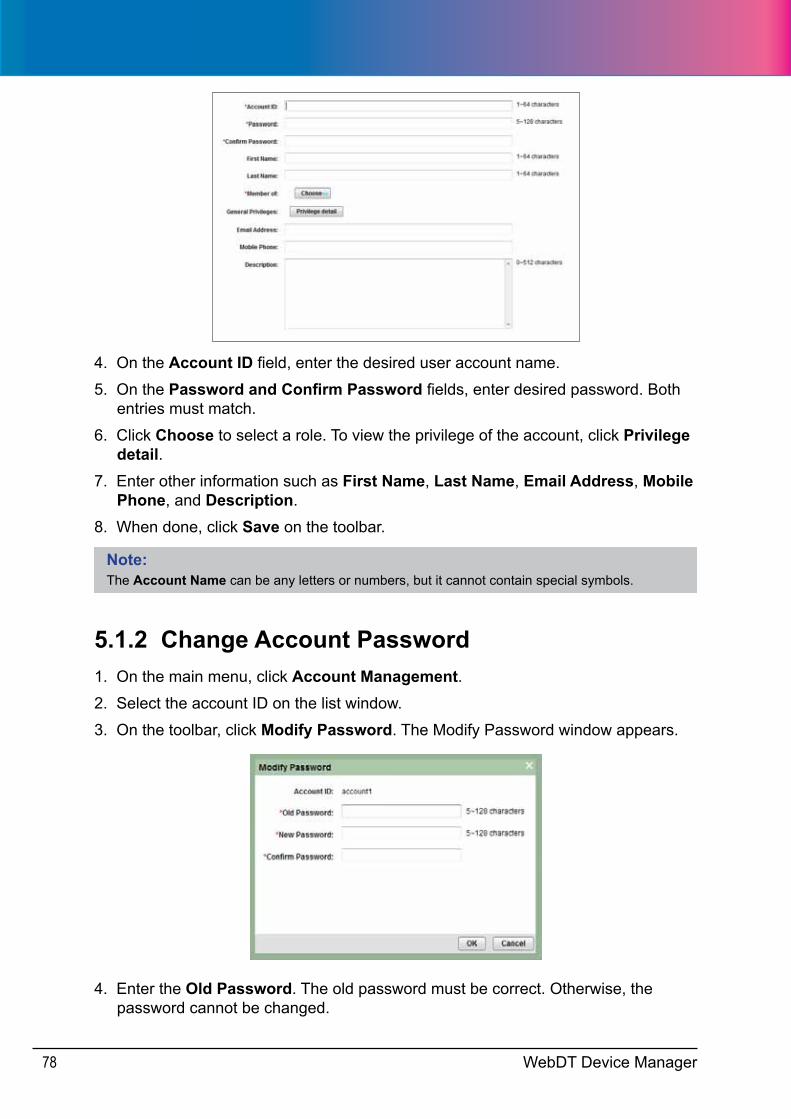
4. On the Account ID field, enter the desired user account name.
5. On the Password and Confirm Password fields, enter desired password. Both entries must match.
6. Click Choose to select a role. To view the privilege of the account, click Privilege detail.
7. Enter other information such as First Name, Last Name, Email Address, Mobile Phone, and Description.
8. When done, click Save on the toolbar.
Note:The Account Name can be any letters or numbers, but it cannot contain special symbols.
5.1.2 Change Account Password1. On the main menu, click Account Management.2. Select the account ID on the list window.
3. On the toolbar, click Modify Password. The Modify Password window appears.
4. Enter the Old Password. The old password must be correct. Otherwise, the password cannot be changed.
WebDT Device Manager 79
5. Enter the new password in the New Password and Confirm Password fields. Both entries must match.
6. Click OK to save and close the window.
5.1.3 Modify AccountsOnce saved, the account name cannot be changed anymore. However, you can modify other information.
1. On the main menu, click Account Management.2. Select the account ID on the list window.
3. Modify the necessary information.
4. When done, click Save.
5.1.4 Delete Accounts1. On the main menu, click Account Management.2. Select the account ID on the list window.
3. On the toolbar, click Delete.
4. Click OK to confirm.
5.1.5 Refresh Accounts1. On the main menu, click Account Management.2. On the toolbar, click Refresh. The list window is refreshed.

WebDT Device Manager80
5.2 Role ManagementA role defines the privilege details given to a user.
On the main menu, click Role Management to display the Role management page.The list window displays the user-defined roles. Click a role to view the details on the display window.
The System Manager role is a default role in WDM and cannot be modified. However, if the Windows Active Directory (AD) account is used, this role is automatically deleted.
5.2.1 WDM Role Management
5.2.1.1 Create Roles1. On the main menu, click Role Management.2. On the toolbar, click New.
3. On the Name field, enter the desired role name. If necessary, enter a description.
4. When done, click OK to close the window. The new role appears on the display window.
WebDT Device Manager 81
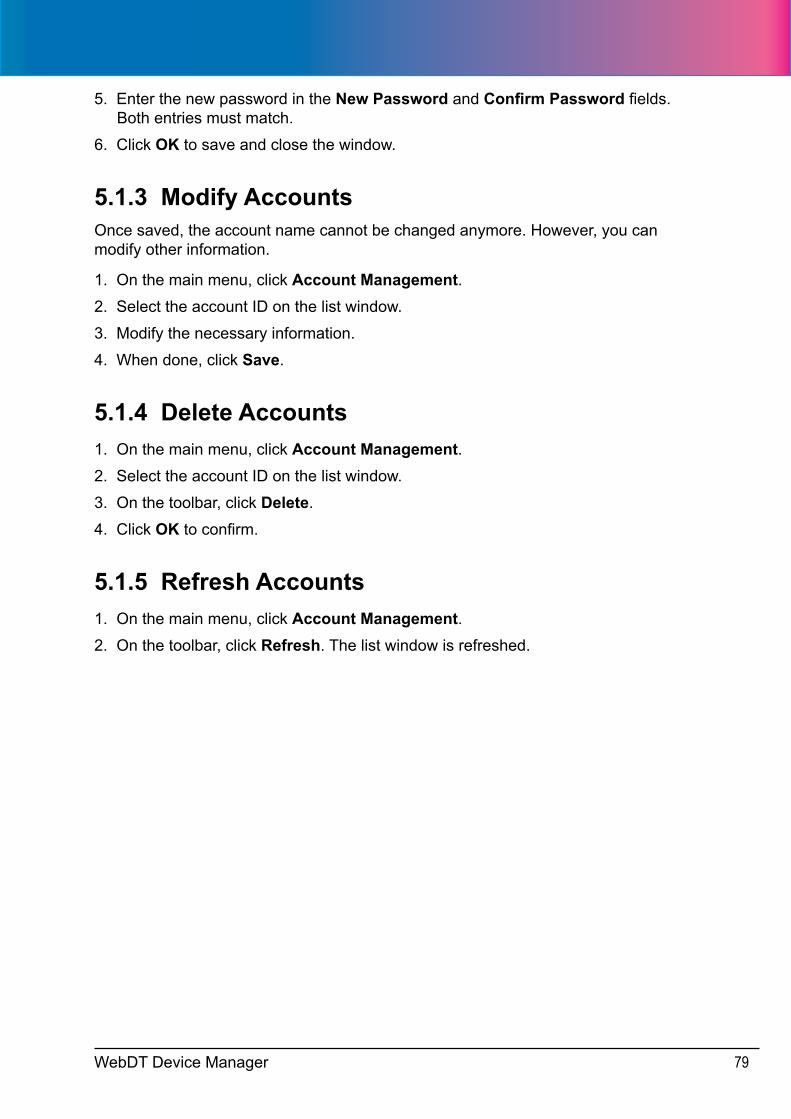
5. On the General Privilege table, click whether to allow or deny the following options:
• Account and Role Management: Allows users to modify settings in Account and Role Management.
• Device Management: Allows users to modify device settings in the Devices menu.
• System Management: Allows users to modify system settings.
6. When done, click Save.
5.2.1.2 Delete Roles1. On the main menu, click Role Management.2. Select the role on the list window.
3. On the toolbar, click Delete.
4. Click OK to confirm.
5.2.1.3 Refresh Roles1. On the main menu, click Role Management.2. On the toolbar, click Refresh. The list window is refreshed.
5.2.1.4 Assign Account to WDM RoleYou can assign the role of a user account from the Role Management page.
1. On the main menu, click Role Management.2. Select the role that you want to assign.
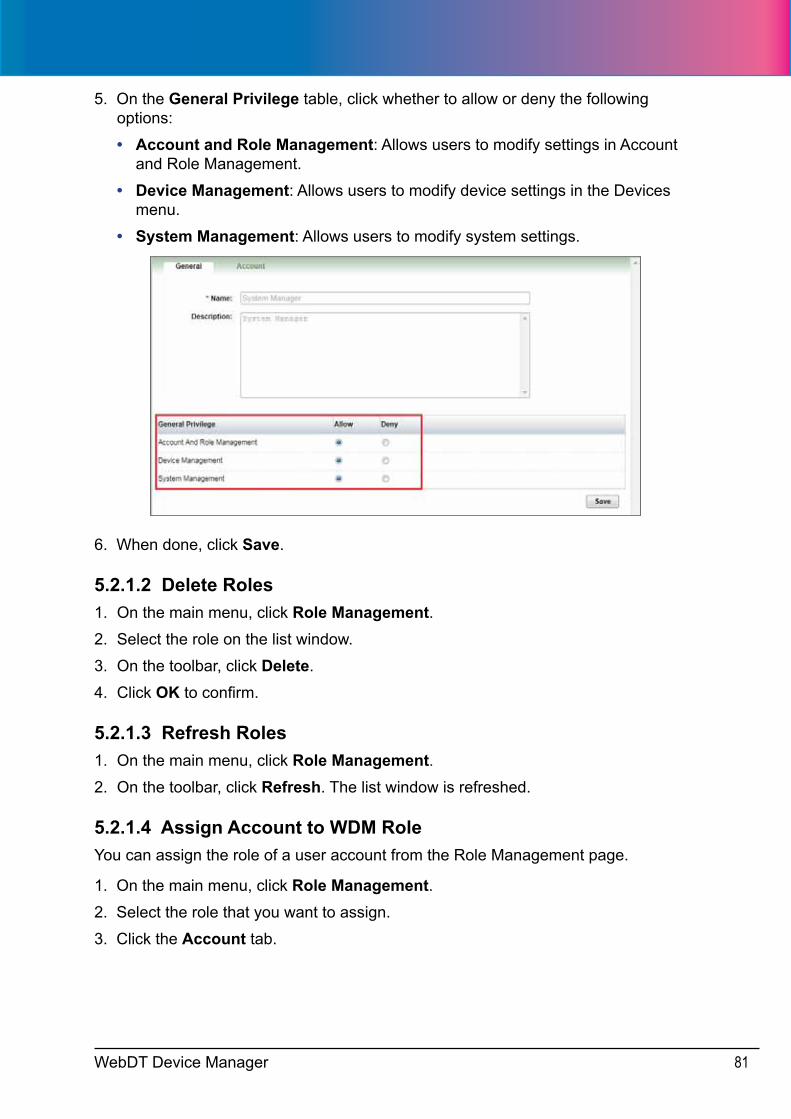
3. Click the Account tab.
WebDT Device Manager82
4. To assign the role to user accounts, do one of the following:
• To create and automatically assign a user account, click (see “5.1.1 Create New Accounts” on page 77).
• To select an account to assign the role to, click . Select the accounts, then click OK. The selected accounts are shown on the display window.
• To remove an account from the table, click .
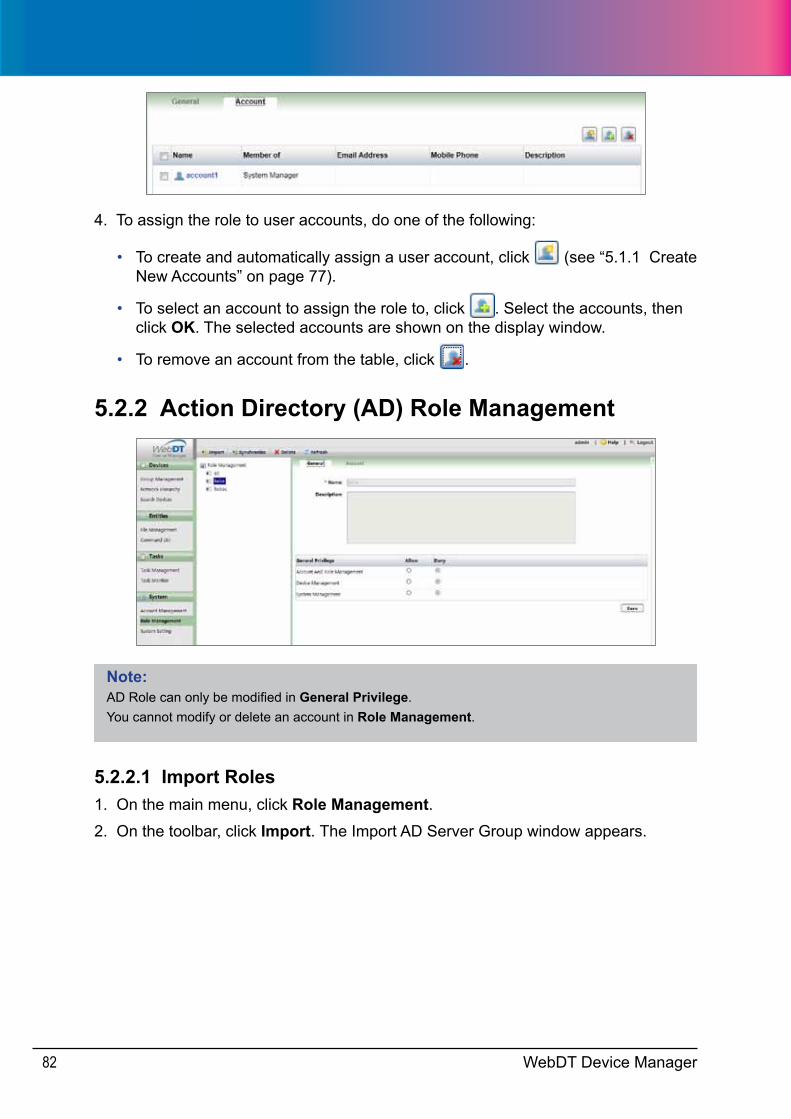
5.2.2 Action Directory (AD) Role Management
Note:AD Role can only be modified in General Privilege.You cannot modify or delete an account in Role Management.
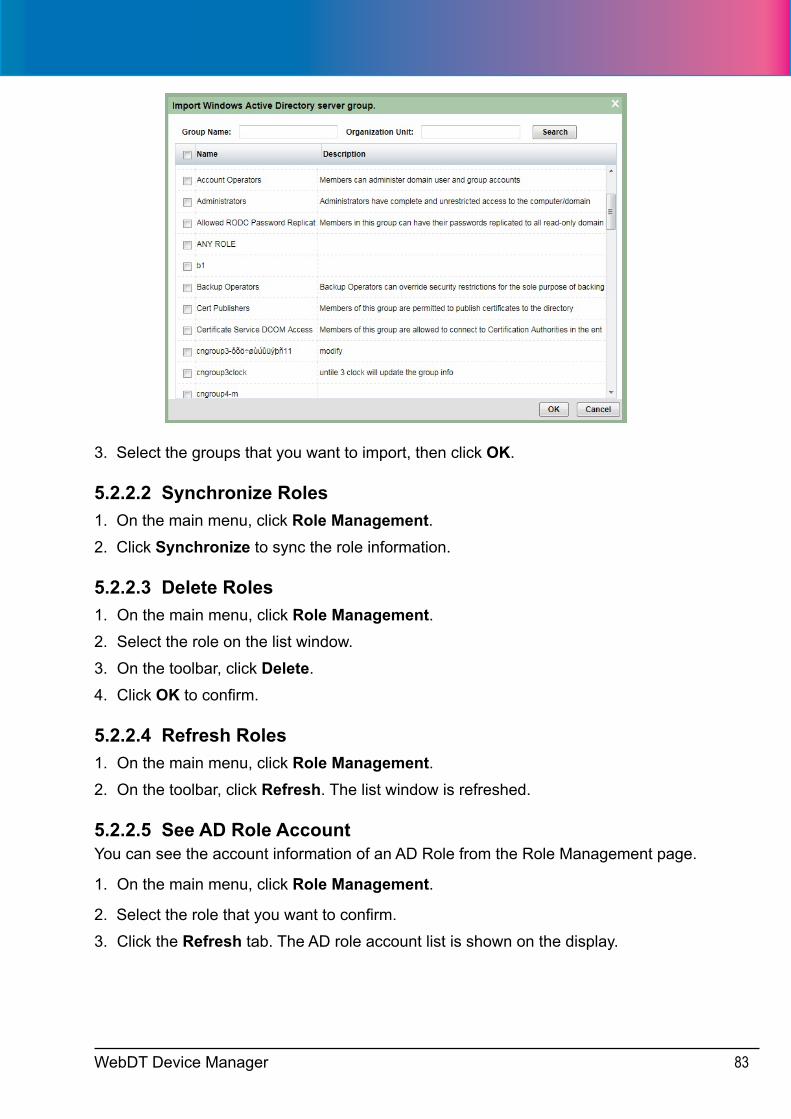
5.2.2.1 Import Roles1. On the main menu, click Role Management.2. On the toolbar, click Import. The Import AD Server Group window appears.
WebDT Device Manager 83
3. Select the groups that you want to import, then click OK.
5.2.2.2 Synchronize Roles1. On the main menu, click Role Management.2. Click Synchronize to sync the role information.
5.2.2.3 Delete Roles1. On the main menu, click Role Management.2. Select the role on the list window.
3. On the toolbar, click Delete.
4. Click OK to confirm.
5.2.2.4 Refresh Roles1. On the main menu, click Role Management.2. On the toolbar, click Refresh. The list window is refreshed.
5.2.2.5 See AD Role AccountYou can see the account information of an AD Role from the Role Management page.
1. On the main menu, click Role Management.
2. Select the role that you want to confirm.
3. Click the Refresh tab. The AD role account list is shown on the display.
WebDT Device Manager84
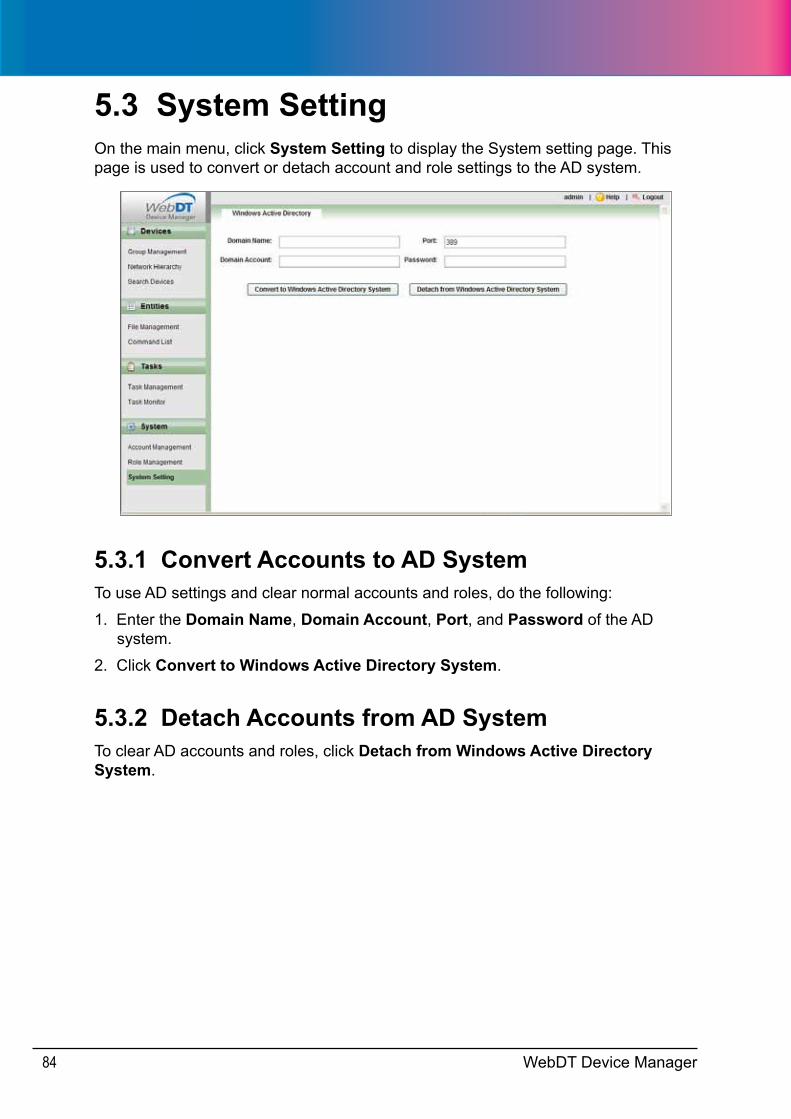
5.3 System SettingOn the main menu, click System Setting to display the System setting page. This page is used to convert or detach account and role settings to the AD system.
5.3.1 Convert Accounts to AD SystemTo use AD settings and clear normal accounts and roles, do the following:
1. Enter the Domain Name, Domain Account, Port, and Password of the AD system.
2. Click Convert to Windows Active Directory System.
5.3.2 Detach Accounts from AD SystemTo clear AD accounts and roles, click Detach from Windows Active Directory System.
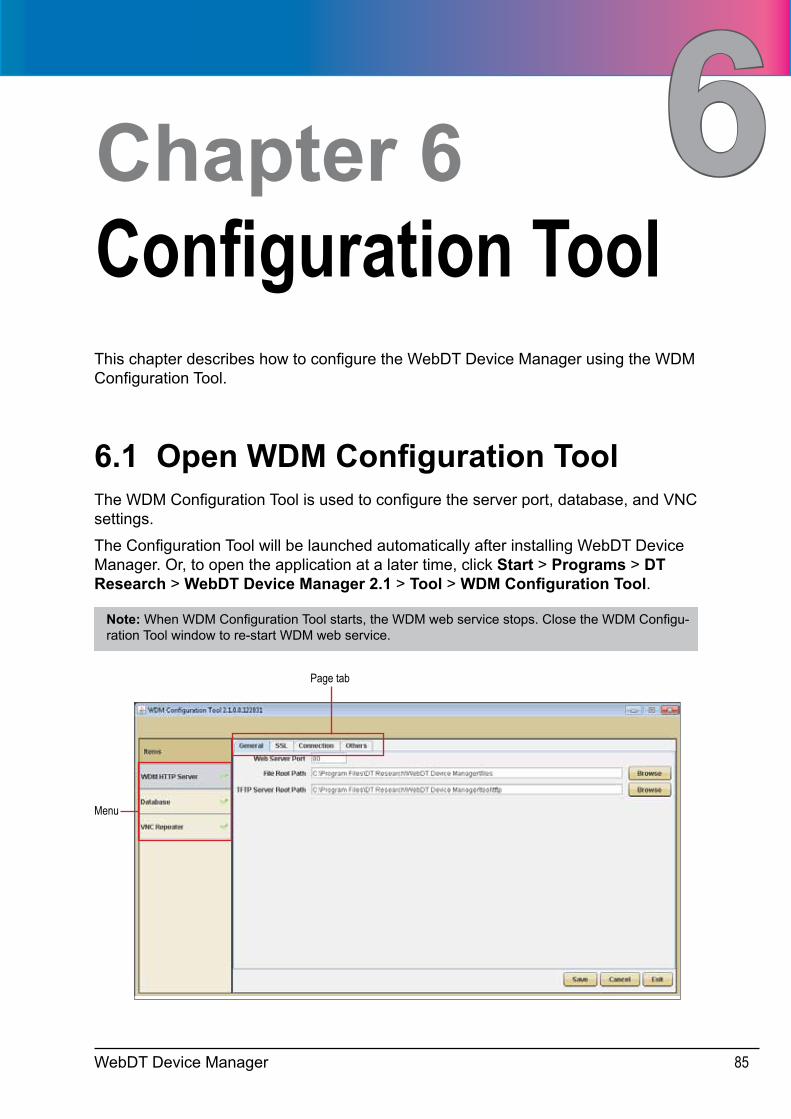
WebDT Device Manager 85
Chapter 6 Configuration Tool
6This chapter describes how to configure the WebDT Device Manager using the WDM Configuration Tool.
6.1 Open WDM Configuration ToolThe WDM Configuration Tool is used to configure the server port, database, and VNC settings.
The Configuration Tool will be launched automatically after installing WebDT Device Manager. Or, to open the application at a later time, click Start > Programs > DT Research > WebDT Device Manager 2.1 > Tool > WDM Configuration Tool.
Note: When WDM Configuration Tool starts, the WDM web service stops. Close the WDM Configu-ration Tool window to re-start WDM web service.
Page tab
Menu
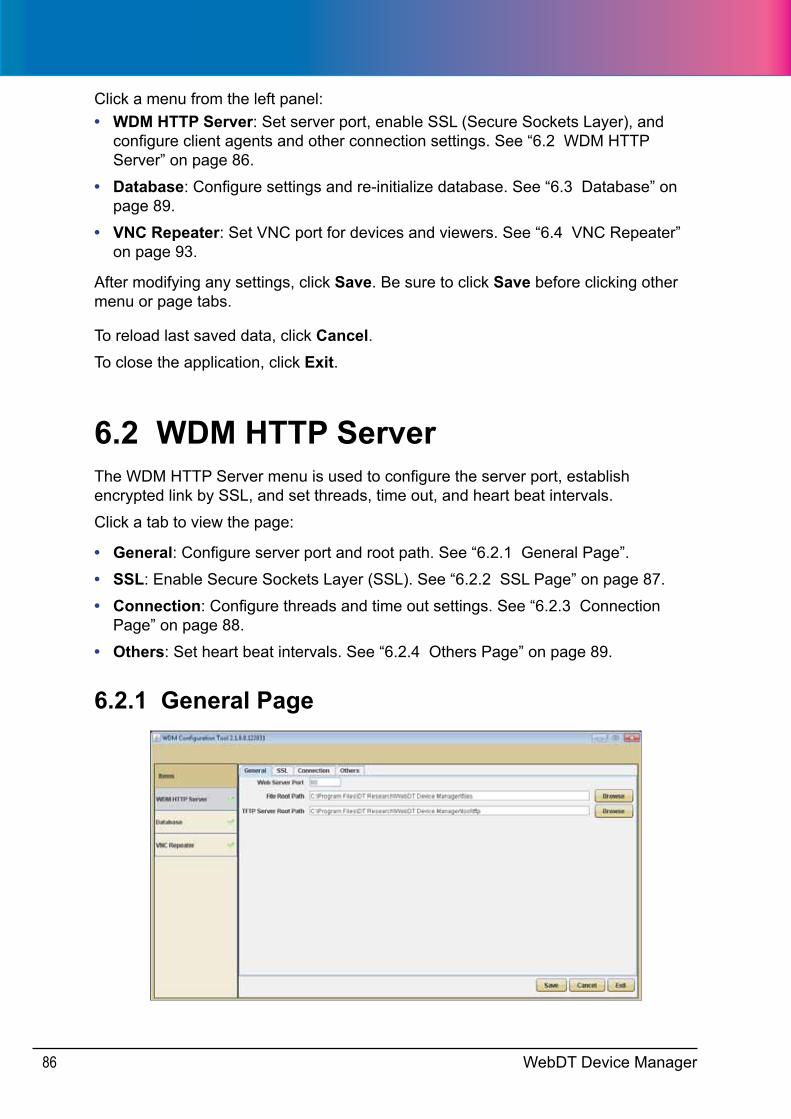
WebDT Device Manager86
Click a menu from the left panel:• WDM HTTP Server: Set server port, enable SSL (Secure Sockets Layer), and
configure client agents and other connection settings. See “6.2 WDM HTTP Server” on page 86.
• Database: Configure settings and re-initialize database. See “6.3 Database” on page 89.
• VNC Repeater: Set VNC port for devices and viewers. See “6.4 VNC Repeater” on page 93.
After modifying any settings, click Save. Be sure to click Save before clicking other menu or page tabs.
To reload last saved data, click Cancel.To close the application, click Exit.
6.2 WDM HTTP ServerThe WDM HTTP Server menu is used to configure the server port, establish encrypted link by SSL, and set threads, time out, and heart beat intervals.
Click a tab to view the page:
• General: Configure server port and root path. See “6.2.1 General Page”.
• SSL: Enable Secure Sockets Layer (SSL). See “6.2.2 SSL Page” on page 87.
• Connection: Configure threads and time out settings. See “6.2.3 Connection Page” on page 88.
• Others: Set heart beat intervals. See “6.2.4 Others Page” on page 89.
6.2.1 General Page
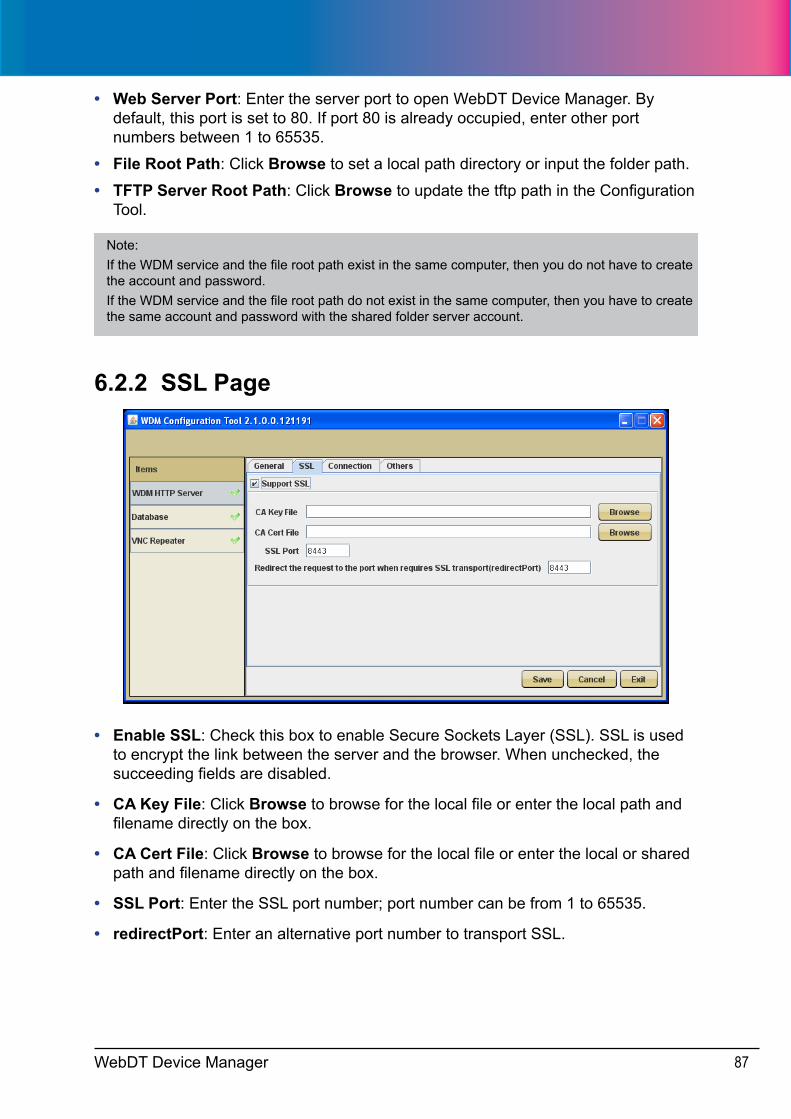
WebDT Device Manager 87
• Web Server Port: Enter the server port to open WebDT Device Manager. By default, this port is set to 80. If port 80 is already occupied, enter other port numbers between 1 to 65535.
• File Root Path: Click Browse to set a local path directory or input the folder path.
• TFTP Server Root Path: Click Browse to update the tftp path in the Configuration Tool.
Note: If the WDM service and the file root path exist in the same computer, then you do not have to create the account and password.If the WDM service and the file root path do not exist in the same computer, then you have to create the same account and password with the shared folder server account.
6.2.2 SSL Page
• Enable SSL: Check this box to enable Secure Sockets Layer (SSL). SSL is used to encrypt the link between the server and the browser. When unchecked, the succeeding fields are disabled.
• CA Key File: Click Browse to browse for the local file or enter the local path and filename directly on the box.
• CA Cert File: Click Browse to browse for the local file or enter the local or shared path and filename directly on the box.
• SSL Port: Enter the SSL port number; port number can be from 1 to 65535.
• redirectPort: Enter an alternative port number to transport SSL.
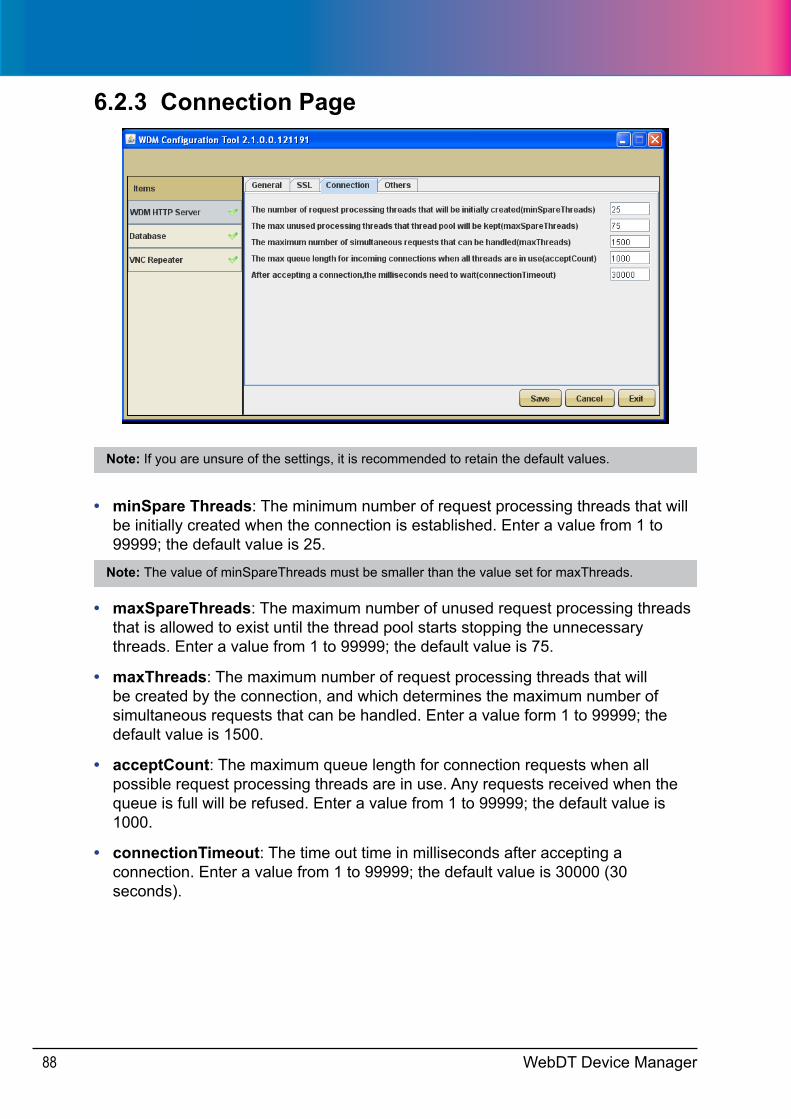
WebDT Device Manager88
6.2.3 Connection Page
Note: If you are unsure of the settings, it is recommended to retain the default values.
• minSpare Threads: The minimum number of request processing threads that will be initially created when the connection is established. Enter a value from 1 to 99999; the default value is 25.
Note: The value of minSpareThreads must be smaller than the value set for maxThreads.
• maxSpareThreads: The maximum number of unused request processing threads that is allowed to exist until the thread pool starts stopping the unnecessary threads. Enter a value from 1 to 99999; the default value is 75.
• maxThreads: The maximum number of request processing threads that will be created by the connection, and which determines the maximum number of simultaneous requests that can be handled. Enter a value form 1 to 99999; the default value is 1500.
• acceptCount: The maximum queue length for connection requests when all possible request processing threads are in use. Any requests received when the queue is full will be refused. Enter a value from 1 to 99999; the default value is 1000.
• connectionTimeout: The time out time in milliseconds after accepting a connection. Enter a value from 1 to 99999; the default value is 30000 (30 seconds).
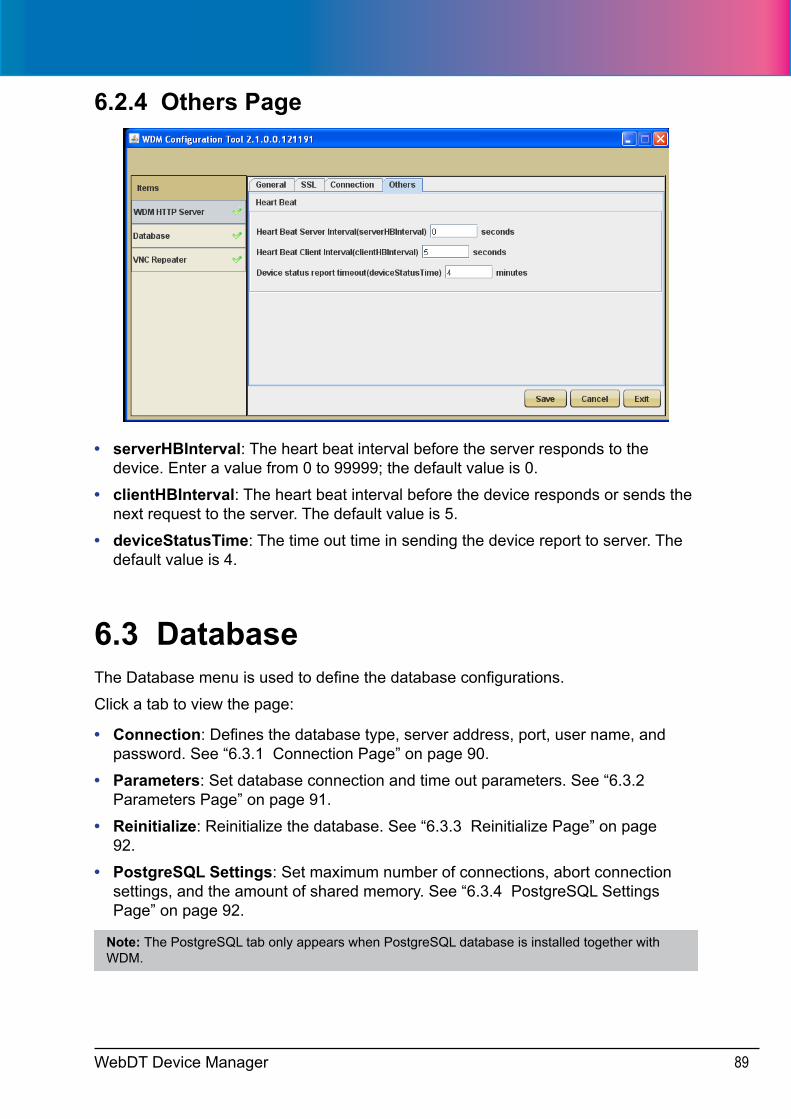
WebDT Device Manager 89
6.2.4 Others Page
• serverHBInterval: The heart beat interval before the server responds to the device. Enter a value from 0 to 99999; the default value is 0.
• clientHBInterval: The heart beat interval before the device responds or sends the next request to the server. The default value is 5.
• deviceStatusTime: The time out time in sending the device report to server. The default value is 4.
6.3 DatabaseThe Database menu is used to define the database configurations.
Click a tab to view the page:
• Connection: Defines the database type, server address, port, user name, and password. See “6.3.1 Connection Page” on page 90.
• Parameters: Set database connection and time out parameters. See “6.3.2 Parameters Page” on page 91.
• Reinitialize: Reinitialize the database. See “6.3.3 Reinitialize Page” on page 92.
• PostgreSQL Settings: Set maximum number of connections, abort connection settings, and the amount of shared memory. See “6.3.4 PostgreSQL Settings Page” on page 92.
Note: The PostgreSQL tab only appears when PostgreSQL database is installed together with WDM.
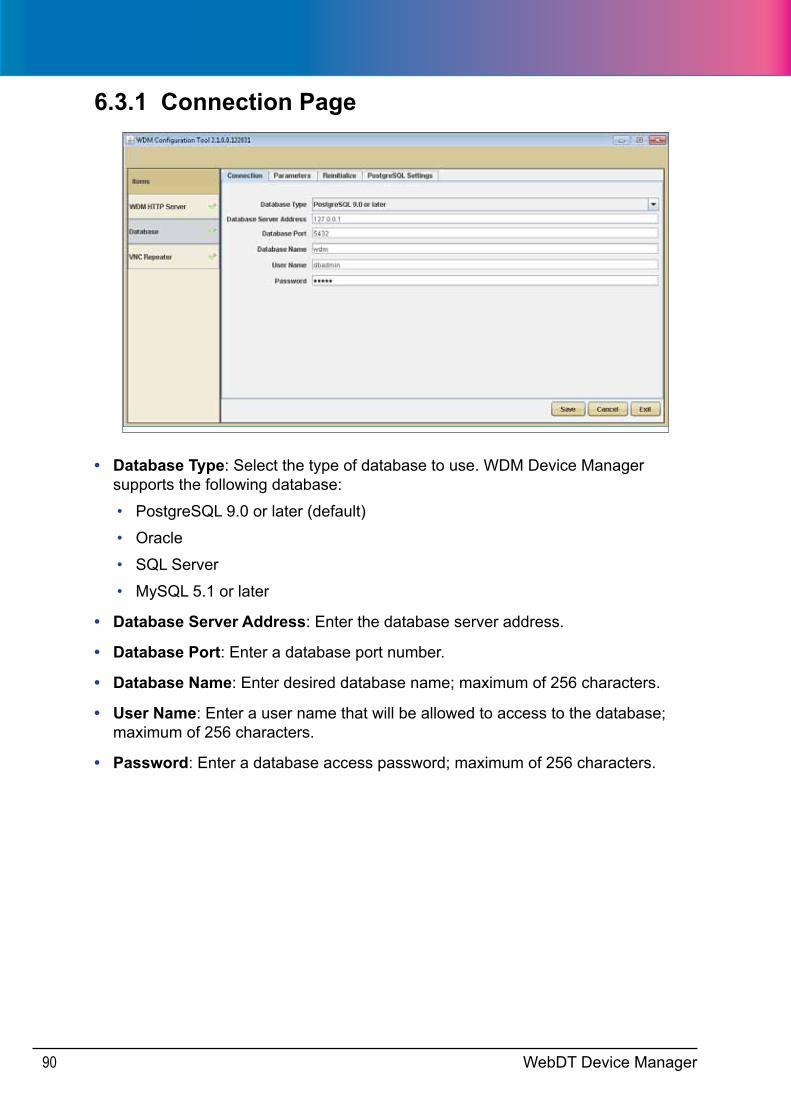
WebDT Device Manager90
6.3.1 Connection Page
• Database Type: Select the type of database to use. WDM Device Manager supports the following database:
• PostgreSQL 9.0 or later (default)
• Oracle
• SQL Server
• MySQL 5.1 or later
• Database Server Address: Enter the database server address.
• Database Port: Enter a database port number.
• Database Name: Enter desired database name; maximum of 256 characters.
• User Name: Enter a user name that will be allowed to access to the database; maximum of 256 characters.
• Password: Enter a database access password; maximum of 256 characters.
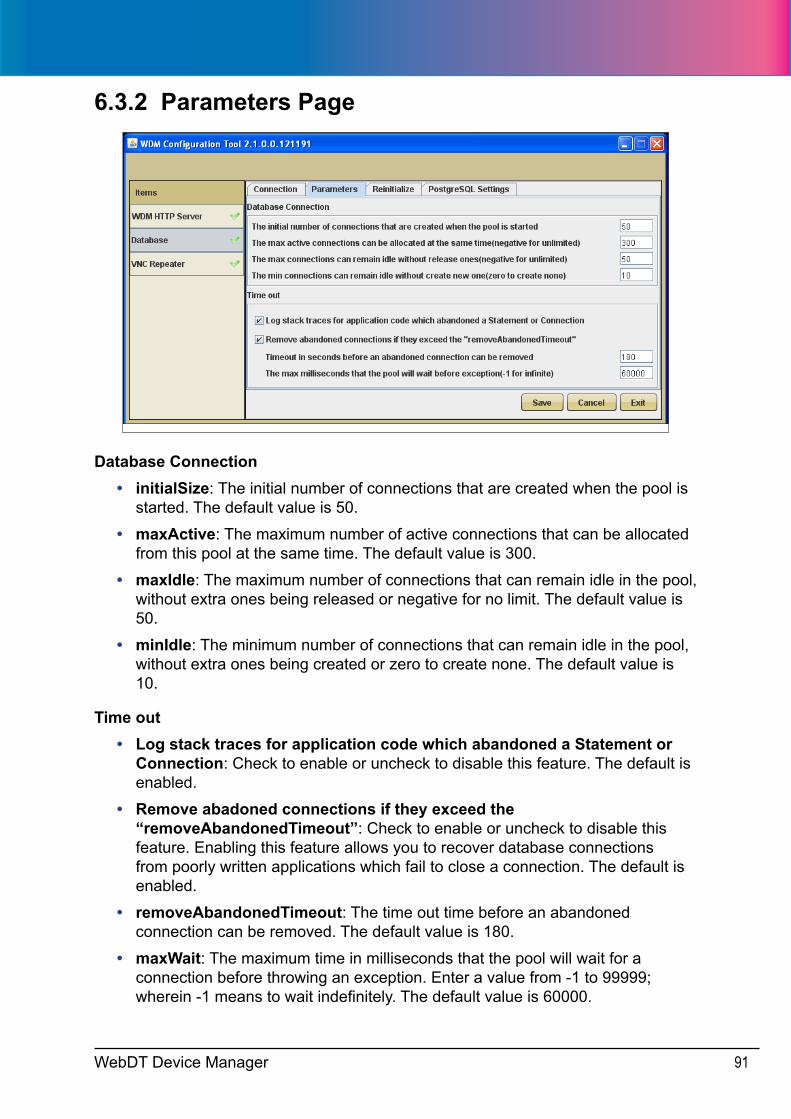
WebDT Device Manager 91
6.3.2 Parameters Page
Database Connection• initialSize: The initial number of connections that are created when the pool is
started. The default value is 50.
• maxActive: The maximum number of active connections that can be allocated from this pool at the same time. The default value is 300.
• maxIdle: The maximum number of connections that can remain idle in the pool, without extra ones being released or negative for no limit. The default value is 50.
• minIdle: The minimum number of connections that can remain idle in the pool, without extra ones being created or zero to create none. The default value is 10.
Time out• Log stack traces for application code which abandoned a Statement or
Connection: Check to enable or uncheck to disable this feature. The default is enabled.
• Remove abadoned connections if they exceed the “removeAbandonedTimeout”: Check to enable or uncheck to disable this feature. Enabling this feature allows you to recover database connections from poorly written applications which fail to close a connection. The default is enabled.
• removeAbandonedTimeout: The time out time before an abandoned connection can be removed. The default value is 180.
• maxWait: The maximum time in milliseconds that the pool will wait for a connection before throwing an exception. Enter a value from -1 to 99999; wherein -1 means to wait indefinitely. The default value is 60000.
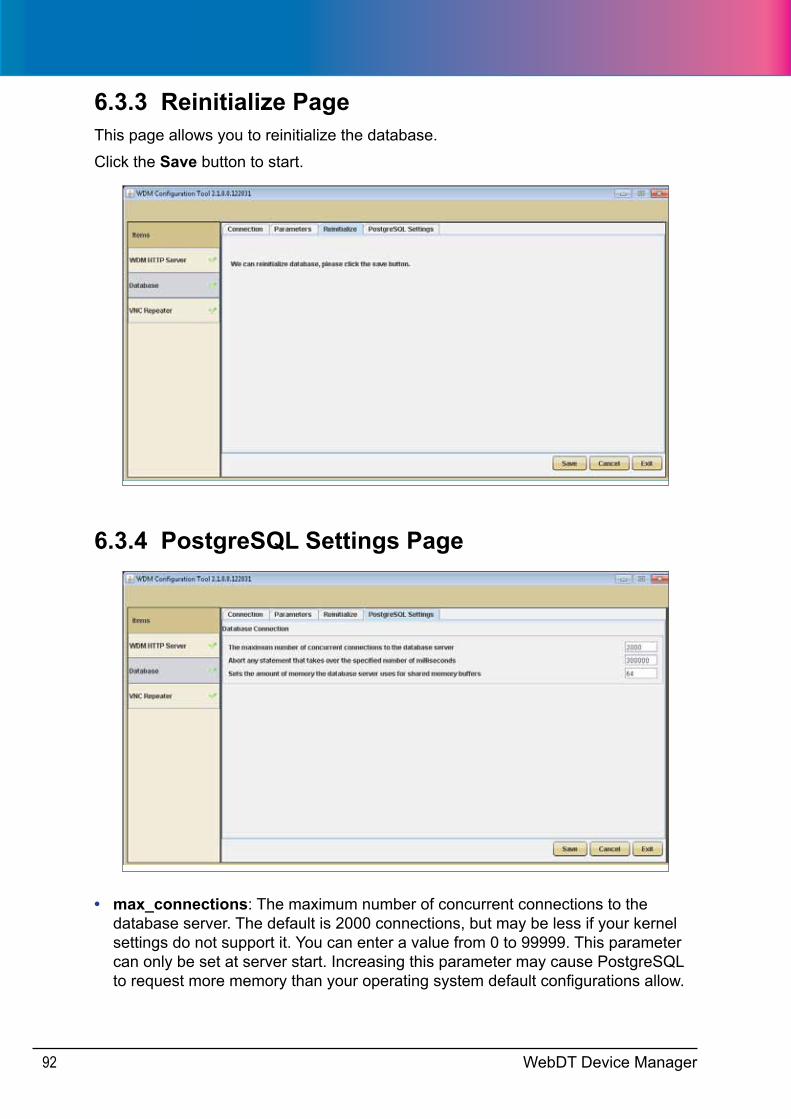
WebDT Device Manager92
6.3.3 Reinitialize PageThis page allows you to reinitialize the database.
Click the Save button to start.
6.3.4 PostgreSQL Settings Page
• max_connections: The maximum number of concurrent connections to the database server. The default is 2000 connections, but may be less if your kernel settings do not support it. You can enter a value from 0 to 99999. This parameter can only be set at server start. Increasing this parameter may cause PostgreSQL to request more memory than your operating system default configurations allow.
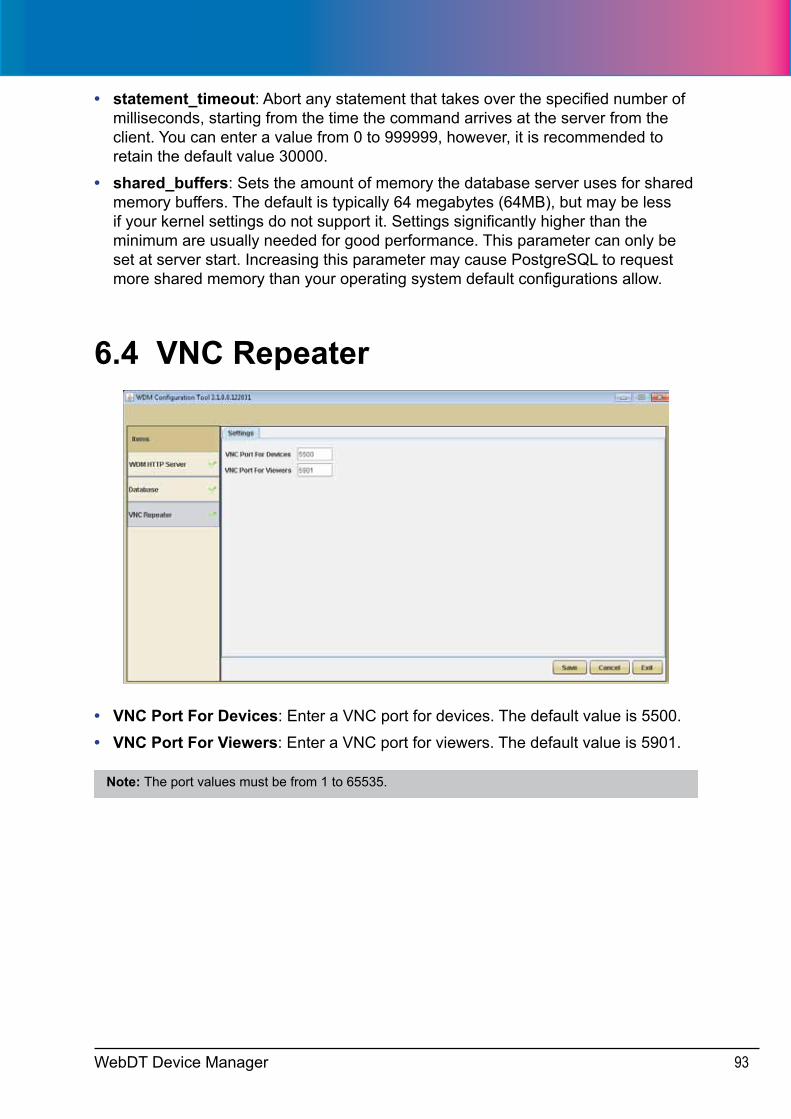
WebDT Device Manager 93
• statement_timeout: Abort any statement that takes over the specified number of milliseconds, starting from the time the command arrives at the server from the client. You can enter a value from 0 to 999999, however, it is recommended to retain the default value 30000.
• shared_buffers: Sets the amount of memory the database server uses for shared memory buffers. The default is typically 64 megabytes (64MB), but may be less if your kernel settings do not support it. Settings significantly higher than the minimum are usually needed for good performance. This parameter can only be set at server start. Increasing this parameter may cause PostgreSQL to request more shared memory than your operating system default configurations allow.
6.4 VNC Repeater
• VNC Port For Devices: Enter a VNC port for devices. The default value is 5500.
• VNC Port For Viewers: Enter a VNC port for viewers. The default value is 5901.
Note: The port values must be from 1 to 65535.