bustagetroupe.files.wordpress.com€¦ · web viewthis is qlab’s answer to a blank word document....
TRANSCRIPT

A Brief, Illustrated Guide to Using QLab (The Actual Things You Will Be Using)
What’s Inside:
Downloading and opening QLab: page 2
How to make Qlab make sounds: pages 2 - 3
What the hell are all the icons: pages 3 - 7
How to play multiple tracks simultaneously: pages 7 - 8
Other things you can do: pages 8 - 9
Help, everything is broken: page 9

Hey! So you’re doing sound? Excellent. You’re gonna want to use QLab. I know iTunes exists, and you could try to use like six different media players simultaneously if you really wanted to, but QLab will let you do all the things you need in one place so you don’t have to use iTunes or six different media players simultaneously. So my vote is do QLab instead. Assuming you agree, read on.
Step 1: Go download QLab. It’s free. Google it, go to the website, download the right version for whatever
computer/platform you have. Then open the program to continue your adventure.Step 2: “Okay, I opened QLab, now what the hell am I looking at?”
If all goes well, you’ll be looking at this:
This is QLab’s answer to a blank Word document. This is the canvas on which you will construct your sound masterpiece. (Or not, depending on how many cues you have...but I remain optimistic on your behalf!)
Step 3: “Okay, cool. How do I make this make sounds?” This is where the fun comes in! By this point, you should have amassed your
various sound effects and songs and recordings of actors.o (Side note, I advise putting all your tracks in the same folder and naming
each one as EXACTLY what it is, even if it seems absurd at the time - I promise you’ll appreciate your past self later when you are looking at one track called “cast A jessica 1 with hpf and leveler final” and “cast A
2

jessica 1 with hpf and leveler final FINAL USE THIS ONE” instead of two that are just called “final.” An even better way of doing this would be to move the old ones into a different folder and just keep the final ones together, if you’re like me and too nervous to delete old versions.)
So have your folder of tracks open on half your screen and the QLab file open on the other half, and then you click and drag the tracks into the QLab file.
You will then see the track in the QLab file.o Note that QLab automatically numbers cues as you drag them in, but you
can edit the numbers (and there is an overwhelming possibility that you will have to).
Step 4: “What the hell are all those icons and do I need to use all of them?” You very likely will not be using all of the pretty buttons, but there are a couple
that you DEFINITELY want to know about.
First up, the Stop cue ( ) (part of the rightmost bank of icons)o The good thing about QLab is once you hit Go on a cue, it will just keep
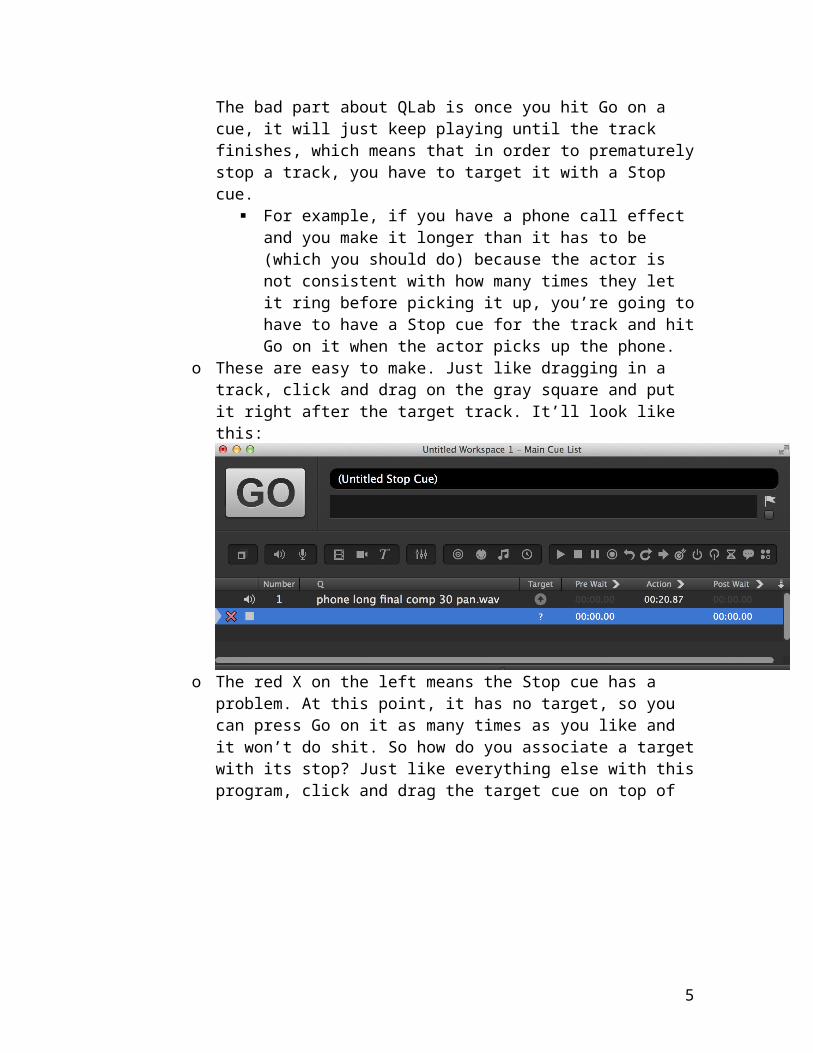
playing until the track finishes, which means you can layer cues to have several going at the same time (unlike in iTunes). The bad part about QLab is once you hit Go on a cue, it will just keep playing until the track finishes, which means that in order to prematurely stop a track, you have to target it with a Stop cue.
For example, if you have a phone call effect and you make it longer than it has to be (which you should do) because the actor is not consistent with how many times they let it ring before picking it up, you’re going to have to have a Stop cue for the track and hit Go on it when the actor picks up the phone.
3

o These are easy to make. Just like dragging in a track, click and drag on the gray square and put it right after the target track. It’ll look like this:
o The red X on the left means the Stop cue has a problem. At this point, it has no target, so you can press Go on it as many times as you like and it won’t do shit. So how do you associate a target with its stop? Just like everything else with this program, click and drag the target cue on top of the stop.
o Look, no more red X. Additionally, once you have associated a target with its stop, the Stop cue will automatically name itself as “stop [name of target]” and this is nifty because then there’s no guessing what will be stopping when you fire the Stop cue.
Next up, the Fade cue ( ) (by itself, toward the left, next to an uppercase T)o This cue is used when you want to fade a track but don’t want to move the
actual faders or gain on the sound board itself - QLab lets you send a track off into oblivion (or make it louder) without changing any of the settings on the board. Which is good.
4
o Just like everything else, click and drag the fader icon to create a cue below the target track.
o Note that pesky red X, meaning something is wrong. Your cue has no target. Once again, click and drag its target cue on top.
o What? There’s still the red X? Something’s still wrong...turns out, Fade cues require an extra step. Look at the panel below the cue list:
5

o Click the tab that says “Levels.”
o On the fader labeled “master,” you have to drag it all the way down and let go - it will then say -INF (negative infinity) in a very nice shade of yellow.
o Now your Fade cue will fade out the track. If you ALSO want it to stop the track when it’s done, check the box that says “Stop target when done”.
o Note the lack of red X, meaning the cue is good to go. Note also how the track auto-named itself “fade and stop [name of track]” - if you didn’t check the “stop” box it would just say “fade [name of track]”.
o Now, Fade cues don’t have to fade out - they can also fade up. The whole process is the same, except instead of dragging the master fader in the levels tab to -INF, you set it to whatever final volume you want your track to have. This will depend entirely on the show and the effect - talk to your director and find out what they want.
6

o Also, if you’re not fading out a track, don’t check the Stop box (unless you want an abrupt and consistent cutoff).
o Also, the default fade-out time is 5 seconds (meaning the Fade cue will execute itself over a 5-second span), but that can be adjusted by clicking the “Curve Shape” tab (next to “Levels”) and typing in the new amount of time in the “Duration” box:
o There are other things you can do with Fade cues, but these are the things you are most likely to encounter, and you can always read the actual QLab user manual if you want to do something that’s not discussed here.
Step 5: “Wait, what if I want a bunch of tracks to start playing at the same time? Can I do that?”
Indeed you can! Take a gander at this panel (the default one that comes up below the cue list when a cue is selected / highlighted):
In the bottom left corner, there’s a thing that’s called “Continue.” The default setting is “Do not continue,” which means that (unlike iTunes or a media player) once one cue plays, that’s all that will play, until you specifically hit Go on another cue.
However, sometimes you want stuff to play together. Say, for instance, that in the show, a doorbell rings and a dog barks at the same time. While you can fire two tracks one after the other, there will inevitably be some delay. So what you do is, you click on the first track, then open the drop-down box next to “Continue” and select “Auto-continue.” At the far right of the track in the cue list, this little arrow
7

will pop up, where it’s usually just blank space (see the red-boxed things):
This means that when you fire the first track (phone call), the one immediately after it (buzzer) will play at the same time.
The other variant of this is “Auto-follow,” which is the same process except you select “Auto-follow” in the drop-down box, and the arrow has a circle on the top:
“Auto-follow” means that once the first track (phone call) has finished playing, the one immediately after it (buzzer) will play without your having to press Go.
You can also have chains of auto-continuing or auto-following tracks - you just have to keep selecting which one you want, as each only applies to the track immediately following.
You can also use these with Stop or Fade cues.Step 6: “What are some other things I should know about or might want to do?”
Renaming tracks:o You can call any track whatever you like. Just change the name from the
main panel, and try to keep it as clear as possible, for your own sake! Renumbering tracks:
o Same deal. You’re going to move things around and delete stuff and add stuff - renumbering is nice so you avoid sequences of tracks numbered something like “5, 7.6, 2, 3, 2.9.” It’s just nicer. You don’t have to do it, though - it’s not crucial for the functioning of the program.
8

Adjusting the volume of tracks:o This is very handy. Let’s say you’re working with three cues - two of them
are much quieter than the third, and you want all of them to play at the same time (see Step 5). You can’t raise the volume on the board, because that will also make the loud track louder. You can either open the cues in Audacity and dick around with the gain there, or you can just do it from QLab itself. Highlight the annoying track and click the “Device & Levels” tab on the below-cue-list panel:
o It looks pretty much like what you saw with the Fade cue, and it’s the same thing except without the option to fade. In this case, the master fader is the permanent volume of the target track. So you just move it up or down (depending on if you want the track to be louder or softer) and call it a day.
o You’re going to get the best results if you play the tracks all together while you’re dicking around with the master fader level. Trust your ears. Go with what sounds like a good balance to you. Then play it through the house speakers and get feedback from your director.
Using the space bar:o You don’t have to literally click the big Go button to fire a cue - you can
also just hit the space bar. But with both of these, just make sure you don’t double click or double hit - make sure you’re only playing the tracks you want to play.
Step 7: “My assistant is running the show tonight from their computer and I sent them the QLab file but now all the tracks have red X’s and HELP NOTHING IS PLAYING.”
QLab is just a computer program - it has to have something to read, and it follows a file path to locate the tracks to play. If you move the audio files it’s targeting, or put the QLab file on a different laptop, the tracks don’t follow it - the program won’t know where they are. You’ll have to get the actual .wavs or whatever onto the other laptop and re-click-and-drag everything back into the QLab file / onto the appropriate cue.
Those are all the QLab things you are likely to want to do. The program can do a bunch of other stuff, but for your purposes, that should pretty much cover it. Break a leg!
-DDJ, Summer 2015
9