images.pcmac.orgimages.pcmac.org/.../documentscategories/documents/… · web viewk.cc.4 online...
TRANSCRIPT
Lesson 1Objective: Describe the systematic construction of flat shapes using ordinal numbers.
Focus Standards
K.CC.4d Understand the relationship between numbers and quantities; connect counting to cardinality.d. Develop understanding of ordinal numbers (first through tenth) to describe therelative position and magnitude of whole numbers.
K.G.5 Model shapes in the world by building shapes from components (e.g., sticks and clay balls) and drawing shapes.
Lesson Video
YouTubeordinal numbers #1ordinal numbers #2
K.G.5
Guided Practice
Internet4Classrooms games to teach standard K.CC.4
games to teach standard K.G.5
Illustrative Mathematics
tasks by K.CC.4
tasks by K.G.5
Math Worksheets K.CC.4 printables & lessons
K.G.5 & K.G.6 additional printables & lessons
CCSS Math K.CC.4 online resources, games, activities, videos & lessons
K.G.5 online resources, games, activities, videos & lessons
Independent Practice
Top Marks (games) Shapes, Position & Movement
Ordering
Khan Academy K.CC.4
K.G.5 and K.G.6
IXL activities listed by standard
Station ideasPrintables: "Slap It" ordinal numbers game Shape Play-Doh MatsInteractive games:ShapevilleOrdinal number games
Teacher Resources
OpenEd K.CC.4 Assessments, Homework, Videos, Lesson Plans (must create account)
K.G.5 Assessments, Homework, Videos, Lesson Plans (must create account)
LiveBinder Teacher & Parent Resources
Howard County Resources for K.CC.4
Assessing K.CC.4
Resources for K.G.5
Assessing K.G.5
Suggested Lesson Structure
Fluency Practice (12 minutes)
Application Problem (5 minutes) Concept Development (25 minutes)
Student Debrief (8 minutes)
Total Time (50 minutes)
Fluency Practice (12 minutes)
Count to 100 by Ones K.CC.1 (3 minutes) If You’re Happy and You Know It K.CC.4d (5 minutes) Peek-a-Boo Shapes K.G.2 (4 minutes)
Count to 100 by Ones (3 minutes)
Materials: (S) Rekenrek dot paper (fluency template)
Note: This activity maintains the rote counting skills acquired in GK–Module 5, and calls attention to the structure of numbers to 100 with the use of the Rekenrek’s rows of 10 and the verbal cue as they cross decades.
Students count to 100 (or as high as they can in three minutes) by touching the beads on the Rekenrek dot paper. Have them say buzz after the last number of each row.
If You’re Happy and You Know It (5 minutes)
Note: This fun, familiar song gives students the opportunity to practice putting events in sequence, preparing them for today’s work with ordinal numbers and step-by-step procedures.
T: Raise your hand if you know the song “If you’re happy and you know it.” S: (Raise hands.)T: Even if you don’t know all of the words, you can still do all of the moves, and that’s the part that will
help us in math today. We’ll sing the song three times, and use a different movement each time.
NOTES ON MULTIPLE MEANS OF REPRESENTATIONS:
Help English language learners work with partners by giving them sentence starters such as, “This is a ___ because it has ___ sides,” and “I drew a ___ which has ___ corners.” Be sure to post labeled pictures of shapes on the word wall for students to refer to.
Then, we’ll sing it a final time, and put all three movements together. Ready?Verse 1: If you’re happy and you know it, clap your hands. (Clap, clap.) Verse 2: If you’re happy and you know it, stomp your feet. (Stomp, stomp.) Verse 3: If you’re happy and you know it shout hooray. “Hooray!” Verse 4 (combined): If you’re happy and you know it do all three. (Clap, clap. Stomp, stomp.) “Hooray!”
Invite students to make up three new verses and actions, then combine all three at the end.
Peek-a-Boo Shapes (4 minutes)
Materials: (T) Paper cutouts of triangles, rectangles, squares, hexagons, and circles (variety of sizes, including exemplars, non-examples, and variants), pictures of objects that have flat shapes
Note: This quick review of the work of GK–Module 2 prepares students to work with flat shapes in today’s lesson.
Show students each shape briefly, and then take it out of view. Remind students beforehand that they are to use the listen, think, raise your hand, wait for the snap procedure to name the shape in choral response. Start with easy shapes to build confidence, and then steadily increase the level of difficulty. After they have named the shapes, have students tell the number of sides.
Application Problem (5 minutes)
Materials: (S) Markers, paper
We are going to be talking about shapes again! Draw several things you saw this past week that looked like shapes you know. What are the different shapes called?
Share your picture with your partner. Talk about each of the shapes and how you knew its name. Does your partner agree with you?
Note: Use this time to review the definitions of squares, circles, rectangles, triangles, and hexagons with the students. Circulate to ensure accuracy in the students’ definitions and precision in their discussions. Coupled with the fluency work, the Application Problem will serve as a brief review prior to construction of shapes in today’s lesson.
Concept Development (25 minutes)
Materials: (S) 15 coffee stir sticks or similar material marked at the midpoint with permanent marker, scissors, small ball of clay, pencil, piece of construction paper, ruler
NOTES ON MULTIPLE MEANS OF ENGAGEMENT:
Scaffold below grade level students’ understanding of ordinal numbers by modeling for them. Ask students to get up one at a time to demonstrate first in line, second in line, and third in line. Have students practice saying who is first, second, and third in line as you point to each corresponding student.
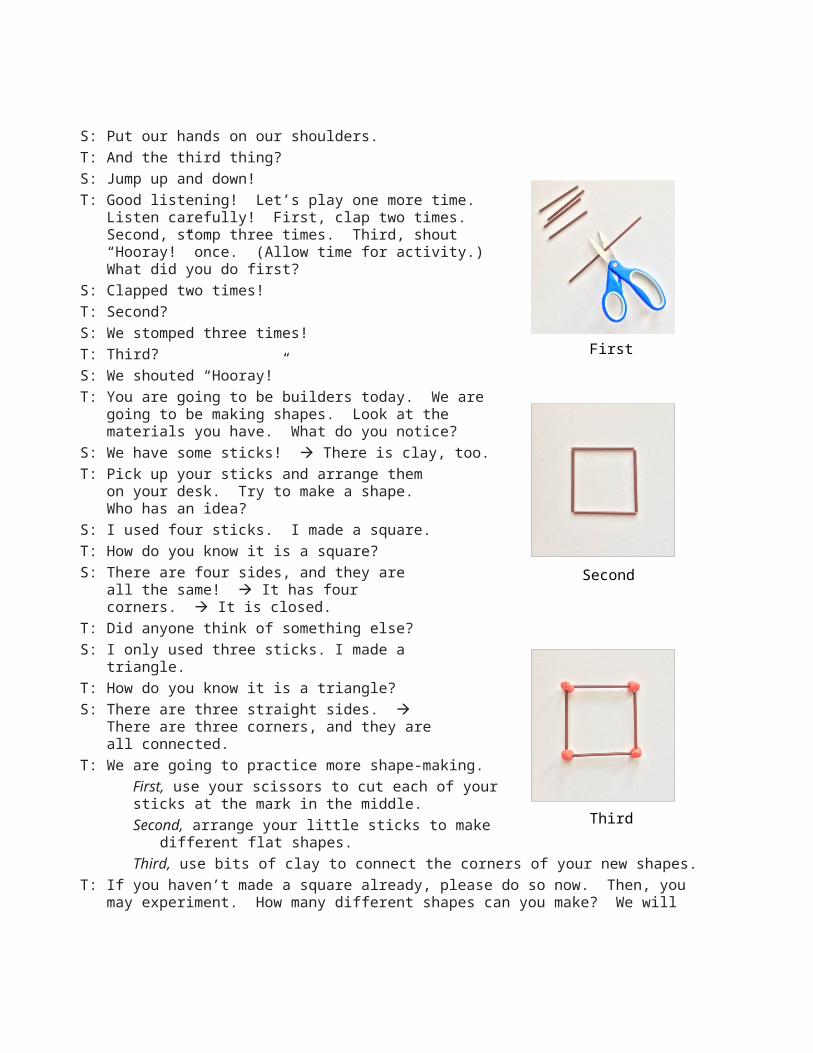
First
Second
Third
T: Listen to my directions. First, stand up. Second, put your hands on your shoulders. Go!S: (Stand up and then put hands on their shoulders.)T: What did I ask you to do first?S: Stand up!T: What was the second thing I asked you to do?S: Put our hands on our shoulders.T: Good! Please sit down. Listen to my directions. First,
stand up. Second, put your hands on your shoulders. Third, jump up and down! (Allow time for activity.) Please sit down. What did I ask you to do first?
S: Stand up!T: What was the second thing I asked you to do?S: Put our hands on our shoulders.T: And the third thing?S: Jump up and down!T: Good listening! Let’s play one more time. Listen carefully! First, clap
two times. Second, stomp three times. Third, shout “Hooray!” once. (Allow time for activity.) What did you do first?
S: Clapped two times!T: Second?S: We stomped three times!T: Third? S: We shouted “Hooray!”T: You are going to be builders today. We are going to be making
shapes. Look at the materials you have. What do you notice?S: We have some sticks! There is clay, too.T: Pick up your sticks and arrange them on your desk. Try
to make a shape. Who has an idea?S: I used four sticks. I made a square.T: How do you know it is a square?S: There are four sides, and they are all the same! It
has four corners. It is closed.T: Did anyone think of something else?S: I only used three sticks. I made a triangle. T: How do you know it is a triangle?S: There are three straight sides. There are three
corners, and they are all connected.T: We are going to practice more shape-making.
First, use your scissors to cut each of your sticks at the mark in the
middle. Second, arrange your little sticks to make different flat shapes. Third, use bits of clay to connect the corners of your new shapes.
T: If you haven’t made a square already, please do so now. Then, you may experiment. How many different shapes can you make? We will have a shape show when you are done. (Allow ample time for experimentation and construction.)
T: Who would like to share one of their shapes? Tell us what you did first, second, and third. Use your math words!
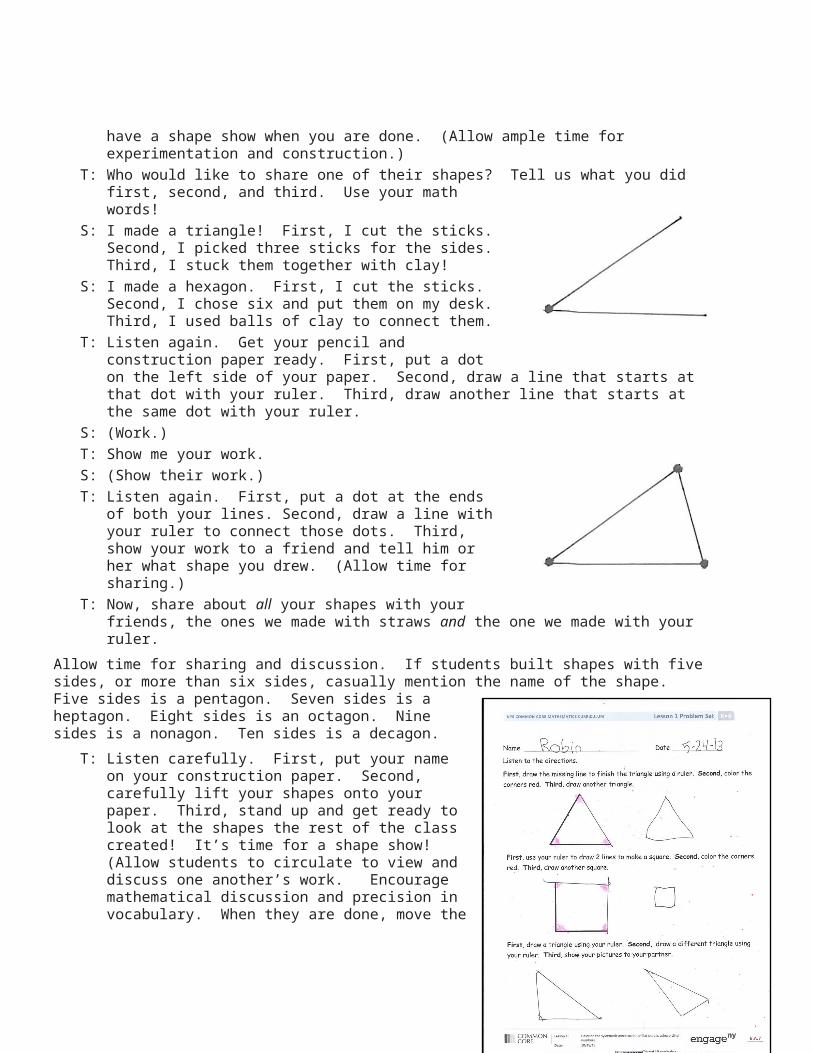
S: I made a triangle! First, I cut the sticks. Second, I picked three sticks for the sides. Third, I stuck them together with clay!
S: I made a hexagon. First, I cut the sticks. Second, I chose six and put them on my desk. Third, I used balls of clay to connect them.
T: Listen again. Get your pencil and construction paper ready. First, put a dot on the left side of your paper. Second, draw a line that starts at that dot with your ruler. Third, draw another line that starts at the same dot with your ruler.
S: (Work.) T: Show me your work. S: (Show their work.)T: Listen again. First, put a dot at the ends of both your lines.
Second, draw a line with your ruler to connect those dots. Third, show your work to a friend and tell him or her what shape you drew. (Allow time for sharing.)
T: Now, share about all your shapes with your friends, the ones we made with straws and the one we made with your ruler.
Allow time for sharing and discussion. If students built shapes with five sides, or more than six sides, casually mention the name of the shape. Five sides is a pentagon. Seven sides is a heptagon. Eight sides is an octagon. Nine sides is a nonagon. Ten sides is a decagon.
T: Listen carefully. First, put your name on your construction paper. Second, carefully lift your shapes onto your paper. Third, stand up and get ready to look at the shapes the rest of the class created! It’s time for a shape show! (Allow students to circulate to view and discuss one another’s work. Encourage mathematical discussion and precision in vocabulary. When they are done, move the papers carefully to a part of the room where they may be saved for use in Lesson 3 of this module.)
Problem Set (10 minutes)
Students should do their personal best to complete the Problem Set
within the allotted 10 minutes.
Student Debrief (8 minutes)
Lesson Objective: Describe the systematic construction of flat shapes using ordinal numbers.
The Student Debrief is intended to invite reflection and active processing of the total lesson experience.
Invite students to review their solutions for the Problem Set. They should check work by comparing answers with a partner before going over answers as a class. Look for misconceptions or misunderstandings that can be addressed in the Debrief. Guide students in a conversation to debrief the Problem Set and process the lesson.
You may choose to use any combination of the questions below to lead the discussion.
What words did we use to help us complete our Problem Set in order?
What was the first thing we did in our Problem Set? Did everyone draw a line to complete the triangle first, before they colored their triangle green?
Look at the triangles and squares you drew in your Problem Set. Are all the sides equal in length? Find someone who drew their shapes with equal length sides; find someone who drew their shapes with unequal length sides.
How did the words first, second, and third help us be good builders today?
Can you think of a time when order is important? What would happen if we put our shoes on first and our socks on second?
Can you think of other ways that we use words like first, second, and third?
Exit Ticket (3 minutes)
After the Student Debrief, instruct students to complete the Exit Ticket. A review of their work will help you assess the students’ understanding of the concepts that were presented in the lesson today and plan more effectively for future lessons. You may read the questions aloud to the student.
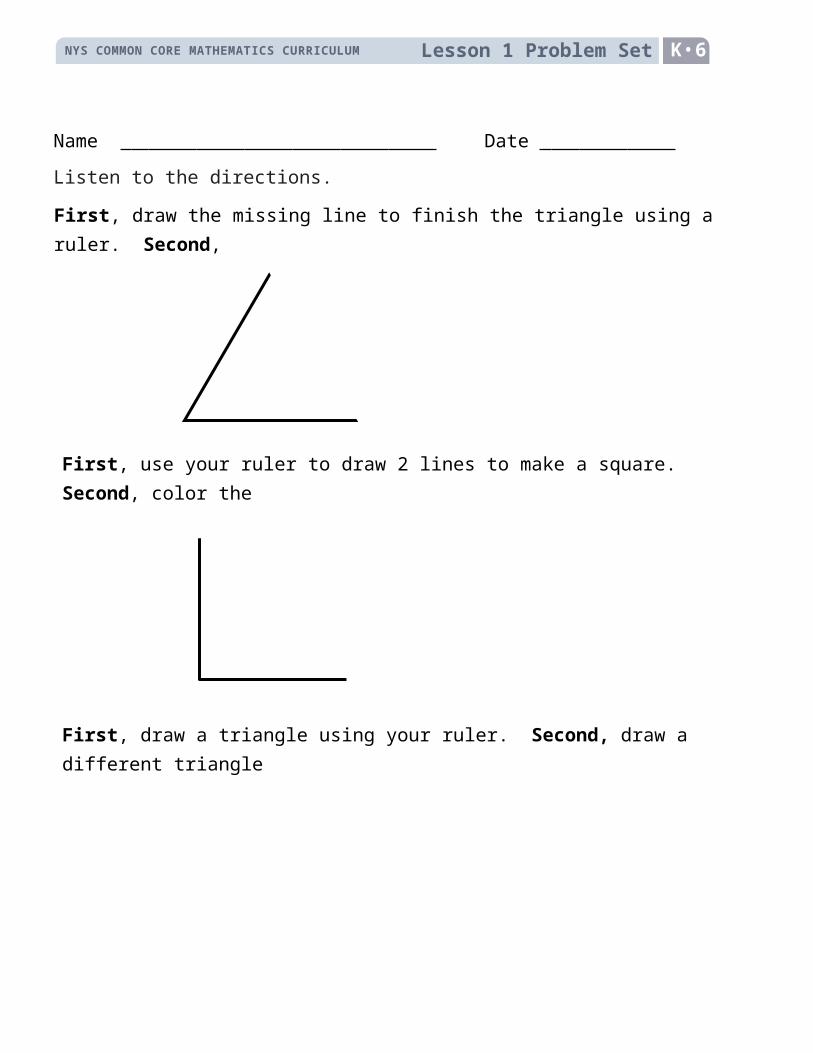
Lesson 1 Problem SetNYS COMMON CORE MATHEMATICS CURRICULUM K•6
Name Date Listen to the directions.First, draw the missing line to finish the triangle using a ruler. Second, color the corners red. Third, draw another triangle.
First, use your ruler to draw 2 lines to make a square. Second, color the corners red. Third, draw another square.
First, draw a triangle using your ruler. Second, draw a different triangleusing your ruler. Third, show your pictures to your partner.
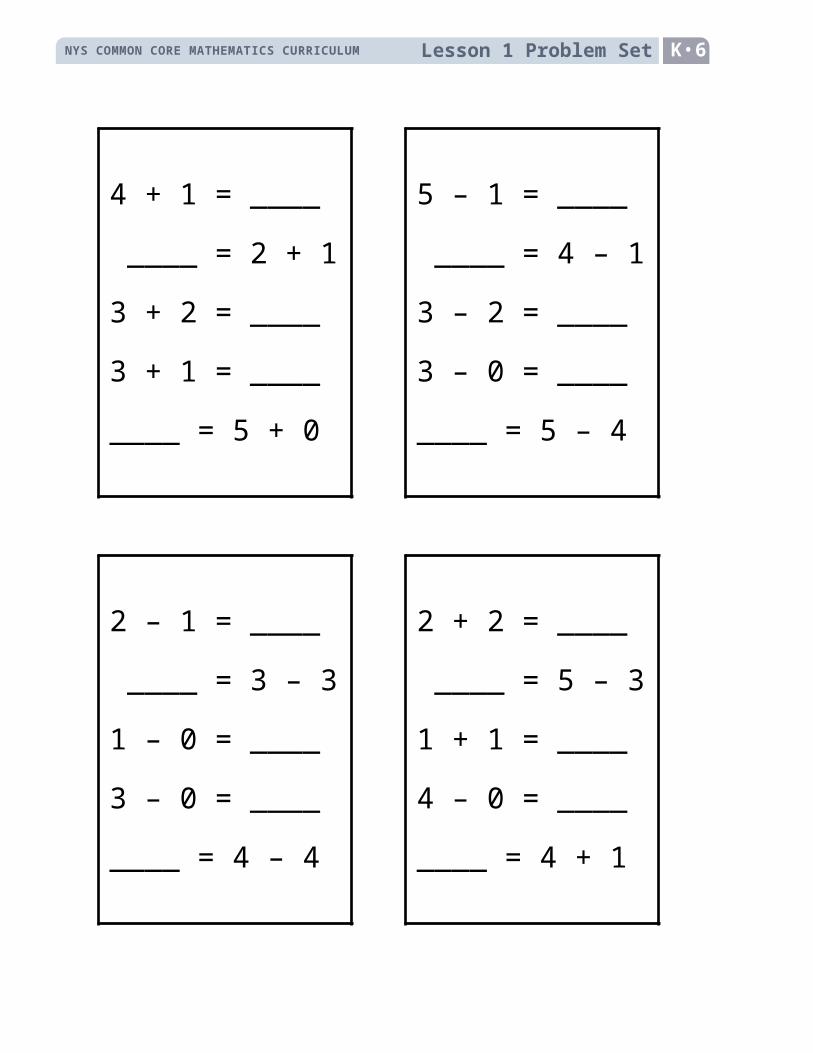
Lesson 1 Problem SetNYS COMMON CORE MATHEMATICS CURRICULUM K•6
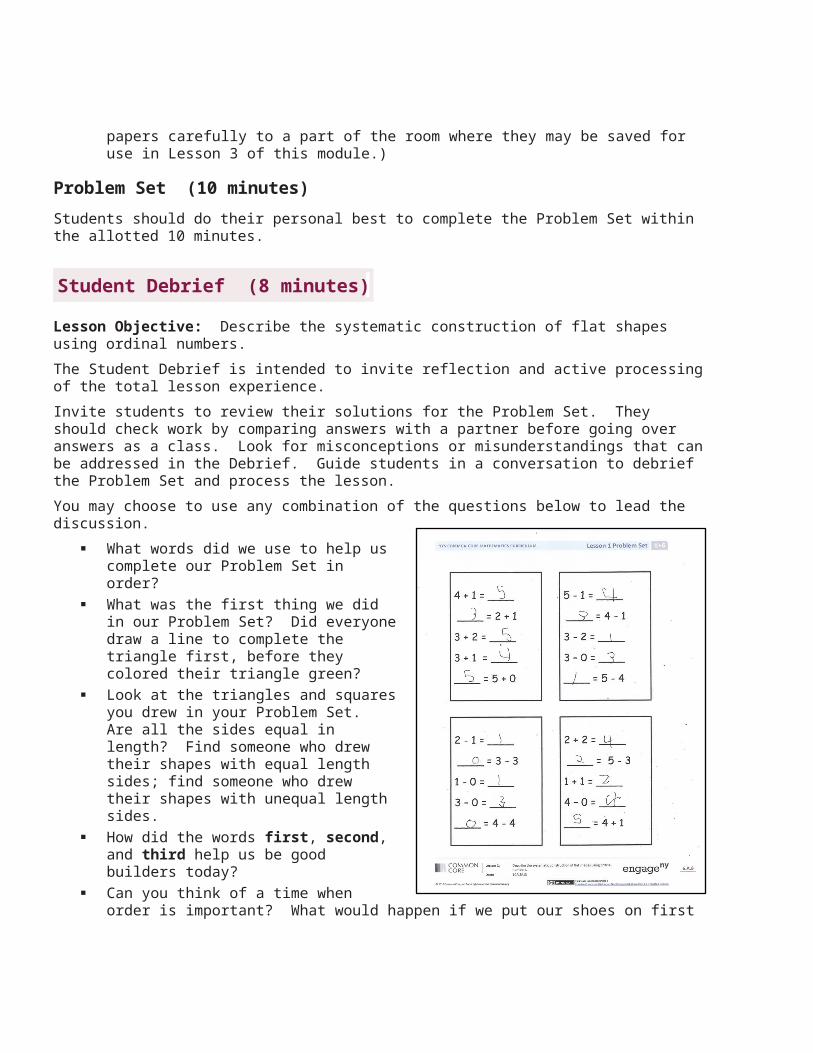
4 + 1 = ____ ____ = 2 + 1 3 + 2 = ____3 + 1 = ________ = 5 + 0
5 – 1 = ____ ____ = 4 – 1 3 – 2 = ____3 – 0 = ________ = 5 – 4
2 – 1 = ____ ____ = 3 – 3 1 – 0 = ____3 – 0 = ________ = 4 – 4
2 + 2 = ____ ____ = 5 – 3 1 + 1 = ____4 – 0 = ________ = 4 + 1
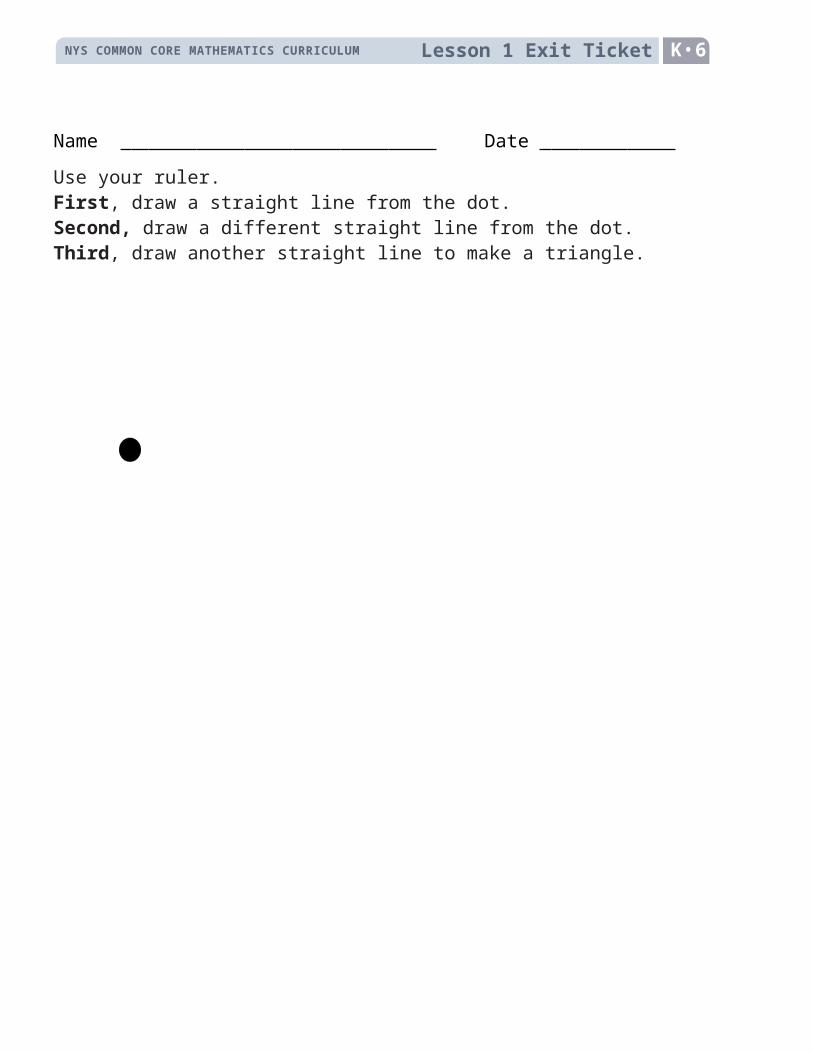
Lesson 1 Exit TicketNYS COMMON CORE MATHEMATICS CURRICULUM K•6
Name Date Use your ruler.First, draw a straight line from the dot.Second, draw a different straight line from the dot. Third, draw another straight line to make a triangle.
Lesson 1 HomeworkNYS COMMON CORE MATHEMATICS CURRICULUM K•6
Name Date
First, draw 2 lines to make a rectangle.Second, put a red circle on all the corners. Third, put an X on the longer sides.
Follow the directions.First, use your ruler to draw a line finishing the triangle. Second, color the triangle green. Third, use your ruler to draw a bigger triangle next to the green triangle.
First, draw a line to complete the hexagon. Second, color the hexagon blue. Third, write the number of sides the hexagon has in the box below.
On the back of your paper draw:A shape with 3 straight sides.A shape with 4 straight sides.A shape with 6 straight sides.
Lesson 1 Fluency TemplateNYS COMMON CORE MATHEMATICS CURRICULUM K•6