wattbike full test guide - wattbike | indoor bike trainer · 2 wattbike full test guide...
TRANSCRIPT

2 Wattbike Full Test Guide | 05/2015-v1.0EN
ContentsKey - the Terminology Explained ....................................................................................................................................................4
Introduction ...........................................................................................................................................................................................5Tests covered .....................................................................................................................................................................................................................................5Why test? .............................................................................................................................................................................................................................................5Who can carry out the tests? ................................................................................................................................................................................................6Before & After the tests .............................................................................................................................................................................................................6The tests ................................................................................................................................................................................................................................................6British Cycling....................................................................................................................................................................................................................................7
How the Wattbike works....................................................................................................................................................................8What does this mean? ................................................................................................................................................................................................................8How can the tables in this guide be used .....................................................................................................................................................................8
Resistance, Cadence & Power Tables .............................................................................................................................................9
Accuracy & Calibration .......................................................................................................................................................................10Accuracy ............................................................................................................................................................................................................................................... 10Testing the accuracy of the Wattbike .............................................................................................................................................................................. 10Calibration ............................................................................................................................................................................................................................................ 10
Warranty .................................................................................................................................................................................................12How to set zero on a Wattbike Performance Monitor (WPM) ...................................................................................................................... 12A Monitor .............................................................................................................................................................................................................................................. 12Test screens ........................................................................................................................................................................................................................................ 12
Heart Rate and Power Training Zones ............................................................................................................................................13
The 20’ Warm Up .................................................................................................................................................................................15Warm Up on the Wattbike Pro ............................................................................................................................................................................................. 15Warm Up on the Wattbike Trainer ..................................................................................................................................................................................... 16
The 20’ Cool Down ..............................................................................................................................................................................17Cool Down on the Wattbike Pro.......................................................................................................................................................................................... 17Cool Down on the Wattbike Trainer .................................................................................................................................................................................. 17
6” Peak Power Test ..............................................................................................................................................................................19Air Resistance Setting and Cadence Recommendations for the 6” Test ............................................................................................... 19Conducting a 6” Peak Power Test ...................................................................................................................................................................................... 19Results Screens from the 6” Test .........................................................................................................................................................................................206” Peak Power Test on an A Monitor ................................................................................................................................................................................21
30” Sprint Test ......................................................................................................................................................................................22The Monark Bike ..............................................................................................................................................................................................................................22Air Resistance & Cadence Recommendations for the 30” Test ...................................................................................................................22Conducting a 30” Test ................................................................................................................................................................................................................24Conducting a 30” Sprint Test using an A Monitor ..................................................................................................................................................26Score calculation for the A Monitor...................................................................................................................................................................................27The Monark Calculations ...........................................................................................................................................................................................................27
Submaximal Ramp Test ......................................................................................................................................................................28How Does The Test Work? ......................................................................................................................................................................................................28Conducting a Submaximal Ramp Test ...........................................................................................................................................................................29How to Interpret the Test Results .......................................................................................................................................................................................31
Maximal Ramp Test .............................................................................................................................................................................32Maximal Ramp Test Starting Point for Males ..............................................................................................................................................................32Maximal Ramp Test Starting Point for Females .......................................................................................................................................................33Air Resistance & Cadence Setting Recommendations for the Maximal Ramp Test on a Wattbike Pro .........................33Air Resistance & Cadence Setting Recommendations for a Maximal Ramp Test on a Wattbike Trainer .......................37Conducting a Maximal Ramp Test .....................................................................................................................................................................................38Conducting a Maximal Ramp Test using WPM A ...................................................................................................................................................40
3’ Aerobic Test ......................................................................................................................................................................................41

wattbike.com @wattbike /Wattbike
Air Resistance Setting and Cadence Recommendations for the 3’ Aerobic Test ............................................................................41Conducting a 3’ Aerobic Test .................................................................................................................................................................................................42Conducting a 3’ Aerobic Test Using an A Monitor .................................................................................................................................................44
10’ Progress Check ..............................................................................................................................................................................45Conducting a 10’ Progress Check .......................................................................................................................................................................................45Conducting a 10’ Progress Check Using an A Monitor ........................................................................................................................................46Calculating Percentages for the 10’ Progress Check ............................................................................................................................................47
20’ Threshold Test ...............................................................................................................................................................................48How to Interpret the Test Result? .......................................................................................................................................................................................50Conducting a 20’ Threshold Test ........................................................................................................................................................................................50Conducting a 20’ Threshold Test on an A Monitor ................................................................................................................................................52Physical Activity Readiness Questionnaire (PAR-Q) ............................................................................................................................................52
Informed Consent ................................................................................................................................................................................54

4 Wattbike Full Test Guide | 05/2015-v1.0EN
Key - the Terminology Explained• EMHR – Estimated Maximum Heart Rate is an estimation based on calculations to determine the maximum heart rate of a person, based on the results of a submaximal test.
• MHR – Maximum Heart Rate is the highest recorded heart rate in any maximal test.
• EMMP - Estimated Maximum Minute Power is the estimated value of a persons’ actual MMP. This can be found by completing the Wattbike Submaximal Ramp Test.
• MMP – Maximum Minute Power is the highest average power achieved in any minute (usually the final minute) of a maximum 1 minute cycling ramp test or the average power for the whole of a 3’ Aerobic Test.
• Submaximal Test – Any physical stress test where the rider does not exercise to maximal effort, or failure. Generally they exercise to level 7 ‘the no speak’ stage on the Borg scale rate of perceived exertion (scale of 1-10).
• Wattbike Performance Monitor (WPM) A – The first Performance Monitor available on the Wattbike. It has all the basic features needed to be able to take advantage of the sensors in the bike.
• Wattbike Performance Monitor B – The second Performance Monitor available on the Wattbike. It has a greater capacity for settings and functionality for creating custom workouts and testing. All the screen shots and walk throughs from this monitor are displayed in this guide. This will be referred to as WPM. All the tests mentioned in this guide can be adapted for a bike that has a Wattbike Performance Monitor A.
• Cadence – The pedalling rate, the number of revolutions of the crank arms per minute, expressed in rpm (Revolutions Per Minute.
There are various references to Wattbike A monitor in this document. The B monitor being the most current iteration of the WPM. All of the screen shots and steps for carrying out a test are all written for the B monitor. However where applicable there are steps for running the tests on the A monitor.
wattbike.com @wattbike /Wattbike
IntroductionAll exercise prescription and sport specific training plans need a start point. Currently, many plans are based on theory rather than fact.
Testing on a Wattbike gives accurate, comparable and repeatable data that can be trusted and is of scientific quality. Once a test has been conducted on a Wattbike, exercise prescription and sport specific training zones can be set with confidence, and changes in fitness tracked throughout the plan.
This Guide outlines tests that may be used to determine exercise prescription and sport specific training zones for anyone from a de-conditioned, inactive individual right up to an Olympic Champion.
It is not an exhaustive Guide of cycling tests but the tests selected cover a wide range of circumstances. Other cycling tests not in this Guide can be used or appropriate tests designed for specific purposes. Contact Wattbike if any guidance is required.
Tests CoveredThere are 7 tests and 1 technique view that is covered in this Guide they are all pre programmed into the Wattbike Performance Monitor:
1. Two Sprint Tests:
• Power Peak 6” • 30” Test
2. Two Ramp Test:
• Submaximal Ramp • Max Ramp
3. Three Aerobic Tests:
• 3’ Aerobic • 20’ Threshold • 10’ Progress
Note.
There is one ‘Focused Pedaling Technique’ test although it is in the test section of the monitor it is not covered in this guide.
Why Test?There are many reasons why testing is vital for successful implementation of an exercise or training plan.
• Initial testing provides a starting point and the information a personal trainer; coach, sports scientist or clinician needs to devise an appropriate and successful plan. Progress checks allow on-going assessment of fitness and enable changes to be made to the plan, if necessary.
• On-going regular testing also provides a picture of short, medium and long term changes in all aspects of exercise, training performance or general fitness. Tests should be carried out at the beginning of each phase of exercise or training and at specific points during a phase to monitor changes in performance.
• Finally, at the end of a plan testing allows a full analysis and review of the plan and contributes to future planning.
Whilst the tests can be carried out using just the Wattbike and a heart rate monitor, for a fuller profile of an athlete; gas analysis and lactate testing can be easily integrated into the Wattbikes test protocols.
6 Wattbike Full Test Guide | 05/2015-v1.0EN
Who Can Carry Out the Tests?The tests in this Guide are to be overseen by qualified personal trainers (REPS Level 3/4), coaches, sport scientists and trained medical personnel. The higher risk maximal tests of:
• Max Ramp• 30” Test• 3’ Aerobic • 20’ Threshold
Can only be overseen by personnel who are qualified to do so and have emergency medical equipment on site.
If further training is needed on how to complete the tests in this Guide a technical workshop with a Wattbike Sport Scientist is available.
Before & After the TestsTests put the body under high levels of stress and are not suitable for everybody. It is vital that before a test is conducted full medical disclosure is obtained and an informed consent form completed. It is also advisable to check that the rider’s blood pressure is within the normal range.
Before any test is undertaken we recommend warming up correctly. Following completion of a test an appropriate cool down should be done. There are some recommended warm up and cool down routines in this Guide.
Overview
A. The tests should only be carried out by appropriately qualified personnel
B. Medical information and Informed consent forms must be completed prior to the test (PAR-Q etc...)
C. Blood pressure should be checked prior to the test
D. If there are any doubts about the rider’s medical history a doctor must be consulted prior to the test
E. The test must be fully explained to the rider before beginning
F. If the rider experiences any adverse symptoms during the test or requests to stop the test must be abandoned immediately
G. The tests in this Guide are not suitable for children and young adults under 18
H. You will need an ANT/ANT+SPORT compatible heart rate belt to complete the tests (Polar, Suunto or Garmin).
Medical Warning
The tests in this Guide assume a high level of basic fitness and should not be used with beginners (unless the specific test is appropriate) or if the rider has been ill or injured. If in doubt ask the rider to consult their Doctor before for approval before undertaking a Wattbike test.
The tests in this Guide are not suitable for children or young adults under the age of 18 unless under supervision.
The TestsThe tests cover the full range of fitness levels and include procedures for both sub-maximal and maximal testing.
Maximal testing should only be used when the rider has a good level of fitness and is involved in sport or high intensity physical activity on a regular basis. Sub-maximal testing does not place as much stress on the body and is therefore more suitable for most gym users and inactive people.
Note - It is recommended that the same Wattbike is used for tests on all occasions.

wattbike.com @wattbike /Wattbike
British CyclingThroughout this Guide, there are various references to British Cycling. The Wattbike was designed alongside British Cycling and some of the tests in this Guide have British Cycling as their source.
We have also used, for illustrative purposes, the British Cycling heart rate and power training zones as an analysis tool for some of the tests. Other tests/training zone methodologies can equally be used with the Wattbike data.

8 Wattbike Full Test Guide | 05/2015-v1.0EN
How the Wattbike worksThis is just a brief overview of how the Wattbike works. A one-day Technical workshop is available for users who want to know more.
• The Wattbike load cell measurement system is on the chain and works together with magnet sensors that track the pedals. The load cell measures directly the force, in Newtons, the rider is applying through the cranks onto the chain.
• The force data is collected at a resolution of a 100 samples a second and for each parameter measured to 5 decimal places when using Wattbike Expert software. For practical purposes, the Wattbike Performance Monitor shows whole numbers.
• The accuracy of the Wattbike relates to the measurement system. The measurement system is not influenced by the air and magnetic resistance (this just creates variable resistance for the rider to work against), nor by environmental conditions (heat/cold, humidity, altitude), nor by the chain being ‘tight’/‘slack’.
What Does this Mean?The Wattbike will not produce the same ‘result’ every time on the same air brake setting i.e.
80rpm at level 1 = 115w OR 90rpm at level 3 = 200w
All the tables in this Guide are mathematically constructed and assume perfection i.e. constant application of force and constant cadence under set environmental conditions – they are for guidance only.
Around the individual Wattbike calibration/manufacturing tolerances, 80rpm for 110w may be at air resistance setting 1.5 and 90rpm for 200w at level 3.5 (or higher/lower).
Some differences may also be due to the air resistance conditions. For example, significant differences will be seen at altitude (due to the density of air – ‘drag’ is reduced). Wattbike have 6 Wattbikes in Colorado Springs (altitude 1839 m) which are 15% (at level 10) - 25% (at level 1) below the standard table figures. To apply the same force at the same rpm as on a sea level Wattbike the air resistance would need to be increased.
How Can the Tables in This Guide Be Used• Assume a ride at 90rpm at 200w on a Wattbike Pro (table shows this at level 3 next section).
• Start with the air brake at level 3 and adjust the air brake until consistently hitting 200w at 90rpm. This is the equivalent setting for that Wattbike (e.g. air brake position 3.5).
• Alternatively, at the table air resistance setting required increase/reduce the cadence to match the power output. Knowing the correct air resistance position and/or cadence will allow the rider to use the cadence/ power tables as written.

wattbike.com @wattbike /Wattbike
Resistance, Cadence & Power TablesUse the tables below to establish the correct power output (in watts) by air resistance setting and cadence (in 5rpm bands) for any test or training workout. For ease of reference the watts have been rounded to the nearest 5w.
More specific instructions, if appropriate, are given for each individual test protocol in this Guide.
Wattbike ProCadence Level 1 Level 2 Level 3 Level 4 Level 5 Level 6 Level 7 Level 8 Level 9 Level 10
40 25 30 30 40 45 45 50 50 55 55
45 35 40 40 45 50 55 55 60 60 65
50 40 40 50 55 60 65 70 70 75 80
55 50 50 60 70 75 80 90 95 105 105
60 60 60 70 80 90 100 110 115 120 125
65 70 80 90 100 115 125 135 150 155 160
70 85 90 105 120 135 150 165 175 185 190
75 100 105 130 150 175 185 200 210 225 240
80 115 125 150 170 195 215 235 250 270 280
85 130 145 170 195 225 260 275 295 320 340
90 150 165 200 235 265 300 325 350 375 390
95 175 185 225 265 310 350 375 400 425 450
100 195 215 260 310 355 395 430 465 500 520
105 210 230 295 350 400 445 490 525 565 600
110 245 270 330 395 455 510 555 600 645 675
115 270 310 380 445 515 575 625 675 725 760
120 300 335 410 490 570 640 695 750 810 850
125 340 370 460 550 650 740 785 835 925 950
130 360 405 495 600 705 785 855 925 995 1045
Wattbike TrainerCadence Level 1 Level 2 Level 3 Level 4 Level 5 Level 6 Level 7 Level 8 Level 9 Level 10
40 15 15 15 20 25 25 25 30 30 30
45 20 20 20 25 30 30 30 35 35 35
50 25 25 25 30 35 35 40 40 45 45
55 30 30 35 40 40 45 50 50 55 55
60 35 35 40 45 50 55 60 65 70 70
65 40 45 50 55 65 70 75 80 85 90
70 50 50 60 70 75 85 95 100 105 110
75 55 60 70 80 95 105 115 120 130 135
80 65 70 85 95 110 125 135 145 155 160
85 75 80 100 115 130 145 160 170 180 190
90 85 95 115 135 150 170 185 200 215 225
95 100 110 130 155 175 200 215 230 245 260
100 110 125 150 175 200 225 245 265 285 300
105 125 140 170 200 230 260 280 300 325 340
110 140 155 190 225 260 290 320 340 365 385
115 155 175 210 250 290 325 355 385 415 435
120 170 190 235 280 325 365 395 430 460 485
125 190 210 260 310 360 405 440 480 513 540
130 210 230 280 340 400 450 490 530 570 595

10 Wattbike Full Test Guide | 05/2015-v1.0EN
Accuracy & Calibration“The Wattbike is certainly an exceptional ergometer, and the excellent repeatability of testing is ideal for training facilities where athletes are tested regularly for fitness program effectiveness.” 59
Tom Stanef, Senior Technical Officer, South Australian Institute of Sport, 7th April 2010
Accuracy• The Wattbike is designed to measure force in Newtons
• The force that the rider produces is measured by the bike
• The two resistance systems; magnetic and air, only provide a load for which the rider can work against
• The resistance systems do not influence the way the load cell works
• The air and magnetic resistances are ways in which to load the rider whilst riding
• As with other ergometers it is not possible to have the same accuracy over the full range (for the Wattbike Pro the range is 0-3760watts, for the Wattbike Trainer the range is 0-2000watts)
• The mean accuracy of the Wattbike measurement system is typically within 2% (-0.42% +/- 1.21%) with retest variance typically better than 1% (0.42% +/- 0.46%). `South Australian Institute of Sport 31/03/2010
• Split down into intermediate ranges the Wattbike measurement system accuracy is typically:
Range Error<100w Up to 6%
100w - 200w Within 2%
200w - 500w Within 1.5%
>500w Within 1%
Over the full range within 2%
Testing the Accuracy of the WattbikeTo test and compare the accuracy of the Wattbike it is important not to replace any of the production parts used in the original calibration process. It is not possible, for instance to fit a SRM crank set, or any other crank length. Doing so will skew the readings and invalidate the warranty.
With the correct equipment and test protocol the accuracy of the Wattbike can be tested using dynamic calibration rigs or by attaching a torque sensor (such as HBM or Vacuumed Calibrator), without affecting any of the production parts.
This may involve considerable cost for test equipment but it is important to apply scientific methodology and rigor to ensure test accuracy. Wattbike are very happy to provide any assistance that is required, particularly to sports scientist that may wish to validate the accuracy of the Wattbike power output.
CalibrationThe Wattbike is factory calibrated and does not need recalibrating at any time.
• Power in watts is the absolute value with the amount of power produced measured from the sum of all the forces applied to the chain through the cranks
• That force is measured by one load cell and sequencing of the applied force is calculated according to crank position (determined by the location of two magnetic sensors)
• The chain itself has no influence on measurement provided that it has not become rusty and stiff
• Calibration is the final process before the covers are attached to complete the Wattbike construction

wattbike.com @wattbike /Wattbike
• A dynamic process is used to calibrate each Wattbike individually using a state of the art dynamometer to determine ‘square polynomial coefficients’
• The production chain ring + sprocket + crank set are an integral part of the calibration process
• Each Wattbike has a unique Sensor ID, which is stored in the 1-Wire memory
• This ID can be read in the Wattbike Performance Monitor together with the individual calibration coefficients
• A calibration file for each Wattbike is saved in our factory central database and the coefficients loaded into the 1-Wire memory of the Wattbike.

12 Wattbike Full Test Guide | 05/2015-v1.0EN
WarrantyThe Wattbike is constructed and calibrated by experienced engineers, tampering with the Wattbike invalidates all warranties and Wattbike cannot guarantee accuracy if the Wattbike is taken apart or any of its production parts are replaced with non-Wattbike approved materials.
How to ‘Set Zero’ on a WPMB Monitor
• Select Settings from the Main menu then Device Settings then Set zero state
• Rotate the pedals backwards for a few revolutions to unload the Wattbike. The cranks should be unladen and in a horizontal position
• Press ENTER – the monitor will start the sequence to Set zero
• The B Monitor now has an Auto zero set function that is automatically turned on and the WPM will automatically reset zero every time the WPM powers on.
A MonitorWhilst the Wattbike is factory calibrated there is a function to Set Zero from the Wattbike Performance Monitor. This can be used to ensure that the Wattbike has been returned to zero prior to testing.
1. Select Setup from the Main menu then Memory and simultaneously press all four buttons on the bottom of the screen
2. Rotate the pedals backwards for a few revolutions to unload the Wattbike. The cranks should be unladen and in a horizontal position
3. Press ENTER – the monitor will automatically Set Zero.
Test ScreensWhilst it is still necessary to select the correct resistance level and cadence for the desired power output, monitoring tests and recalling the data post- test is much easier using the pre-loaded test screens. For some of the tests there are test results calculated from algorithms programmed into the monitor firmware.
New test protocols can be designed in the workout area of the monitor and saved as named favourites.
ENTERESC
Info
Set zero state?
ESCAPE ENTER

wattbike.com @wattbike /Wattbike
Heart Rate and Power Training Zones On the Wattbike heart rate is measured by connecting a heart rate belt to the Wattbike Performance Monitor (coded Suunto, Garmin and Polar).
We have adopted the British Cycling methodology for calculating heart rate and power training zones. This methodology has been expanded to include a table of recommended Wattbike cadence and air resistance settings to achieve the heart rate and power zones required.
In general a workout where heart rate is 50 beats below MHR is recovery or base endurance. 30 to 50 beats below maximum is endurance training, 15 to 30 beats below maximum is intensive training and 0-15 beats below is very short high intensity interval training.
Once a Wattbike test has been conducted it is possible to work out the air resistance and cadence settings that apply to each of the heart rate and power training zones using the table provided in this guide.
The key measures that a test provides and that can be used to establish (or estimate) heart rate and power training zones are:
• Heart rate (bpm)• Watts (w)• Cadence (r/m)
The only way to determine cycling MHR and MMP is by using a properly constructed cycling test.
However such a test requires considerable motivation, physical stress and discomfort and it is inadvisable without medical clearance and supervision, particularly for individuals predisposed to coronary heart disease.
Qualified personnel should only conduct tests and they should have attended the Wattbike Fitness Testing Workshop.We will use a submaximal test in this workshop to illustrate how training zones are constructed.
Training zones are determined by percentage of MHR, percentage of MMP and duration. Each Training Zone has a different purpose as defined in the following table:
Training Zone Purpose % MHR % MMP RPE (1-10) & Feeling
Recovery Regeneration and Recovery <60 <35 1 very relaxed. Able to carry on a
conversation. <60
1. Basic Establish base endurance 60-65 34-45 2 Relaxed. Able to carry on a
conversation 90’-360’
2. Basic Improve efficiency 65-75 45-55 3 Working. Feel warmer. Heart rate and respiration up. May sweat 60’-240’
3. Intensive Improve sustainable power 75-82 55-65
5 Hard work. Heart rate and respiration up. Carbon dioxide builds up. Sweating. Breathing hard
45’-120’
4. Intensive Push threshold up 82-89 65-75 6 Stressed. Panting. Sweating freely 30’-60’
5. Maximal
Sustain a high percentage of maximal aerobic power
89-94 78-85 7 Very stressed. Gasping. Sweating heavily 14’-40’
6. Maximal Increase maximum power output >94 85-100 10 Heavily stressed. Gasping. Sweating
heavily 4’-10- intervals
Supra-maximal Increase sprint power output N/A >100 10 Extremely stressful. Gasping.
Sweating heavily Short intervals
Note: The maximum duration times are those applicable to highly trained elite cyclists with the range designed to reflect beginners to elite cyclists.

14 Wattbike Full Test Guide | 05/2015-v1.0EN
The following table summarises the purpose and physiological adaptation of each of the training zones.
Training Zone Purpose Physical Adaptations Race fitness
Recovery Regeneration and Recovery
Increase blood flow to muscles to flush out waste products and provide nutrients
Promotes recovery and therefore training response
Zone 1 Establish base endurance
Improves fat metabolism, gets muscles/tendons/ligaments/nerves used to cycling. Increases economy
More efficient use of energy. Prepares body for harder training, works on technique/skill
Zone 2 Improve efficiency
Improves the ability to use oxygen, produce power and increases efficiency
Able to produce more power with the same level of effort, works on technique/skill
Zone 3Improve sustainable power
Improves carbohydrate metabolism, changes some fast twitch muscle to slow twitch
Improved sustainable power, good for all cycling events
Zone 4 Push threshold up
Improves carbohydrate metabolism, develops lactate threshold, changes some fast twitch muscle to slow twitch
Improved sustainable race pace, useful during tapering or pre-competition periods: too much time in this zone can cause staleness
Zone 5
Sustain a high percentage of maximal aerobic power
Develops cardiovascular system and VO2max, improves anaerobic energy production and speeds turnover of waste products
Improved time trialling ability and resistance to short-term fatigue
Zone 6Increase maximum power output
Increases maximum muscle power, develops cardiovascular system and VO2max, increase threshold
Sprint speed, ability to accelerate away from a group and tolerate lots of hard work, such as mountain climbing
Supra-maximal Increase sprint power output
Increases maximum muscle power, develops neural control of pedalling at specific cadence
Develop race-specific skills at race pace, starting power, sprint speed and the ability to jump away from the bunch
wattbike.com @wattbike /Wattbike
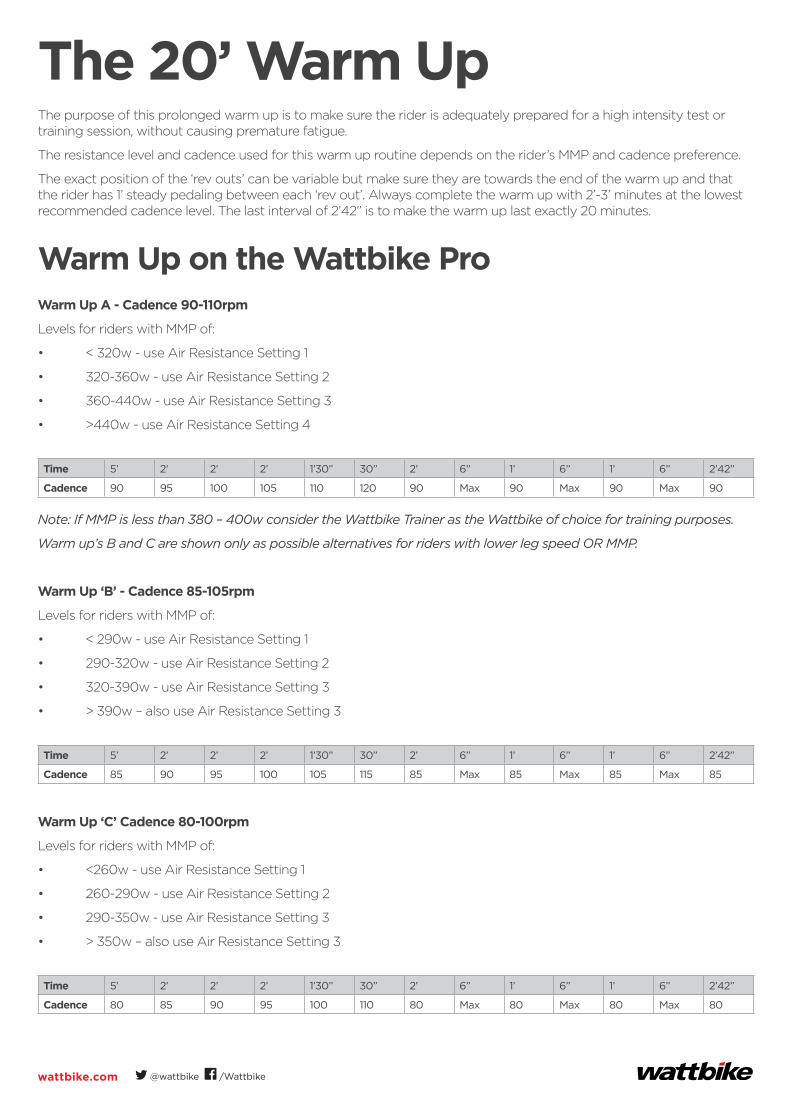
The 20’ Warm UpThe purpose of this prolonged warm up is to make sure the rider is adequately prepared for a high intensity test or training session, without causing premature fatigue.
The resistance level and cadence used for this warm up routine depends on the rider’s MMP and cadence preference.
The exact position of the ‘rev outs’ can be variable but make sure they are towards the end of the warm up and that the rider has 1’ steady pedaling between each ‘rev out’. Always complete the warm up with 2’-3’ minutes at the lowest recommended cadence level. The last interval of 2’42” is to make the warm up last exactly 20 minutes.
Warm Up on the Wattbike Pro Warm Up A - Cadence 90-110rpm
Levels for riders with MMP of:
• < 320w - use Air Resistance Setting 1
• 320-360w - use Air Resistance Setting 2
• 360-440w - use Air Resistance Setting 3
• >440w - use Air Resistance Setting 4
Time 5’ 2’ 2’ 2’ 1’30” 30” 2’ 6” 1’ 6” 1’ 6” 2’42”
Cadence 90 95 100 105 110 120 90 Max 90 Max 90 Max 90
Note: If MMP is less than 380 – 400w consider the Wattbike Trainer as the Wattbike of choice for training purposes.
Warm up’s B and C are shown only as possible alternatives for riders with lower leg speed OR MMP.
Warm Up ‘B’ - Cadence 85-105rpm
Levels for riders with MMP of:
• < 290w - use Air Resistance Setting 1
• 290-320w - use Air Resistance Setting 2
• 320-390w - use Air Resistance Setting 3
• > 390w – also use Air Resistance Setting 3
Time 5’ 2’ 2’ 2’ 1’30” 30” 2’ 6” 1’ 6” 1’ 6” 2’42”
Cadence 85 90 95 100 105 115 85 Max 85 Max 85 Max 85
Warm Up ‘C’ Cadence 80-100rpm
Levels for riders with MMP of:
• <260w - use Air Resistance Setting 1
• 260-290w - use Air Resistance Setting 2
• 290-350w - use Air Resistance Setting 3
• > 350w – also use Air Resistance Setting 3
Time 5’ 2’ 2’ 2’ 1’30” 30” 2’ 6” 1’ 6” 1’ 6” 2’42”
Cadence 80 85 90 95 100 110 80 Max 80 Max 80 Max 80

16 Wattbike Full Test Guide | 05/2015-v1.0EN
Warm Up on the Wattbike TrainerWarm Up - Cadence 90-110rpm
Levels for riders with MMP of:
• < 180w - use Air Resistance Setting 1
• 185-200w - use Air Resistance Setting 2
• 200-250w - use Air Resistance Setting 3
• 250-300w - use Air Resistance Setting 4
• 300-350w - use Air Resistance Setting 5
• 350-390w - use Air Resistance Setting 6
• 390-420w - use Air Resistance Setting 7
• 425-450w - use Air Resistance Setting 8
• 450-480w - use Air Resistance Setting 9
• >480w – Use Air Resistance setting 10
Time 5’ 2’ 2’ 2’ 1’30” 30” 2’ 6” 1’ 6” 1’ 6” 2’42”
Cadence 90 95 100 105 110 120 90 Max 90 Max 90 Max 90
If MMP is greater than 390w you may wish to consider the Wattbike Pro as the Wattbike of choice for training purposes.
Always err on the side of caution and choose a level that produces the warm up effect.
Summary - The basis of this warm up is:
1. The overall average power output for the whole 20’ is approximately 50% of MMP
2. At the 110 cadence level power output is approximately 75% of MMP
3. Heart rate is gradually increasing and peaks at approximately 80% of maximum at the 120-130 cadence 30” effort level, and then falls rapidly.
wattbike.com @wattbike /Wattbike
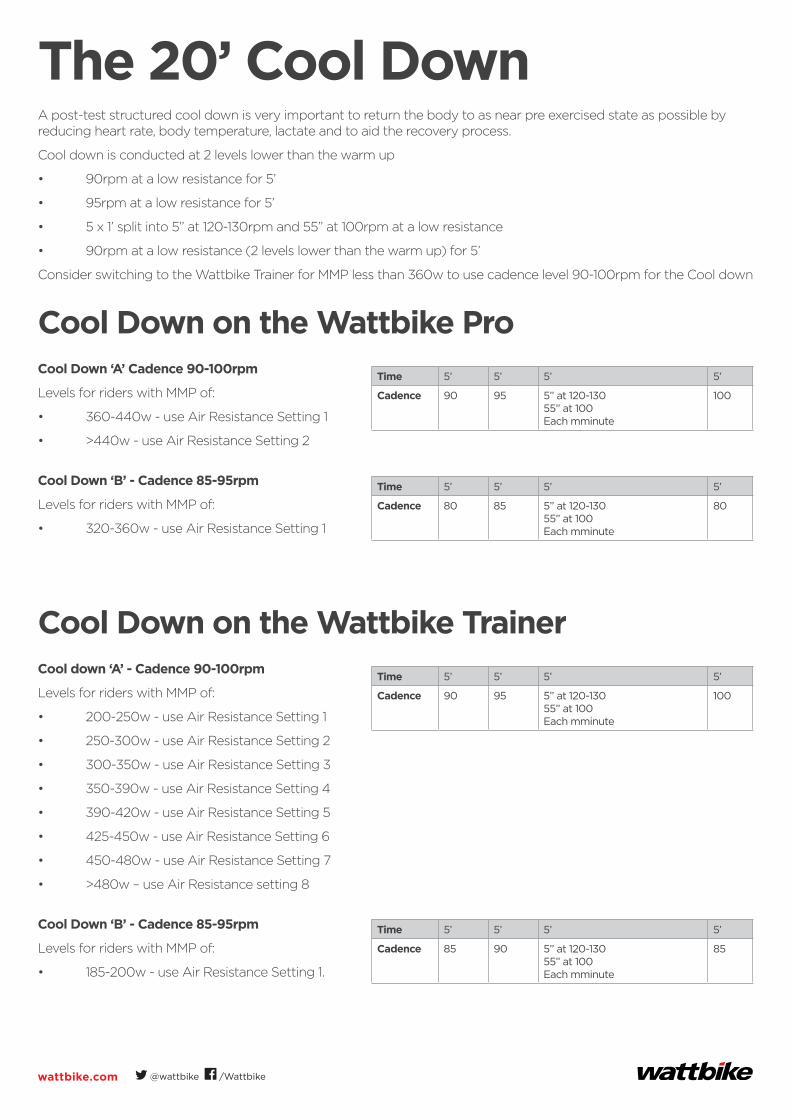
The 20’ Cool DownA post-test structured cool down is very important to return the body to as near pre exercised state as possible by reducing heart rate, body temperature, lactate and to aid the recovery process.
Cool down is conducted at 2 levels lower than the warm up
• 90rpm at a low resistance for 5’
• 95rpm at a low resistance for 5’
• 5 x 1’ split into 5” at 120-130rpm and 55” at 100rpm at a low resistance
• 90rpm at a low resistance (2 levels lower than the warm up) for 5’
Consider switching to the Wattbike Trainer for MMP less than 360w to use cadence level 90-100rpm for the Cool down
Cool Down on the Wattbike ProCool Down ‘A’ Cadence 90-100rpm
Levels for riders with MMP of:
• 360-440w - use Air Resistance Setting 1
• >440w - use Air Resistance Setting 2
Cool Down ‘B’ - Cadence 85-95rpm
Levels for riders with MMP of:
• 320-360w - use Air Resistance Setting 1
Cool Down on the Wattbike TrainerCool down ‘A’ - Cadence 90-100rpm
Levels for riders with MMP of:
• 200-250w - use Air Resistance Setting 1
• 250-300w - use Air Resistance Setting 2
• 300-350w - use Air Resistance Setting 3
• 350-390w - use Air Resistance Setting 4
• 390-420w - use Air Resistance Setting 5
• 425-450w - use Air Resistance Setting 6
• 450-480w - use Air Resistance Setting 7
• >480w – use Air Resistance setting 8
Cool Down ‘B’ - Cadence 85-95rpm
Levels for riders with MMP of:
• 185-200w - use Air Resistance Setting 1.
Time 5’ 5’ 5’ 5’
Cadence 90 95 5” at 120-13055” at 100Each mminute
100
Time 5’ 5’ 5’ 5’
Cadence 80 85 5” at 120-13055” at 100Each mminute
80
Time 5’ 5’ 5’ 5’
Cadence 90 95 5” at 120-13055” at 100Each mminute
100
Time 5’ 5’ 5’ 5’
Cadence 85 90 5” at 120-13055” at 100Each mminute
85

18 Wattbike Full Test Guide | 05/2015-v1.0EN
Cool Down ‘C’ - Cadence 80-90rpm
Levels for riders with MMP of:
• < 180w - use Air Resistance Setting 1
The basis of this cool down is:
• The overall average power output in Watts for the whole 20’ is approximately 35%-40% of MMP
• Heart rate is between 60%-75% of MHR (60% towards the end) – if heart rate remains high reduce the air resistance setting or cadence or both.
Time 5’ 5’ 5’ 5’
Cadence 80 85 5” at 120-13055” at 100Each mminute
80

wattbike.com @wattbike /Wattbike
6” Peak Power TestThe peak power test is designed to find the highest peak power and rpm. Despite its short duration it can be very stressful on both muscular and nervous system, therefore an adequate warm up is needed before attempting this test. Peak power and rpm are usually attained within the first few pedal revolutions.
Air Resistance Setting and Cadence Recommendations for the 6” TestThe air resistance setting used is a matter of judgment to get the best possible performance from the rider using a combination of the resistance and cadence. However suggested settings are shown in the 30” sprint table. We have seen high peak powers from all resistance settings and with a wide range of cadence.
Note: Any combination of air resistance and cadence is acceptable
Conducting a 6” Peak Power TestThe Wattbike has pre-set test workouts and a number of automatic outputs following completion of a test.
1. From the Main menu select workout/Tests and then Tests – the Tests screen appears.
2. Select Peak Power 6” Test.
3. Input rider weight and press ENTER to start the Test.
4. A loading screen will appear with a progress bar once this has disappeared the person can start riding.
20 Wattbike Full Test Guide | 05/2015-v1.0EN
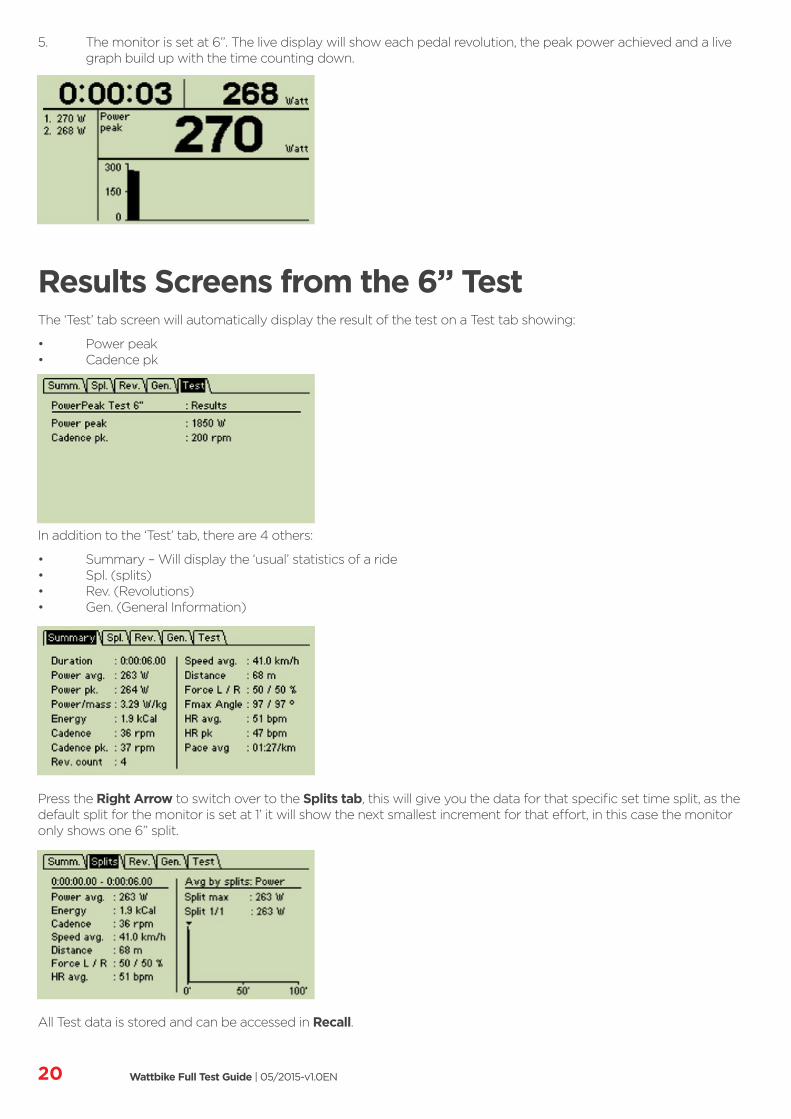
5. The monitor is set at 6”. The live display will show each pedal revolution, the peak power achieved and a live graph build up with the time counting down.
Results Screens from the 6” TestThe ‘Test’ tab screen will automatically display the result of the test on a Test tab showing:
• Power peak• Cadence pk
In addition to the ‘Test’ tab, there are 4 others:
• Summary – Will display the ‘usual’ statistics of a ride• Spl. (splits)• Rev. (Revolutions)• Gen. (General Information)
Press the Right Arrow to switch over to the Splits tab, this will give you the data for that specific set time split, as the default split for the monitor is set at 1’ it will show the next smallest increment for that effort, in this case the monitor only shows one 6” split.
All Test data is stored and can be accessed in Recall.
wattbike.com @wattbike /Wattbike
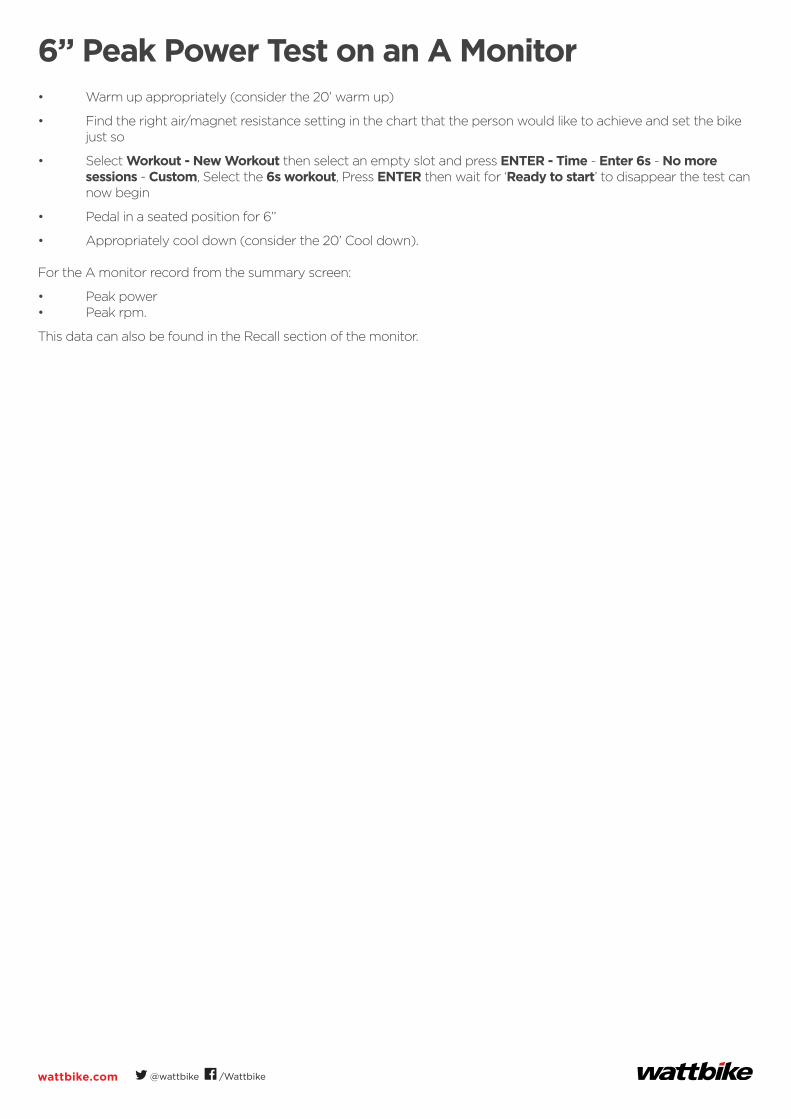
6” Peak Power Test on an A Monitor• Warm up appropriately (consider the 20’ warm up)
• Find the right air/magnet resistance setting in the chart that the person would like to achieve and set the bike just so
• Select Workout - New Workout then select an empty slot and press ENTER - Time - Enter 6s - No more sessions - Custom, Select the 6s workout, Press ENTER then wait for ‘Ready to start’ to disappear the test can now begin
• Pedal in a seated position for 6”
• Appropriately cool down (consider the 20’ Cool down).
For the A monitor record from the summary screen:
• Peak power• Peak rpm.
This data can also be found in the Recall section of the monitor.

22 Wattbike Full Test Guide | 05/2015-v1.0EN
30” Sprint TestThe Monark BikeBefore describing how to do a 30” Sprint Test on a Wattbike some background to the conventional Wingate test is necessary.
• The Wingate test is a 30 second test developed for the Monark.
• The Monark creates flywheel resistance by loading weights based on body mass.
• It records a calculation of the average power in each 5 second interval of a 30 second test and provides a peak power value based on the highest 5 second average and, a rate of deterioration, i.e. a percentage difference between the highest 5 second average power and the lowest 5 second average power.
• The Monark bike does not a directly measure force/ power
• We have therefore created a 30” test for the Wattbike which uses real time measurement of force to produce real data over 30”.
NOTE: For reference the Monark calculations are in the last page in this section.
Air Resistance & Cadence Recommendations for the 30” TestThe air resistance setting used is a matter of judgment to get the best possible performance from the rider using a combination of the resistance and cadence. However suggested settings are shown below. We have seen acceptable results from all resistance settings and with a wide range of cadence.
NOTE: Any combination of air resistance and cadence is acceptable.

wattbike.com @wattbike /Wattbike
Wattbike Pro
Male FemaleWeight (kg) Air Setting Magnet Setting Weight (kg) Air Setting Magnet Setting
<50 1 1 <45 1 1
51-55 2 1 46-50 1 1
56-60 2 1 51-55 2 1
61-65 3 1 56-60 2 1
66-70 3 1 61-65 2 1
71-75 4 1 66-70 2 1
76-80 4 1 71-75 3 1
81-85 4 1 76-80 3 1
86-90 5 1 81-85 3 1
91-95 5 1 86-90 4 1
96-100 6 1 91-95 4 1
101-105 6 1 96-100 5 1
106-110 7 1 101-105 5 1
111-115 7 1 106-110 5 1
116-120 8 1 111-115 5 1
121-125 8 1 116-120 6 1
126-130 9 1 121-125 6 1
131-135 9 1 126-130 7 1
136-140 10 1 131-135 7 1
141-145 10 1 136-140 8 1
146-150 10 5 141-145 8 1
24 Wattbike Full Test Guide | 05/2015-v1.0EN
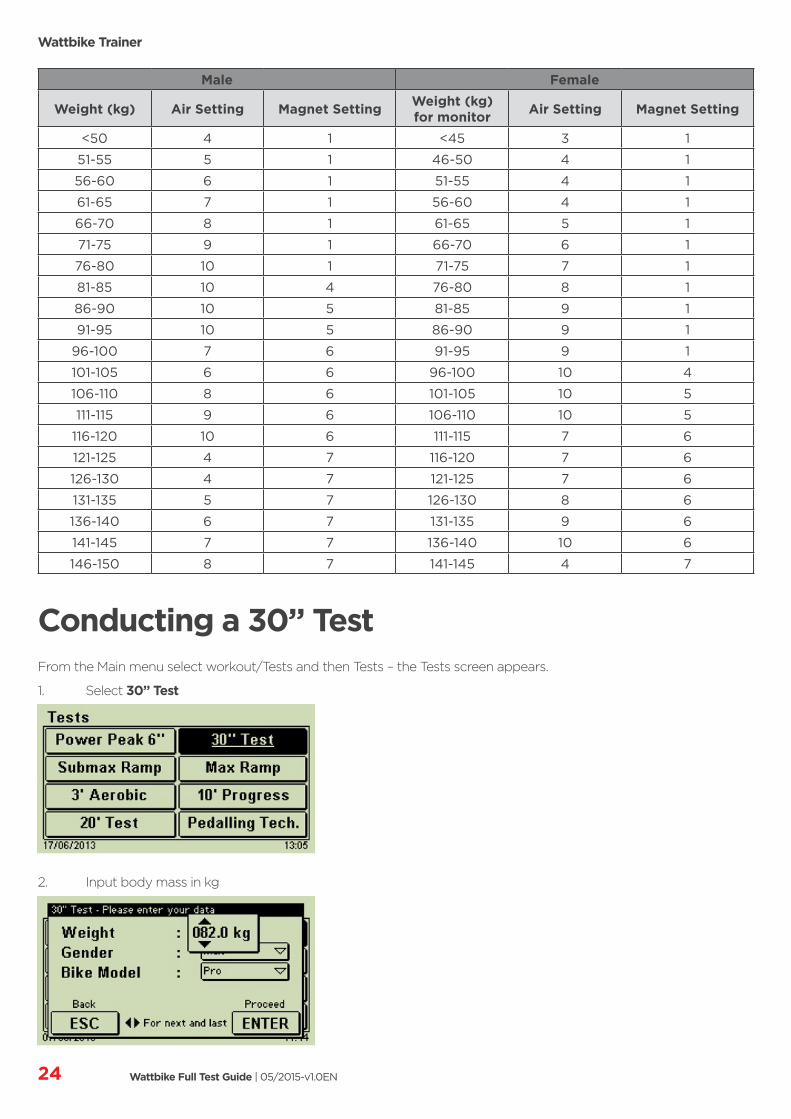
Wattbike Trainer
Male Female
Weight (kg) Air Setting Magnet Setting Weight (kg) for monitor Air Setting Magnet Setting
<50 4 1 <45 3 1
51-55 5 1 46-50 4 1
56-60 6 1 51-55 4 1
61-65 7 1 56-60 4 1
66-70 8 1 61-65 5 1
71-75 9 1 66-70 6 1
76-80 10 1 71-75 7 1
81-85 10 4 76-80 8 1
86-90 10 5 81-85 9 1
91-95 10 5 86-90 9 1
96-100 7 6 91-95 9 1
101-105 6 6 96-100 10 4
106-110 8 6 101-105 10 5
111-115 9 6 106-110 10 5
116-120 10 6 111-115 7 6
121-125 4 7 116-120 7 6
126-130 4 7 121-125 7 6
131-135 5 7 126-130 8 6
136-140 6 7 131-135 9 6
141-145 7 7 136-140 10 6
146-150 8 7 141-145 4 7
Conducting a 30” TestFrom the Main menu select workout/Tests and then Tests – the Tests screen appears.
1. Select 30” Test
2. Input body mass in kg

wattbike.com @wattbike /Wattbike
3. Input gender
4. Input Trainer or Pro
5. Recommended air/magnet setting (but any setting can be used)
6. Live screen graph – shows every 5 seconds
Test Tab:
Tests Screen- Displayed after the tests
26 Wattbike Full Test Guide | 05/2015-v1.0EN
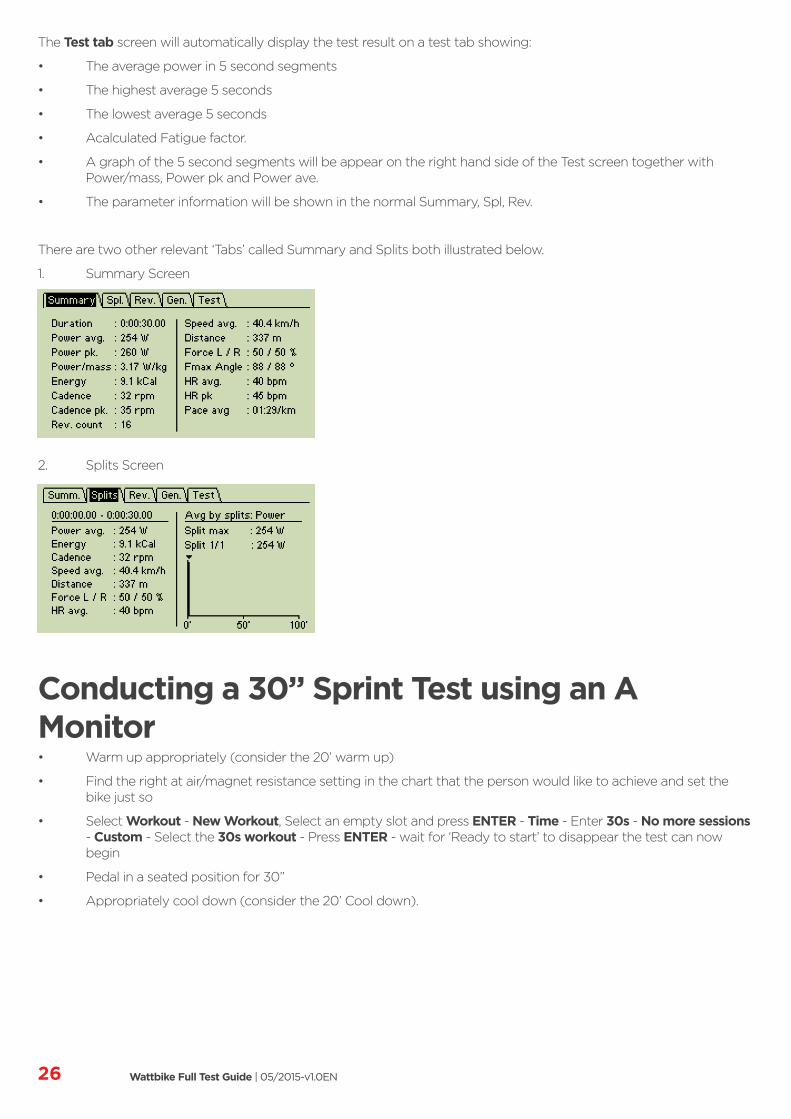
The Test tab screen will automatically display the test result on a test tab showing:
• The average power in 5 second segments
• The highest average 5 seconds
• The lowest average 5 seconds
• Acalculated Fatigue factor.
• A graph of the 5 second segments will be appear on the right hand side of the Test screen together with Power/mass, Power pk and Power ave.
• The parameter information will be shown in the normal Summary, Spl, Rev.
There are two other relevant ‘Tabs’ called Summary and Splits both illustrated below.
1. Summary Screen
2. Splits Screen
Conducting a 30” Sprint Test using an A Monitor• Warm up appropriately (consider the 20’ warm up)
• Find the right at air/magnet resistance setting in the chart that the person would like to achieve and set the bike just so
• Select Workout - New Workout, Select an empty slot and press ENTER - Time - Enter 30s - No more sessions - Custom - Select the 30s workout - Press ENTER - wait for ‘Ready to start’ to disappear the test can now begin
• Pedal in a seated position for 30”
• Appropriately cool down (consider the 20’ Cool down).
wattbike.com @wattbike /Wattbike
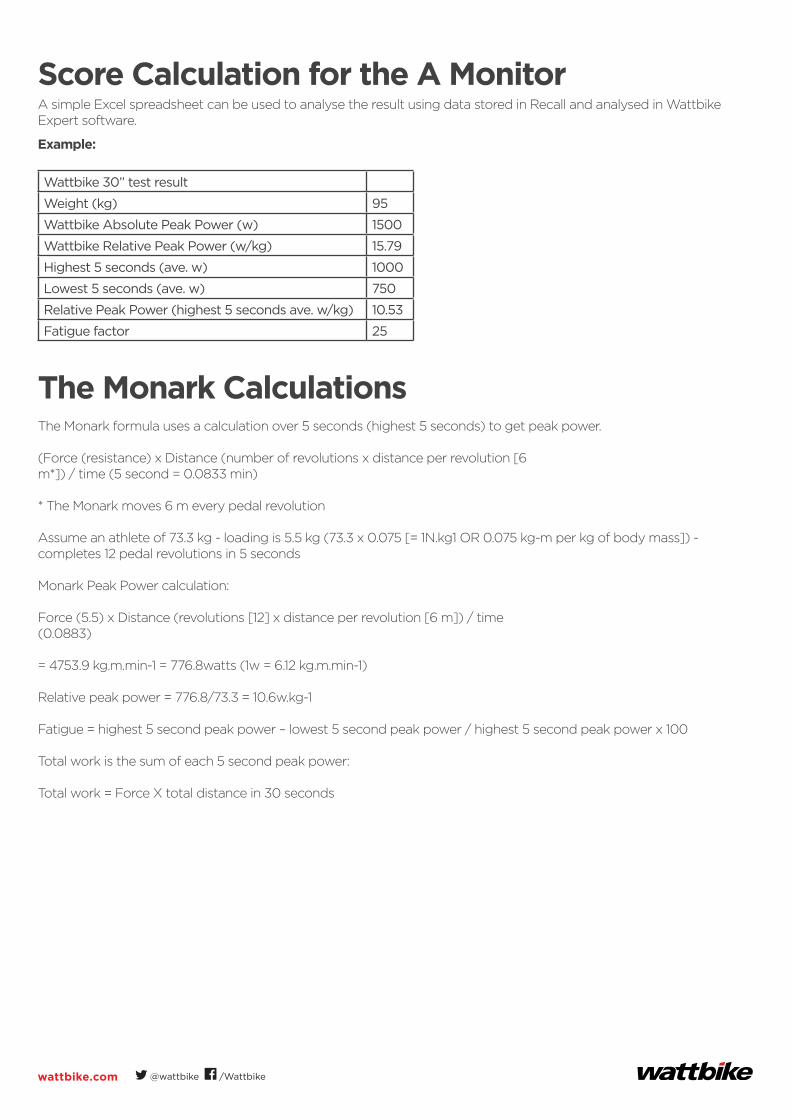
Score Calculation for the A MonitorA simple Excel spreadsheet can be used to analyse the result using data stored in Recall and analysed in Wattbike Expert software.
Example:
Wattbike 30” test result
Weight (kg) 95
Wattbike Absolute Peak Power (w) 1500
Wattbike Relative Peak Power (w/kg) 15.79
Highest 5 seconds (ave. w) 1000
Lowest 5 seconds (ave. w) 750
Relative Peak Power (highest 5 seconds ave. w/kg) 10.53
Fatigue factor 25
The Monark CalculationsThe Monark formula uses a calculation over 5 seconds (highest 5 seconds) to get peak power.
(Force (resistance) x Distance (number of revolutions x distance per revolution [6m*]) / time (5 second = 0.0833 min)
* The Monark moves 6 m every pedal revolution
Assume an athlete of 73.3 kg - loading is 5.5 kg (73.3 x 0.075 [= 1N.kg1 OR 0.075 kg-m per kg of body mass]) - completes 12 pedal revolutions in 5 seconds
Monark Peak Power calculation:
Force (5.5) x Distance (revolutions [12] x distance per revolution [6 m]) / time(0.0883)
= 4753.9 kg.m.min-1 = 776.8watts (1w = 6.12 kg.m.min-1)
Relative peak power = 776.8/73.3 = 10.6w.kg-1
Fatigue = highest 5 second peak power – lowest 5 second peak power / highest 5 second peak power x 100
Total work is the sum of each 5 second peak power:
Total work = Force X total distance in 30 seconds
28 Wattbike Full Test Guide | 05/2015-v1.0EN
Submaximal Ramp TestThis test is designed for people who take part in moderate activity on a regular basis (3 x 30’ per week). This includes regular gym users, people who run, cycle or those who play sports recreationally.
This test is designed to give a benchmark fitness level from which improvement in fitness can be monitored. As with the sub-maximal 10’ test, the test is terminated when the rider indicates they have reached level 7 on the Borg scale rate of perceived exertion (‘no-talk’ level).
The heart rate achieved at termination is deemed to be 85% of MHR and 60w is added to the Watts achieved at the termination level to determine MMP so that heart rate and power training zones can be calculated.
As it is a sub-maximal test, it can be done regularly (monthly) to track fitness improvement and to re-establish heart rate and power training zones as fitness levels change.
A Few Notes
• The test uses just one setting – o Air resistance level 8 on a Wattbike Trainer OR o Air resistance level 3 on a Wattbike Pro
• As a general rule for unfit individuals start at 55w and for fit individuals start at 100w
• The data collected during this test can be used to estimate MMP and MHR, which can then be used to establish training zones using the British Cycling methodology
• The minimum stages that need to be completed are 6 for the Performance Monitor to calculate the EMMP and EMHR
• If the rider is able to complete 12/13 or more minutes consider using the 3’ Aerobic Test or a more appropriate ramp test.
How Does The Test Work?• Warm up for 5’ at 50-60rpm on air resistance setting 8 on the Wattbike Trainer setting 8 or setting 3 on the Wattbike Pro
• Pedal in a seated position for 1’ at the starting power
• Increase the air resistance setting and cadence as necessary every minute to ensure a 15w increase in power (w) output every minute
• Keep increasing the power (w) output by 15w per minute (by increasing the cadence) until the rider reaches the no-talk stage – level 7 on the Borg scale rate of perceived exertion – note peak heart rate achieved (assumed to be 85% of MHR)
• OR if the rider experiences any adverse symptoms, requests to stop or experiences an emergency situation
• Cool down for 5’ at 50-60rpm on air resistance setting 8 on the Wattbike Trainer or setting 3 on the Wattbike Pro – or lower setting as appropriate.
wattbike.com @wattbike /Wattbike
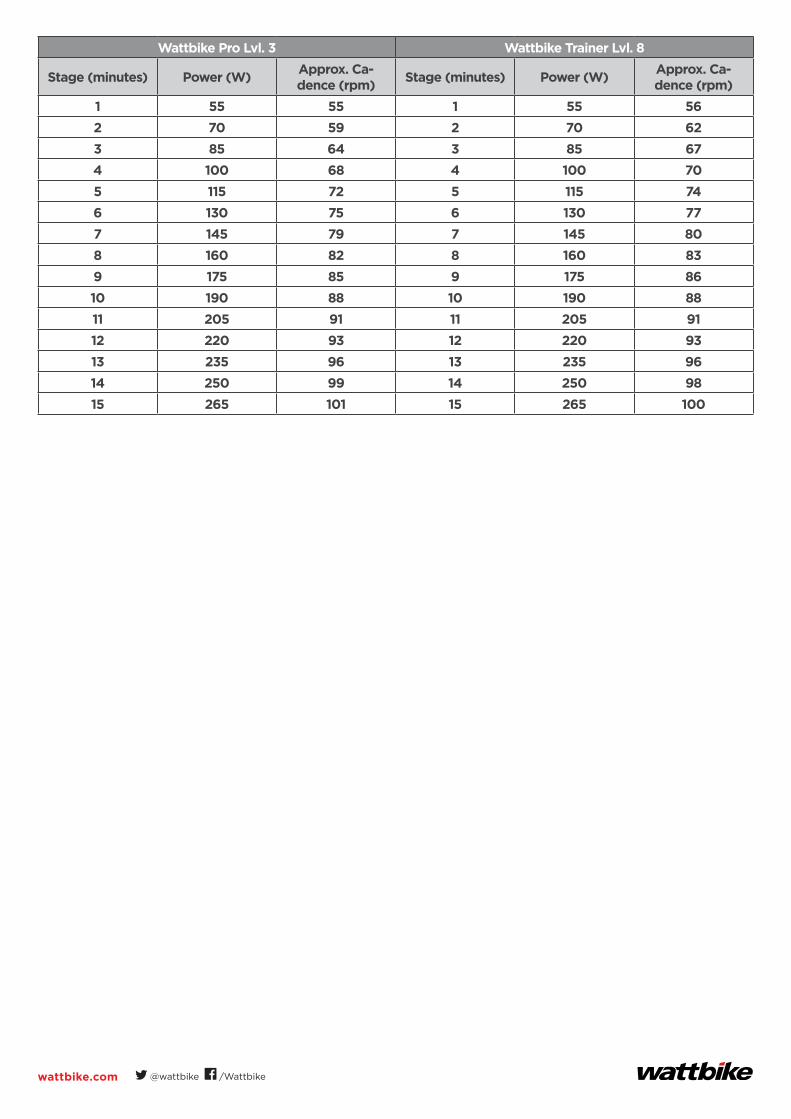
Wattbike Pro Lvl. 3 Wattbike Trainer Lvl. 8
Stage (minutes) Power (W) Approx. Ca-dence (rpm) Stage (minutes) Power (W) Approx. Ca-
dence (rpm)1 55 55 1 55 562 70 59 2 70 623 85 64 3 85 674 100 68 4 100 705 115 72 5 115 746 130 75 6 130 777 145 79 7 145 808 160 82 8 160 839 175 85 9 175 8610 190 88 10 190 8811 205 91 11 205 9112 220 93 12 220 9313 235 96 13 235 9614 250 99 14 250 9815 265 101 15 265 100
30 Wattbike Full Test Guide | 05/2015-v1.0EN
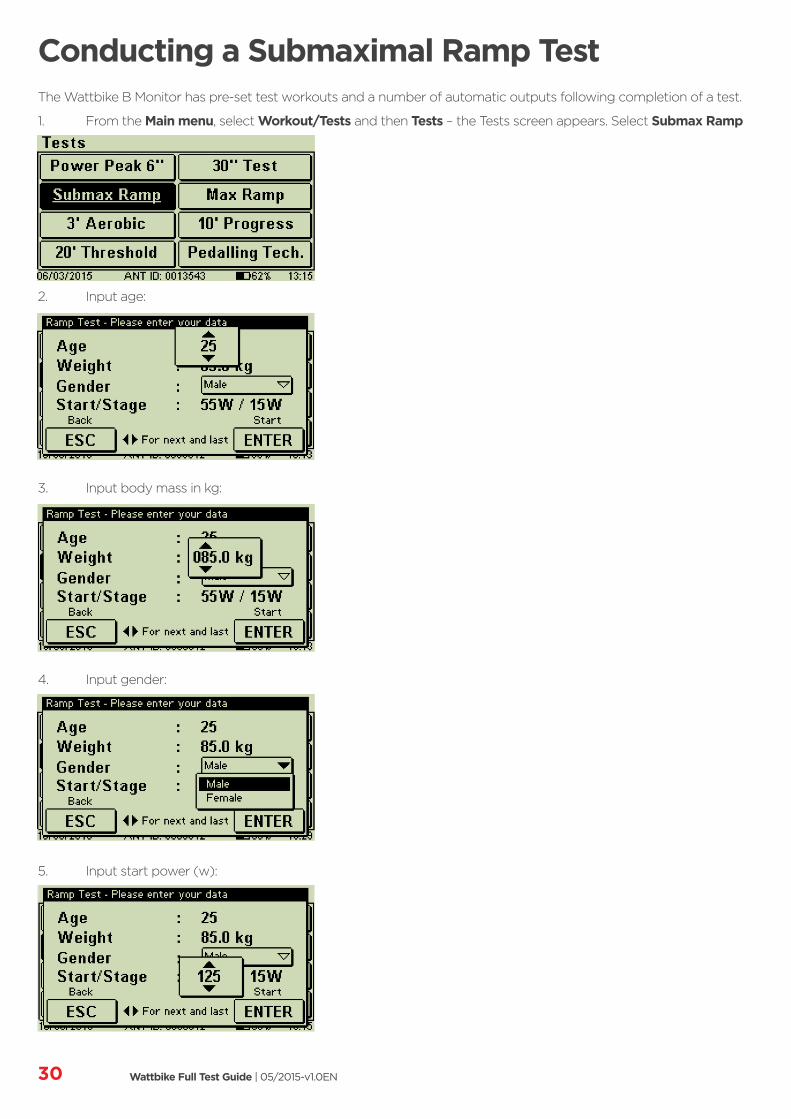
Conducting a Submaximal Ramp Test The Wattbike B Monitor has pre-set test workouts and a number of automatic outputs following completion of a test.
1. From the Main menu, select Workout/Tests and then Tests – the Tests screen appears. Select Submax Ramp
2. Input age:
3. Input body mass in kg:
4. Input gender:
5. Input start power (w):

wattbike.com @wattbike /Wattbike
6. Input stage ramp in power (w):
7. Live screen with Target power (w):
There are two test result screens, the first is the Test tab and the second is the Zones tab.
Test Tab:
This tab will show:
1. EMMP as MMP2. EMHR as MHR3. Estimated Power/mass4. VO2max estimate5. METs.
*This VO2max estimate is derived from Storer et al. (1990 Storer TW, Davis JA, & Caiozzo VJ. Accurate prediction of VO2max in cycle ergometry. Med Sci Sports Exerc 1990; 22:704-712
This above formula has the advantage of estimating maximum oxygen uptake (VO2max) using body weight (kg), age and MMP to determine the result. Compared to direct measures it gives a good estimate [±6%].
Zones tab:
This tab displays the heart rate and power training zones in a table:

32 Wattbike Full Test Guide | 05/2015-v1.0EN
1. This tab will use EMMP and EMHR to calculate training zones based on the British Cycling heart rate and power training zones.
The data can be viewed in graph form in Intervals with the power data (scroll across the graph for each minute) and with all the parameter data available in Summary (again scroll up/down for each minute).
How to Interpret the Test Results?• Take the power and heart rate at test termination
• Add 60w to the power achieved – this is MMP
• Divide the heart rate by 85 and multiply by 100 – this is MHR
• Apply the MHR and MMP to the heart rate and power training zone calculator on the Wattbike website (wattbike.com/trainingzone) to get estimated heart rate and power training zones.
NOTE: You can use the EMMP number as a good starting point to deliver the 3-minute aerobic test in this guide.
wattbike.com @wattbike /Wattbike
Maximal Ramp TestThis Test has been marked as one of the highest risk tests, purely because of the time, the intensity the person is working at and the incrementally harder exertion levels that are required. This test requires the person to work to the point of failure.
We have adopted the British Cycling Ramp Test methodology as a basis for explaining how to conduct a maximal ramp test on a Wattbike. Other maximal ramp test protocols are available and can be configured on a Wattbike using the air resistance, power and cadence tables.
It is possible to conduct maximum ramp tests on either the Wattbike Pro or Wattbike Trainer. Where possible it is recommended that selection of Pro or Trainer is based on being able to use just one level of air resistance setting using increasing cadence in the range 90-100rpm to complete the test.
However it is also possible to use the magnetic resistance on both the Wattbike Pro and Trainer to produce combinations of power and cadence. Using the magnet on the Trainer is very useful for tests and training workouts for MMP* up to 360w as it ensures that warm up, test or workout and cool down can be done effectively without switching from Pro to Trainer.
Maximal ramp tests up to 300w can be conducted on the Wattbike Trainer just using the air resistance. For tests likely to achieve 320w-360w, a combination of one air resistance setting and magnet resistance is needed.
* The highest average minute power output (in watts) during a Wattbike cycling ramp test (usually the final minute)
• It is possible to use the magnetic resistance on both the Wattbike Pro and Trainer to produce combinations of power and cadence.
• Using the magnet on the Trainer is very useful for tests and training workouts for MMPs up to 360w as it ensures that warm up, test or workout and cool down can be done effectively without switching from Pro to Trainer, Trainer to Pro.
• Maximal ramp tests up to 300w can be conducted on the Wattbike Trainer just using the air resistance.
Maximal Ramp Test Starting Point for MalesThere is only one prerequisite for this test; the participant must have completed the 3-minute Test.
To estimate an adequate test starting point for a male who will be participating in the Maximal Ramp Test, using the score from the 3-minute test use the statements and the table below:
• Watts – 3 minute test MUST be over 280w
• Watts achieved in 3 minutes = 315w round to nearest multiple of 20 = 300w
• Count back 10 stages (include the 300w as first stage)
• Starting power for the test 120w
• Test would start at 120w and ramp by 20w every minute.
3’ Test 300 320 340 360 380 400 420 440 460 480 500
Start w 100 120 140 160 180 200 220 240 260 280 300
If 3-minute test use score is over 420w use 240w as the start point for the maximal ramp test.
Starting Power, Based on Weight & Ability – Ramp by 20w Every Minute
Weight (kg) Club Level National Level World Class Level
<50 120 140 160
50-59 140 160 180
60-69 160 180 200
70-79 180 200 220
80+ 200 220 240

34 Wattbike Full Test Guide | 05/2015-v1.0EN
Maximal Ramp Test Starting Point for FemalesThere is only one prerequisite for this test; the participant must have completed the 3-minute Test.
To estimate an adequate test starting point for a female who will be participating in the Maximal Ramp Test, using the score from the 3-minute test use the statements and the table below:
3’ Test 215 230 245 260 275 290 305 320 335 350 375
Start w 65 80 95 110 125 140 155 170 185 200 215
Example:
• Watts – 3-minute test MUST be over 215w• Watts achieved in 3 minutes = 260w round to nearest multiple of 15 = 260w• Count back 10 stages (include the 260w as first stage)• Starting power for the test 125w• Test would be start at 125w and ramp by 15w every minute
If 3’ aerobic test score is over 320w use 180w as the start point for the maximal ramp test.
The starting power for the British Cycling Maximal Ramp Test depends on gender, weight and cycling ability.
Starting Power, Based on Weight & Ability – Ramp by 15w Every Minute
Weight (kg) Club Level National Level World Class Level<45 80 95 110
45-49 95 110 125
50-54 110 125 140
55-59 125 140 155
60-64 140 155 170
65+ 155 170 185
Use the tables below to work out the air resistance setting and cadence to use for a maximal ramp test.
Air Resistance & Cadence Setting Recommendations for the Maximal Ramp Test on a Wattbike ProMaximal Ramp Test on a Wattbike Pro (Male)
Resistance levels for this test depend on cadence preference. There are a number of ways of conducting a maximal ramp test. However for the purposes of this Guide we recommend a cadence range of 90-100 although for some of the lower starting powers a cadence of < 90 may be needed.
Maximal Ramp Test at a Set Resistance Level & Increasing Cadence:
Example:Starting power 120w;
1. 8 stages 120w to 260w on air resistance setting 1 cadence range 82-113
2. 12 stages 120w to 300w on air resistance setting 2 cadence range = 79-114.
wattbike.com @wattbike /Wattbike
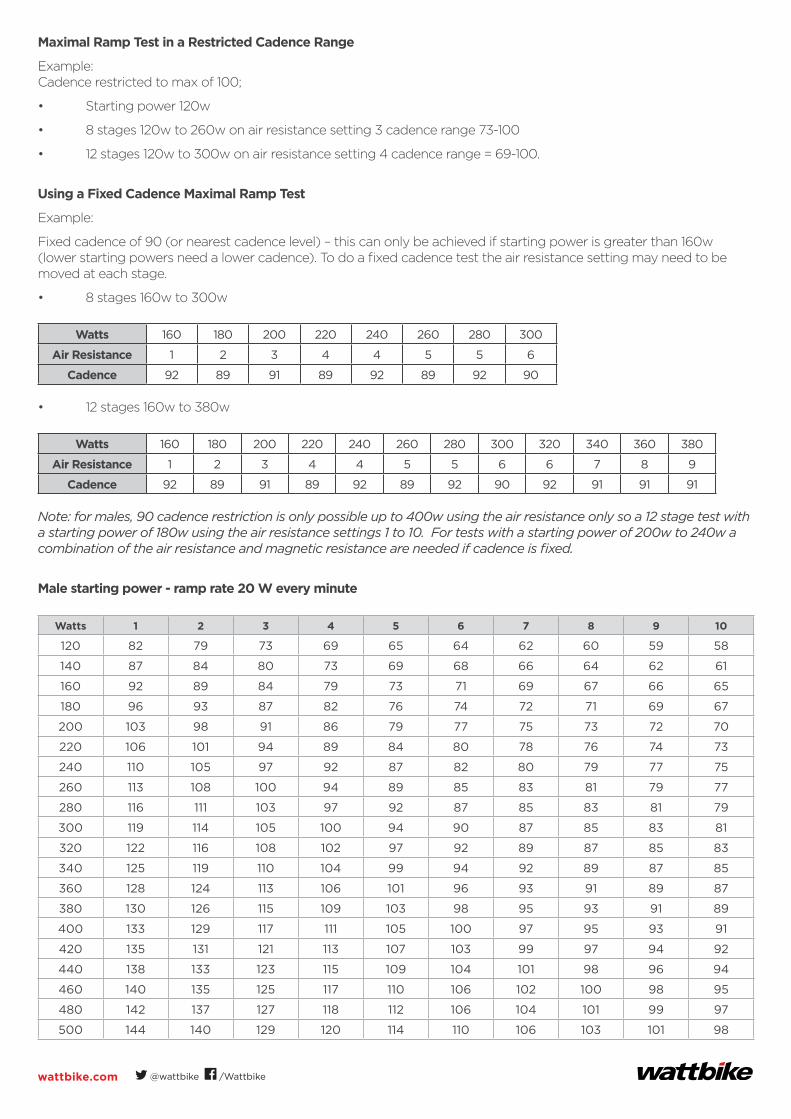
Maximal Ramp Test in a Restricted Cadence Range
Example:Cadence restricted to max of 100;
• Starting power 120w
• 8 stages 120w to 260w on air resistance setting 3 cadence range 73-100
• 12 stages 120w to 300w on air resistance setting 4 cadence range = 69-100.
Using a Fixed Cadence Maximal Ramp Test
Example:
Fixed cadence of 90 (or nearest cadence level) – this can only be achieved if starting power is greater than 160w (lower starting powers need a lower cadence). To do a fixed cadence test the air resistance setting may need to be moved at each stage.
• 8 stages 160w to 300w
Watts 160 180 200 220 240 260 280 300
Air Resistance 1 2 3 4 4 5 5 6
Cadence 92 89 91 89 92 89 92 90
• 12 stages 160w to 380w
Watts 160 180 200 220 240 260 280 300 320 340 360 380
Air Resistance 1 2 3 4 4 5 5 6 6 7 8 9
Cadence 92 89 91 89 92 89 92 90 92 91 91 91
Note: for males, 90 cadence restriction is only possible up to 400w using the air resistance only so a 12 stage test with a starting power of 180w using the air resistance settings 1 to 10. For tests with a starting power of 200w to 240w a combination of the air resistance and magnetic resistance are needed if cadence is fixed.
Male starting power - ramp rate 20 W every minute
Watts 1 2 3 4 5 6 7 8 9 10
120 82 79 73 69 65 64 62 60 59 58
140 87 84 80 73 69 68 66 64 62 61
160 92 89 84 79 73 71 69 67 66 65
180 96 93 87 82 76 74 72 71 69 67
200 103 98 91 86 79 77 75 73 72 70
220 106 101 94 89 84 80 78 76 74 73
240 110 105 97 92 87 82 80 79 77 75
260 113 108 100 94 89 85 83 81 79 77
280 116 111 103 97 92 87 85 83 81 79
300 119 114 105 100 94 90 87 85 83 81
320 122 116 108 102 97 92 89 87 85 83
340 125 119 110 104 99 94 92 89 87 85
360 128 124 113 106 101 96 93 91 89 87
380 130 126 115 109 103 98 95 93 91 89
400 133 129 117 111 105 100 97 95 93 91
420 135 131 121 113 107 103 99 97 94 92
440 138 133 123 115 109 104 101 98 96 94
460 140 135 125 117 110 106 102 100 98 95
480 142 137 127 118 112 106 104 101 99 97
500 144 140 129 120 114 110 106 103 101 98

36 Wattbike Full Test Guide | 05/2015-v1.0EN
It is far easier to conduct this test by selecting a cadence progression that maintains the air resistance setting at the same level throughout the test or a cadence that needs the minimum number of air resistance settings.
It is recommend that in general cadence should be kept in the range of 90-100 although for some of the low powers a lower cadence less than 90 may be needed. For high powers a greater range of air resistance settings may be needed to get the cadence/power combination needed. For example:a. 8 stages from 120w to 260w can be achieved by increasing the cadence for 73 at 120w to 100 cadence at 260w leaving the air resistance setting at level 3 throughout the whole of the test.
b. 12 stages from 120w to 340w can be achieved using air resistance setting 5 (cadence 65 to 99) or air resistance setting 4 (cadence 65 to 95).
Maximal Ramp Test on a Wattbike Pro (Female)
Resistance levels for this test depend on cadence preference. There are a number of ways of conducting a ramp test.
Example of how to complete a maximal ramp test at a set resistance level and increasing cadence:
Starting power 80w,
• 8 stages 80w to 180w on air resistance setting 1 cadence range 69-100
• 12 stages 80w to 260w on air resistance setting 2 cadence range = 66-108 OR air resistance setting 3 cadence range = 62-100
Example of how to complete a maximal ramp test in a restricted cadence range:
Cadence restricted to max of 100rpm
• This can be achieved for all the starting power levels for female cyclists i.e. up to a starting power of 180w for 8 to 12 stages Example of how to complete a maximal ramp test using a fixed cadence:
Fixed cadence of 90 (or nearest cadence level) – this can only be achieved for starting power greater than 150w (lower starting powers need a lower cadence). To do a fixed cadence test requires the air resistance setting to be moved at each stage.
Watts 155 170 185 200 215 230 245 260 275
Air Resistance 1 2 3 3 4 4 4 5 5
Cadence 91 91 88 91 88 90 93 89 91
8 stages 155w to 275w
Watts 155 170 185 200 215 230 245 260 275 290 305 320 335
Air Resistance 1 2 3 3 4 4 4 5 5 6 6 7 7
Cadence 91 91 88 91 88 90 93 89 91 89 90 89 91
12 stages 155w to 335w
wattbike.com @wattbike /Wattbike
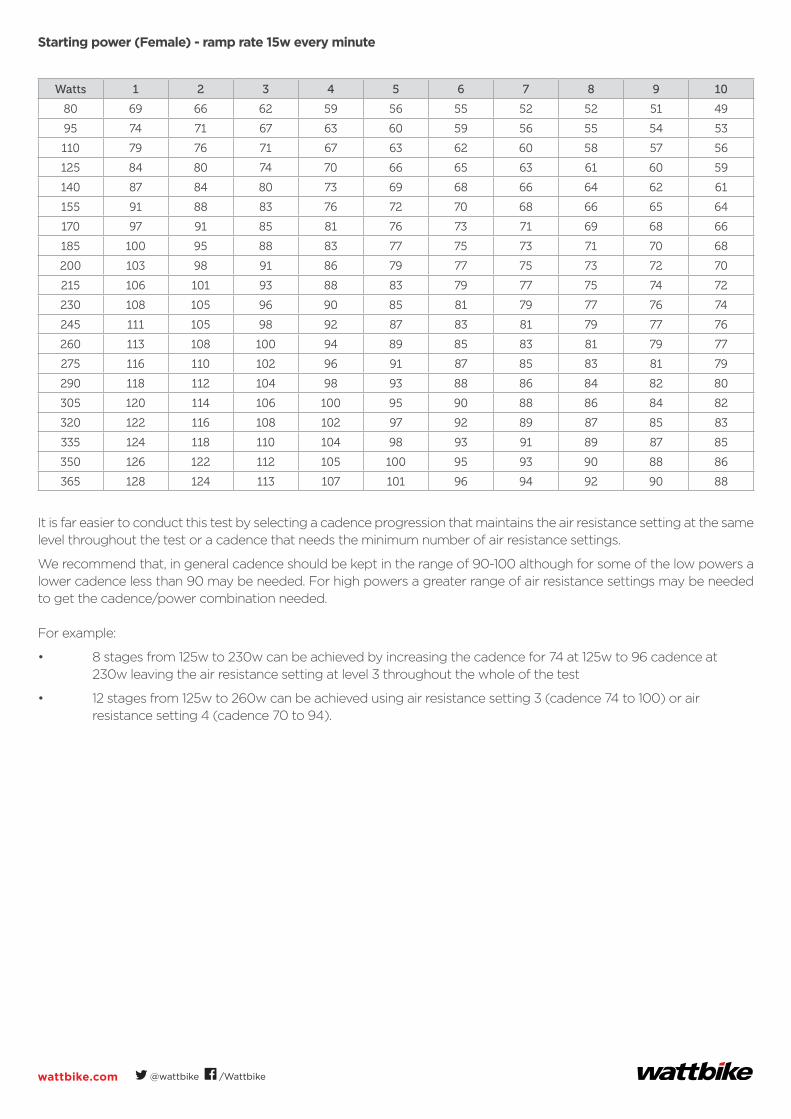
Starting power (Female) - ramp rate 15w every minute
Watts 1 2 3 4 5 6 7 8 9 10
80 69 66 62 59 56 55 52 52 51 49
95 74 71 67 63 60 59 56 55 54 53
110 79 76 71 67 63 62 60 58 57 56
125 84 80 74 70 66 65 63 61 60 59
140 87 84 80 73 69 68 66 64 62 61
155 91 88 83 76 72 70 68 66 65 64
170 97 91 85 81 76 73 71 69 68 66
185 100 95 88 83 77 75 73 71 70 68
200 103 98 91 86 79 77 75 73 72 70
215 106 101 93 88 83 79 77 75 74 72
230 108 105 96 90 85 81 79 77 76 74
245 111 105 98 92 87 83 81 79 77 76
260 113 108 100 94 89 85 83 81 79 77
275 116 110 102 96 91 87 85 83 81 79
290 118 112 104 98 93 88 86 84 82 80
305 120 114 106 100 95 90 88 86 84 82
320 122 116 108 102 97 92 89 87 85 83
335 124 118 110 104 98 93 91 89 87 85
350 126 122 112 105 100 95 93 90 88 86
365 128 124 113 107 101 96 94 92 90 88
It is far easier to conduct this test by selecting a cadence progression that maintains the air resistance setting at the same level throughout the test or a cadence that needs the minimum number of air resistance settings.
We recommend that, in general cadence should be kept in the range of 90-100 although for some of the low powers a lower cadence less than 90 may be needed. For high powers a greater range of air resistance settings may be needed to get the cadence/power combination needed.
For example:
• 8 stages from 125w to 230w can be achieved by increasing the cadence for 74 at 125w to 96 cadence at 230w leaving the air resistance setting at level 3 throughout the whole of the test
• 12 stages from 125w to 260w can be achieved using air resistance setting 3 (cadence 74 to 100) or air resistance setting 4 (cadence 70 to 94).

38 Wattbike Full Test Guide | 05/2015-v1.0EN
Air Resistance and Cadence Setting Recommendations for a Maximal Ramp Test on a Wattbike TrainerRamp test on a Wattbike Trainer (Male)Starting Power - ramp rate 20w every minute
Watts 6 M 7 M 8 M 9 M 10 M
120 80 77 75 74 73
140 84 81 79 77 76
160 88 85 83 81 80
180 92 89 87 85 83
200 95 93 90 88 86
220 99 96 93 91 90
240 100 3 99 96 94 92
260 101 4 100 3 99 97 95
280 103 4 100 4 100 3 99 98
300 n/a 103 4 101 4 100 3 100
320 n/a n/a 103 4 101 3 101 3
340 n/a n/a n/a 103 4 101 4
360 n/a n/a n/a n/a 103 4
Ramp test on a Wattbike Trainer (Female)Starting power - ramp rate 10w every minute
Watts 4 M 5 M 6 M 7 M 8 M 9 M 10 M
80 74 71 68 66 65 64 63
95 79 76 73 70 69 68 66
110 84 80 77 74 73 71 70
125 88 84 81 78 76 75 74
140 92 87 84 81 79 77 76
155 95 91 87 84 82 80 79
170 99 94 90 87 85 83 82
185 100 3 97 93 90 88 86 84
200 100 4 100 96 93 90 88 87
215 102 4 100 3 98 95 93 90 89
230 101 4 101 97 95 93 91
245 102 4 100 3 100 97 95 93
260 n/a 101 4 100 3 99 97 95
275 n/a 103 4 100 4 101 99 97
290 n/a n/a 102 4 102 3 101 99
305 n/a n/a n/a 101 4 101 3 100
320 n/a n/a n/a 103 4 101 4 101 3
335 n/a n/a n/a n/a 103 4 101 4
350 n/a n/a n/a n/a n/a 102 4
365 n/a n/a n/a n/a n/a 104 4
wattbike.com @wattbike /Wattbike
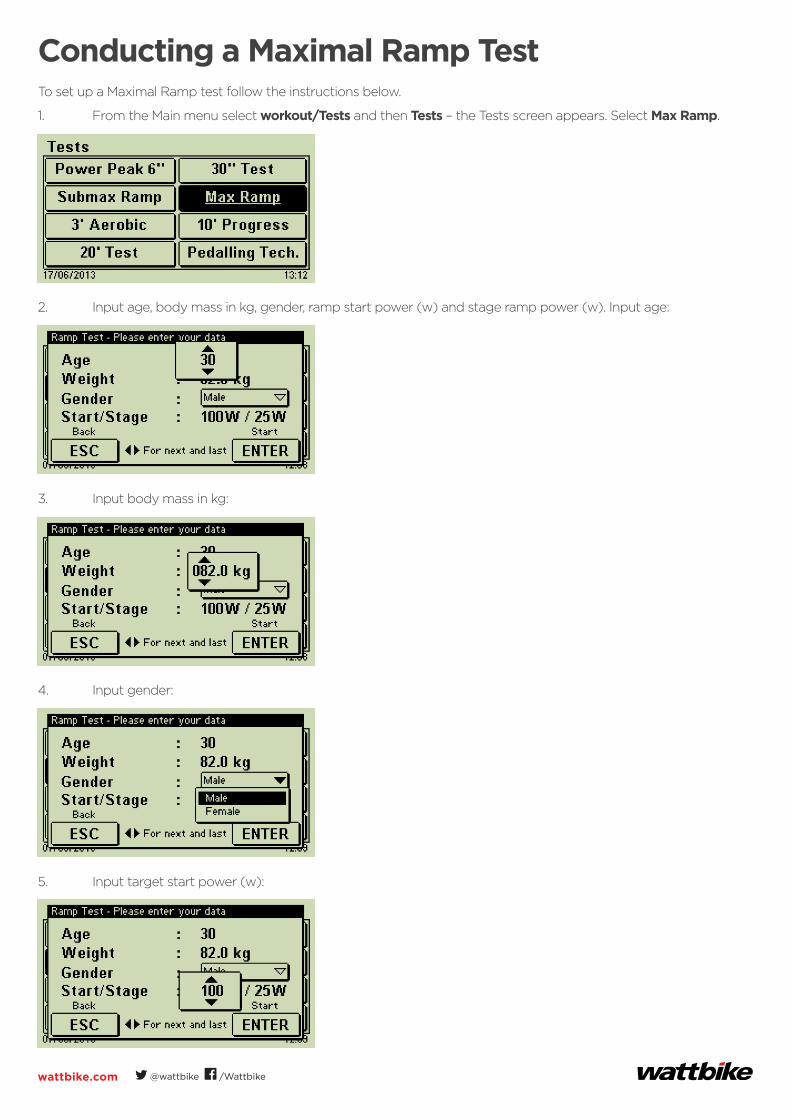
Conducting a Maximal Ramp TestTo set up a Maximal Ramp test follow the instructions below.
1. From the Main menu select workout/Tests and then Tests – the Tests screen appears. Select Max Ramp.
2. Input age, body mass in kg, gender, ramp start power (w) and stage ramp power (w). Input age:
3. Input body mass in kg:
4. Input gender:
5. Input target start power (w):
40 Wattbike Full Test Guide | 05/2015-v1.0EN
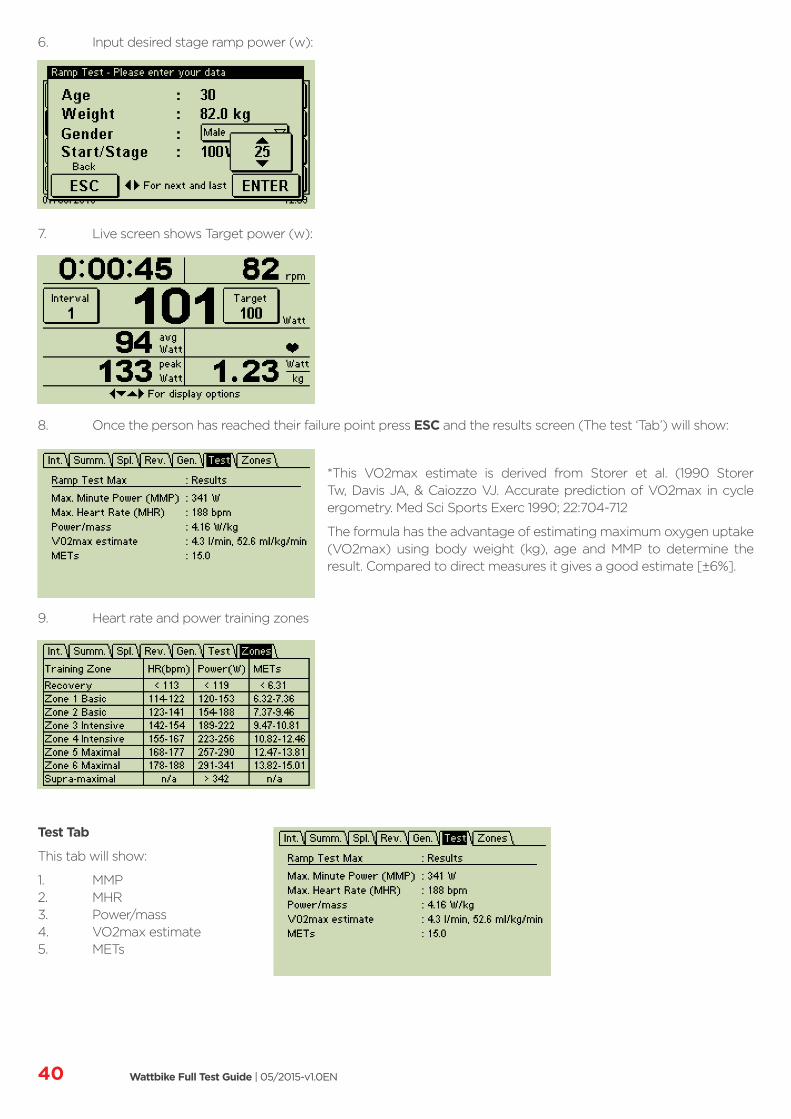
6. Input desired stage ramp power (w):
7. Live screen shows Target power (w):
8. Once the person has reached their failure point press ESC and the results screen (The test ‘Tab’) will show:
*This VO2max estimate is derived from Storer et al. (1990 Storer Tw, Davis JA, & Caiozzo VJ. Accurate prediction of VO2max in cycle ergometry. Med Sci Sports Exerc 1990; 22:704-712
The formula has the advantage of estimating maximum oxygen uptake (VO2max) using body weight (kg), age and MMP to determine the result. Compared to direct measures it gives a good estimate [±6%].
9. Heart rate and power training zones
Test Tab
This tab will show:
1. MMP2. MHR3. Power/mass4. VO2max estimate5. METs

wattbike.com @wattbike /Wattbike
Zones Tab
This tab will use estimated MMP and estimated MHR to calculate training zones based on the British Cycling heart rate and power training zones.The data can be viewed in graph form in Intervals with the power data (scroll across the graph for each minute) and with all the parameter data available in Summary (again scroll up/down for each minute).
Conducting a Maximal Ramp Test Using WPM AThis Test has been marked as one of the highest risk tests, purely because of the time, the intensity the person is working at and the incrementally harder exertion levels that are required. This test requires the person to work to the point of failure.
1. Link a heart rate belt into the monitor
2. Warm up appropriately (consider the 20’ warm up)
3. Pedal in a seated position for 1’ at the starting power
4. Increase the air resistance setting and cadence as necessary every minute to ensure a 20w increase in power
(w) output every minute for males and 10w for females
5. Keep increasing the power (w) output by 20w (male) or 15w (female) every minute until rider cannot complete a full minute at the ramp level (only complete minutes count)
6. Cool down appropriately (consider the 20’ Cool down)
Record:
• Highest Power average (w) achieved in the final complete minute – this is the estimate of MMP (use Recall to get this information)
• Note the maximum heart rate achieved during the test is the maximum heart rate (use Recall to get this information).
Select a starting power that ensures the test lasts between 8-12 minutes.

42 Wattbike Full Test Guide | 05/2015-v1.0EN
3’ Aerobic TestThis test estimates aerobic capacity. The average power and maximum heart rate achieved during the test can be used to calculate heart rate and power training zones.
Aerobic capacity is related to the ability to perform moderate to high intensity exercise for prolonged periods and is an important component for endurance cyclists and for general fitness.
Air Resistance Setting and Cadence Recommendations for the 3’ Aerobic TestThere are many physiological influences of performance when training such as; age, gender, height and weight. All of which will influence the optimal air resistance setting for the individual.
A little experimentation will quickly establish the correct setting and cadence combination. Cadence should be in the range 90-110rpm for this test.
Lower than 90rpm may be relevant for inexperienced cyclists and higher than 110rpm for experienced cyclists although very low cadences may indicate too high an air resistance setting and very high cadences too low an air resistance setting.
“100rpm is a good benchmark cadence”
Within the calibration range of each Wattbike and, for every air resistance setting and cadence combination the watts output is known. This makes it relatively simple to set the air resistance and cadence to achieve a required output. The tables below approximate the power output in watts for selected combinations of cadence and air resistance settings for both the Wattbike Pro and Trainer.
Whilst the tables show all the air resistance settings from 1 to 10 it is anticipated that for most riders the most effective setting will be in resistance range 1-5 on the Wattbike Pro (in exceptional circumstances powerful cyclists may need a higher air resistance setting) with the full range of air resistance settings available on the Wattbike Trainer.
At 100rpm, the minimum power output on the Wattbike Pro is 190w at air resistance level 1 and at the same cadence, up to 520w at level 10. On the Wattbike Trainer, the range at 100rpm is 110w at air resistance level 1 through to 300w at level 10.
As a general rule if the 3’ test score is more than 280-320w training on either the Wattbike Pro or Wattbike Trainer is possible although for higher scores 400w+ the Wattbike Pro is more appropriate. If the score is under 300w then it is recommended that training on the Wattbike Trainer is more appropriate although note there is some overlap between the Wattbike models.
Air resistance levels 5-10 on the Wattbike Trainer overlap air resistance levels 1-3/4 on the Wattbike Pro.
NOTE: It is possible to use the magnetic resistance on both the Wattbike Pro and Trainer to produce combinations of resistance. Using the magnet on the Trainer is very useful for tests and training workouts for MMP’s up to 360w as it ensures that warm up, test or workout and cool down can be done effectively without switching from Pro to Trainer, Trainer to Pro.
Careful selection of the air resistance setting and cadence range is important as the best result is achieved by maintaining constant cadence and power output throughout the whole 3’ of the test.
Power output at different cadences and air resistance settings are show in the tables below. For ease of reference the watts rounded to the nearest 5w.
wattbike.com @wattbike /Wattbike
Wattbike PRO Air resistance Cadence/Power Table
rpm/resistance 1 2 3 4 5 6 7 8 9 10
80 115 125 150 170 195 215 235 250 270 280
85 130 145 170 195 225 260 275 295 320 340
90 150 165 200 235 265 300 325 350 375 390
95 175 185 225 265 310 350 375 400 425 450
100 195 215 260 310 355 395 430 465 500 520
105 210 230 295 350 400 445 490 525 565 600
110 245 270 330 395 455 510 555 600 645 675
115 270 310 380 445 515 575 625 675 725 760
120 300 335 410 490 570 640 695 750 810 850
Wattbike Trainer Air resistance Cadence/Power Table
rpm/resistance 1 2 3 4 5 6 7 8 9 10
80 65 70 85 95 110 125 135 145 155 160
85 75 80 100 115 130 145 160 170 180 190
90 85 95 115 135 150 170 185 200 215 225
95 100 110 130 155 175 200 215 230 245 260
100 110 125 150 175 200 225 245 265 285 300
105 125 140 170 200 230 260 280 300 325 340
110 140 155 190 225 260 290 320 340 365 385
115 155 175 210 250 290 325 355 385 415 435
120 170 190 235 280 325 365 395 430 460 485
Conducting a 3’ Aerobic TestThe Wattbike Monitor has pre-set test workouts and a number of automatic test specific metrics following completion of a test, this section will display how to set up and understand the 3 minute test.
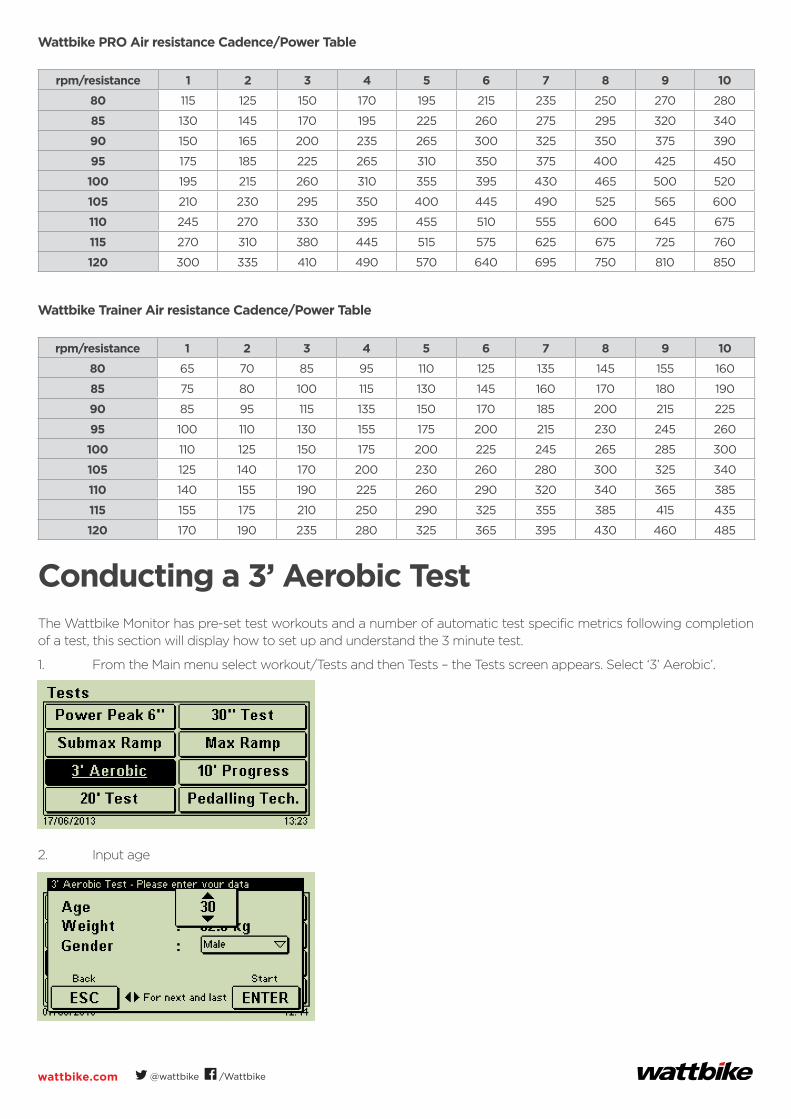
1. From the Main menu select workout/Tests and then Tests – the Tests screen appears. Select ‘3’ Aerobic’.
2. Input age
44 Wattbike Full Test Guide | 05/2015-v1.0EN
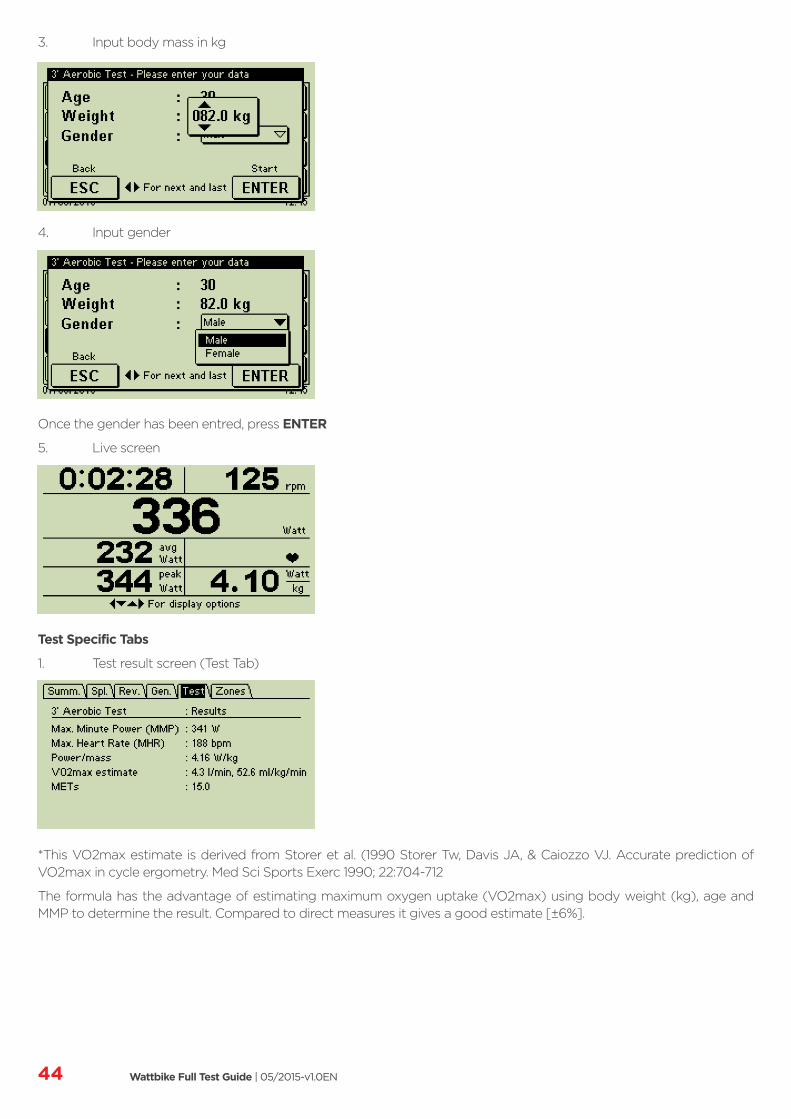
3. Input body mass in kg
4. Input gender
Once the gender has been entred, press ENTER
5. Live screen
Test Specific Tabs
1. Test result screen (Test Tab)
*This VO2max estimate is derived from Storer et al. (1990 Storer Tw, Davis JA, & Caiozzo VJ. Accurate prediction ofVO2max in cycle ergometry. Med Sci Sports Exerc 1990; 22:704-712
The formula has the advantage of estimating maximum oxygen uptake (VO2max) using body weight (kg), age and MMP to determine the result. Compared to direct measures it gives a good estimate [±6%].

wattbike.com @wattbike /Wattbike
2. Zones Tab
This tab will use MMP and MHR to calculate training zones based on the British Cycling heart rate and power training zones.
Conducting a 3’ Aerobic Test Using an A Monitor• Pair a heart rate belt into the monitor
• Warm up appropriately (consider the 20’ warm up)
• Find the right air/magnet resistance setting in the chart that the person would like to achieve and set the bike
just so
• Select Workout - New Workout - Select an empty slot and press ENTER - Time - Enter 3’ - No moresessions - Custom - Select the 3’ workout - Press ENTER - wait for ‘Ready to start’ to disappear the test cannow begin
• Pedal in a seated position for 3”
• Appropriately cool down (consider the 20’ Cool down)
Record from the summary screen:
• Power average (w) achieved over the 3’ – this is the MMP (use Recall to get this information)
• The maximum heart rate achieved during the test is the maximum heart rate (use Recall to get this information).
• Use the maximum heart rate and MMP to calculate the Heart Rate and Power Training Zones.
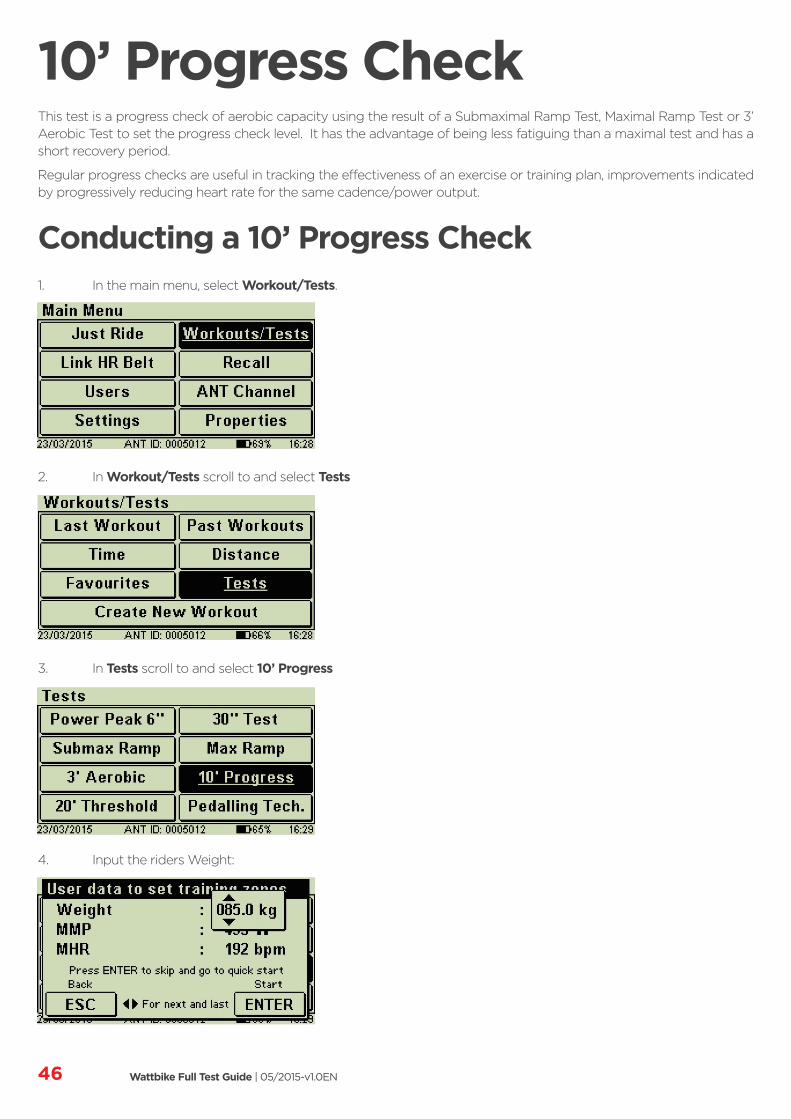
46 Wattbike Full Test Guide | 05/2015-v1.0EN
10’ Progress CheckThis test is a progress check of aerobic capacity using the result of a Submaximal Ramp Test, Maximal Ramp Test or 3’ Aerobic Test to set the progress check level. It has the advantage of being less fatiguing than a maximal test and has a short recovery period.
Regular progress checks are useful in tracking the effectiveness of an exercise or training plan, improvements indicated by progressively reducing heart rate for the same cadence/power output.
Conducting a 10’ Progress Check1. In the main menu, select Workout/Tests.
2. In Workout/Tests scroll to and select Tests
3. In Tests scroll to and select 10’ Progress
4. Input the riders Weight:

wattbike.com @wattbike /Wattbike
5. Input the riders MMP:
6. Input the riders MHR then Press ENTER:
7. Either press ENTER to confirm, or ESC to go back to the previous screen:
8. After selecting ENTER the progress test will begin.
Conducting a 10’ Progress Check Using an A Monitor• Pair a heart rate belt into the monitor
• Find the right air/magnet resistance setting in the chart that the person would like to achieve and set the bikejust so
• Warm up for 5’ at 50% of MMP
• Pedal in a seated position for 10’ at the air resistance, cadence required to achieve 70% of MMP
• Cool down for 5’ at 35% of MMP.
Record:
• The average HR and average power at the end of each 1’ (use Recall to get this information) for comparisonagainst future progress checks.

48 Wattbike Full Test Guide | 05/2015-v1.0EN
Calculating Percentages for the 10’ Progress CheckThe table below may be of help when calculating 35%, 50% and 70% of 3-minute power.
3 min (W) 100 125 150 175 200 225 250 275 300 325
35% 35 45 50 60 70 80 90 95 105 115
50% 50 60 75 85 100 110 125 135 150 160
70% 70 85 105 120 140 155 175 190 210 225
3 min (W) 350 375 400 425 450 475 500
35% 120 130 140 150 160 165 175
50% 175 185 200 210 225 235 250
70% 245 260 280 295 315 330 350
Example:
MMP of 250watts
• Warm up at 50% of 250w = 120w for 5’ on air resistance setting 3/4 at 90rpm on a Wattbike Trainer
• Ride at 70% of 250w = 170w for 10’ on air resistance setting 5/6 at 90/95rpm on a Wattbike Trainer
• Cool down at 35% of 260w = 90w for 5’ on air resistance setting 2 at 90rpm on a Wattbike Trainer.
Use the resistance, cadence and power tables to get individual values.

wattbike.com @wattbike /Wattbike
20’ Threshold TestThis Test has been marked as one of the highest risk tests, purely because of the time, the intensity the person is working at and the incrementally harder exertion levels that are required. This test requires the person to work to the point of failure.
British Cycling also uses a Threshold Test to determine heart rate and power training zones.
The zones established from this test are:
HR Zone THR % TPower % Physiology
1 <68 <55 Active recovery
2 68-83 55-76 Endurance
3 83-94 76-90 Tempo
N/A 88-93 Sweet spot
4 94-105 90-105 Threshold
5 105-121 105-120 VO2 max
6 102-150 Anaerobic capacity
Neuromuscular
These training zones are calculated based on the result of the 20’ Threshold Test. The result of this test can be referred to in terms of heart rate or power OR if using a Wattbike, both.
To put the terminology into context:
• The threshold established is the highest physical intensity that a rider can sustain for approximately one hour.
• This would equate to performing a 25mile/ 40 km time trial or an hour record. These require a maximal butevenly distributed effort for the entire distance or duration.
If a rider exceeds this threshold intensity then fatigue will set in rapidly and pace may drop significantly. With training, threshold will increase so that more power can be produced for the same physiological effort (heart rate).
Heart rate and power at the ‘Threshold’ correlate significantly with endurance performance and is closely associated with the pace needed when climbing and during sustained efforts.
It is not necessary to ride for 1 hour to determine threshold, it can be extrapolated from a 20’ test.
During the test, the rider will be riding as hard as they can sustain for 20’. It is important to get the rider to maintain the same pace throughout the duration of the test with smooth pedaling and cadence in the range 90-100.
Knowing where to pitch the air resistance setting, power output and cadence can be approximately established on by undertaking the 3’ Aerobic Test in this Guide and then pitching the power and cadence at 75%-80% of estimated MMP.
Example:
3’ Aerobic Test result = 360w
• 75%-80% = 270w to 290w – so, 280w for conducting the 20’ Threshold Test
• 280w on a Wattbike Pro at 90rpm = air resistance setting 5 (91rpm)
• OR at 95rpm air resistance setting 6 (96rpm)
• OR at 100rpm air resistance setting 3 (103rpm)
Air Resistance Setting and Cadence Recommendations for the 20’ Threshold TestThe Wattbike is an air resistance bike so factors such as training background, age, gender, height and weight all influence the optimal air resistance setting.
A little experimentation will quickly establish the correct setting and cadence combination. Cadence should be in the
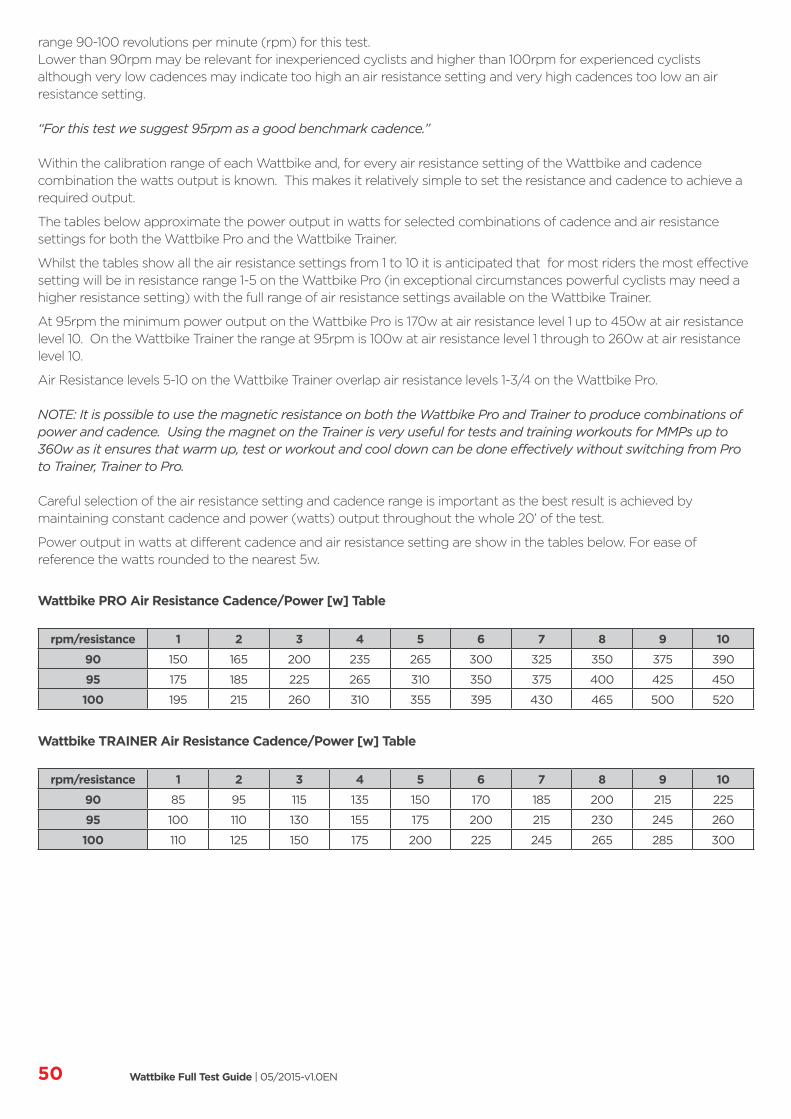
50 Wattbike Full Test Guide | 05/2015-v1.0EN
range 90-100 revolutions per minute (rpm) for this test.Lower than 90rpm may be relevant for inexperienced cyclists and higher than 100rpm for experienced cyclists although very low cadences may indicate too high an air resistance setting and very high cadences too low an air resistance setting.
“For this test we suggest 95rpm as a good benchmark cadence.”
Within the calibration range of each Wattbike and, for every air resistance setting of the Wattbike and cadence combination the watts output is known. This makes it relatively simple to set the resistance and cadence to achieve a required output.
The tables below approximate the power output in watts for selected combinations of cadence and air resistance settings for both the Wattbike Pro and the Wattbike Trainer.
Whilst the tables show all the air resistance settings from 1 to 10 it is anticipated that for most riders the most effective setting will be in resistance range 1-5 on the Wattbike Pro (in exceptional circumstances powerful cyclists may need a higher resistance setting) with the full range of air resistance settings available on the Wattbike Trainer.
At 95rpm the minimum power output on the Wattbike Pro is 170w at air resistance level 1 up to 450w at air resistance level 10. On the Wattbike Trainer the range at 95rpm is 100w at air resistance level 1 through to 260w at air resistance level 10.
Air Resistance levels 5-10 on the Wattbike Trainer overlap air resistance levels 1-3/4 on the Wattbike Pro.
NOTE: It is possible to use the magnetic resistance on both the Wattbike Pro and Trainer to produce combinations of power and cadence. Using the magnet on the Trainer is very useful for tests and training workouts for MMPs up to 360w as it ensures that warm up, test or workout and cool down can be done effectively without switching from Pro to Trainer, Trainer to Pro.
Careful selection of the air resistance setting and cadence range is important as the best result is achieved by maintaining constant cadence and power (watts) output throughout the whole 20’ of the test.
Power output in watts at different cadence and air resistance setting are show in the tables below. For ease of reference the watts rounded to the nearest 5w.
Wattbike PRO Air Resistance Cadence/Power [w] Table
rpm/resistance 1 2 3 4 5 6 7 8 9 10
90 150 165 200 235 265 300 325 350 375 390
95 175 185 225 265 310 350 375 400 425 450
100 195 215 260 310 355 395 430 465 500 520
Wattbike TRAINER Air Resistance Cadence/Power [w] Table
rpm/resistance 1 2 3 4 5 6 7 8 9 10
90 85 95 115 135 150 170 185 200 215 225
95 100 110 130 155 175 200 215 230 245 260
100 110 125 150 175 200 225 245 265 285 300
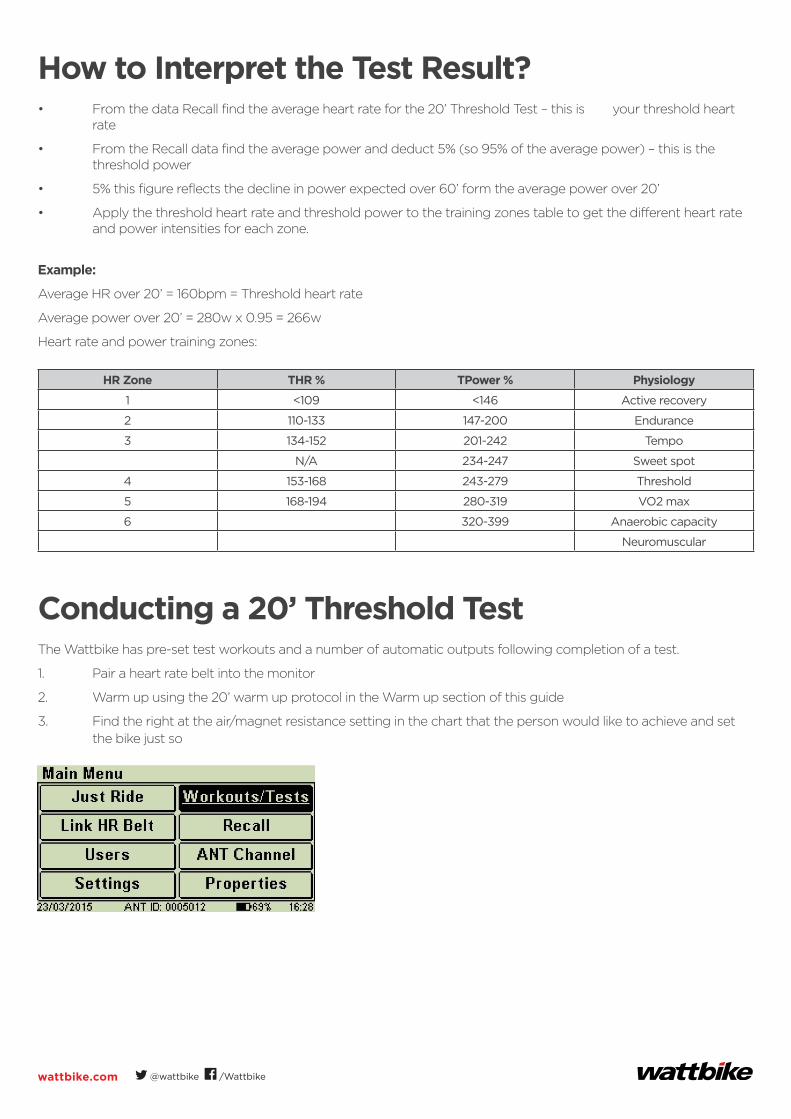
wattbike.com @wattbike /Wattbike
How to Interpret the Test Result?• From the data Recall find the average heart rate for the 20’ Threshold Test – this is your threshold heart
rate
• From the Recall data find the average power and deduct 5% (so 95% of the average power) – this is thethreshold power
• 5% this figure reflects the decline in power expected over 60’ form the average power over 20’
• Apply the threshold heart rate and threshold power to the training zones table to get the different heart rateand power intensities for each zone.
Example:
Average HR over 20’ = 160bpm = Threshold heart rate
Average power over 20’ = 280w x 0.95 = 266w
Heart rate and power training zones:
HR Zone THR % TPower % Physiology
1 <109 <146 Active recovery
2 110-133 147-200 Endurance
3 134-152 201-242 Tempo
N/A 234-247 Sweet spot
4 153-168 243-279 Threshold
5 168-194 280-319 VO2 max
6 320-399 Anaerobic capacity
Neuromuscular
Conducting a 20’ Threshold TestThe Wattbike has pre-set test workouts and a number of automatic outputs following completion of a test.
1. Pair a heart rate belt into the monitor
2. Warm up using the 20’ warm up protocol in the Warm up section of this guide
3. Find the right at the air/magnet resistance setting in the chart that the person would like to achieve and setthe bike just so
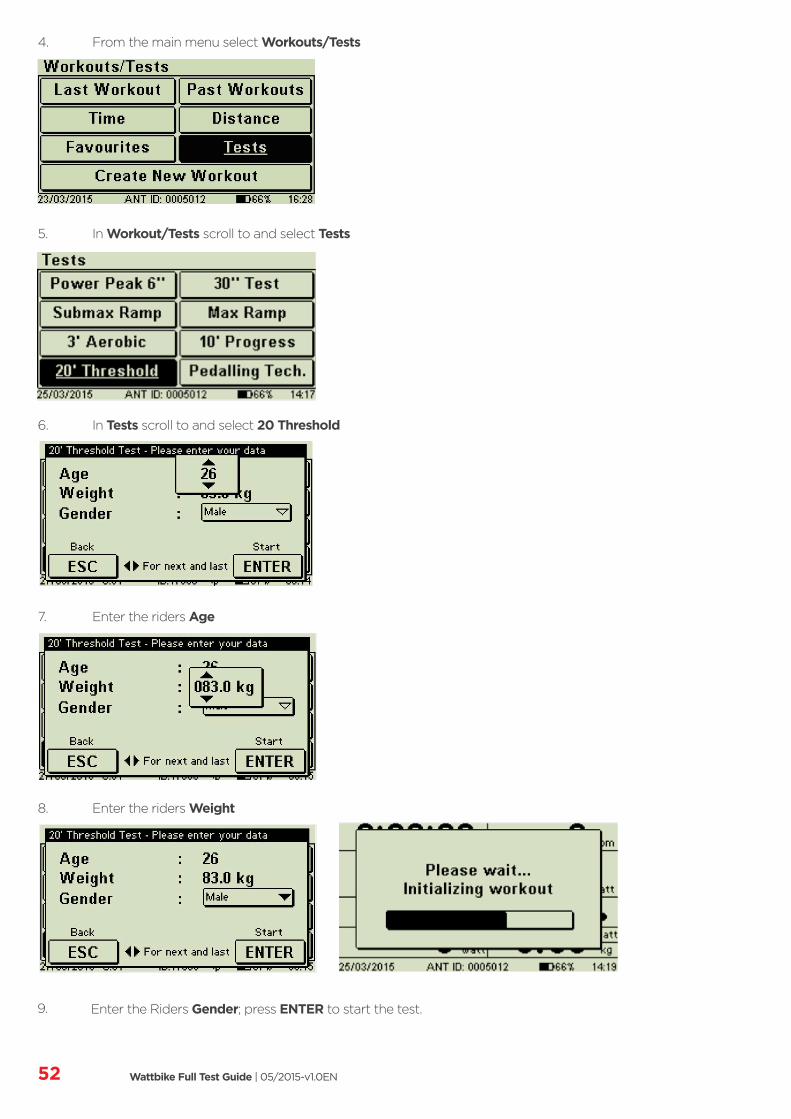
52 Wattbike Full Test Guide | 05/2015-v1.0EN
4. From the main menu select Workouts/Tests
5. In Workout/Tests scroll to and select Tests
6. In Tests scroll to and select 20 Threshold
7. Enter the riders Age
8. Enter the riders Weight
Enter the Riders Gender; press ENTER to start the test.9.

wattbike.com @wattbike /Wattbike
Conducting a 20’ Threshold Test on an A MonitorThe zones shown in this tab are specific for the 20’ Test. These Zones are derived from the FTP Coggan method.
1. Pair a heart rate belt with the monitor
2. Warm up using the 20’ warm up protocol in the Warm up section of this guide
3. Find the right air/magnet resistance setting in the chart that the person would like to achieve and set the bikejust so
4. In the menu of the monitor select Workout - New Workout - select an empty slot and press ENTER - Time- Enter 20’ - No more sessions - Custom - Select the 20’ workout - Press ENTER - wait for Ready to start todisappear the test can now begin
5. Pedal in a seated position for 20’
6. Appropriately cool down (consider the 20’ Cool down).
Record:
• Average Power
• Average Heart Rate
Physical Activity Readiness Questionnaire (PAR-Q)PAR-Q will tell you if you should check with your doctor before you significantly change your physical activity patterns. If you are over 69 years of age and are not used to being very active, check with your doctor. Common sense is your best guide when answering these questions.
Please read carefully and answer each one honestly: check YES or NO.
1 Has your doctor ever said you have a heart condition and that you should only do physical activity recommended by a doctor? YES NO
2 Do you feel pain in your chest when you do physical activity? YES NO
3 In the past month, have you had a chest pain when you were not doing physical activity? YES NO
4 Do you lose your balance because of dizziness or do you ever lose consciousness? YES NO
5 Do you have a bone or joint problem (for example, back, knee, or hip) that could be made worse by a change in your physical activity? YES NO
6 Is your doctor currently prescribing medication for your blood pressure or heart condition? YES NO
7 Do you know of any other reason why you should not do physical activity? YES NO
If yes, please comment:
YES to one or more questions:
You should consult with your doctor to clarify that it is safe for you to become physically active at this current time and

54 Wattbike Full Test Guide | 05/2015-v1.0EN
in your current state of health.
NO to all questions:
It is reasonably safe for you to participate in physical activity, gradually building up from your current ability level. A fitness appraisal can help determine your ability levels.
I have read, understood and accurately completed this questionnaire. I confirm that I am voluntarily engaging in an acceptable level of exercise, and my participation involves a risk of injury.
Signature
Print name
Date
Having answered YES to one of the above, I have sought medical advice and my GP has agreed that I may exercise.
Signed:
Date:
Note: This physical activity clearance is valid for a maximum of 12 months from the date it is completed and becomes invalid if your condition changes so that you would answer YES to any of the 7 questions
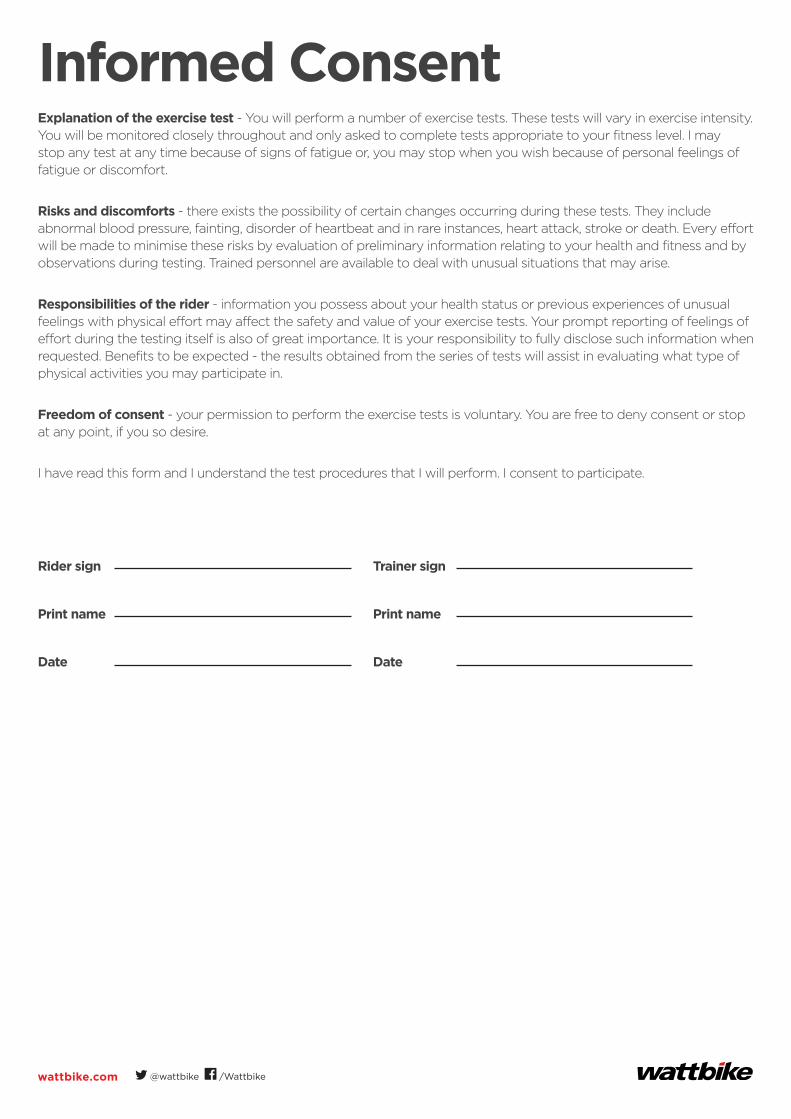
wattbike.com @wattbike /Wattbike
Informed ConsentExplanation of the exercise test - You will perform a number of exercise tests. These tests will vary in exercise intensity. You will be monitored closely throughout and only asked to complete tests appropriate to your fitness level. I may stop any test at any time because of signs of fatigue or, you may stop when you wish because of personal feelings of fatigue or discomfort.
Risks and discomforts - there exists the possibility of certain changes occurring during these tests. They include abnormal blood pressure, fainting, disorder of heartbeat and in rare instances, heart attack, stroke or death. Every effort will be made to minimise these risks by evaluation of preliminary information relating to your health and fitness and by observations during testing. Trained personnel are available to deal with unusual situations that may arise.
Responsibilities of the rider - information you possess about your health status or previous experiences of unusual feelings with physical effort may affect the safety and value of your exercise tests. Your prompt reporting of feelings of effort during the testing itself is also of great importance. It is your responsibility to fully disclose such information when requested. Benefits to be expected - the results obtained from the series of tests will assist in evaluating what type of physical activities you may participate in.
Freedom of consent - your permission to perform the exercise tests is voluntary. You are free to deny consent or stop at any point, if you so desire.
I have read this form and I understand the test procedures that I will perform. I consent to participate.
Rider sign Trainer sign
Print name Print name
Date Date

56 Wattbike Full Test Guide | 05/2015-v1.0EN
Notes
